The Affiliate Program for WooCommerce plugin is a robust and flexible solution for managing affiliate marketing within your WooCommerce store. It enables you to grow your business by rewarding users who refer new customers to your store.
Key Features of the WooCommerce Affiliate Program:
- Full management of affiliate registrations, approvals, and commissions.
- Customizable affiliate referral links with trackable results.
- Detailed reporting on affiliate activity and earnings.
- Flexible commission settings including fixed and percentage-based commissions.
- Social sharing capabilities that allow affiliates to easily promote products on platforms like Facebook, Twitter, and WhatsApp.
- Integration with popular payment gateways for fast, secure payouts.
Benefits of Integrating Affiliate Program for WooCommerce:
↑ Back to top-
Grow your business by leveraging affiliate marketing, rewarding users for referring new customers.
-
Customize commission structures to fit your business model, offering fixed amounts or percentage-based rewards.
- Automate affiliate approval, tracking, and commission payouts, saving time while scaling your affiliate efforts.
- Offer affiliates real-time tracking of their progress, referral activity, and commissions in their own My Account section.
Requirements
To install Affiliate Program for WooCommerce, you will need:
- WordPress Version 5.3 or newer (installed).
- WooCommerce Version 3.9 or newer (installed and activated).
- PHP Version 7.2 or newer.
- A valid business plan for managing affiliates and processing commissions.
Installation
- Log in to WordPress Admin.
- Navigate to Plugins > Add New.
- Search for the Affiliate Program for WooCommerce plugin.
- Enter “Affiliate Program for WooCommerce” in the search bar.
- Click on Install Now and wait until the plugin is installed successfully.
- Once installed, click on Activate Now to start configuring the plugin.
- Alternatively, you can activate it later via Plugins > Installed Plugins.
- Navigate to Settings:
- Go to WooCommerce > Settings.
- Select the Affiliate tab.
Affiliate Settings
↑ Back to topOnce you’re in the Affiliate tab, you’ll see the settings grouped into three main sections under Affiliate Settings:
- General Settings
- Required Settings
- Additional Settings
These sections provide full control over how your affiliate program operates. Refer to the image for a visual guide. Each section allows you to enable the program, define commission types, set maximum commission limits, and configure additional settings like user roles and registration preferences. This clear structure makes it easy to configure your affiliate program efficiently.
General Settings
↑ Back to topThese settings control the basic functionality of the Affiliate Program, including enabling or disabling the program.

-
Enable/Disable Affiliate Program
- Check this box to activate or deactivate the Affiliate Program for your site.
- You can enable this option at any time to allow affiliates to begin registering and using referral links.
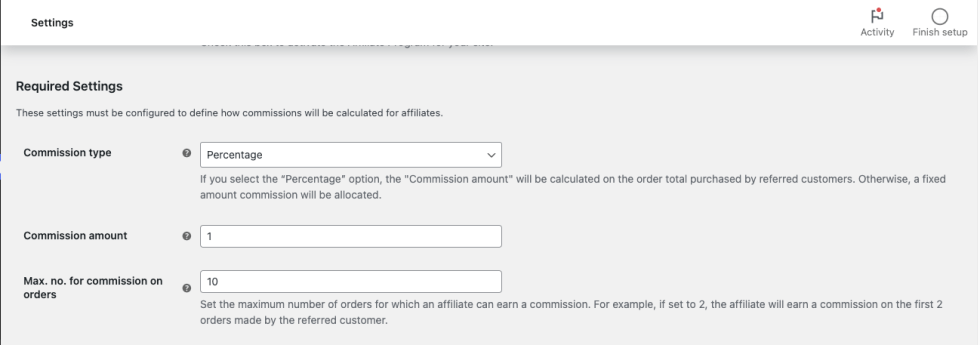
Required Settings
↑ Back to top↑ Back to top
These settings must be configured to define how commissions will be calculated for affiliates.
-
Commission Type
- Choose whether to offer a Percentage or Fixed commission.
- Percentage: The commission is calculated as a percentage of the order total.
- Fixed: The commission is a flat rate per referral, regardless of order value.
-
Commission Amount
- Set the specific value for the commission, based on the selected commission type.
- For Percentage commissions, enter a value like “10” for 10%.
- For Fixed commissions, enter an amount like “$5” for each referral.
-
Max. No. for Commission on Orders
- Define the maximum number of orders for which an affiliate can earn a commission for a single referred customer.
- For example, if this is set to “2,” affiliates will receive commissions for the first two orders made by the referred customer, after which no further commissions will be earned.
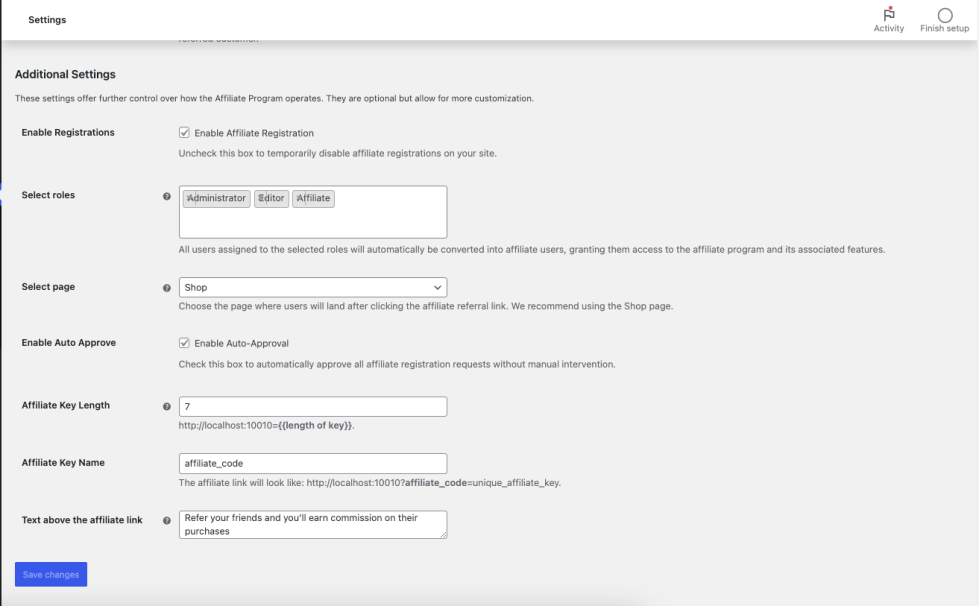
Additional Settings
↑ Back to top↑ Back to top
These settings offer further control over how the Affiliate Program operates. They are optional but allow for more customization.
-
Enable Registrations
- Check this box to allow users to register as affiliates.
- Uncheck it to temporarily disable affiliate registrations without affecting existing affiliates.
-
Select Roles
- Select the user roles that are eligible to become affiliates.
- For example, you may only want “Customers” or “Shop Managers” to register as affiliates.
- If left blank, all user roles will be eligible to register as affiliates.
-
Select Page
- Choose the page where users will land after clicking an affiliate referral link.
- It is recommended to use the Shop page for this.
-
Enable Auto Approve
- Check this box to automatically approve all affiliate registrations without requiring admin approval.
-
Affiliate Key Length
- Set the length of the unique affiliate key generated for each affiliate.
- The minimum key length is 7, and the maximum is 10 characters.
-
Affiliate Key Name
- Customize the name of the key used in affiliate URLs.
- For example, if set to “affiliate_code”, the affiliate link will look like this: https://your-site.com/?affiliate_code=unique_key.
-
Text Above the Affiliate Link
- Add custom text that will be displayed above the affiliate’s referral link on their My Account page.
- Example: “Refer your friends and earn commission on their purchases.”
8. Enable Affiliate Click Tracking
- Check this option to start tracking affiliate link clicks.
9. Click Log Retention (days)
- Define the number of days to retain click logs before auto-deletion (e.g., 1 day).
10. Saving Settings
- After making changes, click Save Changes at the bottom of the page to apply your settings.
reCAPTCHA Settings Overview
↑ Back to topThese settings are used to protect your Affiliate Registration Form from bots and spam by integrating Google reCAPTCHA. This option enables reCAPTCHA verification on the affiliate registration form. When enabled, it helps ensure that only real users can register as affiliates by preventing automated bot submissions.
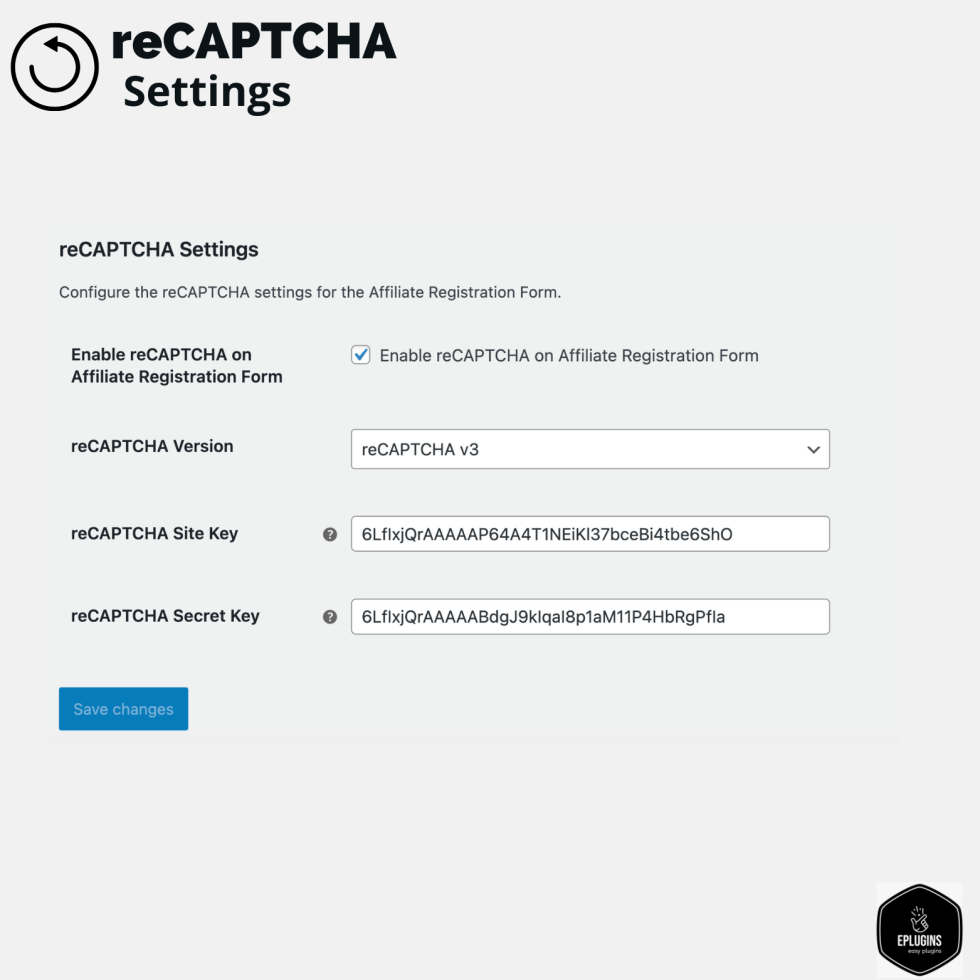
Enable reCAPTCHA on Affiliate Registration Form
↑ Back to top- What it does:
When this checkbox is enabled, reCAPTCHA will be displayed on the affiliate registration form. - Why it’s useful:
Prevents spam or automated registrations by ensuring that only human users can submit the form.
reCAPTCHA Version
This field is responsible for selecting the version of reCAPTCHA to be used, such as reCAPTCHA v2 or v3. Choose the version based on your preferred user experience and security level.
reCAPTCHA Site Key
This field is used to enter the reCAPTCHA Site Key provided by Google. It is required for integrating reCAPTCHA on the frontend of the affiliate registration form.
reCAPTCHA Secret Key
This field is used to enter the reCAPTCHA Secret Key provided by Google. It is used on the backend to verify user responses with Google’s reCAPTCHA service.
Save Changes
Click this button to save and apply the configured reCAPTCHA settings to the affiliate registration form.
Captcha on Registration
↑ Back to top
Available Shortcodes
↑ Back to topUse the following shortcodes to display affiliate-related content on any page or post of your website.
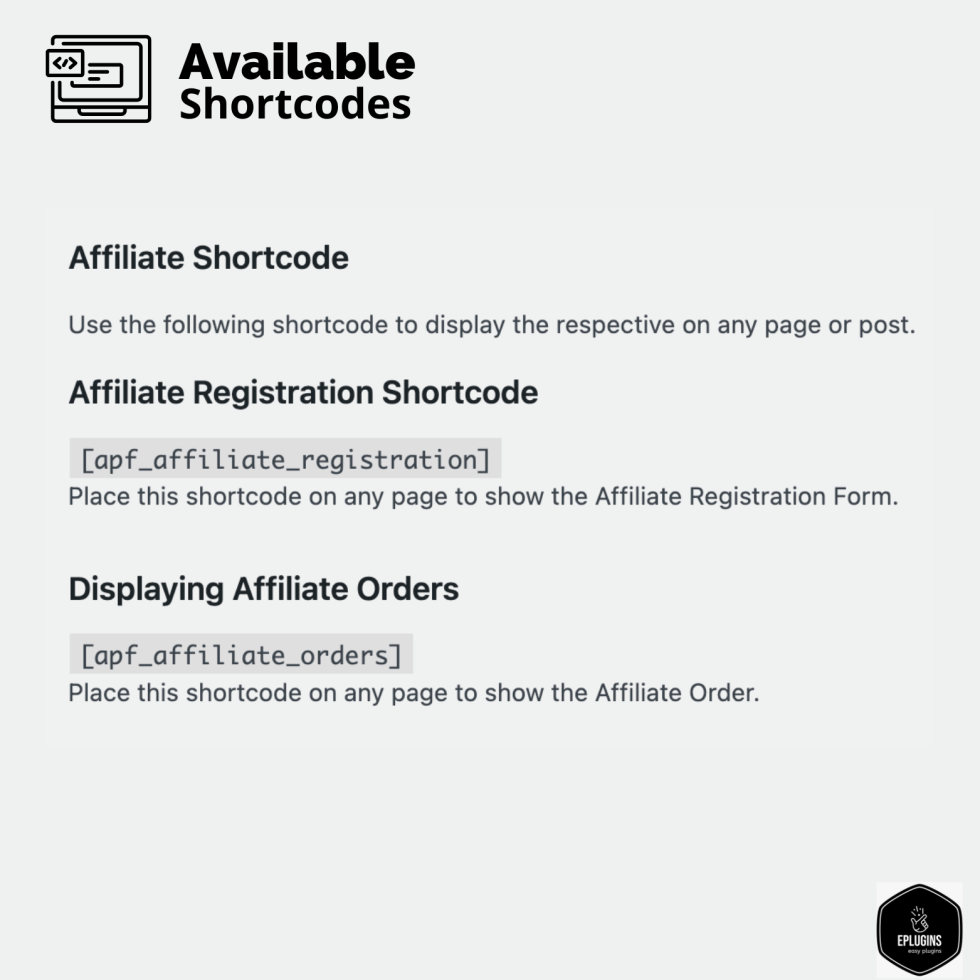
Affiliate Registration Shortcode
This shortcode is used to display the Affiliate Registration Form. Place it on any page or post where you want users to register as affiliates.
Displaying Affiliate Orders
This shortcode is used to display the list of affiliate orders. Place it on any page to show the order details associated with the logged-in affiliate.
Automatic Affiliate Coupons
↑ Back to topThis section allows you to automatically generate a unique referral coupon code when a user registers as an affiliate. These coupons can be used to offer discounts to referred customers, encouraging conversions and helping track affiliate performance.
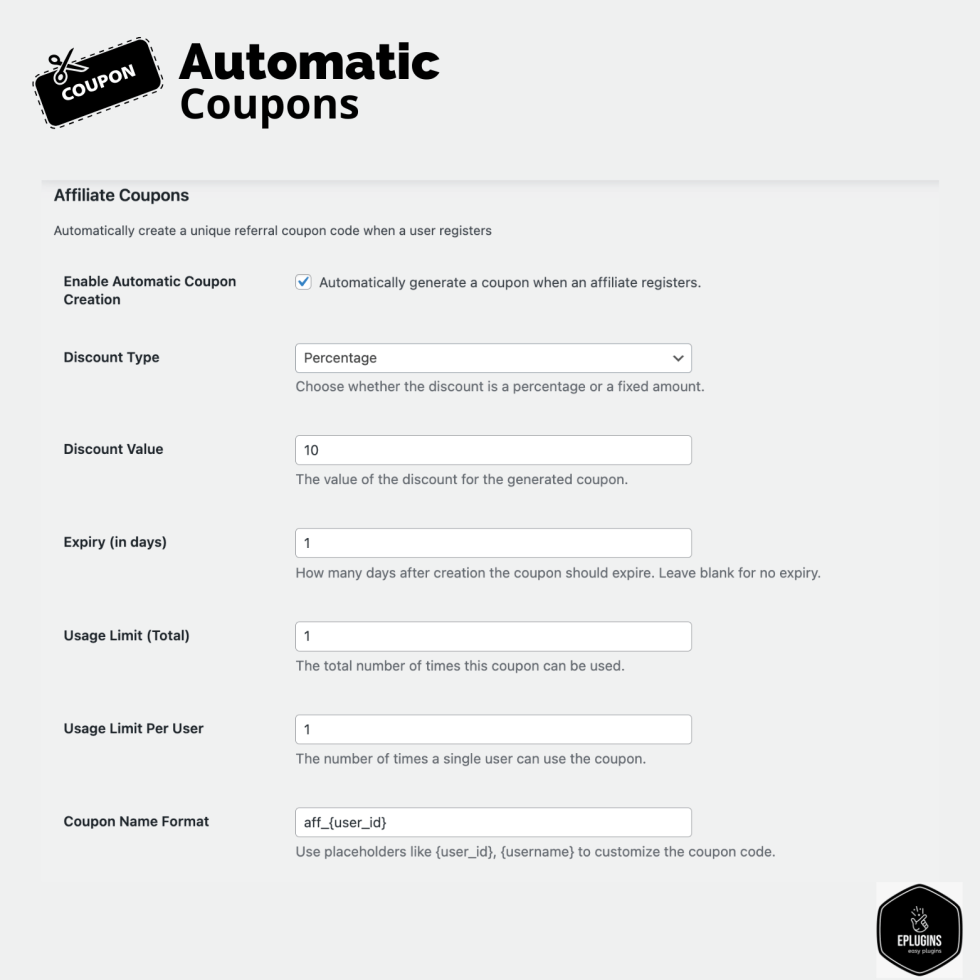
Enable Automatic Coupon Creation
Description:
When enabled, a coupon is automatically created and assigned to each user upon successful affiliate registration.
Usage:
Useful for automating the referral process — affiliates can start promoting their unique coupon immediately, without manual admin intervention.
Discount Type
Description:
Choose how the discount should be applied.
Options typically include:
- Percentage: The discount is a percentage of the cart total.
- Fixed: A flat amount is deducted from the cart total.
Usage:
Use “Percentage” for scalable discounts (e.g., 10% off), and “Fixed” when offering a specific value (e.g., ₹100 off).
Discount Value
Description:
Enter the numeric value of the discount.
- For percentage: 10 means 10% off.
- For fixed: 100 means ₹100 off (or the store’s currency).
Usage:
Set according to your marketing goals — higher discounts may attract more conversions but reduce profit margins.
Expiry (in days)
Description:
Set how many days after creation the coupon remains valid.
Leave blank to create a non-expiring coupon.
Usage:
- Set to 7 for a one-week validity.
- Use for time-sensitive campaigns or to drive urgency in purchases.
Usage Limit (Total)
Description:
The total number of times this coupon can be used across all customers.
Usage:
- Set to 1 to make it single-use.
- Set higher if you want the same coupon to be used by multiple customers.
Usage Limit Per User
Description:
Defines how many times a single user can apply this coupon.
Usage:
- Useful when a coupon is public but you want to prevent overuse by any one customer.
- Set to 1 for one-time use per customer.
Coupon Name Format
Description:
Customize how the coupon code is named using dynamic placeholders.
Common placeholders include:
- {user_id} – The affiliate’s WordPress user ID.
- {username} – The affiliate’s WordPress username.
Usage:
- Example: aff_{user_id} → Generates aff_103 if the user ID is 103.
- Helps track and identify who referred which customers via coupon code.
Use Case
A new affiliate registers. The system generates a coupon like aff_205, offering 10% off for 7 days. The affiliate shares it with friends or on social media. Whenever someone uses that coupon at checkout, the system logs the affiliate referral.
Note:
↑ Back to topSite admin can also create coupons and assign it manually to any affiliate.
site administrators have the ability to create discount coupons and assign them to specific affiliates. These affiliates can then share the assigned coupons with their audience, such as through social media or their own websites.
When a customer uses the shared coupon during a purchase on the website, they receive a discount, and the affiliate who shared the coupon earns a commission on the sale.
- Go to the WP Dashboard.
- Navigate to Marketing > Coupons > Add New.
- Create and configure the coupon.
- Assign the coupon to an affiliate if needed.
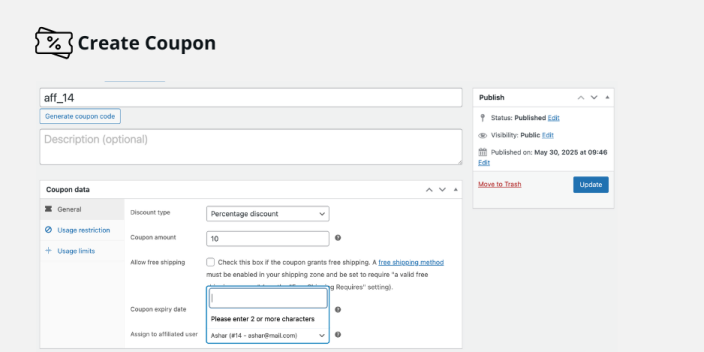
For example, if the site admin creates a coupon code “SAVE20” that offers a 20% discount and assigns it to Affiliate A, Affiliate A can share this code with potential customers. When a customer uses the “SAVE20” coupon during checkout, they enjoy a discount, and Affiliate A earns a commission based on the sale.
Affiliates can easily view any coupons assigned to them by logging into their account on the WooCommerce-powered website, making it simple for them to track and manage their promotional efforts.w
Affiliate Registration Fields
↑ Back to topThis section allows you to customize the Affiliate Registration Form by adding, editing, or removing input fields. You can collect specific information from users during affiliate sign-up based on your business needs.
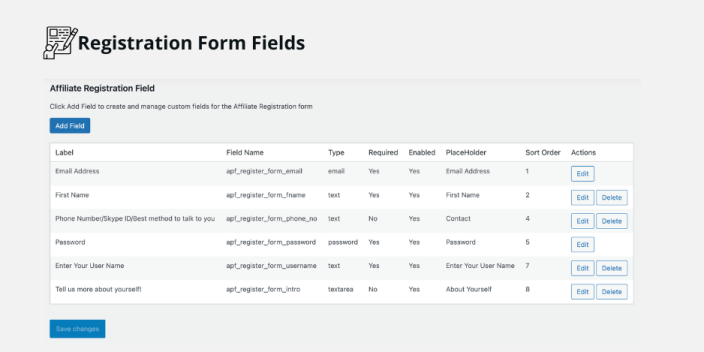
Add Field
↑ Back to topClick this button to add a new custom field to the affiliate registration form. You can define the label, field name, input type, placeholder, and other properties.
You can also edit/delete the previously created fields.
PayPal Setup and Payment Process for WooCommerce Affiliates
↑ Back to topOnce your affiliates have earned commissions, you can process their payouts directly within your WooCommerce dashboard using the PayPal integration. Below is a step-by-step guide on configuring PayPal settings and processing affiliate payments.
1. PayPal Setup: Configuring Payment Settings
To enable seamless payments through PayPal, follow these steps:
Navigating the Settings
- Navigate to WooCommerce > Settings.
- Select the Affiliate tab.
- Go to the PayPal Settings section, where you will configure both live and test mode settings.
PayPal Settings Overview
Production Mode (Live):
- These settings are for real transactions. Enter your live PayPal credentials here:
- Live Client ID
- Live Secret Key
Sandbox Mode (Test):
- These settings are used for testing payments before going live:
- Sandbox Client ID
- Sandbox Secret Key
Enable Test Mode:
- Check the box to enable sandbox mode for testing or staging purposes. Uncheck it when you’re ready to go live.
Refer to the image below for the PayPal settings page:
Processing Payments for Affiliates
↑ Back to top↑ Back to top
Once affiliates have earned commissions, you can pay them directly from the Affiliate Reports dashboard. Follow these steps to process payments:
Navigating the Affiliate Reports
- Navigate to WooCommerce > Affiliate Reports.
- Scroll down to the Affiliate Table at the bottom.
- This table shows all affiliate details, including earnings, balance, and referral link.

Steps to Process a Payment
- Click the Pay button next to the affiliate you want to pay.
- A Commission Payout modal will appear.
- You’ll have the option to choose between Manual or PayPal as the payment method.
- Fill in the payout details (amount, etc.), and click Proceed to finalize the transaction.
Refer to the image below for how the payment modal appears:

By following these steps, you can efficiently manage affiliate payments and ensure smooth financial transactions within your WooCommerce setup.
Advanced Settings & Features
↑ Back to top1. Enabling or Disabling Social Sharing Icons on the My Account Page
↑ Back to top
You can easily control the visibility of social sharing icons (Facebook, Twitter, WhatsApp) on the affiliate’s My Account page.
Steps to enable/disable:
- Navigate to WooCommerce > Settings > Affiliate tab.
- Under the Social Sharing section, check or uncheck the boxes next to the platforms you want to enable or disable.
For detailed information, please refer to the link [here] .
2. Manage Campaigns
↑ Back to top↑ Back to top
This section allows you to create product-specific or category-specific affiliate campaigns with custom commission rates. You can assign these campaigns to selected affiliate users and monitor performance effectively.
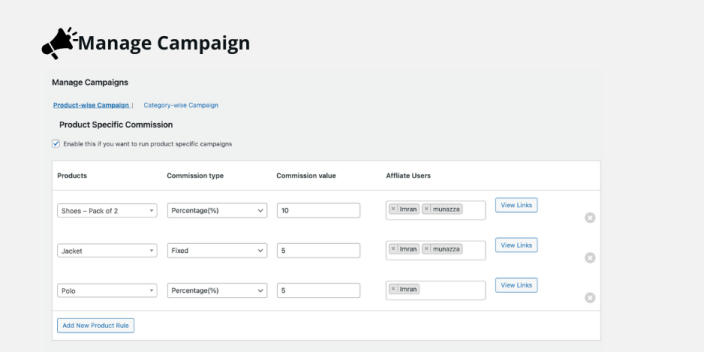
Campaign Types
↑ Back to top
- Product-wise Campaign: Create affiliate campaigns targeting specific products.
- Category-wise Campaign: Create affiliate campaigns targeting specific product categories.
Product-Specific Commission
Enable this option if you want to assign custom commission rates to specific products for selected affiliates.
Field Descriptions and Usage
↑ Back to top
| Field | Description |
| Products | Select the product for which you want to create a campaign. |
| Commission Type | Choose whether the affiliate will earn a percentage (%) of the product price or a fixed amount. |
| Commission Value | Enter the commission amount. For example, 10 means 10% or ₹10 depending on the type. |
| Affiliate Users | Select one or more affiliate users who will receive this commission when they refer a sale for the selected product. |
| View Links | Click this to view the unique affiliate links generated for the selected product. These links can be shared by the affiliates. |
Usage
To give a specific affiliate 10% commission on a product called “Shoes – Pack of 2”:
- Select the product.
- Set Commission Type to Percentage.
- Enter 10 as the Commission Value.
- Select the affiliate(s) from the list.
- Click View Links to access the referral link.
Repeat the process for additional products and affiliates as needed.
Affiliate Access to Campaign Links
↑ Back to top
The product-wise and category-wise campaign links assigned to an affiliate are displayed on their My Account page.
Only the affiliates selected for a campaign will see and be able to use these special referral links.
3. Setting Specific Commission Rates for a Particular Product
↑ Back to topIf you’d like to set a unique commission for certain products instead of the default rate, follow these steps:
Steps to set product-specific commissions:
- Go to WooCommerce > Settings > Affiliate tab > Affiliate Reports > Product-Wise Commissions.
- In the Product-Specific Commissions section, choose the product and enter the commission rate (either percentage or fixed).
For detailed information, please refer to the link [here] .
4. Approving an Affiliate Request
↑ Back to topManage incoming affiliate registrations by manually approving or rejecting requests from the admin panel.
Steps to approve or reject requests:
- Navigate to WooCommerce > Affiliate tab > Affiliate Reports > Requests.
- You’ll see the list of pending requests. Click Approve or Reject next to the affiliate’s name to take action.
For detailed information, please refer to the link [here] .
5. Affiliate Click Stats
↑ Back to topThis section provides a comprehensive log and overview of affiliate link clicks. It helps administrators monitor affiliate activity, track campaign effectiveness, and detect unusual or duplicate click behavior.
Click Summary Overview
This tab gives a high-level summary of clicks on affiliate referral links based on:

|
Field |
Description |
|
Affiliate ID |
Unique identifier assigned to each affiliate. |
|
Product Name |
Name of the product linked to the affiliate referral. |
|
Category |
Product category of the linked item. |
|
Other |
Any additional info (if available) related to the click. |
|
Total Clicks |
Total number of times the affiliate link was clicked. |
|
Unique Clicks |
Number of distinct (unique IP-based) clicks recorded. |
|
Last Clicked |
The timestamp of the most recent click for that entry. |
Usage
↑ Back to top- Analyze affiliate performance: See which affiliates are driving the most traffic.
- Detect fraud or unusual activity: Repeated non-unique clicks from the same IP may indicate click fraud.
- Optimize campaigns: Determine which products or categories are getting the most attention through affiliate links.
Related Links:
↑ Back to topAffiliate User Journey: A Step-by-Step Guide [here]
Feel free to reach out if you need any further updates or assistance!