WooCommerce empty cart plugin allows you to clear customers’ carts and sessions automatically after a specific time. Set time in minutes, hours, and days to clear the carts. Redirect users to the shop page or any store page after removing all the products in the cart.
Installation
↑ Back to top- Download Clear Cart and Sessions for WooCommerce and have your.zip file.
- At the WordPress admin panel, go to the Plugins section, and click ‘Add New’ to upload and install the empty WooCommerce cart plugin you recently downloaded from WooCommerce.com.
- Upload the .zip file to proceed with the installation.
- Wait until the plugin installs. After successful installation, activate the plugin, and move on to configuration settings.
Configurations
↑ Back to topAt the admin panel go to WooCommerce > Settings and click Clear Cart and Session tab to configure this extension. Here you can find 3 sections of settings such as Session Expire, Empty Cart Button, and Redirection Settings.
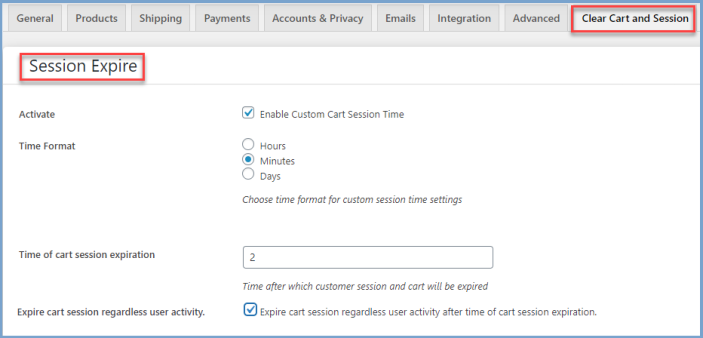
Session Expire:
↑ Back to topHere you can set the followings.
- Activate (Enable/Disable Custom Cart Session Time).
- Time Format (Choose time in Hours, Minutes, and Days for clearing cart and sessions)
- Time of Cart Session Expiration (Specify the time in numbers).
- Expire Cart Session regardless user activity (Expire cart session regardless user activity after time of cart session expiration.)
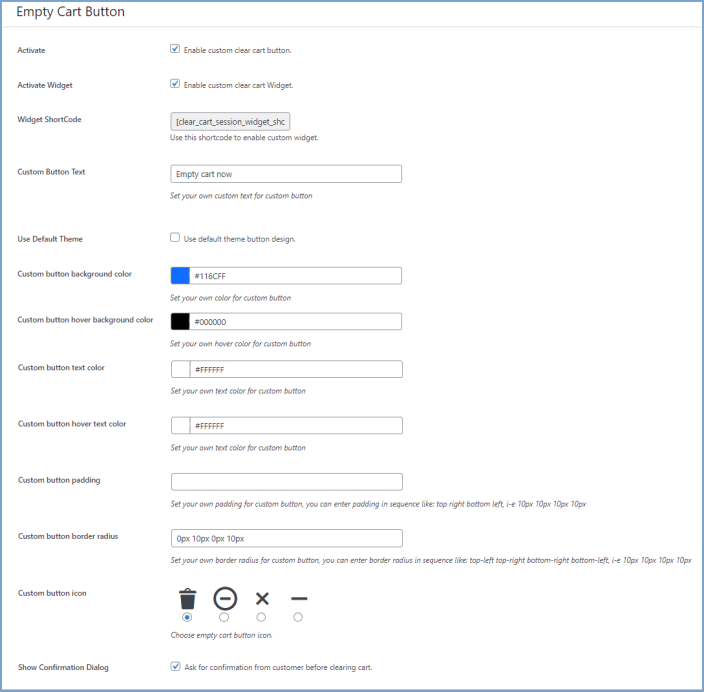
Empty Cart Button:
↑ Back to topFrom this section of the WooCommerce empty cart button plugin, you can enable the empty cart button on the cart page to allow customers to clear all the products in the cart with just one click. You can configure the following settings for the Empty Cart Button.
- Activate (Enable/Disable Empty Cart Button on the cart page)
- Activate Widget (Check this to enable a custom clear cart widget)
- Custom Button Text (Customize empty cart button text)
- Use Default Theme (Check this option to use the default theme button design)
- Custom Button Background Color (Choose the background color of the custom button)
- Custom Button Hover Background Color (Select the background color for the custom button in case of hover)
- Custom Button Text Color (Choose empty cart button text color)
- Custom Button Hover Text Color (Select the hover text color for the custom button)
- Custom Button Padding (Enter padding for the custom button. You can enter padding in sequence like top right bottom left, i-e 10px 10px 10px 10px)
- Custom Button Border Radius (Set the radius for the custom button. You can enter border radius in sequence like top-left top-right bottom-right bottom-left, i-e 10px 10px 10px 10px)
- Custom Button Icon (Choose the icon to display the empty cart)
- Show Confirmation Dialog (Check this option to ask for confirmation from the customer before clearing the cart)
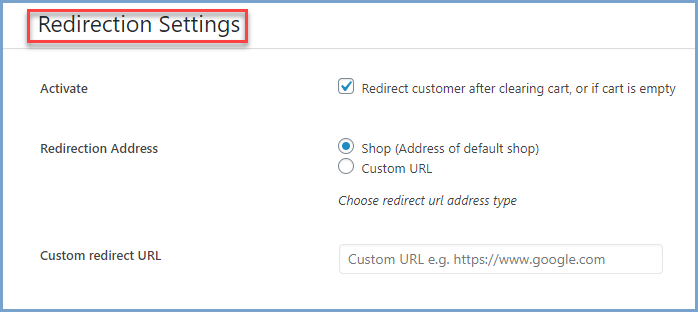
Redirection Settings:
↑ Back to topYou can redirect customers to the shop or any store page after clearing the cart from this section. This section of the WooCommerce cart empty after adding product plugin has the following settings.
- Activate (Check this option to enable redirection)
- Redirection Address (Choose Shop if you want to redirect customers to the shop page or custom to redirect to any other store page)
- Custom redirect URL (Specify URL where you want to redirect your customers )
Buttons Shortcode
↑ Back to topUse shortcodes to easily display clear cart, save cart, and share cart buttons anywhere on your website. By default, all buttons are displayed if no “show” attribute is provided. You can also control visibility using the “show” attribute (e.g., clearCart, shareCart, saveCart). Example: [save_share_clear_cart_widget] or [save_share_clear_cart_widget show=”clearCart,shareCart”]
Save & Share Cart Section
↑ Back to topIn the “Save & Share Cart” section, you can configure multiple settings. These settings are as follows.
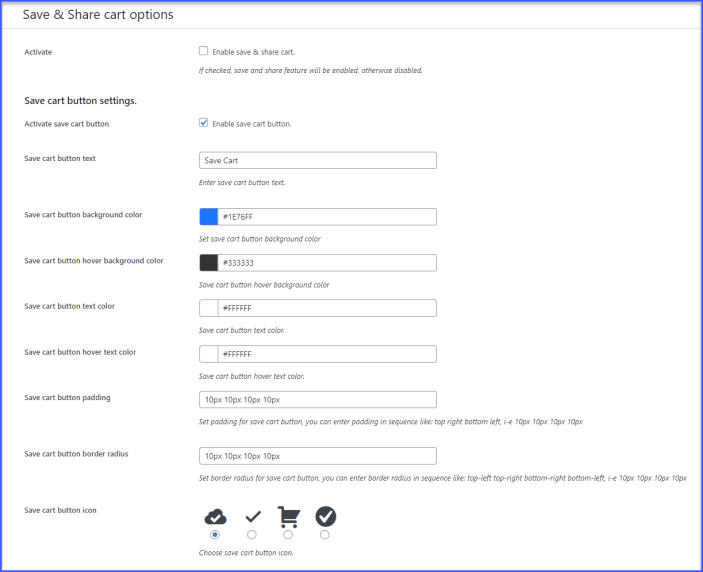
Save & Share cart options
↑ Back to topActivate (Click the checkbox to enable the save & share cart feature)
Save Cart Button Settings
- Activate Save Cart Button (Click to enable the save cart button)
- Save Cart Button Text (Enter the text to be displayed on the save cart button)
- Save Cart Button Background Color (Choose the background color for the save cart button)
- Save Cart Button Hover Background Color (Select the background color for the save cart button hover)
- Save Cart Button Text Color (Select the color for the text of the save cart button)
- Save Cart Button Hover Text Color (Choose the color of the text of the save cart button when hovering)
- Save Cart Button Padding (Enter the padding for the save cart button. You can enter padding in sequence like top right bottom left, i-e 10px 10px 10px 10px)
- Save Cart Button Border Radius (Set the radius of the save cart button. You can enter the border radius in sequence like top-left top-right bottom-right bottom-left, i-e 10px 10px 10px 10px)
- Save Cart Button Icon (Choose the icon for the save cart button)
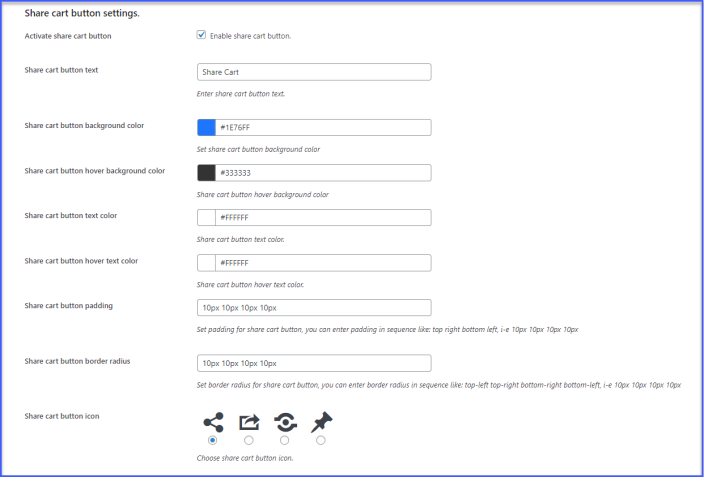
Share Cart Button Settings
- Activate Share Cart Button (Enable the checkbox to activate the share cart button)
- Share Cart Button Text (Add text for the share cart button)
- Share Cart Button Background Color (Choose the background color for the share cart button)
- Share Cart Button Hover Background Color (Select the background color for the share cart button hover)
- Share Cart Button Text Color (Select the color for the text of the share cart button)
- Share Cart Button Hover Text Color (Choose the color of the text of the save cart button when hovering)
- Share Cart Button Padding (Enter the padding for the share cart button. You can enter padding in sequence like top right bottom left, i-e 10px 10px 10px 10px)
- Share Cart Button Border Radius (Set the border radius for the share cart button. You can enter the border radius in sequence like top-left top-right bottom-right bottom-left, i-e 10px 10px 10px 10px)
- Share Cart Button Icon (Select the icon for the share cart button)
Save & Share Popup Options
- Save Cart Popup Heading Text (Enter the heading text to be displayed on the save cart popup)
- Share Cart Popup Heading Text (Add text for the heading of the share cart popup)
- Cart Popup Wrapper Background Color (Set the background color for the cart popup wrapper)
- Cart Popup Header Background Color (Set the background color for the cart popup header)
- Cart Popup Header Text Color (Select the color for the cart popup header text)
- Cart popup body background color (Choose the background color for the body of cart popup)
- Cart Popup Body Text Color (Set the color of the text in the body of the cart popup)
- Cart Popup Border Radius (Set the border radius for the cart popup, you can enter the border radius in sequence like top-left top-right bottom-right bottom-left, i-e 10px 10px 10px 10px)

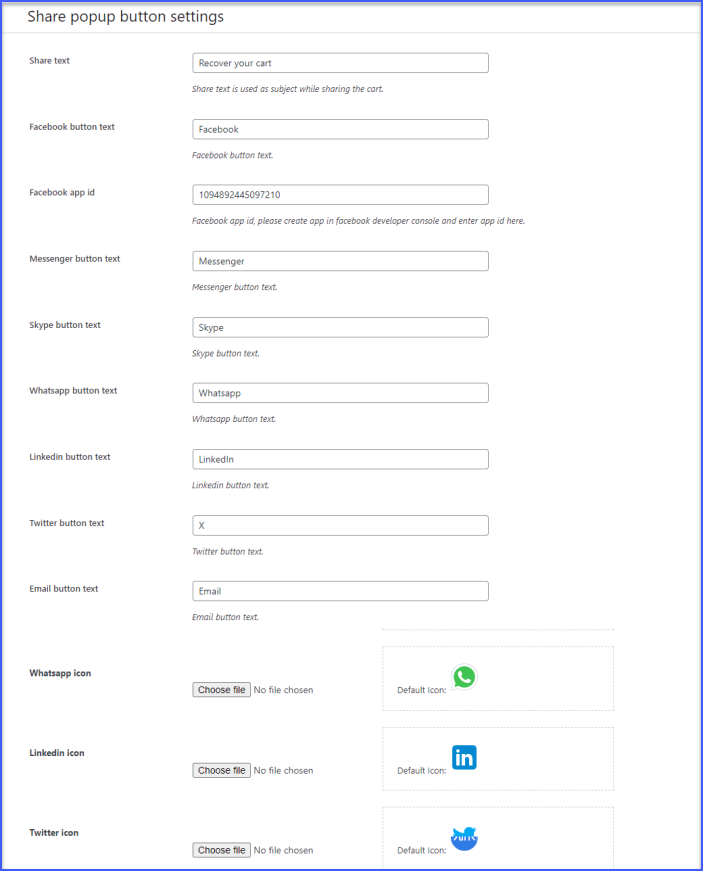
Share Popup Button Settings
- Share Text (Enter the subject text for the sharing the cart)
- Facebook Button Text (Set the text for the Facebook share button)
- Facebook App Id (Enter the Facebook app id. You will need to create app in facebook developer console and enter app id here)
- Messenger Button Text (Enter the text for the messenger button)
- Skype Button Text (Add text for the Skype button)
- Whatsapp Button Text (Add text for the WhatsApp button)
- LinkedIn Button Text (Enter text for the WhatsApp button)
- Twitter Button Text (Add text for the Twitter button)
- Email Button Text (Enter text for the Email button)
- Link Button Text (Enter text for the link button)
- Upload Icons for the Share Buttons (Choose the logos that you want to display for the share buttons. You can upload logo for the following)
- Messenger
- Skype
- Link
Buttons General Settings
- Buttons Alignment (Set alignment of the save and share cart buttons. You can choose the alignment as)
- Left
- Center
- Right

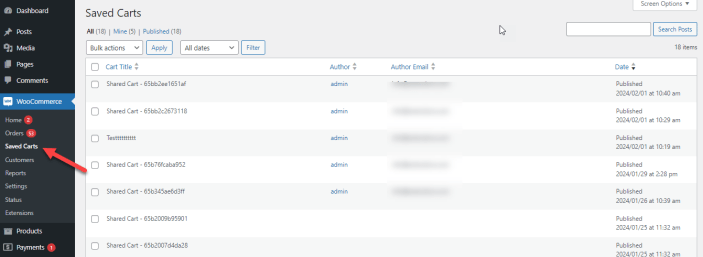
Saved/Shared Carts
You can check all the saved carts in the “Saved Carts” section. Go to WooCommerce > Saved Carts here you can manage all the saved/shared carts.
FAQs
↑ Back to top1. How do I add a clear CART button in WooCommerce?
At the admin panel go to WooCommerce > Settings and click Clear Cart and Session tab. Here go to the Empty Cart Button section and enable the “clear cart button” to add a clear cart button in WooCommerce.
2. How do I clear a cart session in WooCommerce?
In the clear cart and session tab, go to the session expire section. From here you can enable session expiration for the cart and also set a time for cart expiration.
3. Can I redirect customers to a specific page after the cart is empty?
In the redirection settings section of the WooCommerce clear cart plugin, you can select where you want to redirect customers after they clear the cart. You can either redirect them to the shop page or add a custom URL.