Checkout Field Editor for WooCommerce lets you add, edit, and manage checkout fields without coding. Add 25 field types, charge fees per field selection, apply conditional logic based on cart contents or user roles, and create custom checkout sections, all from a single plugin. Compatible with WooCommerce Cart and Checkout Blocks and HPOS.
Block Checkout and HPOS Compatibility
↑ Back to topThe Checkout Field Editor plugin is fully compatible with WooCommerce Cart and Checkout Blocks. You can add and manage custom fields in the Billing, Shipping, and Additional sections on the block-based checkout page.
Warning: Custom sections created using this plugin are not supported on the block-based Checkout page and will not be displayed. Custom fields added to Billing, Shipping, and Additional sections are fully supported.
Installing the Checkout Field Editor Plugin
↑ Back to topInstall the Checkout Field Editor plugin from your WooCommerce account. Follow these steps:
- Download Checkout Field Editor and Conditional Fields for WooCommerce from your account and save the .zip file.
- Go to WordPress Admin > Plugins > Add New, upload the .zip file, and install.
- After installation completes, activate the plugin and proceed to configuration.
Features of Checkout Field Editor Plugin
↑ Back to top- Add custom fields.
- Add custom sections.
- Add and customize default billing fields.
- Add and customize default shipping fields.
- Display conditions.
- Add Pricing.
Configuration
↑ Back to topFrom your store’s WP Admin dashboard, navigate to WooCommerce > Settings > Conditional Checkout Fields for WooCommerce to configure the settings of the plugin.
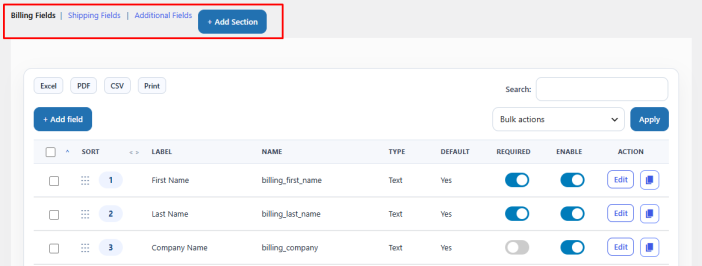
Checkout Sections
↑ Back to topThe Checkout Field Editor plugin lets you add and manage custom fields across four checkout sections:
- Billing: Add new custom fields or edit the default WooCommerce billing fields.
- Shipping: Add custom fields to the shipping section on the checkout page.
- Additional: Customise fields in the additional information section.
- New Section: Create entirely new custom sections with configurable positioning.
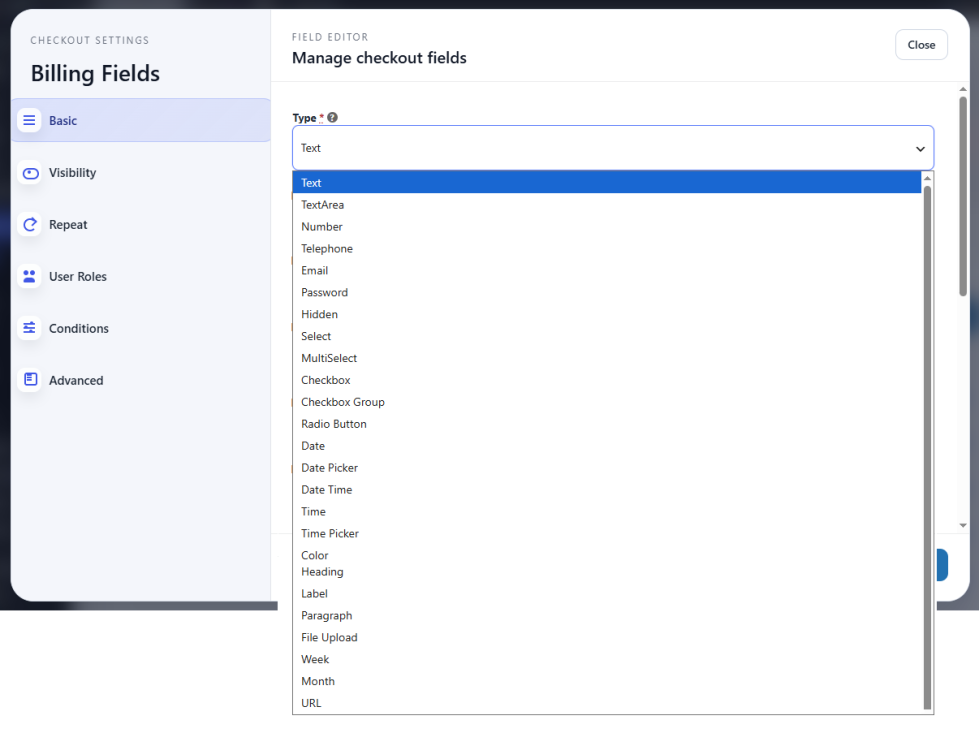
25 Custom Checkout Field Types
↑ Back to topThe plugin supports 25 field types for collecting information from customers at checkout:
- Text
- TextArea
- Number
- Telephone
- Password
- Hidden
- Select
- MultiSelect
- Checkbox
- Checkbox Group
- Radio Button
- Date
- Date Picker
- Date Time
- Time
- Time Picker
- Color
- Heading
- Label
- Paragraph
- File Upload
- Week
- Month
- URL
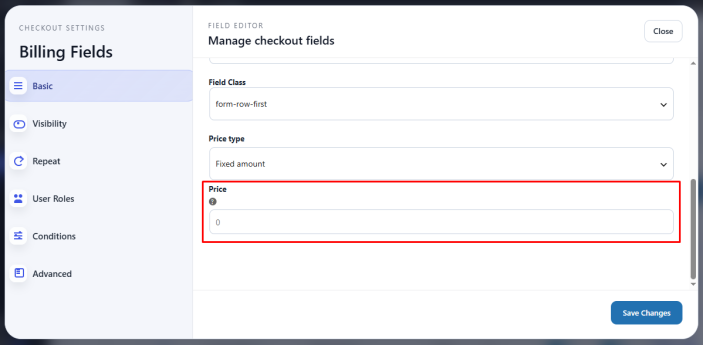
Charging Fees for Custom Checkout Fields
↑ Back to topThe Checkout Field Editor allows you to attach a fee to any custom checkout field. When a customer fills in or selects a field that has a price assigned, that amount is automatically added to the order total. This is useful for add-on services at checkout, such as:
- Gift wrapping: a checkbox that adds a flat fee to the order
- Priority handling: a select field where different options carry different fees
- Custom engraving: a text field that charges per personalised item
- Extended warranty: an optional field that adds a fixed amount
To set a price for a field, enter the amount in the Price field under Basic Settings when adding or editing a custom field. Enable Repeat Price to charge the fee once per cart item when the repeat field feature is active.
To make the fee taxable, enable the Taxable option under Visibility Settings.
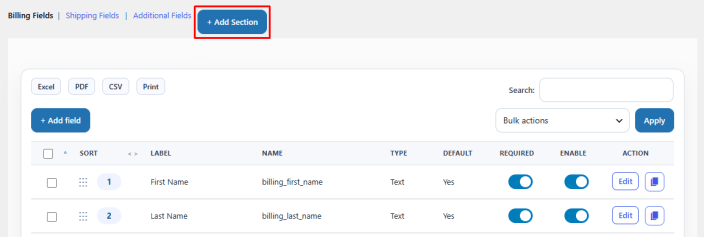
Adding Custom Fields to the Checkout Page
↑ Back to topClick on the specific checkout section tab to customize fields in that section. Here, you can add new custom fields to the checkout or edit the default fields in the section. You can enable or disable each field from the list, make any field required, and duplicate any field with a single click along with all settings.
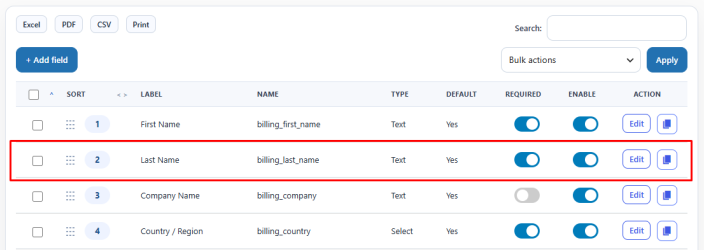
Click “Edit” to customize the default field, or click “Add Field” to add a new custom field. You can configure the following settings for each new field:
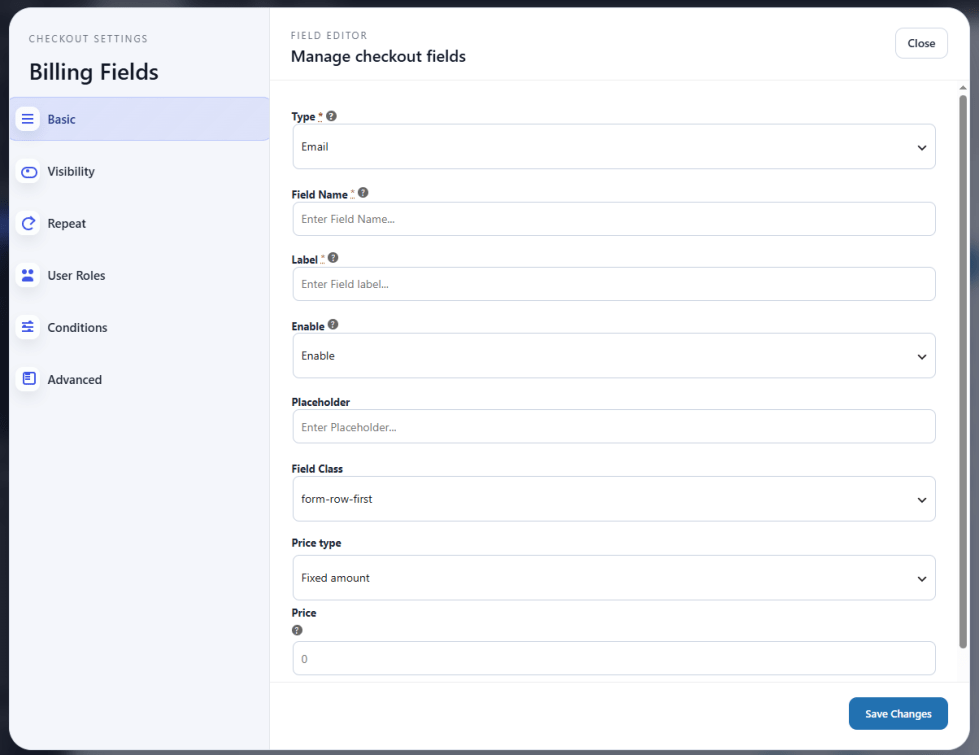
Basic Settings
↑ Back to top- Type: Choose the type of field you want to add to the checkout page. You can select between 25 different field types.
- Field Name: Set the name for the field.
- Label: Enter a label for the custom field.
- Enable: Enable or disable the field.
- Placeholder: Set a placeholder for the field.
- Field Class: Set the field class for the row. You can choose between the following:
- Form-row-first
- Form-row-last
- Form-row-wide
- Price Type: Choose the price type for the specific field. You can choose between the following types:
- Fixed Amount
- Percentage of Cart Total
- Percentage of Subtotal
- Percentage of Subtotal (ext. tax)
- Dynamic
- Price: Set a price for the custom checkout field.
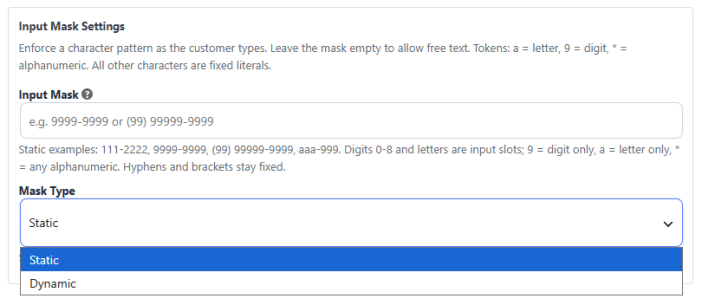
Mask Input for Text and Telephone Fields
Enforce a character pattern as the customer types. Leave the mask empty to allow free text. Tokens: a = letter, 9 = digit, * = alphanumeric. All other characters are fixed literals. Set the masking type as static or dynamic.
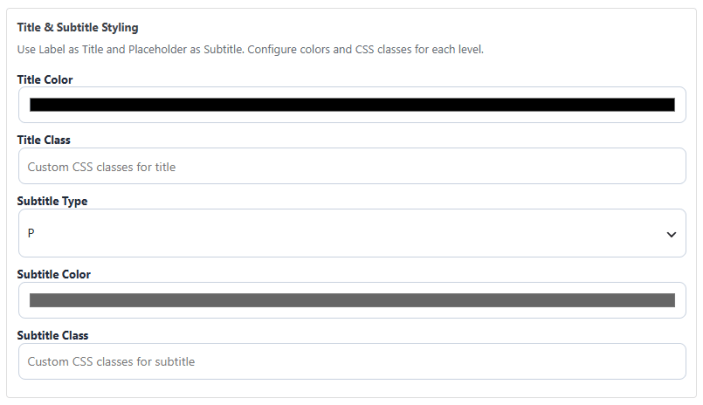
Customization for Heading, Label, and Paragraph Fields
Extensive personalization for the headings, labels, and paragraph fields. You will have the following additional options:
- Title Color
- Title Class
- Subtitle Type
- Subtitle Color
- Subtitle Class
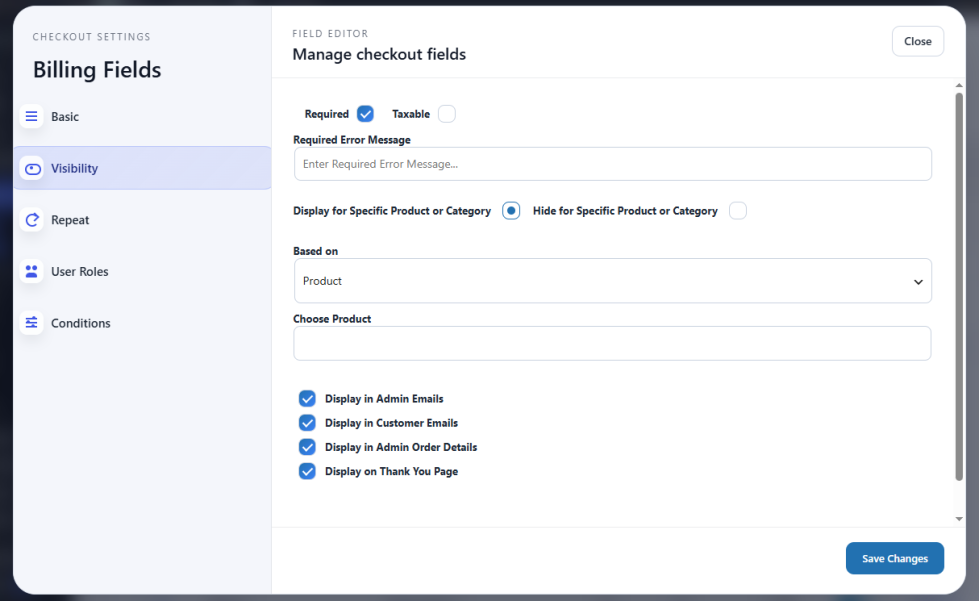
Visibility Settings
↑ Back to top- Required: Make the field mandatory.
- Required Error Message: Enter the error message for the required field.
- Taxable: Click the checkbox to make the field taxable.
- Display/Hide for Specific Product or Category or Tag: Hide or display the field for a specific product, category, or tag.
- Based On: Choose if you want to hide based on product, category, or tag.
- Choose Product/Category/Product Tag: Choose the product, category, or tag based on which you want to hide or display the field.
- Display in Admin Emails: Check to display the field in admin emails.
- Display in Customer Emails: Check to display the field in customer emails.
- Display in Admin Order Details: Check to display the field in Admin order details.
- Display on Thank You Page: Check to display the custom field on the Thank You page.
Repeat Field Settings
↑ Back to top- Repeat this Field: Click the checkbox to repeat the field.
- Based on: Select based on what condition you want to repeat the field. You can choose between the following:
- Product Quantity
- Cart Count
- Label Suffix: Choose the label suffix for the repeating field. You can select as:
- Alphabet
- Number
- Repeat Price: Click the checkbox if you want to repeat the price as well.
- Choose Products: Choose the product (s) based on which you want to repeat the field.

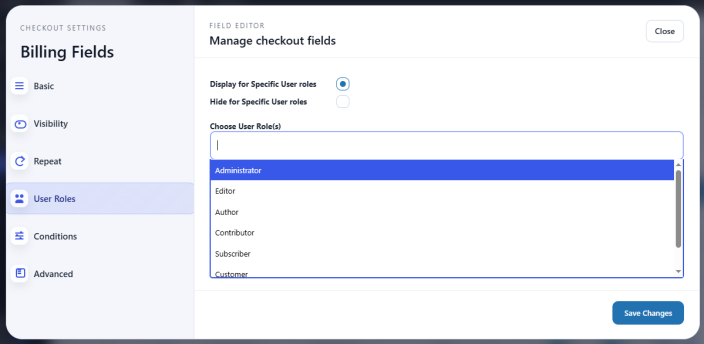
User Roles Settings
↑ Back to top- Display for Specific User Roles: Check if you want to display the field for specific user roles.
- Hide for Specific User Roles: Click the checkbox if you want to hide the field for specific user roels.
- Choose User Role(s): Choose the user role(s) for which you want to hide or display the custom checkout field.
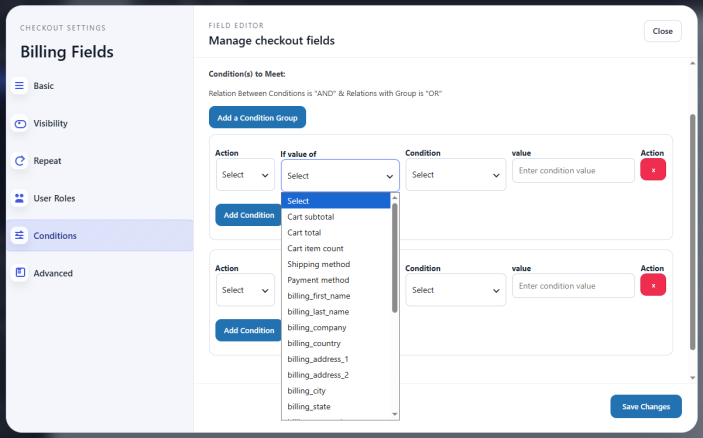
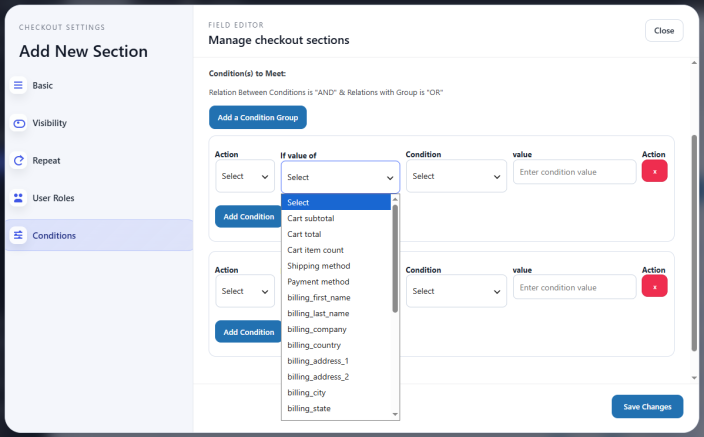
Conditions Logic Settings
↑ Back to topApply conditional logic to checkout fields and control the display of fields based on different conditions. Click on “Add a Condition Group” and configure conditional logic. The plugin uses “AND” and “OR” conditions.
Note: The relation Between Conditions is “AND,” & Relations between Groups is “OR”. In the case of “AND”, all conditions must be true. In the OR condition, if any operation is true, the expression will be true.
Create conditional fields based on the following configuration:
- Action: Choose if you want to “Show” or “Hide” the field based on the condition.
- If Value of: Choose the value for which you want to apply the condition rule. You can choose any of the fields (custom or default) to apply the condition, or you can choose the following values:
- Cart Subtotal
- Cart Total
- Shipping Method
- Payment Method
- Choose any of the checkout fields
- Condition: Choose the condition that you want to apply to the value. You can choose between the following:
- Is empty
- Is not empty
- Is equal to
- Is greater than
- Is less than
- Is not equal to
- Is checked
- Value: Enter the value to match the condition.
You can follow the same configuration for adding custom fields to the billing, shipping, and additional sections on the checkout page.
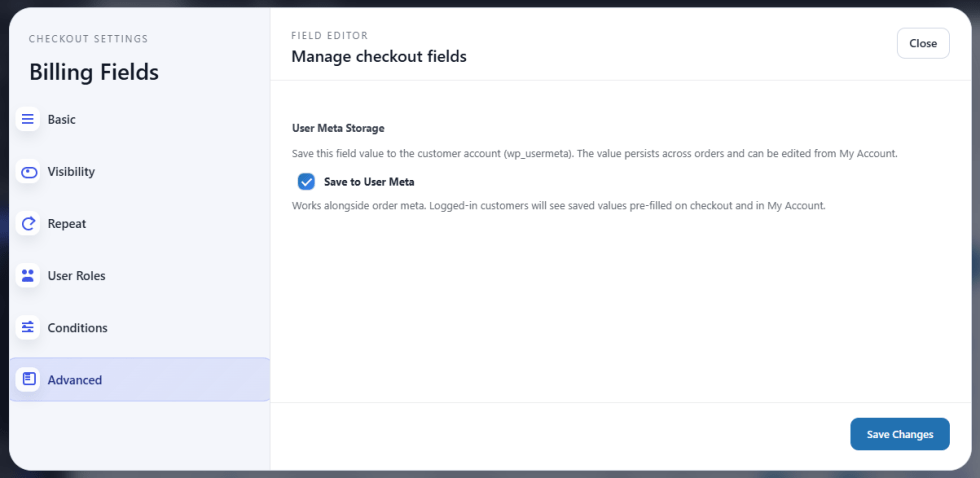
Advanced Settings
↑ Back to topSave values to customer accounts and pre-fill on future orders. The value persists across orders and can be edited from My Account.
Common Use Cases
↑ Back to topThe following examples show how store owners use the Checkout Field Editor to handle real checkout scenarios.
Gift Wrapping Fee
↑ Back to topAdd a Checkbox field labelled “Gift Wrapping” with a price of $5. Under Visibility Settings, set Display/Hide for Specific Product or Category to show the field only when a gift-eligible product is in the cart. Customers who check the box are charged $5 automatically.
B2B VAT Number Collection
↑ Back to topAdd a Text field labelled “VAT Number” and use Visibility Settings to show it only when a business or wholesale product is in the cart. Use User Roles Settings to display it only for the Wholesale user role. Leave it optional or mark it Required depending on your tax requirements.
Per-Item Personalisation
↑ Back to topAdd a Text field labelled “Engraving Text” and enable Repeat this Field with Based On set to Product Quantity. Select the relevant product under Choose Products. The field will appear once for each unit ordered, allowing customers to provide individual text for each item.
Wholesale-Only Checkout Fields
↑ Back to topAdd fields for purchase order numbers, payment terms, or delivery instructions. Under User Roles Settings, set Display for Specific User Roles and choose the Wholesale role. These fields remain hidden from retail customers entirely.
Conditional Delivery Time Slot
↑ Back to topAdd a Time field labelled “Preferred Delivery Time.” Under Conditional Logic Settings, set the condition to show the field only when the Shipping Method is equal to your delivery shipping option. The field is hidden for customers who select standard shipping or local pickup.
Adding New Section to the Checkout Page
↑ Back to topThe Checkout Field Editor allows you to create entirely new sections on the checkout page with a custom title, position, and fields. Navigate to the New Section tab and click Add Section to configure:
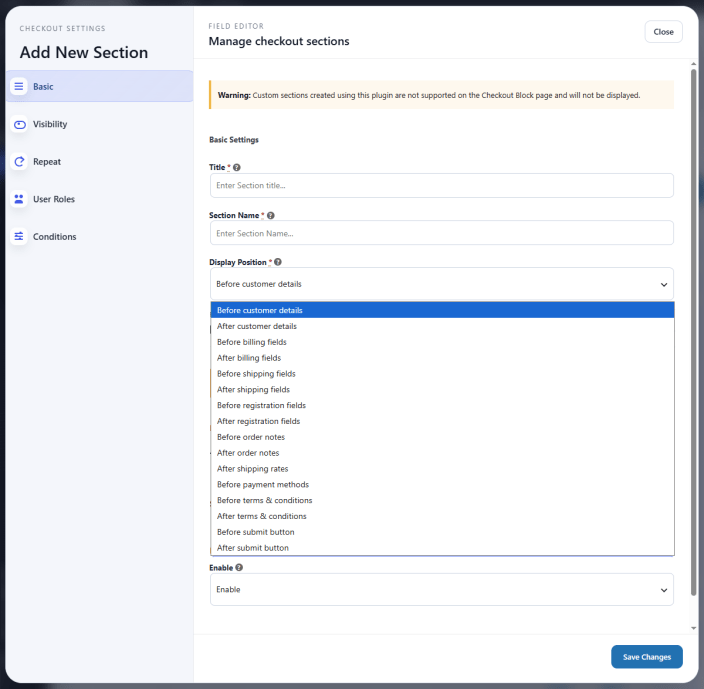
Warning: Custom sections created using this plugin are not supported on the Checkout Block page and will not be displayed.
Basic Settings
↑ Back to top- Title: Add the title for the custom section.
- Section Name: Enter a name for the checkout section.
- Display Position: Choose the display position for the custom section. You can choose between the following options:
- Before Customer Details
- After Customer Details
- Before Billing Fields
- After Billing Fields
- Before Shipping Fields
- After Shipping Fields
- Before Registration Fields
- After Registration Fields
- Before Order Notes
- After Order Notes
- After Shipping Rates
- Before Payment Methods
- Before Terms & Conditions
- After Terms & Conditions
- Before Submit Button
- After Submit Button
- Enable: Enable or disable the custom checkout section.
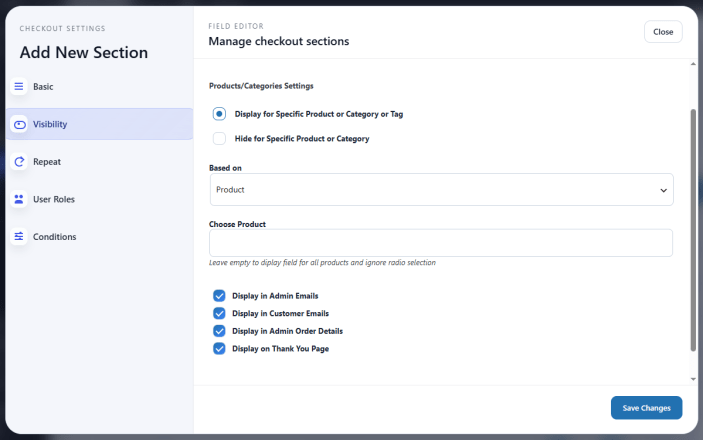
Visibility Settings
↑ Back to top- Display/Hide for Specific Product or Category: Hide or display the section for specific products or categories.
- Based on: Choose whether to apply visibility settings based on products or categories.
- Choose Product/Category: Select the product or category for which you want to show or hide the section.
- Display in Admin Emails: Check to display the section details in admin emails.
- Display in Customer Emails: Check to display the section details in customer emails.
- Display in Admin Order Details: Check to display the section details in Admin order details.
- Display on Thank You Page: Check to display the custom section on the Thank You page.
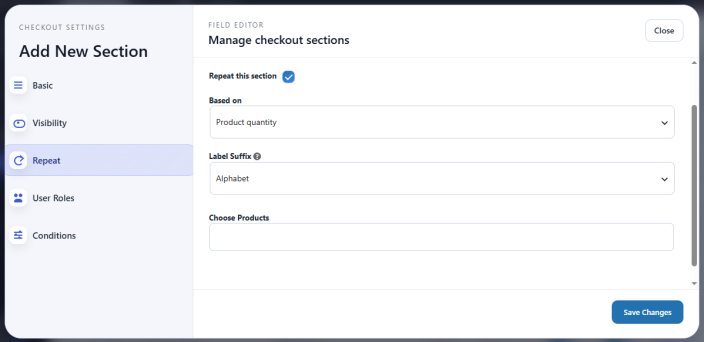
Repeat Section Settings
↑ Back to top- Repeat this Section: Click the checkbox to repeat the section.
- Based on: Select the condition based on which you want to repeat the section. You can choose between the following:
- Product Quantity
- Cart Count
- Label Suffix: Choose the label suffix for the repeating section. You can select:
- Alphabet
- Number
- Choose Products: Choose the product(s) based on which you want to repeat the section.
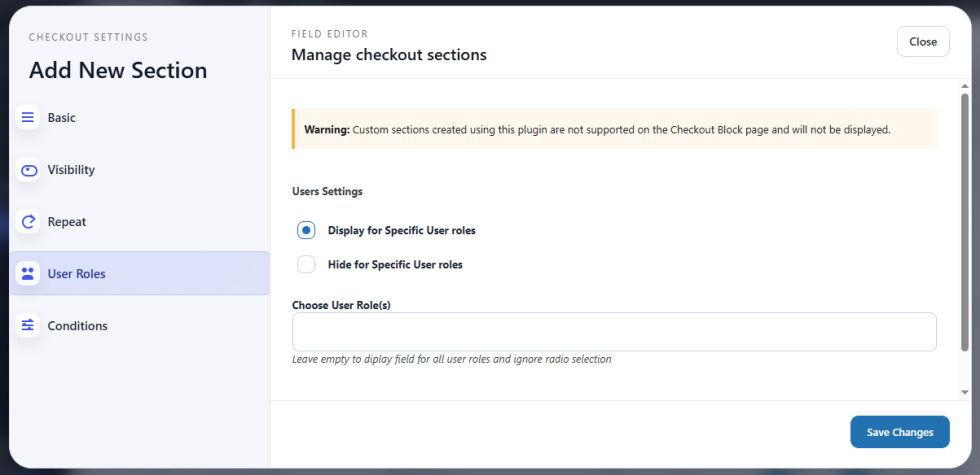
User Roles Settings
↑ Back to top- Display for Specific User Roles: Check if you want to display the section for specific user roles.
- Hide for Specific User Roles: Click the checkbox if you want to hide the section for specific user roles.
- Choose User Role(s): Choose the user role(s) for which you want to hide or display the custom section.
Conditions Logic Settings
↑ Back to topApply conditional logic to sections and control the display of sections based on different conditions. Click on “Add a Condition Group” and configure the conditional logic. The plugin uses “AND” and “OR” conditions.
Note: The relation between conditions is “AND,” and the relation between groups is “OR.” In the case of “AND”, all conditions must be true. In the case of “OR”, if any condition is true, the expression will evaluate as true.
Create conditional sections based on the following configuration:
- Action: Choose whether you want to “Show” or “Hide” the section based on the condition.
- If Value of: Choose the value for which you want to apply the condition rule. You can select any section (custom or default) to apply the condition, or choose from the following values:
- Cart Subtotal
- Cart Total
- Cart Item Count
- Shipping Method
- Payment Method
- Choose any of the checkout fields (Default or Custom)
- Condition: Choose the condition you want to apply to the value. You can select from the following:
- Is empty
- Is not empty
- Is equal to
- Is greater than
- Is less than
- Is not equal to
- Is checked
- Value: Enter the value to match the condition.
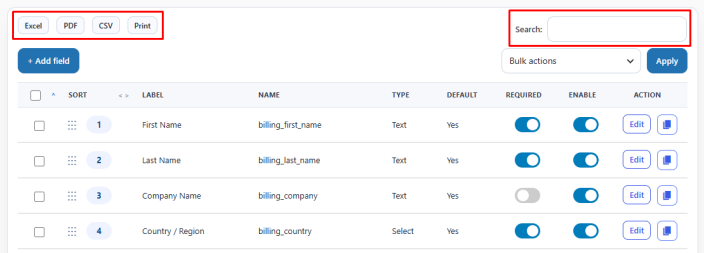
Search, Export, or Print Checkout Fields
↑ Back to topQuickly find, manage, export, or print checkout fields using the checkout field editor plugin. Navigate to WooCommerce > Settings > Conditional Checkout Fields and use the search bar to instantly find any specific checkout field across all sections.
Easily export your checkout fields in multiple formats for reporting, backup, or documentation purposes:
- Excel
- CSV
You can also print the complete list of checkout fields for quick review, internal sharing, or maintaining offline records. This feature helps store admins efficiently manage and organize all custom checkout fields without manually reviewing each section.
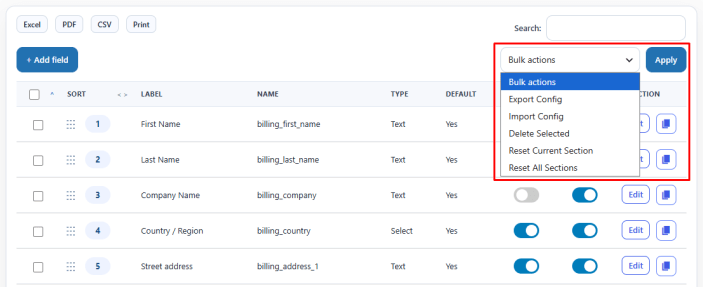
Bulk Actions for Each Checkout Section
↑ Back to topUse bulk actions to easily make changes to each section of the checkout. You can use different options from the dropdown menu to apply changes. You will have the following options:
- Export Config: Export the configurations for the section.
- Import Config: Import the configurations for the section.
- Delete Selected: Delete the selected fields.
- Reset Current Section: Reset all the fields and configuration in the current section.
- Reset All Sections: Reset all checkout sections to default.
FAQs
↑ Back to topCan I edit or delete the default checkout fields?
This extension allows you to edit the default checkout fields and hide them. Moreover, you can change the sequence of default fields, and apply validation.
Is it possible to display custom checkout fields to only specific users?
Yes, you can assign checkout fields to specific user roles. This way you can create custom checkout fields for specific user roles.
Can I add condition fields to the checkout page?
The extension lets you create conditional checkout fields. You can apply And or Or based conditions on different fields to get the required information from your customers.