
This plugin will automatically send your customers coupon emails based on actions within your store. Store managers can select what action triggers the coupon, create new coupons or use existing ones, create re-usable email templates, send test emails and collect customer birthdays via the My Account page.
Requirements & Installation
↑ Back to topYour WordPress site needs WooCommerce running first. Cart, Checkout, and My Account pages all have to work before you start.
You need to have admin rights to install this. This plugin requires WordPress 5.8, WooCommerce 7.0 and PHP 7.4. You may need higher versions of WooCommerce.
- Grab the plugin zip from your WooCommerce.com account.
- Log into WordPress admin.
- Go to plugins and then Add New Plugin (this may differ based on your WordPress version). Upload Plugin and upload the zip you downloaded in step 1. Click install now.
- Activate it once it’s installed.
- A screen may appear asking you to complete the Onboarding Wizard. Follow the steps to set up the plugin. Or go to WooCommerce > Settings > Coupon Email Settings.
Getting Started
↑ Back to topOnce you have installed the plugin you can start the setup wizard. Clicking on “Coupon Email Setup” in the WooCommerce menu will take you through 6 screens to get your extension setup. You can click the Start setup button to get started, Next will move you forward and Back will take you back. If you want to exit this wizard you can click Close / Exit Wizard and manually set up the plugin.
Setup Step 1
↑ Back to topThis screen will tell you what you need to do to get started with the plugin. Clicking Start setup will begin.
Setup Step 2
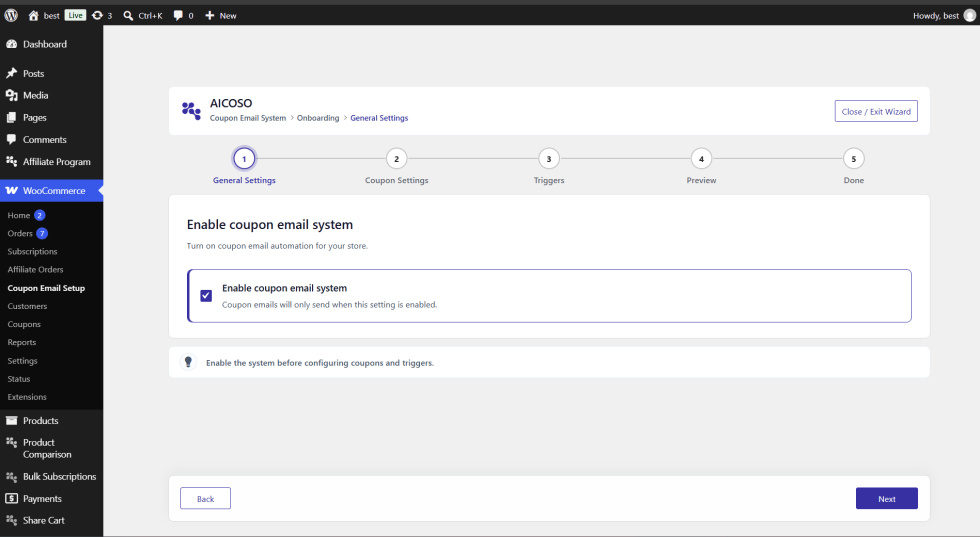
↑ Back to topCheck the box under Enable coupon email system. This will mean that coupon emails will only be sent if this is ticked. Click Next.
Setup Step 3
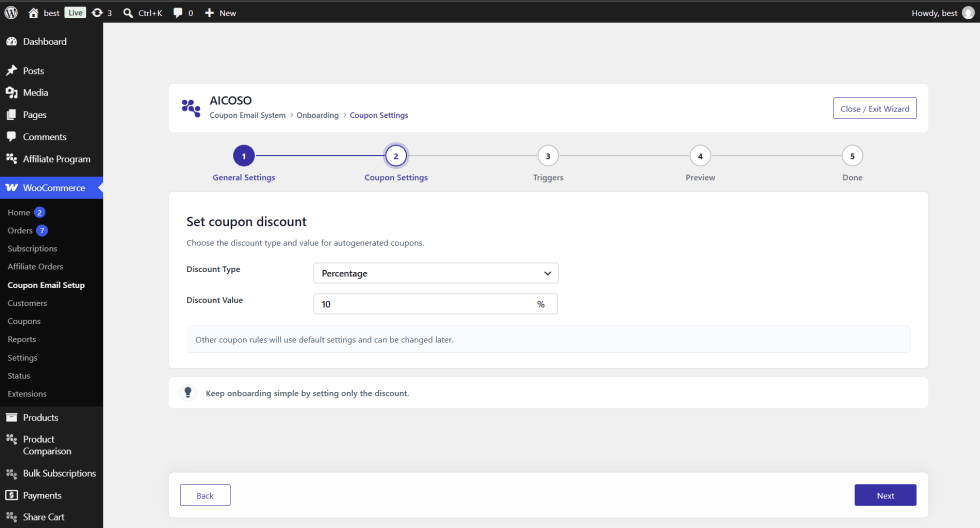
↑ Back to topHere you can set what type of discount and value the automatically generated coupons will have. For example, percentage discount with a value of 10. All other coupon rules will be using the default settings and can be changed later within the triggers.
Setup Step 4
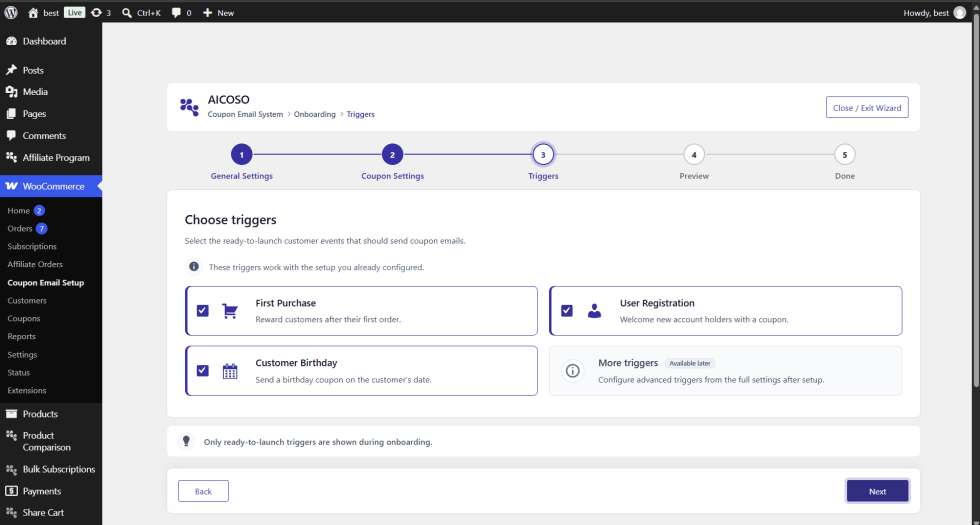
↑ Back to topHere you can select which customer actions will send out coupon emails. We have included some ready to go triggers: First Purchase, User Registration and Customer Birthday. Other triggers can be set up within the full settings.
Setup Step 5
↑ Back to top
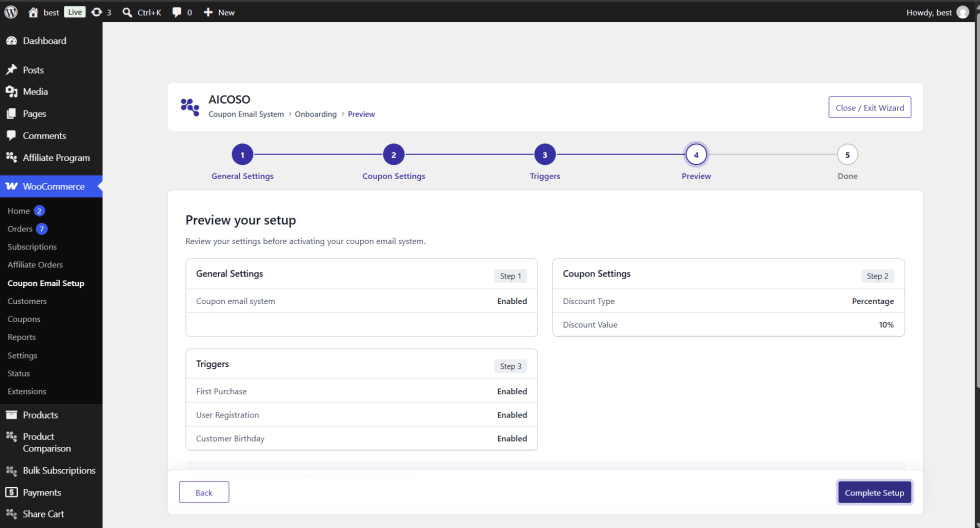
This screen will show you a preview of your General Settings, Coupon Settings and Triggers. Only once you click Complete Setup will it save your settings. If you want to change anything click Back.
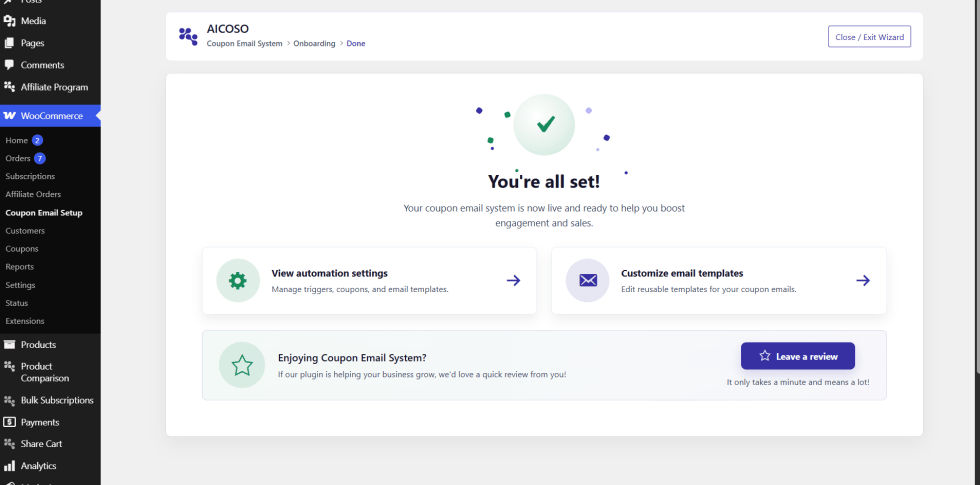
Changing Settings
↑ Back to topTo edit the coupons settings you go into WooCommerce > Settings > Coupon Email Settings. During onboarding you will just configure the core settings. The Email Builder, conditions and advanced coupon settings will be found under the settings tab.
Note: This tab will have a title of Coupon Email Settings. The following sections will be available General Settings, Email Builder, First Purchase, User Registration, Spent Threshold, Order Threshold, Product Purchase, Customer Birthday, Days After Last Purchase and How To.
Settings
↑ Back to topGo to WooCommerce > Settings > Coupon Email Settings. Once you have made the necessary changes click save changes. If you make any further changes you will need to click save changes again.
General Settings
↑ Back to topWooCommerce > Settings > Coupon Email Settings > General Settings
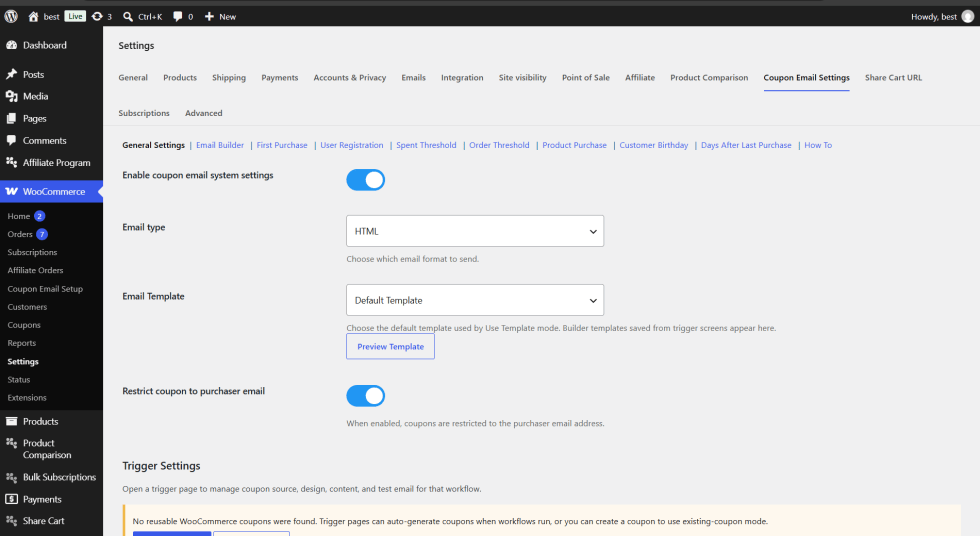
Setting Description
- Enable coupon email system settings: This allows you to enable/disable the extension. Production coupon emails will only be sent if this is enabled.
- Email Type: Allows you to select the format of the email. Select HTML if using templates/Email Builder.
- Email Template: Choose the default template to use with your triggers. The built in templates are Default Template, Modern Blue Template and Elegant Purple Template. Templates saved in the Email Builder will also appear here.
- Preview Template: Preview the chosen template.
- Restrict coupons to purchasers email: If this is enabled coupons will be limited to the purchasers email.
Below this you will see a card for each trigger. Clicking the Open Trigger Settings button will allow you to edit them.
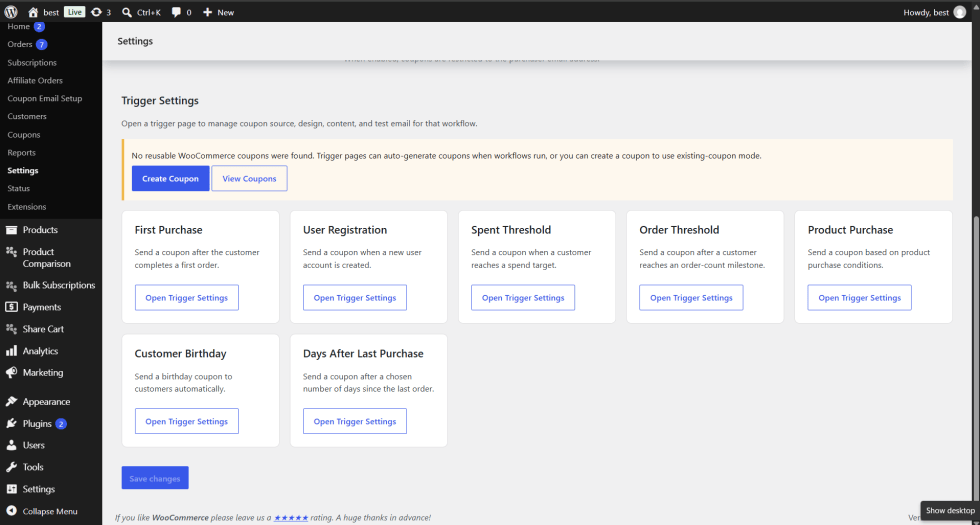
Customer Flow
- Go to General Settings.
- Enable the coupon email system settings.
- Select your email type and default email template.
- Click Preview Template to take a look at the design.
- Click Save Changes.
- Click the Open Trigger Settings button on your card.
Note: If there are no coupons in your store you will see a notice. This will include buttons to create a new coupon. If your trigger is set to automatically generate coupons you won’t need a coupon already created.
Email Builder
↑ Back to topUnder: WooCommerce > Settings > Coupon Email Settings > Email Builder
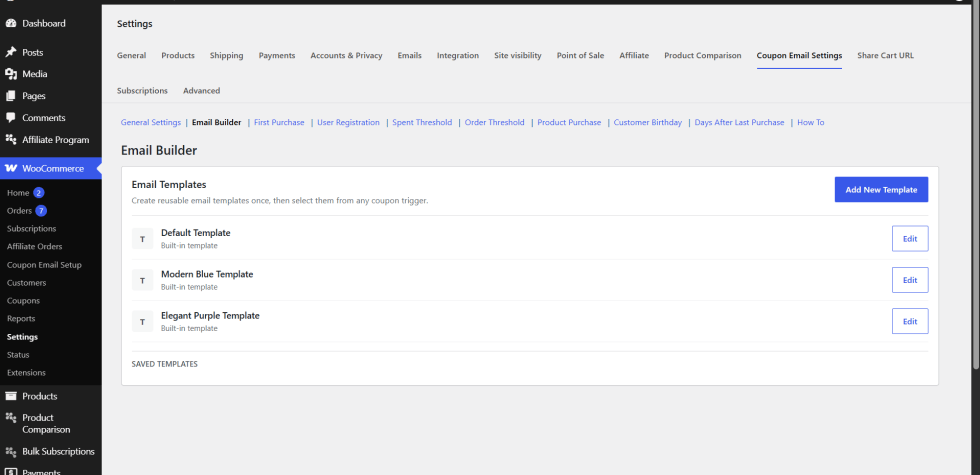
Settings
- Add New Template – Create a new template for your email
- Built-in Templates – Default Template, Modern Blue Template, and Elegant Purple Template. These can be edited using the Edit button
- Saved Templates – All of your created templates will be shown here. They can be edited and deleted using the Edit/Delete buttons.
There are 2 options available within the Email Builder. The first option is Drag & Drop which lets you add different sections to your email. The second option is Custom Code which lets you write your own HTML. On the right hand side is the Live Preview showing how your email will appear.
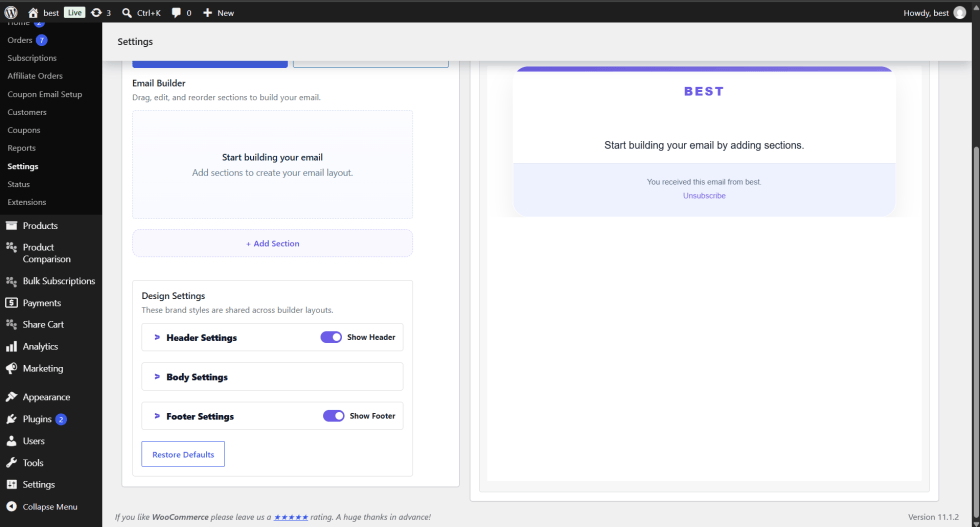
Click to add a new section by clicking + Add Section.
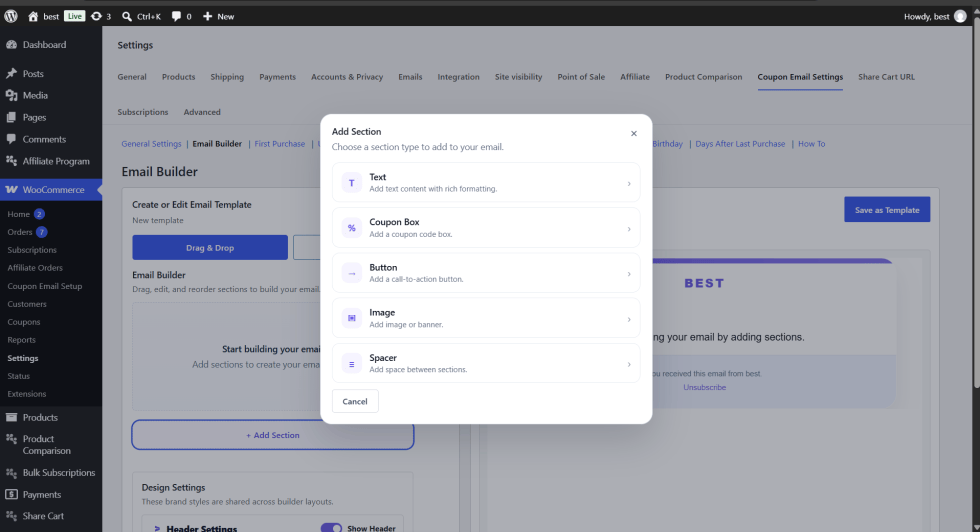
- Text – Add some rich text to your email
- Coupon Box – Add a box to show the coupon code
- Button – Add a button to encourage the user to take action
- Image – Add an image/banner
- Spacer – Add some spacing between sections
The Coupon Box has a Title field (Default: Your Coupon Code). It also has a Code Placeholder (Default: {coupon_code}) that will be replaced with the actual coupon code when the email is sent. Every section has buttons so they can be edited, moved up/down, duplicated, and deleted.
Design Settings
The design settings can be found on all the builder pages and by clicking restore defaults you can reset to the original design settings.
Header Settings
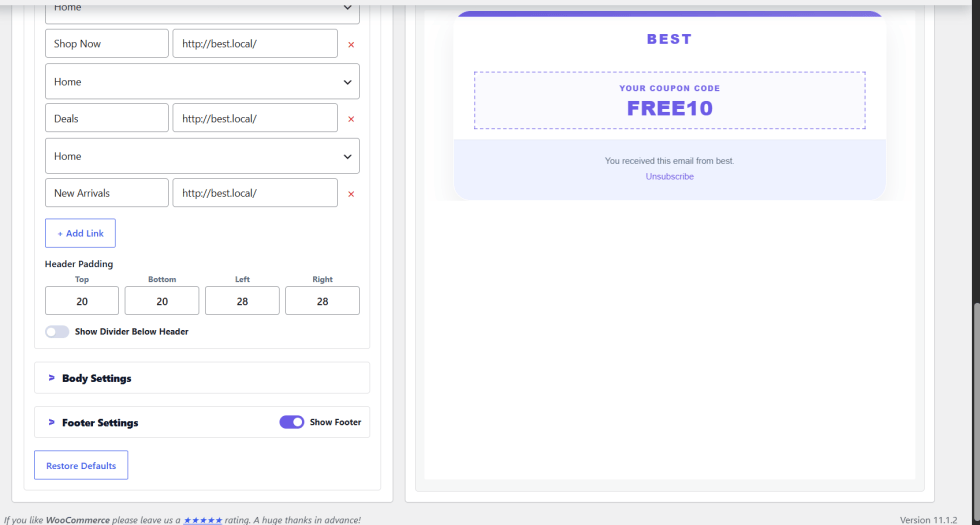
- Show Header: Toggle to show or hide header
- Header Layout: Show Logo + Nav for logo and links on one line | Show Logo for just logo | Show Logo + Links for logo with links below.
- Logo URL: Paste your image URL or upload a logo using the upload button.
- Logo Alignment: Align your logo to the left, centre or right.
- Header Background and Text Colour: Set the colour of your header.
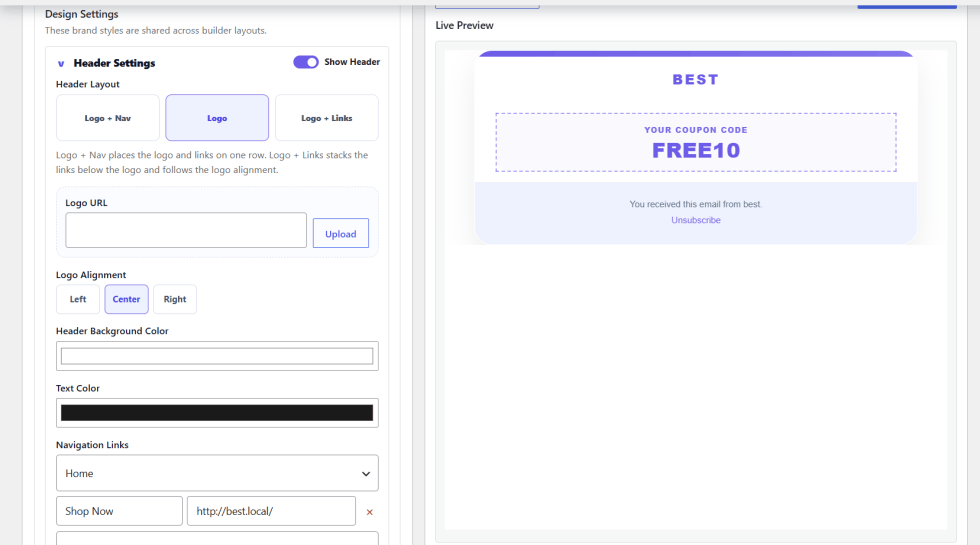
- Navigation Links: Select a page, enter your link text and URL. Press + Add Link to add more links, or press the red × to remove links.
- Header Padding: Top, bottom, left and right padding.
- Divider Below Header: Add a line below your header.
Body Settings
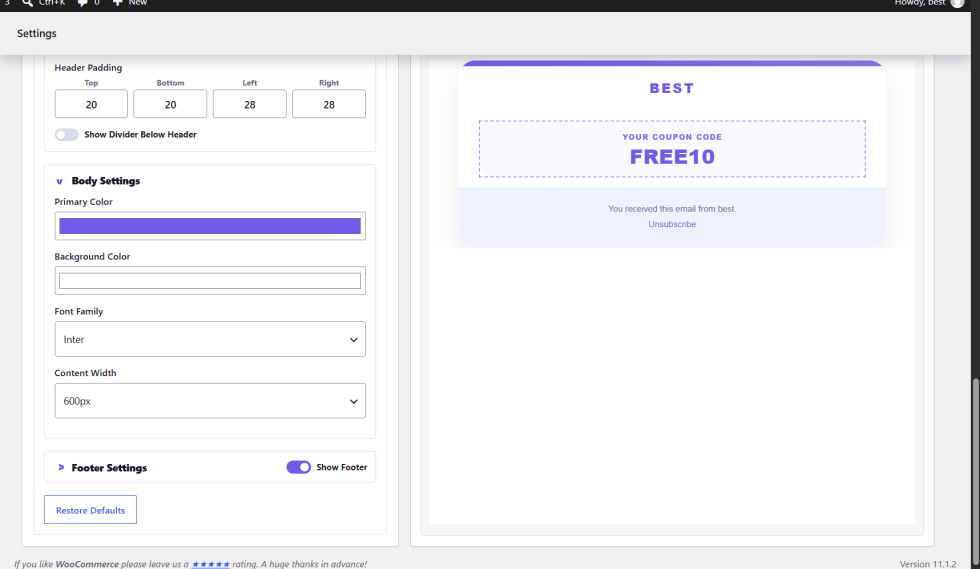
- Primary Colour: Main colour of your email.
- Background Colour: Background colour of your email.
- Font Family: Font of your email e.g Inter
- Content Width: Width of your email content e.g 600px
Footer Settings
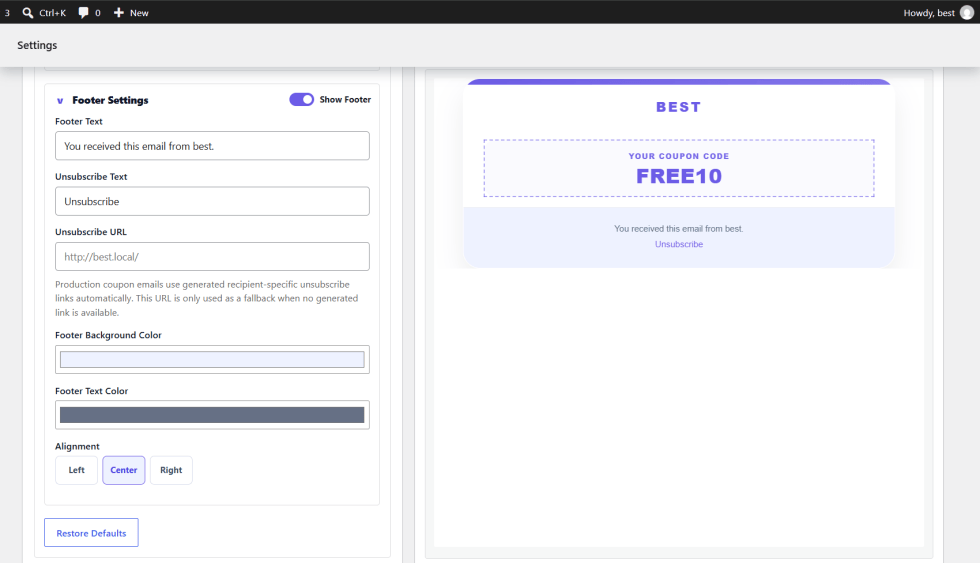
- Show Footer: Toggle to show or hide the footer.
- Footer Text: Text to display at the bottom of your email.
- Unsubscribe Text: Text for unsubscribe link.
- Unsubscribe URL: This is a backup URL. In practice, the unsubscribe links in production coupon emails will use a dynamically generated recipient specific link. This URL will only show if there is no dynamically generated link.
- Footer Background, Text and Alignment: Style your footer.
Custom Code
↑ Back to top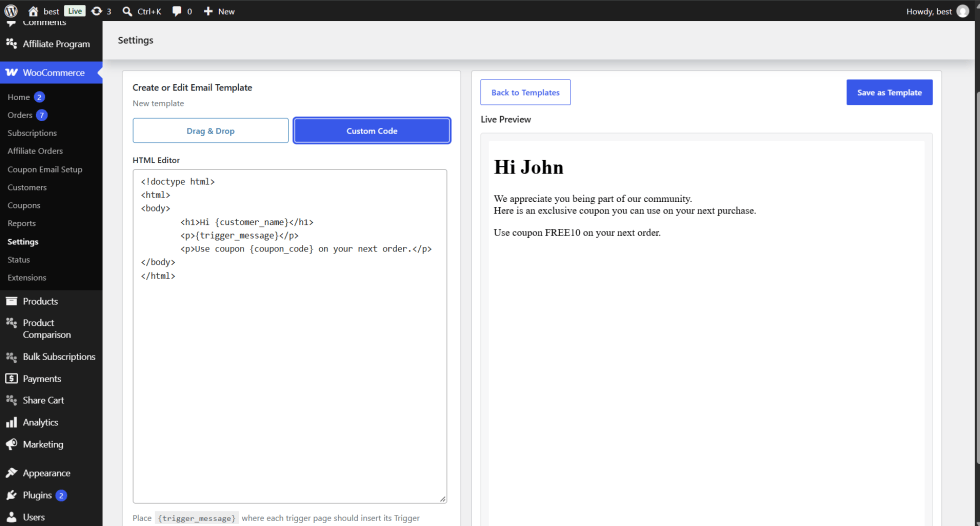
Click on Custom Code and compose your email using the HTML editor. Placeholders such as {customer_name}, {coupon_code} can be used and {trigger_message} where each trigger’s trigger message will go.
Customer flow
↑ Back to top- Open the Email Builder and click Add New Template.
- Drag and drop to design your email, or click on Custom Code and write your HTML.
- View the Live Preview.
- Click Save as Template, enter a Template Name and click Save Template.
- Once you have saved, the button will change to Update Template which can be used to save any future changes.
- Click Back to Templates and check your template is showing under Saved Templates.
- Open a trigger and select your template from Choose Template.
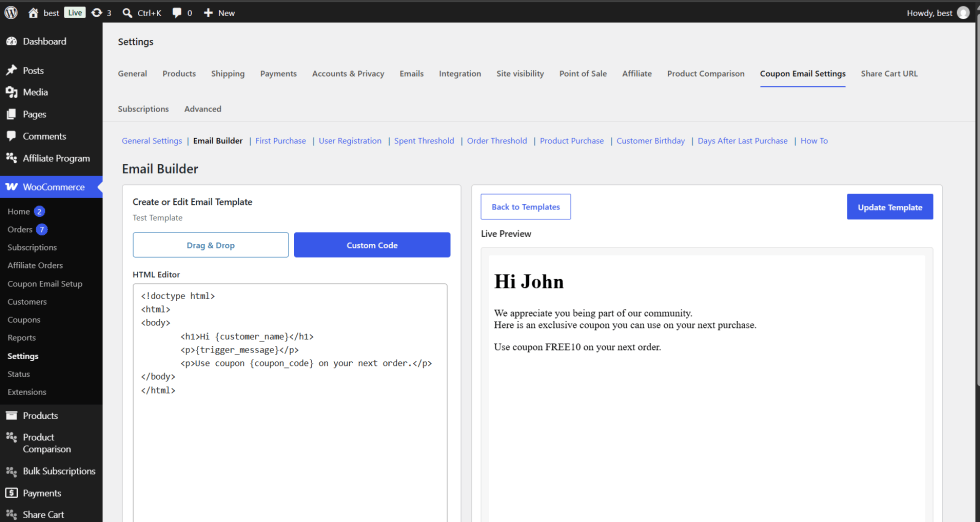
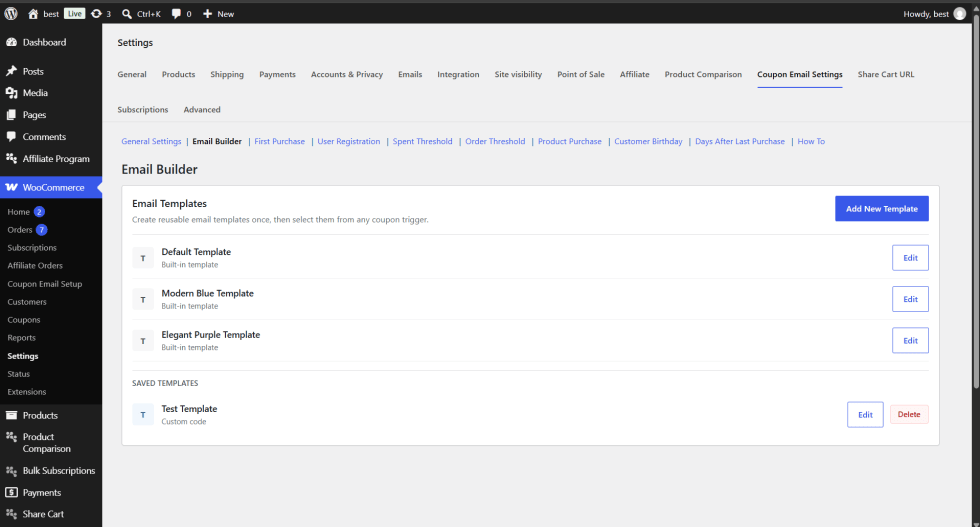
Notes: You can edit built-in templates, however you cannot delete them. Saved templates can be edited and deleted.
Trigger settings
↑ Back to topEach trigger contains three sections, Trigger Setup, Email Design and Message Content. These can be viewed below under First Purchase. The other triggers will just have the differences highlighted.
First Purchase
↑ Back to topWooCommerce > Settings > Coupon Email Settings > First Purchase
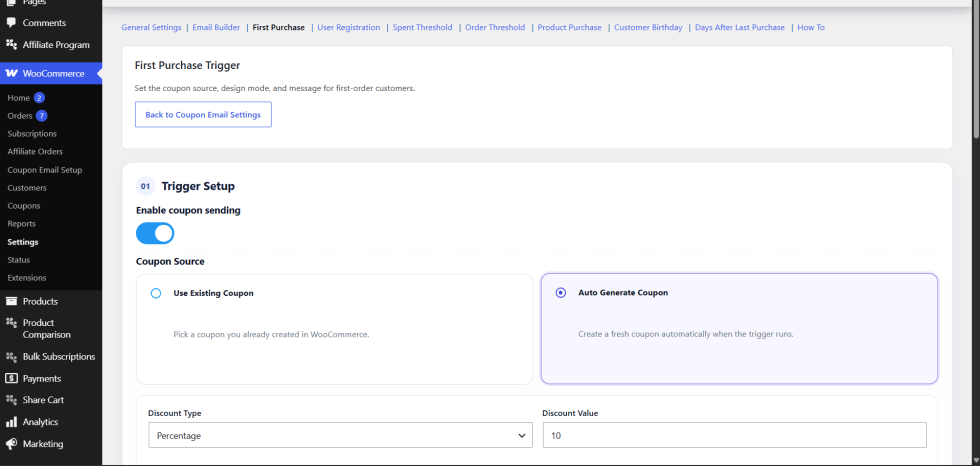
This trigger will send a coupon email when a customer makes their first purchase. To go back to the General settings click Back to Coupon Email Settings.
Settings
- Enable sending coupon: Enable/disable this trigger
- Coupon Source: Choose between using an existing coupon or auto generating one. Use Existing Coupon will use a coupon you have already created, Auto Generate Coupon will create a new coupon.
Choosing Use Existing Coupon, select a published coupon from WooCommerce and choose how you want the plugin to handle it. Keep Original Coupon will keep your coupon as is and make a copy for the recipient when required. Edit Selected Coupon will edit your original coupon and you will need to confirm the changes.
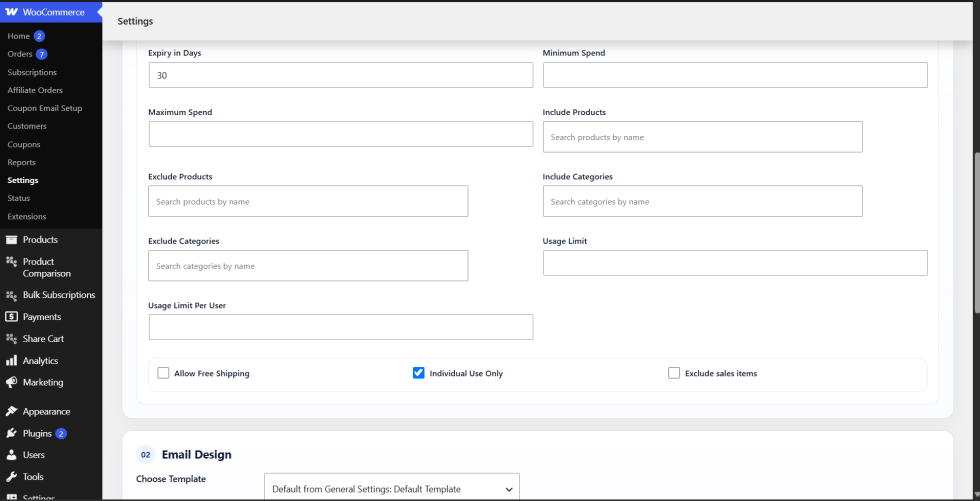
Choosing Auto Generate Coupon will give you the following options:
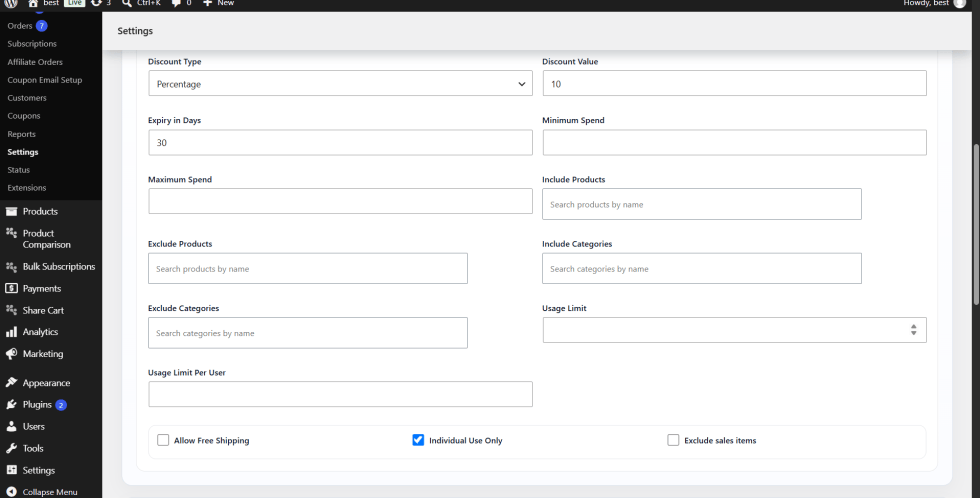
- Discount Type: Percent, Cart or Product discount
- Discount Value: Value of coupon, must be more than 0
- Days Valid: How long the coupon will be valid for
- Minimum Spend & Maximum Spend: Subtotal minimum/maximum, leave blank for no limit.
- Include Products & Exclude Products: Include/exclude specific products
- Include Categories & Exclude Categories: Include/exclude specific categories
- Max Uses: How many times the coupon can be used
- Max Uses Per Customer: How many times the coupon can be used by one customer
- Free Shipping, Single Use Only & Exclude sales: Extra options for the coupon.
In the Email Design section choose which template to use from the Choose Template dropdown. This will default to whatever template is chosen in General Settings. You can create and edit templates in the Email Builder tab.
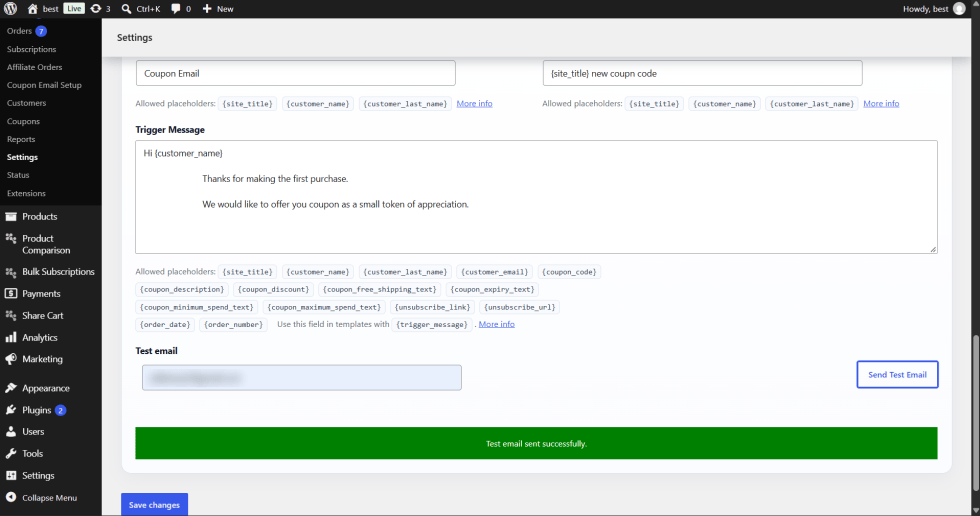
Under Message Content, enter your email text. You can use the following placeholders:
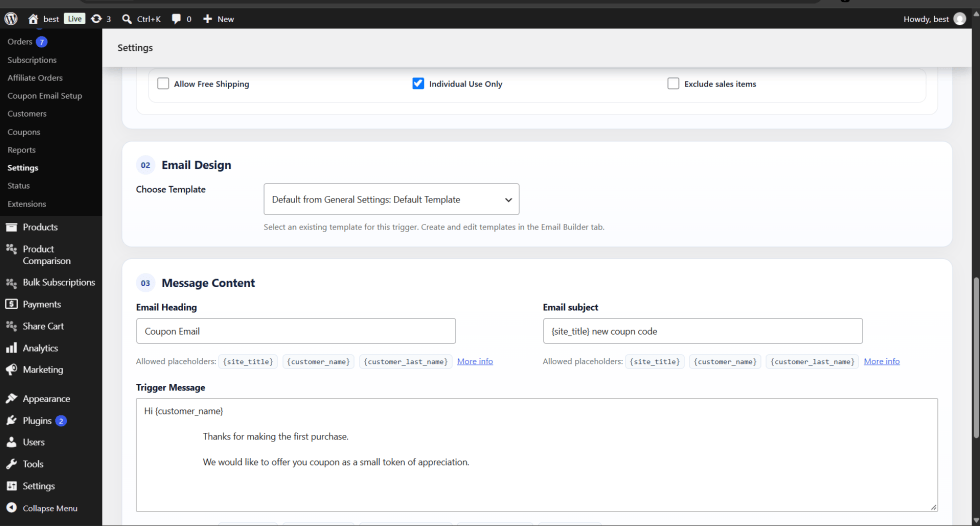
- Email Heading: Email heading
- Email subject: Email subject line
- Trigger Message: The message to display in the email. This will show wherever {trigger_message} is in the chosen template.
- Test email: Enter an email address and click Send Test Email.
Customer Journey
- Open First Purchase
- Enable sending coupon
- Choose your Coupon Source and enter the coupon options
- Choose the template from Choose Template
- Enter your Email Heading, Email subject and Trigger Message
- Enter your email in the Test email box and click Send Test Email
- Make sure you get the message “Test email sent” and the email shows up in your inbox.
- Click Save changes
- Create a test order as a new customer and change the order status to Processing or Completed.
- Check the customer received the coupon email.
Note: The coupon email will only be sent once per order. If the extension/triggers are disabled or if the customer has unsubscribed then the email will not be sent.
User Registration
↑ Back to topGo to WooCommerce > Settings > Coupon Email Settings > User Registration.
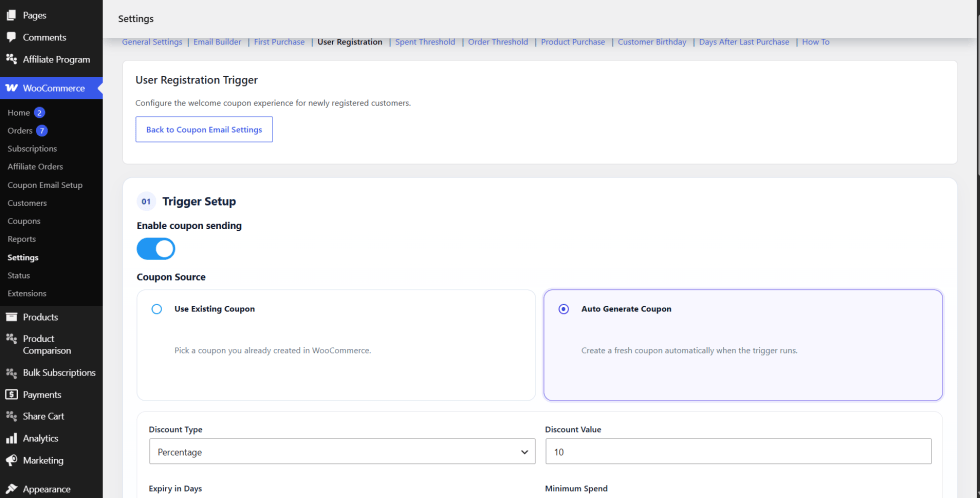
This trigger will give your new customers a welcome coupon. You can setup the trigger, design the email and write the message just like in the first purchase section. Choose if you want to give out a coupon, choose the source and set up your coupon.
Setup
- Enable coupon sending: Choose whether you want to give out a coupon
- Coupon Source: Choose where you want the coupon to come from
- Coupon Setup: Set up your coupon. Same as First Purchase section.
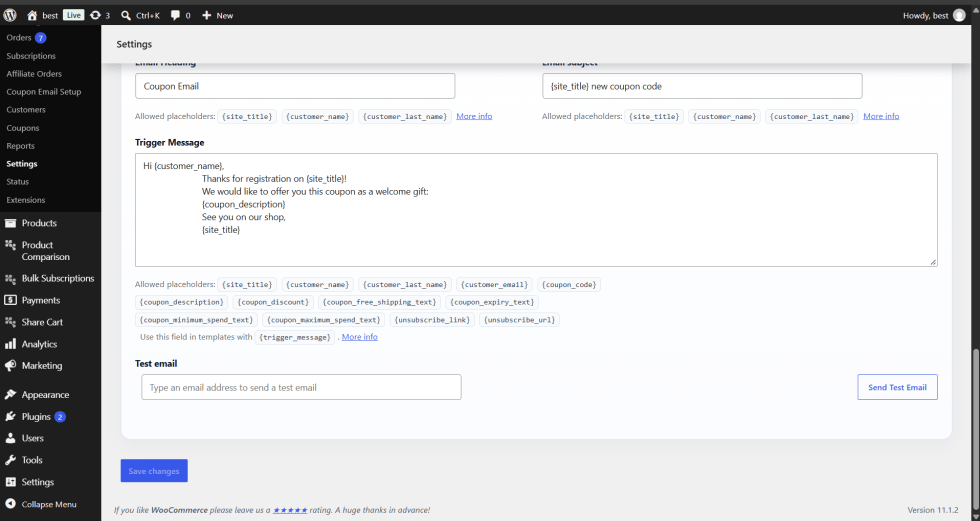
- Trigger Message: The default message will tell your new customer they have received a welcome coupon.
Customer Process
Start by going into User Registration.
- Enable a coupon to be sent.
- Choose where the coupon is coming from and set up your coupon.
- Write your email heading, subject and trigger message.
- Send a test email and click save changes.
- Create a new customer account within your store front.
- Check that the new customer has received their welcome coupon.
Note: Order placeholders such as {order_date} and {order_number} are not available as there will be no order.
Spent Threshold
↑ Back to topGo to WooCommerce > Settings > Coupon Email Settings > Spent Threshold.
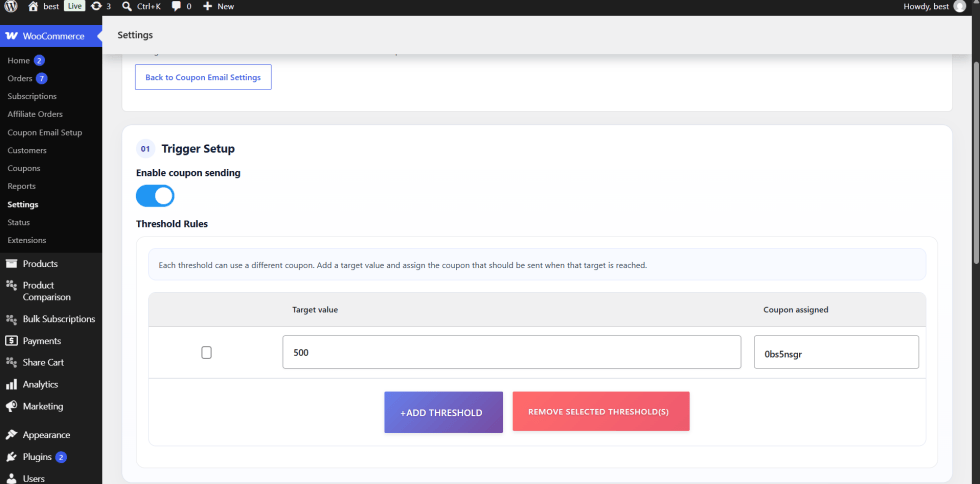
This trigger will send a coupon when the order hits a certain amount. You can add multiple rules and assign different coupons.
Setup
- Enable coupon sending: Enable/disable trigger.
- Target Amount: Set the amount the customer needs to spend to receive a coupon.
- Assigned Coupon: Choose which coupon to give out.
- +ADD THRESHOLD: Add new rule.
- REMOVE SELECTED THRESHOLD(S): Remove any rules selected by using the checkboxes.
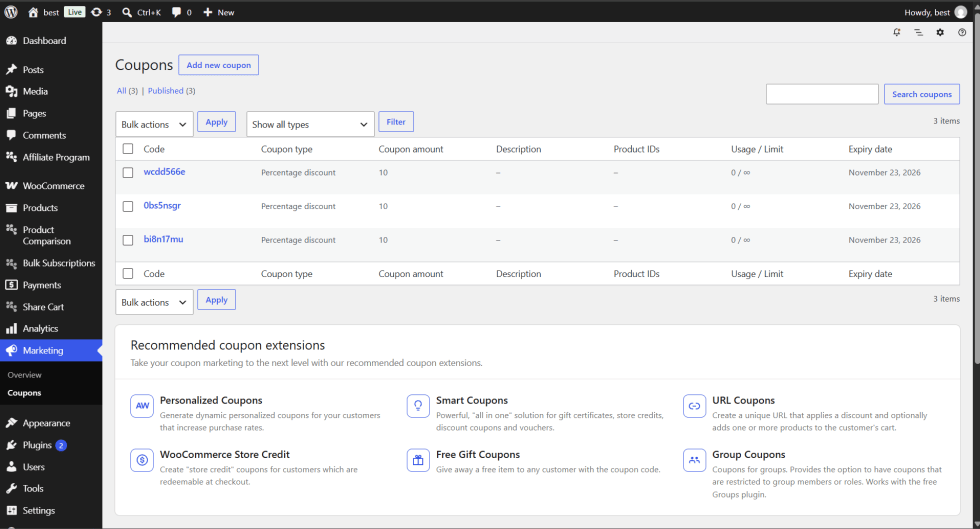
The coupons used in this section are existing coupons which can be created and viewed under WooCommerce > Coupons.
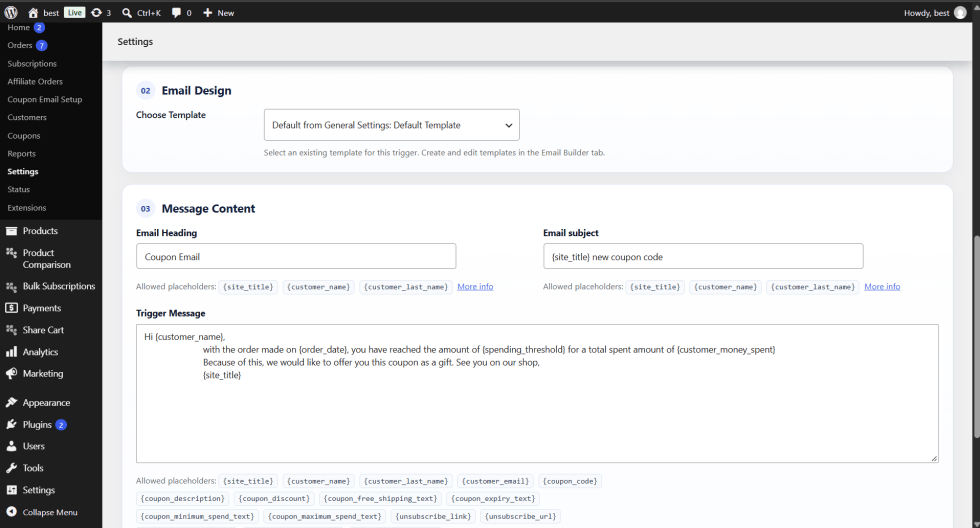
The email can be designed and message can be written as in the First Purchase section. The placeholders {customer_money_spent}, {customer_total_spent} and {spending_threshold} will be added.
Customer Process
- Go to Spent Threshold.
- Enable a coupon to be sent.
- Enter your target amount e.g. 500.
- Choose your coupon.
- Enter your email heading, subject and trigger message.
- Send a test email and click save changes.
- Place a test order and update the order status to either Processing or Completed. This should be over/ equal to the target amount.
- Check that the customer has received the correct assigned coupon.
Note: Any rules without a target amount or assigned coupon will be ignored.
Order Threshold
↑ Back to topNavigate to WooCommerce > Settings > Coupon Email Settings > Order Threshold:
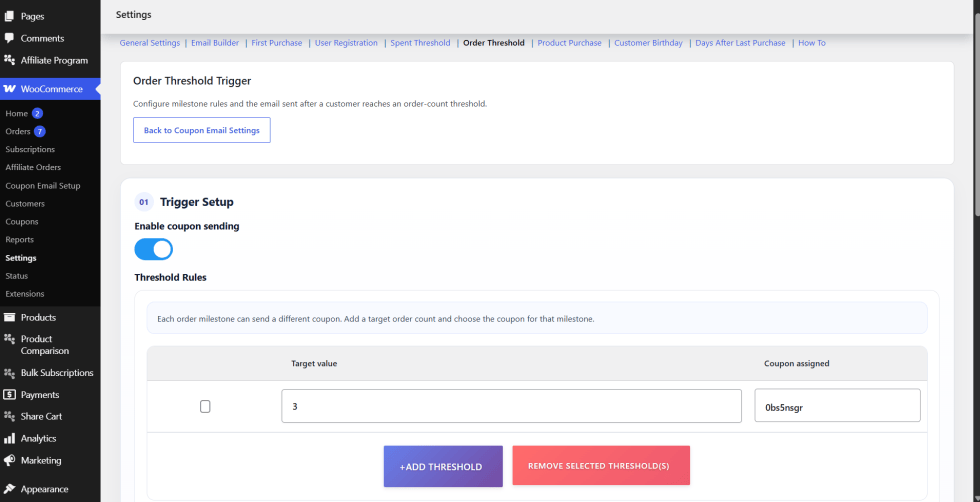
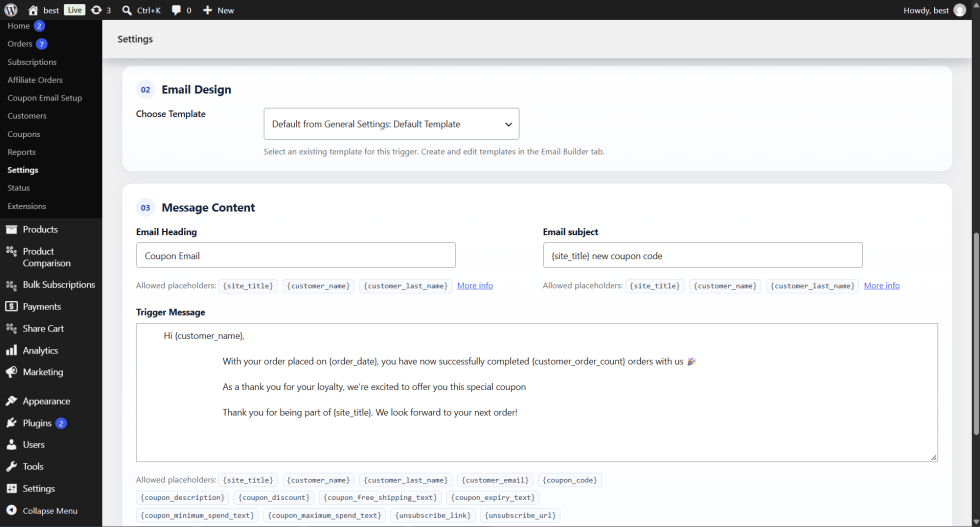
This trigger will give your customers a coupon based on how many orders they have made. It functions in the same way as the Spent Threshold trigger but the Target needs to be set to the number of orders. For example 3.
Setting Description
- Enable: Toggle to enable/disable the sending of coupons
- Target: Set how many orders need to be made to send a coupon
- Coupon to Assign: Select which coupon is given.
This trigger will include the following placeholders: {customer_order_count}, {order_threshold} and {customer_money_order}. The {customer_money_order} placeholder has been included for backwards compatibility.
Customer Process
Navigate to Order Threshold
- Toggle Enable
- Set the Target (e.g. 3)
- Select the desired Coupon to Assign
- Complete the Email Heading, Email Subject and Trigger Message
- Send a Test Email and Save Changes
- Make an order which will reach the Target amount of orders and change the status to Processing/Completed
- Make sure the customer gets the coupon.
Product Purchase
↑ Back to topNavigate to WooCommerce > Settings > Coupon Email Settings > Product Purchase
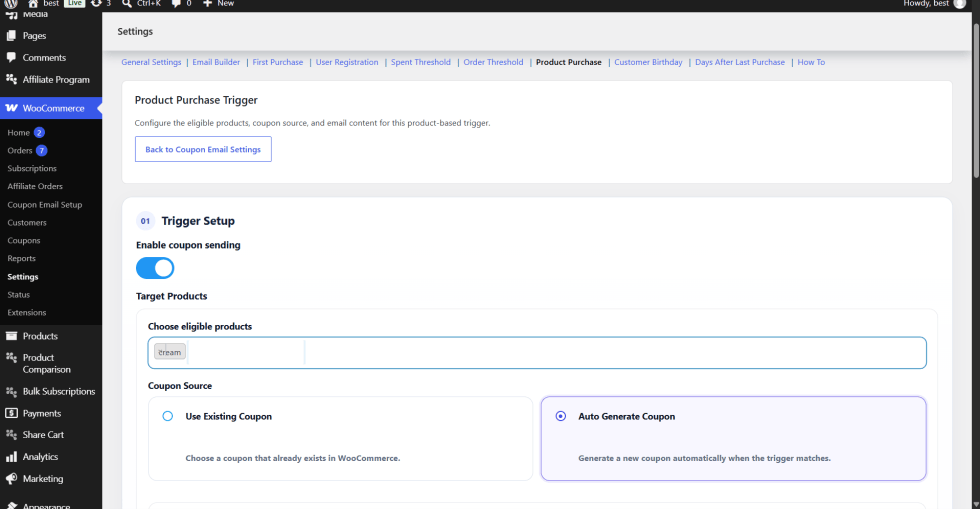
This trigger will give your customers a coupon if they purchase any of the products you select.
Setting Description
- Enable: Toggle to enable/disable the sending of coupons
- products to qualify: Search and select products to give a coupon.
- Coupon Source: Select between Use Existing Coupon or Auto Generate Coupon. See First Purchase.
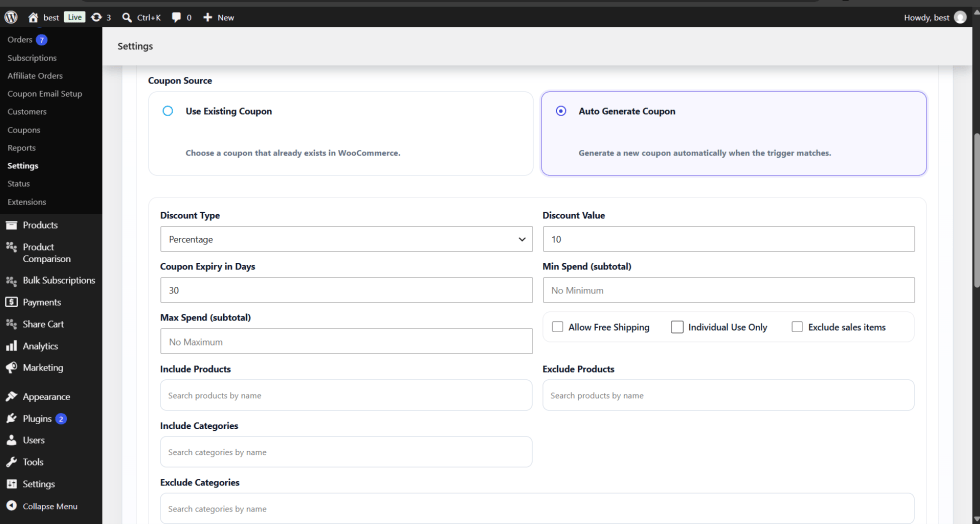
Auto Generate Coupon will have the same settings as First Purchase. These are: Coupon Expiry (Days), Min Spend (Sub-total), Max Spend (Sub-total) and Usage Limit (Per Coupon). However, Individual Use Only will not be selected by default.
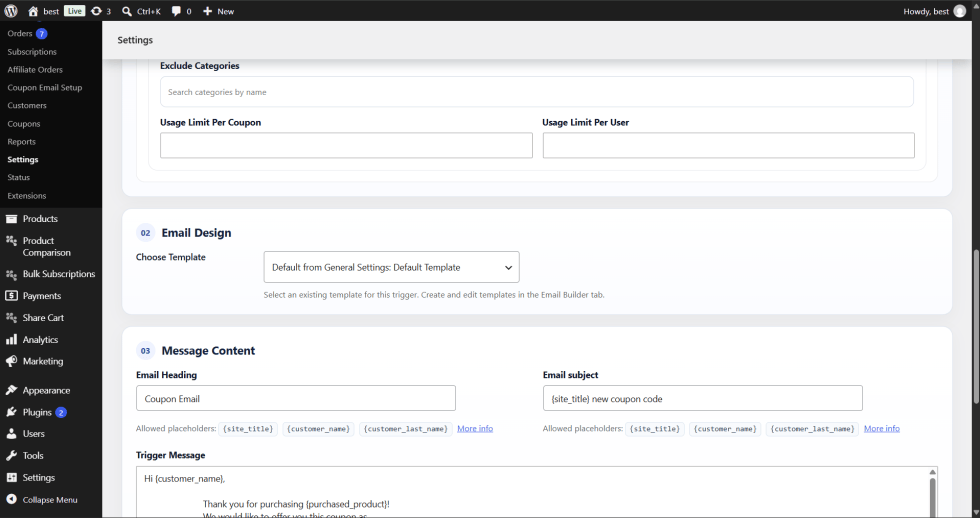
The default message will thank your customer for purchasing the product. This trigger includes the placeholders {purchased_product} and {purchases_threshold}.
Customer Process
Navigate to Product Purchase
- Toggle Enable
- Select products to qualify
- Select the Coupon Source and complete the coupon options.
- Complete the Email Heading, Email Subject and Trigger Message
- Send a Test Email and Save Changes
- Make a test order containing one of the qualifying products and change the status to Processing/Completed.
- Make sure the customer gets the coupon email.
Customer Birthday
↑ Back to topGo to WooCommerce > Settings > Coupon Email Settings > Customer Birthday
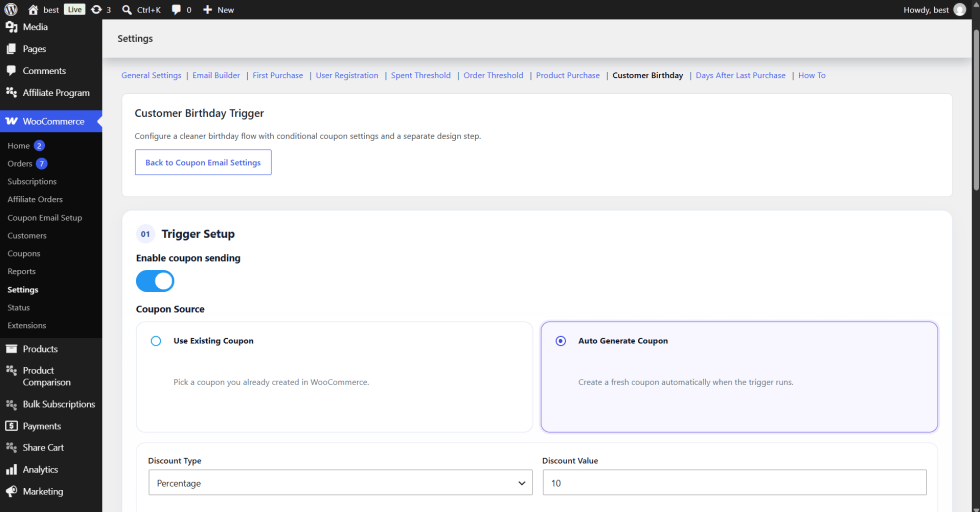
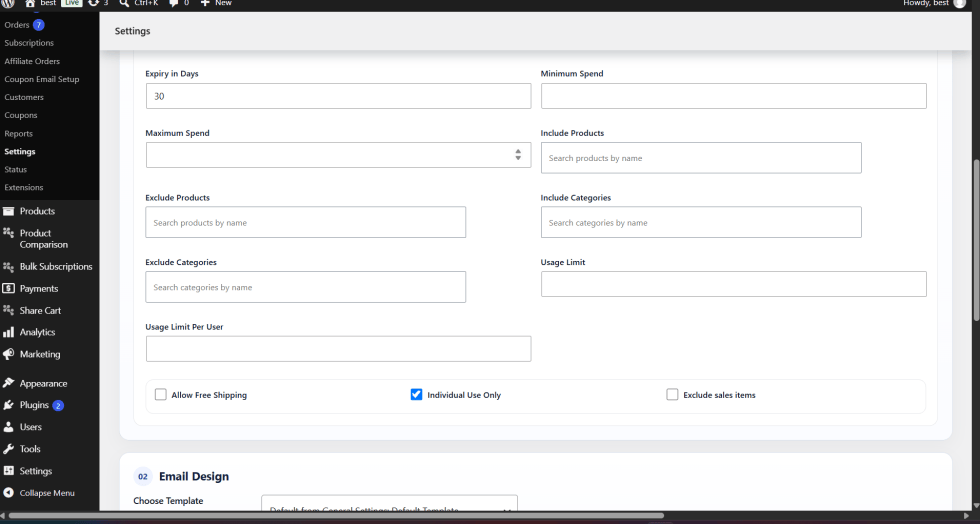
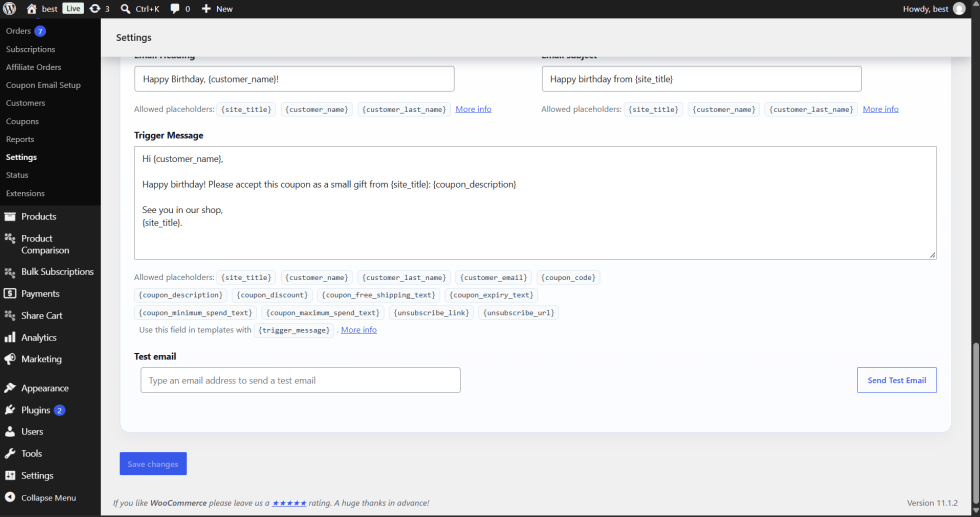
This will send out the birthday coupon to the customer automatically on their birthday. The settings are similar to the First Purchase trigger so just select the Coupon Source and coupon options below:
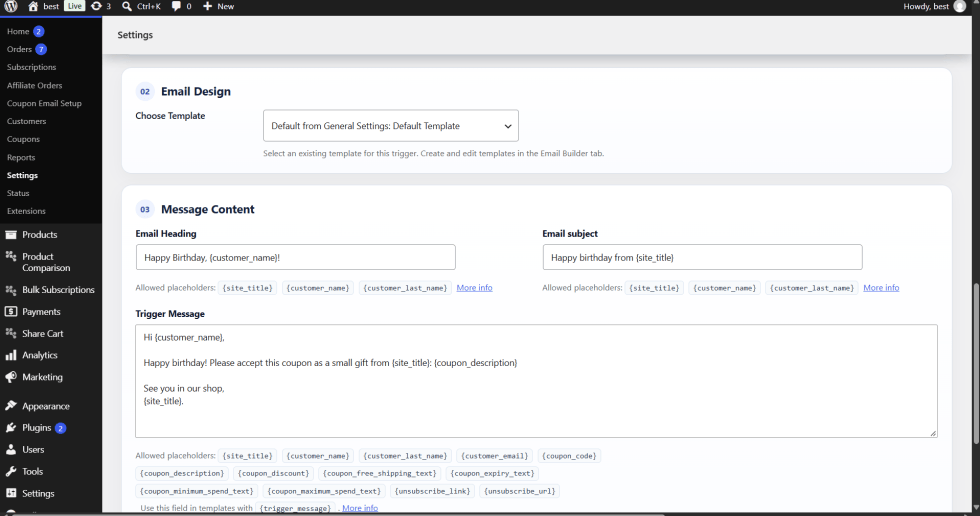
The email will automatically have a heading of “Happy Birthday, {customer_name}!” and the subject line will be “Happy birthday from {site_title}”.
Customer Flow
- Go to Customer Birthday
- Turn on sending coupons.
- Choose the Coupon Source and select your coupon options.
- Fill in your email heading, subject line and trigger message.
- Test and save.
- Login as a customer and go into My Account > Account details. Enter their birthday into the Birthday field (in the format MM-DD such as 08-15) under Additional Profile Details.
- Click Save Changes. The customer will receive the birthday coupon on the date they have saved.
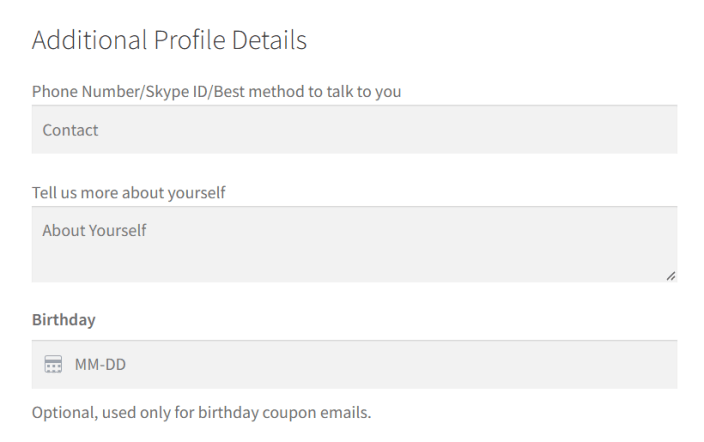
Please note this field is optional and the description states it is only used for birthday coupons. Customers can also enter their birthday in at checkout. The plugin will check for birthdays once per day and any customers that have not saved their birthday will be ignored.
Days After Last Purchase
↑ Back to topGo to WooCommerce > Settings > Coupon Email Settings > Days After Last Purchase
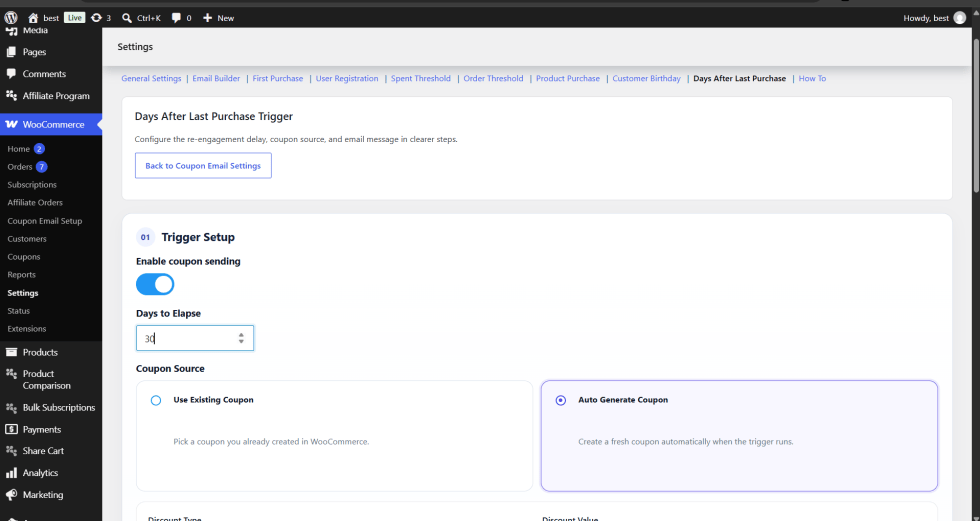
This trigger will send out a win-back coupon to customers who haven’t placed an order for X number of days.
Setting Description
- Enable Coupon Sending – Enable/disable this trigger
- Days to elapse – The number of days since their last order you want to send the email (e.g. 30)
- Coupon Source – Choose between using an existing coupon or auto generating one. (Similar to First Purchase)
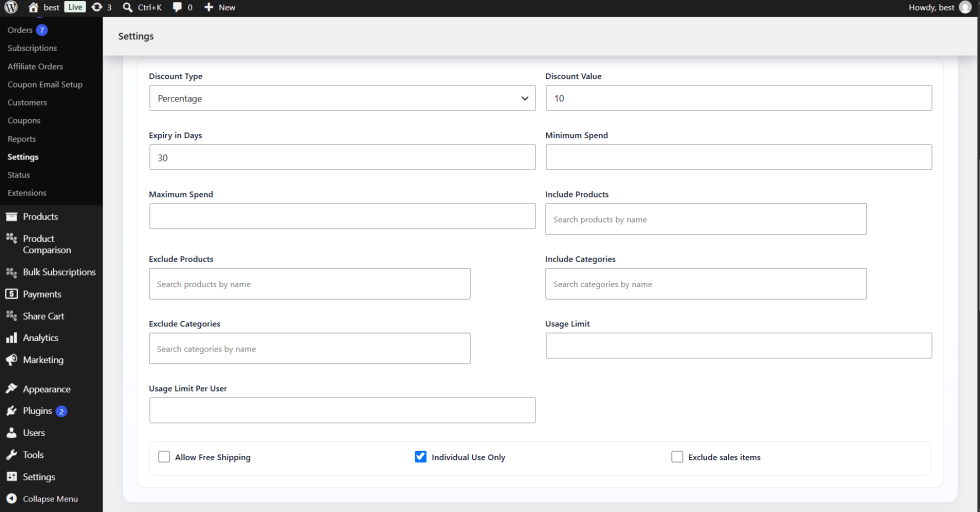
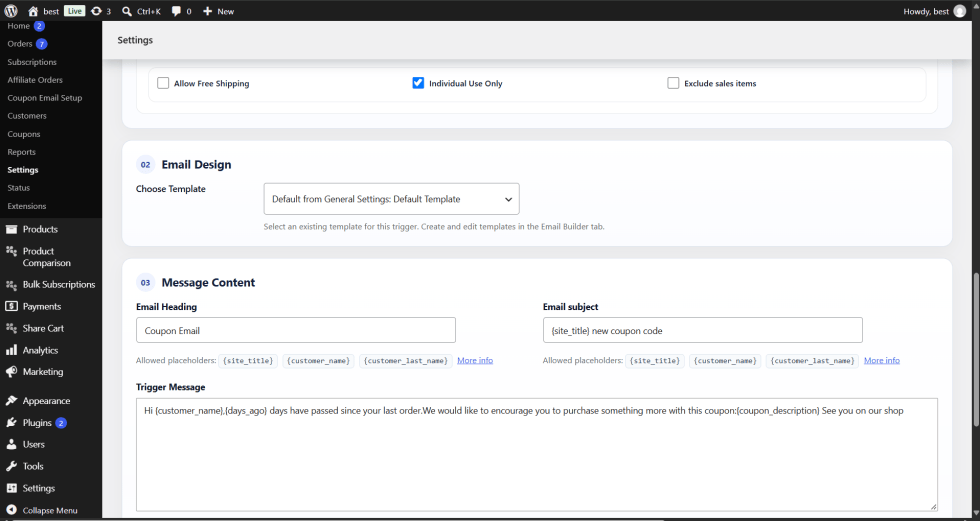
This trigger adds new variables: {days_ago}, {days_ago_text}, {last_order_date}, {last_order_total}, {last_order_products}
Customer Flow
- Go to Days After Last Purchase
- Enable coupons.
- Enter in the number of days to elapse (e.g. 30).
- Select coupon source and choose your coupon options.
- Create your email heading, subject and trigger message.
- Test and save.
- Wait until the number of days since the customers last Processing/Completed order equals the number you have entered in days to elapse. The plugin will check once per day.
- Ensure the customer receives the coupon.
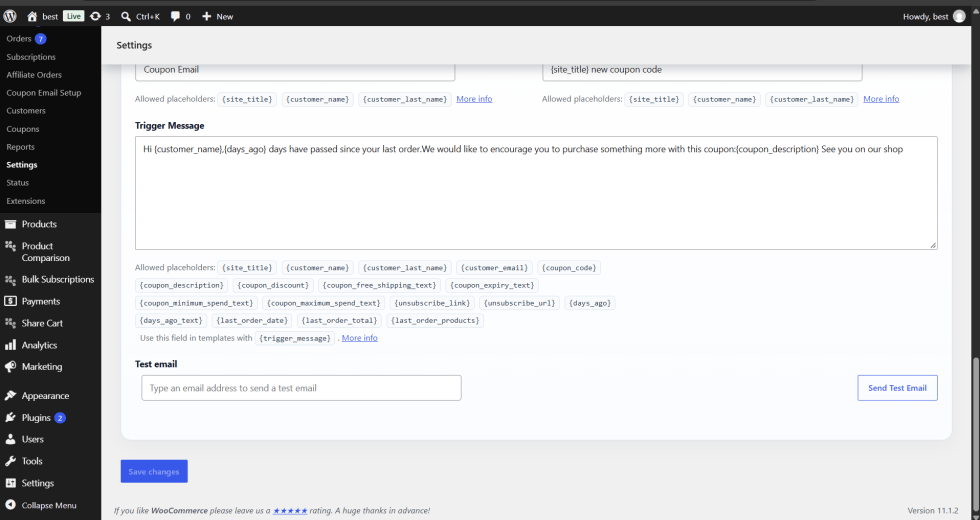
Please note this will only fire once per period of inactivity. If the customer makes an order then they will become eligible again.
How To
↑ Back to topNavigate to WooCommerce > Settings > Coupon Email Settings > How To.
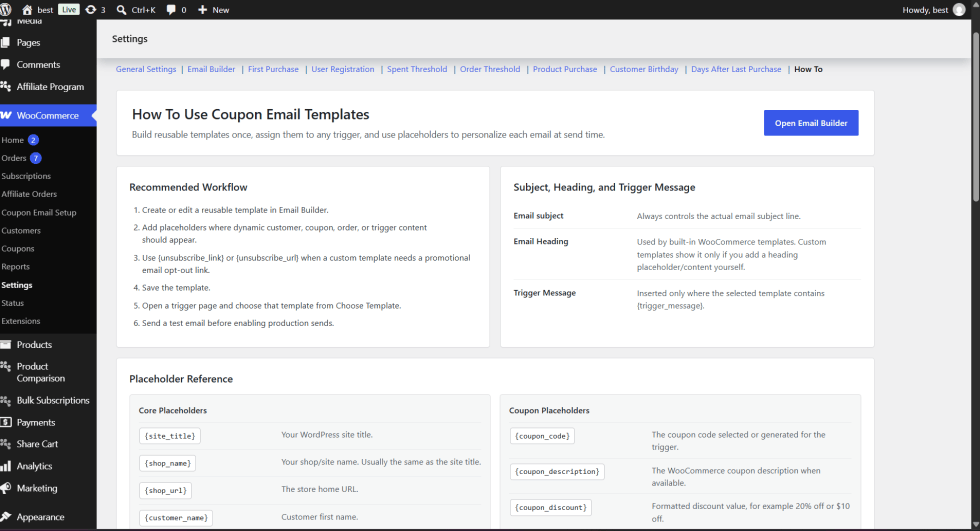
The How To page provides a quick how to guide. Simply click on Open Email Builder.
| Setting | Description |
|---|---|
| Recommended workflow | Create / edit your template, include the placeholders, save your template, select your template and send a test email. Then activate the email to be sent in production. |
| Subject | This will always display as the subject of the email. |
| Heading | This is used within the default WooCommerce templates. It will only display in your custom templates if you include a heading placeholder or content. |
| Message | This will only display if your template includes {trigger_message}. |
| Placeholders & Notes | See the screenshots below. |
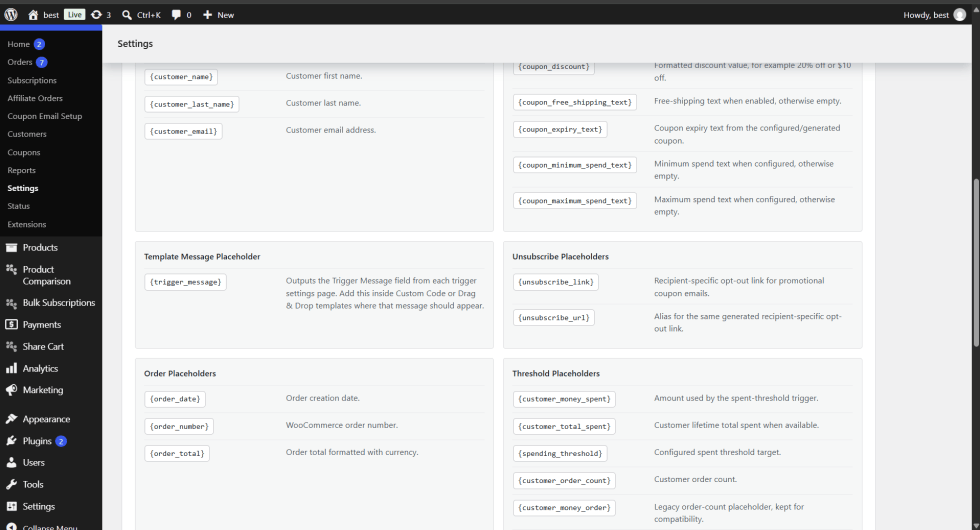
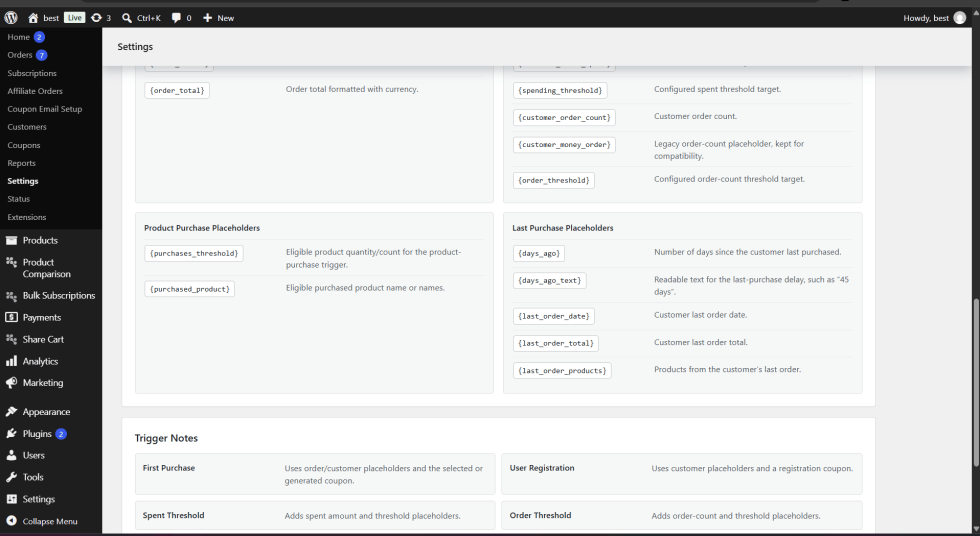
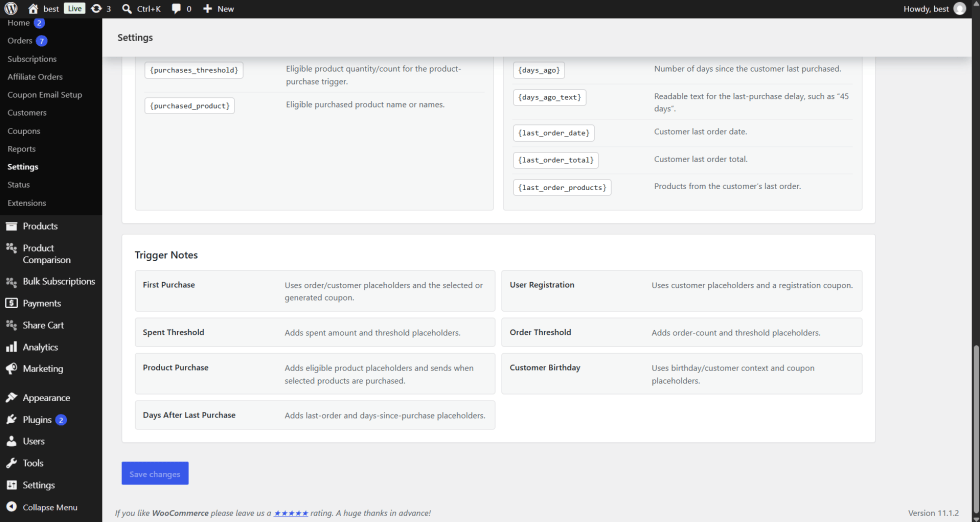
Placeholders
↑ Back to topPlaceholders will be replaced with real data when the email is sent. They can be used in the Heading, Subject, Message and templates.
| Type | Placeholder | Description |
|---|---|---|
| Core | {site_title} | Your WordPress Site Title |
| Core | {shop_name} | Your shop/site name (Typically will be the same as your site title) |
| Core | {shop_url} | Store Homepage URL |
| Core | {customer_name} | Customer First Name |
| Core | {customer_last_name} | Customer Surname |
| Core | {customer_email} | Customer Email |
| Coupon | {coupon_code} | The coupon code selected/generated |
| Coupon | {coupon_description} | The description of the coupon in WooCommerce (if applicable) |
| Coupon | {coupon_discount} | The discount amount (e.g 20% off or $10 off) |
| Coupon | {coupon_free_shipping_text} | Free shipping text (Will be blank if not enabled) |
| Coupon | {coupon_expiry_text} | Expiry Text |
| Coupon | {coupon_minimum_spend_text} | Minimum Spend Text (Will be blank if not set) |
| Coupon | {coupon_maximum_spend_text} | Maximum Spend Text (Will be blank if not set) |
| Template | {trigger_message} | Will insert the Trigger Message from your trigger. Include in templates where required. |
| Unsubscribe | {unsubscribe_link} | A personalised unsubscribe link for promotional coupons. |
| Unsubscribe | {unsubscribe_url} | Same as above but as a URL. |
| Order | {order_date} | Date order was created. |
| Order | {order_number} | Order number from WooCommerce |
| Order | {order_total} | Total order amount including currency. |
| Threshold | {customer_money_spent} | The money spent by the customer used by the Spent Threshold trigger. |
| Threshold | {customer_total_spent} | Total amount spent by customer (If available) |
| Threshold | {spending_threshold} | The goal set for the spending threshold. |
| Threshold | {customer_order_count} | Number of orders made by the customer. |
| Threshold | {customer_money_order} | Legacy placeholder for order count. (For backwards compatibility) |
| Threshold | {order_threshold} | The goal set for the order count. |
| Product Purchase | {purchases_threshold} | Number of qualifying products. |
| Product Purchase | {purchased_product} | Name(s) of qualifying product(s). |
| Last Purchase | {days_ago} | Number of days since last purchase. |
| Last Purchase | {days_ago_text} | Readable version of delay (e.g 45 days). |
| Last Purchase | {last_order_date} | Date of last order. |
| Last Purchase | {last_order_total} | Total of last order. |
| Last Purchase | {last_order_products} | Products from last order. |
Please note you can only use {site_title}, {customer_name} and {customer_last_name} within the Heading & Subject fields. All other placeholders can be used within the Message & templates. Placeholders available will be shown under each trigger.
Front End Workflow
↑ Back to topAdd Birthday
↑ Back to topRequirements: Customer Birthday trigger must be enabled. Customer is logged into their account.
- Login to your My Account page.
- Go to Account details.
- Scroll down to Additional Profile Details.
- Add the customers birthday into the Birthday field. E.g 08-15.
- Click Save changes.
Birthday field is optional. Customers can add their birthday at checkout if they haven’t added one.
Receive Coupon Email
↑ Back to top- Customer performs the action set within the trigger. E.g. First Order, Register or Purchase a specific product.
- Once the order status has been updated to Processing/Completed the email will be sent out. Customer Birthday & Days After Last Purchase emails are sent out using a daily check. The customer will open the email and apply the coupon code at checkout.
Unsubscribe from coupons.
↑ Back to top- Open the coupon email with the unsubscribe link (either {unsubscribe_link}, {unsubscribe_url} or in the footer of a Drag & Drop template).
- Click the unsubscribe link.
- Customer will no longer receive promotional coupons.
Troubleshooting
↑ Back to top| Problem | Solution |
|---|---|
| No emails being sent | Ensure Enable coupon email system settings is enabled in General Settings. Ensure Enable coupon sending is enabled for your trigger. Ensure the order has been set to Processing/Completed and that the customer hasn’t unsubscribed. Try sending a test email to ensure your site can send mail. |
| Settings not saving | Ensure you click Save changes on the Coupon Email Settings tab. |
| Existing coupons not showing | Only published coupons within WooCommerce will show. Create/Publish your coupon from WooCommerce > Coupons. |
| Auto-generated coupons not being created | Ensure Discount Type is selected and Discount Value is higher than 0. |
| Birthday field not showing | The field will only show if Customer Birthday trigger is enabled. The field will not show at checkout for logged in customers who have saved their birthday. |
| Birthday / Last Purchase emails not being sent | Emails rely on daily scheduled checks. Ensure your WordPress Cron or Server Cron is running. |
| Local store not sending emails | Local addresses (e.g .local) typically won’t send emails. Try using the extension on a live/staging site. Or install an SMTP plugin. |

