Crowdfunding Pro for WooCommerce helps you to easily create and run crowdfunding campaigns in your WooCommerce shop.
Installation
↑ Back to topDownload the crowdfunding-pro-for-woocommerce.zip file from your WooCommerce account.
- Go to: WordPress Admin > Plugins > Add New and Upload Plugin. Choose File for the file you downloaded.
- Install Now and Activate Plugin.
More information at: Install and Activate Plugins/Extensions.
Setup and Configuration
↑ Back to topCrowdfunding Pro settings can be found in WooCommerce > Settings > Crowdfunding Pro.
General
↑ Back to top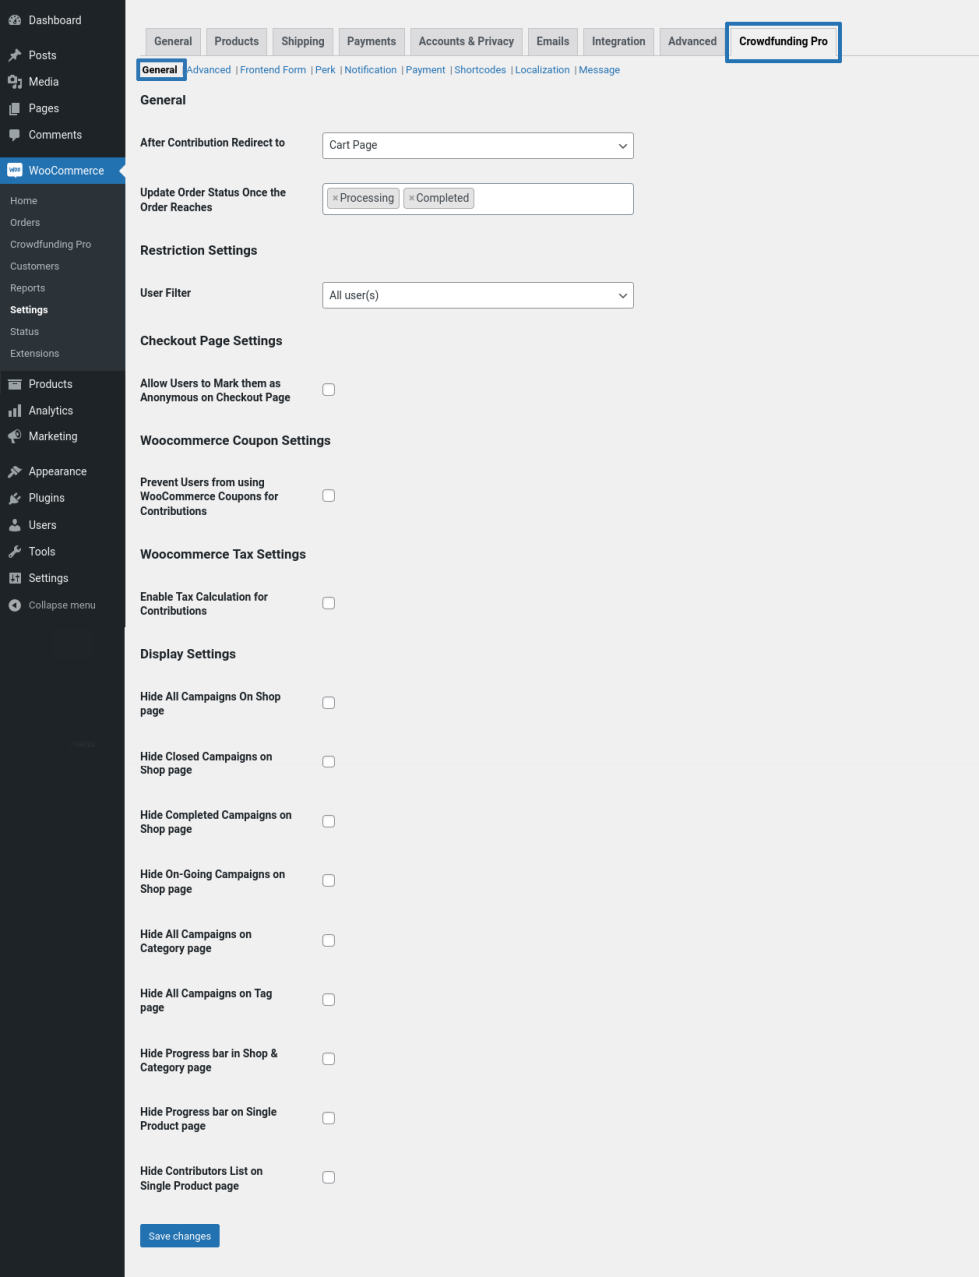
Within the General tab, you can customize the following plugin options:
General Settings
- After users add a campaign product to their cart, by default, they will be redirected to the cart page. If you want the user to instead be redirected to the checkout page, select Checkout Page in the After Contribution Redirect field. Note: crowdfunding products cannot be combined with regular products in the cart.
- By default, a campaign contribution automatically reflects on the product page once the contribution order reaches a status of Processing/Completed. You can adjust this option in the Update Order Status Once the Order Reaches field.
Restriction Settings
- All users can contribute to campaigns in the shop by default. If you want to restrict campaign contribution to specific users/user roles, select the applicable user / user roles from the dropdown under User Filter.
Checkout Page Settings
- Once a contribution is made, by default, the contributor name will be visible in a table on the product page. If you want to provide users the option of remaining anonymous, enable the Allow Users to Mark them as Anonymous on Checkout Page option.
WooCommerce Coupon Settings
- By default, users will be allowed to use WooCommerce Coupons for contribution orders. If you want to prevent users from using coupons, enable the Prevent Users from using WooCommerce Coupons for Contributions checkbox.
Display Settings
By default, tax will be charged for Crowdfunding products. You can customize the Tax for Crowdfunding Products by disabling the Enable Tax Calculation for Contributions option.
WooCommerce Tax Settings
By default, tax will be charged for Crowdfunding products. You can customize the Tax for Crowdfunding Products by disabling the Enable Tax Calculation for Contributions option.
Display Settings
- By default, Crowdfunding products will be visible on the shop page. If you want to hide the Crowdfunding Products on the shop page, you can do so by enabling “Hide All Campaigns On Shop page” option.
- By default, Crowdfunding products will be visible on the category page. If you want to hide the Crowdfunding products on the category page, you can do so by enabling “Hide Closed Campaigns on Shop page” option.
- By default, Completed Crowdfunding products will be visible on the shop page. If you want to hide the Completed Crowdfunding products from the shop and category pages, you can do so by enabling “Hide Completed Campaigns on Shop page” option.
- By default, ongoing crowdfunding products will be visible on the shop page. If you want to hide the ongoing crowdfunding products from the shop and category pages, you can do so by enabling “Hide On-Going Campaigns on the Shop page” option.
- By default, All Crowdfunding products will be visible on category pages. If you want to hide the All Crowdfunding products from the shop and category pages, you can do so by enabling “Hide All Campaigns on Category page” option.
- By default, Crowdfunding products will be visible on the Tag page. If you want to hide the crowdfunding products from the tag page, you can do so by enabling “Hide All Campaigns on the Tag page” option.
- By default, a progress bar will be displayed for crowdfunding products on the shop and category pages. If you want to hide progress bar for crowdfunding products on shop & category pages, you can do so by enabling “Hide Progress bar in Shop & Category page” option.
- By default, the progress bar will be displayed on the crowdfunding product page. If you want to hide the progress bar on the crowdfunding product page, you can do so by enabling “Hide Progress bar on Single Product page” option.
- By default, the contributor’s list will be displayed on the crowdfunding product page. If you want to hide the contributor’s list on the crowdfunding product page, you can do so by enabling “Hide Contributors List on Single Product page” option.
Advanced
↑ Back to top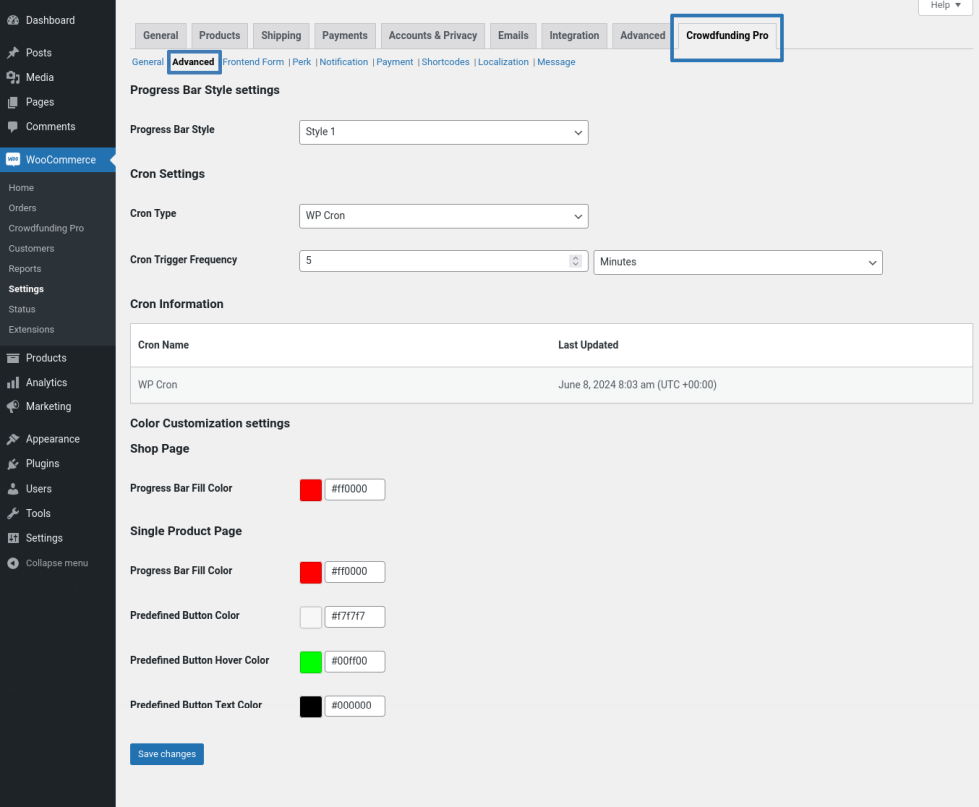
Progress Bar Style Settings
You can customize the look and feel of the campaign progress bar within the Progress Bar Style option.
Cron Settings
There are 2 types of Crons,
- WP Cron
WP Cron is supported in all WordPress sites by default(Unless turned off manually in the wp-config file). The main disadvantage of WP Cron is that it will trigger only when someone visits the site. For example, If there is no site activity for some time say 10 days, the cron will not be triggered on those 10 days.
2. Server Cron
Server Cron is an alternate to WP Cron. The main advantage of Server Cron is that it is not dependent on site activity. But, Server Cron requires a separate configuration. As far as we know, it cannot be configured using a Plugin within the site. It can only be configured from the site’s C-Panel or control panel.
If you want to use WP Cron, then in “Select Cron Type” select “WP Cron”. If you want to run Server Cron, select “Server Cron”. Please follow the steps mentioned in the “Server Cron Configuration” section.
Cron Configuration
Here, you can see the cron last updated details with time & date.
Color Customization Settings
In this section, you can customize the color of the progress bar and buttons.
Frontend Form
↑ Back to top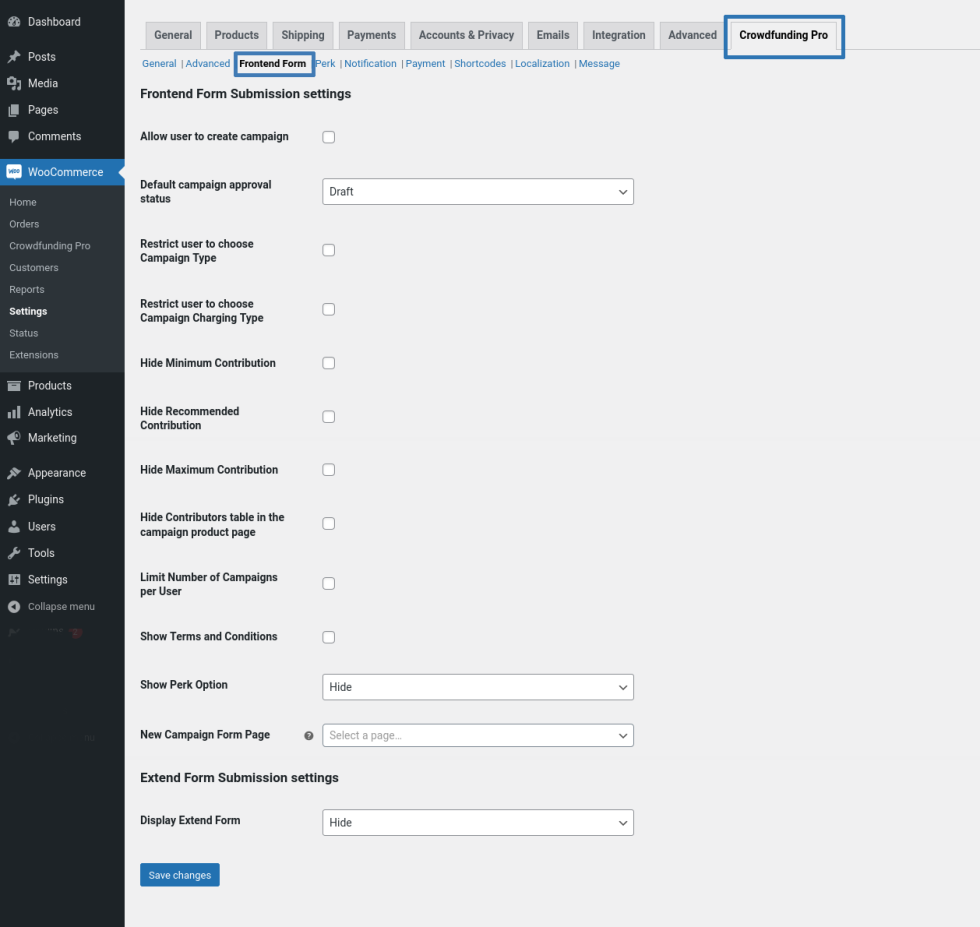
Frontend From Submission From
- By default, users will not be allowed to create a campaign. If you want to allow users to create the campaign, you can do so by enabling Allow user to create campaign option.
- By default, user created campaign will be sent to draft, the admin can review and publish the campaign manually. If you want user created campaign will be sent to live, select an Approved option in the Default campaign approval status.
- By default, users can create both types of campaigns(Fundraising & Product Purchase). If you want to restrict the user to choose the campaign types, enable Restrict user to choose Campaign Type and select the campaign type which you want your users to create a campaign.
- By default, users can create campaigns using both Charging Types(Change Contribution immediately & Charge contribution on Campaign Completion). If you want to restrict the user to choose the Charging Types, enable Restrict user to choose Campaign Charging Type and select the Charging Type which you want users to create a campaign.
- By default, Minimum, Recommended and Maximum contribution fields are displayed in frontend form. If you want to hide, enable the hide options for Minimum, Recommended and Maximum.
- Option to hide contributors table on the campaign product page using Hide Contributors table in the campaign product page option.
- Option to set a limit for the user to create the number of campaigns using Limit Number of Campaigns per User option.
- You can display the terms and conditions to the users for creating the campaigns, using Show Terms and Conditions option.
Extend From Submission Settings
Allow user to extend their created ongoing campaign form using the Display Extend Form option.
Perk Settings

- By default, the perk option will be Show(enabled) on globally level settings using the Perk Option Show/Hide option. If you want to enable perk for the campaign product, you can configure Perk for Campaign settings in campaign product settings(Edit product page).
- By default, the user can update the quantity of the perk product. If you want to restrict the user from updating the quantity, select Disable on Allow User to select Perk Quantity option.
Notifications
↑ Back to top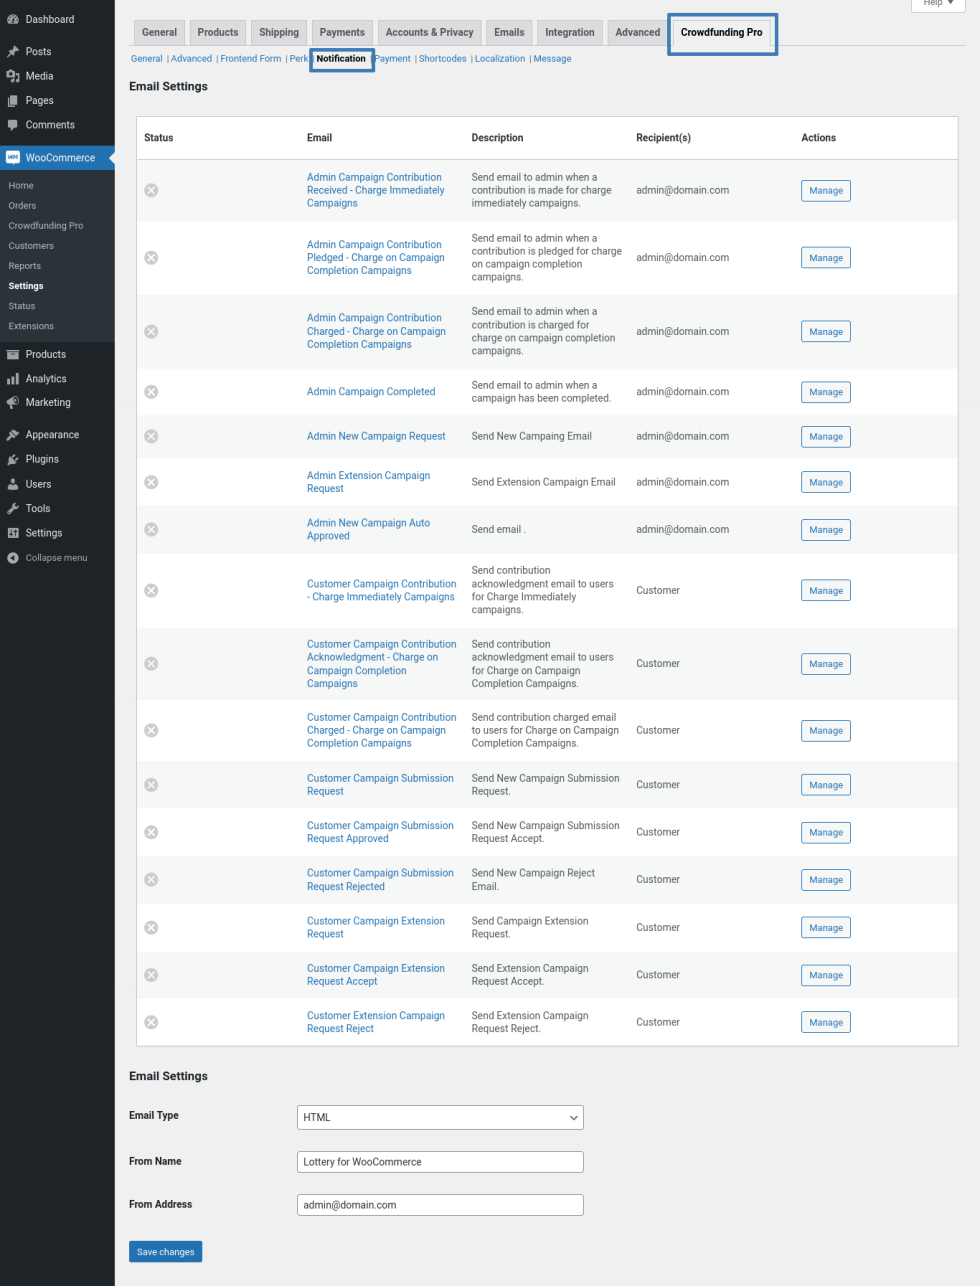
Manage and customize the following email notifications:
- Customer Campaign Contribution – Charge Immediately Campaigns
- Customer Campaign Contribution Acknowledgment – Charge on Campaign Completion Campaigns
- Customer Campaign Contribution Charged – Charge on Campaign Completion Campaigns
- Admin Campaign Contribution Received – Charge Immediately Campaigns
- Admin Campaign Contribution Pledged – Charge on Campaign Completion Campaigns
- Admin Campaign Contribution Charged – Charge on Campaign Completion Campaigns
- Admin Campaign Completed
PayPal Payouts
↑ Back to top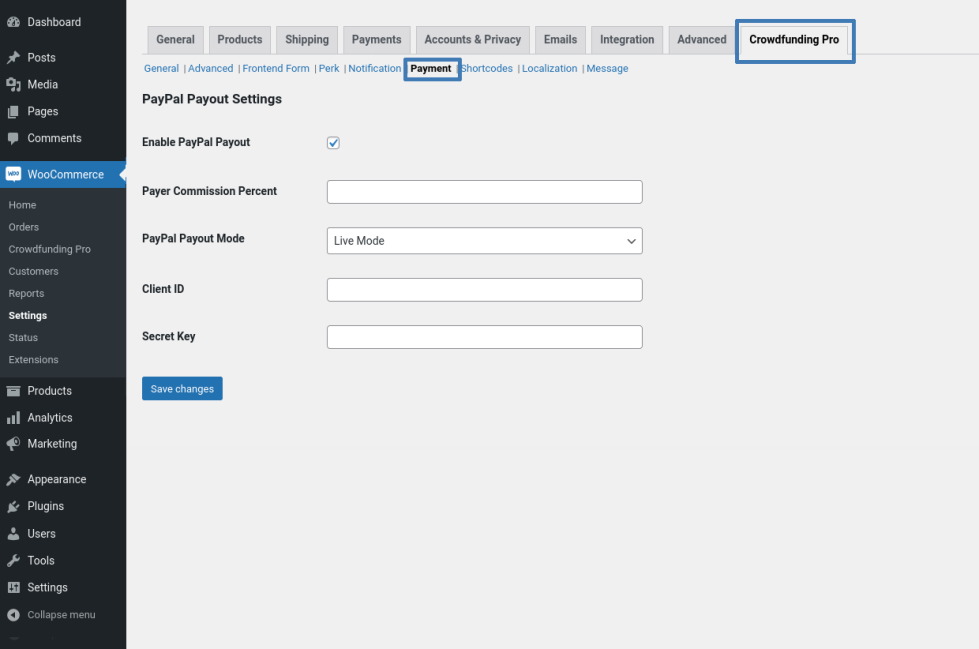
You can send the raised contribution amount to the campaign creators directly from your site to their PayPal account. To send the contribution amount:
- Navigate to the Payments tab (WooCommerce > Settings > Crowdfunding Pro > Payments).
- Enable PayPal Payouts checkbox.
- In the Payer Commission Percentage field, set the commission percentage which the campaign creator should be receiving.
Shortcodes
↑ Back to top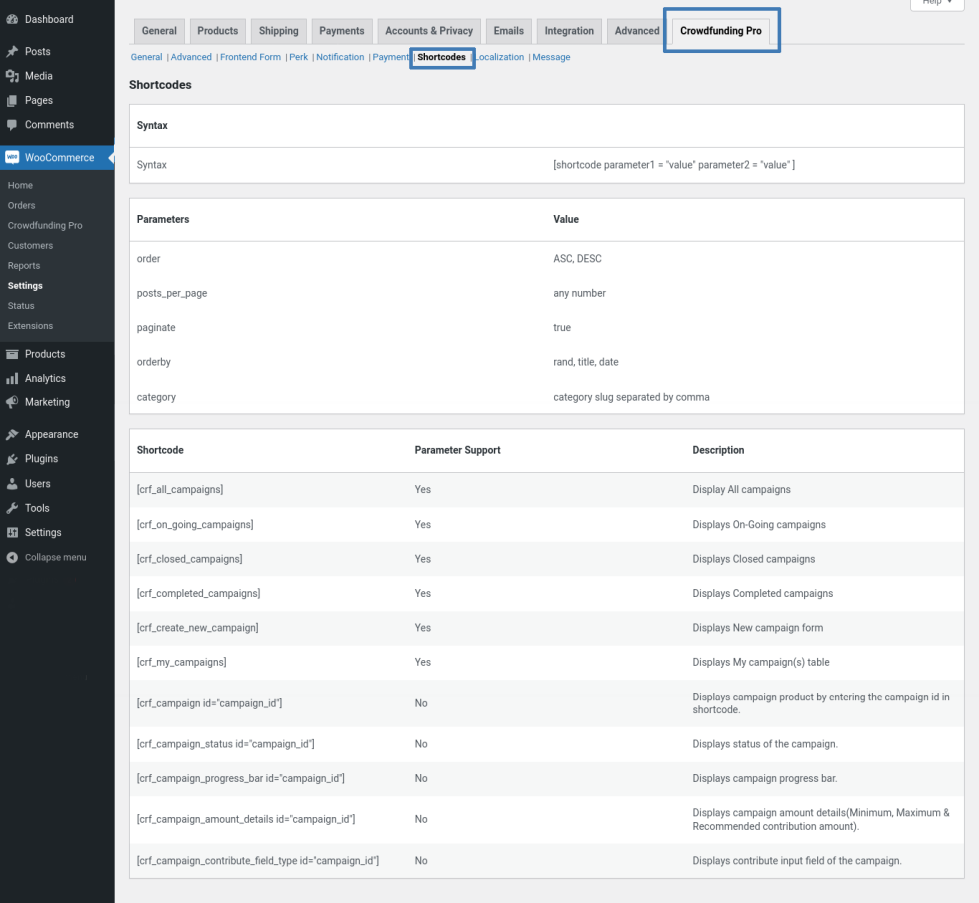
Shortcodes are available for use in order to display the following:
- All Campaigns
- On-Going Campaigns
- Closed Campaigns
- Completed Campaigns
Localization
↑ Back to top
In this section, you can customize the campaign detail labels displayed to the user on the product page.
Messages
↑ Back to top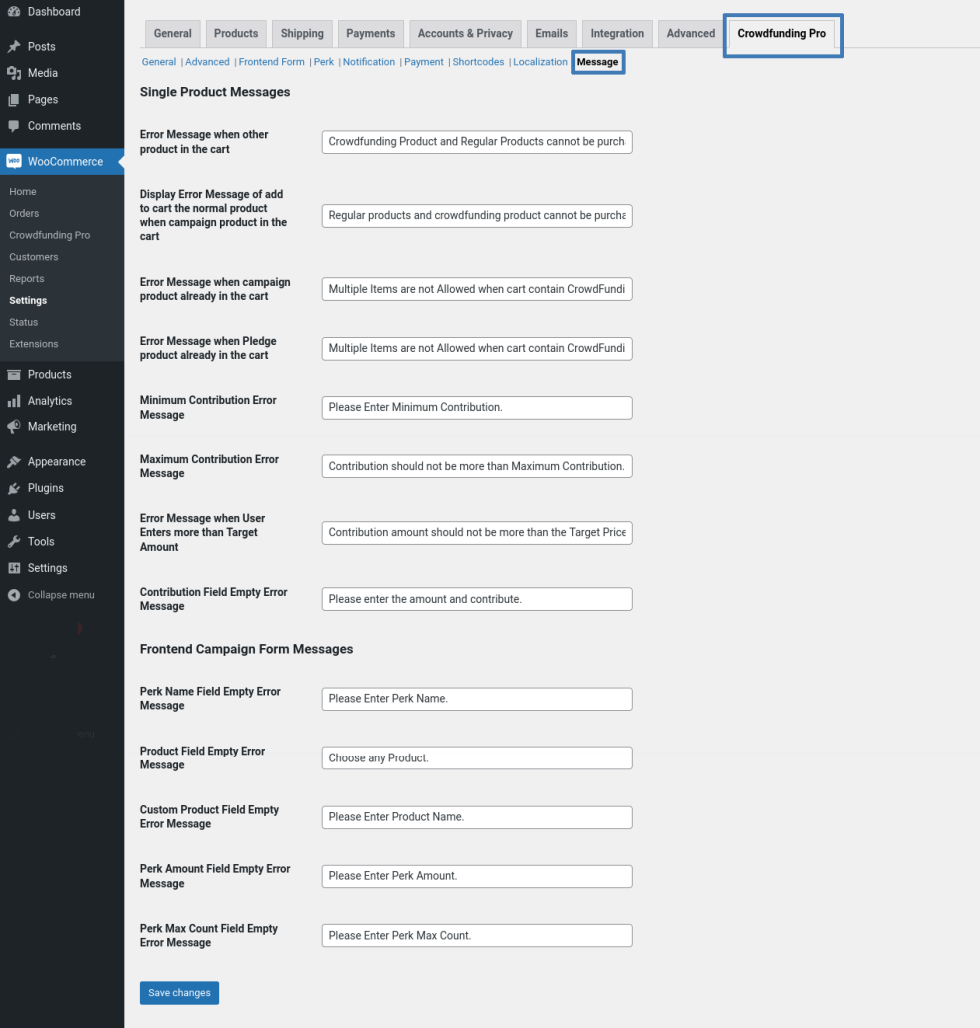
This section allows you to customize the notifications displayed to the user related to crowdfunding products/campaigns.
Usage
↑ Back to topCampaign Configuration
↑ Back to topCampaign Charging Type
When creating a crowdfunding campaign, choose from two campaign charging types:
Charge Immediately Campaigns
By enabling this method, the campaign contribution will be charged immediately once the user makes the contribution.
Charge on Campaign Completion Campaigns
For this method, users will not be charged at the time of contribution. Instead, they will be charged only when the campaign goal is successfully met.
Campaign Types
There are two types of crowdfunding campaigns that you can create:
- Fundraising Campaigns: campaigns raising funds for a cause.
- Product Purchase Campaigns: campaign funds are raised by customers purchasing a specific product sold in your shop.
Creating a campaign
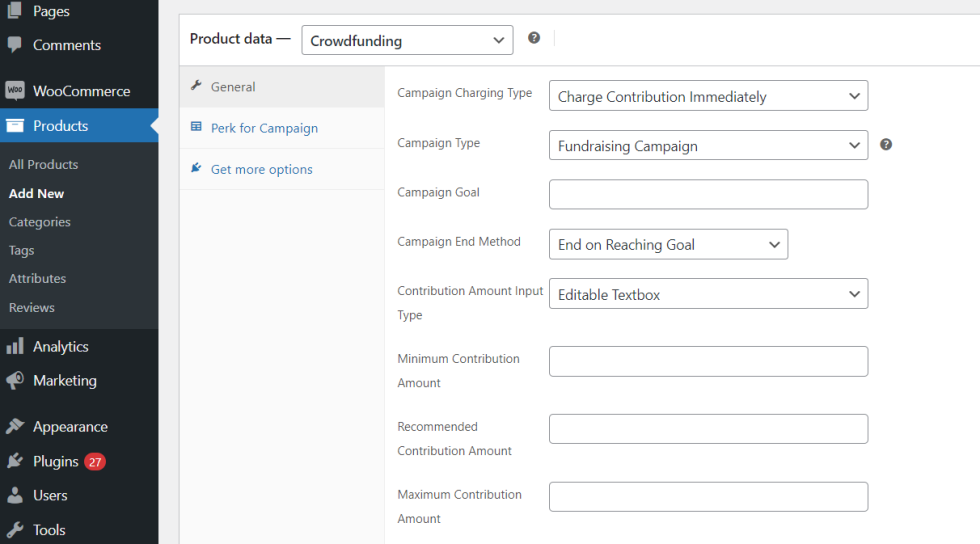
- Navigate to WooCommerce > Crowdfunding Pro > Create New Fund Campaign. Fill in the title and description.
- The “Product Type” will default to “Crowdfunding”.
- Select the Campaign Charging Type and Campaign Type option.
- If the Campaign Type is set as Product Purchase Campaign, a product will have to be selected in the Select a Product field.
- Set Campaign Goal. If the Campaign Type is set as Product Purchase Campaign, the campaign goal will automatically populate based on the product price.
- Select a Campaign End Method, the following options are available:
- End on Reaching Goal: The campaign will be closed once the set target is met.
- End on Reaching Date: The campaign will be closed once the end date is reached.
- End on Reaching Goal/Date: The campaign will be closed on reaching Goal/Date.
- End on Reaching Quantity: The campaign will be closed on reaching the specified quantity.
- Campaign Never Ends: The campaign has no end date.
- By default, your users will be able to enter their contribution amount in a textbox. You can change the input type by selecting from the following options:
- Editable Textbox
- Non-Editable Textbox
- Predefined Buttons
- Predefined List Box
- You can optionally set the Minimum Contribution Amount, Maximum Contribution Amount and Recommended Contribution Amount.
- If you want to send the contribution amount to a different campaign creator, enter the PayPal email id of the user for which the contribution is to be sent.
Once a Fundraising Campaign or Product Purchase Campaign is configured and published, customers will be able to make contributions. On the campaign landing page, the user can view the following details:
- Purpose of the Campaign
- Campaign Goal
- Min/Max/Recommended contribution
- Campaign End Date(If Applicable)
Users will be able to contribute to the campaign by entering the contribution amount (based on campaign configuration) and proceed to complete the payment.
Once the payment is complete and the order reaches the specified status, the raised contribution will reflect on the product page and the contributor name along with the contribution amount will be visible on the campaign page (unless the Allow Users to Mark them as Anonymous on Checkout Page option is enabled).
The campaign will close based on the Campaign End Method condition that is set. Specifically, at the close of Product Purchase Campaigns and the campaign goal amount is reached, an order will be created with the product linked to the campaign and the order will be assigned to the campaign creator.
Paying Campaign Creator from the Site
↑ Back to top- When PayPal Payouts credentials are configured and the campaign creator’s email id is configured in the campaign product, the contribution amount can be sent to the campaign creator once the campaign closes.
- For Charge Immediately Campaigns, the contribution amount can be transferred once the campaign is closed. There is no need for the campaign to be successful.
- For Charge on Campaign Completion Campaigns, the contribution amount can be transferred once the campaign is successfully closed and the entire contribution amount has been successfully charged.
- To transfer the contribution amount to the campaign creator, the admin will have to visit WooCommerce > Crowdfunding Pro > Closed Campaigns and select Make Payment.
Translation
↑ Back to topCrowdfunding Pro for WooCommerce is translation ready meaning you can edit the po files to translate the text to any language.
The steps to do the translation are as follows. For example, if we were to setup French translation:
- Download and install Poedit
- Open the file crowdfunding-pro-for-woocommerce > languages folder > re-crowdfunding-pro-for-woocommerce.pot using Poedit
- Create a new translation file by clicking Create new translation button
- Choose the Source text and set its corresponding French text in Translation Text Area.
- Save the changes
- Save the file name as crowdfunding-pro-for-woocommerce-fr_FR.po.
- If you are using WordPress Version 3.9.13 or below, then in wp-config.php define the WPLANG as French. Syntax is define(‘WPLANG’, ‘fr_FR’);
- If you are using WordPress Version 4.0 or above, then go to WordPress dashboard > Settings > General and select the Site Language as French.