

1. Download Custom Permalinks for WooCommerce from the WooCommerce marketplace.
2. Go to WooCommerce > Settings > Custom Permalinks.
3. In the “product permalinks” section choose “Product slug alone” or “Product slug with category name” if you want to include category slug into URL.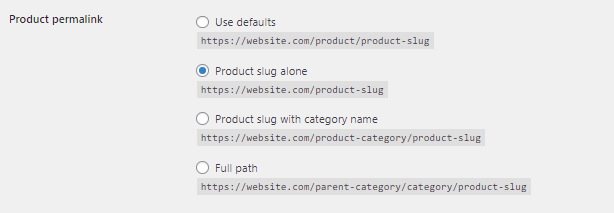
1. Download Custom Permalinks for WooCommerce from the WooCommerce marketplace.
2. Go to WooCommerce > Settings > Custom Permalinks.
3. In the “category permalinks” section choose “Category slug alone” or “Full path” if you want to include category entire path to this category in the URL. 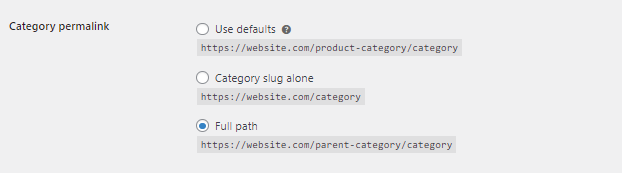
1. Download Custom Permalinks for WooCommerce from the WooCommerce marketplace.
2. Go to WooCommerce > Settings > Custom Permalinks.
3. Type .html, .htm, .php, or any other extension you wish to see in the URLs ending. Then choose what kind of URLs you wanna change – product pages, category pages, or both. 
Setup and Configuration
↑ Back to topTo set up your store with Custom Permalinks for WooCommerce:
Go to WooCommerce > Settings > Custom Permalinks.
↑ Back to top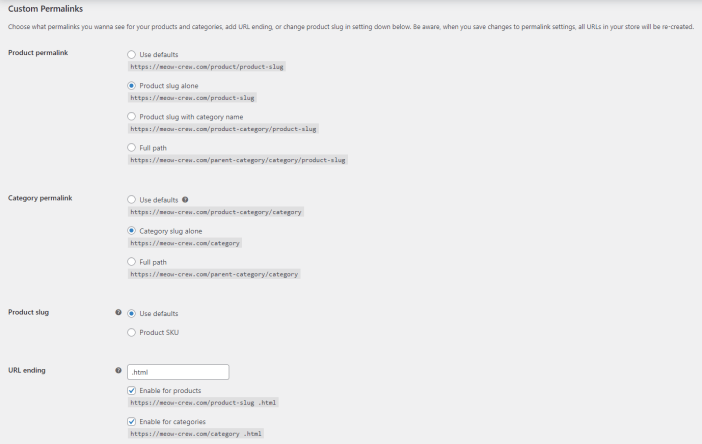
Here you can find everything you need to set up permalinks for your products and categories pages.
Set up product permalinks.
↑ Back to top
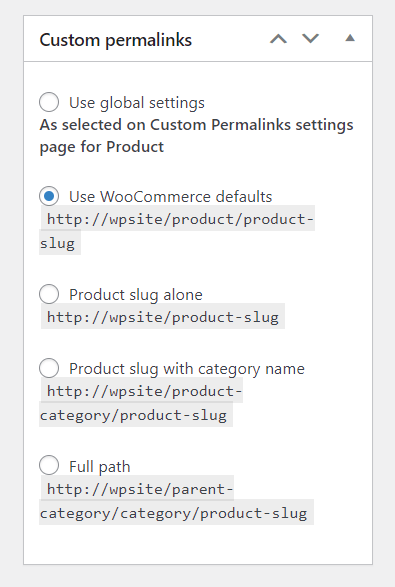
You can find 4 options here:
Use defaults – extension doesn’t affect your product’s permalinks in any way. Your permalinks would be the same as you set in the general WordPress settings.
Product slug alone – you will see product slug right after the domain name. /product/, /product-category/, and any other part of the default permalink structure will be cut off.
Product slug with category name – you can create pretty URLs that will indicate the main category where the product is situated (it also may be category chosen in Yoast SEO plugin if you use that option) + product slug alone.
Full path – differs from the last option only with one additional part of permalink – parent category. In case you use second-level categories, the URL will be formed with 1st level category slug + 2nd level category slug + product slug. This will work as expected if your product belongs to one category, then parent and child (or few) categories slugs will be included in the permalink. In case your product belongs to several categories of different levels, you should select which one of those categories should be considered as primary category. By defaul WP recognise the highest level category as primary, in case you want to switch primary category you would need to use additional plugins as Yoast SEO or The SEO Framework to select primary category for each product.
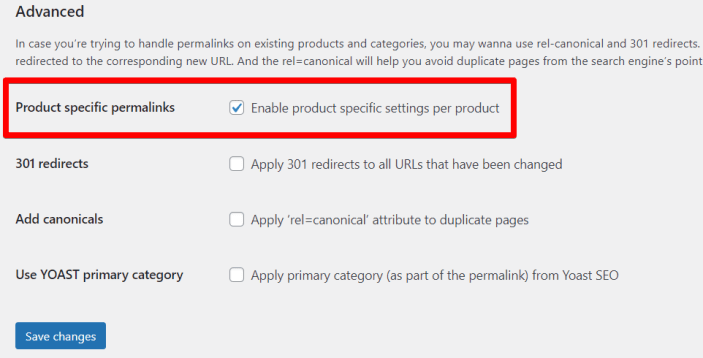
Changing permalink structure for the product separately from general settings
Aside from setting up permalinks for all product pages, you can also set up a permalink structure for each product separately.
Enable ‘Product specific permalinks’ feature in Advanced settings:
Then go to the product page, for which you wish to change the permalink and you will find a new metabox available for you – Custom permalinks.
Here you can change permalink settings that will be applied for this specific product only. It doesn’t affect any other products in the store.
For instance, if you want to keep the regular WooCommerce permalink structure for all products except a few and make landing pages for those few, you can choose Use WooCommerce defaults on general plugin settings level, and then go to those product pages and pick up the desired structure for them separately, e.g. Product slug alone. In this case, all of your products will have a regular WooCommerce structure (store.com/product/product-slug) except those few landing pages with store.com/product-slug URL structure.
How to set up full path when product belongs to several categories
↑ Back to topWhen a product in WooCommerce belongs to several categories, it is crucial to select a primary category to ensure that the product permalinks are structured correctly. By default, WordPress recognizes the highest-level category as the primary category, which can lead to undesired permalink structures if not manually adjusted.
A primary category is the main category that you want to associate with a product when it belongs to multiple categories. This primary category dictates the category path that appears in the product’s permalink. Setting a primary category ensures that the product’s URL includes the most relevant category hierarchy.
For example, if a product belongs to “Clothing” (parent) and “Men’s Clothing” (child), the permalink might only include “Clothing” unless the primary category is explicitly set to “Men’s Clothing.”
Setting the Primary Category with Yoast SEO or The SEO Framework plugins
- First thing you need to do is activate one of those two integrations in the Custom Permalinks settings (depending on which plugin you use):

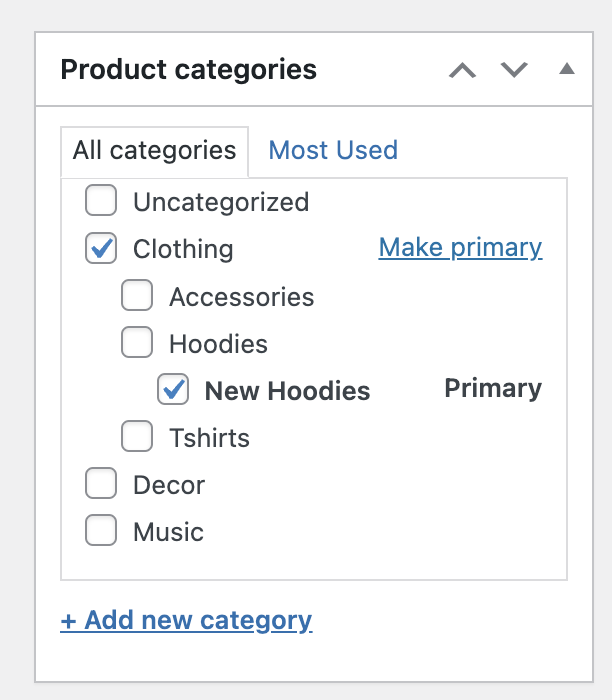
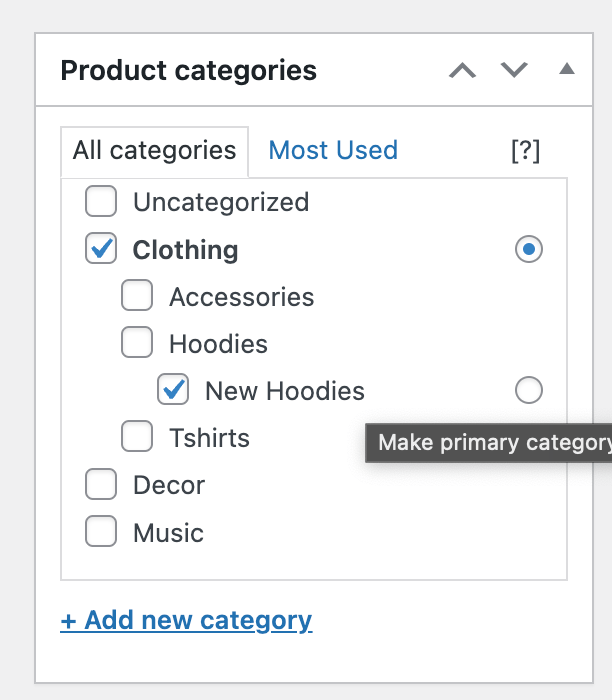
- Edit the product for which you want to set the primary category.
- On the product edit page, locate the “Categories” section.
- You will see a list of categories assigned to the product. Click the “Make Primary” button next to the category (if you use Yoast SEO) you want to set as the primary, or select the primary category in the radio-box selector (if you use The SEO Framework):
- Update the product as last step.
When you correctly set the primary category, the product permalink will include the full path of the selected primary category, along with any parent categories. Here’s an example to illustrate:
-
Product Categories:
- Clothing (Parent)
- Men’s Clothing (Child)
- Shirts (Child of Men’s Clothing)
-
Without Setting Primary Category:
- Permalink:
https://example.com/clothing/product-name
- Permalink:
-
With Primary Category Set to Shirts:
- Permalink:
https://example.com/clothing/mens-clothing/shirts/product-name
- Permalink:
To ensure the permalink includes the full path of parent and child categories, you should select the lowest-level child category as the primary category. This way, the URL will reflect the complete category hierarchy, providing a clear and SEO-friendly structure.
Set up category permalinks.
↑ Back to top
After customizing permalinks for product pages, you may want to change categories permalinks as well. You have 3 options here:
Use defaults – extension doesn’t affect your category’s permalinks in any way. Your permalinks would be the same as you set in the general WordPress settings.
Category slug alone – extension simply removes /product-category/ part from the URL and leaves the only category slug right after the domain.
Full path – in case you use second-level categories, the permalink will consist of 1st level category slug (parent category) + 2nd level category (child category) slug.
Include /shop/ base
↑ Back to topWhen you remove /product/ or /product-category/ based via plugin settings, the /shop/ base is also automatically removed. Then your permalink starts looking like you can see on the example:

As you can see, the default /shop/ base is missing for all URL configurations. In case you need to bring the /shop/ base back, enable the option below:

Then /shop/ base will be included right before the product or category slugs (depends on what permalink configuration you choose to use).
For instance, if you choose the Product slug alone for Product permalink, it will be:
http://site.com/product-slug – without option enabled
http://site.com/shop/product-slug – with ‘Include shop’ option enabled
Note that the Include shop’ option enables /shop/ base for both product’s and category’s permalinks.
And the category permalink for the ‘Full path’ option will be:
http://site.com/parent-category/category-slug – when ‘Include shop’ option disabled
http://site.com/shop/parent-category/category-slug – when ‘Include shop’ option is on
How to Translate the /shop/ Base Using WPML with Custom Permalinks
↑ Back to topHere is a step-by-step guide to translating the /shop/ base using Custom Permalinks and WPML if you need ‘shop’ to be translated for different locals:
1. Adjust Product and Category Permalink Settings
First, configure your product and category permalinks according to your preference in the Custom Permalinks settings.
2. Enable the “Include /shop/” Feature
Make sure to enable the “Include /shop/” feature in the Custom Permalinks settings. Set the default value to the appropriate language (in most cases, this would be “shop” in your default language).

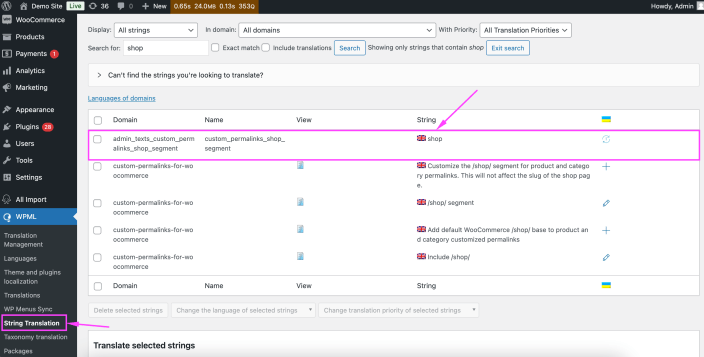
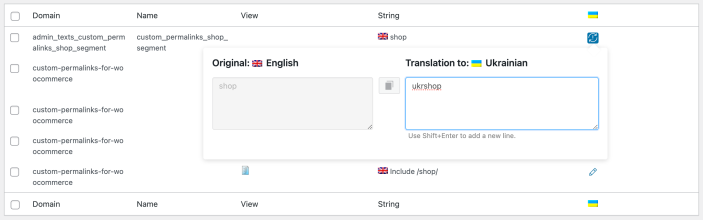
3. Use WPML String Translation
Next, go to WPML > String Translation and search for “shop” in the admin_texts_custom_permalinks_shop_segment domain.
4. Add Translations for Each Language
Add the appropriate translations for each language you are using. For example, you could translate “shop” to “catalog” or any other term in the target language.
5. Verify the Translated /shop/ Base
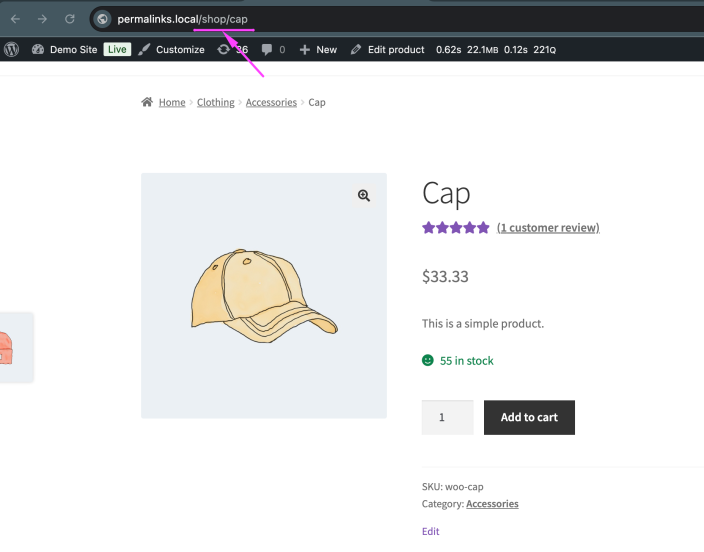
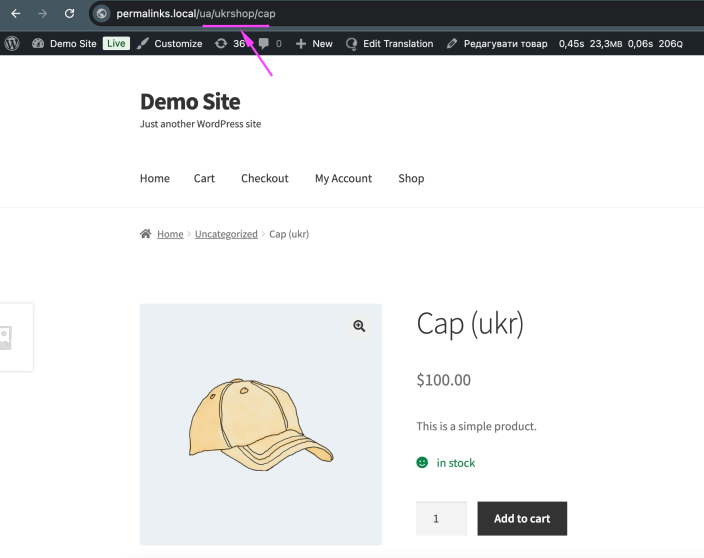
Now, you can confirm that the /shop/ base has been translated for both products and categories.
Default:
Translated:
Important Note:
You will need WPML String Translation installed for this feature to work.
Replace product slug w/ SKU
↑ Back to top
There are times when you want to replace the regular product slug (which is usually generated from the product title) with another product identifier – SKU. Be aware, to use SKU as the product slug you need to determine SKU for every product here:

Add extensions after the slug (.html, .htm, .php)
↑ Back to top
In case you migrated from another CMS and wanna replicate old URLs, you may need to extend a regular slug with some custom URL ending, like .html. You can specify any kind of ending you want in that field and then apply it to every product or category page.
Advanced settings
↑ Back to top
In this section, you’ll find options that might be beneficial or even crucial for your SEO, so don’t forget about it.
-
Turn on 301 redirects.
301 redirects affect both regular users and search engine crawlers. When you’re editing permalinks on existing products and categories, it’s better to use 301 redirects. After enabling 301 redirects, anyone who goes to the old URL will be redirected to the corresponding new URL so that you won’t lose any old clients.
-
Add canonicals to avoid content duplicates
After you make changes in permalinks, the page would be reachable by two different URLs (the old one and the new one). rel=”canonical” link tag specifies the “preferred” version of a web page, so search engines don’t consider them to be content duplicates.
-
Choose the primary category (via Yoast plugin)
This feature is available only if you utilizing Yoast SEO plugin. If so, you can enable categories from Yoast settings to be considered for permalinks. Yoast plugin instructions on primary category.
Sitemap
↑ Back to topTo let search engines know about your newly established URLs better to place them into sitemap.xml. To do so, please install the Yoast SEO plugin and turn off any other plugins that you may use for sitemap generation. Then every new URL will be placed to sitemap.xml automatically.
FAQs
↑ Back to top- Can this extension hurt ranking on Google?
The answer could be yes and no at the same time. If you’re using the extension on a newly created website, it would probably only improve your SEO. But if you’re going to change permalinks for pages that already have some search volume, then better go read about 301 redirects or consult with SEO experts on how to do it in the safest way.
- Do I need to regenerate URLs in some way after changing the permalinks structure?
No, you don’t. All the URLs will be changed automatically after you click the “save changes” button.
- What will happen with permalinks if I remove the extension?
In that case, you’ll find that all of your URLs are restored and look the same they were before installing the plugin. 301 redirects and canonical rules will be deleted as well.