Drinkify is a premium eCommerce WordPress block theme that is perfect for creating a website for a liquor shop. This block-based theme is ideal for liquor stores, brewery beer, drink stores, pubs, cafes, restaurants, wineries, and any online businesses. It comes with a sleek and unique design that lets you sell your products online.
To use Drinkify, you must first install the Drinkify theme, and to sell products online, you need to install the WooCommerce plugin.
Drinkify Installation
↑ Back to topTheme Installation
↑ Back to top- Log in to your WooCommerce.com account.
- Navigate to the Downloads page. You will see the Drinkify theme and click on Download to get a compressed drinkify.zip theme file on your computer.
- Log into the WordPress admin panel.
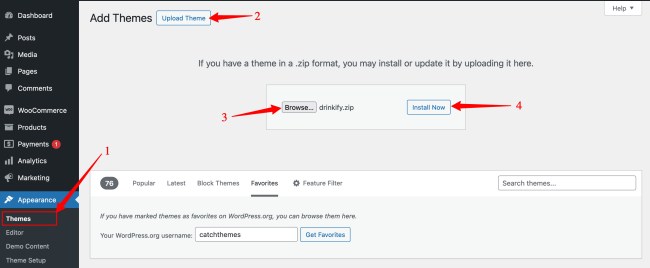
- Go to Appearance > Themes and click on the Add New button, at the top of the screen.
- In the Add Themes screen, click on Upload Theme.
- Click on Choose File, and then browse for the compressed drinkify.zip theme file on your computer.
- Click on Install Now to start the installation.
- After the installation is done, click on the Activate button.
More information on Adding New Themes.
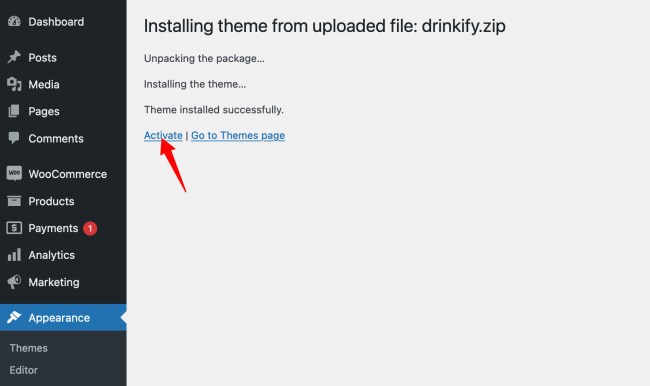
Activate Drinkify Theme
Required Plugins
↑ Back to topThis theme is built with the WooCommerce plugin for eCommerce. So, make sure that the WooCommerce plugin is installed and active to sell your products and services online.
Installing WooCommerce Plugin
↑ Back to top- Log into the WordPress admin panel.
- Go to Plugins -> Add New.
- Search for “WooCommerce”.
- In the search results, click on Install Now.
- After the installation is done, click on the Activate button.

Importing Demo Content
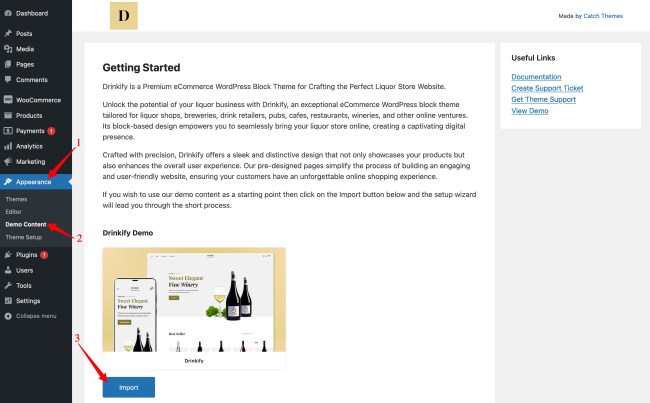
↑ Back to topImporting demo content is an easy way to replicate the demo site and start editing the content. It will allow you to quickly edit everything instead of creating content from scratch.
Navigate to the “Appearance -> Demo Content” or click on the “Import” button.
Theme Customization
↑ Back to topThe Drinkify theme is a block theme that enables the Site Editor. The Site Editor allows you to design the entire site, including the header, footer, and everything in between, with blocks and patterns. It gives you greater control over how your site looks. You can rearrange the blocks and patterns and edit templates and template parts.
Accessing The Site Editor
↑ Back to topDrinkify is a block theme, which means you can edit the elements of the theme using the Site Editor.
- Log into the WordPress admin panel.
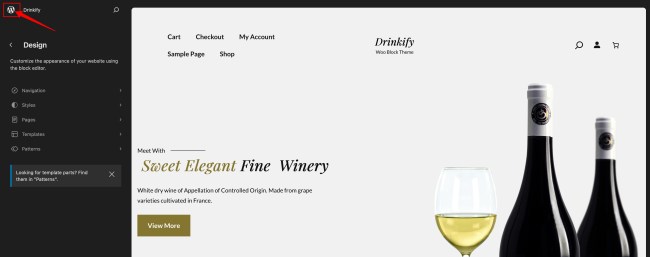
- Go to Appearance -> Editor. The Site Editor will then load the front page of your site for you to start editing.
- Now, you can edit the blocks (headings, paragraphs, images, buttons, and so on) and patterns directly. Add or remove the blocks and patterns, and manage their position by moving up and down as per your need.

Returning To The Dashboard
↑ Back to topTo go back to your dashboard, click the WordPress icon (or Site icon if you have set one) to open the Site Editor left navigation.
Accessing the Templates Using Site Editor
↑ Back to top- Access the Site Editor as mentioned above.
- Click on Templates on the left side of the screen. Now, you will see the templates and you can click on Manage all templates to view all templates.
- Click on the Template that you want to access/edit.


The Drinkify theme offers 28 different Templates. You can customize these templates if you feel like changing anything on a specific template and wish to see those changes across your site. Basically, a template defines the structure of the content area of the site, such as a Front Page, 404, Search, Archive, Single post, Page, Shop, etc.
Here is the list of templates available templates within Drinkify:
- 404: Displays when a visitor views a non-existent page, such as a dead link or a mistyped URL.
- Archive: Displays post categories, tags, and other archives.
- Archive Product: Displays your products.
- Blank: The blank template can be used for displaying the contents of a post or page.
- Blog Page (No Sidebar Full Width): Displays the Latest posts on a full-width layout.
- Blog Page (Sidebar on Left): Displays the Latest posts with a Sidebar on the Left.
- Blog Page (Sidebar on Right): Displays the Latest posts with a Sidebar on the Right.
- Cart: Displays the shopping cart page.
- Checkout: Displays the checkout page.
- Front Page: Displays your site’s homepage, whether it is set to display the latest posts or a static page. The Front Page template takes precedence over all templates.
- Home: Displays the latest posts as either the site homepage or as the “Posts page” as defined under reading settings. If it exists, the Front Page template overrides this template when posts are shown on the homepage.
- Index: Used as a fallback template for all pages when a more specific template is not defined.
- Order Confirmation: The Order Confirmation template serves as a receipt and confirmation of a successful purchase. It includes a summary of the ordered items, shipping, billing, and totals.
- Pages: Display all static pages unless a custom template has been applied or a dedicated template exists.
- Product Search Results: Displays search results for your store.
- Search Results: Displays when a visitor performs a search on your website.
- Single Posts: Displays single posts on your website unless a custom template has been applied to that post or a dedicated template exists.
- Single Page (No Sidebar Full Width): Displays a single page on a full-width layout.
- Single Page (Sidebar on Left): Displays a single page with a Sidebar on the Left.
- Single Page (Sidebar on Right): Displays a single page with a Sidebar on the Right.
- Single Post (No Sidebar Full Width): Displays a single post on a full-width layout.
- Single Post (Sidebar on Left): Displays a single post with a Sidebar on the Left.
- Single Post (Sidebar on Right): Displays a single post with a Sidebar on the Right.
- Single Product: Displays a single product.
- Shop With Full Width: Displays your products on a full-width layout.
- Shop With No Sidebar: Displays your products without a sidebar.
- Shop (Sidebar on Left): Displays your products with a Sidebar on the Left.
- Shop (Sidebar on Right): Displays your products with a Sidebar on the Right.

Editing the Front Page Using The Site Editor
- Access the Site Editor as mentioned above.
- Click on Templates on the left side of the screen.
- Click on the Front Page to edit the Front page.
- Click on the blocks that you want to edit.
More Information on the Template Editor using Site Editor
Accessing the Template Parts Using Site Editor
↑ Back to top- Access the Site Editor as mentioned above.
- Click on Patterns on the left side of the screen.
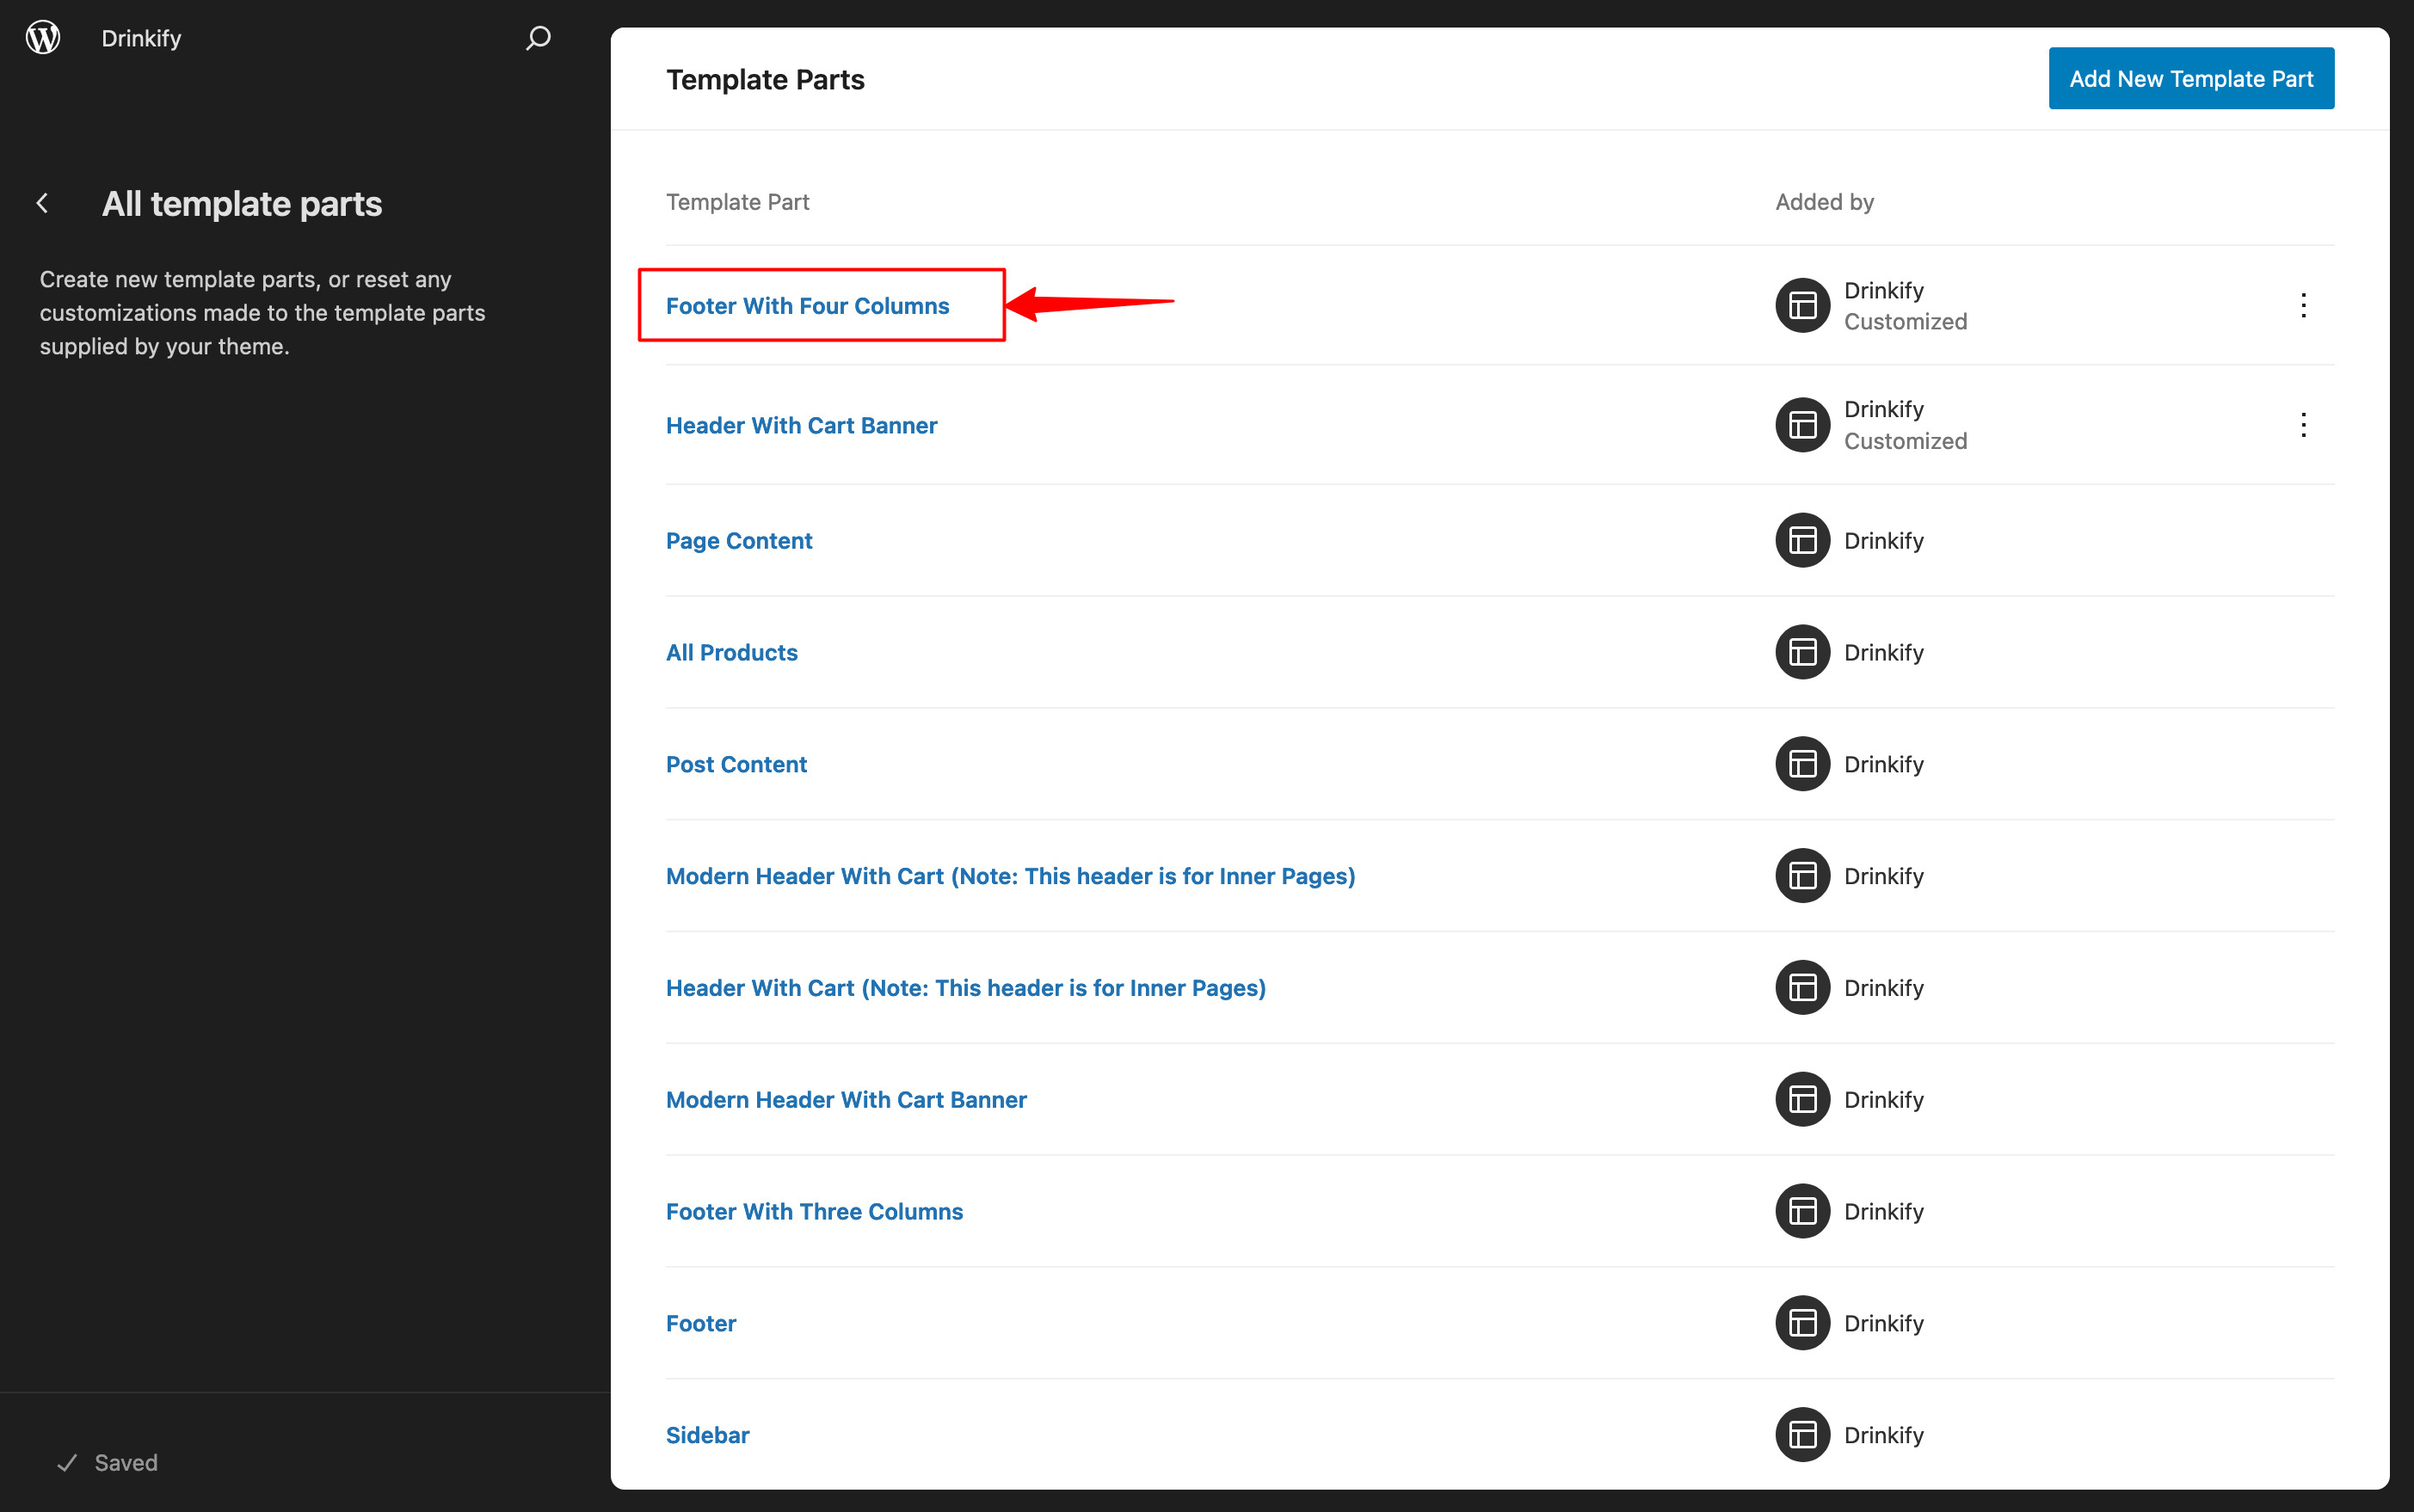
- Click on Template Parts on the left side of the screen. You can click on Manage all template parts to view all template parts.
- Click on the Template Parts that you want to access/edit.

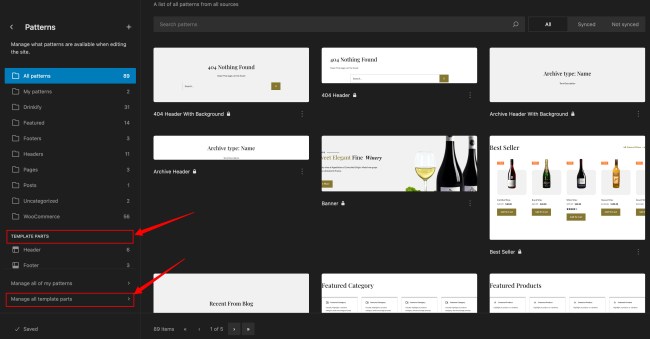
The Drinkify theme offers 13 different Template Parts. The Template Parts are part of the Templates that help you to organize and add structure to the theme to avoid having to repeat code. For example, you can define the template part for the header and footer and then combine them with the Font Page template file.
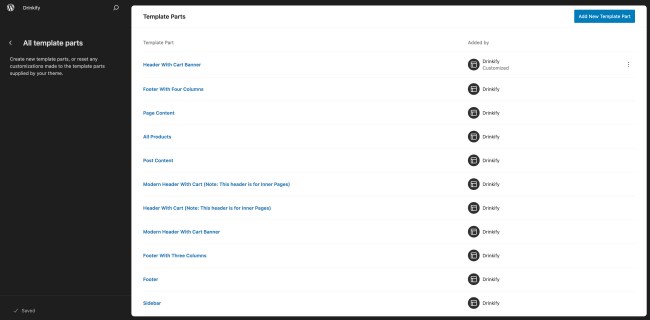
Here is the list of template parts available within the Drinkify theme:
- All Products
- Footer
- Footer With Three Columns
- Footer With Four Columns
- Primary Header
- Header With Banner
- Modern Primary Header
- Modern Header With Banner
- Page Content
- Post Content
- Primary Header
- Sidebar
- Sidebar Products
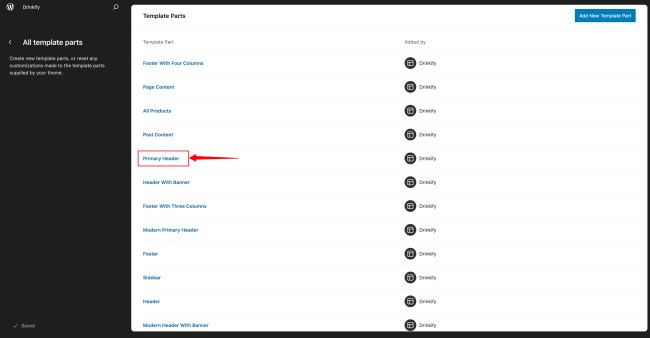
Editing The Header Using The Site Editor
Drinkify theme uses the Primary Header template part as the default for the header. This template part includes a Site Logo, Site Title, Site Tagline, Navigation Menu, Search, My Account, and Mini Cart blocks.
- Access the Site Editor as mentioned above.
- Click on Patterns on the left side of the screen.
- Click on Template Parts on the left side of the screen. You can click on Manage all template parts to view all template parts.
- Click on the Primary Header that you want to edit the blocks inside the header.
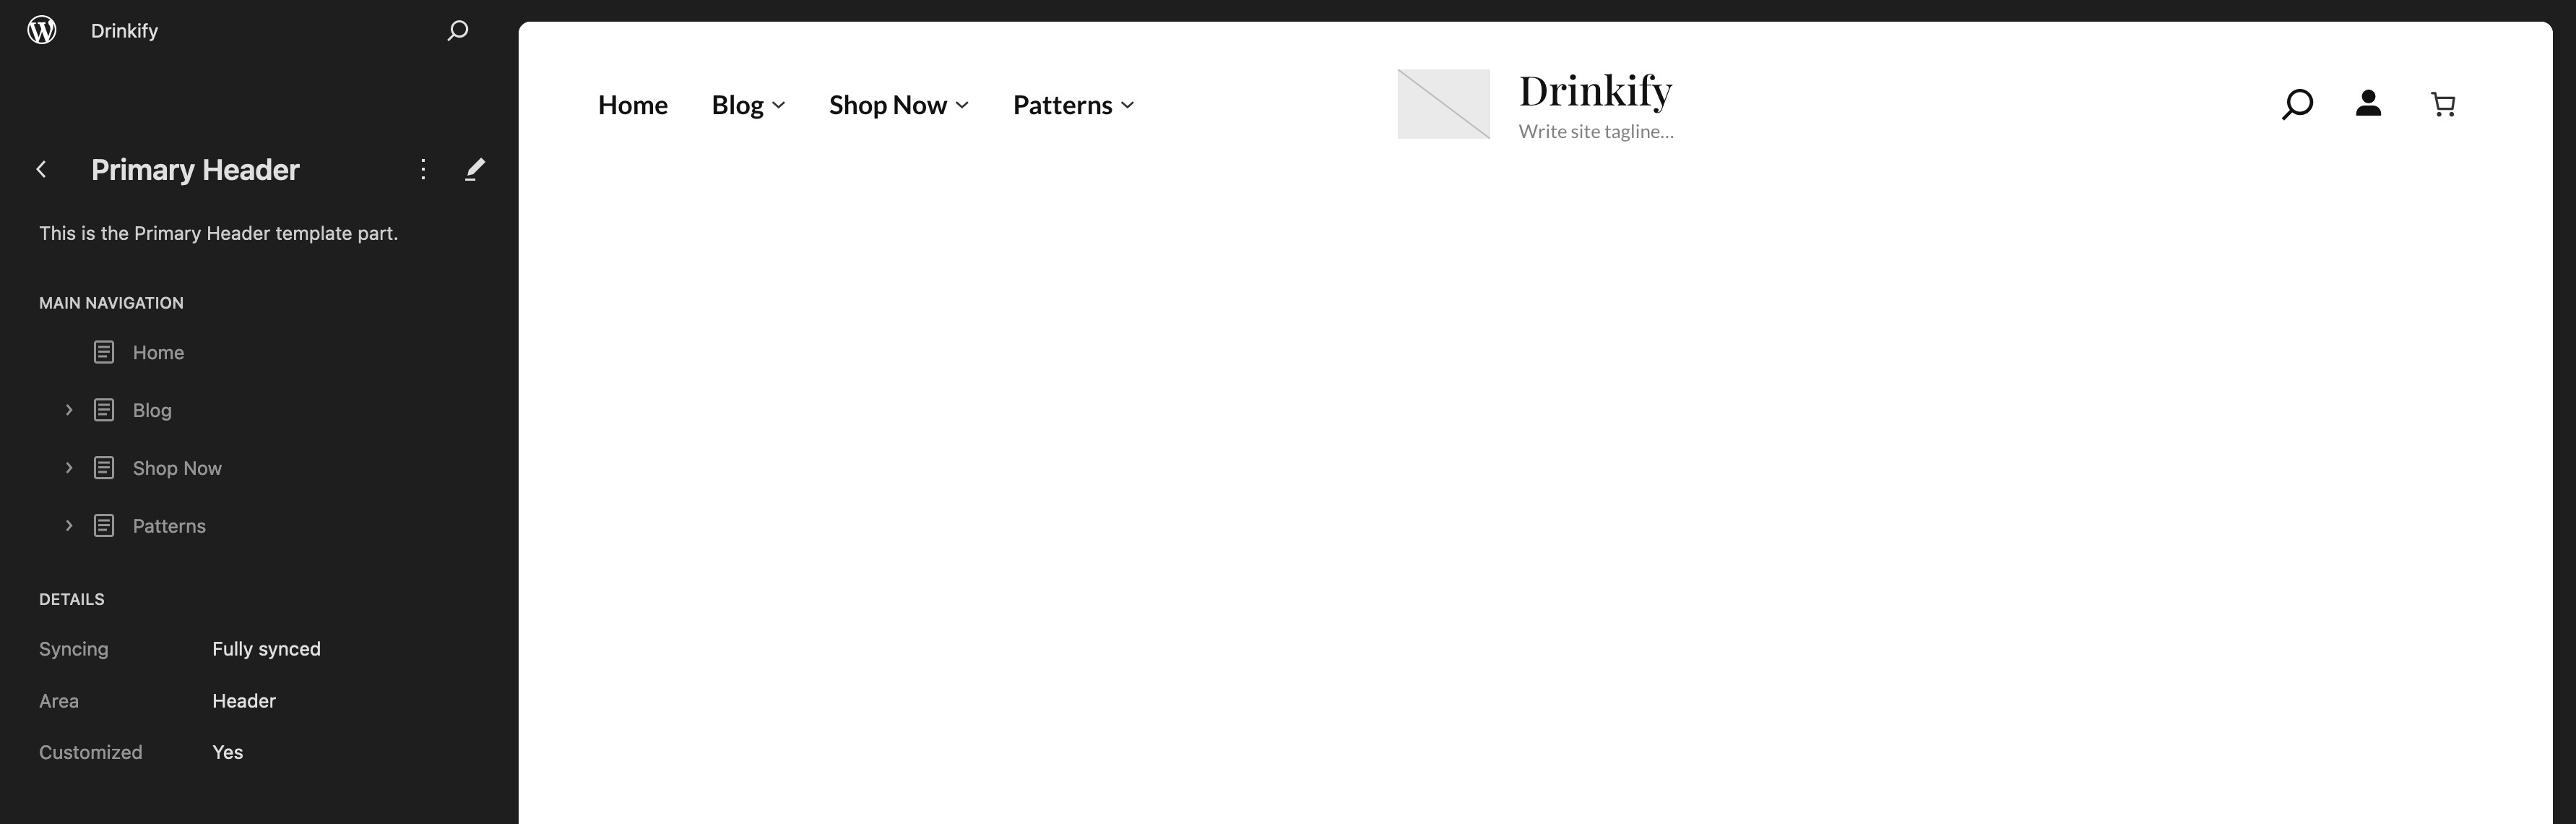
Site Logo, Title And Tagline
- Access the Primary Header template part as mentioned above.
- Click on the Site Logo placeholder which will open the Media Uploader.
- From the Media Uploader, you can either upload a logo from Upload files or use the existing image from the Media Library.
- Select the logo and click on the Select button.
- For other settings and customization, navigate to the right sidebar, where you will find different settings like Styles, Image Width, Dimensions, etc.
- Click on Site Title and edit the Title.
- Click on the Site Tagline and edit the Tagline.
- After all the adjustments, click on the Save button.
More information on the Site Logo block.
Editing Header Navigation Menu
- Access the Primary Header template part as mentioned above.
- Select the Navigation Block and edit it as instructed in the heading below Navigation Block (Site Navigation Menu)
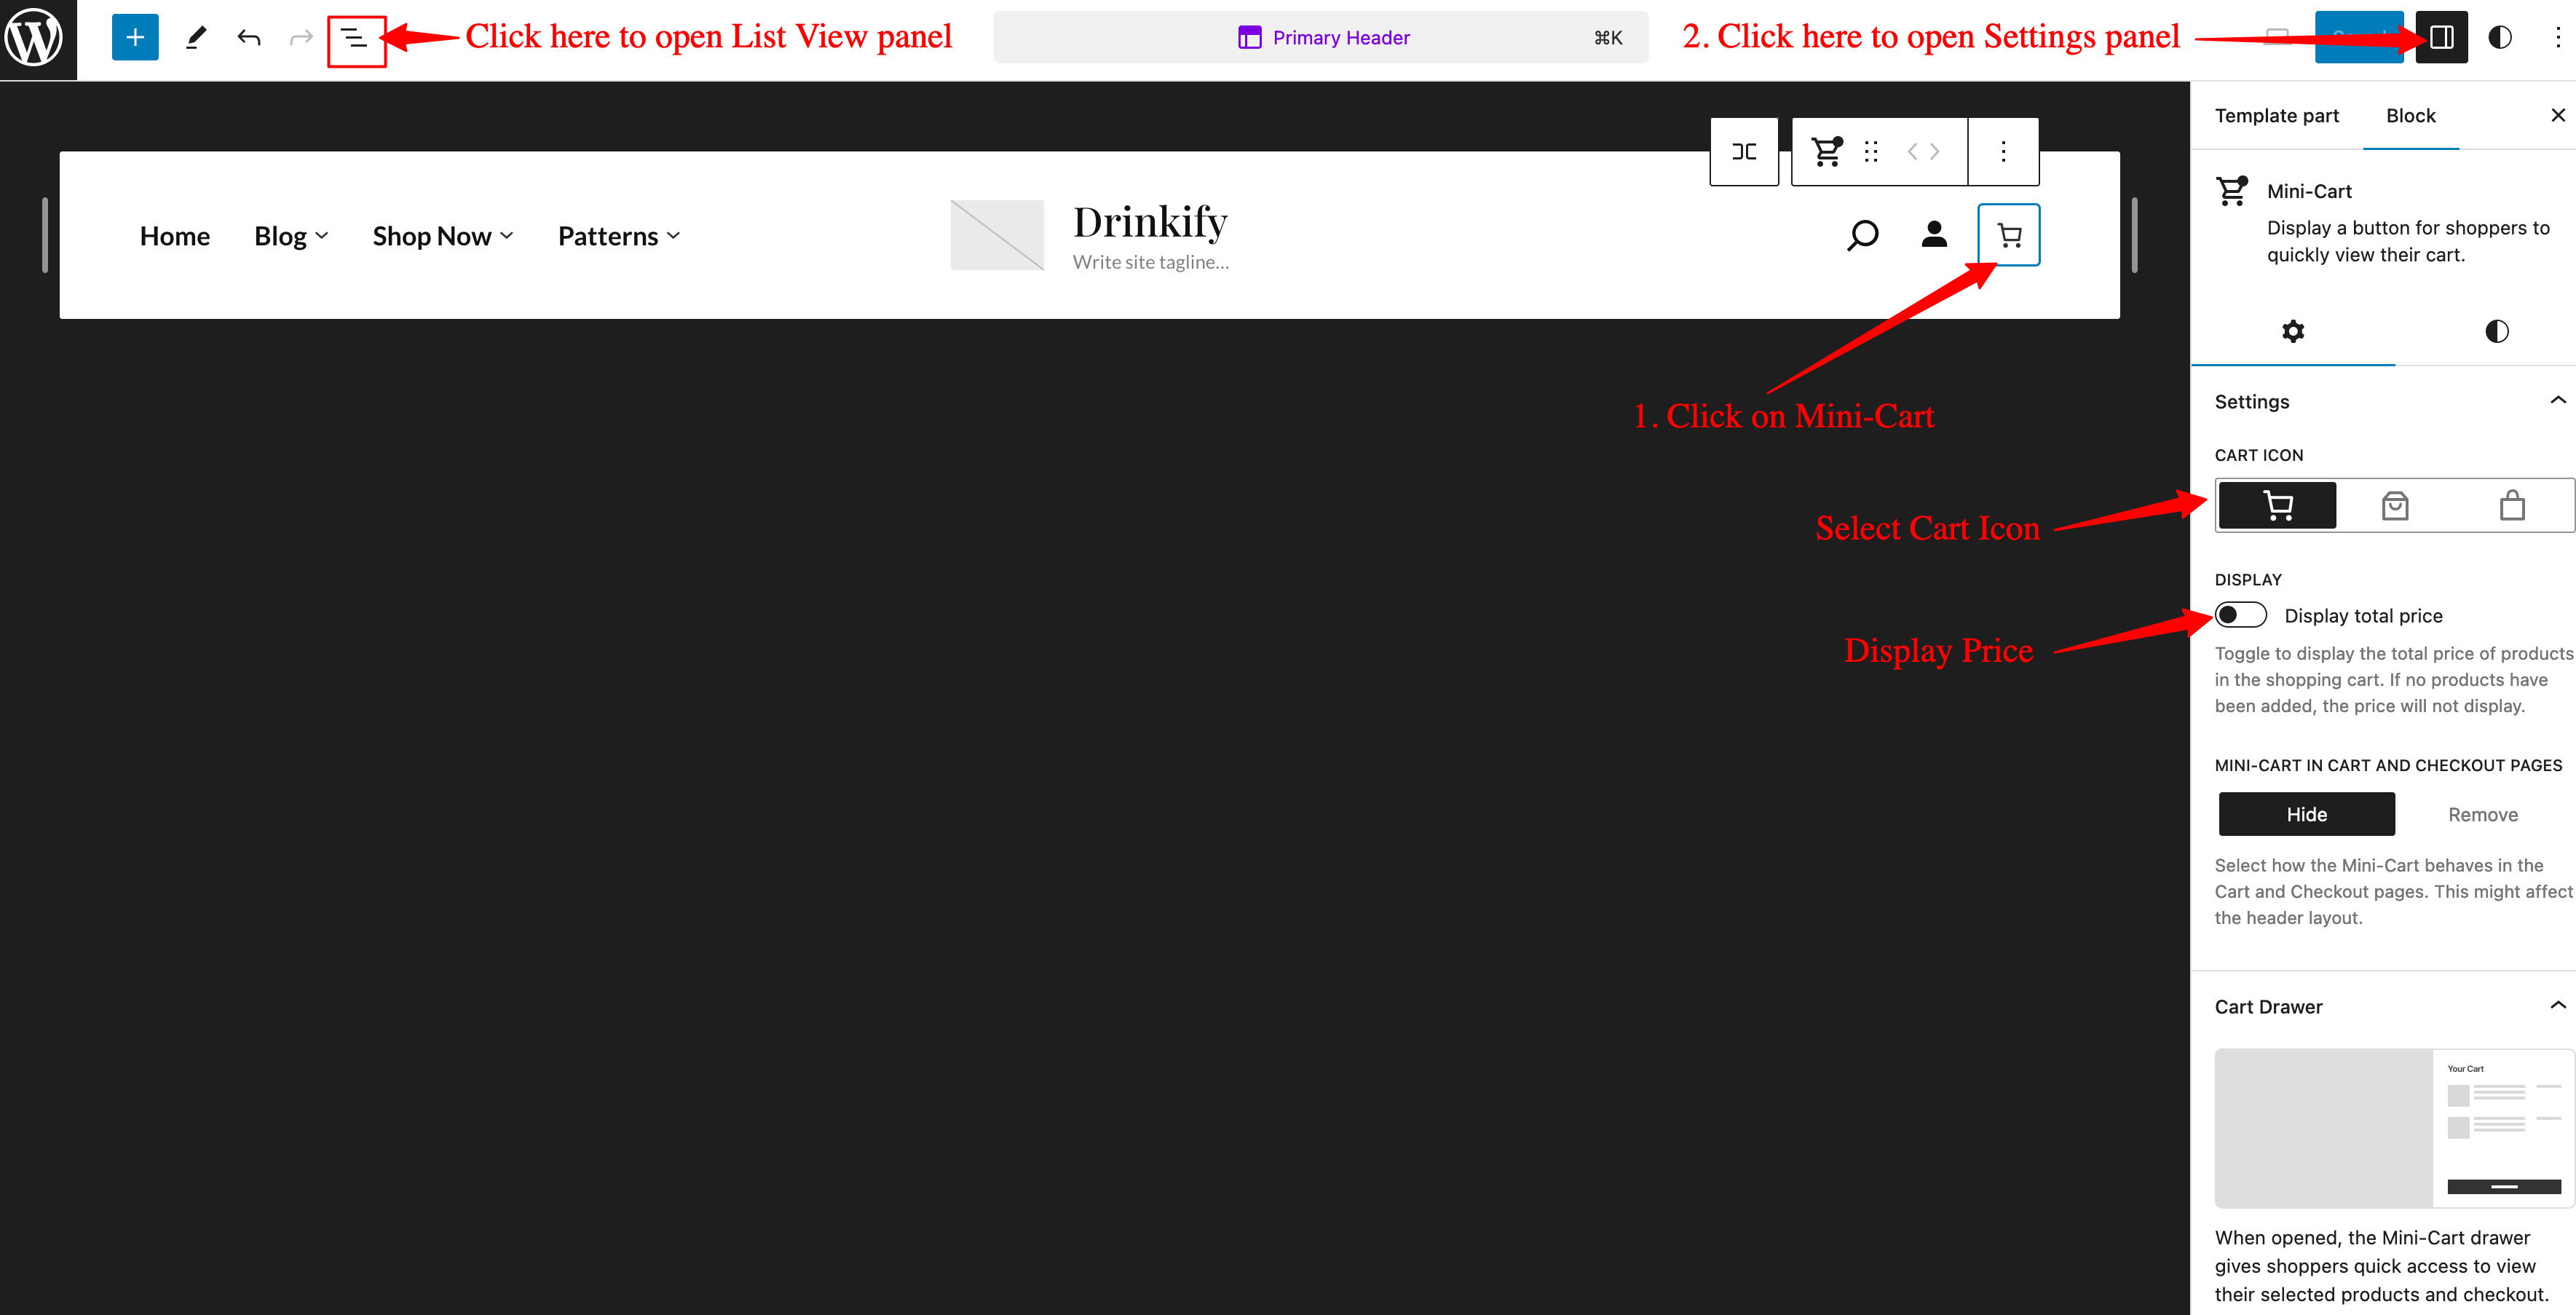
Adjusting Mini Cart Block
- Access the Primary Header template part as mentioned above.
- Select the Mini Cart block and from Settings, you toggle Hide Cart Price or remove it from the Options (3 Horizontal dots) button in the Block Toolbar.
- After adjusting, click on the Save button.
Note: Similarly, you can edit other blocks in the Header as per your need.

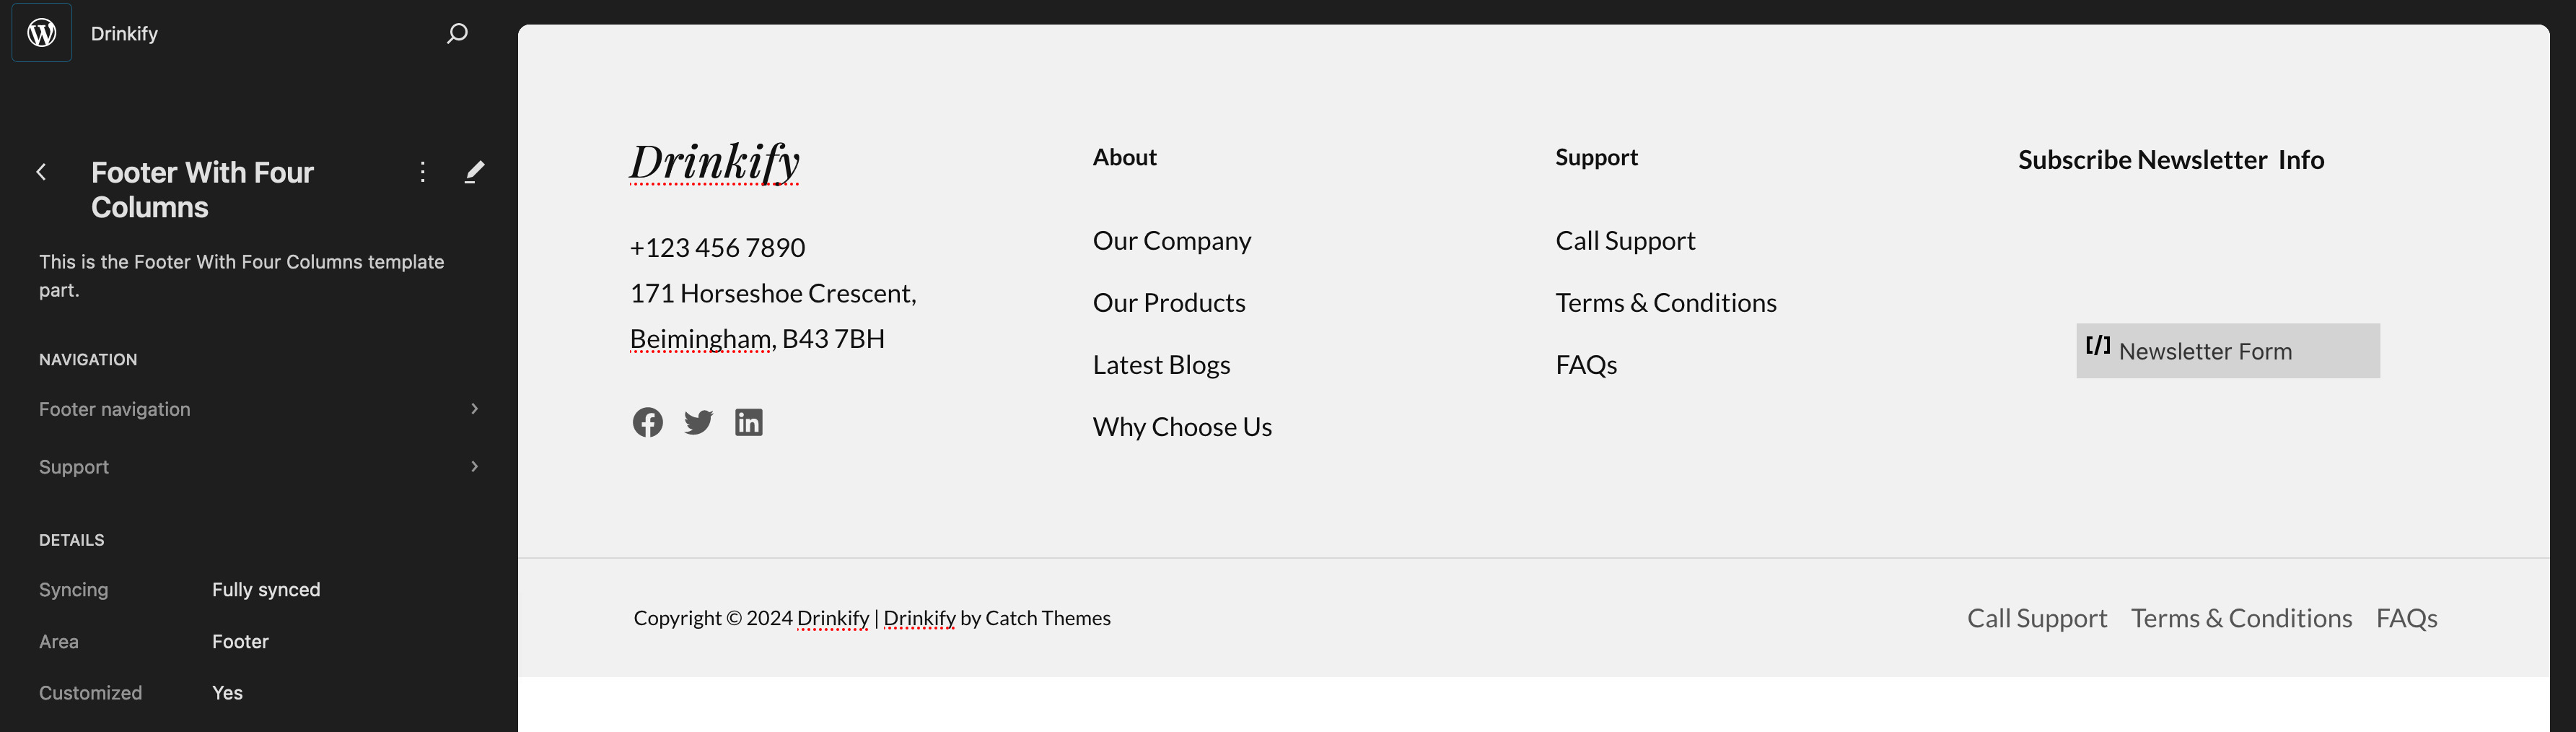
Editing Footer Using The Site Editor
Drinkify theme uses the Footer With Four Columns template part as the default for the footer. This template part includes Heading, Paragraph, Navigation, and Social Icons blocks which are wrapped in Row, Columns, and Group blocks.
- Access the Site Editor as mentioned above.
- Click on Patterns on the left side of the screen.
- Click on Template Parts on the left side of the screen. You can click on Manage all template parts to view all template parts.
- Click on the Footer With Four Columns that you want to edit the blocks inside the header.
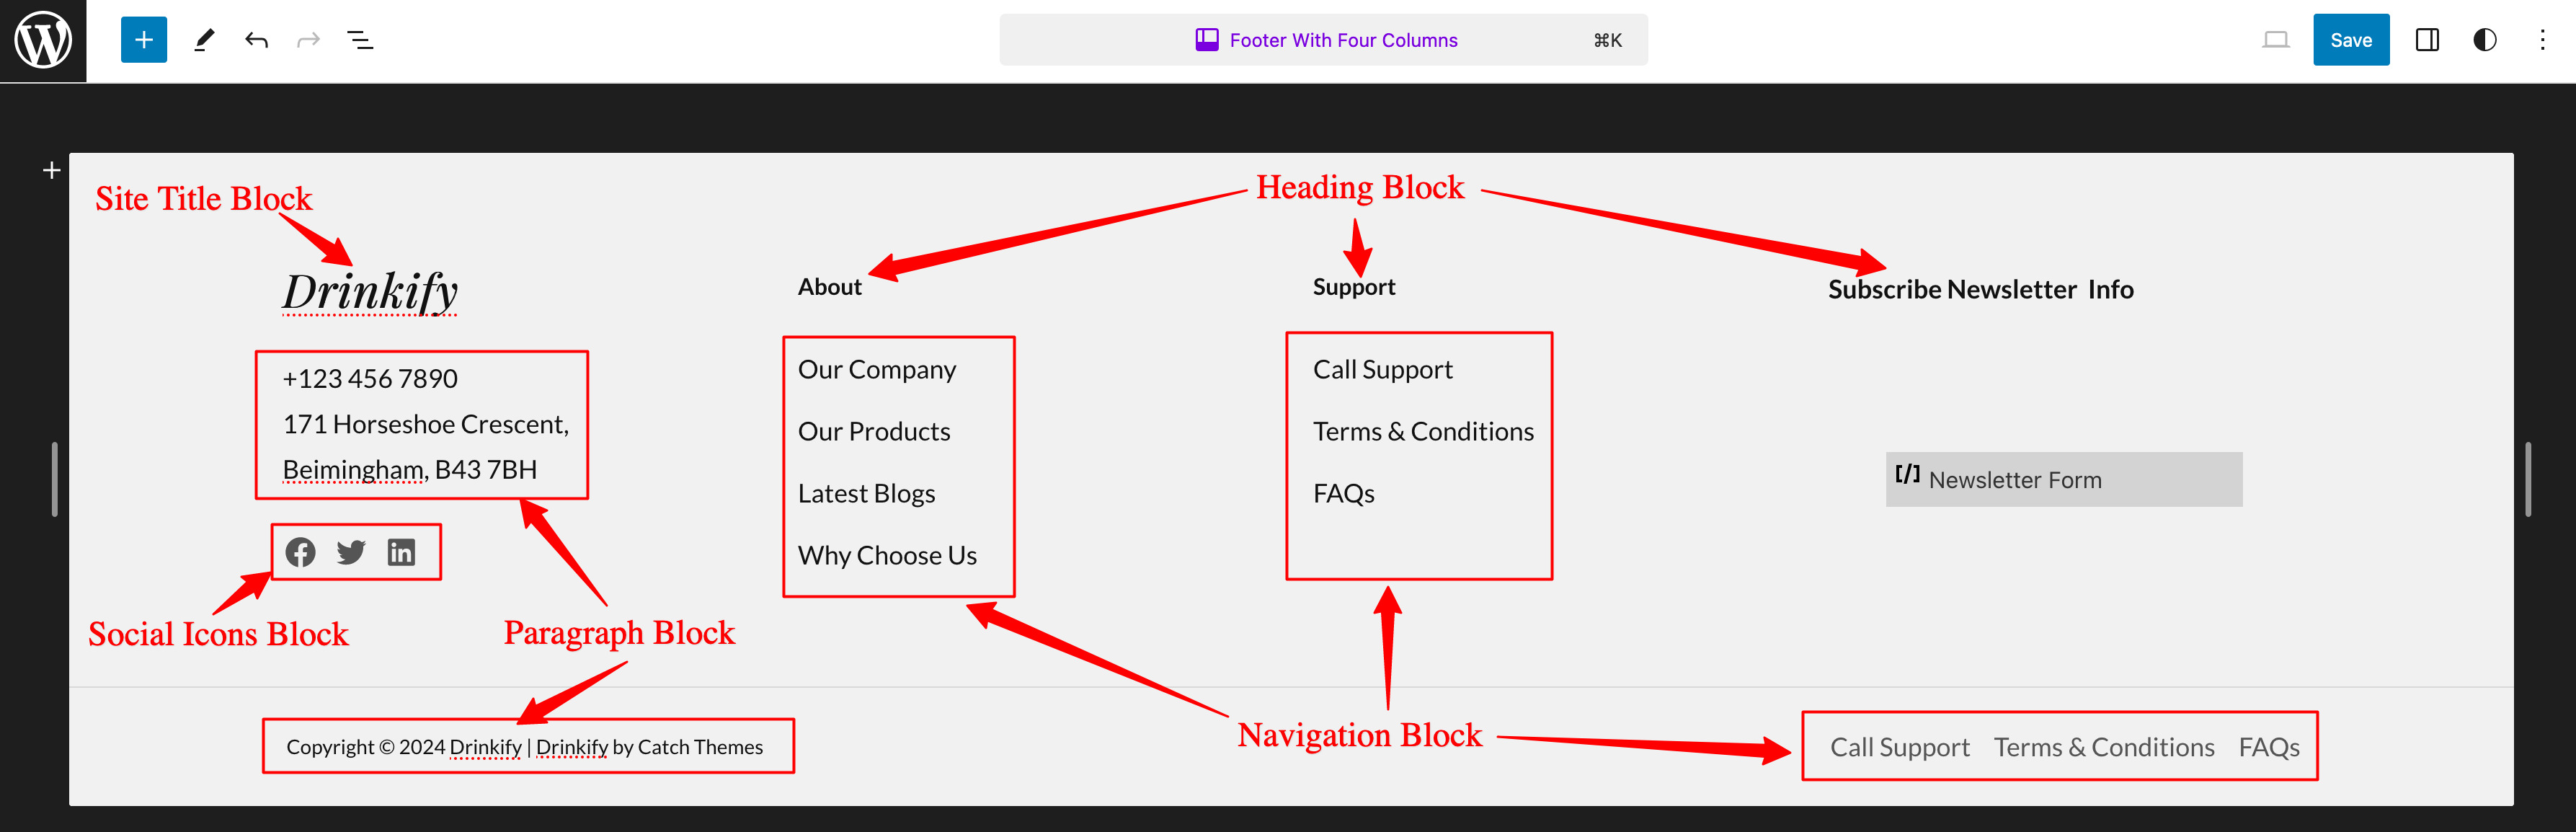
Editing Heading and Paragraph
- Access the Footer With Four Columns template part as mentioned above.
- Click on the Heading or Paragraph block that you want to edit and edit the text as per your need.
Editing Footer Social Icons
- Access the Footer With Four Columns template part as mentioned above.
- Select the Social Icons Block and edit it as instructed in the heading below Social Icons Block (Social Media Menu).
Editing Footer Copyright Text
- Access the Footer With Four Columns template part as mentioned above.
- Click on the Footer Copyright Paragraph block and edit the text and links as per your need.
Editing Footer Navigation Menu
- Access the Footer With Four Columns template part as mentioned above.
- Select the Navigation Block and edit it as instructed in the heading below Navigation Block (Site Navigation Menu)
Blocks
↑ Back to topBlocks are the components for adding content in WordPress. There are many different block types available in the WordPress editor to add text, media files, and layout elements which gives you more flexibility to build content. This theme supports all WordPress and WooCommerce blocks that you can use to create well-organized content.
You can add or edit blocks in Page and Post Block Editor as well as in Site Editor.
Adding Block In The Block Editor (Page/Post)
↑ Back to topThere are several ways to add a block to your post or page from the Block Editor when you are editing your post or page.
You can use the Block Inserter (+) icon to add a block. You can also use a shortcut slash (/) command to quickly add blocks or use the More options on any of the block’s toolbar to add a block. You can also move blocks or search for a block in your post or page.
Adding Blocks Using The Block Inserter (+) Icon
There are three ways to add a block using the Block Inserter (+) icon.
- Block inserter (+) icon in the top toolbar
- Block inserter (+) icon to the right of an empty block
- Block inserter (+) icon in between blocks

After you click on the Block inserter (+) icon, it will display a list of blocks available as well as a search box to search for a specific block that you need. Click on that block that you want as per your need. For Example, you can use the Heading block to add a heading, paragraph block to add text, Image block to add an image, Navigation block to add a navigation menu, Social Icon block to add Social Media profiles, and so on.
More information on the Adding Blocks.
Navigation Block (Site Navigation Menu)
↑ Back to topThe Navigation Block is an advanced block that enables you to edit your site’s navigation menu. This theme has used the Navigation block in various template parts like Primary Header and Footer (With Four Columns). So, you can edit these template parts to add your existing navigation menu or create a new navigation menu.
Adding Existing Navigation Menu
- Access the Site Editor as mentioned above.
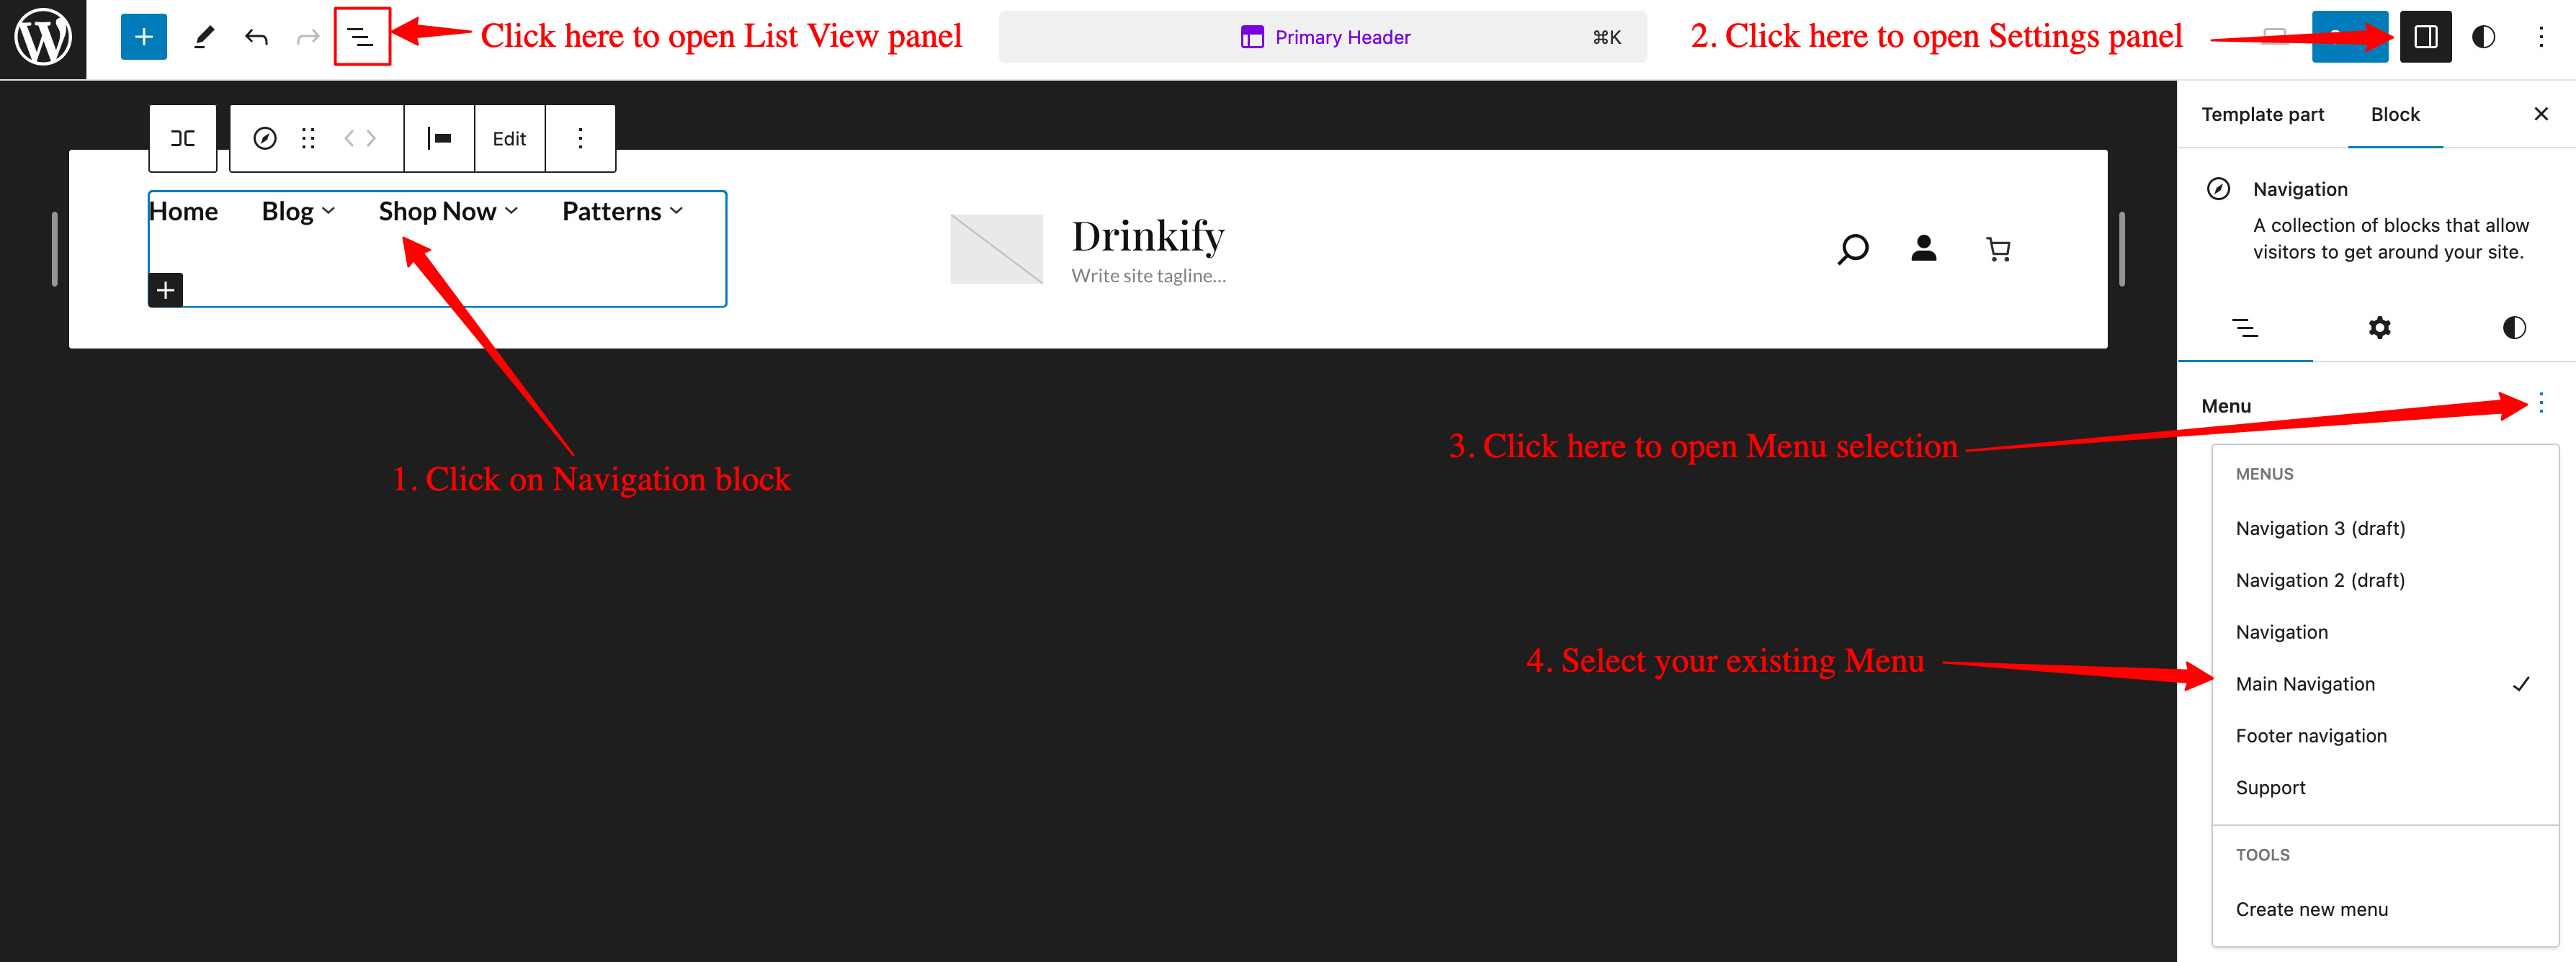
- Access the template part which has a Navigation block. The screenshot below shows the Navigation Block on the Primary Header template part.
- Click on the Navigation block and open the Settings panel.
- If you have a menu you’ve already created with the Navigation block or one from a previous theme (including menus from any classic themes), then you can select the existing menu from the Settings panel.
- After selecting the menu, click on the Save button.
More information on Navigation Block.
Creating a New Navigation Menu
- Access the Site Editor as mentioned above.
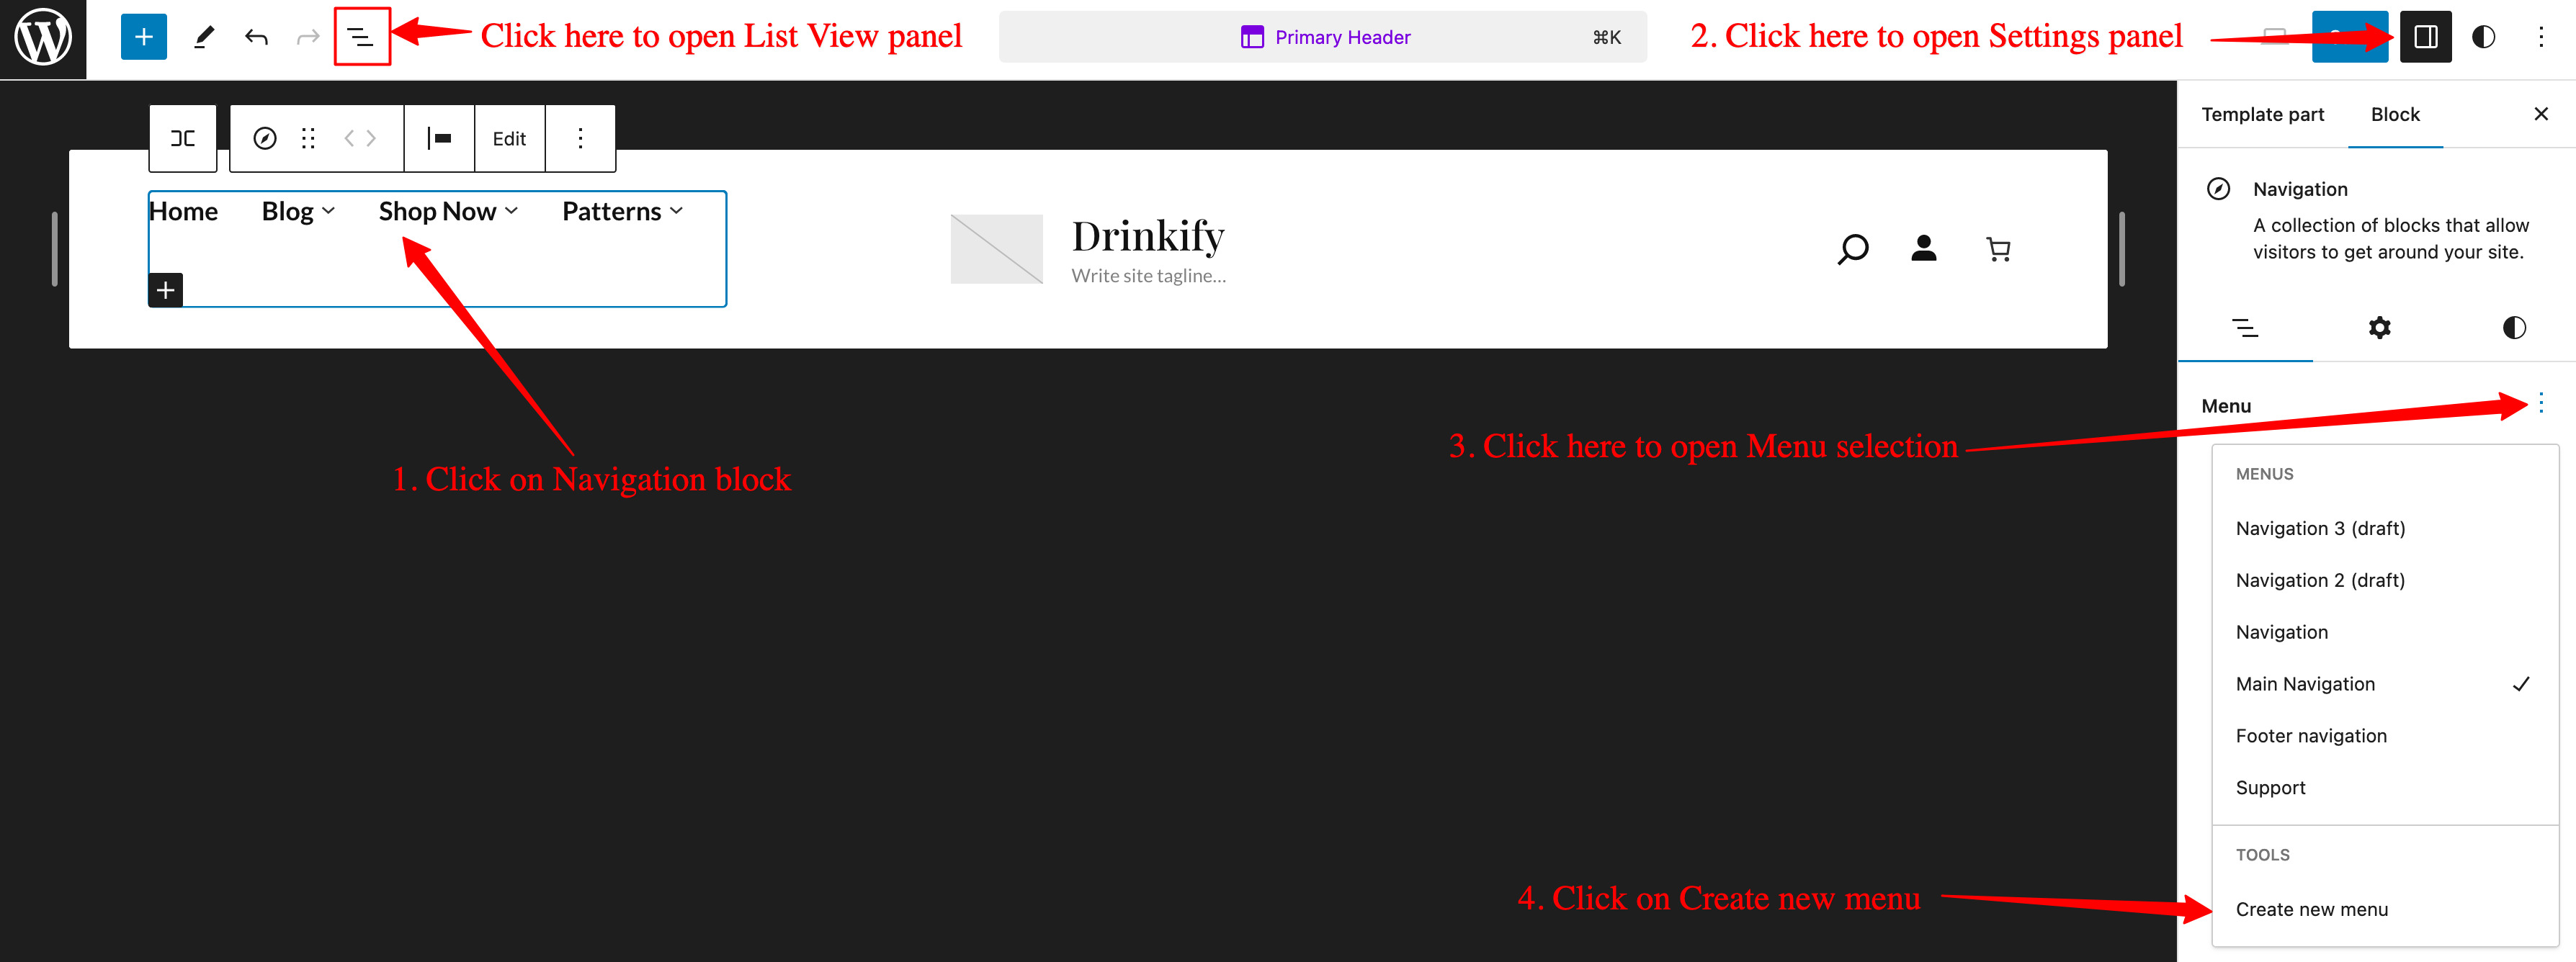
- Access the template part which has a Navigation block. The screenshot below shows the Navigation Block on the Primary Header template part.
- Click on the Navigation block and open the Settings panel which should show the Navigation block settings. Sometimes, you need to select “Select Navigation” from the toolbar to show the Navigation settings panel.
- From the Settings panel, click on Menu Selector and select Create New Menu.
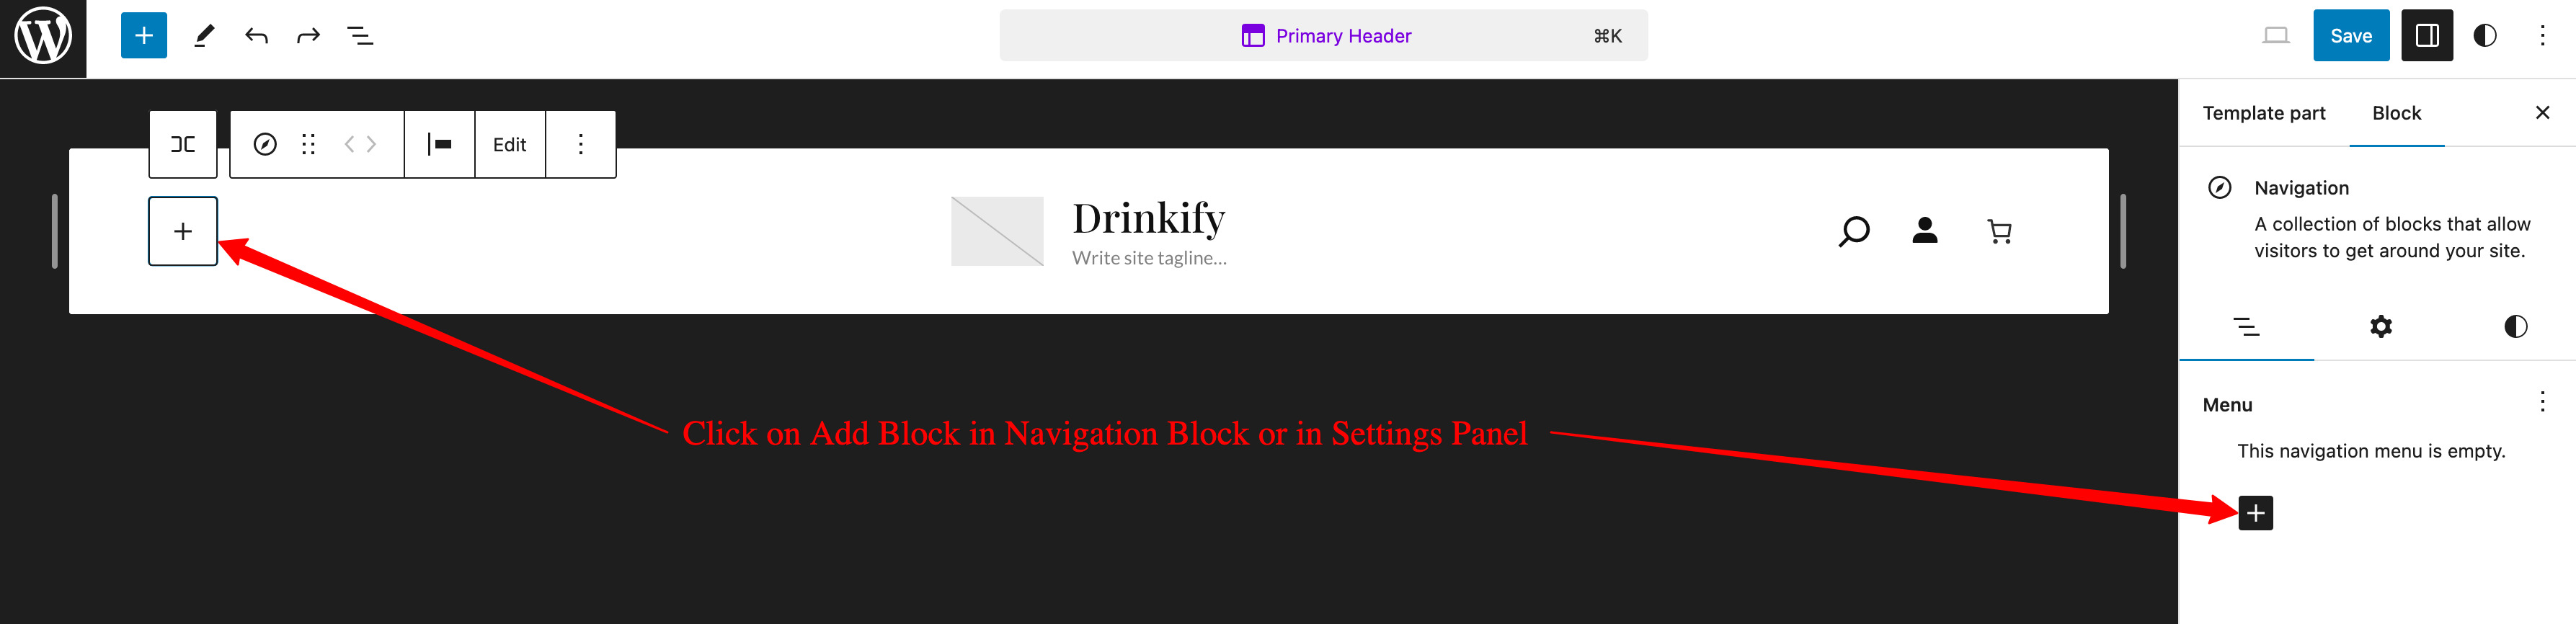
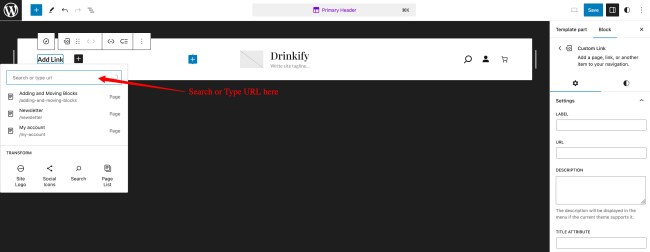
- This will add an empty menu, now click on the + Add Block button in the Navigation block or the Settings panel of the Menu. Then Search or Type the URL to add a page/post and also you can type a custom URL and label in the settings panel.
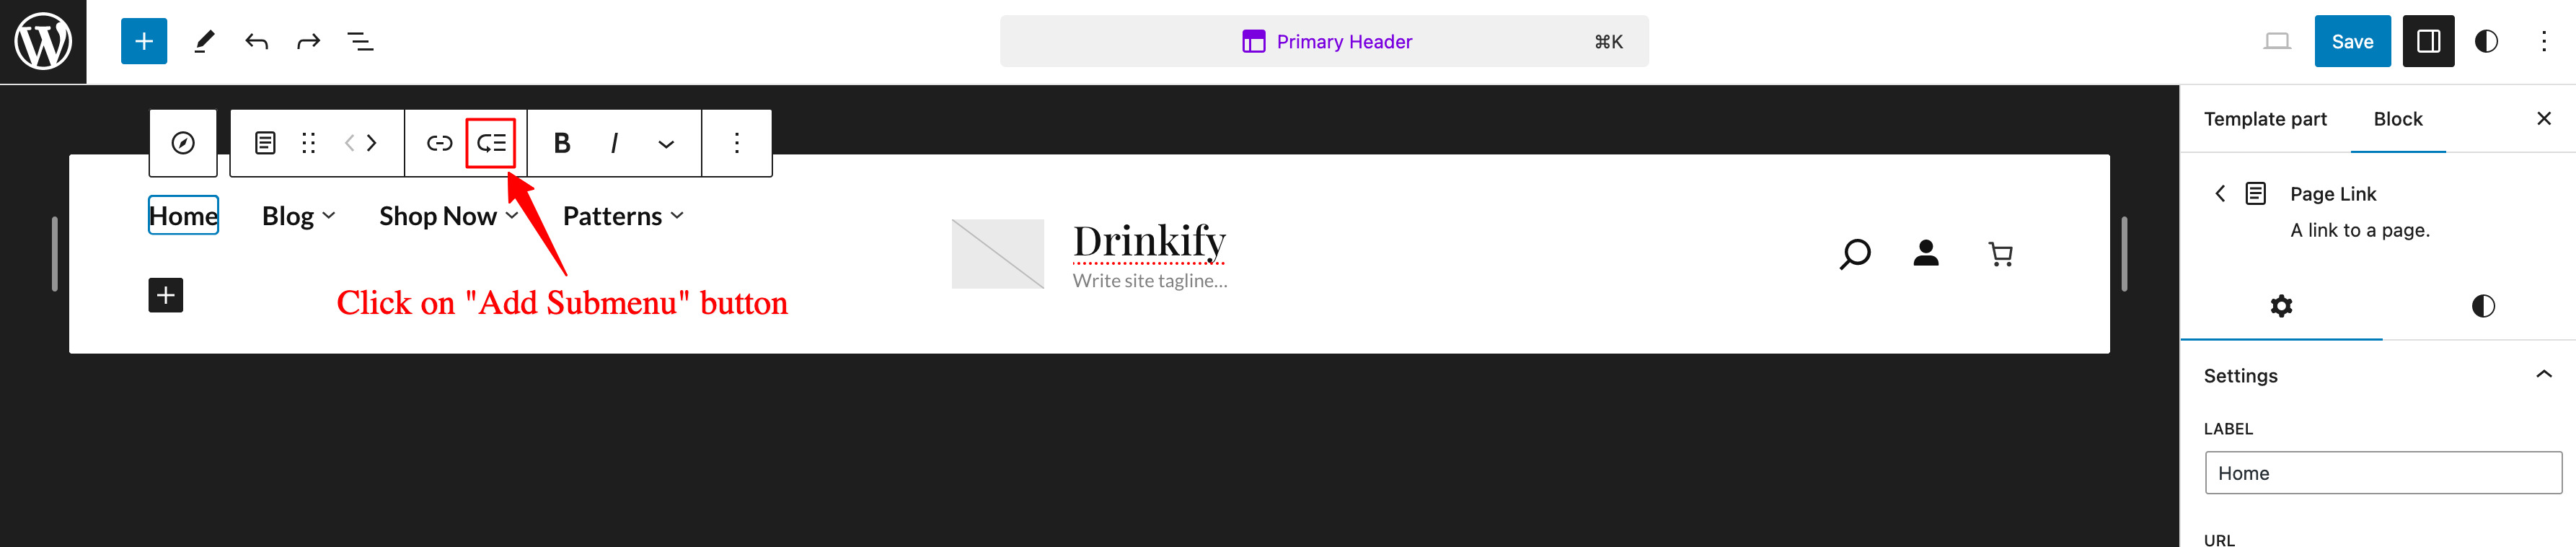
- To add submenu items, simply select the block you want to add submenu items to and, in the block toolbar, click on the submenu icon. This will automatically add a submenu item below the block you selected.
- After adding all the necessary links, click on the Save button.
More information on Creating a New Menu.
Social Icons Block (Social Media Menu)
↑ Back to topThe Social Icons block allows you to add icons linking to your social media profiles or sites. This helps to increase the visibility of your social media profiles. This theme has used the Social block in various template parts like Footer (With Four Columns), and Heder Top.
Editing Default Social Media Icons And Links
- Access the Site Editor as mentioned above.
- Access the template part which has a Social Icons block. The screenshot below shows the Social Icons Block on the Footer With Four Columns template part.
- You will see Facebook, Twitter, and Linkedin as the default Social Media Icons.
- To add a link to default Social Media Icons, just click on the Social Media Icon, add the URL for the social media profile in the input field, and press Enter.
- To remove any default Social Media Icon let’s say Instagram Icon, just click on the Instagram Icon, click on the Options (3 Horizontal dots) button in the Block Toolbar, and click on Remove Instagram.
- After editing Social Media Icons, click on the Save button.
Adding Social Media Icons And Links
- Access the Site Editor as mentioned above.
- Access the template part which has a Social Icons block. The screenshot below shows the Social Icons Block on the Footer With Four Columns template part.
- Select the Social Icons block and click on the (+) icon at the rightmost corner to show the list of available social media platforms.
- If you do not find the platform you are looking for in the menu, type the name of the platform in the search box.
- Select the icon from the menu to add it to the Social Icons block.
- Add the URL for the social media profile in the input field and press Enter.
- Repeat these steps for each of the social media profiles you want to add.
- After adding all the necessary Social Media Icons, click on the Save button.
More information on Social Icons Block.
Patterns
↑ Back to topBlock Patterns are a collection of predefined block layouts, available from the patterns tab of the block inserter. Once inserted into content, the blocks are ready for additional or modified content and configuration.
Using the block pattern is an easy way to create beautiful layouts. Besides standard patterns, Drinkify comes with 31 incredible pre-designed block patterns to produce professional designs.
To add a pattern, click on the block Add button, and then click on the Browse All button, in the floating block picker. In the left-hand side panel, click on the Patterns tab, and then from the dropdown pick the desired pattern group.
There are three ways to add Block Patterns using the Block Inserter (+) icon.
- Click on the Block inserter (+) icon in the top toolbar and Click on Patterns. Browse the Patterns and select the one that you like to add.
- Click on the Block inserter (+) icon to the right of an empty block, after that Click on the Browse All button, and finally Click on Patterns. Browse the Patterns and select the one that you like to add.
- Click on the Block inserter (+) icon in between blocks, after that Click on the Browse All button, and finally Click on Patterns. Browse the Patterns and select the one that you like to add.
Drinkify Block Patterns
↑ Back to topDrinkify comes with 31 incredible pre-designed block patterns to produce professional designs.
- 404 Header With Background
- 404 Header
- Archive Header With Background
- Archive Header
- Banner
- Best Seller
- Blog Header With Background
- Featured Category
- Featured Product
- Footer
- Footer With Four Columns
- Footer With Three Columns
- Header Media
- Hero Content
- Hidden 404
- Logo
- Mobile Sticky Icon Menu
- Modern Header With Cart Banner
- News
- Post Header With Background
- Post Header
- Product Sidebar
- Promo
- Recent Blog
- Recent Products Alternate
- Recent Products
- Search header With Background
- Search header
- Shop Header
- Sidebar
- Testimonial
Adding Drinkify Theme Patterns
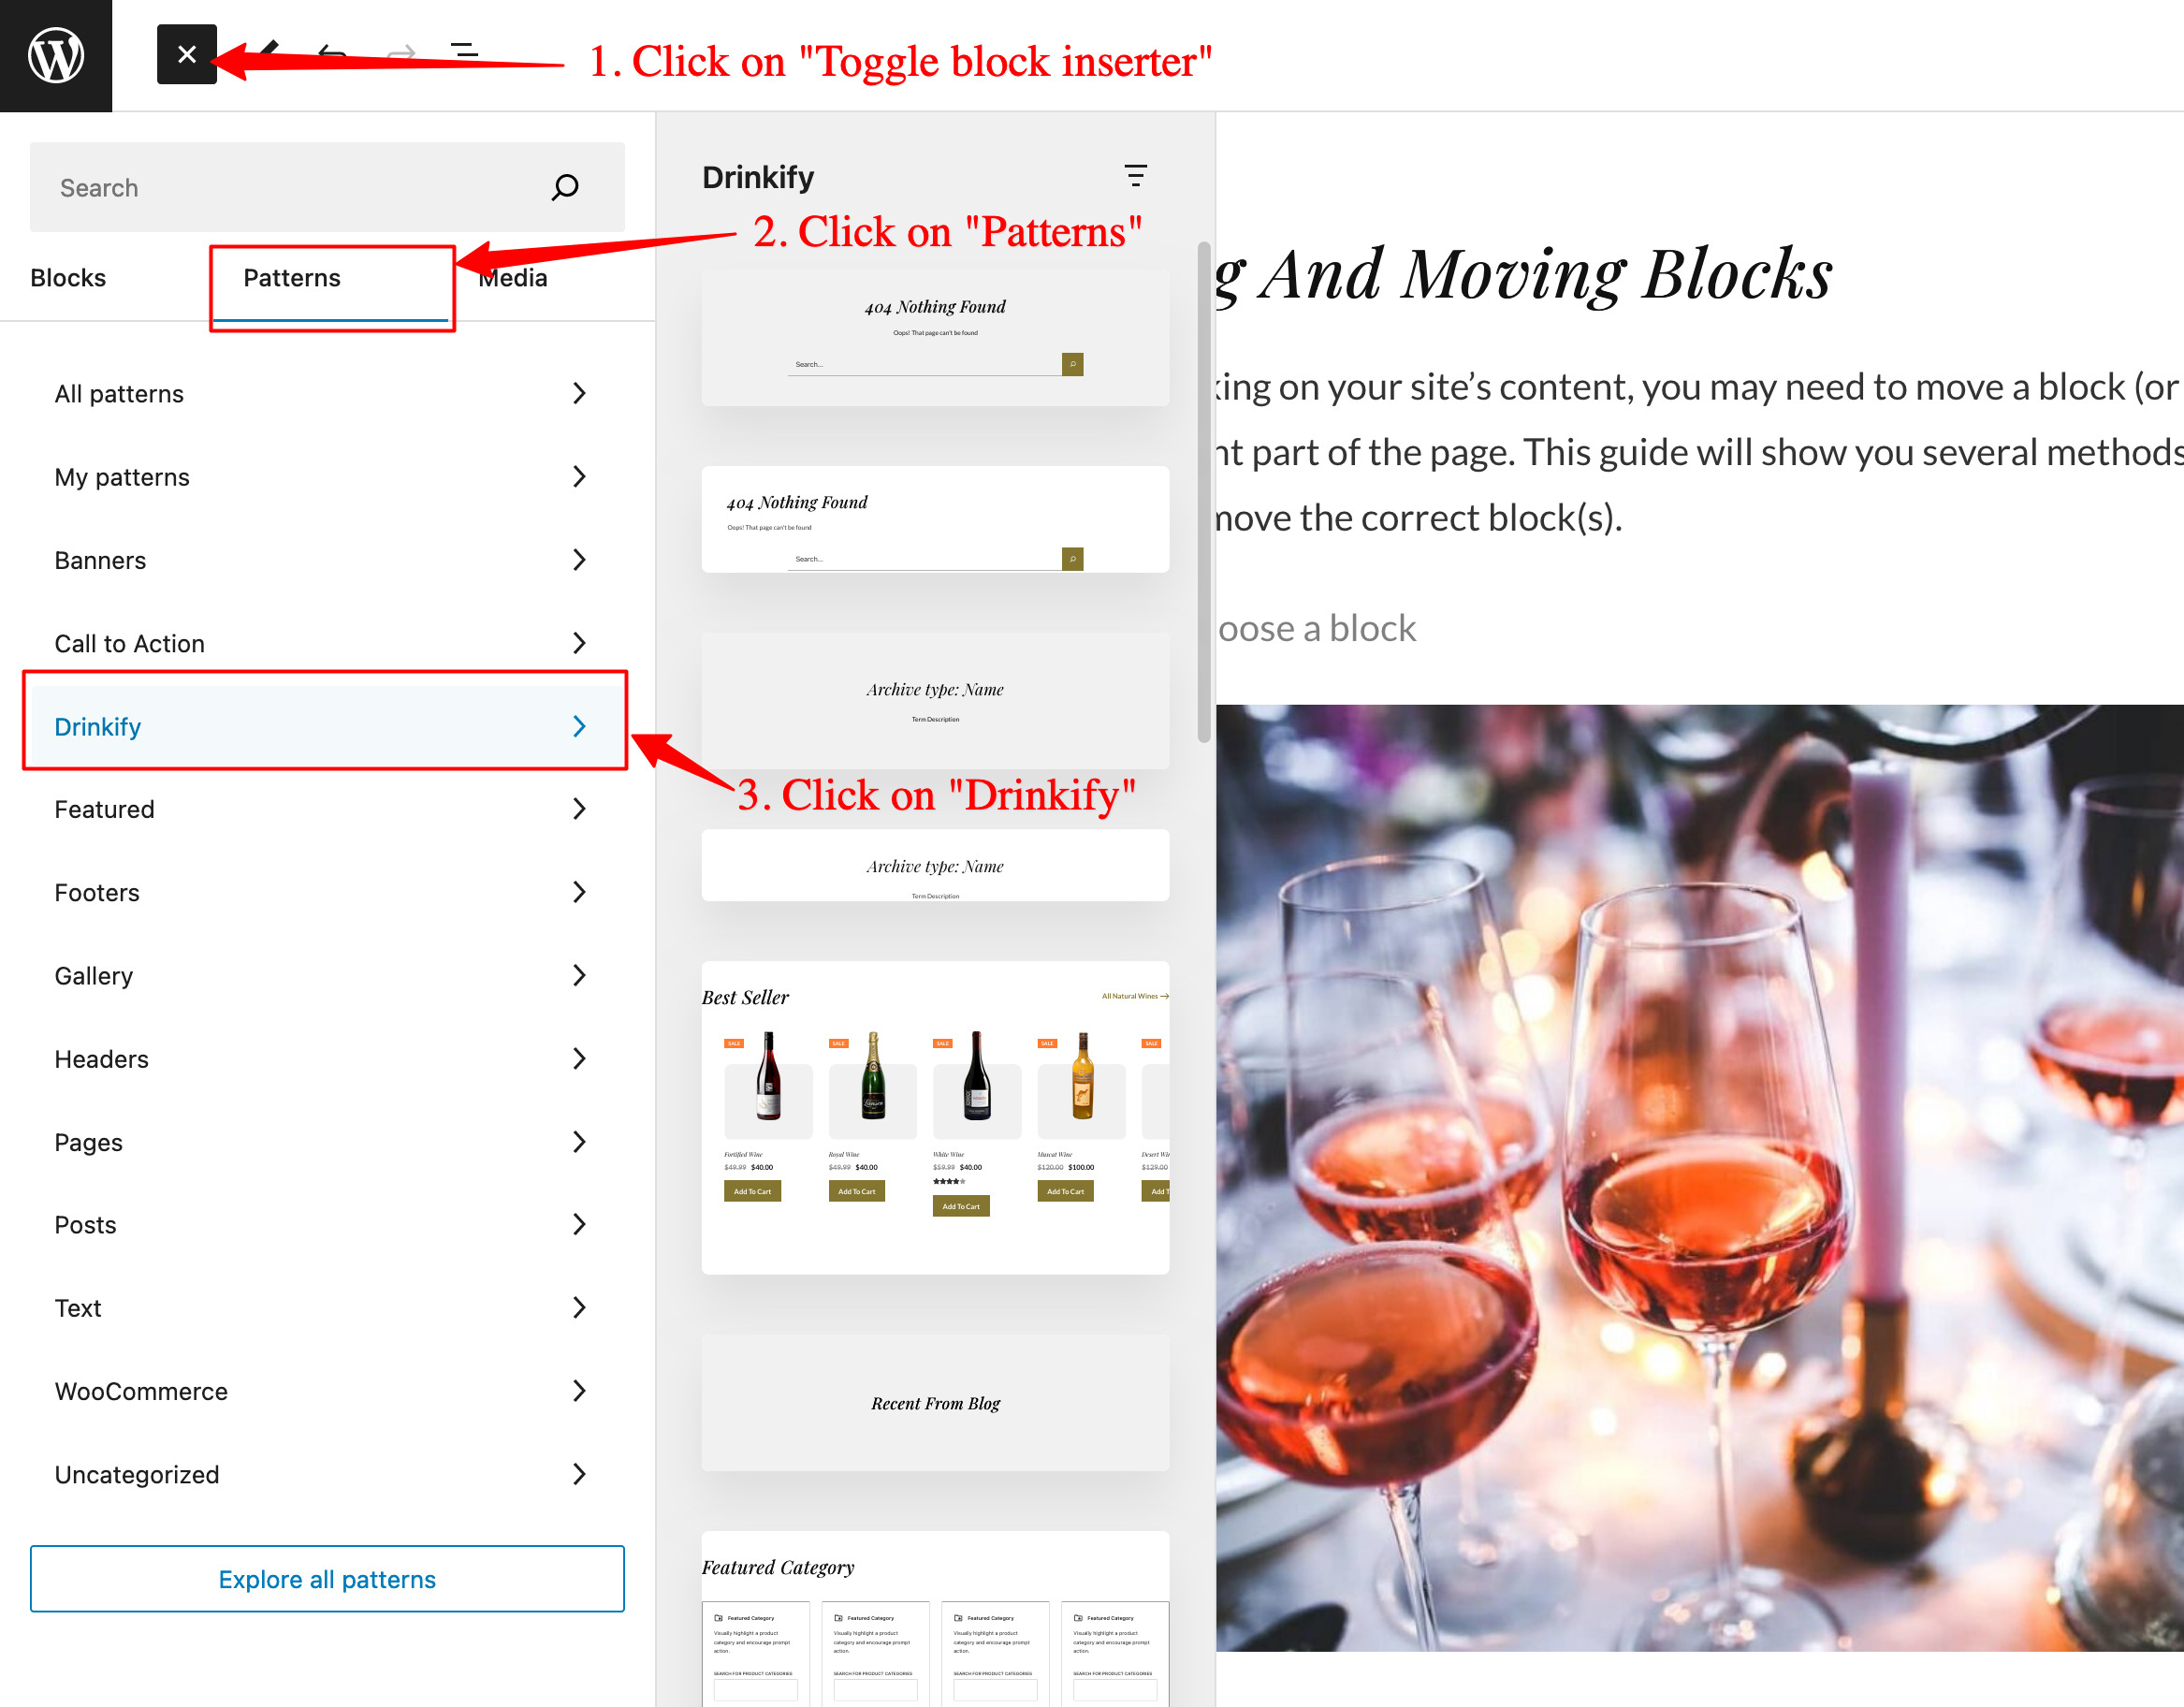
↑ Back to top- Click on the Toggle Block inserter (+) icon in the top toolbar.
- Click on Patterns.
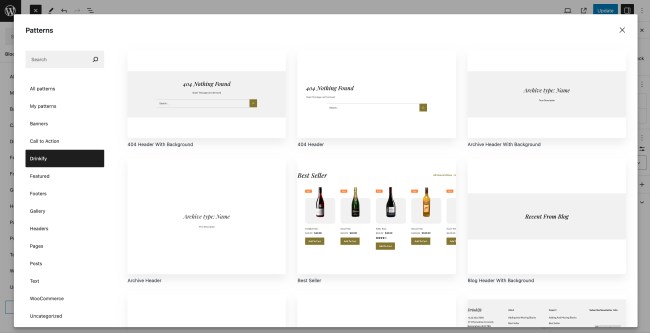
- Select Drinkify in the select box. Here you can also click on Explore all patterns to view all patterns.
- Select the Drinkify theme custom patterns.
More information on Block Patterns