The EU Energy Label for WooCommerce plugin allows you to assign official EU energy labels to your products according to the European Union’s energy classification rules. The plugin displays energy consumption labels and supports both the previous and latest versions issued by the EU.
As energy labelling is now mandatory for energy-consuming products sold in the EU, this plugin ensures your WooCommerce store remains compliant while helping customers make informed, energy-efficient choices.
Overview
The EU Energy Label for WooCommerce plugin offers the following features:
- Add EU energy labels to WooCommerce products.
- Enable labels on both shop and single product pages.
- Set the label position on individual product pages.
- Enable tooltip display on hover (for both product and shop pages).
- Set a custom image for tooltips.
- Use both previous and latest EU label formats.
- Add a custom redirect URL when hovering over tooltips.
- Choose default label colors.
- Select from multiple label types.
Installation
- To install the plugin:
- Download the
.zipfile from your WooCommerce account. - Go to your WordPress dashboard: Plugins → Add New.
- Click Upload Plugin at the top.
- Choose the downloaded
.zipfile. - Click Install Now, then Activate the plugin.
Setup and Configuration
Once installed, navigate to WooCommerce → EU Energy Label Settings to configure the plugin.
General Settings
↑ Back to topFrom the plugin settings page, you can:
- Enable labels on shop, archive, category, and single product pages.
- Define the default position for labels using dropdown options.
- Set tooltip behavior (image display, link redirect, etc.).

How to enable Plugin Working
- Navigate to the EU Energy Labels Setting Options under your WordPress Admin Dashboard.
- Toggle the Enable Plugin Working switch to activate the plugin.
- To display labels on the product and shop pages, enable the respective toggle switches.
- Choose the desired label position from the dropdown menu to control where labels appear on product pages.
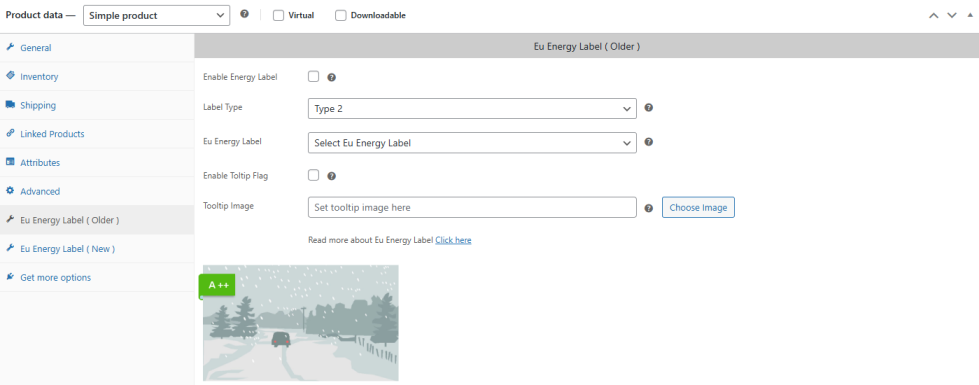
How to set Label to Product
- Go to the individual product edit page in your dashboard.
- Scroll down to the EU Energy Label (Old) and EU Energy Label (New) sections.
- Click on the EU Energy Label tab to configure the product’s label settings.
- Check the Enable box to activate labeling for that product.
- Choose the label type (from the two available options).
- Select the appropriate EU energy label category and optionally upload a custom tooltip image.

Frontend Display
↑ Back to topShop Page
- Labels appear on product thumbnails.
- Each label follows EU-standard color and layout.
- Hovering over a label (if enabled) will show the tooltip image.
Product Page
↑ Back to topTooltip functionality can also be enabled on the product page.
Labels are displayed in the configured position (e.g., near product image or description).

Shop Page View
The plugin allows you to display EU Energy Labels for each product on the Shop page based on its energy efficiency rating.
Tooltip Functionality
Tooltips provide additional information when users hover over the label. You can:
- Upload a custom image (e.g., a full-size energy chart).
- Set a custom URL that opens on click.
- Enable/disable tooltip on product/shop pages independently.
Theme and Builder Compatibility
The plugin is tested and compatible with the following popular themes and page builders:
- Elementor
- WPBakery
- Divi (Builder & Theme)
- Storefront
- Avada
- Woodmart
- Flatsome
- Porto
- XStore
- Shopkeeper
Translation
The plugin includes a .POT file, making it easy to translate into any language using tools like Loco Translate or Poedit.