Flexi Custom Order Status for WooCommerce Pro plugin helps you add and manage custom order statuses for your store. You can notify customers and admins about order updates through email or SMS when the status of an order is changed to a custom status. The plugin can send automatic alert notifications for admins have stayed for a pre-defined period of time on a particular custom status. With this plugin, you can also customize the default WooCommerce order statuses, set a custom order status for any payment method selected, automate stock adjustments, and efficiently update multiple orders in bulk.
Installation
↑ Back to top- Download the .zip file from your WooCommerce account.
- Go to: WordPress Admin > Plugins > Add New and Upload Plugin with the file you downloaded with Choose File.
- Install Now and Activate the extension.
More information at Install and Activate Plugins/Extensions.
Setup and Configuration
↑ Back to topThe general settings of Flexi Custom Order Status for WooCommerce Pro plugin helps you to add custom statuses in different sections on the admin side, add default status for different payment methods, make the custom status orders editable and much more.
Settings for Custom Order Status
↑ Back to topThe settings of Custom Order Status for WooCommerce Pro plugin helps you to configure how custom order statuses behave across your store. It helps you assign default statuses, maintain consistency with fallback options, control how statuses appear in the admin interface, add default status for different payment methods, make the custom status orders editable and much more.
Let us understand these settings in detail.
Settings for Custom Order Status
↑ Back to topTo go to the Settings page, follow the path WooCommerce -> Settings -> Custom Order Status -> Settings.
A default Settings page looks like as shown below:


Order Status Defaults
↑ Back to topThis section lets you configure the default behavior of order statuses in your store.
Default order status
↑ Back to topThe Default Order Status option allows you to choose which status should be assigned to orders by default. This is useful when you want all new orders to follow a consistent starting point in your workflow. You can select a default order status for an order from the drop-down. This drop-down will include all the custom order statuses as well as the default statuses as shown below. Hence, if you want, you can also opt to assign a custom status as a default order status to an order.

Custom order statuses displayed in drop down
Initially, you can set a default order status that will be applied to all new orders in your store. However, in some cases, you may want different order statuses to be assigned based on the payment method selected by the customer.
To handle such scenarios, the plugin allows you to assign specific order statuses to individual payment gateways.
Note: The default order status is applied to new orders unless a specific status has been assigned to the selected payment method. In such cases, the payment method status takes precedence and overrides the default status.
For example, if the default status is set to Processing, but the status for the BACS (Bank Transfer)payment method is set to Awaiting Bank Transfer, then orders placed using that payment method will be assigned the Awaiting Bank Transfer status instead of Processing.
Set order status for payment gateways
The setting to set order status for payment gateways is available under the Status by Payments tab of the plugin.
It allows you to assign specific order statuses to each payment gateway, including both the default WooCommerce payment methods and any additional gateways added to your store.

The status selected for Credit Card (Stripe) will be applied to orders placed using this payment method, even if a global default order status is set.
For example, if the default order status is Processing and the status for Credit Card (Stripe) is set to Credit Card Payment Processing, then orders placed using this method will be assigned the Credit Card Payment Processing status instead of Processing.

Default order status for Credit Card (Stripe) payment method is set to Credit Card Payment Processing.
Cash on Delivery (COD)
Similarly, the status selected for Cash on Delivery will be applied to orders placed using this payment method.
For instance, if the default order status is Pending and the status for COD is set to COD Order Confirmed, then orders placed using COD will be assigned the COD Order Confirmed status instead of Pending.
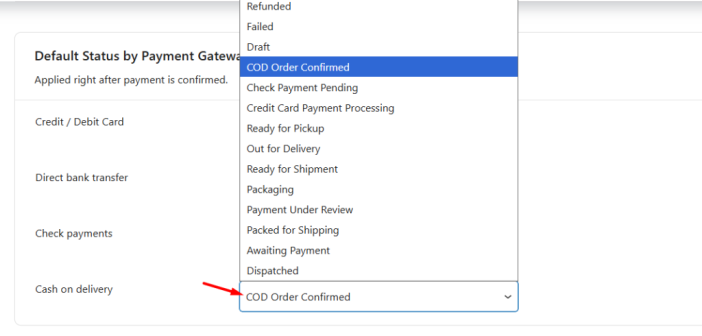
Default order status for COD payment method is set to On Hold
Note – You can also select custom order statuses from the dropdown for COD and other payment methods.
Apply fallback status when plugin is disabled
↑ Back to topWhen the plugin is disabled, custom order statuses may no longer be available. Enabling this option ensures that such orders are reassigned to the default order status configured in the plugin.
For example, if the default order status is set to Processing, then orders using custom statuses will be automatically updated to Processing when the plugin is disabled.

Fallback delete order status set as Processing
Status when a custom status is deleted
↑ Back to topThis setting allows you to choose a fallback status that will be applied to orders when a custom order status is deleted.

When a custom status is removed, any orders currently assigned to that status cannot remain without a valid status. In such cases, those orders are automatically reassigned to the status selected here.
For example, if a custom status like Ready for Dispatch is deleted and this setting is configured as On hold, then all orders that were using Ready for Dispatch will be updated to On hold.
Display Settings
↑ Back to topThis section controls how custom order statuses are displayed and accessed within the admin interface.
Add custom statuses to admin order bulk actions
↑ Back to topWhen this setting is enabled, your custom statuses appear in the Bulk Actions dropdown on the Orders page. This allows you to update the status of multiple orders at once.

For example, after packaging several orders, you can select them in bulk and choose Change status to “Ready for Dispatch” from the dropdown. This helps update multiple orders quickly without opening each one individually.

Add custom statuses to admin reports
↑ Back to topEnable this option to include orders with custom statuses in your store reports.

If this setting is enabled, orders with custom order statuses such as Awaiting Quality Check or Payment Verification Required will also be counted in reports like Orders, giving you a more accurate view of total orders and revenue.
Show custom statuses in order list actions
↑ Back to topWhen you create a new custom order status, you are asked to choose an icon code and icon color. This selected icon gets displayed on Admin’s Orders page under the Actions column when Show in order list actions setting is enabled. This icon represents the custom status and when it is clicked, the corresponding order status changes to this custom order status.
You need to enable the setting Show colors for action buttons if you want to add the icon along with the selected color under Actions column.

Icons displayed under Actions column for Custom statuses
This option when enabled without enabling the color, the icons will appear in standard grey color. This setting allows you to display custom status icons under Actions column for quick change action of order status. Hence its considered as one of the vital settings of the plugin.
Enable colors in status column
↑ Back to topThis setting displays custom statuses in their assigned colors in the Status column of the Orders page.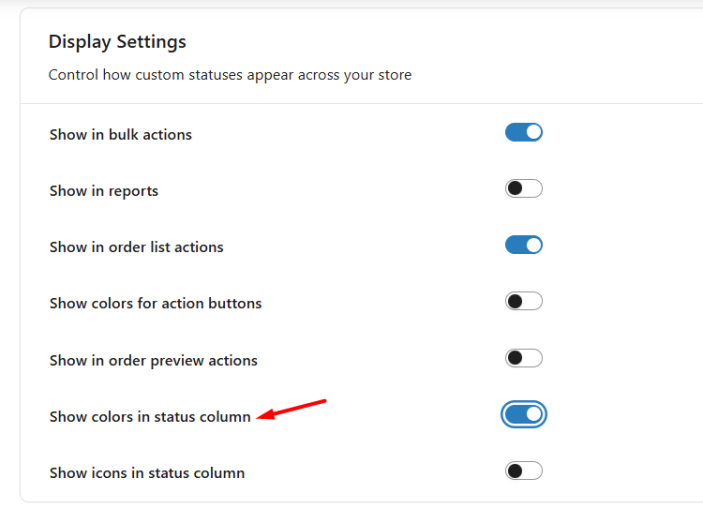
For example, you may configure the status Awaiting Payment in orange and Ready for Dispatch in blue. With colors enabled, admins can quickly identify orders that need attention (e.g., payment verification) without opening them.
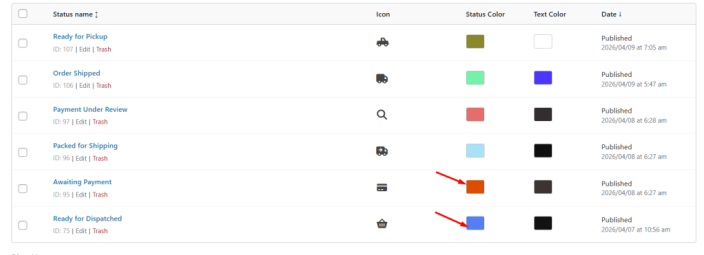
Status table showing custom statuses added colors
The Status column on admin’s Orders page will display custom statuses with their respective colors as shown below:

Status column displaying statuses with their assigned colors
If this option is unchecked, the statuses will be displayed without their assigned colors and appear in standard grey color as shown below:

Status column displaying statuses without their assigned colors
Add custom statuses to admin order preview action buttons
↑ Back to topEnable this option to display custom statuses in the order preview popup (opened via the eye icon).

When previewing an order, you can immediately see that it is in Ready for Dispatched status without opening the full order page.
This helps admins quickly review order details along with its status in one place.

Custom order status displayed on the Preview page
Hence, this option allows the display of custom status on the preview page so that one can get all orders details along with the order status together on the same page.
Advanced Options
↑ Back to topThis section includes additional settings to control the behavior of custom order statuses.
Make custom status orders editable
↑ Back to topThis setting allows you to edit orders even when they are in a custom status.

If an order is marked as Ready for Dispatch, but you need to update customer details or change items, enabling this option allows you to edit the order as usual.


If disabled, the order becomes non-editable and shows a message like “This order is no longer editable.”
Change status to custom order status
Make custom status orders paid
↑ Back to topWhen enabled, orders with custom statuses are treated as paid orders, similar to Processing or Completed.
If an order is marked as Ready for Dispatch, enabling this setting ensures it is treated as a paid order.

Filters Priority
↑ Back to topThis setting allows you to control the priority at which the plugin’s filters are applied in WooCommerce.
By default, the value is set to 0. You can increase or decrease this value if you need to adjust how the plugin interacts with other plugins or custom code that also use filters.
In most cases, the default value works well and does not need to be changed.

Reset Settings
↑ Back to topThis option allows you to reset all the settings in this section to their default values.
When you enable the Reset section settings checkbox and click Save changes, all the configured options will be reverted back to their default state.
Reset Usage Tracking
↑ Back to topThis option allows you to reset the usage tracking data collected by the plugin.
When enabled and saved, the existing tracking data is cleared and tracking starts fresh.

After configuring the behavior of order statuses, you can define your own workflow by creating custom statuses. Follow the step-by-step guide in this doc to get started to create new custom order statuses.
Additional Features
↑ Back to top- Add, Edit & Delete Custom Order Status
- Set Custom Order Status Rules
- Sending Email Notifications
- Notify Admins via Emails about custom status change after a period of time
- Modify WooCommerce Order Statuses to custom order statuses
- Notify customers about change in order status with SMS
FAQ’s
↑ Back to topView all FAQ’s from here.
Questions & Support
↑ Back to topHave a question before you buy? Please fill out this pre-sales form.