The AI Assistant extension is a powerful, intuitive tool designed to elevate your WooCommerce product descriptions to the next level. Utilizing OpenAI’s cutting-edge language models (GPT-3 and GPT-4), it can transform your prompts into detailed, engaging, and attractive product descriptions, short product descriptions, and review responses.
Requirements
↑ Nach oben- PHP 5.6+
- WooCommerce 4.0+
- An Open AI API key
Installation
↑ Nach obenThe Kestrel AI assistant extension is available on the WooCommerce Marketplace. Please purchase and download the extension from the WooCommerce Marketplace.
- Download the .zip file from your WooCommerce account.
- Go to: WordPress Admin > Plugins > Add New and Upload Plugin with the file you downloaded with Choose File.
- Install Now and Activate the extension.
Setup and Configuration
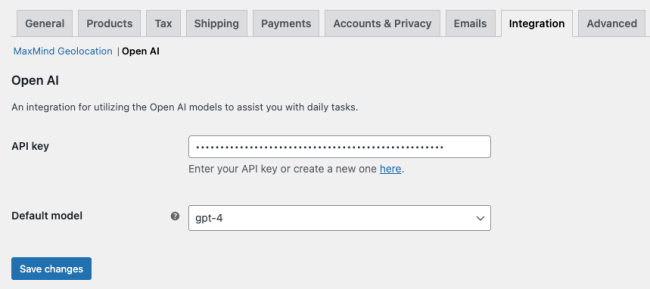
↑ Nach obenOnce the extension is installed and activated, you can proceed to configure it. You will find the settings in “WooCommerce > Settings > Integrations > Open AI”.
Note: You can find quick access to the settings page by clicking on the “Settings” link you can find in the plugin list.
First of all, you need to enter your Open AI API key. If you don’t have one, you can obtain it here.
After pasting the API key in the setting with the same name, save the form. The key will be validated, and if everything is okay, a list with the available models will appear.
Select the “Default model” the extension will use. At this moment, only the models “GPT-3.5-turbo” and “GPT-4” are supported.
Note: The “GPT-4” model will only appear in the list when available to your OpenAI account.
Click on “Save changes” to save your settings.
That’s all the configuration needed. You can start using the AI Assistant now.
AI Assistant tasks
↑ Nach obenHere is a list of tasks the AI Assistant is able to accomplish to:
Generate product description
↑ Nach obenAdding the description to a product is one of the most time-consuming when manually done. Fortunately, the AI Assistant is able to generate this content from a series of guidelines and product info. Here is an example:
The steps to follow are:
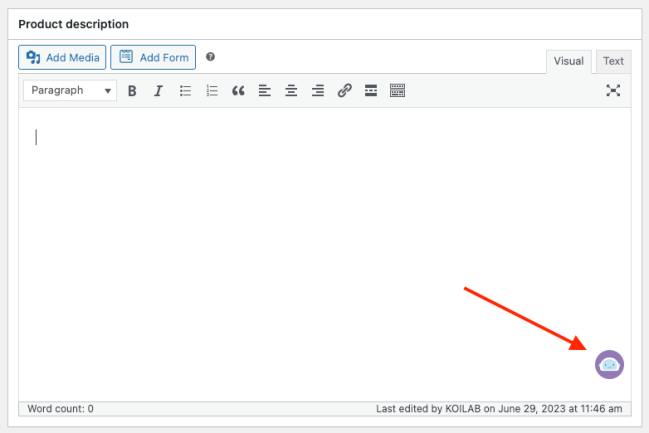
- Go to the edit screen of the product you want to generate the description.
- In the “Product description” metabox, click on the assistant icon located in the bottom-right corner of the textarea.
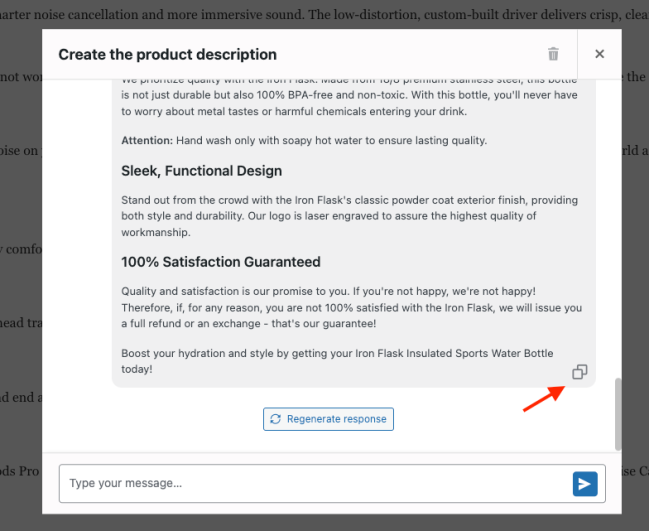
A modal window will open with a text field to input your prompt. This is what instructs the AI on how to generate your product description.
By default, a ready-made prompt is provided. This default prompt takes the text from your existing product description and uses it to generate a new, more detailed, and attractive description. The prompt message to the AI is the text contained within triple single quotes ”’ ”’. In the default prompt, we ask the AI to format the text into HTML and write a detailed and attractive product description. You may edit the prompt as you wish.
Tip: When editing the prompt, if you type {, a dropdown list of placeholders will appear. For example, you could select {product_description} and this will include any text already in the product description text box when generating the new description. This allows for easy and accurate data insertion directly into your prompts. Just ensure you keep your instruction to the AI within the triple single quotes ''' '''.
Once you’re happy with your prompt, submit it and wait for the response.
Summarize product description
↑ Nach obenOnce you have the description of a product, you can ask the AI Assistant to generate a short description by summarizing the product description. The steps are the same as described above.
Reply to a review
↑ Nach obenHave you received a product review and would like to thank (or apologize for) the customer? The AI Assistant can also do this task!
Navigate to the product review, and click on the “Reply” link to display the textarea. Now, click on the assistant icon and ask him for a reply. Remember to use the available placeholders in your prompt by typing {.
Add order note
↑ Nach obenSometimes, you need to notify the customer about something important related to its order. Adding a note to the order is the most common way to do it, and of course, the AI Assistant can help you to redact this text.
Just go to the edit-order screen, and in the right sidebar, you will find the “Add note” form with the assistant icon ready to help.
We have seen several tasks the assistant can handle, but remember that for all of them, the key is the prompt you give to the AI. Make sure it’s tailored to the context – be it a short description or a review response.
Conversation management
↑ Nach obenAfter receiving the first response from the AI Assistant, you can keep chatting with it to iterate over the content you are trying to generate. During the conversation, you have several actions to perform:
Select response
↑ Nach obenWhen you are satisfied with the returned response, select the message by clicking on it.
Note: You can select past responses, not only the last one.
If you choose to insert the text, please note that it will be appended to any existing content in the ‘Product Description’ box, rather than replacing it. This means your original text will remain intact, and the new AI-generated content will be added to the end. You can then edit the post as normal.
Regenerate response
↑ Nach obenIf you’re not entirely satisfied with the current AI-generated response, but believe it can provide a better output, click the “Regenerate response” button. This will instruct the AI Assistant to use the same prompt to generate a new version of the text.
Delete conversation
↑ Nach obenAll conversations are automatically stored in the database in order to continue the conversation with the AI Assistant. Sometimes, you might want to delete a conversion to start a new one with a better prompt. To do so, click on the “Trash” icon located in the top-right corner and confirm the action. You will be redirected to the initial prompt screen.
Remember, the AI Assistant is here to make your job easier, so feel free to use these features as much as needed until you’re satisfied with the results. Your goal is to create the most engaging and detailed content possible, and the AI Assistant is here to help you achieve that.
And that’s it! You’ve just used the AI Assistant to generate a detailed, attractive product description for your product. Repeat these steps for any other products you want to enhance with AI-generated descriptions.
OpenAI API disclaimer
↑ Nach obenWhen using the AI Assistant extension, please keep in mind that it relies on the OpenAI API to generate content. As with any API, there can be instances where requests may take some time or even result in errors. This is not necessarily a fault of the extension, but a part of the API’s operation that users should be aware of.
Here are some examples of possible behaviors and errors:
- API Response Times: OpenAI’s GPT-3 and GPT-4 models are extremely powerful, but that also means they need to process a significant amount of data. As a result, API calls can sometimes take a bit longer than expected. For a typical call, you might expect a response within a few seconds. However, during peak usage times or for particularly complex requests, response times might increase.
- Rate Limit Errors: OpenAI implements rate limiting to ensure fair usage amongst its users. If you’re making a large number of requests in a short period, you might encounter a
rate limit exceedederror. If this happens, try waiting for a minute or two before making another request. - Validation Errors: If there’s an issue with the input data you’re sending to the API, you might encounter a
validation error. Double-check your prompts and API settings if you’re seeing this error. - API Outages: Like any online service, OpenAI’s API can occasionally have outages or disruptions. If you’re encountering errors and you’re certain your requests and settings are correct, check OpenAI’s status page or Twitter feed for any reported issues.
Please understand that these occurrences are normal when dealing with real-time APIs and are not specific to the AI Assistant Extension. We recommend patience and understanding while the OpenAI API processes your requests to generate high-quality content.