Overview
↑ Back to topMautic Integration for WooCommerce syncs your WooCommerce customers’ data on Mautic. So that you can segment your WooCommerce customers, set automated & targeting campaigns, and recover your abandoned carts easily. Businesses can get more leads, sales, and conversions by using WooCommerce Mautic Integration.
Additionally, our Mautic integration plugin offers compatibility with Event Tickets Manager for WooCommerce, CF7, WooCommerce Subscriptions, and HPOS.
Installation
↑ Back to top- Download the .zip file from your WooCommerce account.
- Go to: WordPress Admin > Plugins > Add New and Upload Plugin. With the file you downloaded, Choose File.
- Install Now and Activate Plugin.
Setup and Configuration
↑ Back to topTo begin configuring Mautic Integration for WooCommerce, navigate to WooCommerce > Mautic > Get Started tab.
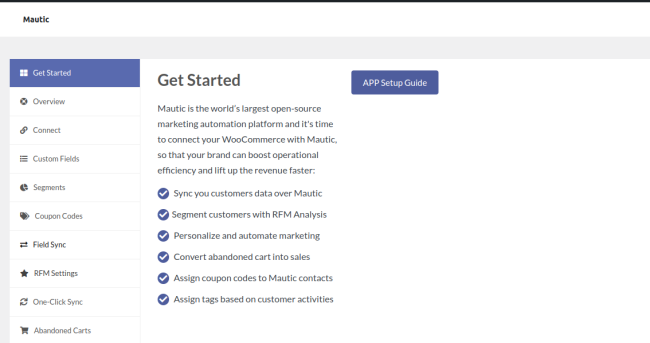
Click Next to authorize the connection between your Mautic account and the WooCommerce store.
Once connected, you’ll get a message and a Proceed to the next step button. Click on it to move to the next step which is Mautic Custom Fields.

Note: If needed, you can also Change and Re-Authorize your Mautic Account.
Connection with Mautic Account
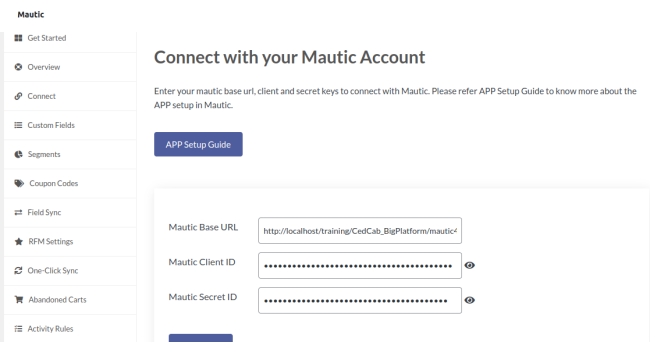
↑ Back to topAs soon as you click on the Get Started button, you’ll see the Connect tab. This tab will ask you to fill Mautic Basic URL, Mautic Client ID, and Mautic Secret ID.

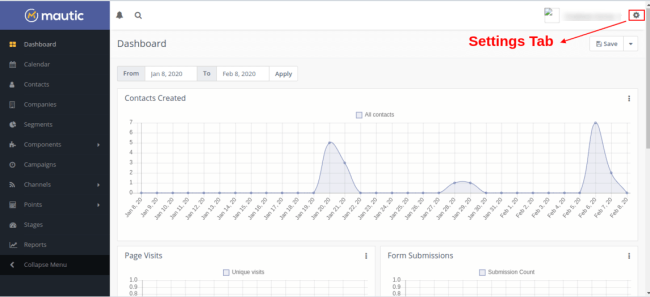
To generate your set of Mautic API keys, navigate to Mautic Settings.
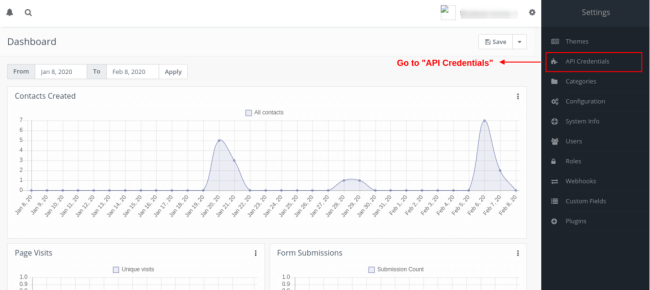
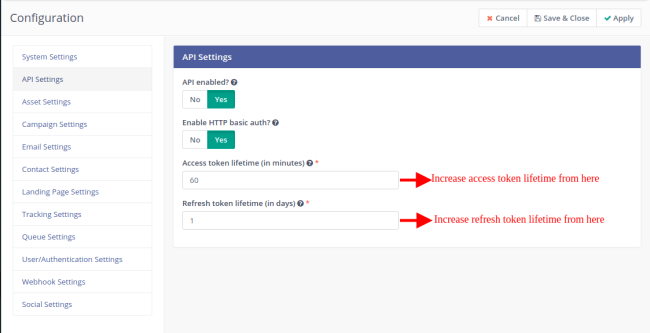
- Go to Configuration > API Settings.
- Toggle on API Enabled and Enable HTTP basic auth options.

Note: If you don’t enable these options, the API Credentials setting won’t appear in your Mautic CRM.
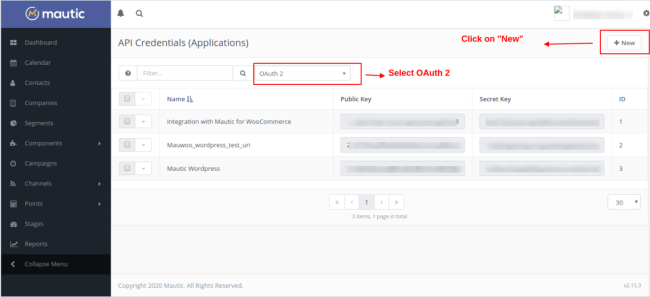
Next, click into API Credentials.
Select New to create a fresh App connection in Mautic.
Start creating a new App by entering in the Authorization protocol, app Name and the Redirect URI.
- Your Redirect URL will be: https://your-site-url/wp-admin/admin.php
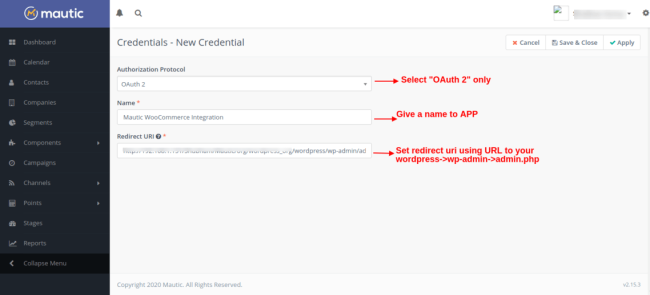
- Save the App and your Client ID and Client Secret keys will be generated to authorize the connection.

By default, the refresh token is valid for 14 days. You can configure both Access and Refresh token lifetime via Mautic Settings > Configuration > API Settings. Once the refresh token expires, you will be required to manually reauthorize the connection.
Note: It’s recommended that you increase the lifetime of an access token and refresh the token before connecting the extension to Mautic to avoid manual reauthorization.
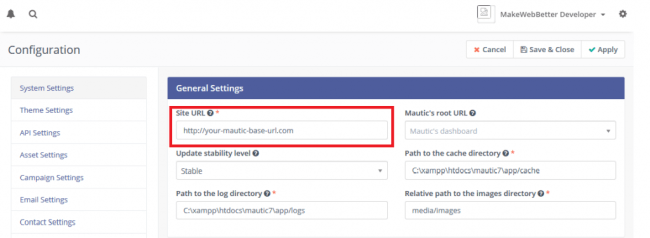
After generating your set of API keys, navigate to Mautic Settings > Configuration > General Settings to get your Mautic Base URL.
Your Site URL is your Mautic Base URL.
Navigate back to the Mautic Integration for Woo plugin settings page (WP Admin > WooCommerce > Mautic > Connect). Enter your Mautic Base URL, Mautic Client ID, and Mautic Secret ID, and select Authorize.
You will then be redirected to Mautic and prompted to permit to connect your account. Click Accept.
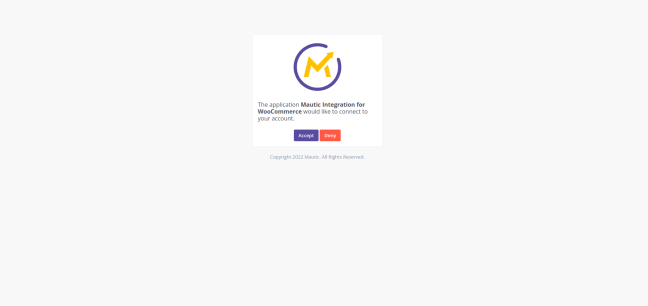
Mautic Integration for WooCommerce will now be successfully connected to your Mautic account.
Note: Please ensure all details (connection status, account email, and token renewal) are present under the Connect tab. If any of those details are missing, you will need to clear your Mautic cache and will have to set up the connection again. For more information about clearing cache, please refer to the troubleshooting guide.
Usage
↑ Back to topCustom Fields
↑ Back to topOnce you have successfully connected your Mautic account, you’ll be prompted to create custom fields in your Mautic account. Custom fields will help you to segment your WooCommerce customers.
Mautic Integration for WooCommerce creates over 70+ custom fields allowing you to capture your customer’s data and order information in Mautic Custom Fields.
Creating Custom Fields
Within the Custom Fields tab, select Start Setup.
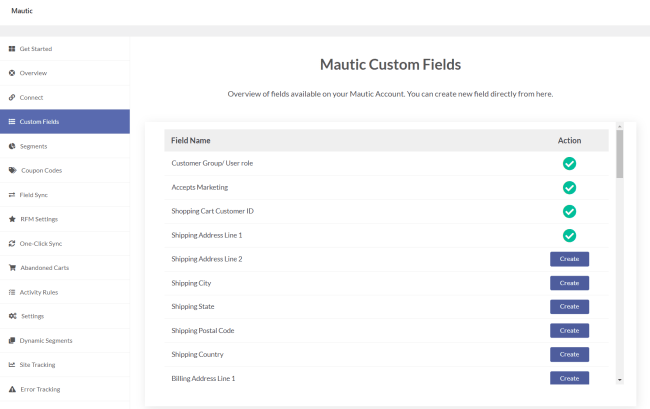
The plugin will start creating the custom fields you’ve selected in your Mautic account.
Custom Fields:
1) Customer Group: (i) Accepts Marketing, (ii) Customer Group/ User role, (iii) Shopping Cart ID
2) Shopping Cart Information: (i) Shipping Address Line 1, (ii) Shipping Address Line 2, (iii) Shipping City, (iv) Shipping State, (v) Shipping Postal Code, (vi) Shipping State, (vii) Shipping Country, (viii) Billing Address Line 1, (ix) Billing Address Line 2, (x) Billing City, (xi) Billing State, (xii) Billing Postal Code, (xiii) Billing Country
3) Order: (i) Last Order Status, (ii) Last Order Fulfillment Status, (iii) Last Order Tracking NumberLast Products Bought, (iv) Last Order Tracking URL, (v) Last Order Shipment Date, (vi) Last Order Number, (vii) Last Order Payment Method, (vii) Total Number of Current Orders
4) Last Products Bought: (i) Last Product Bought, (ii) Last Product Types Bought, (iii) Last Products Bought, (iv) Last Total Number Of Products Bought, (v) Product Types Bought, (vi) Products Bought, (vii) Total Number Of Products Bought, (viii) Last Products Bought Product 1 Image URL, (ix) Last Products Bought Product 1 Name, (x) Last Products Bought Product 1 Price, (xi) Last Products Bought Product 1 Url, (xii) Last Products Bought Product 2 Image URL, (xiii) Last Products Bought Product 2 Name, (xiv) Last Products Bought Product 2 Price, (xv) Last Products Bought Product 2 Url, (xvi) Last Products Bought Product 3 Image URL, (xvii) Last Products Bought Product 3 Name, (xviii) Last Products Bought Product 3 Price, (xix) Last Products Bought Product 3 Url, (xix) Products Attributes
5) Categories Bought: (i) Categories Bought, (ii) Last Categories Bought
6) RFM Information: (i) Total Value of Orders, (ii) Average Order Value, (iii) Total Number of Orders, (iv) First Order Value (v) First Order Date, (vi) Last Order Value, (vii) Last Order Date, (vii) Average Days Between Orders, (viii) Account Creation Date, (ix) Order Monetary Rating, (x) Order Frequency Rating, (xi) Order Recency Rating
7) SKUs Bought: (i) Last SKUs Bought, (ii) SKUs Bought
8) Abandoned Cart: (i) Current Abandoned Cart, (ii) Abandoned Cart Products HTML, (iii) Abandoned Cart Products Count, (iv) Abandoned Cart Total Value (v) Abandoned Cart Products, (vi) Abandoned Cart URL, (vii) Offered Abandoned Cart Coupon Codes
9) Dynamic Coupon Code Generation: (i) Coupon Code Offered, (ii) Coupon Codes Used, (iii) Coupon Discount Amount, (iv) Coupon Expiry Date, (v) Last Coupon Code Used
10) WooCommerce Subscription fields: (i) Last Subscription Order Number, (ii) Last Subscription Parent Order Number, (iii) Last Subscription Order Status, (iv) Last Subscription Order Creation Date, (v) Last Subscription Order Paid Date, (vi) Last Subscription Order Completed Date, (vii) Last Subscription Trial End Date, (viii) Last Subscription Next Payment Date, (ix) Last Subscription Billing Period, (x) Last Subscription Billing Interval, (ix) Last Subscription Products
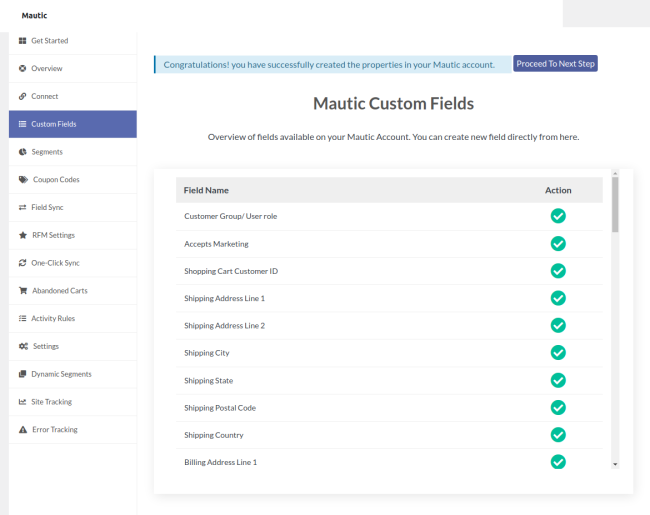
Once the fields are created, click Next Step to configure Segments.
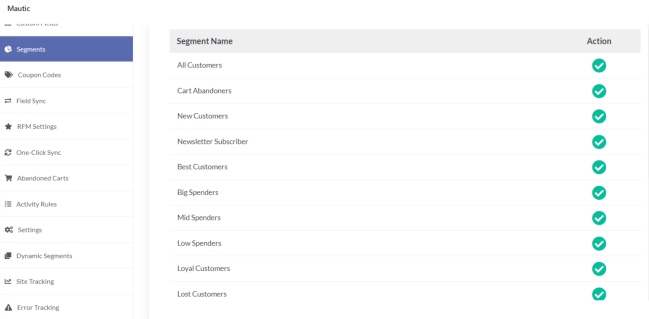
Segments
↑ Back to topWoo Mautic Integration allows you to organize customers by segments based on the custom field data and create campaigns accordingly. Available segments include:
- All Customers
- Cart Abandoners
- New Customers
- Newsletter Subscriber
- Best Customers
- Big Spenders
- Mid Spenders
- Low Spenders
- Loyal Customers
- Lost Customers1
- Lost Cheap Customers/Low-Value Lost Customers
- About to Sleep
- One-Time Purchase Customers
- Two-Time Purchase Customers
- Three-Time Purchase Customers
- Bought four or more times
- Repeat Buyers
- Customers Needing Attention
- Churning Customers
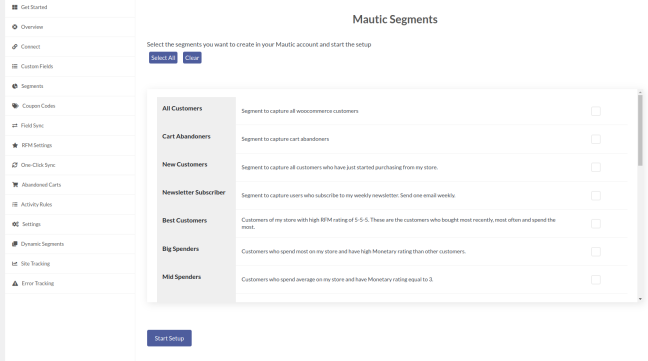
Within Segments, select the segments you want to create in your Mautic Account and click Start Setup.
Coupon Codes
↑ Back to topOnce segments are created, you can move to the Coupon Codes to generate coupons for WooCommerce customers.
Coupon Generation Rules
Within the “Coupon Generation Rules” tab, you can set rules to generate single-use dynamic coupon codes that are generated based on customers’ RFM ratings. To generate,
- Click Add New Rule.
- Specify the RFM rating by setting the recency, frequency and monetary value at which the coupon will be generated.
- Enter the name of the coupon code.
- Enter the coupon discount amount.
- Set the coupon discount type – choose from Percentage, Fixed Cart, and Fixed Product discount.
- Option to allow free shipping with the coupon.
- Set coupon expiry.
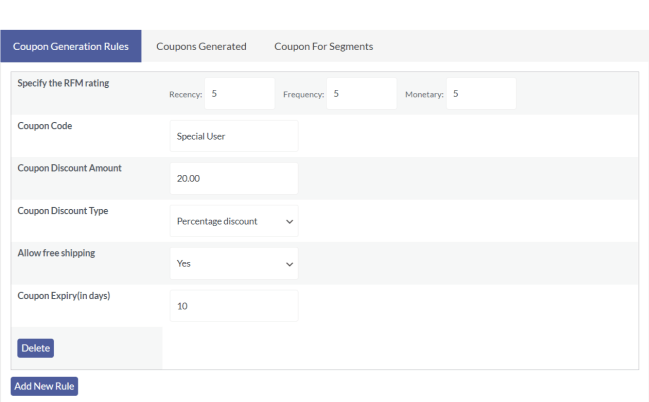
Note: You can add multiple rules in this tab by clicking Add New Rules to generate different coupons on different conditions.
After configuring the rules, click Save Changes to apply your coupon settings.
Coupons Generated
The “Coupons Generated” tab displays the details of all coupons you’ve generated.

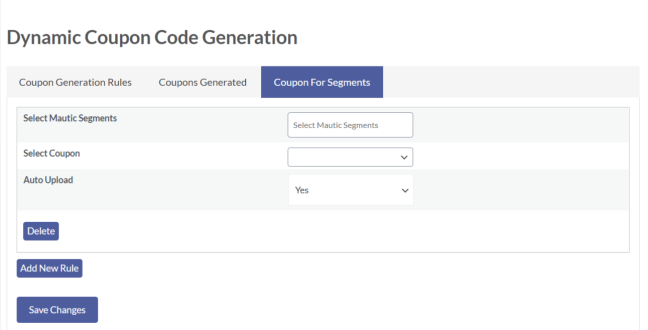
Coupon Code Segment
Within the “Coupon Code Segments” section, you can send coupons to specific customer segments.
- Click Add New Rule.
- Select one or more Mautic customer segments to send the coupon.
- Select the applicable coupon.
- Choose whether to automatically apply the coupon to orders by selecting Yes or No under the Auto Upload option.
Field-to-Field Sync
↑ Back to topYou can sync your WordPress user fields to your Mautic account. First, create the custom field on Mautic. Then, map it with your existing WordPress user meta field by selecting the respective field from the “User WordPress Field” dropdown.
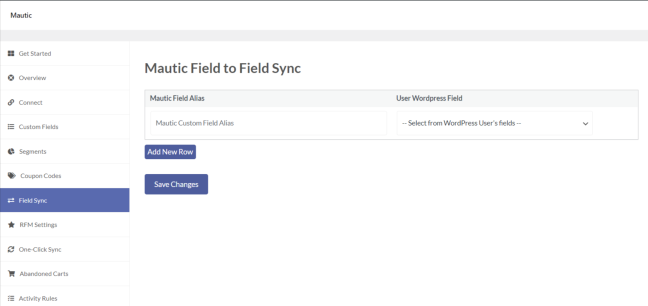
Save Changes.
RFM Settings
↑ Back to topRFM settings allow you to assign scores to your customers based on their behavior such as buying frequency, number of products they bought, and the monetary value they spent on a scale of 1 to 5.
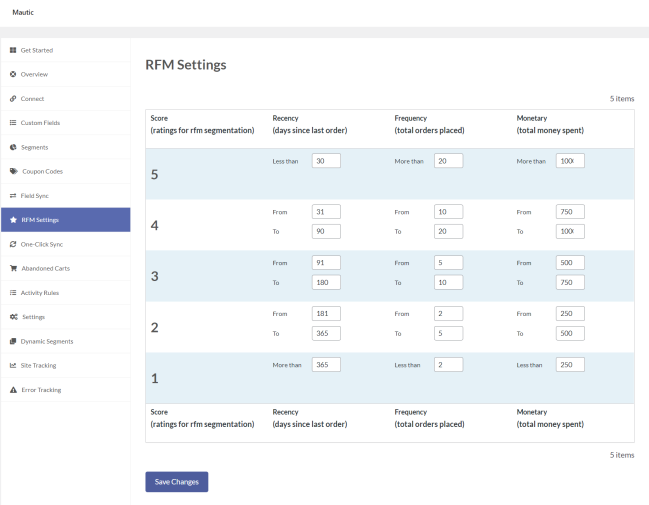
Set RFM settings by specifying recency, frequency, and monetary value for each RFM rating. Save Changes to apply your settings.
One-Click Sync
↑ Back to topWith the one-click option, you can sync Mautic with all your historical customer data gathered before you installed the plugin.
- Enable/Disable the checkbox to turn On/Off this setting.
- Select the User Role(s) that you want to sync. If you don’t add any role, by default, all user role data will be synced to your Mautic CRM.
- Select the order statuses that you want to sync. If you don’t select any order, by default, data for all order statuses will be synced.
- You can select the date range of the data you want to sync to Mautic CRM.
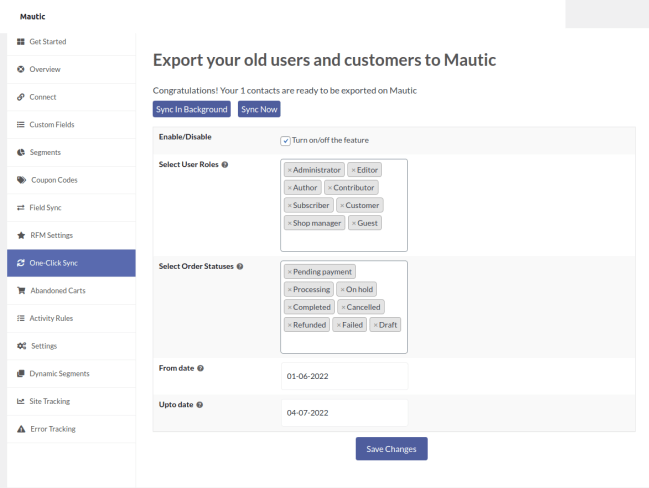
After adding all the details, Save Changes.
Note: Sync in the background and Sync Now Button will be visible once all the criteria are fulfilled and if any data is left to sync.
Sync Options
There are two methods to sync data, Sync In Background and Sync Now.
- Sync In Background: Use this option to sync the data in the background. This process runs in the background so you can continue with other actions.
- Sync Now: Use this option to sync your data on the current page. With this option, you will have to wait for the synchronization to complete before doing any other tasks.
After your data is synced, you can move to the next step.
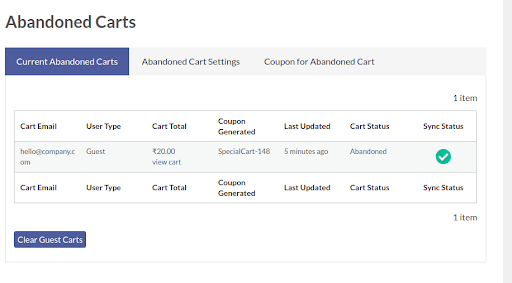
Abandoned Cart
↑ Back to topIn the Abandoned Cart tab, you can manage all the activities related to abandoned carts on your WooCommerce store.
1. Current Abandoned Carts – Here, the admin user can view abandoned cart data such as –
- Cart Email
- User Type
- Cart Total
- Coupons Generated for Abandoned Carts
- Last Updated
- Cart Status
- Sync Status
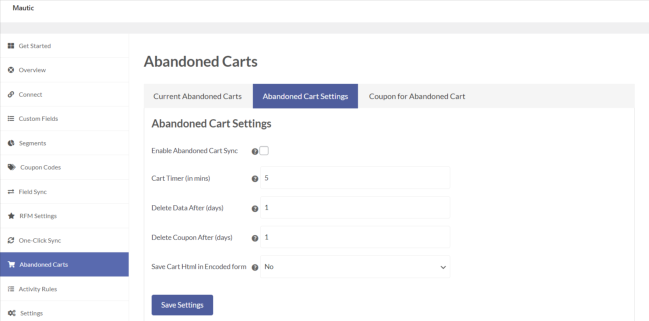
2. Abandoned Cart Settings – You can change the abandoned cart settings in this section.
- Enable Abandoned Cart Sync to sync your abandoned cart data.
- Set the Cart timer duration (in minutes). Customers’ abandoned cart data will be updated in your Mautic CRM after this specified duration. The minimum value is 5 minutes. For example, if you choose 10 minutes, your customers’ abandoned cart data will be updated after every 10 minutes.
- Set the number of days after which to automatically Delete Data. Your customer data will be deleted from your WooCommerce account after the number of days you’ve selected.
- Set the number of days after which to automatically Delete Coupons generated for abandoned carts.
- Option to Save Cart HTML In Encoded Format.
- Enable Qty display in Abandoned product HTML Tick this option setting to sync the product quantity
- Enable Image display in Abandoned product HTML Tick this option to sync the product image
Note: To show the product image the “Save Cart HTML in the Encoded” optionshould be set to “Yes”
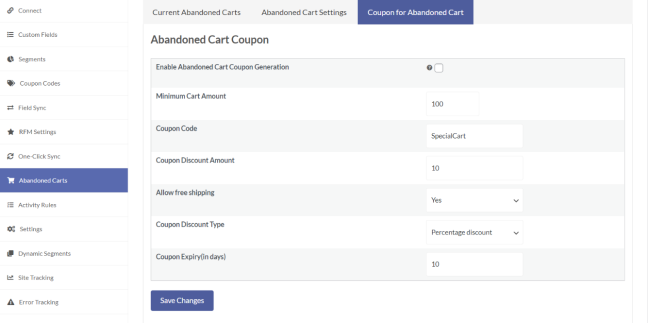
3. Abandoned Cart Coupon Codes – In this section, you can set up the coupon code settings for the abandoned cart.
- Enable Abandoned Cart Coupon Generation for your customers as well as guest users.
- Set Minimum Cart Amount to issue abandoned cart coupon codes.
- Enter the name of the Coupon Code. You can also enter the prefix of the coupon so that each coupon that is randomly generated contains the same prefix.
- Enter Coupon Discount Amount. For example, if you want to offer a coupon with a discount value of 10, then you must enter 10 in the adjacent textbox.
- Option to Allow Free Shipping with coupon codes on abandoned carts.
- Set Coupon Discount Type – choose from a percentage discount (e.g. 10%) or a fixed discount type (e.g. $10).
- Set Coupon Expiry (in days). For example, if a value of 10 is input, the customer has to redeem the coupon code within 10 days from the date of the offering.
Save Changes to apply your settings.
Activity Rule
↑ Back to topIn this tab, you can set up two rule types in order to assign particular tags to specific user activities or order statuses.
- User Activity Tag Assignment: Select a user’s activity and enter a tag that will be added to that user activity.
- Order Activity Tag Assignment: Select order status and enter a tag that will be added to that order activity.

Settings
↑ Back to topMautic Integration for WooCommerce plugin settings can be managed under the Settings tab.
1. General Settings
- Enable the Plugin to enable the automatic data sync.
- Enable Logging to enable the plugin sync log creation. It will help in debugging errors.
- Sync orders with statuses: Only orders with the selected order status will be synced over to Mautic CRM. If you don’t select any, all order status data will be synced.
- Sync users with the role: Only data from the selected user role will be synced.
- Add Tags to Contacts: Segment your customers based on their previous shopping patterns and behaviors by adding tags to each contact. The following tags are included –
- SKUs Bought: Add tags to contacts based on the product SKUs bought.
- Categories Bought: Select the relevant category/categories to apply the Categories Bought tag.
- Products Bought: Tag your customers buying specific products with this tag.
- Customer Group/User Role: Add tags to contacts based on their user role e.g. registered user, guest user, subscriber, etc.
- Products Attribute: Tag customers buying products based on product attributes like size, color, etc.
- Custom Tags: Enter one or more tags to assign each contact synced by the plugin.
- Disable Custom Fields: Select one or more fields you don’t want to be synced over Mautic..
- Preferred Sync Method: Select a Sync method for your data. You can choose between Real-time Sync which will sync your data instantly or every 5 minutes. However, your abandoned cart data will still be synced every 5 minutes.
- Option to Add a marketing checkbox if you want your customers to accept marketing and promotional content.
- Option to customize the Marketing checkbox label text that will be displayed after the Marketing checkbox.
2. Advanced Settings
- Switch to a new Mautic account: Click to change your current Mautic account and switch to a new one.
- Update Mautic Custom Fields: Click to Update Mautic Custom Fields.

Dynamic Segments
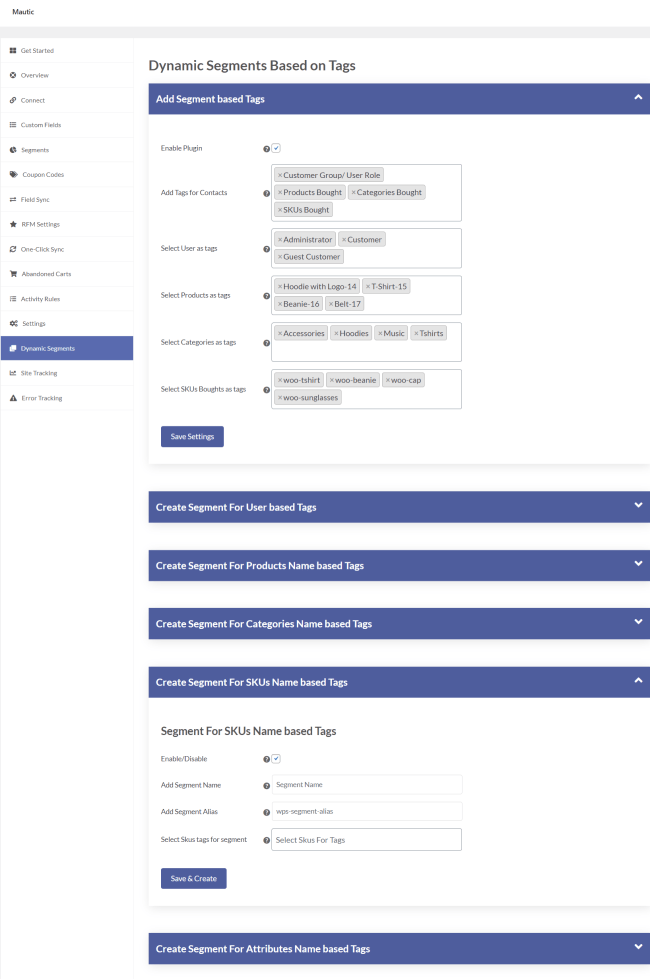
↑ Back to topThe Mautic Integration for WooCommerce plugin allows you to create dynamic segments based on custom fields and tags.
You can add tags as filters to create segments based on contacts, user roles, products bought, product attributes, SKUs, product categories, and much more.
Segment Creation
↑ Back to topAdd tags for Contacts
Customer Group / User Role – Select the relevant User(s) to apply the Customer Group / User Role tag. Only the selected users will be assigned the contact tag.
Products Bought – Select the relevant product(s) to apply the Products Bought tag.
Categories Bought: Select the relevant category/categories to apply the Categories Bought tag.
SKU’s Bought: Select the relevant SKU(s) to apply the SKU’s Bought tag.
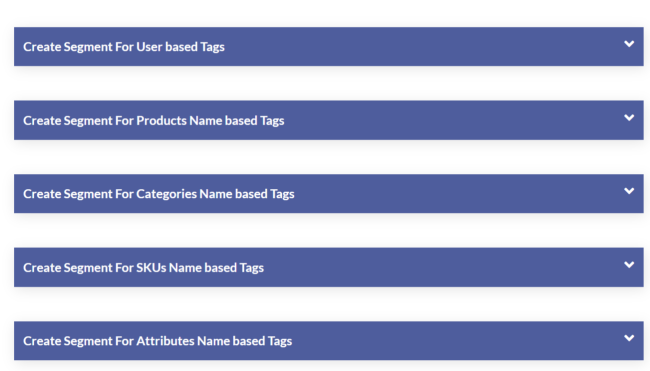
Create Segment For User-based Tags
To create a segment based on SKU tags, add the Segment Name and alias, and select the relevant SKU tags.
Create Segment For Product Name based Tags
To create segments based on product tags, add the Segment Name and alias, and select the relevant product tags.
Create Segment For Categories Name-based Tags
To create segments based on category tags, add the Segment Name and alias, and select the relevant Category tags.
Create Segment For SKUs based Tags
To create segments based on SKU tags, add the Segment Name, Alias, and select the relevant SKU tags.
Create Segment For Attributes based Tags
To create segments based on attribute tags, add the Segment Name, and Alias, and select the relevant Attributes tags.
Site Tracking
↑ Back to topSite Tracking helps you to track the user activities on your WooCommerce site. Just embed your Mautic Tracking Code in the Site Tracking section.
Note: Navigate to Mautic > Settings > Configuration > Tracking Settings to get your Mautic Tracking Code.
Error Tracking
↑ Back to topError Tracking provides a log of all errors with the option to download the log file.
Tracking Script
↑ Back to top
Mautic Integration for WooCommerce allows you to inject the tracking script either in the Header or Footer as per your choice.
For this, go to the Site Tracking setting of the plugin. From Script Location, choose the Header or Footer where you want to inject your tracking script.
To get the Tracking Code, go to Tracking Settings from the Configuration setting of the Mautic CRM.
Then, after copying it, paste this tracking code without a script tag. And finally, click on the Save to inject it either in Header or Footer
Mautic Forms
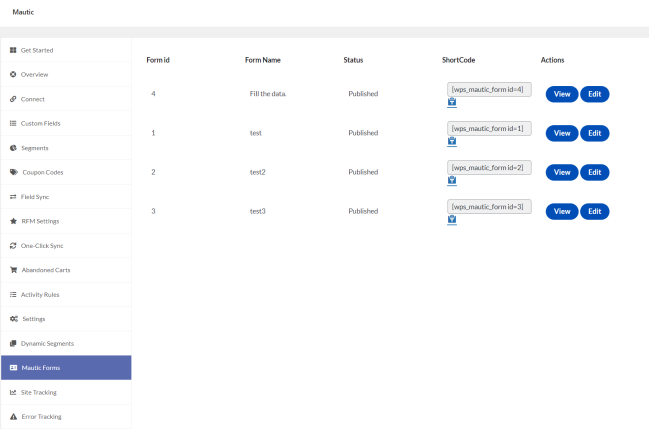
↑ Back to topIn the Mautic Integration for WooCommerce plugin, you can render Mautic forms on your websites using Shortcodes.
From the Mautic Forms of the plugin settings, View and Edit- the details, fields, and actions of your Mautic forms. Inject Shortcodes in order to render the Mautic form on your website. With the help of the Form ID of Mautic attached in Shortcodes, the Mautic forms will be listed.
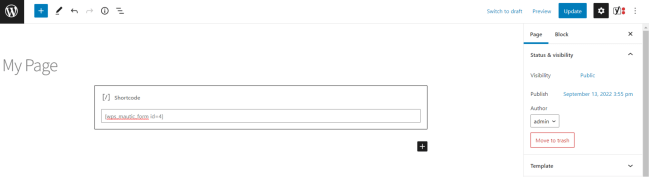
Here is an instance of a copied shortcode of form ID 4 given here:
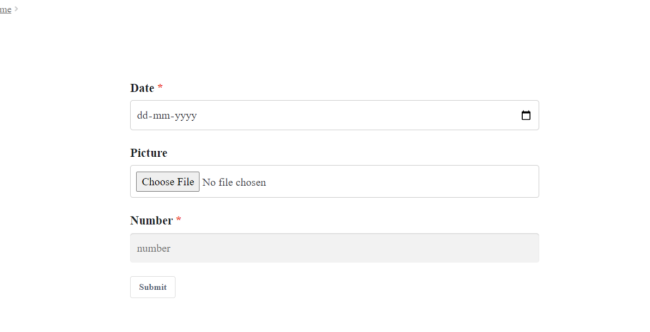
Here is the form:
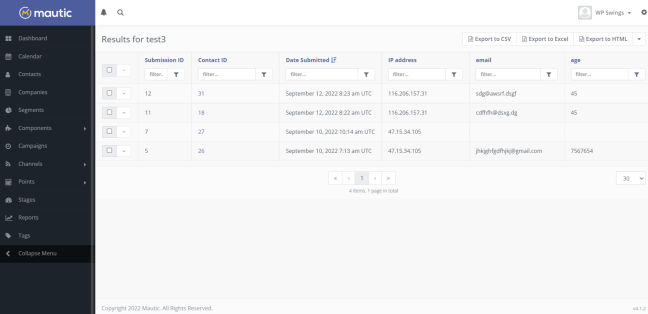
From the Component setting of the Mautic CRM, go to the Forms section. Here, you can view all the Mautic Forms submitted on your website.
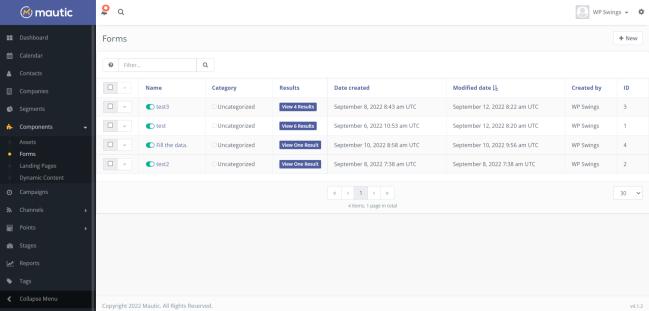
If you click on View Results of any particular form, you will be able to view all the details such as Submission ID, Contact ID, Date Submitted, IP address, email, and age.
WooCommerce Subscription Compatibility
The WooCommerce Mautic Integration is compatible with the WooCommerce Subscription Plugin. When you activate the subscription plugin, 11 custom fields are automatically created in the Mautic Custom fields section, which allows you to sync the WooCommerce subscription order data over to the Mautic CRM.
To sync the subscription data, follow these steps:
1. Install and activate the WooCommerce Subscriptions plugin.
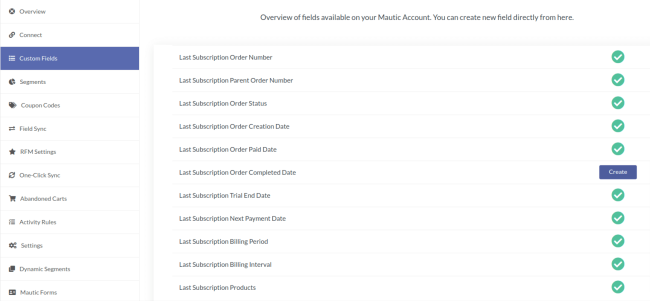
2. Go to the Custom Fields tab of the WooCommerce Mautic Integration Plugin.
3. Scroll down to locate the added custom fields.
4. Then, click on the Create button to create new custom fields to feed data to Mautic CRM.
Note: Only fresh subscription order data will be synced and any orders that are renewals of existing subscriptions will not sync.
5. Now, Log in to your Mautic Account & go to the Contacts section which contains the order list.
6. Filter the list with the email used by the customer to place the subscription order and open the details.
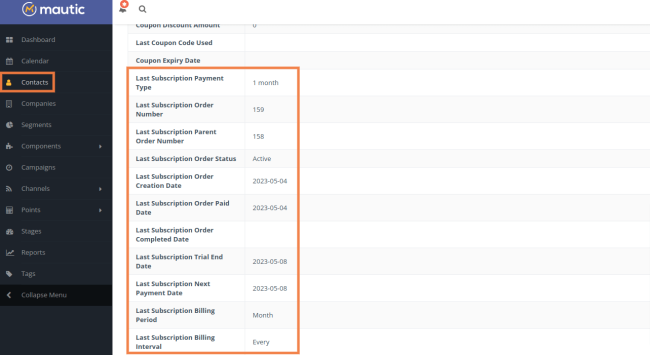
7. You will find the custom fields holding the subscription order data.
Compatibility with the Events Tickets Manager Plugin
↑ Back to topThe Mautic Integration for WooCommerce seamlessly integrates with the Events Tickets Manager Pro plugin by WP Swings. This compatibility offers a complete solution for managing your WooCommerce store and events.
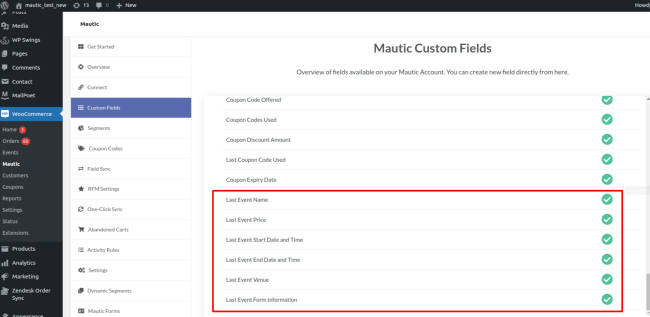
Events Tickets Manager Pro allows you event ticket personalization, layout creation, and product category addition. It enables quick event creation, customer notifications, and ticket delivery via email. The data inputs are taken from the events plugin and then synced to Mautic.

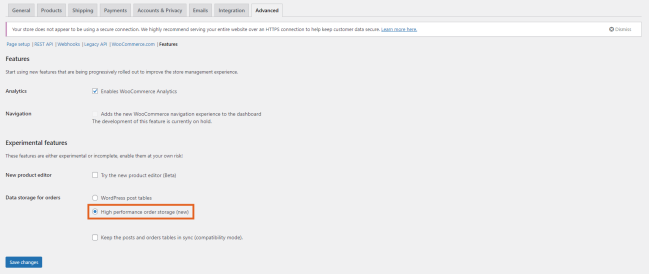
Compatibility with WooCommerce HPOS
High-Performance Order Storage (HPOS) is a database framework tailored to the unique demands of eCommerce operations. The WooCommerce Mautic Integration is compatible with the HPOS system, ensuring efficient order processing, even during peak periods of high order volume.
You can enable the HPOS feature by going to WooCommerce >> Settings >> Advanced >> Features and enabling the HPOS storage option
CF7 Compatibility
↑ Back to topMautic Integration for WooCommerce enables you to sync all your contact form 7 submission data to Mautic in accordance with the field mappings.
Feeds: Select CF7 Form in the Feed Tab, and associate its field with the form. Click on the Add Feeds button to get started.
Feed Details: In this section, you can select the specific CF7 Form with which you want to sync the data.
Simply follow these steps:

- Under the Feed details, click on the Select CF7 Forms dropdown to select the form you require.
- From the Select Object dropdown, you can select an object- contact, or company to associate with the selected form.
Map Fields: From the Map Fields Section, you can map Mautic fields to your CF7 form field. There are two field types: Standard value and custom value.
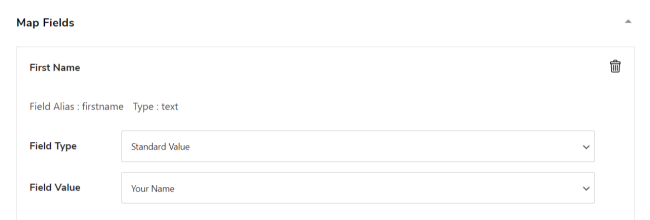
Add New Fields: You can introduce new fields to the selected CF7 form by using this Add New Field Setting.
Conditional Statements
↑ Back to topThe Conditions Filter can be applied to forms to filter out specific form submissions as per your business demands. The form submission data will be sent over to Mautic only if it meets the applied conditions.
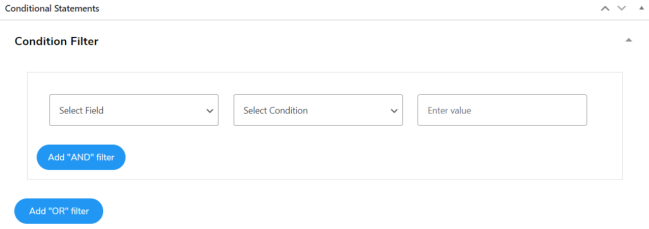
You can apply AND/OR conditions to your forms. If the CF7 form submissions don’t meet the required conditions, then no logs will be created for those submissions.
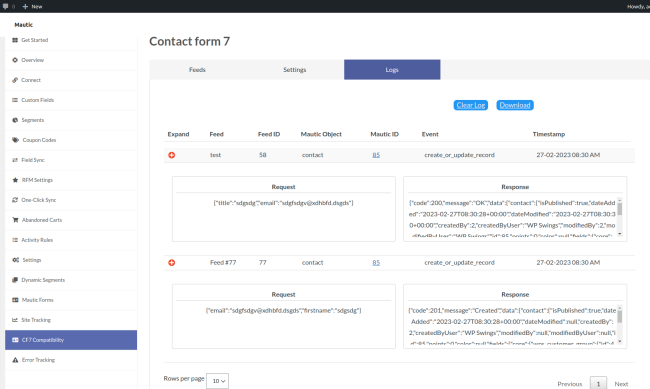
Logs
↑ Back to topA log entry is automatically updated upon all successful form submissions. You can expand the log entry and view the details of form submissions as well as the response from Mautic.
To view the details of a log entry, Follow these steps:
- Move to Logs.
- Click on the Expand button to see the log details
- Click on the expanded log’s Mautic ID to see the data created over Mautic.
The Request section contains the users’ form submission details and the Response section shows the response from Mautic.
Settings
↑ Back to topThe Settings tab contains four sub-settings – Enable logs, Plugin data, Email notification, and Delete logs after N days to control the major features of Mautic Integration for WooCommerce.
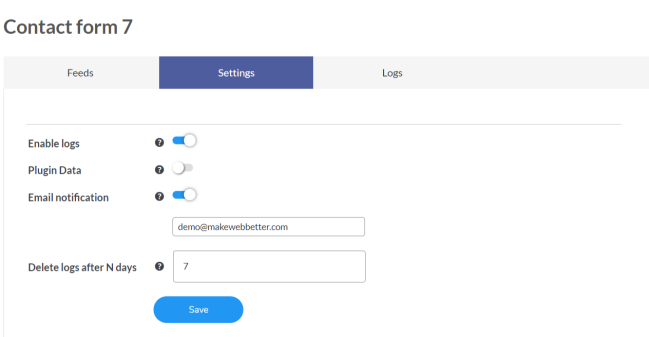
Enable Logs: Click on the Enable Logs toggle to automate the creation of logs upon successful CF7 form submissions.
Plugin Data: If you want to delete all the plugin data from your WordPress database upon plugin uninstallation, enable the Plugin Data toggle.
Email Notification: You will receive an email notification whenever any error occurs in the API interaction during the CF7 form submissions. To enable this feature, click on the Email Notification toggle.
By default, the error notification will be sent to your WordPress account email, but you can enter any other email address to receive notification. You can visit your email inbox to view respective error email notifications.
Delete Logs After N Days: You can delete the form submission logs after N days. After the set number of days is over, the logs will automatically be deleted in bulk. To set the schedule for the deletion, follow these steps:
- Go to Settings tab > Delete logs after N days.
- Enter the number of days after which you want the logs to be deleted.
- Click on Save to save your changes.
Note: By default, the logs are set to delete after 7 days. So, you can only enter a number greater than or equal to 7.
Troubleshooting Guide
↑ Back to top
1. Getting an error “I’m sorry! I couldn’t find the page you were looking for” while the connection was set up.
This error is due to an invalid client ID, client secret, or Mautic base URL. Refer to the Mautic app setup guide provided at the connection tab of the plugin. Please cross-check all details and try again.
2. Getting “500 internal server error” during connection setup.
Check if you have entered the correct redirect URL while generating your API keys.
It should be “https://your-wp-base-url/wp-admin/admin.php”. Please check and update your API settings and try to make the connection again.
3. Getting “site is currently offline” during connection setup.

Please check the directory permission of the cache and log directories of your Mautic installation. They should have read and write permissions. If they already have the read and write permissions and the issue still persists, please provide the execute permission as well.
After setting up the permissions, clear your Mautic cache and try to set up the connection.
4. Getting “Error in creating a field” or “Something went wrong” while creating custom fields or contact segments.
This error occurs due to Mautic cache or incorrect directory permissions. Please clear your Mautic cache, set up the right directory permissions, and try again.
5. How to clear the Mautic cache?
There are several ways to do that. In version 2.x, the easiest way is to navigate to the folder where your Mautic is set up and follow this path: path-to-mautic/app/. You will find the cache folder there. Delete its content or just rename the current cache folder to something like cache_bkup or _cache. Through terminal command: navigate to the Mautic root folder and then run the following command- php app/console cache:clear.
In version 4.x, the easiest method is to navigate to the folder where your Mautic is set up and follow this path: path-to-mautic/var/.
You will find the cache folder there. Delete its content or just rename the current cache folder to something like cache_bkup or _cache.
6. Cleared the cache but the issue is still there.
This can be caused when Mautic doesn’t have permission to write to the new cache files. Contact your System admin to resolve this.
7. Setup is completed but contacts are not showing up in Mautic.
Please check the “preferred sync method” setting in the settings tab of the plugin. If “In every 5 minutes” is selected, then check if the scheduled action “mauwoo_cron_schedule” is set up and working fine. You can use any cron manager plugin to verify the scheduled action.
8. Setup is completed but abandoned cart contacts are not syncing.
Abandoned cart sync works every 5 minutes on scheduled action “mauwoo_cron_schedule”. Please check it is set up correctly and working fine.
9. Contact syncing is working fine but some fields are not capturing the data.
Please check if you haven’t disabled those fields via the settings provided in the settings tab of the plugin. If they are not disabled, then check the log file in the error tracking tab of the plugin.
Check for the Process: Updating or Creating a user’s data and its response. If you notice any message like “This value is not valid”, please update your custom fields from advanced settings from the settings menu. This should update your custom field values and contact sync should work fine after that.
10. Contacts are showing up in Mautic but segments are not updating. All segments have 0 contacts.
If you are using self-hosting Mautic, then you will need to set up Mautic cron jobs for segments. Our plugin only creates segments in Mautic. Contacts will be assigned by Mautic itself in every cron execution.
Here is the full guide for Mautic cron jobs setup.
For more tips and knowledge about the Mautic, you can also refer to the following link: Mautic troubleshooting tips
FAQs
↑ Back to top1. Do I have to install Mautic separately before installing Mautic Integration for WooCommerce?
Yes, you need to install Mautic separately. This extension only provides a connection to sync data between your WooCommerce store and Mautic.
2. Which custom fields does the Mautic Integration for WooCommerce plugin create?
The Mautic CRM integration plugin creates over 70+ custom fields.
3. Does the Mautic Integration plugin create segments?
Yes, this WooCommerce integration plugin creates segments in your Mautic account.
4. What is the Field to Field Sync feature in the Mautic integration plugin?
The Field to Field Sync feature provides a mapping between the existing Mautic contact properties and WordPress user’s fields.
5. Can I sync my store’s old order data to Mautic?
Yes, the One-Click sync feature of the plugin can be used to sync your old order details to Mautic.
6. How can we generate the dynamic coupon code Mautic Plugin?
Go to the Coupon Codes section in the Mautic Integration for WooCommerce extension. Click on the Coupon Generation Rules tab there and then click on Add New Rule. Fill in all the required details and click on Save Changes to generate your new coupon code. Customers who belong to that rule will be able to use that coupon code.
7. Does Coupon Code work for segments in the Mautic integration plugin?
Yes, coupon codes work for segments. You can go to the Coupon Codes section in this extension and click on the Coupon For Segments tab. There you can select the specific segment and coupon codes you’ve generated, that can be used by that selected segment only.
8. Can we capture the abandoned cart user detail in Mautic CRM integration?
Yes. If a user enters his/her email on the checkout page and doesn’t complete the order, the email will be stored in the Abandoned Cart section of this extension.
9. Can we recover the abandoned carts with the Mautic plugin extension?
Yes. You can create campaigns to recover abandoned carts that involve the practice of sending dynamic coupon codes to the cart abandoners via email. This brings them back and prompts them to complete the purchase.
10. Can we add the tags for the change of user activities in the Mautic CRM integration?
Yes, you have the functionality to add the tags for user activities in the User Activity Tag Assignment section under the Activity Rules section of this plugin.
11. How can we check the errors of the Mautic Integration plugin?
You can simply go to the Error Tracking section in this plugin. All the errors of Mautic WooCommerce Integration are listed here. You can also download the error log file if needed.
12. Is there any way to sync Coupons for Abandoned Cart Users in the Mautic plugin?
Yes, in our plugin there is a setting for Abandoned Cart Coupon. You can add the rule for abandoned cart coupons and when the user fulfills the rule, a coupon will be added to their contact.
13. Is there any way to add the tag of the Last Order Payment Method in the Mautic integration plugin?
Yes, there is a setting to add the Last Order Payment method tag. Go to the Settings Tab > Select Add Tag to Contacts > select Tag Last Order Payment Method.