Send automated notifications with customizable templates in your WooCommerce Store.
Feature Overview
↑ Back to topWith the Notifications with WhatsApp, you will have an integration with WhatsApp Cloud API to automatically send purchase data to buyers and sellers for the following actions:
- New Order Notification for Sellers
- New Order Notification for Customers
- Update Order Status Notification for Customers
- Abandoned Cart Notification for Customers
- Unpaid Order Notification for Customers
- View Received Messages
- Reply to Received Messages
- Auto-reply to received Messages
- Insert Coupons into Marketing Notifications
- In-Stock Notifications
- Product Review Notification
Installation
↑ Back to topSee the steps to install the plugin:
- Download the extension from your WooCommerce dashboard.
- Go to Plugins > Add New > Upload and select the ZIP file you just downloaded.
- Click Install Now and then Activate.
Activation
↑ Back to topGo to menu WooCommerce > Notifications with WhatsApp:
WhatsApp Connection Settings Cloud API Credentials
↑ Back to topEnter your WhatsApp Cloud API credentials to connect your store and automatically send messages that have been configured in Message Templates.
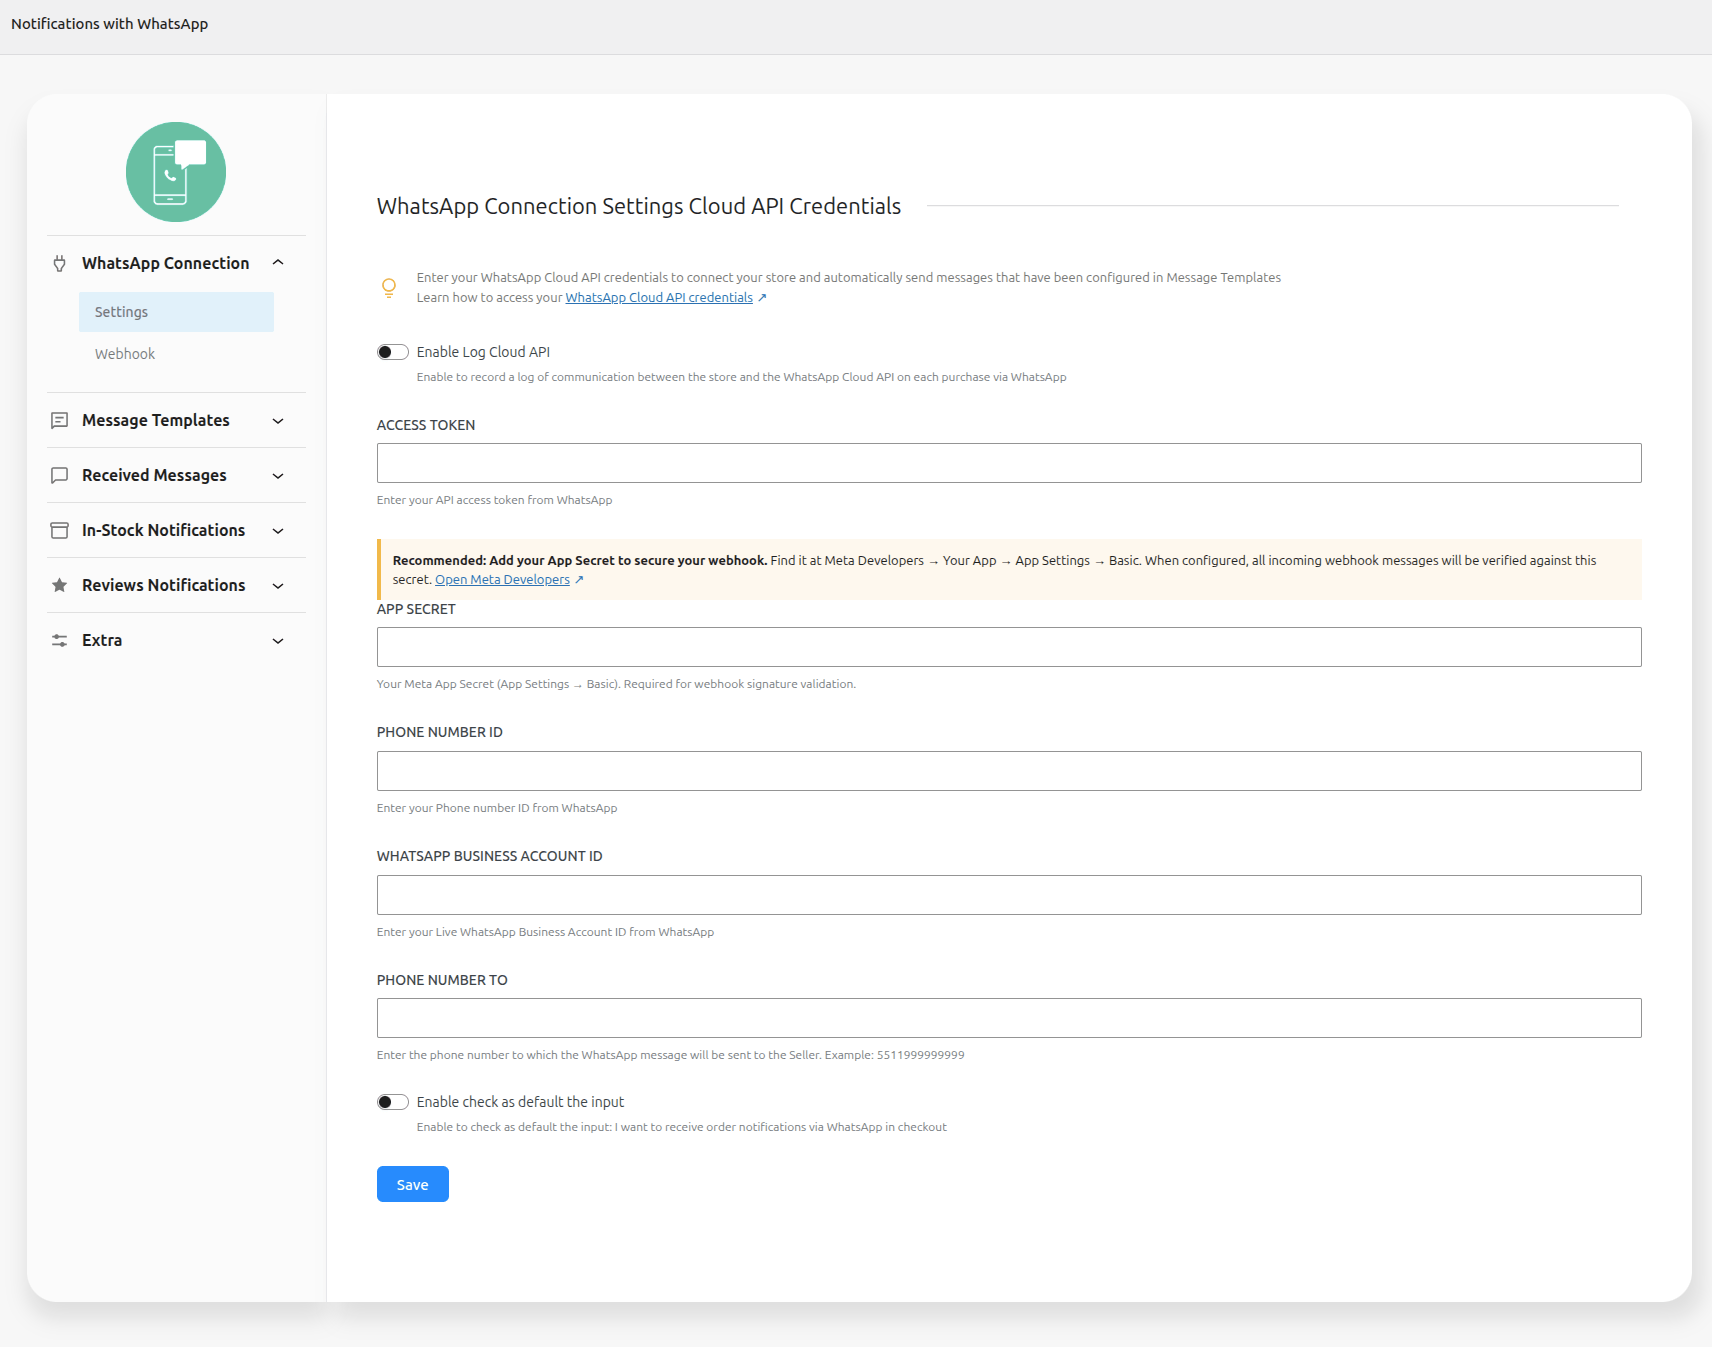
Enable Log Cloud API -> Enable to record a log of communication between the store and the WhatsApp Cloud API on each purchase via WhatsApp
API Token -> Get your API token from WhatsApp
API Phone Number -> Get your API Phone number from WhatsApp
WhatsApp Business Account ID -> Get your Live WhatsApp Business Account ID from WhatsApp
Phone Number To -> Get your phone number that will be sent the message on WhatsApp. Example: 5511999999999
Enable check as default the input -> Enable to check as default the input: I want to receive order notifications via WhatsApp in checkout
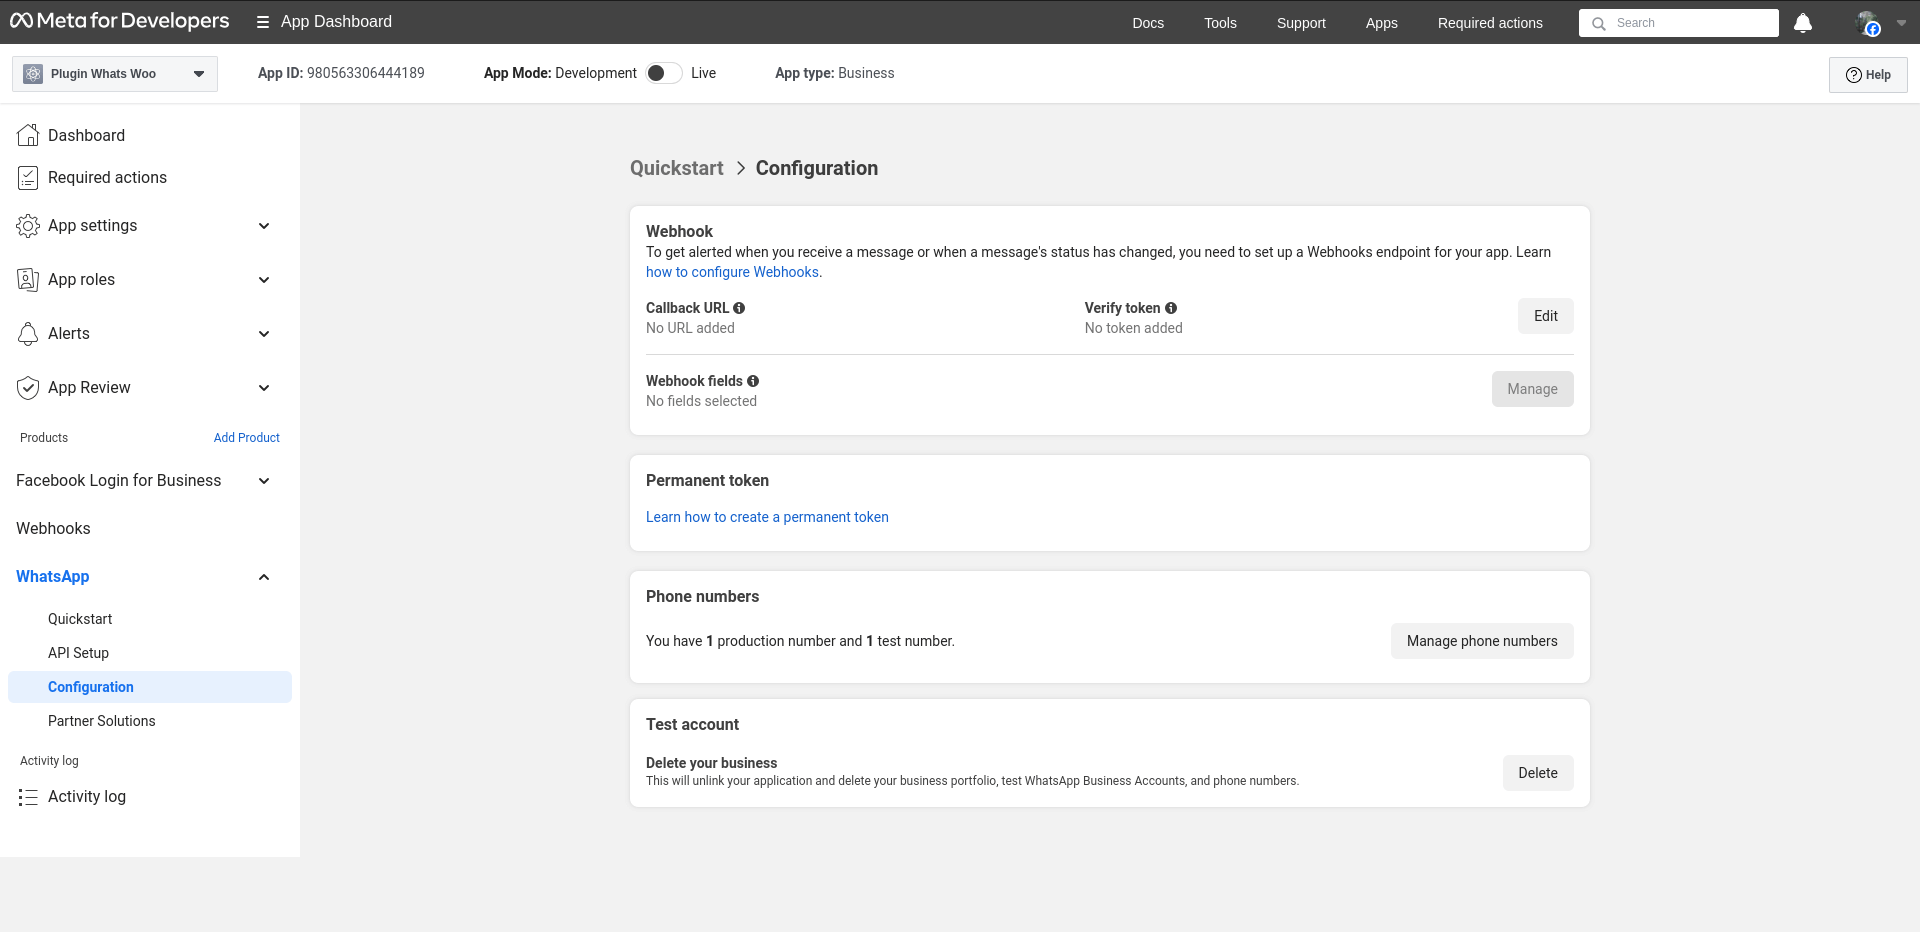
WhatsApp Connection Webhook callback URL
↑ Back to topSubscribe to Webhooks to get notifications about messages your business receives. Read more
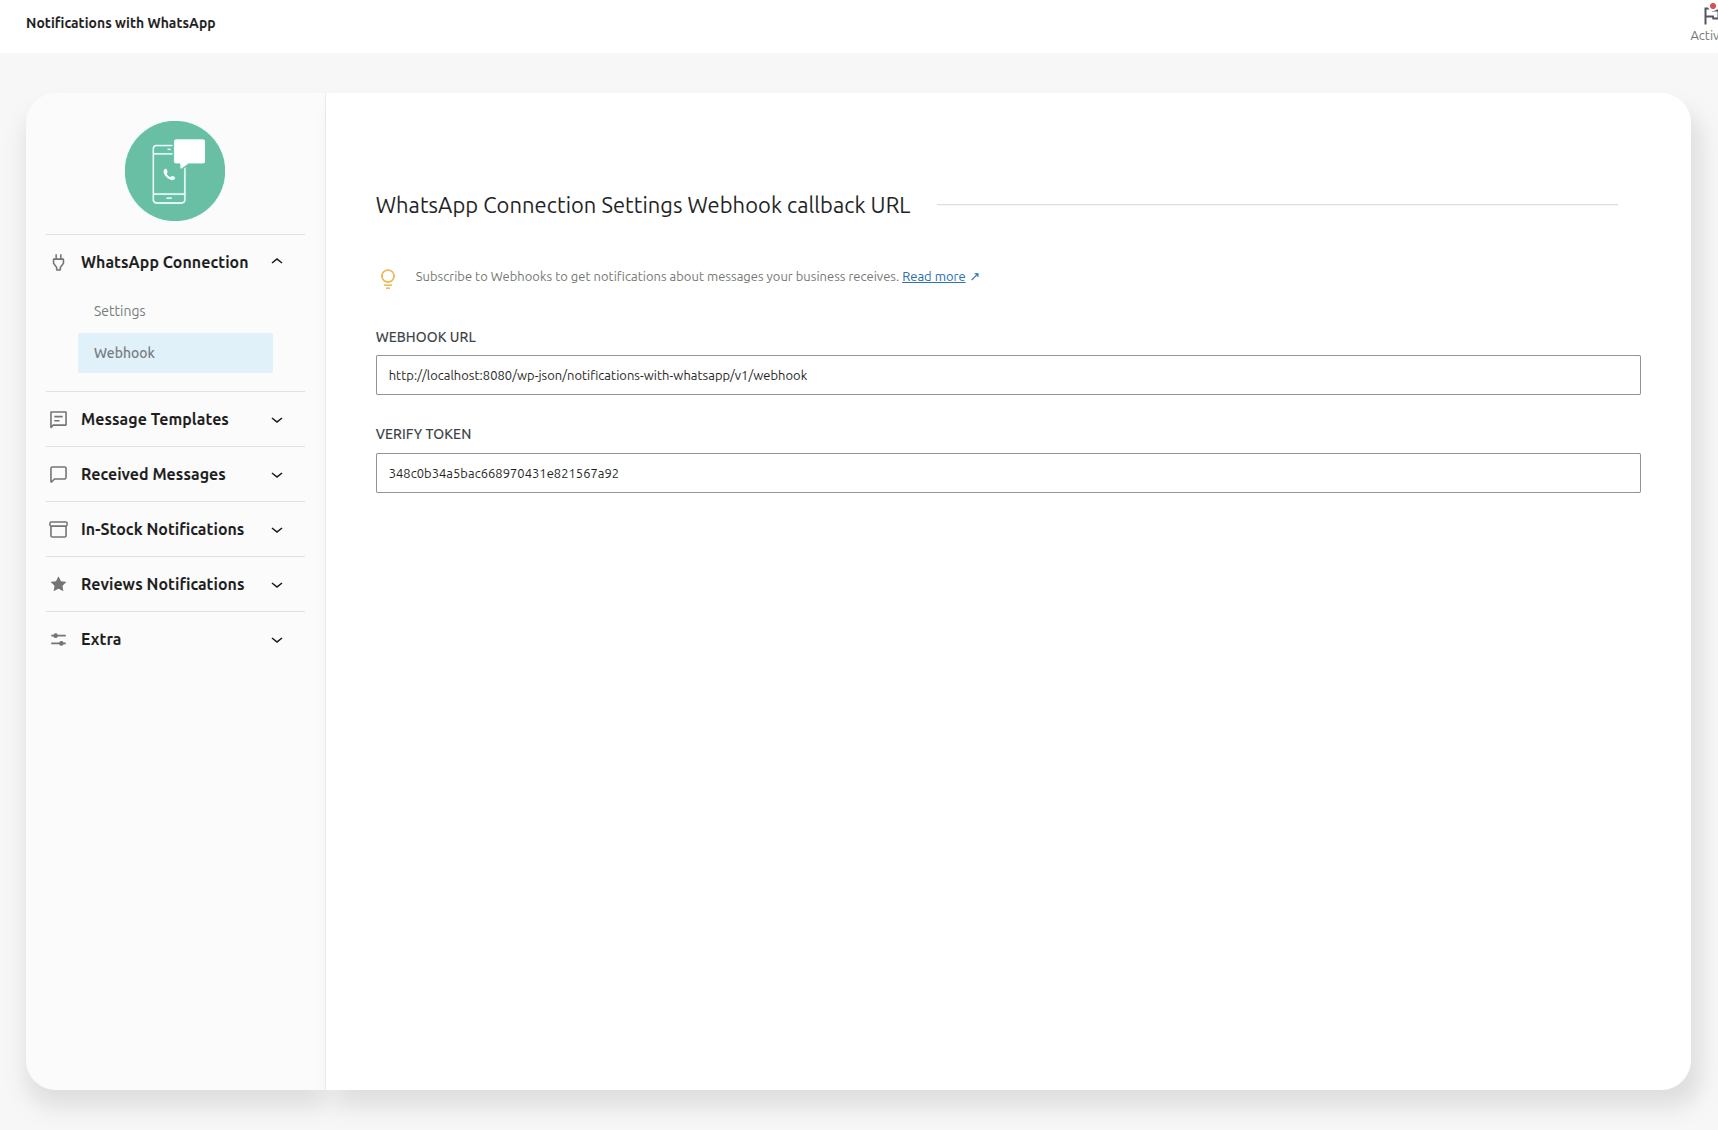
Webhook URL -> Url that must be added in the webhook Meta
Verify Token -> Token that must be added in the webhook Meta
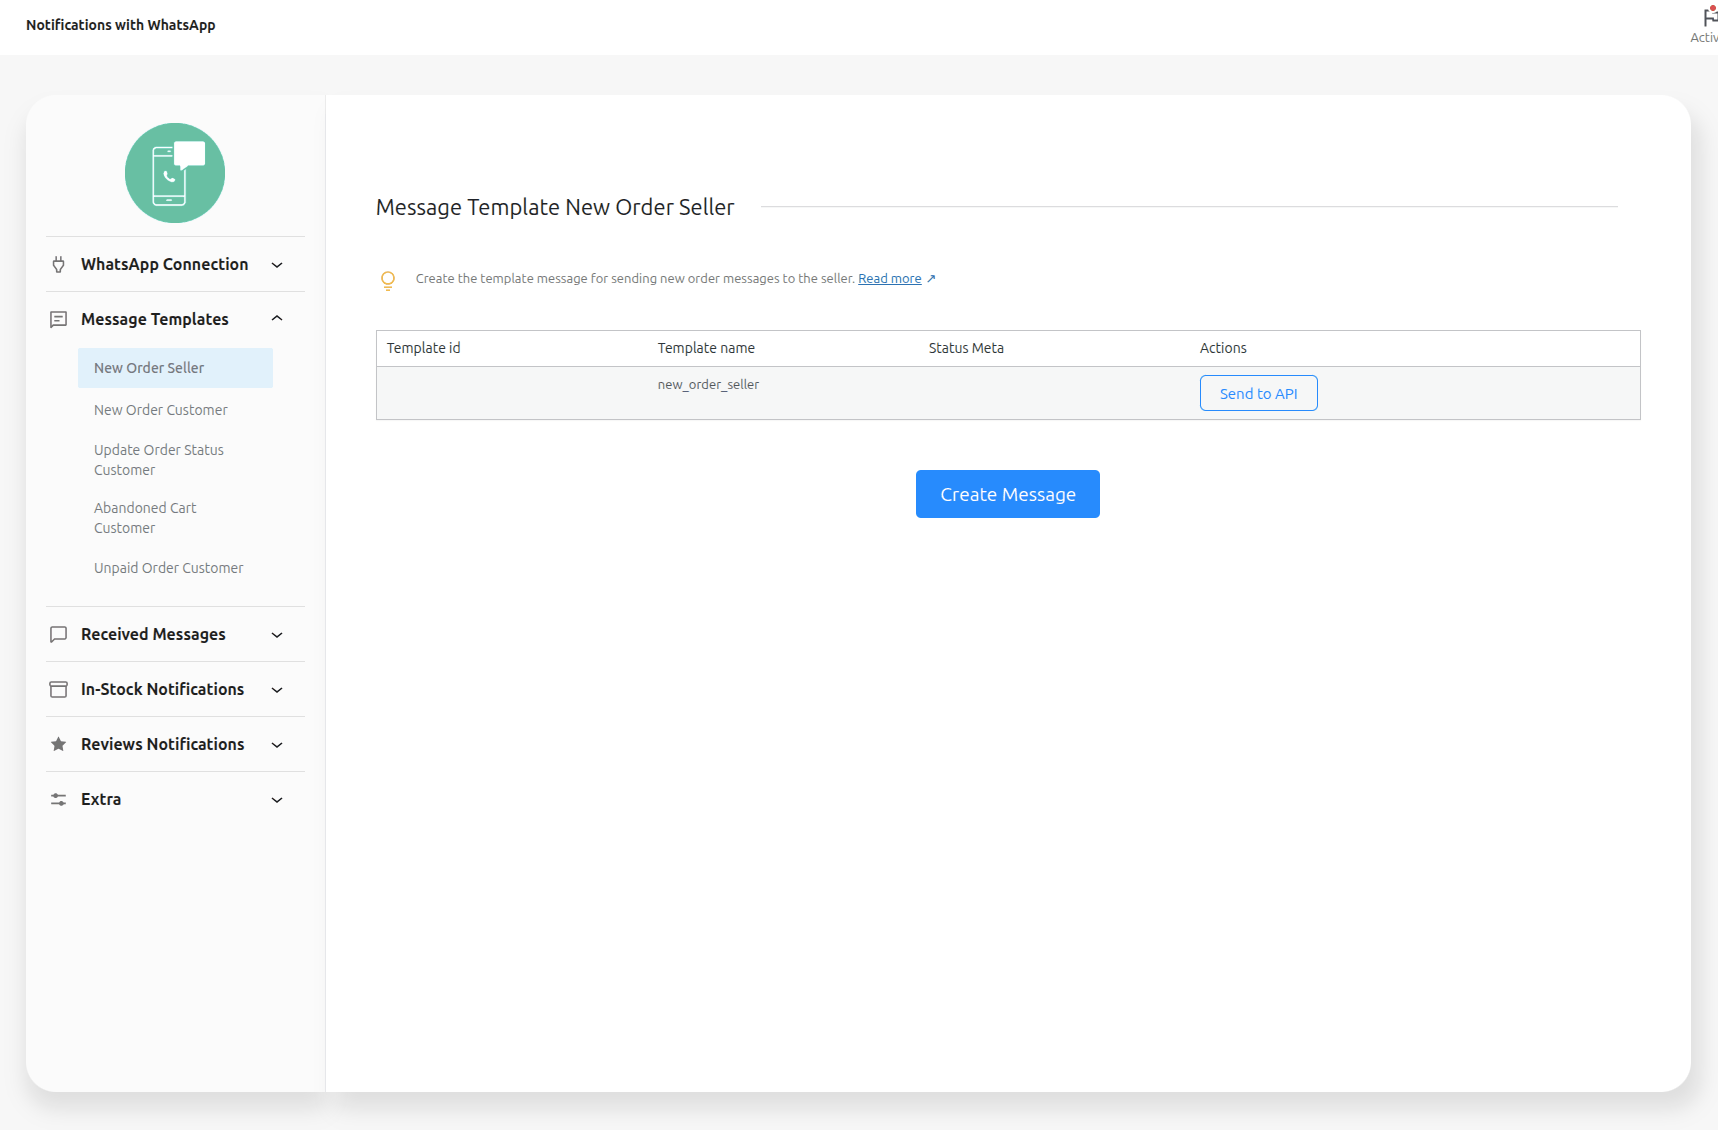
Message Template New Order Seller
↑ Back to topCreate the template message for sending new order messages to the seller:
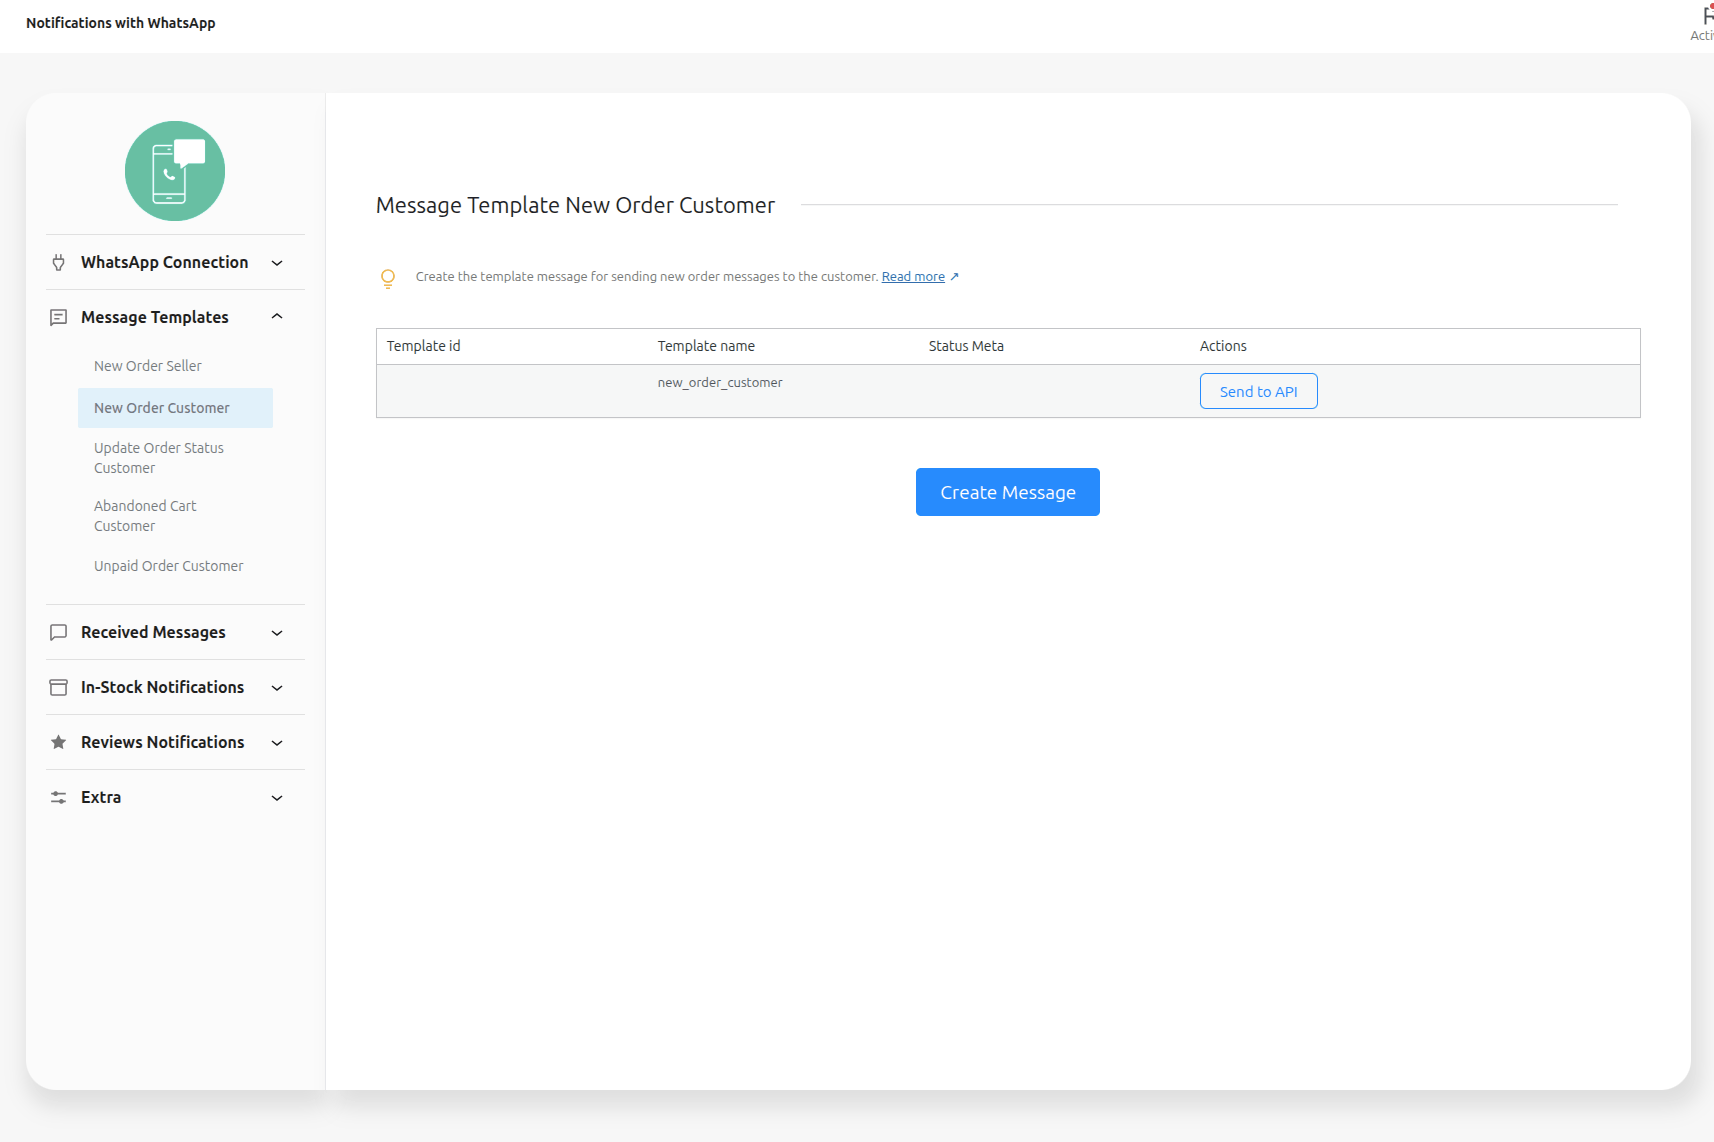
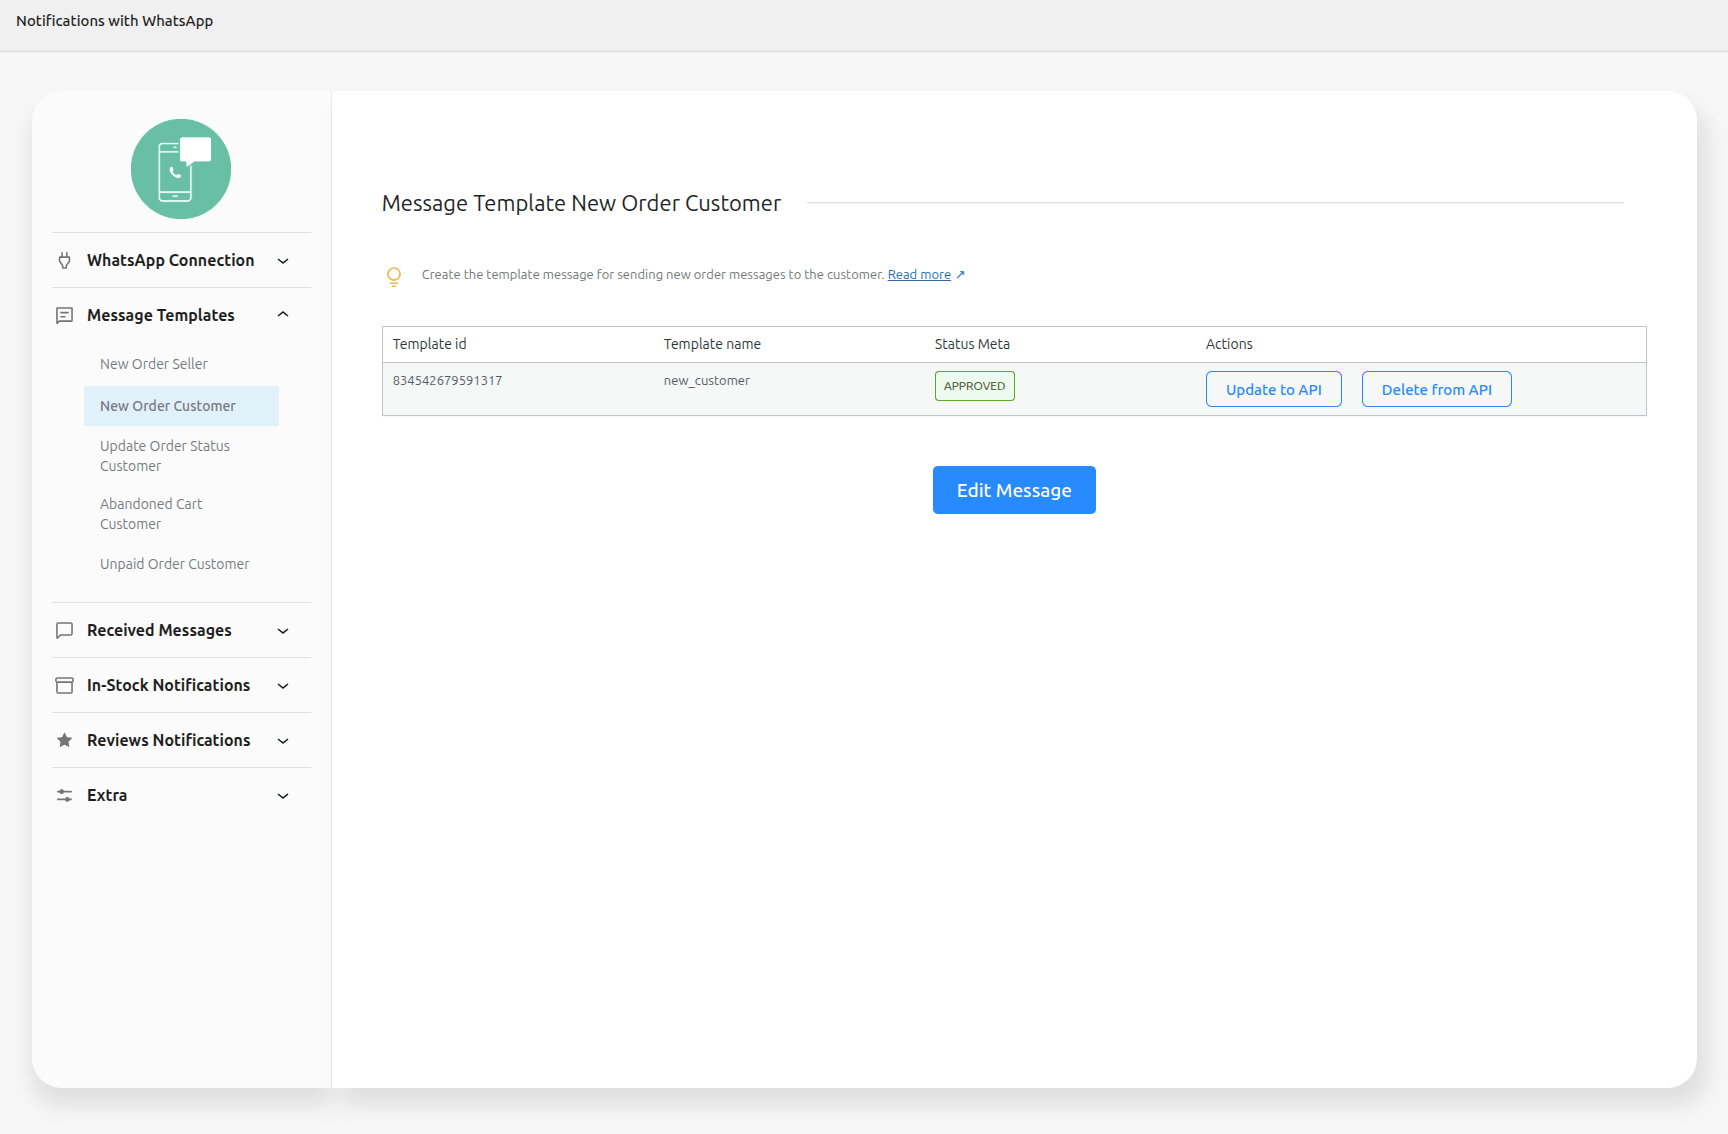
Message Template New Order Customer
↑ Back to topCreate the template message for sending new order messages to the customer:
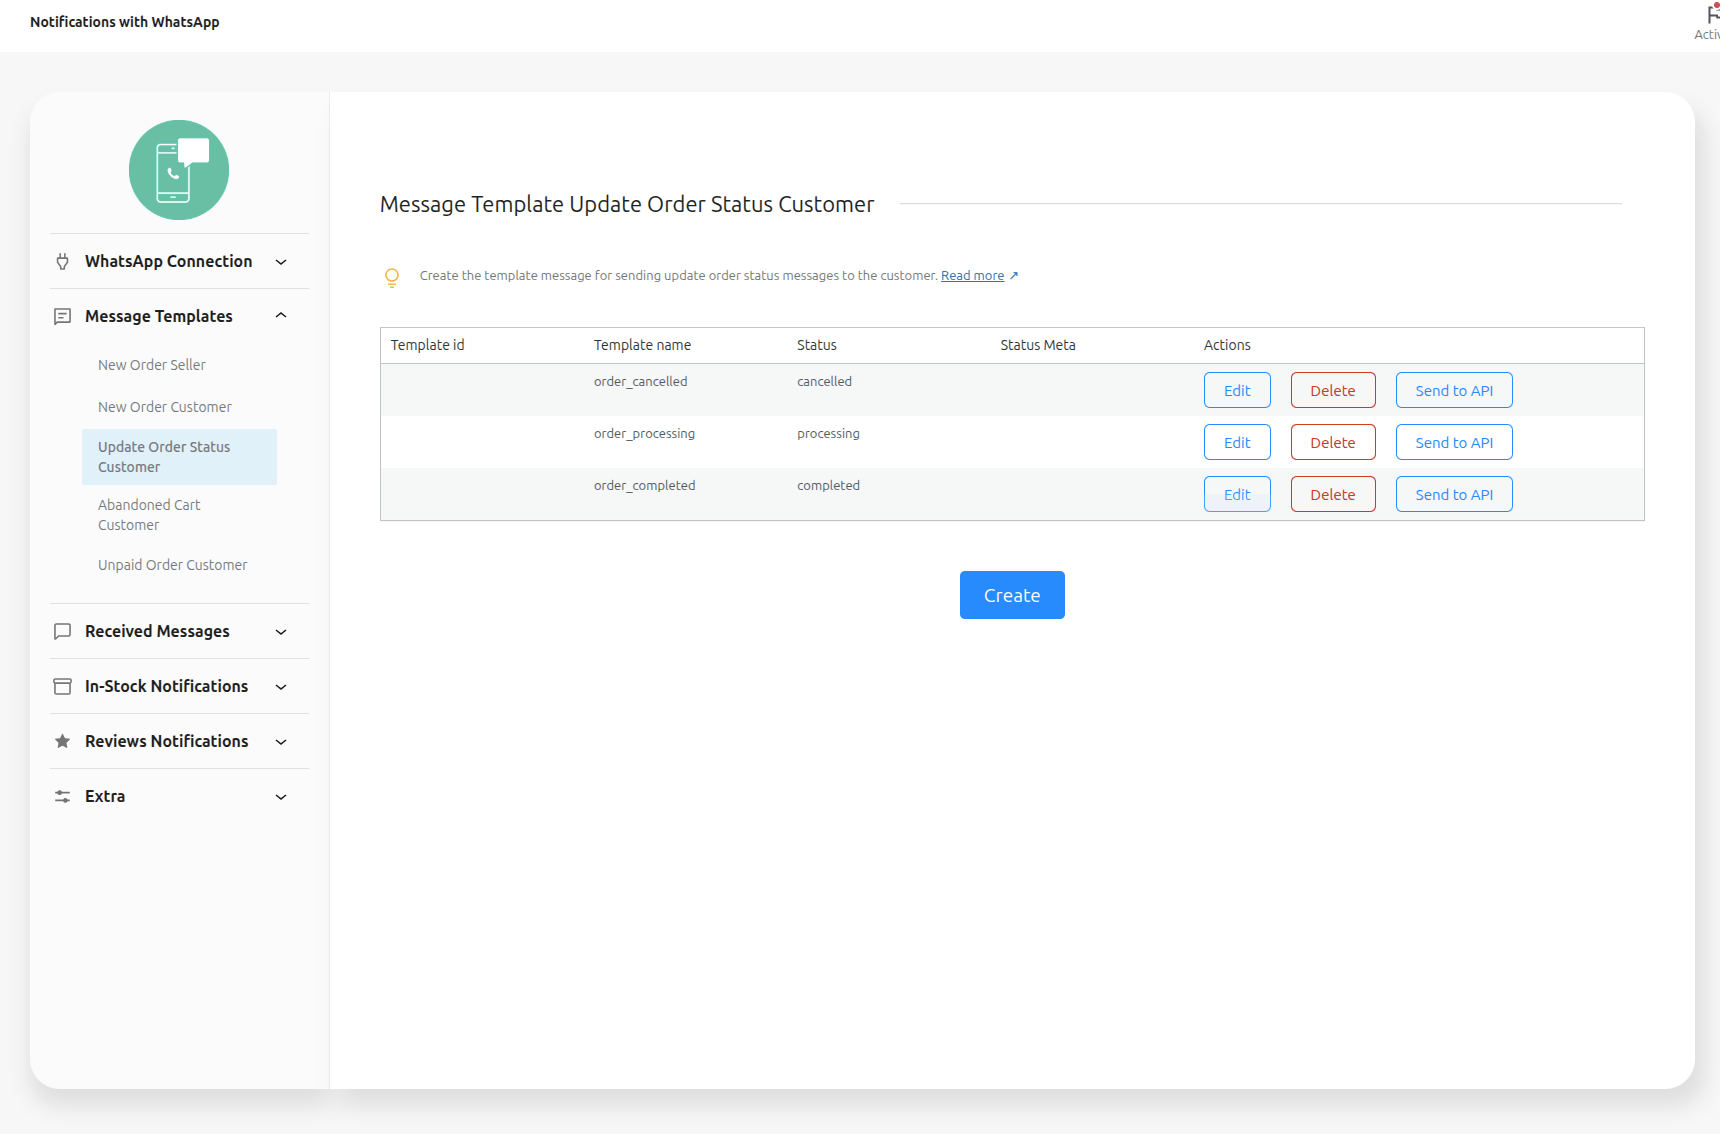
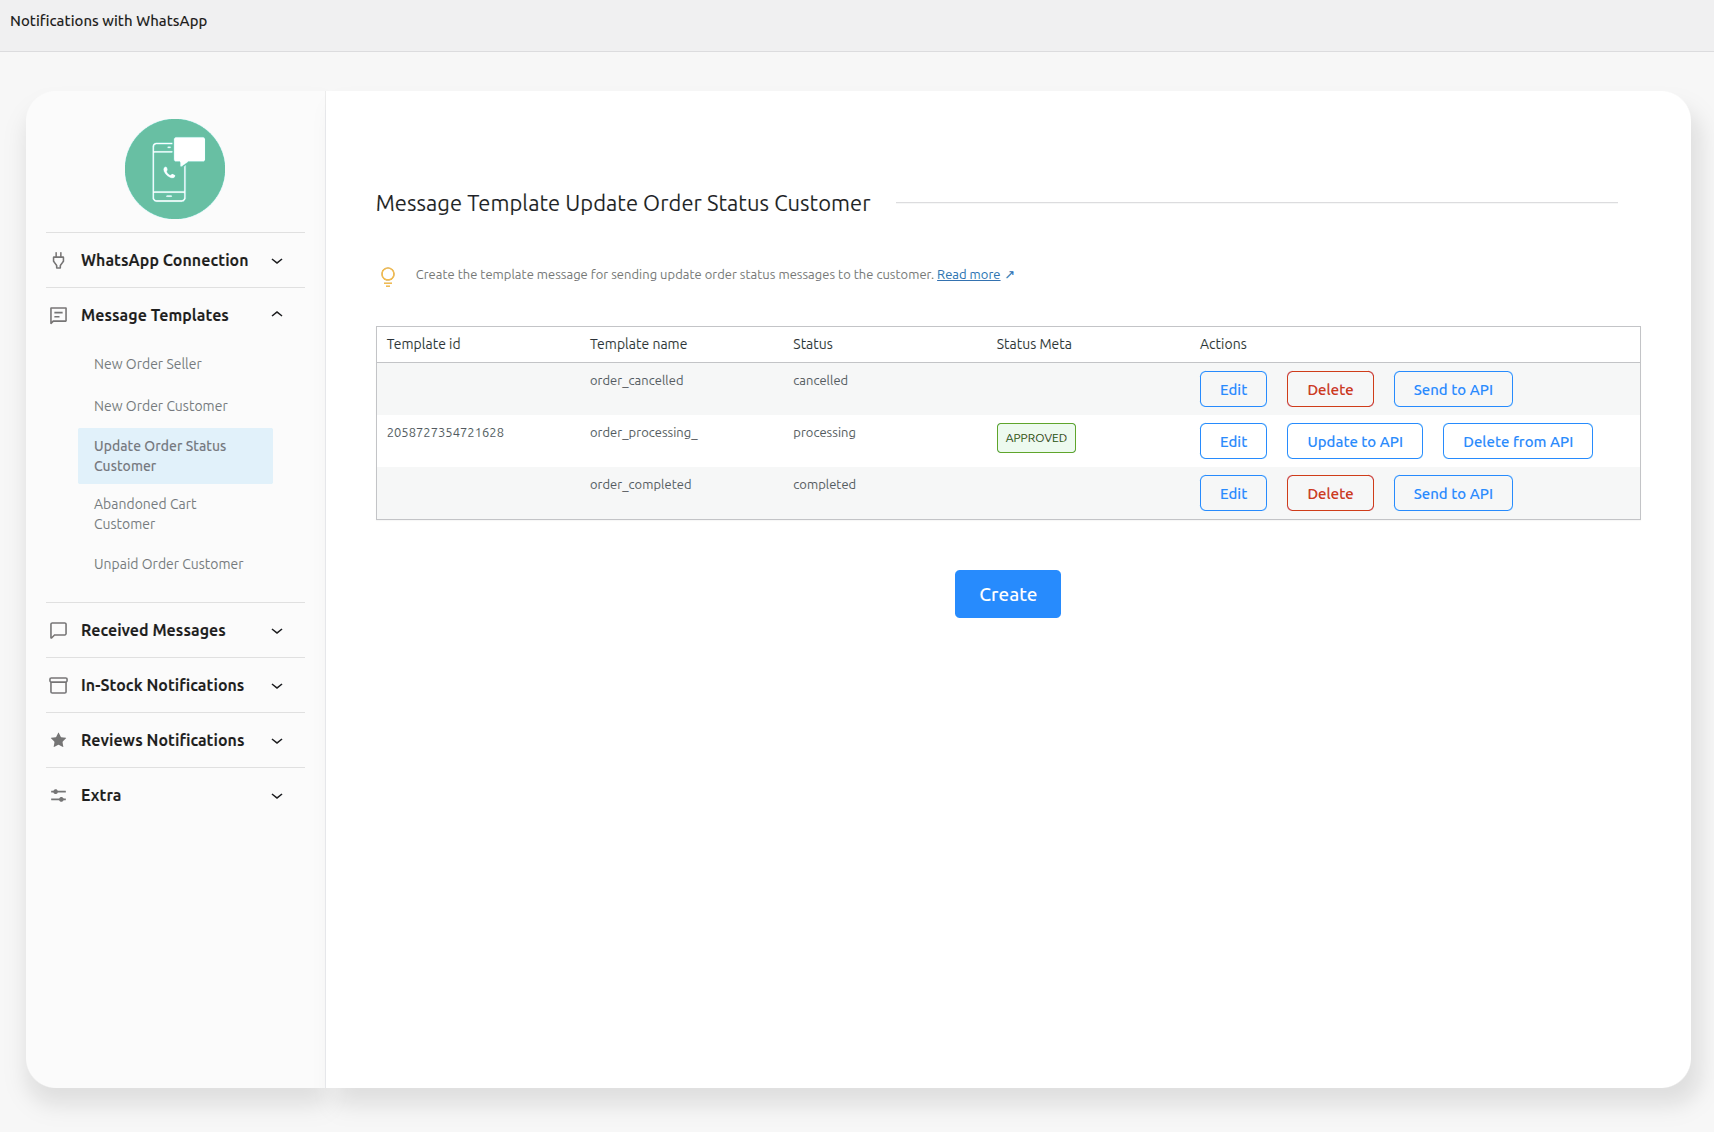
Message Template Update Order Status Customer
↑ Back to topCreate the template message for sending update order status messages to the customer:
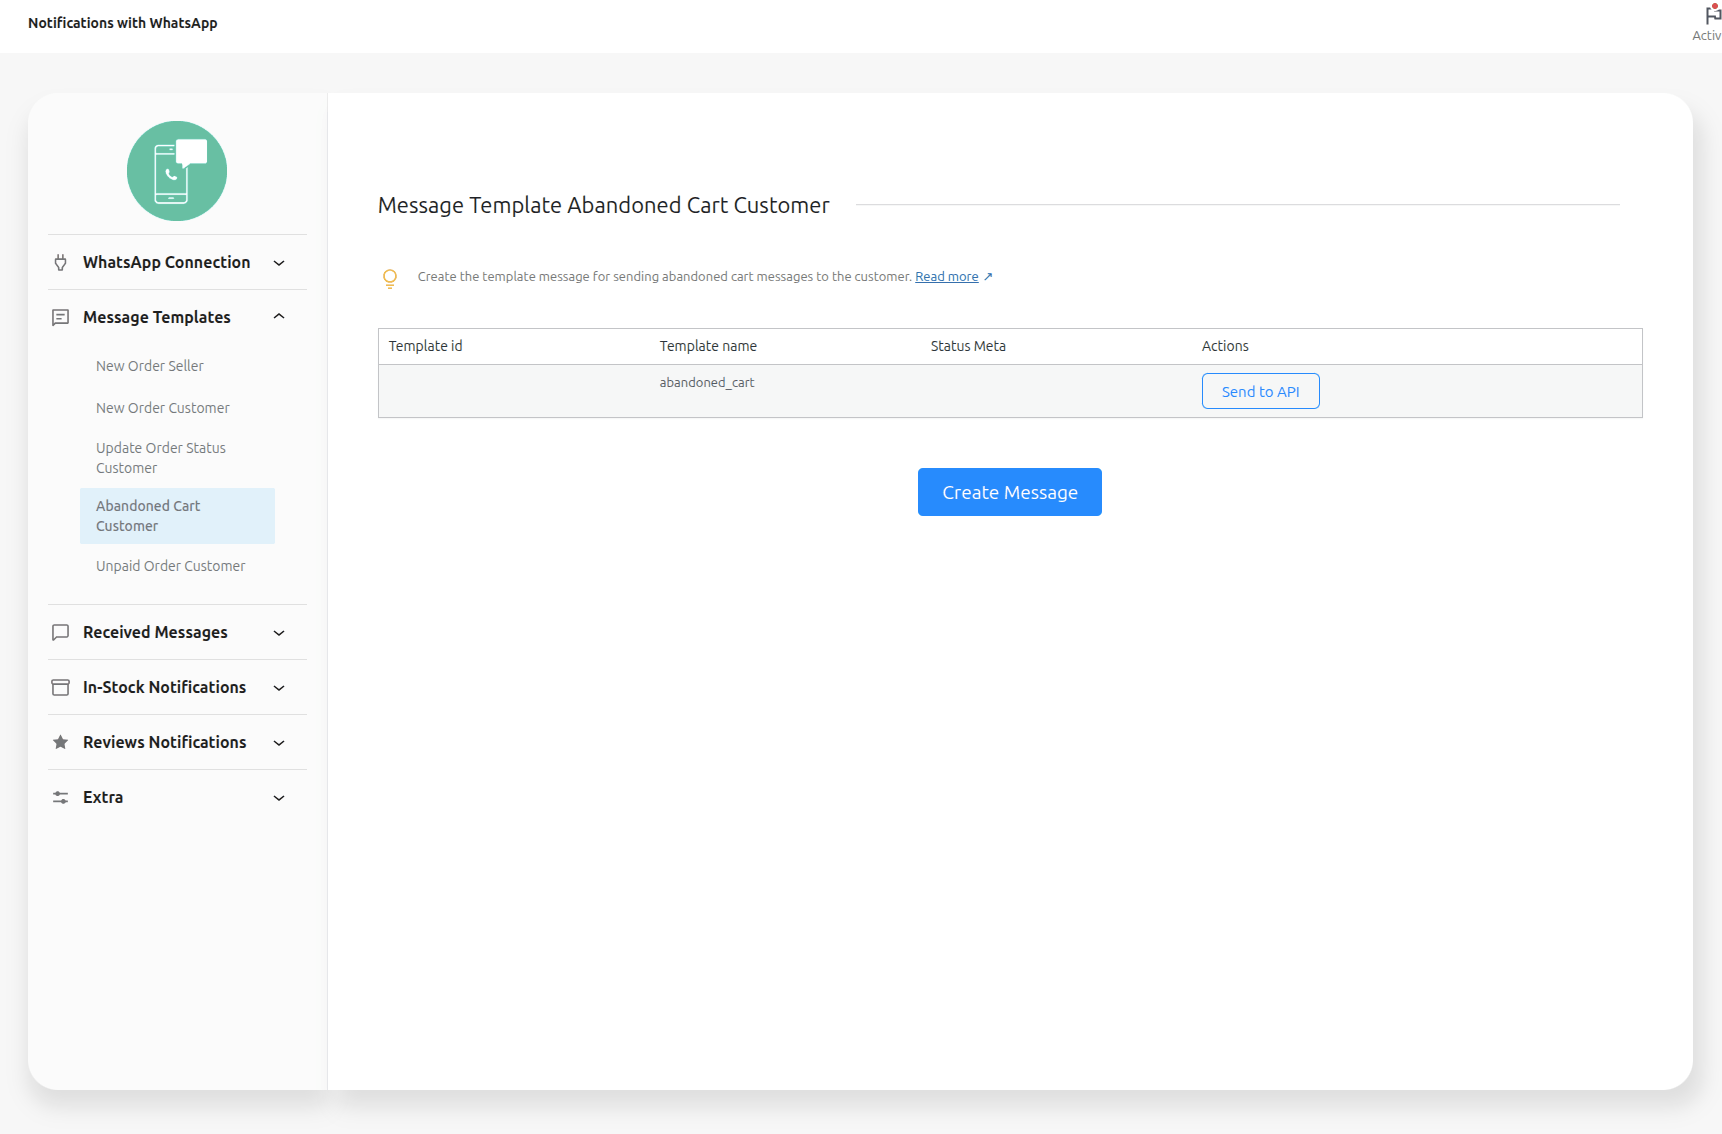
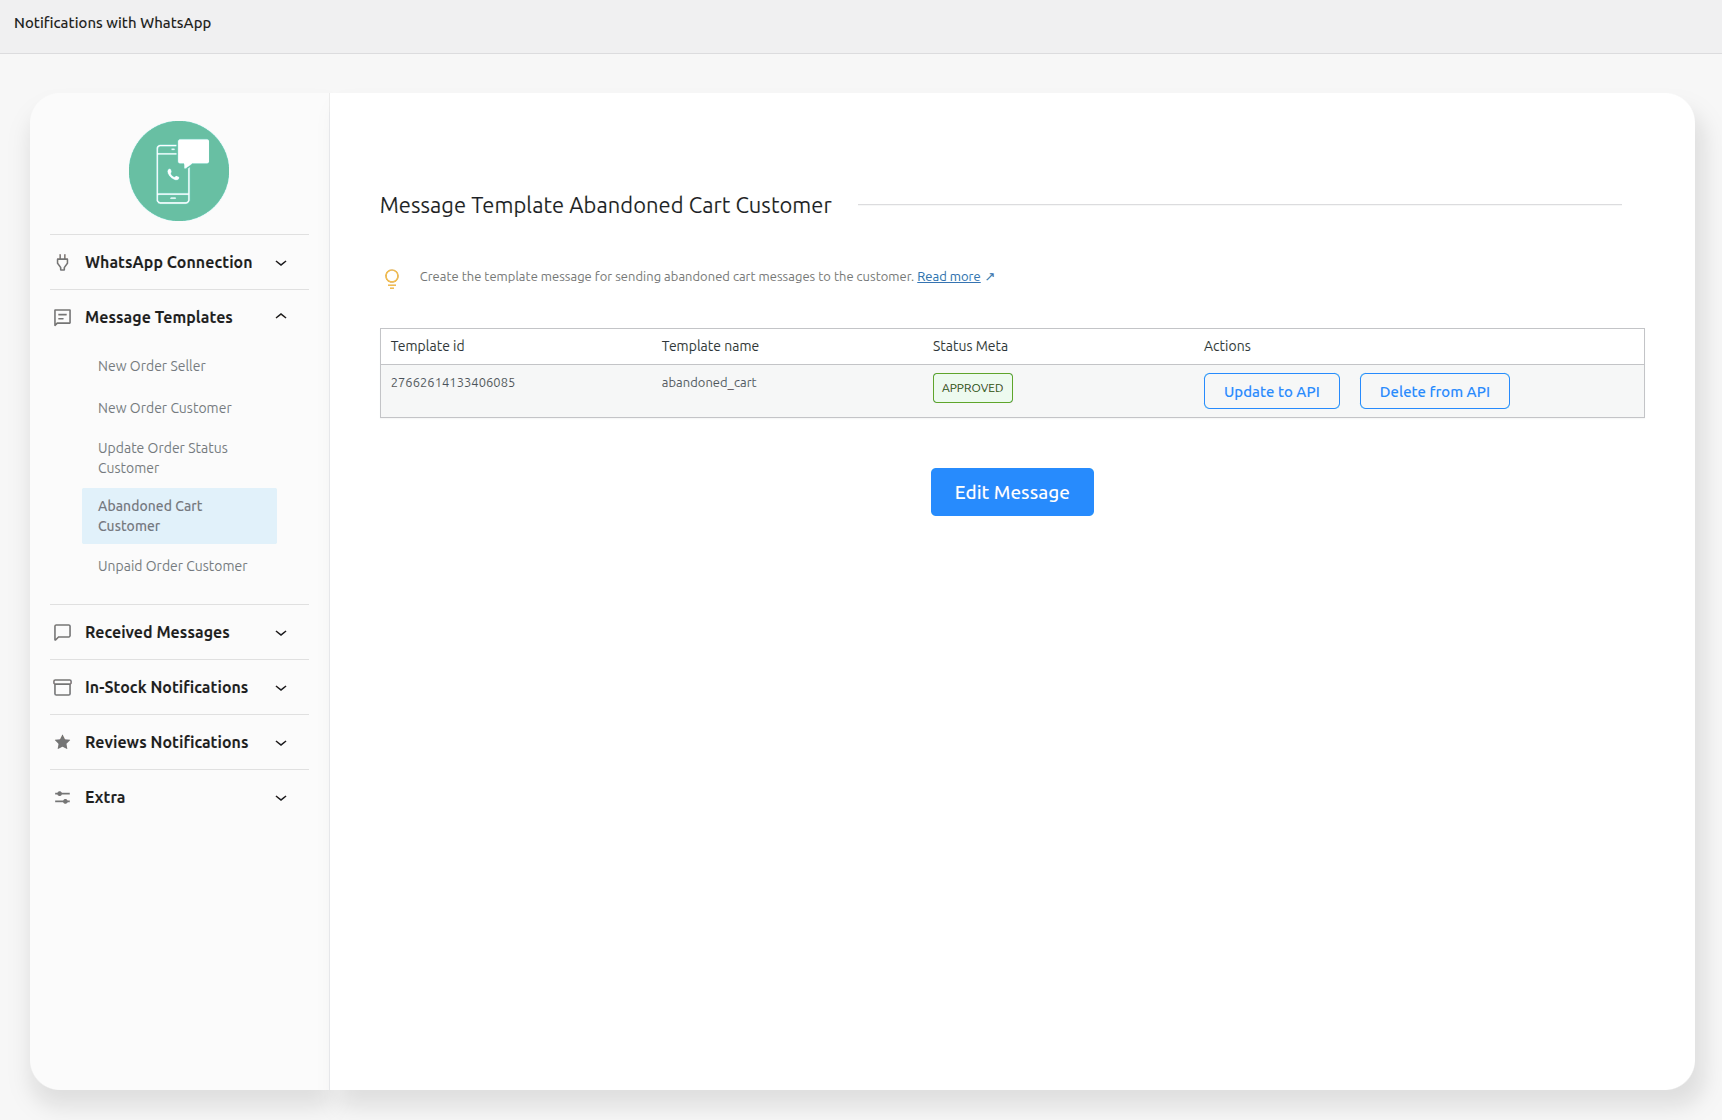
Message Template Abandoned Cart Customer
↑ Back to topCreate the template message for sending abandoned cart messages to the customer:
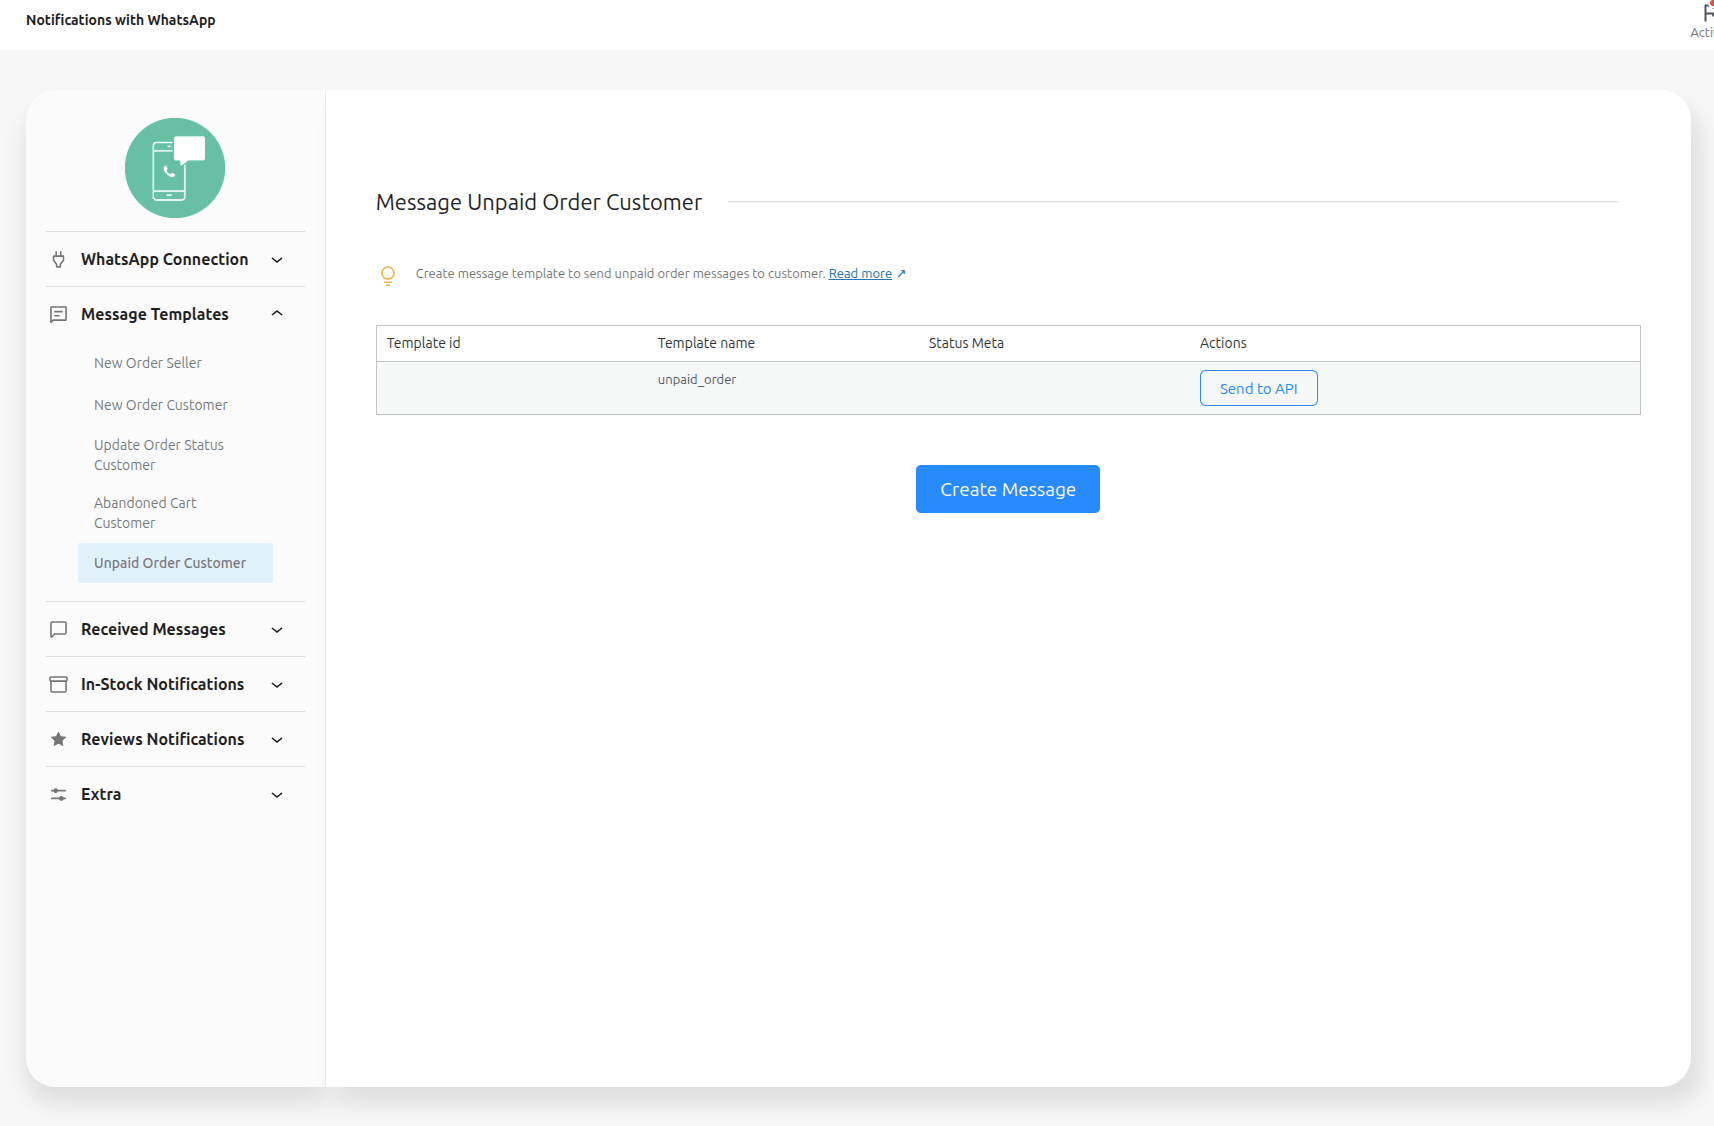
Message Template Unpaid Order Customer
↑ Back to topCreate message template to send unpaid order messages to customer:
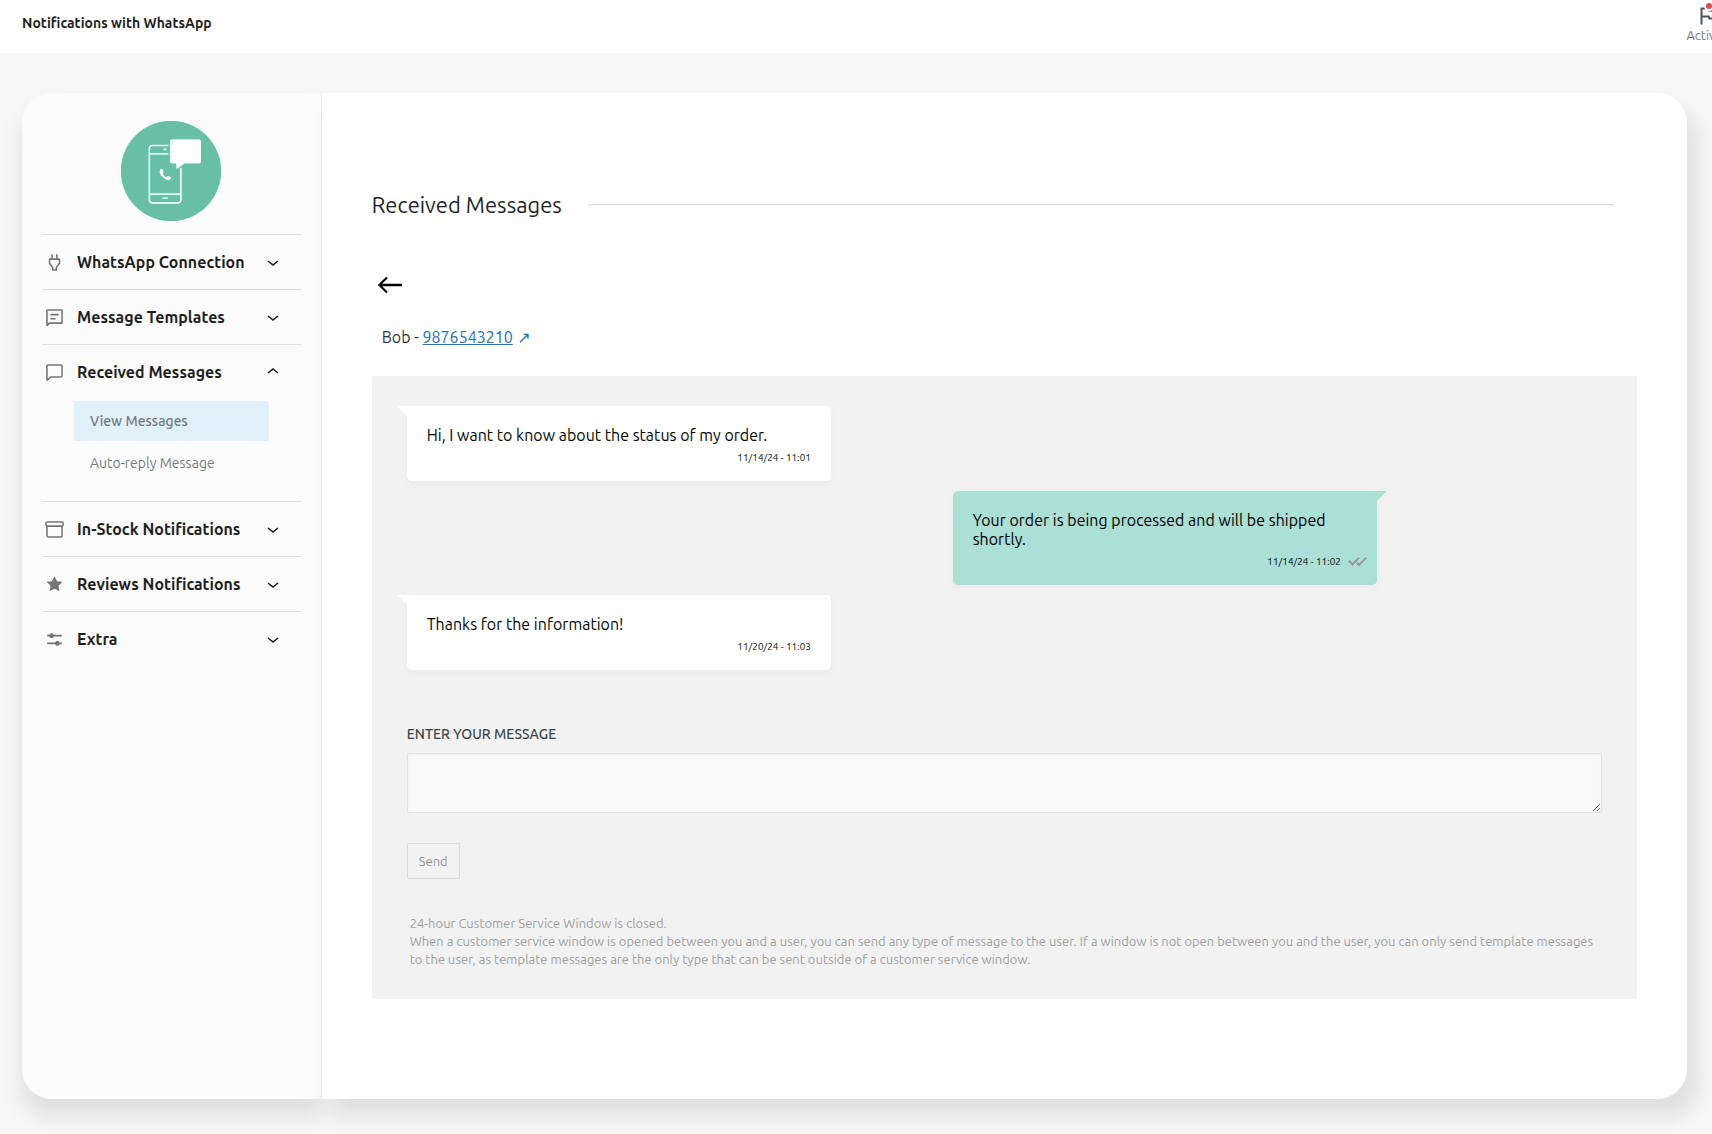
Received Messages
↑ Back to topView messages received on WhatsApp from customers who receive notifications
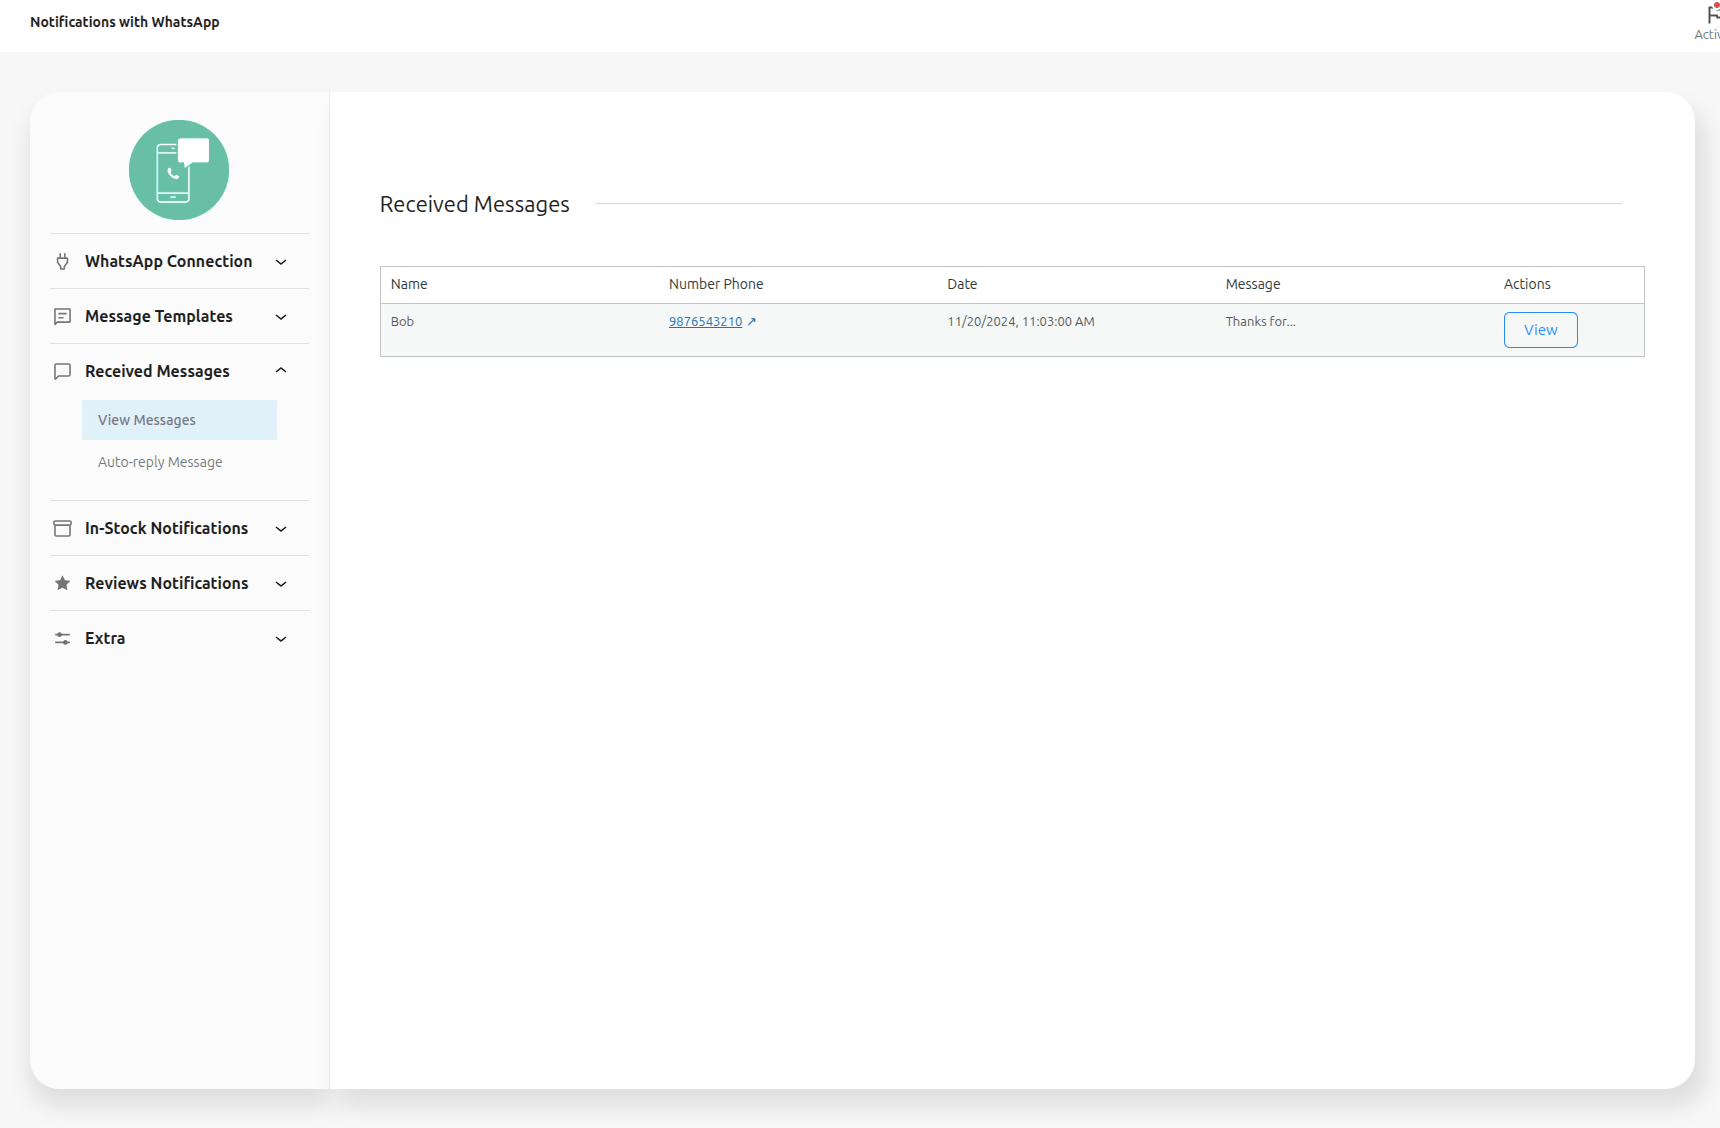
Reply to messages received on WhatsApp from customers who receive notifications
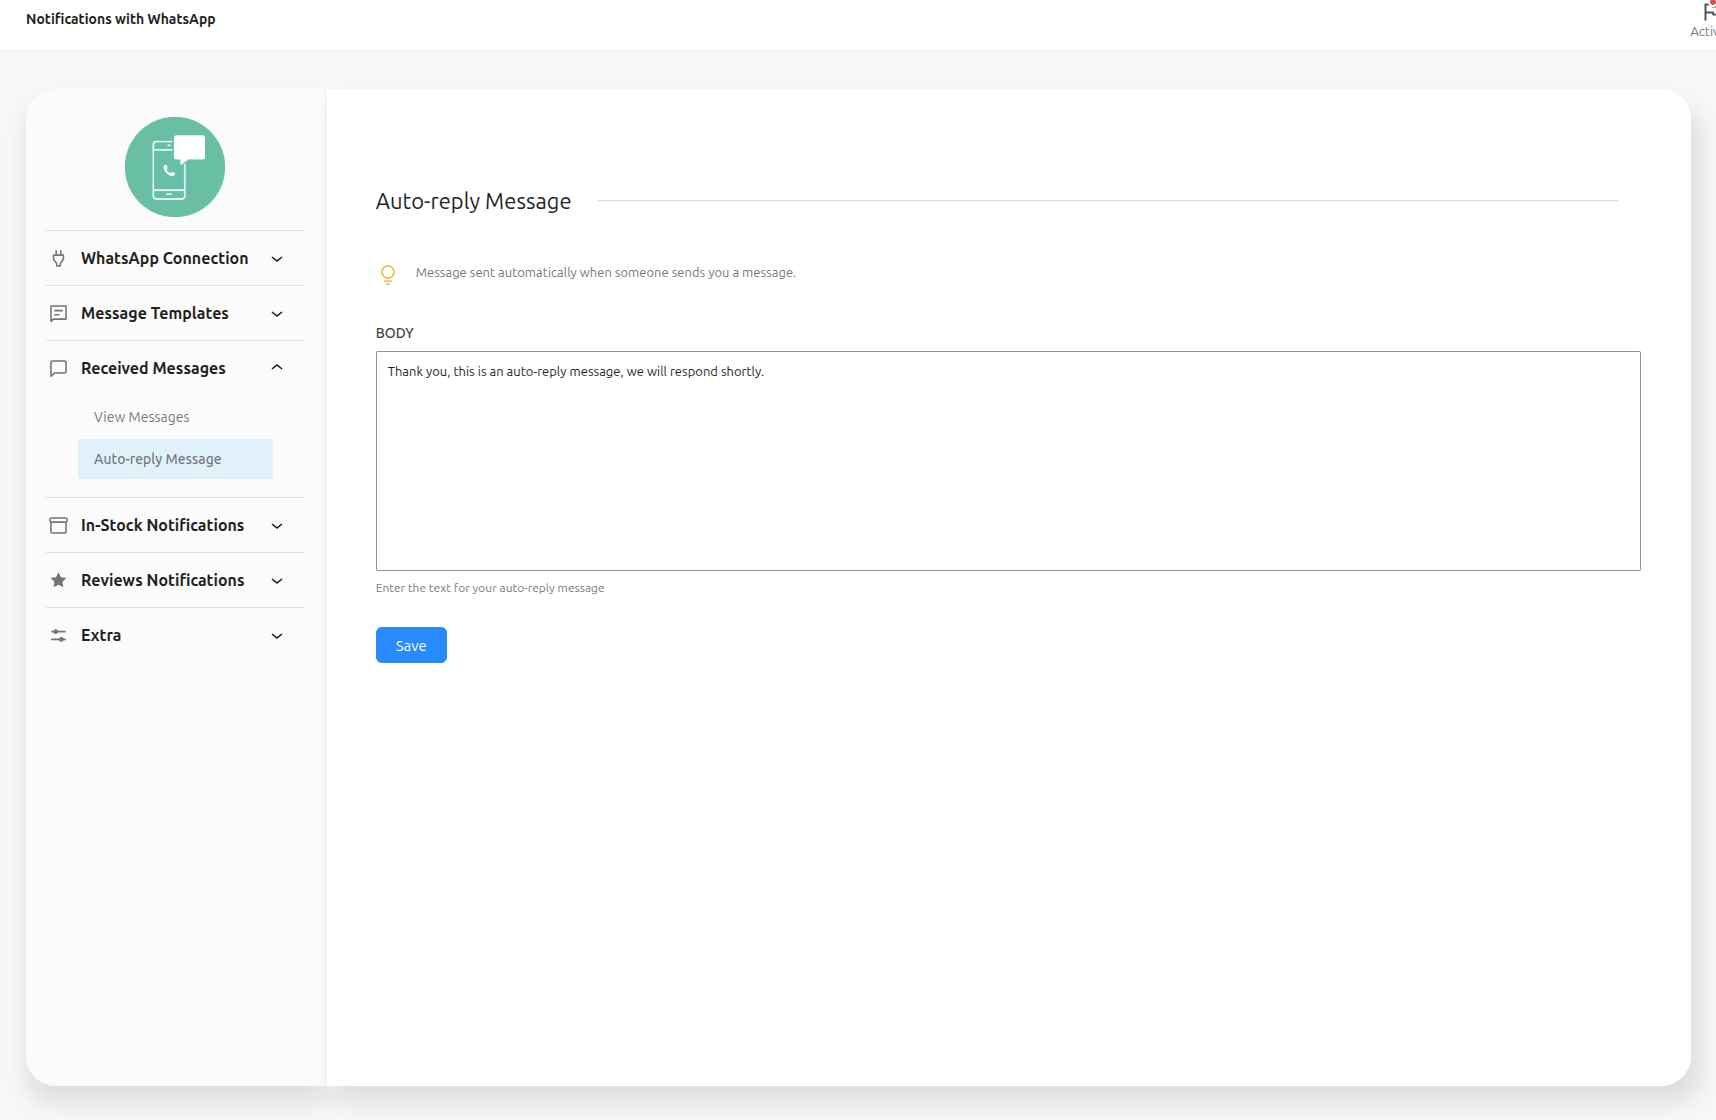
Auto-reply Message
↑ Back to topMessage sent automatically when someone sends you a message
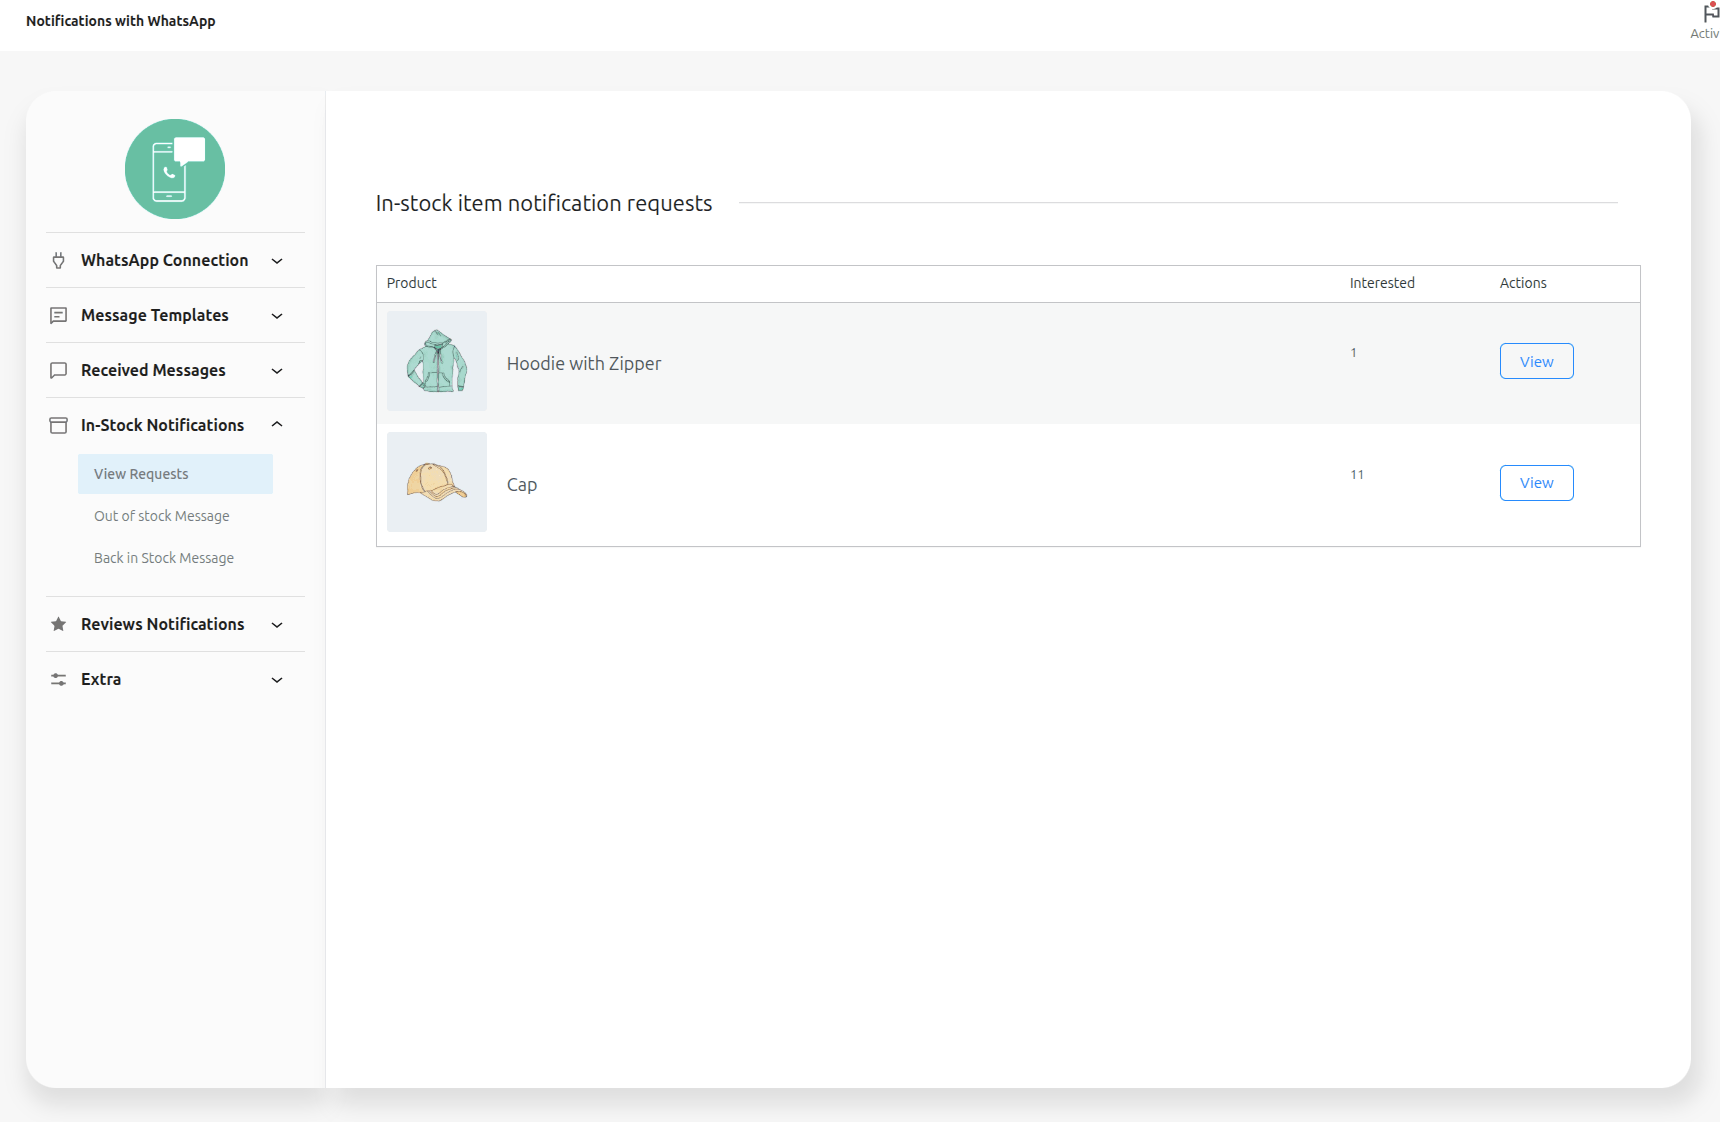
In-Stock Notifications View Requests
↑ Back to topShow all notification requests when a product is back in stock
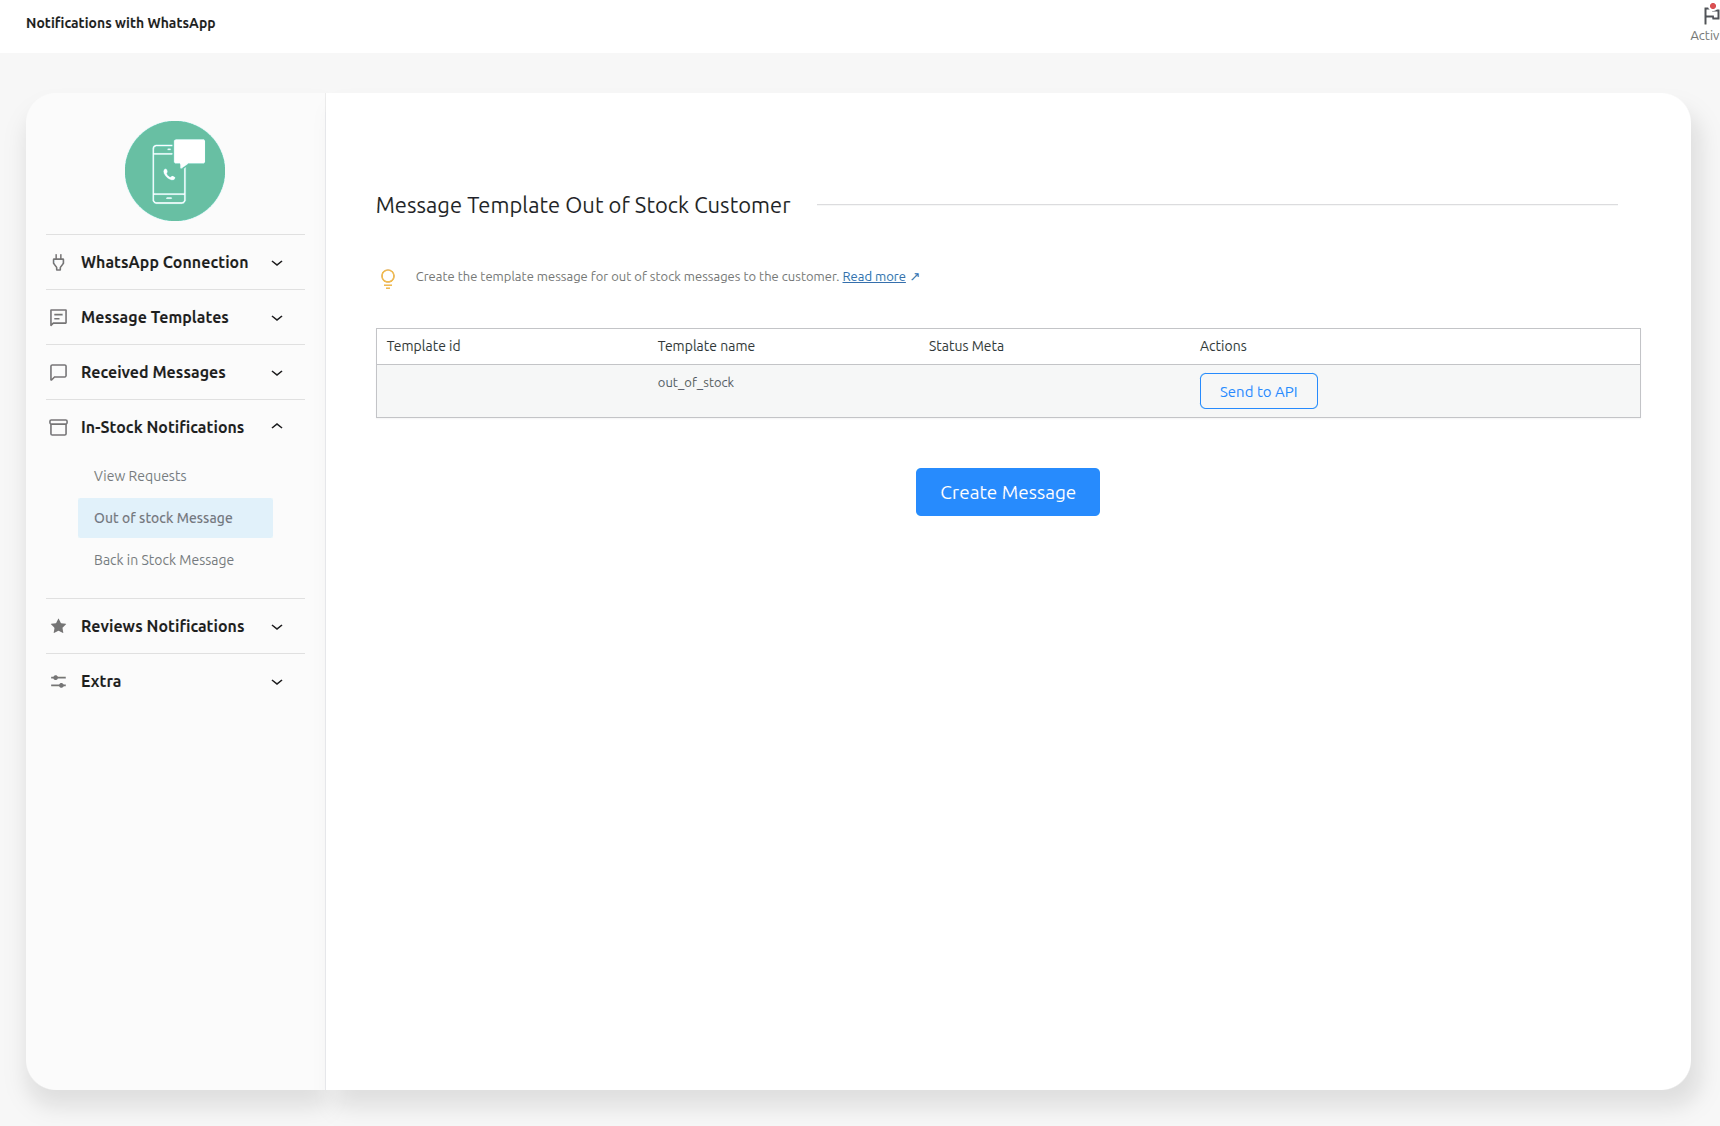
Message Template Out of Stock Customer
↑ Back to topCreate the template message for out of stock messages to the customer
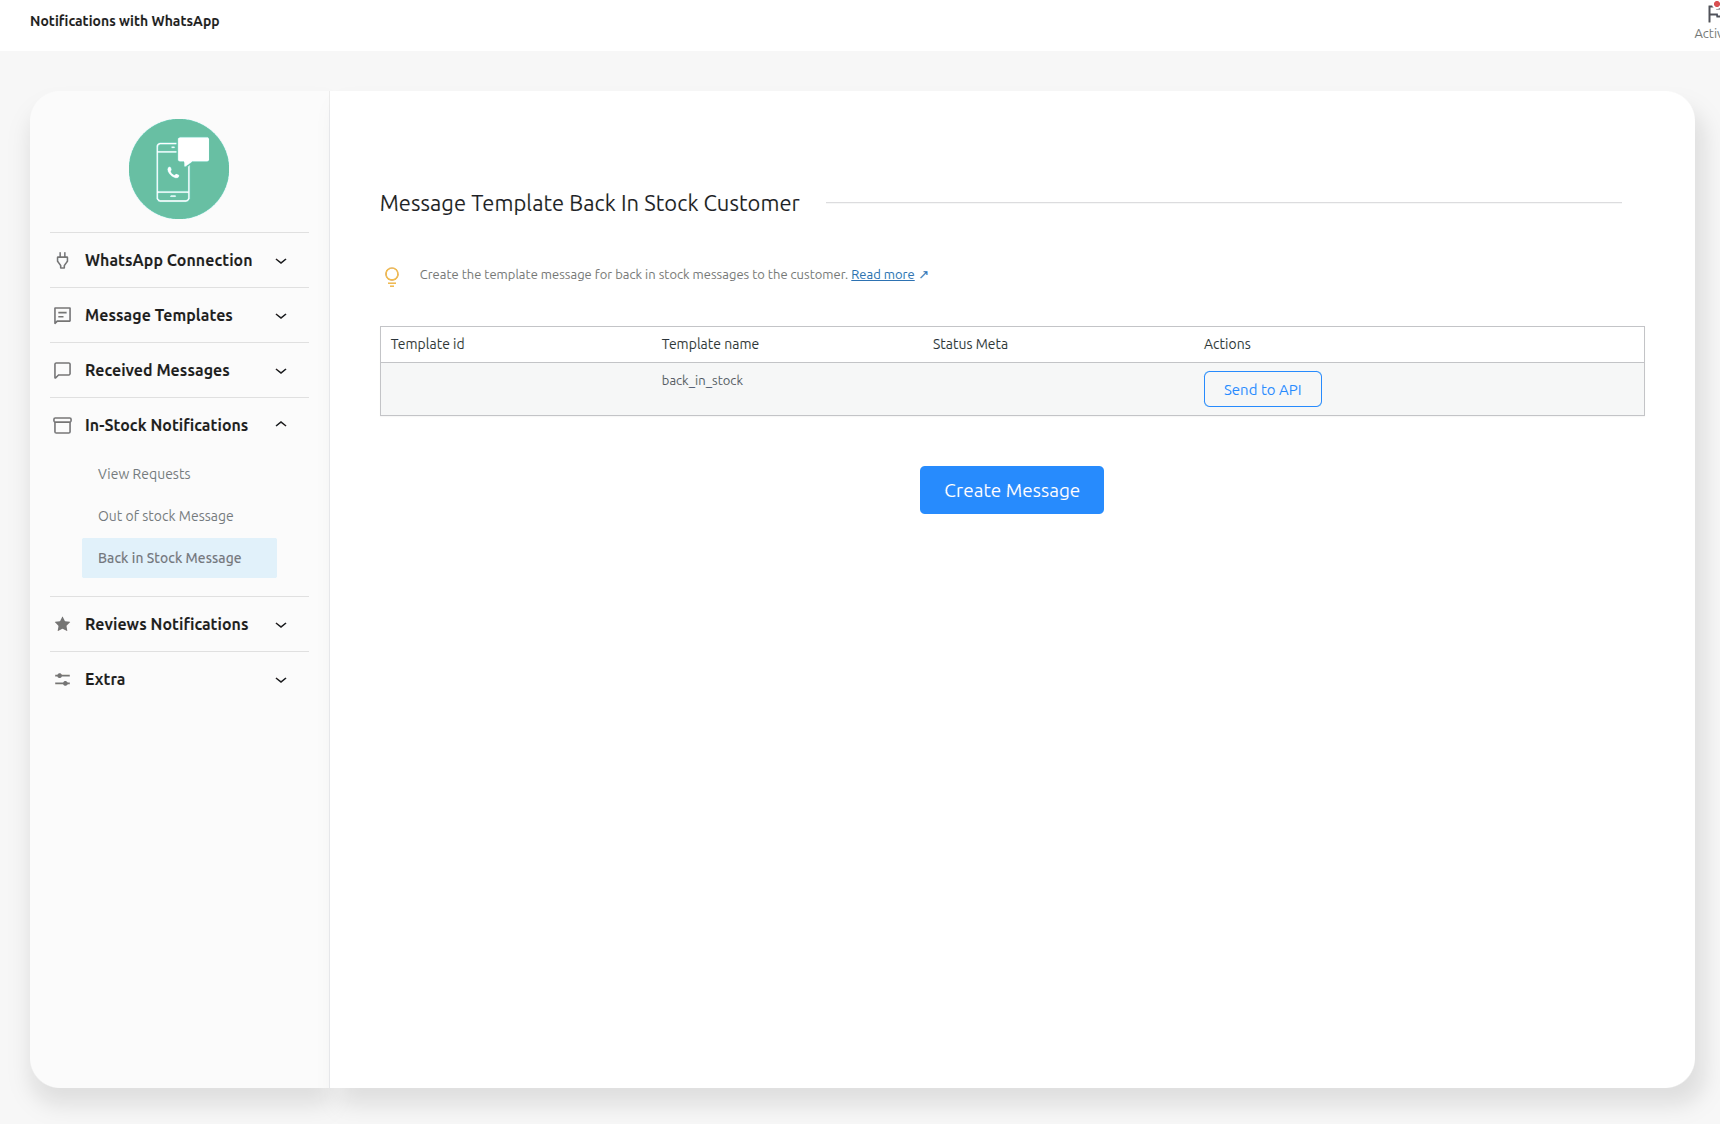
Message Template Back in Stock Customer
↑ Back to topCreate the template message for back in stock messages to the customer
Message Template Review Notification Customer
↑ Back to topCreate the template message for review notification products to the customer

Coupon
↑ Back to topCreate coupons with custom rules to send in customer messages

Usage
↑ Back to topSee how using the plugin works and how configure:
Create Messages
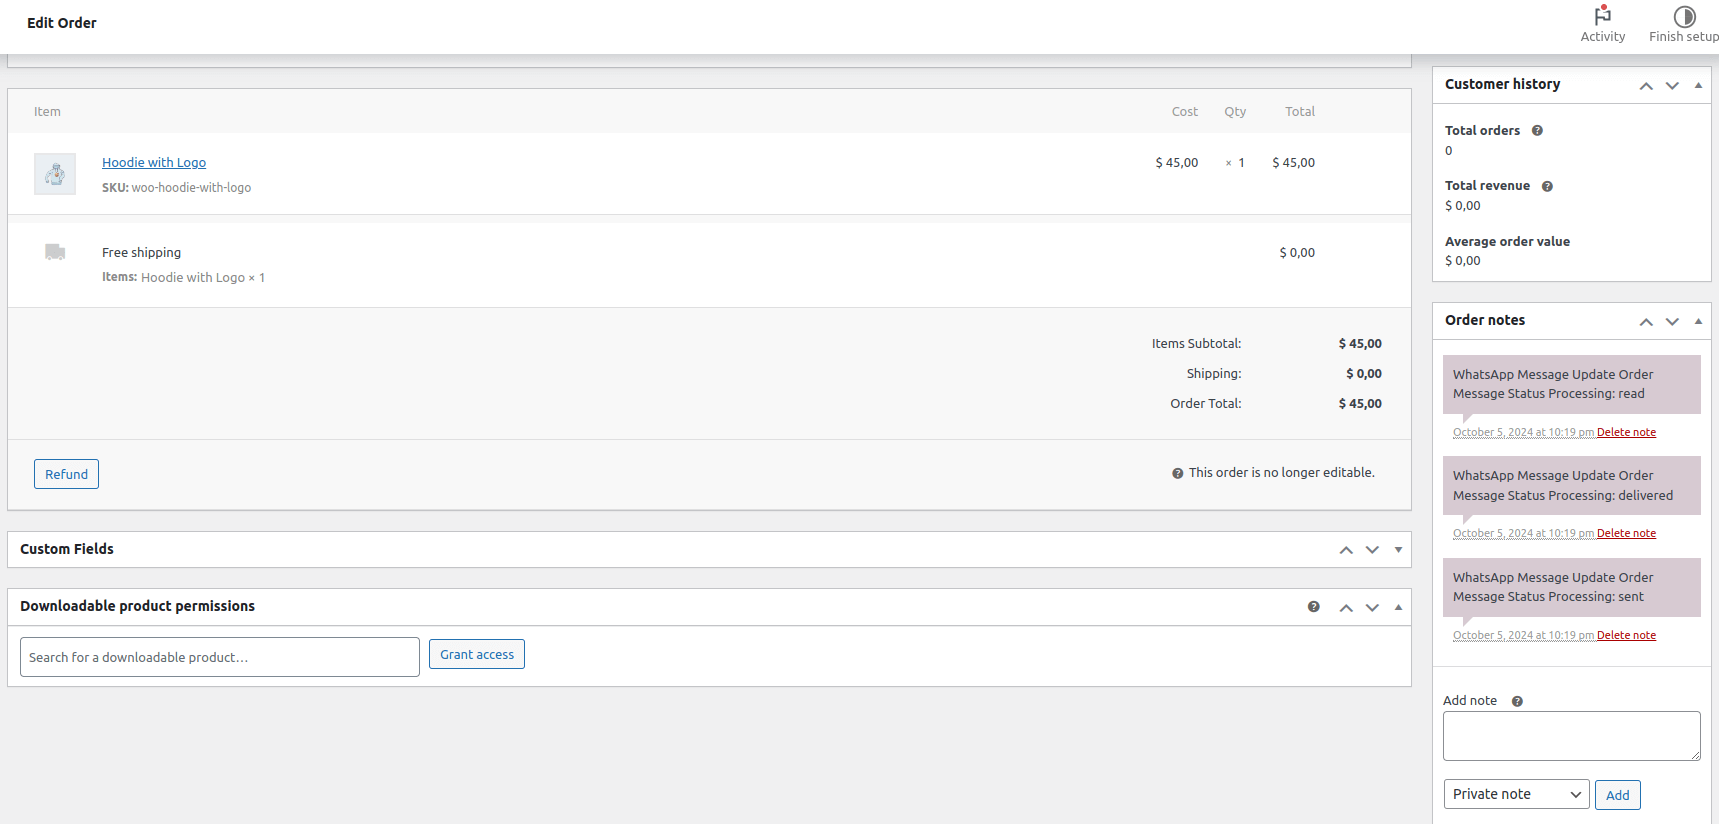
↑ Back to topOrder Note
↑ Back to topIn order notes you can see if the message was: sent, delivered and read.
Configuration Meta Business
↑ Back to topFor the plugin to work, you need to make some settings within Meta Business, see how to configure it below:
Tutorial Configure Meta Business
↑ Back to topSee the tutorial on how to configure Meta Business:
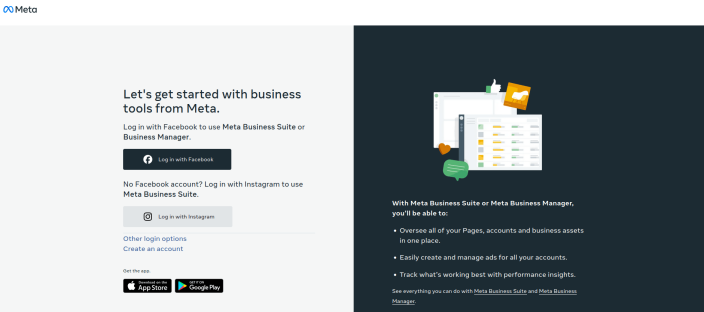
Create a Business Account
↑ Back to topAccess the link https://business.facebook.com and register your company, and then link this account to your business’s social networks (Facebook and Instagram)
To create an account you can also check: Create a Business Account in Meta Business Manager
To link this account to your company’s social networks, you can check: Add a Page to your Business Account
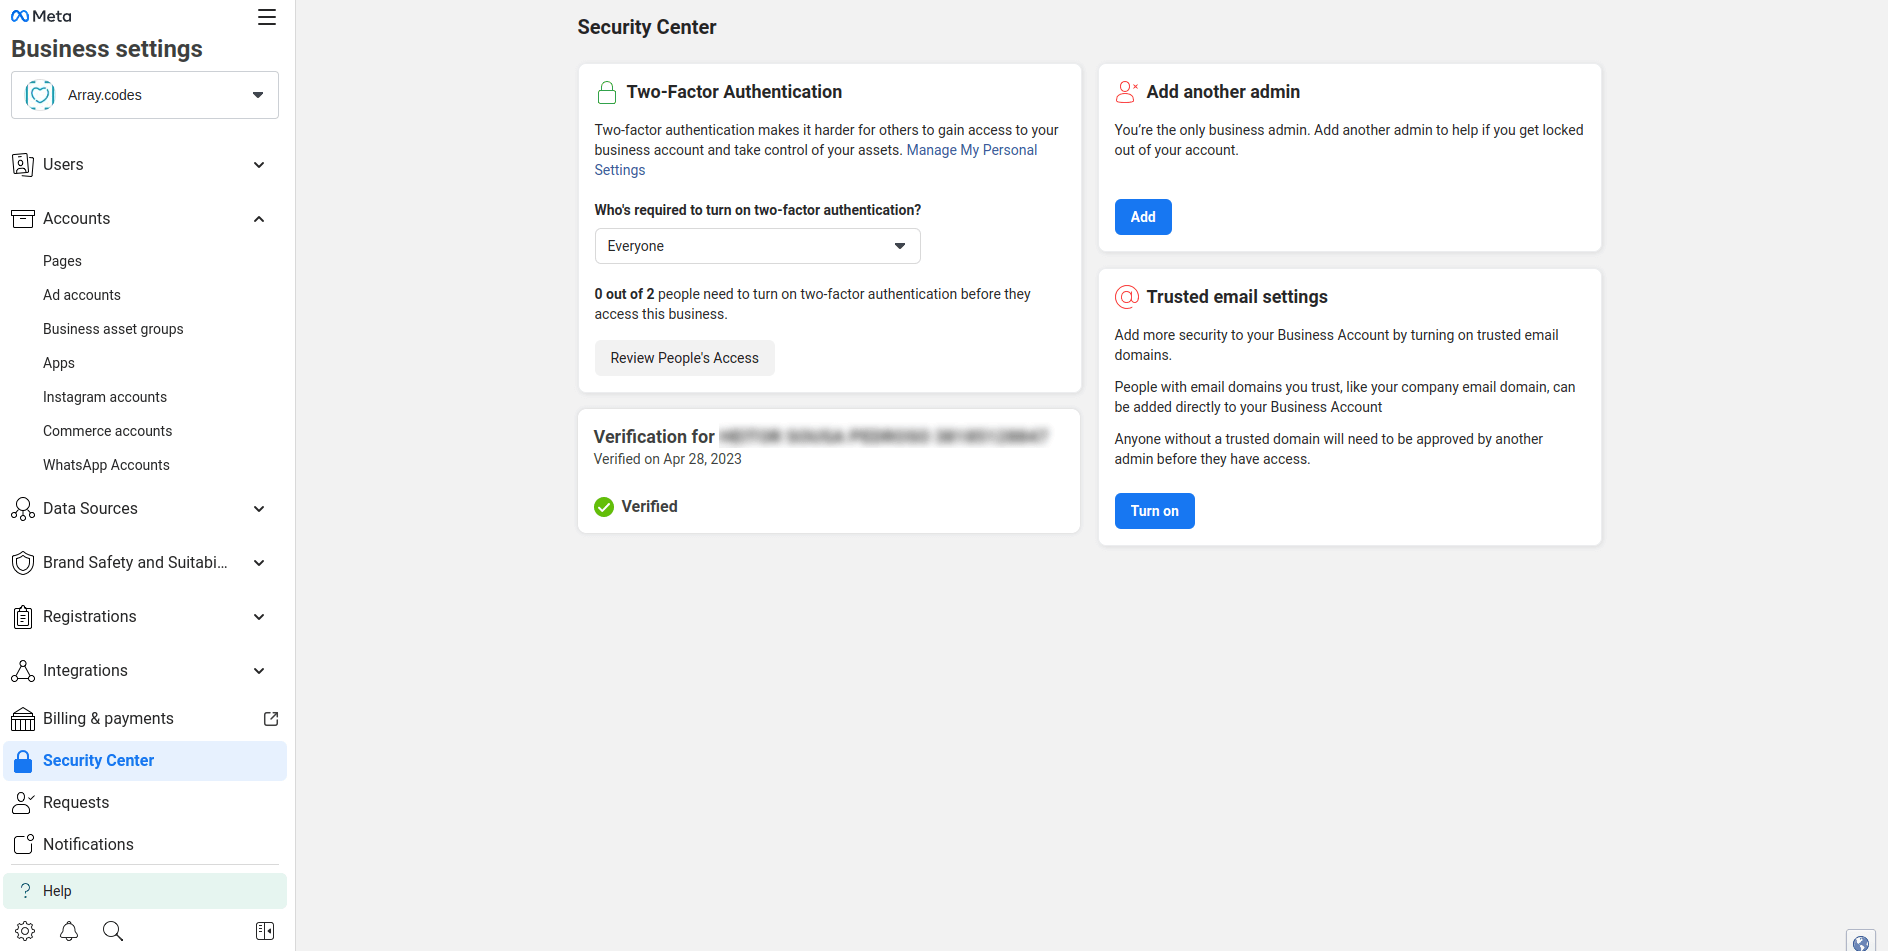
Verify your business
↑ Back to topTo use WhatsApp features, it is important that you complete a Business verification.
This is necessary to be able to fully use WhatsApp Cloud API credentials without intermediaries. Only people with full control of a business account can complete this process.
To complete Business verification you can check: Verify your business
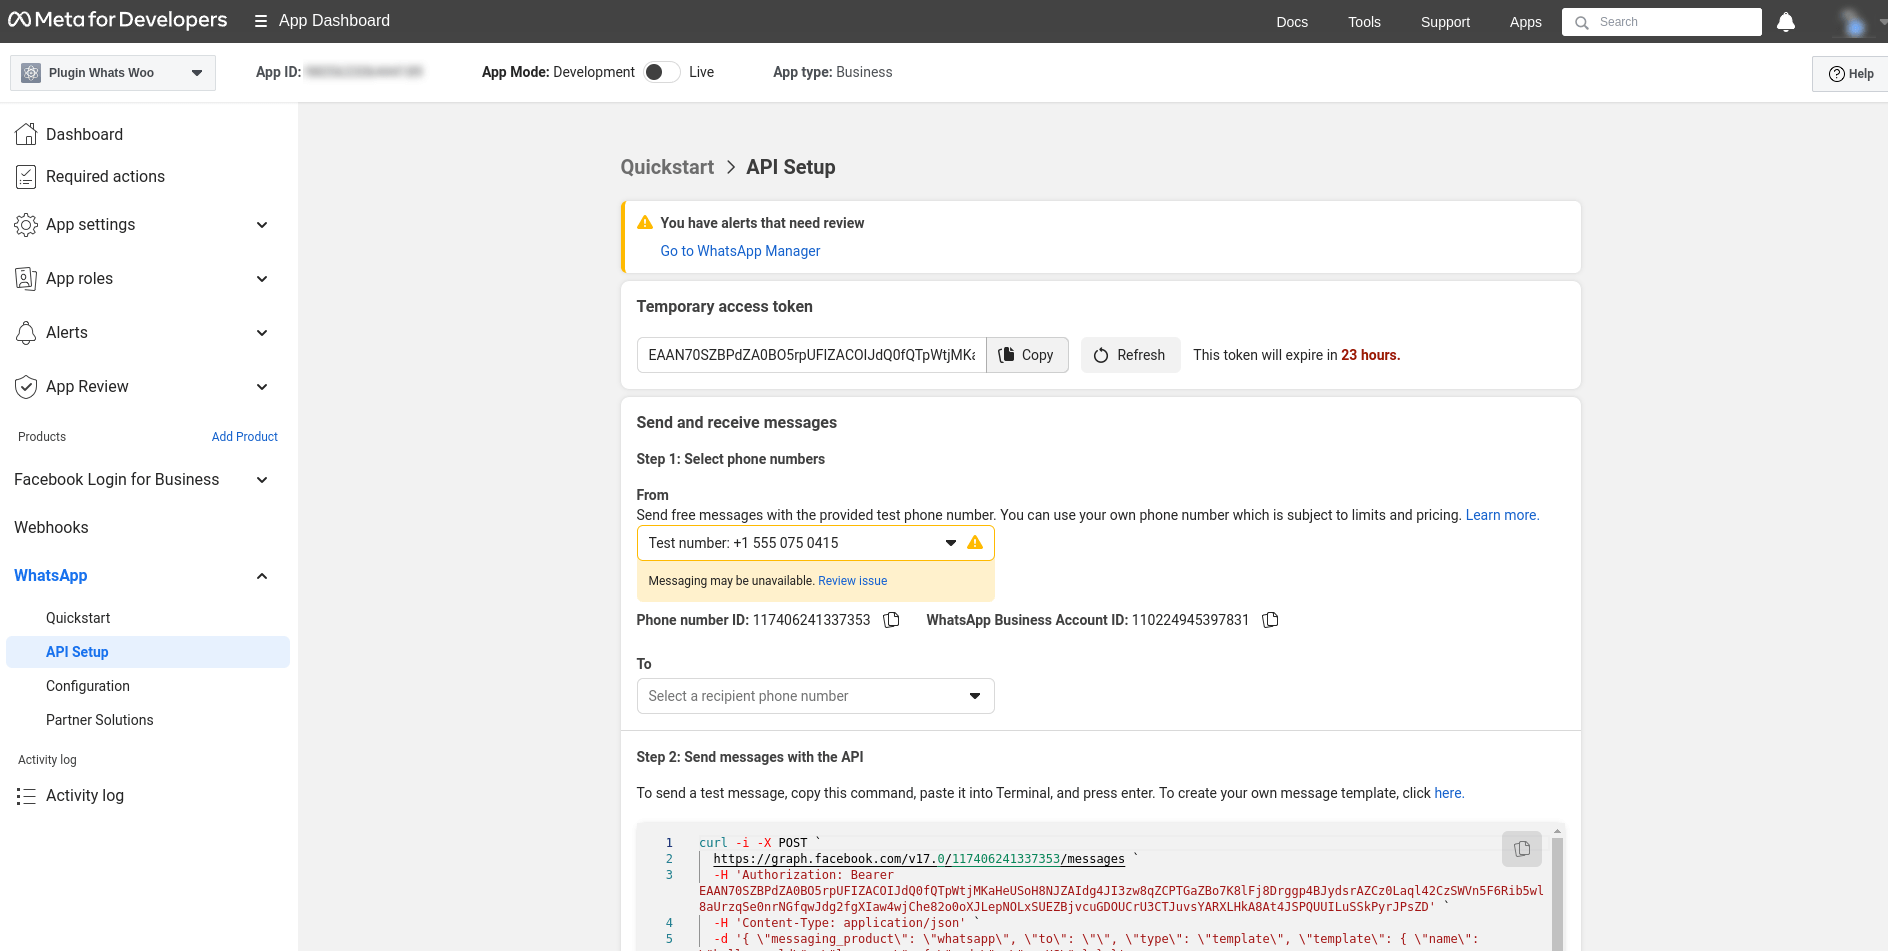
Generate WhatsApp Cloud API credentials
↑ Back to topFinally, we must generate a WhatsApp Cloud API credentials token temporary for tests.
To generate a token you can check: Using Authorization Tokens for the WhatsApp Business Platform or Add The WhatsApp Product To Your App
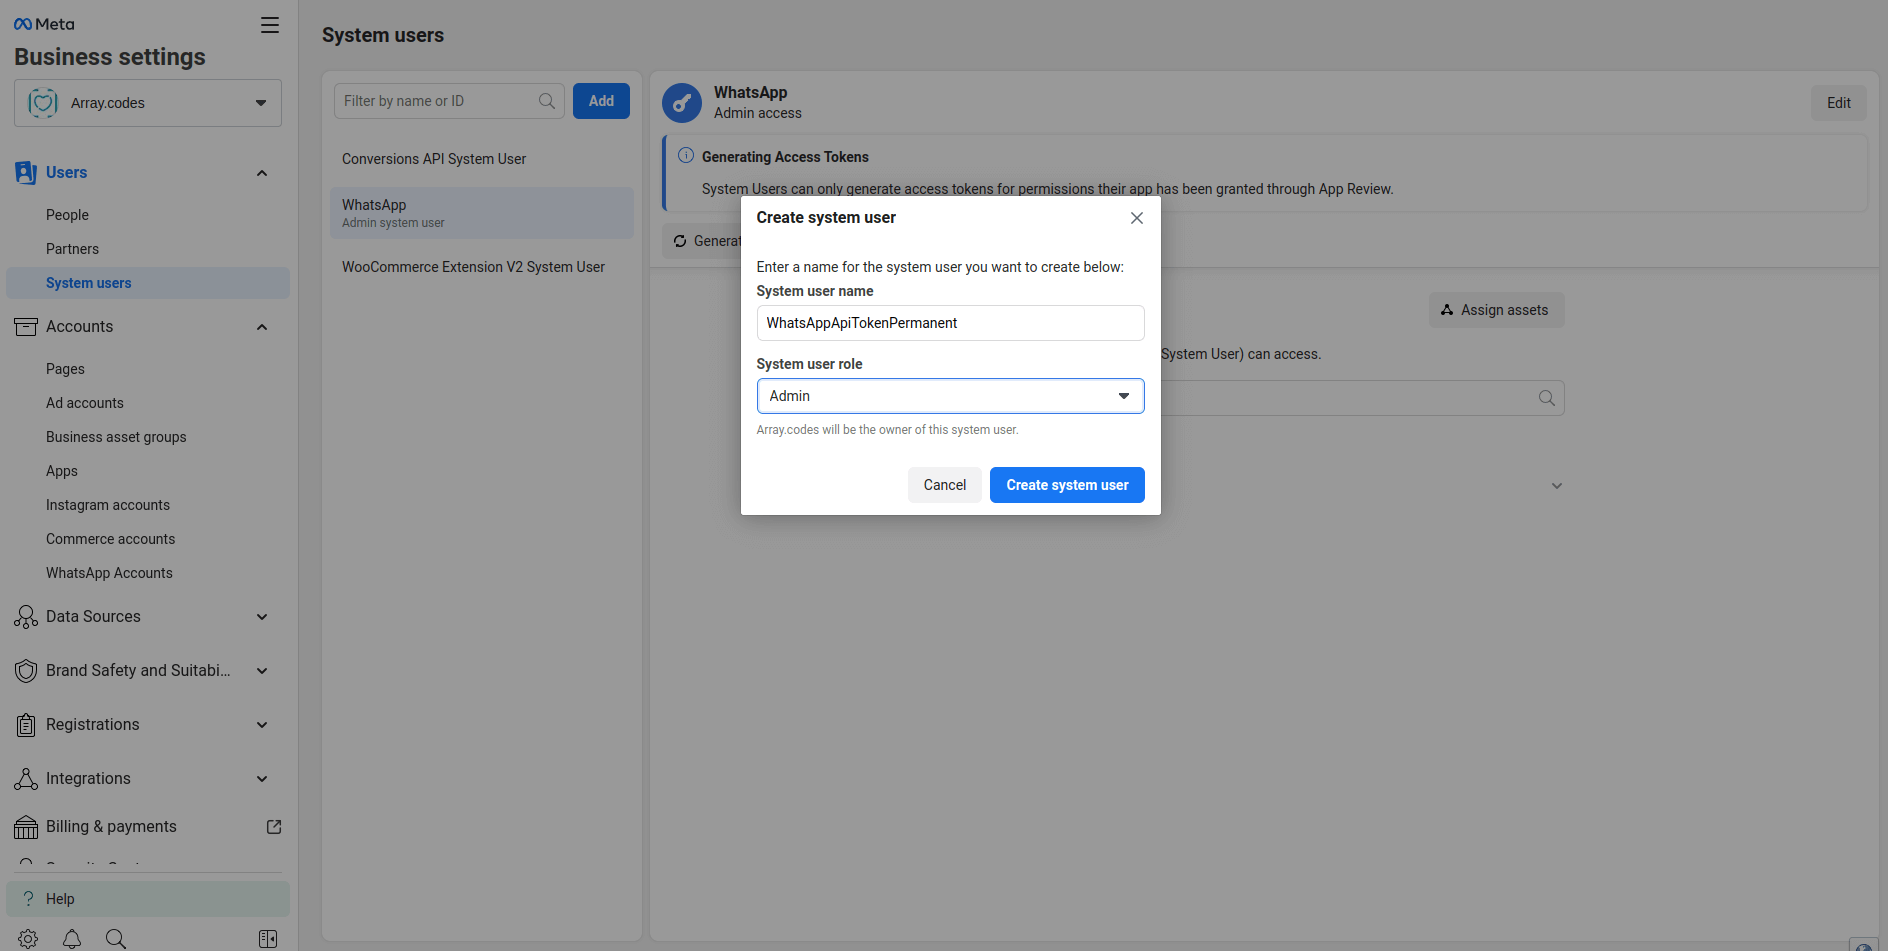
Creating a Permanent Access Token
↑ Back to topKnowing that you need to use a bearer token in the Authorization header of an HTTP request is helpful, but it’s not enough. The only access token you’ve seen so far is temporary. Chances are that you want your app to access the API for more than 24 hours, so you need to generate a longer-lasting access token.
To create a system user, do the following:
- Go to Business Settings.
- Select the business account your app is associated with.
- Below Users, click System Users.
- Click Add.
- Name the system user, choose Admin as the user role, and click Create System User.
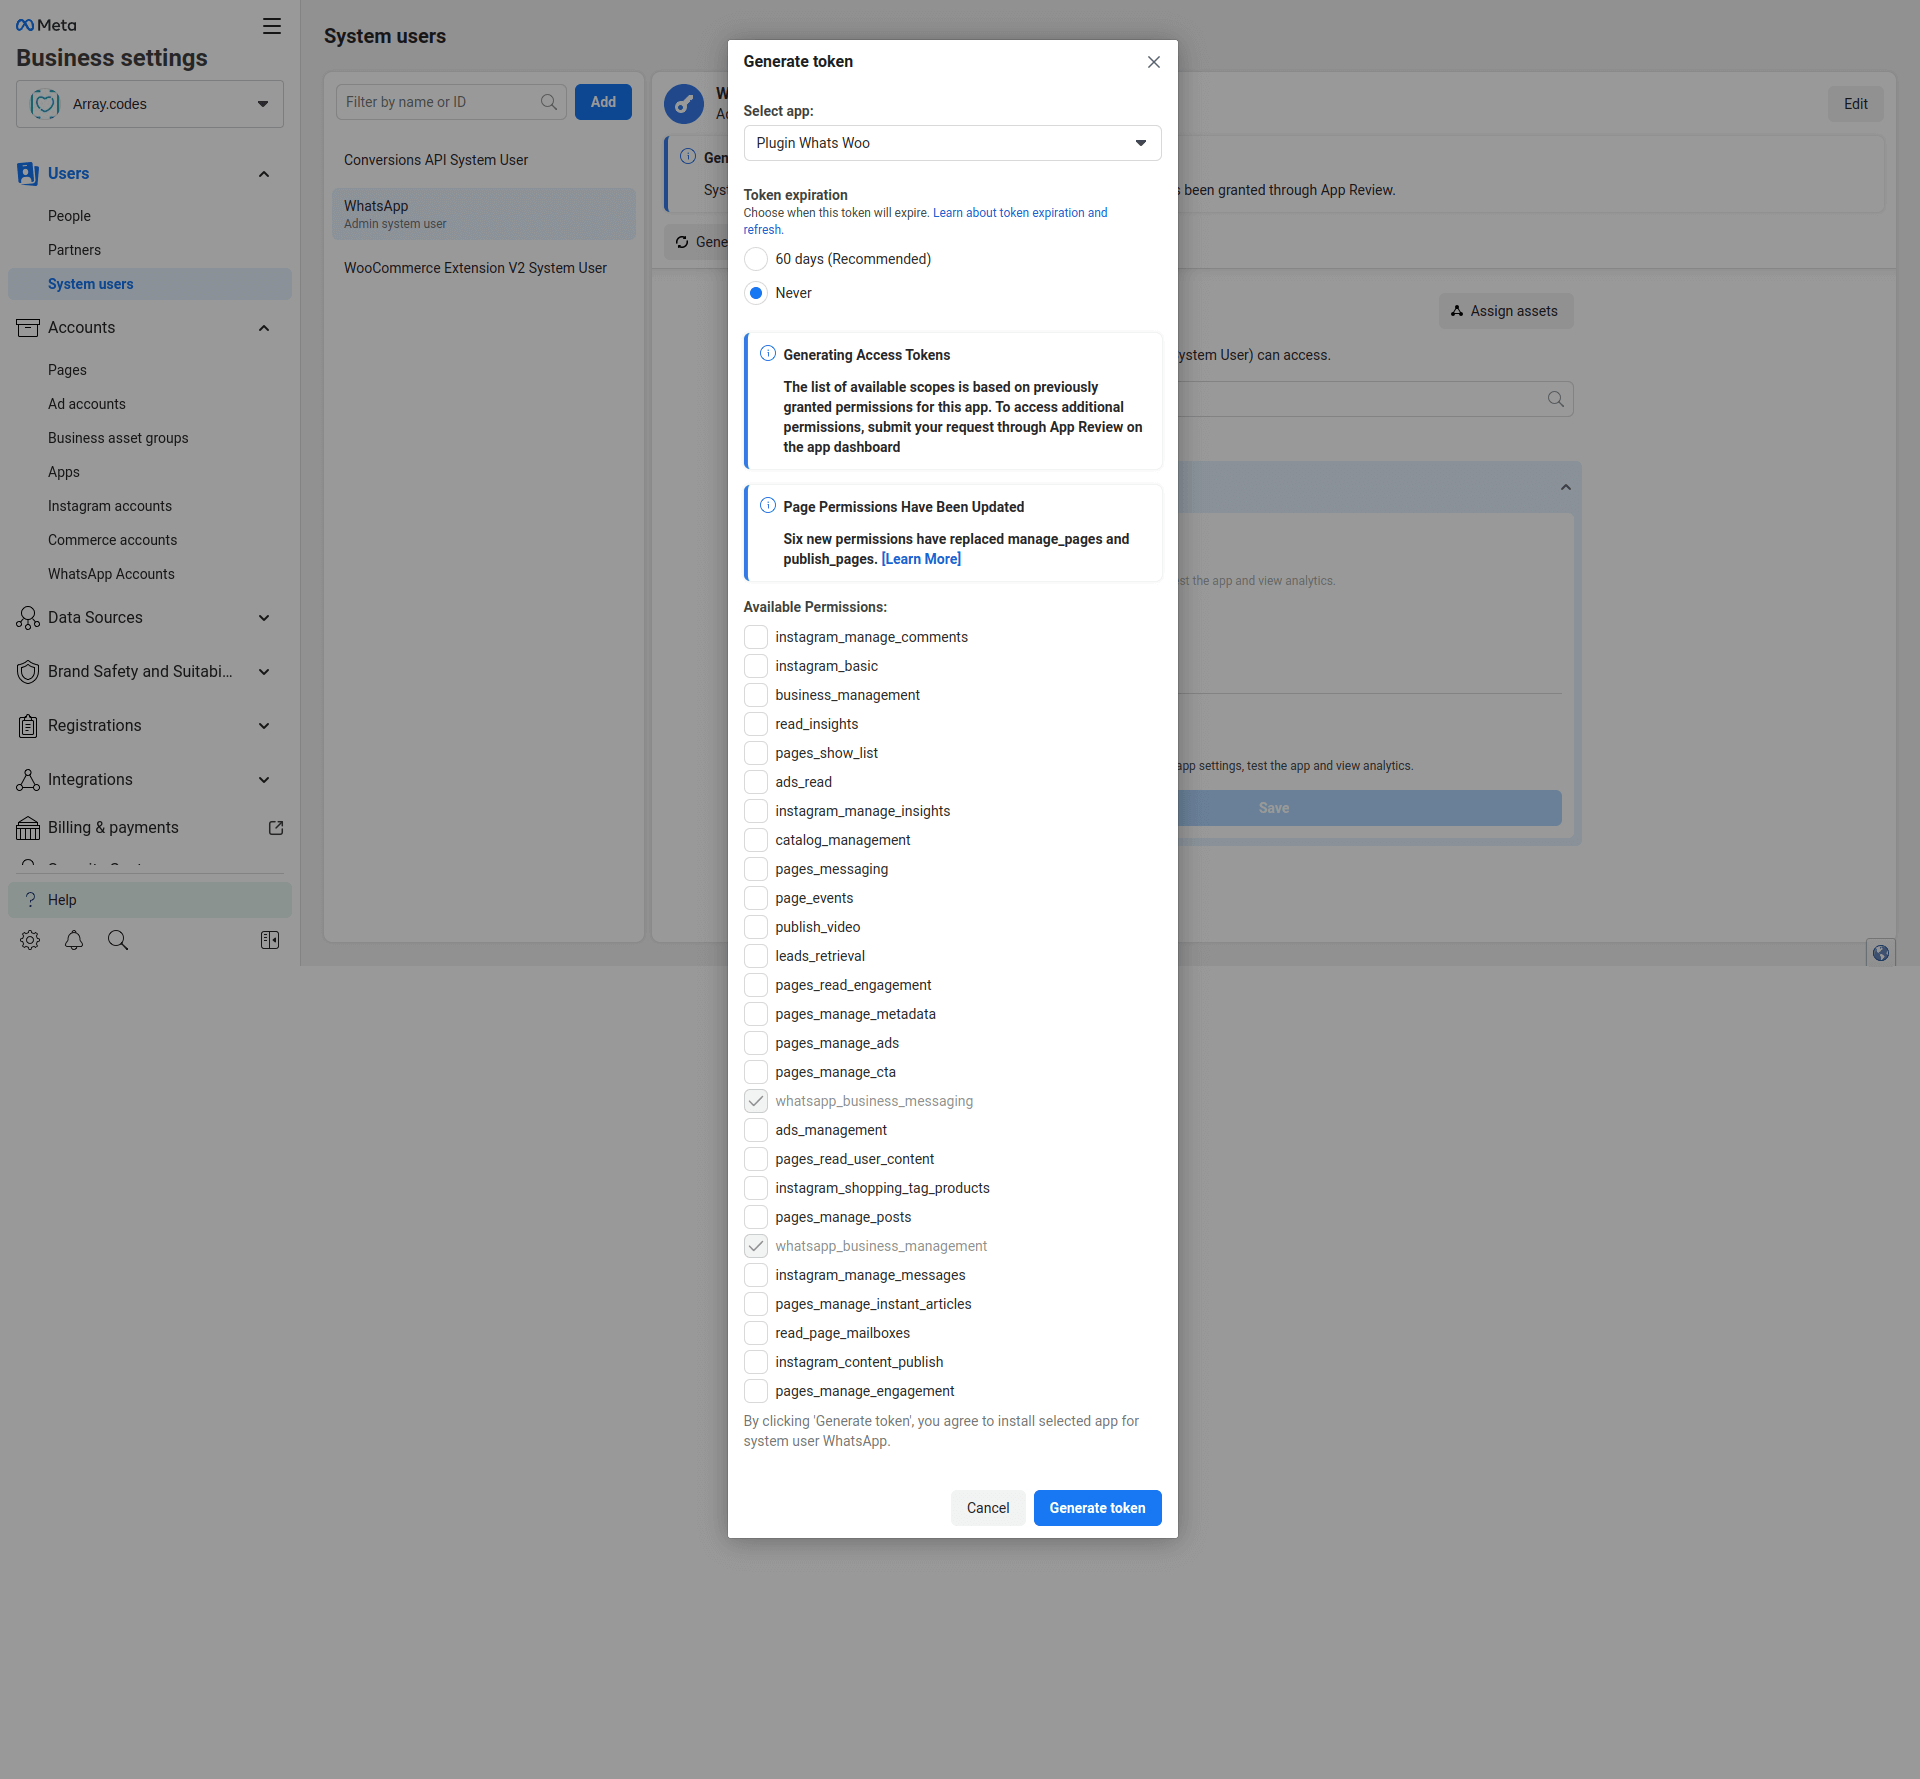
- Select the whatsapp_business_messaging permission.
- Click Generate New Token.
- Copy and save your token.
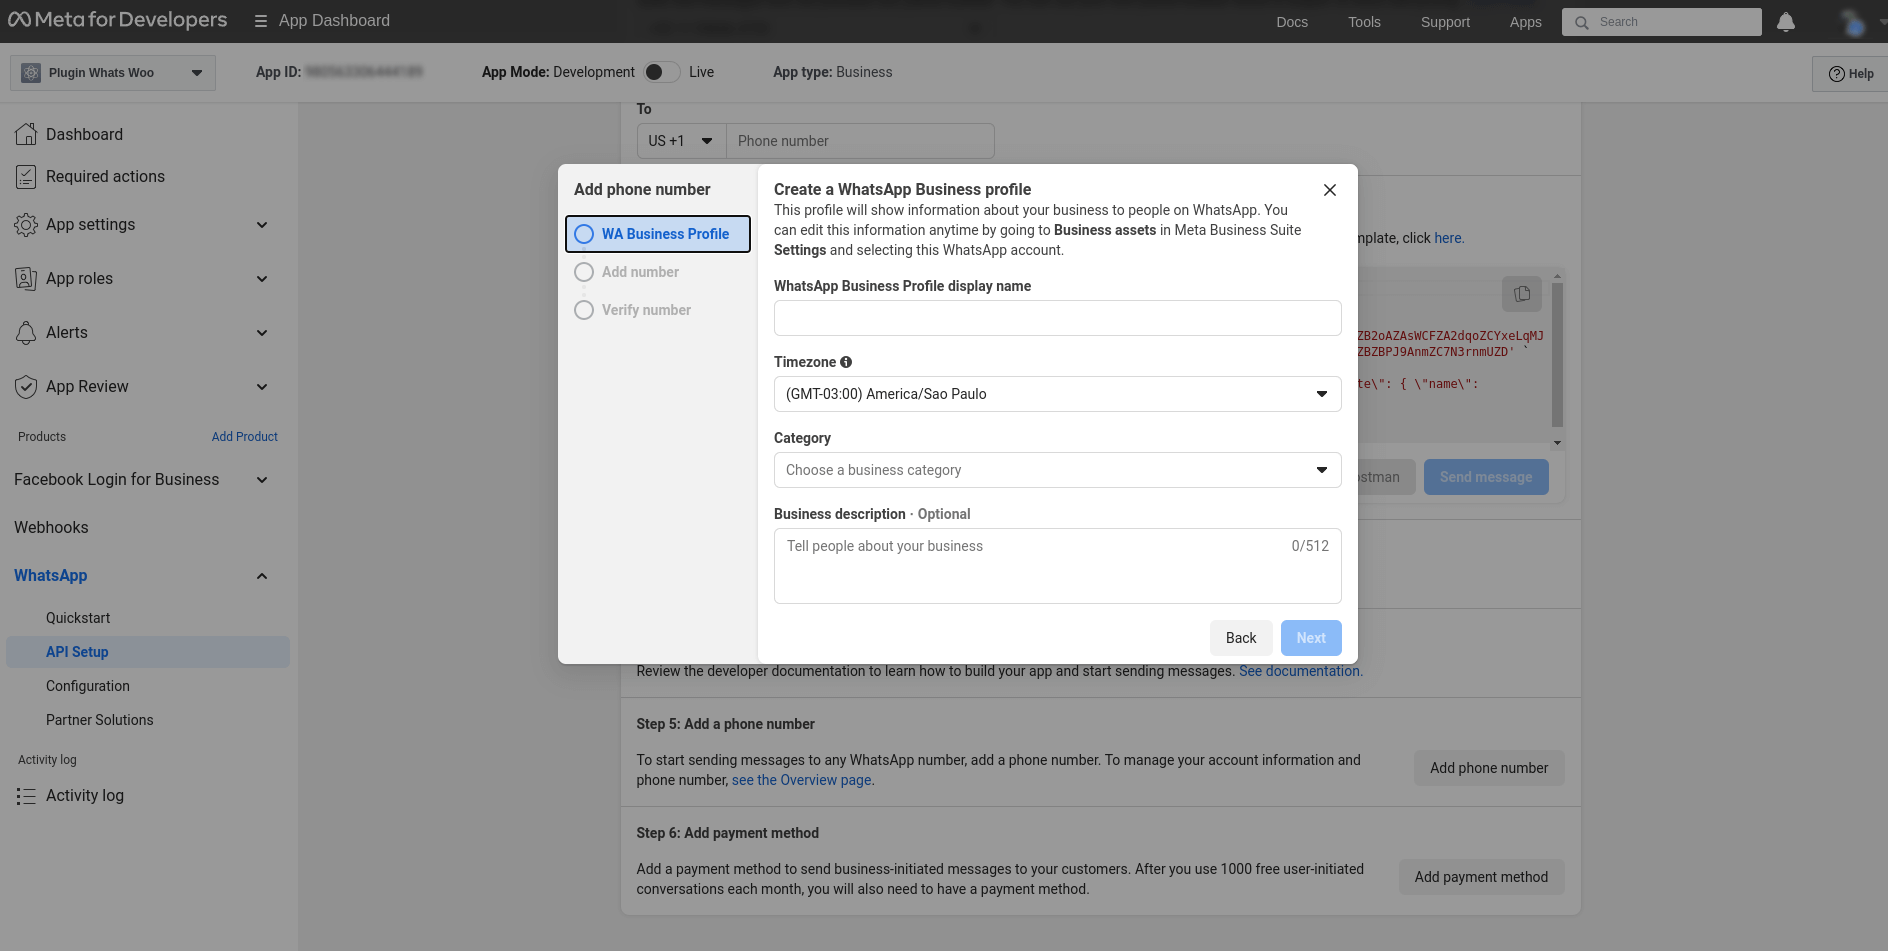
Add a Real Business Number
↑ Back to topWith your test business number and test WhatsApp business account, you can begin to develop your application.
When you use these test assets, you don’t pay to send messages as you work to develop your app.Once you are ready to start sending messages to your customers, you can add a real business phone number in the API Setup panel and create a real WhatsApp Business Account.
- Navigate to the Meta App that is set-up for WhatsApp by going to developers.facebook.com > My Apps > Select your App.
- Use left menu to navigate to the WhatsApp > API Setup panel.
- On the right pane select Add phone number button under Step 5: Add a phone number.
If your phone number is currently registered with WhatsApp Messenger or the WhatsApp Business App, you need to first delete it. You will not be able to use that number on the WhatsApp Business app simultaneously. Your number must be used on the Business Platform or Business App.
You can also check: Add a Phone Number
Configure Webhook Callback
↑ Back to top1 – To receive messages on WhatsApp that sends notifications In the APP go to WhatsApp > Configuration:
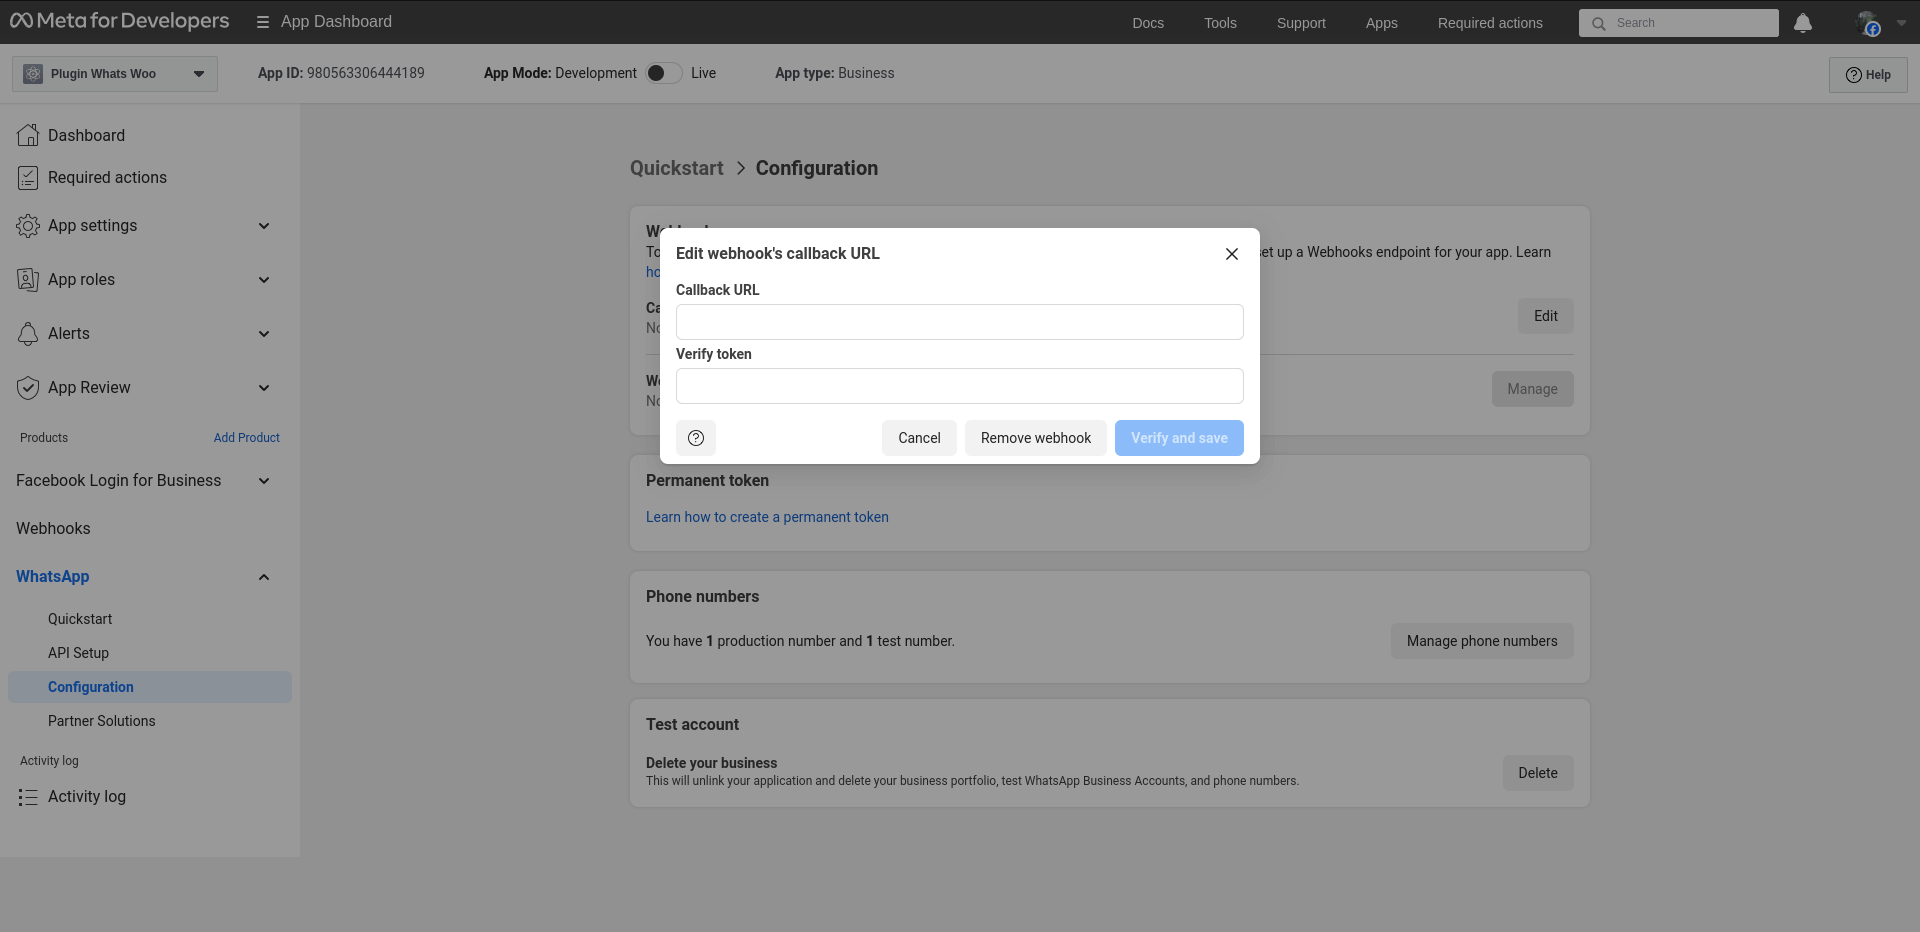
2 – In webhook, click edit and add the url and verification token generated by the plugin:
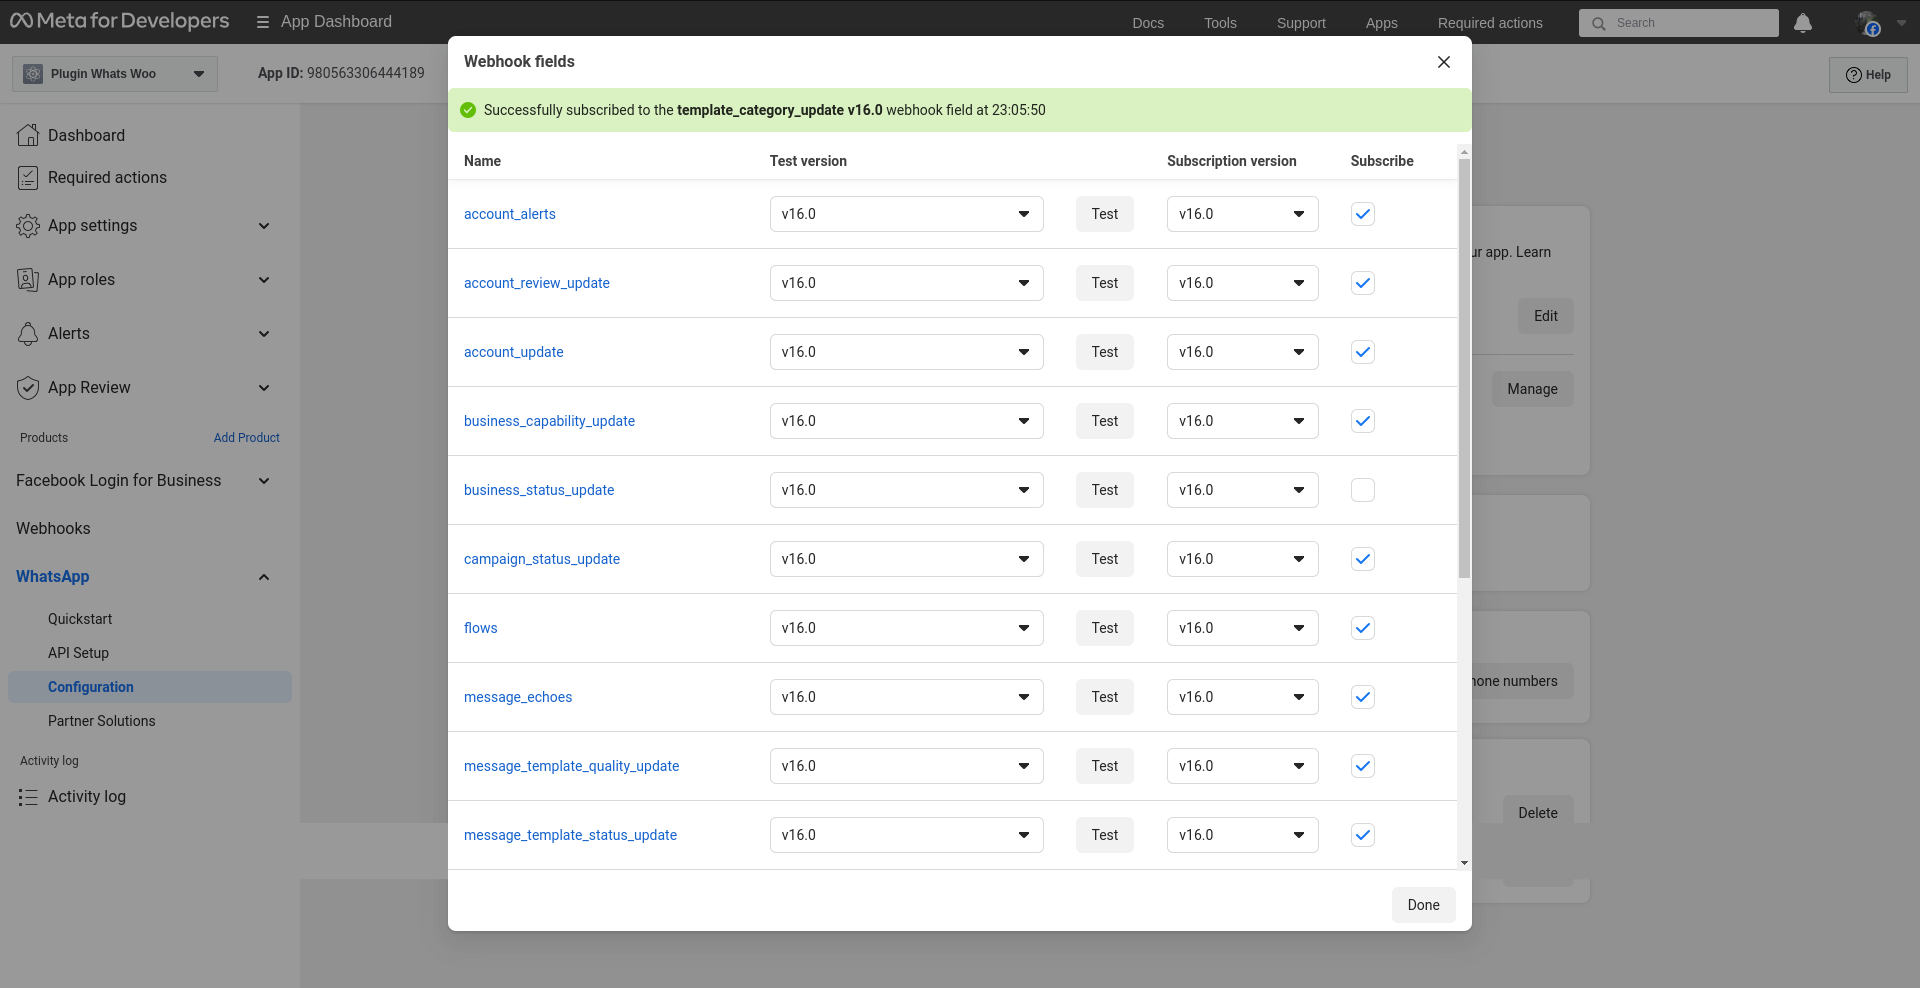
3 – After verifying the token, in Webhook fields, click Manage, select all fields and click done:
Message Templates
↑ Back to topWhatsApp message templates are specific message formats that companies use to send notifications or customer service messages to people who have opted in to receive notifications.
For the message to reach its destination, it is necessary to create the template for each model.
Tutorial Create Messages
↑ Back to topSee the tutorial on how to create the messages that will be sent:
Create Message Template New Order Seller / Customer
↑ Back to top1 – Create the template message for sending notifications for Seller and/or Customer
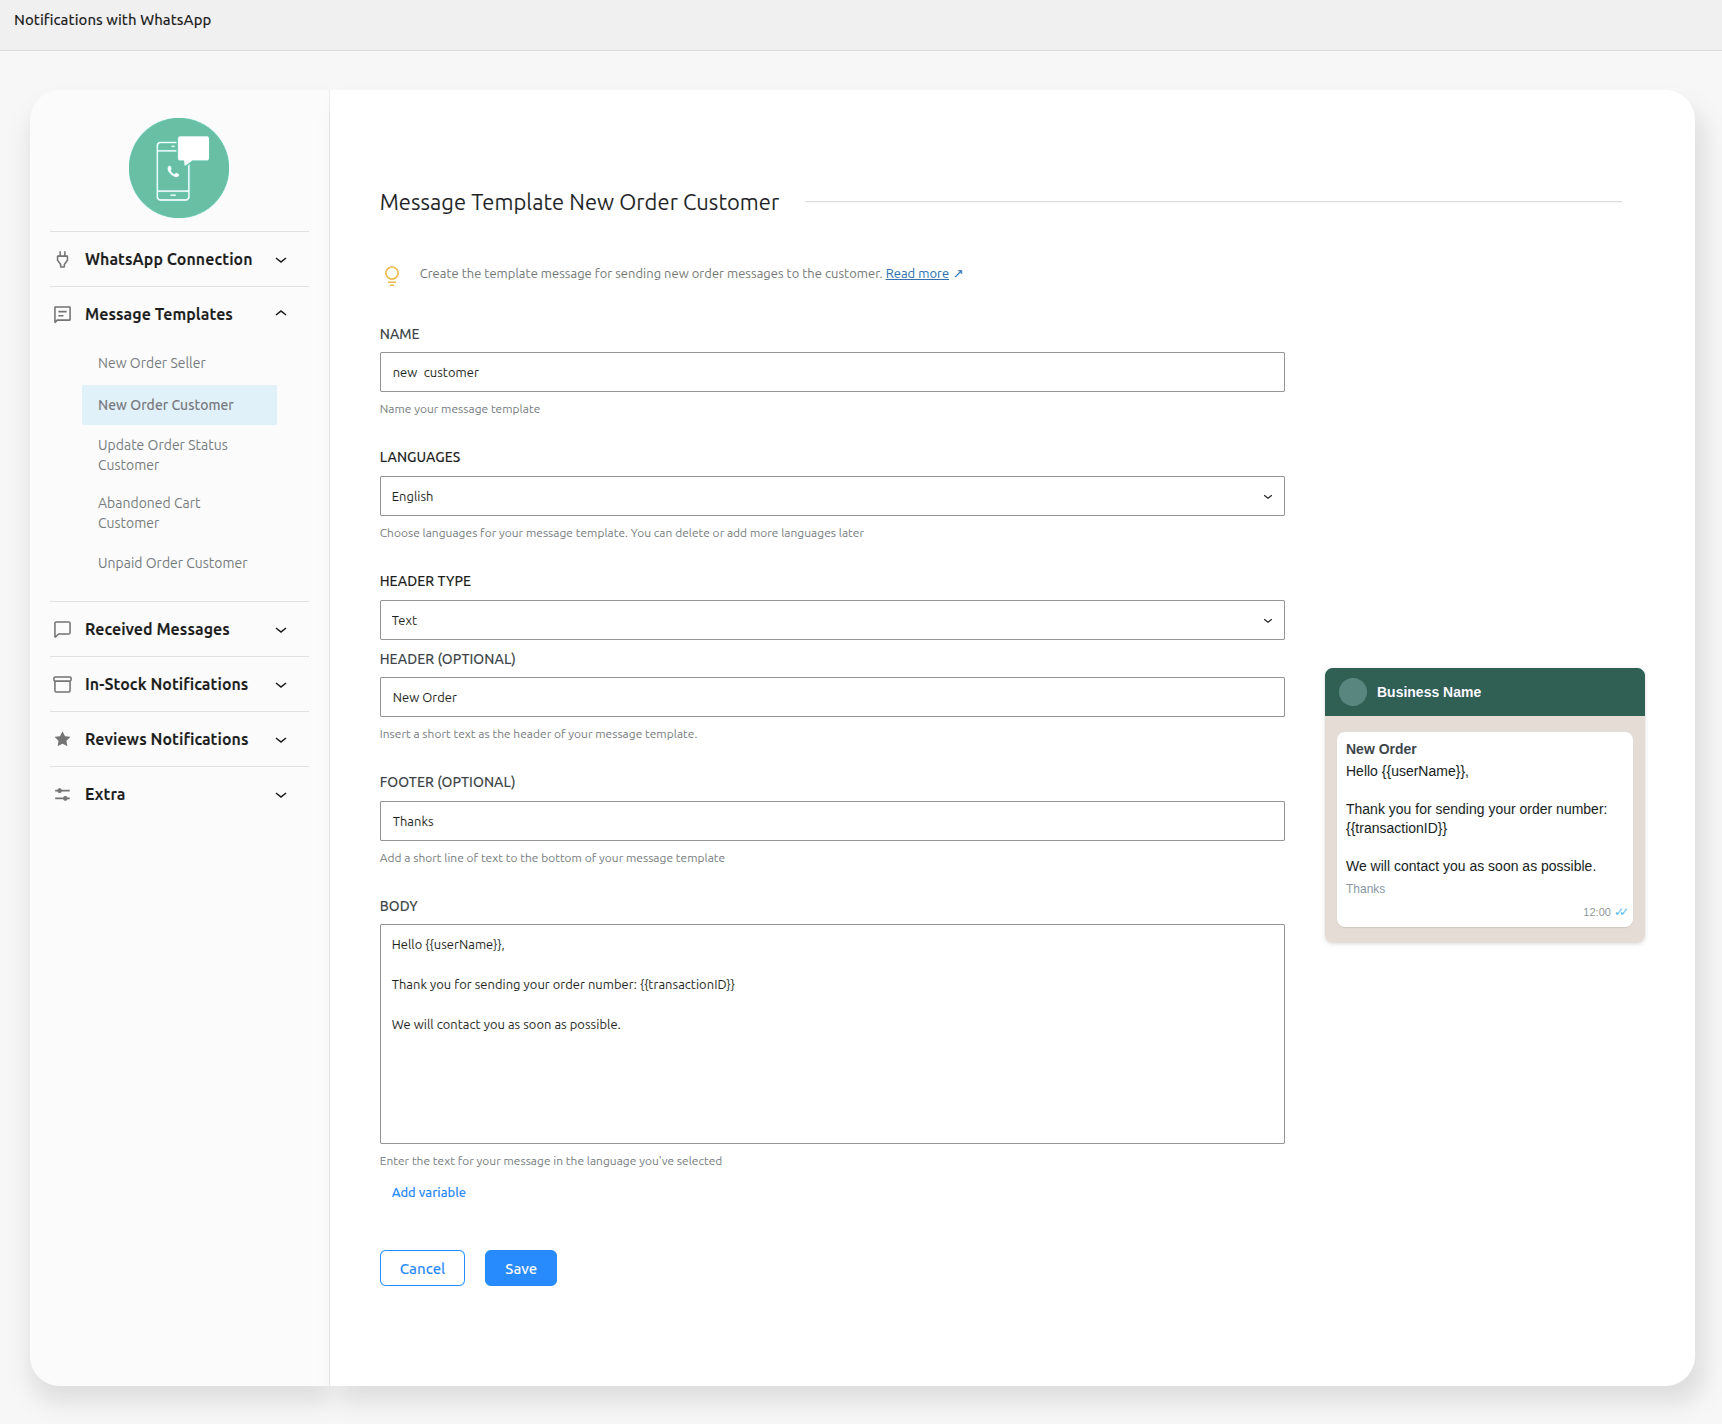
Name -> Name your message template
Languages -> Choose languages for your message template.
Header -> Add a title or choose which type of media you’ll use for this header
Footer -> Add a short line of text to the bottom of your message template
Body -> Enter the text for your message in the language you’ve selected
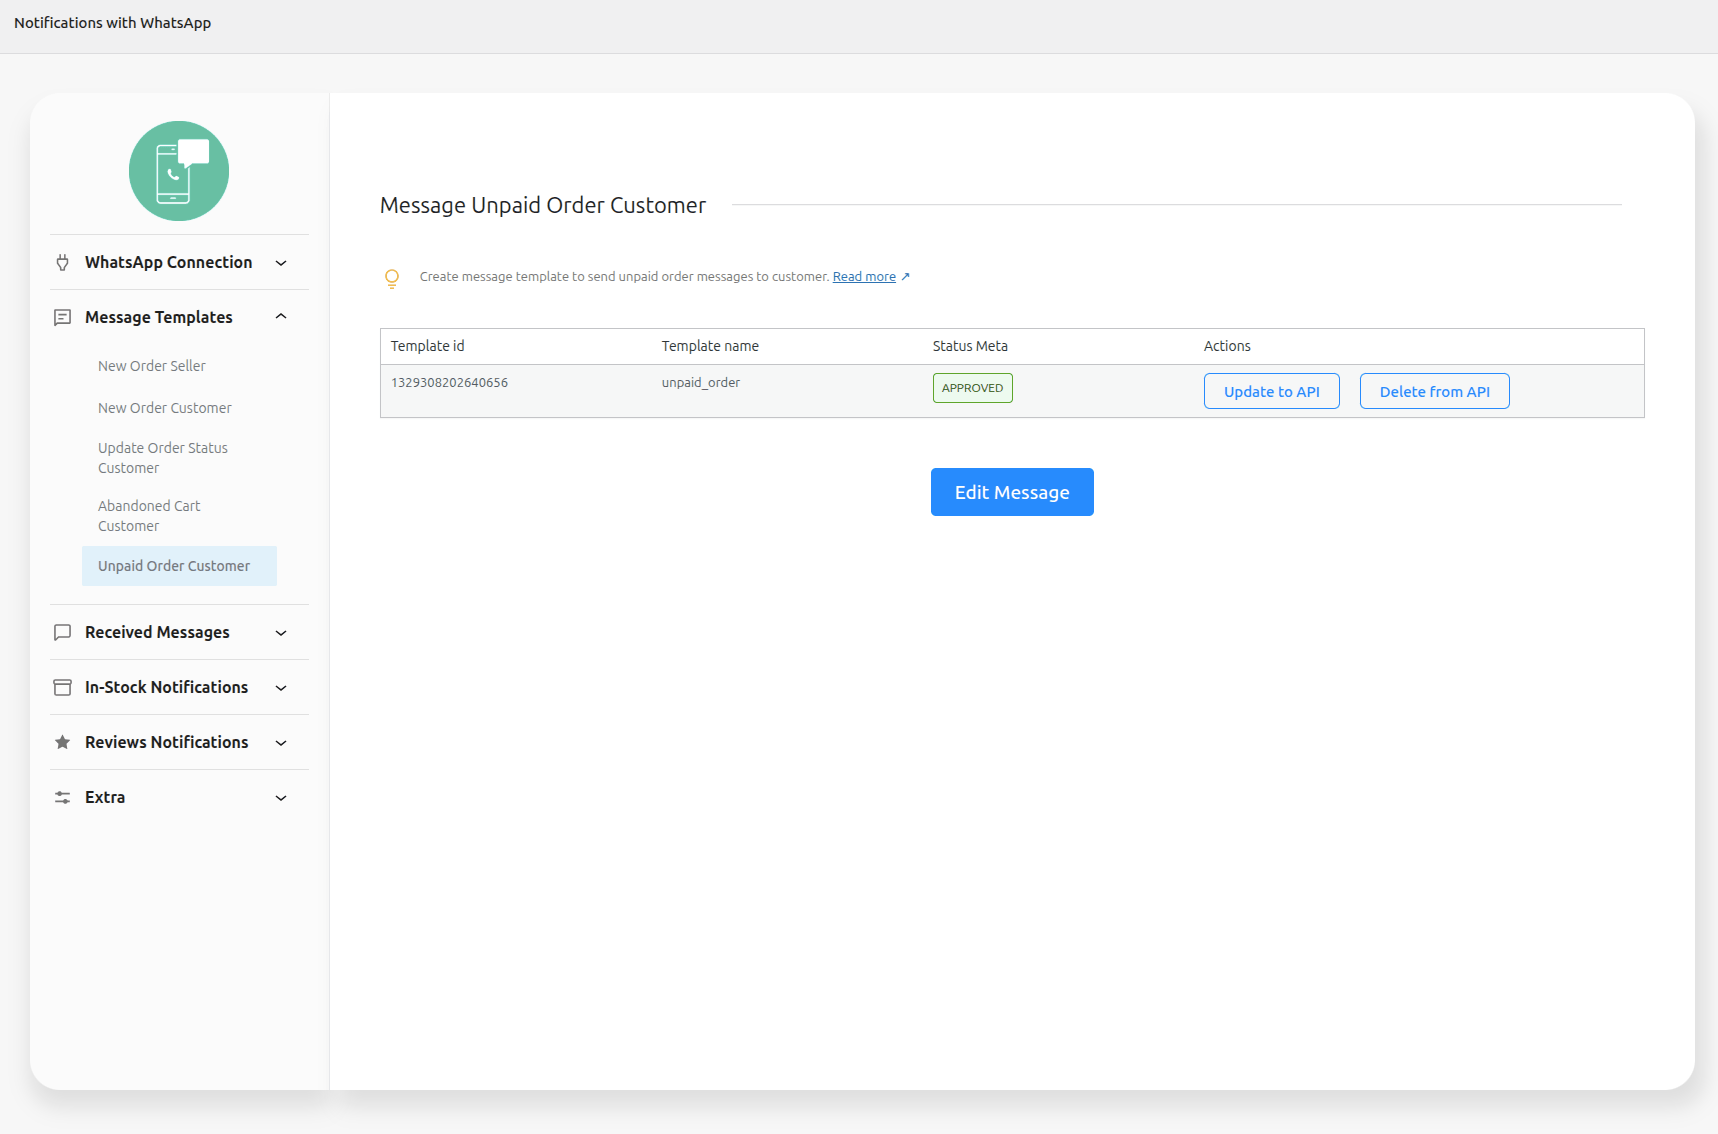
2 – After creating the model, click in button Sent to API and wait for the status to change to approved. (This approval may take up to 24 hours)
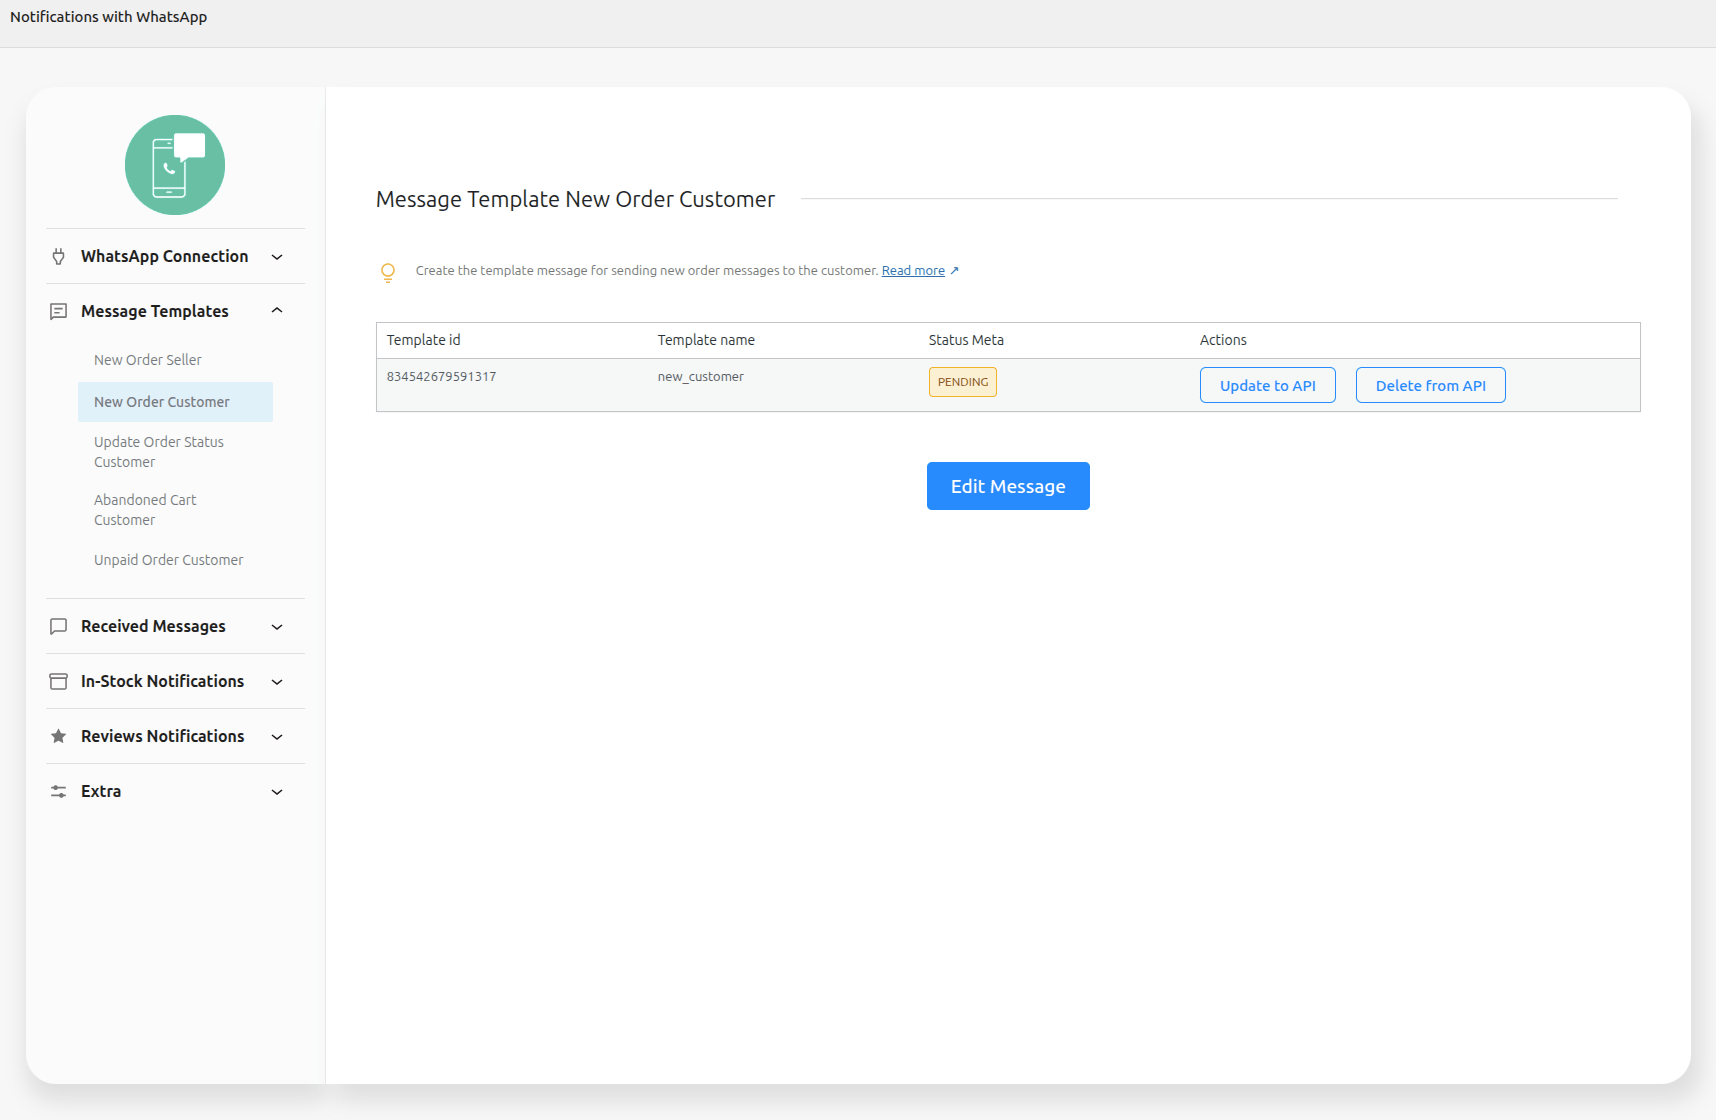
You can also track the approval status of the message template within Meta Business at: WhatsApp Manager > Account tools > Message templates
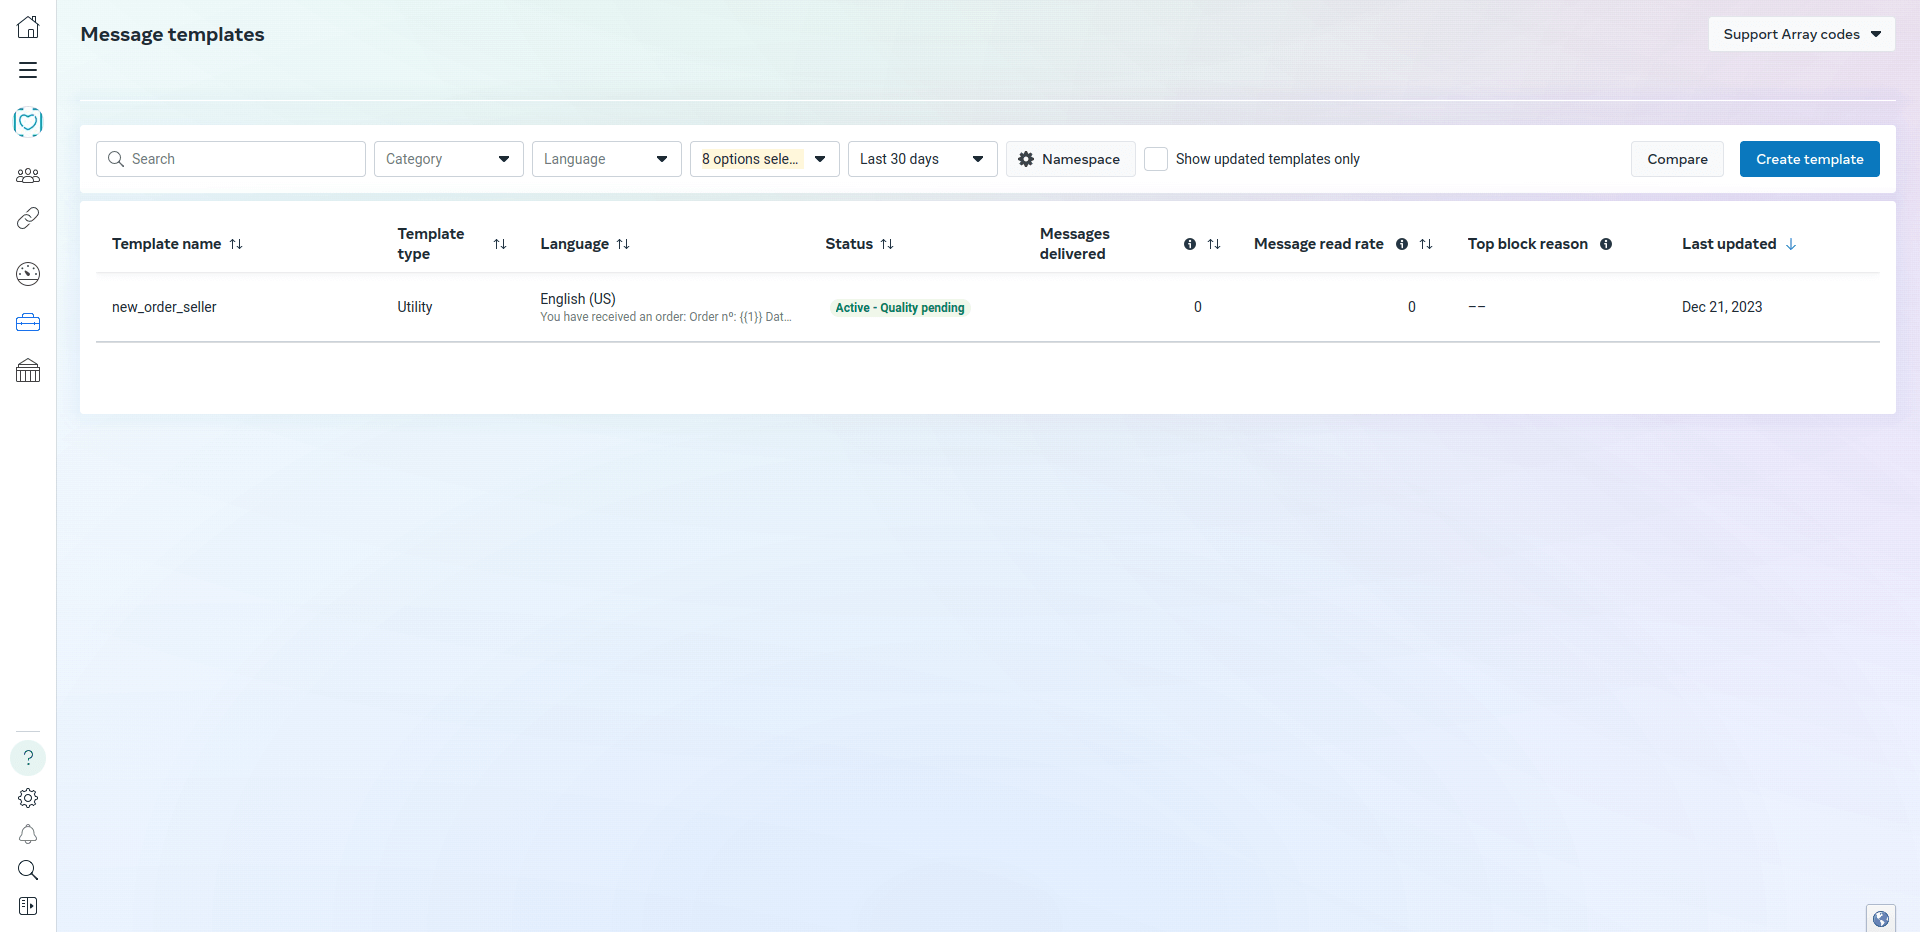
3 – Once approved, the status will change and the messages will be sent
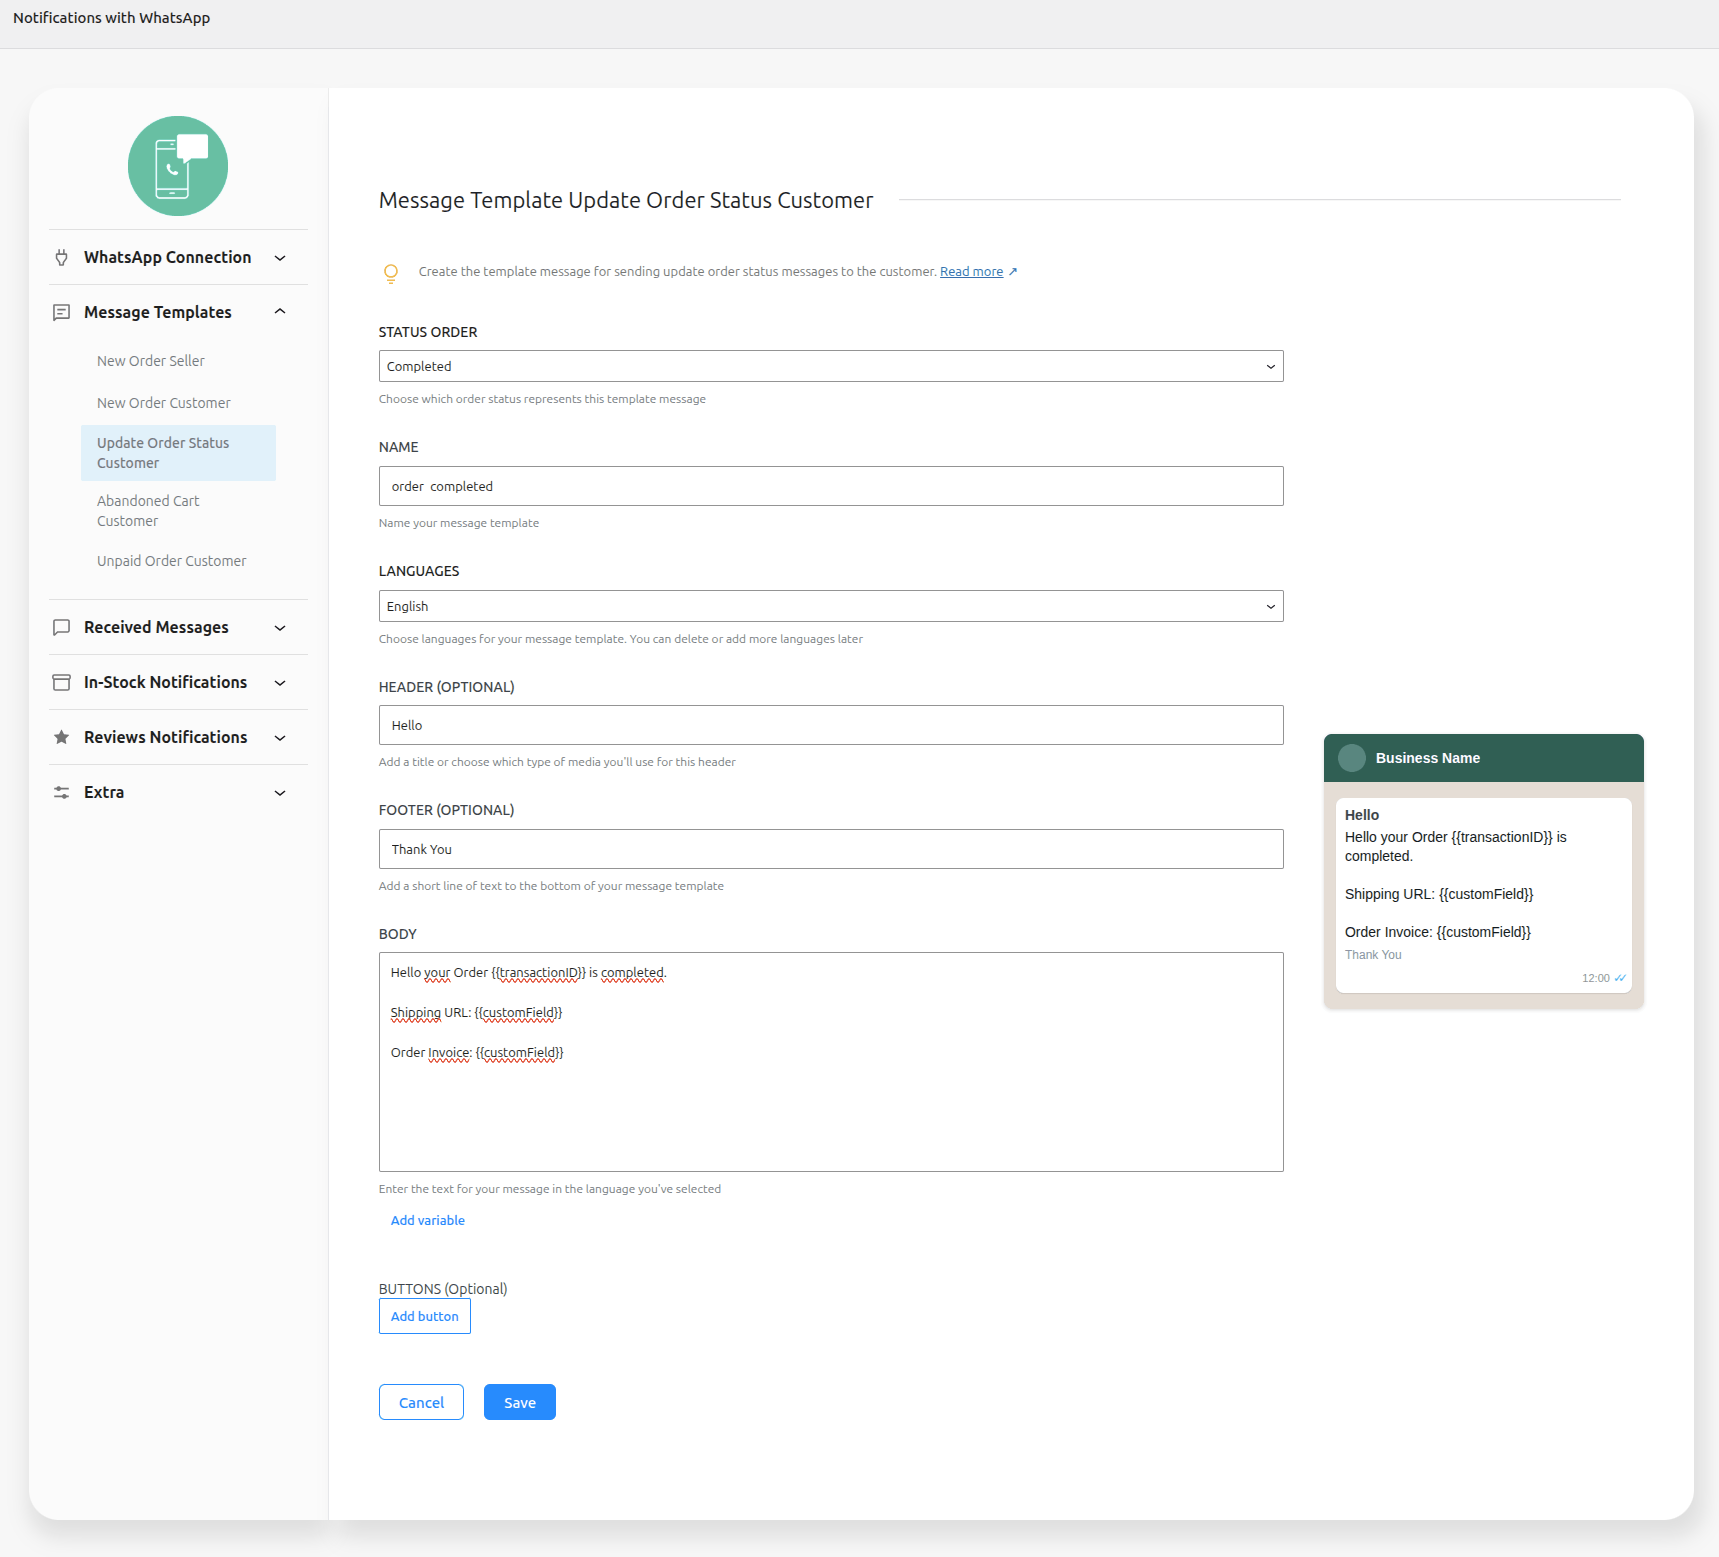
Create Message Template Update Order Status Customer
↑ Back to top1 – Create the template message for sending update order status messages to the customer
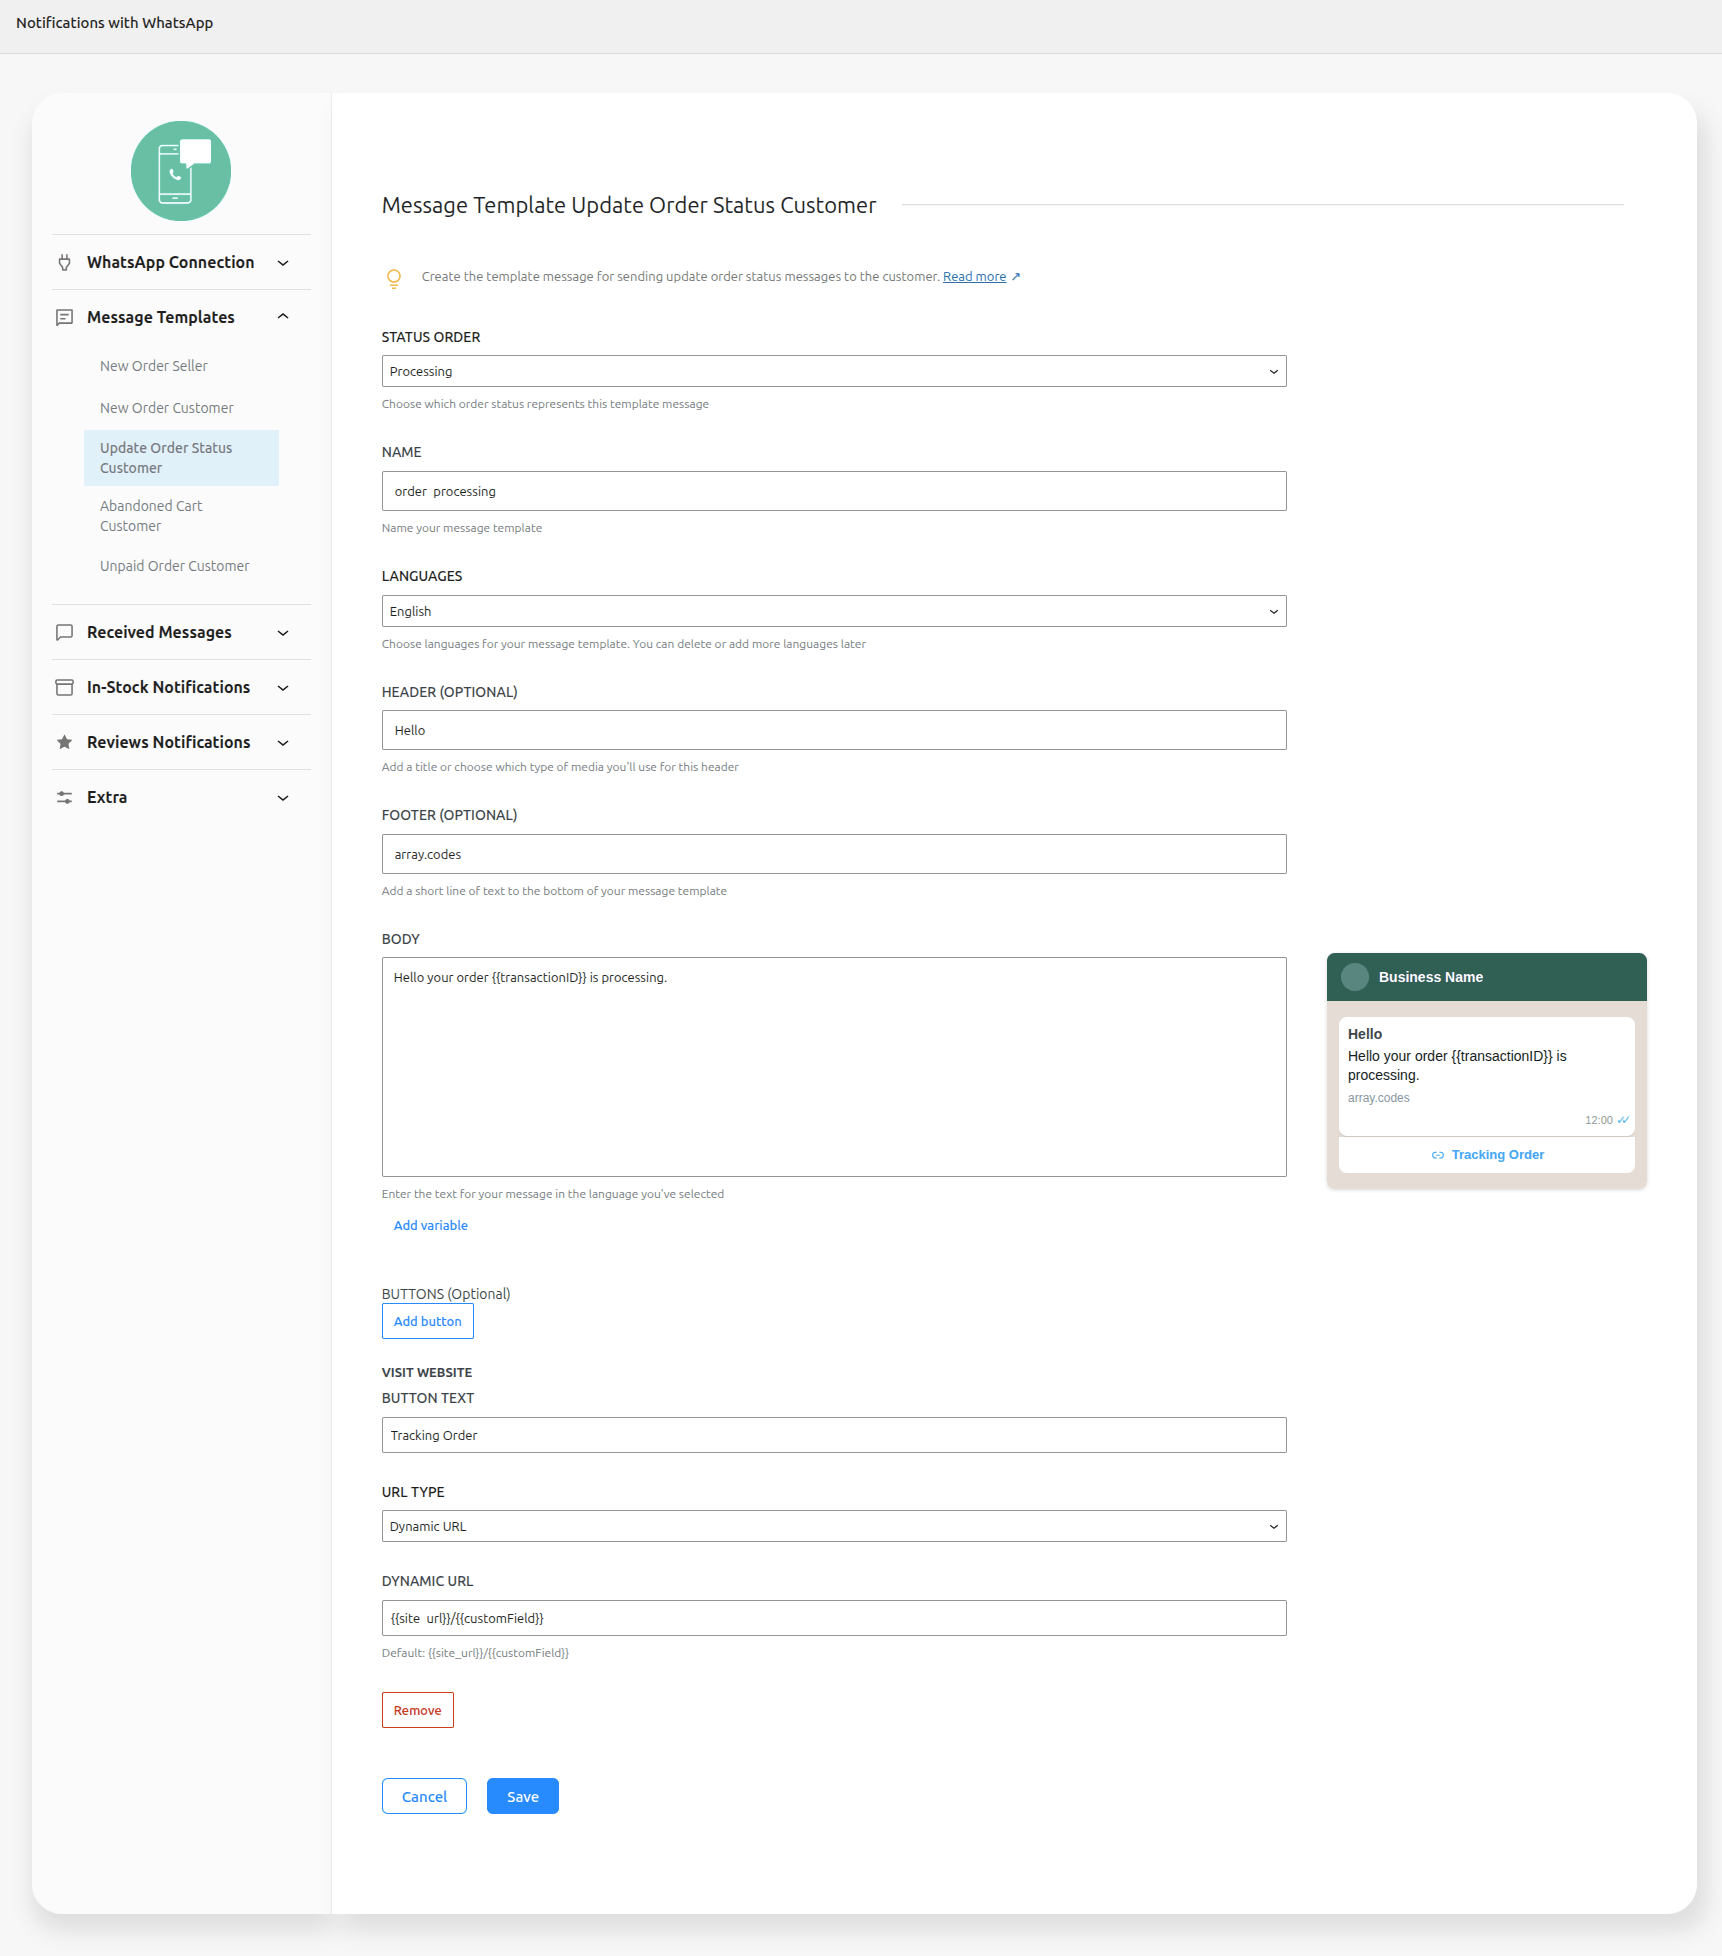
Status Order -> Choose which order status represents this template message
Name -> Name your message template
Languages -> Choose languages for your message template.
Header -> Add a title or choose which type of media you’ll use for this header
Footer -> Add a short line of text to the bottom of your message template
Body -> Enter the text for your message in the language you’ve selected
Buttons -> Add buttons visit website on your message
2 – After creating the model, click in button Sent to API and wait for the status to change to approved. (This approval may take up to 24 hours)
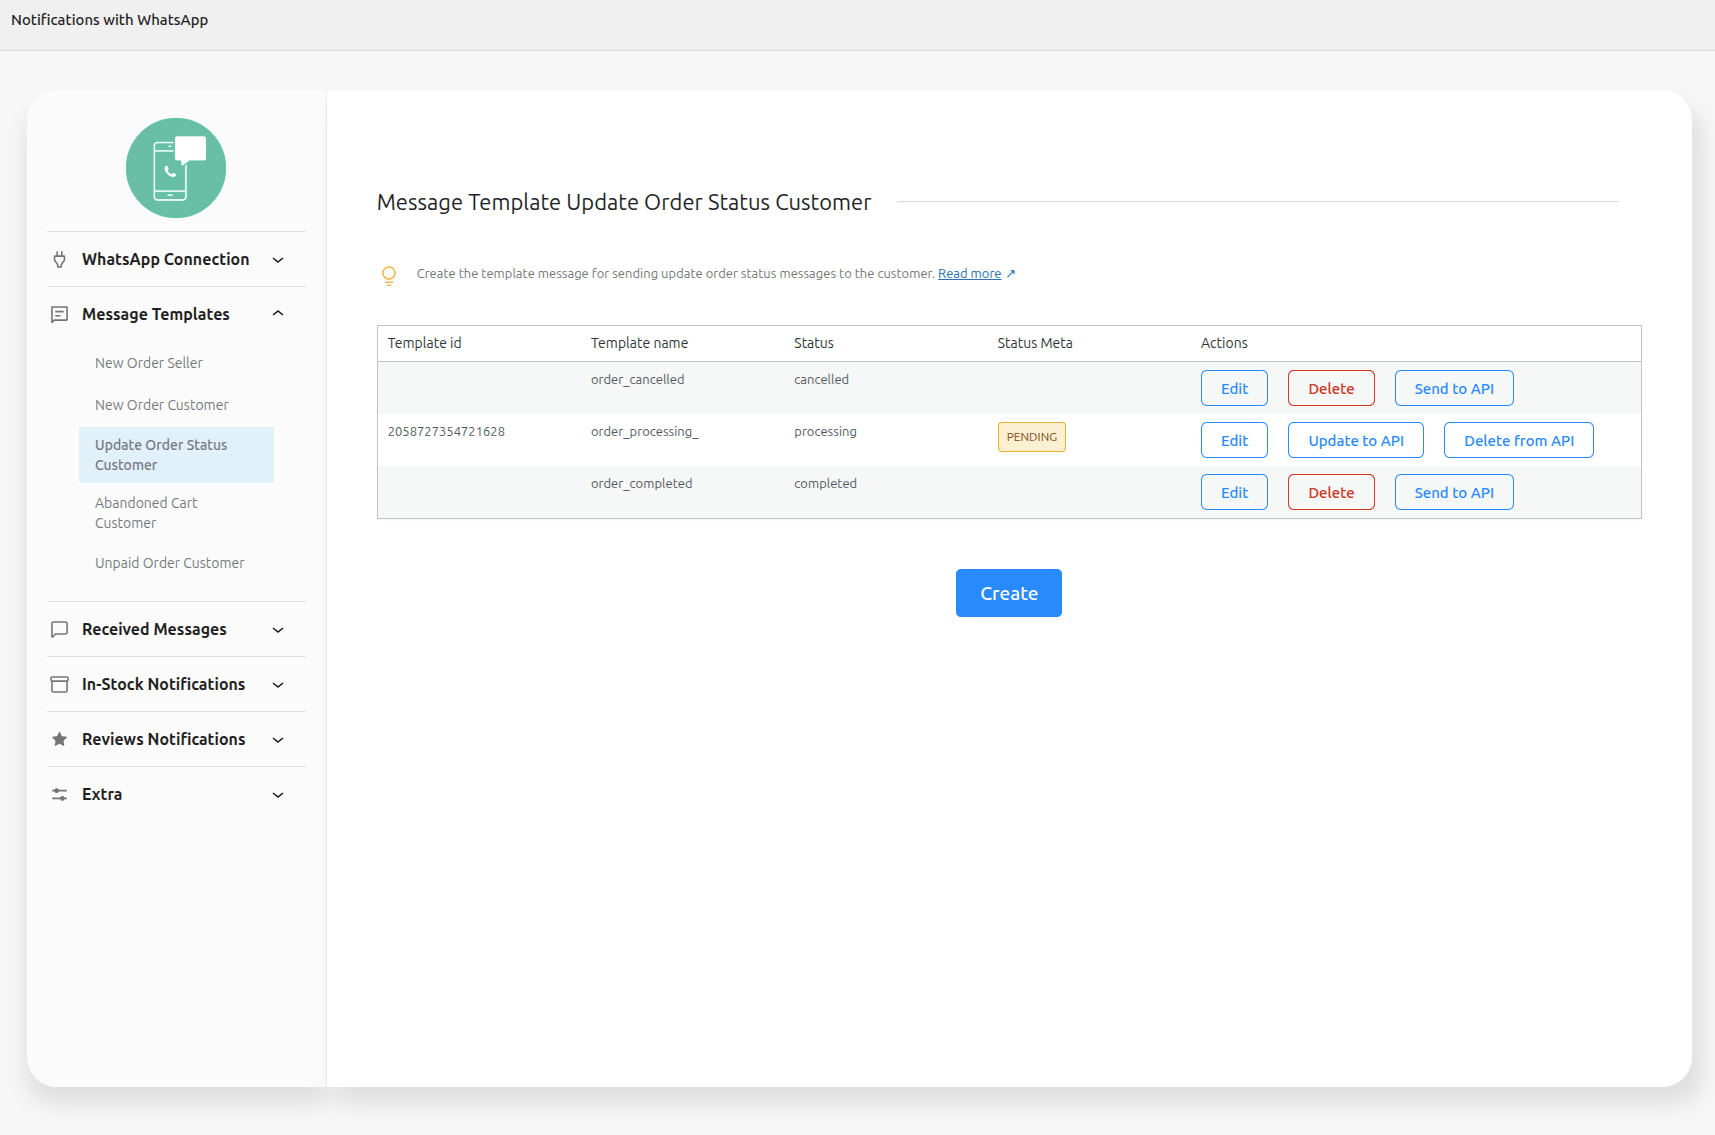
You can also track the approval status of the message template within Meta Business at: WhatsApp Manager > Account tools > Message templates
3 – Once approved, the status will change and the messages will be sent
Create Message Template Abandoned Cart Customer
↑ Back to top1 – Create the template message for sending abandoned cart messages to the customer
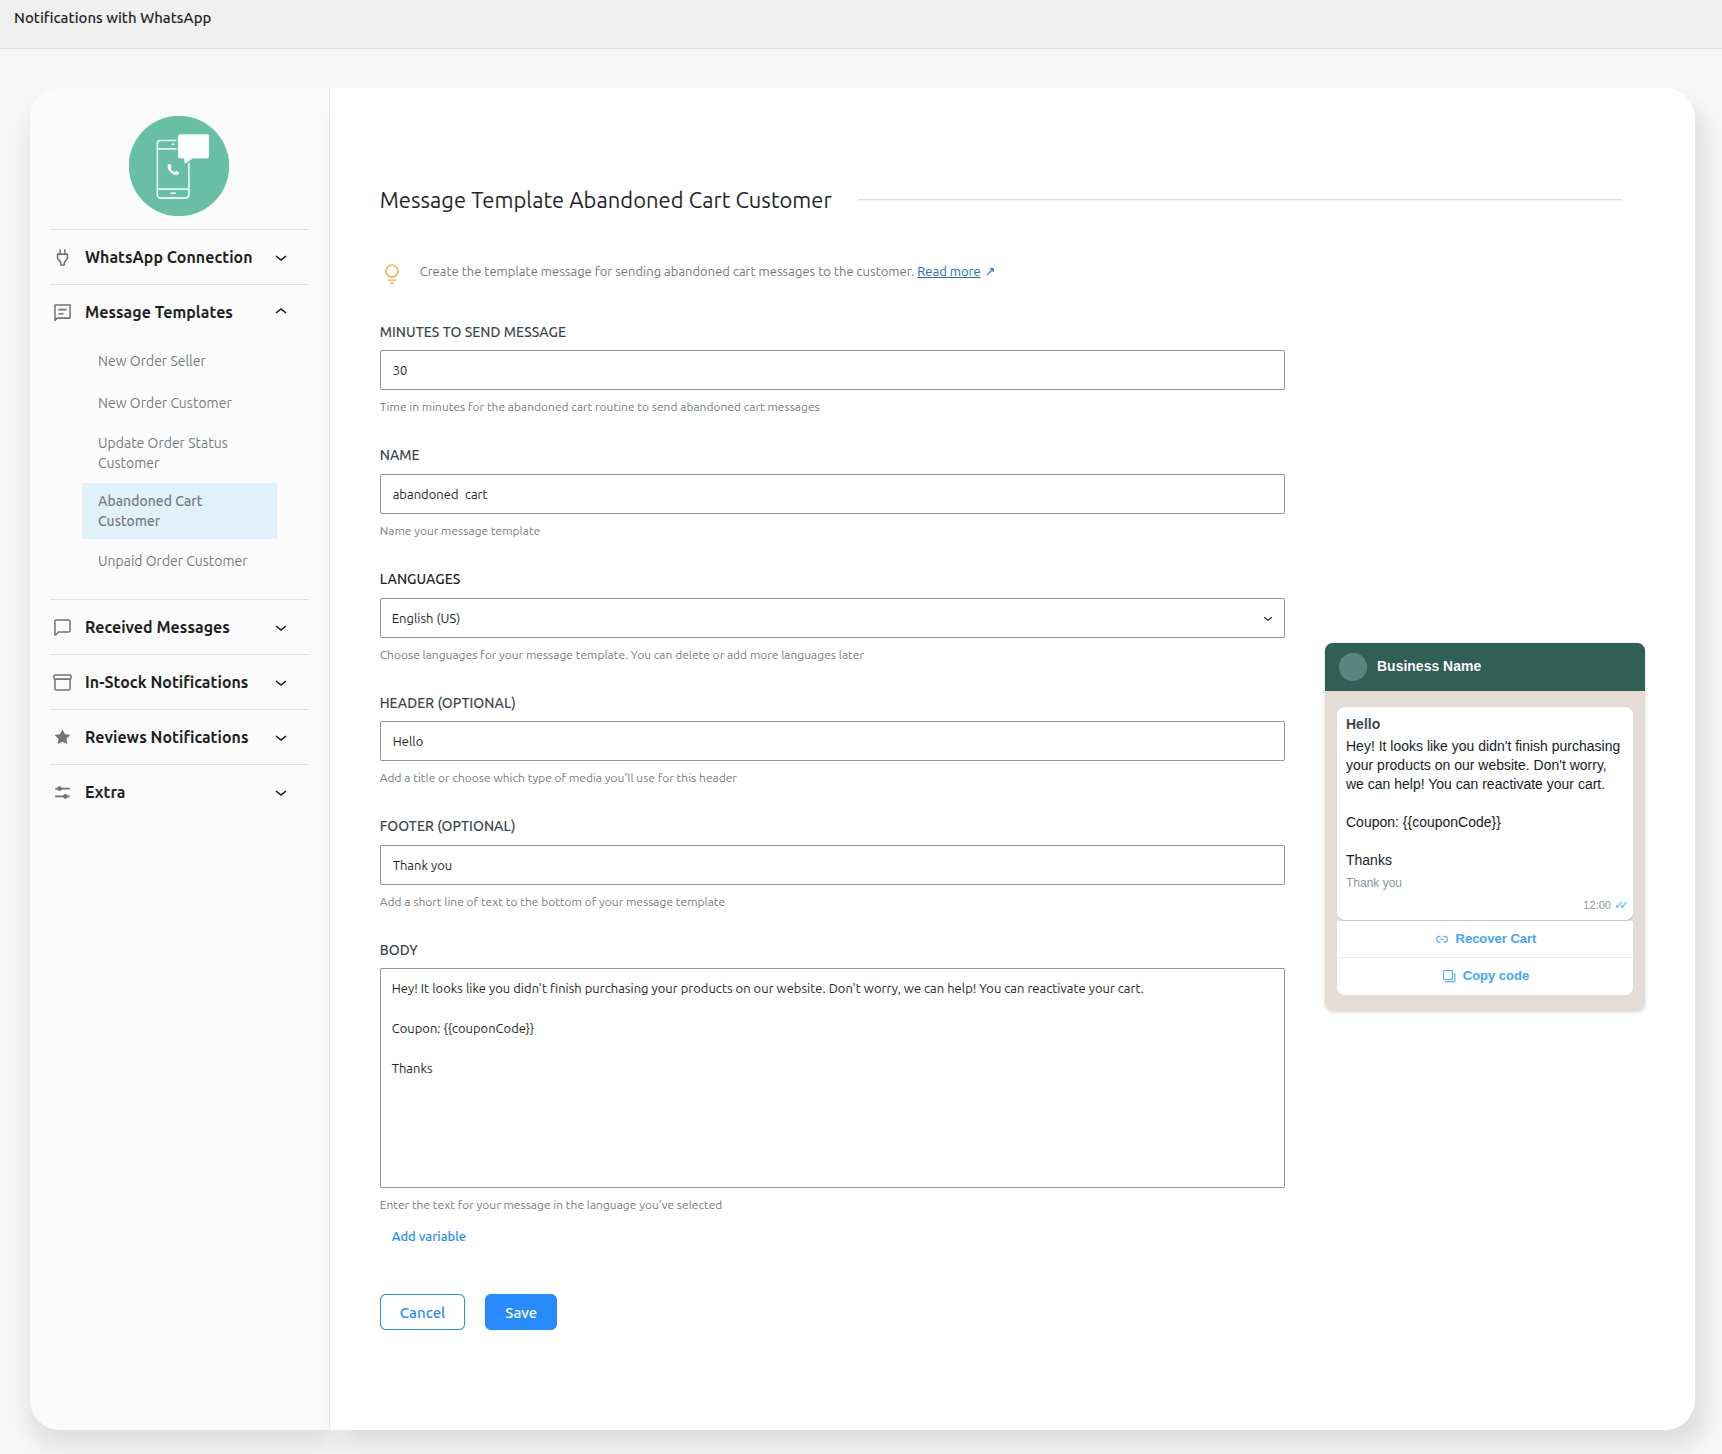
Minutes to send Message -> Time in minutes for the abandoned cart routine to send abandoned cart messages
Name -> Name your message template
Languages -> Choose languages for your message template.
Header -> Add a title or choose which type of media you’ll use for this header
Footer -> Add a short line of text to the bottom of your message template
Body -> Enter the text for your message in the language you’ve selected
2 – After creating the model, click in button Sent to API and wait for the status to change to approved. (This approval may take up to 24 hours)
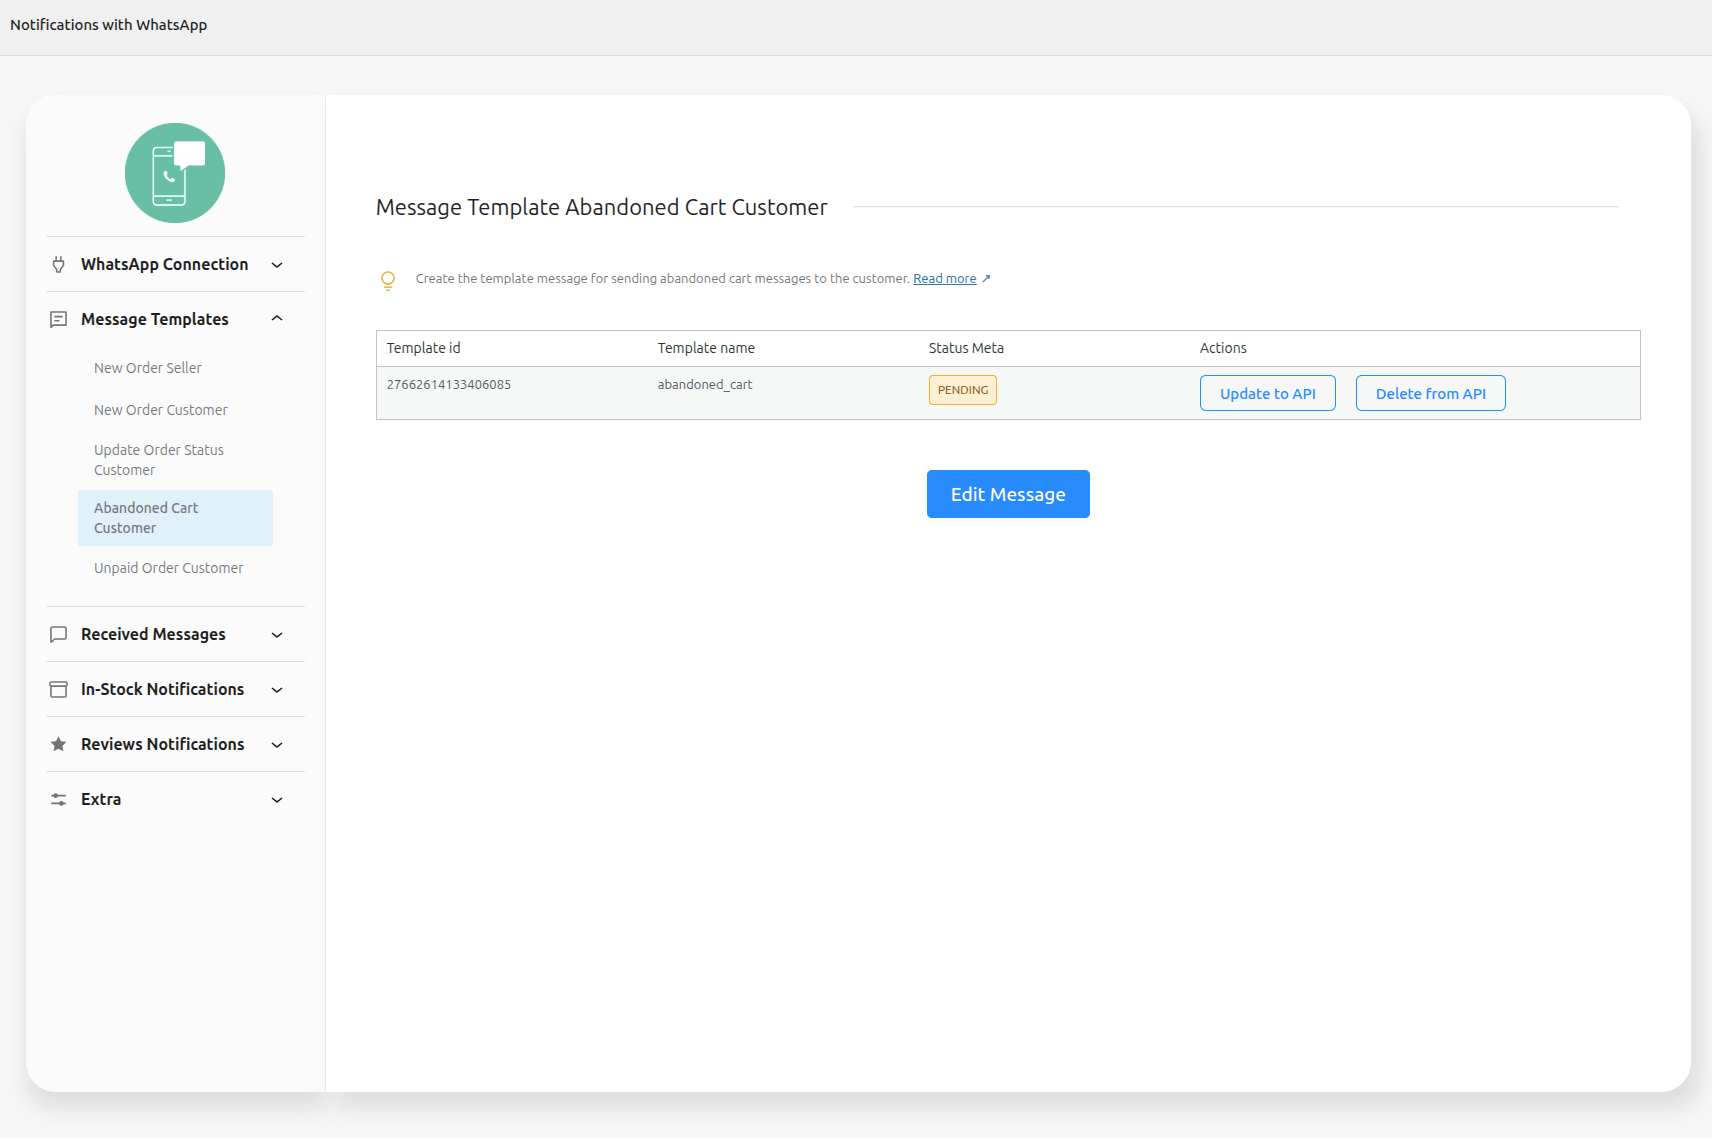
You can also track the approval status of the message template within Meta Business at: WhatsApp Manager > Account tools > Message templates
3 – Once approved, the status will change and the messages will be sent
Test Message Template Abandoned Cart Customer
↑ Back to topIf you want to test an abandoned cart, follow the tutorial:
Create Message Template Unpaid Order Customer
↑ Back to top1 – Create the template message for sending unpaid order messages to the customer
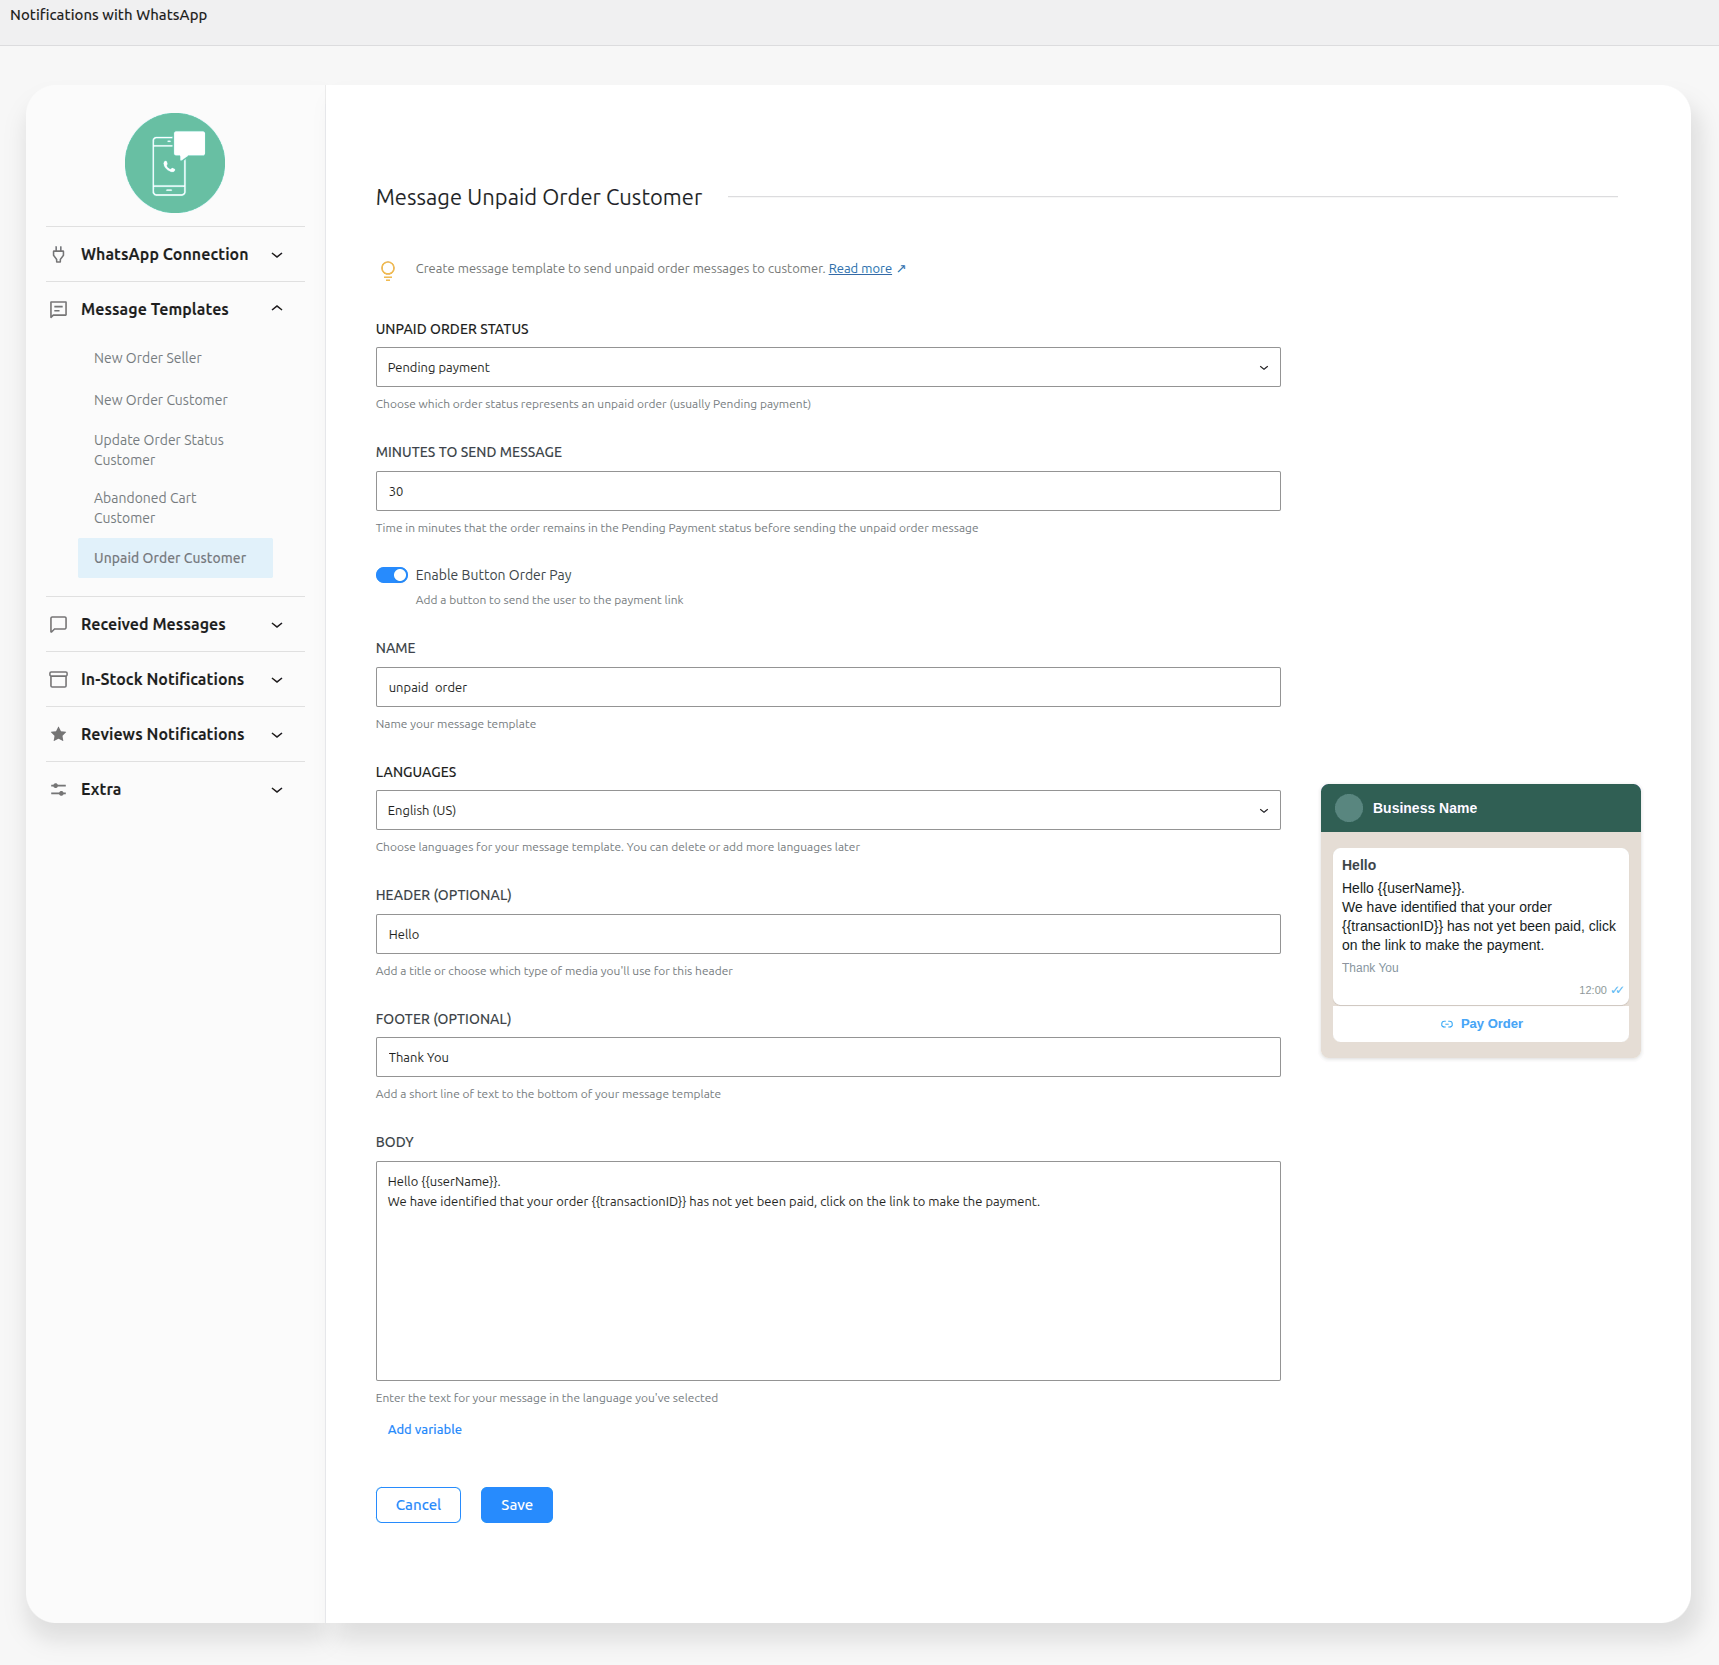
Unpaid Order Status -> Choose which order status represents an unpaid order (usually Pending payment)
Minutes to send Message -> Time in minutes that the order remains in the Pending Payment status before sending the unpaid order message
Enable Button Order Pay -> Add a button to send the user to the payment link
Name -> Name your message template
Languages -> Choose languages for your message template.
Header -> Add a title or choose which type of media you’ll use for this header
Footer -> Add a short line of text to the bottom of your message template
Body -> Enter the text for your message in the language you’ve selected
2 – After creating the model, click in button Sent to API and wait for the status to change to approved. (This approval may take up to 24 hours)

You can also track the approval status of the message template within Meta Business at: WhatsApp Manager > Account tools > Message templates
3 – Once approved, the status will change and the messages will be sent
The default URL to retrieve payment is the checkout payment URL, if you want to modify this URL you can use the hook notifications_with_whatsapp_before_payment_url_unpaid_order_message .
See an example of changing to thank you page url:
/**
 * Fired before sending an Unpaid Order message to WhatsApp
 * This hook contains a string with the checkout payment url that should be the return of the function with the desired url to be inserted in the message
 * This hook contains an Order object (WC_Order) related to the message that will be fired.
 * It can be used to insert a non-standard custom url in the message.
 *
 * @param string $url_token Empty array to be changed
 * @param \Wc_Order $data Order (Wc_Order)
 *
 * @since 3.3.0
 *
 * @see https://woocommerce.com/document/notifications-with-whatsapp/
 */
function notifications_with_whatsapp_before_payment_url_unpaid_order_message( $url_token, $order ){
    $url_token = $order->get_checkout_order_received_url();
    return $url_token;
}
add_filter( 'notifications_with_whatsapp_before_payment_url_unpaid_order_message', 'my_custom_hook_notifications_with_whatsapp_before_payment_url_unpaid_order_message', 10, 2 );
Create Message Template Out Of Stock Customer
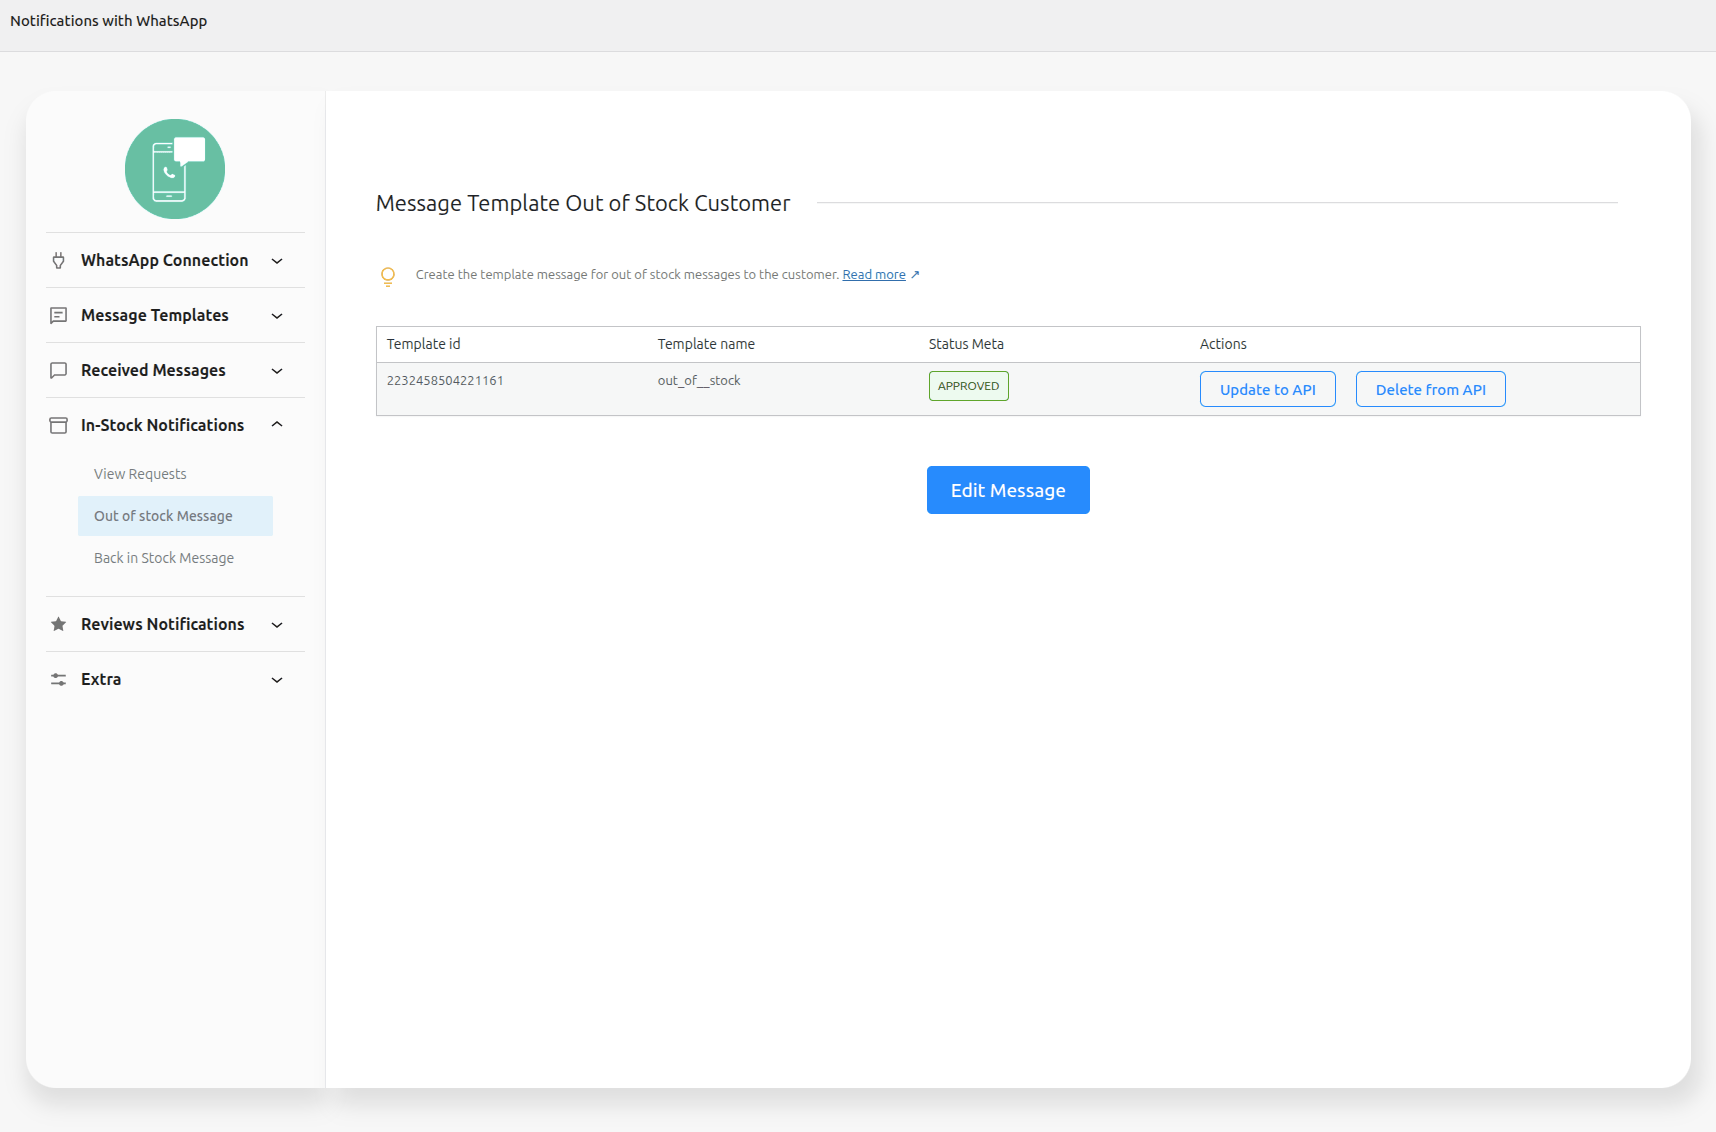
↑ Back to top1 – Create the template message for out of stock messages to the customer
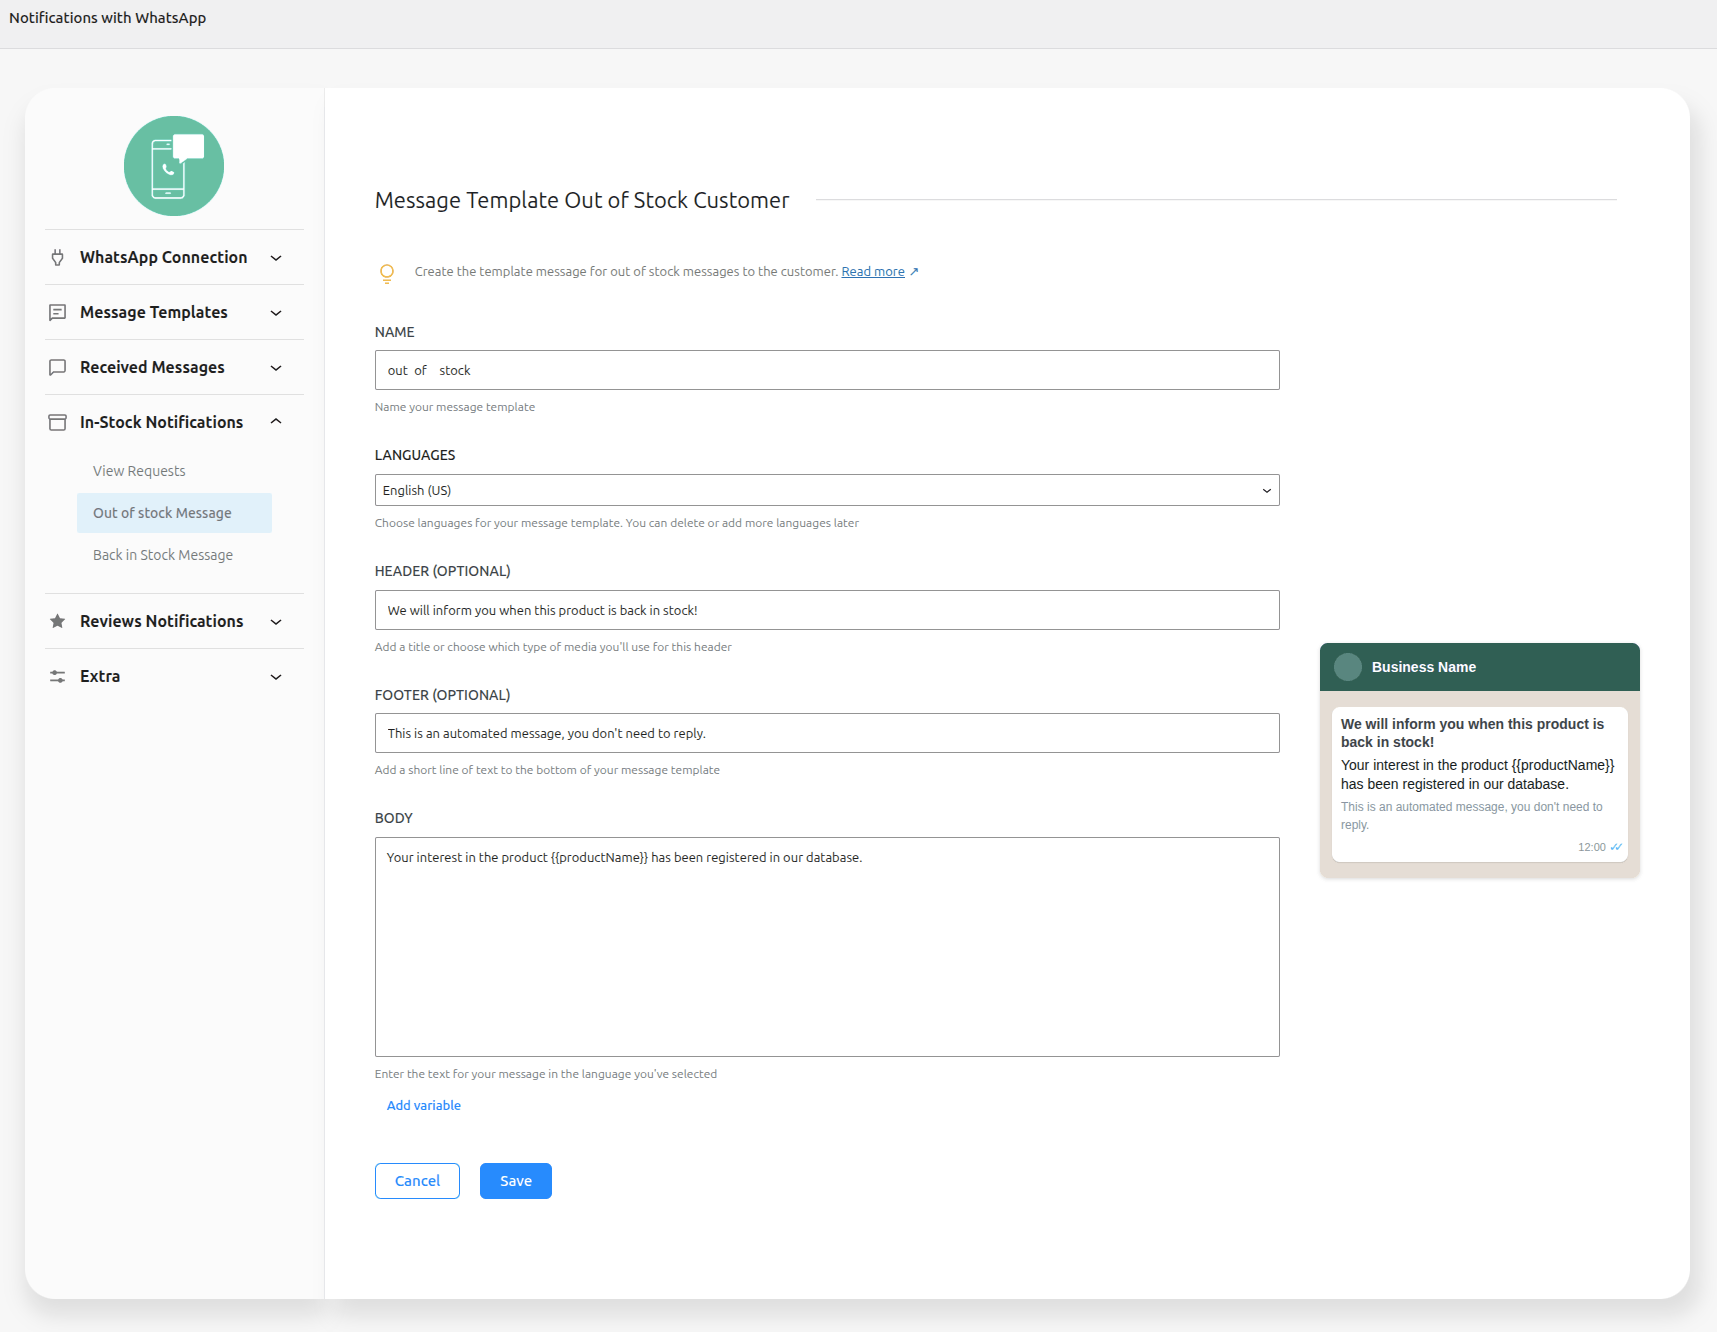
Name -> Name your message template
Languages -> Choose languages for your message template.
Header -> Add a title or choose which type of media you’ll use for this header
Footer -> Add a short line of text to the bottom of your message template
Body -> Enter the text for your message in the language you’ve selected
2 – After creating the model, click in button Sent to API and wait for the status to change to approved. (This approval may take up to 24 hours)

3 – Once approved, the status will change and the messages will be sent
Create Message Template Back In Stock Customer
↑ Back to topCreate the template message for back in stock messages to the customer
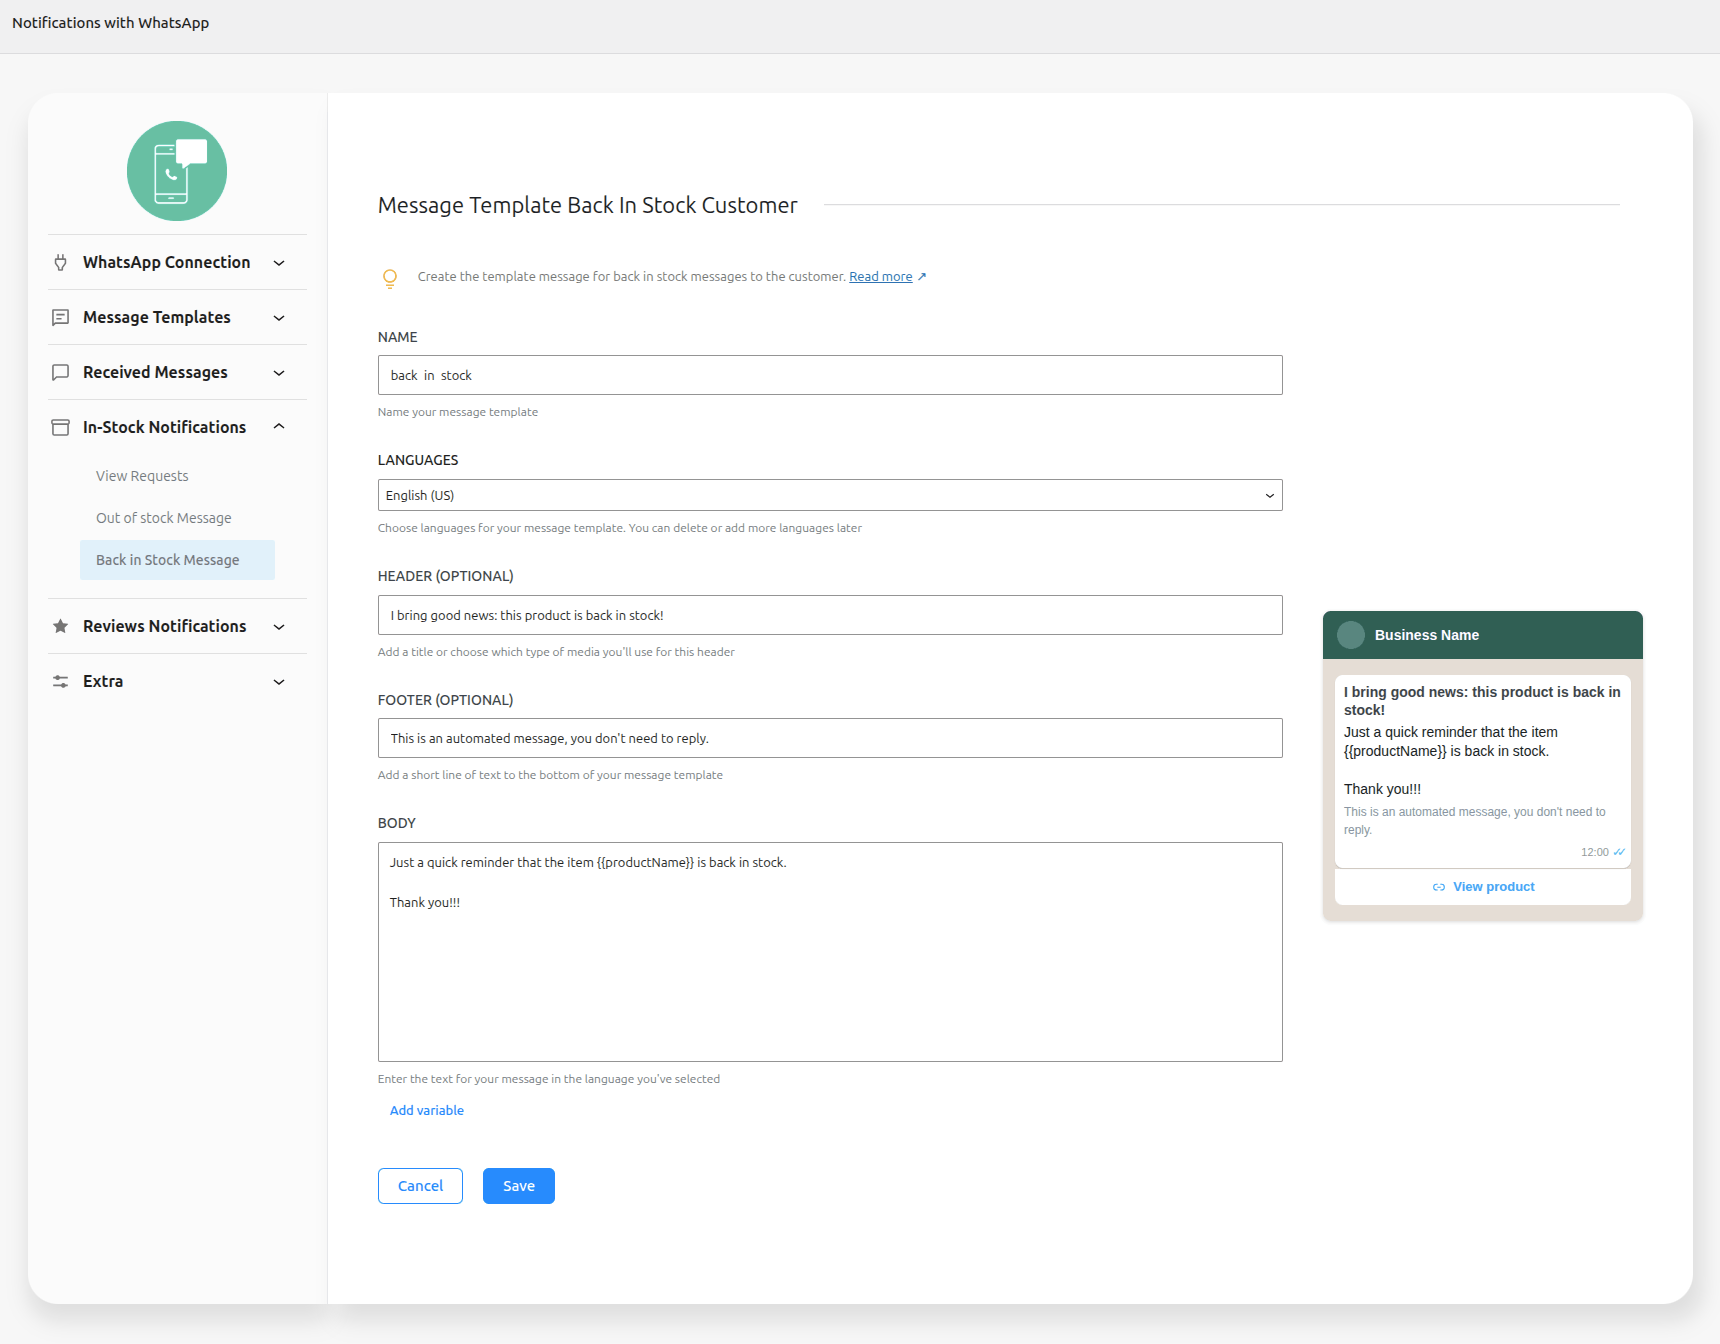
Name -> Name your message template
Languages -> Choose languages for your message template.
Header -> Add a title or choose which type of media you’ll use for this header
Footer -> Add a short line of text to the bottom of your message template
Body -> Enter the text for your message in the language you’ve selected
2 – After creating the model, click in button Sent to API and wait for the status to change to approved. (This approval may take up to 24 hours)

3 – Once approved, the status will change and the messages will be sent

Create Message Template Review Notification Customer
↑ Back to topCreate the template message for review notification products to the customer
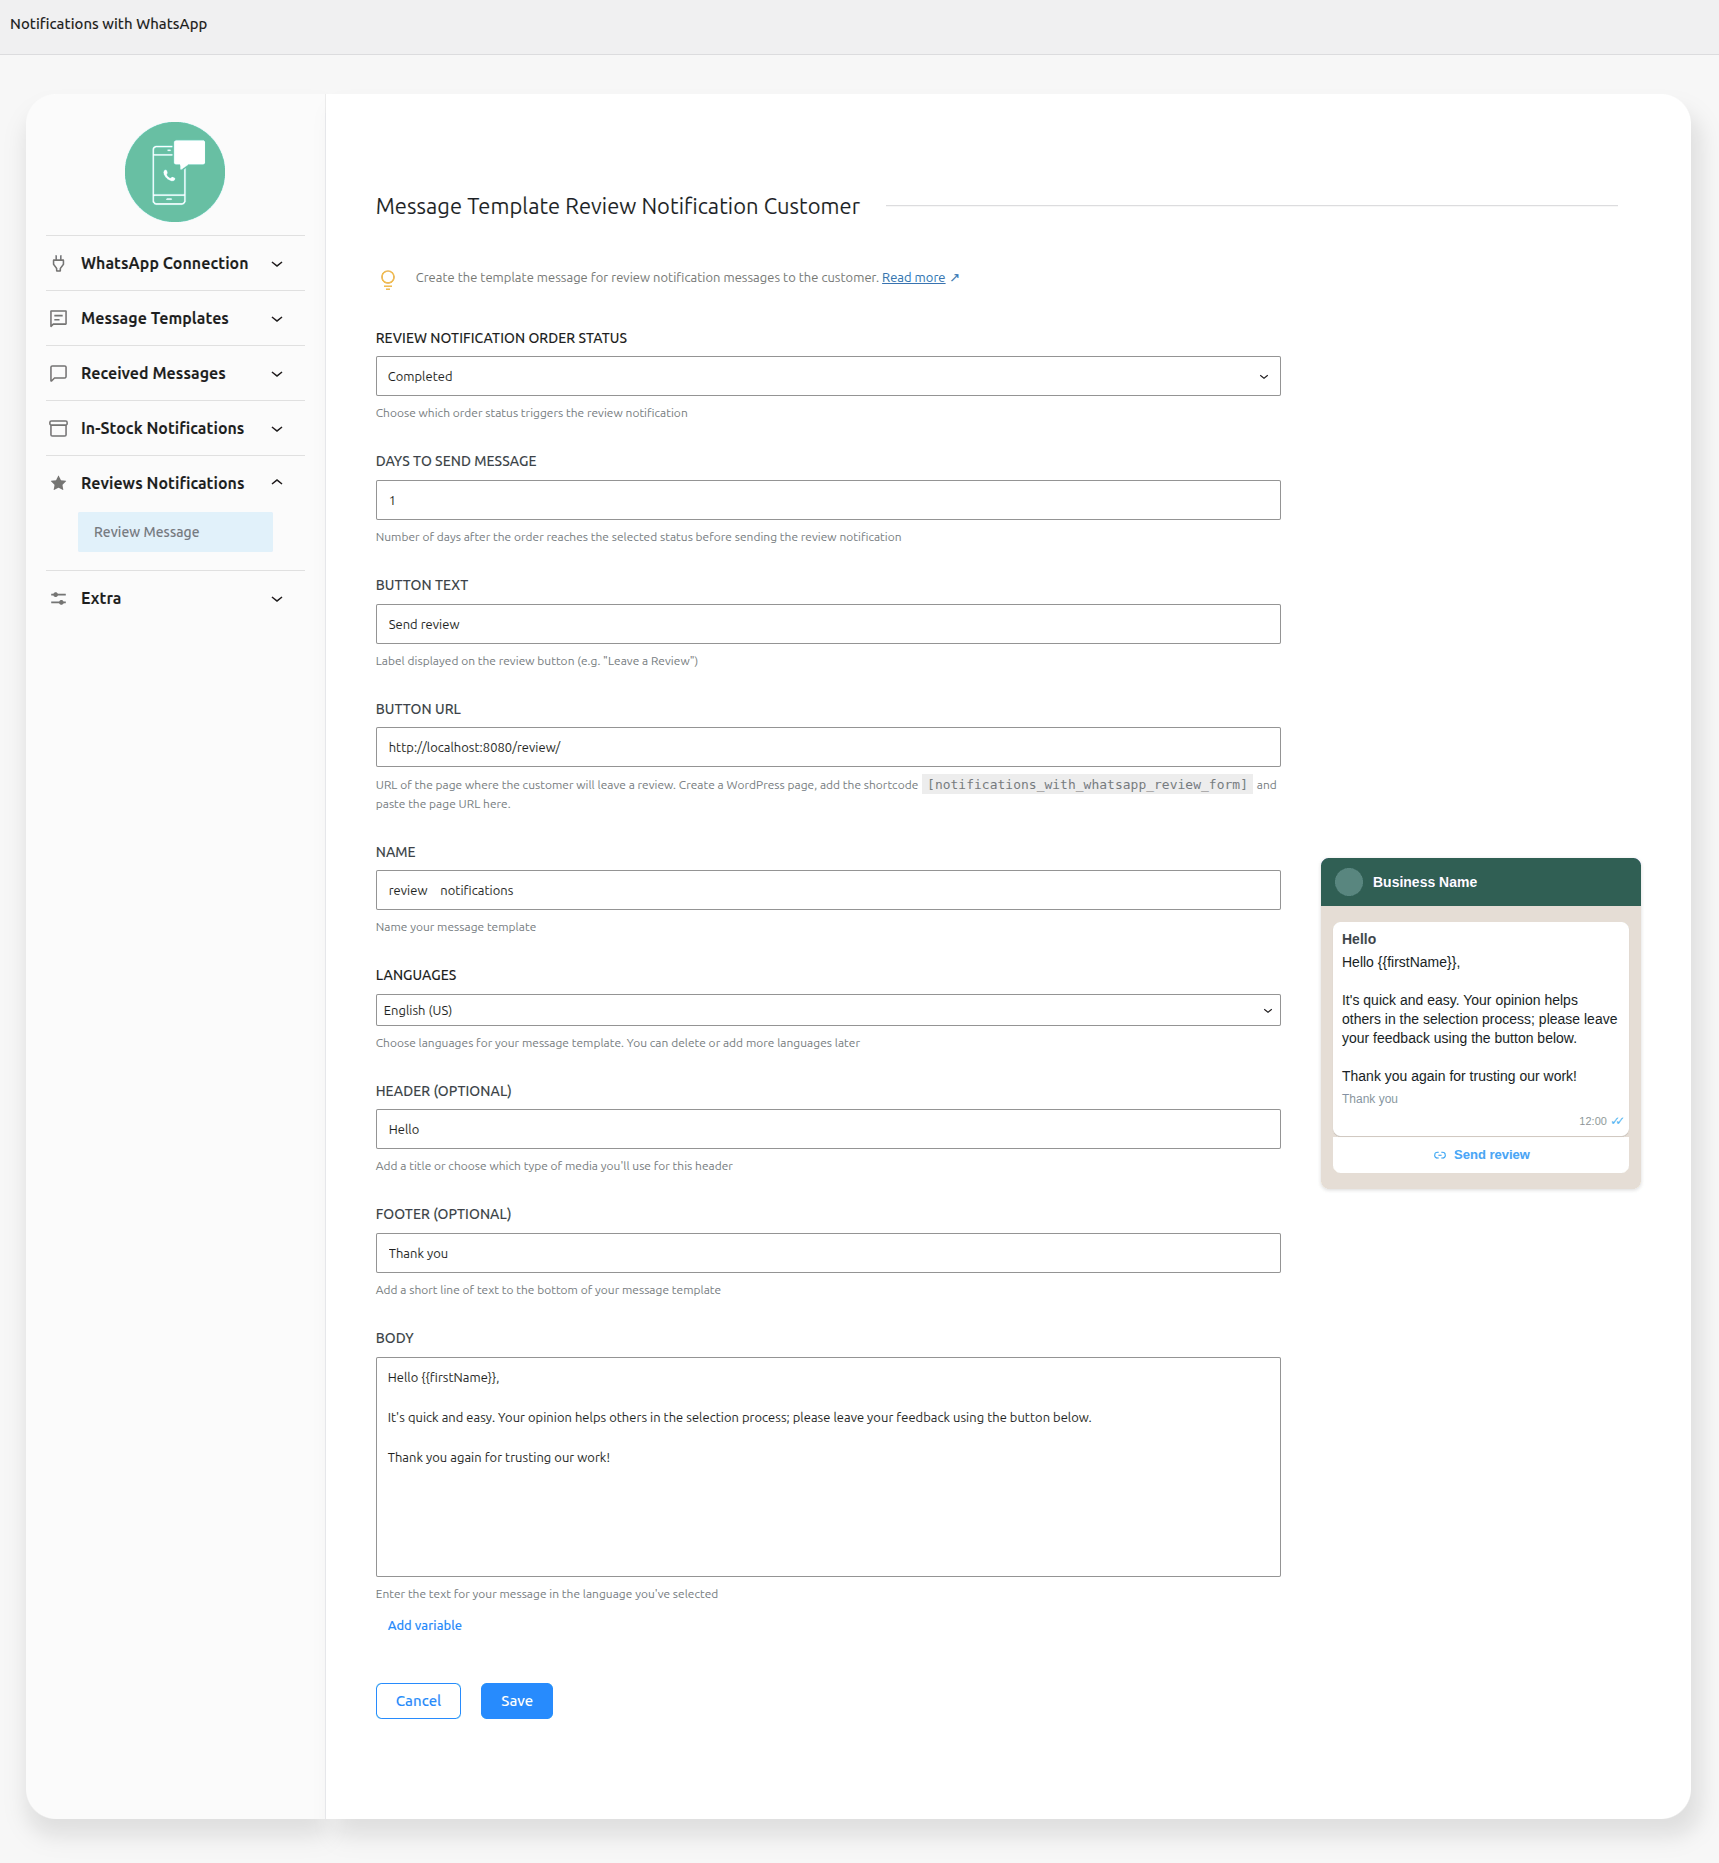
Review Notification Order Status -> Choose which order status triggers the review notification
Days to send Message -> Number of days after the order reaches the selected status before sending the review notification
Button Text -> Label displayed on the review button (e.g. “Leave a Review”)
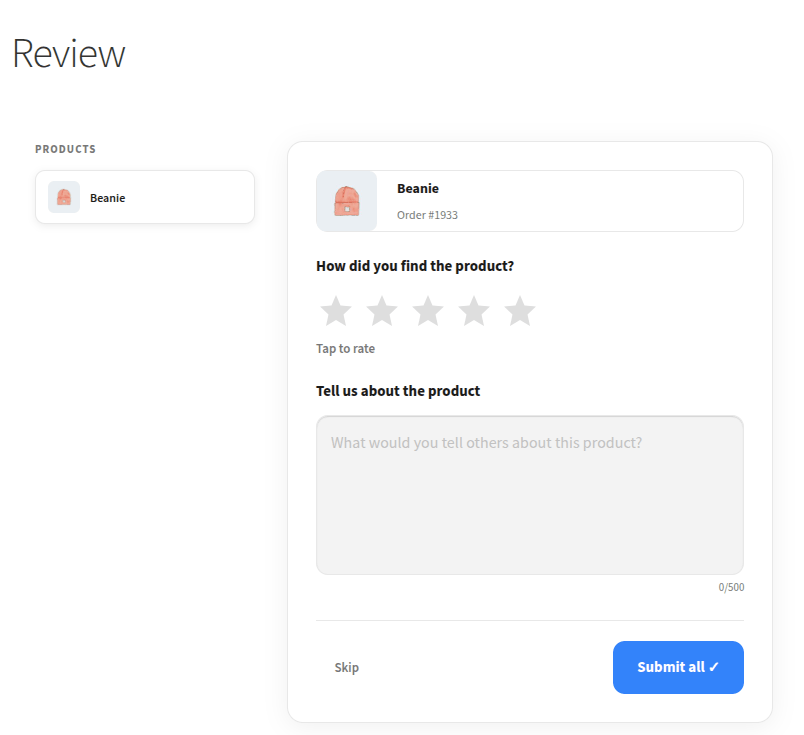
Button URL -> URL of the page where the customer will leave a review. Create a WordPress page, add the shortcode [notifications_with_whatsapp_review_form] and paste the page URL here.
Name -> Name your message template
Languages -> Choose languages for your message template.
Header -> Add a title or choose which type of media you’ll use for this header
Footer -> Add a short line of text to the bottom of your message template
Body -> Enter the text for your message in the language you’ve selected
2 – After creating the model, click in button Sent to API and wait for the status to change to approved. (This approval may take up to 24 hours)
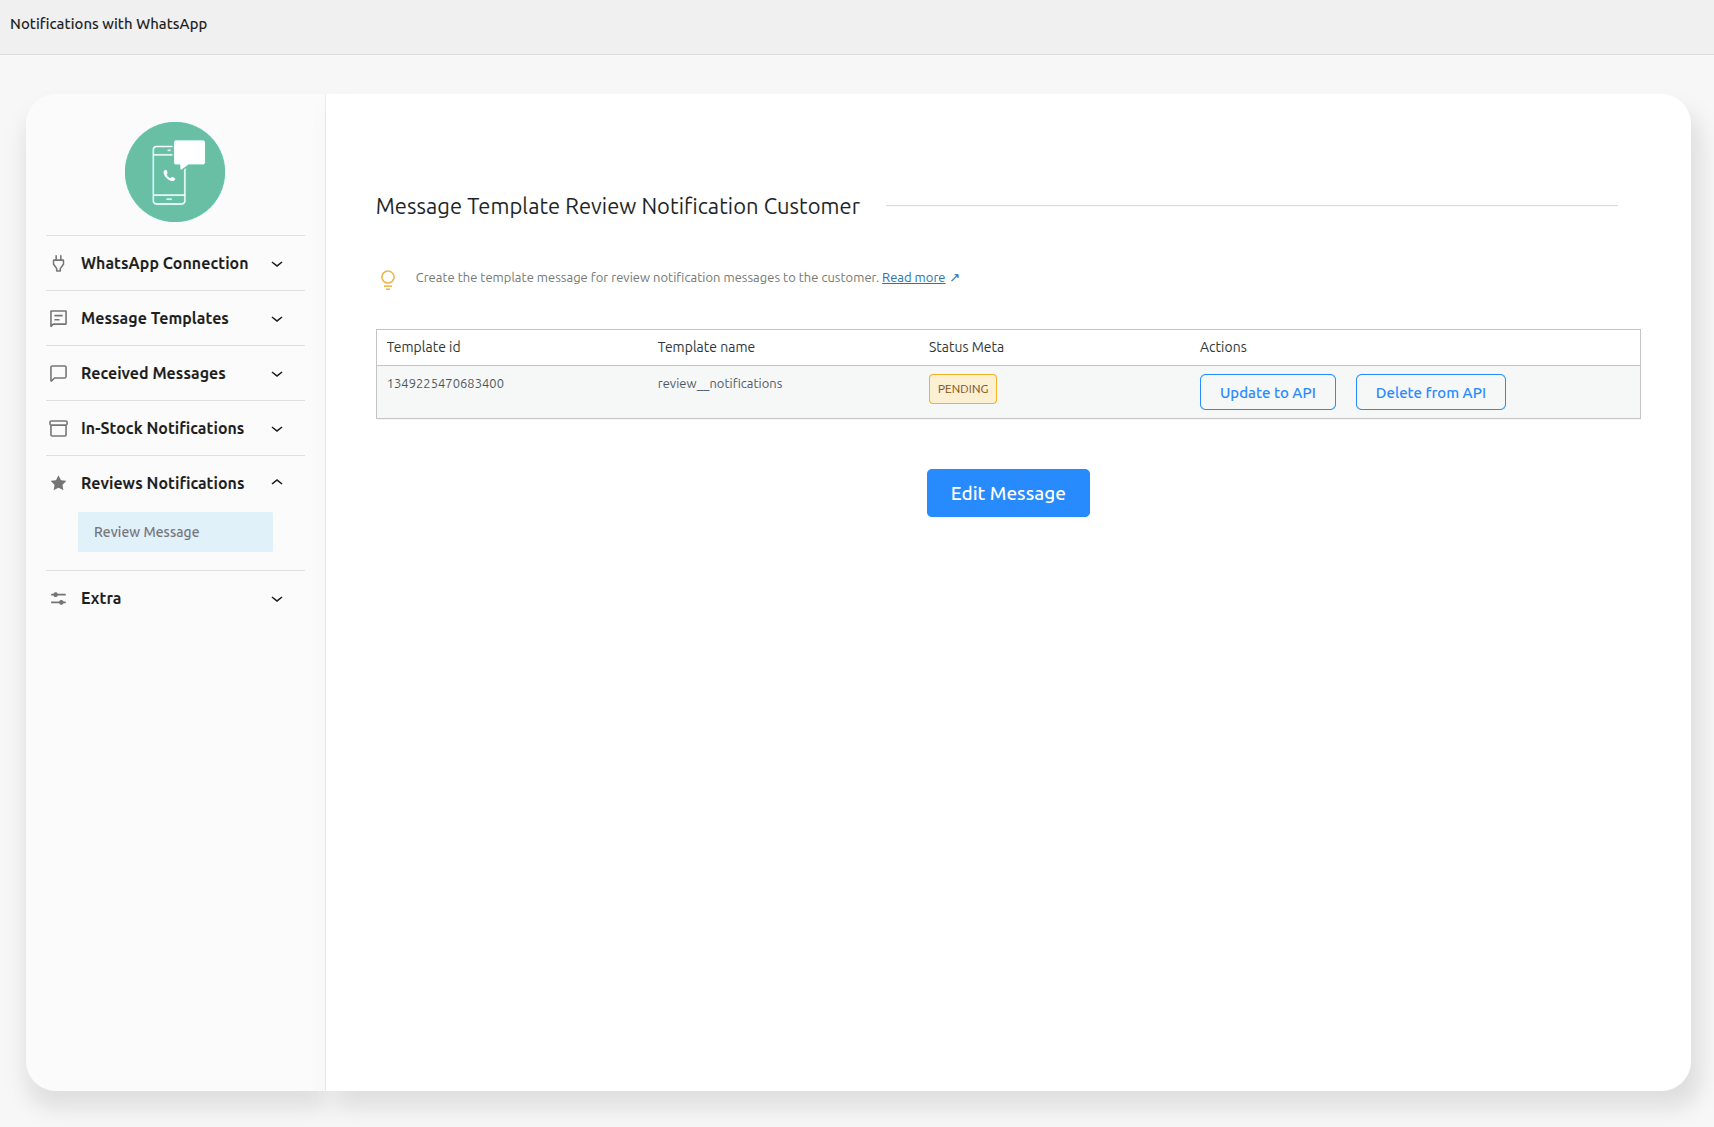
3 – Once approved, the status will change and the messages will be sent
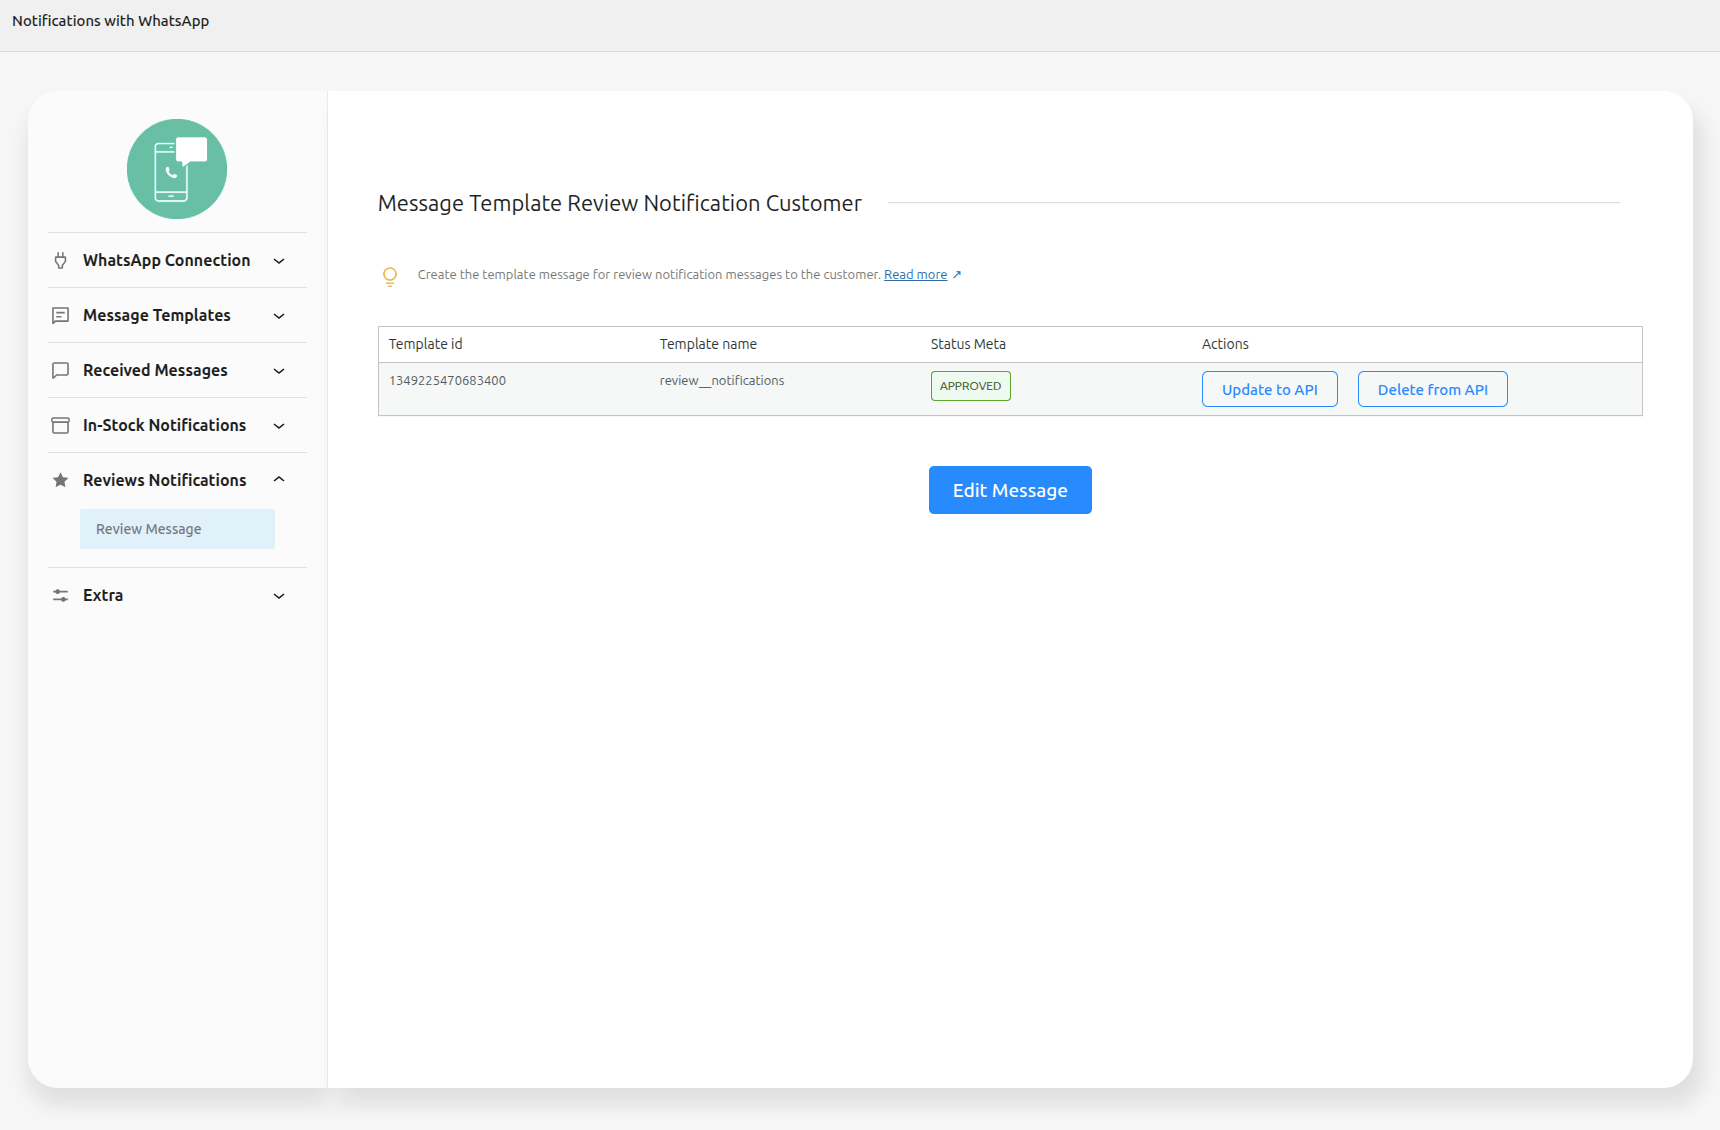
4 – The user will receive a link to rate the product via a form
Variables Message Template
↑ Back to topAllows you to personalize your messages for each recipient by entering customer and order information.
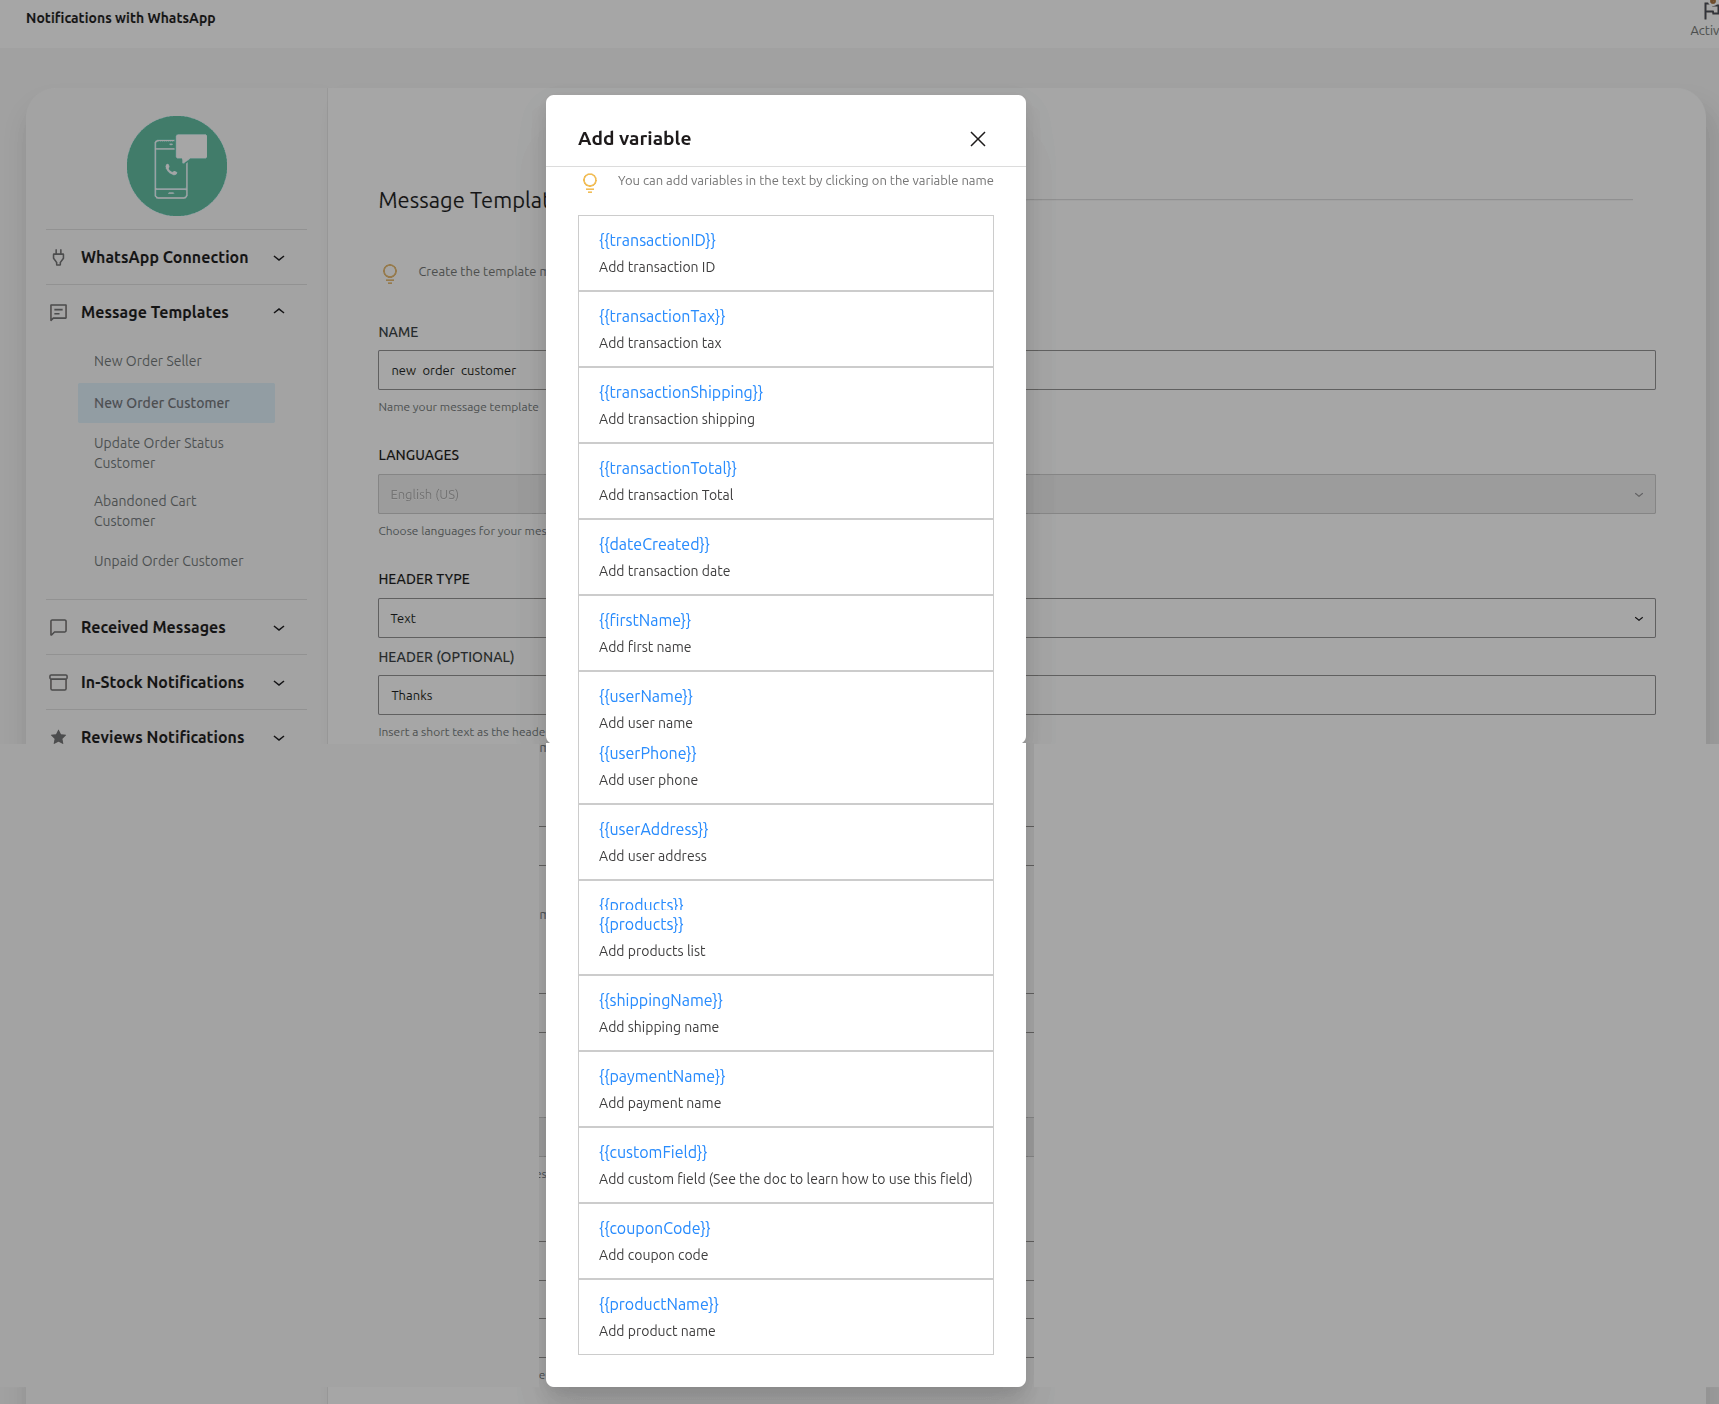
| transactionID | Insert Order ID Example: 283 |
| transactionTax | Insert Order Tax Example: 10.00 |
| transactionShipping | Insert Order Shipping Example: 10.00 |
| transactionTotal | Insert Order Total Example: 18.00 |
| dateCreated | Insert Order Date Example: 2023-05-16 – 02:01:51 |
| firstName | Insert User First Name Example: John |
| userName | Insert User Name Example: John Smith |
| userPhone | Insert User Phone Example: 555-1212 |
| userAddress | Insert User Address Example: My Street, 132 – Kingston, New York – 12401 |
| products | Insert List Products Order Example: 1x Beanie – value: 18 – cód: 18 |
| couponCode | Code of Coupon Example: 5%OFF |
| customField | Insert Custom Field Example: Tracking Url, Order Invoice, etc |
Update Message Template
↑ Back to topAfter editing the message, it is important that you send the changes again by clicking the Update from API button
Exclude Message Template
↑ Back to topYou can remove the message by clicking the Exclude from API button
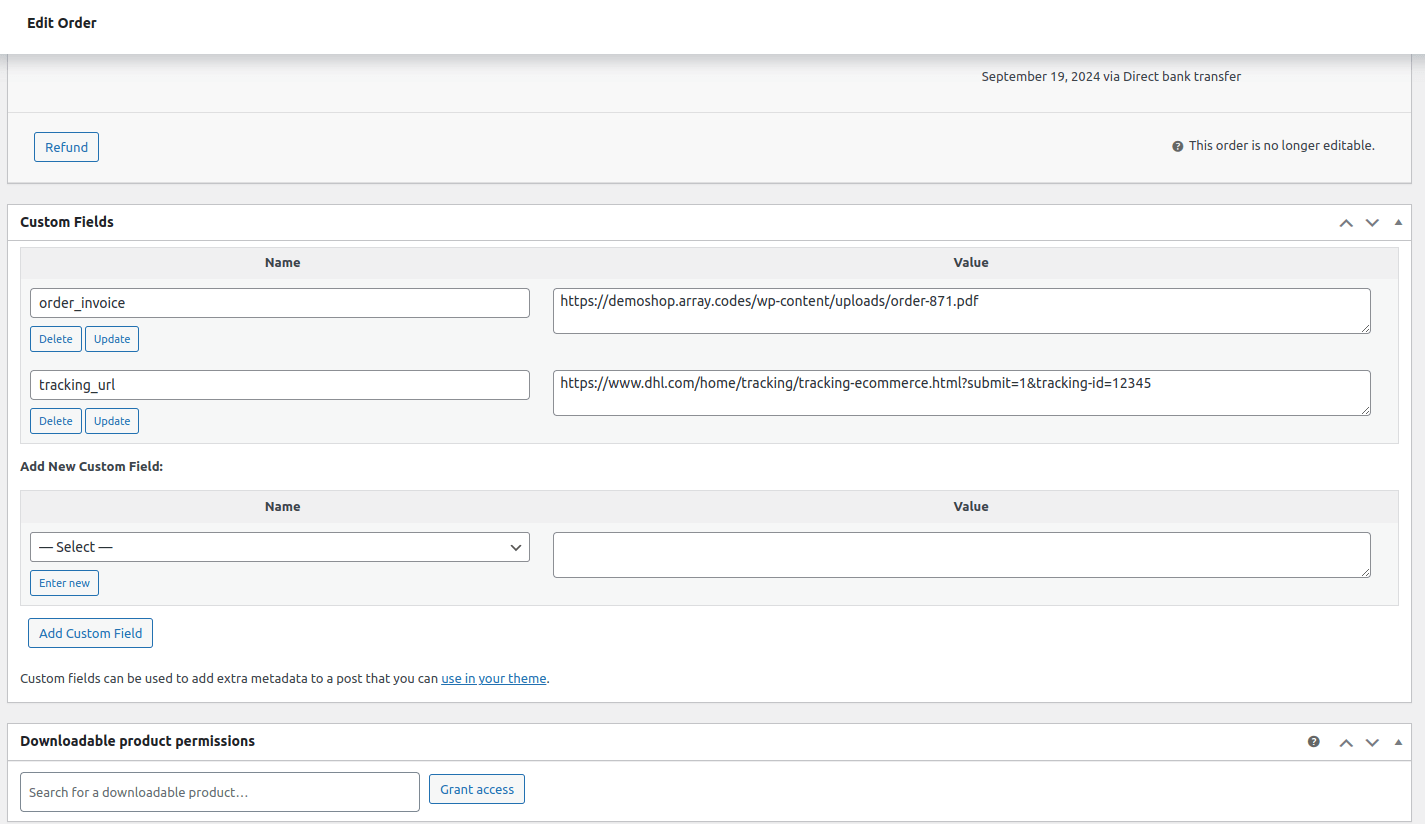
Custom Field
↑ Back to topThe Custom Field is designed to add information to your order that is not part of the standard order variables. You can use it to send: Tracking Link, Tracking Code, Order Invoice and any other relevant information you want to send.
For this, you can use the notifications_with_whatsapp_before_send_fields_message hook.
See video tutorial of how to use hook:
See more examples of how to use hook:
1 – Insert a Custom Field Variable in Message Template
2 – Create a Custom Field in Order
3- Insert Code for send Tracking url and Order Invoice in the message:
/**
 *  Fired before sending a message to WhatsApp
 *  This hook contains an empty array that must be the function's return with the desired value to be inserted in the custom field
 *  This hook contains an Order object (WC_Order) related to the message that will be triggered.
 *  Can be used to insert a non-default custom_field into the message.
 *
 * @param array $custom_fields Empty array to be changed
 * @param object $order Order (Wc_Order)
 */
function my_custom_hook_notifications_with_whatsapp_before_send_fields_message( $custom_fields, $order ){
    $order_id = $order->get_id();
    $tracking_url = $order->get_field('tracking_url');
    $order_invoice = $order->get_field('order_invoice');

    $custom_fields[] = $tracking_url;
    $custom_fields[] = $order_invoice;

    return $custom_fields;
}
add_filter( 'notifications_with_whatsapp_before_send_fields_message', 'my_custom_hook_notifications_with_whatsapp_before_send_fields_message', 10, 2 );
You can also take advantage of the functions of other plugins that create their own fields in the order and then send them in the messages:
Code example for send Tracking number and Tracking url in the message using the plugin Advanced Shipment Tracking for WooCommerce instead of custom fields:
/**
 *  Fired before sending a message to WhatsApp
 *  This hook contains an empty array that must be the function's return with the desired value to be inserted in the custom field
 *  This hook contains an Order object (WC_Order) related to the message that will be triggered.
 *  Can be used to insert a non-default custom_field into the message.
 *
 * @param array $custom_fields Empty array to be changed
 * @param object $order Order (Wc_Order)
 */

function my_custom_hook_notifications_with_whatsapp_before_send_fields_message( $custom_fields, $order ){
    if ( function_exists( 'ast_get_tracking_items' ) ) {

        $order_id = $order->get_id();
        $tracking_items = ast_get_tracking_items($order_id);
        $tracking_number='';
        $tracking_provider='';
        $tracking_url='';
        $date_shipped='';

        foreach($tracking_items as $tracking_item){
            $tracking_number = $tracking_item['tracking_number'];
            $tracking_provider = $tracking_item['formatted_tracking_provider'];
            $tracking_url = $tracking_item['formatted_tracking_link'];
            $date_shipped = date_i18n( get_option( 'date_format' ), $tracking_item['date_shipped'] );
        }
    }
$tracking_url = $order->get_field('tracking_url');
    $order_invoice = $order->get_field('order_invoice');

    $custom_fields[] = $tracking_number;
    $custom_fields[] = $tracking_url;

    return $custom_fields;
}
add_filter( 'notifications_with_whatsapp_before_send_fields_message', 'my_custom_hook_notifications_with_whatsapp_before_send_fields_message', 10, 2 );
Custom Field Button
↑ Back to topThe Custom Button field was developed to add a button to your order with a personalized link containing your order information. You can use it to send, for example: a tracking link, a link to your order on your account page, or any other relevant link you wish.
For this, you can use the notifications_with_whatsapp_before_send_button_field hook.
See example of how to use hook:
1 – Create a message template for the order completion status, with a dynamic link button to send the user to the tracking link.

2 – Enter the code to send the tracking URL:
/**
 * Triggered before sending a message to WhatsApp, the value goes inside the button.
 * This hook contains an empty string that should be the function's return value, with the desired value to be inserted into the custom field.
 * This hook contains an Order object (WC_Order) related to the message that will be triggered.
 *
 * Can be used to insert a non-standard custom field into the message.
 *
 * @param string $custom_field Empty string to be changed
 * @param object $data Order (Wc_Order)
 *
 * @since 3.8.0
 *
 * @see https://woocommerce.com/document/notifications-with-whatsapp/
*/

function my_custom_hook_notifications_with_whatsapp_before_send_button_field( $custom_field, $order ){
    if($order->get_status() === 'completed'){

      $order_id = $order->get_id();
      $tracking_url = $order->get_field('tracking_url');
      return $tracking_url;

    }
}
add_filter( 'notifications_with_whatsapp_before_send_button_field', 'my_custom_hook_notifications_with_whatsapp_before_send_button_field', 10, 2 );
Hookies
↑ Back to topThis guide shows the hooks available to you who want to modify the default Notifications with WhatsApp behavior.
It is important to be clear that we will not give complete examples of the possibilities, but only an idea of what is possible to do.
notifications_with_whatsapp_field_user_address_message
This hook contains a string with the user’s address that should be the return of the function with the modified value of the address field:
/**
 * Fired before sending a message to WhatsApp
 * This hook contains a string with the user's address that should be the return of the function with the modified value of the address field
 * This hook contains an Order object (WC_Order) related to the message that will be fired.
 * It can be used to change the value of the address field in a message.
 *
 * @param string $address String address to be changed
 * @param object $data Order (Wc_Order)
 *
 * @since 3.1.0
 *
 * @see https://woocommerce.com/document/notifications-with-whatsapp/

*/
function my_custom_hook_notifications_with_whatsapp_field_user_address_message( $address, $order ){
    $order_id = $order->get_id();
    $street      = $order->get_billing_address_1();
    $number = get_field('_billing_n_mero', $order_id);
    $neighborhood = get_field('_billing_neighborhood', $order_id);
    $complement  = $order->get_billing_address_2();
    if(!empty($complement)){
        $number = $number . ', ' . $complement;
    }
    $city        = $order->get_billing_city();
    $region      = $order->get_billing_state();
    $postal_code = $order->get_billing_postcode();
    $address = $street . ', ' . $number . ' - ' . $neighborhood . ' - ' . $city . ' - ' . $region . ' - ' . $postal_code;
    return $address;
}
add_filter( 'notifications_with_whatsapp_field_user_address_message', 'my_custom_hook_notifications_with_whatsapp_field_user_address_message', 10, 2 );
Coupon
↑ Back to topThe coupon is used to add coupons to your marketing messages, you associate a coupon with a template and can now use it as a variable

Name Template -> Choose which template message represents this coupon
Coupon code -> Coupon code for the created coupon
Discount type -> Discount type for the created coupon
Coupon amount -> Coupon amount for the created coupon
Coupon expiry date -> Coupon amount for the created expiry date
Individual use only -> Individual use only coupon
Add Copy offer code button in template -> Add Copy offer code button in template below text
To activate the coupon in the notification, add the {{coupon}} variable in the template