Overview
↑ Back to topThe OnBuy Integration for WooCommerce assists in syncing your items from your WooCommerce store to OnBuy and managing your OnBuy orders. The direct API integration enables the WooCommerce store owner to synchronize the price, inventory, order, and other details.
Key Features
↑ Back to top1. Global setting on OnBuy
It is easy for admins to add or update the meta keys and other attributes of the product. Features of the global setting on OnBuy integration are the following:
- MetaKeys and Attribute List – allows admins to select the checkboxes for the META KEYS AND ATTRIBUTES LIST in order to map the selected meta keys to their attributes.
- Order Setting – displays the order status on OnBuy to be synced with the WooCommerce store depending on its delivery state (i.e if it’s fully or partially dispatched, canceled, etc). Enable or disable the WooCommerce mail restriction for OnBuy orders as per your choice.
- Setting Schedule – by using the cron job, automation of the inventory/price/order can be enabled or disabled by setting the time interval and admins can also sync existing products/auto-upload products.
- BuyBox Setting – Mark your presence among competitors with the OnBuy Buy Box. The feature lets you stand out by providing priority over the price range of any product among the other sellers.
2. Category Search
Category mapping enables admins to select categories relevant to the product-specific keyword and includes the technical details and Category features for that specific category.
3. Profiling
Admin can use the Profiles to override the product settings at the category level.
4. Product Management
Admin can view all product details such as Product Image, Product Name, Product Type, Product Price, Product SKU, Product Stock, OnBuy winning price, Profile, and category name. Admin can apply the filters by Product, Post, Stock Status, Product Type, Product Category, and Product per page. Also, the admin can upload, update, remove a listing, create a listing and mark it as not uploaded.
5. Queue Management
Under queue management, the admin can find errors with products under approval to be listed on OnBuy and amend them in order to upload them again.
6. Order management
Using the “fetch order” button in this section, you can import the order from OnBuy to WooCommerce stores by filtering them by order status within the global setting tab. After the order has been fetched, you can update the order status as fully or partially dispatched or canceled from the WooCommerce store.
7. Timeline Log
The Timeline log stores the information related to the Inventory, Product, Order Activity, and WP-Cron executions.
Registration Process
↑ Back to topTo Register On OnBuy
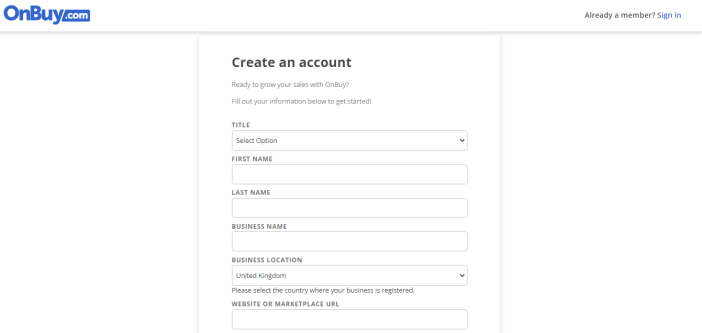
- Get started with the registration process by clicking here.
- On the registration page, you will be prompted to fill in the details as well as agree with a few terms and conditions of OnBuy.
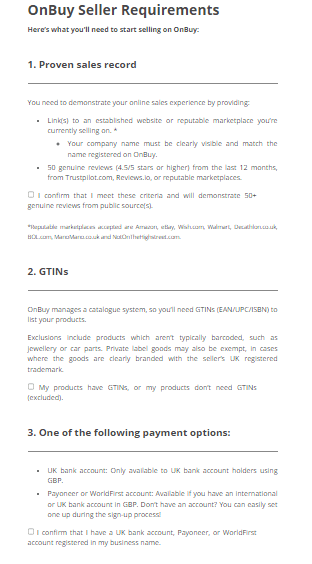
As per the OnBuy policies, you need to fulfill the following requirements-
- You need to have a proven sales record before registering as a seller on OnBuy.
- GTINs are mandatory to list your products on the marketplace.
- Any 1 of the following payment methods is required- UK bank account, Payoneer, or WorldFirst account.
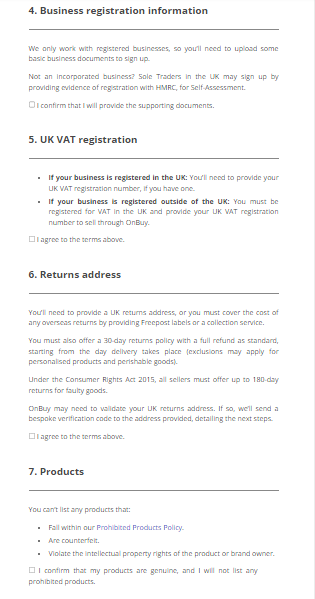
- Business registration information.
- UK VAT registration.
- UK return address for accepting returns.
- Cannot list products that fall within the Prohibited Products Policy.
OnBuy Accounts
↑ Back to topTo start the integration, the first mandatory step for the admin user is to complete the Configuration.
Configuration:
Go to your WooCommerce admin panel and you will see the Marketplaces menu displayed in the left navigation bar.
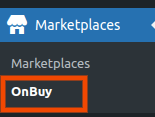
Click on the OnBuy section of the panel.
The following page will display the Seller Name, OnBuy Seller Id, Company Name, and Account Status.
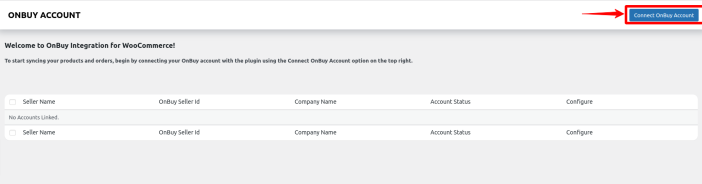
Click on the Connect OnBuy Account button and the next screen will prompt you to complete the form.
The admin user is required to provide the following details (as displayed below):
- Seller Id
- Consumer Key
- Secret Key
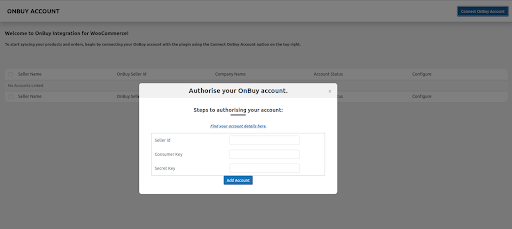
To retrieve the Seller Id, Consumer Key, and Secret Key, you will need to log in to your OnBuy seller panel.

Enter your seller credentials and log in. You’ll be redirected to the OnBuy seller homepage.
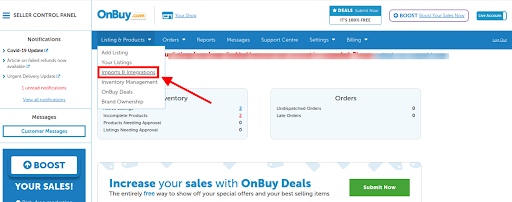
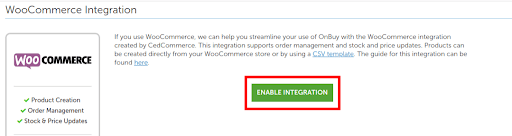
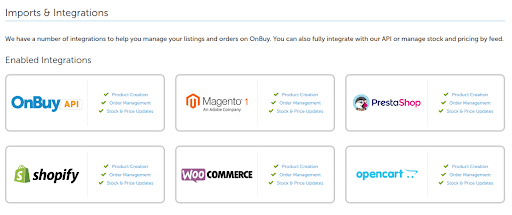
Click on Imports & Integration under Listings & Products.
The page appears as:
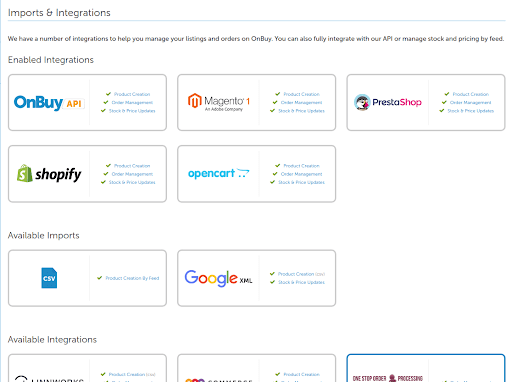
Now, to enable the WooCommerce integration, click on WooCommerce Integration under Available Integrations.
After clicking on WooCommerce Integration, you will be redirected to the page as shown below. Click the Enable Integration button to enable the extension.
Once the extension is enabled, it will be visible in the list of Enabled Extensions.
Next, under Enabled Extension, click on WooCommerce Integration.
You’ll be redirected to a new page as shown below:
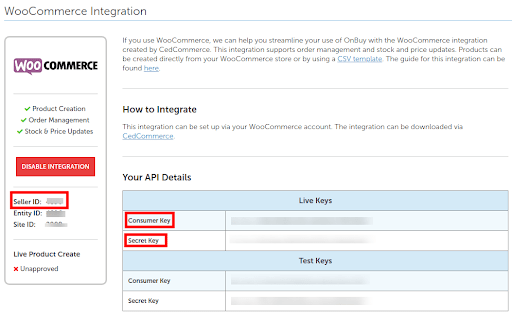
Retrieve all the necessary details from here and navigate back to the WooCommerce Seller panel.
Enter the Seller ID, Consumer Key, and Secret Key. Click the Add Account button to add the account.
Adding the account will reflect your Account with its Seller Name, OnBuy Seller Id, Company Name, and account status.
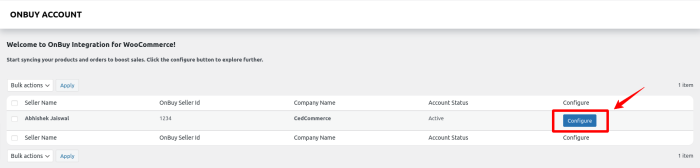
Also, you can delete your account just by selecting the checkbox placed before it, and selecting Delete from the dropdown as specified in the screenshot.

Global Setting On OnBuy
↑ Back to topTo carry out the global settings:
Go to the OnBuy account page and click on the “Configure” button, A page will be open where you have to click on Global settings.
This section provides all the configurations related to product and order sync settings.
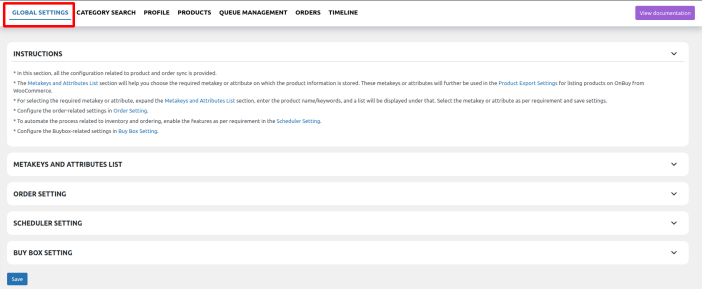
MetaKeys and Attributes List On OnBuy:
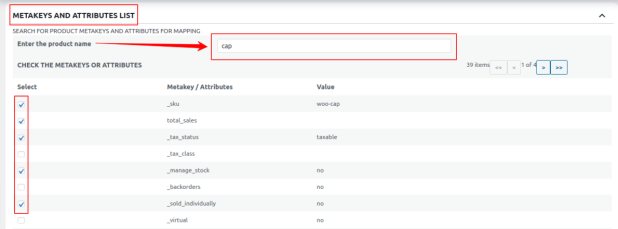
The Meta keys and Attributes List section will help you to choose the required meta key or attribute on which the product information is stored. These meta keys or attributes will further be used in “Product Export Settings” for listing products on OnBuy from woocommerce as specified in the screenshot.
In this, you can search the product by its title as specified in the screenshot.
For selecting the required meta key or attribute expand the Meta keys and Attributes List section enter the product name/keywords and the list will be displayed under that. Select the meta key or attribute as per requirement and save settings as specified in the screenshot:
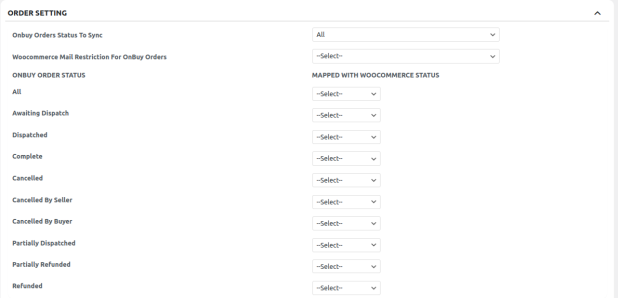
Order Setting On OnBuy:
You can easily sync your OnBuy order with the orders on your WooCommerce store under the order setting.
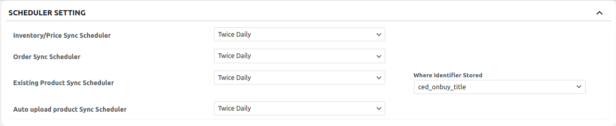
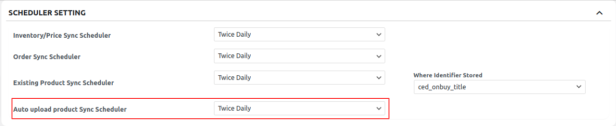
Scheduler Setting On OnBuy:
Scheduler settings sync the product data on your OnBuy store with your WooCommerce store. The scheduler feature further has various options for updating your data on both the store. The admin selects the time frame for each as per the requirement.
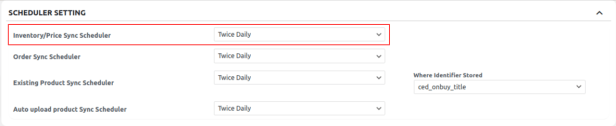
a. Inventory/Price Sync Scheduler:
The feature easily syncs the inventory or the price within the selected time frame.
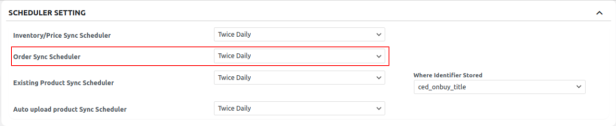
b. Order Sync Scheduler:
Orders placed on the OnBuy store are easily synced with your WooCommerce store within the selected time frame.
c. Existing Product Sync Scheduler:
The details related to the existing products are synced between the OnBuy marketplace and the WooCommerce store with this feature in the selected time frame.

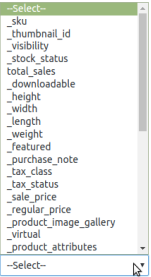
Select the Identifier:
In this, the admin has to select the Identifier of the product from the dropdown.
d. Auto Upload product Sync Scheduler:
Products are auto-uploaded from WooCommerce to the OnBuy marketplace automatically with this feature.
Settings of BuyBox
Mark your presence among the competitors with the OnBuy Buy Box. The feature lets you stand out by providing priority over the price range of any product among the other sellers.
Also, don’t forget to map the Set maximum limit to be decreased as it limits the price not to decrease less than the maximum limit.

Category Search On OnBuy
↑ Back to topCategory mapping enables admins to select more than one category relevant to the product-specific keyword and can also add the technical details for the specific category.
To carry out the Category Search:
Go to the OnBuy account page and click on the “Configure” button, A page will be open where you have to click on Category Search.
Search OnBuy Category
↑ Back to topIn the search OnBuy category, the admin has to enter the “KEYWORD” to search the category for that product.
Once you enter the keyword then the desired categories get fetched and the checkboxes get appeared to correspond to each WooCommerce category.
You need to select the WooCommerce category using the checkbox on the left side and a list of OnBuy categories will appear in the dropdown. Select the OnBuy category from the drop-down for the respective keyword in which you want to list the products of the selected WooCommerce category on OnBuy as specified in the screenshot:
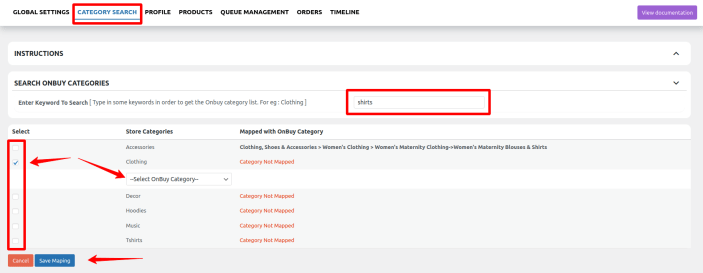
After performing all these steps, click the Save mapping option at the bottom. Once you map the categories profiles will automatically be created and you can use the Profiles in order to override the product settings at the category level.
Profile Management
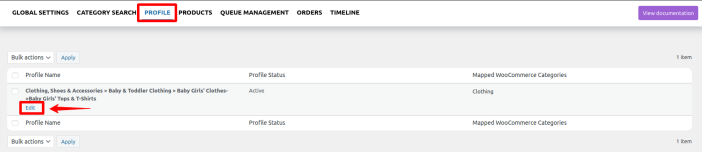
↑ Back to topIn this section, you will see all the profiles created after category mapping.
You can use the Profiles in order to override the product settings at the category level. For overriding the details edit the required profile using the edit option under the profile name.
In this, the admin can perform several tasks.
- Edit The Profile.
To edit the profile:
As you, open the profile section, click on the Edit as specified in the screenshot:
After hitting the Edit button you will be redirected to a page where you will be having some attributes as specified in the screenshot:
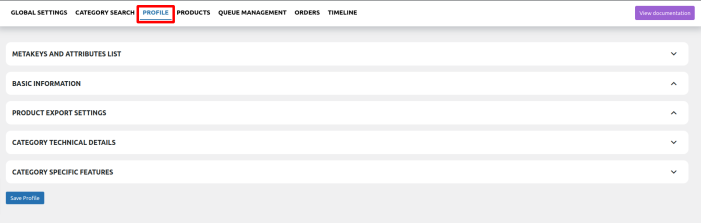
Meta keys and Attributes List:
The Meta keys and Attributes List section will help you to choose the required meta key or attribute on which the product information is stored. These meta keys or attributes will further be used in “Product Export Settings” for listing products on OnBuy from woocommerce as specified in the screenshot.
In this, you can search the product by its title as specified in the screenshot.
For selecting the required meta key or attribute expand the Meta keys and Attributes List section enter the product name/keywords and the list will be displayed under that. Select the meta key or attribute as per requirement and save settings as specified in the screenshot:
Basic Information: In this, you can see the profile name as specified in the screenshot:

Product Export Setting: In the product export settings, you are allowed to enter the details of the product which you will be exporting as specified in the screenshot:

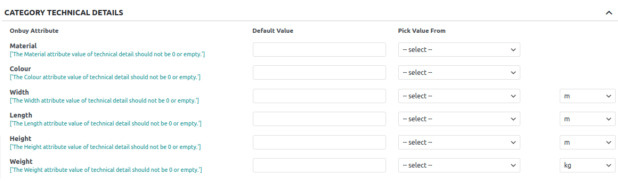
Category Technical Details: In this section, you need to fill out the Technical details for a specific category.
Category Specific Features: In this section, you need to map the features for a specific category.

Click the Save Profile button at the bottom.
Product Management On OnBuy
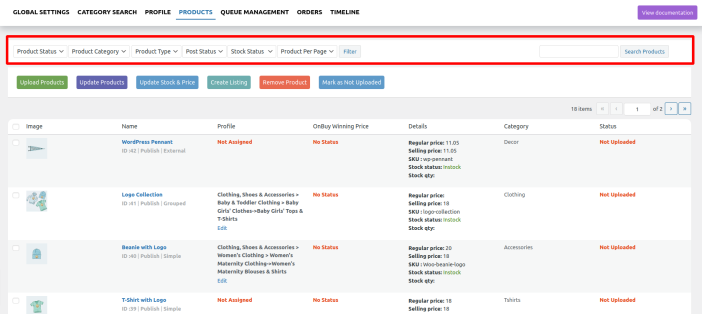
↑ Back to topAdmin can view all product details such as Product Image, Product Name, Product Type, Product Price, Product SKU, Product Stock, OnBuy winning price, Profile, and category name
Also, the admin can apply the filters by Product, Post, Stock Status, Product Type, Product Category, and Product per page as specified in the screenshot:
The Search Product option lets you find products using product names/keywords.
For this, the admin will perform the following task:
- Upload Products.
- Update Products.
- Update Stock and Price.
- Create Listing.
- Remove Product. ( OnBuy Product )
- Mark as not Uploaded
Uploading the Products On OnBuy
↑ Back to topSelect the checkboxes associated with the products you need to upload products.
Click the Upload Products button, as specified in the screenshot.
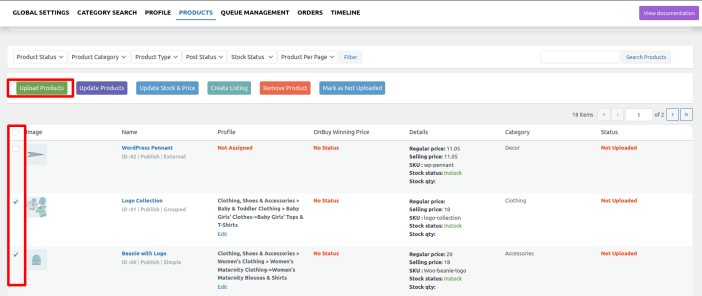
Once the product is successfully uploaded on OnBuy you will have the product view link on the right [ The Eye Icon ].
Updating The Products On OnBuy
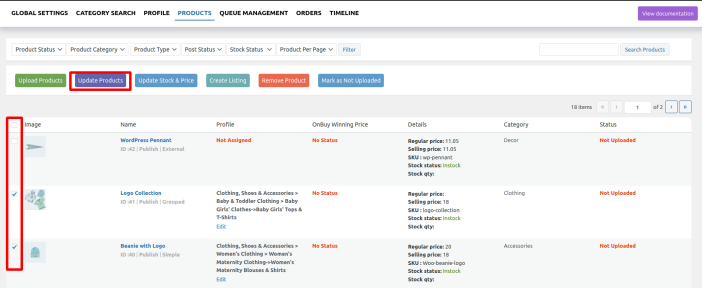
↑ Back to topSelect the checkboxes associated with the products you need to update products.
Click the Update Products button, as specified in the screenshot.
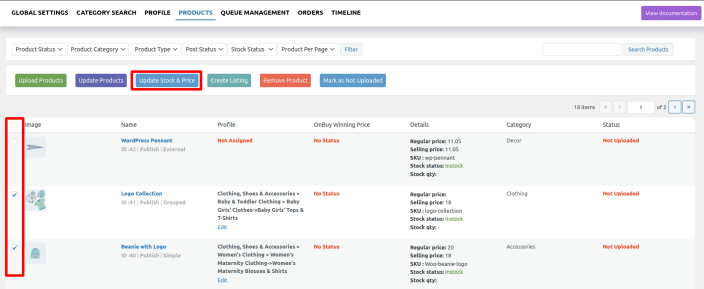
Updating The Stock On OnBuy
↑ Back to topSelect the checkboxes associated with the products you need to update products.
Click the Update Stock & Price button, as specified in the screenshot.
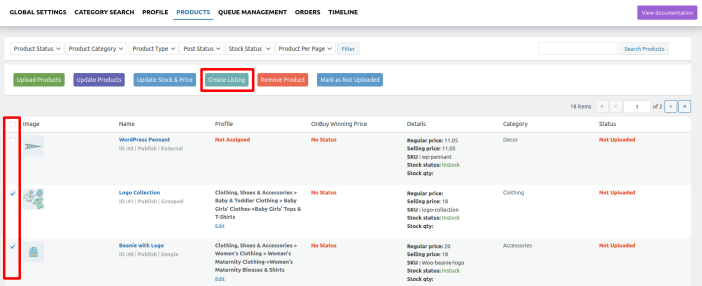
Creating List On OnBuy
↑ Back to topSelect the checkboxes associated with the products you need to update products.
Click the Create Listing button, as specified in the screenshot.
Removing List On OnBuy
↑ Back to topSelect the checkboxes associated with the products you need to update products.
Click the Remove Listing button, as specified in the screenshot.
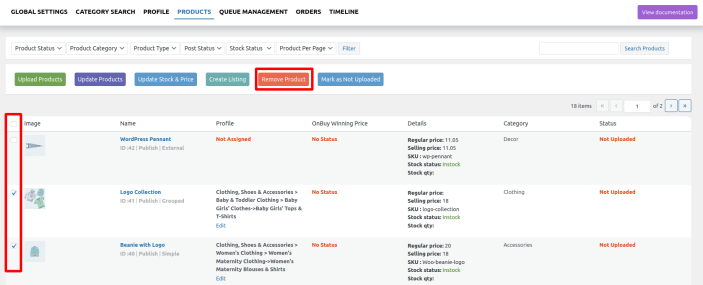
Note: If you want to delete the product from OnBuy Store, then you can perform the Remove Product operation from the plugin.
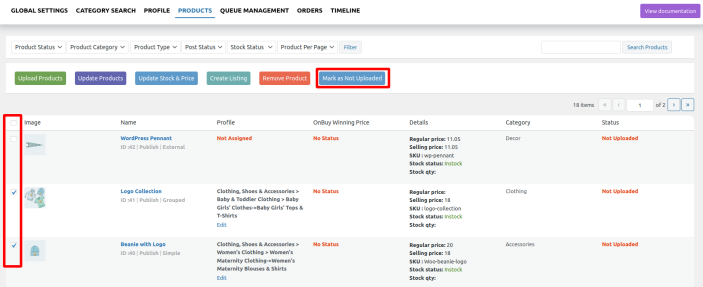
Mark Products As Not Uploaded On OnBuy
↑ Back to topAll those products that the admin does not want to upload can be marked as “Mark as not uploaded” with the help of this feature.
Follow these simple steps:
- Select the checkboxes associated with the products you need to un-synced the products from the integration(If necessary).
- Click the Mark as a Not Uploaded button, as specified in the screenshot.
Managing Queue On OnBuy
↑ Back to topTo carry out the Queue Management:
Go to the OnBuy account page and click on the “Configure” button, A page will be open where you have to click on Queue Management.
The queue management will appear on a page where the admin can view the OnBuy Queue of the products.
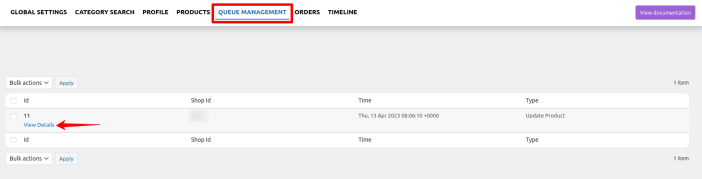
Once the admin will click on View Details will generate the details of the product with its Import Id, Feed Status, ProductId, and Product SKU.

Order Management On OnBuy
↑ Back to topTo carry out the Orders Section:
Go to the OnBuy account page and click on the “Configure” button, A page will be open where you have to click on the orders Section.
In the Orders section, the admin can view all the OnBuy orders here and fetch the orders by clicking on the Fetch Orders button.
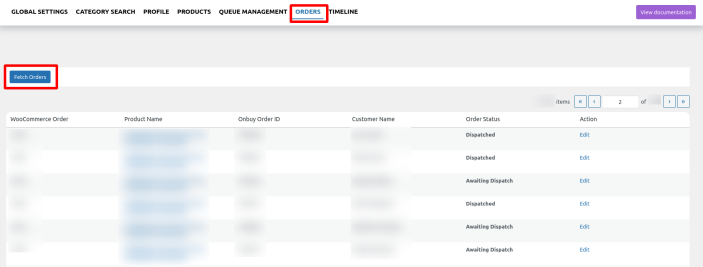
Note: Make sure you have the SKUs present in all your products/variations for order syncing.
The admin can also set the scheduler for Auto fetch orders in the Global settings->Scheduler Setting as specified in the screenshot.

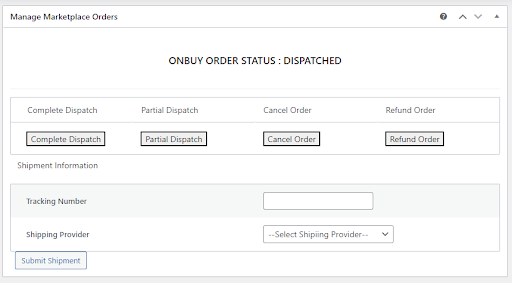
You can also submit the tracking details from WooCommerce to OnBuy. You need to go into the order edit section using the Edit option in the order table below. Once you go into the order edit section you will find the section at the bottom where you can enter tracking info and update them on OnBuy.
Timeline
↑ Back to top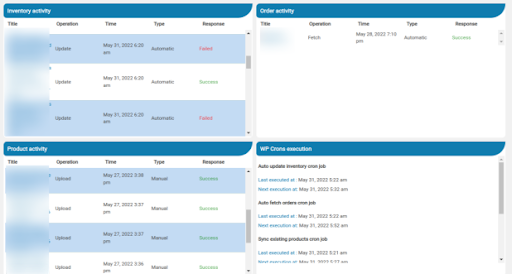
The Timeline log stores the information related to the following:
Inventory Activity:
- Title: Reflects the name of the product for which the inventory update is processed.
- Operation: Operation under the inventory activity will be stated under the ‘Update’.
- Time: Exact date, day & time the inventory update was processed.
- Type: The type of activity falls under two sub-division- manually and automatic.
- Response: The final status is stored under the response column with either success or failure.
Product Activity:
- Title: Reflects the name of the product which is processed.
- Operation: The product section can have the upload/update/remove activities that will be mentioned in the column.
- Time: Exact date, day & time the product sync was processed.
- Response: The final status is stored under the response column with either success or failure.
Order Activity:
- Title: OnBuy Order number is mentioned in this column.
- Operation: Operation under the orders will be stated under the ‘fetch’.
- Time: The respective date, day & time will be displayed when the order fetch was executed.
- Response: The final response of the orders will be stored under the response.
WP-Cron Executions:
Displays the cron information which is present in the plugin. It shows the last executed time and next execution time for the cron events:
- Auto-updated inventory.
- Auto fetches order.
- Sync existing products.
- Auto upload products.
- Auto queue scheduler
- Auto check winning price
FAQs
↑ Back to top1- Can I increase the prices of the products while uploading them on OnBuy?
Ans. Yes, you can increase the prices of your WooCommerce products by using the Markup feature. The increments can be made by a percentage value or by a fixed amount. You can also increase the value of your products based on categories.
2- Is there any feature to upload and update the selected products on OnBuy?
Ans. Yes, you can easily upload and update selected products on OnBuy with the Profile-based Product Upload feature. Uploading products based on categories and attributes makes it easy for customers to navigate through products easily.
3- Will it create any conflicts if I use a POS system with WooCommerce?
Ans. No, you will not face any conflict if you use a POS system. If your POS system is connected with WooCommerce, then the integration works like a medium through which your WooCommerce store and OnBuy are connected. So if the POS is fully secured with WooCommerce, then the plugin will not create any conflicts.
4- Is there any limitation for stock and order syncing? When will my OnBuy products be fetched in the WooCommerce store?
Ans. No, there is no limit for stocks and orders. Unlimited stocks and orders can be automatically synced between both platforms at a specific time interval.
5- Is there any feature for updating the shipment tracking details on OnBuy?
Ans. Yes, you can upload shipment tracking details on OnBuy through your WooCommerce store using the Submit Shipment feature. Once the tracking details are updated, customers can easily track the delivery status of their orders and experience transparency throughout their buying journey.