Configuration
↑ Back to topAfter activating this extension, the Store Hours menu option will display under the WooCommerce menu.
Click Store Hours to access all settings for Order Scheduler Pro.

Basic settings
↑ Back to topThe extension requires the time and date format (under Settings > General in your store’s WP Admin dashboard) be setup properly. We’d recommend using the following time and date settings, this will make sure the time and date are properly calculated by the scheduling logic to display the time and dates on checkout.
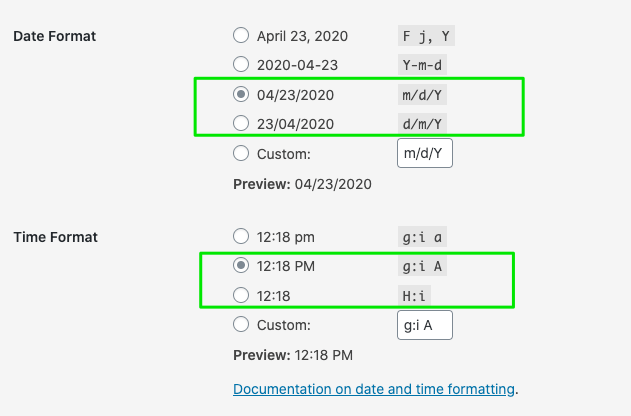
Supported Date Formats m/d/Y, d/m/Y or Y-m-d; and Time Formats g:i a, g:i A or H:i
Setting a store schedule
↑ Back to topSetting up a schedule is easy. The first step, you can quickly toggle on and off the store schedule functionality. Once Store Hours Manager is enabled, the Days schedule will be used to automatically open and close the store based upon the schedule.

Days schedule
Creating a schedule will allow the store to open and close automatically.

Note: Time periods can only be created for one 24 hour period. If you have a store schedule that needs to continue to the next day, list the closing period for one day at 11:59 PM and create a new opening period for the following day as 12:01 AM.
Holiday schedule
Using the calendar, select days of the year that are holidays. Selected days will automatically override the active Day Schedule and display the store as closed.

Notification
↑ Back to topCustomers can see either a box or bar styled notification of the store status. Toggle the notification on or off and select how the notification is presented to the customer You can trigger the notification by site visit or page visit and based upon a defined duration of time.

The notification can be displayed site wide on all pages, or on select pages and posts allowing control of when the notification is shown to visitors.

Customize the box/bar notification
Brand and customize the notification by adding a logo, selecting colors, styles, location of the placement, text and dismiss functionality.

Set store closed Bbehavior
↑ Back to topWhen the store is closed, you can define the action for checkout. Within the Store Hours > Actions tab, you can disable checkout, preventing orders from being placed, or allow checkout.

Note: If you enable Pickup and Delivery functionality, checkout will allow orders to be placed.
Notification and actions settings
↑ Back to topWithin Store Hours > Settings, enable management mode to avoid triggering the notification on the front-end of the store and disable the actions set to prevent checkout.

Widget
↑ Back to topShow a widget on notifications displaying store hours.

Customize the widget color, branding, text, font and use CSS for custom placements on your site.
Shortcodes
Easily add a shortcode to your pages, posts, footers and sidebar widgets to display the full schedule, specific days or widget.


Updating the schedule will automatically update in the content.
Order Type: Pickup, Delivery or Ship
↑ Back to topDefine the type of orders you will allow to be placed at checkout.

Customize the checkout labels for Pickup, Delivery, and Ship.
Business requirements
Set the business requirements that matter to your business by using preorder days, preorder restrictions, same day restrictions and minimum wait times to dynamically generate using smart scheduling time slots for customers to select at checkout.
Using Shipping Zones and Methods
To properly map pickup and shipping regions, this extension uses WooCommerce Shipping functionality. Under each tab Pickup and Delivery, you can define the Shipping Zones and Methods. Any Shipping Zones and Methods not mapped to Pickup or Delivery will be treated as a Ship option for the customer at checkout, if the option Ship is enabled.
To start, Shipping Methods need to be mapped to the Order Type of Pickup and Delivery. Mapping Shipping Methods will enable the options to display at checkout for customers to select based upon Shipping Zone matched.


As part of the setup process, you need to create Shipping Zones and Shipping Methods in WooCommerce. The extension uses these Shipping Methods to map the functionality at checkout for the order type.
Let us guide you on getting that setup.
The important thing to remember with WooCommerce is that i uses Best Match Shipping Zones when calculating the correct Shipping Zone. As a result, once a ZIP code is matched, all Shipping Methods within this zone are available to the customer to select.
As a result, we setup this Shipping Method configuration within the extension for Take-Out Delivery as a two step setup process.
Step: 1
For every shipping zone you set up, setup multiple shipping methods that can apply to each type. For example, let’s say Zone 1 includes the ZIP code 94123. If within this zone, you want to allow Pickup and Delivery when the ZIP code is a match to this zone, then add both Shipping methods: Local Pickup and Flat Rate Shipping Delivery.
Here is a quick sample video of how we’ve setup a zone with has a Pickup option, Delivery option and a Ship option for a specific set of zip codes.
https://www.loom.com/embed/7ebe45fdba8e49cfa75d6a323a83639a
Now, you can move to,
Step: 2
Map each shipping method to a specific Order Type. For this example, we will map the Shipping Method “Pickup & Take-Out” to the Pickup option. And we map the Shipping Method “Delivery by car” to the Delivery option. The other two options for Gift Certificate, we don’t map to a specific order type. Shipping Methods not mapped to an Order type of Pickup or Delivery will be available for the Ship type, if you have this enabled in the settings.
Here is a quick sample video of how we’ve mapped the Shipping Zone to both Order Types:
https://www.loom.com/embed/3637df4443c04b71a22e20f9ec41ae5a
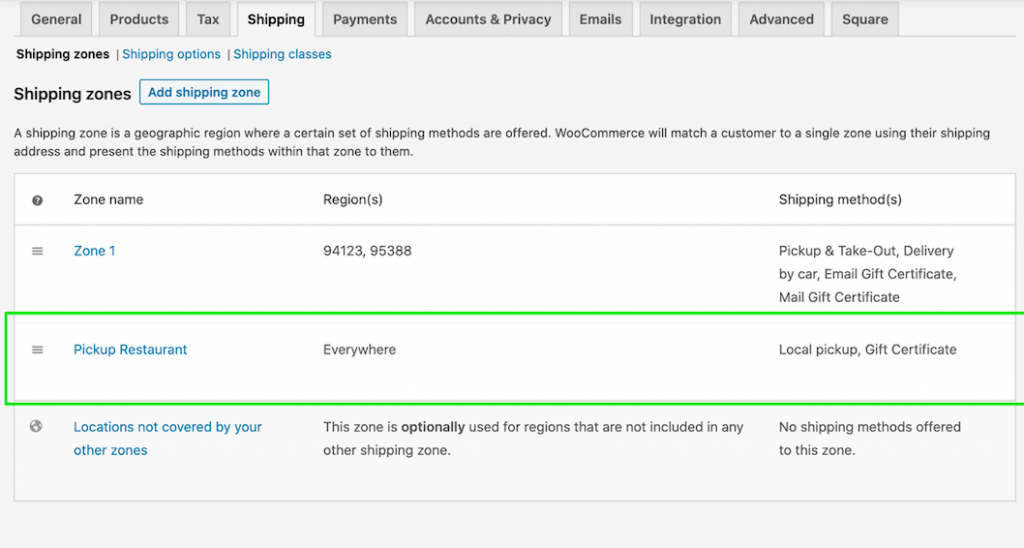
Note: You might notice under the Pickup Order type, we also had the Shipping method mapped as Pickup Restaurant. This shipping method is applied to Everywhere. This will allow any ZIP code input by the customer to allow a Pickup option at checkout.
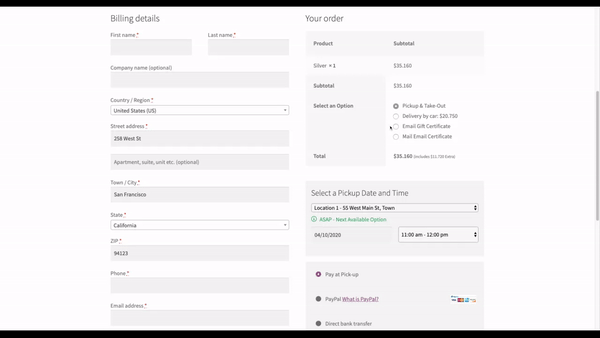
After these two steps, now the checkout functionality will work as you expect. For example, if zip code 94123 is set in Zone 1, the WooCommerce Best Match Shipping zone is found and both Pickup and Delivery are now showing as options to select.
https://www.loom.com/embed/d1e77fd49cf24fa597d5cacd3da985b4
Schedules for Pickup and Delivery
↑ Back to topYou can create unique schedules for Pickup and Delivery, plus you can create multiple pickup locations and delivery regions with their own unique schedules. To create a schedule, navigate to the Pickup and Delivery tabs and click on the day of the week to input the time periods.


Order Management for Pickup and Delivery
For each time period, you can define the time slot in minutes and the number of orders allowed in the time slot. This allows you to use our smart scheduling to automatically create time slots at checkout for the customer to select.

Checkout behavior
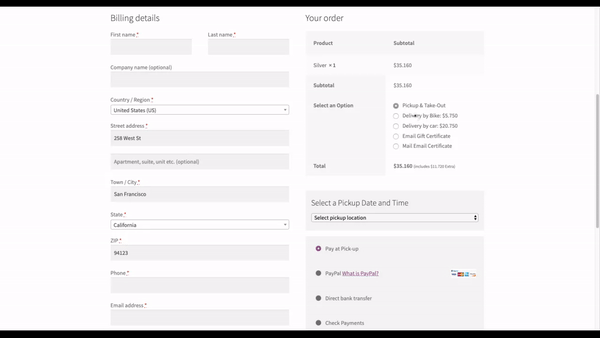
Now on checkout, once a Shipping Zone/Method is matched, the Pickup, Delivery or Ship options will be displayed to customers to select.
Next Available
Enabling the Next Available option under the Order Type settings, smart scheduling will automatically find the next available time slot to display the customer by default to selection. The customer can still change and select a different time slot if needed.
Order management
↑ Back to topOnce an order is placed, now under the Order list you can quickly see the order type: Pickup, Delivery or Ship details. Plus, you can sort and filter to make fulfillment easy.

Modify fulfillment information
Click on the order to edit and modify the fulfillment information after the order has been placed.

Fulfillment information is added as an order note for use with the WooCommerce mobile app.