PayPal Zettle is a complete point-of-sale solution that integrates with your WooCommerce store. Take payments in-store – cash, card, contactless, PayPal In-store, Apple Pay or Google Pay – and manage your inventory from one place.
Connect WooCommerce with PayPal Zettle to keep products and inventory in sync. Manage your in-store and online inventory from WooCommerce. Make a sale on either platform and your inventory will update instantly.
The PayPal Zettle POS for WooCommerce provides the following benefits:
- Connect in minutes – Connect your accounts, sync your library to PayPal Zettle and start selling.
- Export a collection or all of your products from WooCommerce to your PayPal Zettle product library.
- Manage products in one place and automatically synchronize all changes you make from WooCommerce to PayPal Zettle.
- Automatically synchronize stock amounts in real-time between WooCommerce and PayPal Zettle.
- Explicitly select products to be excluded from synchronising to PayPal Zettle.
Requirements
↑ Back to topTo install and use the PayPal Zettle POS for WooCommerce you will need:
- An installed version of WordPress >= 5.4
- An installed and activated version of WooCommerce >= 4.3
- PHP version >= 7.2
Installation
↑ Back to topAutomatic Installation
↑ Back to topThis is the easiest way to install the PayPal Zettle POS for WooCommerce.
- Log into your WordPress installation.
- Go to the menu item Plugins → Add new
- Search for PayPal Zettle POS for WooCommerce. In case several plugins are listed, check if Inpsyde is the plugin author.
- Click on Install now and wait until WordPress says the plugin was installed successfully
- You can activate the plugin immediately by clicking on Activate now on the success page. If you want to activate it later, you can do so via Plugins → Installed Plugins
Manual Installation
↑ Back to topIn case the automatic installation does not work, download the plugin from here.
Unpack the archive and load the folder via FTP into the directory `wp-content\plugins` of your WordPress installation.
Go to Plugins → Installed Plugins and click Activate on PayPal Zettle POS.
Access and configuration
↑ Back to topBe sure to first check your tax and currency settings before synchronize your product library.
This can possibly avoid issues that prevent all or some products or the prices from synchronizing because of setting differences between WooCommerce and Zettle. For more details, go to this section.
- After you have activated the PayPal Zettle POS for the WooCommerce plugin, go to WooCommerce → Settings.
- Select the PayPal Zettle POS tab.
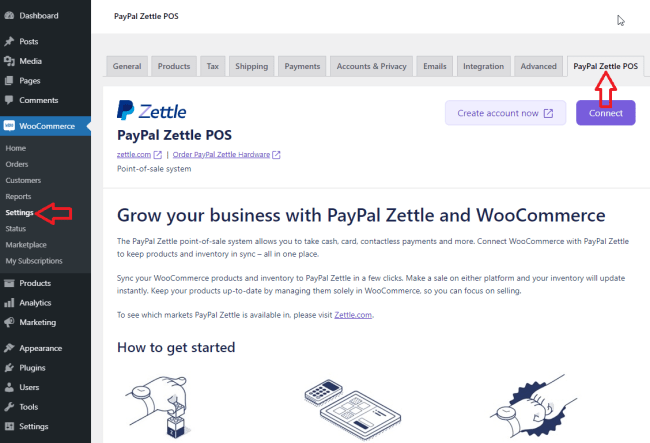
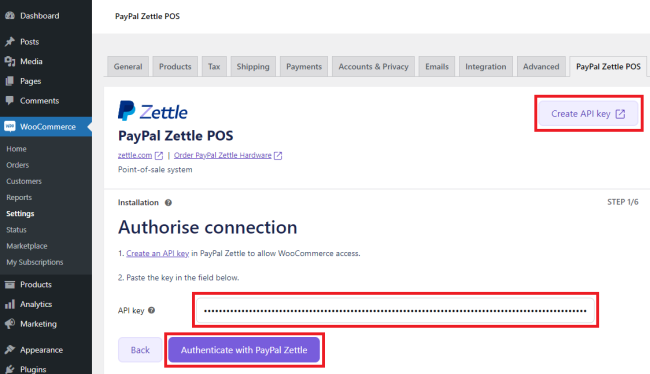
- If you don’t have a PayPal Zettle merchant account yet, choose the option Create account now and follow the steps to create a new PayPal Zettle account.
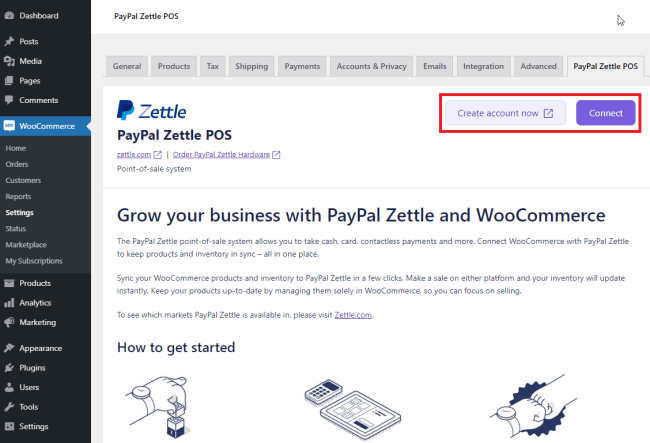
- On the PayPal Zettle POS tab choose Connect – this will open a page in PayPal Zettle asking you to confirm permissions for the plugin to access your PayPal Zettle account data.
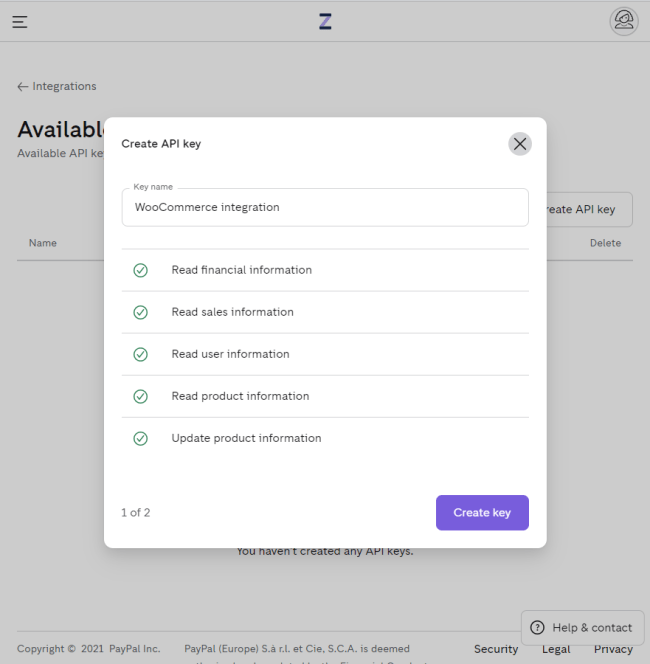
- Confirm the permissions request by clicking on Create API key.
- Copy the generated API Key and return it to the PayPal Zettle POS tab in WooCommerce.
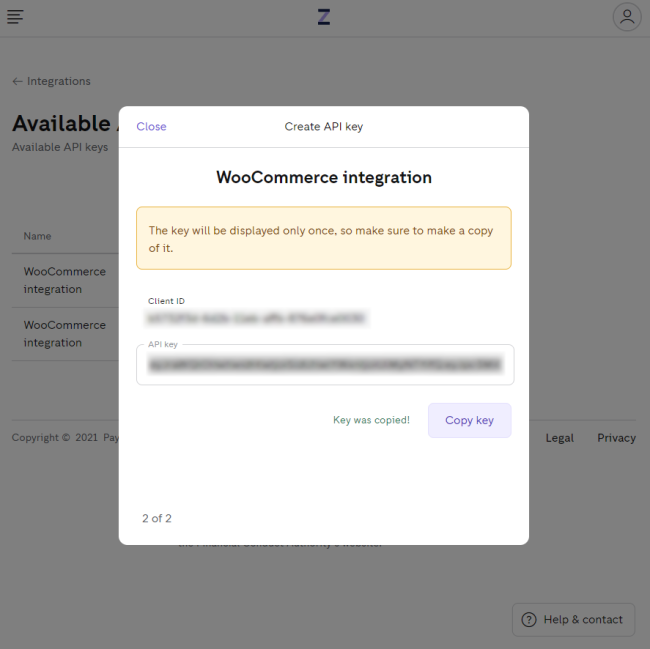
- Paste the copied API key into the API key input field and click Next.
- Click on Authenticate with PayPal Zettle.
- Click Next.
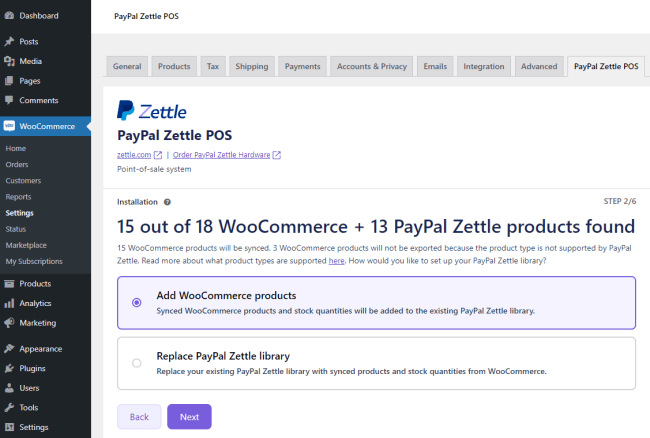
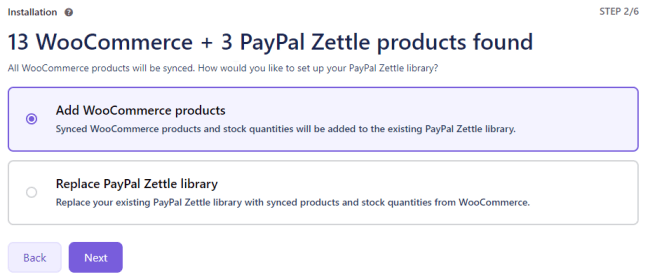
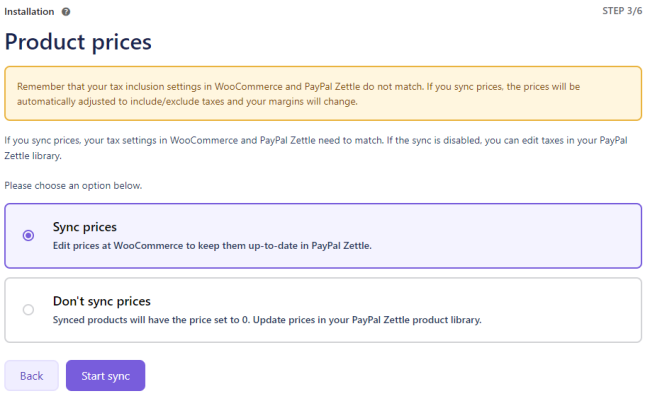
Be aware that his choice will decide if your existing Zettle library will be replaced/deleted (“overwrite PayPal Zettle library”).
If you are not sure about this option, you might want to make a backup of your library before you continue.
- Choose the required option and click on Start sync.
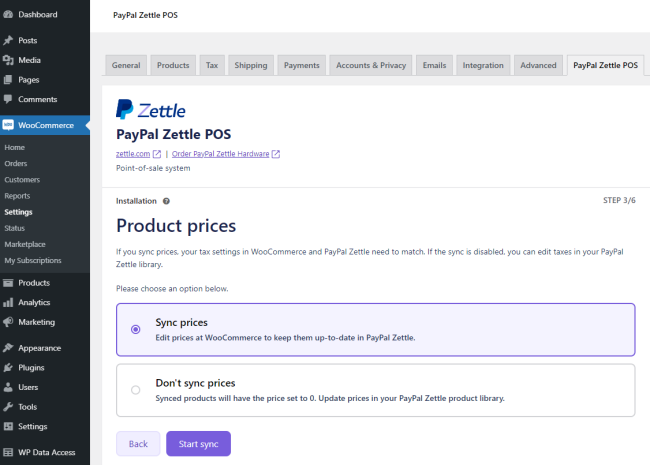
Read carefully the notice on this page, because this can prevent the prices from being synchronized.
The possible notice here will guide you to the cause for the prices not syncing.

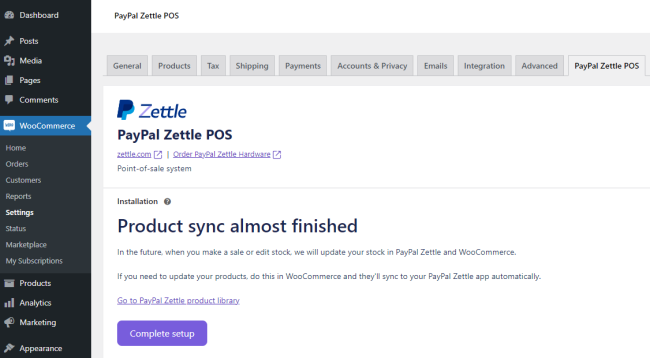
- Once the initial synchronization is complete click on Complete Setup.
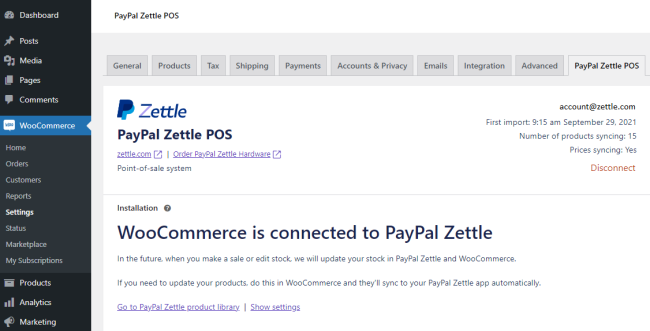
What changes should you see after installation?
↑ Back to topWhen you have installed the plugin and linked onboarded your account you will see the following functionalities to be added:
- The product overview page will have an additional status bar called “Zettle Status”, which will show if a product has been synchronized and if not, what the reason is for this.

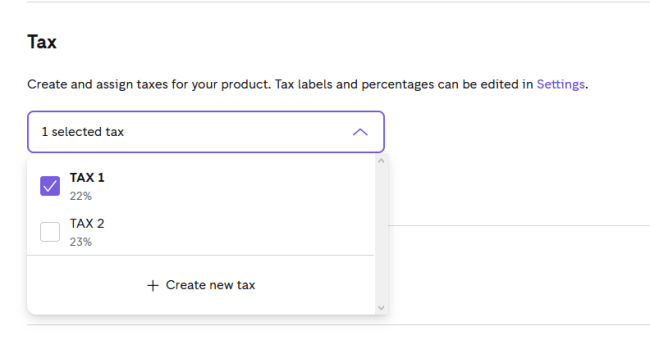
- Every synchronized product will have an additional tab called “PayPal Zettle POS”, where you will be able to exclude products from synchronizing to your Zettle library and add the barcode.

- Zettle logs will be added to WooCommerce > Status > Logs:

These logs can be found in WooCommerce > Status > Logs > select “zettle-pos-integration-[…]” in the dropdown and click on view.
Configuration
↑ Back to topSetting up taxes
↑ Back to topSetting up taxes and tax rates is one of the first tasks you would want to perform before syncing with your PayPal Zettle account. Keep in mind that tax settings both in WooCommerce and PayPal Zettle need to match for syncing and for the payments to work properly.
To specify taxes for a purchase, you will need to follow the below steps:
- Enable taxes in WooCommerce, to begin with.
- Enter in which country you are selling – every country has its own tax rates.
- Set the currency used for purchases in your store.
- Specify details on how taxes will be entered in the future: including or excluding tax for example.
Enabling taxes
- Go to: WooCommerce > Settings > General.
- Select Enable Taxes and Tax Calculations checkbox.
- Save changes.
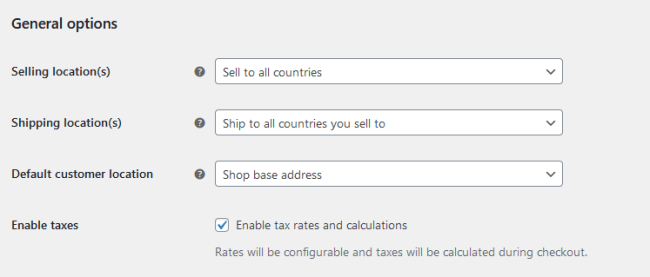
When this is active, tax calculations can be made and configured in WooCommerce. When not, product prices will be displayed as they are, and no calculation will be done at checkout.
Store address
↑ Back to top- Go to: WooCommerce > Settings > General.
- Select Country / State.
- Save changes.
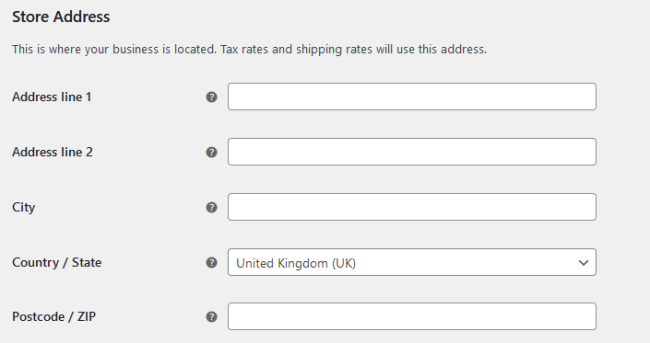
Country / State is important for information where the store is located and for which country we calculate tax.
Currency
↑ Back to top- Go to: WooCommerce > Settings > General.
- Select Currency.
- Save changes.
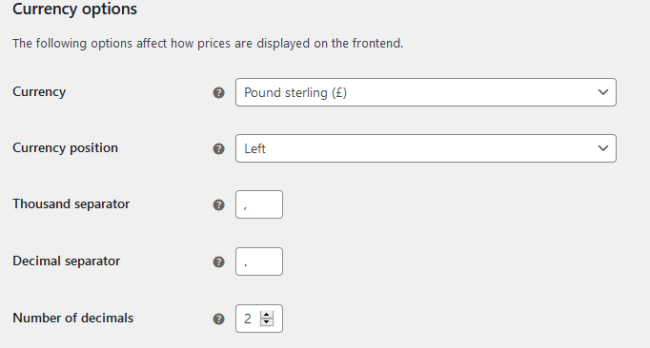
The currency that the shop uses
Configuring tax options
↑ Back to topTo start configuring taxes:
Go to: WooCommerce > Settings > Tax. This tab is only visible if taxes are enabled.
The Tax tab displays several options that can be set to suit your needs — the settings you choose are based on the tax jurisdiction under which your store is located.
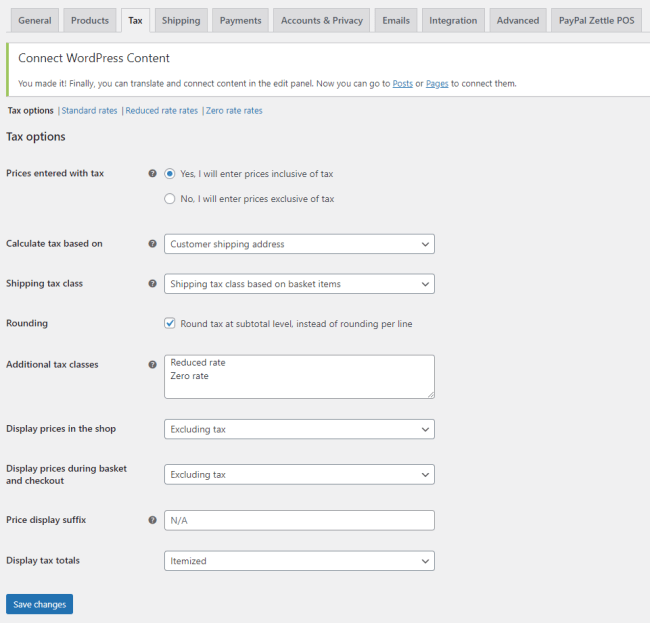
Prices entered with tax
↑ Back to topThis option is perhaps the most important when managing taxes, as it determines how you input product prices later on.
- “Yes, I will enter prices inclusive of tax” means that all catalogue prices are input using your store’s base tax rate.
You have to change the Display prices in the shop and Display prices during cart and checkout options to Include tax from the drop-down. When you decide to show a price inclusive of taxes, the price of the selected product will appear with the tax on the Cart page.
Similarly, this will reflect on the Checkout page.
The total amount on the Checkout page under the Your Order section also shows the tax amount included.
The tax calculation for tax-inclusive prices is:
tax_amount = price – ( price / ( ( tax_rate_% / 100 ) + 1 ) )
- “No, I will enter prices exclusive of tax” would mean that your catalogue prices need to be tax exclusive.
Also, you have to change the Display prices in the shop and Display prices during cart and checkout options to Exclude tax from the drop-down. When you decide to show the price exclusive of taxes, the price of the selected product will appear excluding the tax and the tax will be added separately in the Order Total on the Cart page.
Similarly, this will reflect on the Checkout page.
The total amount on the Checkout page under the Your Order section also shows the tax amount calculated separately.
The tax calculation for tax-exclusive prices is:
tax_amount = price * ( tax_rate_% / 100 )
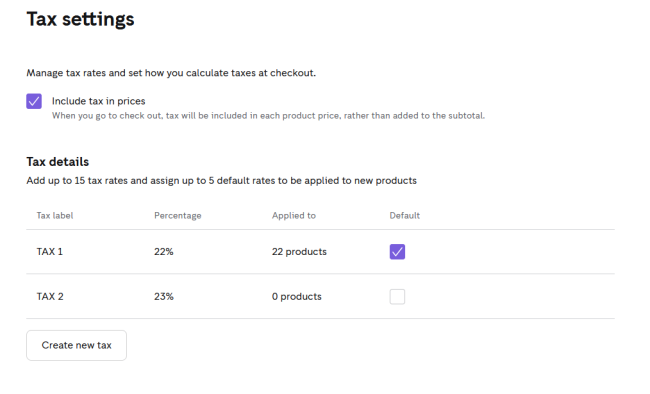
Tax Classes and Lists
↑ Back to topTax classes are assigned to your products based on a Country. Currently, we do not synchronize US tax rates.
Each class is listed at the top of the tax settings page – click a class to view tax rates assigned to the class.
Each tax class that has been assigned to a product needs to have a correlated entry/row in the tax class rates. If the product refers to an “empty tax class” it will result in the product not synchronizing and causing errors in the logs.
If a product has got a “Tax Class” assigned to it, you need to make sure that this tax class has been correctly configured in WooCommerce > Settings > Tax > “Tax Class”
If there is no entry under this tax class you need to add an entry by pressing “Insert row” and adding the details that are needed for your setup. The end result of a minimal tax class setup should look something like this:

Product Tax status and class
↑ Back to top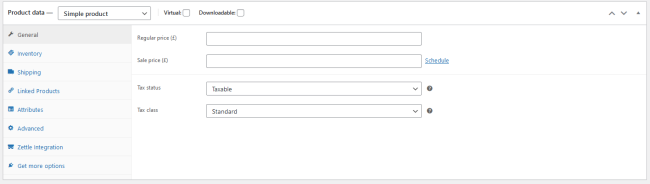
- Tax status defines whether or not the entire product is taxable or just the cost of shipping it.
- Tax class is used to apply the different tax rates specific to certain types of products.
For a Variant Product, to be able to synchronize the product, each variation must have the exact same tax class.
VAT and sales tax
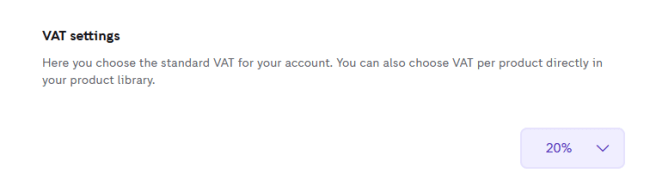
↑ Back to topAccount Information such as country, currency and tax define if the PayPal Zettle account is set to use VAT, sales tax or no tax is applied to all product prices. It also defines if a product’s prices are to be considered including or excluding taxes.
Depending on the PayPal Zettle merchant’s account country, different options are available for handling sales tax and VAT rates for products in the PayPal Zettle Product Library.
Also depending on the merchant’s PayPal Zettle account properties and settings, a product’s price values set in the PayPal Zettle Product Library may either include or exclude taxes (gross/net values). A correct net or gross price value must be used when creating products in the PayPal Zettle Product Library, and a merchant is warned about any inconsistencies between the WooCommerce and the PayPal Zettle account’s tax handling that may affect the merchant. Some of the PayPal Zettle account’s tax settings can be adjusted by the merchant and may therefore change over time (e.g. the gross/net setting for US accounts).
No tax account
If the merchant’s PayPal Zettle account does not support any taxes, no additional information needs to be provided when creating products in the PayPal Zettle Product Library.
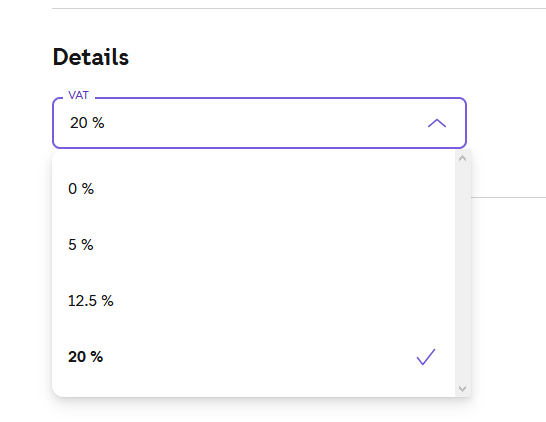
VAT account
In VAT countries, the products in the PayPal Zettle Product Library must set the VAT percentage value to either zero or to a valid VAT rate of the merchant’s country. Trying to submit an invalid VAT percentage value will result in an error of type VAT_NOT_ALLOWED_IN_COUNTRY in WooCommerce log files.
Sales tax account
In countries using sales tax, a PayPal Zettle merchant will be able to set up multiple sales tax rates in the PayPal Zettle Back-office. The merchant can mark one or multiple of the created sales tax rates as “default” to be assigned automatically to newly created products in the PayPal Zettle Back-office.
TAX global settings
TAX settings on the product level
Assigning Default Sales Tax Rates
Enable the Default checkbox when creating a new product in the PayPal Zettle Product Library to have the merchant’s default tax rates assigned to the product.
Tax-Exempt Products
A product in the PayPal Zettle Product Library can be marked to be exempt from sales taxes by setting the optional checkbox enabled. Note that this setting is independent of the sales tax rates that are applied to the product: regardless of the assigned sales tax rates, no tax rates will be applied to this product’s price for purchases.

PayPal Zettle POS for WooCommerce general workflow and checks for tax
↑ Back to topIn step 3 of the onboarding process, we check if the settings in PayPal Zettle and WooCommerce match.
- If the country and currency do not match you will not be able to sync prices.

- If the country and currency match, but tax rates and calculations are disabled, then you will not be able to sync prices.
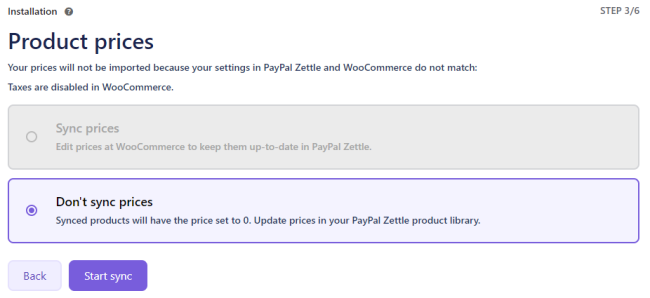
- If the country and currency match, tax rates and calculations are enabled and prices entered with a tax match, you will be able to sync prices and tax.
- If the country and currency match, tax rates and calculations are enabled, but prices entered with tax do not match, you will be able to sync prices, but the prices will be automatically adjusted to include/exclude taxes and your margins will change.
Syncing is available only for simple and variant products. Note that for a variant product, the same tax must be set for each variant to be able to sync the product.
Barcodes
↑ Back to topHow to use barcodes
↑ Back to topPayPal Zettle POS for WooCommerce supports a barcode reader. Product barcodes can be used for scanning products on the point of sale system so you don’t require to search for them, but find them directly. That is why you can add the barcodes in the PayPal Zettle POS integration for WooCommerce to sync them with the PayPal Zettle product library.
The barcode reader is available for Simple and Variable products.
How to use a barcode reader with a simple product?
↑ Back to topThere are two ways of synchronizing the barcode between WooCommerce and PayPal Zettle for simple products.
The first way is:
- Create a simple product or edit an already existing one.
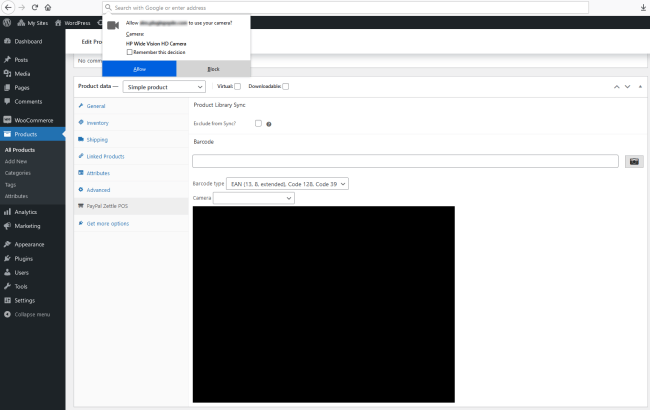
- Navigate to the PayPal Zettle integration tab from the Product Data section.
- Click the barcode input field and input the desired barcode.
- Click Update.
The second way is:
- Create a simple product or edit an already existing one.
- Navigate to the PayPal Zettle integration tab from the Product Data section.
- Click the camera button.
- Select Barcode type.
- Select Camera and allow it in your browser.
- Scan the barcode with your camera.
- Click Update.
Supported Barcode types are:
- EAN (13, 8, extended), Code 128, Code 39). Set as Default.
- Code 128
- Code 39
- Code 39 VIN
- EAN – 13
- EAN extended
- EAN – 8
- UPC – A
- UPC – E
- Codebar
- I2 of 5
- Standard 2 of 5
- Code 93
Supported cameras: Multi option.
How to use a barcode reader with a variable product?
↑ Back to topThere are two ways of synchronizing the barcode between WooCommerce and PayPal Zettle for variable products.
The first way is:
- Create a variable product or edit an already existing one.
- Navigate to the Variations tab from the Product Data section.
- Click the barcode input field and input the desired barcode.
- Click Update.
The second way is:
- Create a simple product or edit an already existing one.
- Navigate to the Variations tab from the Product Data section.
- Click the camera button.
- Select Barcode type.
- Select Camera and allow it in your browser.
- Scan the barcode with your camera.
- Click Update.
Supported Barcode types are:
- EAN (13, 8, extended), Code 128, Code 39). Set as Default.
- Code 128
- Code 39
- Code 39 VIN
- EAN – 13
- EAN extended
- EAN – 8
- UPC – A
- UPC – E
- Codebar
- I2 of 5
- Standard 2 of 5
- Code 93
Supported cameras: All web browsers supported cameras.
Reminder: when scanning the Barcode, it must be in the complete camera window so that it will be detected correctly.
Often issues are experienced while the distance between the bars of the barcode is not detected by incorrect usage of the camera.
How to use barcodes from other plugins?
↑ Back to topWe provide the below WordPress filters which allow you to change how barcode values are retrieved. You can choose from where:
- zettle-pos-integration.barcode.value – accepts WC_Product ( which can be a simple product or variation ), returns barcode value ( string ).
- zettle-pos-integration.barcode.standard-input-ui-enabled – return false to hide our barcode input UI.
The filters can be added at any time before the WordPress init hook is triggered with priority 10.
Example using the GTIN field from a Germanized plugin:
add_filter('zettle-pos-integration.barcode.value', function (string $barcode, \WC_Product $product): string {
    return $product->get_meta('_ts_gtin');
    }, 10, 2);

add_filter('zettle-pos-integration.barcode.standard-input-ui-enabled', '__return_false');
Frequently Asked Questions
↑ Back to topHow can I see why products are not being synced?
↑ Back to topIn your product list “All Products” you will find a column called PayPal Zettle Status which displays information about the product sync for each product.
This column can be disabled via Screen Options.

When your products are not synced, you should find more information about what happened in the PayPal Zettle log files. You can find the PayPal Zettle log files here:
WooCommerce -> Status -> Logs -> select “zettle-pos-integration[…]” in the dropdown menu on the right side
Which product prices will be synchronized?
↑ Back to topThere may be different currency and tax settings in PayPal Zettle and in WooCommerce.
In PayPal Zettle, all product prices are including tax. In WooCommerce, it depends on the configuration. For this reason, you can only synchronize prices when the currency and country settings are the same on both ends. During the initial setup, the Zettle plugin will check if the currency and country settings are matching. When there is a difference between the tax/currency settings of WooCommerce and PayPal Zettle, the price will most likely not synchronize.
The tax percentage can only be synchronized when the settings between PayPal Zettle and WooCommerce match, otherwise you will see an error message in the log or during the onboarding process.
Also, variable WooCommerce products with different tax rates in the variants options can’t be synchronized because of limitations on PayPal Zettle products.
Regarding sales prices: the current selling price of the product will be synced including tax settings. The price that is active on WooCommerce (normal or Sales) will be synchronized to Zettle and will change back when the sales period ends.
How long will it take for changes and updates to be synchronized?
↑ Back to top- Updates to product information will be synced from WooCommerce to PayPal Zettle immediately upon updating the product in WooCommerce.
- Updates to inventory data will happen in real-time in both directions.
- The only delay that we have encountered is a delay caused by the performance of the hosting server.
When does the sync take effect?
↑ Back to topThe stock sync will happen almost in real-time, either with webhooks coming from PayPal Zettle or when the stock changes in WooCommerce. The product information will be synced from WooCommerce to PayPal Zettle immediately upon updating the product in WooCommerce.
Which product types are supported by the PayPal Zettle POS for WooCommerce?
↑ Back to topSimple & Variable products are supported for synchronization with PayPal Zettle.
I activated inventory tracking in PayPal Zettle and it did not activate in WooCommerce, why?
↑ Back to topYou have to activate inventory tracking in WooCommerce.
I deleted all variations from a variable product and now it doesn’t show on PayPal Zettle anymore. What is wrong?
↑ Back to topThis is expected behaviour. A variable product without any variations is not valid for sale in WooCommerce and therefore will not sync to PayPal Zettle. In a similar way when you have a variable product and delete its last variations, the product will be removed and disappear from the PayPal Zettle library.
Can I use “any” variations and discrete variations within the same product?
↑ Back to topNo. If you are using “any” variations you should only use those. If you are using discrete variations you should only use discrete variations.
How can I enable the synchronization of product images to PayPal Zettle when while running on a local computer?
↑ Back to topIf you are running your installation on a local instance (the URL in your browser typically starts with “127.0.0.1” or “localhost”), synchronization of product images with PayPal Zettle will not work correctly as your local installation is not reachable for PayPal Zettle’s systems.
For testing, you can enable sending placeholder images to PayPal Zettle by adding the following lines to your wp-config.php:
putenv('ZETTLE_PLACEHOLDER_IMAGES_ENABLED=1');

$_ENV['ZETTLE_PLACEHOLDER_IMAGES_ENABLED'] = 1;

$_SERVER['ZETTLE_PLACEHOLDER_IMAGES_ENABLED'] = 1;
Can I run the PayPal Zettle POS for WooCommerce on my local computer?
↑ Back to topIf you are running your installation on a local instance (the URL in your browser typically starts with “https://127.0.0.1” or “localhost”), some synchronization features will not work correctly as your local installation is not reachable for PayPal Zettle’s systems. For example, the synchronization of inventory data will not work correctly and you will not receive any updates to stock data from PayPal Zettle.
What are the requirements for WooCommerce products to be synchronized with PayPal Zettle?
↑ Back to topRequirements for all product types:
- Product status is published.
- Catalog visibility is not hidden.
- Visibility is public.
- The site needs to be secure (SSL & HTTPS). More details are found here.
- The product is not explicitly excluded from being synchronized to PayPal Zettle (Product Editor → Product Options → PayPal Zettle POS: checkbox Exclude from Sync? not checked).
- The tax class assigned to the product has been configured in the WooCommerce tax settings. The Country code assigned to the tax class must be a valid one. We advise using the drop-down for avoiding issues (f.e. using UK, instead of GB).
- The product description is limited to 1024 characters; when this amount is breached the product will not sync and an error message will show up in the plugin logs.
Requirements for Simple product type:
- Has a price set.
Requirements for Variable product type:
- The product needs to have at least 1 variation that is purchasable (e.g. the variation needs to have a price set).
- The variable product has no more than three variation attributes set.
- For synchronization incl. price the tax setting must be the same for all variants.
- The product has no more than 99 variations created.
How can I check if the webhooks are functional/established?
↑ Back to topFor most of the issues, you encounter you should always check if the webhooks are established and working. You can do this by deactivating and activating the Zettle plugin and checking if the 4 lines of code have been added to the PayPal Zettle logs. The PayPal Zettle logs can be found here:
WooCommerce > Status > Logs > select “zettle-pos-integration-[…]” in the dropdown and click on view. The added lines of code should look like this:
2021-08-25T11:53:38+00:00 DEBUG Added 1 jobs to the queue
2021-08-25T11:53:40+00:00 INFO Received Webhook: TestMessage
2021-08-25T11:53:40+00:00 DEBUG Executed Job ‘webhook-registration’ with ID 23.
2021-08-25T11:53:40+00:00 DEBUG Removed 1 jobs from the queue
What items are synchronized and in what direction(s):
↑ Back to top- Product name – Only from WC to Zettle
- Product Price – Only from WC to Zettle
- Stock – synchronizes in both directions
- SKU – Only from WC to Zettle
- Barcode – Only from WC to Zettle.
The stock synchronization is not working in the direction from Zettle to WooCommerce. What can I do?
↑ Back to topThis issue can have 3 different causes and solutions, all are explained below. However, the first thing I would advise you to do is to make sure you can manually reproduce the issue by manually adjusting the stock in the Zettle web interface and checking that it doesn’t get updated on WooCommerce. This is in order to test and confirm the possible causes & solutions.
- The website URL was changed and the calls from Zettle do not reach the WordPress website – Deactivate and activate the Zettle plugin, this could reset the URL and resolve the issue. However, it could be required to reset the Zettle store and onboard the Zettle account to get this corrected.
- Plugin conflict – You may want to perform a full conflict test to rule out eventual issues with the theme or a different plugin. We recommend temporarily activating the default theme Storefront and disabling all other plugins except for WooCommerce and Zettle to see if the behaviour persists. Here is a guide that explains the steps in more detail: How to test for conflicts.
- Security measures block the stock sync communication – Any installed security plugin would already be excluded by the previous test, so the only security/firewall that needs to be investigated is the one managed by your hosting partner. For this, you need to reach out to them and ask them if they are possibly blocking the JSON webhooks that are required for the stock updates. We are hearing that the hosting partner firewalls are sometimes blocking these requests since they are interpreted as DDOS attacks and block the phpflood that is being seen. Sometimes the hosting server’s firewall can block the communication from Zettle to WooCommerce. You can contact the hosting partner and check if the API is being blocked from these URLs: https://products.izettle.com/ & https://oauth.zettle.com/
The stock updates are done incorrectly and seem to be multiplied. What can cause this?
↑ Back to topThis would also most likely be caused by another plugin. Again you would need to do Conflict Testing as written above. It could also be caused by a PayPal Zettle server issue, you can check for this type of issue here.
How can I switch from another Zettle plugin to this plugin?
↑ Back to topIn order to switch from another plugin to our plugin, you might want to remove the products from our Zettle library so that you can create new ones in order to link them from the WooCommerce library. When you onboard our plugin without removing the products in Zettle, you will have the WooCommerce products duplicated in your Zettle library. During the onboarding process, the plugin will generate the UUID which links the products from both sides to each other. If this step is not done, there is no possibility to link the products to each other.
There is no option to use the synchronization from the other Zettle plugin with our plugin since they do not have the same process using the UUID as we do.
How do I get the system report and logs?
↑ Back to topThese log files can be found here:
- System report: WooCommerce > Status > Get system report > Copy for support
- Logs: WooCommerce > Status > Logs > select “zettle-pos-integration-[…]” in the dropdown and click on view.
These details are often required when you require additional assistance from the support team for this plugin.
How do I get the products to sync when I do not use taxes?
↑ Back to topWhen you are not using taxes, you cannot disable the taxes in WooCommerce, because this will block the products from synchronizing. Instead, you should set up the tax class with 0 for “Rate %” and set Zettle VAT settings to 0%. This way the synchronization should work as intended.
What images can be synchronized?
↑ Back to topAt the moment, only the image types JPEG, PNG, GIF and TIFF are possible to be transferred. If you are using newer image types like WebP, your images will currently not be synchronized to your Zettle library.
What are the maximum characters that can be use for a product?
↑ Back to topThe product title is the only item that gets synchronized to Zettle and cannot be longer than 256 characters. The description is not synchronized, so it can be as long as WordPress allows it to be.
Can I use multilingual plugins together with PayPal Zettle POS?
↑ Back to topWhen you use a multilingual plugin (like MultilingualPress or WPML), the plugin will create duplicate instances of the products on the WordPress database. This in turn will generate additional products in the translated language on the Zettle library and will avoid the purpose of our plugin, because your entire library will be duplicated on Zettle. Currently, there is no fix for this situation, so we would suggest to only use one of the 2 at the same time to avoid problems.