NOTE
This product is no longer available on WooCommerce.com. This document has been left available for existing users, but will no longer be updated.
1. Features
↑ Back to topPerfect WooCommerce Brands is a free plugin that allows you to add brands to your products.
- Assign brands to your products.
- Add a banner to the brands’ attribute page.
- Add a link to each brand page.
- Supports visual composer.
- Widgets to display brands as a dropdown.
- Show brands as a list (brand names or brand logos).
- Filter products by brand.
- Display brands in product loops.
1.2. Shortcodes
Perfect WooCommerce Brands includes a set of shortcodes that allows you to display all the brands and products in various formats. This plugin offers several shortcodes to:
- Display all brands.
- Display brands carousel.
- Show product carousel by brand.
- Display brands for a specific product.
- A-Z Listing.
2.1. Brands
↑ Back to topOn this page, you will find all the brands listed.
To change the plugin configuration, go to WooCommerce > Settings > Brands.
There, you will find the General, Brand page & Loops, and Developer tabs.
Continue reading to learn more about each one of them.
2.2. General tab
↑ Back to topHere you can customize:
– Slug: This slug will be used in the URL of the brand page.
– Brand logo size: Size to display the logo in your store.
– Brands page: If you need to change the brands’ page link, select an existing page from the dropdown.
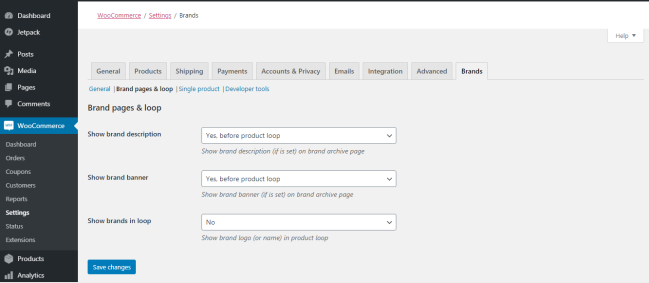
2.3. Brand page & loop tab
↑ Back to topHere you can customize:
– Show brand description: Allows you to display the description you have entered in the brand editor as the header of the brand page. You can display it before or after the product or hide it.
– Show brand banner: Display the banner image uploaded in the brand editor in the brand page header.
– Show brands in a loop: Display the brand’s link or logo in the product loop.

2.4. Developer tools tab
↑ Back to top– Import brands: You can import brands’ data used in other plugins.
– Dummy data: The import dummy test option will upload a list of brands and assign them to random products.
– System status: Displays the current status of the system.
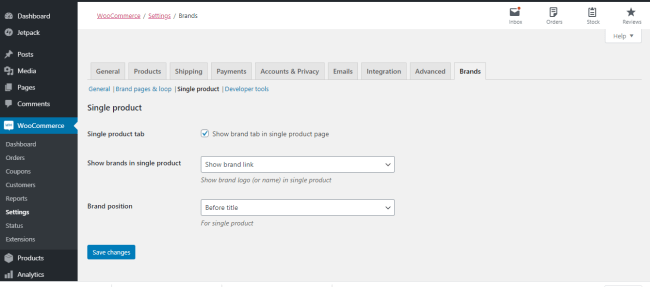
2.5 Single product tab
↑ Back to topFirst, go to WooCommerce dashboard > Settings > Brands to access the plugin configuration.
Under the Single Product section, you will find different options to:
1. Display a brand on a product page.
2. Select alternatives for Brand information, as a link or image.
3. Where to display the brand.

3. Brands
↑ Back to topLearn how to create brands and assign products to different brands.
3.1. Brand Creation and Edition
↑ Back to topTo create a new brand or edit an existing one, access the brand editor page in Products > Brands.
Then, add or edit the name, slug, description, logo, banner, and link of each brand.
On the left side, you will see the available Brands and the fields to add new ones.
Under the list of available Brands, you have two buttons to Export and Import all the information regarding Brands you have created on other sites.
How to import brands from another site?
1. Go to the site that you want to get the Brands list from, and click the Export button.
2. A JSON file called brands.json will be automatically generated.
3. Go to the site where you want to import your brands and import the file you have just downloaded.
4. Once the upload finished, you will see all the imported brands on your site. You can use them as they are or edit them.
3.2. Brand Usage
↑ Back to topAdding brands to products
To display brands in the products page, you need to attach a product with its brand when editing a product.
To do that:
1. Go to the single product editor page.
2. Find the Brands Metabox in the sidebar.
3. Check the brand (you can also create a new brand here).