Install the WooCommerce login with mobile number plugin and allow your customers to register and login into your online store directly with their mobile phone number.
- Download Registration & Login with Mobile Phone Number and have your .zip file
- At the WordPress admin panel, go to the Plugins section, and click ‘Add New’ to upload and install the WooCommerce force login before checkout plugin you just downloaded from WooCommerce.
- Upload the .zip file to proceed with the installation.
- Wait until the plugin installs. After successful installation, activate the plugin, and move on to configuration settings.
First of all you need to create account on
Google Firebase at
here and create the app there. Watch this video on
How to Create App on Google Firebase Console .
At the admin panel
WooCommerce > Settings and click
Login with Phone. Here you find multiple tabs i.e.
: General, Firebase, Labels & Fields, and
Messages.
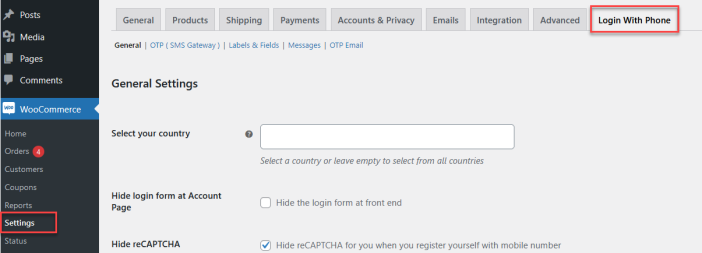 Click on the General tab here you can configure the following settings of the WooCommerce checkout login plugin.
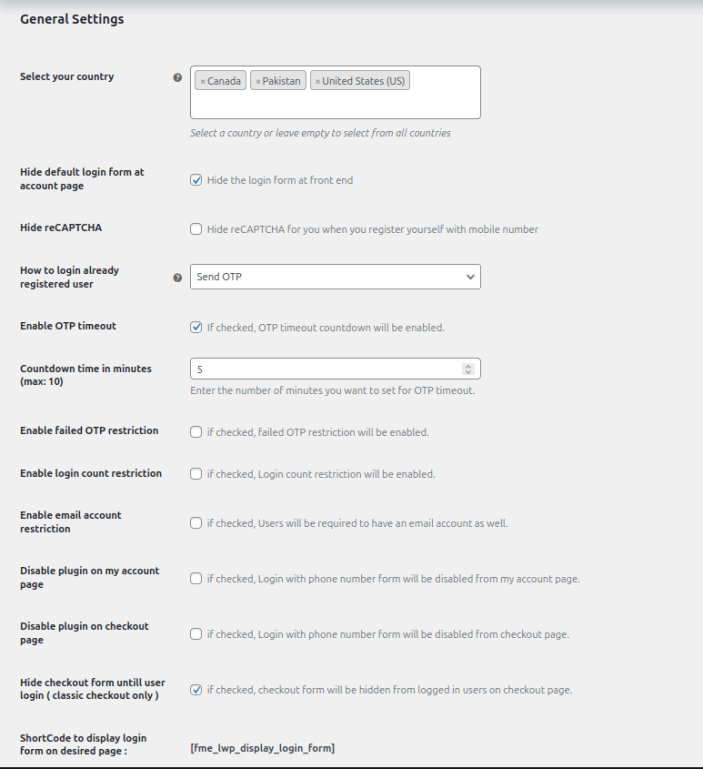
- Select your Country (Select countries you want to enable login with your phone number and leave it empty to allow all the countries)
- Hide Default Login form at Account Page (Check this to hide the default login form on the account page)
- Hide reCAPTCHA (Option to disable reCAPTCHA for customers during login with phone number)
- How to Login Already Registered User (Choose how already registered users can log in) You can choose from the following options:
-
-
- Send OTP
- Show Password Field
- Enable OTP Timeout (Check this to enable the OTP timeout countdown)
- Enable Failed OTP Restriction (Select this to enable failed OTP restriction)
- Enable Login Count Restriction (Check this field to enable login count restriction)
- Enable Email Account Restriction: (if checked, Users will be required to have an email account as well, first time only)
- Disable Plugin on my account page: (Option to disable login with phone plugin on my account page)
- Disable Plugin on Checkout Page: (Option to disable login with phone plugin on checkout page)
- Hide checkout form untill user login (Classic Checkout only): If checked, checkout form will be hidden from logged in users on checkout page.
- Short Code to display login Form on Desired Page: (Use this short code to display login form on any desired page)
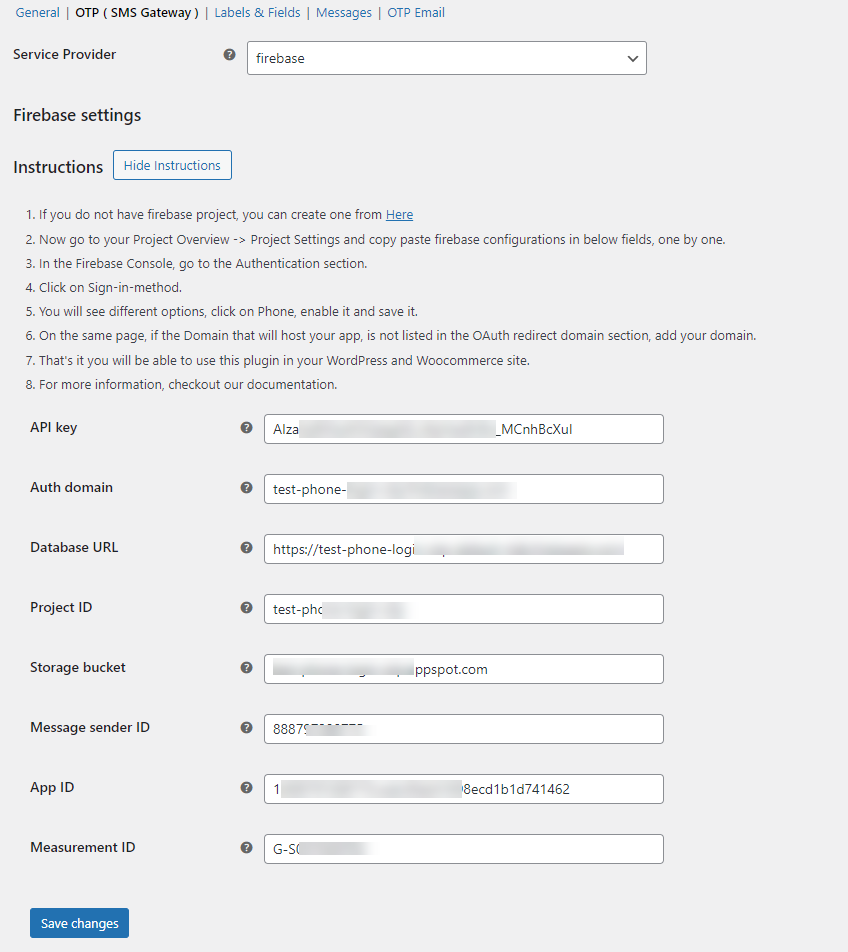
After configuring the
general settings, click on the
OTP (SMS Gateway) tab to configure the following.
Firebase settings:
- API key: (Enter the API key here which you have got from Firebase account)
- Auth Domain:(Enter the Auth Domain here which you have got from Firebase account)
- Database URL: (Enter the Auth Domain here which you have got from Firebase account)
- Project ID: (Enter the Project ID mentioned on Firebase account)
- Storage Bucket: (Enter the Storage Bucket from Firebase account)
- Message Sender Id: (Enter the Project ID from Firebase account)
- App Id: (Enter the App ID here which you have got from Firebase account)
- Measurement Id: (Enter the Measurement ID here which you have got from Firebase account)
MSG91 Settings:
- MSG91 authkey: (Enter the MSG91 authkey here which you have got from MSG91 account)
- MSG91 OTP Template ID: (Enter the MSG91 OTP template ID which you created in your MSG91 account in OTP template section)
- MSG91 OTP resend timeout in seconds: (Enter the time in seconds to resend OTP after timeout)
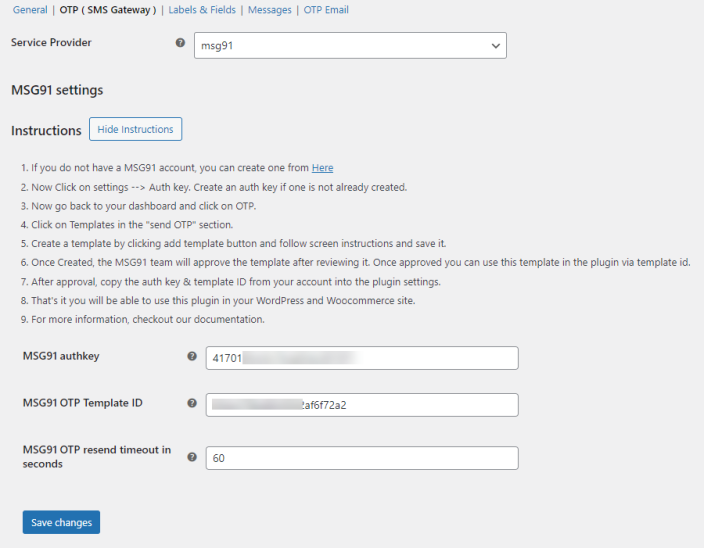 Instructions (MSG91):
- If you do not have a MSG91 account, you can create one from
- Now Click on settings –> Auth key. Create an auth key if one is not already created.
- Now go back to your dashboard and click on OTP.
- Click on Templates in the “send OTP” section.
- Create a template by clicking add template button and follow screen instructions and save it.
- Once Created, the MSG91 team will approve the template after reviewing it. Once approved you can use this template in the plugin via template id.
- After approval, copy the auth key & template ID from your account into the plugin settings.
- That’s it you will be able to use this plugin in your WordPress and Woocommerce site.
- For more information, checkout our documentation.
- Twilio Account SID: (Enter the Twilio Account SID from your Twilio account)
- Twilio Auth Token: (Enter the Auth Token from your Twilio account)
- Twilio Service ID: (Enter the Service ID from service created in your Twilio account)
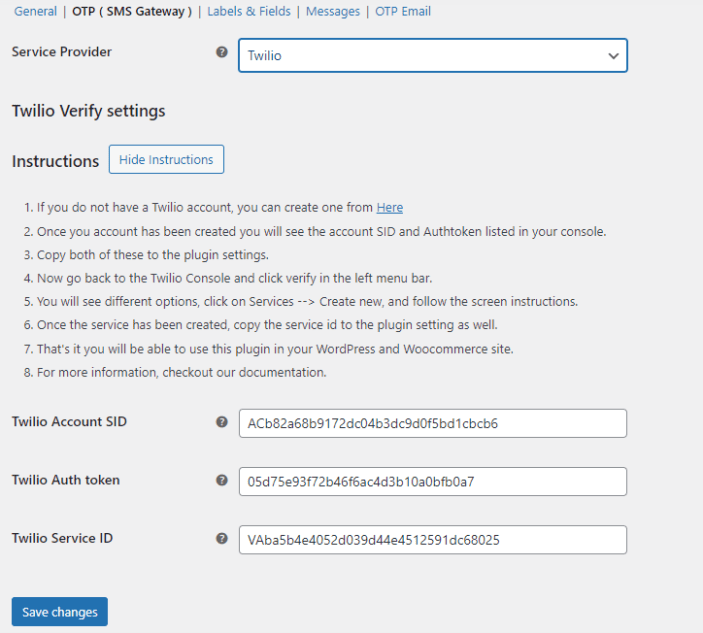 Instructions (Twilio):
- If you do not have a Twilio account, you can create one from
- Once you account has been created you will see the account SID and Authtoken listed in your console.
- Copy both of these to the plugin settings.
- Now go back to the Twilio Console and click verify in the left menu bar.
- You will see different options, click on Services –> Create new, and follow the screen instructions.
- Once the service has been created, copy the service id to the plugin setting as well.
- That’s it you will be able to use this plugin in your WordPress and Woocommerce site.
- For more information, checkout our documentation.
Now click
labels & fields tab to configure the following.
- Main Form Heading Text (Customize the main heading text of login with phone form)
- Phone Number Field Placeholder (Option to add a custom text for the placeholder e.g. Enter Your Phone Number)
- Send Code Button Text (Customize text for send code button)
- Verify Code Placeholder (Option to add a custom text for the placeholder e.g. Verify Your Code)
- Verify Code Button Text (Customize text for verify code button)
- Add Login Button Text (Set text for add login button)
- Change Login Button Text (Specify text for change login button)
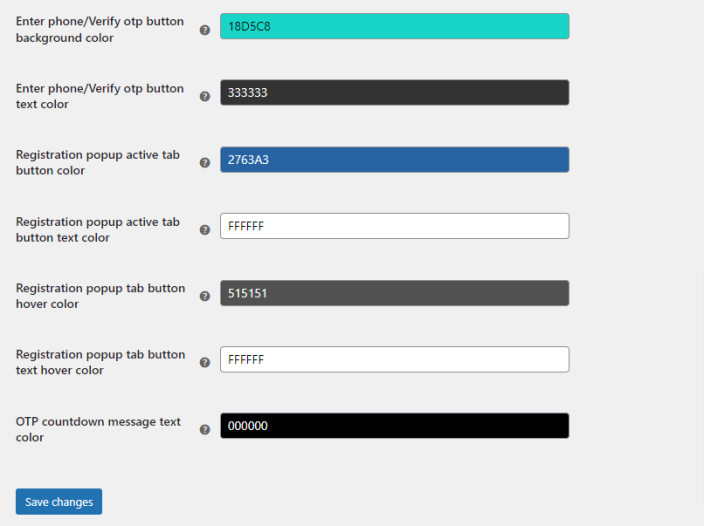
 You can configure the color of the following button elements:
- Phone/Verify OTP Button Background Color
- Phone/Verify OTP Button Text Color
- Registration Popup Active Tab Button Color
- Registration Popup Active Tab Text Color
- Registration Popup Tab Button Hover Color
- Registration Popup Tab Text Hover Color
- OTP Countdown Message Text Color
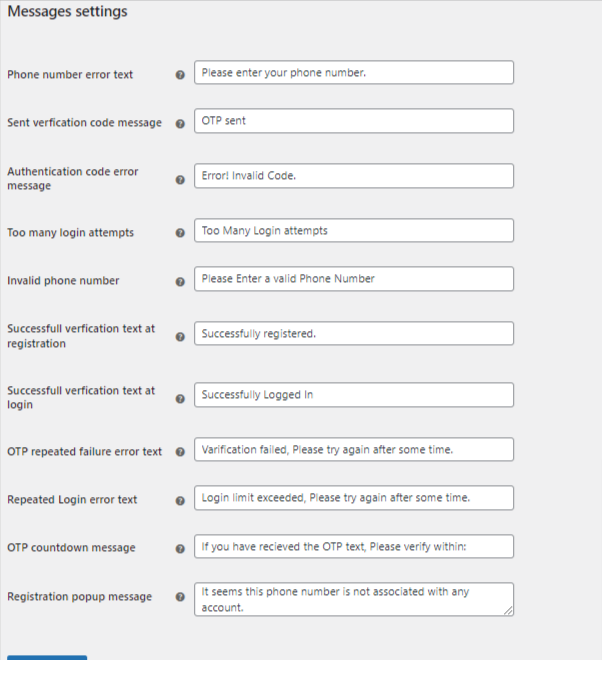
 After configuring the labels & fields tab click on the messages tab, here you can configure the following.
- Phone Number Error Text (This message will be shown when the phone number field is empty)
- Sent Verification Code Message (This message will be shown when the Authentication message is sent)
- Authentication Code Error Message (This message will be shown when an Invalid code is entered)
- Too Many Login Attempts (This message will be shown when a user attempts login many times with the same number or from the same IP address)
- Invalid Phone Number (This message will be shown when the user Enter an invalid Phone Number)
- Successful Verification Text at Registration ( This message will be shown, after successful verification)
- Successful Verification Text at Login (This message will be shown, after successful verification and Logging In)
- OTP Repeated Failure Error Text (This message will be shown on repeated OTP verification failure)
- Repeated Login Error Text (This message will be shown after the login limit is reached)
- OTP Countdown Message (This message will be shown with the OTP countdown timer)
- Registration Popup Message (This message will be shown in the registration popup message)
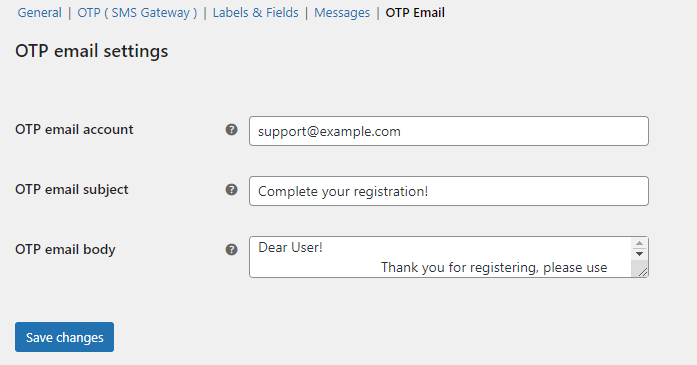
 In this tab, you can configure the following OTP email settings:
- OTP Email Account (Enter the email you want to use to send OTP emails to the customers)
- OTP Email Subject (Set the email subject for the OTP email)
- OTP Email Body (Enter the email body you want to set for the OTP email)
In this tab, you can configure the reCAPTCHA settings for the login/registration form. Configure the following settings:
- Enable Google Recaptcha V2: Click the checkbox to enable reCAPTCHA.
- reCAPTCHA Site Key ( v2 ): Enter the reCAPTCHA site key (v2)
- reCAPTCHA Secret Key ( v2 ): Enter the reCAPTCHA secret key (v2)
- Do I have to create an account to log in with the phone number?
No, you don’t have to create an account to log in. The WooCommerce login with OTP plugin allows customers to log in to your store by just entering their phone number and verifying OTP to log in.
- Can already registered users log in with their mobile phone numbers?
The WooCommerce mobile login plugin enables already registered visitors to log in with two options. You can either select OTP verification or password verification for already registered customers. To do so, go to WooCommerce > Settings > Login with Phone. Here go to the general settings tab and select the verification method for registered users.
- Can users associate their phone numbers with an existing account?
Yes, after OTP verification with the WooCommerce OTP registration plugin, customers will be given two choices. They can either register as new users or link their phone number with an existing account. This allows the website visitors to easily update their existing accounts and log in with their phone numbers.