Installation
↑ Back to top- Download the .zip file from your WooCommerce account.
- Go to: WordPress Admin > Plugins > Add New and Upload Plugin with the file you downloaded with Choose File.
- Install Now and Activate Plugin.
More information at: Install and Activate Plugins/Extensions.
Configure Skroutz XML Feed
↑ Back to topStart selling on Skroutz, the biggest marketplace in Greece with Skroutz Marketplace & XML for WooCommerce. The Skroutz onboarding process requires an XML Feed of all products in your WooCommerce store. If you are not already a seller in Skroutz Marketplace, you can sign up here.
To set up a XML Feed, follow the below steps:
- Go to: WooCommerce > Settings > Skroutz Marketplace & XML > XML Feed.
- Select the field to be used as a Unique ID on the Skroutz platform. By default, this will be the Product ID however you can use the Product SKU or a custom field instead.
- Select the Default Brand Taxonomy. You can also select Brand as the Brand Attribute or any other custom taxonomy you have.
- Select the default SKU field – by default, this will be Product ID however you can choose a Custom field instead.
- EAN field is required for electronics stores only – select the custom field used as the EAN field.
- If using an EAN field, select the Product Categories that require an EAN code. Products without an EAN field will be excluded from the Skroutz XML Feed.
- For products with size variations, such as clothing, select the Size Attributes for each products. You can select multiple size attributes.
- Select the Color Attributes for relevant products.
- Set the Default Availability for Products in Stock and Back Order products.
- In Overwrite Availability, you can choose the attribute that you wish to overwrite the default availability
- In the Inclusions section, you can select specific Categories, Brands or Tags to be included in the XML Feed. If you want to include all products, leave the fields empty.
- Under Exclusions, select the Categories, Brands, or Tags for products to be excluded from the XML Feed.
- Within Feed Generation settings, you can set the frequency of how often the XML Feed Generation Feed is regenerated. By default, Skroutz checks for product changes every hour, so we suggest setting it to 1 hour.
- Set the Batch Size of products generated in a feed. We suggest not changing this setting unless you know your web server resources .
- Save changes.
Configure Skroutz Marketplace (Smart Cart)
↑ Back to topConfiguring Smart Cart for Skroutz on WooCommerce will automatically sync in real time all your orders from the Skroutz Marketplace to your WooCommerce site. You will be able to accept, reject and print vouchers from Skroutz Marketplace orders directly from your WooCommerce dashboard without having to access Skroutz Merchants dashboard. Additionally, your product stock will automatically sync with your Products.
- Go to WooCommerce > Settings > Skroutz Marketplace & XML > Smart Cart Settings.
- Webhook URL is the URL that will be used on Skroutz in order to sync new orders from Skroutz Marketplace to your WooCommerce store. Copy and paste this URL in your Skroutz Merchant account under Services > Skroutz Marketplace.
- In the same section on your Merchant Account, you will also find the API Token. Copy the API token from your merchant account and paste in the API Token field on the plugin Smart Cart settings page.
- Select the Unique ID – by default this is the Product ID. Be sure that this is the same field you are using also on Skroutz XML Feed.
- Within the Default Status for New Orders (Not Accepted), option, you can select the order status for new orders that come in from Skroutz Marketplace. By default, the “On Hold” status will be used.
- You can also set the Default Status for Accepted Orders – by default, the “Processing” status will be used
- Enable Automatic Order Acceptance to automatically accept all orders from Skroutz Marketplace. When enabled, the first available time slot will be used as the pickup time for the courier.
- Save changes.
XML Skroutz Feed Usage
↑ Back to topGo to WooCommerce > Settings > Skroutz Marketplace & XML > XML Feed and copy the Feed URL .
XML Skroutz Marketplace (Smart Cart) Usage
↑ Back to topAfter configuring Skroutz Marketplace (Smart Cart) to your Woo store, new orders from Skroutz Marketplace will automatically sync to your WooCommerce store and the inventory will be synced as well.
Accept or Reject new Skroutz Maretplace Order
↑ Back to topWhen a new order arrives from Skroutz, it will display under Orders such as the below screenshot:

You will notice a new column added with actions to Accept or Reject the Order from Skroutz.
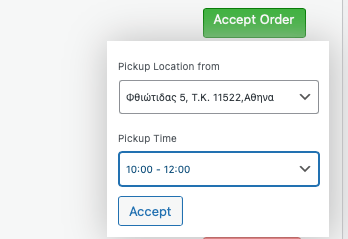
After selecting Accept Order, you will be able to select the pickup time for the courier to pickup the parcel.
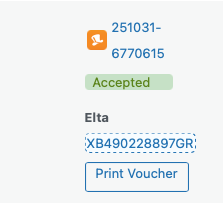
After the order acceptance, the voucher will be automatically issued and you will be able to Print Voucher for your parcel.
Dev Friendly Skroutz XML Feed for further customization using filters
↑ Back to topTake a look on the following examples and further optimize Skroutz XML Feed to match your needs
Modify the Product Query
↑ Back to topUse the wpslash_skroutz_feed_query_args filter to modify the WP_Query arguments used to retrieve products for the feed. The example below only includes products that have stock greater than zero.
add_filter( 'wpslash_skroutz_feed_query_args', function ( $args, $settings ) {
    $args['meta_query'][] = array(
        'key'     => '_stock',
        'value'   => 0,
        'compare' => '>',
        'type'    => 'NUMERIC',
    );
    return $args;
}, 10, 2 );
Exclude Products from Skroutz XML Based on Custom Field
↑ Back to topOn the following example we have a custom field with key name _hide_from_skroutz where when this has been set to yes the product is excluded from the XML feed. You can easily adjust wpslash_skroutz_feed_include_product to your needs to apply your own exclusion rules based on the rules you want.
add_filter( 'wpslash_skroutz_feed_include_product', function ( $include, $product, $settings ) {
    if ( 'yes' === get_post_meta( $product->get_id(), '_hide_from_skroutz', true ) ) {
        return false;
    }
    return $include;
}, 10, 3 );
Exclude Products Cheaper Than a Specific Price
↑ Back to topUsing the wpslash_skroutz_feed_include_product filter you can also exclude products based on their price. The following example excludes all products priced below 5 euros from the Skroutz XML feed.
add_filter( 'wpslash_skroutz_feed_include_product', function ( $include, $product, $settings ) {
    if ( floatval( $product->get_price() ) < 5 ) {
        return false;
    }
    return $include;
}, 10, 3 );
Increase Product Prices on Skroutz XML Feed
↑ Back to topUsing the following example to adjust prices on your Skroutz XML Feed. On the following we are multiplying the price x 1.10. You can modify it to your needs.
add_filter( 'wpslash_skroutz_feed_product_price', function ( $price, $product ) {
    return number_format( floatval( $price ) * 1.10, 2, '.', '' );
}, 10, 2 );
Round Prices on Skroutz XML Feed
↑ Back to topYou can also use the wpslash_skroutz_feed_product_price filter to apply custom rounding rules. The following example rounds all prices to end in .90 cents.
add_filter( 'wpslash_skroutz_feed_product_price', function ( $price, $product ) {
    return number_format( floor( floatval( $price ) ) + 0.90, 2, '.', '' );
}, 10, 2 );
Prepend Brand Name to Product Title
↑ Back to topUse the wpslash_skroutz_feed_product_title filter to modify the product title. The following example prepends the brand name from a pa_brand taxonomy to the beginning of the product title.
add_filter( 'wpslash_skroutz_feed_product_title', function ( $title, $product ) {
    $brand = get_the_terms( $product->get_id(), 'pa_brand' );
    if ( ! empty( $brand ) && ! is_wp_error( $brand ) ) {
        $title = $brand[0]->name . ' ' . $title;
    }
    return $title;
}, 10, 2 );
Use a CDN Domain for Product Images
↑ Back to topUse the wpslash_skroutz_feed_product_image filter to modify product image URLs. The following example replaces your site domain with a CDN domain for faster image delivery.
add_filter( 'wpslash_skroutz_feed_product_image', function ( $image_url, $product ) {
    return str_replace( 'https://mysite.com', 'https://cdn.mysite.com', $image_url );
}, 10, 2 );
Strip HTML from Product Description
↑ Back to topUse the wpslash_skroutz_feed_product_description filter to clean up product descriptions. The following example strips all HTML tags and limits the description to 500 characters.
add_filter( 'wpslash_skroutz_feed_product_description', function ( $description, $product ) {
    $clean = wp_strip_all_tags( $description );
    if ( strlen( $clean ) > 500 ) {
        $clean = substr( $clean, 0, 497 ) . '...';
    }
    return $clean;
}, 10, 2 );
Free Shipping for Specific Product Categories
↑ Back to topUse the wpslash_skroutz_feed_product_shipping filter to modify shipping costs per product. The following example sets free shipping for all products in the free-shipping category.
add_filter( 'wpslash_skroutz_feed_product_shipping', function ( $shipping, $product, $settings ) {
    if ( has_term( 'free-shipping', 'product_cat', $product->get_id() ) ) {
        return 0;
    }
    return $shipping;
}, 10, 3 );
Modify Complete Product Data Before XML Rendering
↑ Back to topThe wpslash_skroutz_feed_product_data filter is the most powerful filter available. It allows you to modify the complete product data array right before XML rendering. You can change any field including id, mpn, ean, name, link, image, size, color, description, quantity, weight, category, price_with_vat, vat, instock, availability, shipping, and manufacturer.
add_filter( 'wpslash_skroutz_feed_product_data', function ( $data ) {
    if ( intval( $data['quantity'] ) < 1 ) {
        $data['quantity'] = 1;
    }
    return $data;
} );
Override Manufacturer from a Custom Field
↑ Back to topUsing the wpslash_skroutz_feed_product_data filter you can also override the manufacturer value. The following example reads a custom field named custom_brand and uses its value as the manufacturer in the XML feed.
add_filter( 'wpslash_skroutz_feed_product_data', function ( $data ) {
    $custom_brand = get_post_meta( $data['product']->get_id(), 'custom_brand', true );
    if ( ! empty( $custom_brand ) ) {
        $data['manufacturer'] = $custom_brand;
    }
    return $data;
} );
Modify Variation Data
↑ Back to topUse the wpslash_skroutz_feed_variation_data filter to modify individual variation data before it is added to the product. You can change variationid, link, availability, manufacturersku, ean, price_with_vat, size, and quantity. The following example applies a 5% markup to all variation prices.
add_filter( 'wpslash_skroutz_feed_variation_data', function ( $entry, $variation, $product ) {
    $entry['price_with_vat'] = number_format( floatval( $entry['price_with_vat'] ) * 1.05, 2, '.', '' );
    return $entry;
}, 10, 3 );