Video Instructions
↑ Voltar Para o TopoInstallation
↑ Voltar Para o Topo- Download the .zip file from your WooCommerce account.
- Go to: WordPress Admin > Plugins > Add New and Upload Plugin with the file you downloaded with Choose File.
- Install Now and Activate the extension.
More information at: Install and Activate Plugins/Extensions.
Setup and Configuration
↑ Voltar Para o TopoRight after plugin activation, you’re ready to use it. First, though, we’d kindly advise you to configure it according to your needs and theme design.
Extension consist of 3 main pages where you can find all available settings:
Settings page – WooCommerce > Settings > Social Proof – here you can find message templates, pop-up behavior settings, and pretty much everything responsible for things going on on the backend.
Social proof events – WooCommerce > Social Proof Events – besides real sales and add-to-cart products you can create your own fake events if you don’t have enough real volume of orders yet or want to draw attention to specific products. You can find real events and som conditions of events recording process.
Pop-up customizer – Appearance > Customize > Social Proof – you can also reach this page through the setting page. Here you can find everything you need to change pop-up appearance to fit your theme and design preferences.
Settings page instructions
To configure go to WooCommerce > Settings > Social Proof
Live sales notifications, product reviews and added-to-cart products
↑ Voltar Para o TopoHow this works:
When your customers add something to the cart, make an order or leave a product review, we record their data to a separate database table. And after, use this information to display social proof notifications with relevant data.
We store customers’ first name, city, product info, product qty, date, and type of event.
Alongside with creation of special browser cookies and session storage parameters.
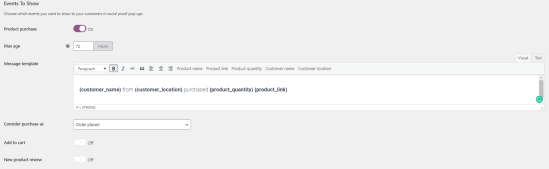
The first thing you need to do is to choose what types of events you want to record and show to your visitors. There are three kinds of events:
- Product purchase – is created whenever customers make orders in your store. Each product stores as a separate event. And after plugin displays live sales notification feed.
- Add to cart – is created every time somebody adds a product to the cart. Each product stores as a separate event.
- New product review – is created whenever clients leave a review for any product.
After you unlocked desired events, you need to configure them and their templates.
Max age – indicates the maximum age of a social proof event before it no longer shows in your store. For instance, if you set it to 1 hour, only events that happened in the last 1 hour will be shown for store visitors. Use hours to properly set up this indicator.
For instance, if you consider Product reviews more valuable than Purchases, you can set the Product review lifetime to a much longer-term to store longer and thus be displayed more times.
Note:
We are starting recording events to the database right after you installed plugins. That means your orders or products reviews, which were created before installing the plugin, wouldn’t be displayed.
Message template – here, you can compose messages you want to be shown for your store visitors, each type of event has its template.
Variables you can use in the template:
{customer_name} – customer’s first name from order’s info (customer billing address).
{customer_location} – customer’s location from order’s info (customer shipping address).
{product_quantity} – will be replaced by the number of purchased products
{product_link} – will be replaced by the product title styled like a link (styling depends on your theme)
{product_name} – will be replaced by the product title
Note: no matter what type of product name you’ll choose {product_name} or {product_link}, the whole pop-up will be clickable and lead you to the product page.
You can also use other customizations available in text redactor. Just note that text alignment is configurable from the live customizer.
In the Product purchase template, you have one more option:
Consider purchase as – choose on what stage event should be recorded.
Order placed – right after client complete order.
Successful payment – after the order proceeded as a successful one.
Customers’ data
↑ Voltar Para o Topo
We understand that customer names, locations, and products they purchase might be sensitive data, so we leave the decision up to you about what pieces of their data you want to reveal. Also, we only record the customer’s first names, not the last name, because we consider it extremely sensitive.
Show real customer data when possible – if you enable this option, we’ll use the customer’s real name and location, if it’s available for pop-up content. We may not know that info in case the user wasn’t signed in and added the product to the cart. For situations like this we use:
Default instead of name – we’ll use this value instead of the customer’s name in cases where the name is unknown. It can be simple “somebody,” or you can compose some default name here.
Default instead of location – we’ll use this value instead of the customer’s location in cases where the name is unknown. You can leave it as “from your city” or specify some city if most of your purchases are from the same area.
Pop-up Behavior
↑ Voltar Para o Topo
In this section, you are able to set up basic principles of live sales and reviews notifications behavior on the frontend, but not design.
Max pop-ups per customer’s session – this setting indicates how many Social Proof pop-ups one visitor can observe per one session on your website. Note that if they remove the plugin’s cookies and local storage or use another browser, they would see pop-ups once more.
Delay between each pop-up – when you set more than 1 pop-up per session, you should choose what delay would be between each pop-up. We recommend you check the average time users spend on your website to figure out the best delay and displaying time. You better not do it too often to not bother your potential customers much. The setting is indicated in seconds.
Pop-up display time – how long pop-up will be displayed before closing. Try to balance how much time users need to understand your message and not be annoying. The setting is indicated in seconds as well.
Close pop-up button – you can let your customers close pop-up notifications or forbid them to do it.
The first “enable” checkbox will show the [X] button on the notification, and after the user clicks it, the plugin will wait seated delay time and display the following event.
In case you “enabled” the second checkbox, website visitors would be able to disable notifications completely. And in that case, they will see pop-ups only after cookies will be removed.

Pop-up trigger
↑ Voltar Para o Topo
In this section, you can configure what will trigger visitors to see the social proof pop-ups.
Delay after page loads – indicates how many seconds should pass after page was loaded to show a first social proof pop-up to the visitor.
Use product context (smart targeting) – this feature helps you bring users back to products they already viewed. For instance, if the user already visited some product page and stayed there or left it, the plugin will search for events w/ this product in the database and then show those events in the first place to build demand and FOMO effect.
Display on pages
↑ Voltar Para o Topo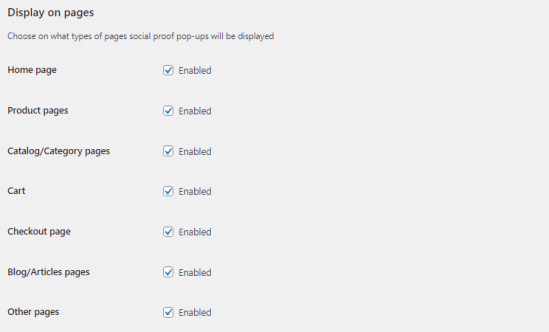
Here you can pick up on what pages social proof pop-ups will be displayed.
Home page – the page that is chosen as your homepages.
Product pages – every product page in your store.
Catalog/Category page – every category (of any level) and shop page.
Cart – cart page (if you have one). We recommend considering the restriction of this page due to possible distractions from successful order completion.
Checkout page – this is obvious the checkout of your store. And we recommend you disable it as well.
Blog/Articles pages – every page of your blog and blogposts.
Other pages – any other page, which you can find in the “pages” section of your wp-admin panel.
If you need to restrict some specific post types you have in your store please contact our support.
Display to users
↑ Voltar Para o Topo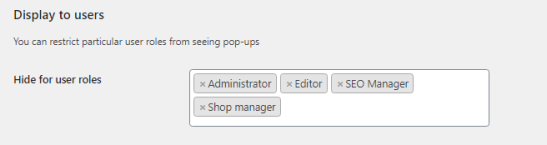
You may want to restrict some particular users from seeing pop-ups. It may be some technical or managers roles, or you may have some specific customers, which don’t need to see those pop-ups.
You can choose any default role set in your store.
Mobile
↑ Voltar Para o Topo
This feature exists to give you a chance to disable pop-ups on mobile pages. Note, we track screen size to decide if the device is mobile or not. We’re not monitoring browser, OS, etc.
Debug
↑ Voltar Para o Topo
We added debug mode to help you figure out any potential issues and track down on what stage pop-ups are crashing or disabling. When you enable debug mode, you can go to the developer console on the frontend or WooCommerce logs to find more information.
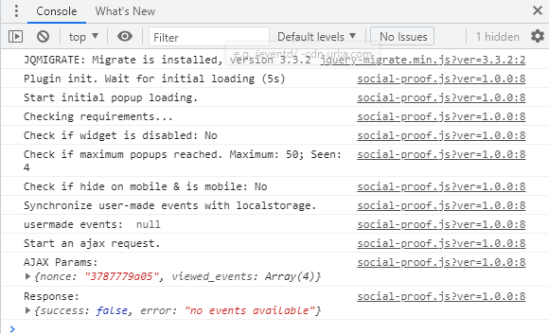
You can see each step of initializing the pop-up.
Initial loading = time you set in “delay after page loads”;
Check if the widget is disabled = in case you enabled the second checkbox in the “close pop” section, user can disable pop-ups;
Check if maximum popups reached = here you can find how many pop-ups you already saw and what is maximum value is;
Then you can see if we consider this page as mobile and if so, pop-ups may be disabled as well;
Usermade events = here, you can see the id of events made by you, so the plugin will not show your events to you;
And at the very end, you can see the error message w/ explanation why you don’t see pop-ups.
Social proof events instructions
You can find it here: WooCommerce > Social Proof Events
How to manually add fake social proofs?
When you have low order volume or want to promote a specific product, you can create events manually. There’re two types of events available for you: New purchase and Added to cart. The plugin doesn’t do fake reviews.

Note, the only thing the plugin does – is creating events in the social proof plugin database table at the stage event happened. It has nothing to do with real orders changes. So, if you made any adjustments to the order or product review after the user left it, the plugin wouldn’t take it into account.
Fields you need to fill to create an fake social proof event:
Choose Type of Event: New purchase or Added to cart.
Enter Customer Name: you can come up with any name you wish; it may not be your real customer’s name.
Enter Location: since we record city as location parameter, we recommend you pick up some city names.
Select Product: you can choose any product you wish, an event from restricted categories.
Quantity: how many products were “virtually” purchased.
After you clicked on the “Add new event” button, it will appear in the List of events table and take may be displayed in the social proof pop-ups immediately.
List of events
↑ Voltar Para o Topo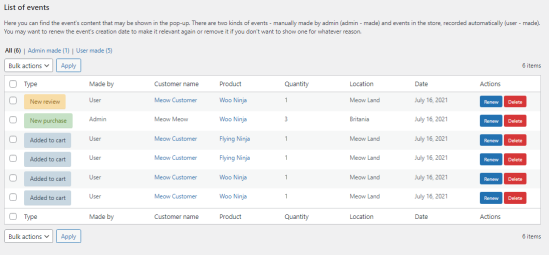
Every product added to the cart by the user, purchases, and product reviews made after plugin installation are recorded into the database. A list of events is the accurate representation of events stored in the database at the moment.
Filters:
All – here you can see each event that is not outdated at the time, no matter who created it.
Admin made – events made manually by admin.
User made – events made by your customers.
What is in the table:
Type of event: New review, New purchase, and Added to cart.
Made by: User (actual events made by your customers), Admin (events added by you manually here)
Customer name: Real user’s name (you can click and find his profile) or Names from fake orders (non-clickable)
Product: Product represented in that event.
Quantity: Hom many products have been purchased. Note that if there were a few in the order, the plugin would create a few events to represent each product.
Location: City string from user’s billing address.
Date: Date of event creation. You can see the exact time hovering over the date.
Renew button: You’ll change the event date to the current date and time and raise it higher so your customers might see it right now.
Delete button: Permanent deletion of an event. You’d not be able to restore one.
Events conditions
↑ Voltar Para o Topo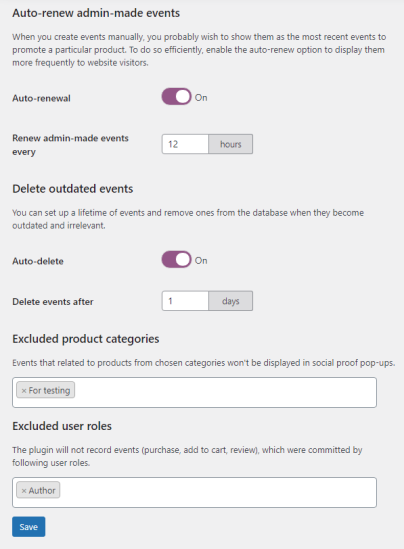
Here you can set conditions for admin and user-made events.
Auto-renew fake social proof events
When you want fake events to be displayed more often and draw attention to products you wish to promote, it’s better to set up auto-renewal time. That means the plugin would renew the event date and time every X hours to raise it higher in the event’s list.
Auto-renewal may be applied only to fake events used for social proof. In case you want to renew the user-made once, you should do it manually.
Delete outdated events
This option is applied to both events, user-made, and admin-made (fake events). So, be careful setting up timeframe here, if auto-deletion time will be shorter than auto-renewal, events would be deleted before renewal time comes. You should set up the timeframe in days.
Excluded product categories
In case you don’t want to promote some products, you can forbid events creation of products in restricted categories. So, if anyone buys or leaves a comment on products in those categories it wouldn’t be recognized as an event to record.
Note that products from restricted categories are still available for fake events.
Excluded user roles
You probably don’t want to record test purchases from the administration roles or made by some customer categories. For that case, you can exclude users who belong to the specific roles from creation user-made events. Here you can find any default user role.
Design social proof pop-ups
↑ Voltar Para o TopoTo create a pop-up design, go to Appearance > Customize > Social Proof, or you can find Go to live Customizer button on the plugin settings page.
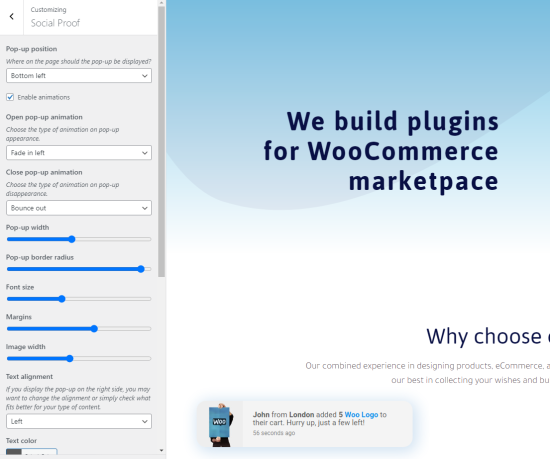
Using a customizer, you can make adjustments to the pop-up design and preview it in life. Changes will be applied after you tap the save button.
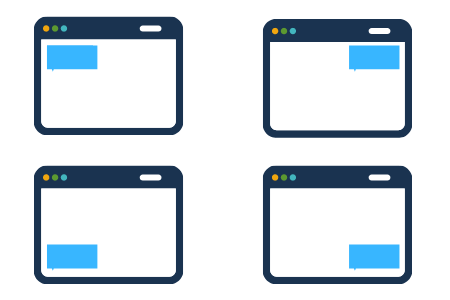
Pop-up position
The very first thing you need to choose here. You have four options: Bottom left, Bottom right, Top left, and Top right. Choose the one where it may draw your customer’s attention.
Enable animations
If you leave this option disabled, then notifications will simply appear on the frontend w/o any animation.
To choose animations, enable this option and then select one of the available options for Open pop-up animation and Close pop-up animation.

Pop-up width
Set up pop-up container width that fits the messages templates you configure for each event. You may want to preview pop-up with different content lengths; to do so, scroll down to Pop-up preview type and see how it looks with other messages.

Pop-up border radius
You can round pop-up corners using this option to make it best fit other elements of your theme design.

Font size
Find the balance between font sizes that wouldn’t seem too pushy but at the same time be easy to read on any device.

Margins
Choose how far from browser edges pop-up should be located.

Image width
Depending on your product thumbnails measurements, you may want to change the image width in the pop-up to make it look better. The image height is calculated automatically relative to the width.

Text alignment
Depending on what place on the page you choose to display your social proof pop-up, you may switch text alignment. You have three options here: Left, Right, Center.

Text and Background colors
By default, Social Proof for WooCommerce applies your theme preferences to pop-up. But you can easily change background and text colors from the live customizer.
P.s. sample below isn’t the greatest design skills representation. Don’t do things like that.

Shadow size and color
As well as pop-up content color, you can change Shadow color and size to draw attention to the notification.

Pop-up preview type
Since we suggest three types of events and messages length may vary, you’d better check how each of them looks in the design you just configured. You may want to make the pop-up content section wider or change the font size.
Additional CSS styles
You can add your custom CSS here to customize things you’re not able to change from the customizer, and that would be applied to Social Proof for WooCommerce pop-up class.
P.s. And don’t forget to preview the pop-up design on mobile and tablet using the responsiveness toolbar at the bottom of the customizer.
P.s.s. Other options like fonts, link styling, etc., are taken from your theme design. So if you want to change that, you need to go and play around with appearance customization or write custom CSS.
Troubleshooting
↑ Voltar Para o TopoMost issues may be caused by the theme affecting pop-up styling or by caching plugins.
Most issues with the pop-up design you can solve using live customizer and custom CSS. If you need custom CSS to solve some problems, reach out to our support.
In case you don’t see the plugin or it seems weird to you, try to purge All pages cache.
When you want to figure out why pop-ups don’t show up, use Debugger (read more in Debug section).
And a few hints for better testing:
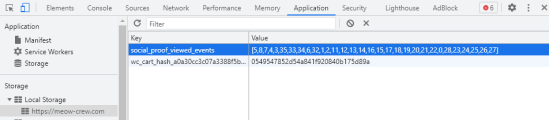
We store events you have viewed in the Local Storage (go to Browser DevTools > Storage > Local Storage) and look after social_proof_viewed_events where you can find values of events IDs you have seen.
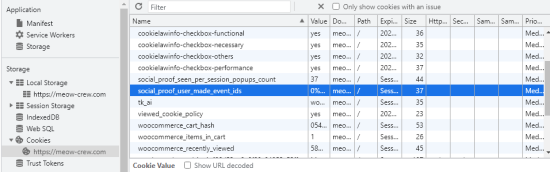
And to see what cookies plugin saved for your browser, find cookies that start with social_proof (to find cookies go to Browser DevTools > Storage > Cookies). You can remove those cookies in case you want to reset pop-ups count or see your own events.

FAQs
↑ Voltar Para o TopoAfter installing Social Proof for WooCommerce you should go right to WooCoommerce > Settings > Social Proof and enable the Product purchase option, configure notification template and from this moment plugin will record and show notifications regarding your recent sales.
You should go to WooCommerce > Social Proof Events and, in the Excluded product categories, point out all your store categories and then manually delete all user-made events if there’re some.
After that, you can create fake social proof events and set up an auto-renewal timeframe.
In this case, user-made events would never store in the database, and you would create a fake events loop.
No, the plugin records it to the user’s cookie to don’t show events made by the same user. Though, they may see their events using another browser or after cleaning cookies.
No, the plugin works right off the box and take and store info inside your website database, with no need in any integrations.
