NOTE
This product is temporarily unavailable on WooCommerce.com. This document has been left available for existing users, but is not currently being updated.
Subscription Box for WooCommerce is an add-on for WooCommerce Subscriptions extension that allows your customers to create their own customized product bundles and subscribe to them.
Note: It is required that WooCommerce and WooCommerce Subscription extensions must be installed and activated on your store to use the features of the Subscription Box plugin.
Requirements
↑ Back to topSubscription Box for WooCommerce Subscriptions requires:
- WooCommerce Subscriptions 2.3+.
- WooCommerce 3.3+.
Table of Contents
- How to Install the Plugin
- Plugin Settings
- How to create a box product
- How to Display Box Products on the Frontend
- How Customers Create Their Boxes
- How Can Customers Edit Their Subscription Plans
How to Install the Plugin
↑ Back to topThe first step is to purchase the plugin. For that, visit the product page for the Subscription Box for WooCommerce plugin. On the right hand, you will see purchase options.
Once purchased, you will get a zip file.
To install the plugin, go to your WordPress dashboard and navigate to Plugins > Add New > Upload Plugin.
Upload the zip file that you have purchased. And click Install Now. Once installed, you’ll see the Activate link. Click to activate the plugin on your site.
Here is another way to Activate the plugin on your site:
From the sidebar, click on Plugins > Installed Plugins.
The Installed Plugins page will have a list of all the plugins that have been installed on your WP site.
Navigate to, or search for: “Subscription Box for WooCommerce”.
Below the plugin name, it will show the Activate link. Click it to activate the plugin. If it’s showing the Deactivate link, it means the plugin is already activated.
How to Create a Box Product
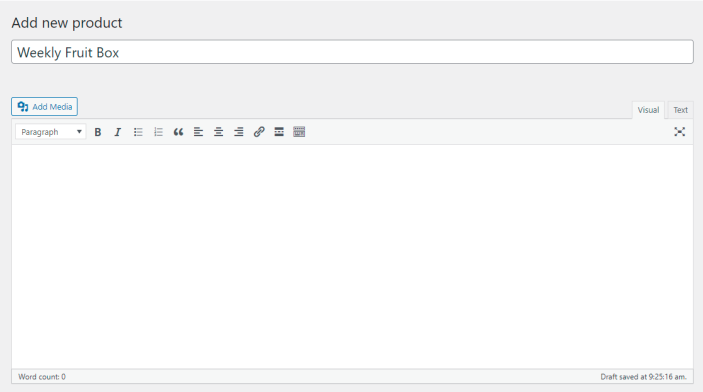
↑ Back to topTo create a Make-Your-Own-Box product, go to Products from the sidebar and click Add New.
Enter your Product Name, for example, Weekly Fruit Box.
Next, scroll down to Product Data section. Here, from the dropdown menu, choose Box Product as the product type.
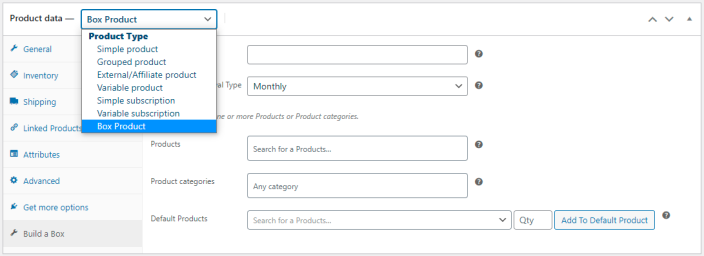
When the Box Product is selected, a tab appears on the side menu titled Build a Box. Open the tab to see the settings and options of the Box product.
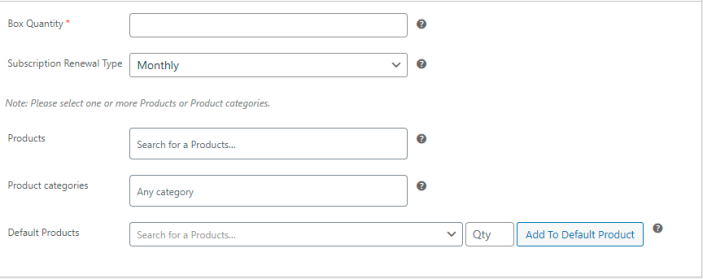
Box Quantity
Here, you need to enter the number of products in the box. For example, if you enter 15 here, the customer will have to add 15 products in the box in order to proceed.
Subscription Renewal Type:
Select the frequency of billing. For example, if you choose Daily here, the box will be subscribed and billed on a daily basis and the items will be delivered daily.
Products:
Here, choose the Products that will be shown on the frontend on the Make-Your-Own-Box page. For example, if you are creating a Fruit Box product, you should choose relevant products here that the customer can choose and add to his box.
Product Categories:
Here, you can choose Product categories. If a category is chosen, all products in that category will be shown on the front end of the Shop page. The customer will be able to select products from that category and create his own box.
Default Products:
Here, you can choose Default Products, which are actually products that are added to the cart when the customer doesn’t want to customize his own box. If the customer doesn’t want to create his own custom box, he can use an option on the top of the mini-cart that says “Add All”. When “Add All” is clicked, the Default Products chosen here by the admin will be added in the mini-cart. The admin can even choose the quantity of a particular product and click the Add to Default Products button.
How to Display Box Products on the Frontend
↑ Back to topAfter you’ve created your box products as detailed above, the next step is to display those on the front end for your users.
Here is how you can display those box products on the front end of your shop.
#1 – Create a new page from Pages > Add New and name it whatever you deem fit, for example, Make Your Own Bundles
#2 – Through the Gutenberg editor, create a layout of your page by adding columns. Then, in each column, add a Box product by choosing Build a Box block.
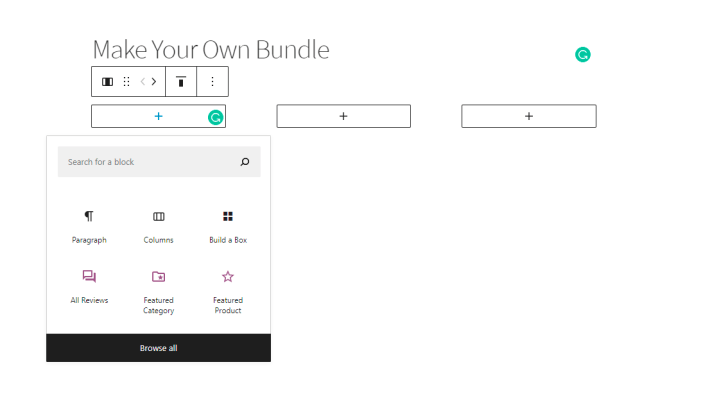
#3 – Next, configure the block settings from the right panel. Here are the options and settings you can configure:
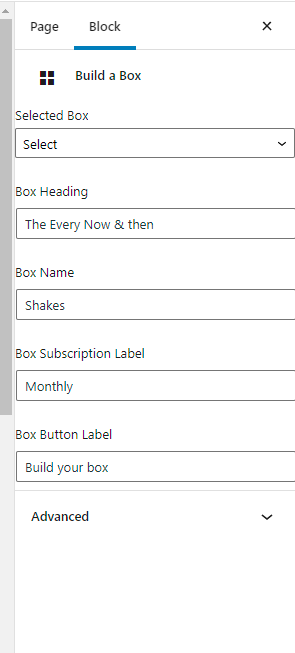
Selected Box: lets you select a box product from the dropdown menu
Box Heading: lets you customize the heading of the box block.
Box Name: lets you change the box product name
Box Subscription Label: lets you change the label of the box subscription
Box Button Label: lets you customize the button label
How Customers Create Their Boxes
↑ Back to topHere is how the plugin works for the customer on the front end.
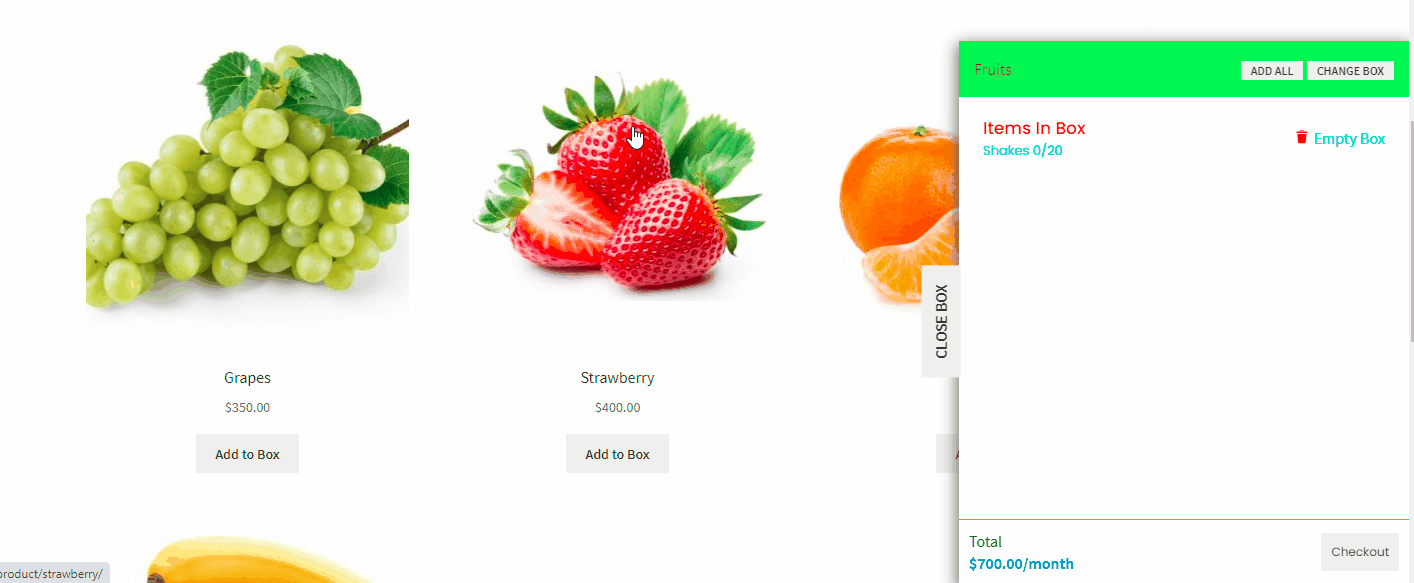
When a customer clicks on a box product, they land on the shop page of the Box. Here, they can see the products or product categories, which the admin configured from the backend.
When a customer clicks on a product, it is added to his mini-cart, shown on the right. The customer will need to add the quantity of products specified. When the customer has selected products in the given quantity, he can check out. Here is a visual presentation of how it works on the front end.

The user can also use the Add All button at the top of the mini-cart. When that button is clicked, the mini-cart is auto-filled with default products and the customer can check out.
How Customers Edit Their Subscription Plans
↑ Back to topThis part of the document relates to how customers edit their subscription plans.
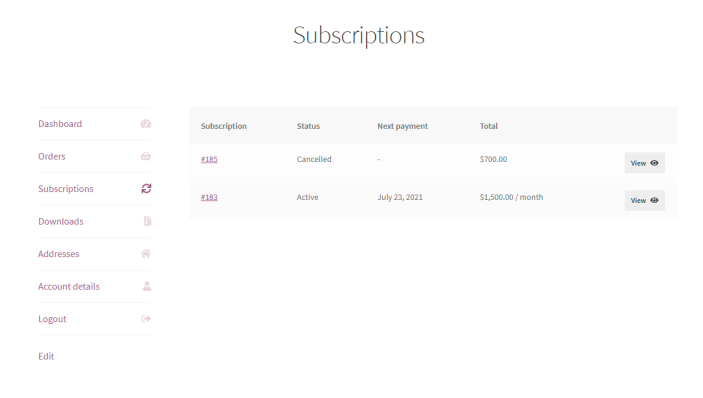
On the My Account page, your customer can view all his subscriptions by clicking the Subscriptions tab.
By clicking the view button next to an active subscription, the customer is redirected to a My Subscription page.
Here, the customer gets the following options:
Membership Overview
In the first section under Membership Overview, the customer can see an overview of his membership including the number of products in his plan and subscription billing.
The customer also gets an option to change his box plan. When he clicks the Change Box Plan button, he is taken to the Bundles shop page from where he can choose another box. On that page, the box already subscribed to will be disabled so the customer can only choose another box and not the existing box plan.

Scheduling
Here, the customer can see when his next delivery is scheduled. The customer can choose to delay or rush the delivery by using the buttons given. When the buttons Delay or Rush are clicked, a calendar pops up that allows the customer to enter the next delivery date.
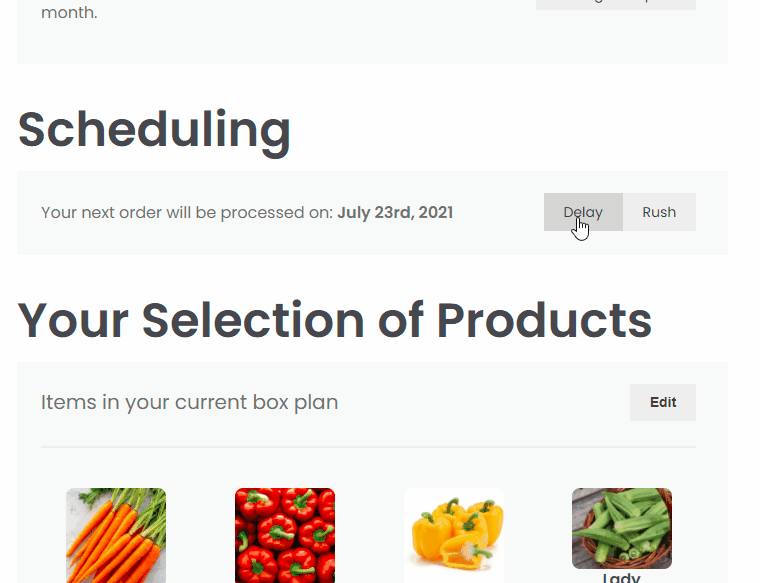
Your Selection of Products
Next, the customer can view the items in the box plan and can also change the items by clicking the Edit button.
When the Edit button is clicked, the customer is taken to that Box page where he can choose the products, add them to his mini-cart and check out.

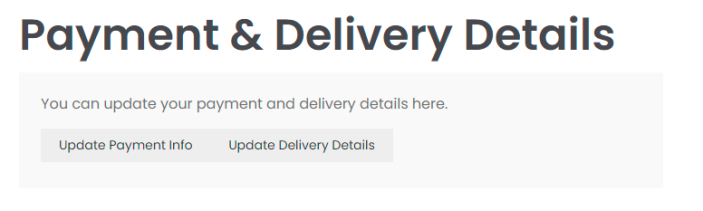
Update Payment/Delivery Details
In the last section, the customer can use the buttons given to update delivery and payment details.
Finally, the customer can cancel his/her subscription by clicking the Cancel Subscription link at the bottom of the page.
Other Plugin Settings
↑ Back to topApart from the above, the Subscription Box for WooCommerce plugin offers the following settings and configurations.
To access these settings, go to WooCommerce > Settings and click the Build a Box tab.
Here are the settings on this page under General:
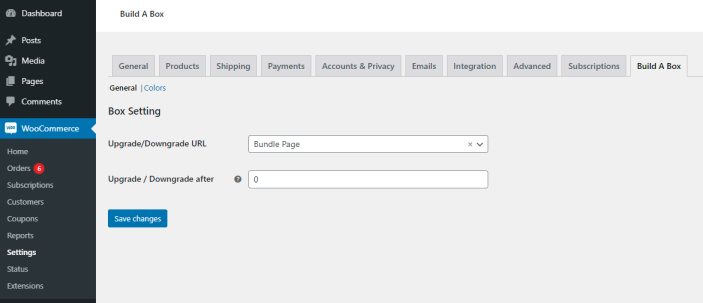
Upgrade/Downgrade URL:
Here, you can select the page from the dropdown menu where your customer will be redirected to when he clicks the Change Box Plan button on the Subscription Overview page.
Upgrade / Downgrade after:
Here you need to enter the number of days after which the Change Box Plan button gets enabled for the customer.
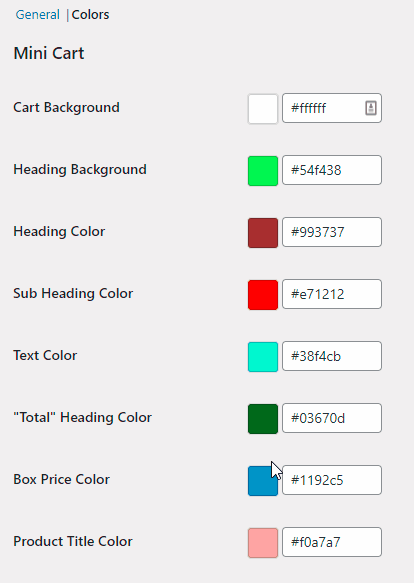
Under the Colors tab, you get a bunch of color settings. You can change the colors shown on the front end using these settings.