Requirements:
↑ Back to topIn order to use the User Registration for Woo Commerce there are a few requirements:
| PHP Version Required | 7.4 |
| WooCommerce Version Required | 4.0.0 |
| WordPress version Required | 5.0 |
| Tested with WordPress: | 6.6 |
| Tested with WooCommerce | 9.3.2 |
Store Owner’s Guide
↑ Back to topInstallation Guide
↑ Back to top- Log in to your WordPress Admin Panel.
- Navigate to the WordPress Admin Dashboard → Plugins → Add New.
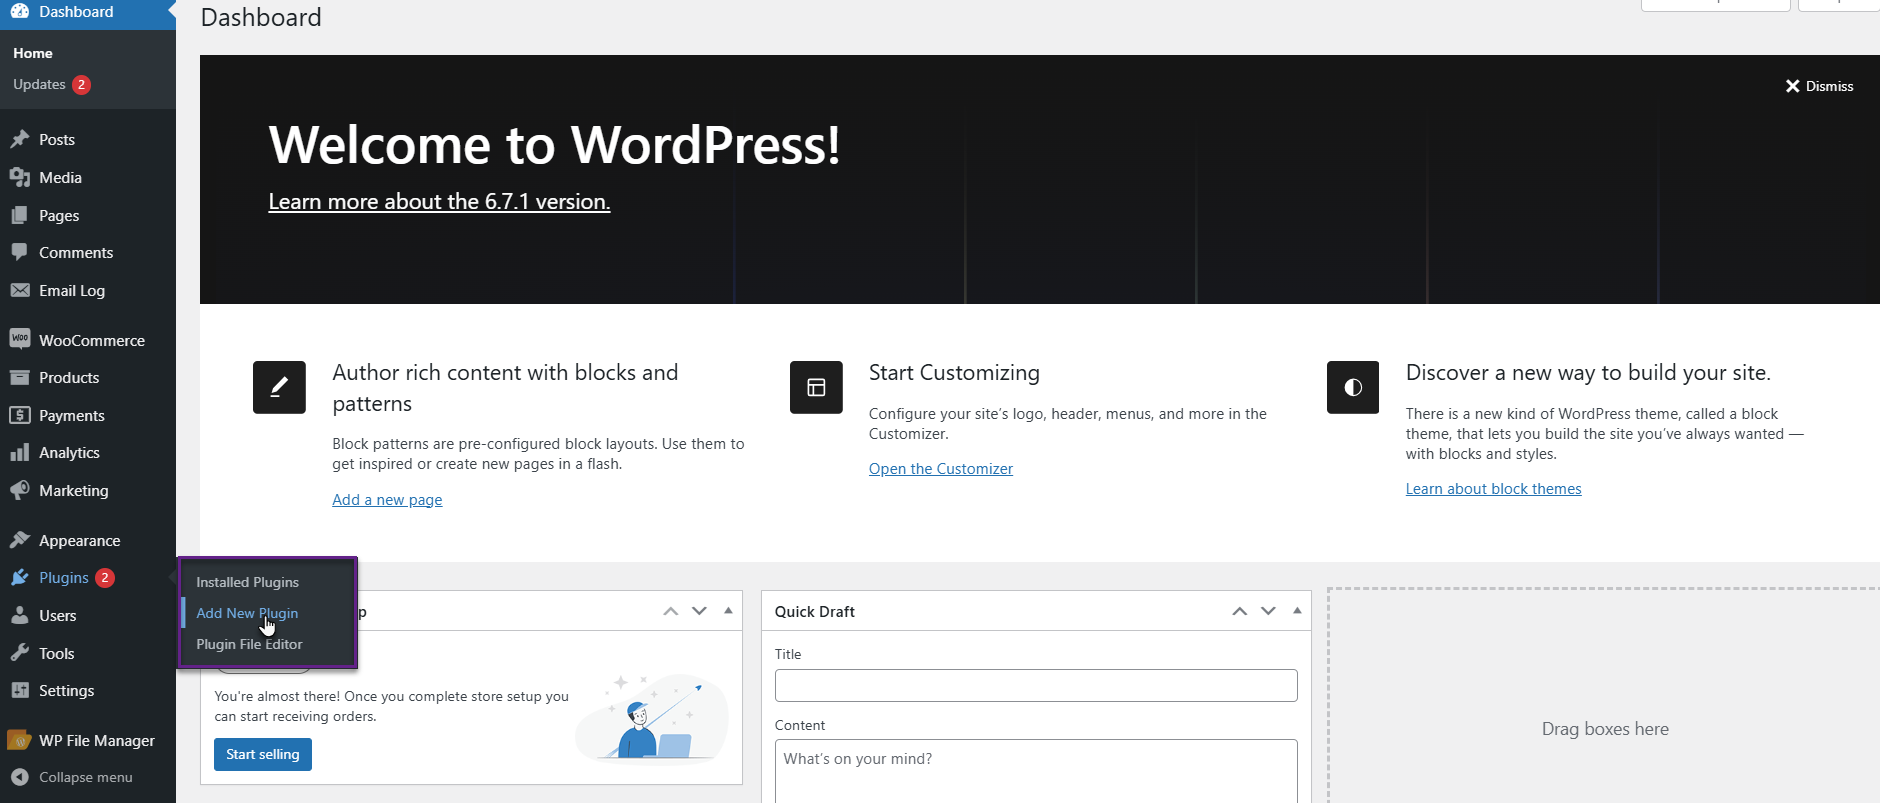
- Click on the Upload Plugin button on the top left corner of your screen.
- Next, click the Choose file button in the below box.
- Select the zip file that you have downloaded and upload it.
- Click on the Activate Plugin button.
Features
↑ Back to top- Add New Role.
- Enable the Billing Form on the Registration Page.
- Enable Shipping Form on Registration Page.
- Display Customization Fields on Registration.
- Display Customization Fields on My Account.
- Display Customization Fields on Checkout.
- Default Billing and Shipping Fields.
- Form Builder for Customization Fields.
- Action of Approval Request.
- Action of Rejection Request.
- Action of Deny Request.
- Add Notifications for Admin.
- Add Notifications for Users.
- Notify with Request Approval.
- Notify with Request Rejection.
- Enable/Disable User Registration Form on My Account Page.
- Enable/Disable the User Registration Link on the My Account Page.
- Added Registration Link Text.
- Select Registration Page.
- Registration Redirection by Selecting Page or URL.
- Override Default Registration Form.
- Enable/Disable Show Password.
- Enable/Disable Default User Role.
- Select Default User Role.
- Enable/Disable User Role Dropdown.
- Include User Role in the Dropdown.
- Display on My Account Page.
- Display on Checkout Page.
- Enable Approve New User.
- Exclude User Roles.
- Custom Message for Account Created.
- Custom Message for Pending Request.
- Custom Message for Rejected Request.
- Enable/Disable Send Notification to All Admins.
- Enable/Disable Send Notification to Admins When User’s Status is updated.
- Enable/Disable Send Notification to Admins By Selecting Specific User’s.
- Customization CSS Option For Registration Page.
- Form Display Dropdown Flat/Round.
- Custom Forms.
- DropBox Integration.
- New Fields.
- New options in existing fields.
- Recaptcha
- Twilio
- Invitation Code
- VAT
- Password Visibility
- Password Strength indicator and Confirm Password.
Getting Started
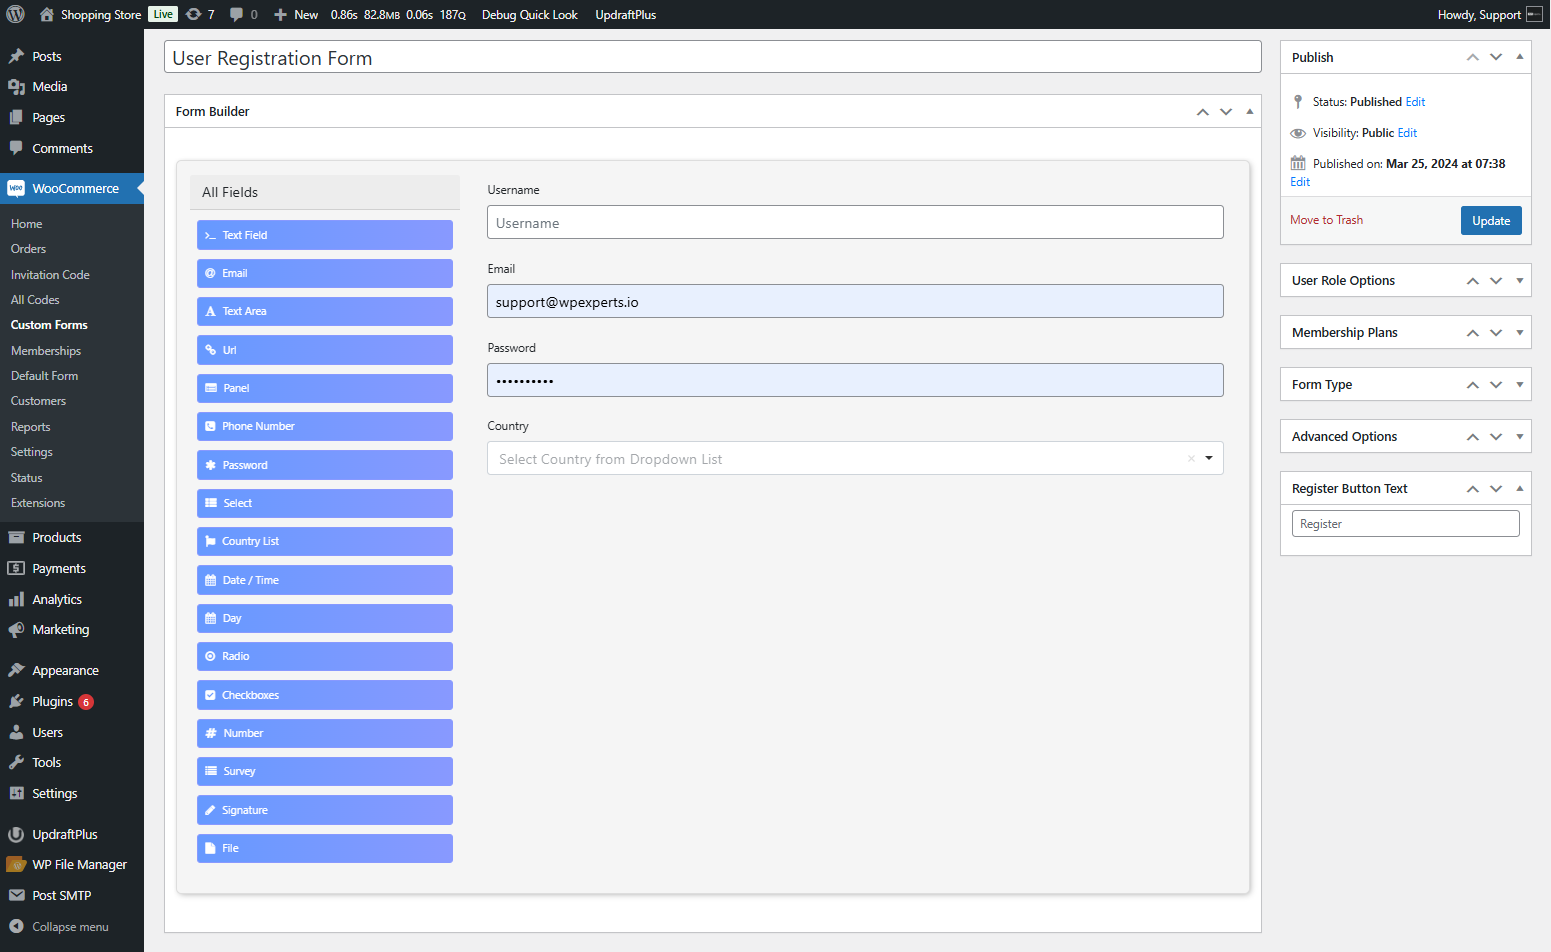
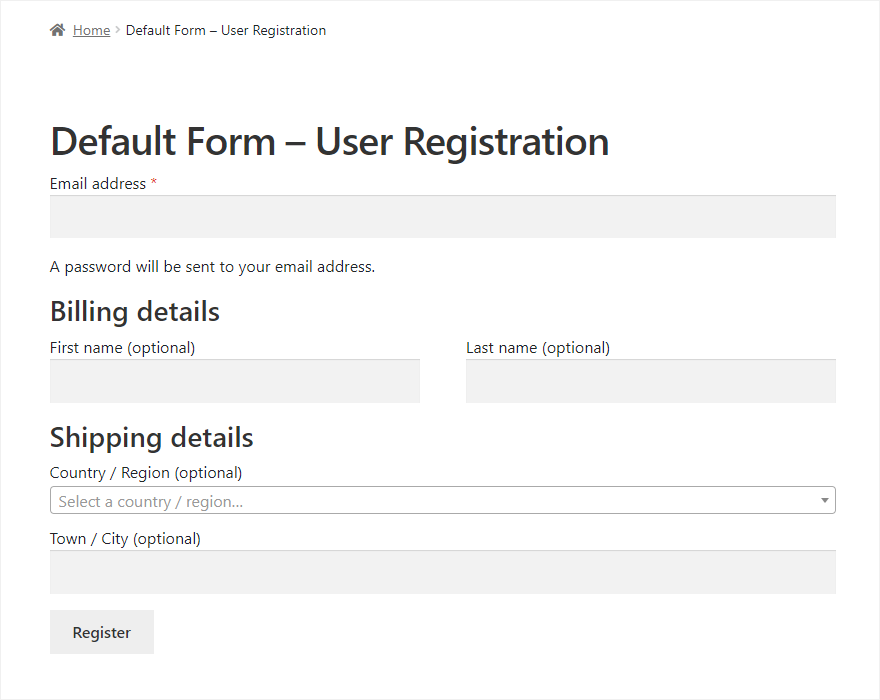
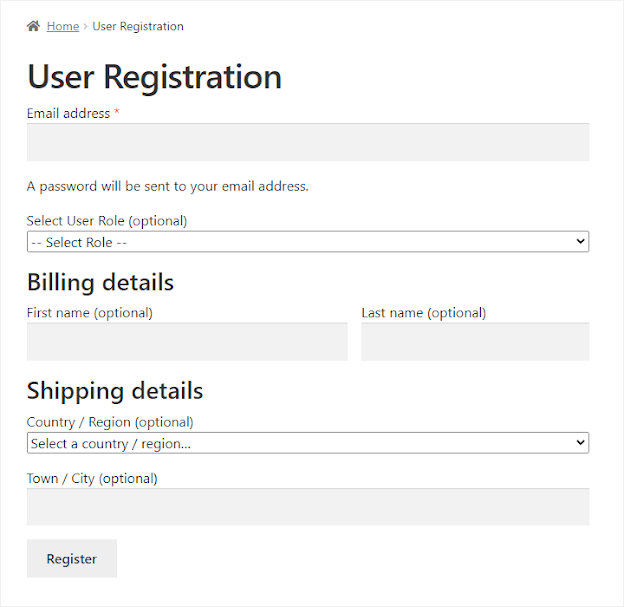
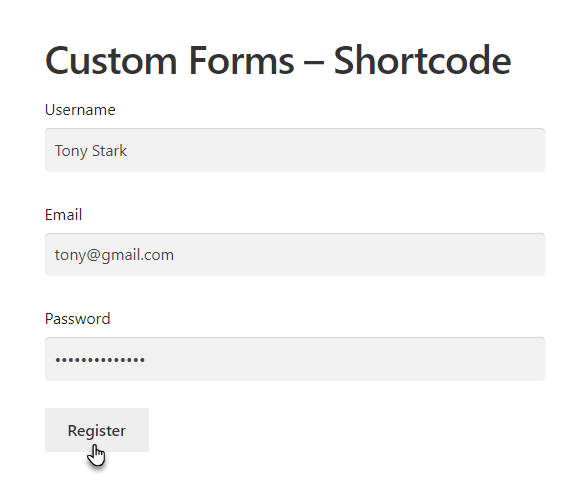
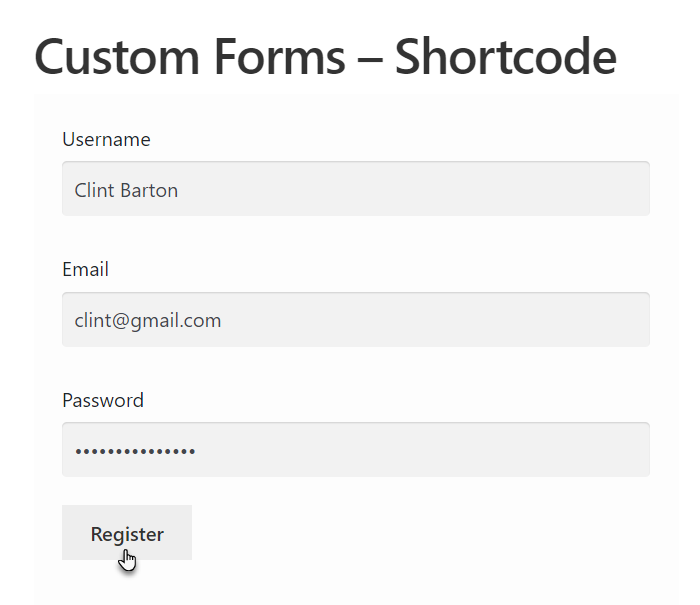
↑ Back to topRegistration Form
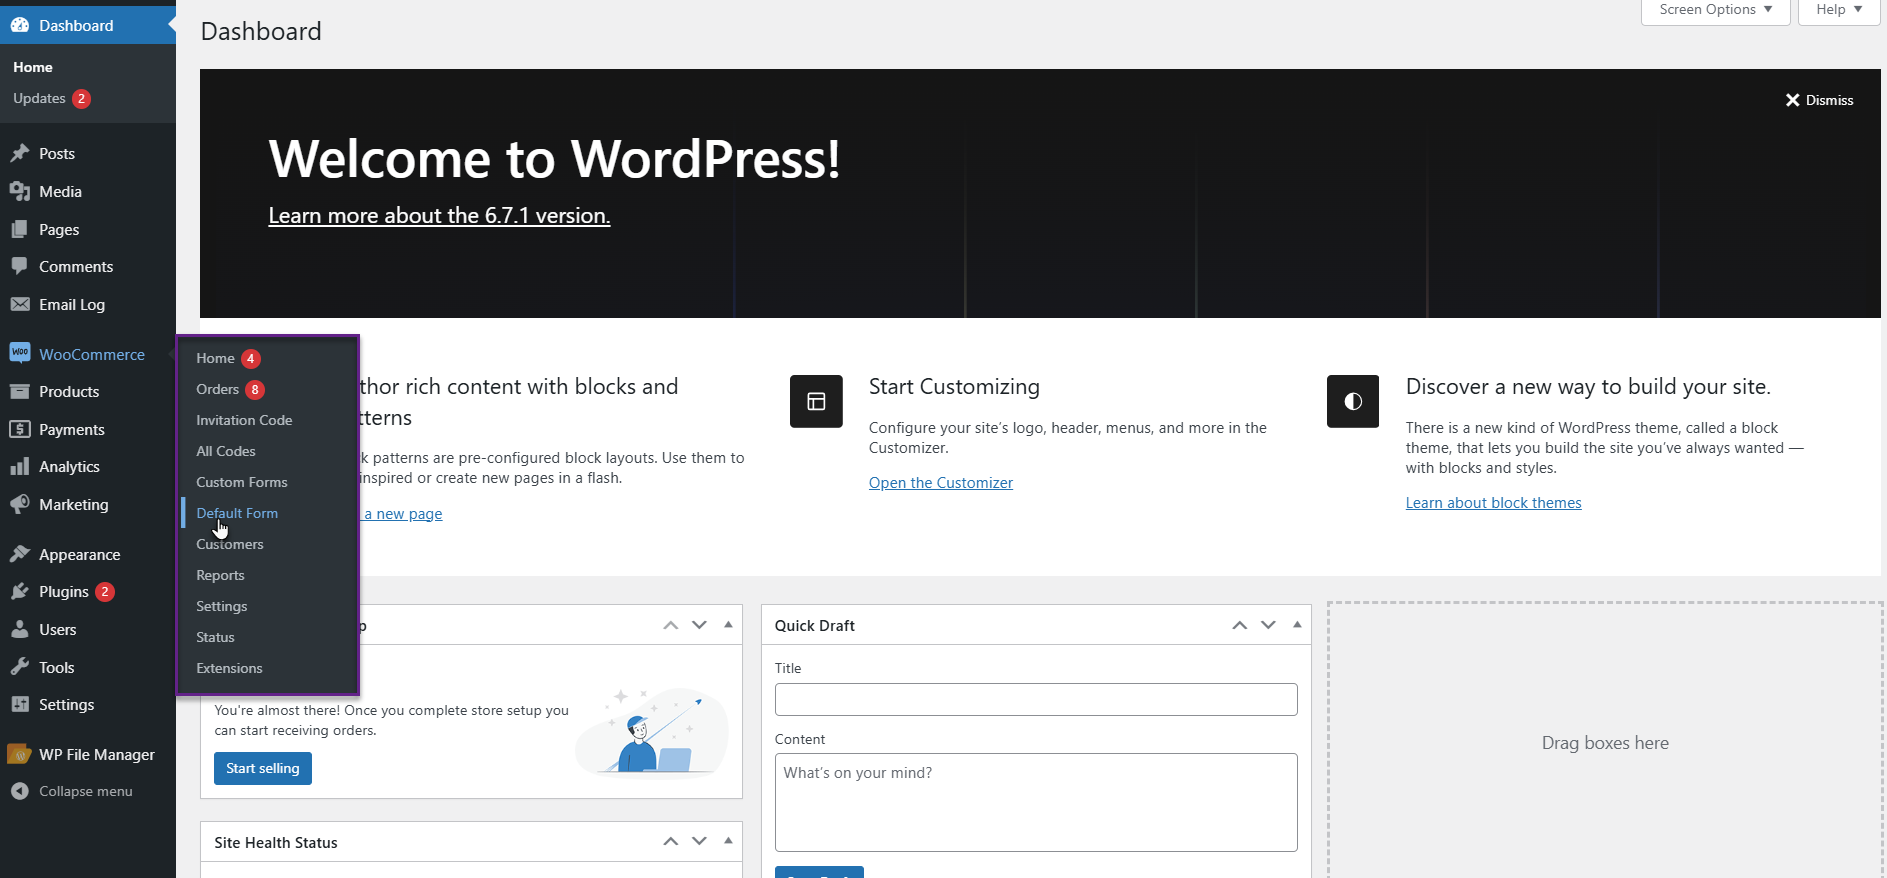
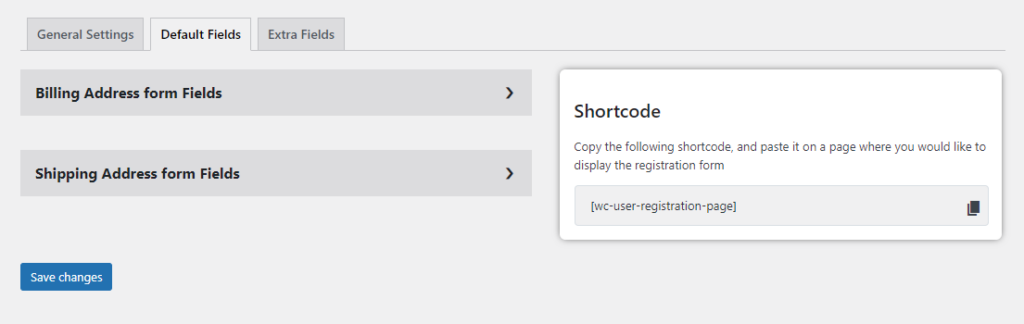
↑ Back to top- Navigate to WordPress Admin Dashboard → WooCommerce → Default Form.
- Once you’re on the Default Form page, you’ll see a Shortcode on the right side of the page.

- This shortcode will enable the User Registration functionality where pasted.
- Copy the shortcode and navigate to WordPress Admin Dashboard → Pages → Add New.
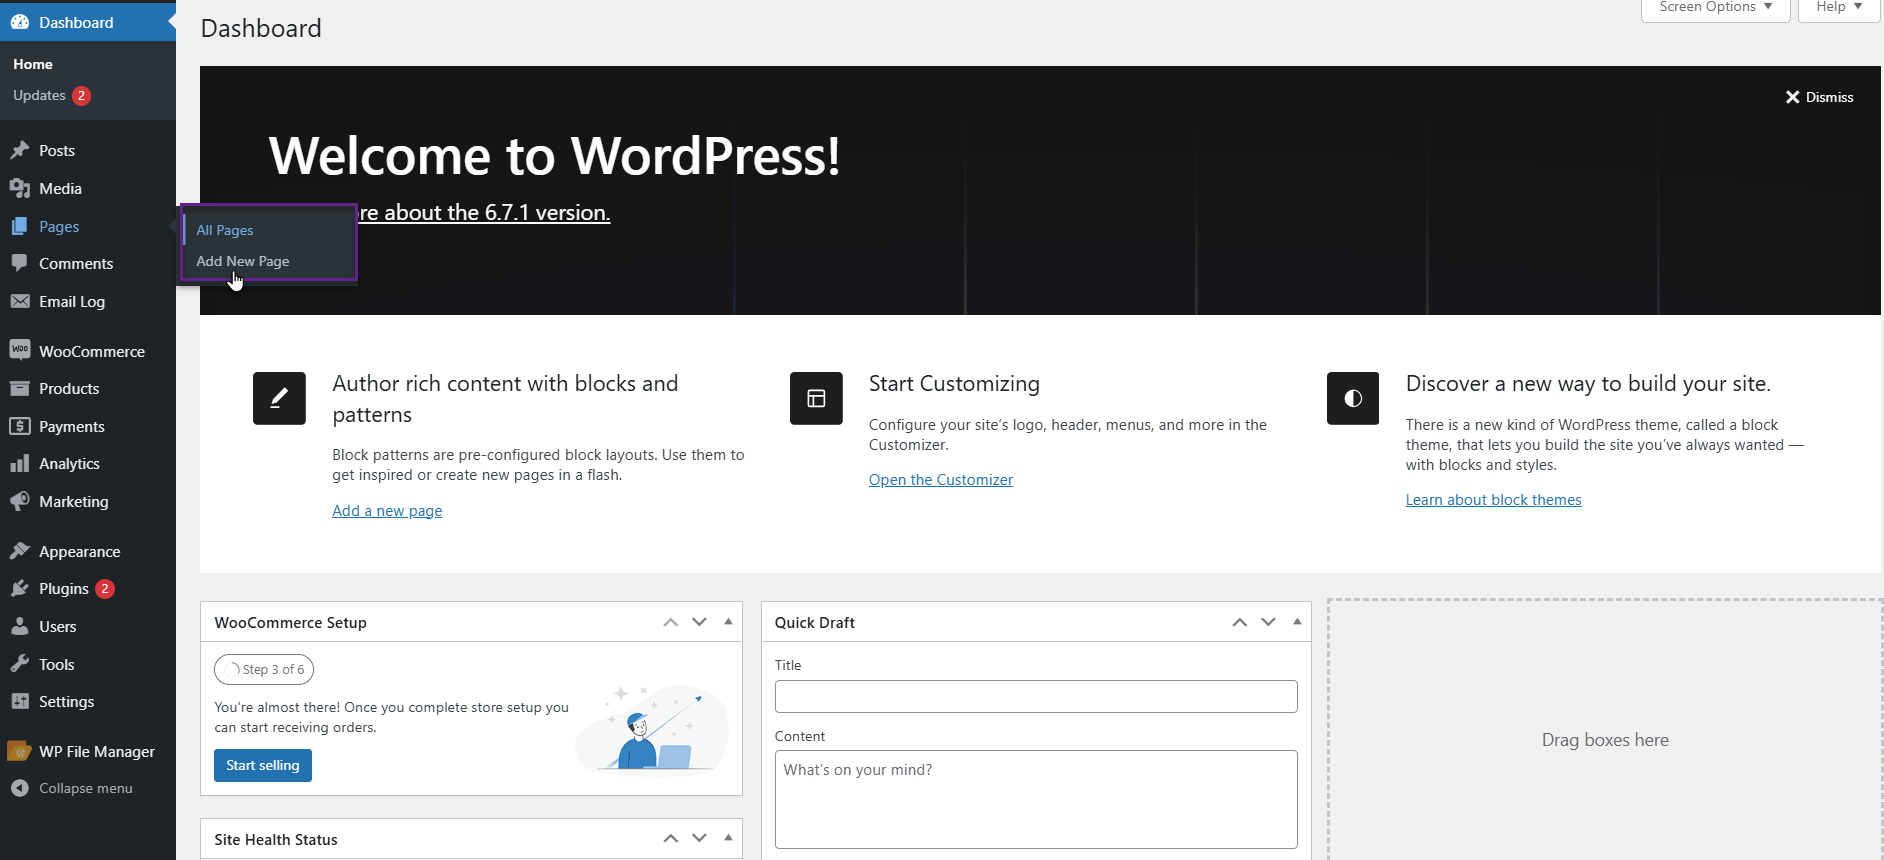
- A new page would open.
- Add the Title of the page.
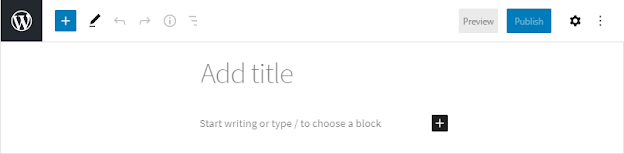
- Click on the sign

- Select the Shortcode element.

- Once done, we can see that a shortcode [wc-user-registration-page] will be added to the page.
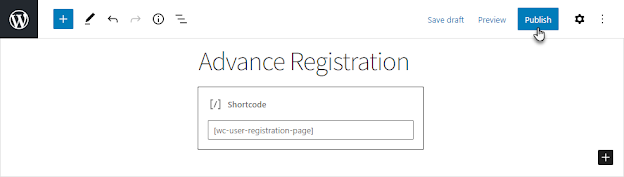
- Click on the Publish button.
- Now go back to the Default Form page by navigating to WordPress Admin Dashboard → WooCommerce → Default Form.
- Once you’re on the Default Form page, you’ll see three tabs on this page.
- General Settings
- Default Fields
- Extra Fields
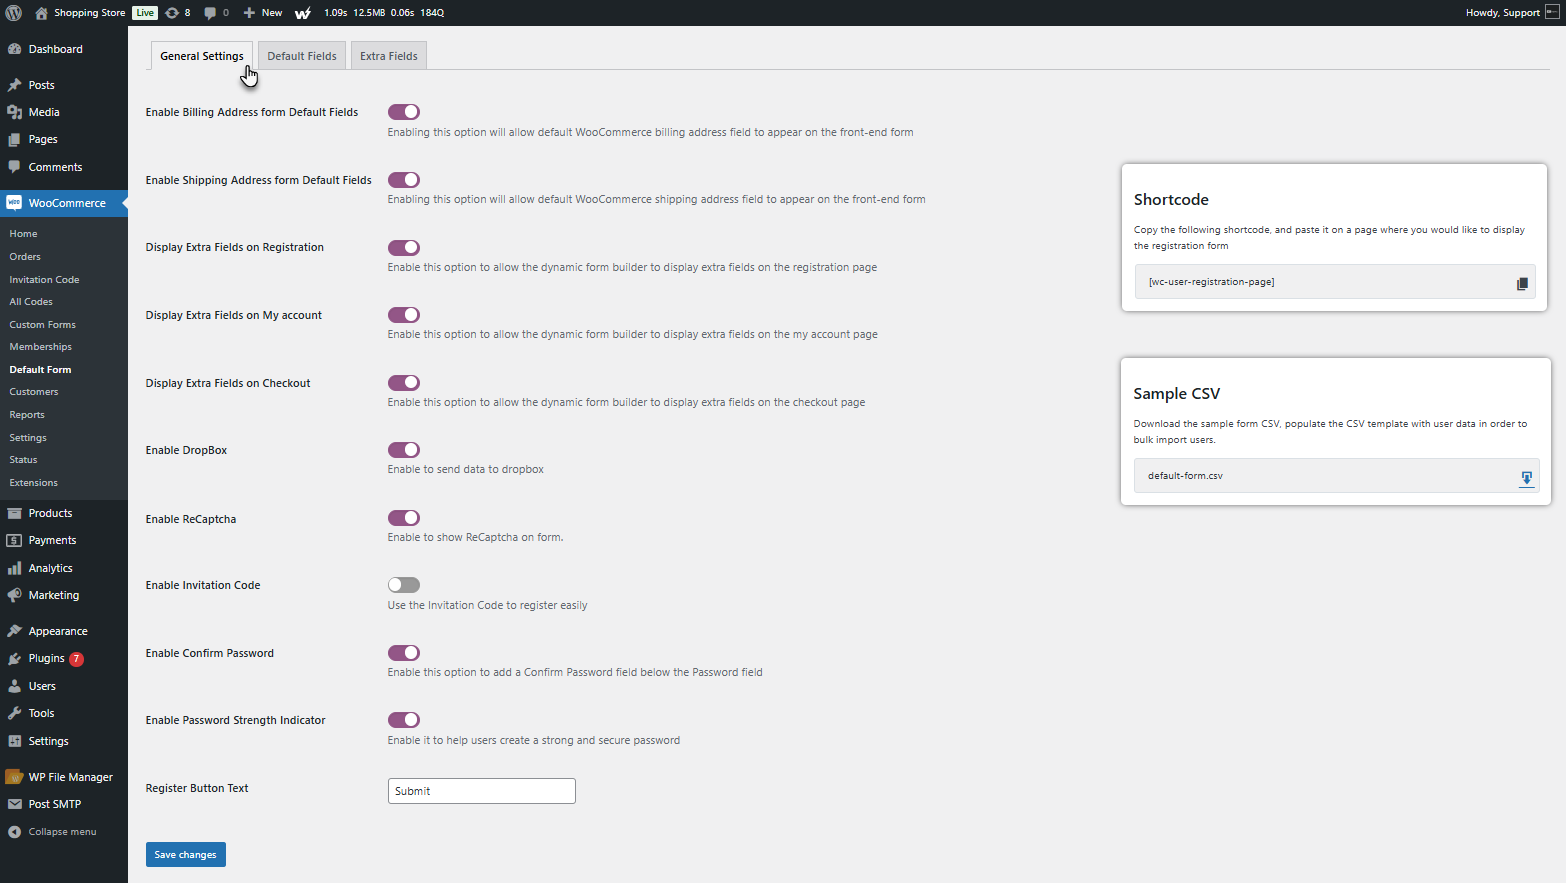
General Settings
↑ Back to top- Navigate to the General Settings tab. (The Admin will be redirected to the General Settings tab by default when you’re on the Registration Form page).
Enable Billing Address from Default Fields
↑ Back to top- Enable this option to display the Billing Address on the User Registration page.
Enable Shipping Address from Default Fields
↑ Back to top- Enable this option to display the Shipping Address on the User Registration.
Display Extra Fields on the Registration Page
↑ Back to top- Enable this option to allow the dynamic form builder to display extra fields on the User Registration.
Display Extra Fields on My Account Page
↑ Back to top- Enable this option to allow the dynamic form builder to display extra fields on the My Account page.
Display Extra Fields on Checkout Page
↑ Back to top- Enable this option to allow the dynamic form builder to display extra fields on the Checkout page.
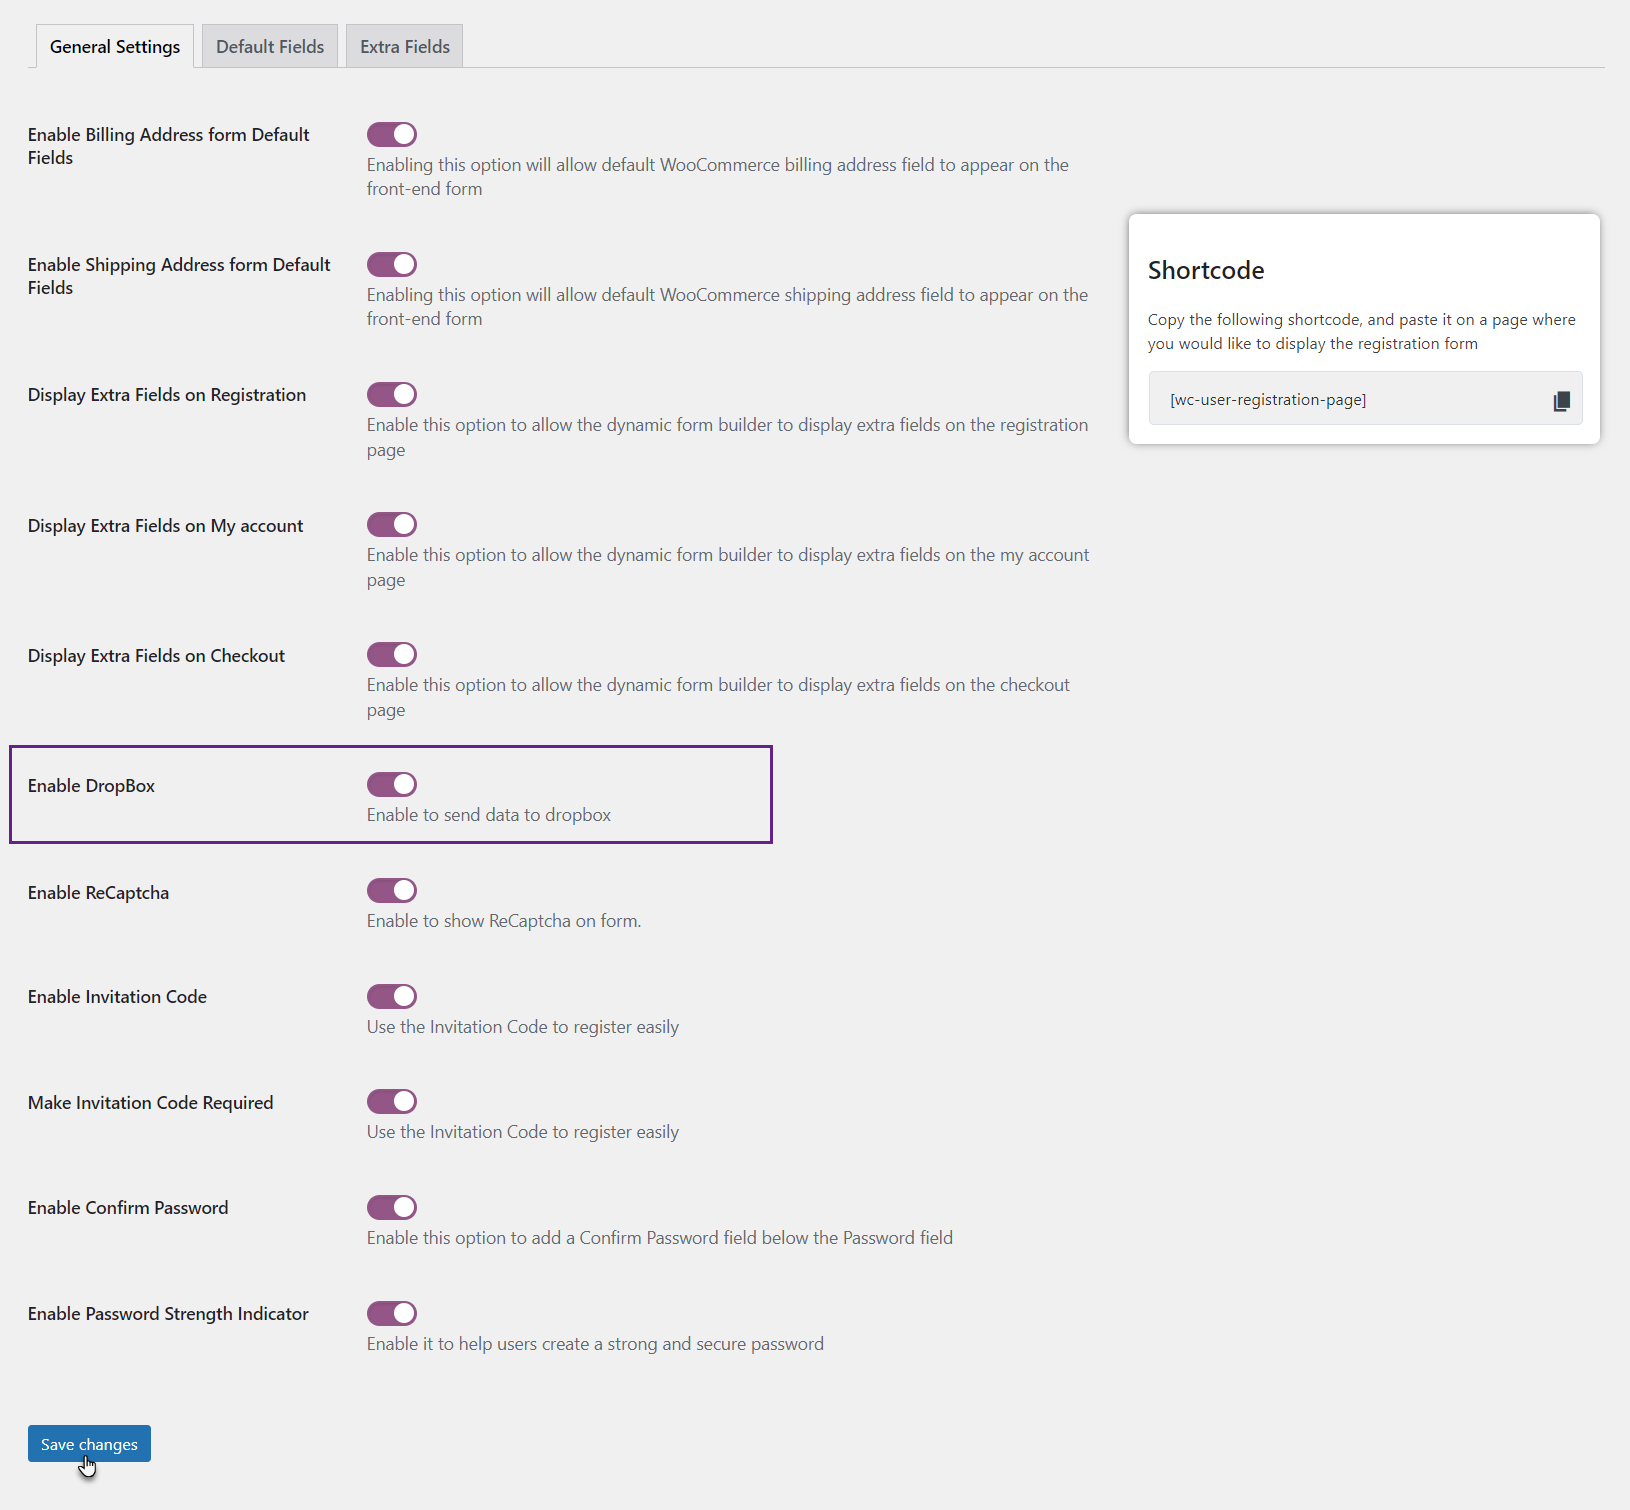
Enable Dropbox
↑ Back to top- Enable this option to send data to Dropbox.
Enable ReCaptcha
↑ Back to top- Enable this option to show ReCaptcha on the form.

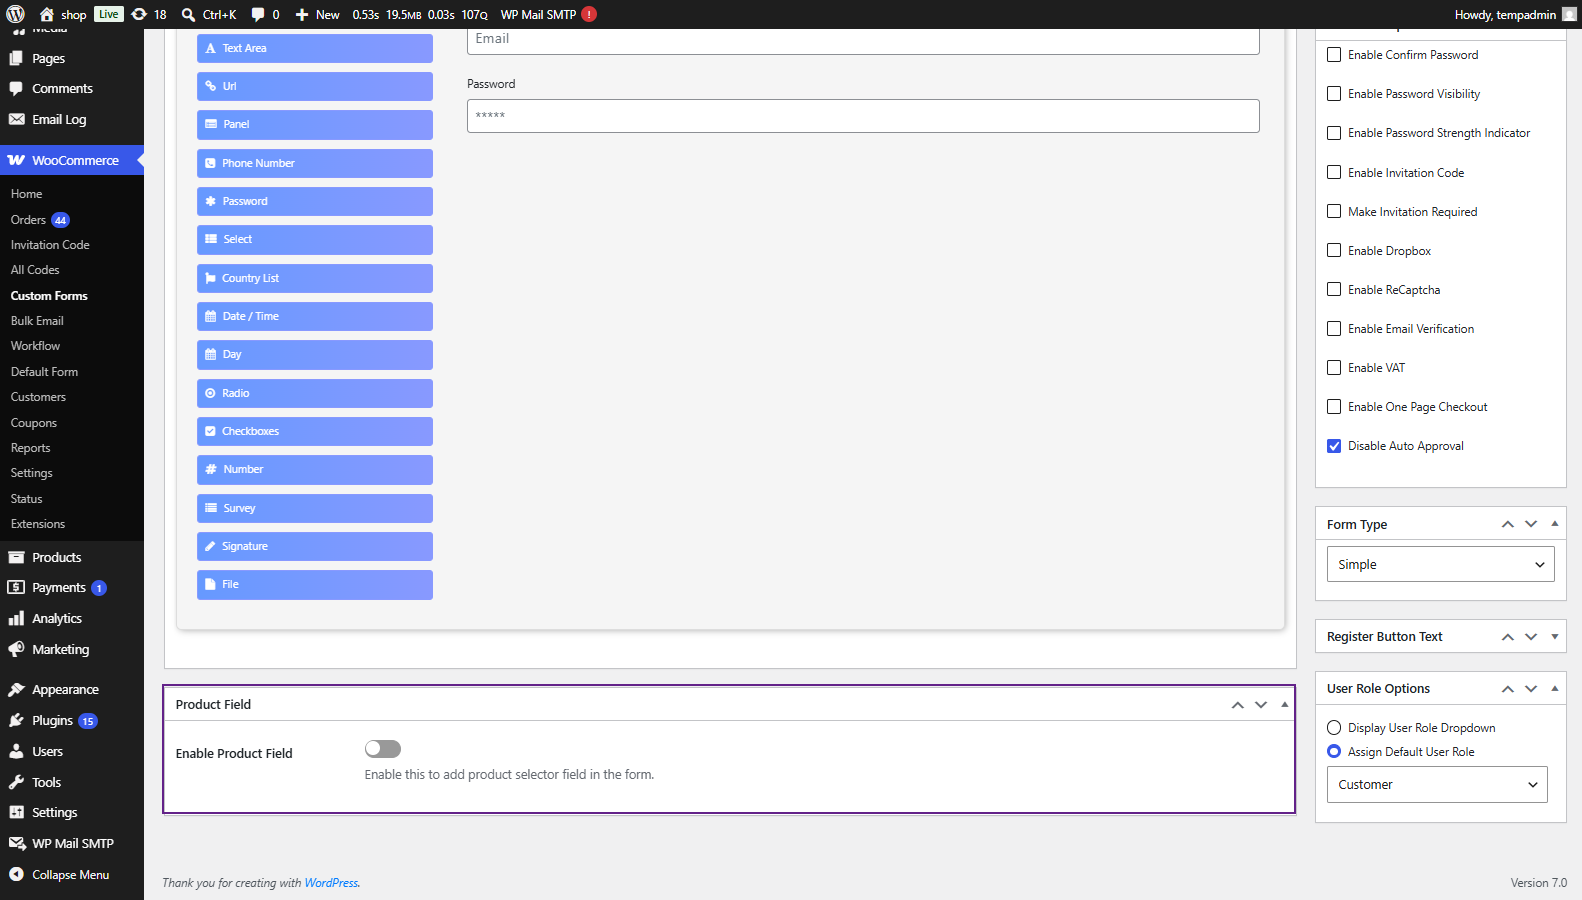
Enable Invitation Code
↑ Back to top- Enable this option to show the Invitation Code on the form. This will permit users to register using an invitation code.

- The Make Invitation Code Required option will appear on enabling the Enable Invitation Code option.
Make Invitation Code Required
↑ Back to top- Enable this option to make the Invitation Code required on the form.
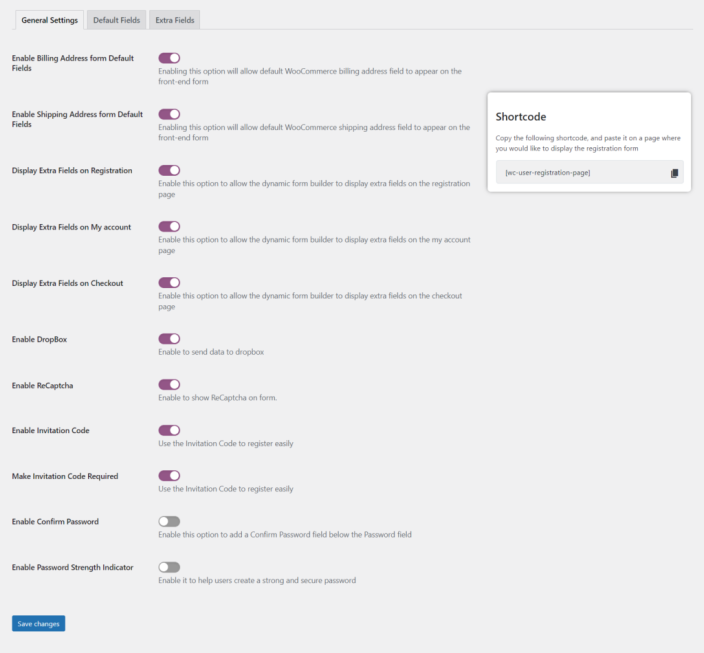
Enable Confirm Password
↑ Back to top- Enable this option to add a confirm password field on the form.
Enable Password Strength Indicator
↑ Back to top- Enable this option to indicate the strength of your password on the form.
- Click on the Save changes button to apply your settings.
Register Button Text
↑ Back to top- To change the Register button on the Default Form, navigate to WordPress Admin Dashboard > WooCommerce > Default Form > General Settings.
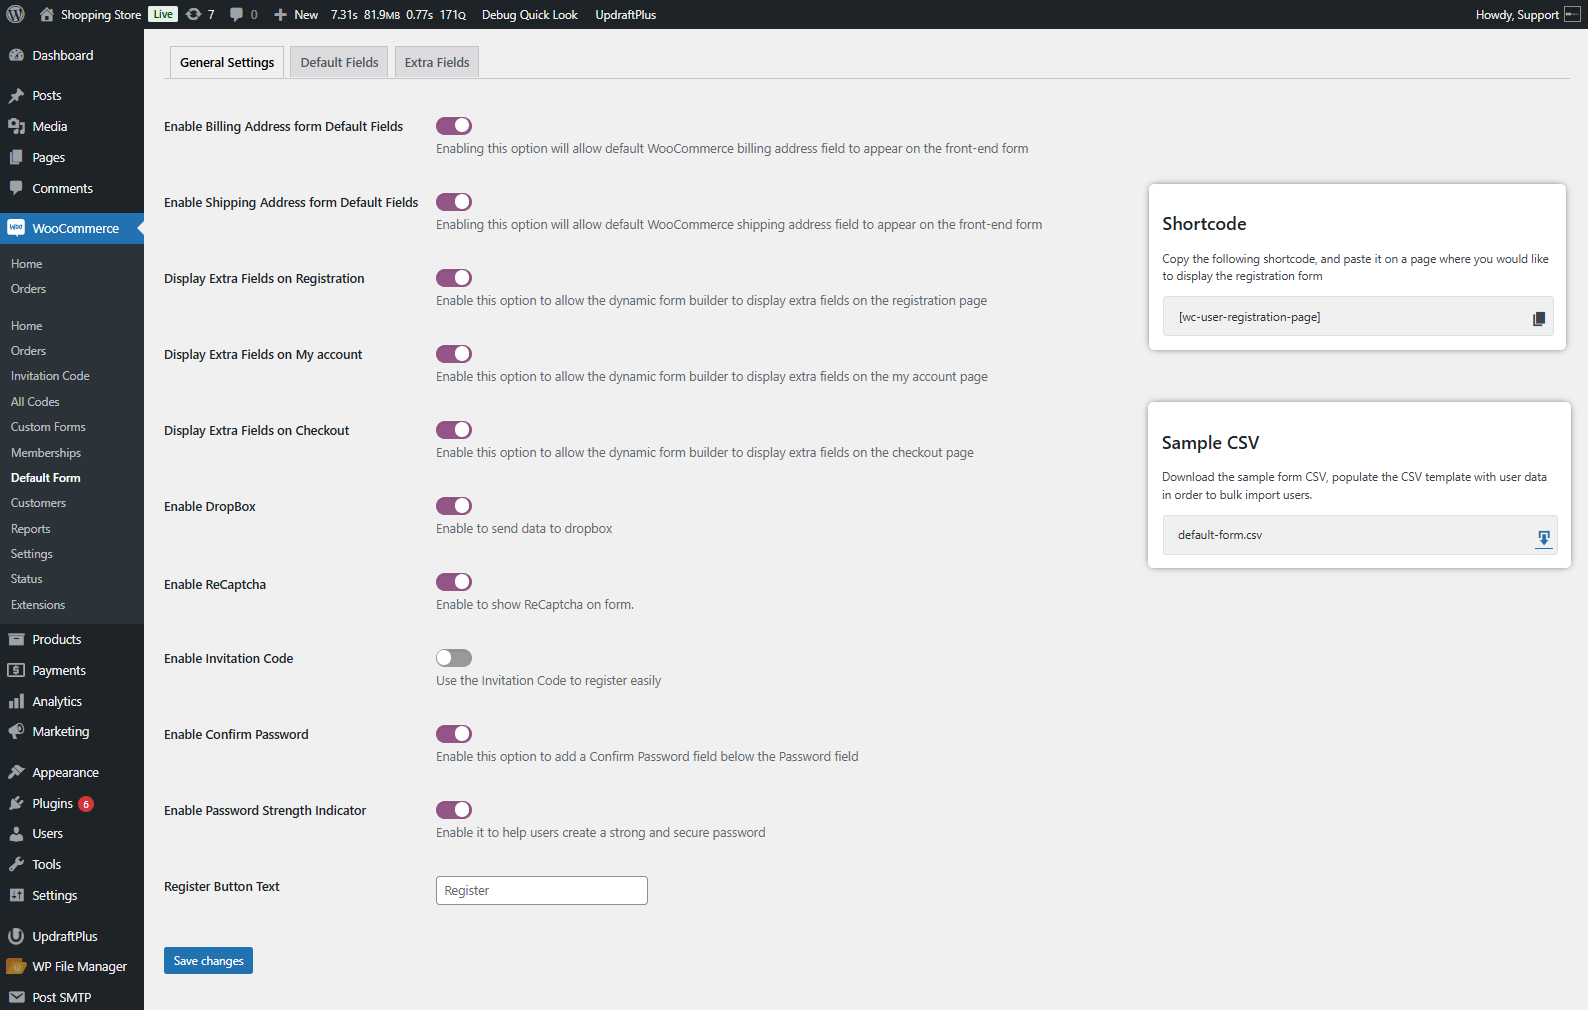
- Locate the Register Button Text field. Add text to change the Register Button on the Default form.
- Click on the Save Changes button to update the changes.
- To change the Register button on the Custom Form, navigate to WordPress Admin Dashboard > WooCommerce > Custom Form > Edit Custom Form.
- Locate the Register Button Text meta box on the side. Add text to change the Register Button on the Custom form.
- Click on the Update button to save changes.
Front End Impact
- Default Form
- Custom Form
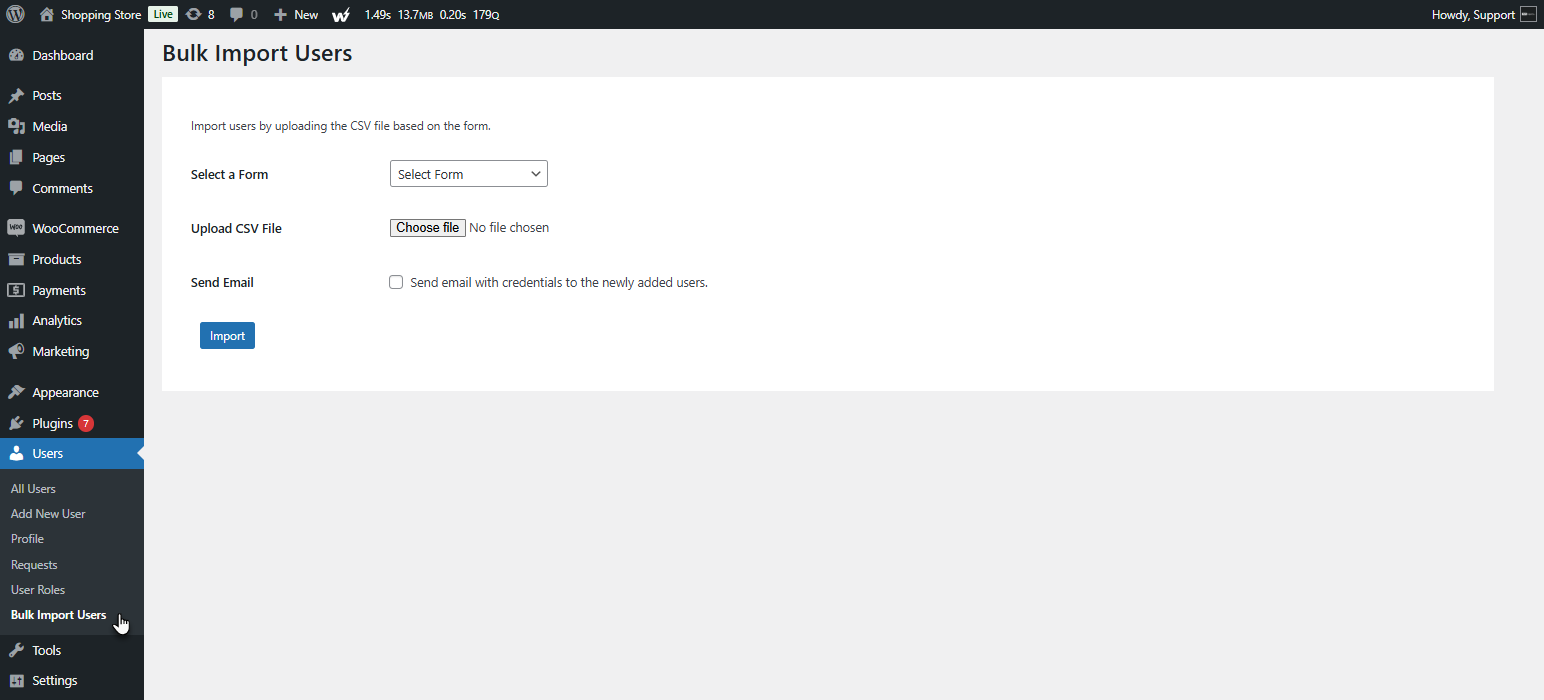
Bulk Import User
↑ Back to top
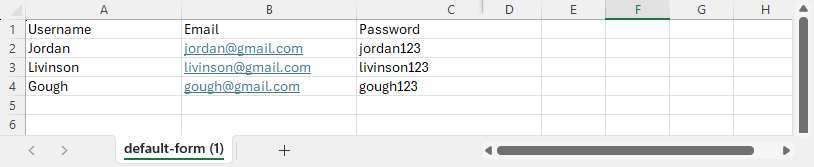
This feature allows admins to add multiple users at once by uploading a CSV file. A sample CSV template containing the required fields for user details is provided. Admins can fill in the necessary information and upload the file, and the system will automatically create user accounts for each entry. Additionally, there is an option to send credential emails to the newly added users, ensuring they receive their login details.
Default Form
- For the Default form, navigate to WordPress Admin Dashboard > WooCommerce > Default Form > General Settings.
- Locate the Sample CSV meta box and click Download to get the Default Form CSV file.
- Once downloaded, add the necessary details to the CSV file before uploading it to the system.
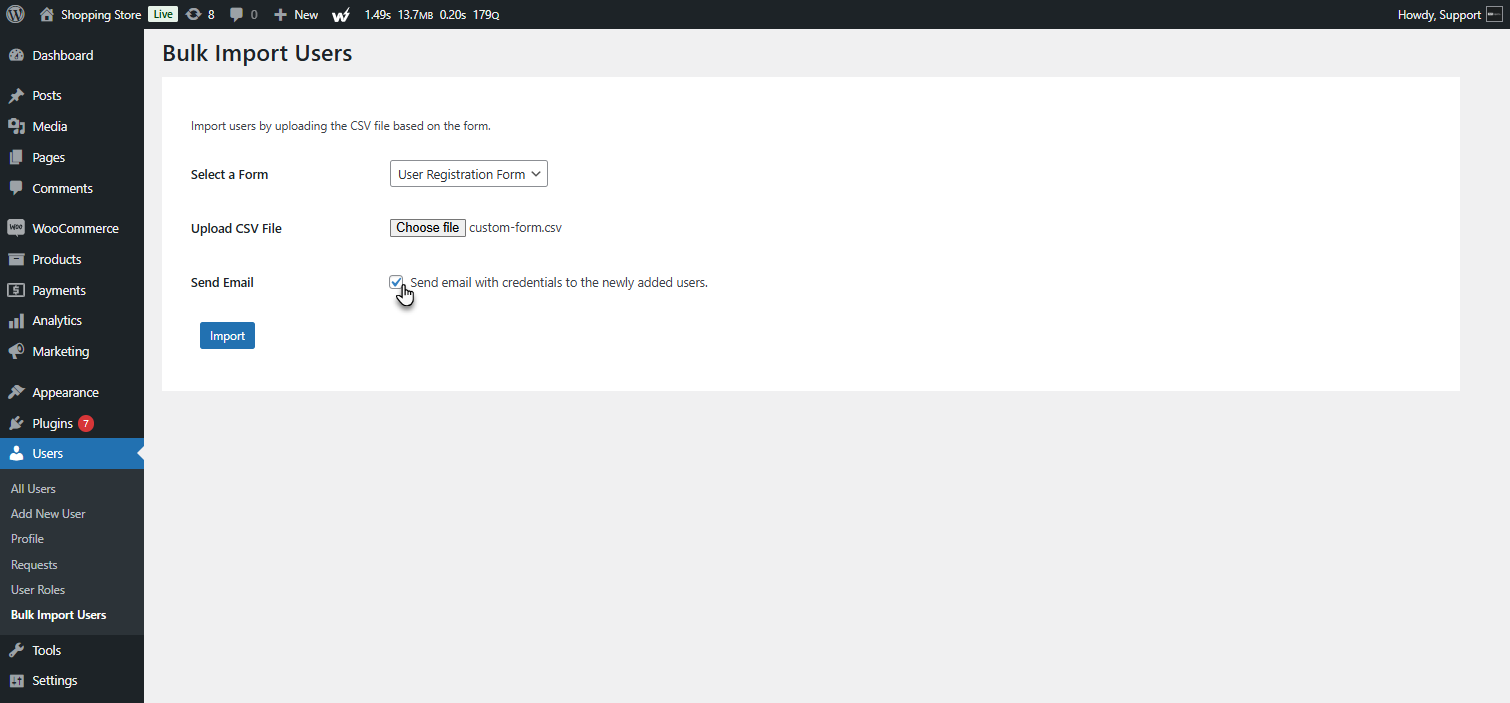
- To upload the CSV file, navigate to WordPress Admin Dashboard > Users > Bulk Import Users
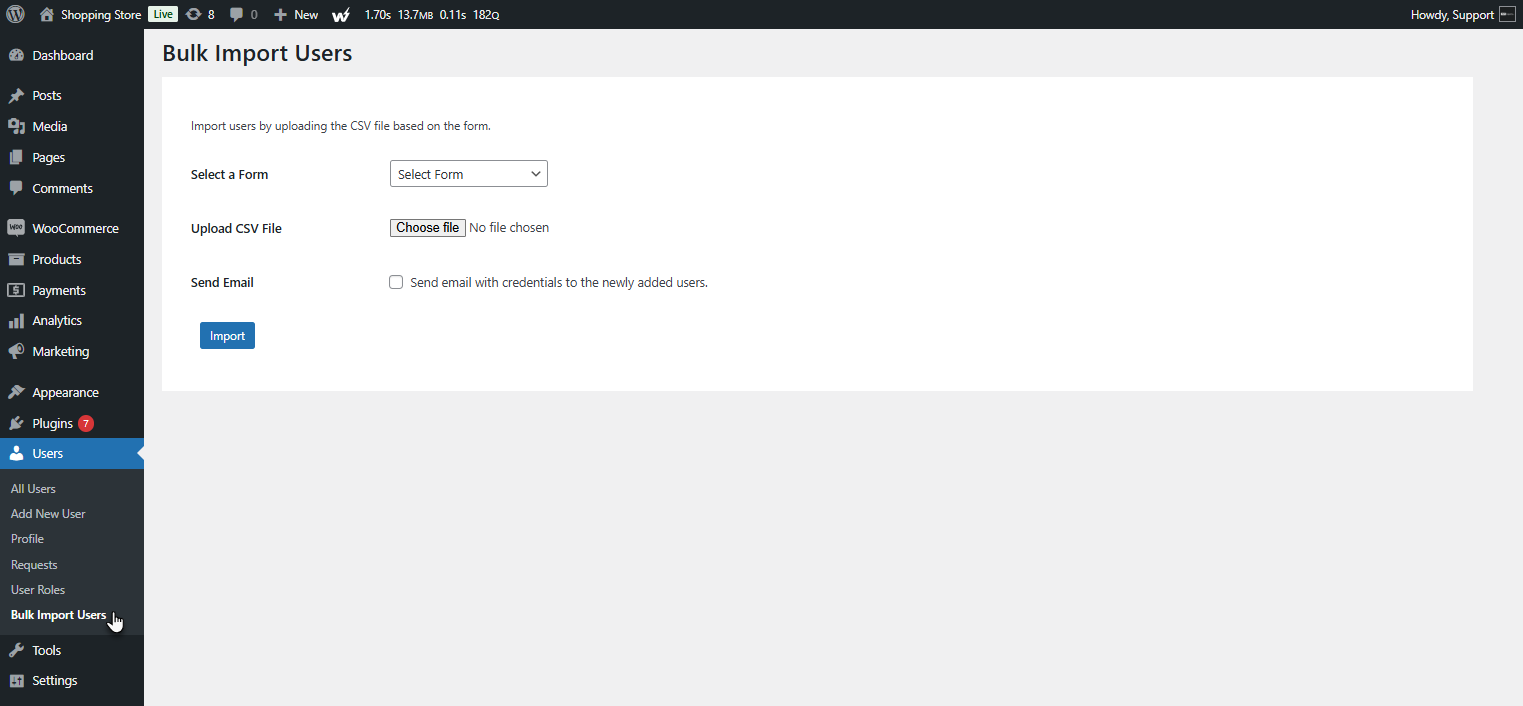
- Select a form from the Select a Form dropdown, where all available forms will be listed.
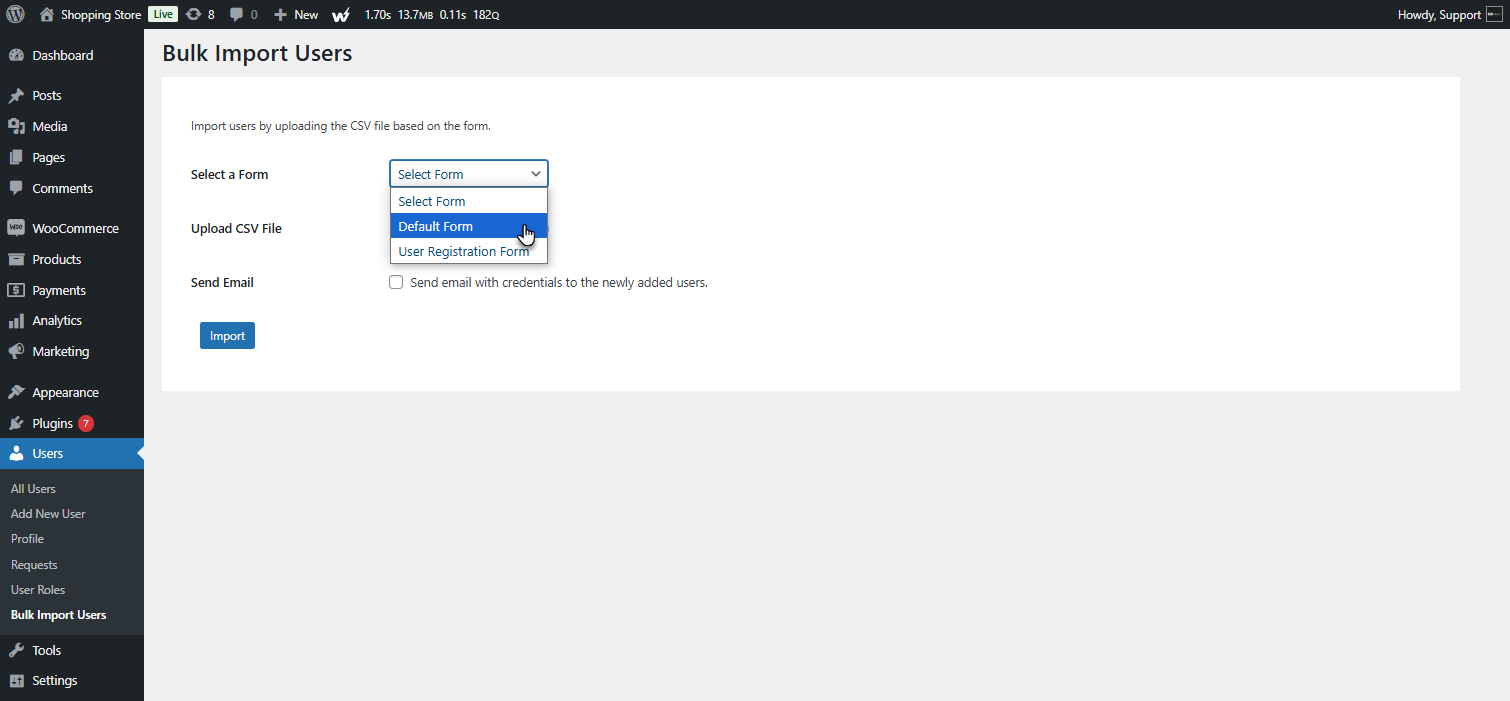
- Choose the CSV file and upload it using the Upload CSV File option.
- To send login credentials to new users, check the Send Email option.
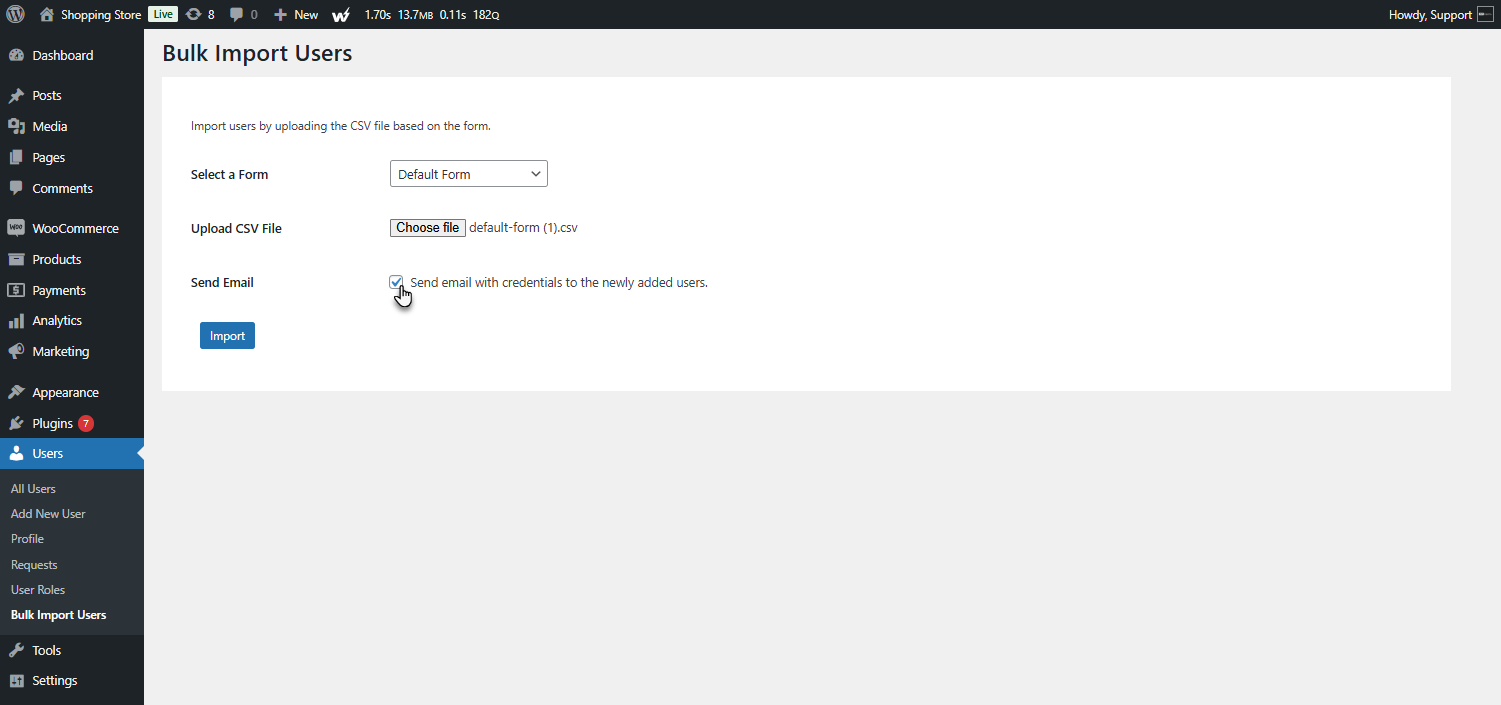
- Click the Import button to complete the process.

- The users in the CSV file will be registered in the All Users tab.
- The credentials will be sent to the user via Email.
Custom Form
- For the Custom Form, navigate to WordPress Admin Dashboard > WooCommerce > Custom Form.
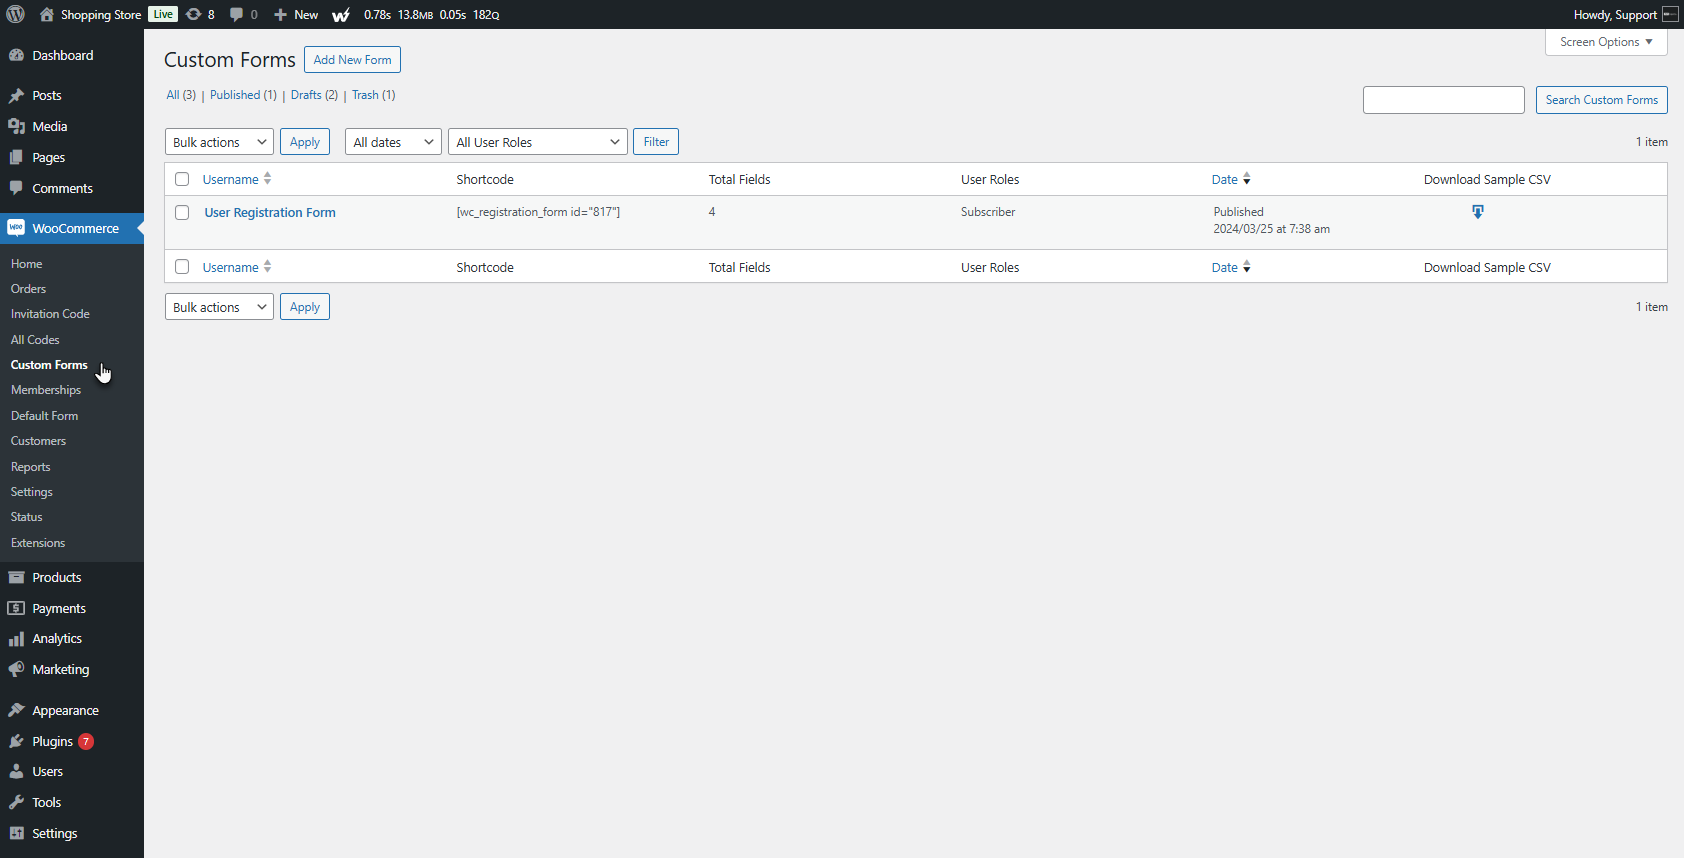
- All Custom Forms will appear. Click on the download button in the download sample CSV column.
- Once downloaded, add the necessary details to the CSV file before uploading it to the system.

- To upload the CSV file, navigate to WordPress Admin Dashboard > Users > Bulk Import Users
- Select a form from the Select a Form dropdown, where all available forms will be listed.
- Choose the CSV file and upload it using the Upload CSV File option.

- To send login credentials to new users, check the Send Email option.
- Click the Import button to complete the process.
- The users in the CSV file will be registered in the All Users tab.
- The credentials will be sent to the user via Email.
Bulk Email
↑ Back to topThe Bulk Email feature allows the admin to send emails to multiple users at once. Emails can be sent to all users under a specific role or to users registered through a specific form.
- Go to WooCommerce → Bulk Email.

- You will see a list of all bulk email templates created earlier.

- Use the filters (Form, User Role, Email Status) to manage or search existing templates.
- You can create a new bulk email by clicking Add New.

Add / Edit Bulk Email
↑ Back to topWhen you click Add New, you’ll be taken to the Bulk Email editor screen.
This section contains one main part:
- Email Configuration
Email Configuration
↑ Back to topThis metabox allows you to define how and to whom the bulk email will be sent.
Title
- Enter a title for your bulk email.
- This title helps the admin identify the email in the Bulk Email list (e.g., “Welcome Email for New Users” or “Discount Offer for Subscribers”).

Email Type
Choose how the bulk email should be sent:
- General – Send an email to all users belonging to specific User Roles.
- Form Specific – Send an email to users who registered through a specific form.
General
- After selecting General, choose the desired roles from the Select User Role dropdown.

- The email will be sent to all users under the selected roles.

Form Specific
- Click on the Form Specific radio button to enable this option.
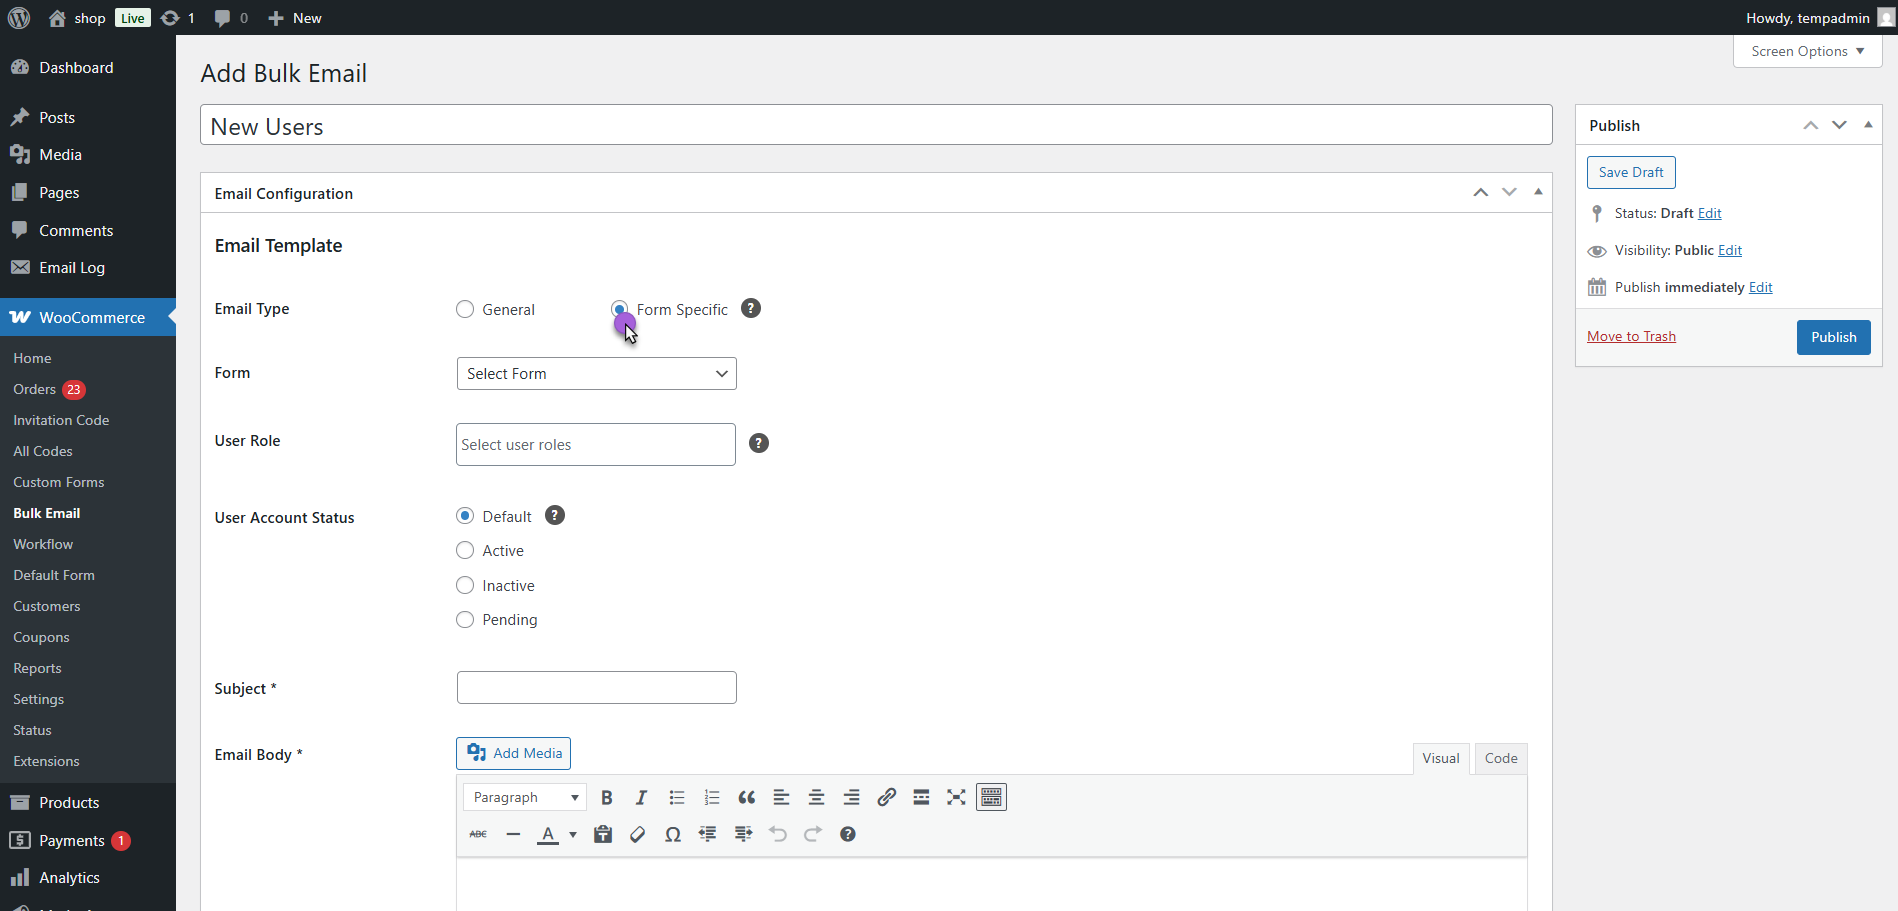
- This is used to send emails to users who registered through a specific Form.
- Once selected, a Form dropdown will appear where you can choose the registration form.

- Select the registration form whose users should receive this email.

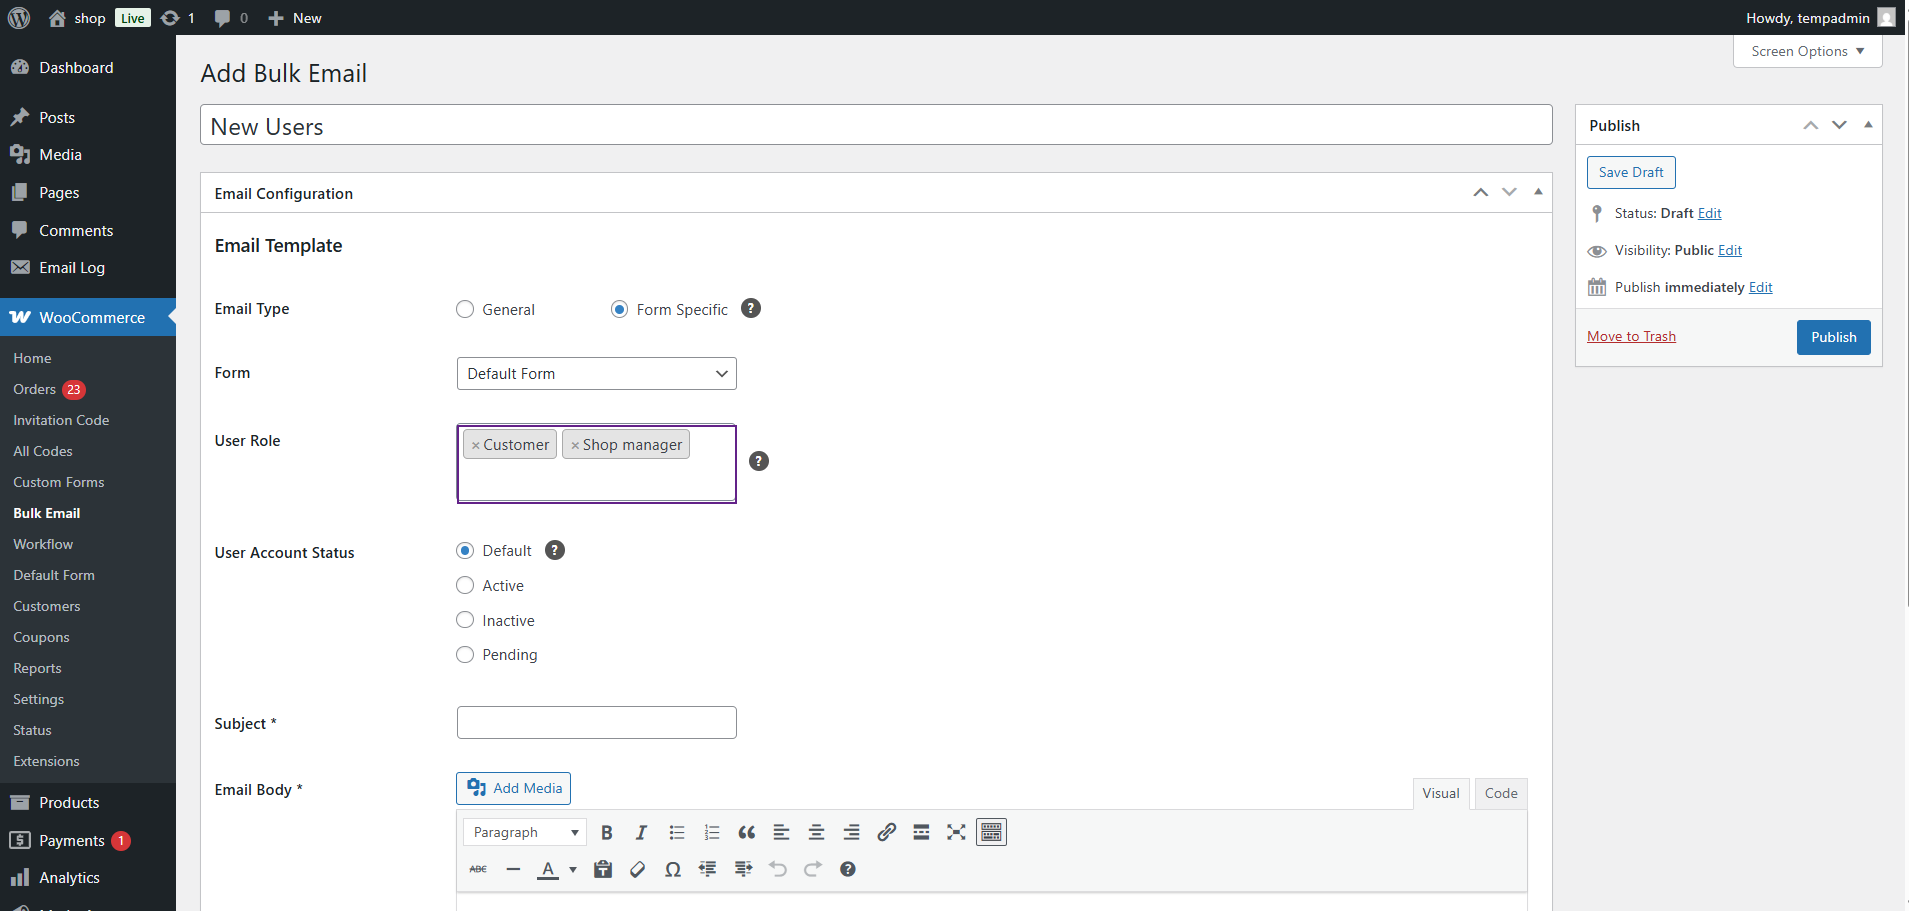
- Select one or multiple User Roles from the dropdown.
- Works for both General and Form Specific email types.
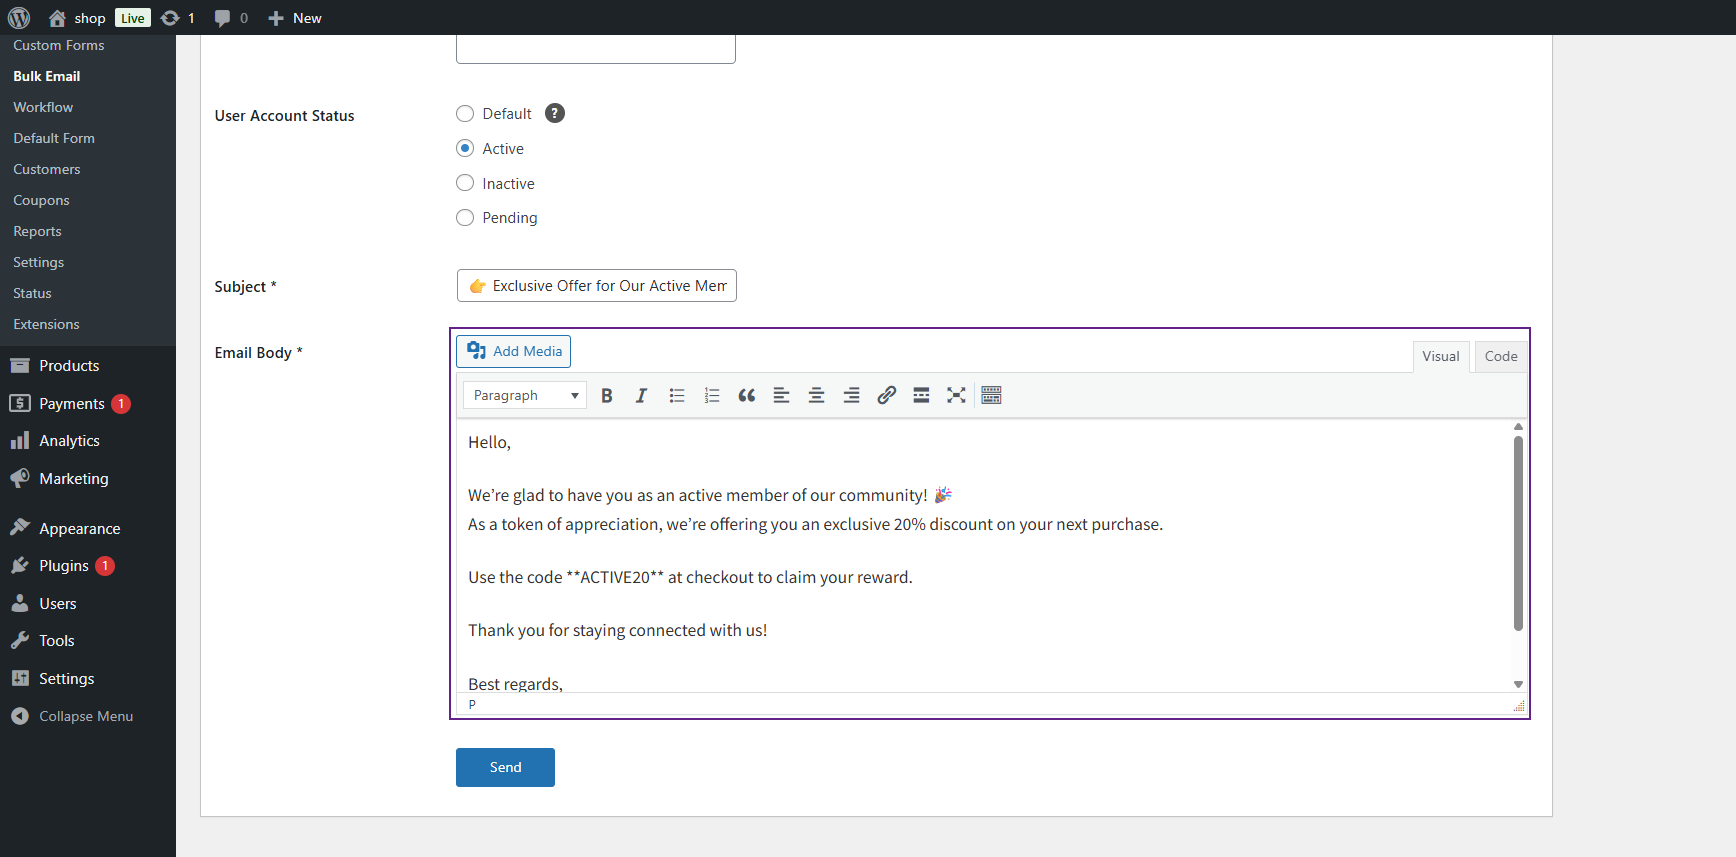
User Account Status
- Select the user account status for which the email should be sent.
- Only one option can be selected at a time.
- Default – Sends email to all users, regardless of their account status.
- Active – Sends email only to users with active accounts.
- Inactive – Sends email to users who are marked as inactive.
- Pending – Sends email to users whose registration or approval is still pending.

Subject
- Enter the subject line for the email.
- This will be visible to the users in their inbox.
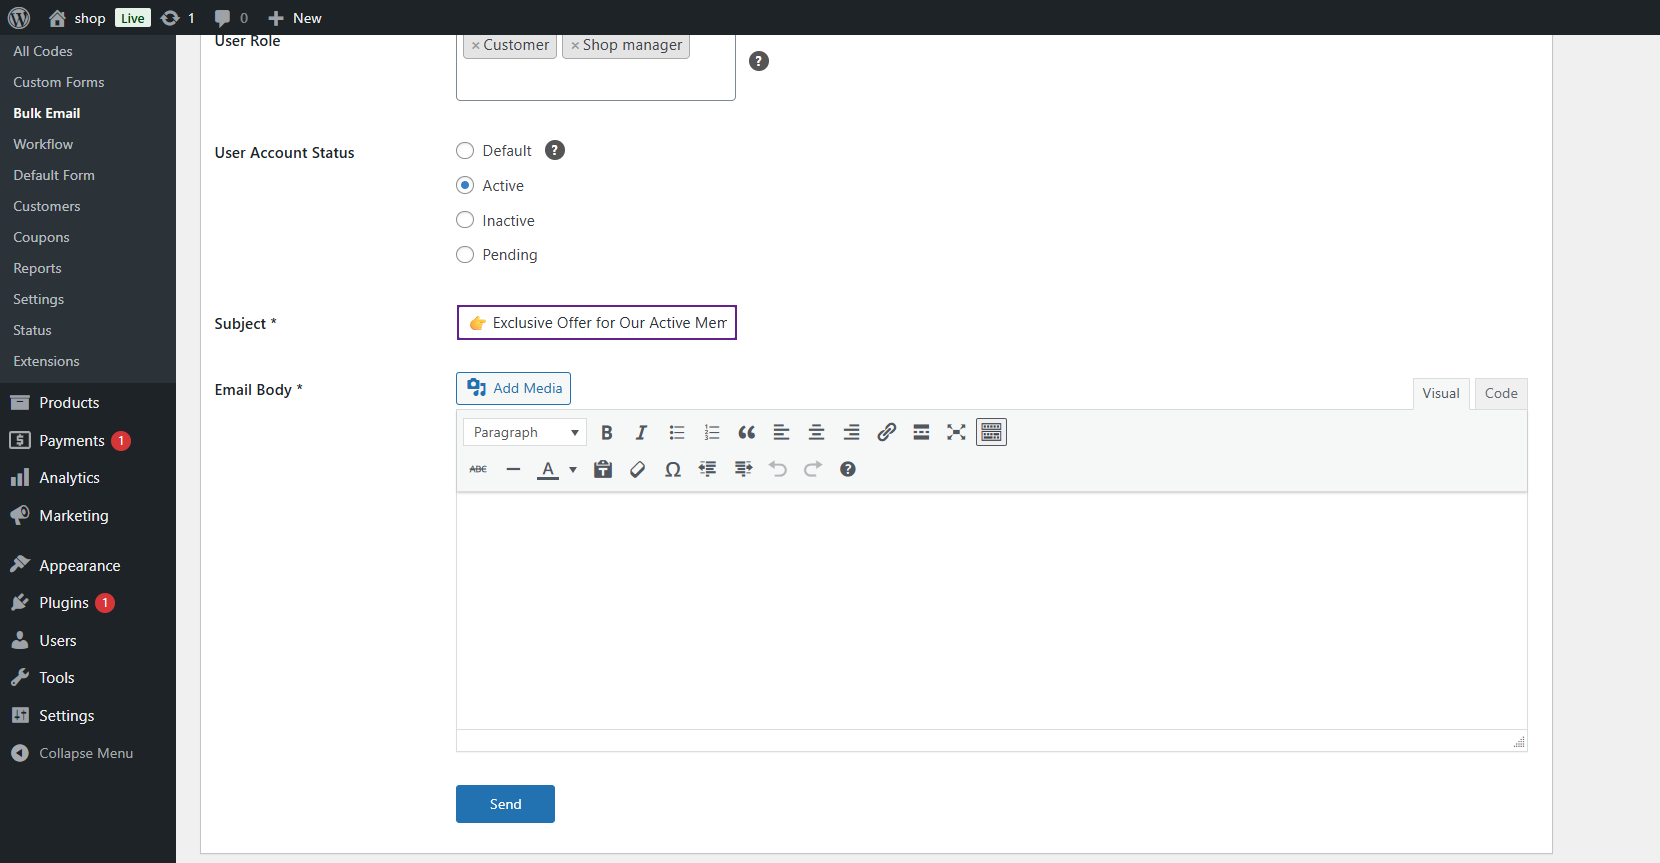
Email Body
- Write the main content of the email.
- You can use text formatting, images, or links using the WordPress text editor.
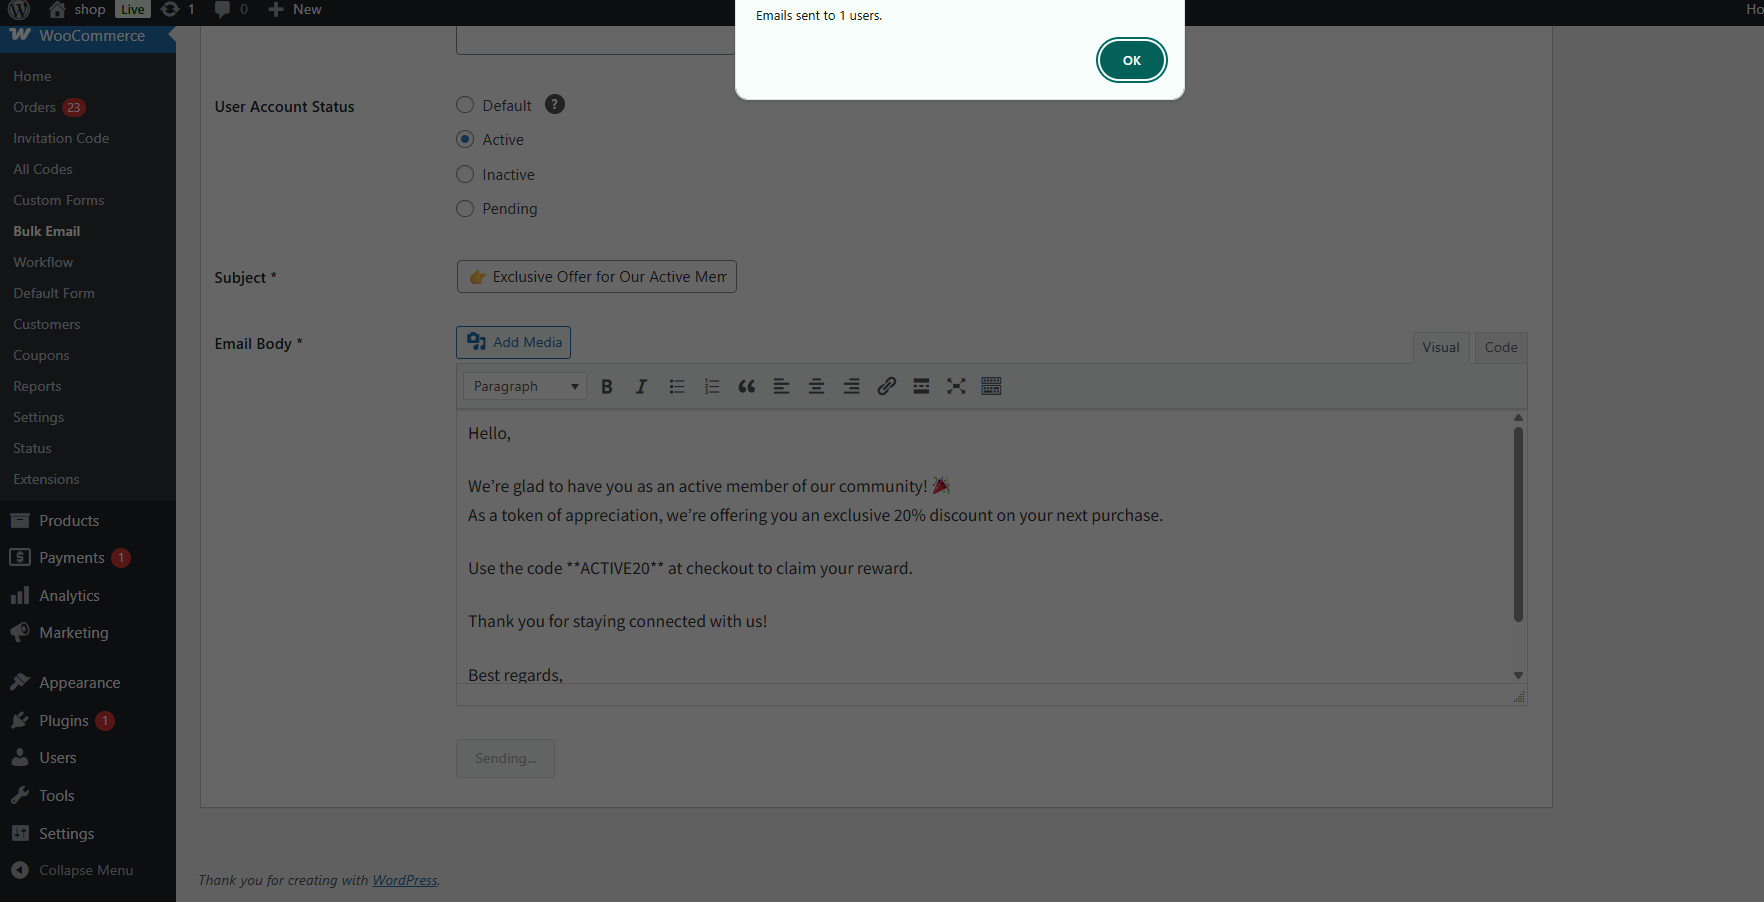
Send Button
- Before sending, click on Update or Publish to save the email settings.

- Then click Send Now to send the email to all selected users.

- Once sent, a success alert will appear confirming that the email has been successfully delivered.
Workflow
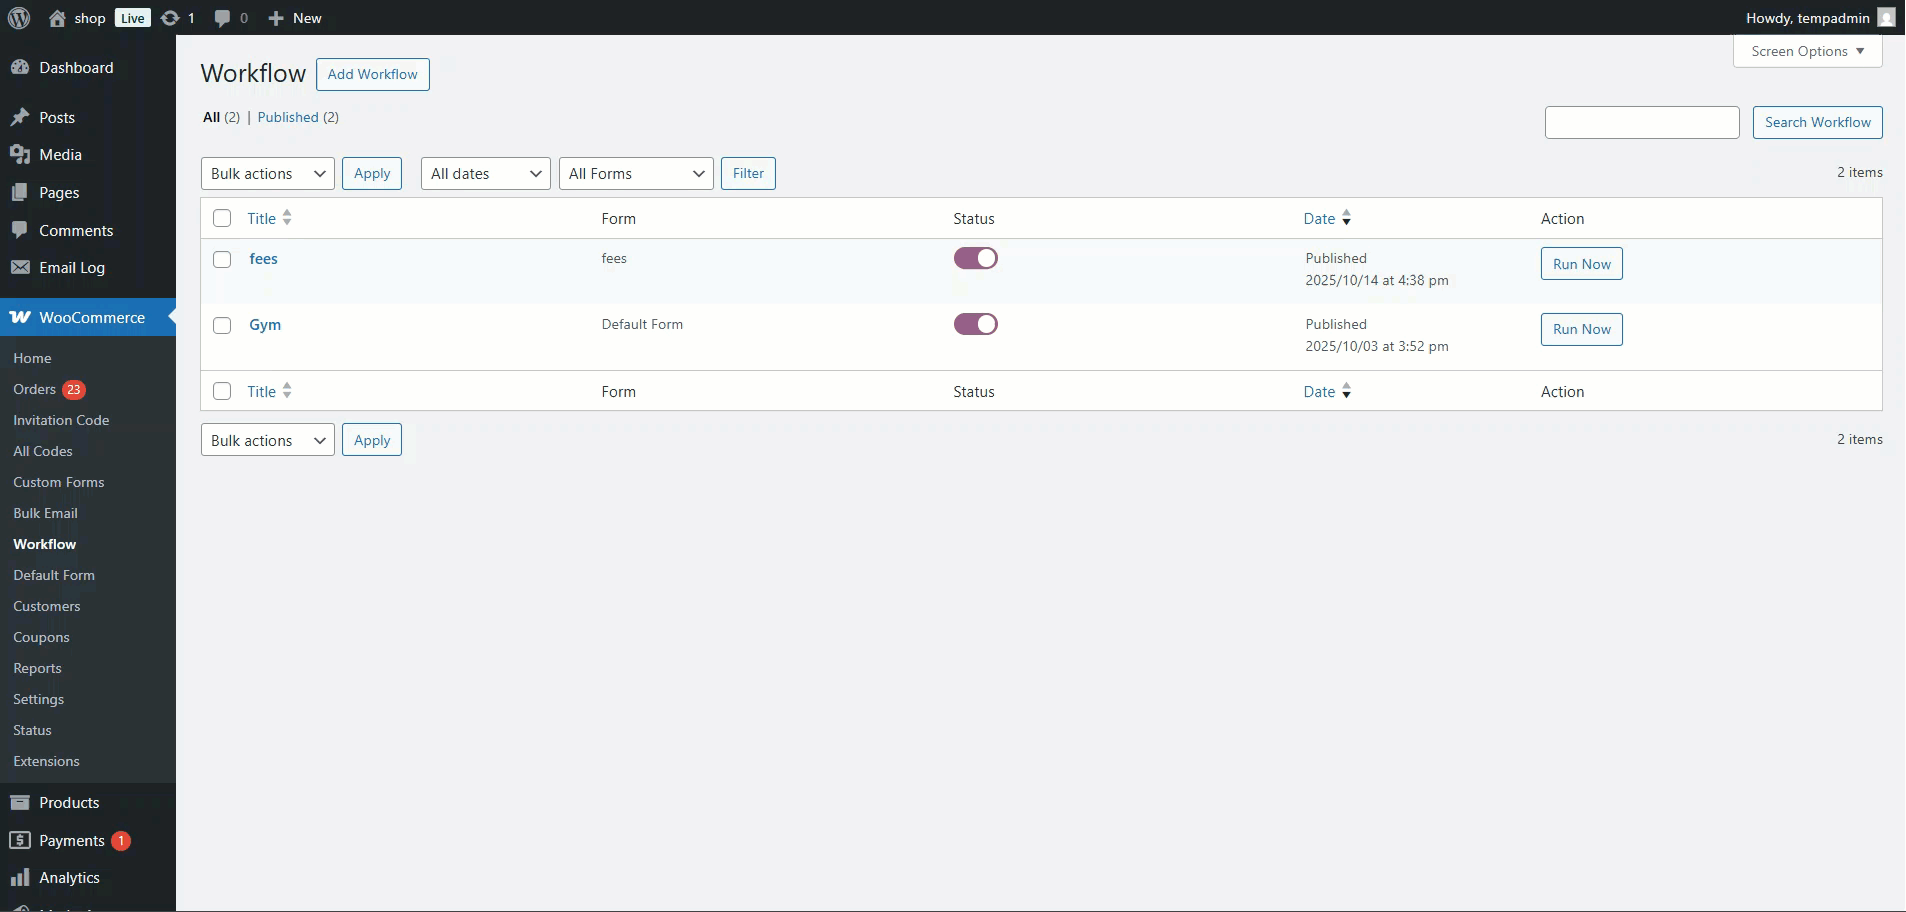
↑ Back to topThe Workflow feature enables administrators to automate multiple actions simultaneously such as changing user status, updating user roles, or sending emails. Tasks can be run instantly or scheduled for later.
- Navigate to WooCommerce > Workflow.

- Here you will see a list of all workflows with:
- Status – Enable or disable a workflow.

- Run Now – Instantly execute the workflow.

- Filters – Filter workflows by Form.
Add New Workflow
↑ Back to top- Go to WooCommerce > Workflow > Add New.

Add the following details:
Title
- Enter a title for your workflow.
- This helps the admin identify the workflow in the list (e.g., Activate Pending Users or Assign Role to Gym Members).
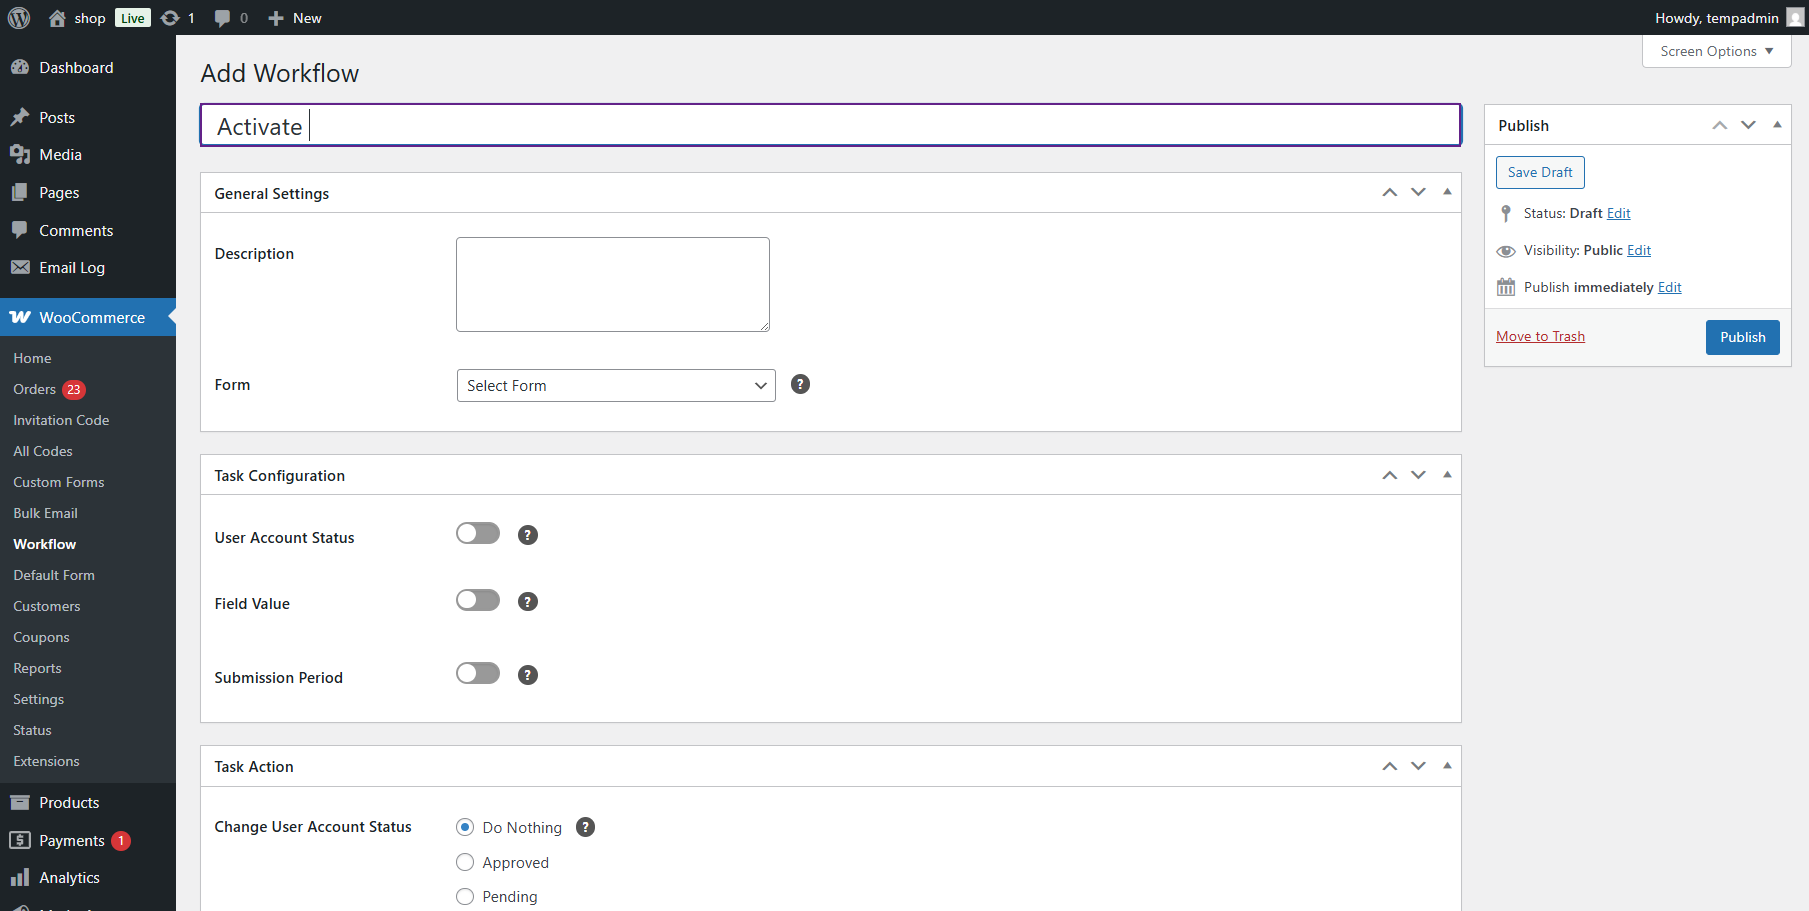
General Settings
↑ Back to topDescription
- Add a short note about what the workflow does.
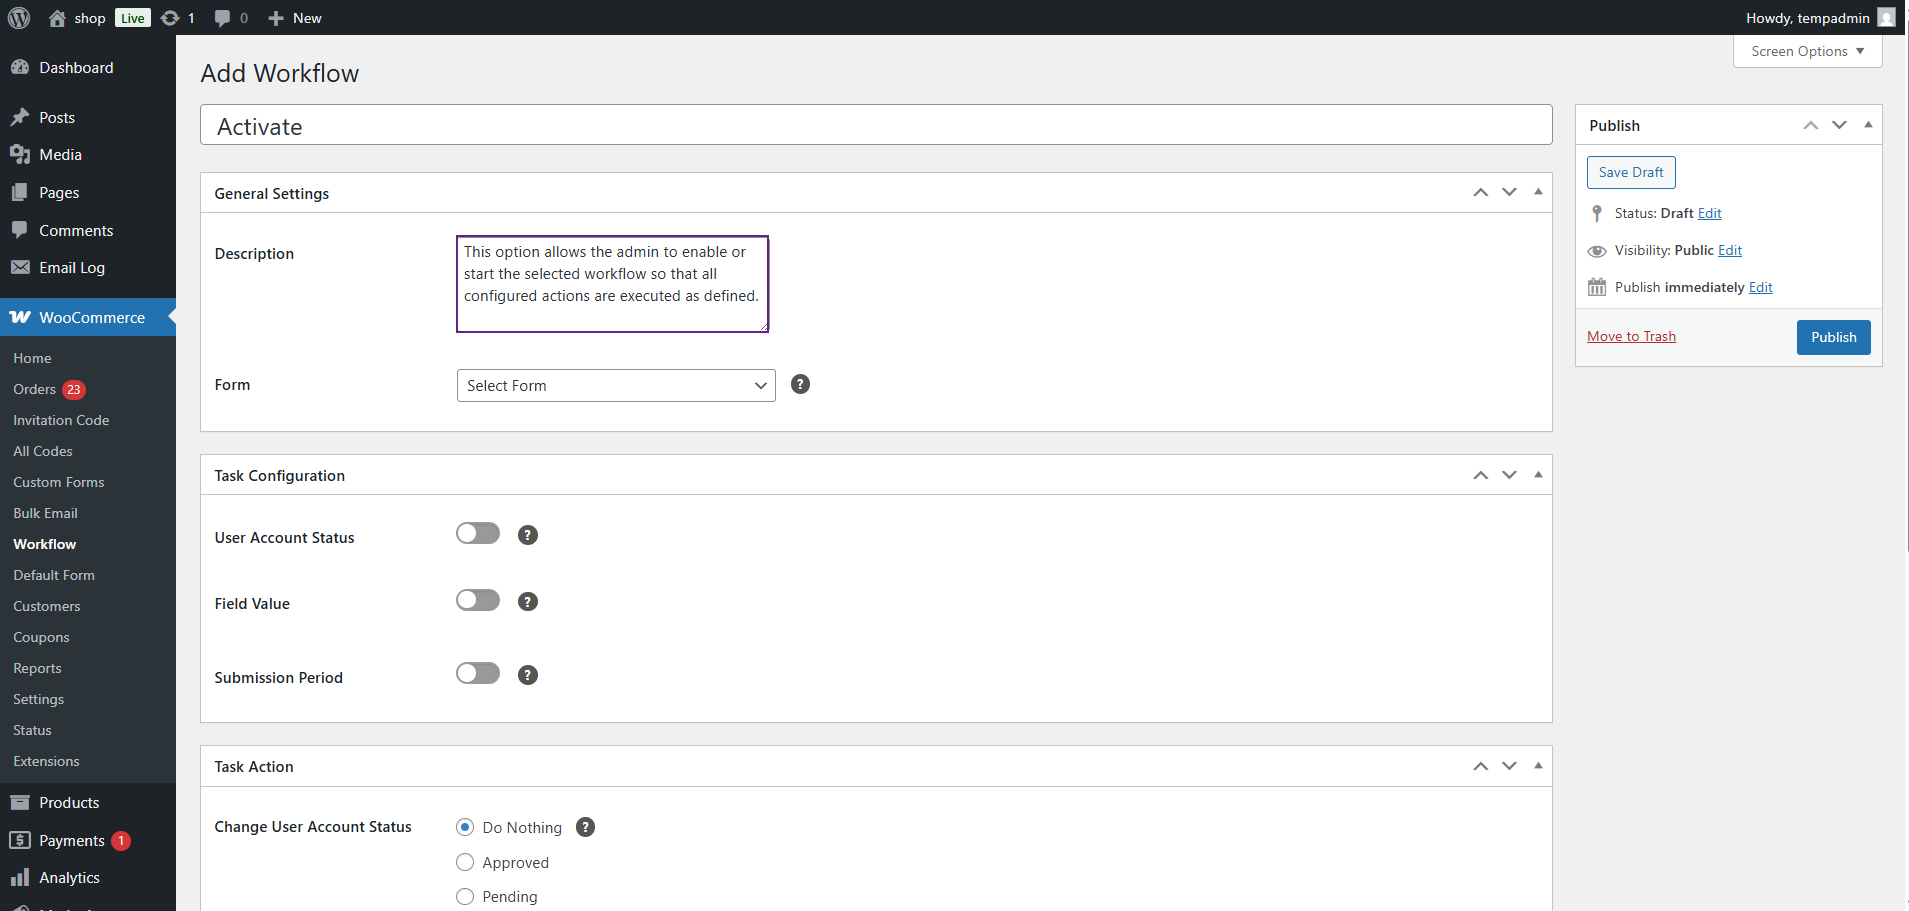
Form:
- Select the form. The workflow will run based on this form.
- The dropdown includes:
- Default Form – Runs the workflow for the default system form.
- Custom Form – Runs the workflow only for custom form.

Task Configuration
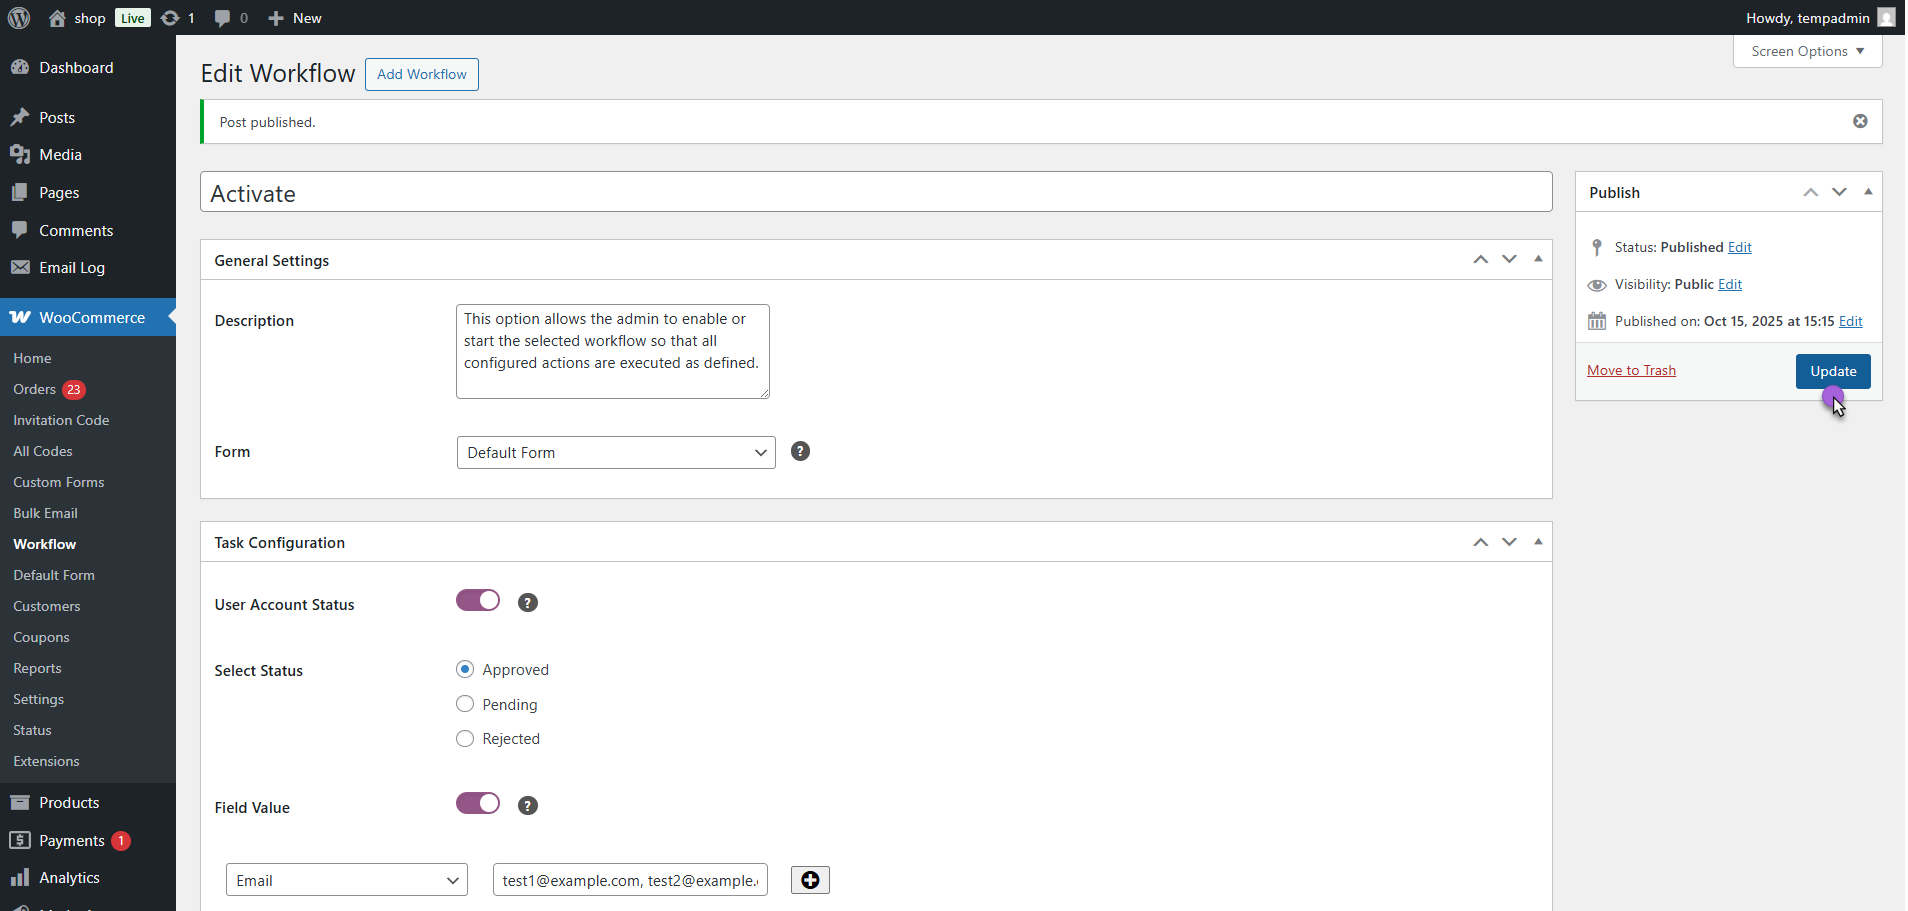
↑ Back to topUser Account Status
This option allows the admin to filter and run the workflow based on users current account status. By enabling it, the admin can target only specific users such as Approved, Pending, or Rejected.
- Enable the toggle button to activate this option.

- Once enabled, a Select Status field will appear.
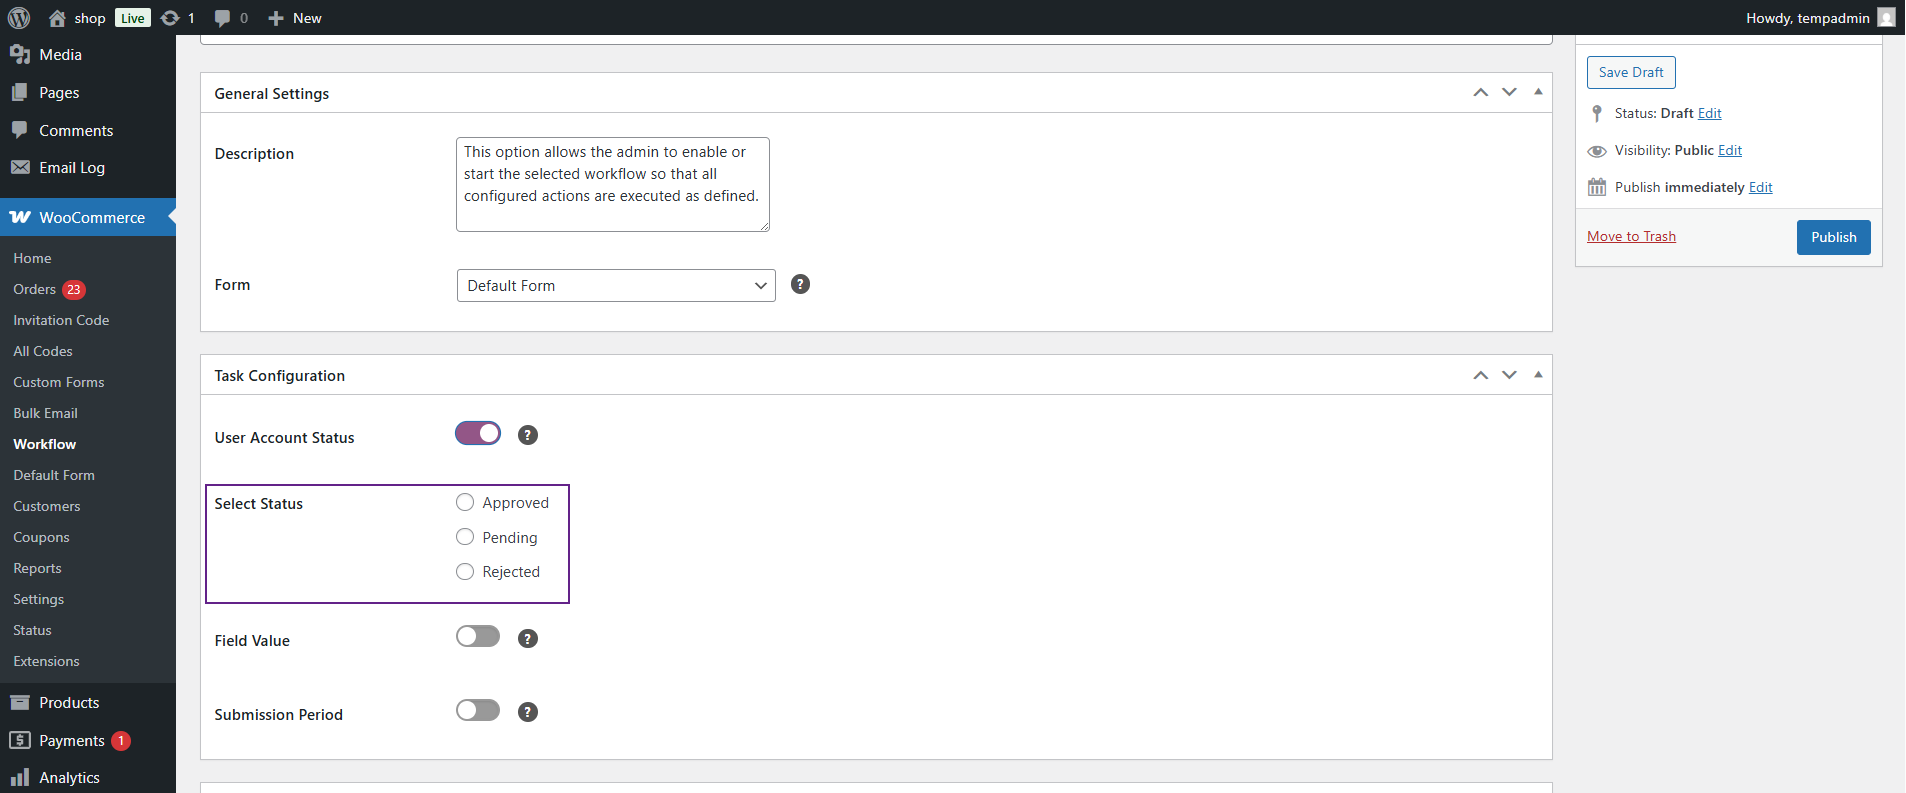
- Choose one status from the available options: Approved, Pending, or Rejected.

- The task will run only for users with the selected status.
Field Value
This option allows the admin to run the workflow based on specific form field values. By enabling it, the admin can target users who match certain criteria.
- Enable the toggle button to activate this option.

- Once enabled, a field row will appear.
- Select a form field and enter a value (e.g., Country = Canada).

- Click the + (plus) button to add more field rows if needed.
- You can also remove a field row at any time.
- Now, the task will be performed on the basis of values of certain fields that exists in certain entries.

Submission Period:
This option allows the admin to run the workflow based on when users submitted the form. By enabling it, the admin can target users who submitted the form before or after the workflow was created, using a specific number of days to define the time range.
- Enable the toggle button to activate this option.

- Once enabled, the options Form Submitted Before Task and Form Submitted After Task toggle will appear.

- Toggle the option and enter the number of days to define the time range.

Task Action
↑ Back to topThis section allows the admin to define what actions will be performed when the workflow runs.
Change User Account Status
This action allows the admin to update the account status of users included in the workflow. The admin can choose to do nothing, or change the status to Active, Pending, or Rejected, depending on the task requirement.
- Select the desired action for the user status.
- Available options: Do Nothing, Pending, or Rejected.

- The selected status will be updated for all users who meet the workflow criteria.
Change User Role
This action allows the admin to update the user role of all users included in the workflow. The admin can select a new role from the dropdown, and the selected role will be assigned to the users when the workflow runs.
- Choose a new user role from the Select Role dropdown.

- The selected role will be assigned to users included in the workflow.
Send Email
This action allows the admin to send an email to users when the workflow runs. By enabling the toggle, the Subject and Email Body fields will appear, where the admin can enter the email content to be sent to the selected users.
- Enable the toggle button to activate email sending.
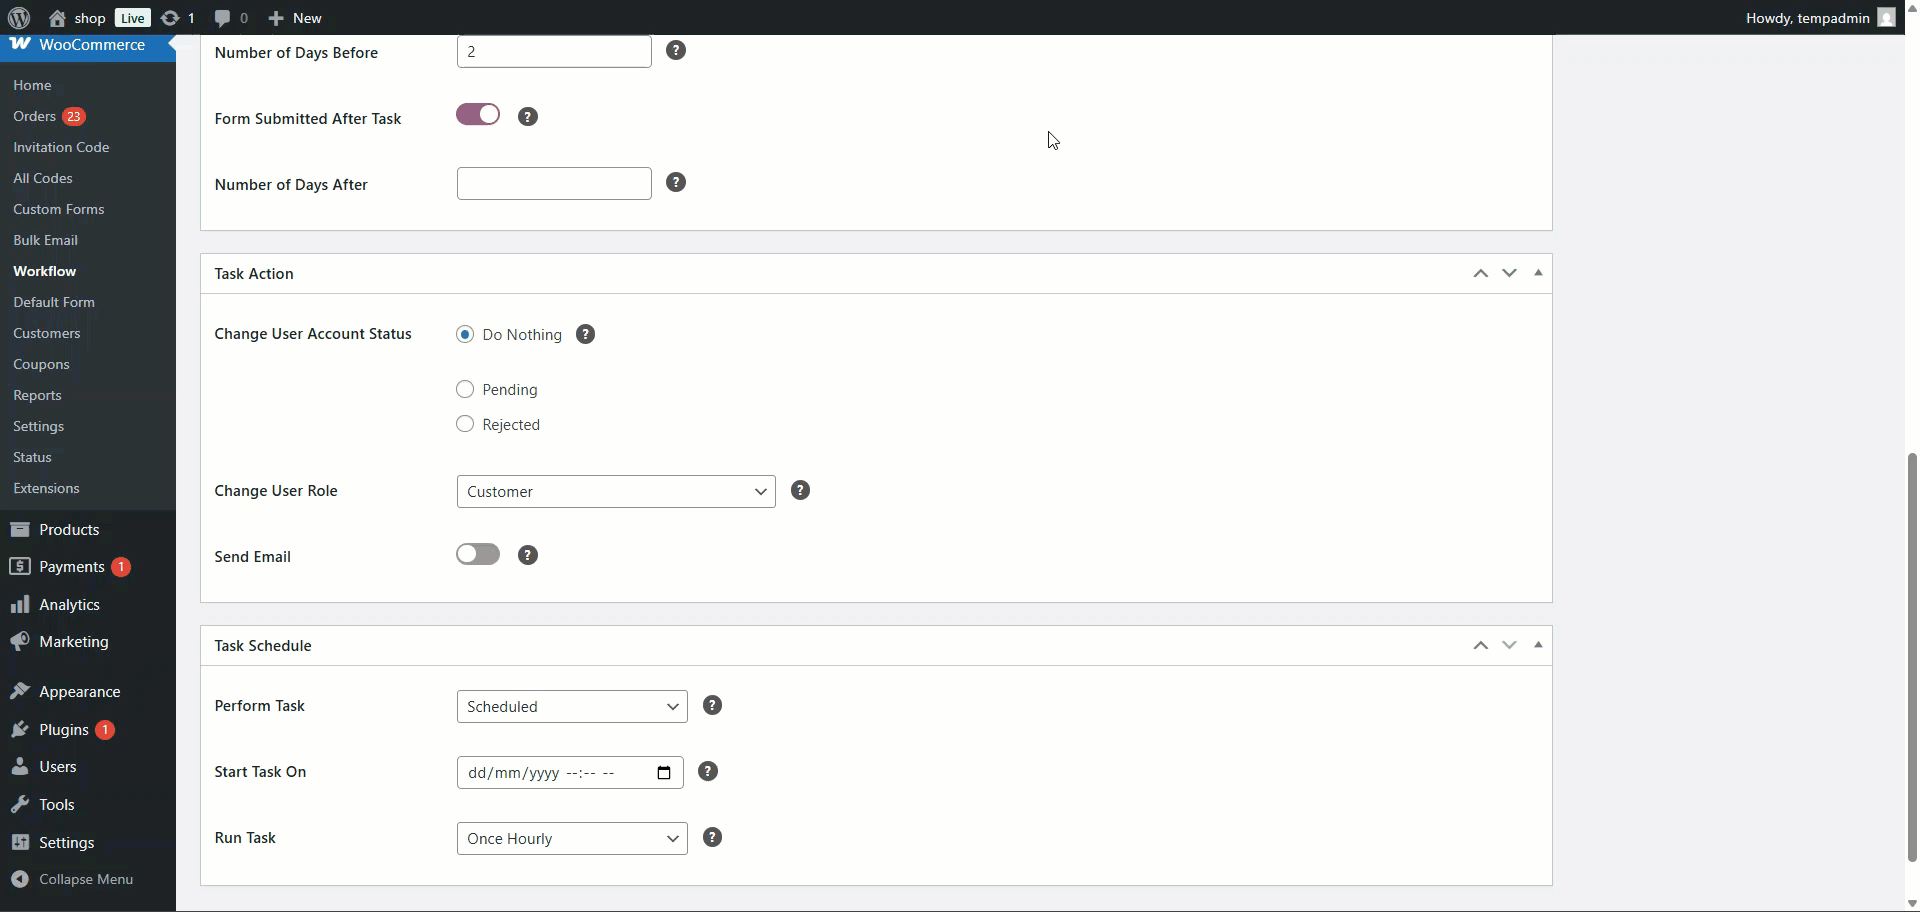
- Once enabled, the Subject and Email Body fields will appear.
- Enter the email content to notify users when the workflow runs.

Task Schedule
↑ Back to topThis section allows the admin to set when and how often the workflow will run.
Perform Task:
- Choose how the task should run Scheduled or Manually.

Start Task On:
- Select a date and time for when the scheduled task should start.

Run Task:
- Choose how often the workflow should run.
- Available options: Once an Hour, Once a Day, Twice a Day, or Once a Week.

- After configuring all the settings, click on the Update or Publish button to save the workflow.
Result of Task
- Navigate to: Users > Requests
Before Running Workflow: The selected users will show their current status (e.g., Pending or Denied).
After running the Workflow, the status of those users will be updated according to the workflow action (e.g., changed to Approved or Denied).

- Now, navigate to: Users > All Users

Before running Workflow, Users will display their existing roles (e.g., Subscribe, Shop manager).

After running the Workflow, the user roles will be updated to the new role selected in the workflow.
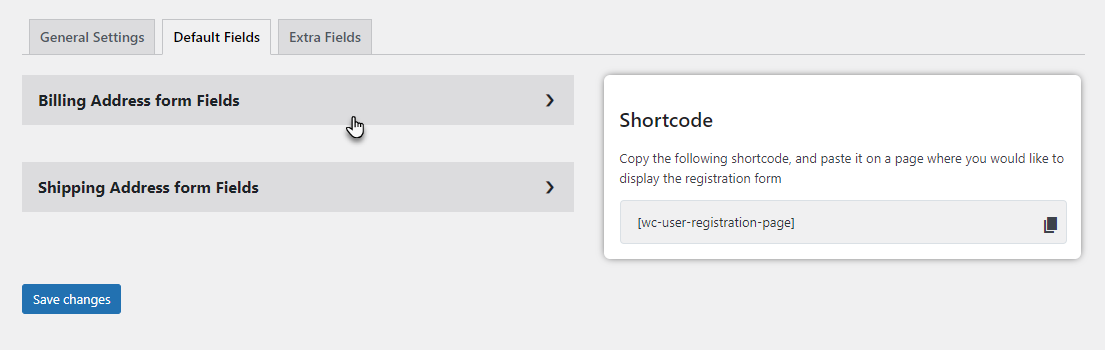
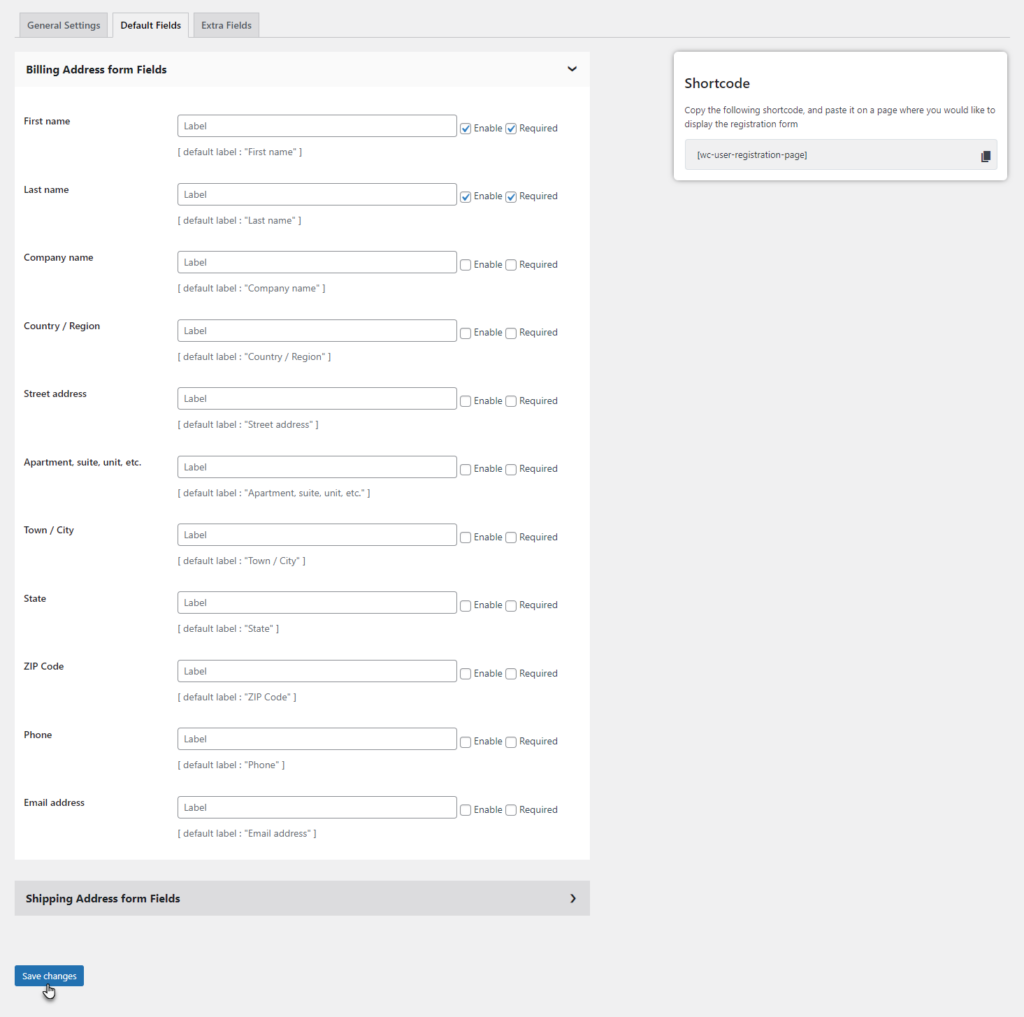
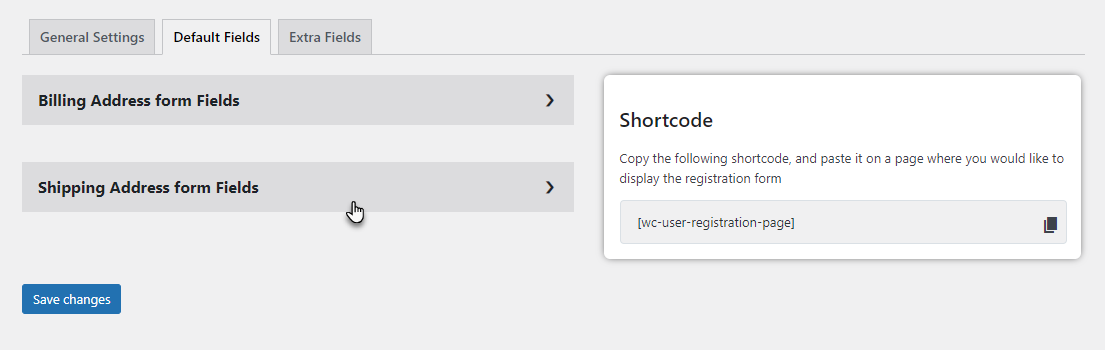
Default Fields
↑ Back to top- Navigate to the Default Settings tab.
- There are two sections in this tab.
Billing Address form Fields
↑ Back to top- Click on the Billing Address form Fields section to expand it.
- Checkmark the Enable checkbox against the fields you want to display in the Billing Address section on the registration form.

- You can also checkmark the Required checkbox against the fields you want to display in the Billing Address section on the registration form.
Shipping Address form Fields
↑ Back to top- Click on Shipping Address form Fields section to expand it.
- Checkmark the Enable checkbox against the fields you want to display in the Shipping Address section on the registration form.
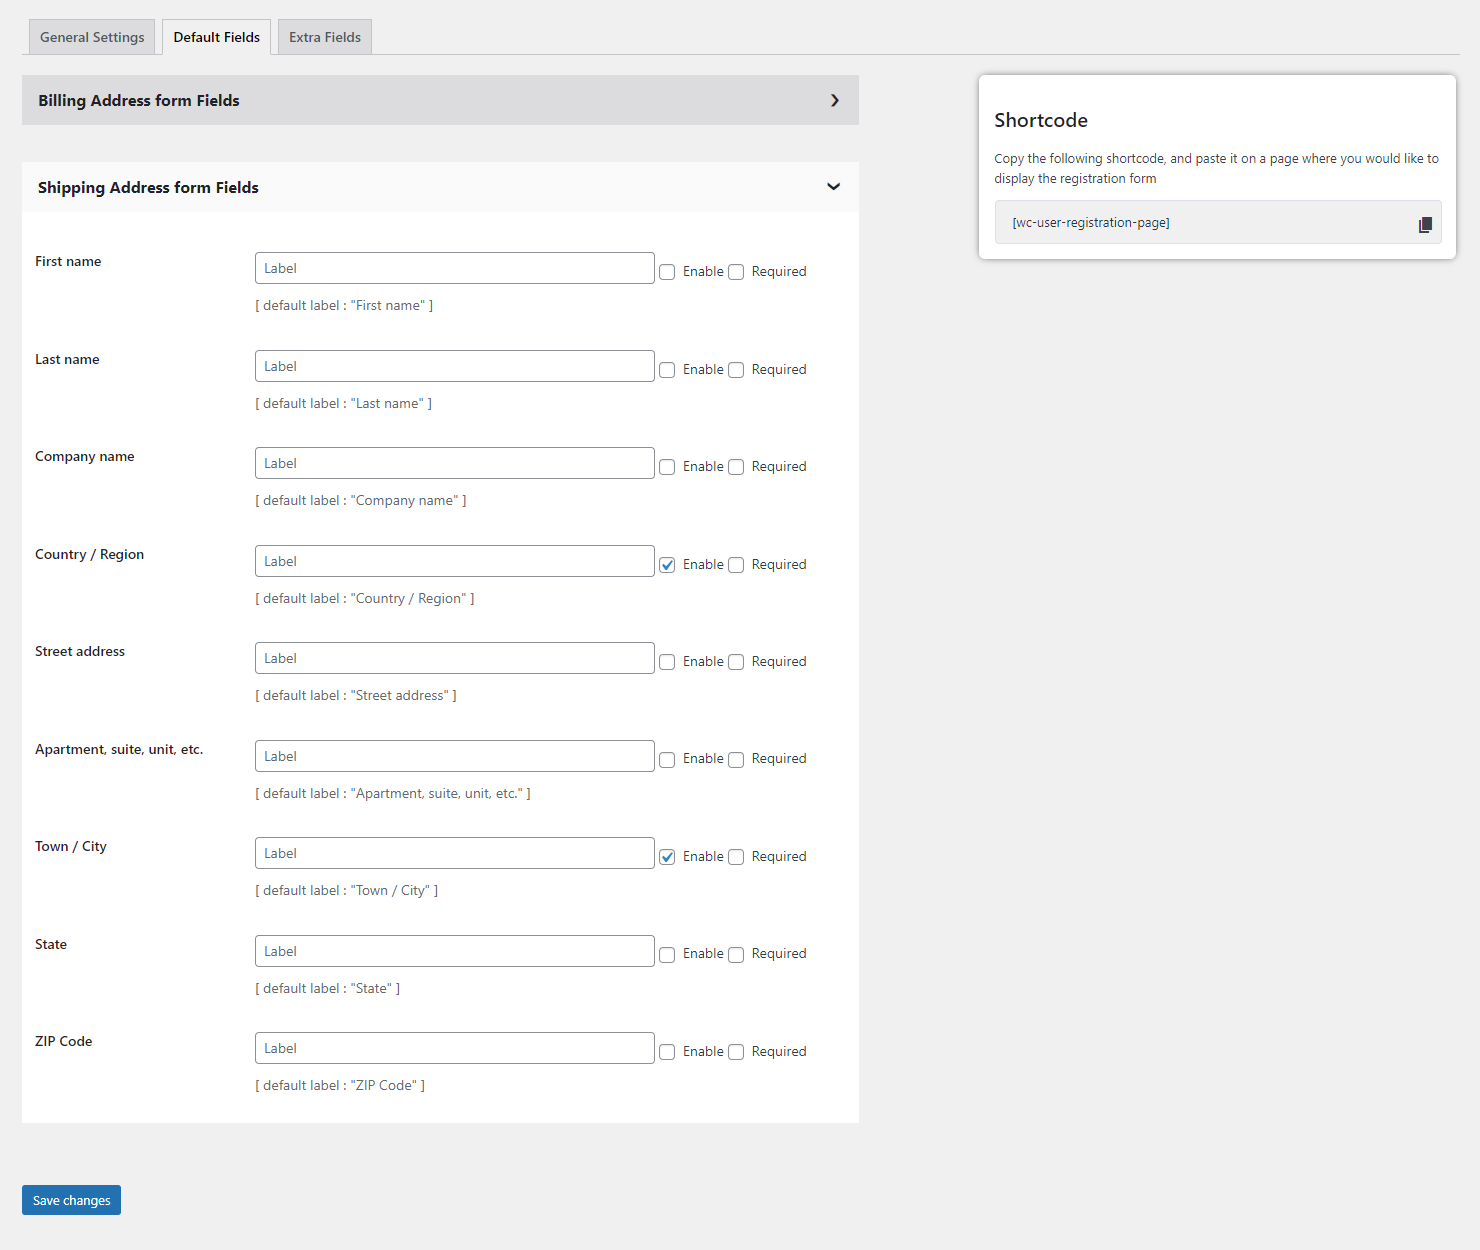
- You can also checkmark the Required checkbox against the fields you want to display in the Shipping Address section on the registration form.

- Click on the Save changes button to apply your settings.
Front-End Impact:
↑ Back to topWhen fields are Enabled on the Billing Address and Shipping Address
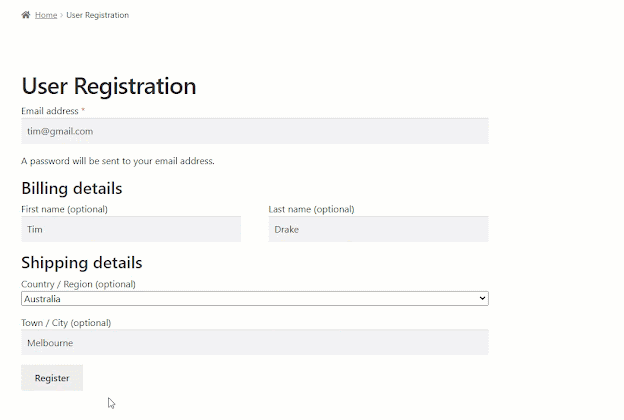
- On the website, go to the User Registration page.
- The fields against the Enable checkbox marked in both the Billing Address and Shipping Address sections will be displayed on the Default Form. It’s important to note that these fields are Optional, meaning that the form can still be submitted successfully even if the user chooses not to complete them.
When fields are required on the billing address and shipping address
- On the website, go to the User Registration Default Form page.
- The fields against the Required checkbox marked in both the Billing Address and Shipping Address sections will be displayed on the Default Form with an asterisk (*) sign, denoting their obligatory nature. Please be aware that these fields must now be filled out; failure to do so will result in the form not being submitted.

Extra Fields
↑ Back to top- Navigate to the Extra Fields tab.
- Once done, you’re on the Form Builder page.

- This form allows you to drag and drop components on your Form.

- Once you’ve added all the fields, click on the Save Changes button to save your form.
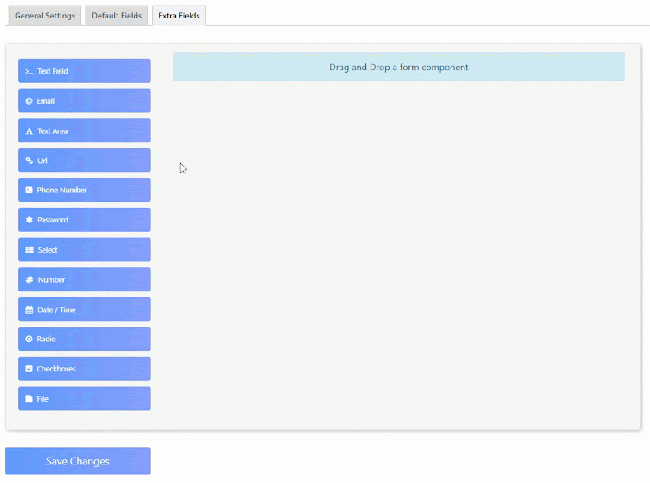
Front-End Impact:
- On the website, go to the User Registration page.
User Roles
↑ Back to top- Navigate to WordPress Admin Dashboard → Users → User Roles.

- Now you’re on the User Roles page.
- There are two sections on this page.

- On the left side of the page, you can Add New Role.
- Enter the Name of the user role.
- Enter the Slug of the user role.
- Enter the Description of the user role.
- Once done, click on the Add New Role button.

- Once the User Role is successfully added, it will appear on the right side of the page.

- Hover over the user role to view the suboptions.

Notifications
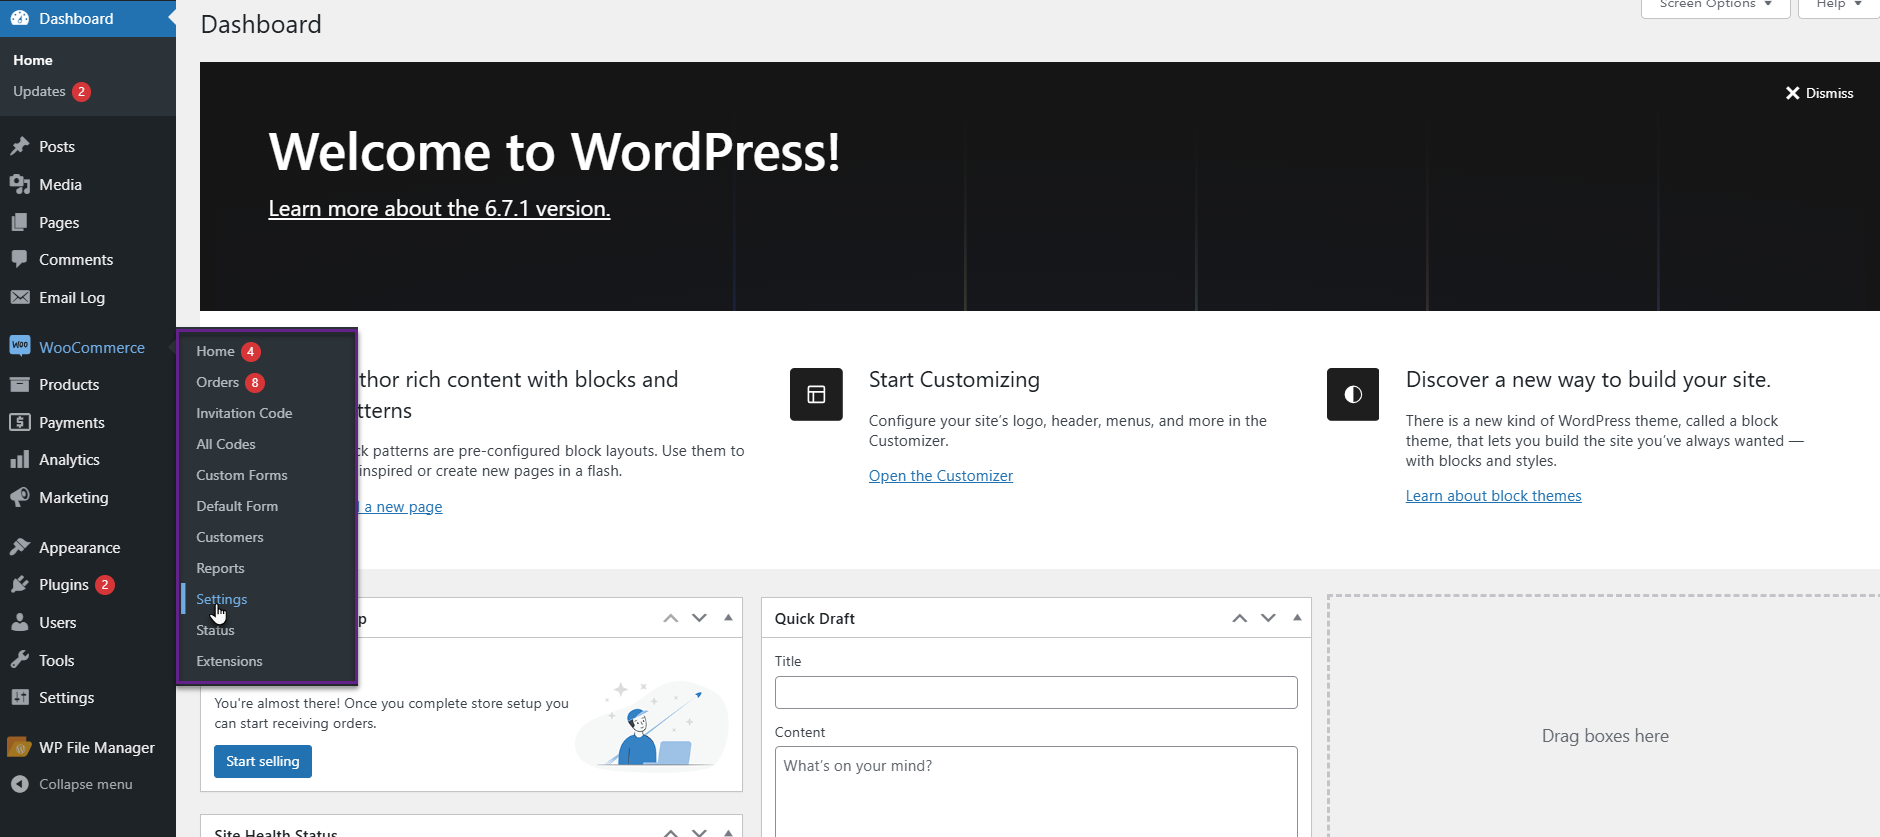
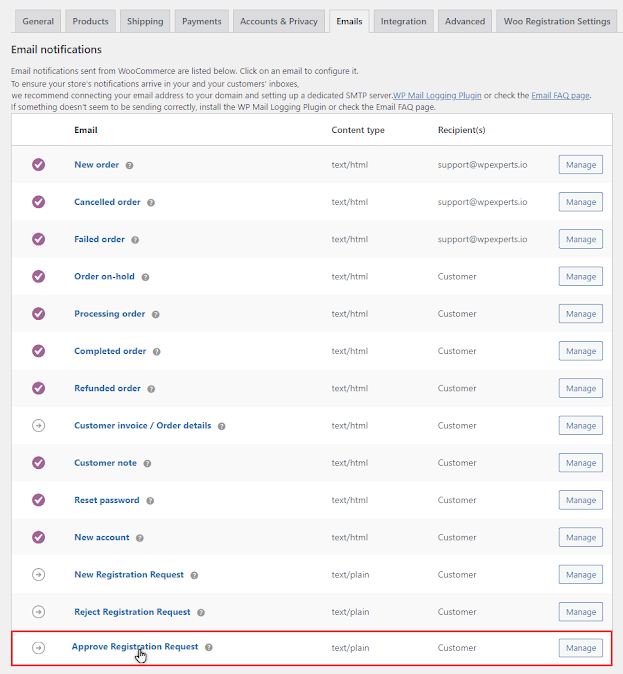
↑ Back to top- Navigate to WordPress Admin Dashboard → WooCommerce → Settings.
- Navigate to the Email tab.

- The Admin and User received the notification via email.
- Once you’re on the Email tab, you’ll see three settings on this page.
- New Registration Request
- Request Registration Rejection
- Request Registration Approval

New Request
↑ Back to top- Click on the New Registration Request to open its settings.

- There are two sections in this tab.
Admin Notification
↑ Back to top- Click on the Admin Notification section to expand it.

- Enable the Enable Notification toggle button to send an email to the Admin about the newly requested user role.
- Set the Email Subject.
- Set the Message.
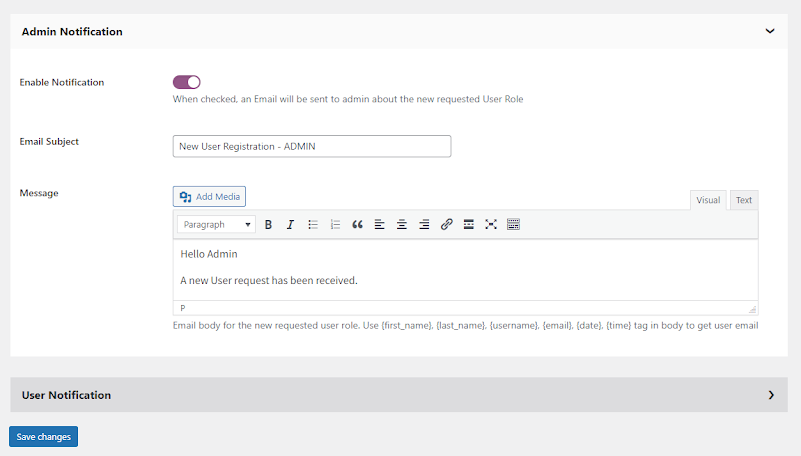
User Notification
↑ Back to top- Click on the User Notification section to expand it.

- Enable the Enable Notification toggle button to send the user an email about the registration requested.
- Set the Email Subject.
- Set the Message.
- Click on the Save Changes button to apply your settings.

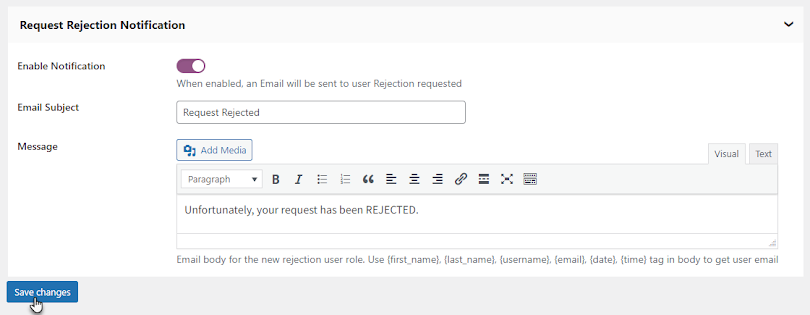
Request Registration Rejection
↑ Back to top- Click on the Request Registration Rejection to open its settings.

- There is only one section in this tab.
Request Rejection Notification
↑ Back to top- Enable the Enable Notification toggle button to send the user an email about the new requested user role.
- Set the Email Subject.
- Set the Message.
- Click on the Save changes button to apply your settings.
Approve Registration Request
↑ Back to top- Navigate to the Approve Registration Request Settings.
- There is only one section in this tab.
Request Approval Notification
↑ Back to top- Enable the Enable Notification toggle button to send the user an email about the new requested user role.
- Set the Email Subject.
- Set the Message.
- Click on the Save changes button to apply your settings.

Auto Approval Signup Request
↑ Back to top- Navigate to the Auto Approval Signup Request Settings
- There is only one section in this tab.
Request Auto Approval Notification
↑ Back to top- Enable the Enable Notification toggle button to send the user an email about the new requested user role.
- Set the Email Subject.
- Set the Message.
- Click on the Save changes button to apply your settings.

Settings
↑ Back to top- Navigate to WordPress Admin Dashboard → WooCommerce → Settings.
- Once you’re on the Settings page, you’ll see the User Registration tab on this page.
- There are Seven subtabs inside the User Registration tab.
- General Settings
- User Settings
- User Approval
- Notifications
- Display
- Integrations
- Verification

General
↑ Back to top- Navigate to the General subtab under “User Registration” (The Admin will be redirected to the General subtab by default when you’re in the Woo Registration Settings tab).
Enable Registration Link
- Enable the Enable Registration Link toggle button on the My Account page to show a registration link.
- Once done, two more options will appear.

Registration Link Text
- Enter the Text for the registration link in the textbox.

Registration Page
- Select the Registration page to be redirected when the user clicks on the Registration Link on the My Account page.

Front-End Impact:
- Go to the website.
- Go to the My Account page.
- On the My Account page, a Registration Link will be mentioned.

- Click on the Registration Link.
- The user will be redirected to the page configured in the Registration Page option.

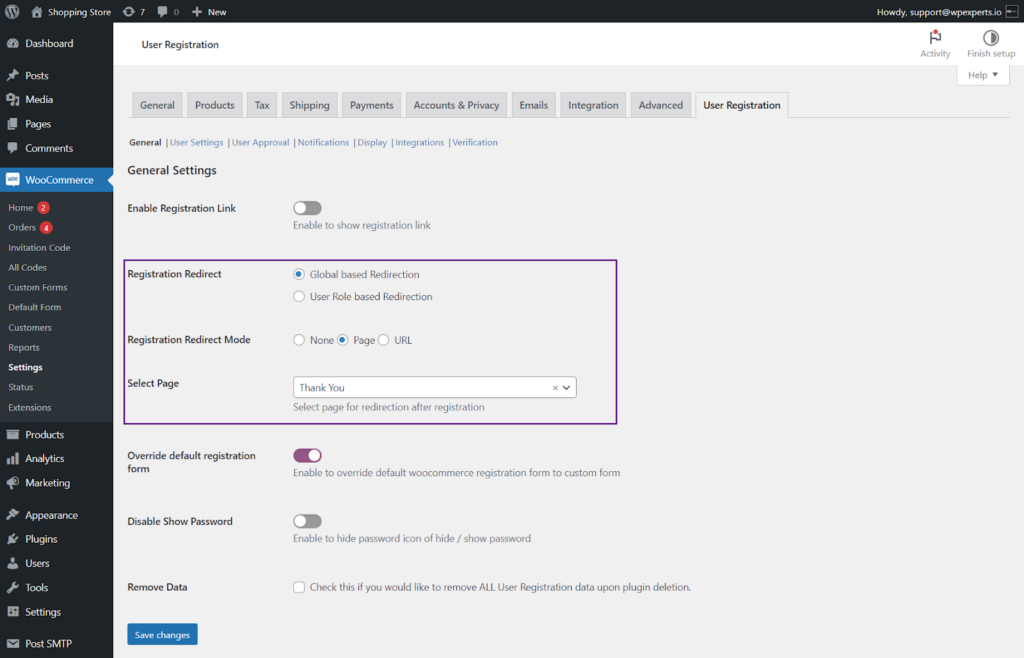
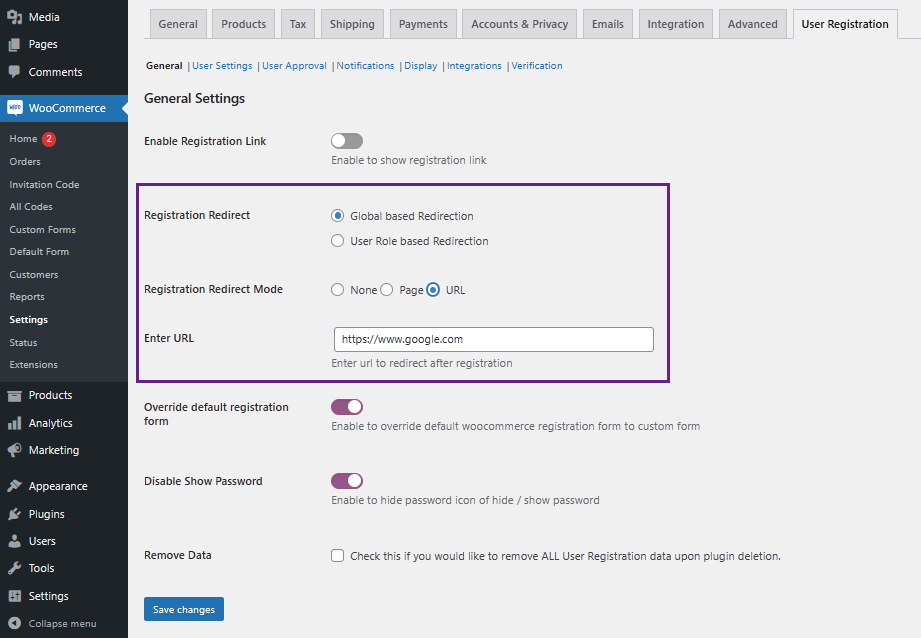
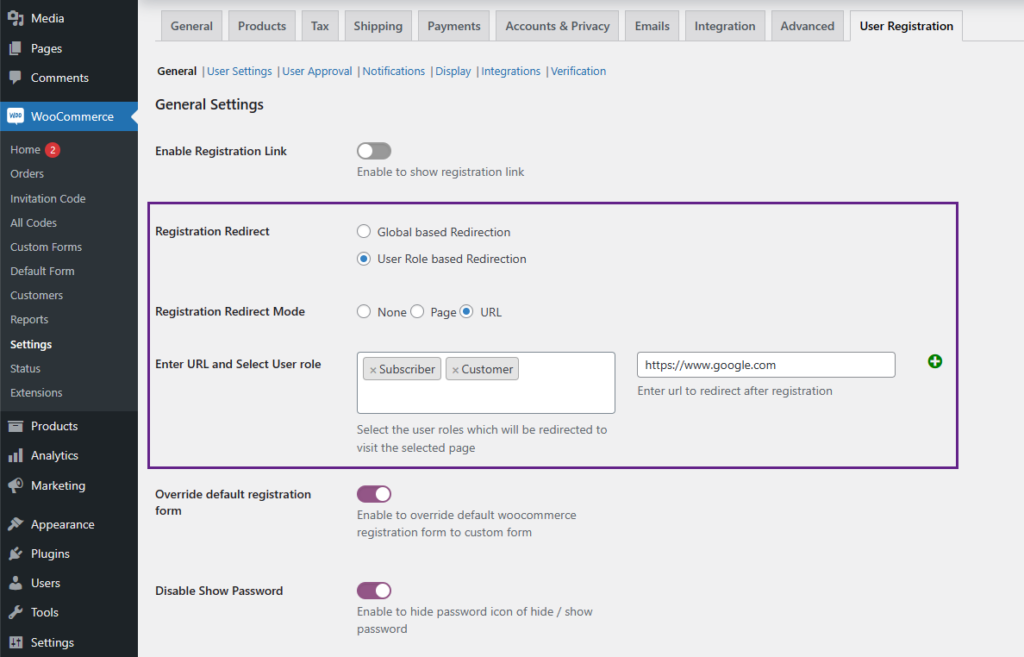
Registration Redirect
- This option has two radio buttons available.
- Global based Redirection
- User Role based Redirection
- Select the This option will allow you to redirect the user when the user clicks the Register button based on Global settings or User Role settings.
Global based Redirection
- When Global-based Redirection is selected, a Registration Redirect Mode option will appear with the following radio button options.

- There are three sub-options available in the Registration Redirect Mode option.
- None
- Page
- URL
- When Global based Redirection is selected, the redirection will function globally on all the user roles.
None – Global based Redirection
- Select the None radio button if you don’t want to redirect the user anywhere.

Page – Global based Redirection
- Select the Page radio button to redirect the user to a page.
- Once done, an option titled Select Page will appear.
- Select the page from the dropdown menu.
Front-End Impact

URL – Global based Redirection
- Select the URL radio button to redirect the user to a page.
- Once done, an option titled Enter URL will appear.
- Enter the respective URL in the textbox.
Front-End Impact
User Role based Redirection
- When User Role-based Redirection is selected, a Registration Redirect Mode option will appear with the following radio button options.
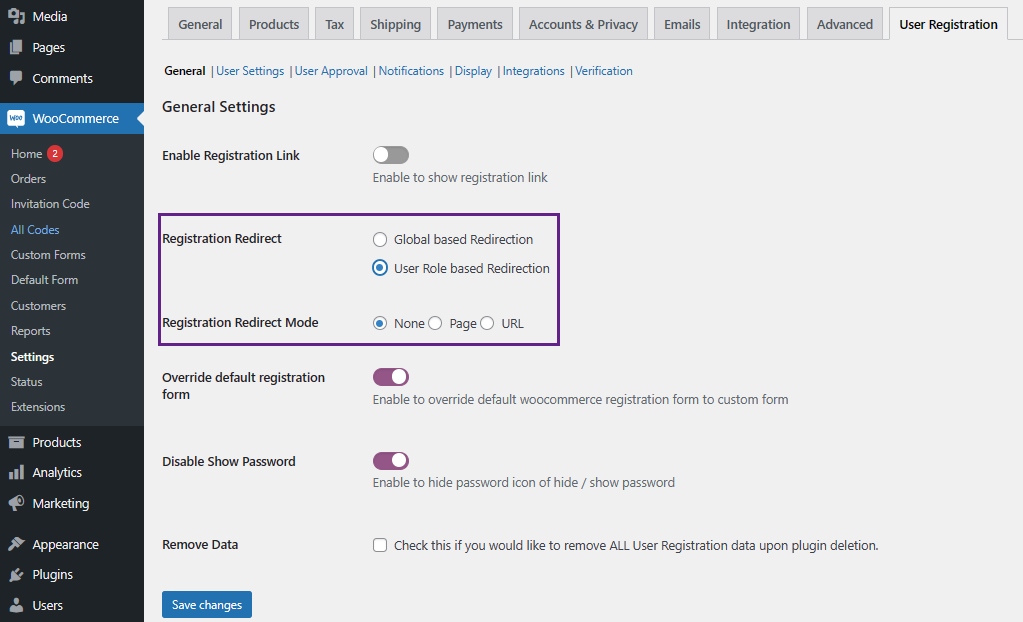
- There are three sub-options available in the Registration Redirect Mode option.
- None
- Page
- URL
- When User Role based Redirection is selected, the redirection will function only on the selected user roles.
None – User Role based Redirection
- Select the None radio button if you don’t want to redirect the user anywhere.

Page – User Role based Redirection
- Select the Page radio button to redirect the user roles to a page.
- Once done, an option titled Select Page and User Role will appear.
- Select the User roles. We can select multiple user roles.
- Select the Page from the dropdown menu.

- After each row, we have a Plus (+) icon and a Trash icon.
- Click on the PLUS (+) icon to add another row where the Administrator can select more pages and user roles according to their requirement.

- On clicking the PLUS (+) icon, we can see that another row has been added.

- Click on the Trash icon to delete that specific row.

- On clicking the Trash icon, the specific row is deleted.

Front-End Impact
- When a user chooses the Subscriber user role and registers using the Default Form, they are redirected to a particular page specified in the configuration.

URL – User Role based Redirection
- Select the URL radio button to redirect the user roles to a page.
- Once done, an option titled Enter URL and Select User role will appear.
- Select the User roles. We can select multiple user roles.
- Enter the respective URL in the textbox.

- After each row, we have a Plus (+) icon and a Trash icon.
- Click on the PLUS (+) icon to add another row where the Admicustomerr can add more URLs and select user roles according to their requirement.

- On clicking the PLUS (+) icon, we can see that another row has been added.
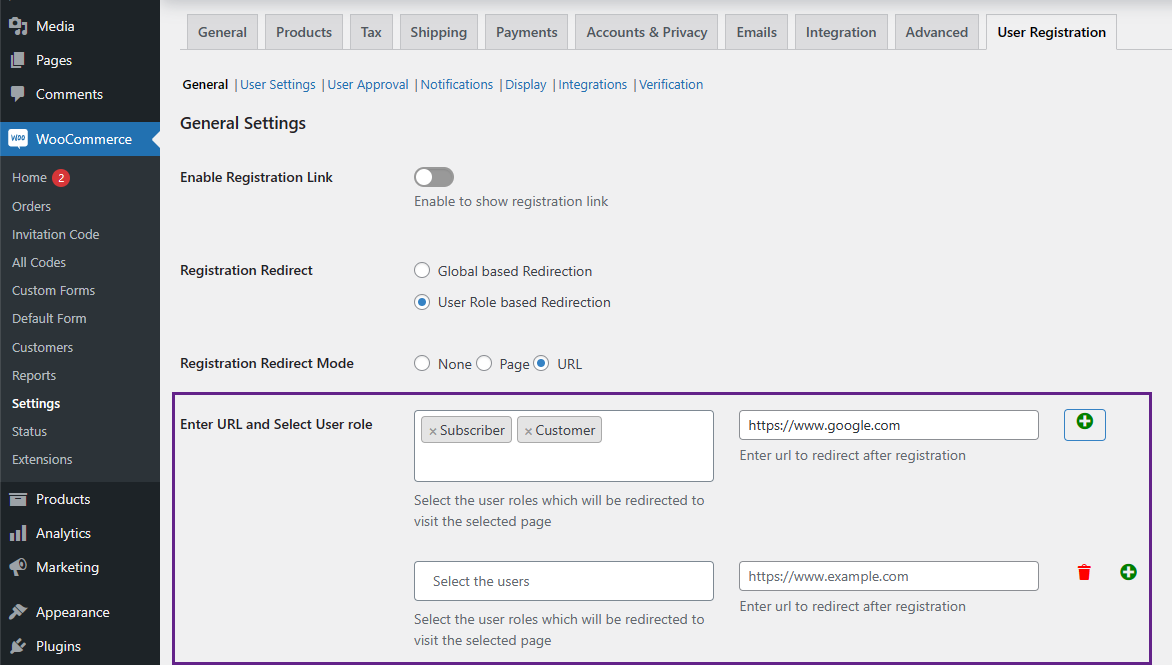
- Click on the Trash icon to delete that specific row.
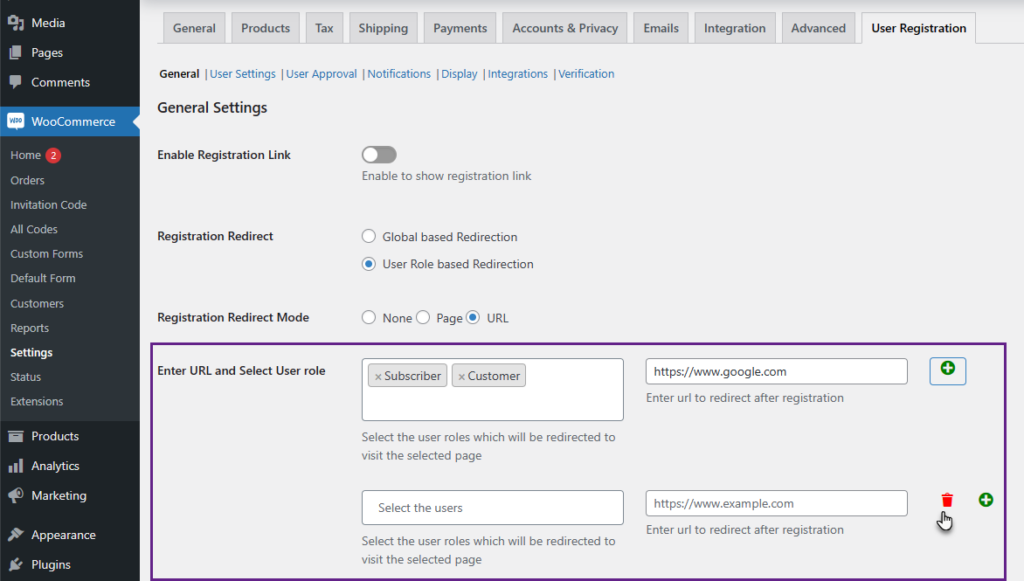
- On clicking the Trash icon, we can see that the specific row has been deleted.
Front-End Impact
- When a user chooses the Customer user role and registers using the Default Form, they are redirected to a particular link specified in the configuration.

Please Note: We cannot select the User Roles chosen already in another row.
Override default registration form
- Enable the toggle button to override the default woocommerce registration form to the custom form.

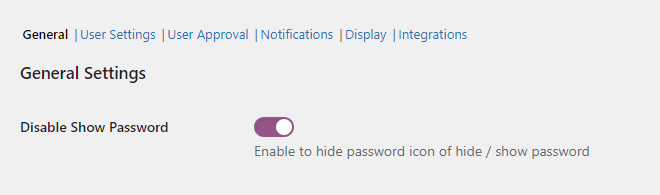
Disable Show Password
- Enable the toggle button to hide the password icon for hide/ show password.
Front-End Impact
Before:
- When the toggle button is disabled, the hide password icon is visible in the password textbox.
After:
- The password icon is hidden in the password textbox when the toggle button is enabled.

Remove Data
- Checkmark the checkbox to remove all user registration data upon plugin deletion.

- Click on the Save changes button to apply your settings.
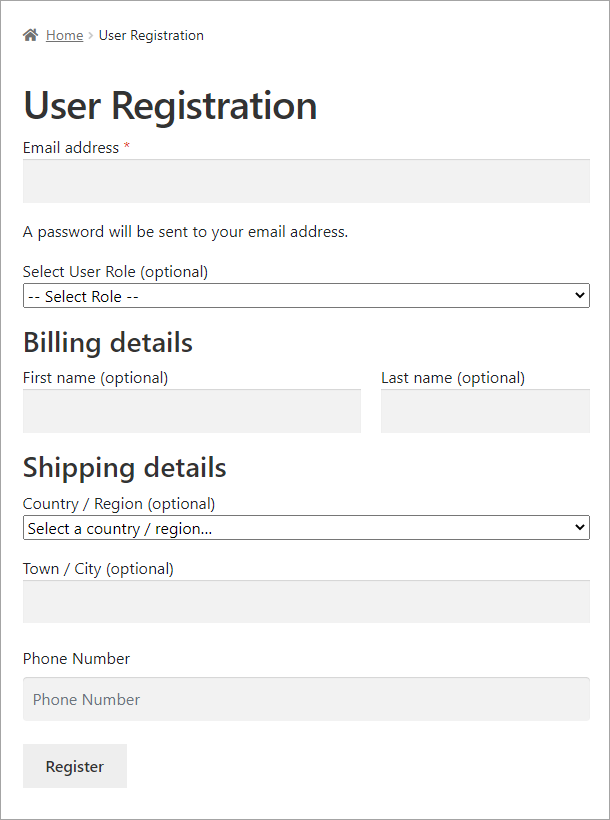
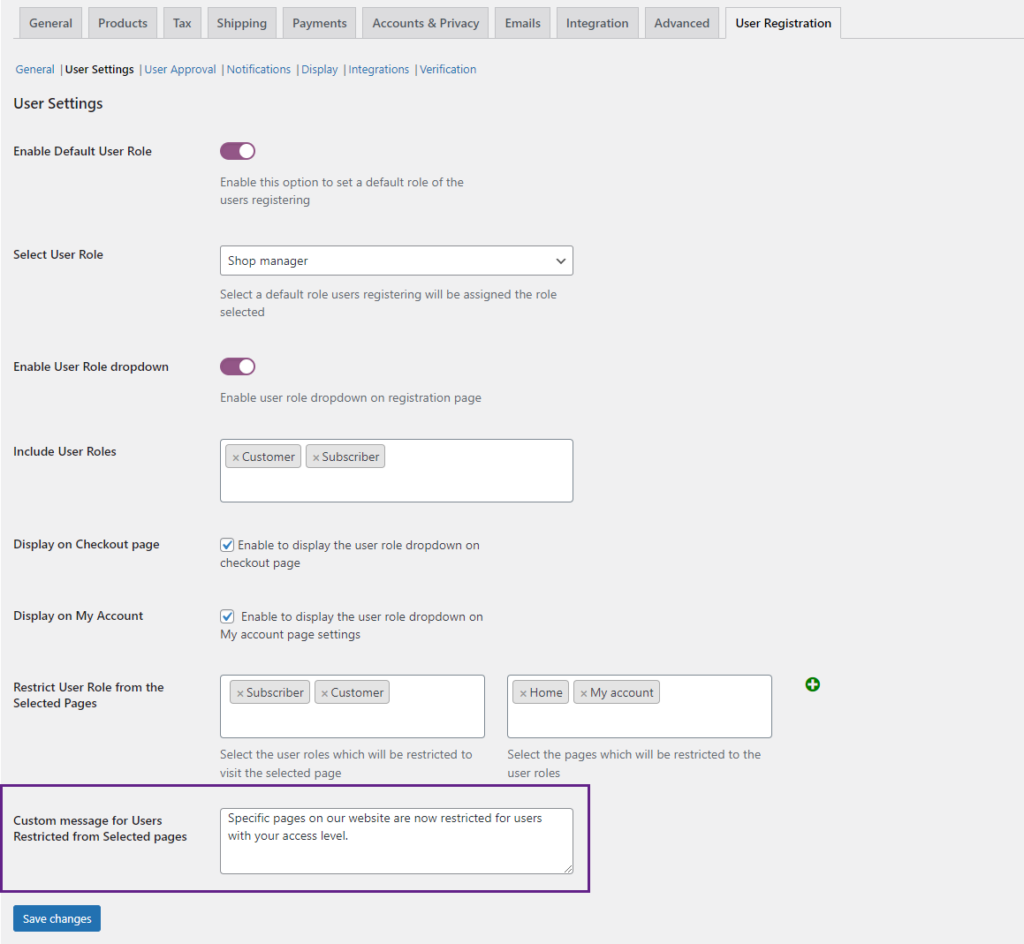
User Settings
↑ Back to top- Navigate to the User Settings subtab.
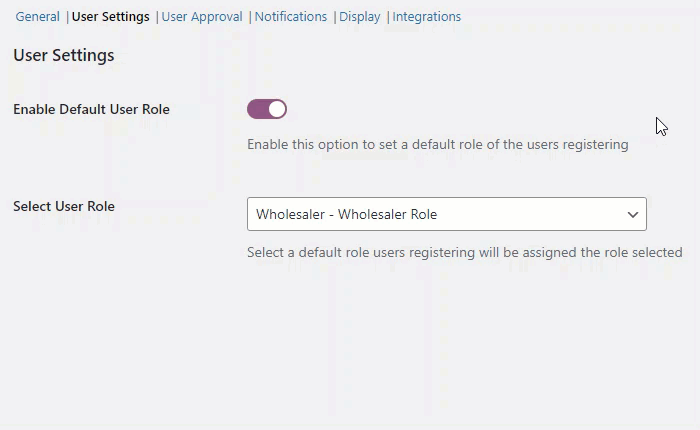
Enable Default User Role
- Enable the Enable Default User Role toggle button to set a default user role for registering users.

Select User Role
- Enable the Enable Default User Role toggle button to set a default user role for registering users.
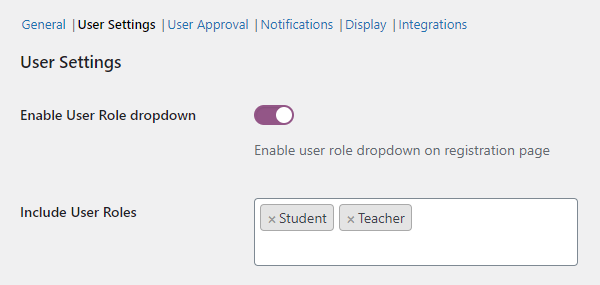
Enable User Role Dropdown
- Enable the Enable Default Role dropdown option to display the user roles on the User Registration page for the registered users.

Include User Roles
- In this option, select the User Roles from the dropdown menu displayed on the User Registration page.
Front-End Impact:

NOTE: If no User Role is selected in the Include User Roles option, then no User Role will be displayed on the User Registration page.
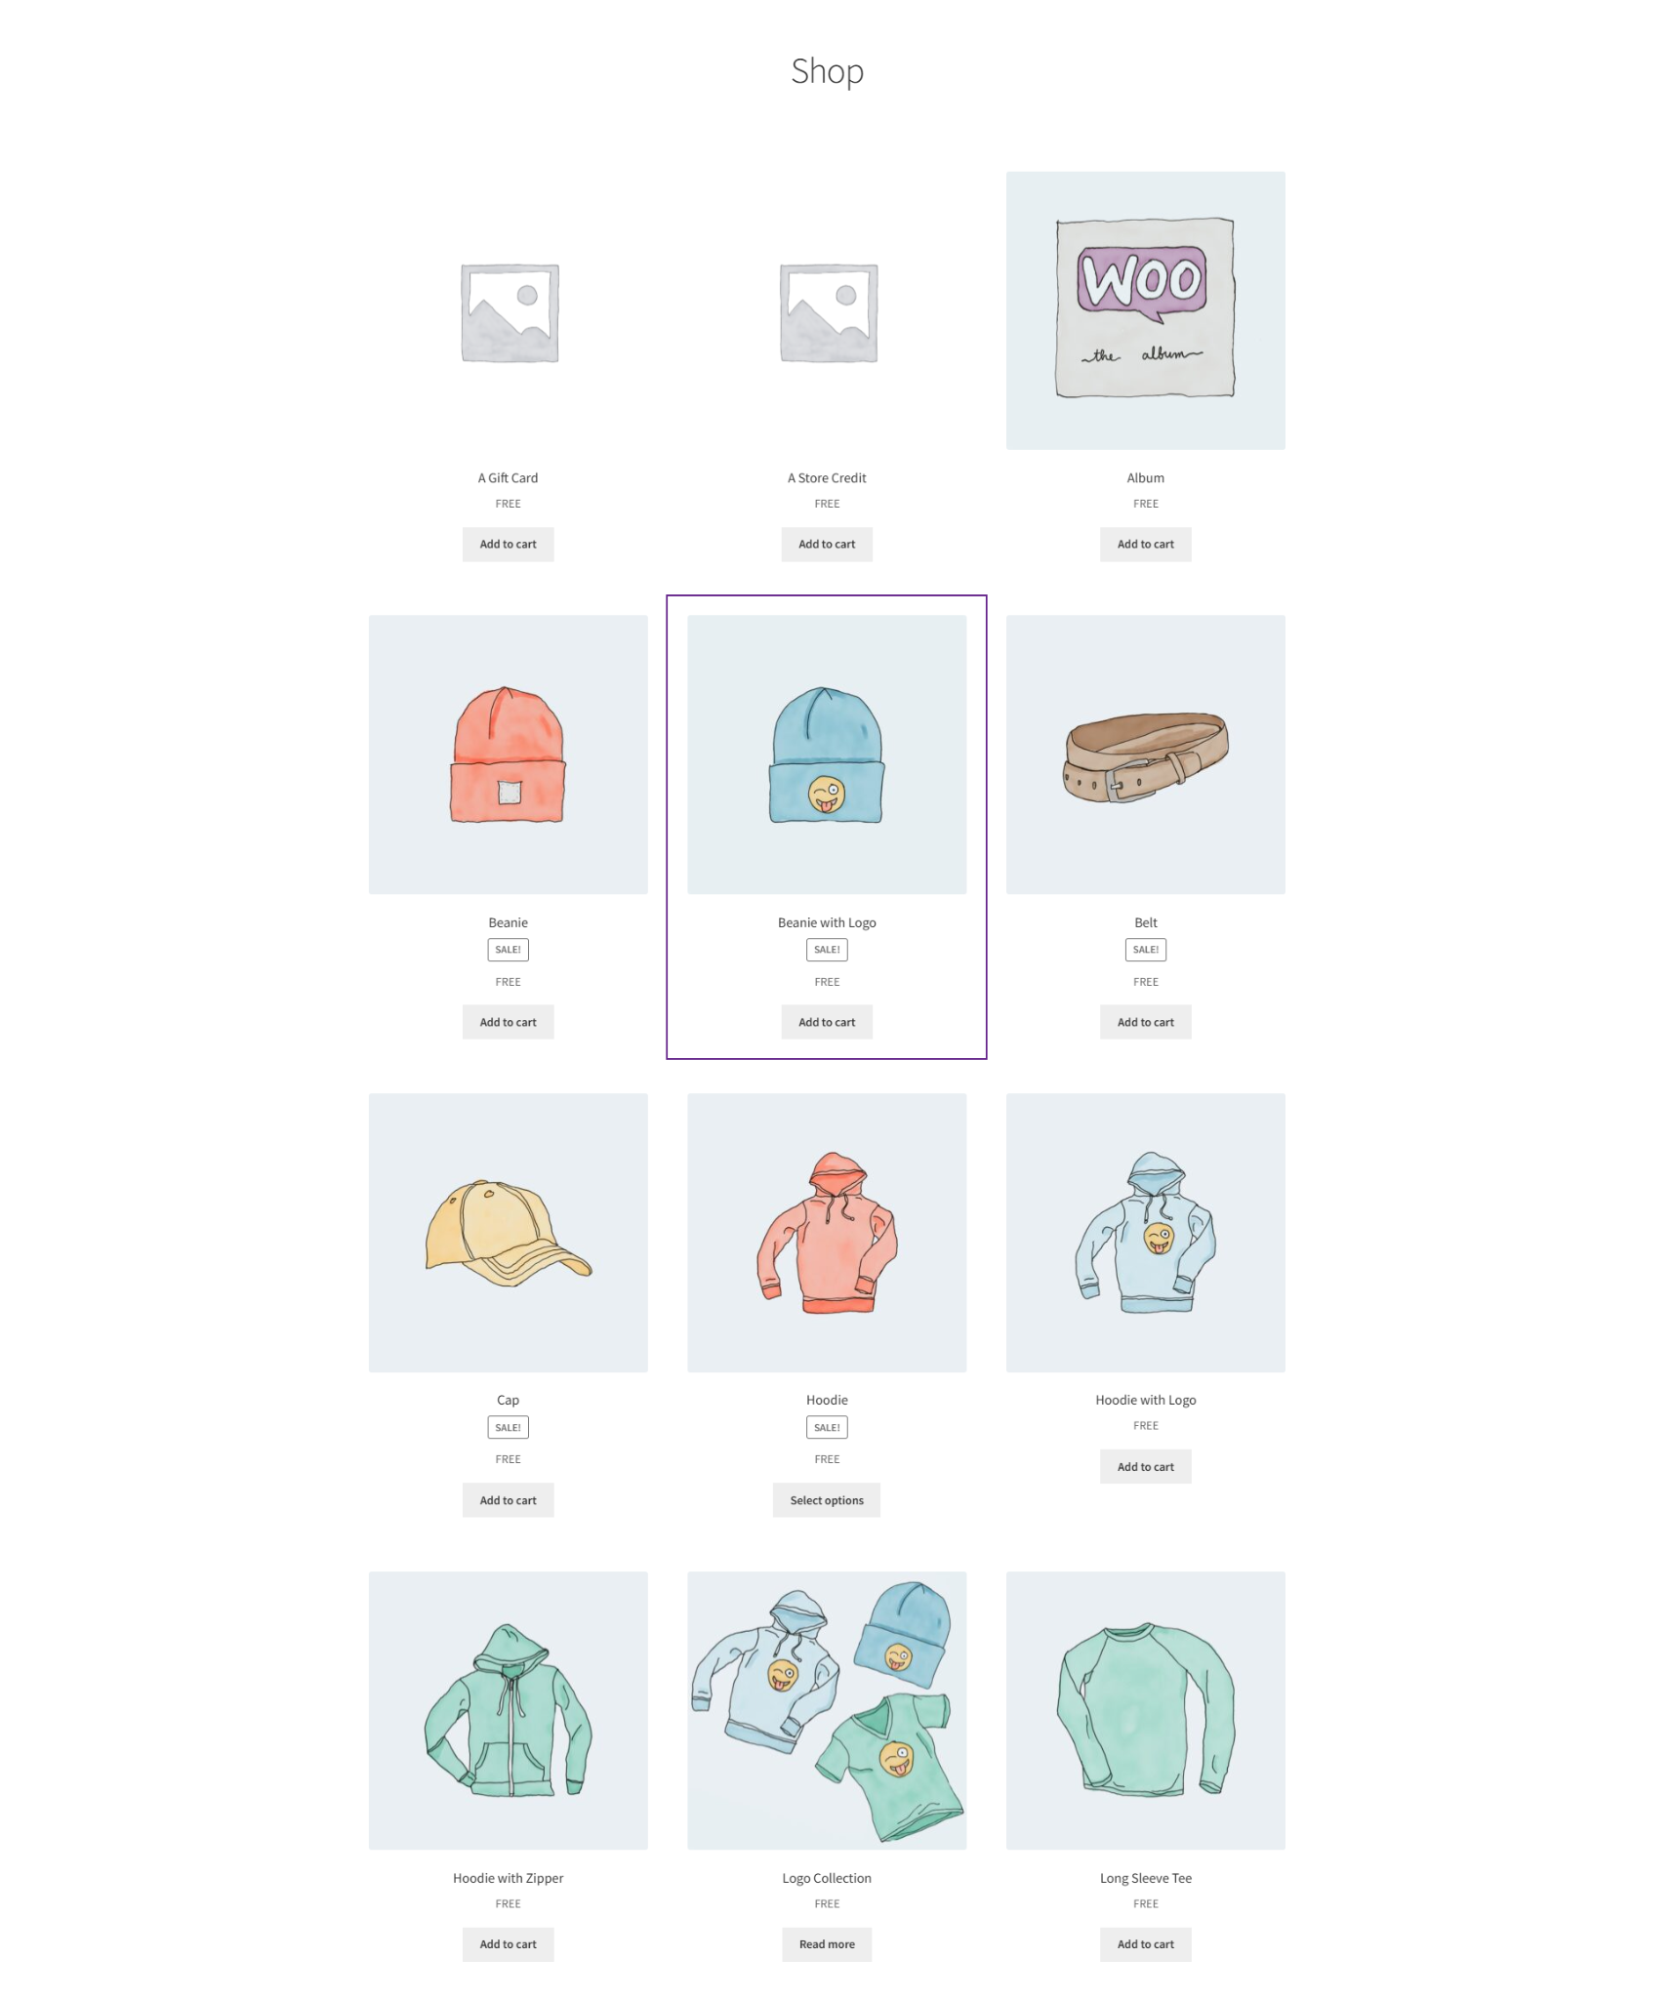
Display the User Role on the Checkout page
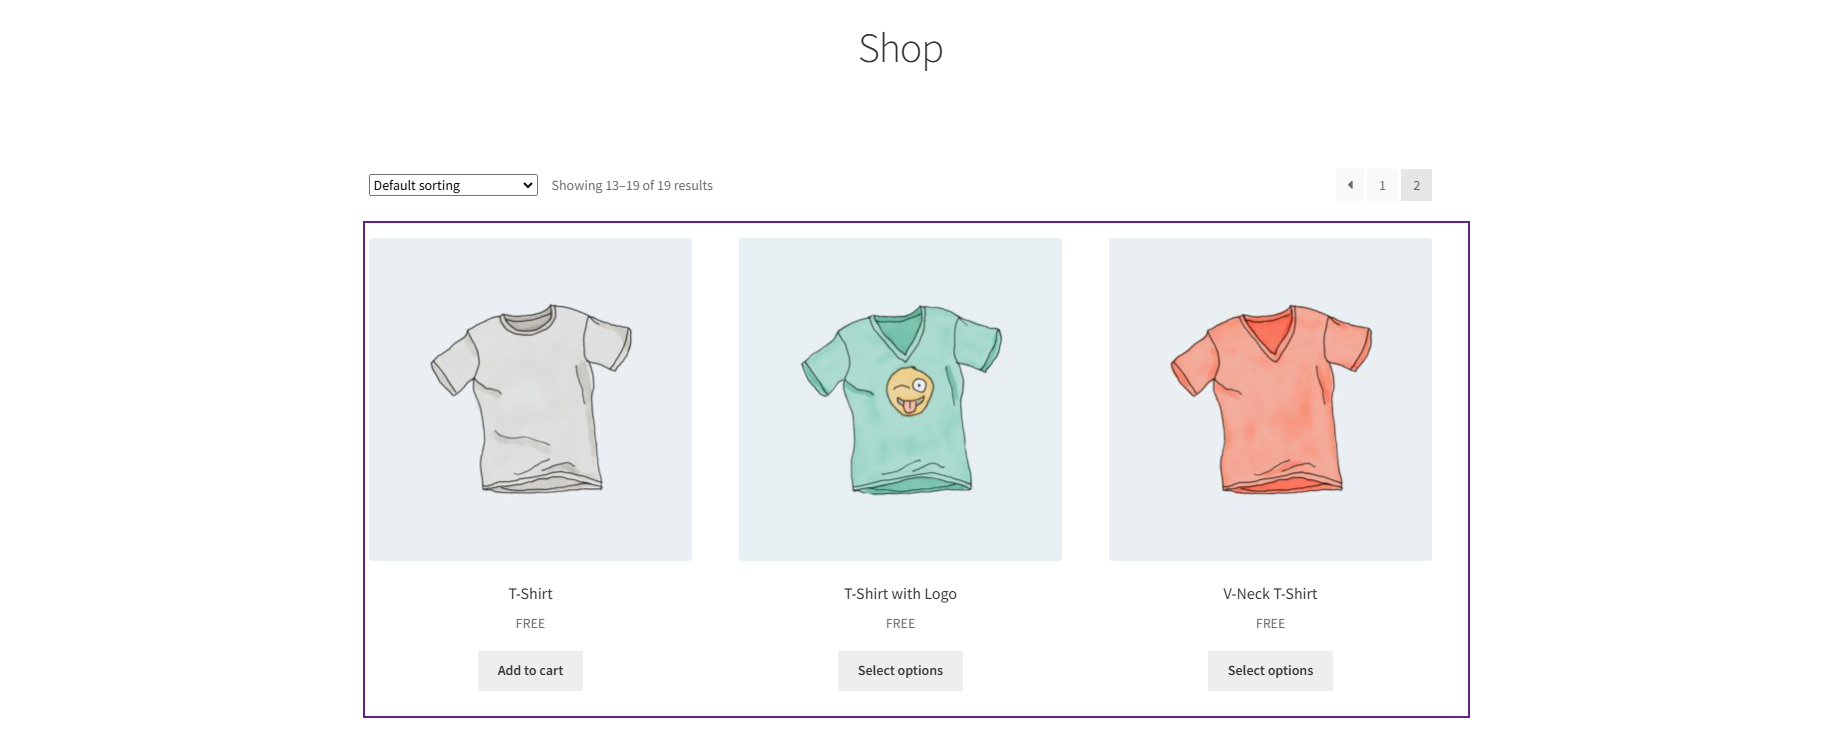
- Checkmark the checkbox to display the user roles dropdown list on the Checkout page for the registered users.

Front-End Impact:
- A guest user will go to the Shop page on the website.
- Click on the Add to Cart button against any product.

- Now go to the Cart page.
- On the Cart page, click on the Proceed to checkout button to go to the Checkout page.

- Once you’re on the Checkout page, there’s a Create an account checkbox at the bottom of the page.
- Checkmark on the Create an account checkbox.

- Once done, a Select User Role option will appear.
- Click on the dropdown menu to select the user role.

Display on My Account
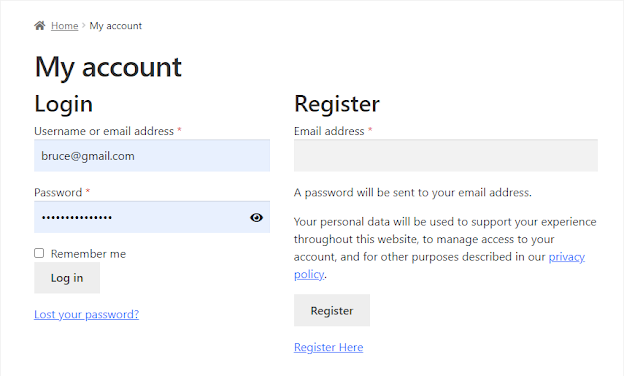
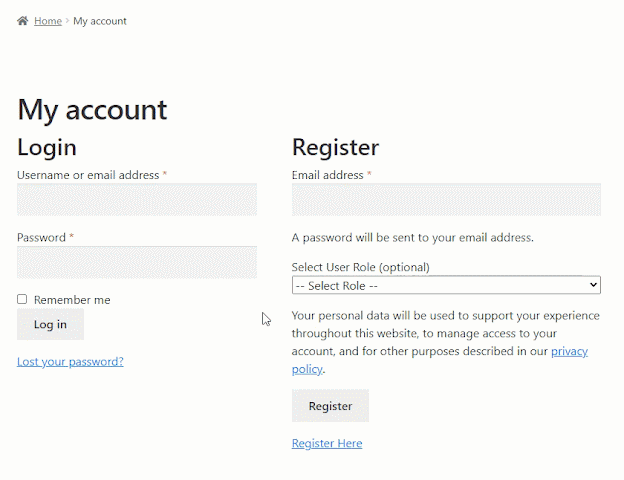
- Checkmark the checkbox to display the user roles dropdown list on the My Account page for registering users.

Front-End Impact:
- A guest user will go to the My Account page on the website.
- An option will appear, Select User Role in the Register section.
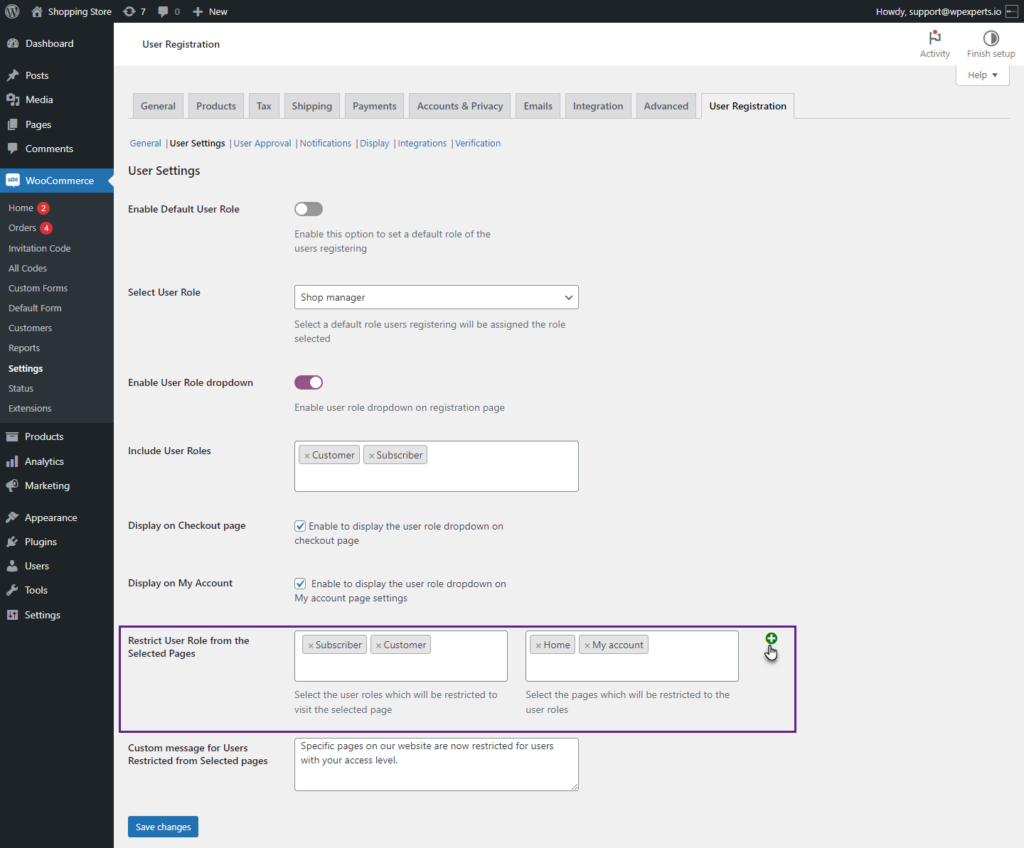
Restrict User Role from the Selected Pages
- In the Restrict User Role from the Selected Pages option, the administrator can restrict pages from specific user roles.
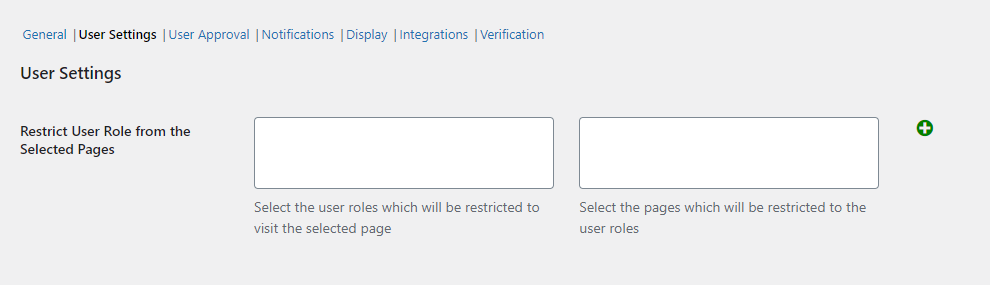
- Select the User roles that will be restricted to visiting the selected pages.
- Select the Pages that will be restricted for the selected user roles.
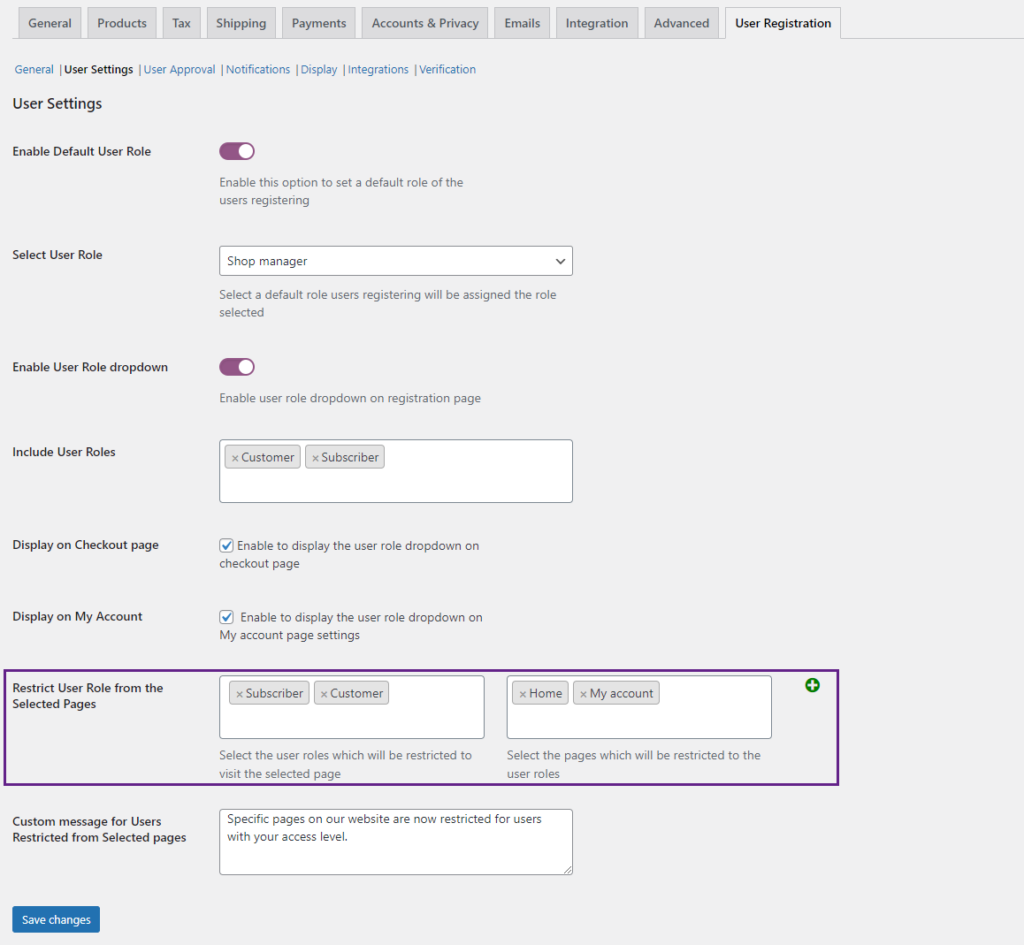
- Click on the PLUS (+) icon to add another row where the Administrator can select more pages and user roles according to their requirement.
Please Note: We cannot select the User Roles chosen already in another row, but Pages can be selected in another row.
- On clicking the PLUS (+) icon, we can see that another row has been added.

- Click on the Trash icon to delete that specific row.

- On clicking the Trash icon, the specific row is deleted.
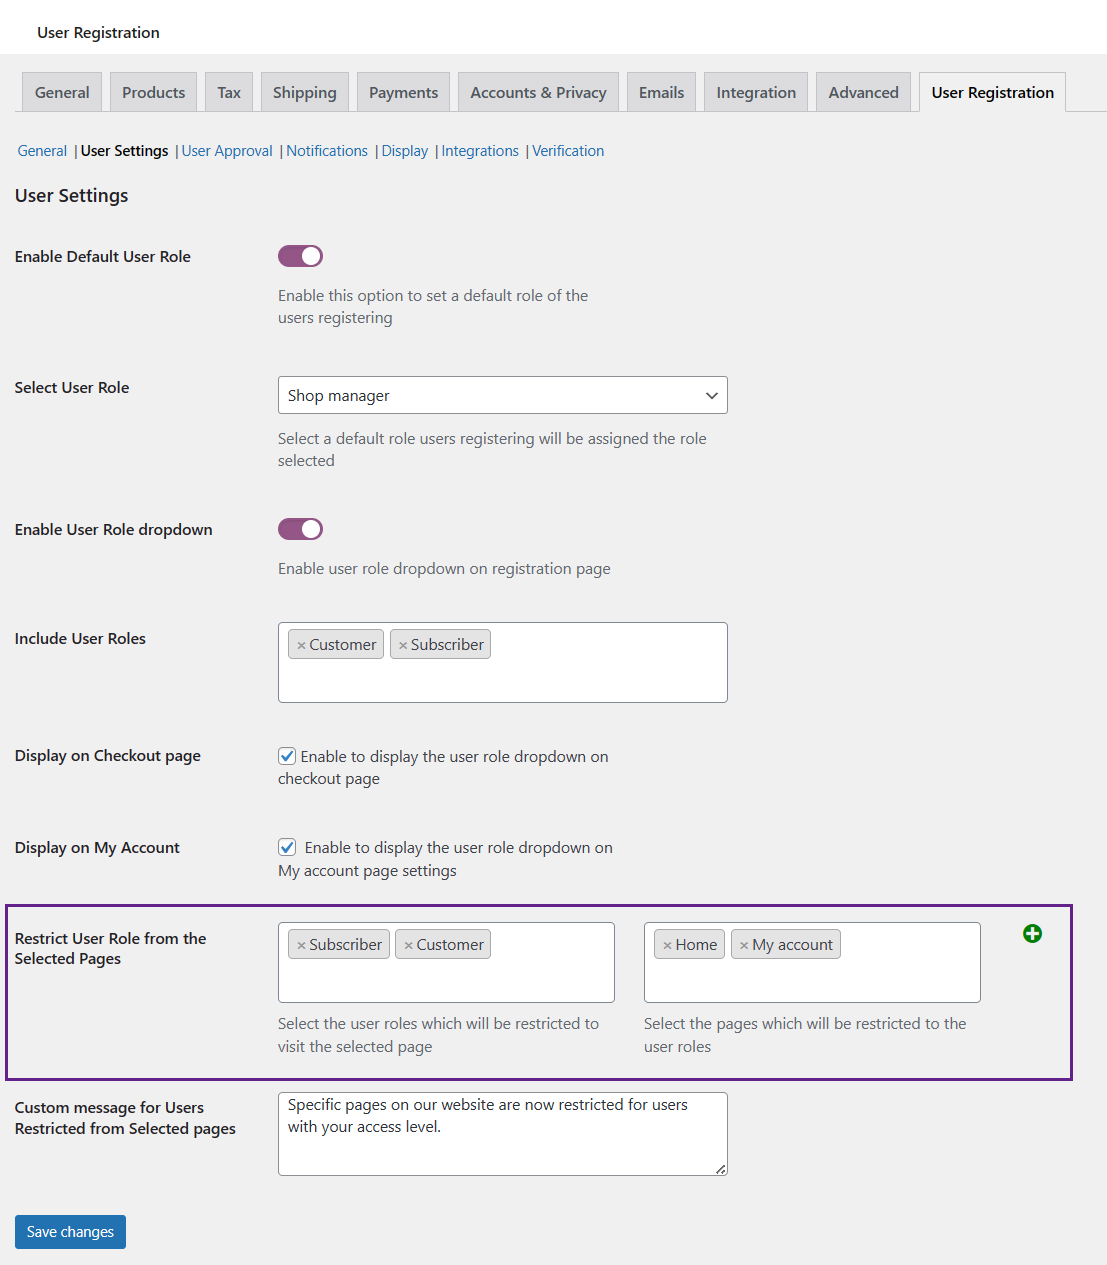
Custom message for Users Restricted from Selected pages
- Navigate to the Custom message for Users Restricted from Selected Pages option, which allows the Administrator to show a specific message to the user that is restricted from specific pages.
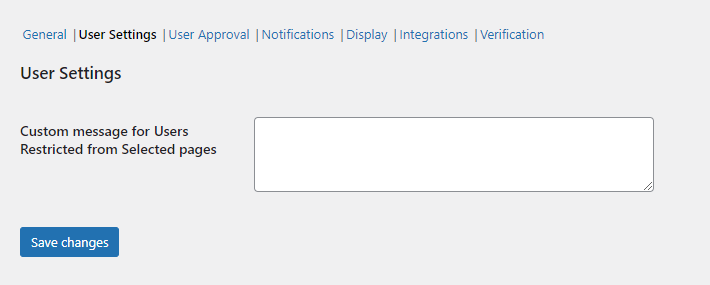
- Enter the custom message that will be displayed to the restricted users when they visit restricted pages.
Front-End Impact
- Some of the user roles are restricted, as can be seen from the above settings.
- After the user has registered with a restricted user role, they will be restricted from accessing specific pages as per the settings mentioned above.

- Once the restricted user navigates to the restricted page, an error message will appear on the front end.

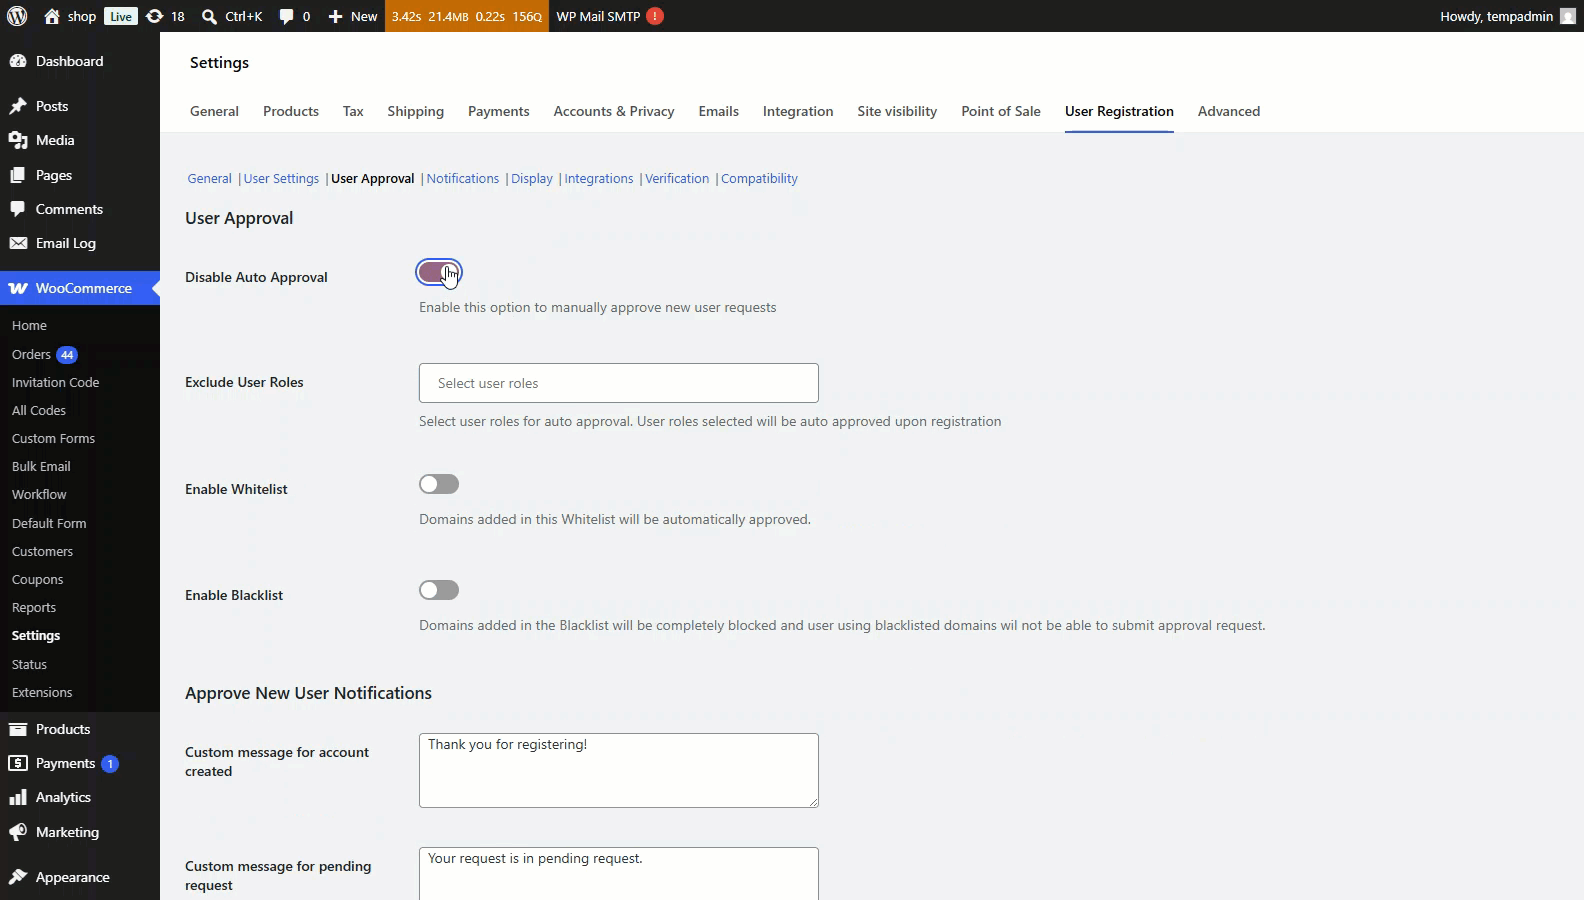
User Approval
↑ Back to top- Navigate to the User Approval subtab.
Enable Approve New User
- Enable the Enable Approve New User toggle button to approve new user requests manually.

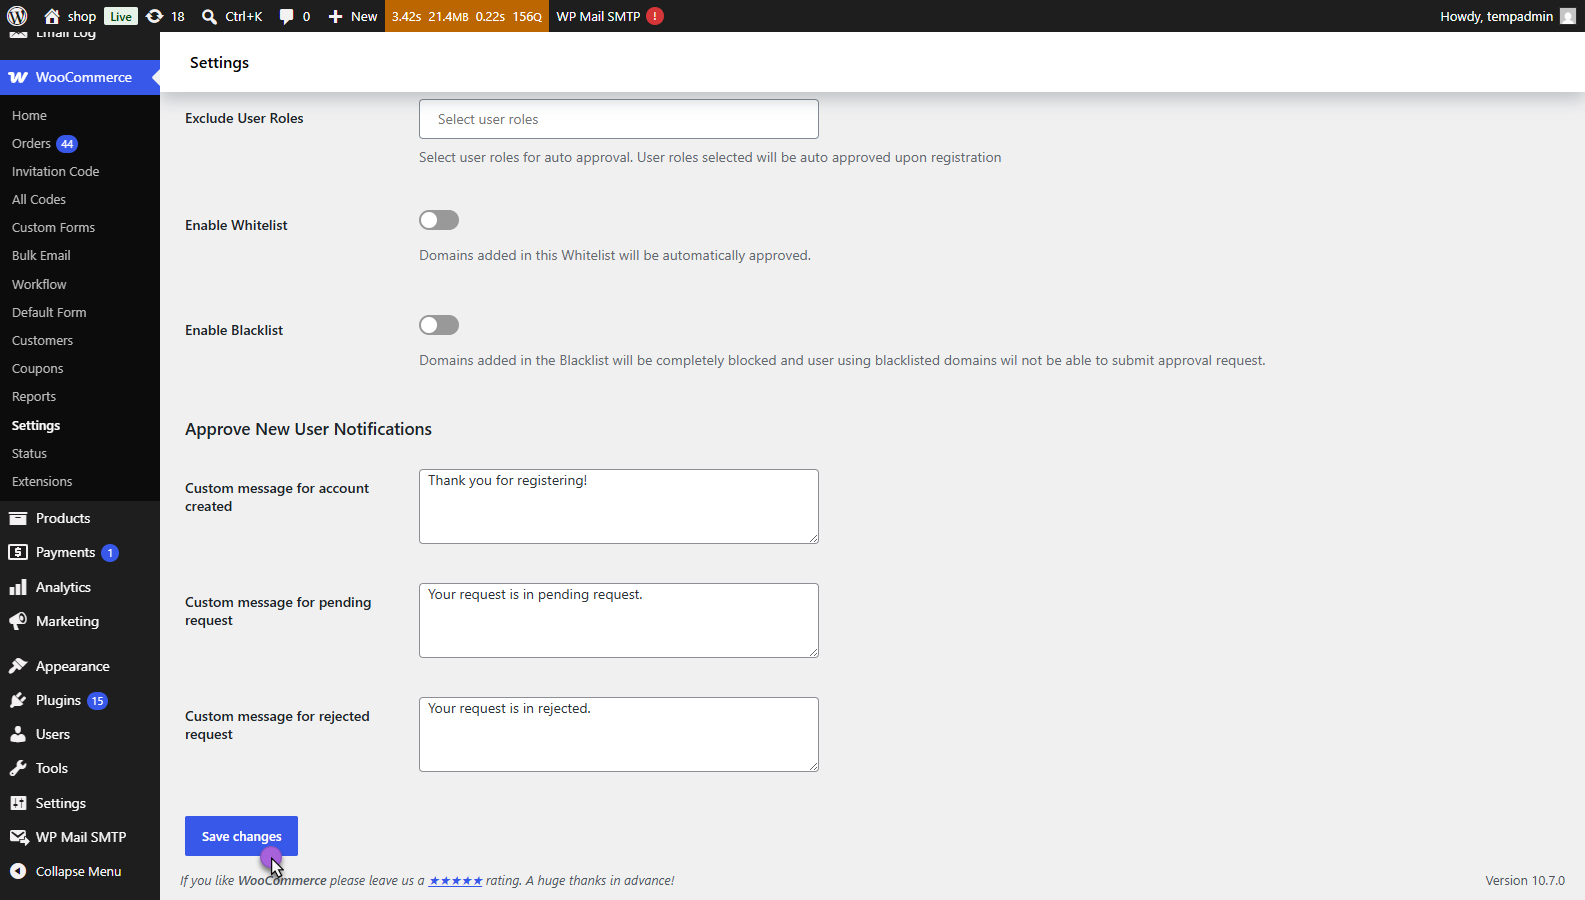
Exclude User Roles
- In this option, select the user roles from the dropdown menu.
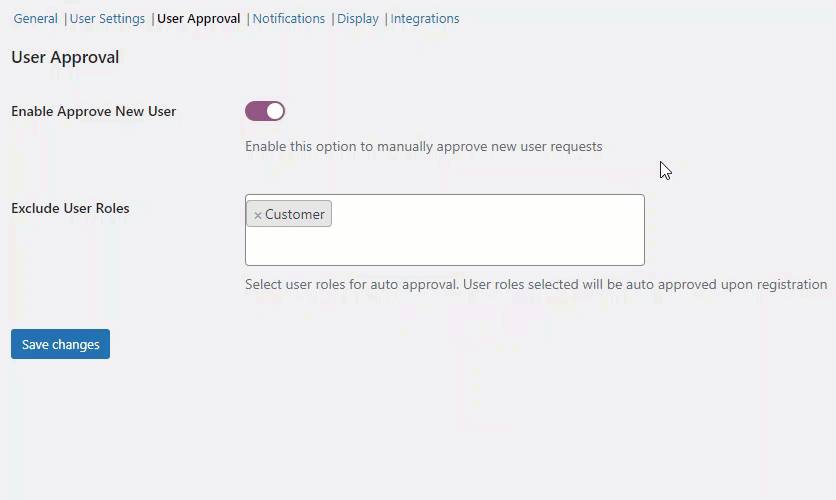
- Those User Roles selected in this option will be auto-approved upon registration.
Enable Whitelist
- On enabling the Enable Whitelist option, the Whitelist Domain List option will appear. When adding, the domains to be automatically approved will be specified in the whitelist tab.
Whitelist Domain List
- Enter the specific domains you want to auto-approve the requests from the email address containing the specified domain name in the Whitelist Domain List textbox.

Enable Blacklist
- On enabling the Enable Blacklist option, the Blacklist Domain List option will appear.
- The registration requests can be restricted based on the domain name the email address contains, adding them to the blacklist tab to reject the registration request from the specified domains given in the blacklist.
Blacklist Domain List
- Enter the specific domains you want to reject requests from the email address containing the specified domain name in the Blacklist Domain List textbox.

Custom message for account created
- Set the custom message on approval of the new user role request.
- This message will be displayed when a user account creation operation is successful. This message will appear for all the users mentioned in the Whitelist Domain.
Custom message for pending request
- Set the custom message on a pending request.
- This message will be displayed when a user retries to enter using his credentials, but his request has yet to be approved.
Custom message for rejected request
- Set the custom message on the rejection of the new user role request.
- This message will be displayed when a user account creation operation is unsuccessful. This message will appear for all the users mentioned in the Blacklist Domain.

- Click on the Save changes button to apply your settings.
Front-End Impact
Custom message for account created – Whitelist Domains
- A user registers using a domain mentioned in the Whitelist Domains section.

- Once the operation is successful, a notification will appear, which is mentioned in the Custom message for account created option.

Custom message for pending request
- Upon clicking the register button, a personalized message that is mentioned in the Custom message for pending request option will be displayed on the Front-End.

Custom message for rejected request – Blacklist Domains
- A user registers using a domain that is mentioned in the Blacklist Domains section.
- Once the operation is successful, a notification will appear, which is mentioned in the Custom message for account created option.

Disable Auto Login
↑ Back to topThe Disable Auto Login feature allows administrators to prevent users from being automatically logged in immediately after completing registration. This feature is useful for websites that only want to collect user registrations without granting instant access to user accounts.
- Go to: WooCommerce > Settings > User Registration > User Approval

- The Disable Auto Login option will be available when Enable Approve New User is disabled.
Global Disable Auto Login
- Enable the Disable Auto Login toggle to prevent automatic login.
When enabled:
- Users can successfully submit the registration form.
- A new user account will be created.
- Users will not be logged in automatically.
- Users must log in manually using their registered credentials.

- Click on Save Changes.
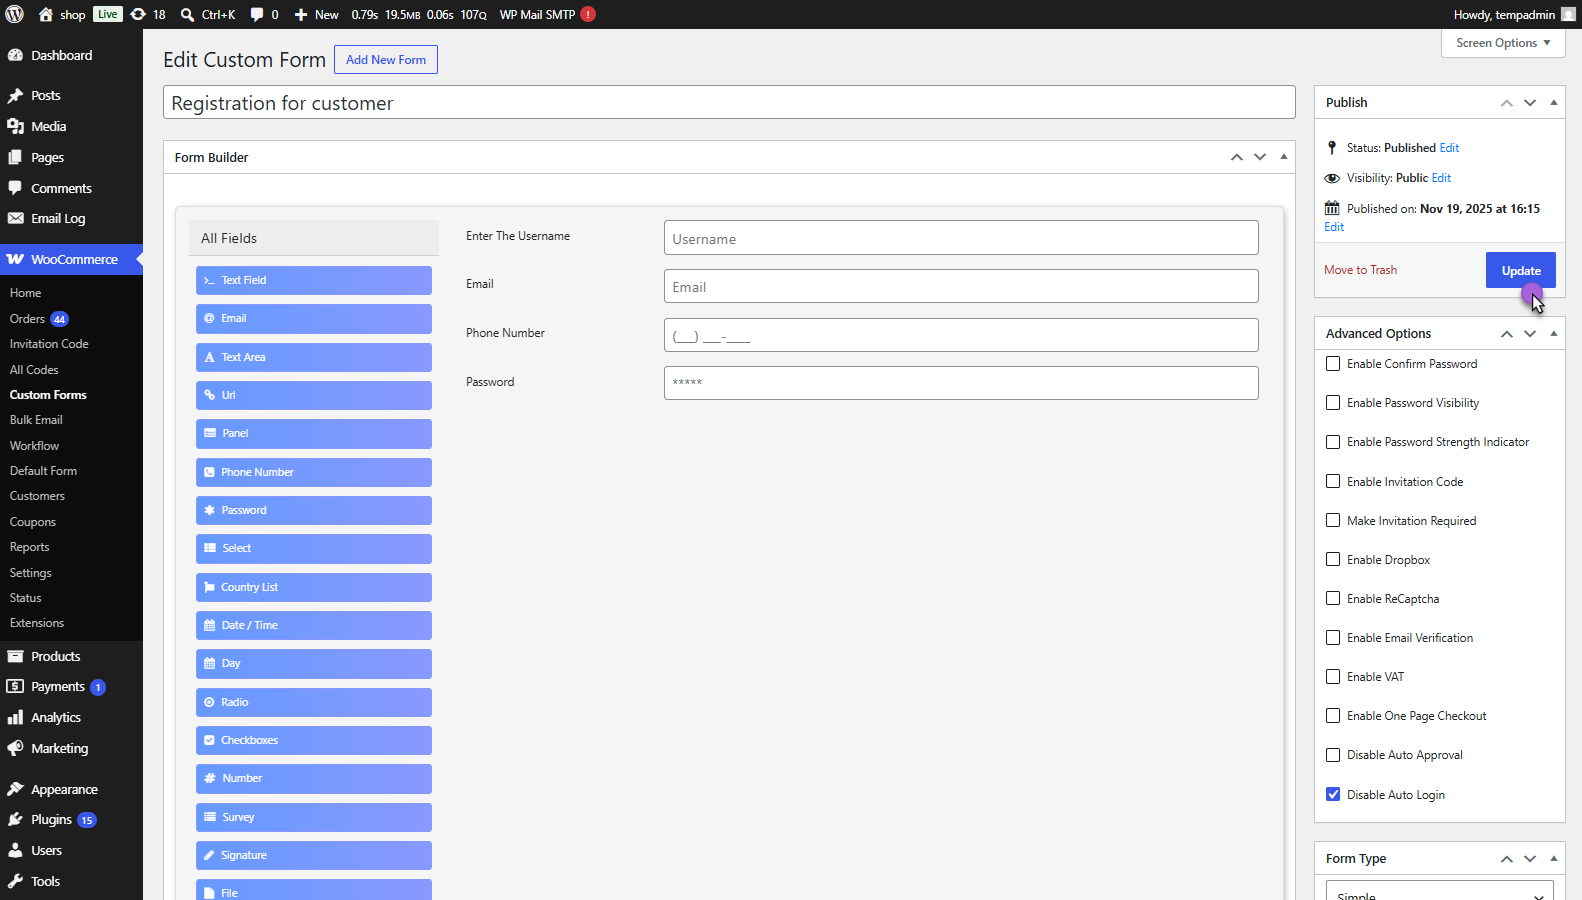
Form-Level Disable Auto Login
Administrators can also configure Disable Auto Login for individual registration forms.
- Navigate to: WooCommerce → Custom Forms

- Open the desired custom form.
- In the Advanced Options panel, locate the Disable Auto Login setting.
- Enable the Disable Auto Login checkbox.
When enabled:
- Users can successfully submit the registration form.
- A new user account will be created.
- Users will not be automatically logged in after registration.
- Users must manually log in using their registered credentials.

- Click on the Update button to save changes.
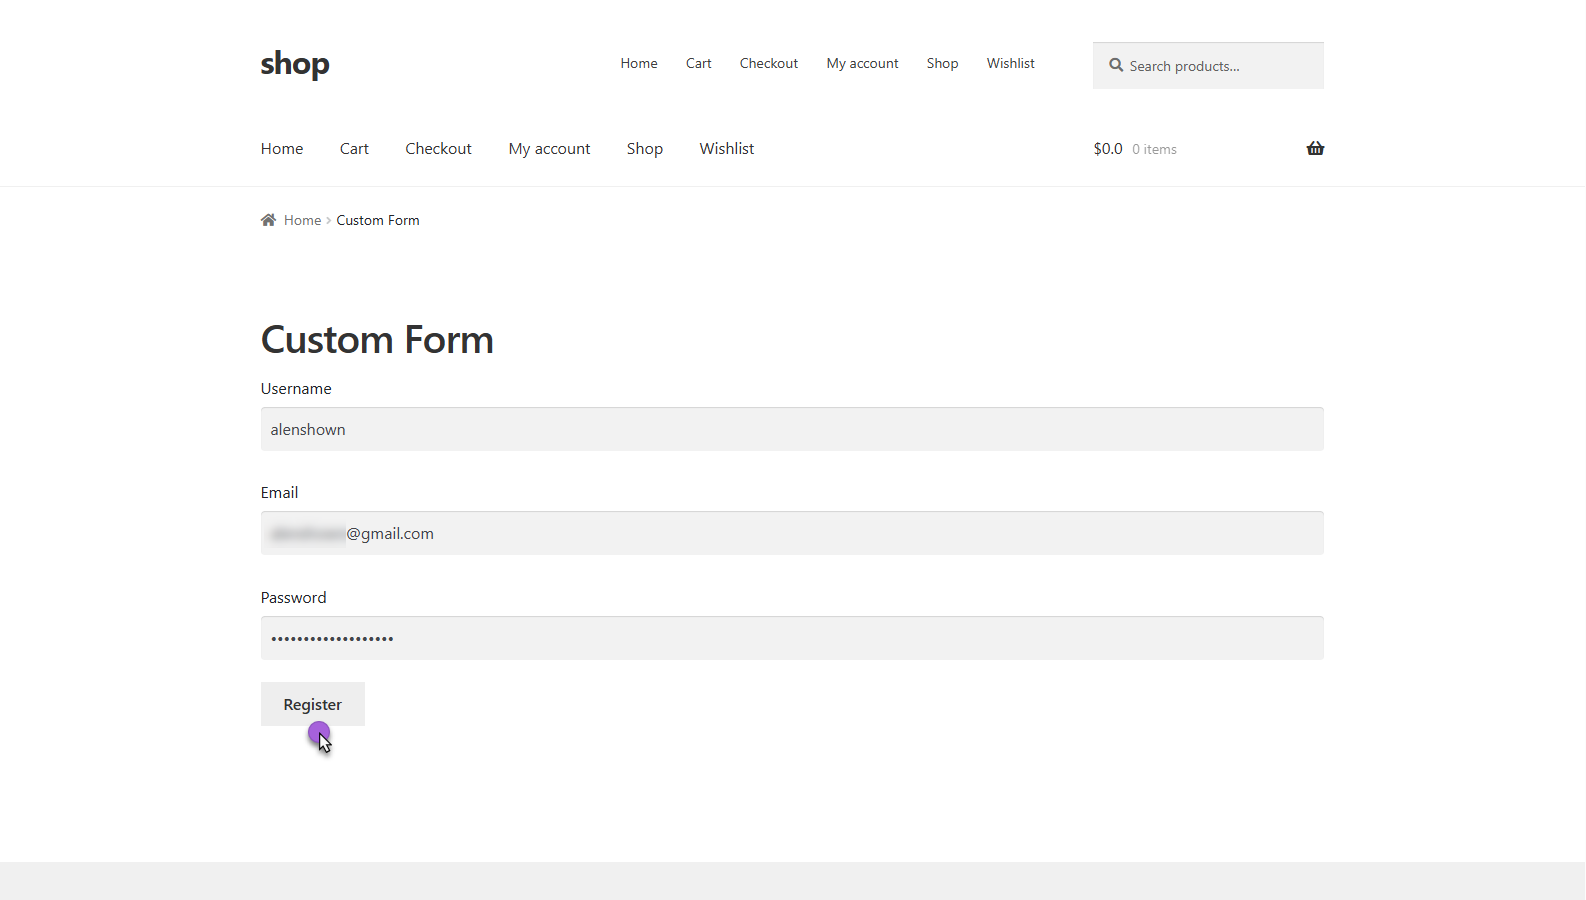
Front-End Impact
- Navigate to the registration page on the website.
- Fill in the registration form with the required details.
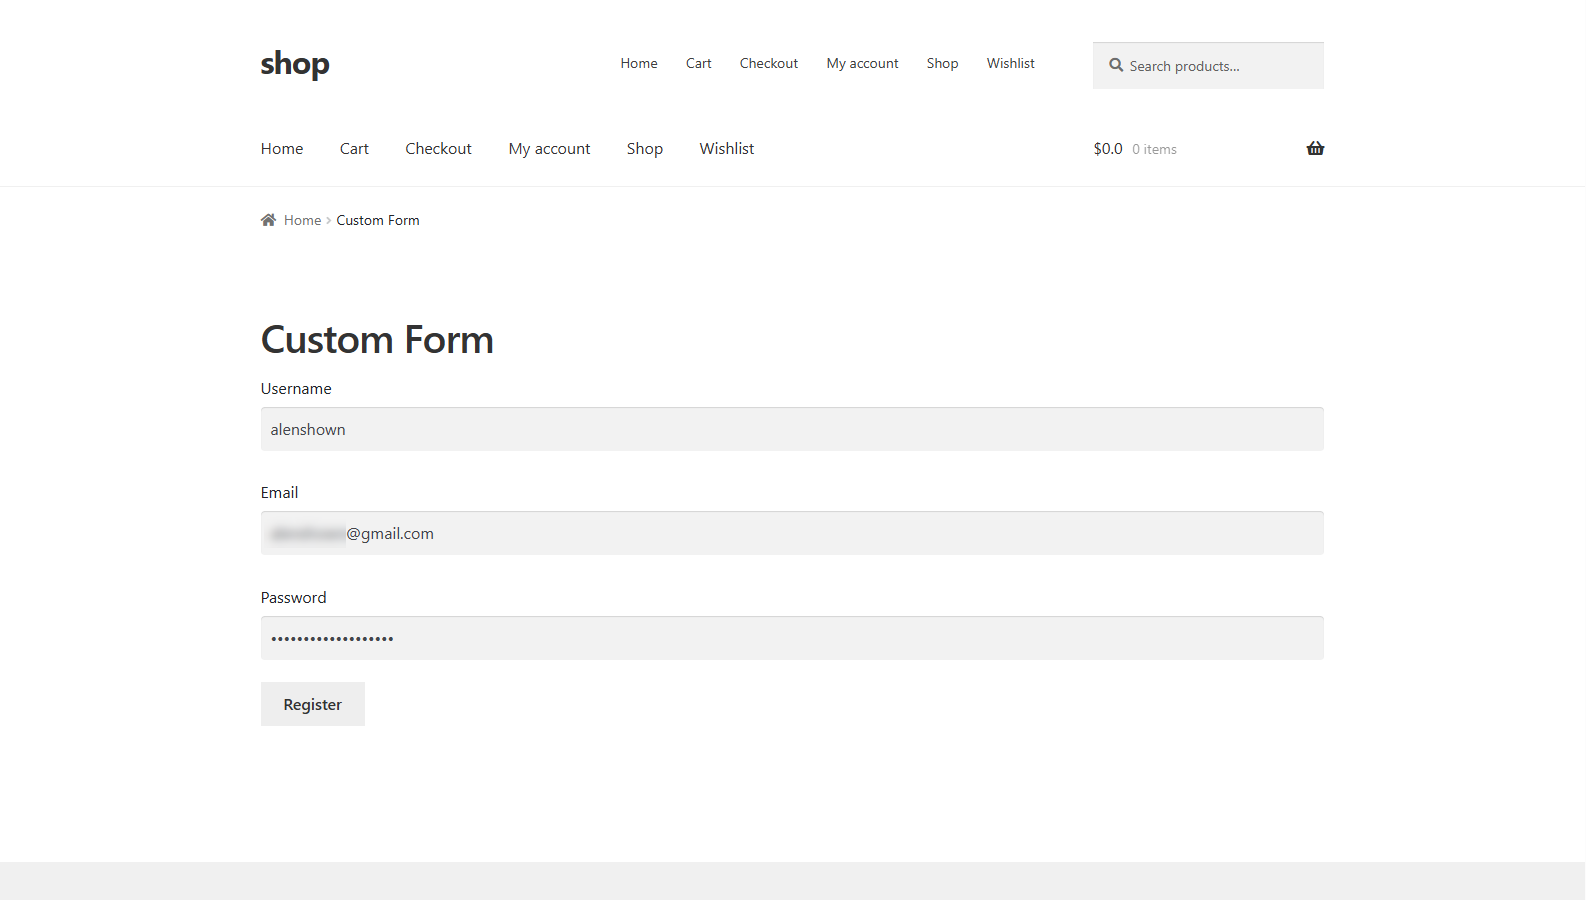
- Click the Register button.
After successful registration:
- The user account is created successfully.
- A registration success message is displayed.
- The user remains logged out.
- The user is not redirected to their account dashboard.
- The user must manually log in using their registered username/email and password.
Notification
↑ Back to top- Navigate to the Notification subtab.
- Notification emails are sent to the site admin when a user needs to be updated.
Send notification emails to all admins
- Enable the Send notification emails to all admins toggle button to send the notification email to all users with admin access.
- The default settings will be that only the site Administrator will notify a user awaiting approval.

Send admin notification emails to specific users
- Enable the Send admin notification emails to specific users toggle button to send the email notification to specific users selected in the dropdown menu.

- You can also add more than one user.

- Click on the Save changes button to apply your settings.
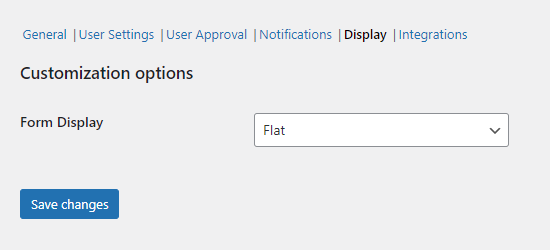
Display
↑ Back to top- Navigate to the Display subtab.
- Admin can add Custom CSS for User Registration.
Registration Page CSS

Form Display
There are two types of form display types available.
- Flat
- Round
Flat
- When the Flat option is selected as the form display type.
Front-End Impact
Round
- When the Round option is selected as the form display type.

Front-End Impact

Integrations
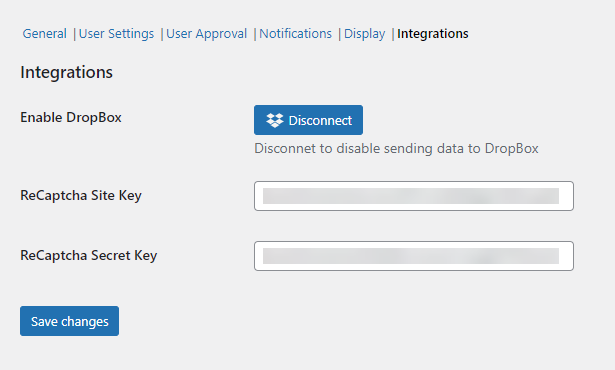
↑ Back to top- Navigate to the Integrations subtab.
Enable DropBox
- In the Enable Dropbox option, click on the Connect button.

- Click on the Continue button.
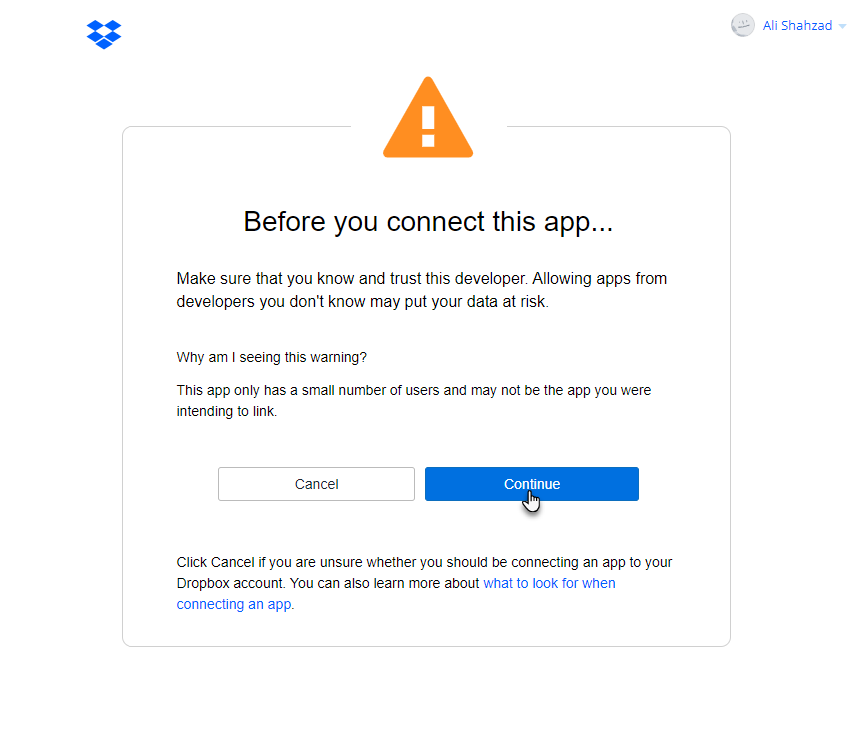
- Click on the Allow button.

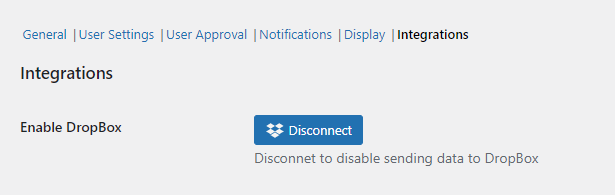
- The Dropbox is now connected.
- Click on the Disconnect button to disable sending data to Dropbox.
ReCaptcha
↑ Back to topReCaptcha Site Key
- The Administrator will need the ReCaptcha Site Key in order to activate ReCaptcha.
ReCaptcha Secret Key
- The Administrator will need the ReCaptcha Secret Key in order to activate ReCaptcha.

- Go to https://www.google.com/recaptcha/about/
- Click on the v3 Admin Console button.

- Once done, you’re on the Register a new site page.

- In the reCAPTCHA type option, choose reCAPTCHA v2.
- Choose the “I’m not a robot” Checkbox option.
- Enter the required fields and click on the Submit button.

- Once done, the SITE KEY and the SECRET KEY will appear.
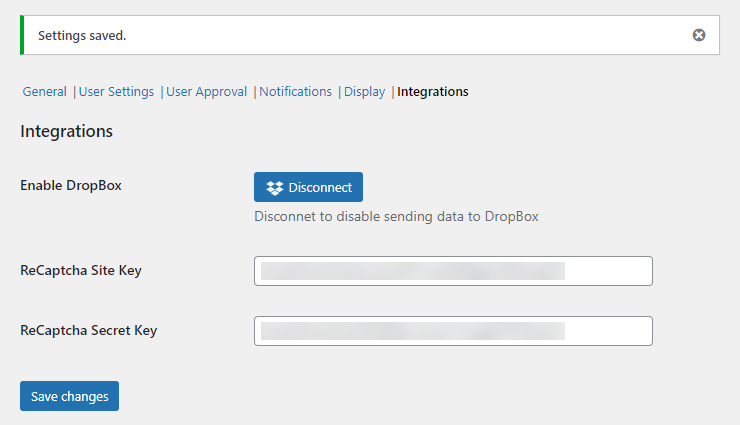
- Copy the SITE KEY and SECRET KEY and navigate back to the Integration tab.

- Enter the SITE KEY and the SECRET KEY in the ReCaptcha Site Key option.
- Click on the Save changes button.

- A notification will appear once the settings are saved.
Twillo Settings
Enable Twillo
- In the Twillo Settings option, click on the toggle button.

- Open a web browser.
- Type or click on the link: console.twilio.com
- Enter your Twilio account credentials (username and password).
- Click the Continue Button to access your Twilio account.

- After logging in, navigate to your account Info.
- Locate and copy your “Account SID, Auth Token & My Twilio phone number”.

- Navigate to the Admin Panel to the Twilio Settings section.
- Paste the Twilio Access Token, Twilio SID &Twilio phone number used into this field.
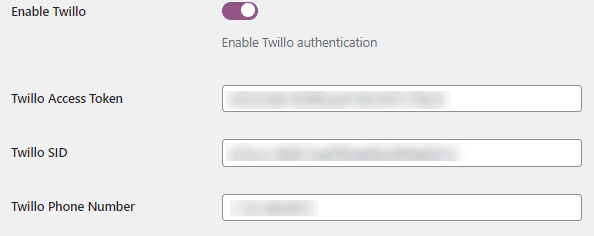
- Admin users can write Twilio messages over the Twilio message box that will be received along with the OTP over mobile.
- Click on the Save changes button.

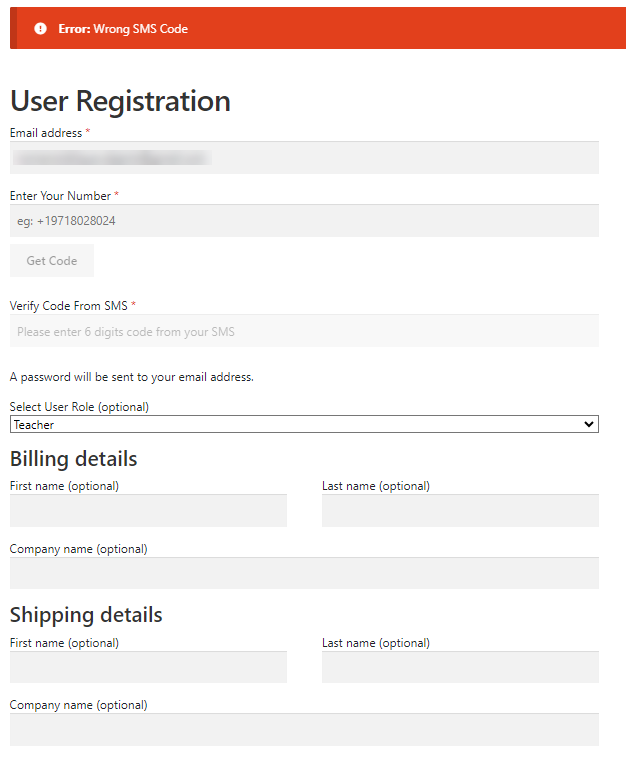
Front-End Impact
- Navigate to the form on the website.
- Enter the number in the Enter your Number fields on the registration form.
- Click on the Get Code button.

- After clicking on the Get Code button, a blue highlighted successful message will be shown.
- Users will receive the OTP over the registered number.

- Copy or type your OTP.
- Again, navigate to the form on the website.
- Paste the code for verification in the Verify Code From SMS field.

- When a user enters an incorrect OTP, the system will display an error message related to the OTP, indicating that the provided OTP is invalid or incorrect.
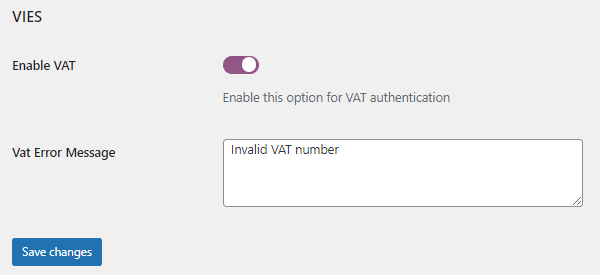
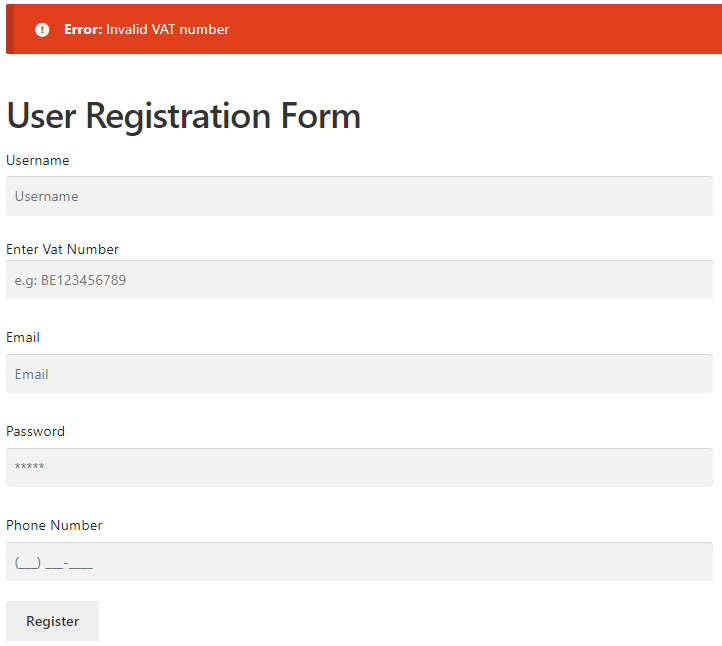
VIES
Enable VAT
- In the Enable VAT option, click on the toggle button.

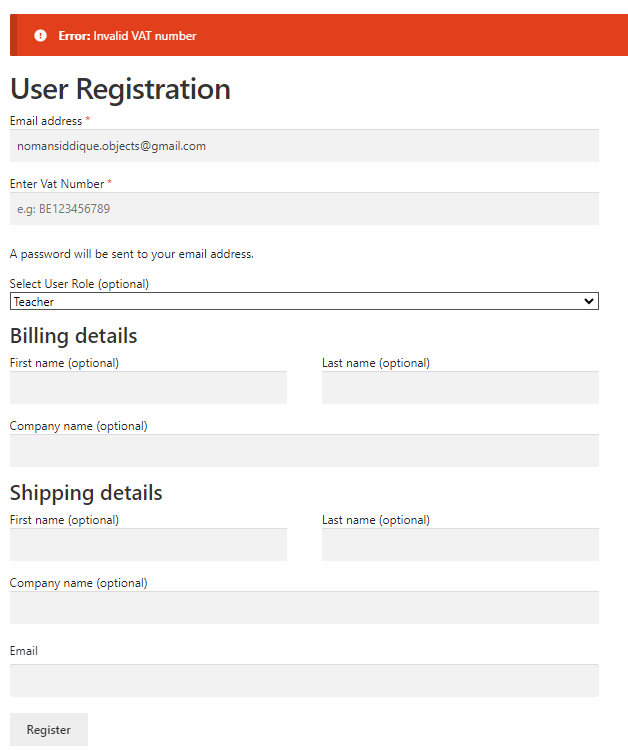
VAT Error Message
- Write the message at the VAT Error Message box that the admin wants to display the message on the front-end.
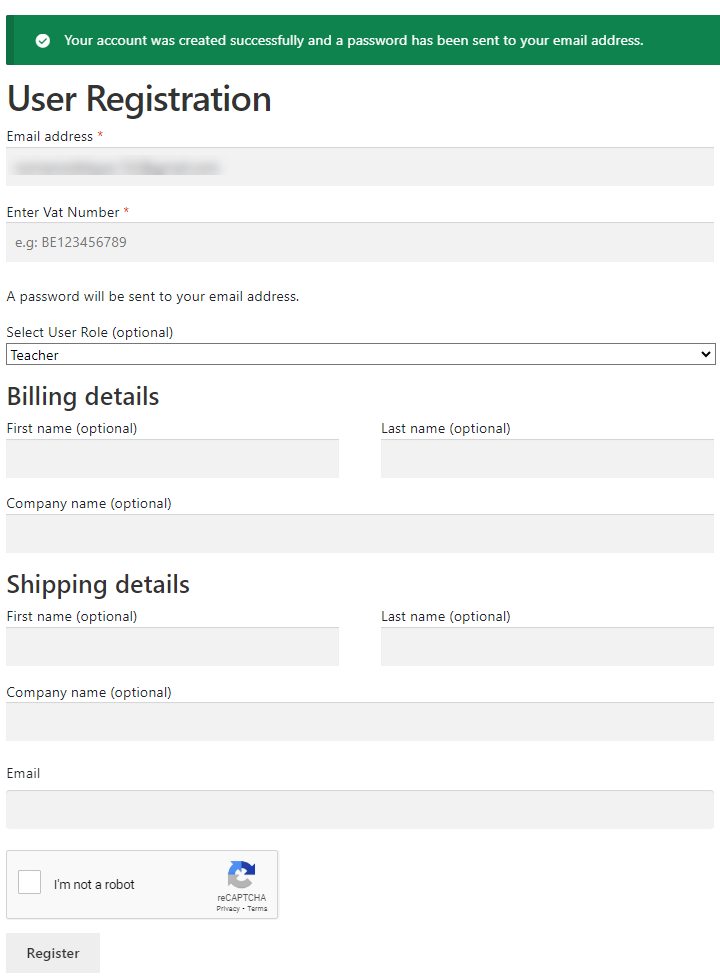
Front-End Impact
- Navigate to the form on the website.
- Enter the VAT Number on the registration form.
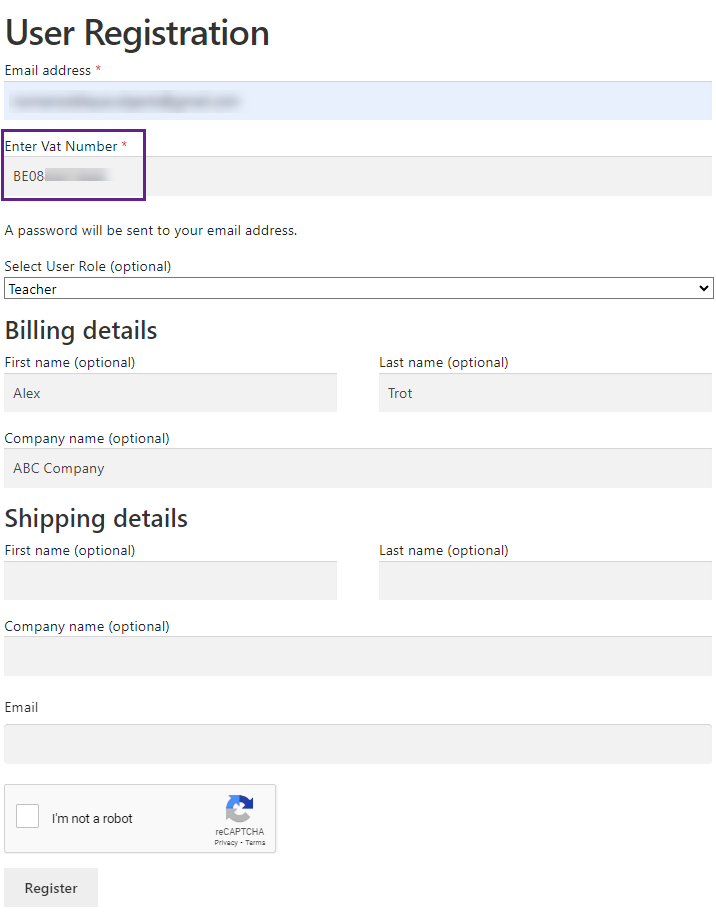
- When the correct VAT number is provided by the user, the system will permit the user to successfully complete the registration process.
- When a user enters an incorrect VAT Number, the system will display an error message related to the VAT Number, indicating that the provided VAT Number is invalid or incorrect.
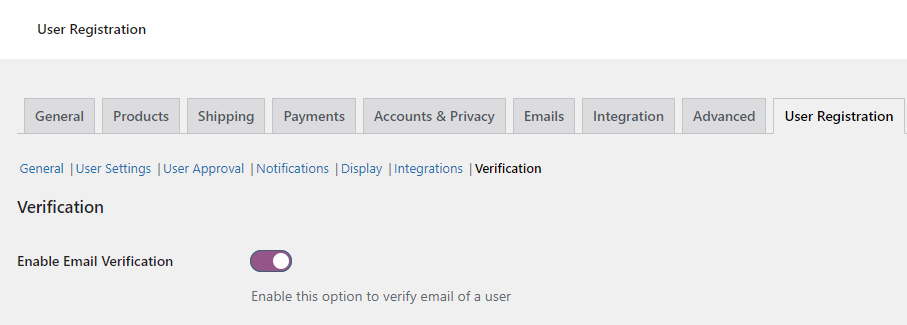
Verification
↑ Back to top- Navigate to the Verification subtab.
Enable Email Verification
- Enable the Email Verification toggle button to send the email verification code to the registered user’s email address to verify the email
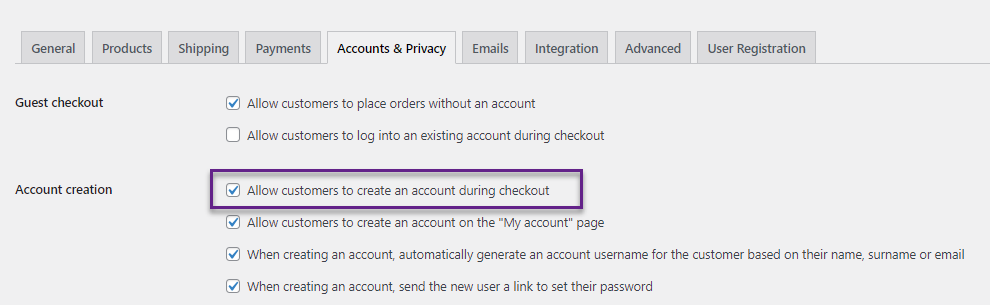
Enable Email Verification on Checkout
- Enable the Email Verification on Checkout toggle button to send the email to the users at the checkout page to verify the email.

NOTE: The initial step is for the admin user to navigate the WooCommerce settings and proceed to the Accounts and Privacy tab. In the Account creation section, the administrator must activate the option “Allow customers to create an account during checkout” by clicking the checkbox.
Verification Error Message
- Write the message in the Verification Error Message box that will appear if the verification is successful.

Front-End Impact
Enable Email Verification
- A user will go to the User Registration page on the website.
- The user will enter the email address.
- Click on the Get Code button.

- Once a user clicks on the Get Code button, the user will receive the Email Verification Code over entered Email.
- The user will copy and paste the code into the Enter Email Code on the User Registration page.

- When the correct Code is provided by the user, the system will permit the user to successfully complete the registration process.

Verification Error Message
- If the user enters an invalid Verification Code, the below message will appear.

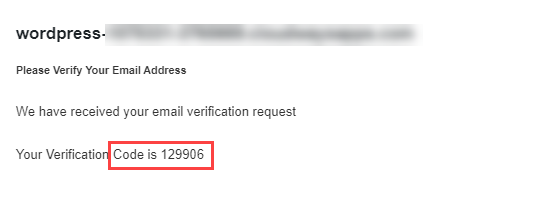
Email Verification on Checkout
- The user will go to the shop page, click the Add to Cart button against any product and proceed to the Checkout page.
- The user will enter the email address.
- Click on the Get Code button.
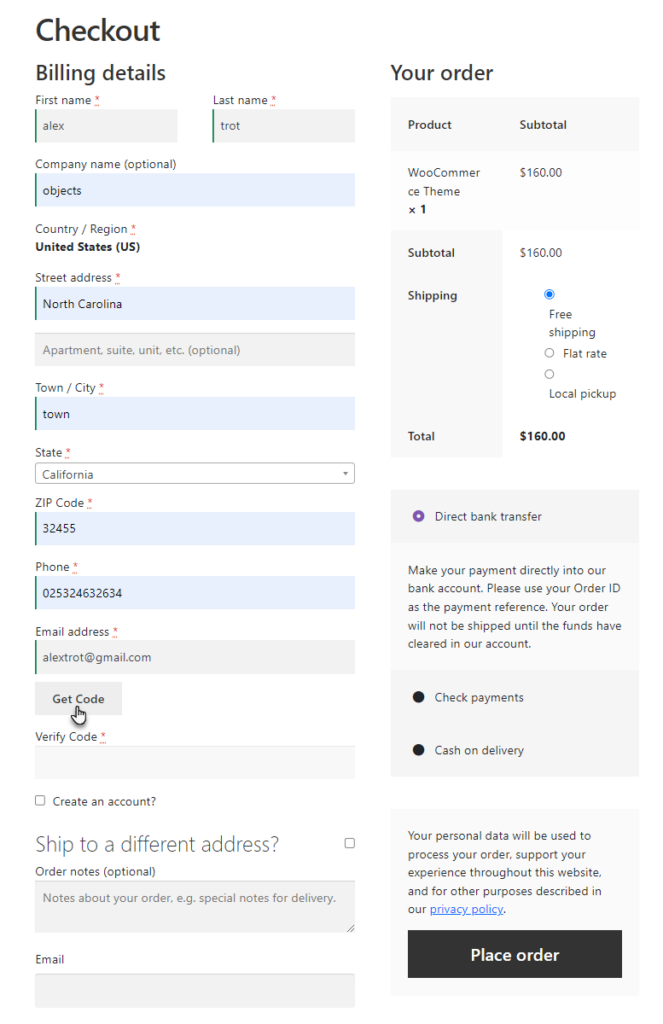
- The user will receive an email containing a code, which they can copy.

- Once the code has been copied, the user will return to the website and paste the code into the Verify Code Field.

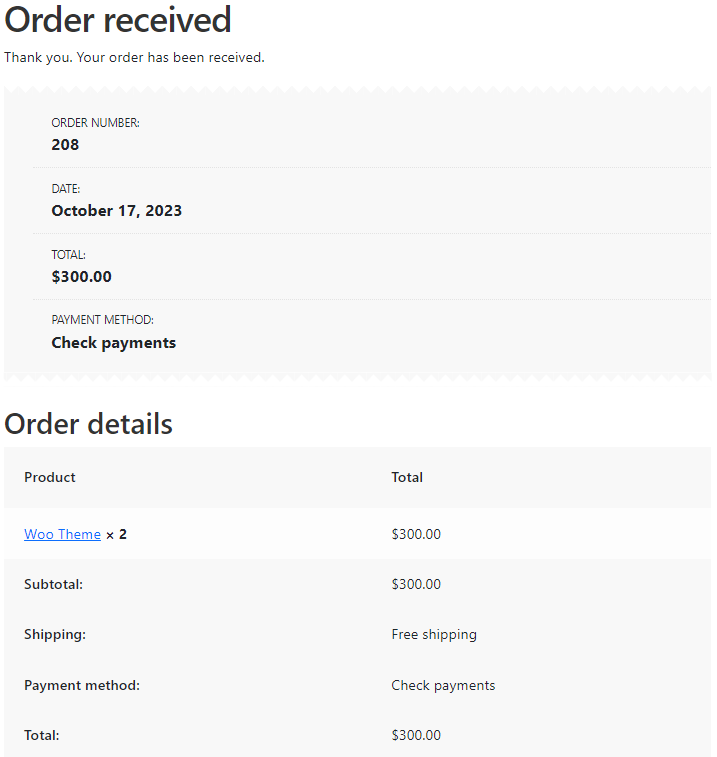
- When the Code is correctly provided by the user, the system will permit the user to successfully place the order.
- If the user enters an invalid Verification Code, the below message will appear.
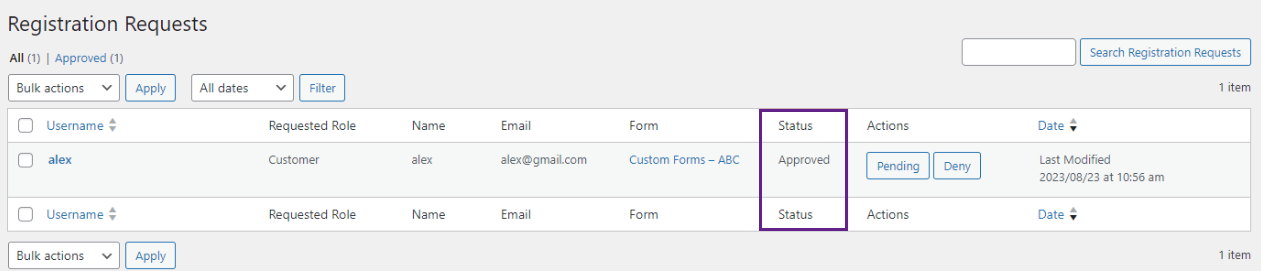
Requests
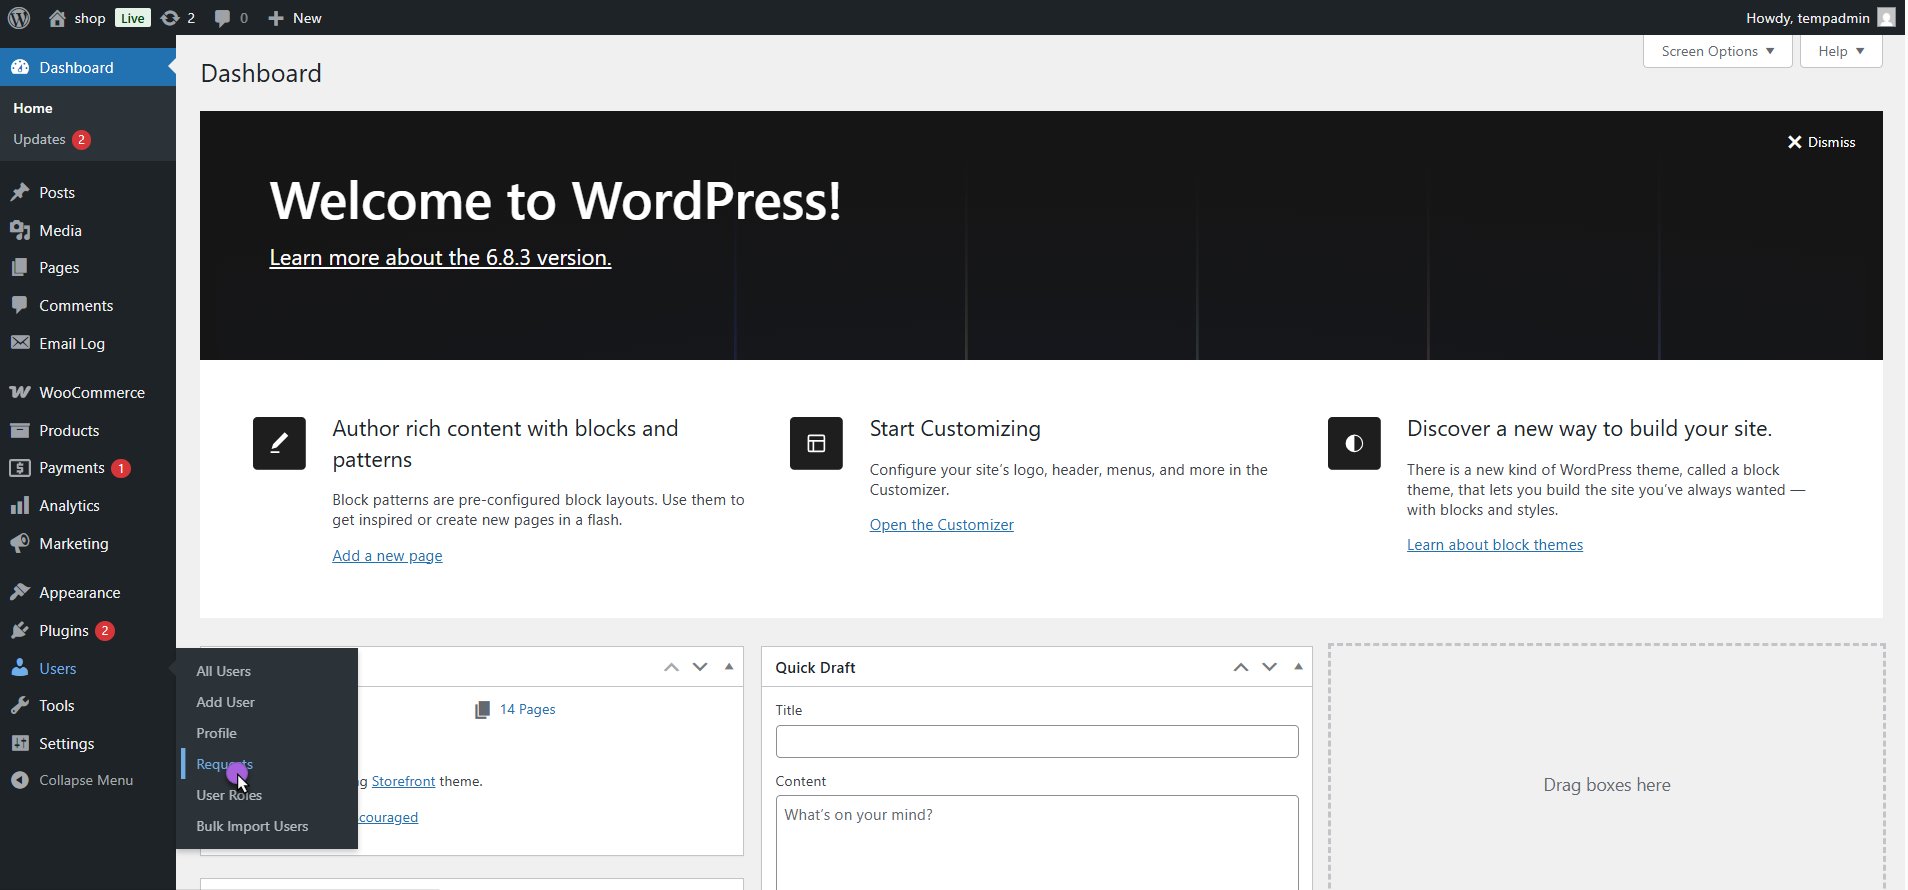
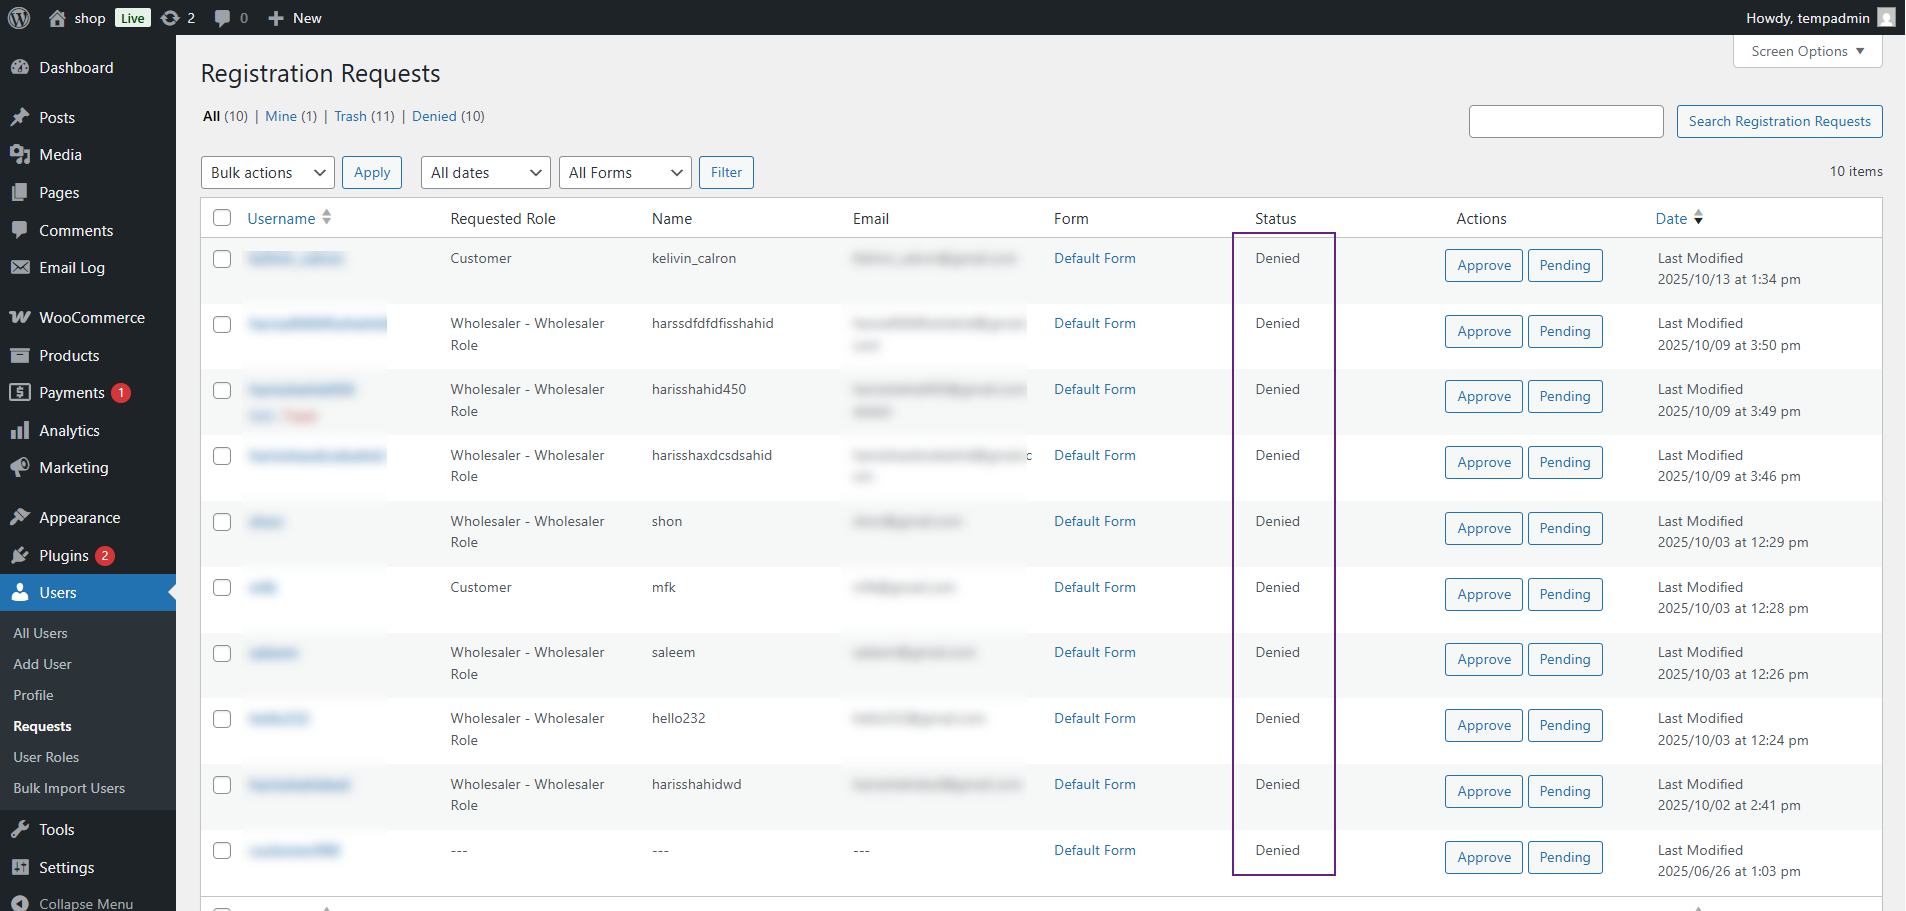
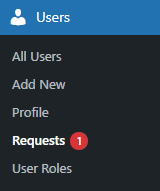
↑ Back to top- Navigate to WordPress Admin Dashboard → Users → Requests.

- All the manual requests will appear on the Registration Requests page.

- All the manual requests will appear on the Registration Requests page.
- The user will go to the User Registration page.
- The user will enter the required fields and credentials.
- Once done, the user will click on the Register button.

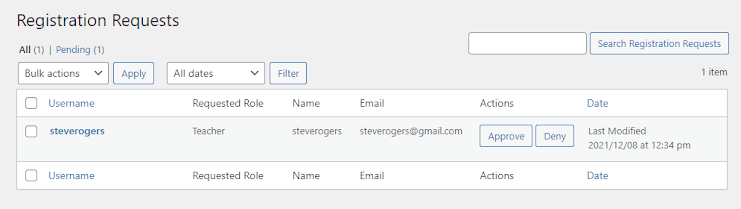
Pending Request
↑ Back to top- An email will be launched once the user clicks the Register button and sent to the User and the Administrator.
Pending Request – User:
↑ Back to top
Pending Request – Administrator:
↑ Back to top
- Now on the Registration Requests page, the Admin will receive the request of that particular user.
- A notification will also appear on the WP Panel against the Request option.
- The user will be in the Pending section on the Registration Requests page.
Approve Request
↑ Back to top- The Admin will click on the Approve button.

- Once done, the user will be moved to the Approved section on the Registration Requests page.
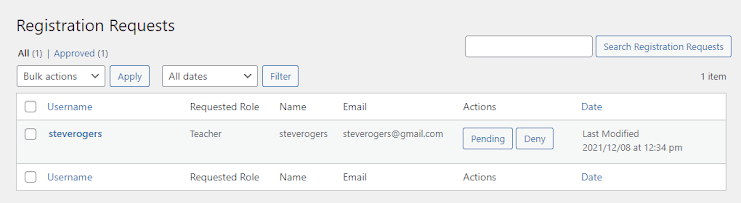
- Also, an email will be sent to the User regarding the Approval of their request.
Approval Request – User:
↑ Back to top
Reject Request
↑ Back to top- The Admin will click on the Deny button.

- Once done, the user will be moved to the Denied section on the Requests page.
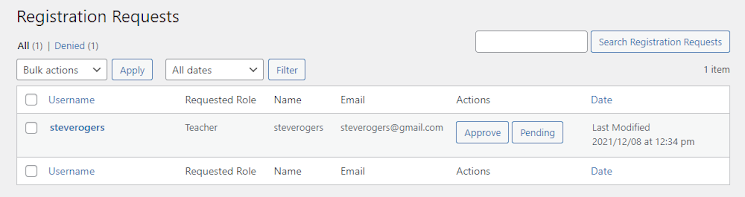
- Also, an email will be sent to the User regarding the Rejection of their request.
Rejected Request – User:
↑ Back to top
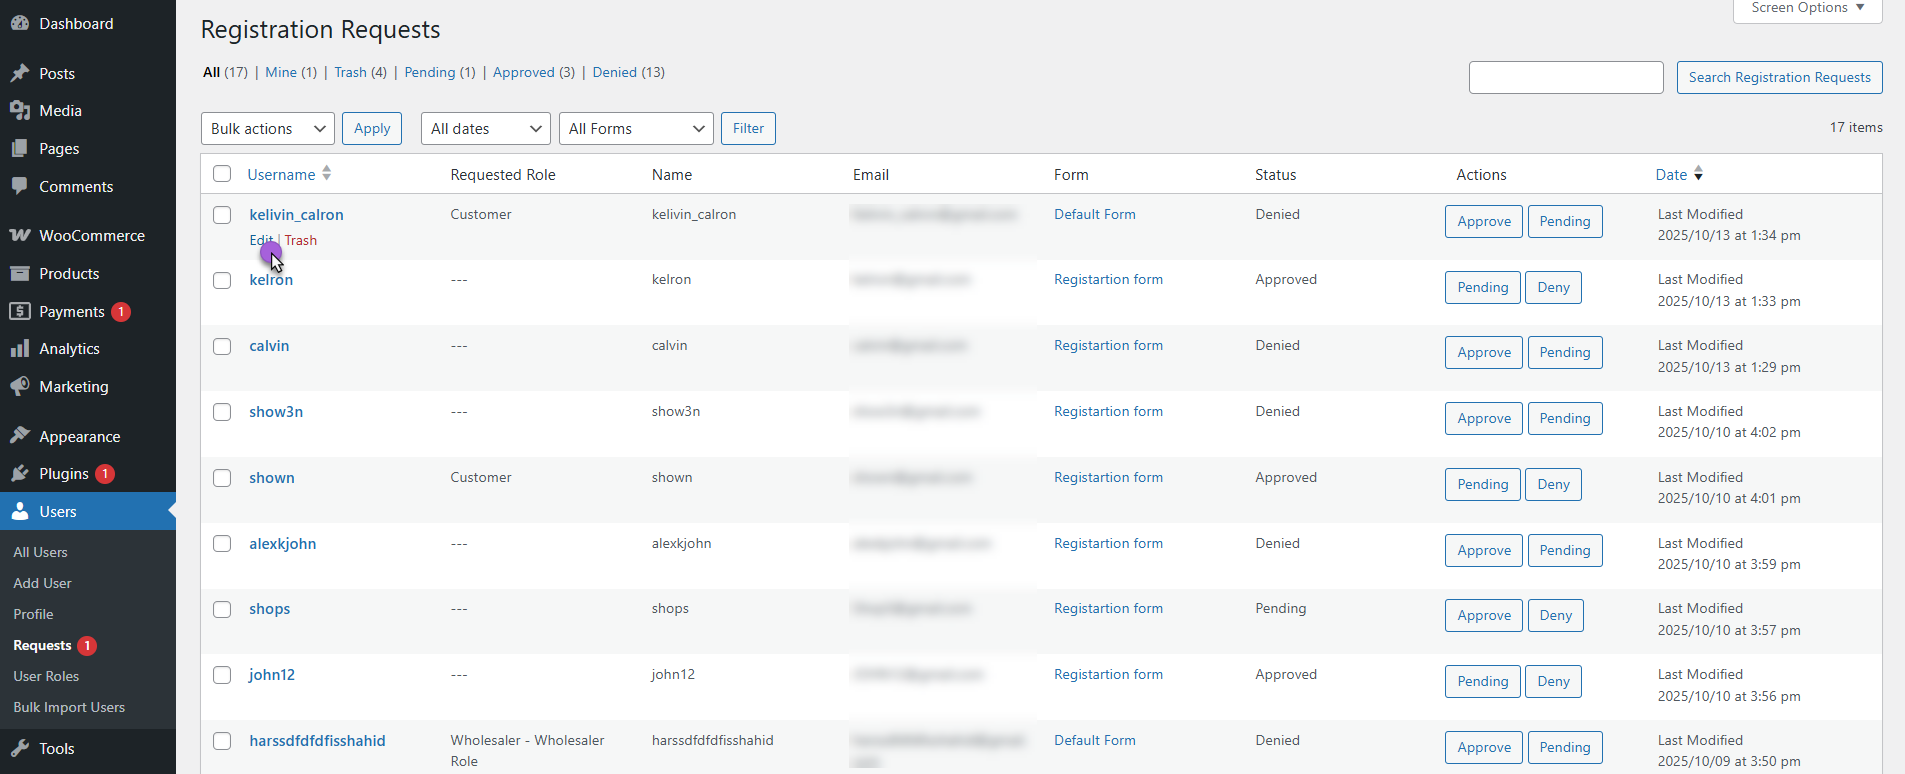
Form Filter
↑ Back to topThe Form Filter allows the admin to view users based on the specific form they used for registration.This helps easily identify which users were registered through the default registration form or through custom registration forms created in the system.
- Navigate to Users > Requests.

- At the top of the table, you’ll find a dropdown labeled Form Filter.

Click on the dropdown — you’ll see options such as:
- All Forms → Displays users registered from all available forms.
- Default Forms → Displays users who registered using the default WooCommerce or system registration form.
- Registration Form (Custom Form) → Displays users who registered using a custom form created through the plugin.

- Select a form from the dropdown to filter the user list.
- The list will automatically update to show only those users who registered through the selected form.

Send Email to Individual Registered Users
↑ Back to topThis feature allows the admin to send emails directly to individual users who registered using the User Registration Plugin. Earlier, the admin couldn’t contact users whose registration was pending or approved. Now, an admin can send a custom email message to any user from their profile in the WordPress dashboard.
- Go to Users > Requests in your WordPress Admin Panel.
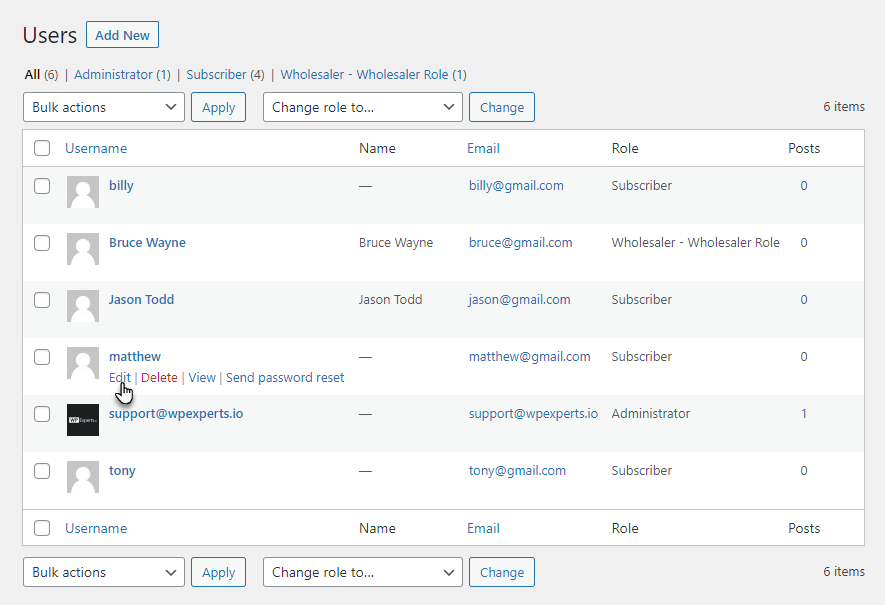
- Click the Edit link under the user you want to email.
- On the Edit User page, you will see a new section named Send an Email.

Send an Email Section
↑ Back to topThe Send an Email section appears only for users who registered through your User Registration Plugin.
This section includes:
- Subject – Enter the subject of the email.

- Email Body – Write the message you want to send to the user.

- After filling in both fields, click on the Send Email button.

Front-End Impact
After the admin sends the email:
- The user receives the message in their registered email inbox.
- The email will include the subject and the admin’s message body.
Invitation Code
↑ Back to top- Navigate to WordPress Admin Dashboard > WooCommerce > Default Form.
- Now you’re on the Default Form page.

- Enable the Invitation Code option to show the invitation code on the form. This will permit users to register using an invitation code.

- The Make Invitation Code Required option will appear on enabling the Enable Invitation Code option.
- Enable this option to make the Invitation Code required on the form.

- An Invitation Code and All Codes options will appear in the WP Admin Panel once you click the Save button.

- Navigate to the Invitation Code option in the WP Admin Panel.
- There are three tabs in the Invitation Code section.
- Add Codes
- Import Codes

Add Codes
↑ Back to top- The invitation codes can be generated Manually or Automatically; each option has its configuration settings to achieve the desired results.
Add Codes – Generate Manually
- In the Add Codes tab, go to the Generate Manually sub-tab.
- In the Add Codes textbox, you can enter your invitation code (one line for each Invitation code).
- Set the Usage Limit.
- Set the Expiry Date.
- Click the Save Changes button.

- Once the operation is successful, you’ll receive a notification labeled as (Number of Code Quantity set) Invitation Code Successfully added. According to the above image, the notification would be 2 Invitation Codes Added Successfully.

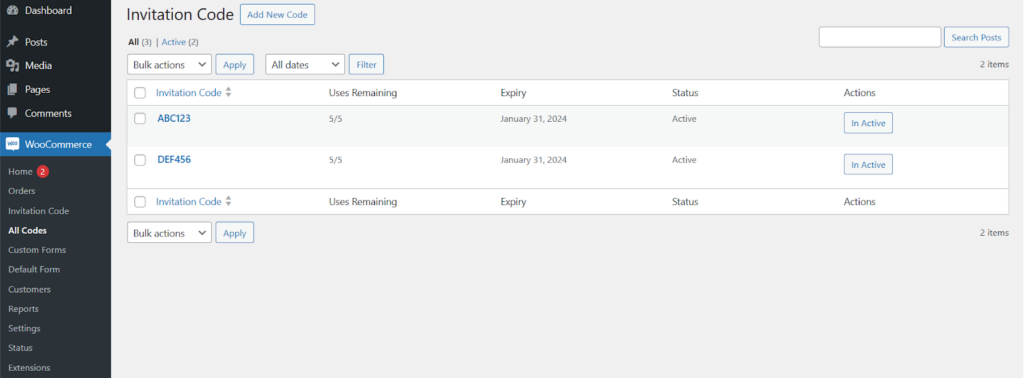
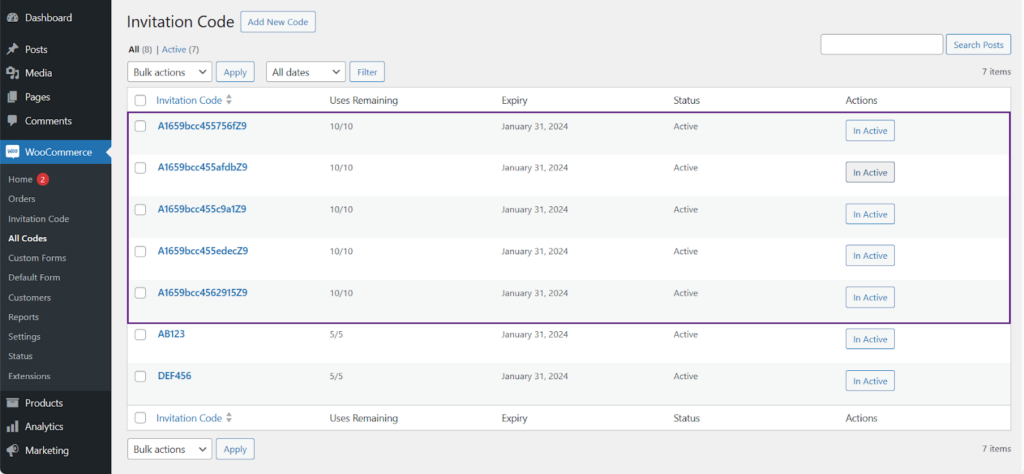
- Go to Admin Dashboard > WooCommerce > All Codes.
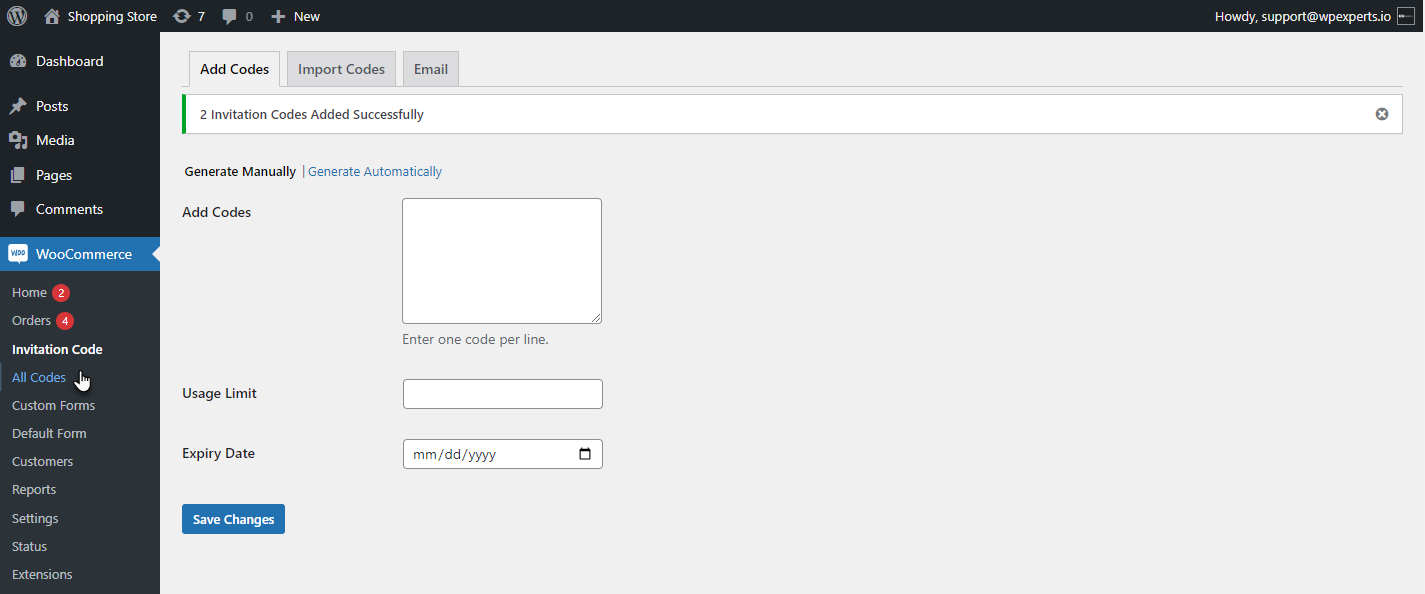
- All the invitation codes are present here with all the details like Expiry, Uses Remaining, Status, and Actions
- We can Edit, Delete, and Change the Status of the Invitation Code.
- We can Activate and Deactivate the Invitation Code from the Actions column.
Add Codes – Generate Automatically
- In the Add Codes tab, go to the Generate Automatically sub-tab.
- Set the Code Prefix.
- Set the Code Suffix.
- Set the Usage Limit.
- Set the Expiry Date.
- Click on the Generate Codes button.

- Once the operation is successful, you’ll receive a notification labeled as (Number of Code Quantity set) Invitation Code Successfully added. According to the above image, the notification would be 5 Invitation Codes Added Successfully.

- Go to Admin Dashboard > WooCommerce > All Codes.

- All the invitation codes are present here with all the details like Expiry, Uses Remaining, Status, and Actions (Where we can Edit, Delete, and Change the Status of the Invitation Code [Activate and Deactivate]) section.
Import Code Tab
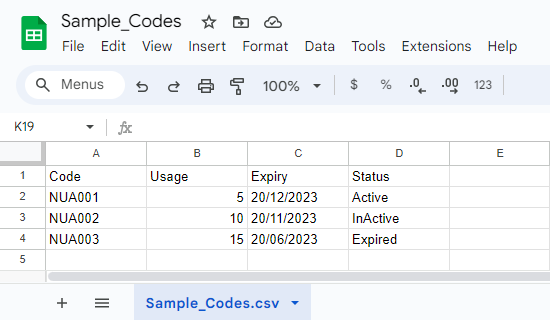
↑ Back to topDownload Sample CSV File
- The invitation codes can be imported via a CSV file.
- You can download the sample file to get familiar with the CSV file format from the Download Sample CSV hyperlink.

- Once the CSV file is downloaded, open it to view the format.
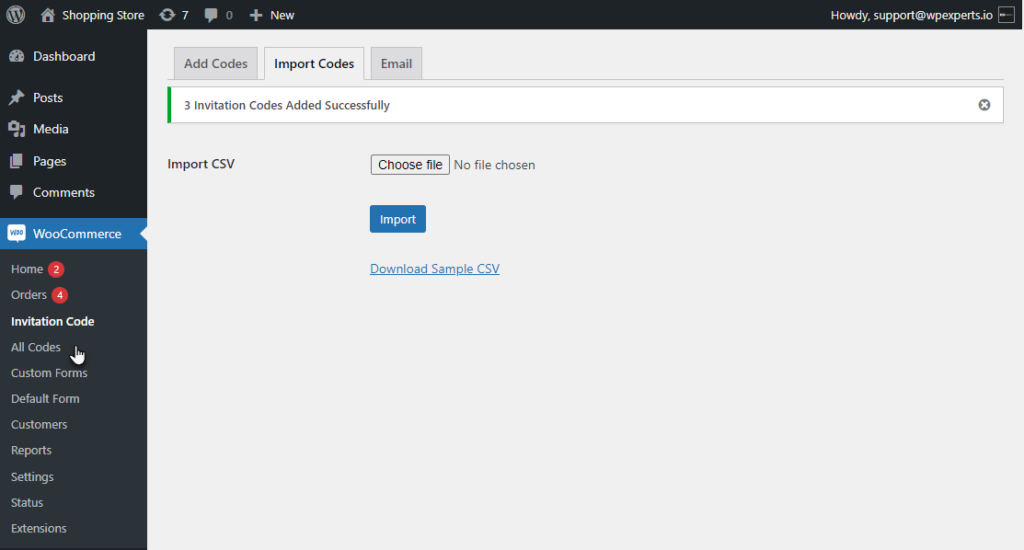
Import CSV File
- Go to Admin Dashboard > WooCommerce > Invitation Code.
- Navigate to the Import Codes tab.
- Select a CSV file.
- Click on the Import button.

- Once the operation is successful, you’ll receive a notification labeled as (Number of Invitation Codes) Invitation Codes in CSV Successfully Imported. According to the CSV file, the notification would be 3 Invitation Codes in CSV Successfully Imported.

- Go to Admin Dashboard > WooCommerce > All Codes.
- Now you’re on the All Codes page.
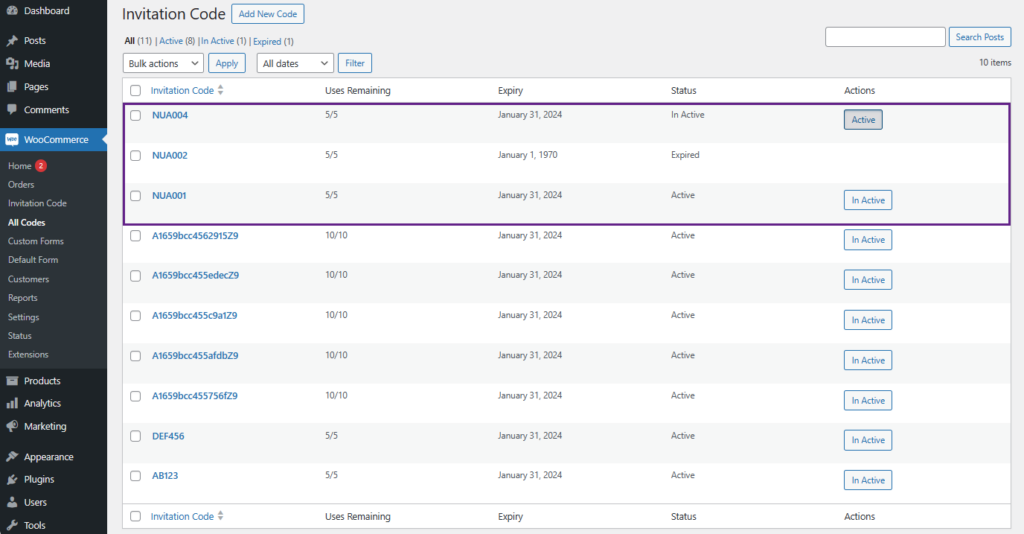
- We can see that the Invitation Codes are imported with all the details.
- Click on the Edit button in the Actions column.

- Now we’re on the Edit Invitation Code page.
- We can Edit the Title, Invitation Code, Uses Left, Usage Limit, Expiry Date, and Status.
- Also, the Invitation Code used by the users will appear on that specific Edit Invitation Code page.

- We cannot activate the Invitation Codes that are Expired from the actions column.
- Click on the Edit option in the Actions column.

- Expired invitation codes will be changed only via the Edit Invitation Code page.
- Since invitation codes expire after a specific date, when updating the Invitation code if the admin does not change the Expiry Date field, the Expiry Date field will turn red as a validation error to update it.

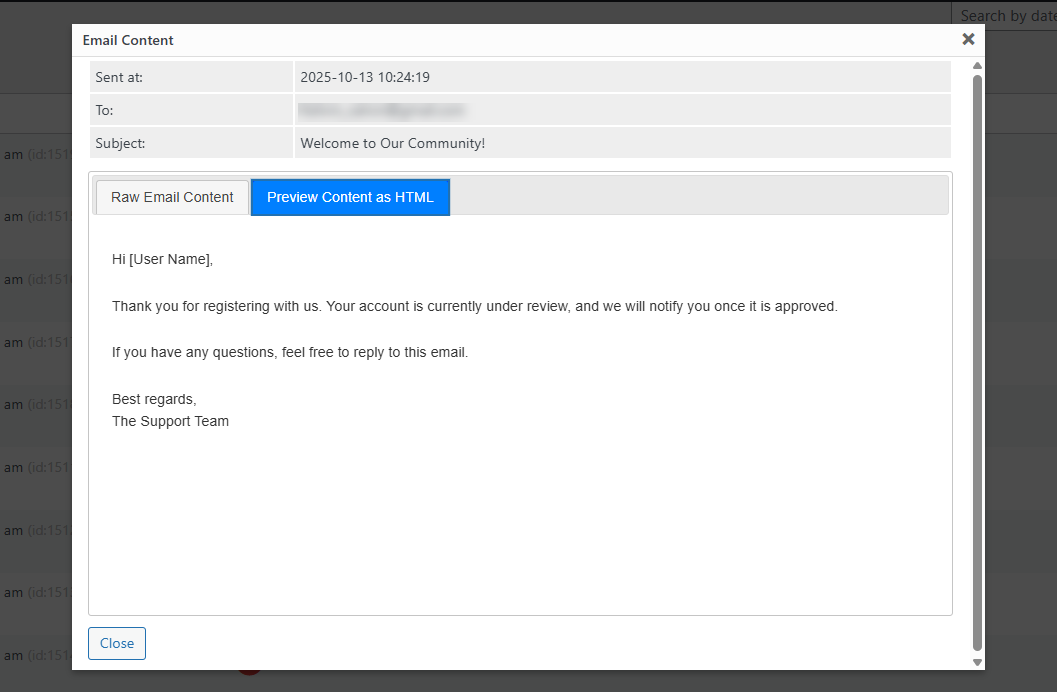
Email Code Tab
↑ Back to top- The invitation codes can be sent via email to get registered.
- The Registration Page field has the flexibility to choose the registration page that has been added, which can be selected from the dropdown menu. The email body will be added with a link to redirect to the respective page for registration.

- The Invitation Code field will display all the active invitation codes. Select any one invitation code sent to the user via email.

- Enter the email address to whom you want to send the invitation code in the User Email field. You can enter more than one email address by adding a comma between the email addresses.
- Set the subject in the Email Subject field.
- Set the message in the Email Message field.
- A toggle is given in the HTML Email field to enable sending the email in rich HTML format.
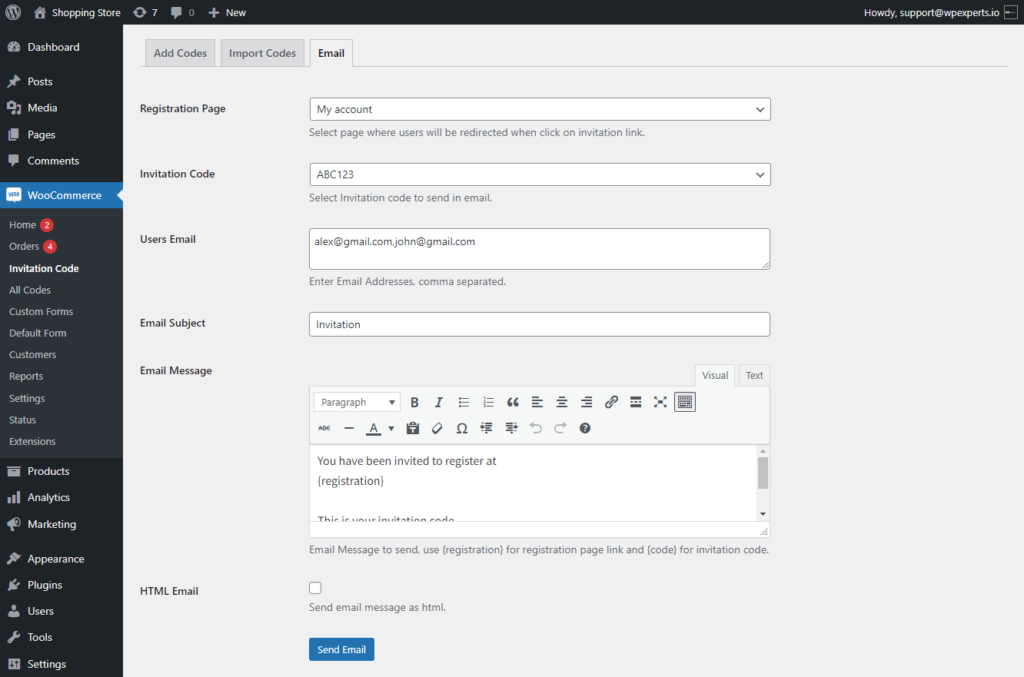
- We can see that the user receives the Invitation Code, and a hyperlink is present, redirecting the user to the selected page when clicked.
- Click the Send Email button to send the email to your users.
- Once the operation is successful, you’ll receive a notification labeled as (Number of Email Addresses entered) Emails successfully sent. According to the above image, the notification would be 2 Emails successfully sent.
- The user will receive the email with all the configured details like subject, Registration Page, Invitation code, etc.
- The user will click on the URL mentioned in the email to get registered.

Front-End Impact
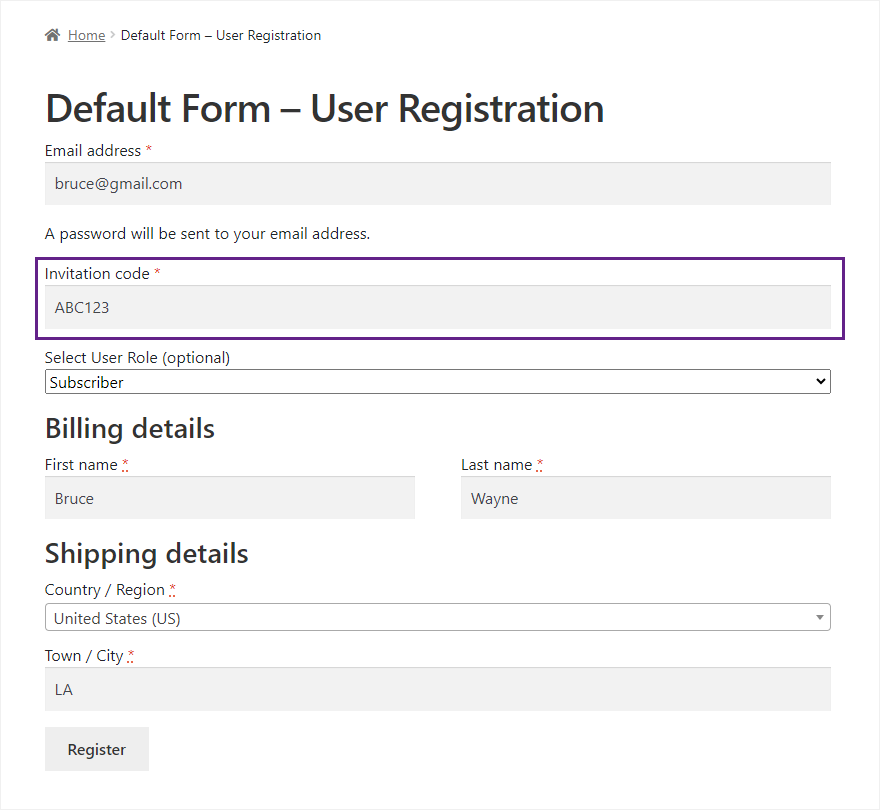
My Account Page
- Once done, the user would be redirected to the Registration page and enter his credentials. The Invitation Code is mentioned in the email.

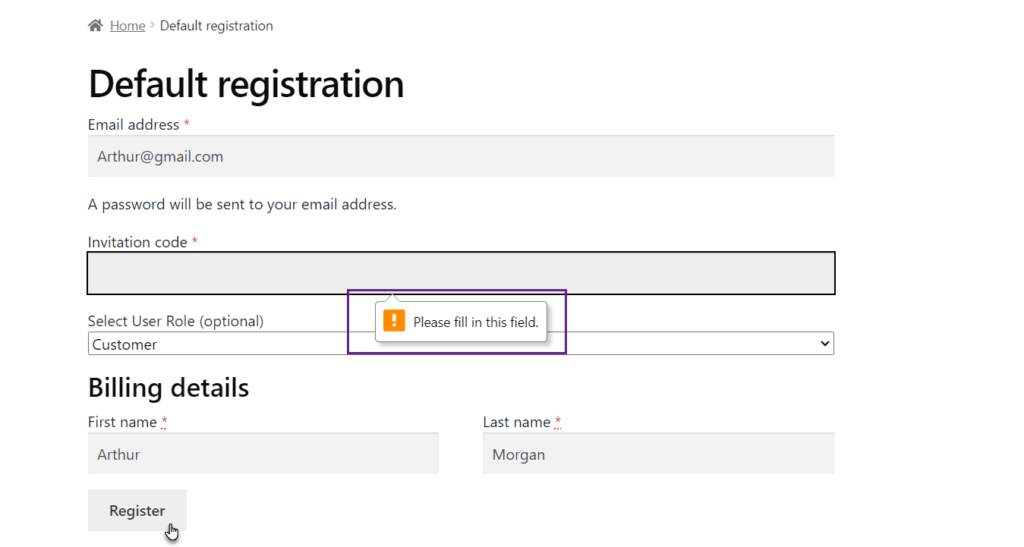
Please Note: This error message will appear if the Make Invitation Code Required option is enabled and the user doesn’t enter the invitation Code on the Registration Form.

Default Form
- The user can navigate to the Default Form and enter the Invitation Code.
Please Note: This validation message will appear if the Make Invitation Code Required option is enabled and the user doesn’t enter the invitation Code on the Default Form.
Custom Forms
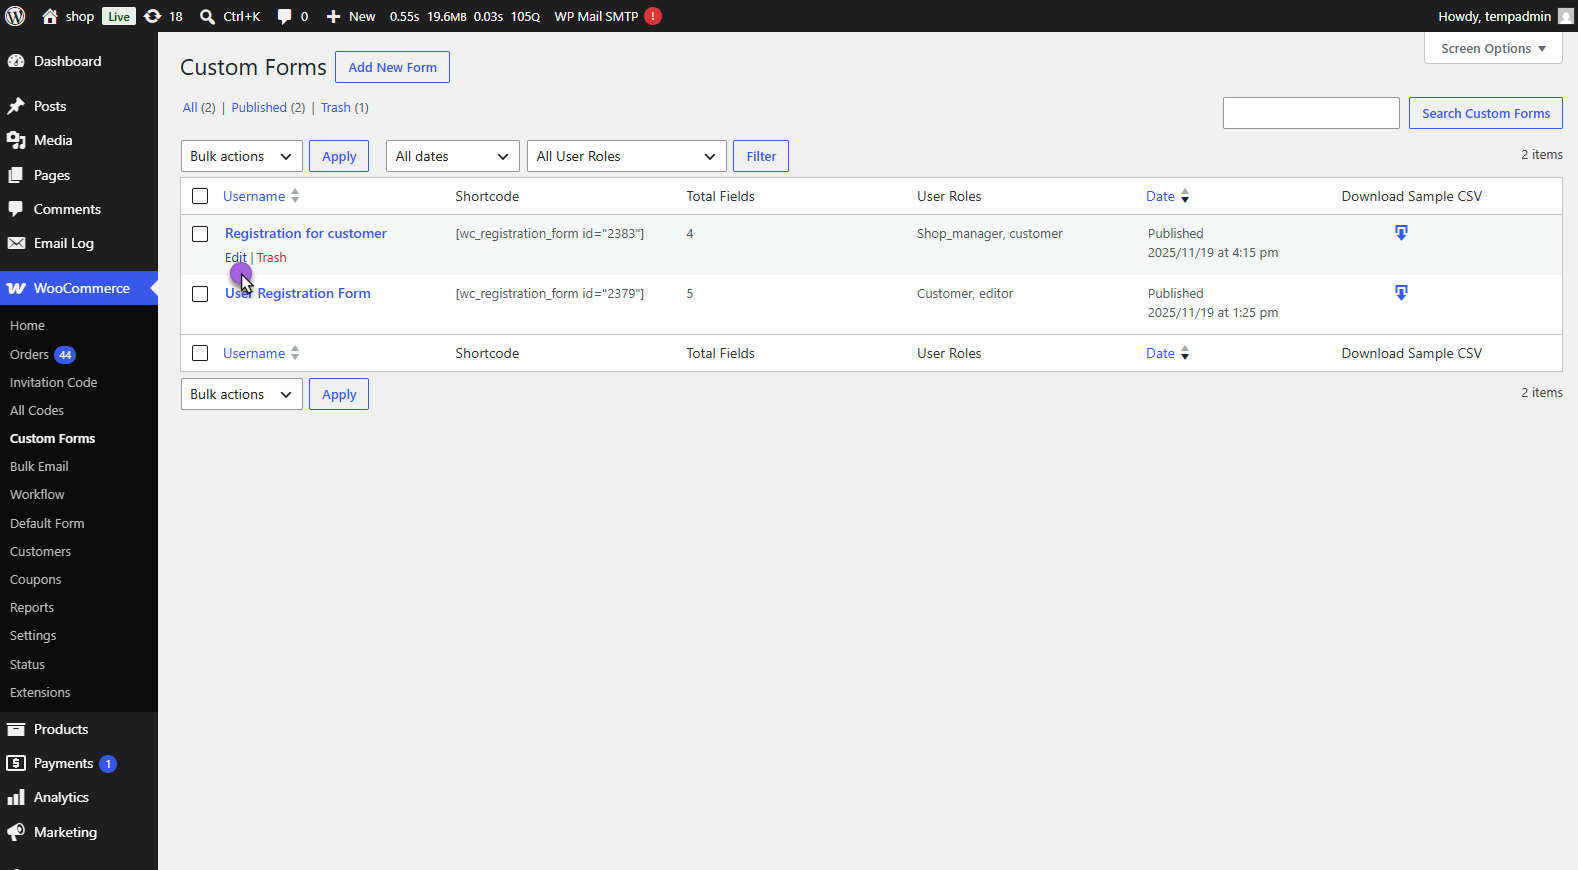
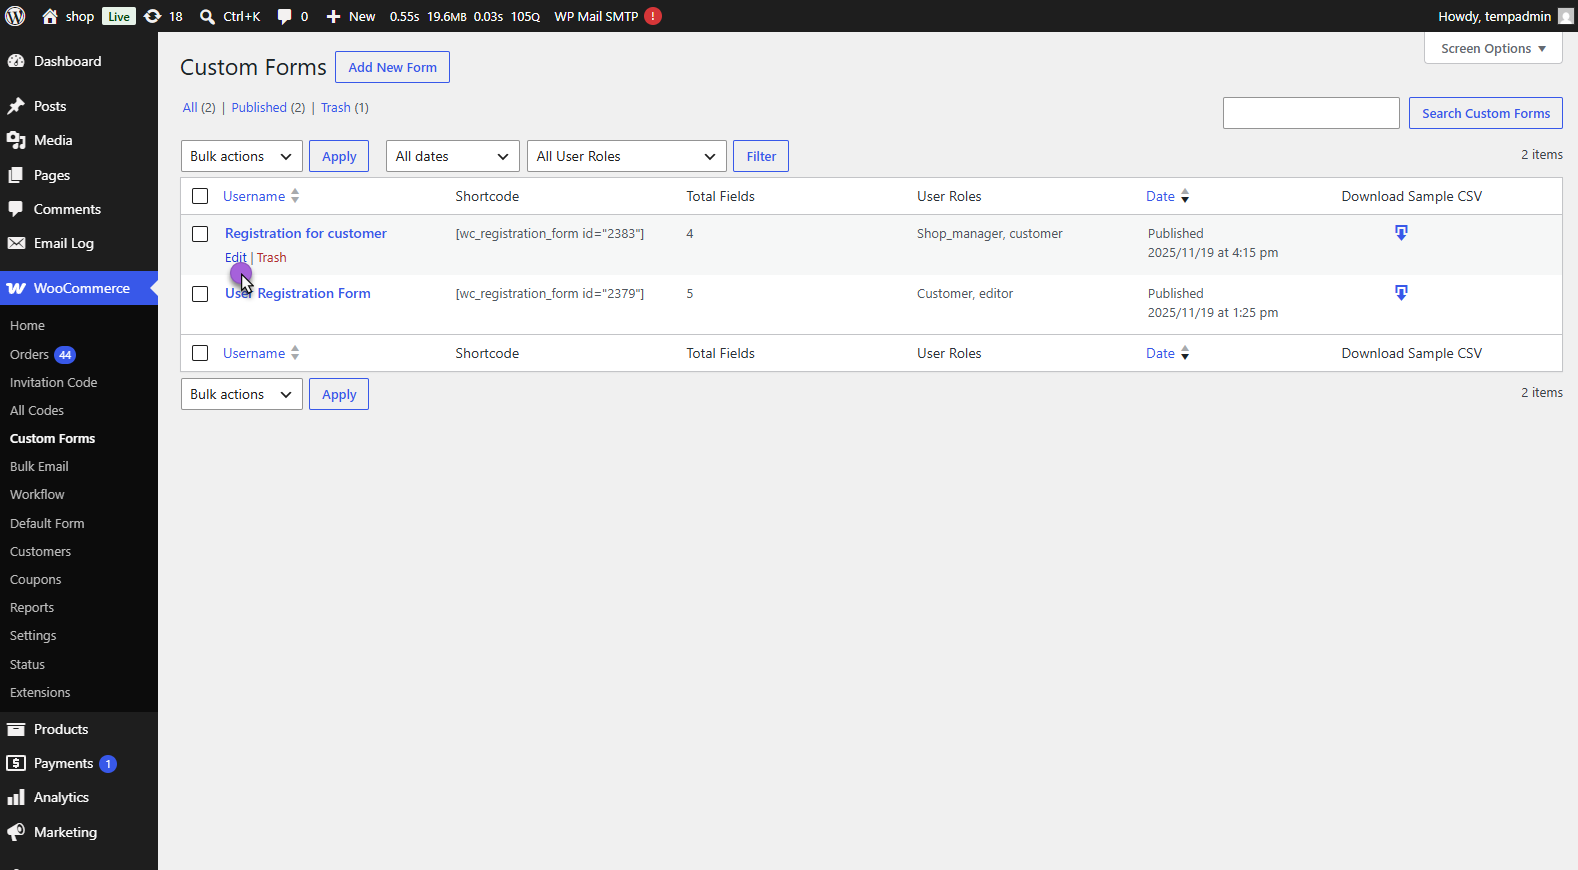
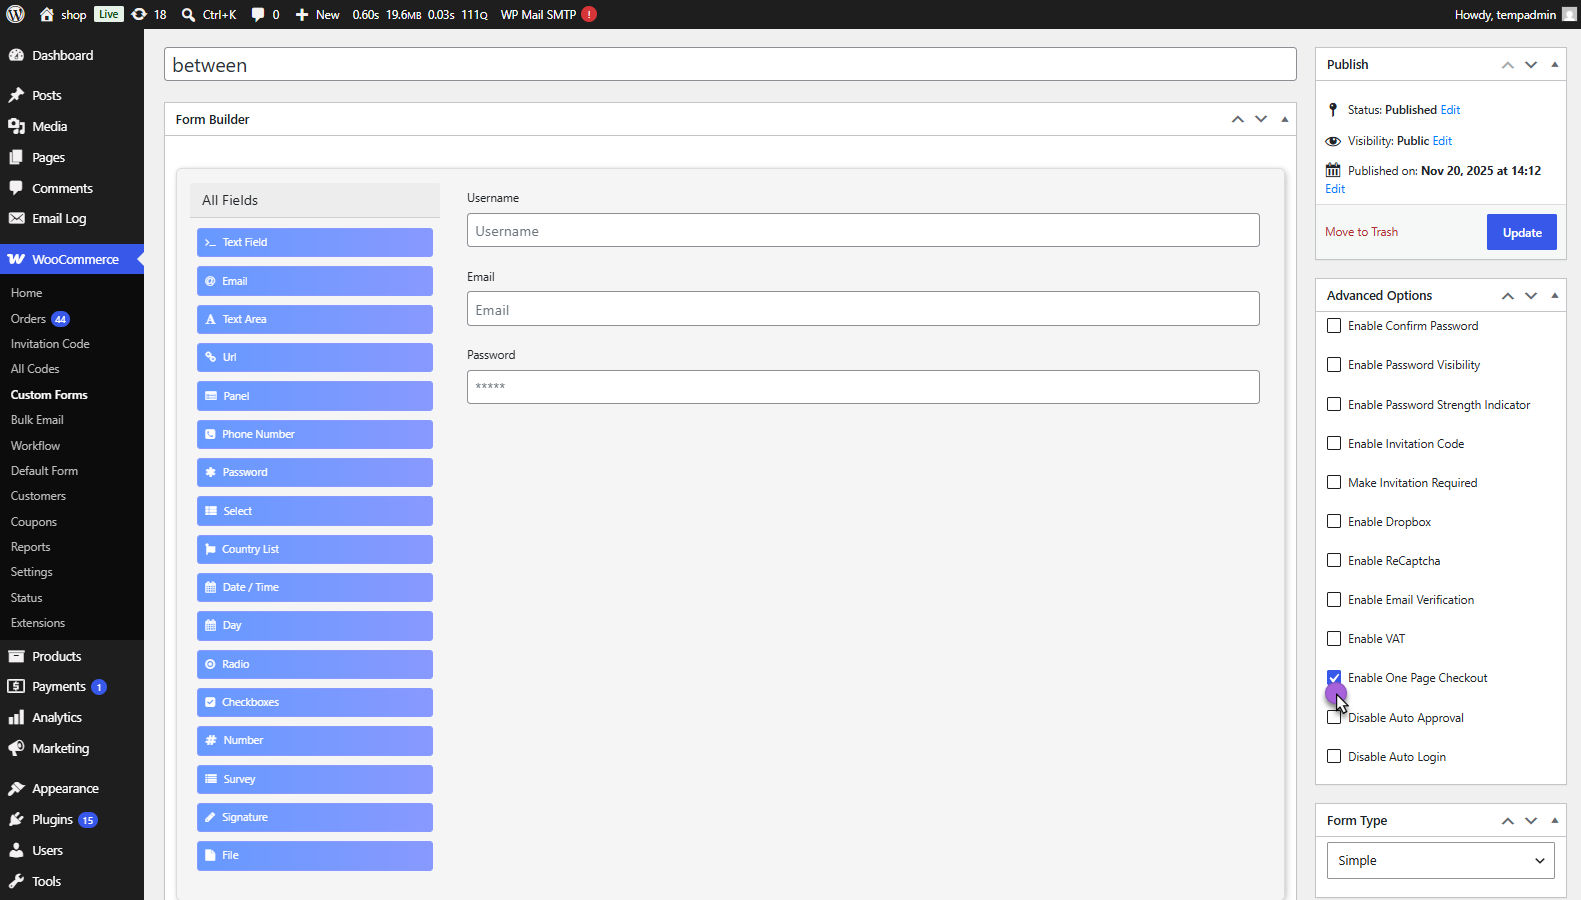
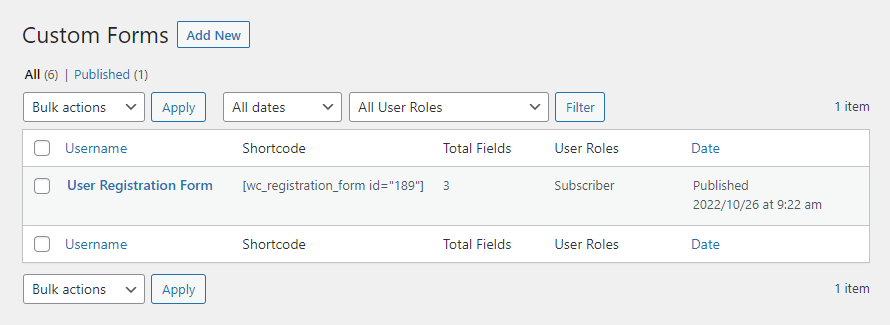
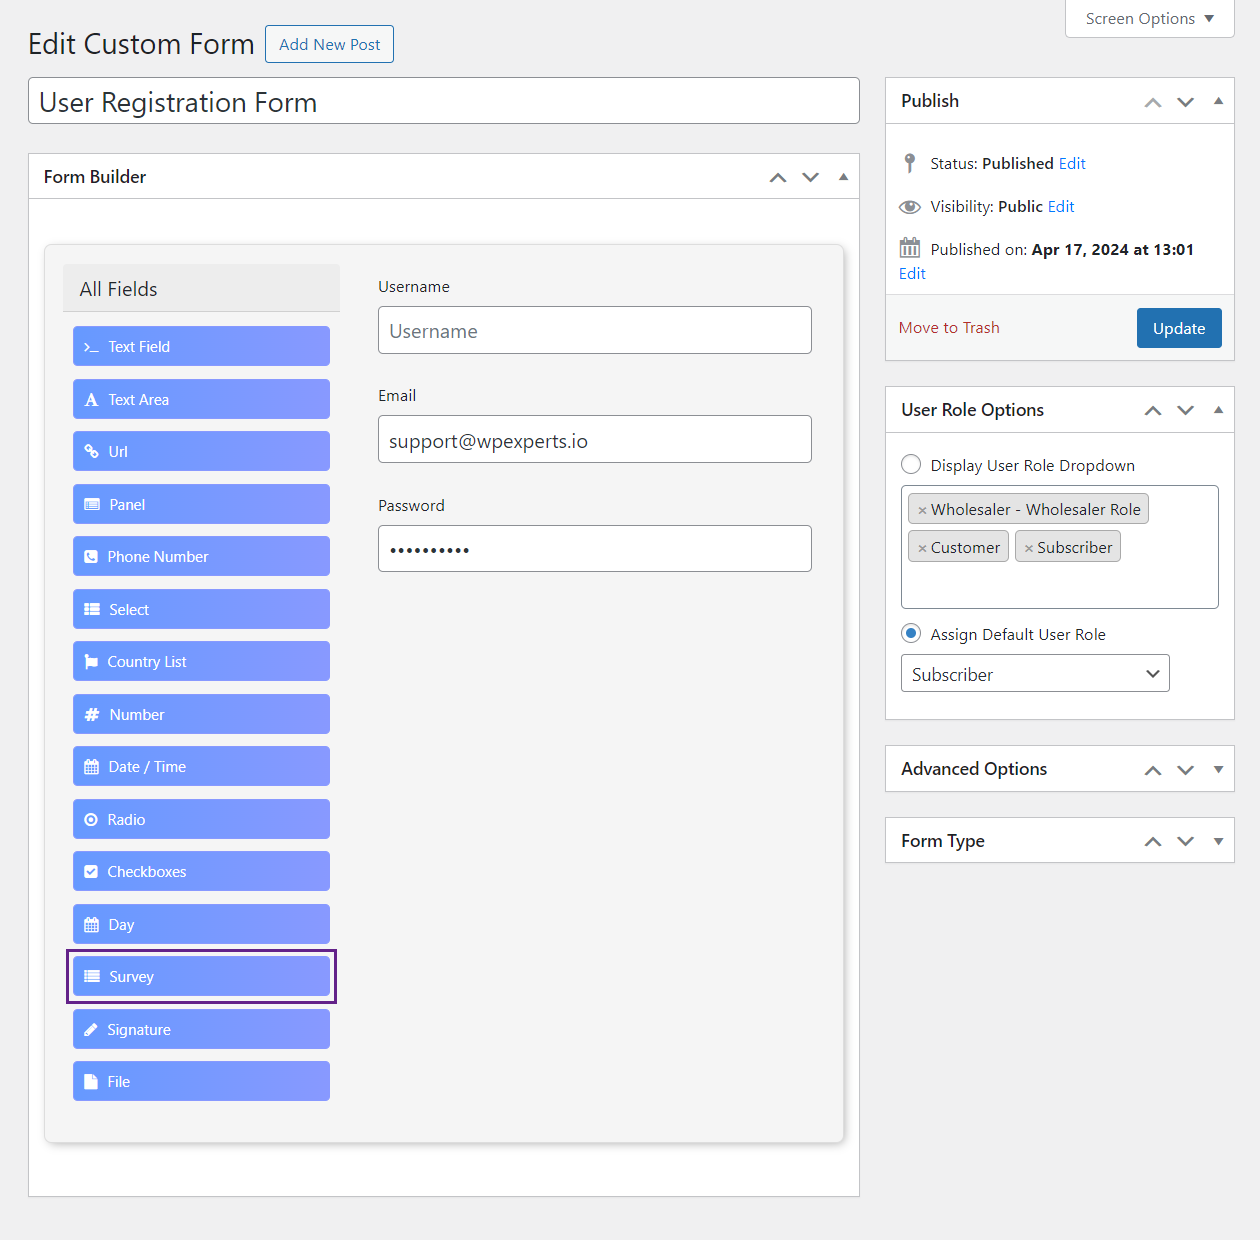
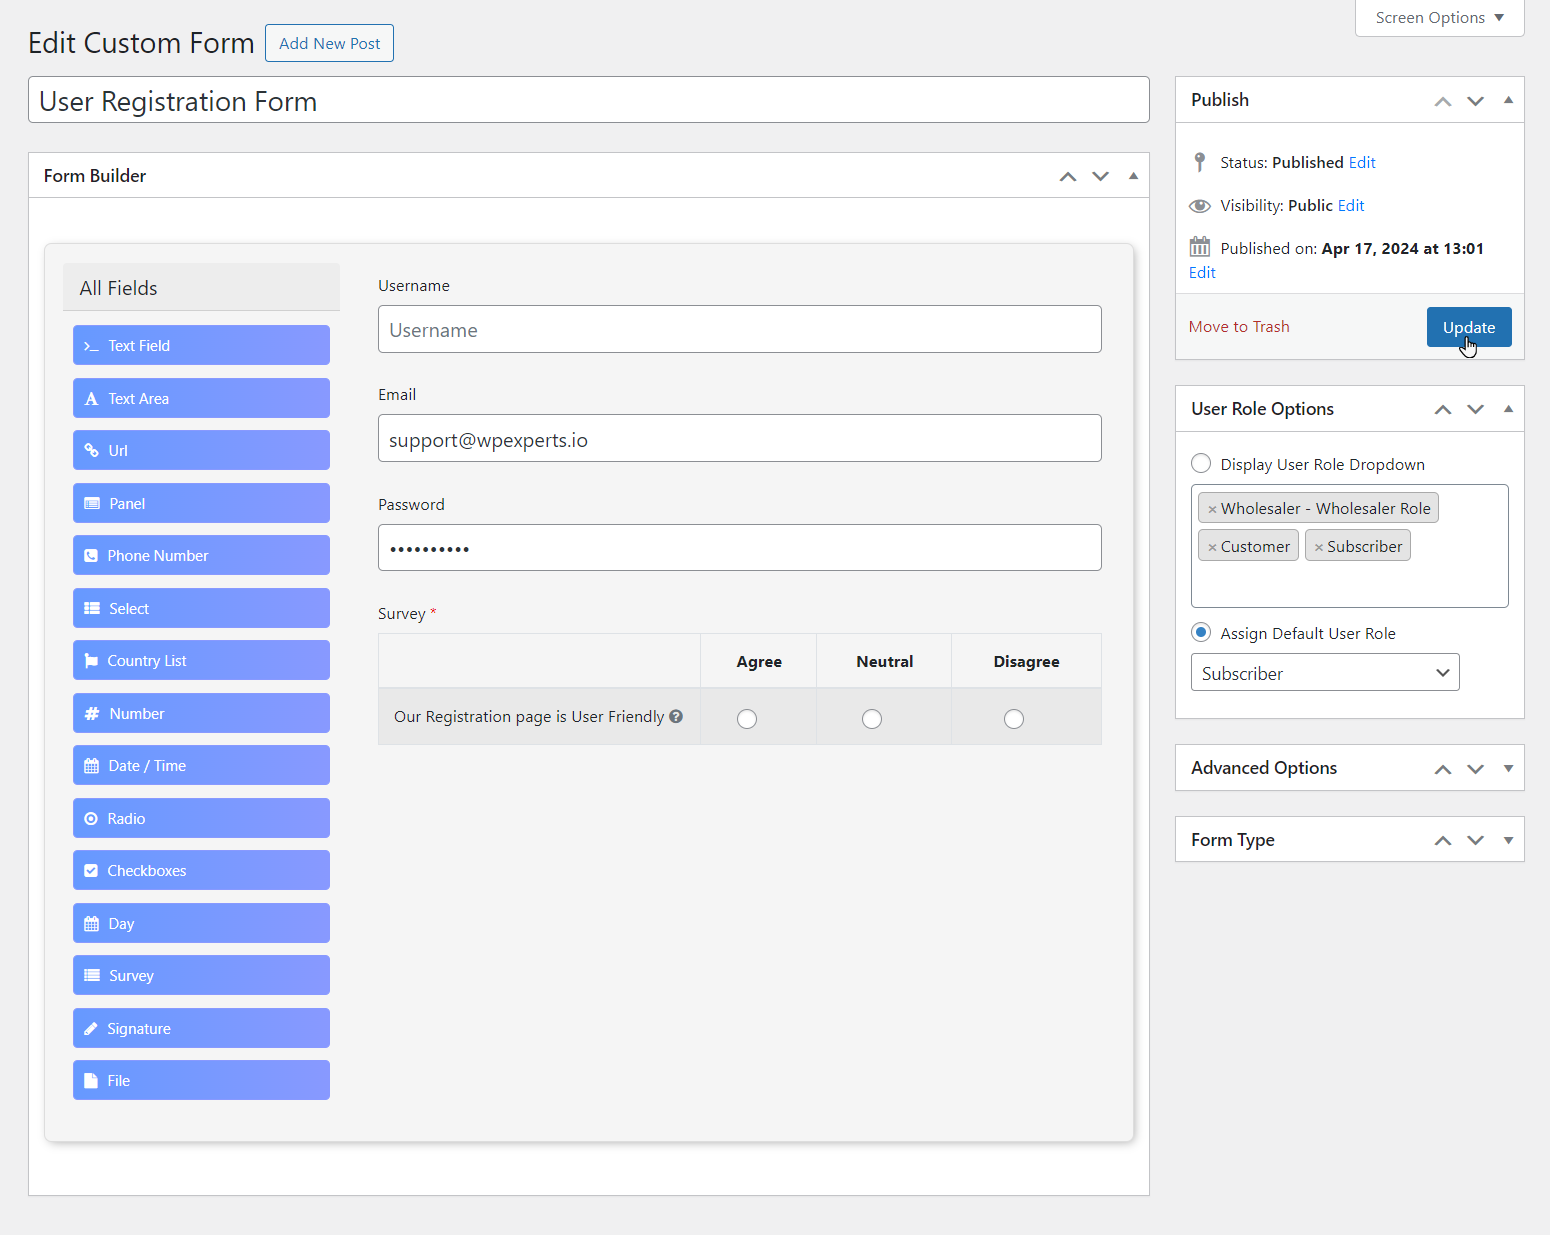
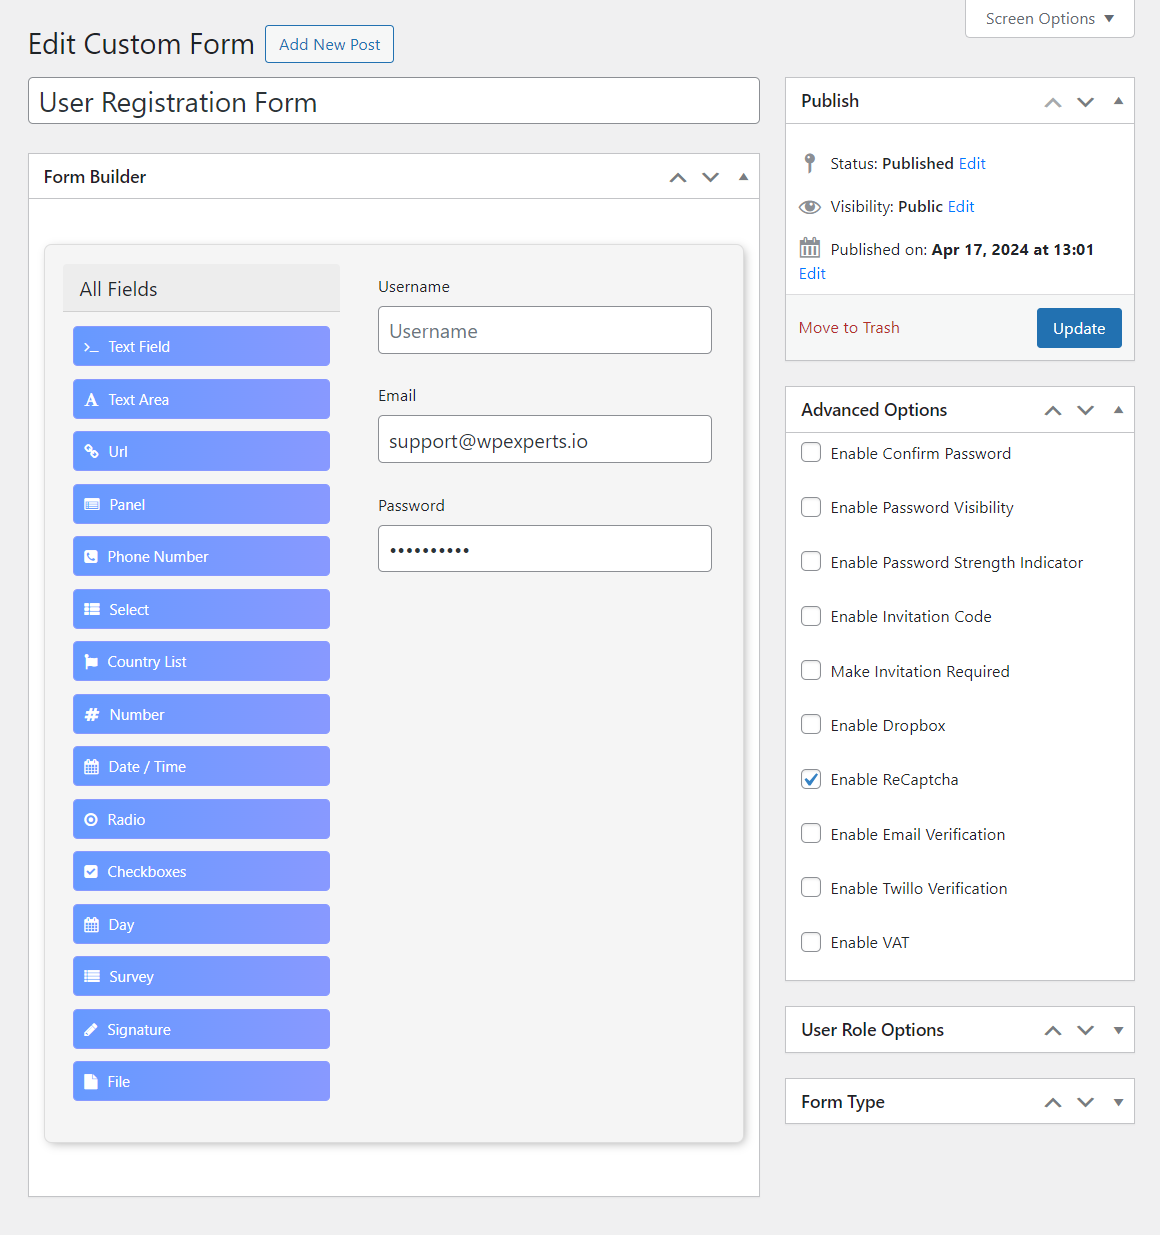
↑ Back to top- Navigate to WordPress Admin Dashboard → WooCommerce → Custom Forms.

- Now you’re on the Custom Forms page.

- Click on the Add New button.

- Now you’re on the Click on the Add New Post page.
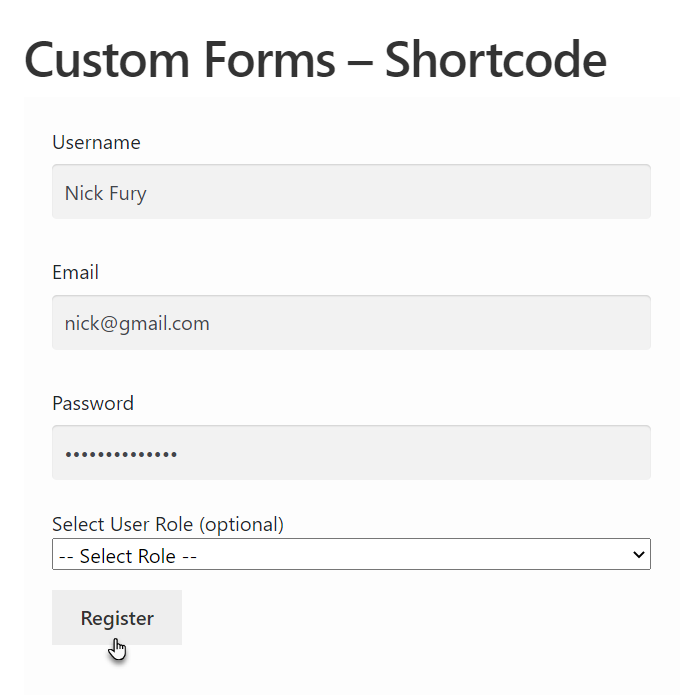
- We can see that the Username, Email, and Password fields are added to the form by default.
- Also, the Display User Role Dropdown radio button is selected by default in the User Role Options section.

- In the User Role Options section, the Administrator can add multiple user roles to which the form would be displayed if the Display User Role Dropdown radio button is selected.
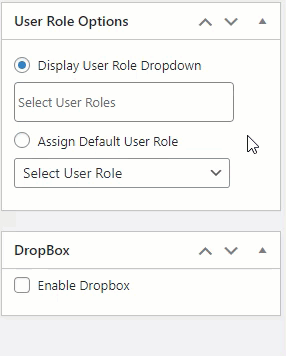
- In the User Role Options section, the Administrator can only one user role to which the form would be displayed if the Assign Default User Role radio button is selected.

- Once done, click on the Publish button.

- Now navigate back to WordPress Admin Dashboard → WooCommerce → Custom Forms.
- The custom form which was created will appear.
- All the forms will have their own unique Shortcode, which can be used to display the form.

- Navigate to WordPress Admin Dashboard → Pages → Add New.

- A new page would open.
- Add the Title of the page.

- Click on the sign to add blocks.
- Select the Shortcode element.
- Now paste the shortcode.
- Click on the Publish button.

- Navigate to the page on the website where the shortcode was pasted.

- A new user will enter the required credentials and click on the Register button.
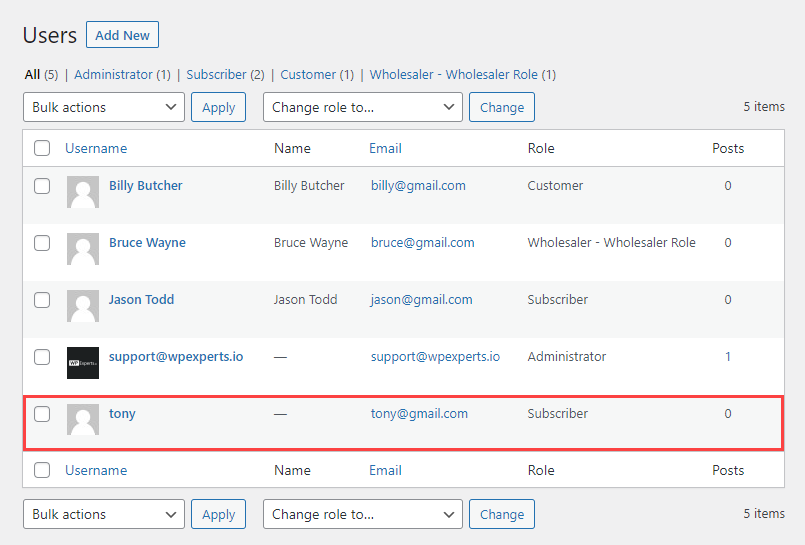
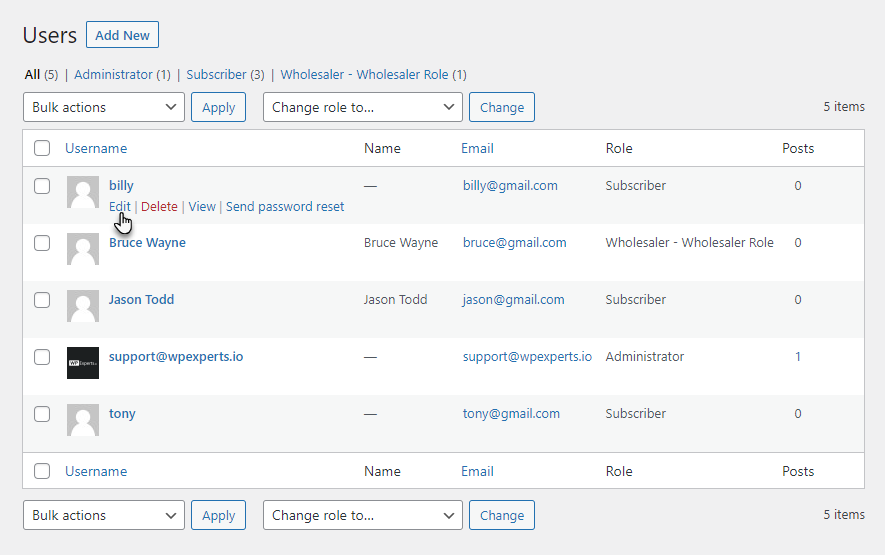
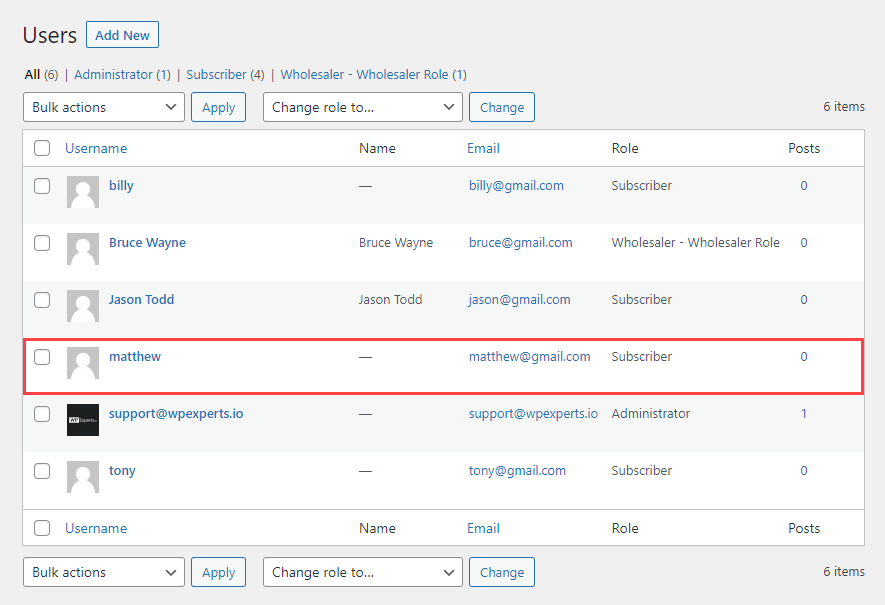
- Once registration is done, the Administrator will navigate to WordPress Admin Dashboard → Users → All Users.

- Now you’re on the Users page.
- The newly registered user will appear on this page.
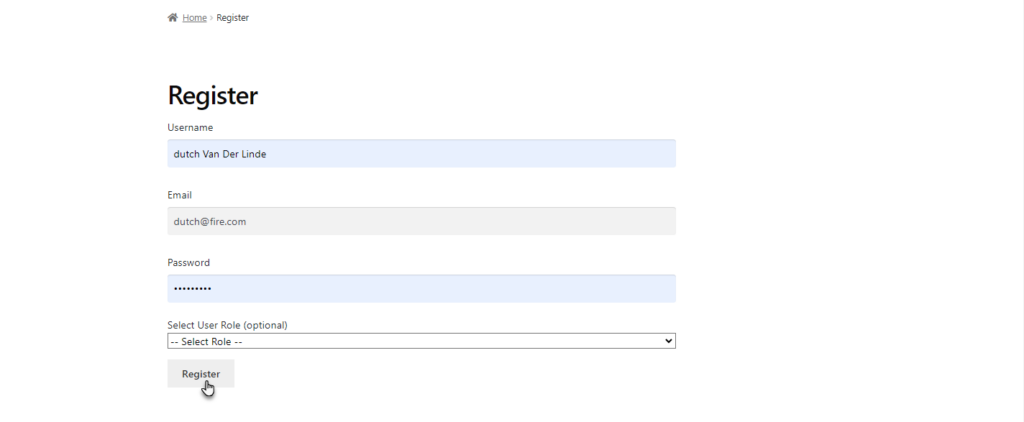
NOTE: When the Display User Role Dropdown radio button is selected in the User Roles Options section, all the user roles will appear in a dropdown menu on Front-End.

Note: While Registration, select the user role in the Select User Role option. Also, note that the Select User Role is optional.

- Suppose the user does not select any user role while registering.
- In that case, the user role assigned to that user will be Customer.

NOTE: If the Administrator has not assigned any user role in the Assign Default User Role radio button in the User Roles Options section.

- In this condition, any user will register using the Custom Form.
- In that case, the user role assigned to that user will be None.

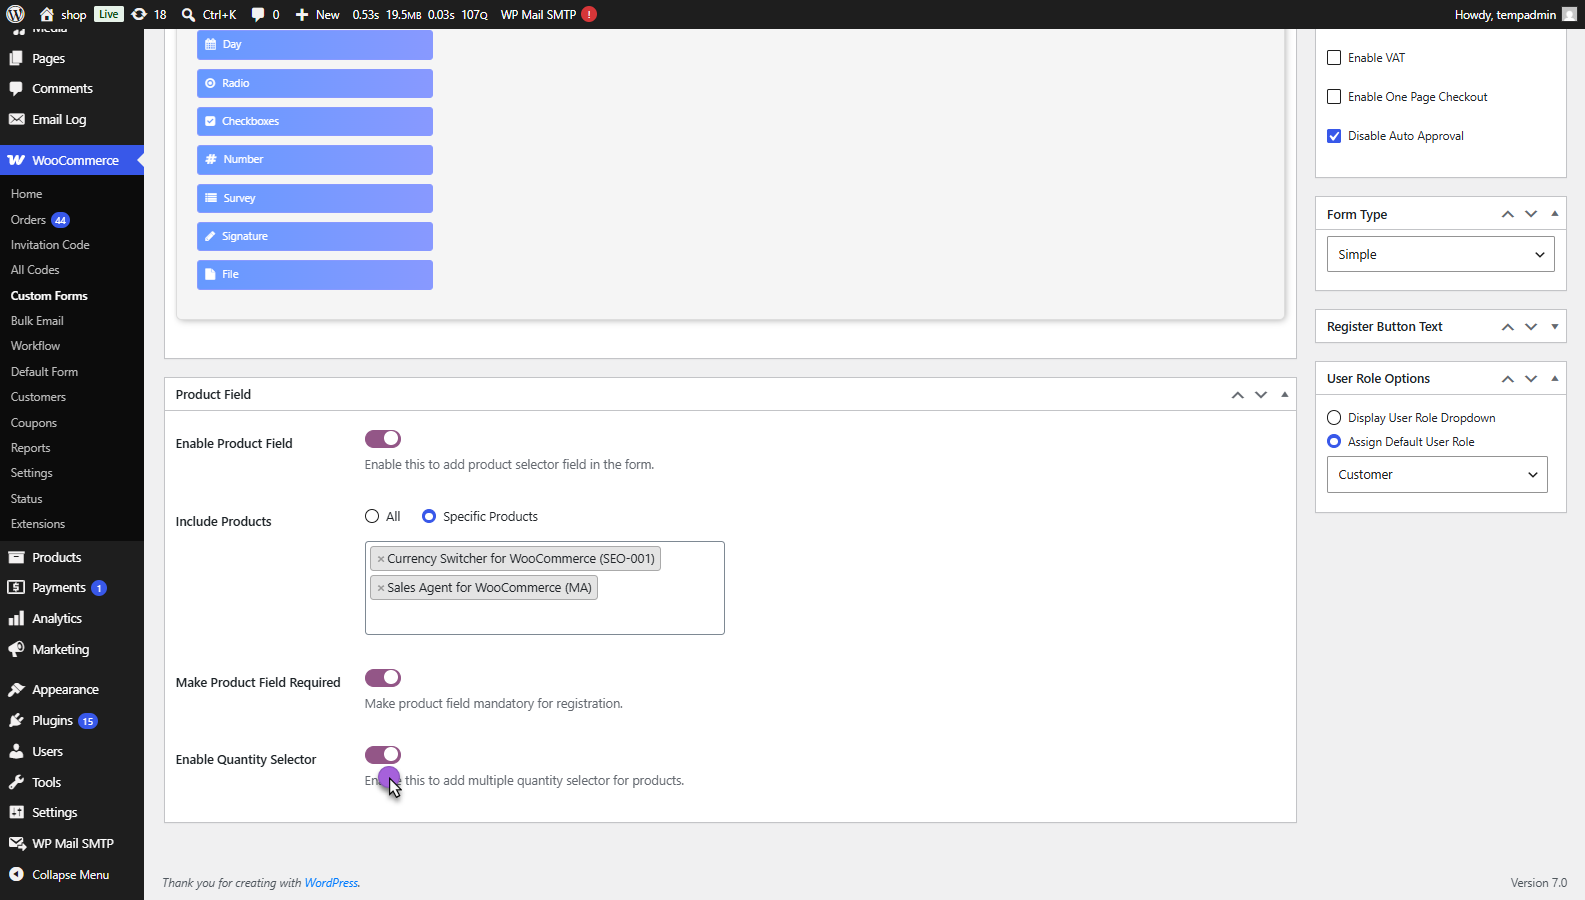
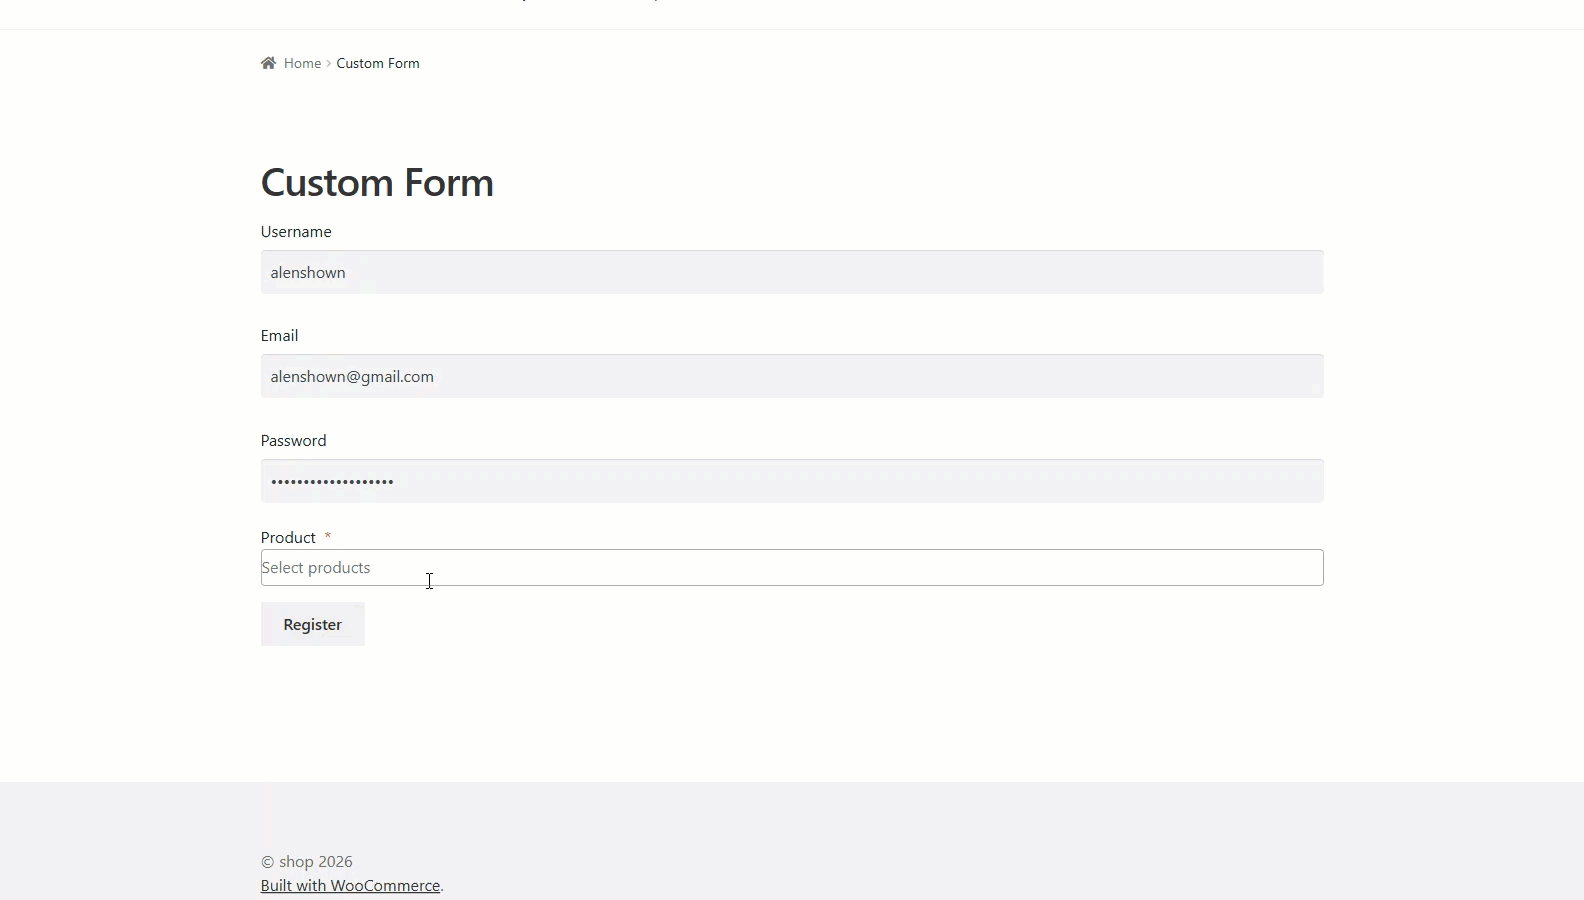
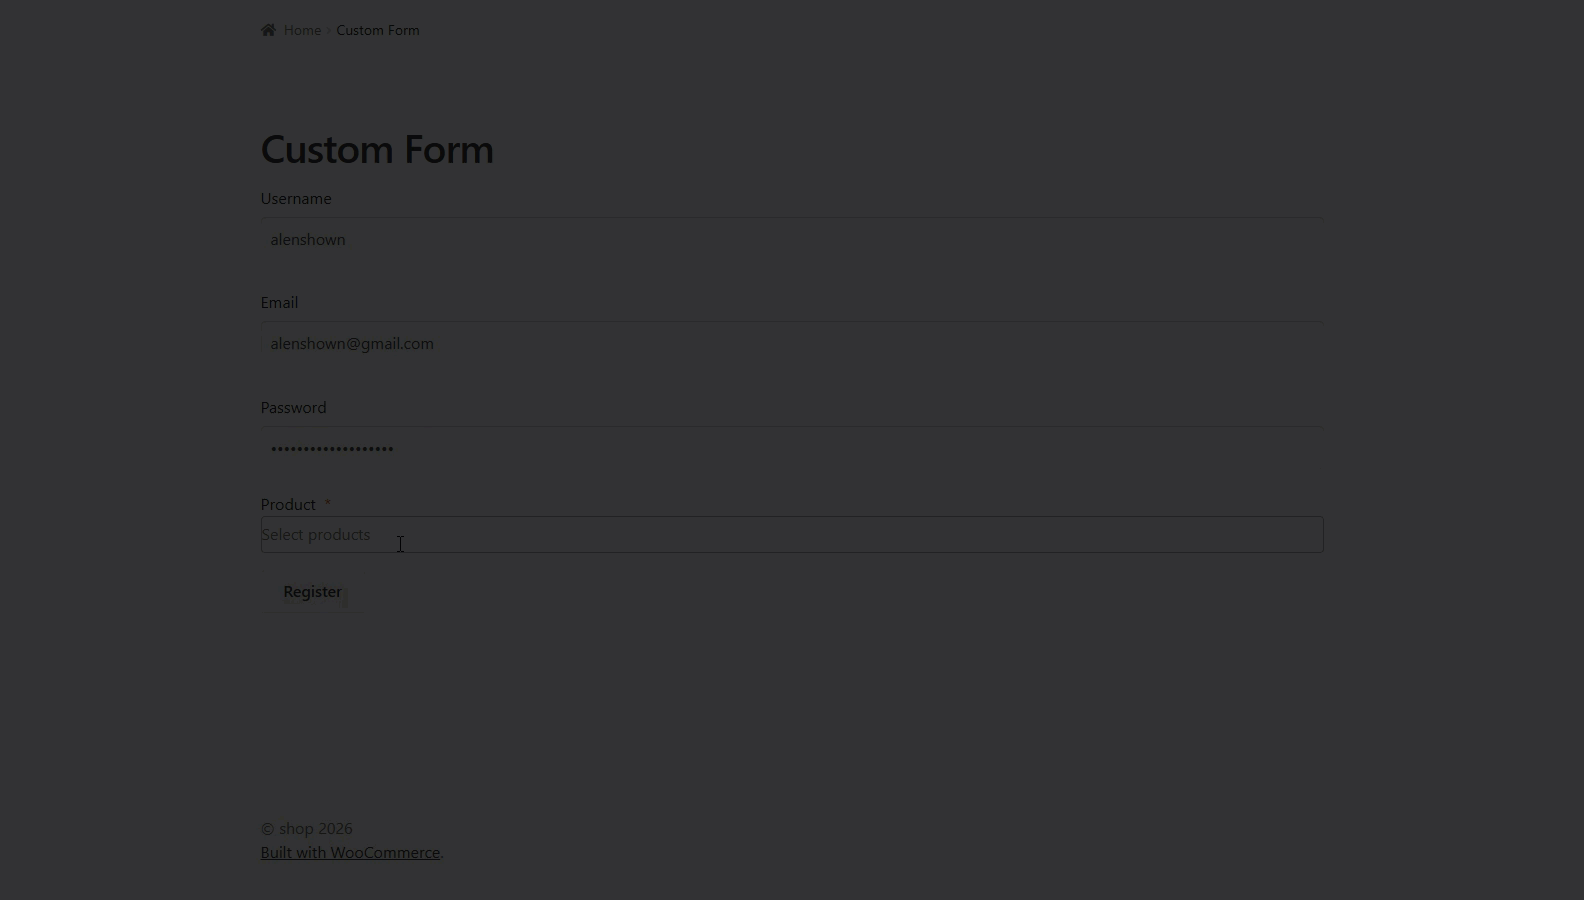
Product Field
↑ Back to topThe Product Field feature allows administrators to display WooCommerce products directly within the registration form. Users can select products during registration, making it easier to combine product selection and account creation in a single process.
- Navigate to: WooCommerce → Custom Forms
- Open the desired custom form.

- Scroll down to the Product Field section.
Enable Product Field
- Enable the Enable Product Field toggle.
When enabled:
- A product selection field is added to the registration form.
- Users can select products while completing registration.
- The selected product information is stored with the registration entry.
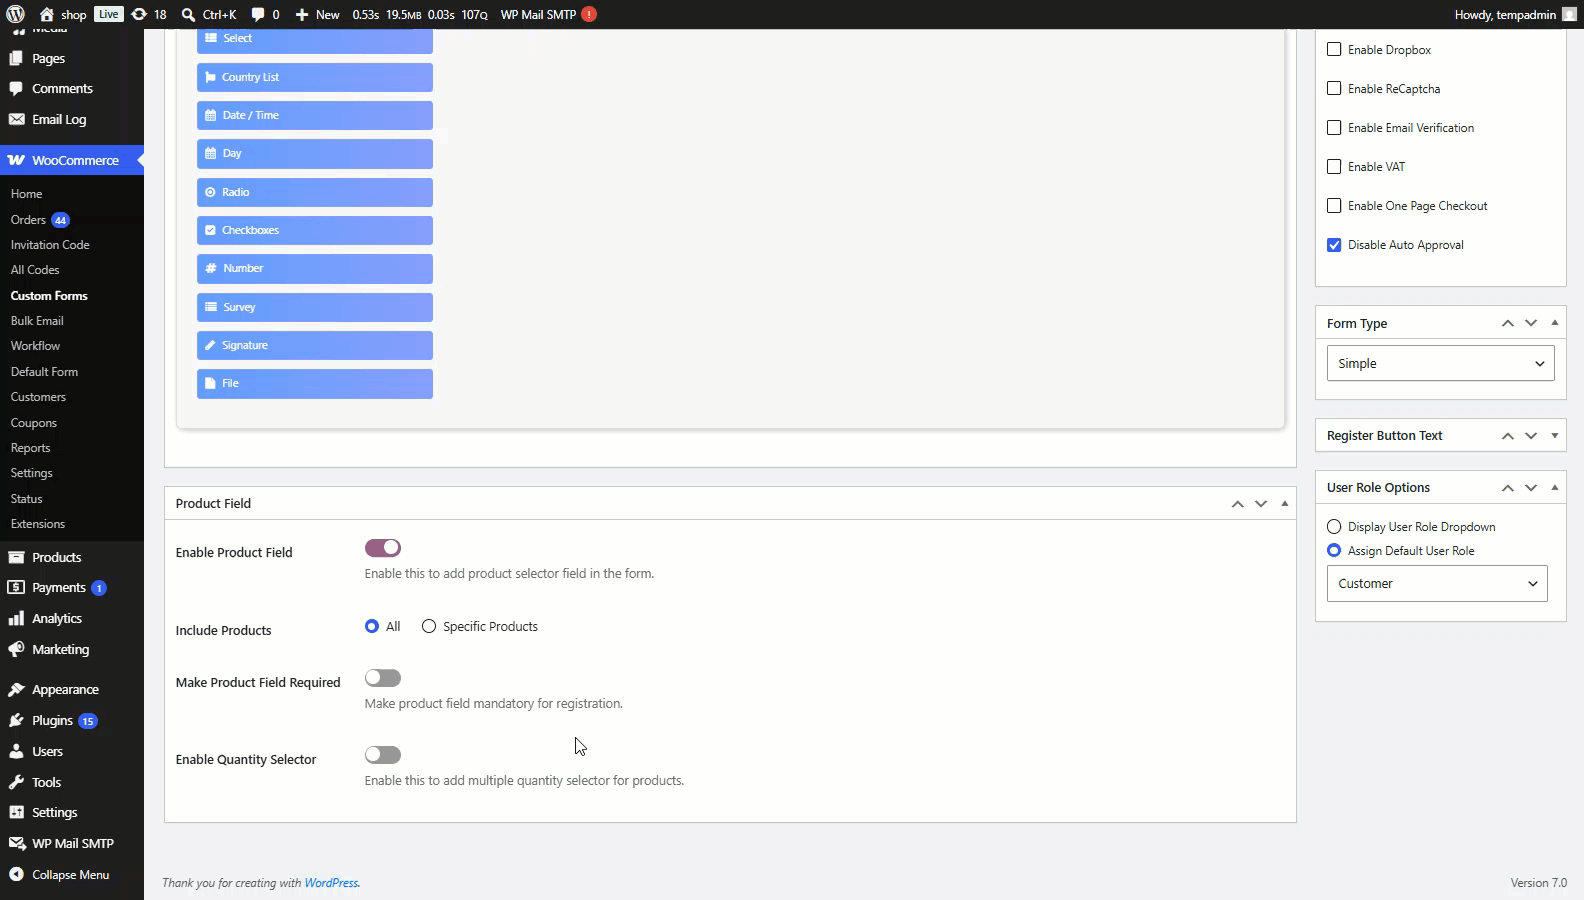
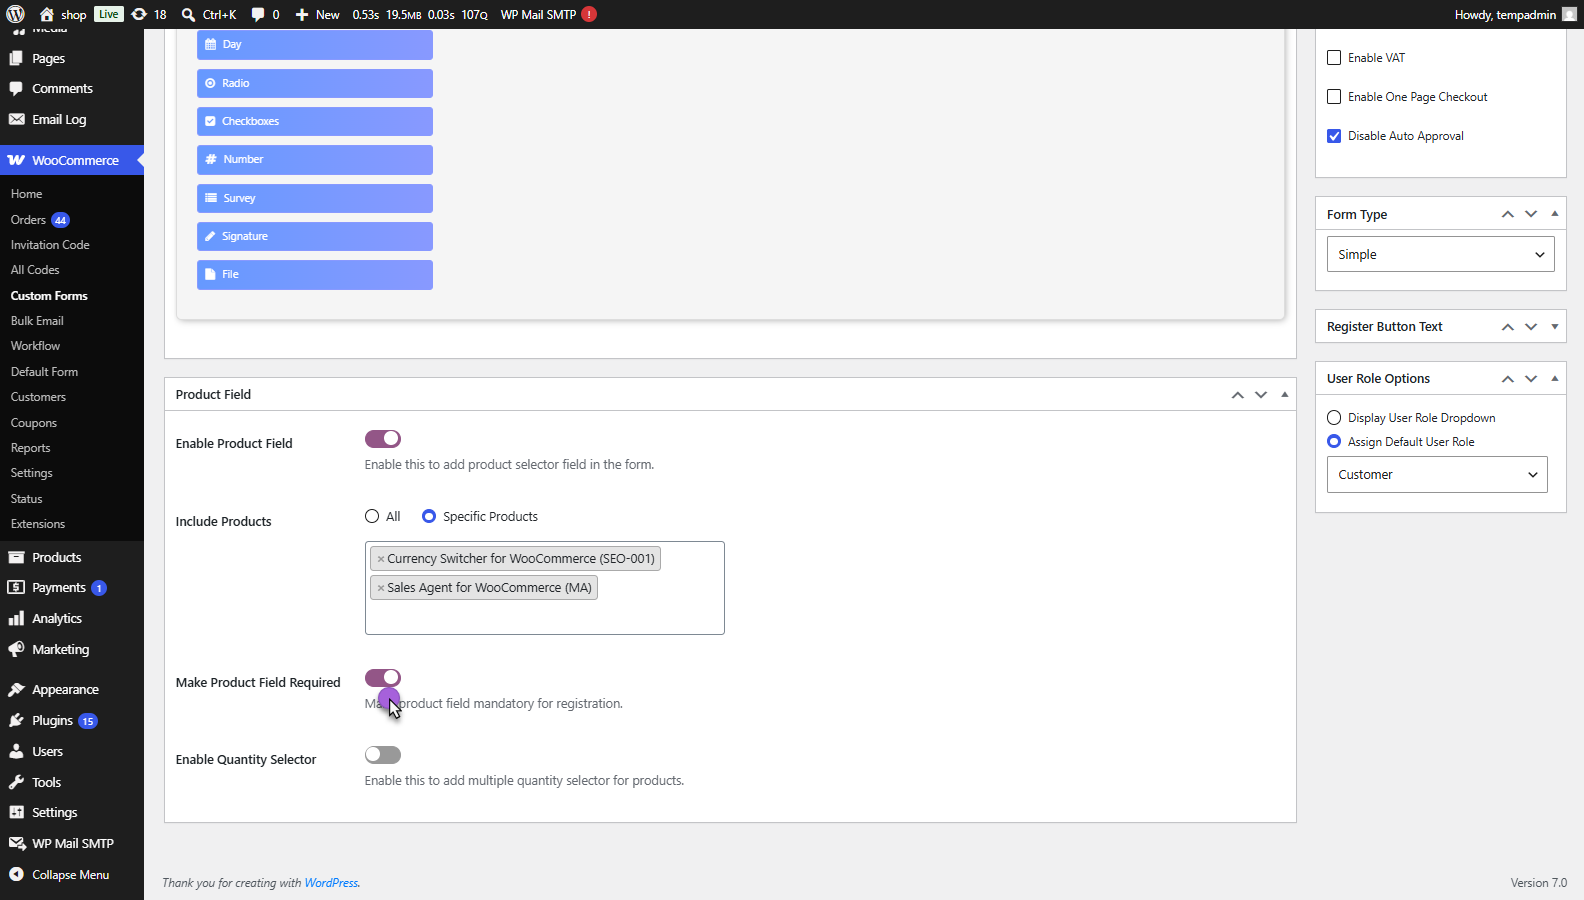
Include Products
- This setting allows administrators to control which products are displayed in the product selector.
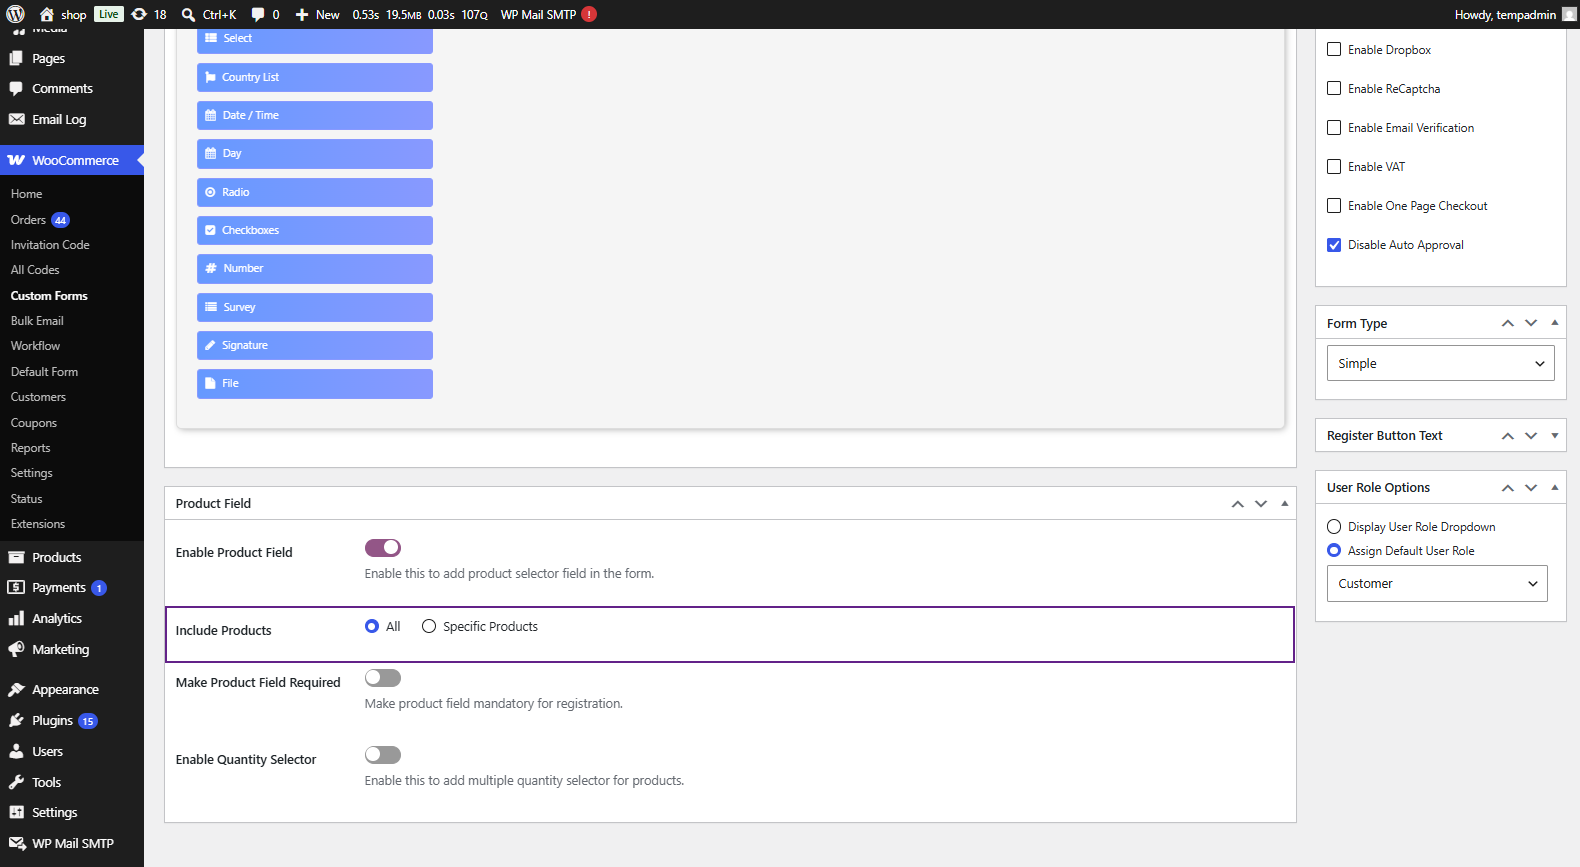
Available Options
- All
- Displays all available WooCommerce products in the product field.
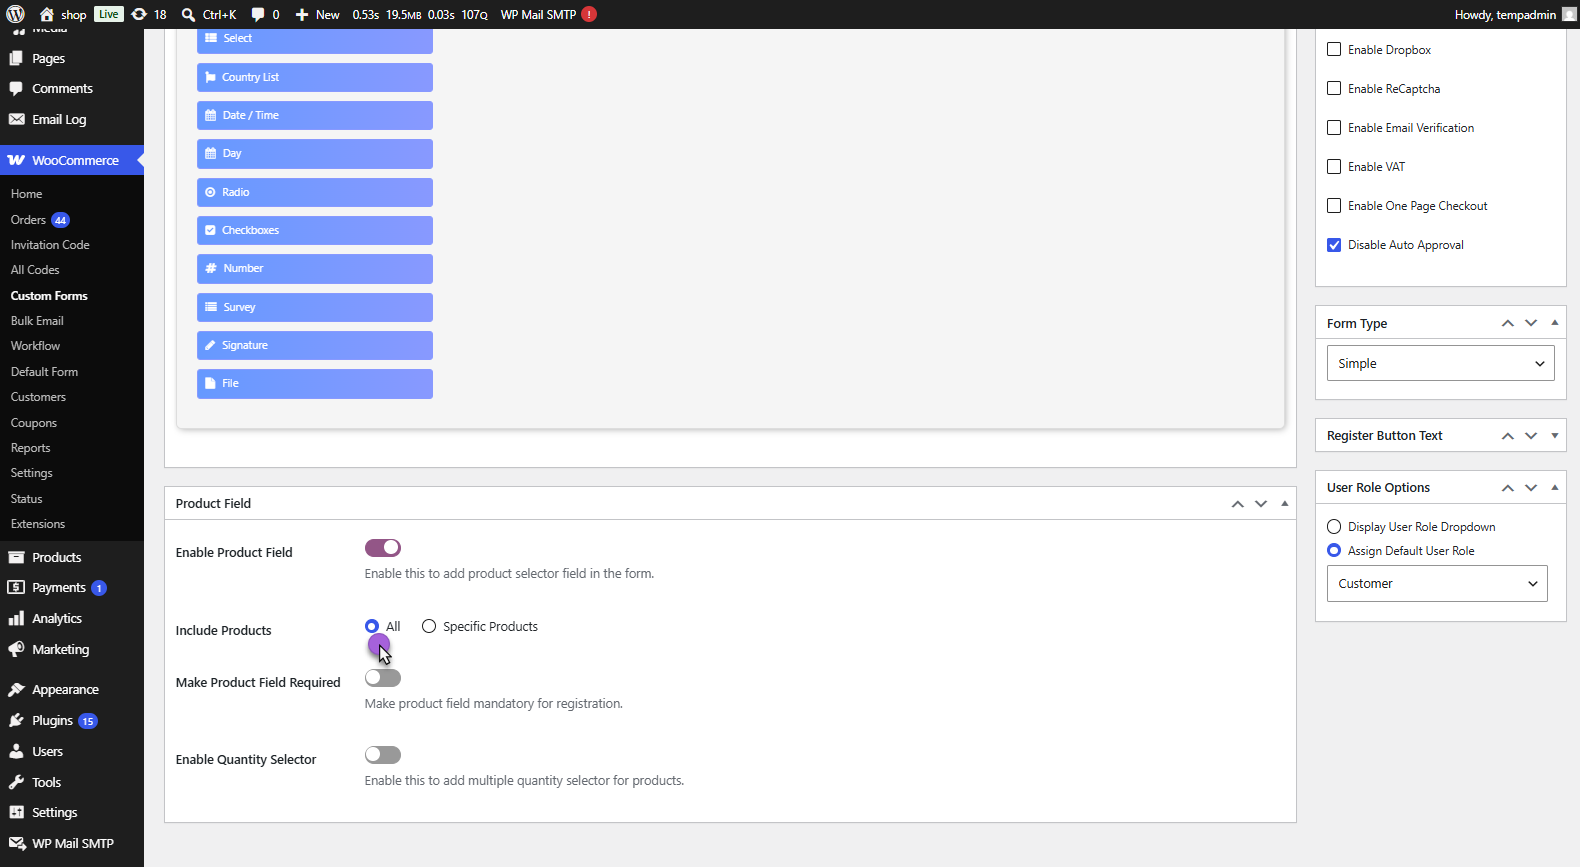
- Specific Products
- Displays only selected products.
When selected:
- A product selection field appears.
- Choose one or more products to display in the registration form.
Make Product Field Required
- Enable the Make Product Field Required toggle.
When enabled:
- Users must select a product before submitting the registration form.
- Registration cannot be completed until a product is selected.
Enable Quantity Selector
- Enable the Enable Quantity Selector toggle.
When enabled:
- A quantity field appears alongside the product selector.
- Users can specify the quantity of the selected product.
- Multiple quantities can be selected during registration.
Front-End Impact
- Navigate to the page where the custom registration form is displayed.
- The registration form will include a Product Field when the feature is enabled.
Product Selection
- Users can choose a product directly from the registration form.
- Depending on the configuration, all products or only specific products will be available.
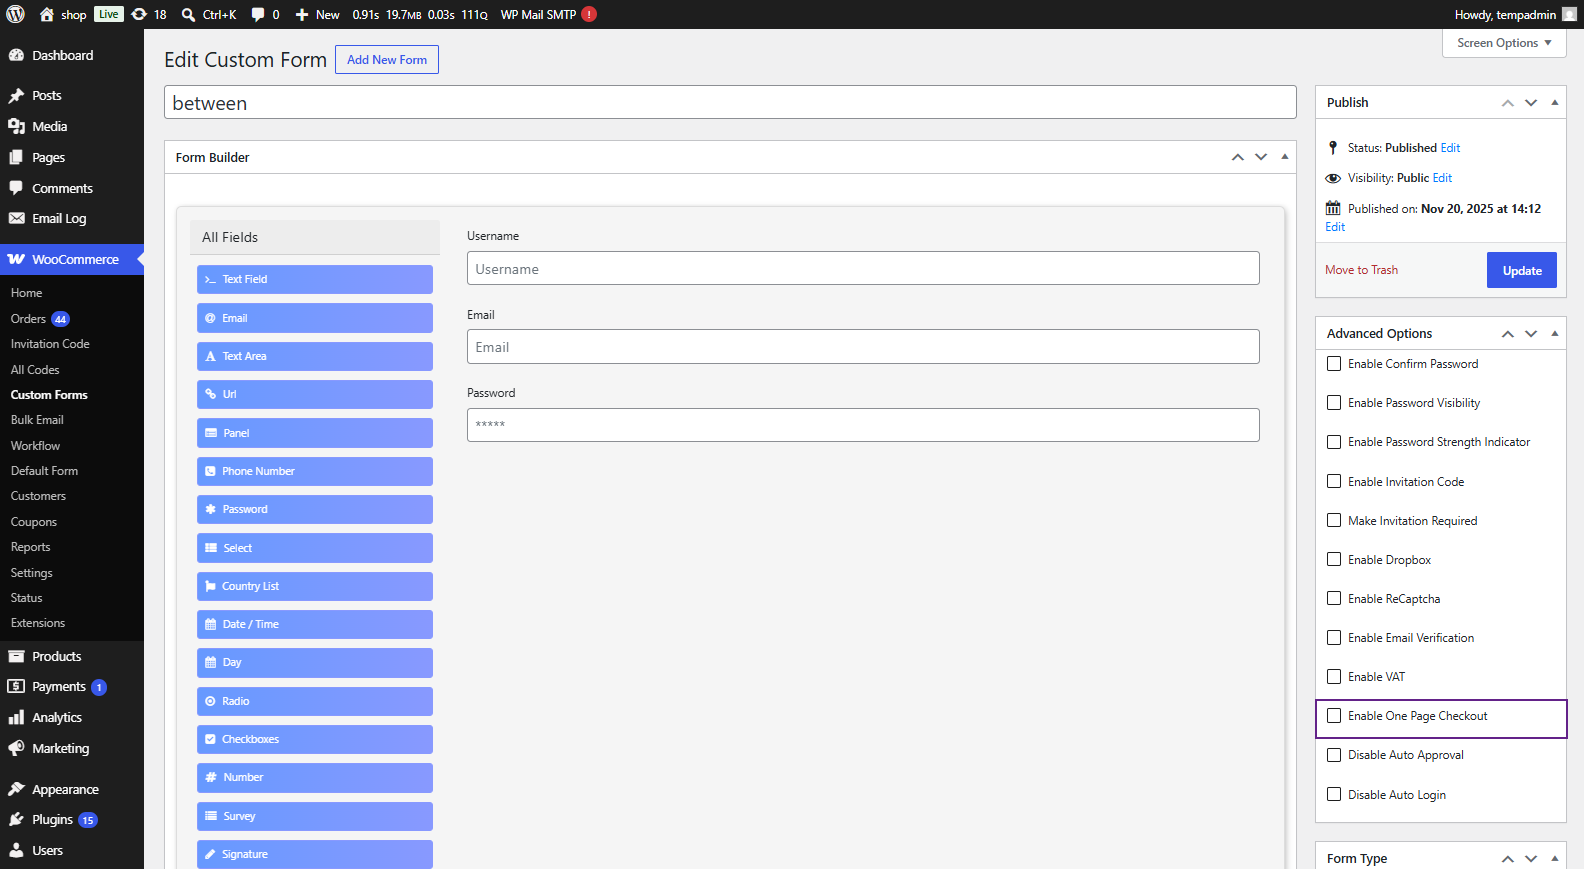
One Page Checkout
↑ Back to topThe One Page Checkout feature allows users to complete both registration and payment from a single registration form. This feature is designed for forms that contain Product Fields or Pricing Fields and require payment before registration is completed. When enabled, a checkout popup is displayed after the user submits the registration form, allowing the payment process to be completed without leaving the page.
- Navigate to: WooCommerce → Custom Forms

- Open the desired custom form.
- In the Advanced Options section, locate the Enable One Page Checkout option.
Enable One Page Checkout
- Enable the One Page Checkout checkbox.
When enabled:
- Users can complete registration and payment in a single flow.
- A checkout popup will appear after the registration form is submitted.
- The payment process is completed directly from the popup.
- Registration is completed after a successful payment.
Front-End Impact
- Navigate to the page where the custom registration form is displayed.
- Complete the registration form.
- If the form contains Product Fields, select the desired product or pricing option.
- Fill in the required registration details.
- Click the Register button.
Checkout Popup
After clicking Register:
- A One-Page Checkout popup appears on the screen.
- The checkout form is displayed inside the popup.
- Customer information entered during registration is automatically populated where applicable.
- Selected products and pricing details are included in the checkout summary.
- Users can select their preferred payment method.
- Users can review their order details before proceeding.
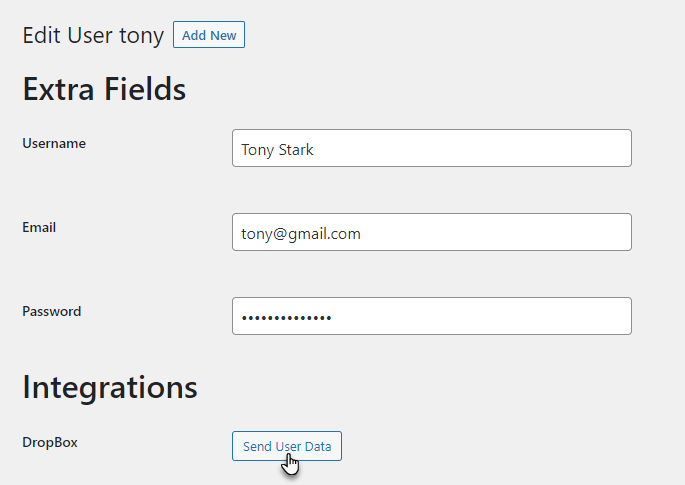
Dropbox
↑ Back to top- Navigate to WordPress Admin Dashboard → WooCommerce → Custom Forms.

- Now you’re on the Custom Forms page.

- Hover over the form to view the suboptions.
- Once done, click on the Edit button.

- Now you’re on the Edit Custom Form page.
- Navigate to the Dropbox section.
- Checkmark the Enable Dropbox checkbox.
- Once done, click on the Update button.

NOTE: Make sure that the Dropbox is connected in the Enable Dropbox option in Integrations subtab.

Also, make sure that the Enable Dropbox option is enabled from the General Settings tab in the Default Form tab.
- Navigate to the WordPress Admin Dashboard → WooCommerce → Default Form.

- Now you’re on the Users page.

- Hover over the user to view the suboptions.
- Once done, click on the Edit button.

- Now you’re on the Edit User page.
- Scroll down and navigate to the Integrations section.
- In the Dropbox option, click on the Send User Data button.
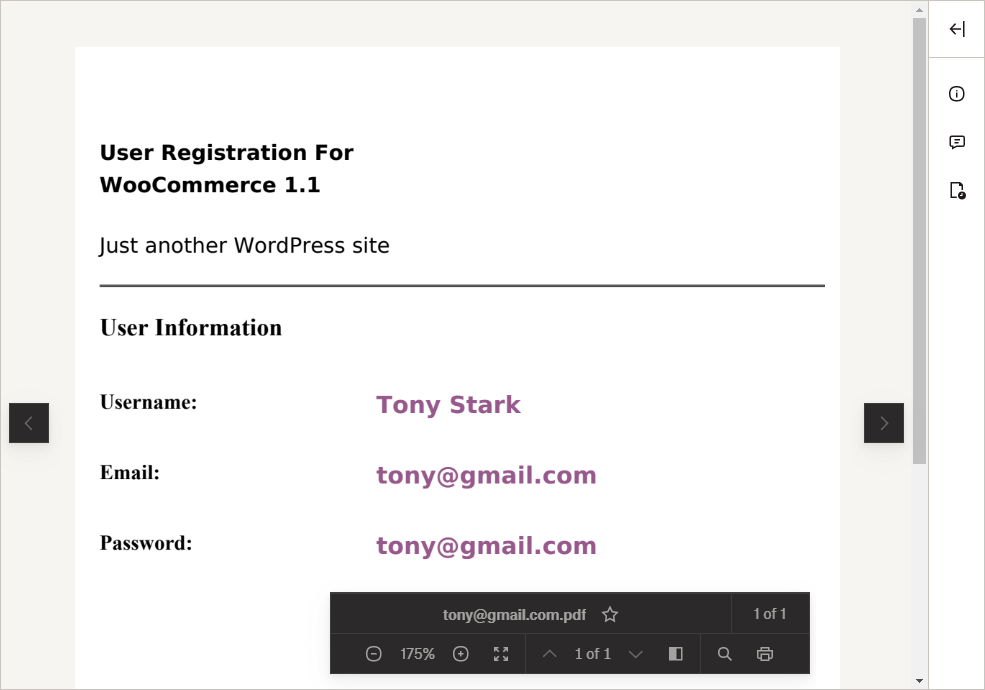
- Now go to your Dropbox account, which is connected to your website.
- A folder will be created with the form name from which that respective user registered.
- Click on the folder.

- A PDF file will be in the folder with the reference of that respective user.
- Click on the PDF file.

- The PDF file will contain details of the user which he filled in while registering using the custom form.
New Fields
↑ Back to top- Navigate to WordPress Admin Dashboard → WooCommerce → Custom Forms.

- Now you’re on the Custom Forms page.
- Hover over the form to view the suboptions.
- Once done, click on the Edit button.
- Now you’re on the Edit Custom Form page.
- We can see that new fields are added to the form.

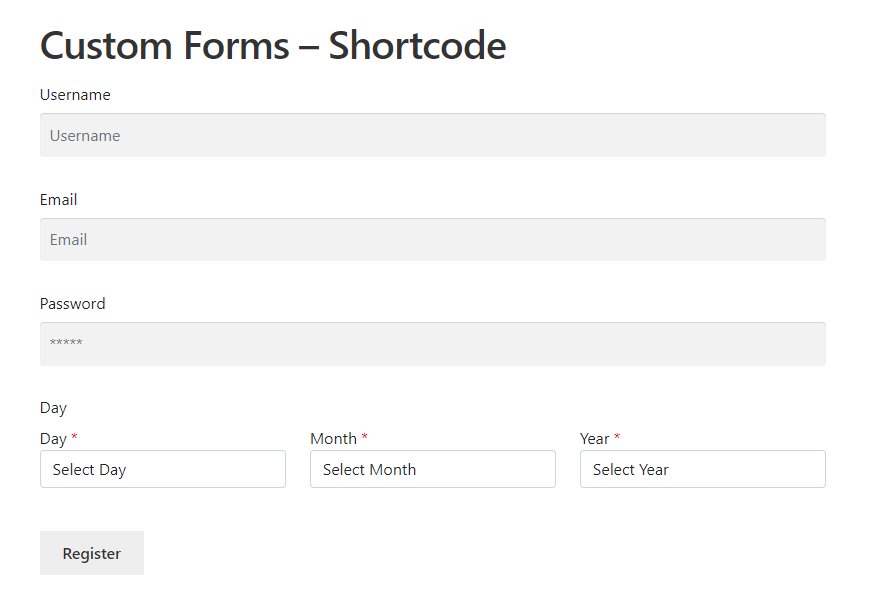
Day – Form Component
- Drag and drop the Day field from the All Fields

- Once done, a popup will appear.
Display
- In the Display tab, customize how the Day component would appear on the front-end.

Day
- In the Day tab, customize how the Day field would appear on the front-end.
- In the Type option, we have two types of display available for the Day field.
- If the Administrator selects the Number in the Type option, the user can enter the day manually.

- If the Administrator selects the Select in the Type option, the user can select the day from the dropdown menu where all the days will be present.
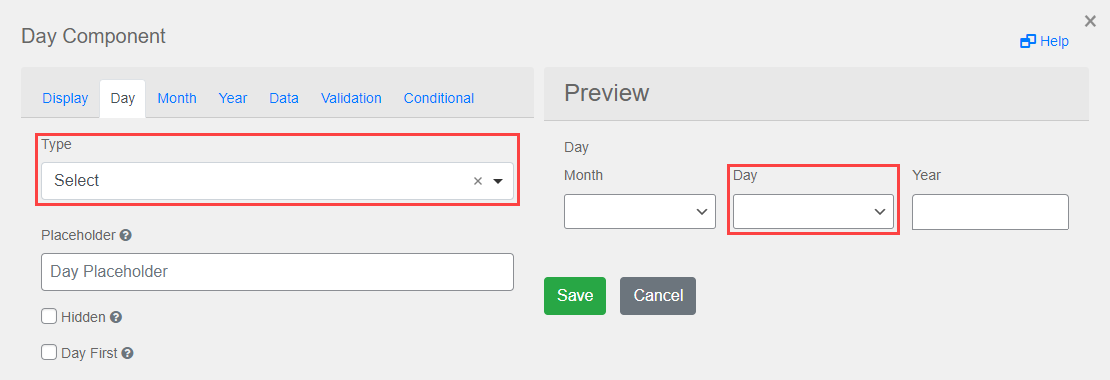
- The Administrator can enter the placeholder text in the Placeholder option that will appear on the Day field.
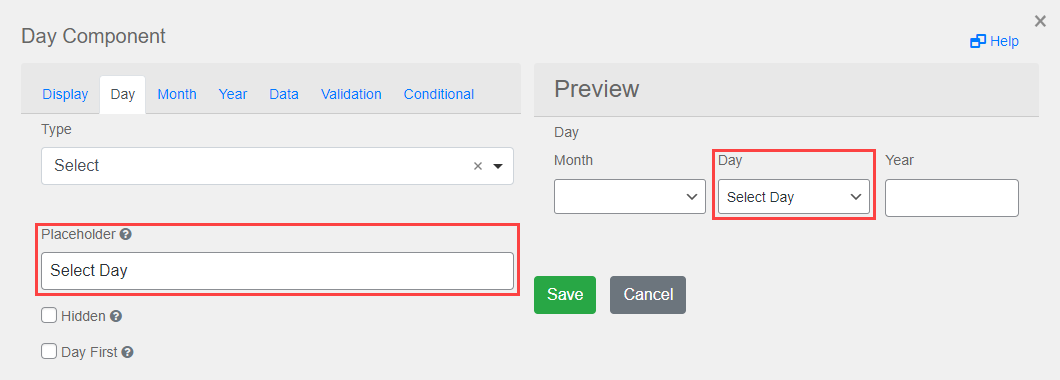
- Checkmark the Hidden checkbox to hide the Day field.

- Checkmark the Day First checkbox to move the Day field before the Month field.

Month
- In the Month tab, customize how the Month component would appear on the front-end.
- In the Type option, we have two types of display available for the Month field.
- If the Administrator selects the Number in the Type option, the user can enter the month manually.

- If the Administrator selects the Select in the Type option, the user can choose the month from the dropdown menu where all the days will be present.
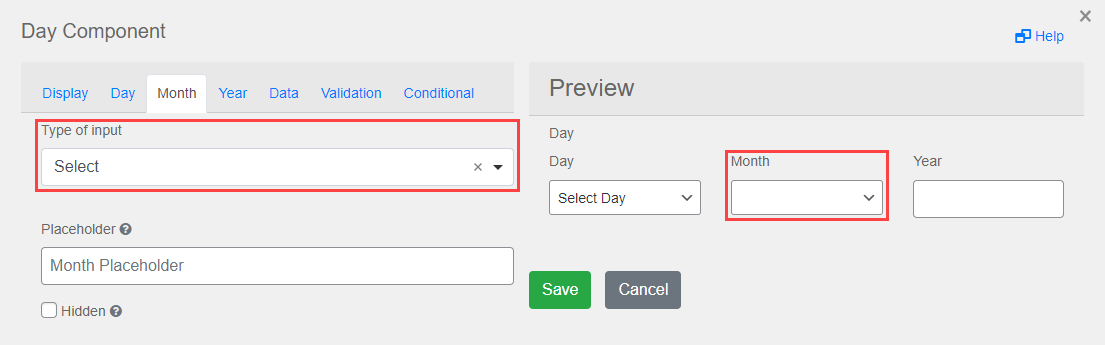
- Checkmark the Hidden checkbox to hide the Month field.

- The Administrator can enter the placeholder text in the Placeholder option that will appear on the Month field.

Year
- In the Year tab, customize how the Year field would appear on the front-end.
- In the Type option, we have two types of display available for the Year field.
- If the Administrator selects the Number in the Type option, the user can enter the year manually.

- If the Administrator selects the Select in the Type option, the user can choose the year from the dropdown menu where all the days will be present.

- The Administrator can set the Minimum Year and Maximum Year of the Year field.
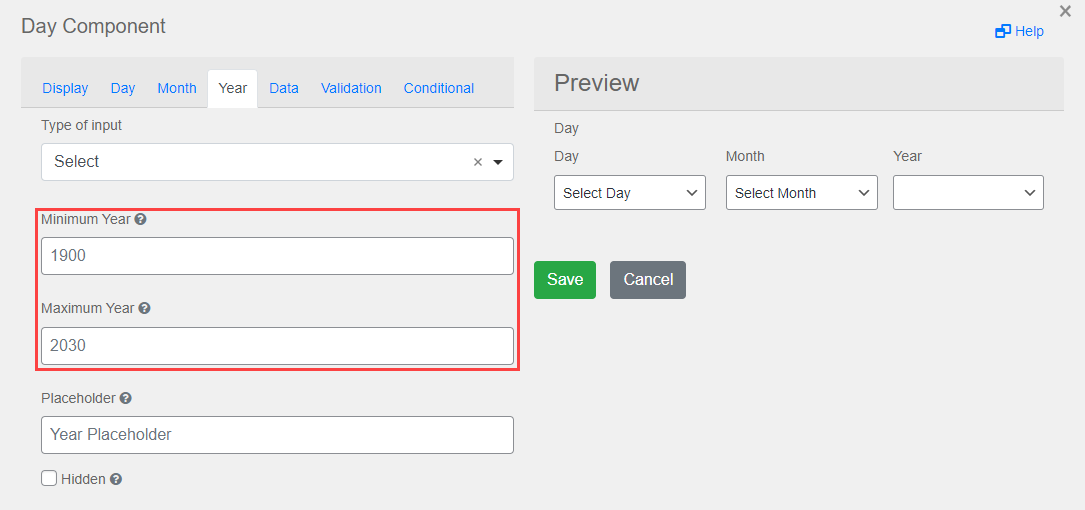
- Checkmark the Hidden checkbox to hide the Year field.

- The Administrator can enter the placeholder text in the Placeholder option that will appear on the Year field.

Data
- In the Data tab, the Administrator can see how all the fields will appear on the front-end.
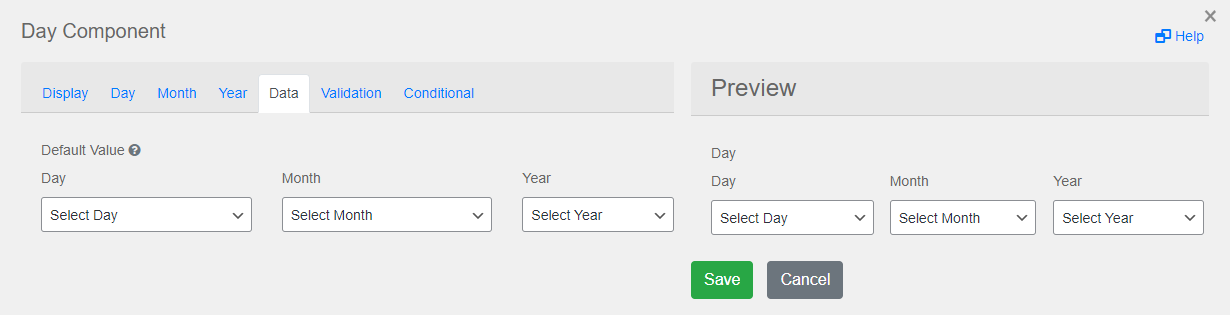
- Enter the data in the fields and it will appear in the Preview section.

Validation
- In the Validation tab, set the validation on the fields which would appear on the front-end.
- Checkmark the Required checkbox against the fields to apply validation on that field.

- Once done, a * would appear on that respective field.

- The Administrator can set the Minimum Day and Maximum Day.

- In the Validate On option, we have two options available.
- If the Administrator selects the Change in the Validate On option, the validation will appear immediately until all the required fields are not filled in that specific component.

Front-End Impact

- If the Administrator selects the Blur in the Validate On option, the validation will appear when the user switches to another component and fills in the fields of that component.
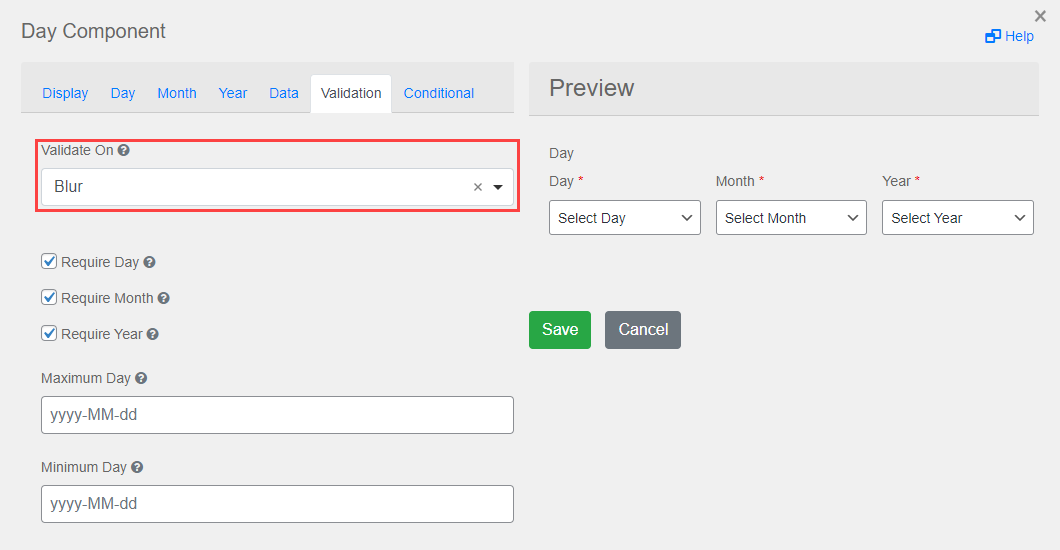
Front-End Impact

Conditional
- In the Conditional tab set the conditions according to your requirements.

- Once done, click on the Save button.

- Once done, click on the Update button.

Front-End Impact
- Navigate to the form on the website.
- Enter the fields required for registration.
- Once done, click on the Register button.

- Once done, navigate to the Navigate to WordPress Admin Dashboard → WooCommerce → Default Form.

- Now you’re on the Users page.
- The user who recently registered will appear on this page.

- Hover over that user to view the suboptions.
- Once done, click on the Edit button.
- Now you’re on the Edit User page.
- Scroll down and navigate to the Extra Fields section.
- The Day field will appear with the data filled in by the user while registering.

Survey – Form Component
↑ Back to top- Drag and drop the Survey field from the All Fields section.
- Once done, a popup will appear.
- A popup will appear on the Day component.
Display
- In the Display tab, customize how the Survey component would appear on the front-end.

Data
- In the Data tab, the Administrator can see how all the fields will appear on the front-end.
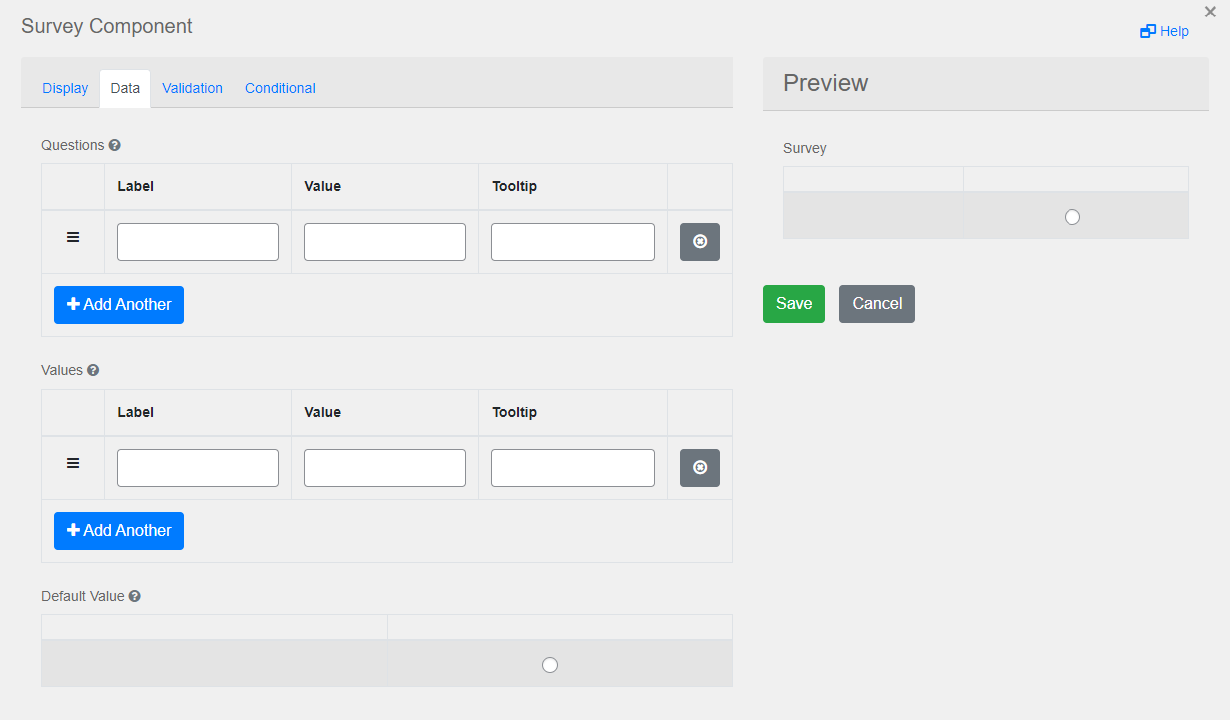
- In the Questions section, enter the question in the Label column.
- The Value column will be automatically added when the question is added in the Label column.
- In the Tooltip column, enter the help message.
- To add more questions, click on the Add Another button.

- The Tooltip help message which appears when a cursor is positioned over a tooltip icon.

- In the Values section, enter the values in the Label column.
- The Value column will be automatically added when the value is added in the Label column.
- In the Tooltip column, enter the help message.
- To add more questions, click on the Add Another button.

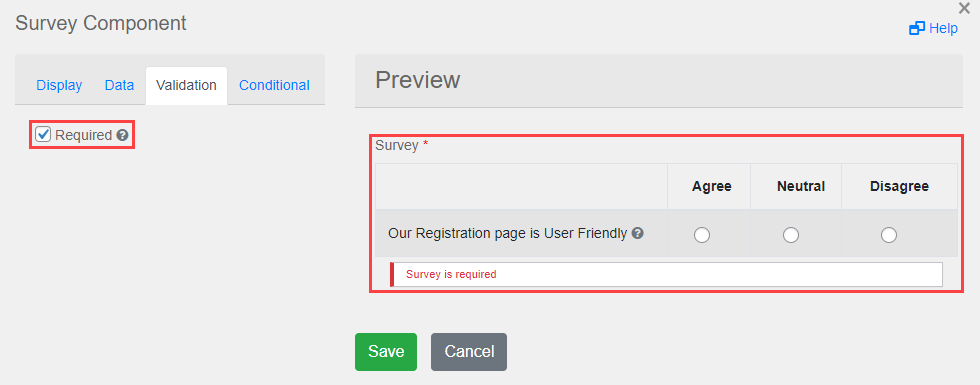
Validation
- In the Validation tab, set the validation on the component which would appear on the front-end.
- Checkmark the Required checkbox to apply on the Survery.
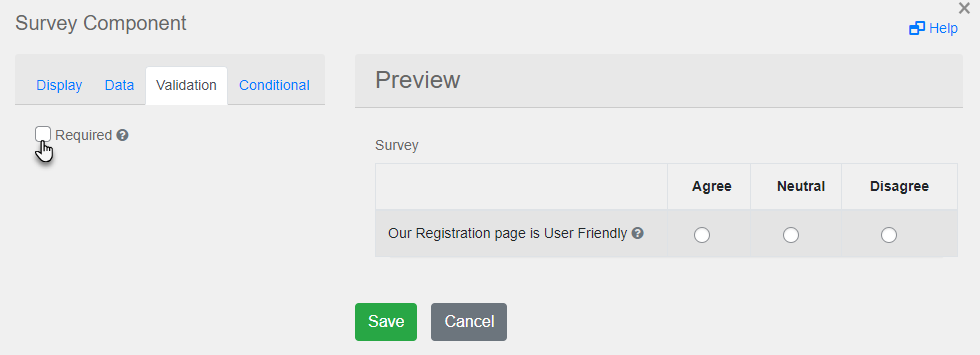
- Once done, a * would appear on the Survey component.
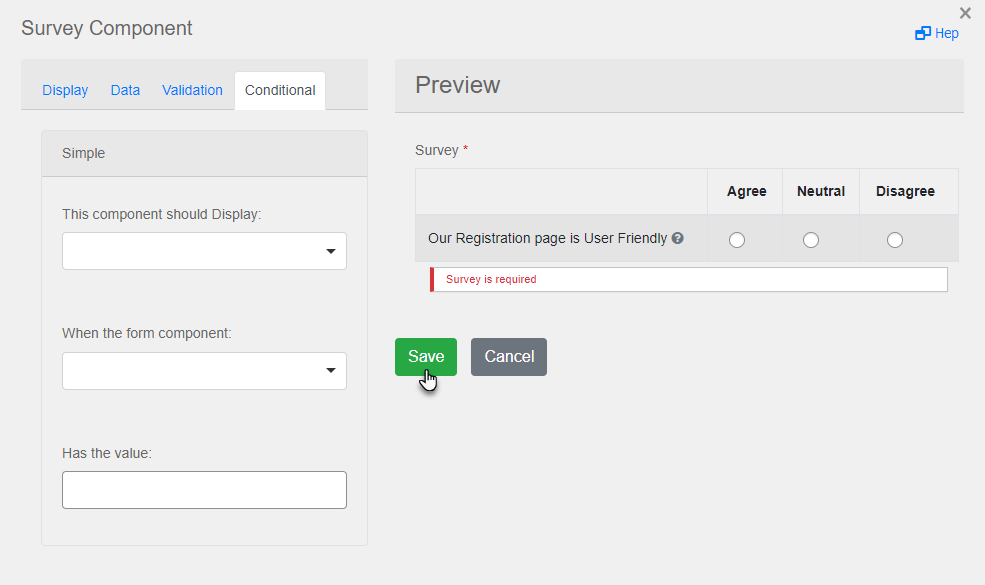
Conditional
- In the Conditional tab set the conditions according to your requirements.
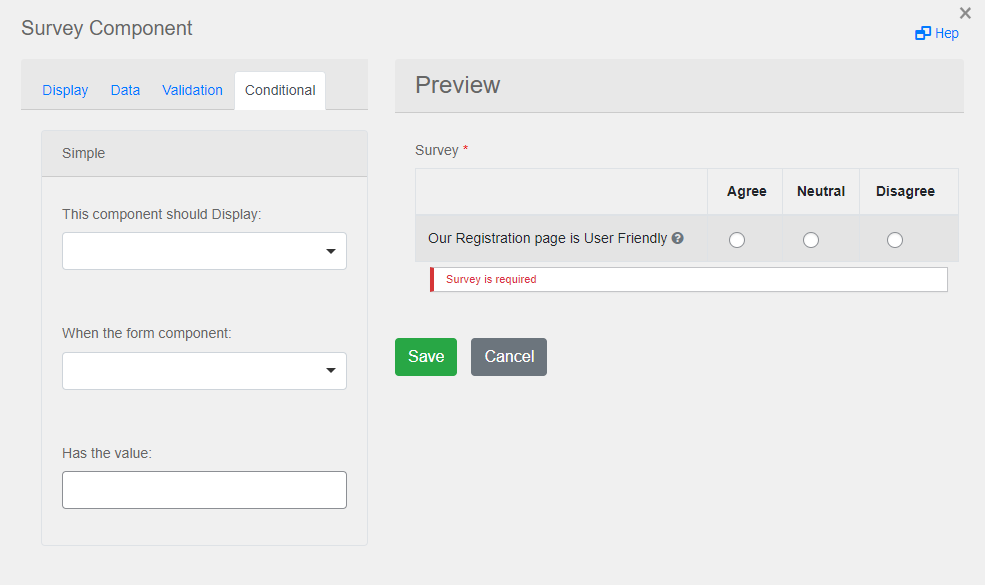
- Once done, click on the Save button.
- Once done, click on the Update button.
Front-End Impact
- Navigate to the form on the website.

- Enter the fields required for registration.
- Once done, click on the Register button.

- Once done, navigate to the Navigate to WordPress Admin Dashboard → WooCommerce → Default Form.

- Now you’re on the Users page.
- The user who recently registered will appear on this page.
- Hover over that user to view the suboptions.
- Once done, click on the Edit button.
- Now you’re on the Edit User page.
- Scroll down and navigate to the Extra Fields section.
- The Survey field will appear with the data filled in by the user while registering.

Signature – Form Component
↑ Back to top- Drag and drop the Signature field from the All Fields section.

- Once done, a popup will appear.
- A popup will appear on the Signature component.
Display
- In the Display tab, customize how the Signature component would appear on the front-end.

Data
- In the Data tab, the Administrator can see how all the fields will appear on the front-end.

- Enter the data in the fields, and it will appear in the Preview section.

Validation
- In the Validation tab, set the validation on the component which would appear on the front-end.
- Checkmark the Required checkbox to apply on the Signature.

- Once done, a * would appear on the Signature component.

Conditional
- In the Conditional tab, set the conditions according to your requirements.

- Once done, click on the Save button.

- Once done, click on the Update button.

Front-End Impact
- Navigate to the form on the website.

- Enter the fields required for registration.
- Once done, click on the Register button.

- Once done, navigate to the Navigate to WordPress Admin Dashboard > WooCommerce > Default Form.

- Now you’re on the Users page.
- The user who recently registered will appear on this page.

- Hover over that user to view the suboptions.
- Once done, click on the Edit button.

- Now you’re on the Edit User page.
- Scroll down and navigate to the Extra Fields section.
- The Signature field will appear with the data filled in by the user while registering.

File – Form Component
↑ Back to top- Drag and drop the File field from the All Fields section.

- Once done, a popup will appear.
- A popup will appear on the File component.
Display
- In the Display tab, customize how the Signature component would appear on the front-end.

File
- In the File tab, the Administrator can set the File Pattern, File Minimum Size, and File Maximum Size.

- If we click on the Display as image(s) checkbox, then a new option will appear titled as Image Size.
- Once enabling the Display as image(s) checkbox, instead of a list of linked files, images will be rendered in the view.
- The image size for previewing images in the Image Size option.

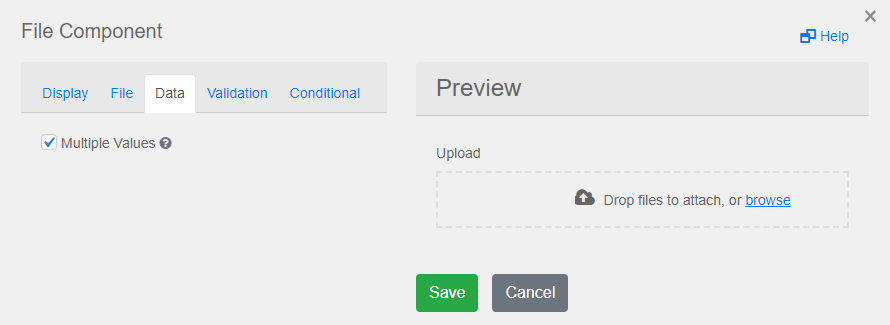
Data
- In the Data tab, a Multiple Values checkbox is present. Checkmark the Multiple Values checkbox.
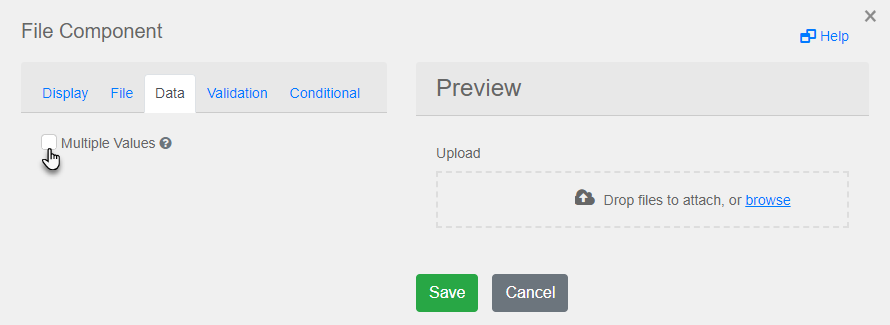
- Once done, it will allow multiple values to be entered for this field.
Validation
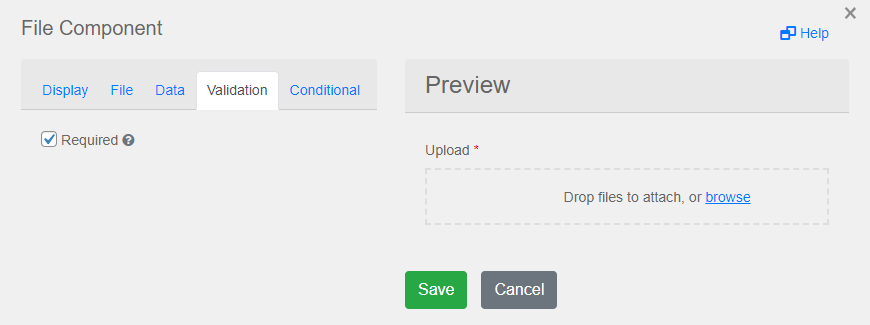
- In the Validation tab, set the validation on the component which would appear on the front-end.
- Checkmark the Required checkbox to apply on the File.

- Once done, a * would appear on the File component.
Conditional
- In the Conditional tab, set the conditions according to your requirements.
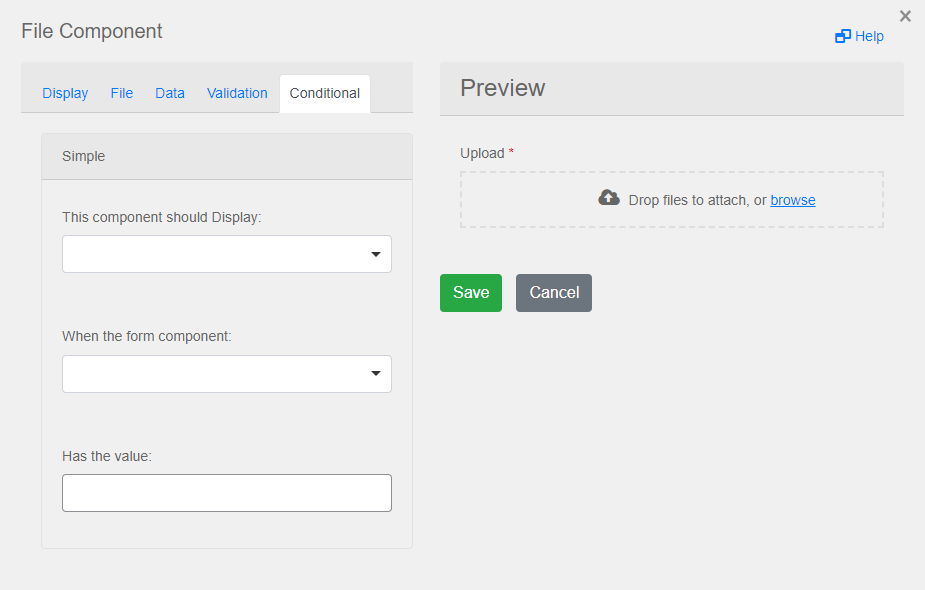
- Once done, click on the Save button.

- Once done, click on the Update button.

Front-End Impact
- Navigate to the form on the website.

- Enter the fields required for registration.
- Once done, click on the Register button.

- Once done, navigate to the Navigate to WordPress Admin Dashboard → WooCommerce → Default Form.

- Now you’re on the Users page.
- The user who recently registered will appear on this page.

- Hover over that user to view the suboptions.
- Once done, click on the Edit button.
- Now you’re on the Edit User page.
- Scroll down and navigate to the Extra Fields section.
- The Signature field will appear with the data filled in by the user while registering.

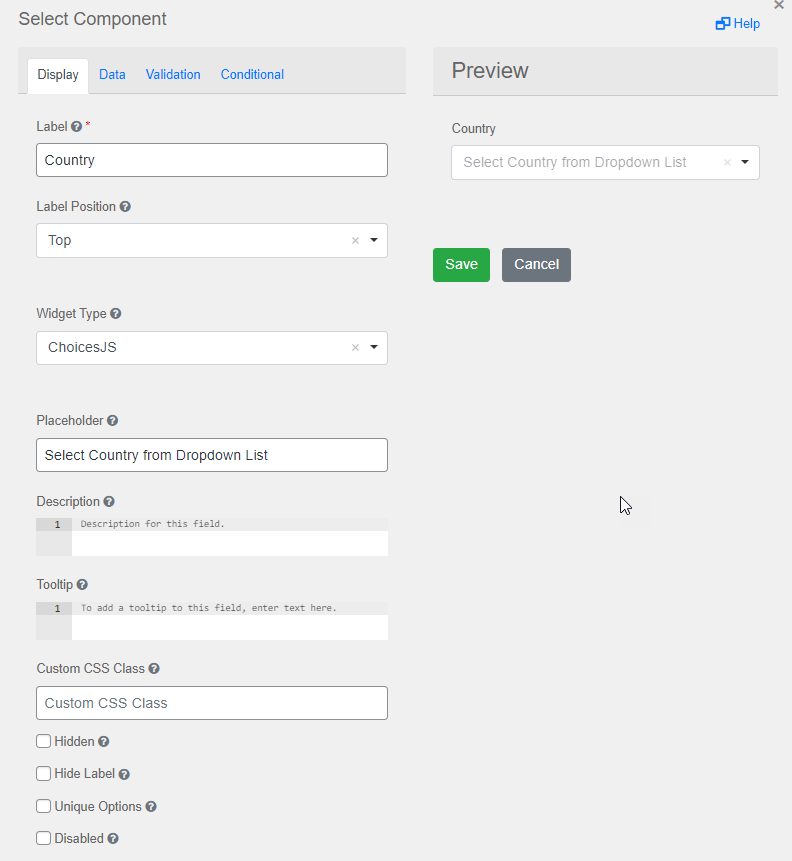
Country List – Form Component
↑ Back to top- Drag and drop the Country List field from the All Fields section.

- Once done, a popup will appear.
- A popup will appear on the Country List component.
Display
- In the Display tab, customize how the Country List component would appear on the front-end.
Data
- In the Data tab, the Administrator can see how all fields appear on the Front-End.

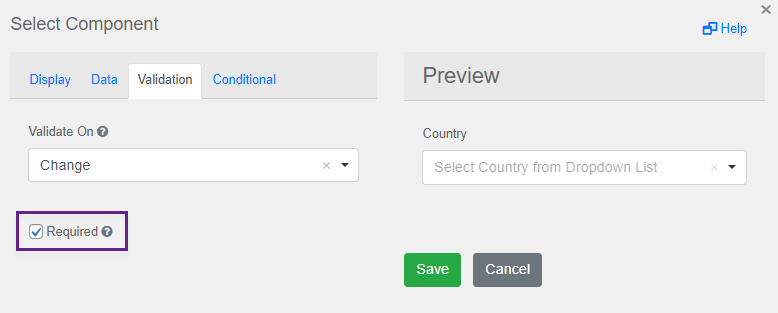
Validation
- In the Validation tab, set the validation for the component appearing on the Front-End.
- Checkmark the Required checkbox to apply to the Country List.

- Once done, a * will appear in the Country List component.
Conditional
- In the Conditional tab, set the conditions according to your requirements.

- Once done, click on the Save button.
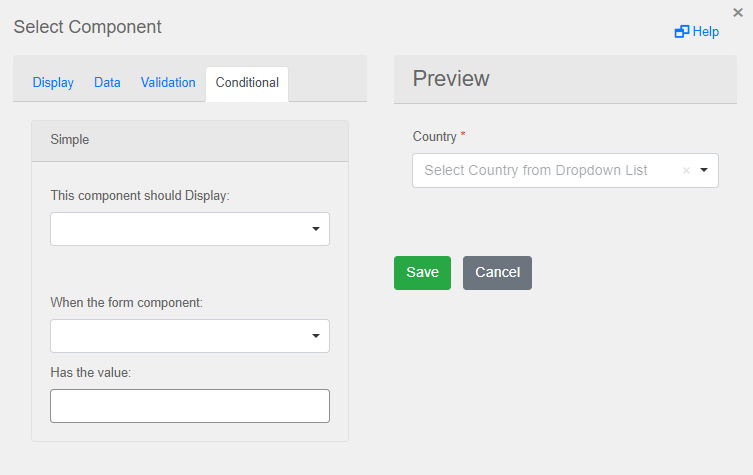
- Once done, click on the Update button.

Front-End Impact
- Navigate to the form on the website.

- Enter the fields required for registration.
- Once done, click on the Register button.

- Once done, navigate to the Navigate to WordPress Admin Dashboard → WooCommerce → Default Form.

- Now you’re on the Users page.
- The user who recently registered will appear on this page.

- Hover over that user to view the suboptions.
- Once done, click on the Edit button.

- Now you’re on the Edit User page.
- Scroll down and navigate to the Extra Fields section.
- The Signature field will appear with the data filled in by the user while registering.

Form Type
↑ Back to top- In the Form Type section, there are two options available.
- Simple
- Multi Step

Simple
- When the Administrator selects the Simple option in the Form Type section, the form would be based on one page only and all the fields will be displayed on it.

Front-End Impact
- Navigate to the form on the website.
- All the fields will appear only on one page.
Multi Step
- When the Administrator selects the Multi Step option in the Form Type section, the form will be displayed on multiple pages, and all the fields will be displayed on the pages on which they were placed.

- When the Administrator selects the Multi Step option in the Form Type section, a page tab will appear at the top of the page. This will indicate on which page you’re.
- You can add pages by clicking on the +Page button.
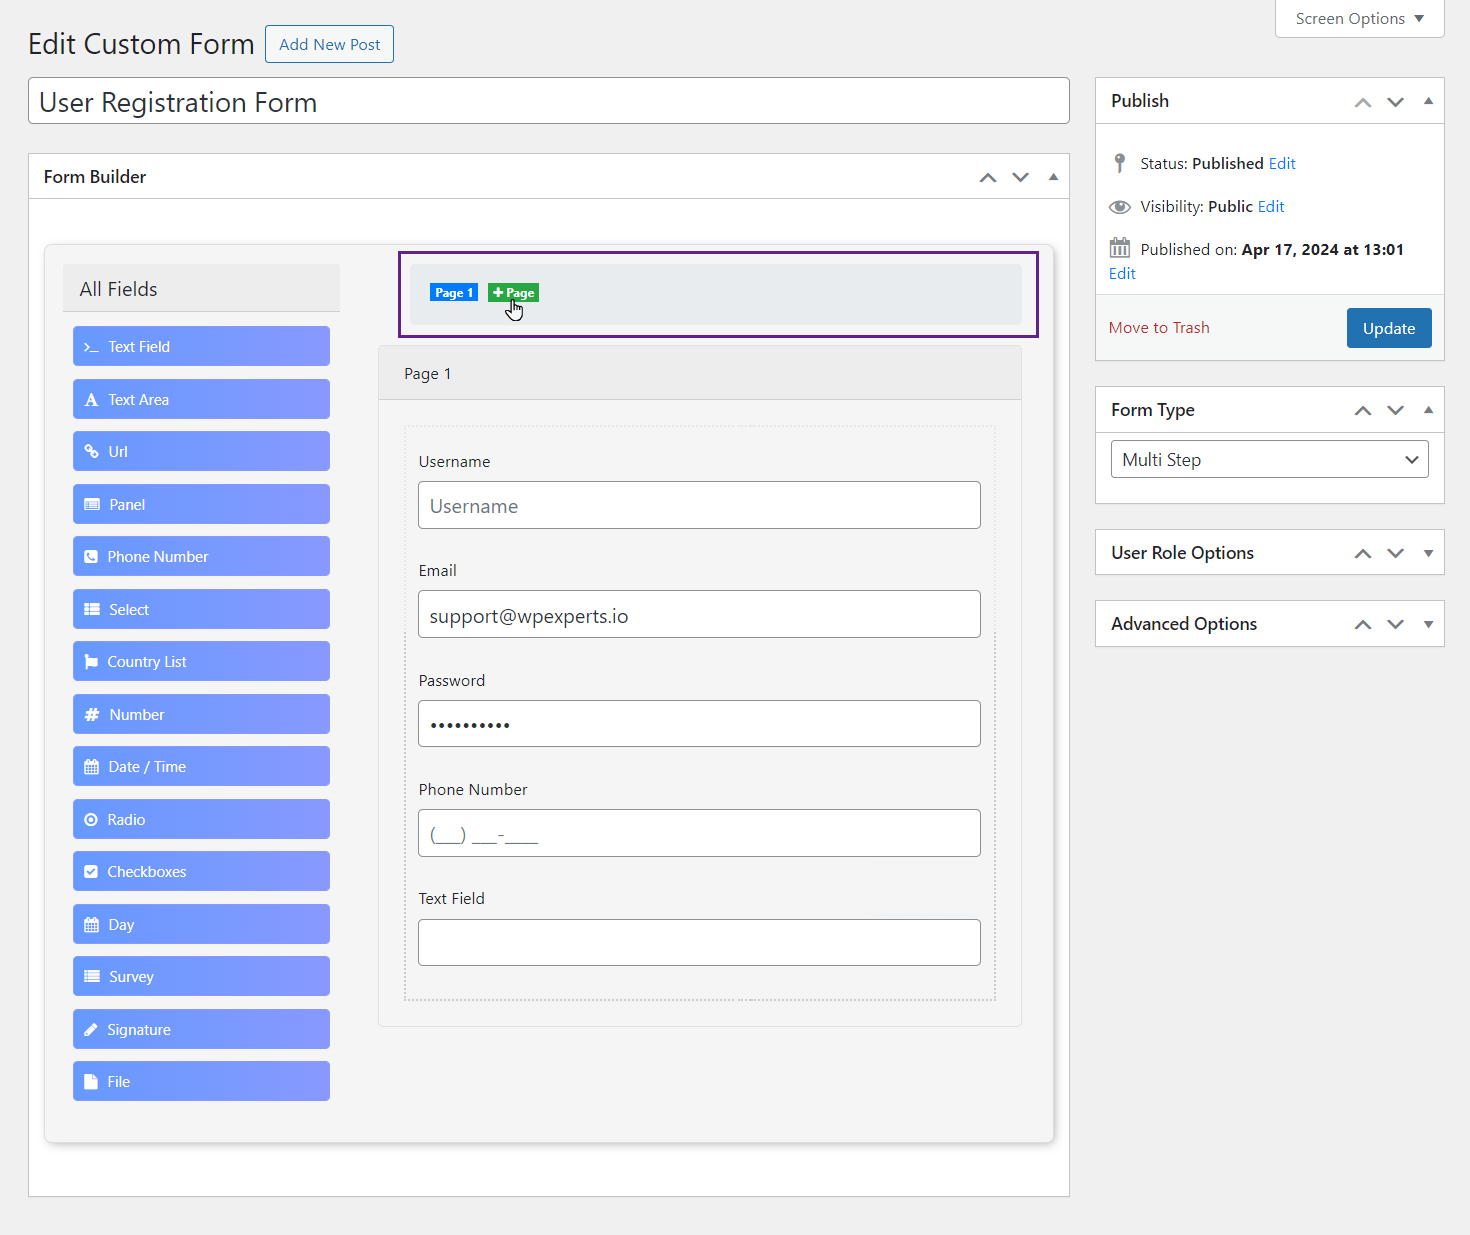
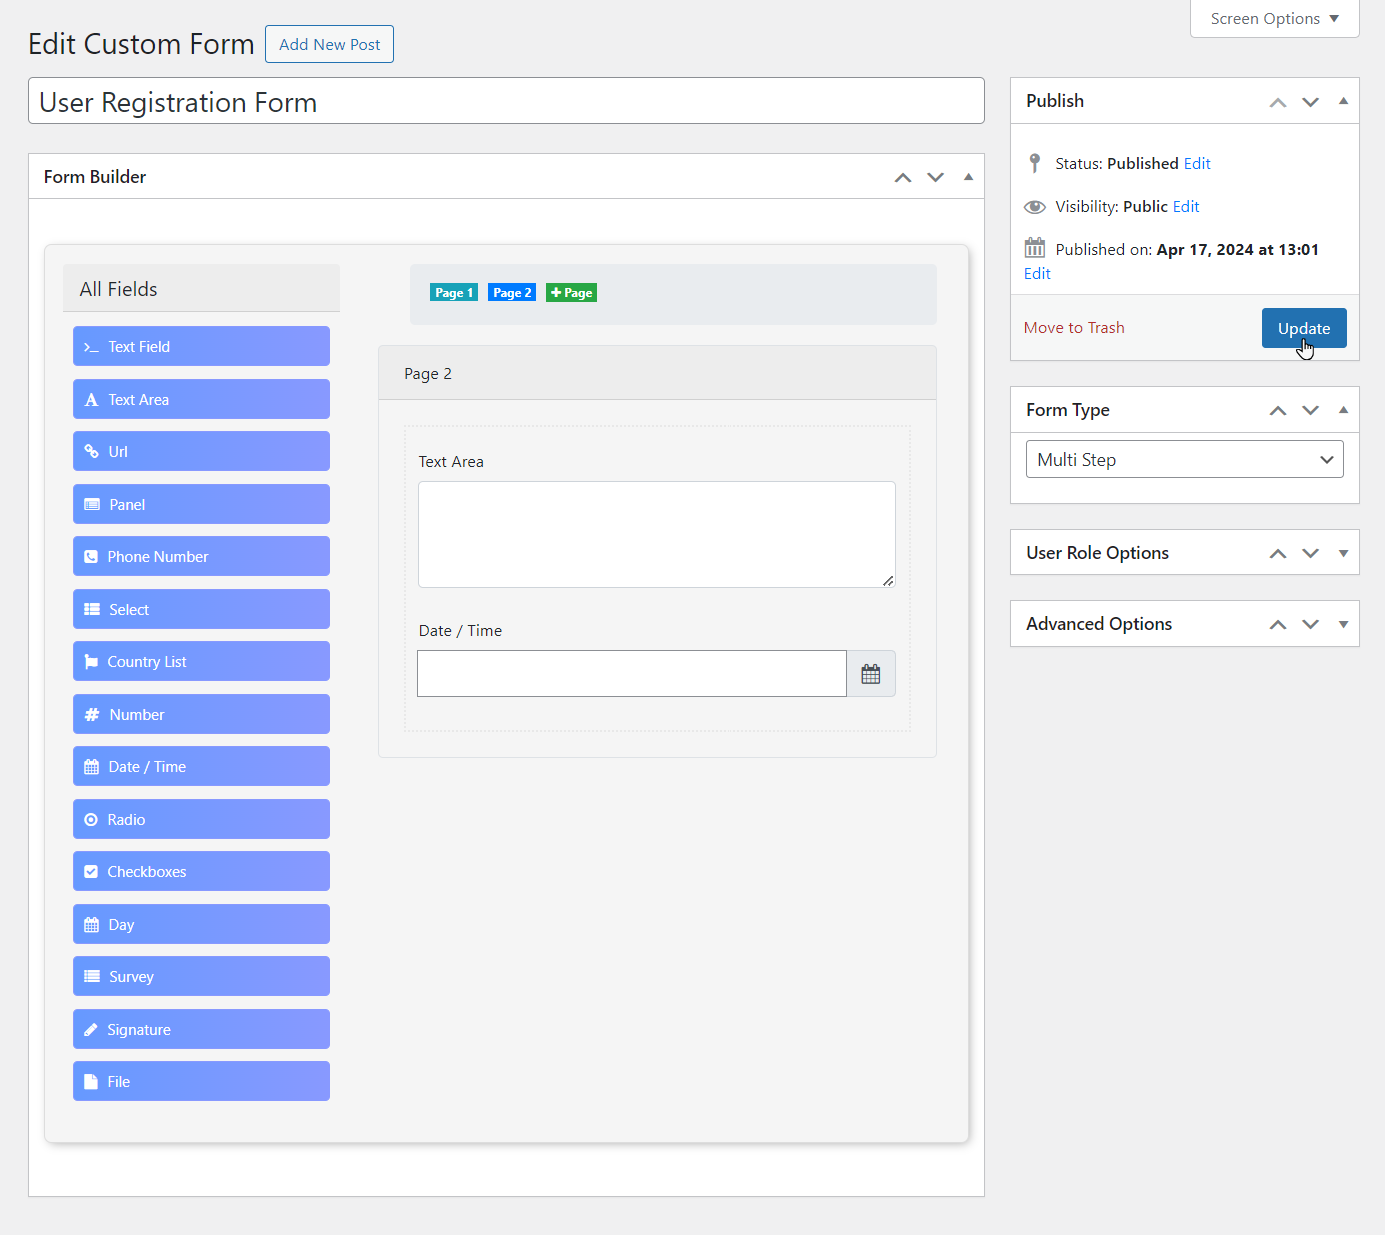
- Once the page is added, click on Page 2 to navigate to it.

- Now you’re on the Page 2.

- Drag and drop components on Page 2 from the All fields section.
- Click on the Update button to save changes.
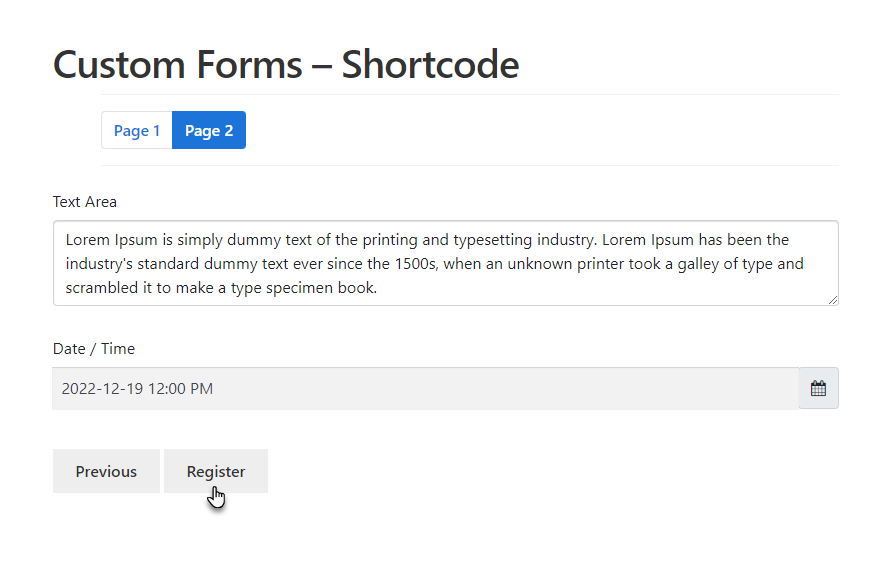
Front-End Impact
- Navigate to the form on the website.
- All the pages will appear with all the fields configured in them.
- Fill in the required fields on Page 1.
- Once done, click on the Next button to navigate to Page 2.

- Fill in the required fields on Page 2.
- Once done, click the Register button.
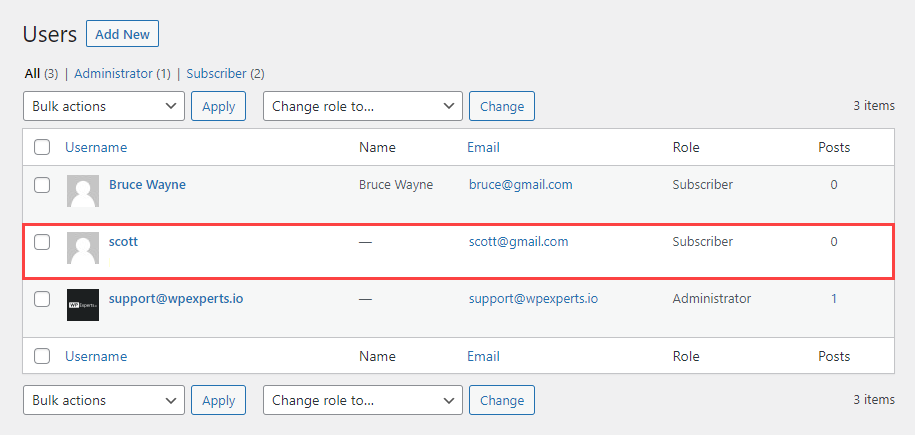
- Once done, navigate to the Navigate to WordPress Admin Dashboard → WooCommerce → Default Form.

- Now you’re on the Users page.
- The user who recently registered will appear on this page.

- Hover over that user to view the suboptions.
- Once done, click on the Edit button.
- Now you’re on the Edit User page.
- Scroll down and navigate to the Extra Fields section.
- All the data which was entered on Page 1 will appear.
- Click on the Next button.

- All the data which was entered on Page 2 will appear.

Advanced Options
↑ Back to topTwilio Verification
↑ Back to top- Navigate to the Twilio Verification section.
- Checkmark the Enable Twilio Verification checkbox in the Twilio Verification section.
- Click on the Update button.
Front-End Impact
- Navigate to the form on the website.
- Enter your Number of all fields on the user registration form.
- Click on the Get Code Button.
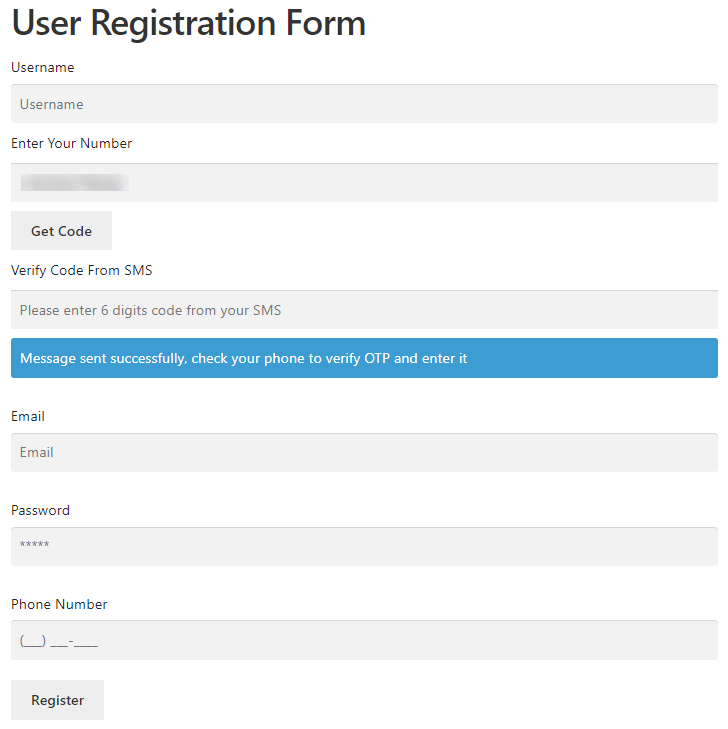
- After clicking on the Get Code button, a blue highlighted successful message will be shown.
- Users will receive the OTP on the registered number.

- Copy or type your OTP.
- Again, navigate to the form on the website.
- Paste the code for verification at Verify Code from SMS field.

- When a user enters an incorrect OTP, the system will display an error message related to the OTP, indicating that the provided OTP is invalid or incorrect.

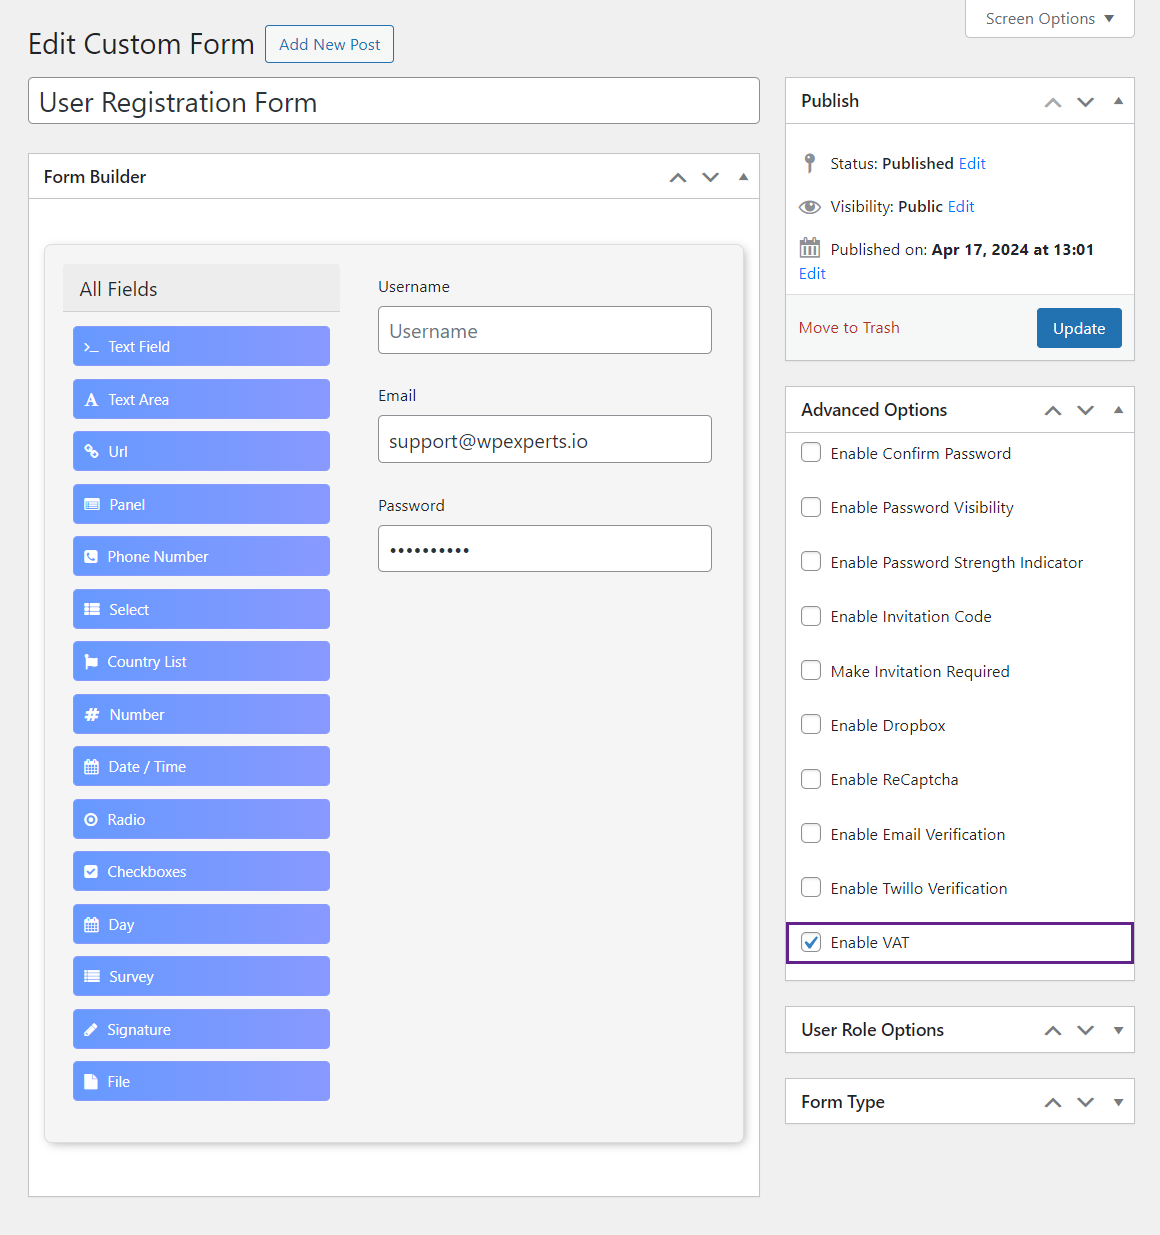
VIES
↑ Back to top- Navigate to the VIES section.
- Checkmark the Enable VAT checkbox in the VIES section.
- Click on the Update button.

Front-End Impact
- Navigate to the form on the website.
- Enter the VAT Number on the registration form.
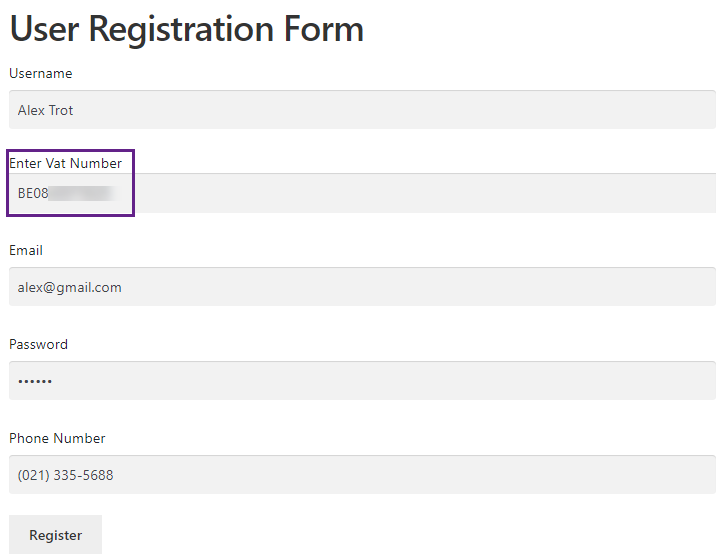
- When the correct VAT number is provided by the user, the system will permit the user to successfully complete the registration process.
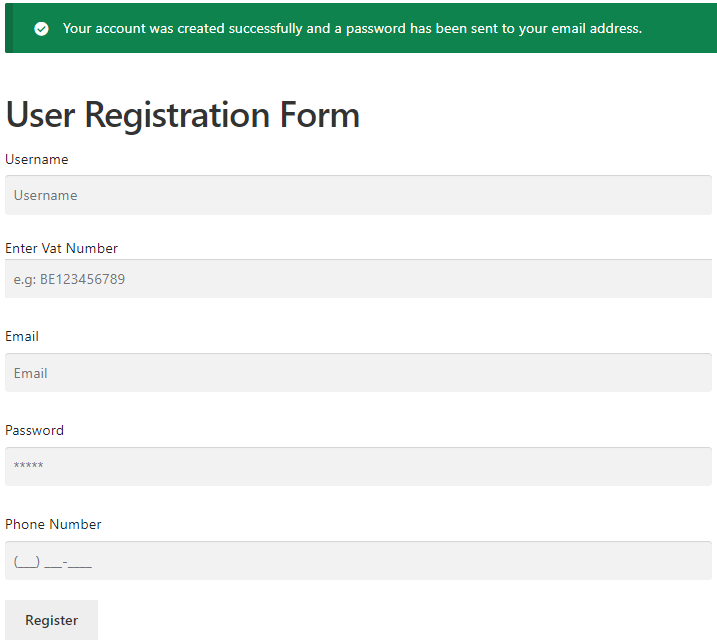
- When a user enters an incorrect VAT Number, the system will display an error message related to the VAT Number, indicating that the provided VAT Number is invalid or incorrect.
Invitation Code
↑ Back to top- The Enable Invitation Code option is present in each form custom form. Once this option is enabled, the Invitation Code option will appear on the form.
- Checkmark the Enable Invitation Code checkbox in the Invitation Code section.
- Checkmark the Make Invitation Required checkbox in the Invitation Code section.

Please Note: Checkmark the Make Invitation Required checkbox in the Invitation Code section to make the Invitation Code mandatory in each custom form.
- Once done, An Invitation Code option will appear on the form page.
Custom Form – Front-End Impact
- Once done, An Invitation Code option will appear on the Custom Form page.

Please Note: This error message will appear if the Make Invitation Code Required option is enabled and the user doesn’t enter the invitation Code on the Custom Form.

- The users who register using the Invitation Code via email will be Auto-Approved regardless of their selected user role.
- We can see that the status of the users registered through the Invitation Code in the Status column is Approved in the Registration Requests section.
Enable Dropbox
↑ Back to top- Checkmark the Enable Dropbox checkbox.
- Once done, click on the Update button.
NOTE: Make sure that the Dropbox is connected in the Enable Dropbox option in Integrations subtab.
Also, make sure that the Enable Dropbox option is enabled from the General Settings tab in the Default Form tab.
Enable reCAPTCHA
↑ Back to top- Checkmark the Enable ReCaptcha checkbox in the ReCaptcha section.
NOTE: Make sure that the Site Key and Secret Key are entered in the ReCaptcha Site Key and ReCaptcha Secret Key option in the Integrations subtab.
Also, ensure that the Enable ReCaptcha option is enabled from the General Settings tab in the Default Form tab.

Front-End Impact
- Navigate to the form on the website.
- The reCAPTCHA at the bottom of all fields on the registration form.

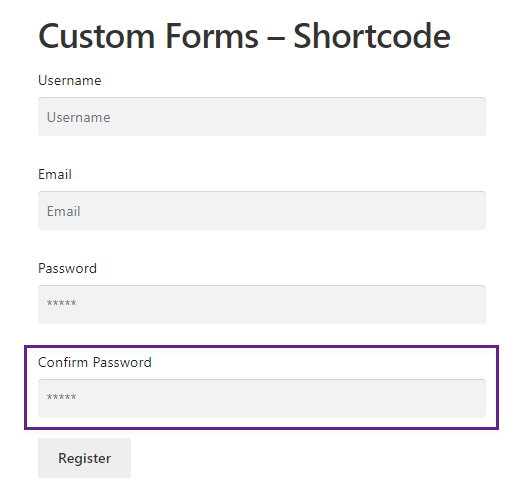
Confirm Password
↑ Back to top- Checkmark the Confirm Password checkbox in the Advanced Options section.
- Enabling the the Confirm Password option, a Confirm Password field will appear below the Password field on the Front-End.
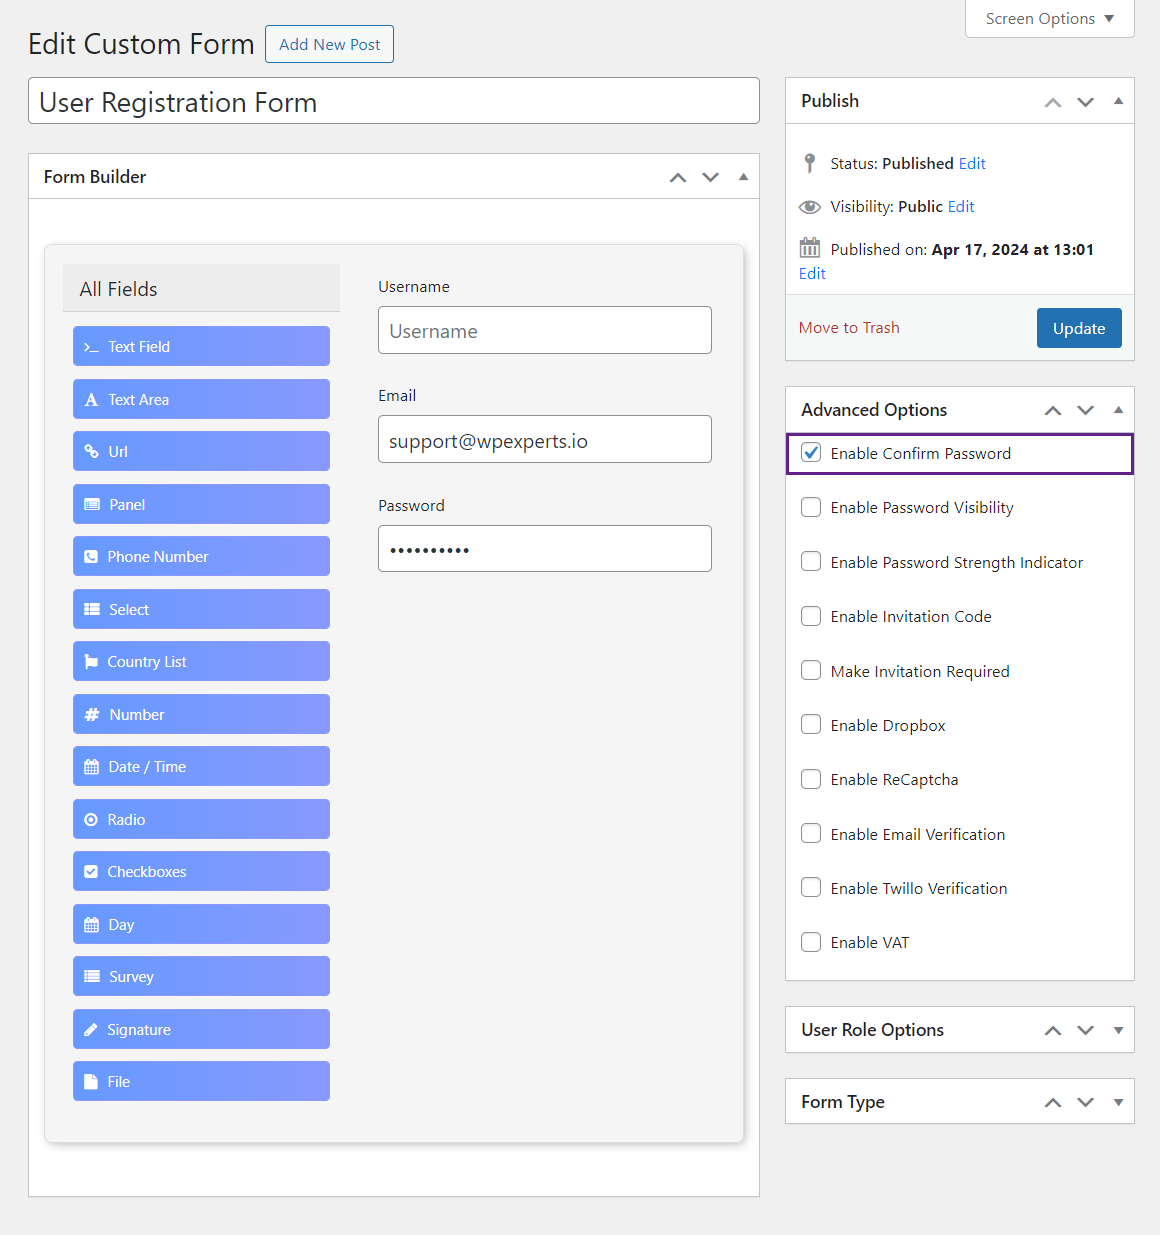
- Once done, click on the Update button.

Front-End Impact
Before

After
Password Visibility
↑ Back to top- Checkmark the Password Visibility checkbox in the Advanced Options section.
- Enabling the Password Visibility option will cause an eye icon to appear on the Password and Confirm Password fields. Users will be able to view their passwords upon clicking the eye icon.

- Once done, click on the Update button.

Front-End Impact
Before

After
- An eye icon will appear against the Password and Confirm Password fields.

- Click on the eye icon to reveal your password.
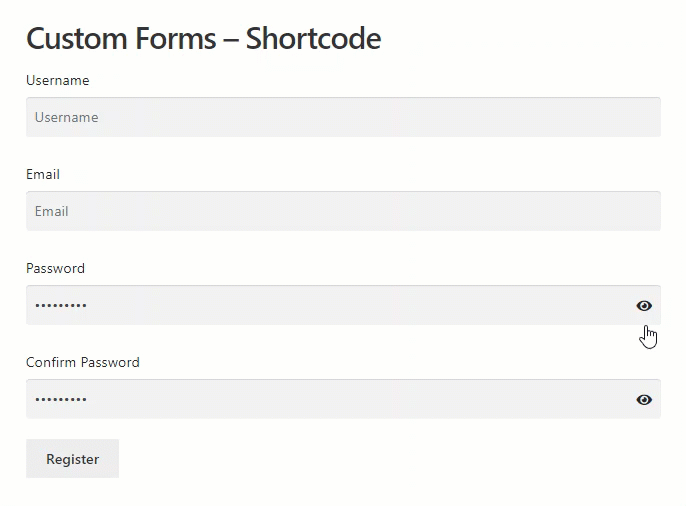
Password Strength Indicator
↑ Back to top- Checkmark the Password Strength Indicator checkbox in the Advanced Options section.
- Enabling the Password Strength Indicator option will help users create a strong and secure password by indicating three levels below the Front-End Password field.

- Once done, click on the Update button.

Front-End Impact
Before
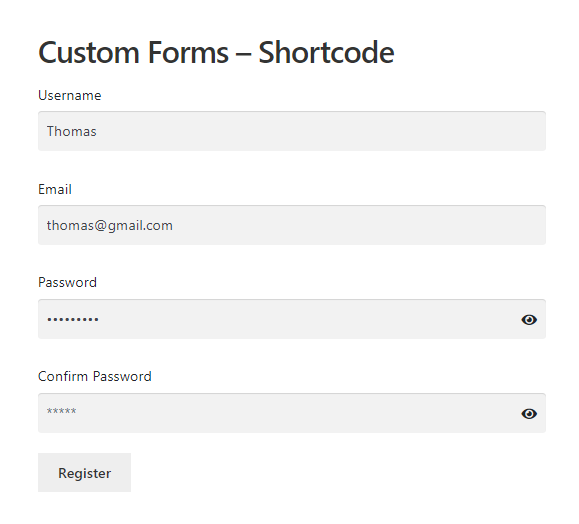
After
- Three levels will indicate your password strength.
Poor Password Strength
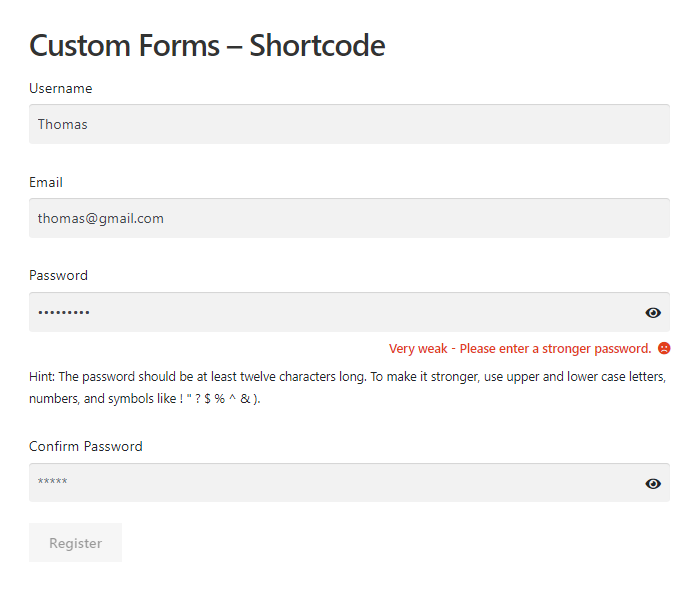
Medium Password Strength

Strong Password Strength

Compatibility
↑ Back to topGroups for WooCommerce
↑ Back to top- Download the Groups for WooCommerce plugin by clicking here.
- Install the plugin and Activate it.
- For further plugin settings and information, please visit the Groups for WooCommerce.
Default Form
Back-End Settings
- Go to Admin Dashboard > WooCommerce > Settings.

- Navigate to the User Registration tab.

- Click the Groups sub-option.
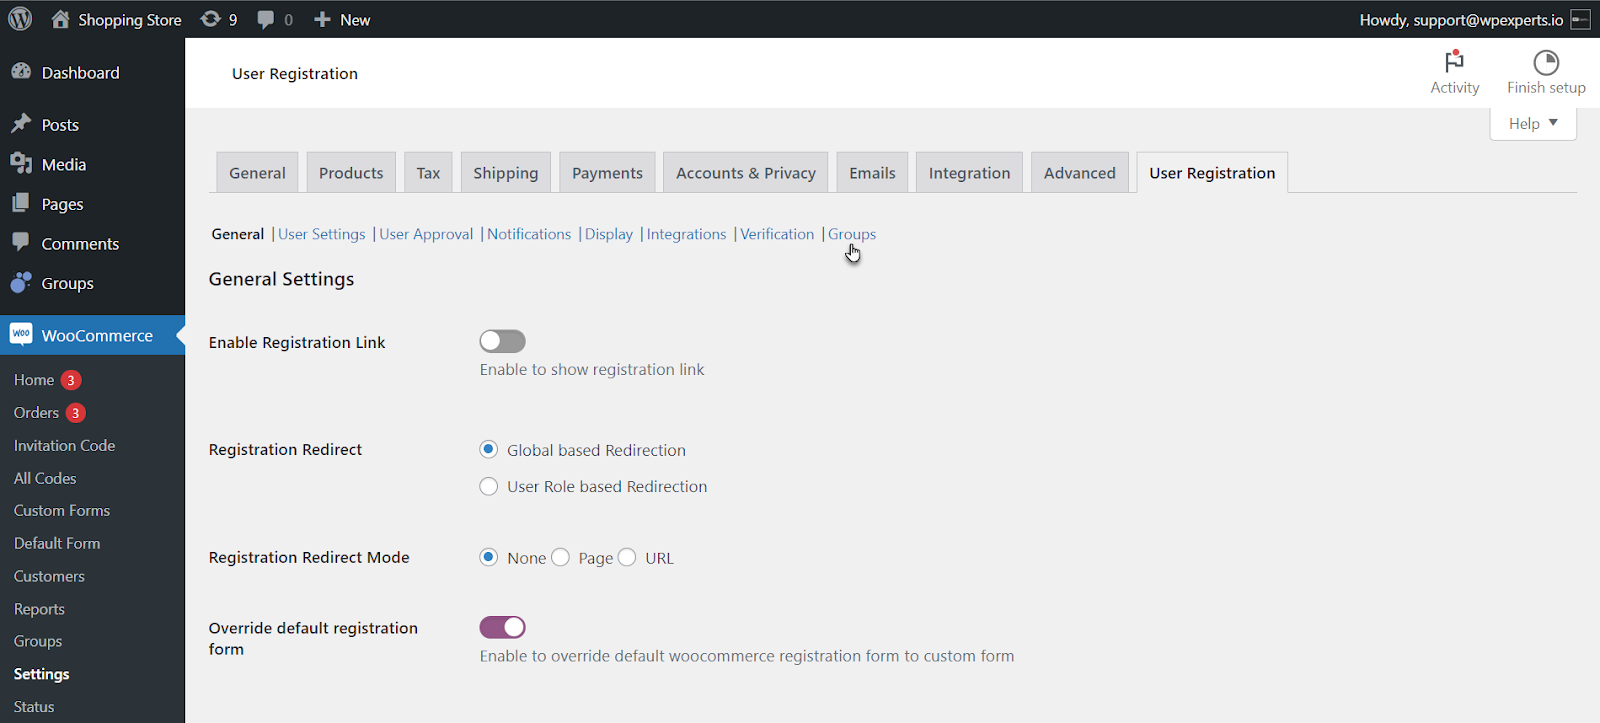
- Select and enable the Enable Groups toggle button.

- After enabling the toggle button, click the Include Groups multi-select dropdown and select your desired groups.

Note: The Include Groups option’s functionality relies on the Enable Groups toggle button. If the Enable Groups option is turned off, the Include Groups option will not be functional.
Front-End Impact
- The Select User Group dropdown option is visible on the Default Form page when the user is on the Default Registration form.

Note: The groups displayed in the front end above have already been created. For additional details and settings regarding group creation, please refer to the Groups for WooCommerce.
Custom Form
Back-End Settings
- Go to Admin Dashboard > WooCommerce > Custom Forms
- Admin can Add or Edit a Custom Form.

- Select and enable the Enable Groups toggle button.
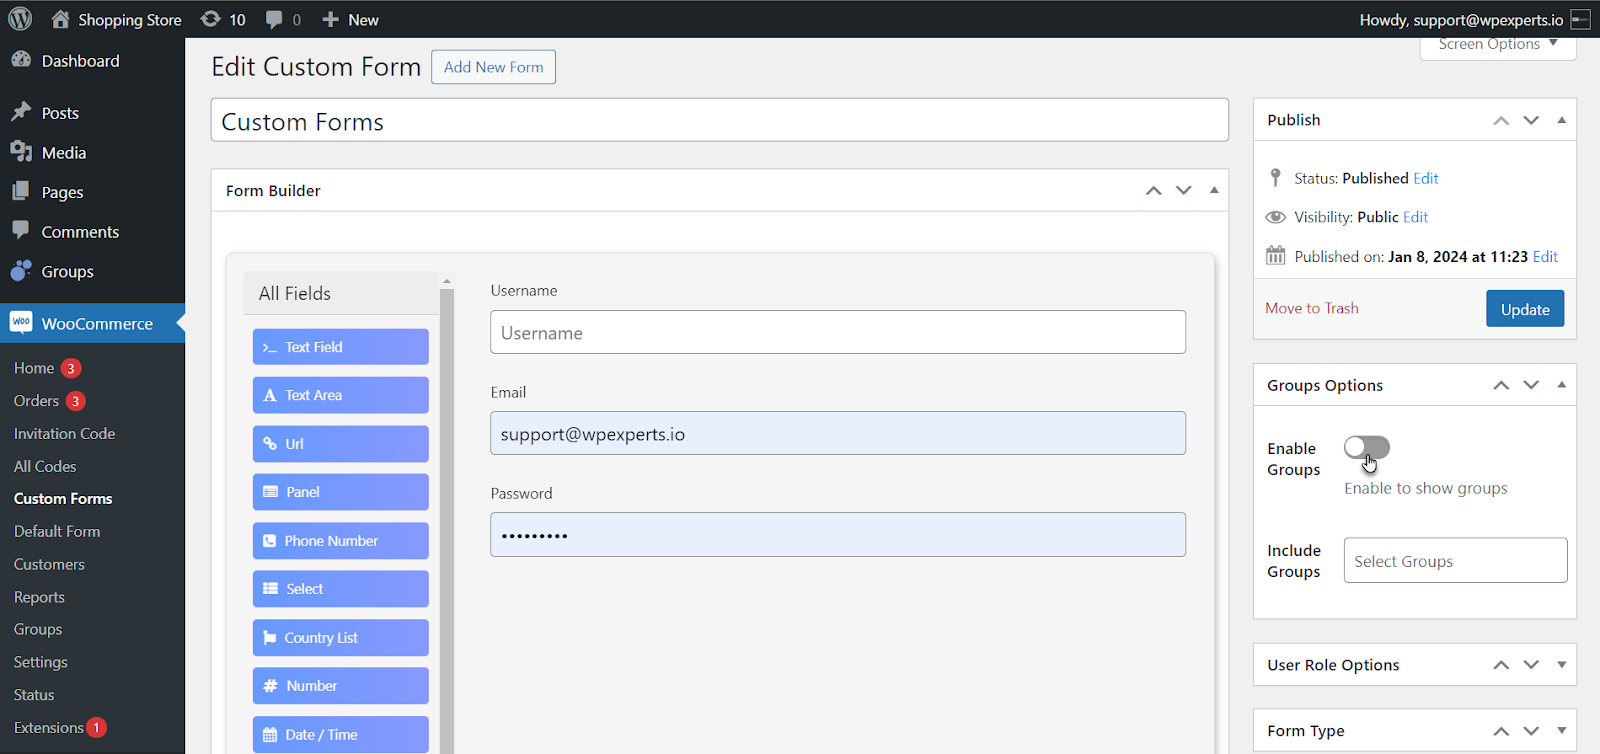
- After enabling the toggle button, click the Include Groups multi-select dropdown and select your desired groups.

Front-End Impact
- Go to the website.
- Navigate to the Custom Form page.
- The Select User Group dropdown option is visible on the Custom Form page when the user is on the Custom Registration Form.

Note: The groups displayed in the front end above have already been created. For additional details and settings regarding group creation, please refer to the Groups for WooCommerce.
Groups section under the Registration Requests.
↑ Back to top- During the registration process on the website, users are prompted to select a Group. This Group selection is visible to the admin in the Registration Request under the Groups section in the backend settings.
- Go to Admin Dashboard > Users > Requests.

- Now the admin is on the Registration Requests page in the back-end settings.
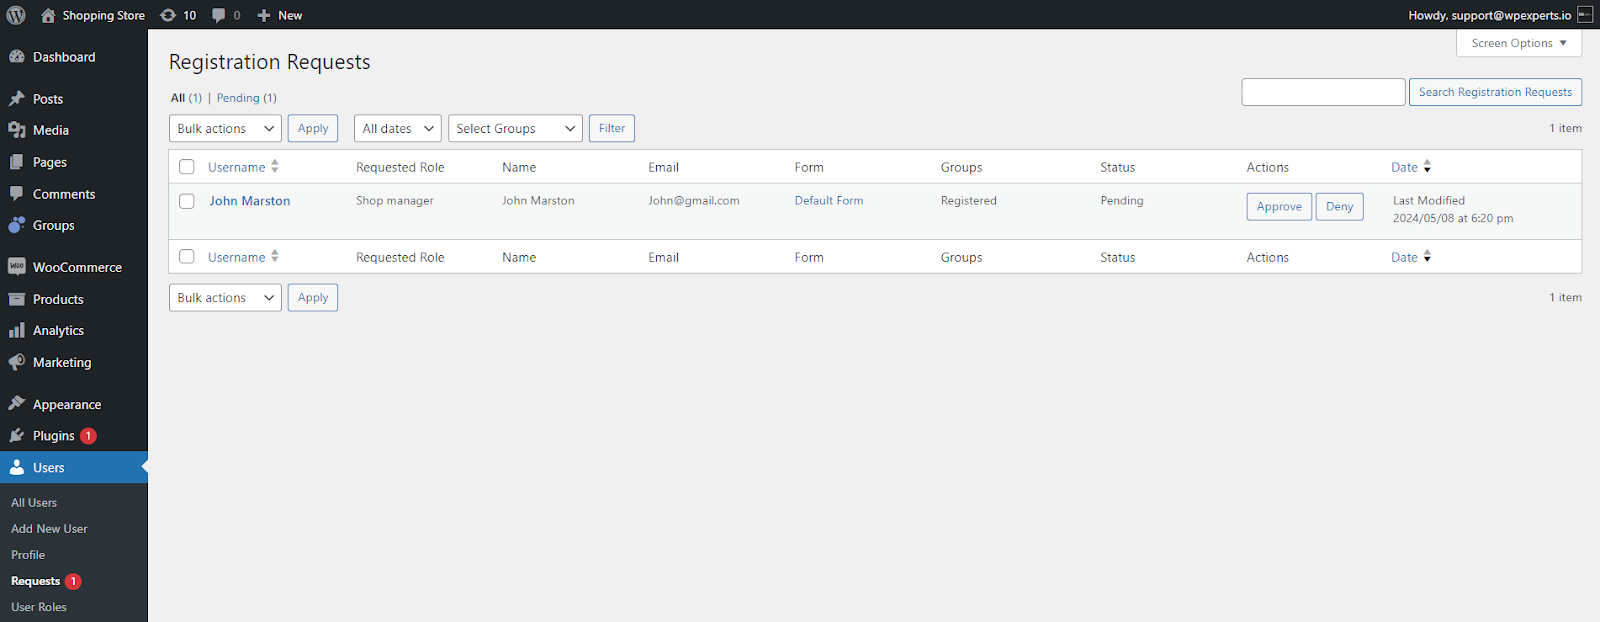
- As you can see, the Group selected by the user is visible on the front end under the Groups section.
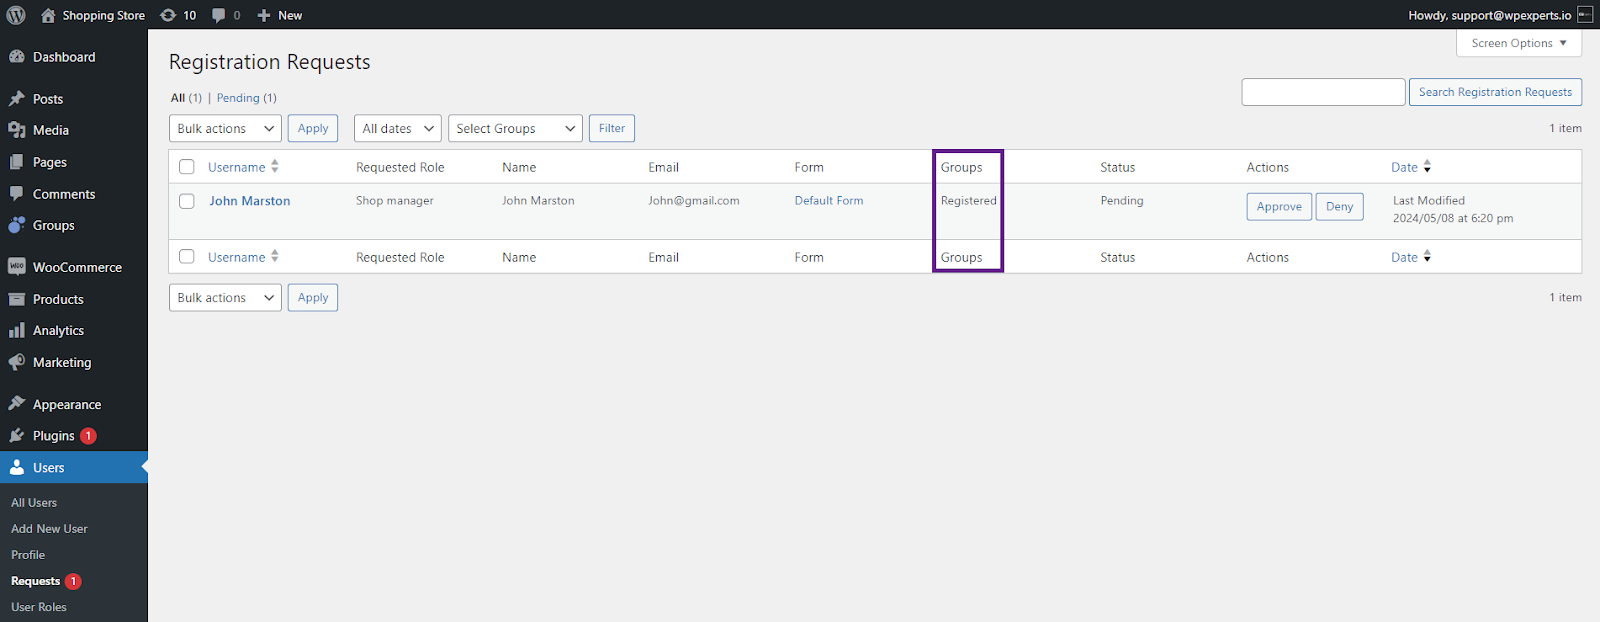
WooCommerce Memberships by SkyVerge
↑ Back to topInstallation of WooCommerce Memberships by SkyVerge
↑ Back to top- Download and install the WooCommerce Memberships (by SkyVerge).
- Follow the WooCommerce Memberships by SkyVerge documentation to set up and configure the plugin.
- To add a Membership Plan, navigate to the WordPress Admin Dashboard > WooCommerce > Memberships > Membership Plans > Add New Membership Plan.

- Follow the WooCommerce Membership documentation to add membership plans.

- Set Grant Access Upon option to User Account Registration and Publish the membership plan.

Default Form
- To enable the membership plan selection in the Default form, navigate to WordPress Admin Dashboard > WooCommerce > Settings > User Registration > Compatibility.
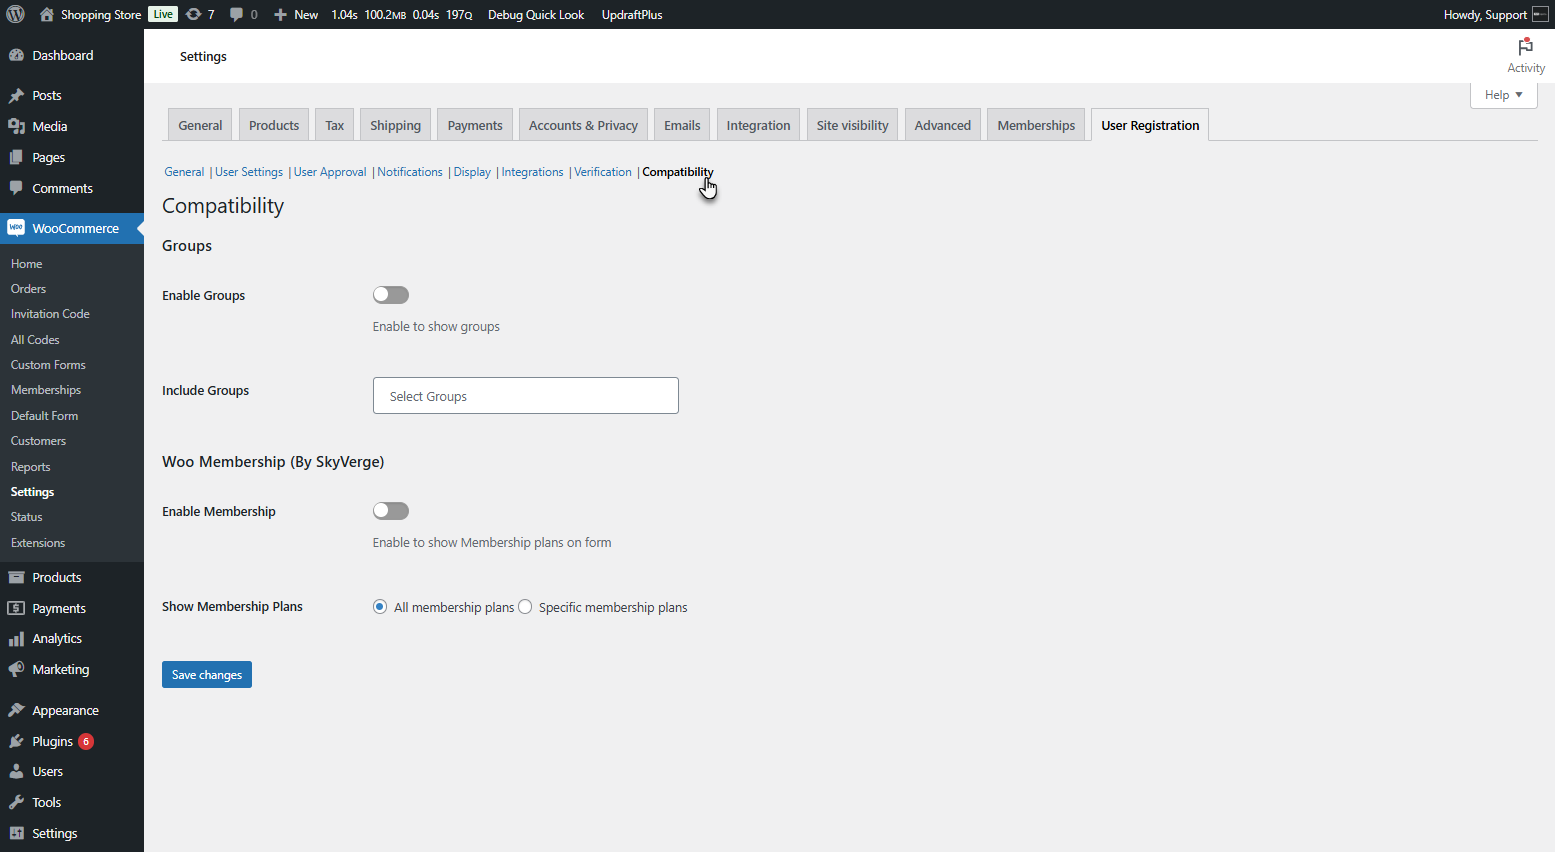
- Locate the Enable Membership toggle button and enable it.

- There are two ways to Show Membership Plans to the user.
- All Membership Plans: Displays all available membership plans in a dropdown on the form.

- Specific Membership Plans: This option adds a multi-selector to the settings, allowing the admin to choose which membership plans will be displayed to the user on the form.

- Click on the Save Changes button to update the settings.

Front End Impact
- Go to the Default User Registration page.
- When the admin selects All Membership Plans in the Show Membership Plans setting, a dropdown will display all available membership plans.

- If Specific Membership Plans is selected, a dropdown will appear showing only the membership plans specified by the admin.

Custom Form
- To enable Membership Plan Selection in a Custom Form, navigate to WordPress Admin Dashboard > WooCommerce > Custom Forms > Edit Custom Form.
- Locate the Membership Plans meta box on the side.

- Enable the toggle button to activate membership plans.

- There are two ways to display membership plans to users:
- All Membership Plans: Displays all available membership plans in a dropdown on the form.

- Specific Membership Plans: This option adds a multi-selector to the settings, allowing the admin to select specific membership plans to display on the form.
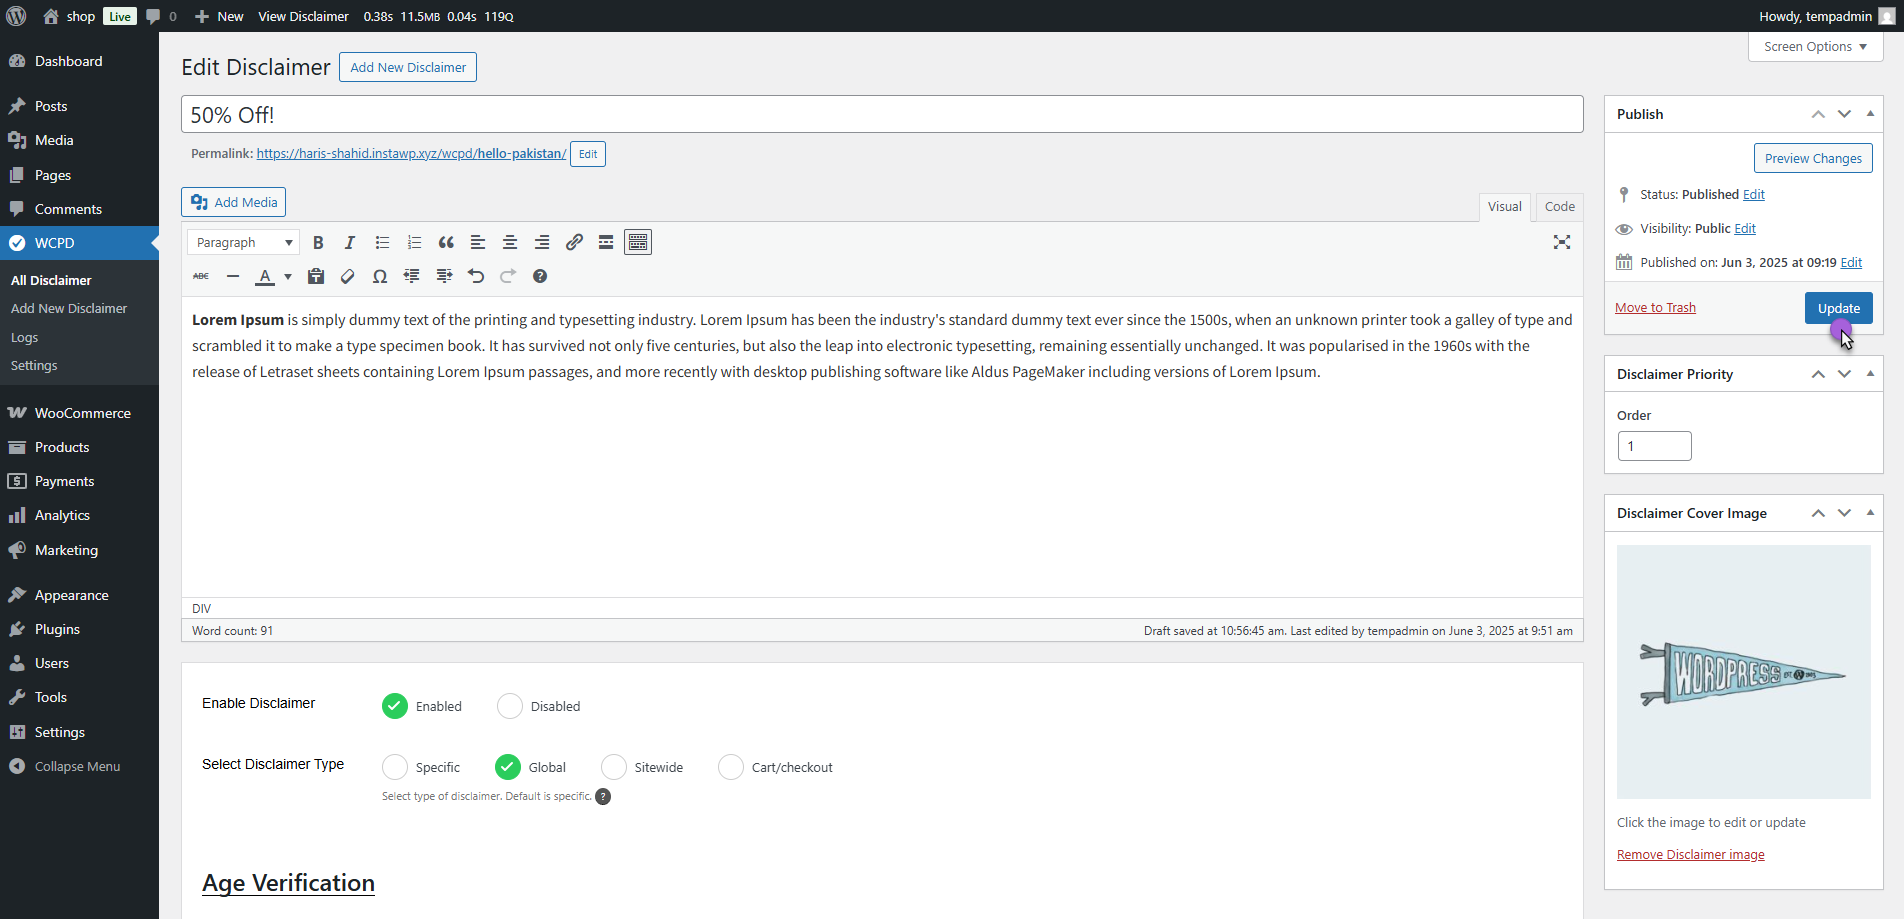
- Click the Update button to save the changes.

Front End Impact
- Go to the Custom User Registration page.
- When the admin selects All Membership Plans in the Show Membership Plans setting, a dropdown will display all available membership plans.
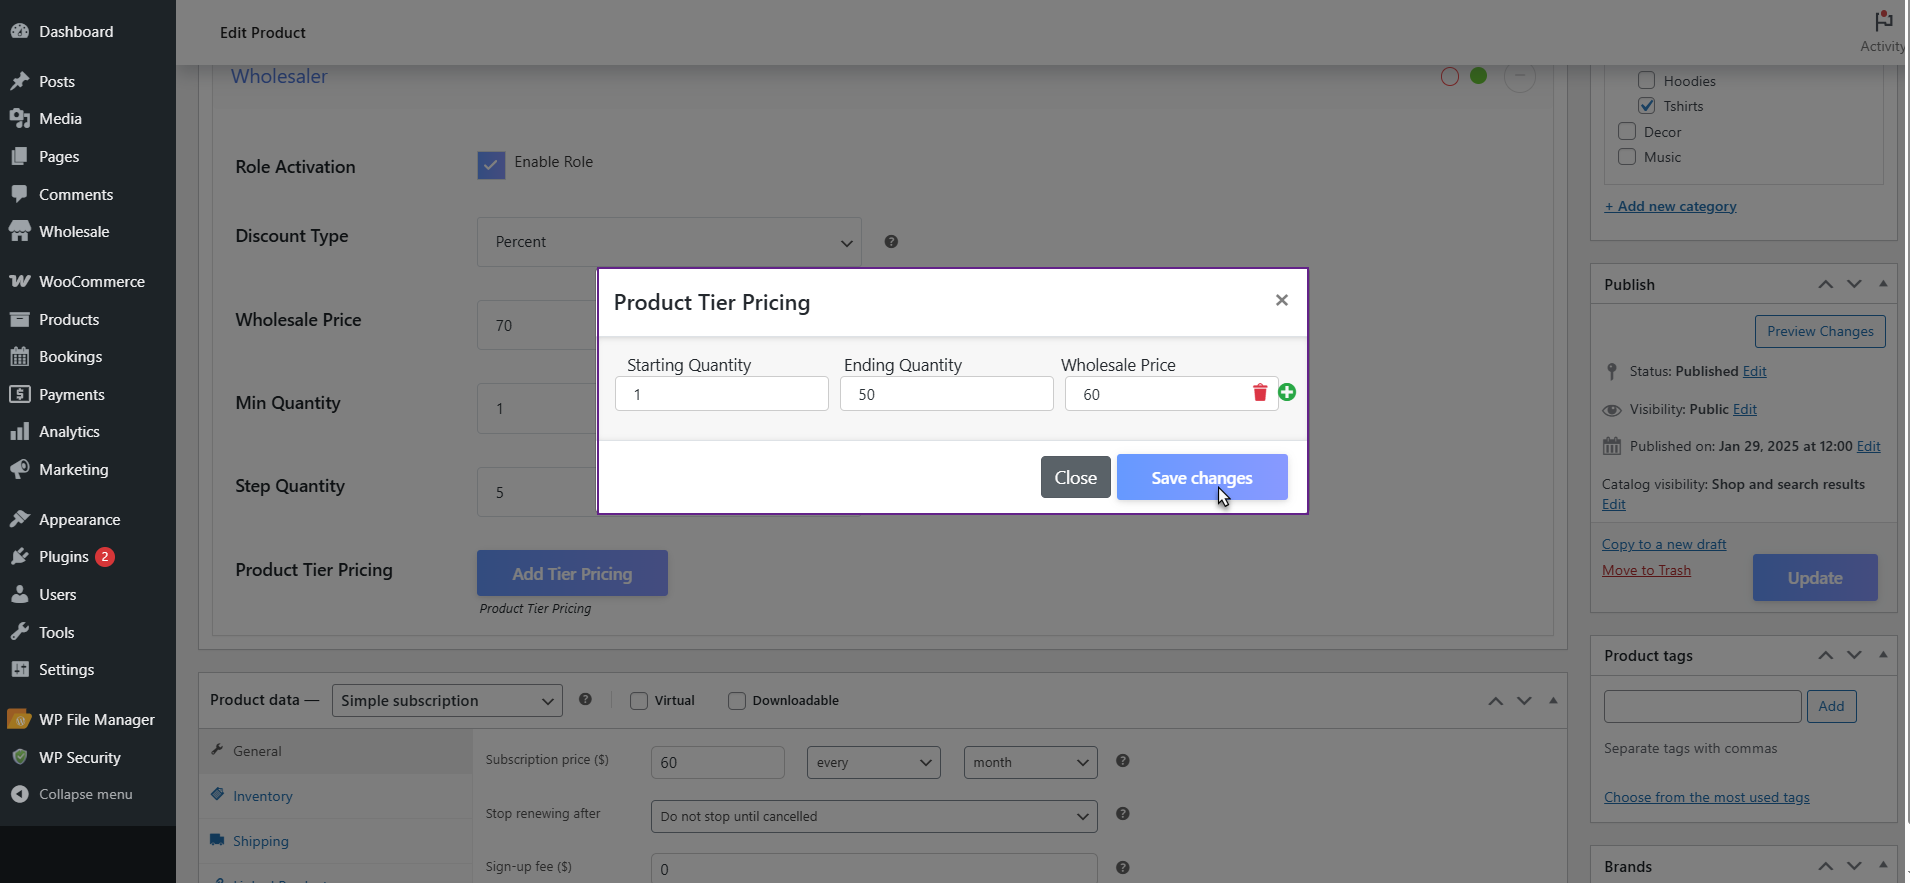
- If Specific Membership Plans is selected, a dropdown will appear showing only the membership plans specified by the admin.

- After selecting the Plan, the user will be listed in the WordPress Admin Dashboard > WooCommerce > Membership > Members List.

PLEASE NOTE: Both users who registered through the Custom or Default registration form and selected a Membership Plan will be listed here.
Compatibility with Wholesale For WooCommerce
↑ Back to top- Download the Wholesale For WooCommerce plugin by clicking here.
- Install the plugin and activate it.
- For further plugin settings and information, please visit Wholesale For WooCommerce.
Enable Advanced Registration
↑ Back to topBack-End Settings
- Go to Wholesale > Settings > General

- Navigate to the Advanced Registration Form Toggle.

- Now, click the toggle to enable it, then confirm the action in the pop-up that appears.
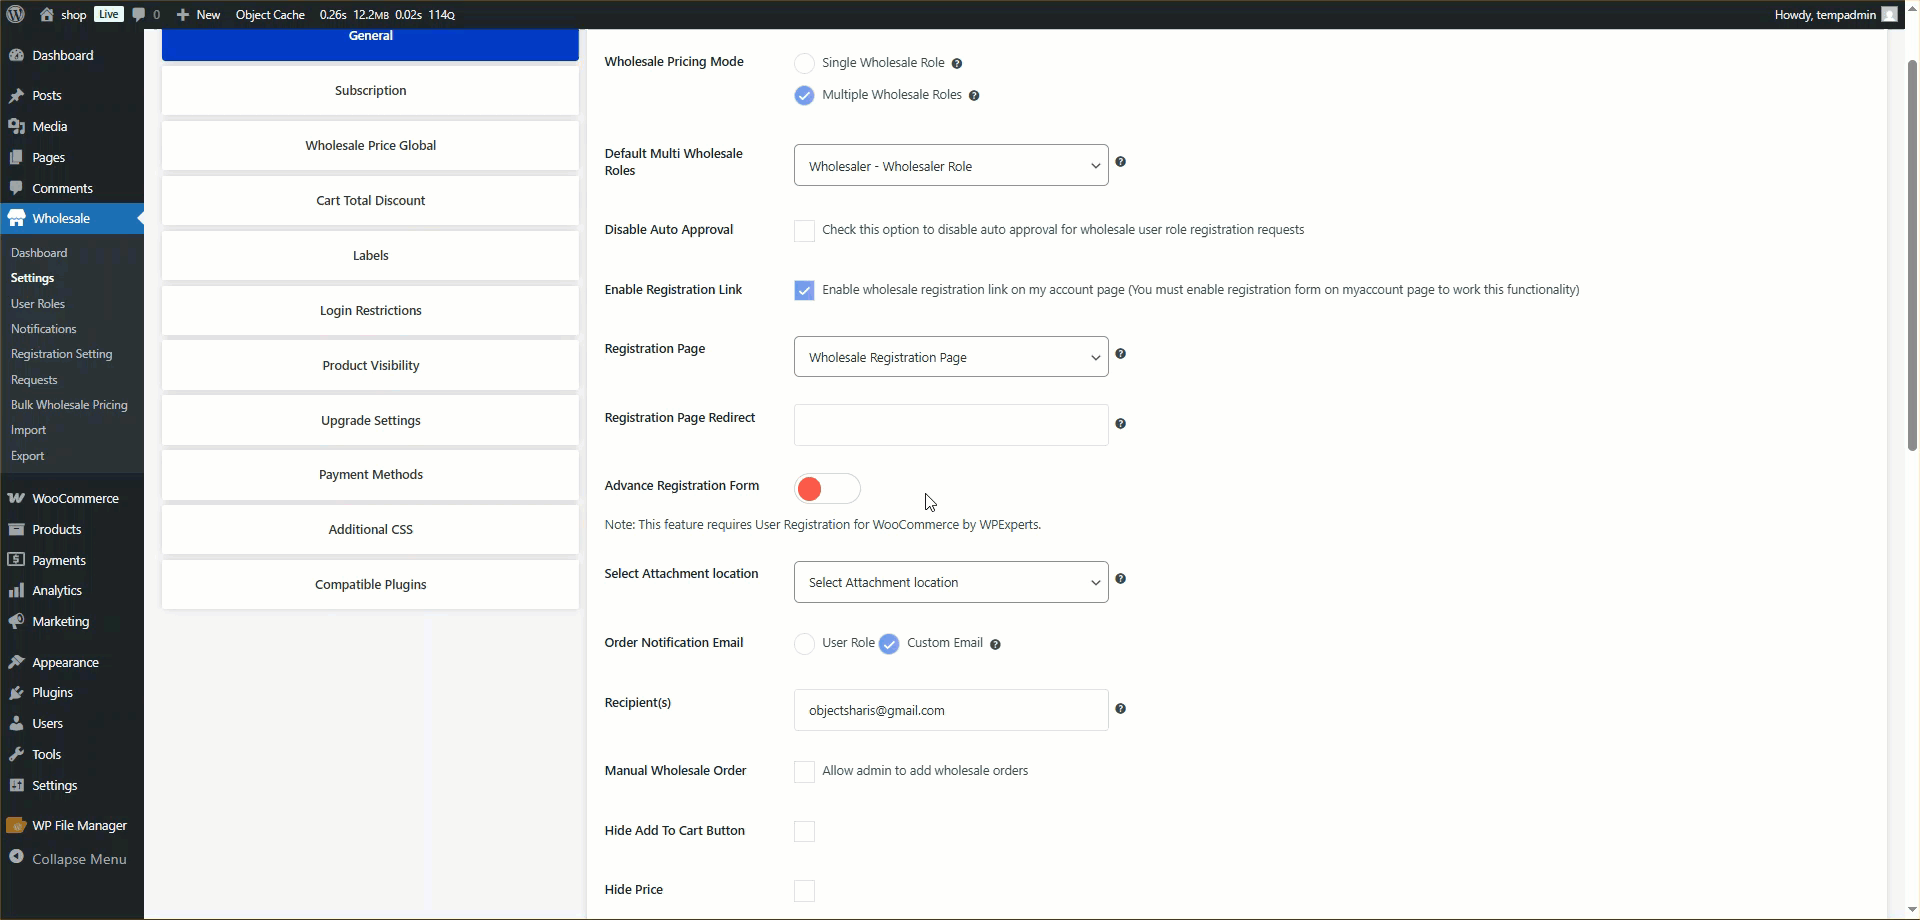
- Click Allow to proceed with the following changes:
- Disable the Default Wholesale Registration Form
- This will turn off the built-in registration form provided by the Wholesale for WooCommerce plugin. Users will no longer be able to register as wholesalers through that form. Instead, all registrations will be handled through the User Registration plugin’s forms.
- Disable Wholesale Notifications
- All email notifications related to wholesale registration — such as request submissions, approvals, or rejections — will be deactivated. The system will now use the User Registration plugin’s notification system to handle these emails.
- Disable Wholesale User Request Section
- The section in the Wholesale plugin that shows pending user registration requests will be hidden. All new user requests, including wholesaler registrations, will appear under the User Registration > Requests section for admin review and approval.

Note: Once enabled, all Wholesale user registrations will be handled by the User Registration plugin.
Custom Registration Form
↑ Back to top- Navigate to: WooCommerce > Custom Forms

- Click an existing form to edit, or click Add New Form to create a new custom registration form.

- On the right-hand side of the form editor, locate the User Role settings panel.

- In the User Role dropdown, you will see a list of available user roles.
- Select one or more Wholesale roles that you want to assign to users registering through this form.
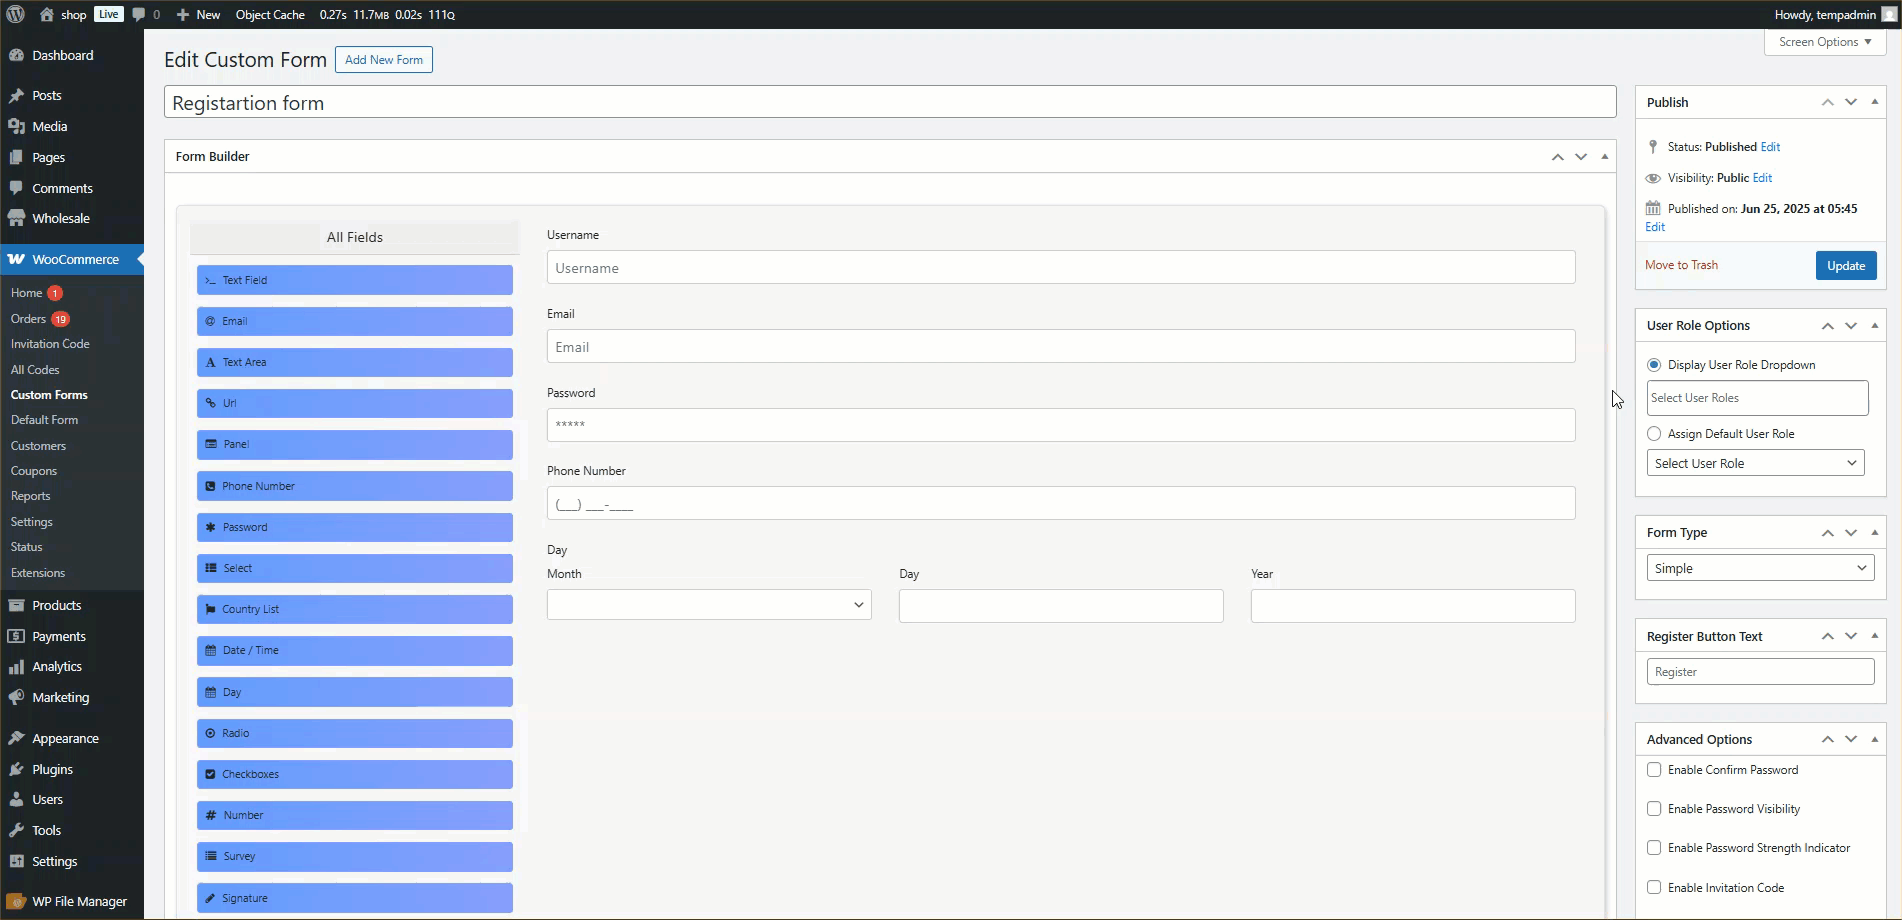
- Once the roles are selected, click the Update button to save the form settings.

Note: Users who register using this custom form will automatically be assigned the selected Wholesale role(s), and their registration will be handled by the User Registration plugin — not by the default Wholesale registration system.
Front-End Impact ( Custom Registration Form)
- Go to the website.
- Navigate to the Custom Registration Form page where the form is displayed (using shortcode).

- The User Role dropdown (labeled as Select User Role) is visible on the form if enabled in the backend settings.

- The drop-down displays all available roles, including any selected Wholesale roles that the admin configured in the Custom Form settings.

- Now, click the Register button.

Registration Requests
↑ Back to top- After a user completes the registration form and selects a Wholesale role, their request is submitted.
- To view the request, navigate to: Admin Dashboard > Users > Requests.

- On the Registration Requests page, the selected Wholesale role is clearly shown under the User Role column.

Default Registration Form
↑ Back to top- Go to: WooCommerce > Settings > User Registration > User Settings.

- Locate the setting: Enable Default User Role.
- Toggle this option to Enabled.

- In the User Role dropdown, select the desired Wholesale role you want to assign by default to users who register using the form.
- Click Save Changes to apply the settings.
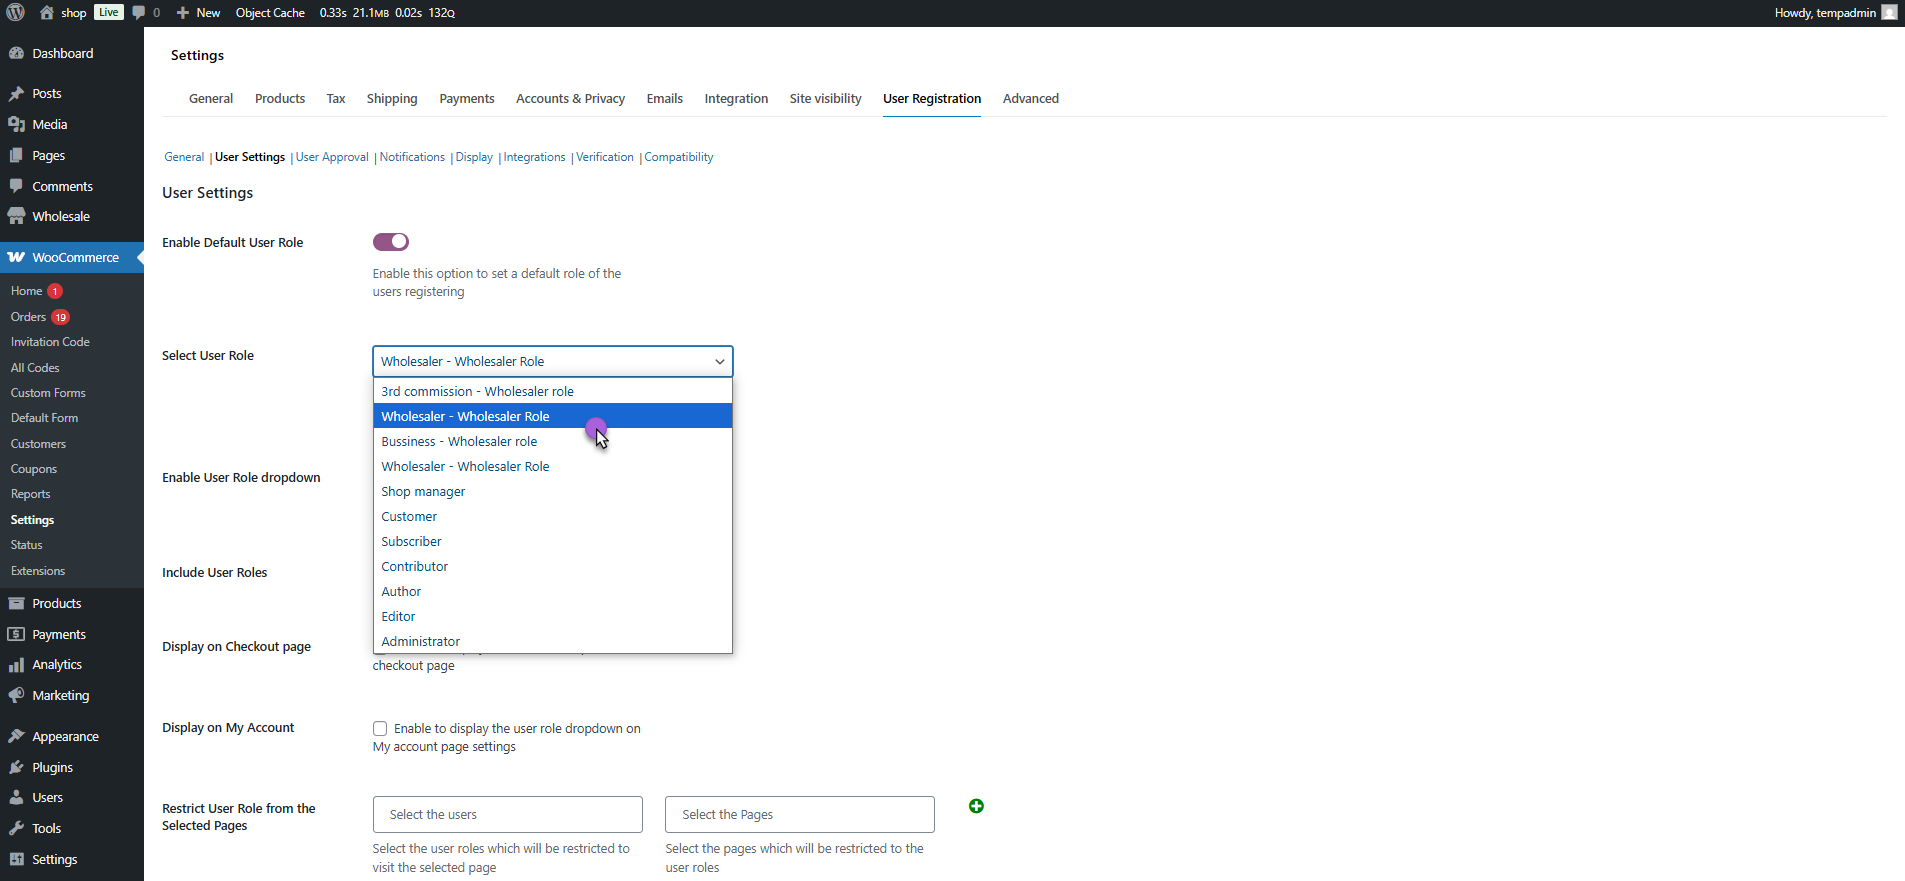
- Locate the setting: Enable User Role Dropdown.
- Toggle this option to Enabled.

- In the User Role dropdown, you will see a list of available user roles.
- Select one or more Wholesale roles that you want to assign to users registering through the form.
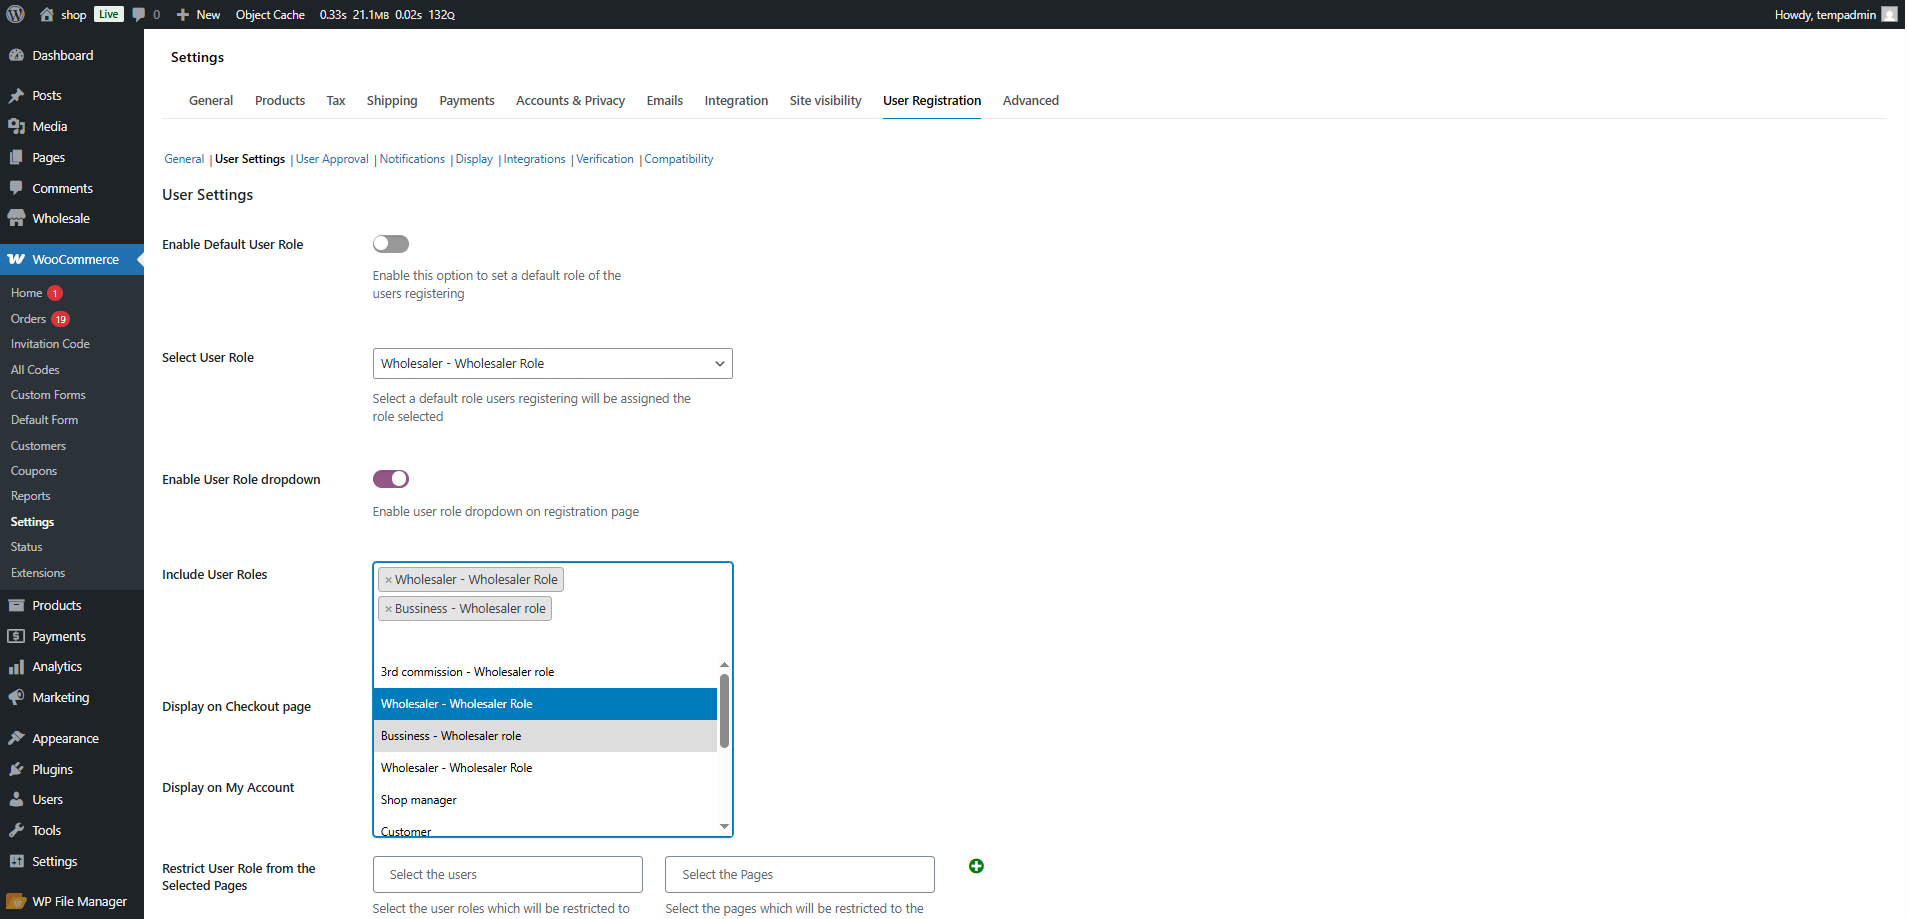
- Once the roles are selected, click the Save Changes button to save the settings.
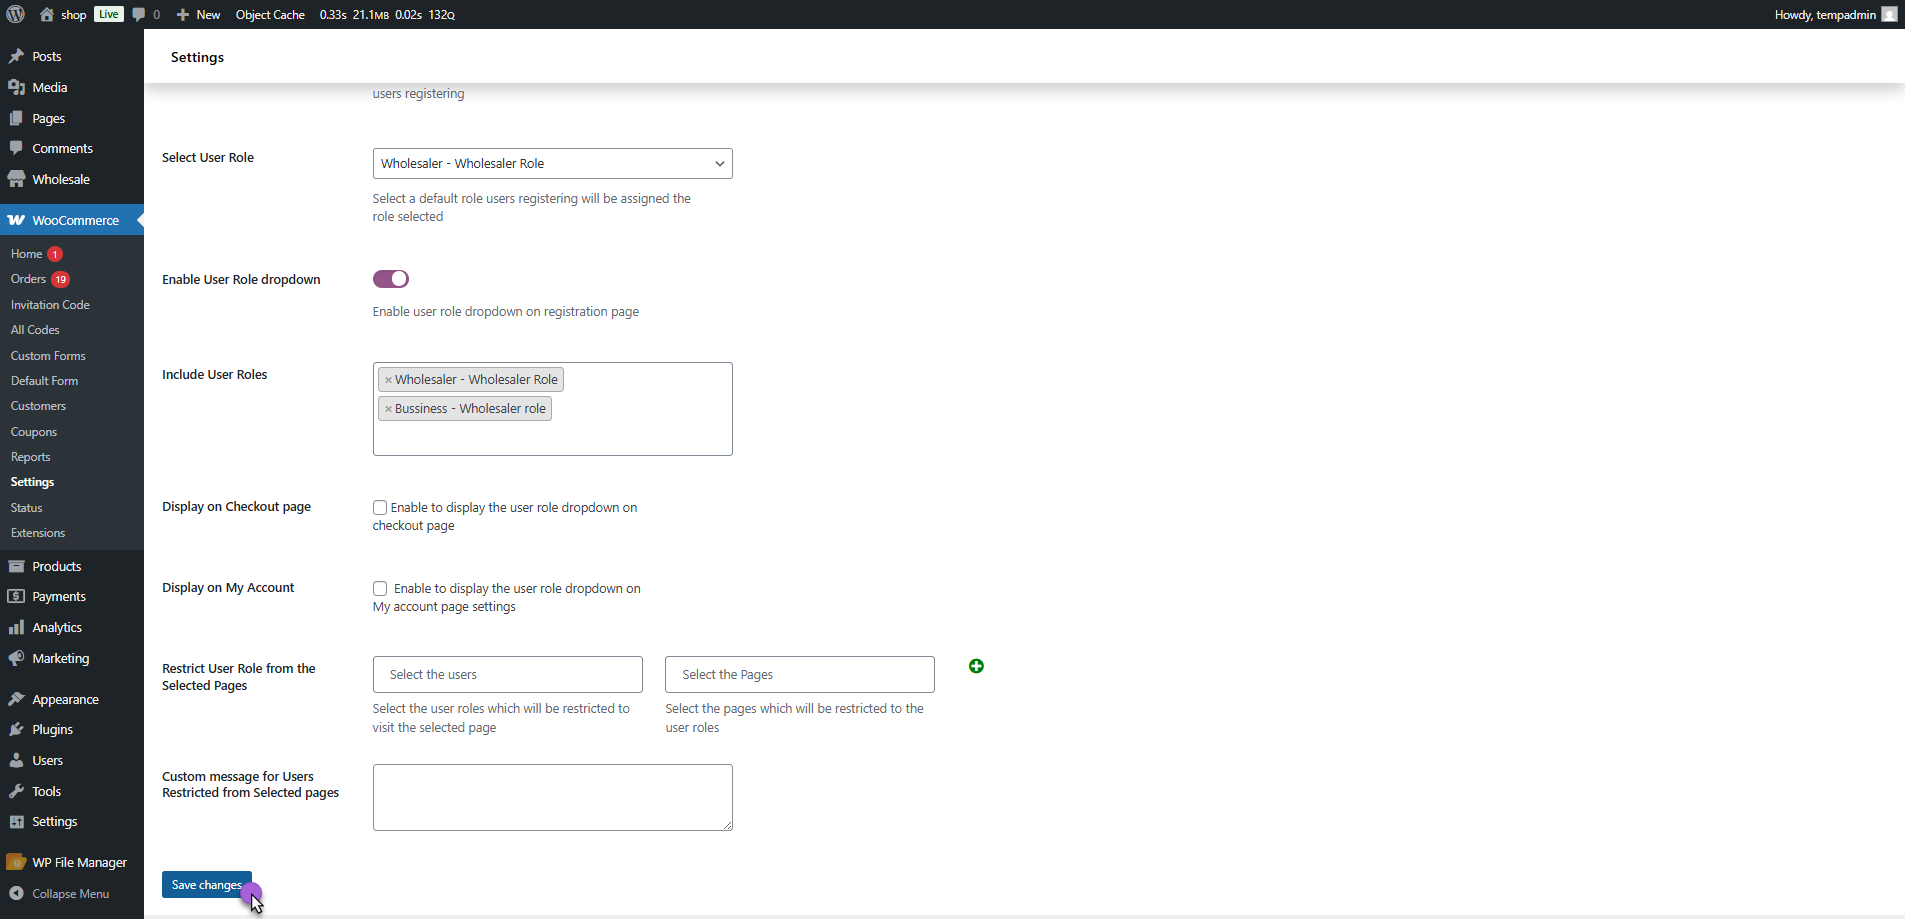
Front-End Impact ( Default Registration Form)
- Go to the website.
- Navigate to the Default Registration Form page where the form is displayed (using shortcode).

- The User Role dropdown (labeled as Select User Role) is visible on the form if enabled in the backend settings..

- The drop-down displays all available roles, including any selected Wholesale roles that the admin configured in the Custom Form settings.

- Now, click the Register button.

- On the Registration Requests page, the selected Wholesale role is clearly shown under the User Role column.

Integration
↑ Back to topWhatsApp Integration (Twilio)
↑ Back to top- Log in to your Twilio account and add a new sender following the Twilio documentation for WhatsApp integration via Twilio.

- Create a Content Template Builder following the Twilio documentation.
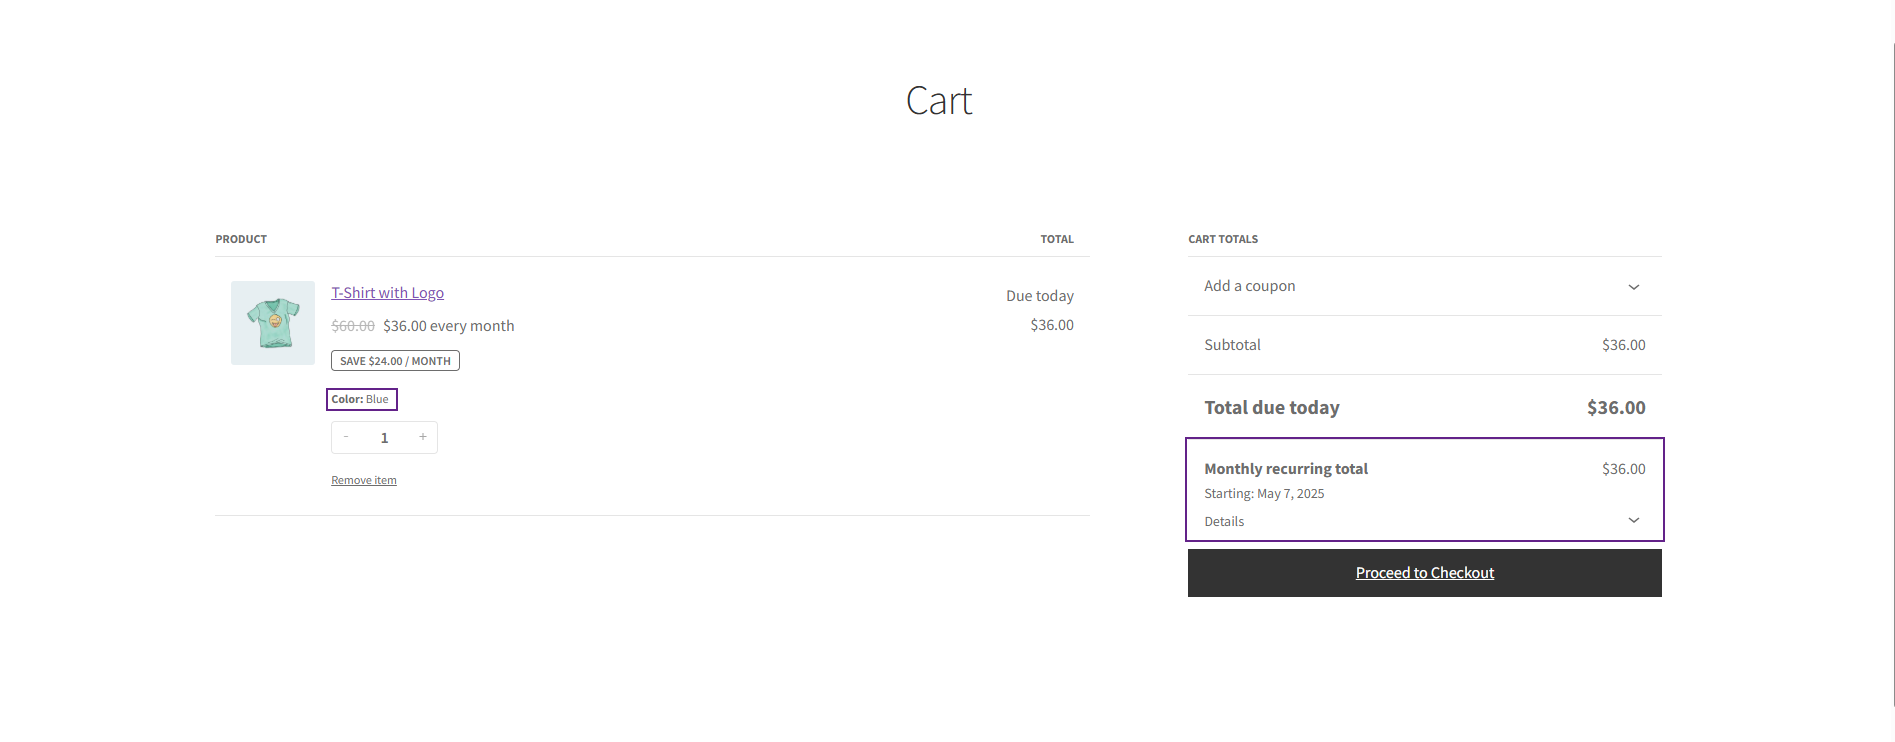
- Once the sender is added and the template is created, copy the Account SID and Auth Token from the Account Dashboard in Twilio for configuration with the plugin.
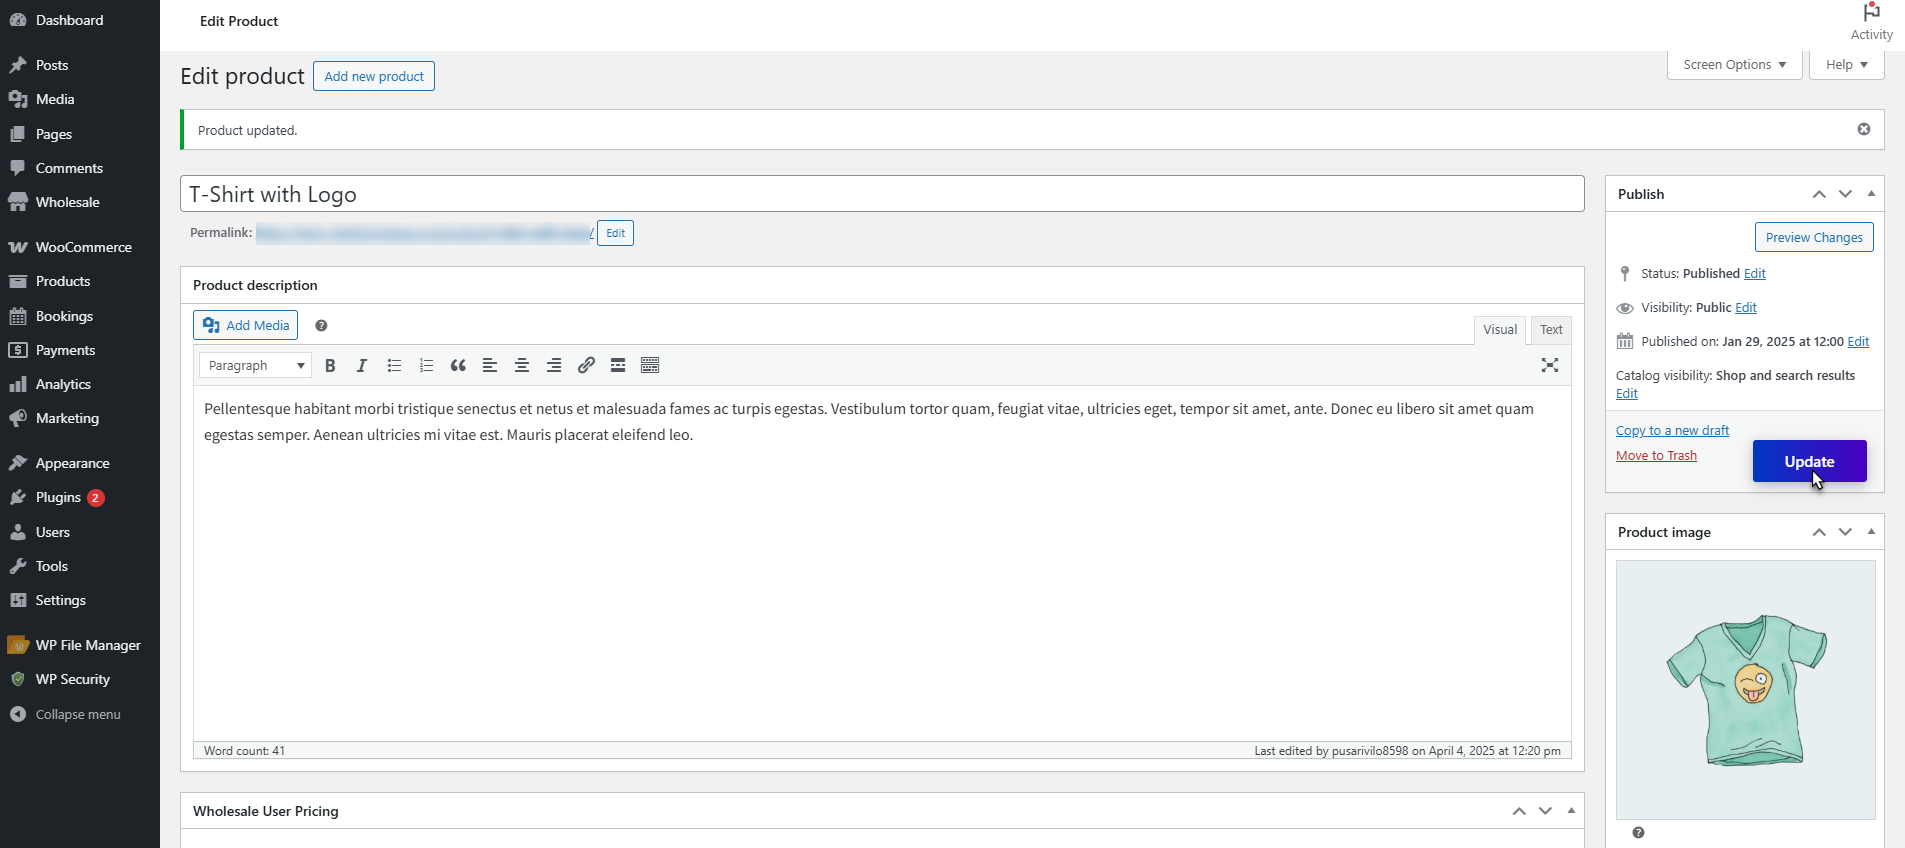
- Navigate to WordPress Admin Dashboard > WooCommerce > Settings > User Registration > Integrations > WhatsApp Settings.

- Enable the WhatsApp option and enter the Twilio Access Token, Twilio SID, and WhatsApp sender number, along with the message and, if necessary, an error message if needed.
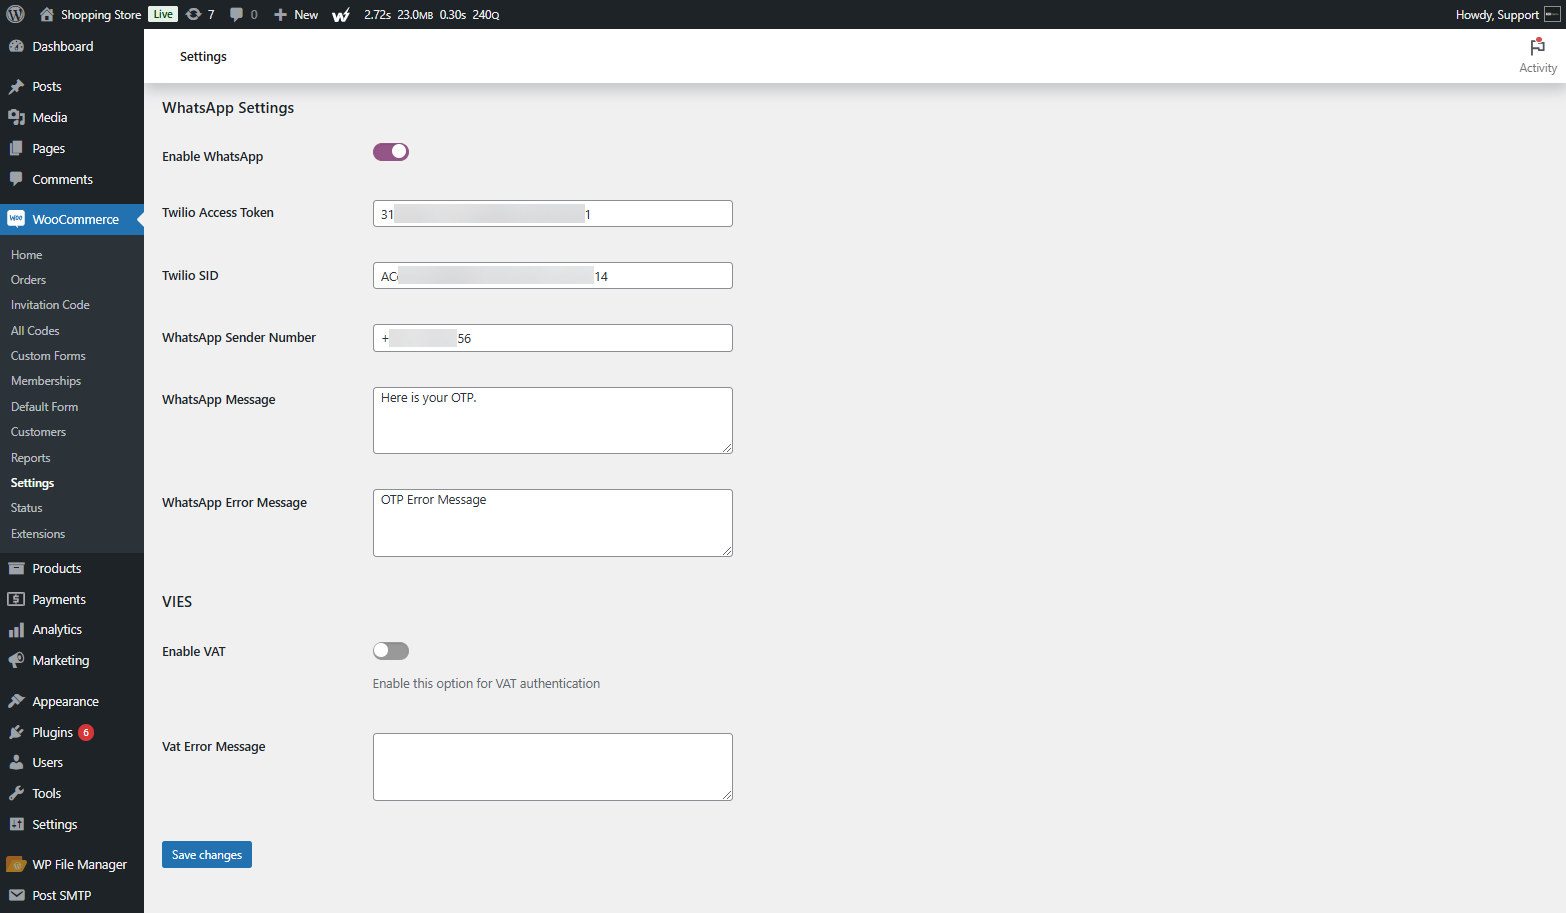
- Click on the Save Changes button to update the settings.

Front End Impact
Default Form
- Go to the Default User Registration form page and fill in the required details.
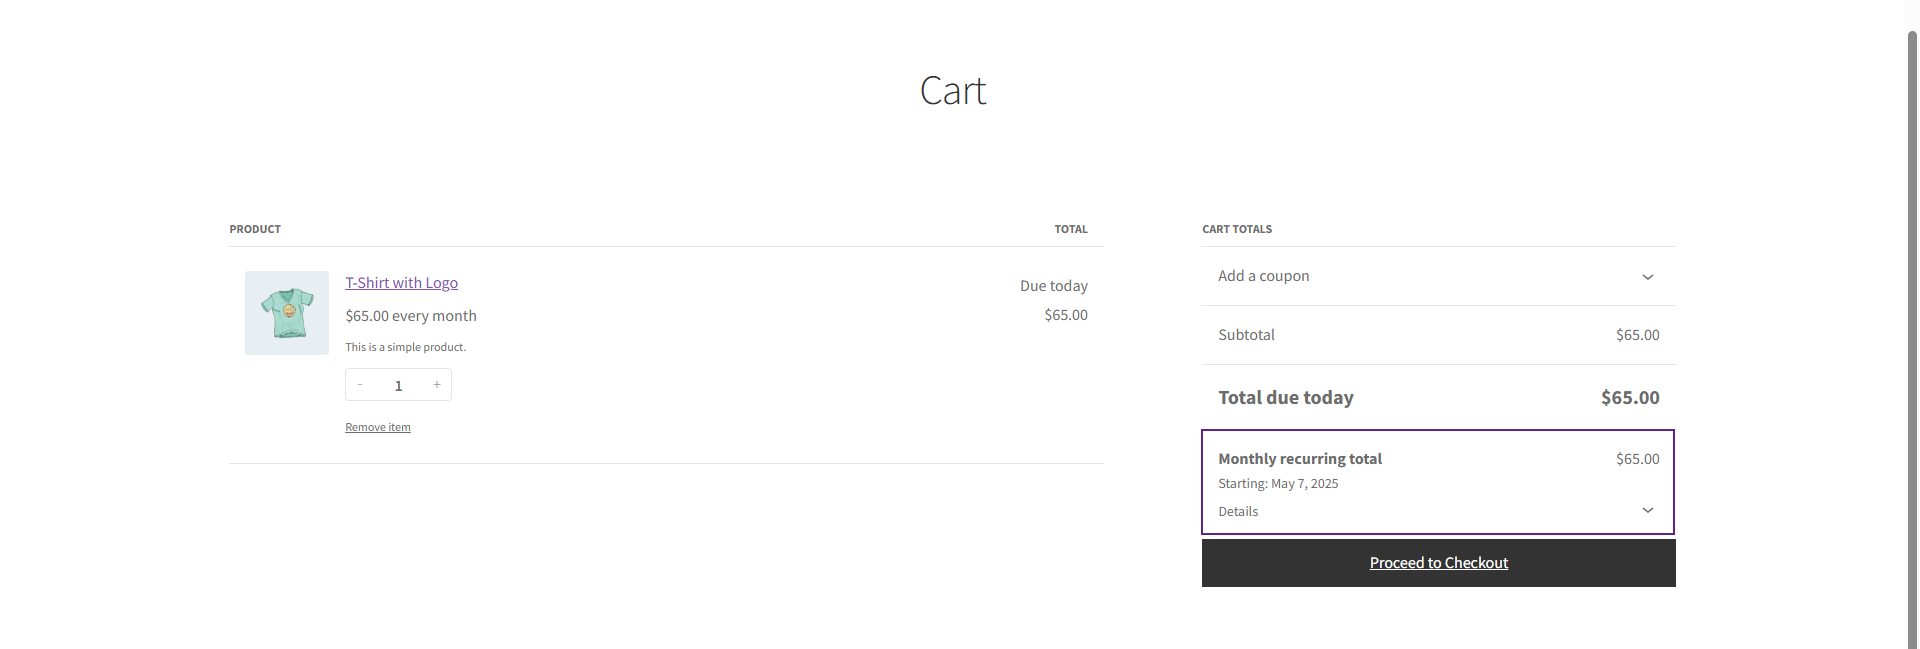
- Below the Phone Number field, a Get Code button with a WhatsApp logo will appear.

- Enter the phone number and click Get Code to receive a message on WhatsApp.

- The code will be sent to the provided WhatsApp number.

- Enter the received code in the Verify Code From WhatsApp field and click Submit to proceed.

- The user will be registered.
Custom Form
- Navigate to WordPress Admin Dashboard > WooCommerce > Custom Form > Edit Custom Form.
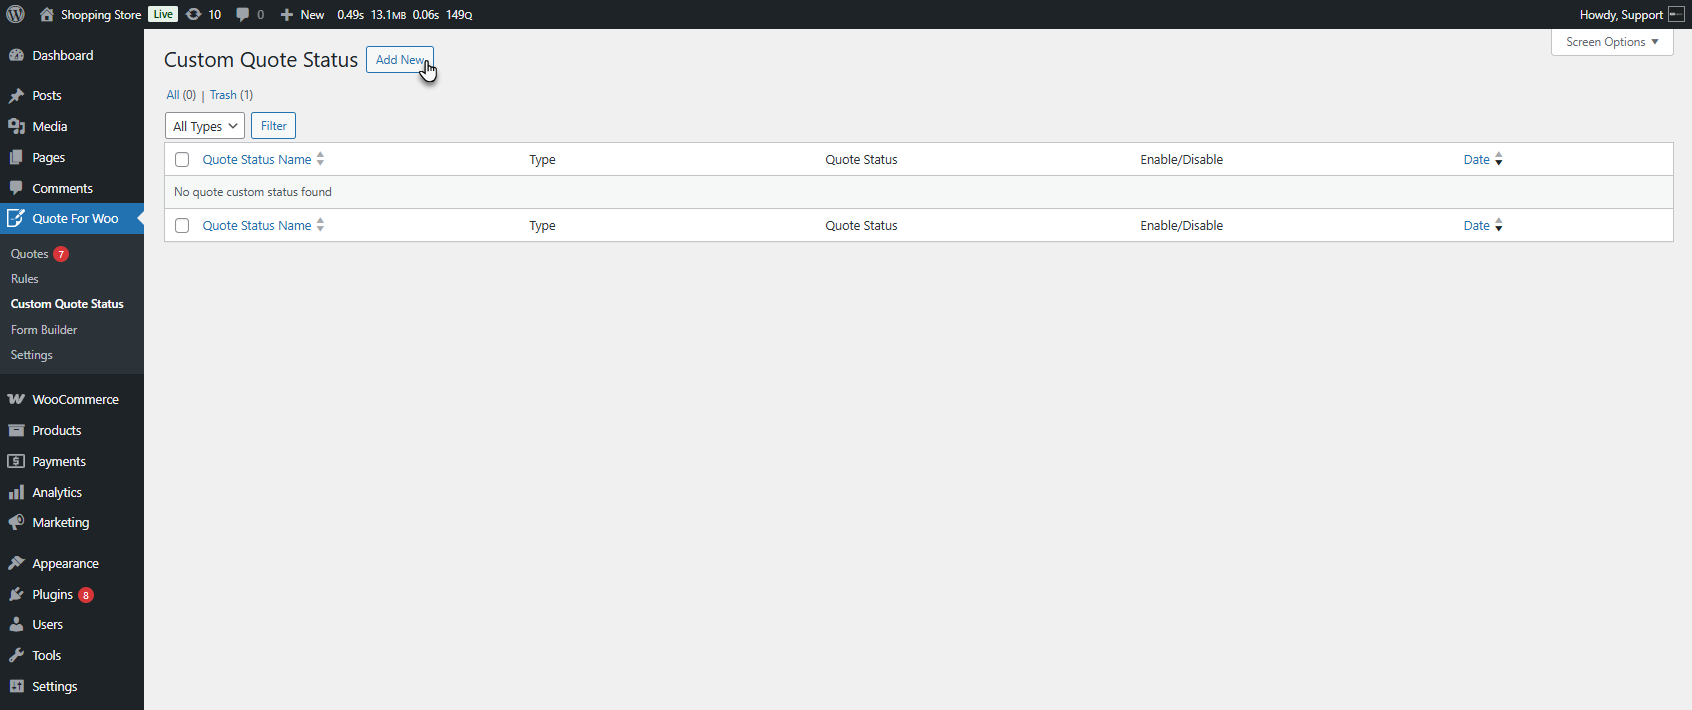
- Locate the Enable WhatsApp Verification option in the Advanced Options and enable it.
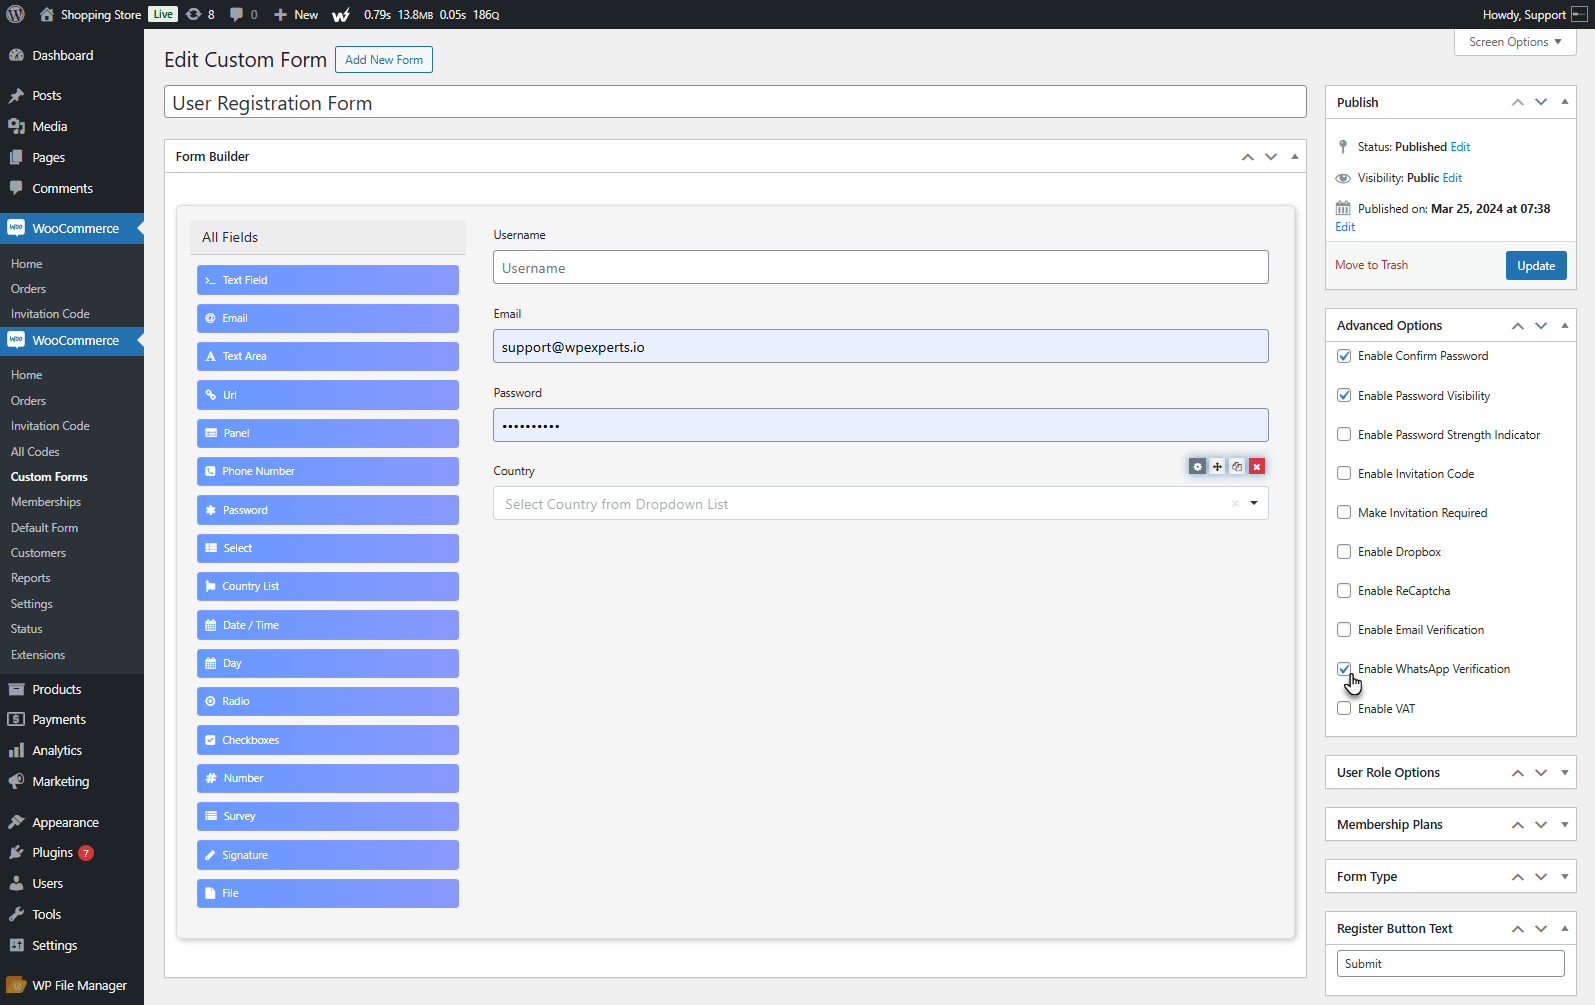
- Click on the Update button to save the changes.
- Go to the Custom User Registration form page and fill in the required details.
- Below the Phone Number field, a Get Code button with a WhatsApp logo will appear.
- Enter the phone number and click Get Code to receive a message on WhatsApp.

- The code will be sent to the provided WhatsApp number.

- Enter the received code in the Verify Code From WhatsApp field and click Submit to proceed.

- The user will be registered.

Firebase Authentication Integration
↑ Back to top- Log in to your Firebase account and navigate to the Firebase Console.
- Create a new project following the Firebase Console Documentation.
- Once the project is created, copy the required credentials for integration with User Registration.
- Navigate to WordPress Admin Dashboard > WooCommerce > Settings > User Registration > Integrations.

- Select the Firebase option in the Get SMS by option.
- Enable Firebase Authentication by clicking on the Enable Firebase Authentication toggle button.

- Enter the API Key, Auth Domain, Project ID, Storage Bucket, Messaging Sender ID, and App ID.
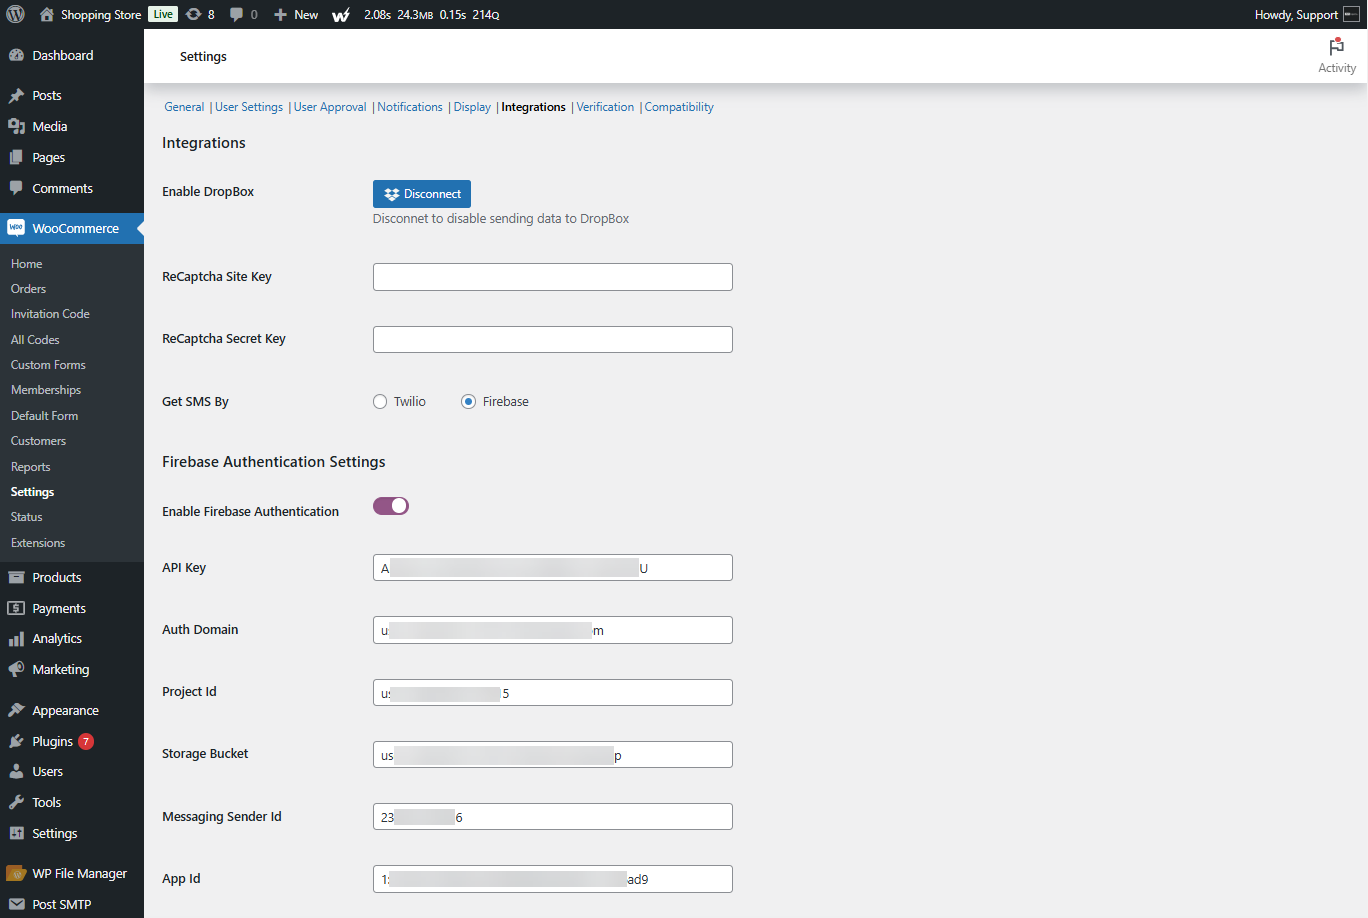
- Click on the Save Changes button to save the settings.

Front End Impact
Default Form
- Go to the Default User Registration form page and fill in the required details.

- Enter the phone number and click Get Code to receive a code in a text message.

- The code will be sent to the provided number.

- Enter the received code in the Verify Code From SMS field and click Submit to proceed.

- The user will be registered.

Custom Form
- Navigate to WordPress Admin Dashboard > WooCommerce > Custom Form > Edit Custom Form.
- Locate the Enable Firebase Authentication option in the Advanced Options and enable it.

- Click on the Update button to save the changes.

- Go to the Custom User Registration form page and fill in the required details.
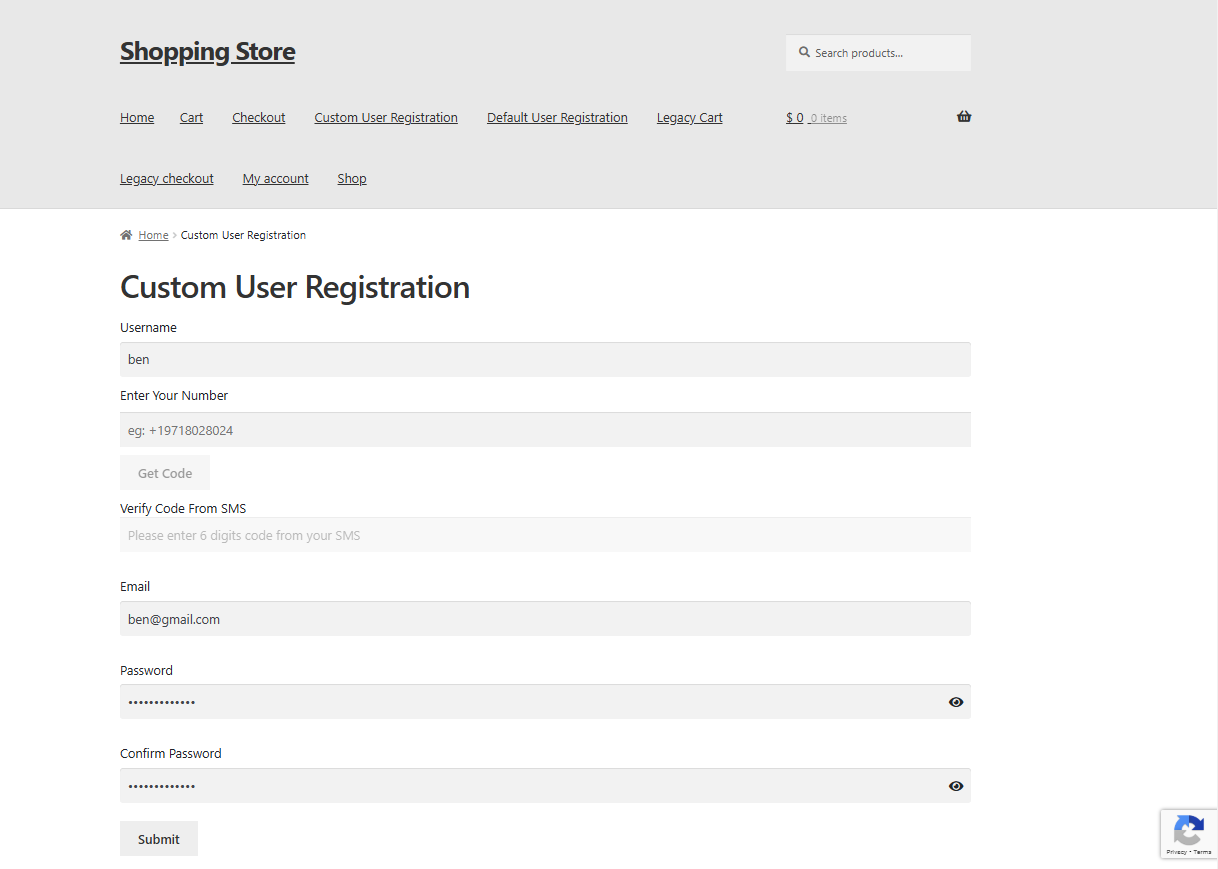
- Enter the phone number and click Get Code to receive a code in a text message.
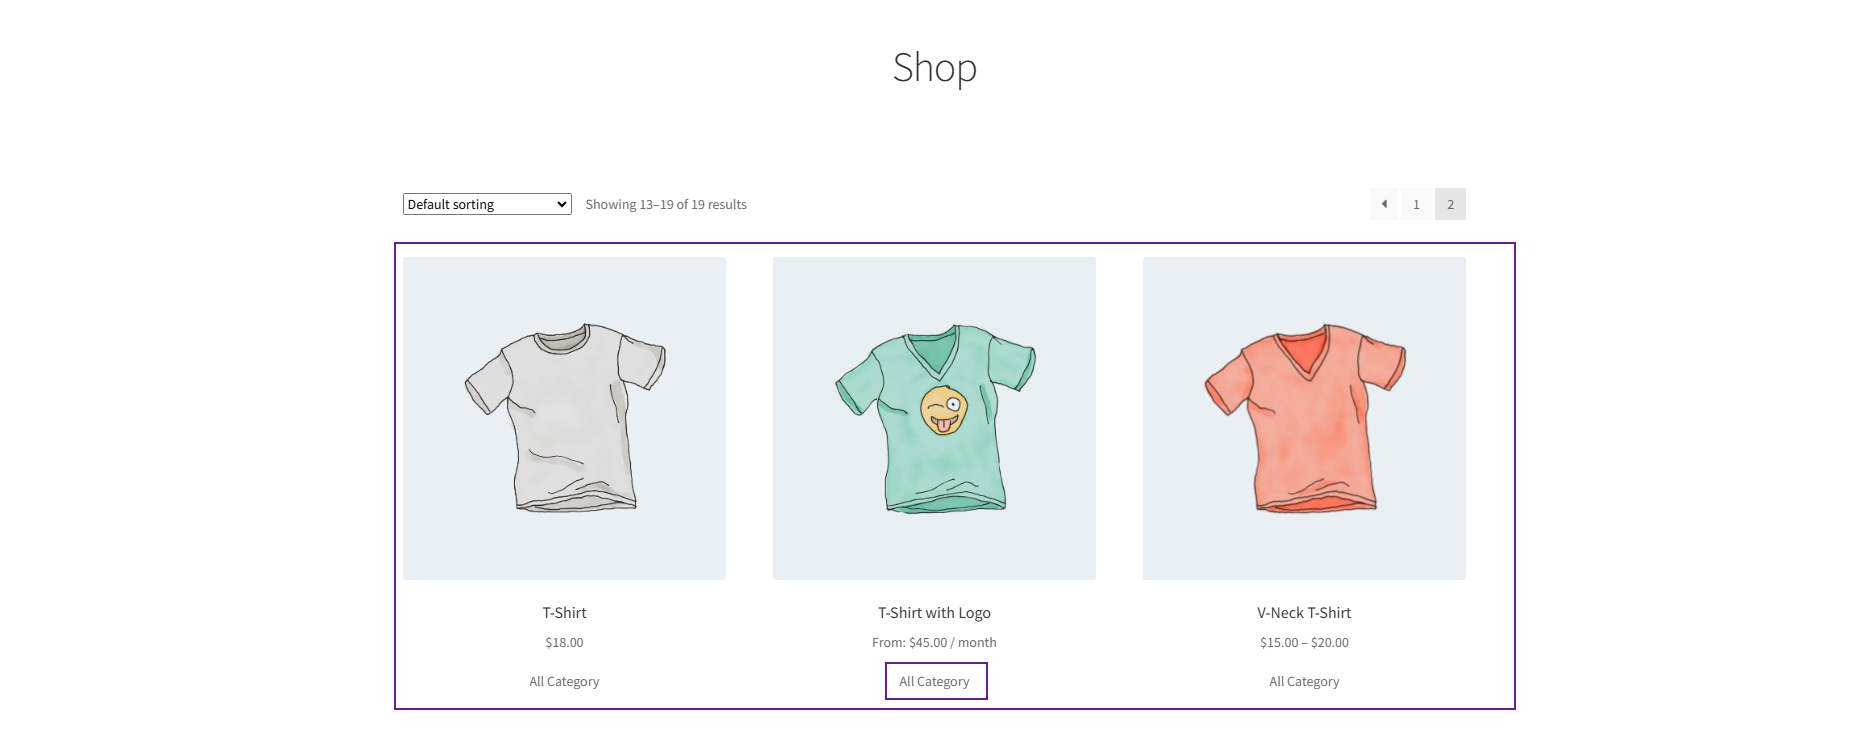
- The code will be sent to the provided number.
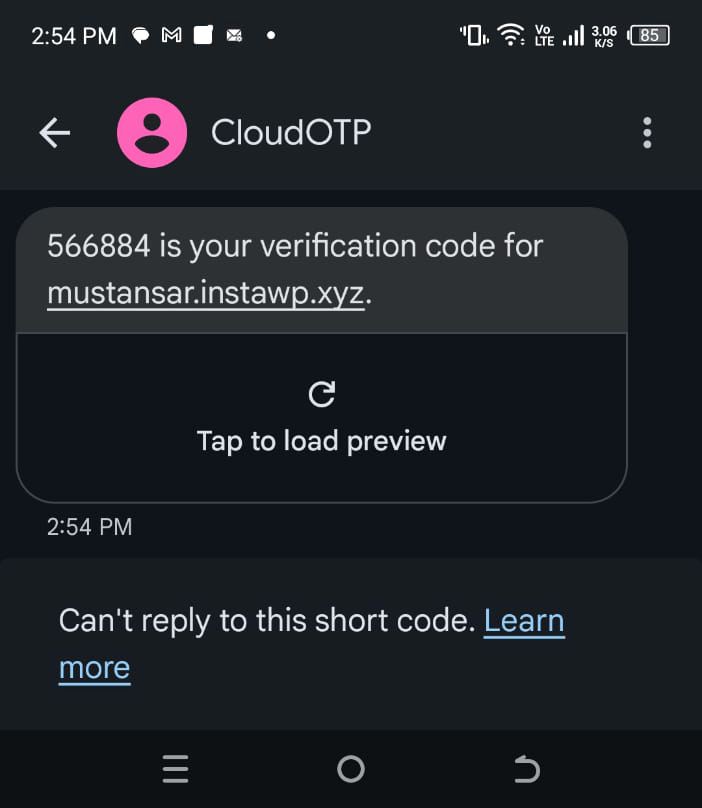
- Enter the received code in the Verify Code From SMS field and click Submit to proceed.
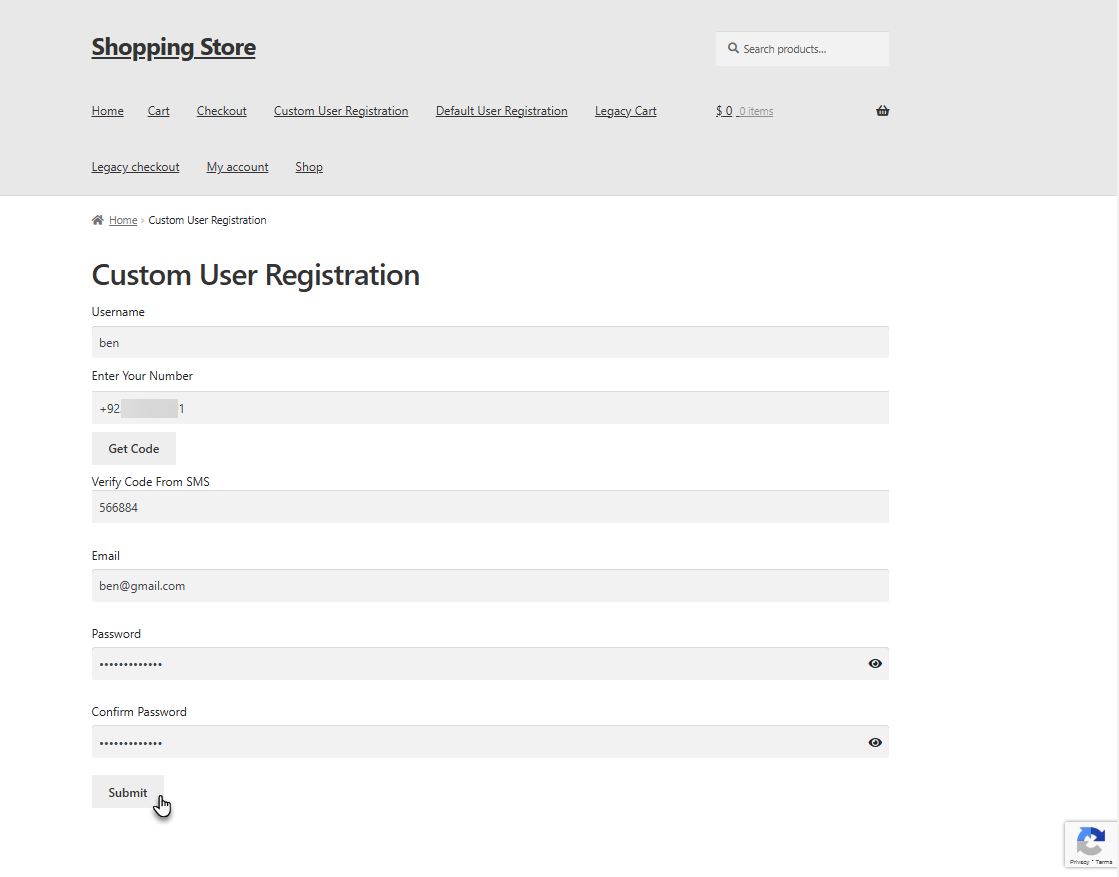
- The user will be registered.
