NOTE
This product is no longer available on WooCommerce.com. This document has been left available for existing users, but will no longer be updated.
Main Features
↑ Back to top- Lightweight, uses post meta to store the video details;
- Does not replace the default WooCommerce product gallery script;
- Allows video to be positioned anywhere in the product gallery;
- Compatibility with over 20 premium themes that use a different gallery product gallery script (ie. Avada, Flatsome, Leka, Sober and others);
- Video thumbnail has a play icon over it to highlight that it is a video;
- Customizable video gallery thumbnail image.
Installation and Activation
↑ Back to top- If not already installed, install and activate WooCommerce.
- Download the plugin zip archive from your WooCommerce account.
- In your WordPress dashboard, go to Plugins – Add New and click Upload Plugin to upload the plugin file downloaded in step 2.
- Click Install Now and next Activate Plugin.
Initial Setup
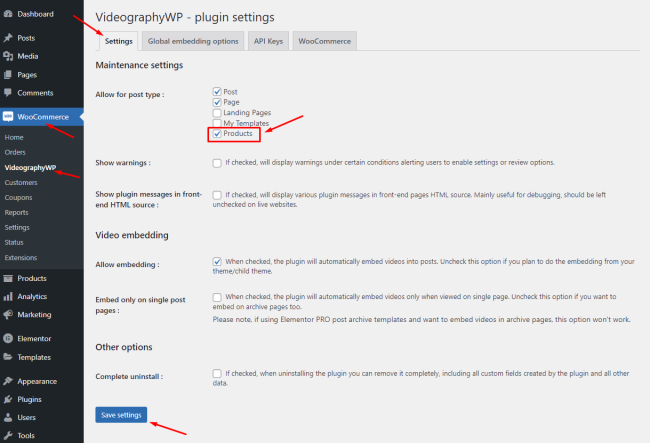
↑ Back to topAfter activating the extension, go to WP Admin > WooCommerce > VideographyWP to access all settings.

Enable for WooCommerce post type Product
↑ Back to topTo enable VideographyWP Pro — Video Product functionality for WooCommerce Products, you need to check the “Allow for post type” option under Settings and ensure that the option is enabled for the Products post type.
Setting up the YouTube API key (optional)
↑ Back to topThe plugin can query public YouTube videos without an API key when used with WooCommerce product videos. Importing videos from YouTube without an API key retrieves the video title and the video image size will be 480×360 pixels. Video description, tags, categories, and all other details will not be available in this case!
How to get the YouTube key
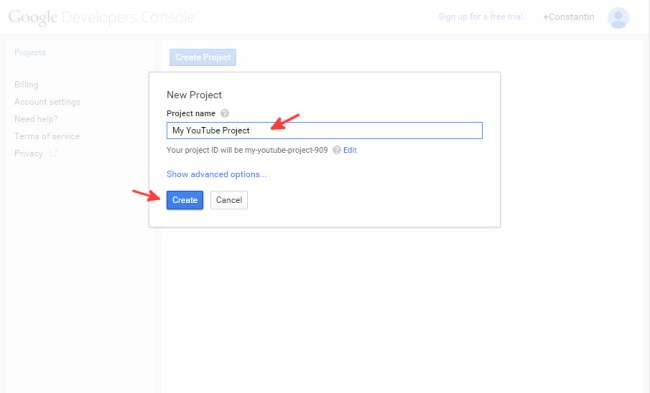
To obtain your API key for YouTube Data API, log in to your Google Account and access the Google Console. The console will direct you to your projects page where you can create a new project if you don’t have any existing ones.

Once you click the Create Project button, a modal window will open asking for your project details.
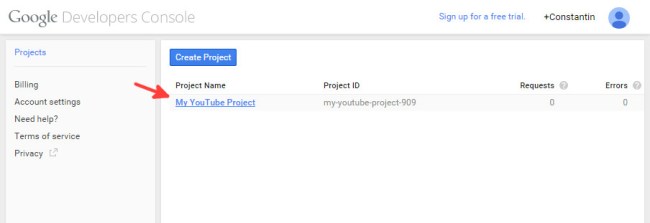
After your project is created, simply enter it by clicking its name.
To enable YouTube Data API, go to the “APIs & auth” section in the left menu of your project. Then, navigate to the “APIs” page and use the search filter to find “YouTube“. From the list of APIs provided by the console, select “YouTube Data API v3“.

From inside the API administration screen, click Enable API button.

After enabling the YouTube API, you can generate the API key for the plugin. To do this, navigate to the “APIs & auth” section in the left menu and select “Credentials“. On the credentials page, click the “Create new Key” button under “Public API access“.

When you click the “Create new Key” button, the interface will open a modal window with several options. Choose the “Server key” option from the available choices.
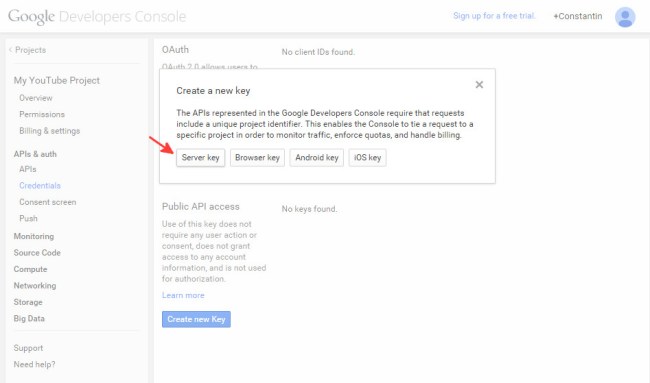
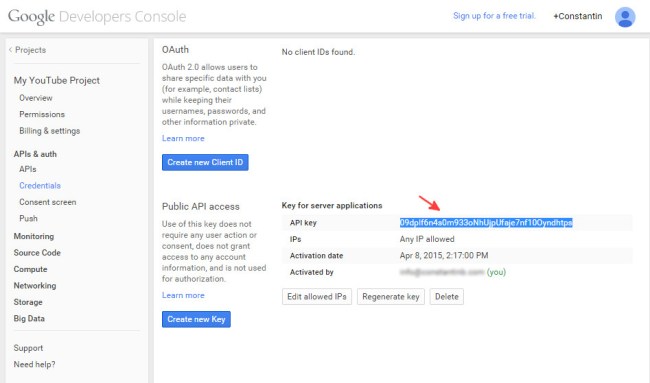
Next, you will have the option to enter a list of IP addresses that are allowed to query APIs using this server key. If you don’t know your server’s IP address you can leave this empty and just click Create button.

Last, copy the API key generated by the console into the plugin Settings page, tab API Keys in the option YouTube server key.
Setting up the Vimeo API key (optional)
↑ Back to topPublic Vimeo videos can be queried without an API key. If you also want to be able to query and attach your private Vimeo videos, you will have to create an API key on Vimeo.
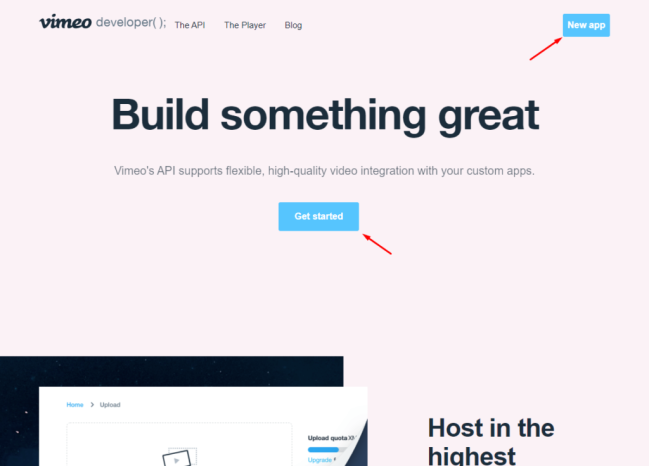
To create an app you must go to https://developer.vimeo.com/. Clicking the button to create an app will require you to log in to Vimeo if you are not already logged in.
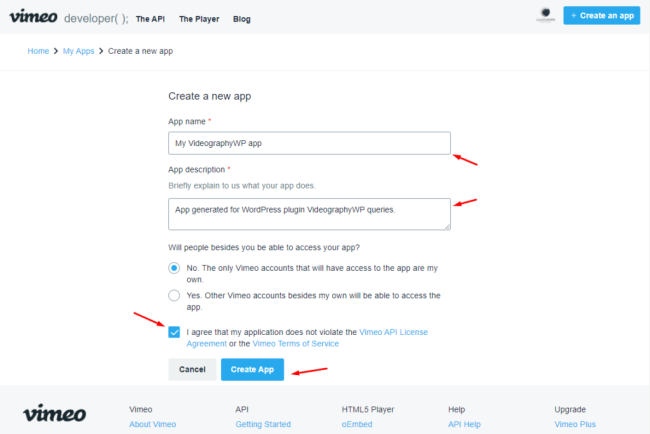
Once you click the button to create a new App, you will be directed to the App setup screen where you need to enter the App title and description.
Next, you will see the App details screen. In this screen, click on the left menu on the “Personal Access Tokens” link.

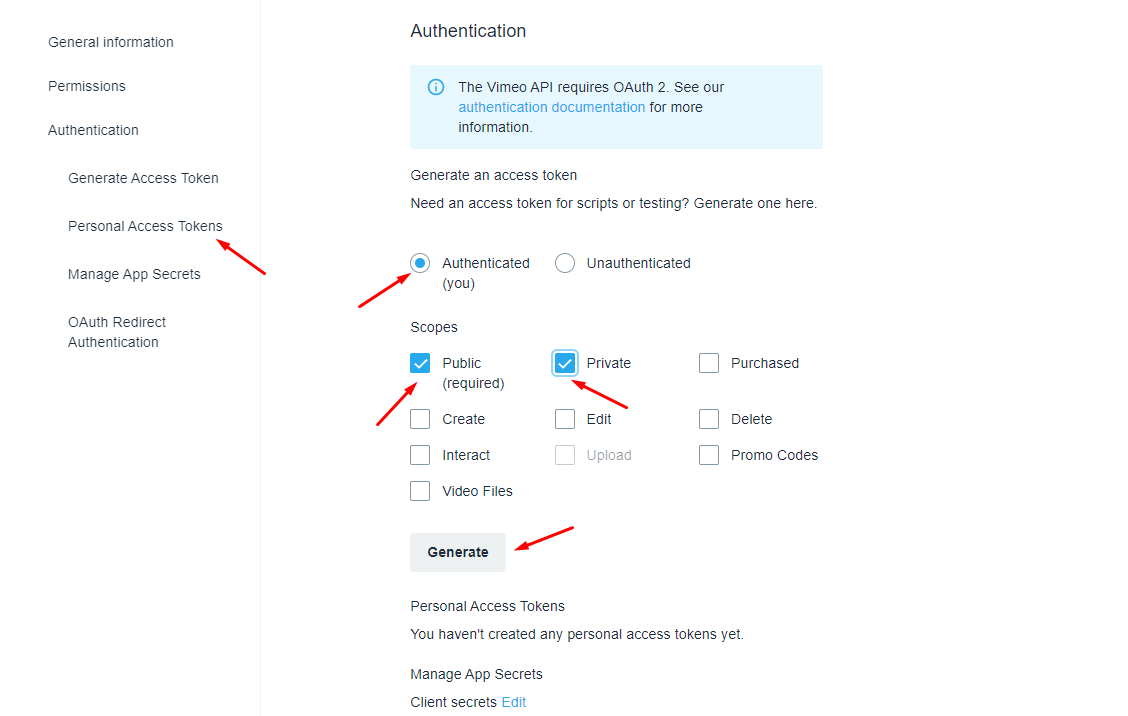
Now you can generate your personal access token that will allow you to query your private videos. Ensure that you select the “Authenticated” option, as it enables you to query your private videos. Once you have made this selection, additional options will appear. Under “Scopes” choose both “Public” and “Private,” and then click on the “Generate” button.
After you generate your token, you will find it in the tokens list below the form used to generate it. Copy the token from the table as required in the next step.

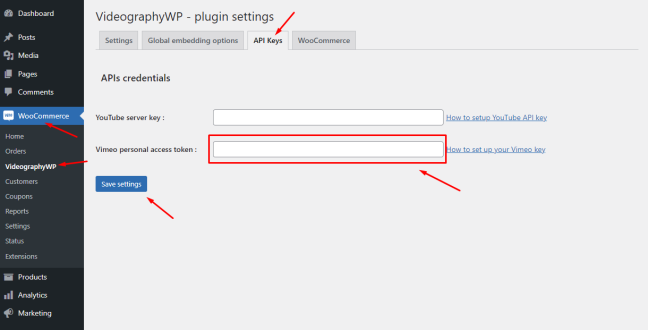
Finally, paste the token into the VideographyWP Settings page. Navigate to the “API Keys” tab and locate the field labeled “Vimeo personal access token“. Paste the token into this field to complete the process.
Query and attach the video to the product gallery
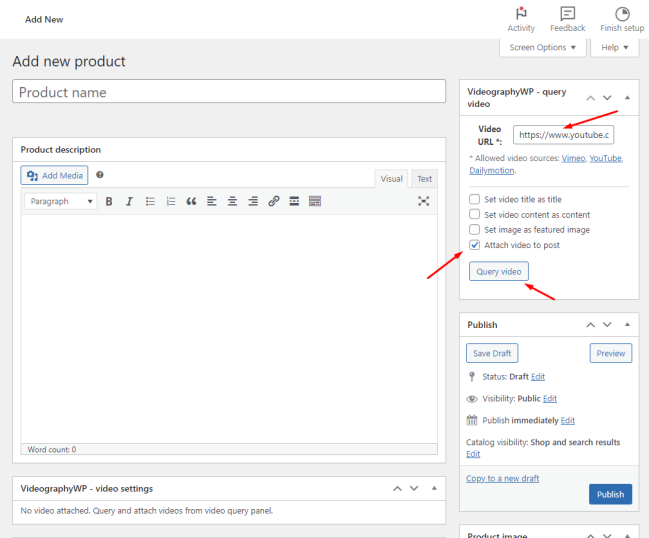
↑ Back to topTo attach a video to a WooCommerce product gallery, simply enter the video URL into the query field, check at least the option “Attach video to post” and click “Query video”. Optionally, you can also check the other options to set the post title and post content and import the featured image.
Remove a video attached to a product gallery
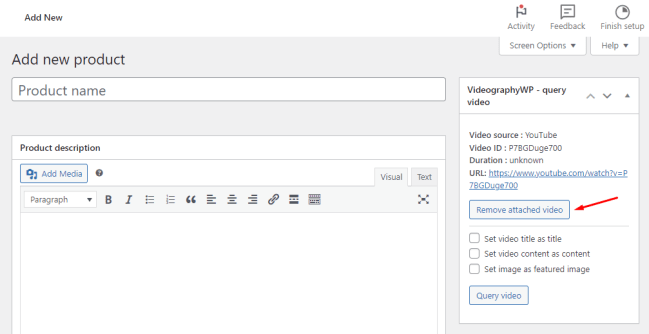
↑ Back to topTo remove a previously attached video simply click the “Remove attached video” from the VideographyWP PRO panel.
Reimport video details of the attached video
↑ Back to topAfter a video is attached, you will have the option to reimport the video details (title, description, and featured image) whenever you will need to do so by simply checking the checkboxes and clicking “Query video”.

WooCommerce product video global options
↑ Back to topOne useful feature is the ability to set global embedding options for videos imported using VideographyWP. The global embedding options can be accessed by going to WP Admin > Settings > VideographyWP and switching to the tab “Global Embedding Options”.
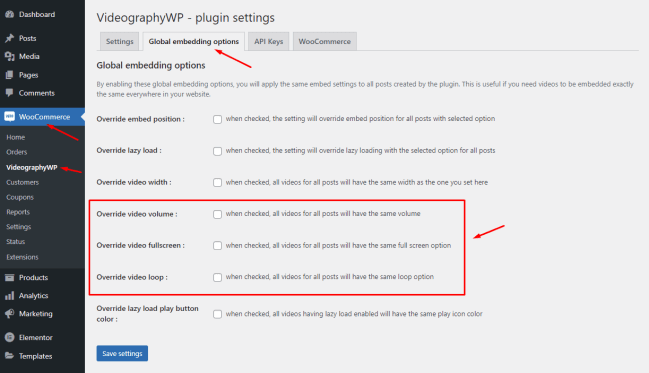
The global embedding options that will apply to all your WooCommerce products are:
- Override video volume: allows you to set a global initial video volume for all your product videos
- Override video fullscreen: allows you to grant access to full screen or deny it
- Override video loop: allow you to enable or disable video loop
To override the thumbnail video play icon color, go to the tab “WooCommerce” and check the option “Override video thumbnail play icon color”. Next, set your preferred color for the video thumbnail icon.
Compatibility with WooCommerce Product Gallery
↑ Back to topVideographyWP PRO — Product Video is compatible with the default WooCommerce product gallery. It seamlessly injects the featured video into the existing gallery, preserving the original script and design, without the need to replace the entire product gallery.
In addition, the extension is fully compatible with WordPress themes that utilize the default WooCommerce gallery script and templates. This ensures that your website design remains intact without any alterations.
Compatibility with WC Themes using a different product gallery
↑ Back to topVarious WordPress themes use a different product gallery to showcase your product images. This breaks compatibility with VideographyWP but over time we developed compatibility with a number of premium WordPress themes and plugins.
Here’s a list of compatible themes that do not use the default WC gallery: Leka, Avada, Basel, Bateaux, Bridge, Elessi, Flatsome, Patron Child Theme, Jevelin, Medicare, Merchandiser, Primrose, Ri Space, Riode, Sober, Tokoo, Unicon, Woodmart, Yolo Motor, Yolo Sofani.
The plugin is compatible with WC gallery plugins WooSwipe and YITH Zoom Magnifier.
The list is open; if your theme is incompatible with the plugin please send us a support ticket and we will create compatibility with it.
How to check if WooCommerce theme is compatible
↑ Back to topTo check if your WooCommerce theme is compatible with VideographyWP Pro – Product Video ask the theme developed if your theme uses the default WooCommerce gallery script and layout to display the product images.
If your theme developer notifies you that the theme does not support the default WooCommerce gallery, check the list of compatible themes mentioned above. If your theme is not included, contact us for more information. We are capable of developing compatibility with your theme, enabling you to utilize VideographyWP Pro- Product Video for seamlessly embedding videos into your product galleries.
WooCommerce product video options
↑ Back to topAfter you attach a video to a WooCommerce product, the product edit screen will display multiple embedding options under the text editor. You can customize these settings for each product individually.
Video embed options
↑ Back to topThe general video embedding options are:
- Player size: you can choose the aspect ratio of the player embedded into the product gallery
- Volume: the video playback volume between 0 (mute) and 100 (maximum volume)
- Allow full screen: whether the player will display the full-screen icon
- Allow video loop: whether the video will loop when finished or will stop playback

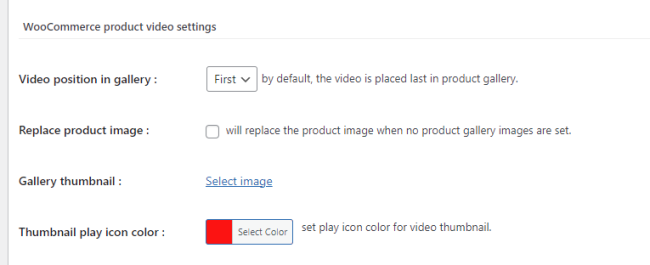
WooCommerce product gallery video options
↑ Back to topThe WC product gallery video settings are:
- Video position in the gallery: allows the setup of video position into the product gallery (first, second, nth, last)
- Replace product image: if there are no product gallery images apart from the featured image, the video embed will replace the featured image and will be displayed alone
- Gallery thumbnail: allows the setup of a custom gallery thumbnail image for the video. If not set, the featured image thumbnail will be used
- Thumbnail play icon color: the color of the play icon displayed over the video thumbnail image in the product gallery
Video provider-specific options
↑ Back to topEach video provider supported by VideographyWP Pro- Product Video has specific options that can be customized from the product edit screen.
YouTube
For YouTube, the settings are:
- No cookies video embed: when checked will embed video from cookieless domain
- Controls: show video controls on the player
- Auto-hide controls: will hide controls while the video is playing
- Hide annotations: will not display any annotations placed on videos
- Hide YouTube logo: this will show the YouTube logo on the video

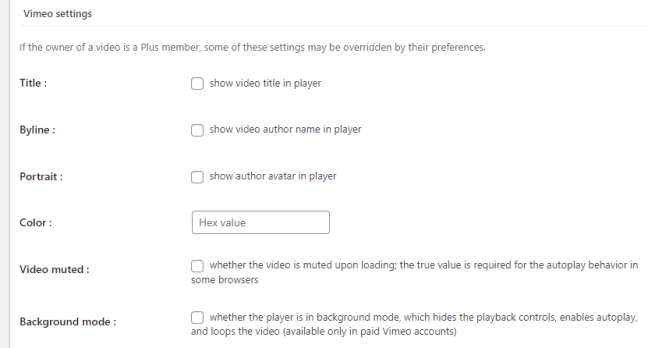
Vimeo
For Vimeo, the options are:
- Title: when checked will display the video title in the player
- Byline: when checked, will display the author name in the player
- Portrait: displays the author’s avatar in the player
- Color: the player buttons color
- Video muted: will load the video muted (required for auto-playing in certain browsers)
- Background mode: will load the video without playback controls with autoplay enabled and video looping
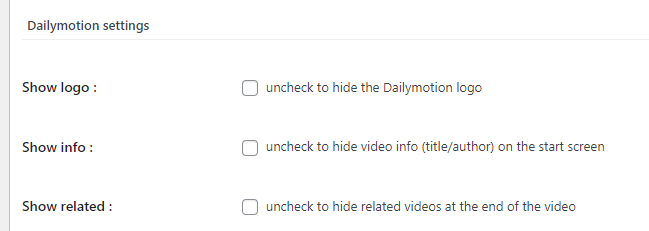
Dailymotion
The option for Dailymotion videos are:
- Show logo: displays the Dailymotion logo;
- Show info: displays the video information on the start screen;
- Show related: displays related videos at the end of the video.