User Roles Editor for WooCommerce allows you to add, edit, or delete user roles. Assign and manage role permissions and automatically switch user roels depending on different conditions.
Installation
↑ Back to top- Download the User Roles Editor for WooCommerce.zip file from your WooCommerce account.
- Go to WordPress Admin > Plugins > Add New and Upload Plugin > Choose File (for the file that was downloaded).
- Install Now and Activate the extension.
Configurations
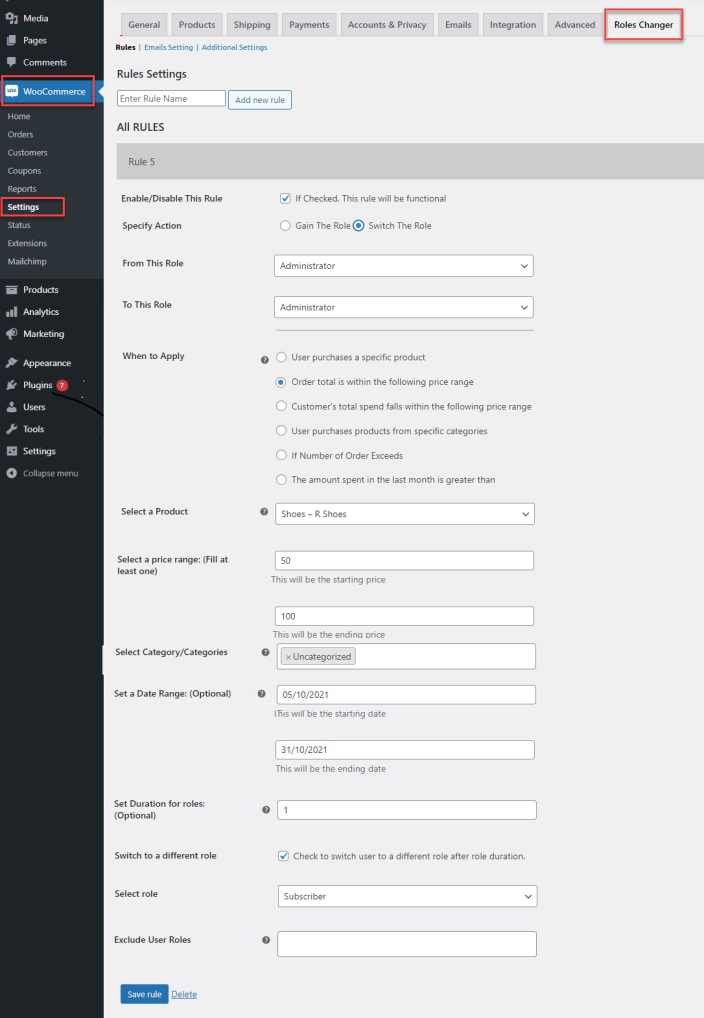
↑ Back to topWithin the admin panel, go to WooCommerce > Settings and click Roles Changer Button tab. Here you will find two tabs, Rules & Email.
Adding new user roles
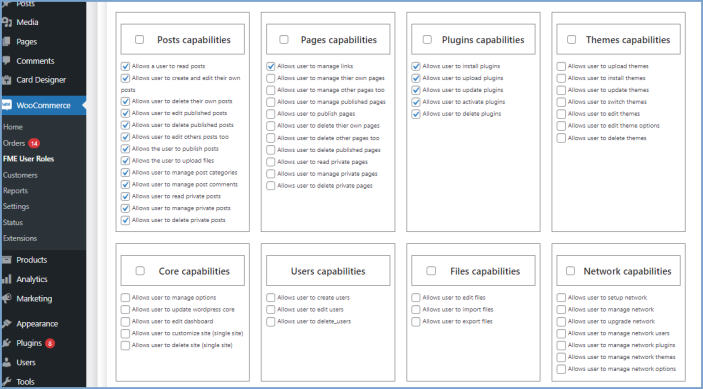
↑ Back to topWooCommerce add user roles plugin allows you to add new user roles, and edit or delete user roles. To do so, at the admin panel go to WooCommerce > FME User Roles. Here you can manage all the user roles. You can edit both the default roles and the custom ones, except for the administrator role. Click on the “Add Role” button to add a new user role and manage the role permissions and capabilities. Moreover, click on “Manage Roles” to change certain capabilities of each role. You can edit the following capabilities:
- Posts capabilities
- Pages capabilities
- Plugins capabilities
- Themes capabilities
- Core capabilities
- Users capabilities
- Files capabilities
- Network capabilities
- Sites capabilities
Rules:
↑ Back to topTo create rules within Rules Settings:
- Enter in a new rule name and click on the Add New Rule button.
- Further specify conditions of the rule by choosing from the below:
- Enable/Disable Rule: If checked, rule will be functional
- Specify Action: Select the option of either Switch the Role or Gain the Role
- From this Role: (displayed if Switch the Role is selected) Specify role user is switching from
- To this Role: (displayed if Switch the Role is selected) Specify role user is switching to
- Select the Role: (displayed if Gain the Role is selected) Select the role the user is gaining
- When to Apply: Select a condition to apply rule for:
- User purchases a specific product
- Order total is within the following price range
- Customer’s total spend falls within the following price range
- User purchases products from specific categories
- No of Order Exeeds
- The amount spent in the last month is greater than
- Select a Product: (displays if User purchases a specific product is selected)Rules will be applied only on selected products
- Select a price range: (displays if Order total is within the following price range or Customer’s total spend falls within the following price range is selected) set price range using starting and ending price, atleast one needs to be filled out.
- Select Category/Categories: (displays if User purchases products from specific categories is selected) Rule will work on only selected Categories.
- Set a Date Range: (Optional) set date range for rule to be applied, rule will only apply for selected dates(Starting and Ending Date)
- Set Duration for Roles: Role will be reverted after specified number of days.
- Switch to a Different Role: check if you want to switch the user to a different one after the role duration is ended.
- Select Role: select the role to which you want to switch the user after the set time duration.
- Exclude User roles: Rule will not be applied to selected roles.
- Save the rule.
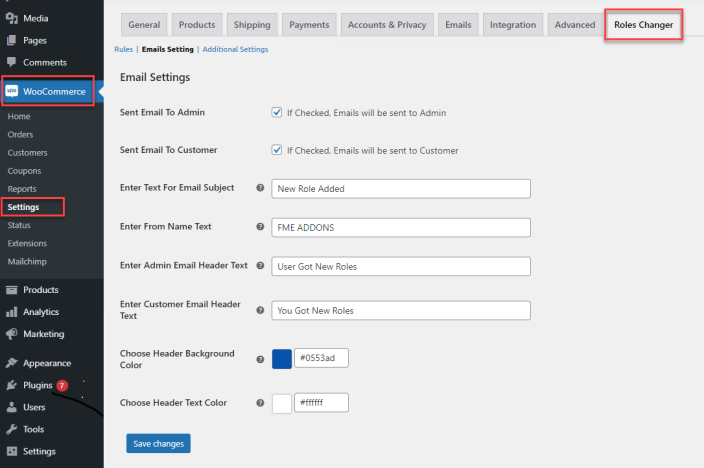
Email settings:
↑ Back to topCustomize the notification emails sent to users when their role has changed with the following fields:
- Sent Emails to Admin: If checked, emails will be sent to Admin.
- Sent Email to Customer: If checked, emails will be sent to Customers.
- Enter Text for Email subject: Set subject of email
- Enter from Name Text: Set From text for email
- Enter Admin Email header Text: Set main header text for Admin emails
- Enter Customer Email header Text: Set main header text for Customer emails
- Choose Header Background Color: Set the header background color
- Choose Header Text Color: Set the header text color
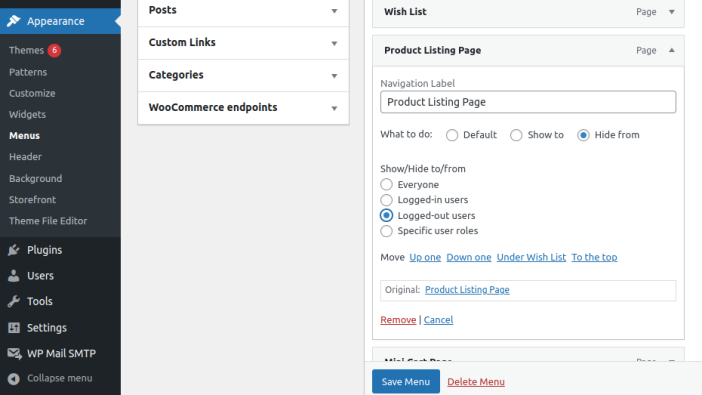
Additional settings:
↑ Back to topAfter Enable Menu Options in additional settings, These Options will display under each menu item in appearance > menus > edit menu item screen to display menu item to only specific users based on roles. You can Hide and Show Menu Items to everyone, logged in users, logged out users or specific user roles.

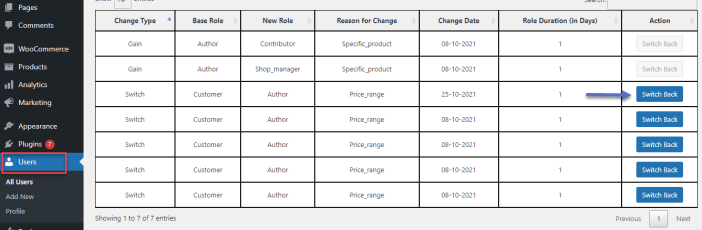
Admin can view User roles history:
↑ Back to topAt the admin panel go to Users > All Users and edit any User profile. Here you can find the User assigned roles history. You can switch back user assigned roles with reason from the given table.
FAQs
- Do the WooCommerce roles permission plugin changes user role automatically?
The plugin automatically switches user roles based on your settings. You can assign roles such as admin, editor, author, and customer.
- Can I create more than one rule for multiple users?
Yes, with the WooCommerce shop manager role plugin you can create multiple rules for managing user role switches and gains for different user groups. The users get a role soon after they purchase a specific product or order products of a particular amount.
- How to automate the whole role-switching process?
You need to set criteria for automating user role switching and gaining. WooCommerce user role shop manager allows four different conditions to determine user roles.
- Specific product purchase
- Purchase from a specific category
- Ordering in a price range
- Customer’s total purchase