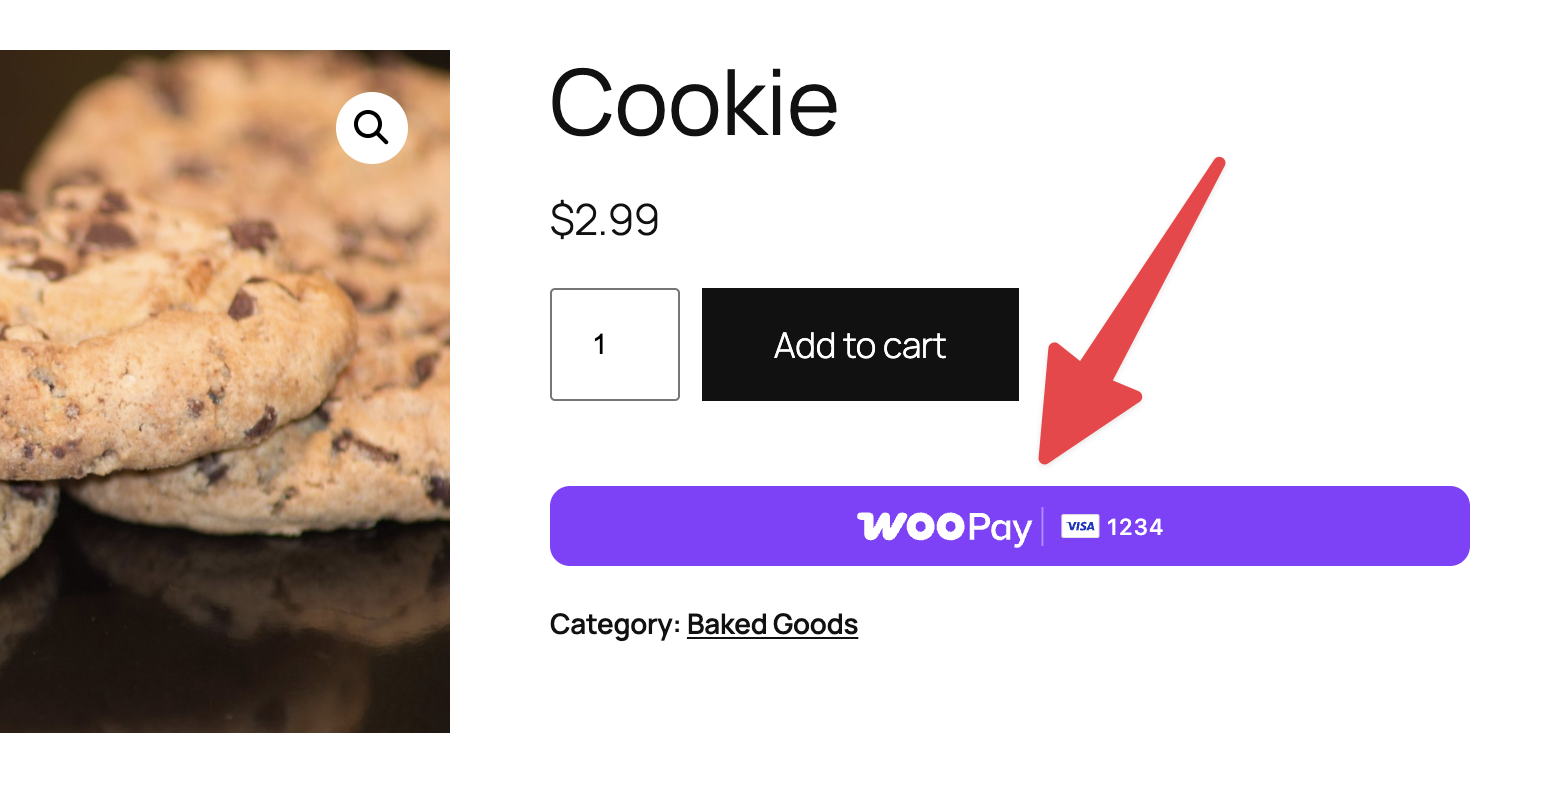
WooPay is a new express checkout solution built by WooCommerce. Using WooPay, customers can save and use payment methods across any WooCommerce store that uses WooPay. When a customer with a WooPay account visits your store, they can check out securely with just a few clicks, making your checkout experience easier.
NOTE: This document is for merchants who want to offer WooPay as a payment option on their site. If you’re a customer of a site that uses WooPay, please see our customer documentation or contact support by logging into your WooPay account. From there, click the question mark icon in the header and then select Contact Support.
Requirements
↑ Back to topWooPay is currently available for U.S. merchants only. To enable it on your store, your site will need to meet the following requirements:
- PHP 7.3+
- WordPress 5.9+
- WooCommerce 7.6.0+
- WooPayments 6.6.0+
Enabling WooPay
↑ Back to topYou can enable WooPay by following these steps:
- Go to Payments > Settings in your site’s admin dashboard.
- Scroll down to to the Express checkouts section.
- Check the box to enable WooPay.
- Click the Save changes button at the bottom of the page.

Please note that WooPay and Link by Stripe are currently incompatible. You cannot have both express checkout methods enabled at the same time.
Customizing
↑ Back to topTo customize WooPay and change the settings:
- Go to Payments > Settings in your site’s admin dashboard.
- Scroll down to the Express checkouts section.
- Click the Customize link inside the WooPay box.

At the top of that page, you choose whether to enable or disable WooPay, as well as customize where the WooPay express checkout button is shown.

Checkout appearance
↑ Back to topIn the Checkout appearance section, you can change several options that control how the WooPay checkout page looks.
The Checkout logo option can be used to show your logo in the WooPay checkout. (If you do not provide a logo, we will use the one you have picked under Appearance > Customize > Site Identity.)
The Checkout theme setting controls whether or not WooPay should try to detect and use certain styles from your site on the WooPay checkout page. (Note that this only works for shoppers who get to WooPay via the shortcode checkout page.)
The Checkout policies option can be used to add some custom text which will be shown during WooPay checkout. You can also use the following shortcodes to insert certain links:
[privacy_policy_link]will insert a link to your site’s privacy policy page, if you have one. This is configured under Settings > Privacy.[terms_of_service_link]will insert a link to your site’s terms of service page, if you have one set under WooCommerce > Settings > Advanced.
If one or both of those pages are not set, the shortcodes will simply return the words “Privacy Policy” or “Terms of Service”, respectively.
You can also use a few basic HTML elements in the “Checkout policies” field:
<a><em><strong><b><i>
See the following images for an example:


If you are using the checkout block and have it set to require a checkbox:

… then WooPay will also require customers to check the box:

Settings
↑ Back to topIn the Settings section, you can configure the display options of the WooPay buttons.
- The Call to action dropdown determines what text is shown in the WooPay button itself: the icon only, “Buy with WooPay”, “Donate with WooPay”, or “Book with WooPay”. You can change this as needed to suit the types of products you sell.
- The Button Size option determines how large the WooPay button will be. Note that larger sizes are more suitable for mobile use.
- The Theme option can be used to adjust the foreground and background colors of the WooPay button. If your site’s background is white or light-colored, use the Dark theme. Conversely, if your site’s background is darker, use the Light theme.
- The Border radius slider controls the amount of rounding to apply to the button.

Keep in mind that, if you have Apple Pay and Google Pay enabled, changing these settings will also change the same settings for the Apple Pay and Google Pay buttons. This is done to maintain visual consistency in your store.
Also note that your selected Call to action may be overridden if the customer has a saved card in their WooPay account. Instead the button will shown their card info.
Testing
↑ Back to topYou can test the WooPay customer experience using WooPayMerchantDemo.com along with the customer-facing documentation.
NOTE: WooPayMerchantDemo.com is in test mode, so you must use a test card, and no real charges will be placed.
If you want to test WooPay on your own site, you can do so by following these steps:
- Enable test mode in the WooPayments settings.
- Open your site in a private / “incognito” browser window.
- Add a product to your cart and go to the checkout page.
- Enter a test email address that has not been used for WooPay before.
- You can create a test email address easily with most email providers. Using Gmail, for example, you can simply add a
+sign and any text after that, so your test email address might bemyname+woopaytest@gmail.com. Mail to that address will still be delivered tomyname@gmail.com, but WooPay will treat it as a new account, which is what you want for a test.
- You can create a test email address easily with most email providers. Using Gmail, for example, you can simply add a
- Fill out the checkout form using test card information, being sure to sign up for WooPay using a phone number you can receive text messages with.
- After checking out, a WooPay account will be created for you with your test email.
- Close your private / “incognito” browser window.
- Open a new private / “incognito” window and go back to your site.
- Add a product to your cart and go to the checkout page.
- Entering the same test email will trigger WooPay to send you a verification code.
- You will be taken to the WooPay site to check out as shown in the customer doc. There will be a banner at the top indicating that it’s in test mode.

- Completing the checkout will result in the test order being placed on your site.
Compatibility
↑ Back to topAfter testing with various WooCommerce settings, as well as the most popular extensions we offer on WooCommerce.com, we’ve created the following compatibility lists. As new extensions are tested and more extensions become compatible, they’ll be added here.
Any extensions that are not listed here remain untested at the current time. We encourage merchants to test their favorite extensions for compatibility and let us know using the question mark icon at the top of this page.
Incompatible settings
↑ Back to topThe WooPay button will not be shown when:
- A guest customer attempts to make a purchase while the “Allow customers to place orders without an account” setting is disabled.
- A guest customer attempts to purchase a subscription product.
- A customer is viewing an External/Affiliate product.
Compatible extensions
↑ Back to top- Advanced Notifications
- Affiliate For WooCommerce
- All Products for WooCommerce Subscriptions
- Australia Post Shipping Method
- AutomateWoo
- AutomateWoo – Refer A Friend add-on
- B2B for WooCommerce
- Composite Products
- Conditional Shipping and Payments
- Cost of Goods
- Dynamic Pricing
- Facebook for WooCommerce
- FedEx Shipping Method
- Gift Cards
- Gravity Forms Product Add-ons
- Jetpack
- Mailchimp for WooCommerce
- Mailpoet
- Measurement Price Calculator
- Min/Max Quantities
- Mix and Match Products1
- Name Your Price
- PDF Invoices
- Per Product Shipping
- Product Add-Ons
- Product Bundles1
- Product Vendors
- Role Based Pricing for WooCommerce
- Royal Mail
- Sensei Pro (WC Paid Courses)
- Sequential Order Numbers Pro
- Shipment Tracking
- Shippo
- UPS Shipping Method
- USPS Shipping Method
- Wholesale For WooCommerce
- WooCommerce Bookings
- WooCommerce Box Office
- WooCommerce Customer / Order / Coupon Export
- WooCommerce Deposits
- WooCommerce Distance Rate Shipping
- WooCommerce Memberships
- WooCommerce Multi-Currency
- WooCommerce One Page Checkout
- WooCommerce Order Barcodes
- WooCommerce Order Status Control
- WooCommerce Order Status Manager
- WooCommerce Points and Rewards
- WooCommerce Pre-orders
- WooCommerce Print Invoices and Packing Lists
- WooCommerce Shipping
- WooCommerce Social Login
- Woo Subscriptions
- WooCommerce Tax
- WooCommerce Zapier
1 With WooPayments version 6.6.0 or later.
Incompatible extensions
↑ Back to topOur list of incompatible extensions includes:
- Avalara AvaTax for WooCommerce
- Checkout Field Editor
- Donation For WooCommerce
- EU VAT Number
- Gifting for WooCommerce Subscriptions
- Local Pickup Plus
- Order Delivery for WooCommerce
- PDF Product Vouchers
- Shipping Multiple Addresses
- Smart Coupons
- Table Rate Shipping
- Teams for WooCommerce Memberships
- Wholesale for WooCommerce
- WooCommerce Checkout Add-Ons
If WooPayments detects that you have an incompatible extension active, we will flag this for you under Payments > Settings.

Frequently asked questions
↑ Back to topI don’t see the option to enable WooPay
↑ Back to topWooPay is currently only available for U.S. merchants.
Why can’t non-U.S. customers use WooPay?
↑ Back to topWooPay will only work for customers located in the U.S. This is due to various country-specific laws around cookie consent and marketing opt-ins in GDPR countries.
Is WooPayments required to use WooPay?
↑ Back to topYes, WooPay is only available as an express payment method in WooPayments. You will need to have WooPayments active in order to offer WooPay to your customers.
Is Jetpack required to use WooPay?
↑ Back to topNo, you do not need to have the Jetpack plugin installed to use WooPay.
What’s the difference between this and WooPayments?
↑ Back to topWooPayments is a WooCommerce payment gateway, which allows you to accept credit and debit cards as well as access a dashboard for managing transactions.
WooPay is a feature of WooPayments. Specifically, it is an express checkout method available to merchants who wish to offer it to their customers. You can set up WooPay in the WooPayments settings, under Payments > Settings.
Will my customers be required to use WooPay?
↑ Back to topNo, customers will have the choice to check out using WooPay or using your store’s standard checkout process.
If they are redirected to the WooPay checkout page due to Direct Checkout, they can go back to your site’s checkout page by clicking the < Return to cart link.
What information is available to me about customers?
↑ Back to topDetails about the customer and the customer’s order are available as usual through the order details page under WooCommerce > Orders. Information such as the customer’s name, address(es), contact information, and order details are included.
How do I get paid when a customer uses WooPay?
↑ Back to topWooPay is part of WooPayments, so you will be paid according to the WooPayments payout schedule, just like for any other order that uses WooPayments.
You can also request instant payouts of WooPay funds, if you are eligible.
How do I opt-out or disable WooPay?
↑ Back to topTo disable WooPay, simply go back to the Payments > Settings page, uncheck the WooPay box, and click Save Changes at the bottom of the page.
If a customer has trouble, where can they get help?
↑ Back to topIf a customer of yours is experiencing a problem paying with WooPay on your site, please refer them to our customer documentation.