Overview
↑ Back to topThe Zoho Books & Inventory Integration plugin offers three pre-created feeds: Contacts, Invoice, and Items that sync respective WooCommerce objects’ data over to Zoho Books and Inventory. You can create custom feeds to collect data according to your specific needs.
https://youtu.be/-fFRVpQBqA4?si=mLKVTKvnDUhI1GgY
Features
↑ Back to top- Connect WooCommerce with Zoho Books & Inventory simultaneously
- Newly created or historical data synchronization.
- Use both default and custom feeds
- Bulk Data Sync, One-Click Sync, and Auto-Sync are available.
- Export the detailed logs in a .log file.
- Establish real-time data synchronization
Setup and Configuration
↑ Back to topThe first step to connecting your WooCommerce store to Zoho Books or Inventory starts with installing our WooCommerce Zoho Books Integration plugin and creating a Zoho Books account.
Step 1 – Install the Plugin
↑ Back to top- Download the .zip file from your WooCommerce account.
- From your WordPress Dashboard, go to Plugins > Add New.
- Click the Upload Plugin button and select the zip file you downloaded.
- Install the extension and click Activate to get started.
Step 2 – Connect to Zoho Books or Zoho Inventory
↑ Back to topAfter successful activation, you can connect WooCommerce store to Zoho Books and Zoho Inventory account. You can choose to connect them separately or establish a simultaneous connection for both accounts.
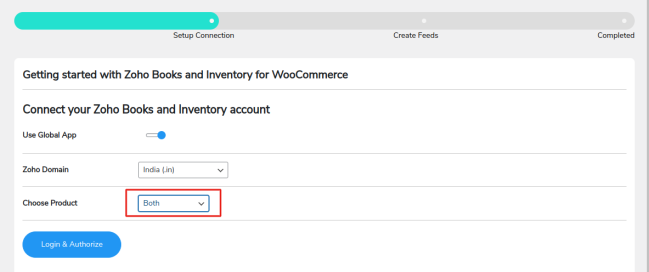
1. Go to WP Swings > Zoho Books Inventory Integration and click on the Connect Your Account button.
2. From the Choose Product dropdown select the software you want to sync your store with.
- Zoho Books
- Zoho Inventory
- Both
3. From the Connect your Zoho Books account section, you can choose to use the Global App and Zoho domain for Integration.
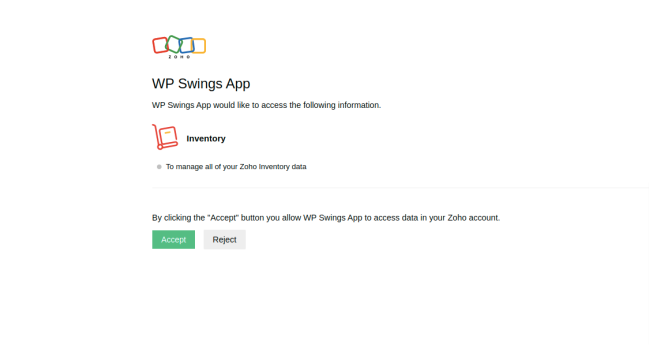
3. Afterwards, click on Login and Authorize.
4. Click on the Accept button to authorize our plugin to read, create, update, & delete all your Zoho Books and Zoho Inventory Data.
If you are not using the global app, follow the underlined method to connect WooCommerce to your Zoho Books account:
1. You have to provide Client ID, Secret ID, Zoho Domain & Redirect URL. Fill in all the details in their respective fields and click on the Authorize button.
2. Select the software platform you want to sync with, Zoho Books or Inventory. You can only choose one at a time.
3. After you hit the Authorize button, you’ll be redirected to the Zoho App authorization page.
4. Click on the Accept button to connect the Zoho Books & Inventory to your WooCommerce store.
Step 3 — Create Feeds
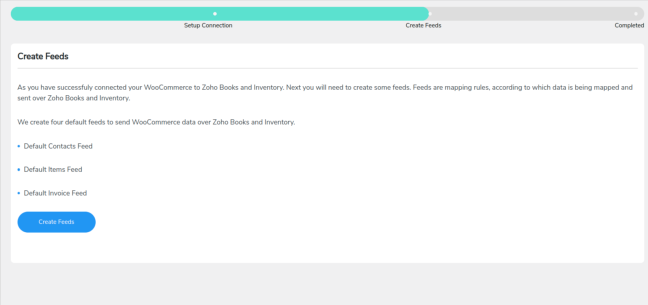
Post-authorization, you can instantly launch the default feeds. All you have to do is click on the Create Feeds button.
Step 4 — Finalize Your Setup
Click on “Move To Next Step” and your setup is complete. Now, go to the dashboard to take an overview of your Zoho Books & Inventory Integration.
Notice: The connection process for both software platforms is similar. The plugin settings are also identical for both plugins irrespective of the platform you are connected to.
Dashboard
↑ Back to topThe dashboard provides real-time information on the total count of synchronized contacts, items, and invoices, keeping you informed about the status of your data synchronization.
Zoho Books Connection Status: This status bar shows if you are connected to your preferred platform or not.
Reauthorize: Reauthorize button will re-establish the connection with Zoho Books. You’d have to follow the setup process again.
Disconnect: It will break the connection between Zoho Books and WooCommerce and stop data synchronization.
Create Feeds for WooCommerce Objects
↑ Back to topThe Integration for Zoho Books plugin offers three default feeds that you can use to synchronize your WooCommerce data with Zoho Books. These feeds are designed to sync specific types of data, such as orders, customers, and products. You can also create custom feeds to sync other types of data.
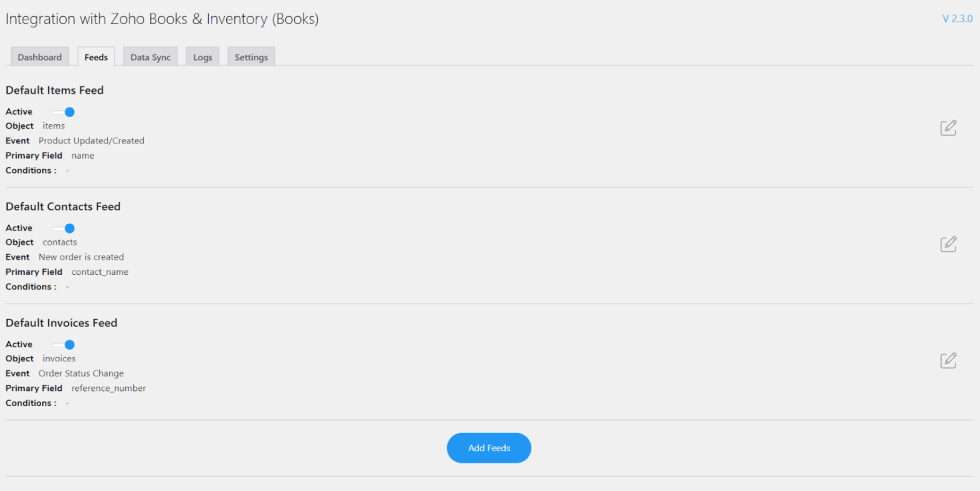
- Contacts Feed
- Invoices Feed
- Items Feed
Click on the Add Feeds button to create a new feed using WooCommerce objects. Here are the settings to customize the feeds:
Title: Add the title of the new feed.
Select Object: This setting lets you select the WooCommerce object for which you want to sync the data.

Choose an object from the drop-down menu to map fields; nine options exist.
- Items
- Contacts
- Invoices
- Sales Orders
- Recurring Invoices
- Purchase Orders
- Contact Person
- Estimates
- Customer Payments
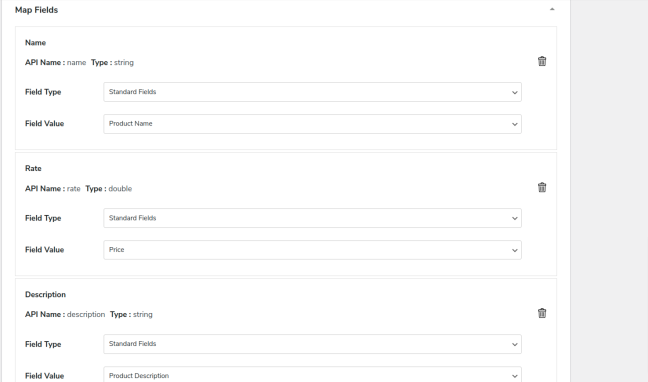
Map Fields: This setting option allows you to map a field to its corresponding value. For example, you can map the Billing Address field with the address to ensure it stores the correct value.
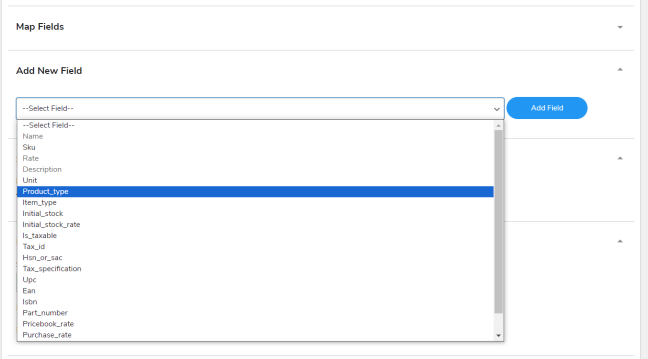
Add New Field: This setting allows you to add a new field to the feed, helping you sync additional data with the feed. For example, you could add a field for the product’s weight or dimensions.
Primary Field: The Primary Field setting lets you select a unique identifier for the feed records, serving as a primary key to distinguish each entry in the feed.
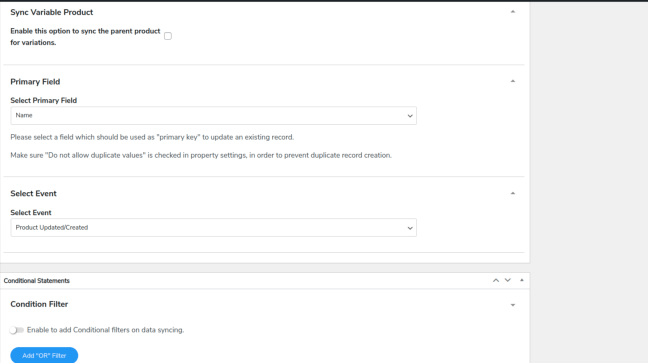
Select Event: Specify the event that triggers data synchronization.
Conditional Filter: The Condition Filter in Feeds feature allows you to sync your data with Zoho Books according to your preferences. You can apply filters to the feeds to control which data is synced. The filters available to you are many, including filters based on dates, exact matches, numbers, text, and more.
- AND condition: The AND condition synchronizes data that satisfies all criteria. For example, you may use an AND condition to sync all customers who signed up after September 1, 2023, and have purchased over $50.
- OR condition: The OR operator synchronizes data that meets either of two conditions. For instance, you could use an OR operator to synchronize all products categorized as “Electronics” or with a price higher than $500.
To finalize your feed, click Publish.
Data Sync
↑ Back to top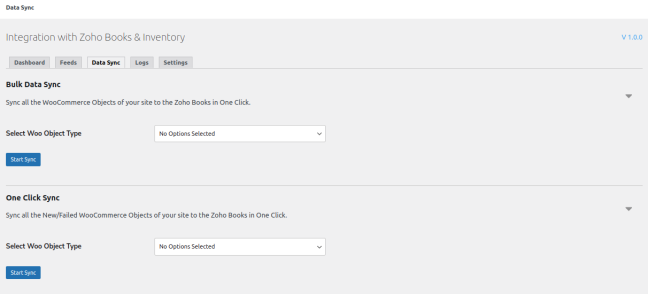
The Data Sync tab offers two distinct options for data synchronization:
1. Bulk Data Sync: This option allows you to synchronize all data, including historical records, for the selected object. It ensures that all existing data is up-to-date and consistent.
2. One-Click Sync: With One-Click Sync, you can synchronize only the newly added data of the selected object or the data that failed to sync in previous attempts. This option is designed to efficiently update and rectify any data discrepancies without re-synchronizing the entire dataset.
By providing these two options, you have greater control over your data synchronization process, enabling you to choose the most appropriate method based on your specific needs and requirements.
3. Pull & Associate Products: When integrating multiple sales channels and third-party platforms, it’s common to encounter synchronization issues, especially when the same products are being imported or synced across multiple systems.
A typical scenario involves syncing products from a marketplace like Etsy to Zoho Inventory, and later connecting another platform like WooCommerce, which also pulls in products from Etsy. In such cases, Zoho might treat the products synced through WooCommerce as separate or duplicate entries instead of recognizing them as the same items originally synced from Etsy.
To address this problem, our plugin offers a Product Association feature that make sure the accurate mapping of products across platforms. This feature allows you to associate or match products between Zoho and WooCommerce in one of the following three ways
Using SKU (Stock Keeping Unit): If your products have unique SKUs that are consistent across all platforms (Etsy, WooCommerce, and Zoho), our plugin can automatically match items based on this identifier

- Using Product ID: You can associate products using their unique product IDs from WooCommerce. This is particularly useful when SKUs are missing or inconsistent.
- Using Product Name: In the absence of SKUs or product IDs, our plugin can attempt to match products based on their names

While this method is less precise due to possible naming variations, it can still be effective when naming conventions are strictly followed
With these three syncronization options, you have greater control over your data synchronization process, allowing you to choose the most appropriate method based on your specific needs and requirements
Show Discount Details
↑ Back to topThe WooCommerce Books and Inventory plugin enables the synchronization of discount amounts in your orders, ensuring that any applied discounts are accurately reflected in your invoices. You can enable or disable this option from the plugin’s setting.

Important: To use this feature, enable Discounts at Transactional Level in your Zoho Books account by following these steps:
Go to Settings > Preferences > General in your Zoho Books Dashboard. Enable the option for Discounts at Transactional Level.

This ensures that discounts applied to orders are correctly recorded in your invoices.
Sync Coupon Details
↑ Back to topWooCommerce Zoho Books and Inventory supports syncing coupon details during checkout. This includes the coupon code, discount amount, and type.

The information is recorded in Zoho Books and Inventory, ensuring accurate tracking of discounts and promotions without manual entry.
Sync Order Notes by Users
↑ Back to topWooCommerce Zoho Books and Inventory allows syncing of customer order notes during checkout.
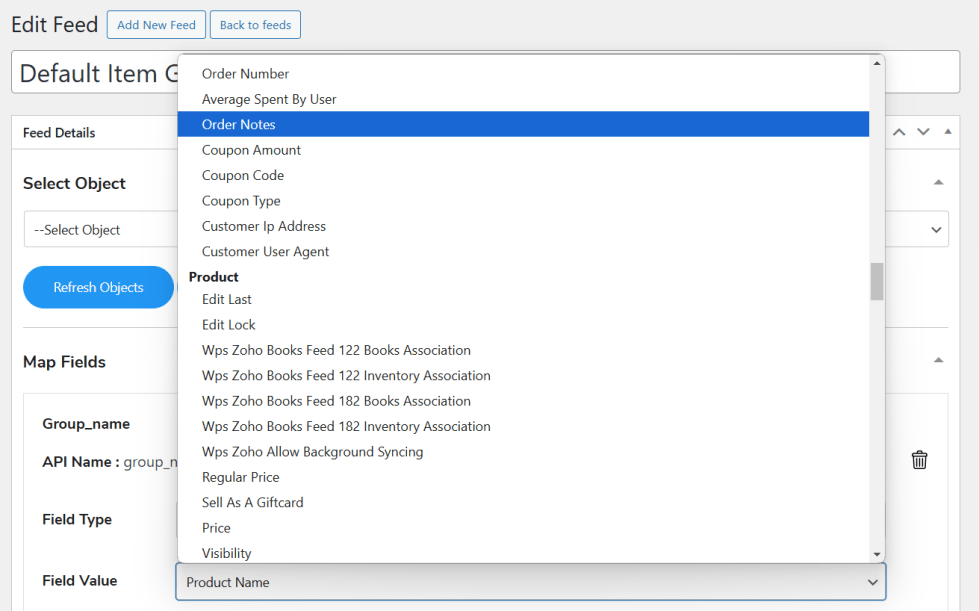
These notes are transferred directly to Zoho Books and Inventory, ensuring all order details are accurately recorded without manual input.
Sync User Browser info and IP address
↑ Back to topYou can set up fields in the feed to capture and sync user details like IP addresses and browser information with Zoho Books & Inventory.
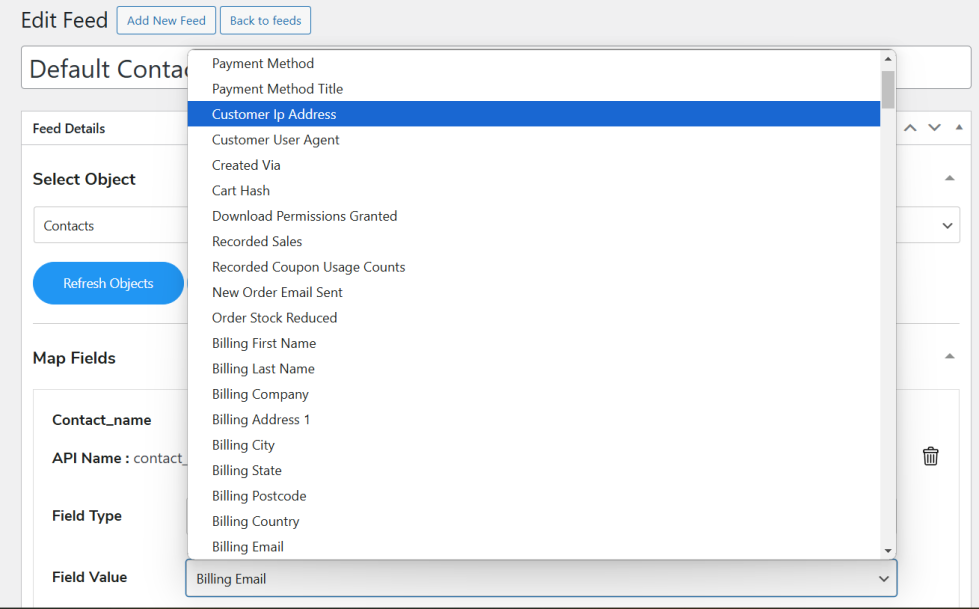
This enhances reporting, provides better insights into user activity, and adds an extra layer of security by helping identify unusual activity more easily. To configure this, navigate to the feed settings, add fields for IP and browser information, map them to Zoho Books & Inventory, and perform tests to ensure that everything is working properly.
Comprehensive Logs
The Logs section offers a comprehensive overview of the data synchronization process, displaying both errored and successful logs. Each log entry provides essential details, including:
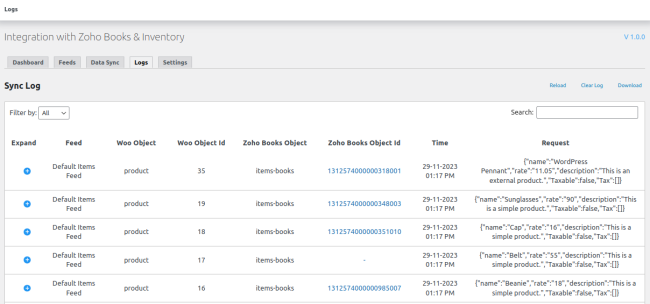
Feed: Indicates the specific feed in which the error occurred during the synchronization process.
Woo Object: This shows the corresponding WooCommerce object related to the error.
Woo Object Id: Displays the unique WooCommerce object ID associated with the error.
Zoho Books Object: This field presents the Zoho Books object where the data should have been synced.
Zoho Books Object Id: Depicts the unique identifier for the Zoho Books object that encountered the error.
Time: Reflects the timestamp at which the error occurred, providing you with the precise time of the synchronization issue.
Furthermore, the Logs section allows you to filter the logs based on two options:
All: This filter displays all logs, both successful and errored, giving you a complete view of the data synchronization process.
Errors: This filter narrows down the view to show only the logs associated with errors, enabling you to easily identify and address any issues that occurred during the synchronization.
Zoho Books WooCommerce Synchronization Settings
↑ Back to topIntegration with Zoho Books & Inventory gives users greater control and flexibility over data synchronization.
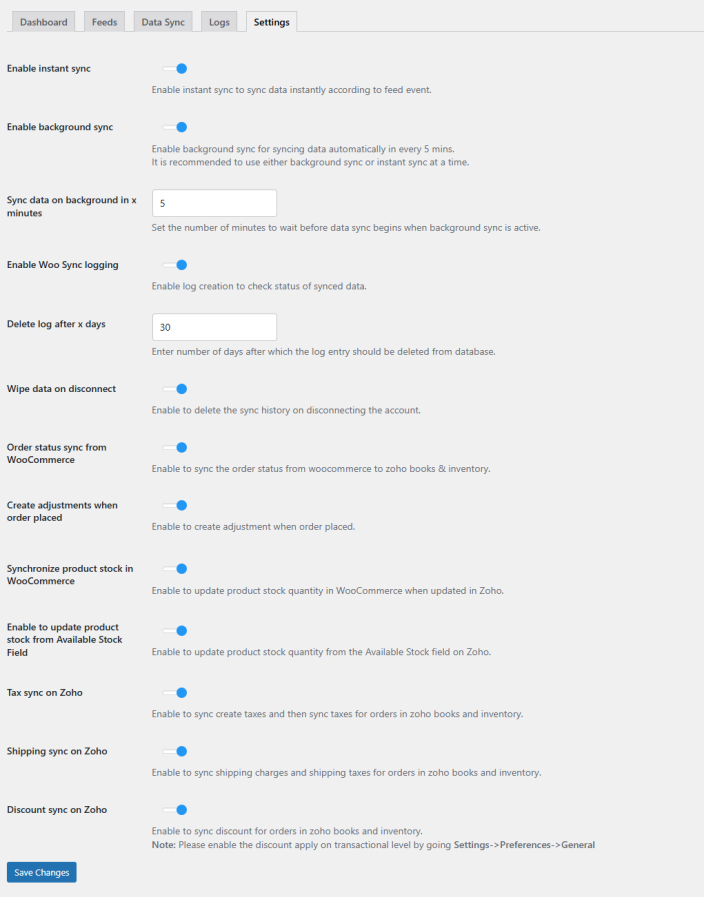
1. Enable instant sync: Enabling this toggle instantly synchronizes WooCommerce data with Zoho Books. If you disable this option, sync must be initiated manually from the Data Sync tab.
2. Enable Background Sync: Select this option to sync data automatically every 5 minutes at regular intervals.
3. Sync Background Data After Specific Time: Here, you can set the number of minutes to wait before data sync begins when background sync is active. This helps in reducing API calls and server load3. Enable Woo Sync Logging: This option allows you to save sync log errors. When disabled, no logs will be saved.
4. Enable Woo Sync Logging: Enabling this option allows you to save sync log errors. When deactivated, no logs will be saved
5. Delete Log After X Days: This option allows you to set the number of days to store the sync logs. For instance, choosing 30 days retains the logs for 30 days before automatically removing them.
6. Wipe Complete Data on Disconnect: Once you disconnect the integration with Zoho Books extension, enabling this toggle will delete all synced data and database keys from Zoho Books and Inventory.
7. Order Status Sync From WooCommerce: Enable this option to synchronize your order status when it changes on your WooCommerce Store to Zoho Books & Inventory
8. Create Adjustments When Order Placed: Enable this option to create stock adjustments when an order is placed, when a user places an order the stock is automatically adjusted in your Zoho inventory.
9. Synchronize Product Stock in WooCommerce: Enable this option to synchronize product stock quantities between Zoho and WooCommerce. When enabled, any changes to product stock levels in Zoho will automatically update in your WooCommerce store, ensuring accurate inventory management.
10. Auto Update Stock: Enable to update product stock quantity from the Available Stock field on Zoho
11. Tax Sync: Enable this option to sync order tax details between WooCommerce and Zoho Books and Inventory. This applies to both single and multiple taxes, ensuring accurate tax calculations and seamless tax reporting for all orders.
12. Shipping Sync: Enable this option to sync shipping tax and shipping charges/costs between WooCommerce and Zoho Books and Inventory.
Note: The above 2 features are currently available only for US data centers, with support for other countries coming soon.
FAQs
↑ Back to top- How do you set up the connection with Zoho Books or Zoho Inventory?
To set up the connection, log in to your Zoho account and go to the Zoho API console to create a new app. You will get a client ID and client secret ID to set up the connection. You can follow the app setup guide to see the complete process.
2. What feeds do we get with the Zoho Books and Zoho Inventory integration to sync data?
The Woo Zoho Books/Zoho Inventory integration plugin comes with the following three default feeds, which sync the respective data over Zoho Books and Zoho Inventory:
- Default Contacts Feed
- Default Items Feed
- Default Invoice Feed
3. How is WooCommerce data synced over Zoho Books or Zoho Inventory?
By default, the integration extracts your product data from WooCommerce and syncs them as items over Zoho Books/Zoho Inventory. It retrieves data from WooCommerce orders for contacts and invoices and syncs it over Zoho Books/Zoho Inventory.
4. Can I create custom feeds to sync data?
You can create custom feeds to sync data to any Zoho Books/Inventory object. To do this, go to the Feed section and click on the “Add new feed” button. This will redirect you to a new feed you can customize based on another listed object and start syncing data accordingly.
5. What is Instant Sync?
If you enable the instant sync feature of Zoho Woo Integration, it will instantly synchronize your WooCommerce data to Zoho Books according to the event selected in your respective feed.
6. Can I sync the data manually?
Yes, you can sync data manually. There are two options available to sync data manually:
- Bulk Data Sync: Sync all the WooCommerce objects of your site to Zoho Books in one click.
- One Click Sync: Sync all your site’s new/failed WooCommerce objects to Zoho Books in one click.
In addition to the above options, you can sync individual orders and product data from the order edit and product edit pages.
7. Can I connect my WooCommerce store with both Zoho Books and Zoho Inventory at the same time?
No, it is not currently possible to connect your WooCommerce store with both Zoho Books and Zoho Inventory simultaneously. You can only use one integration at a time, either Zoho Books or Zoho Inventory.
8. Can stored log data be deleted automatically?
You can set the duration for the logs to be stored in the “Settings” tab of the WooCommerce Zoho Books Integration Plugin. The logs will automatically be deleted after the set duration.
9. Contacts and Items feeds are syncing correctly, but Invoices are not syncing to Zoho Books.
Please ensure you enable manual invoice number generation under Zoho Books > Sales > Invoices section.
10. How do I connect with your customer support if needed?
Our customer support works 24/7 to help you, you can contact us here.

