Documentation of Auto Complete Orders for WooCommerce.
Installation
↑ Back to top- Download the .zip file from your WooCommerce account.
- Go to: WordPress Admin > Plugins > Add New and Upload Plugin the file you have downloaded.
- Install Now and Activate.
More information at Install and Activate Plugins/Extensions.
Initial Setup & Configurations:
↑ Back to topAfter activating the Auto Complete Orders extension, you can see a new “Auto Complete Orders” under WooCommerce menu to create auto-completion rules and control the CronJob settings from WooCommerce > Settings > Auto Complete Orders tab.
Creating New Auto Complete Rule:
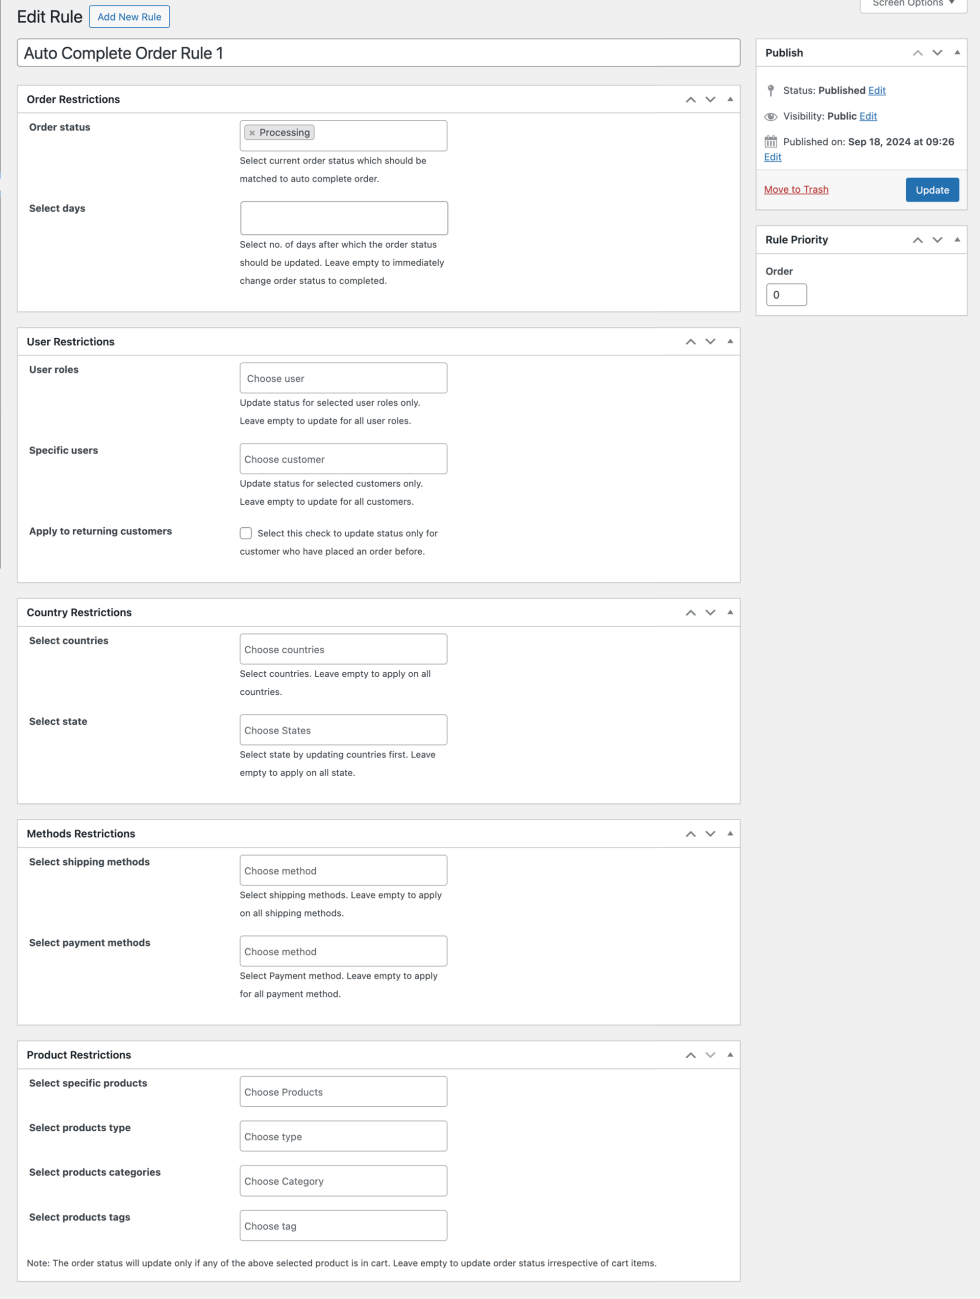
↑ Back to topIn order to automatically change order status to “completed”, you would need to create new custom rule. You can create new rule from WooCommerce > Auto Complete Orders > Add New Rule. While creating new rule you can use following conditions.
These conditions have “AND” relation meaning all of the selected conditions needs to be met in order to update status to completed. For example, if you have selected order status – processing and then selected product type as Virtual and user role as B2B then order status will change to Completed only if a customer with B2B user role has placed an order of Virtual product and its current order status is processing. If you don’t specify any condition beside the current order status then the rule will apply for every order.

Rule Tile
↑ Back to topAdd a unique title for the Auto Complete Orders new rule.
Apply Restriction Based On Order Status & Duration
Order Status: You can choose the current order status, which should be matched to auto-complete order from the following options:
- Pending Payment
- Processing
- On hold
- Cancelled
- Refunded
- Failed
- Draft
Select days: Choose no. of days after which the order status should be updated. You can leave it empty to immediately change the order status to completion.
Restrict Based on Customers & Roles
↑ Back to topUser Roles: Easily update the status for selected user roles by selecting the user role in this select box.
Specific Users: Select certain customers to update the order status for individual customers only.
Apply to Returning Customers: Enable the checkbox to update the status only for customers who have placed an order before.
Note: You can choose to leave empty user roles and specific users to apply for all.
Implement Country Restrictions
↑ Back to topSelect Country: Specify the country where the rule should apply. If the order is from UAE, the status will change.
Select State: Select country and then you can further select states to switch status only for specific states.
Note: Choose to leave empty to apply the rule for all countries and states.
Apply Methods Restriction to The Rule
↑ Back to topYou can easily implement the shipping and payment method restriction on the rule such as the following;
Select Shipping Methods: Select the shipping method to change order status to completed.
Select Payment Methods: Select payment method to change order status to completed only if the order is placed using any of the selected payment method.
Restrict Rules on the Basis of Products
↑ Back to topSelect Specific Products: Apply the rule to specific products – ensuring that the order is marked as completed if ant of the selected product is in order.
Select Products Categories or tag: Convert order to completed status if the cart has any product that belongs to selected category or product tag.
Select Product Type: Choose the product type to apply rule only if the product belongs to selected type i.e virtual, simple, grouped, etc.
Note: The order status will update only if any of the above-selected products are in the cart. Leave empty to update the order status regardless of cart items.
Customize Cron Job Settings
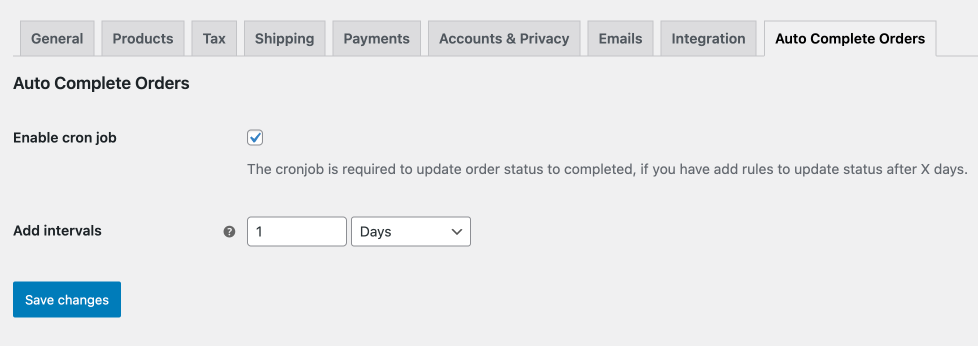
↑ Back to topIf you have added rules to update the status after X days, the cron job is required to update the order status to completion. You can easily configure the Cron Job to auto-complete orders by navigating to WooCommerce > Settings > AutoComplete Orders.
Enable Cron Job: Choose to enable the cron job to update the status of past orders automatically.
Add Intervals: Specify for how many times the cronjob should per day, week or month.

