Description
↑ Back to topThis inventory manager plugin enables the admin to monitor stock levels and manage suppliers efficiently. The admin can activate stock and restock alerts for both suppliers and customers. Customers have the option to sign up for restock alerts and will receive an email notification when a product is restocked. All products can be managed from a single, comprehensive inventory management page. Additionally, the admin can set up custom email notifications for recipients and suppliers, which will be triggered based on the selected product and its stock status.
Features
↑ Back to top- Product restock alerts
- Stock Notifications
- Inventory management section
- Suppliers
- Stock Locations
Installation
↑ Back to top- Download the .zip file from your WooCommerce account.
- Go to WordPress AdminDashboard > Plugins > Upload Plugin > Choose File.
- Install Now and Activate Plugin.
Getting Started
↑ Back to topProduct Restock Alerts
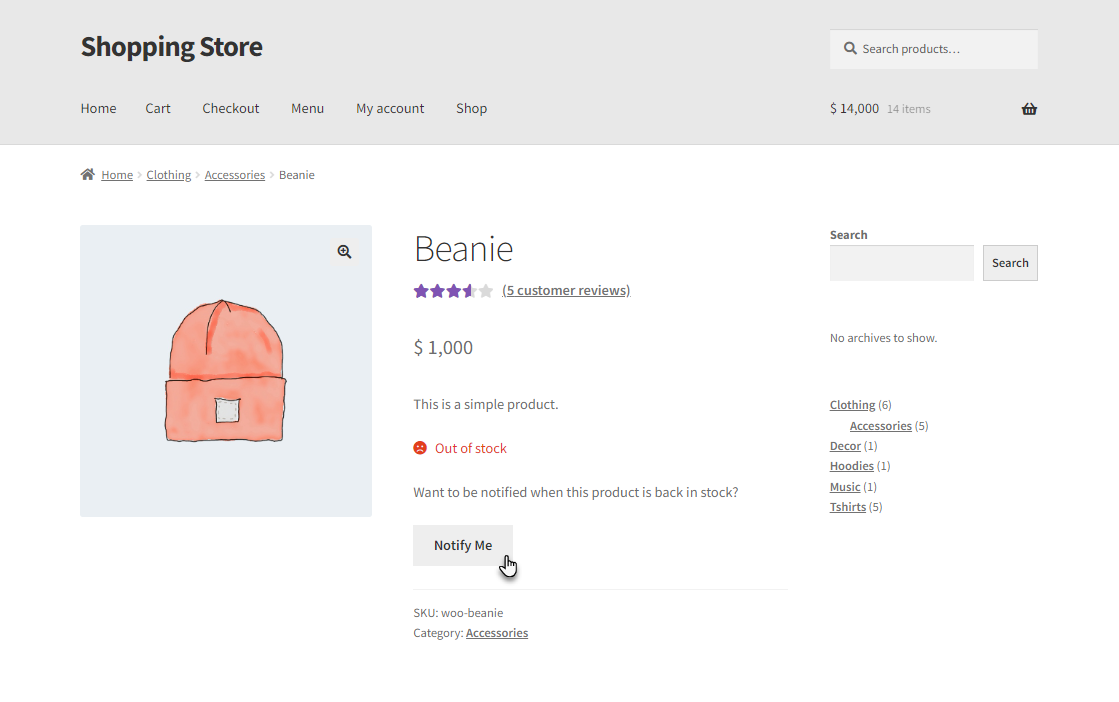
↑ Back to top- This feature allows the admin to set customer alerts when a product is restocked. When a product is out of stock, a “Notify Me” button will appear on the product page. Customers can sign up for an alert for that specific product.
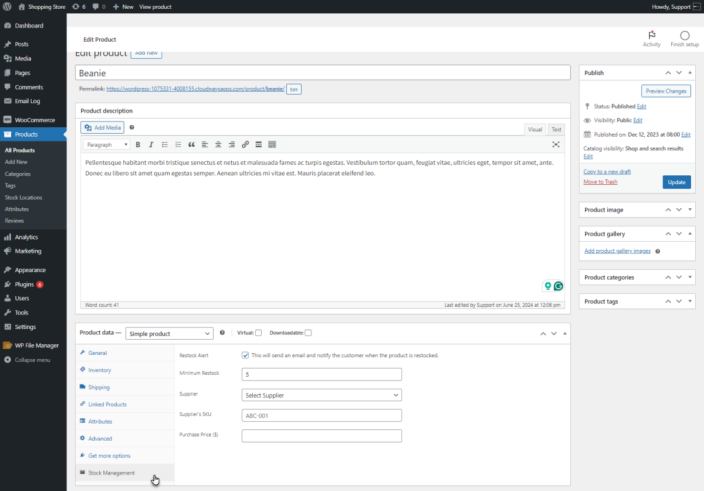
- Go to WordPress Admin Dashboard > Products > All Products > Choose a Product.
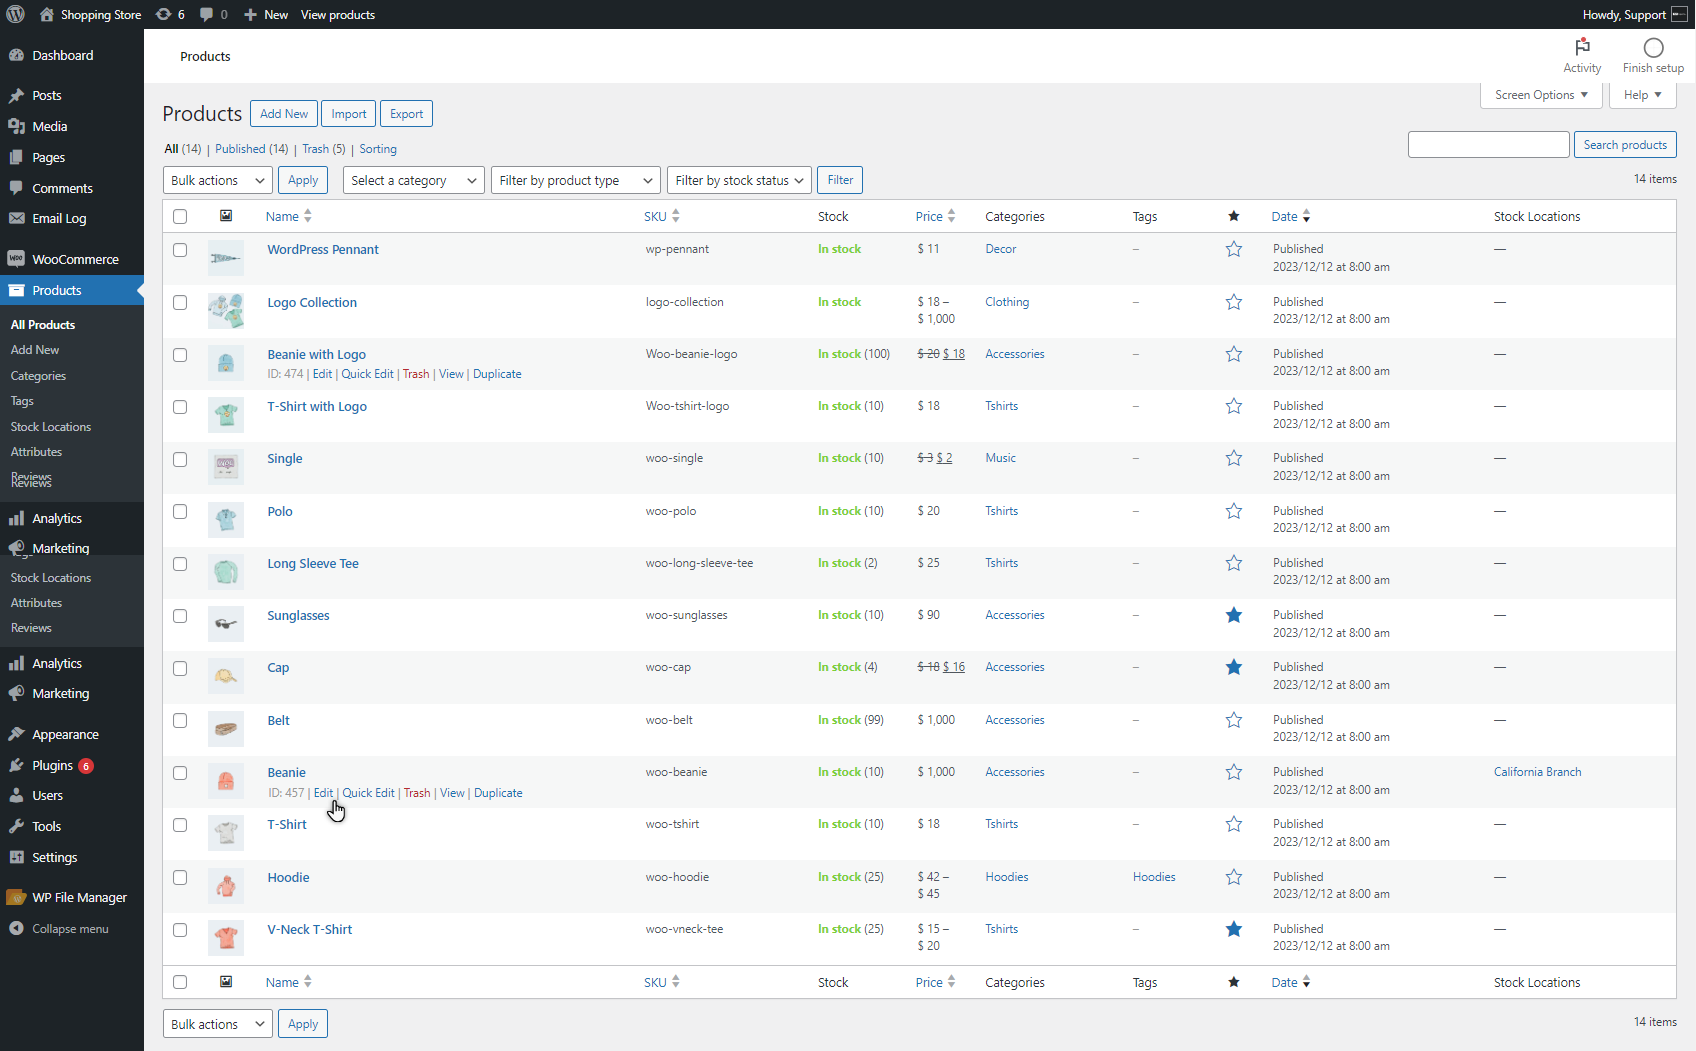
- Navigate to the Stock Management tab on the product page.
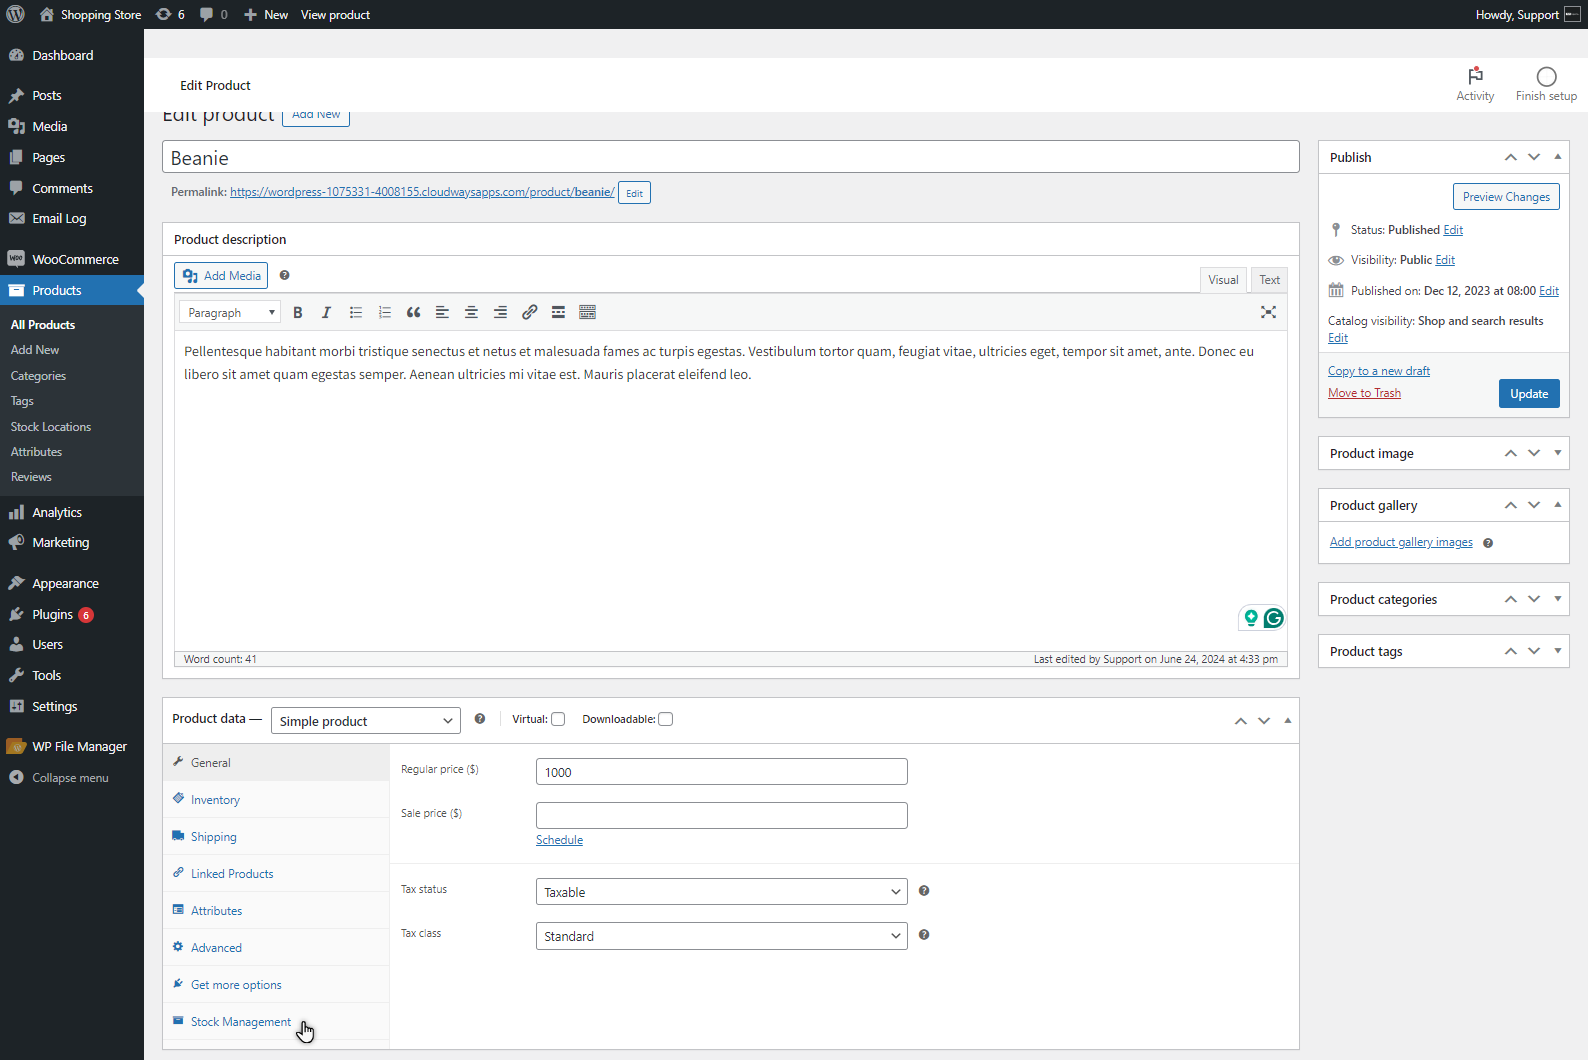
- Enable the Restock Alert option. This will send an email notification to customers when the product is restocked.

- Once the Restock Alert option is enabled, a Minimum Restock field will appear. This can be left empty, and the alert will be sent when the stock quantity in Product data > Inventory is set.
- If the admin wants to set a custom restock quantity on which the restock alert notification will be sent, then set the minimum restock limit to trigger the email notification.
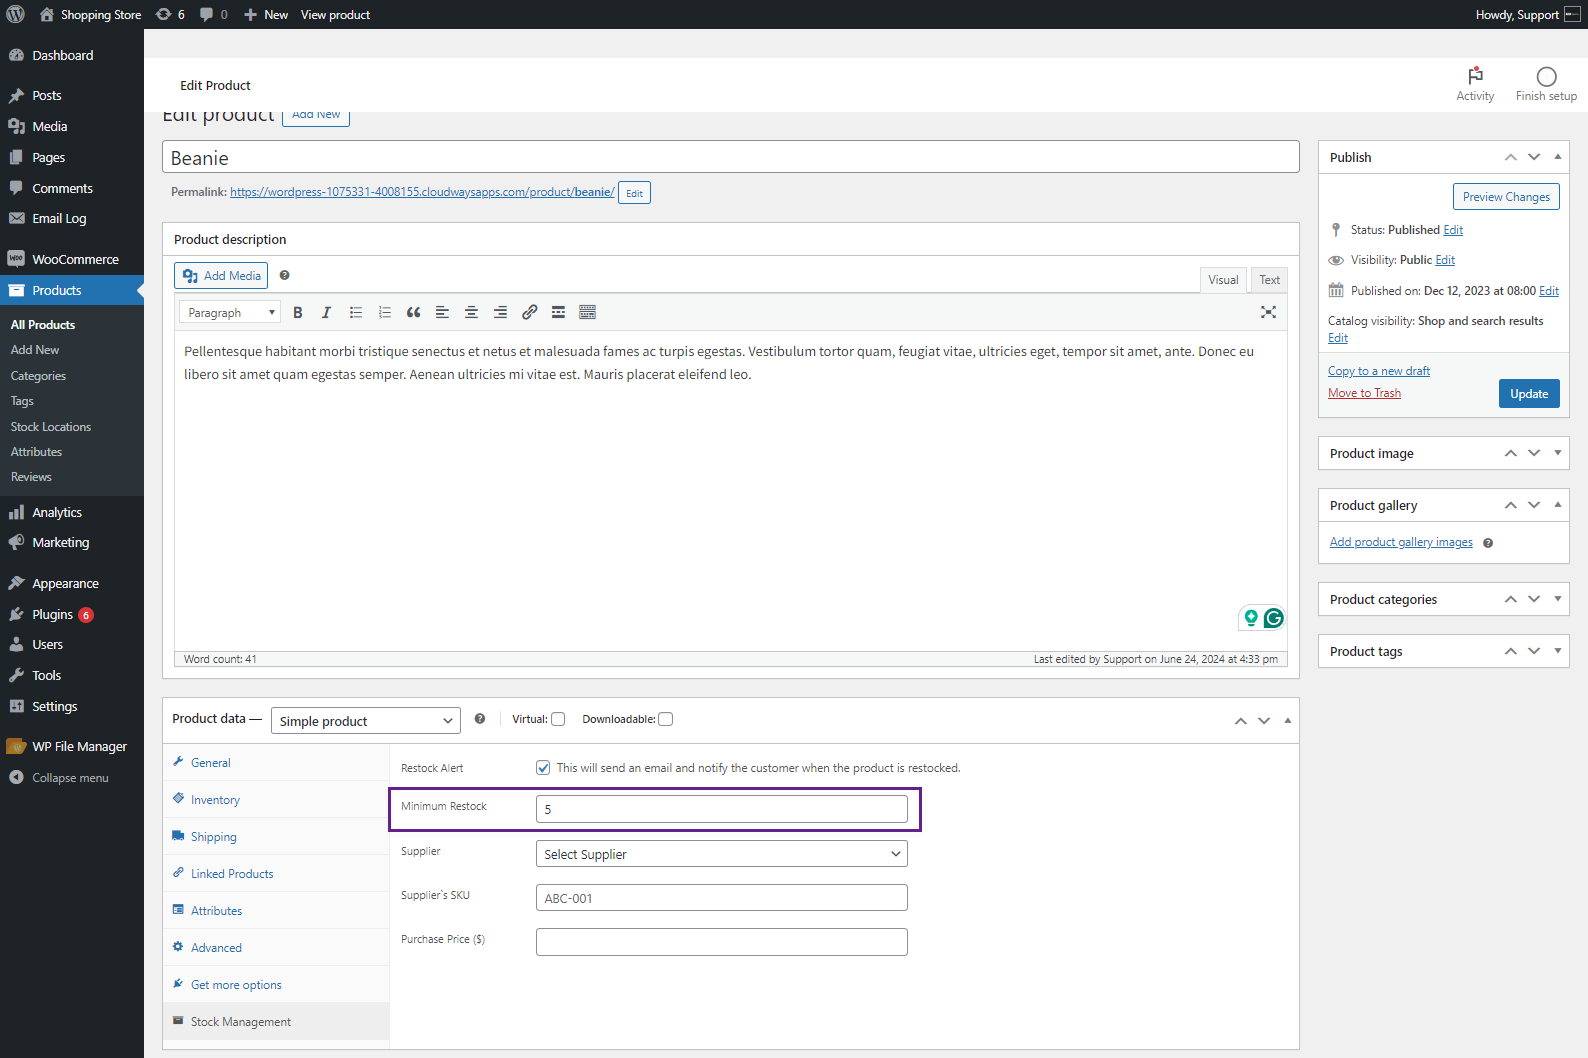
NOTE: This Minimum Restock is the level of restock quantity on which the restock email will be sent to the signed-up users.
- Click the Update button to save your changes.
Front End Impact
For Logged in Users
- Login to your WordPress account.
- Go to the Product page.

- A “Notify Me” button will appear when the product is out of stock.

- Click on the “Notify Me” button to receive a notification when the product is restocked.
- A Successfully Signed up message will appear.
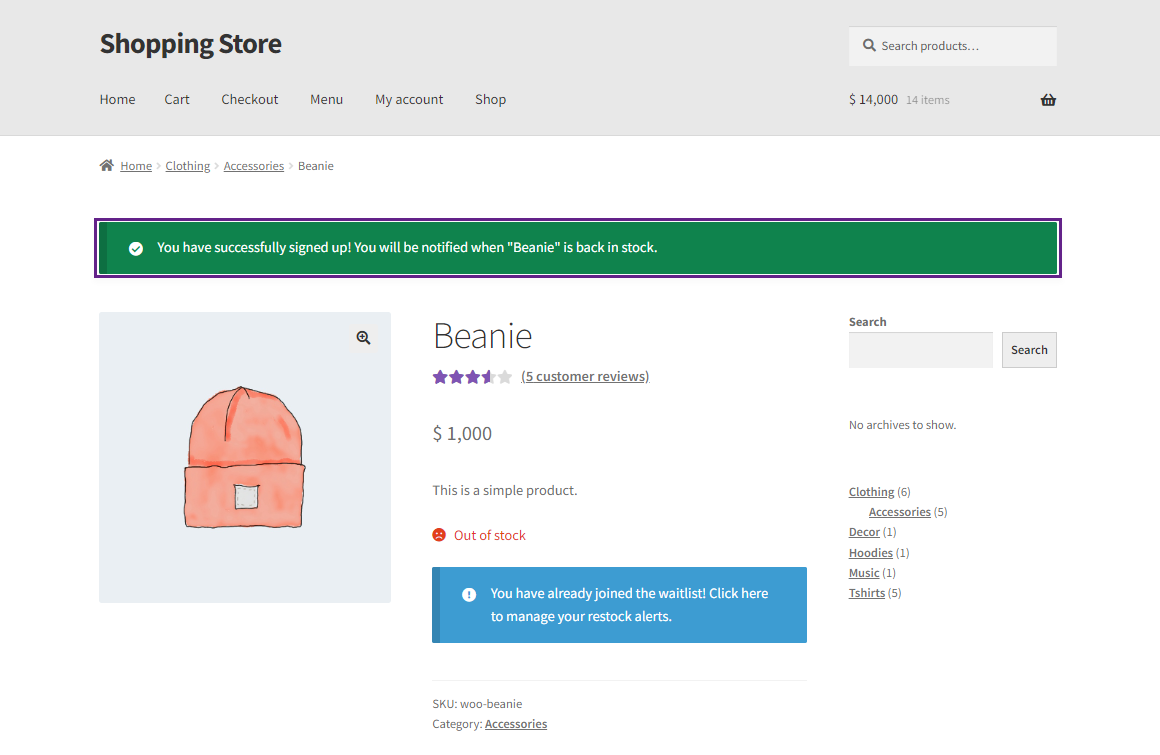
NOTE: The user will be notified when the product is restocked.
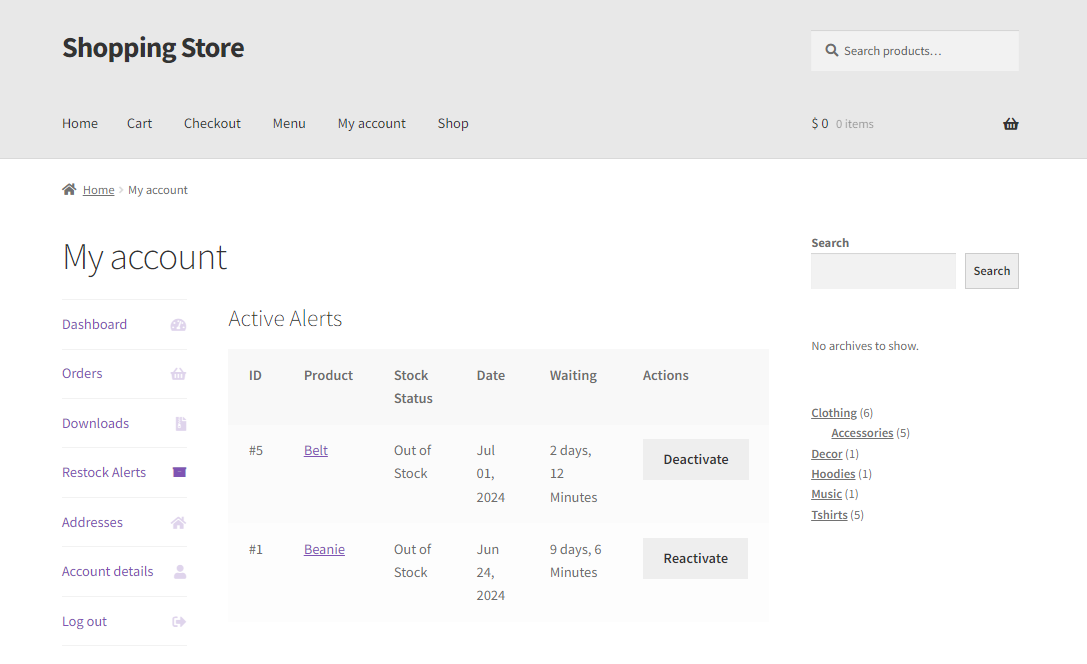
- The User can view all their active alerts by navigating to My Account > Restock Alerts.

- All the restock alerts for the user will be listed in the Restock Alert tab. From this tab, users can activate or deactivate the alerts.
For Guest Users
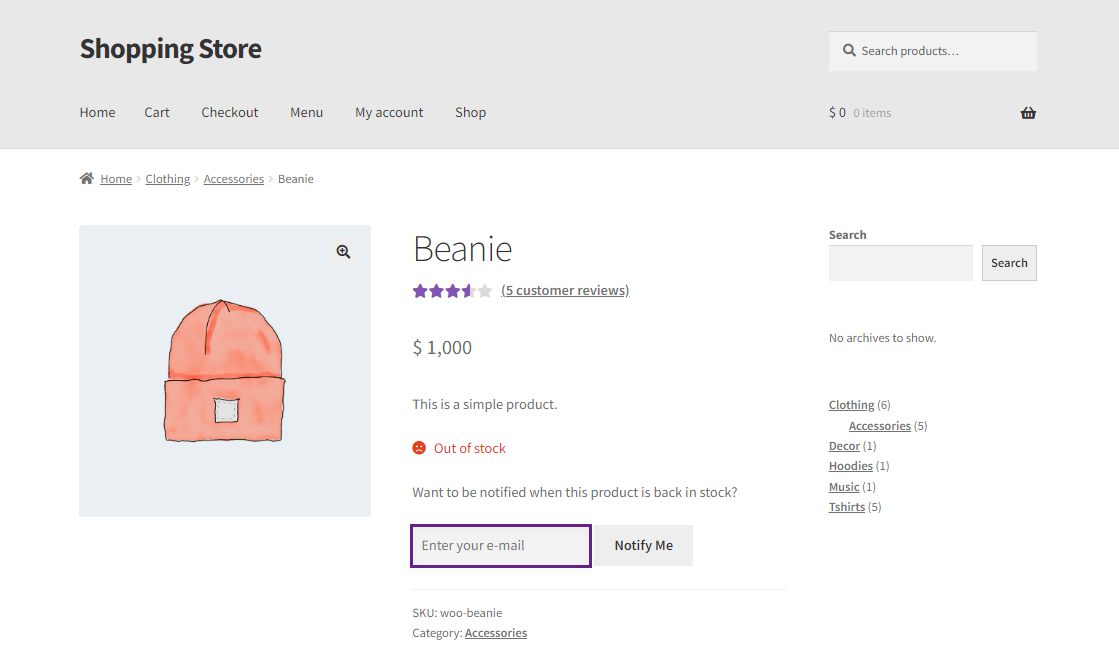
- An email box will be displayed if the user is not logged in. The guest must enter their email address, enabling the “Notify Me” button, allowing them to sign up for the alert.
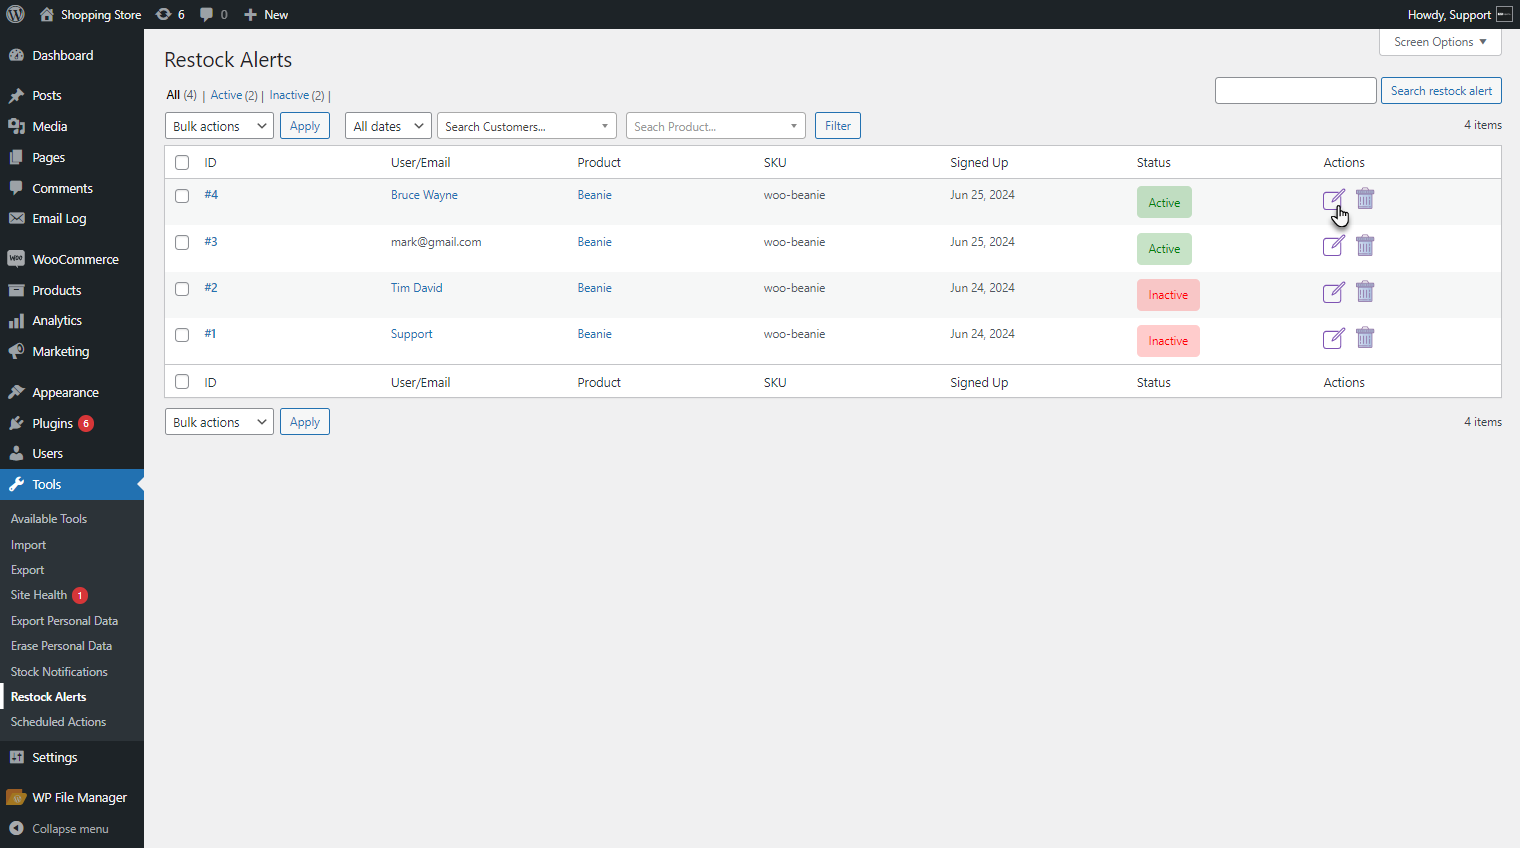
Restock Alerts
- All signed-up customers and their alerts will be displayed in the “Restock Alert” section, Navigate to WordPress Admin Dashboard > Tools > Restock Alert.

- The admin can edit these alerts and view their status. By clicking the “Edit” button in the “Actions” column, the alert edit page will open, allowing further modifications.
- The Edit Restock Alert screen will appear. There will be two meta boxes present on the Edit Restock page.
- Details – The details of the Product and customer will be displayed
- Activity – The activity of the Restock alert will be listed in this section.
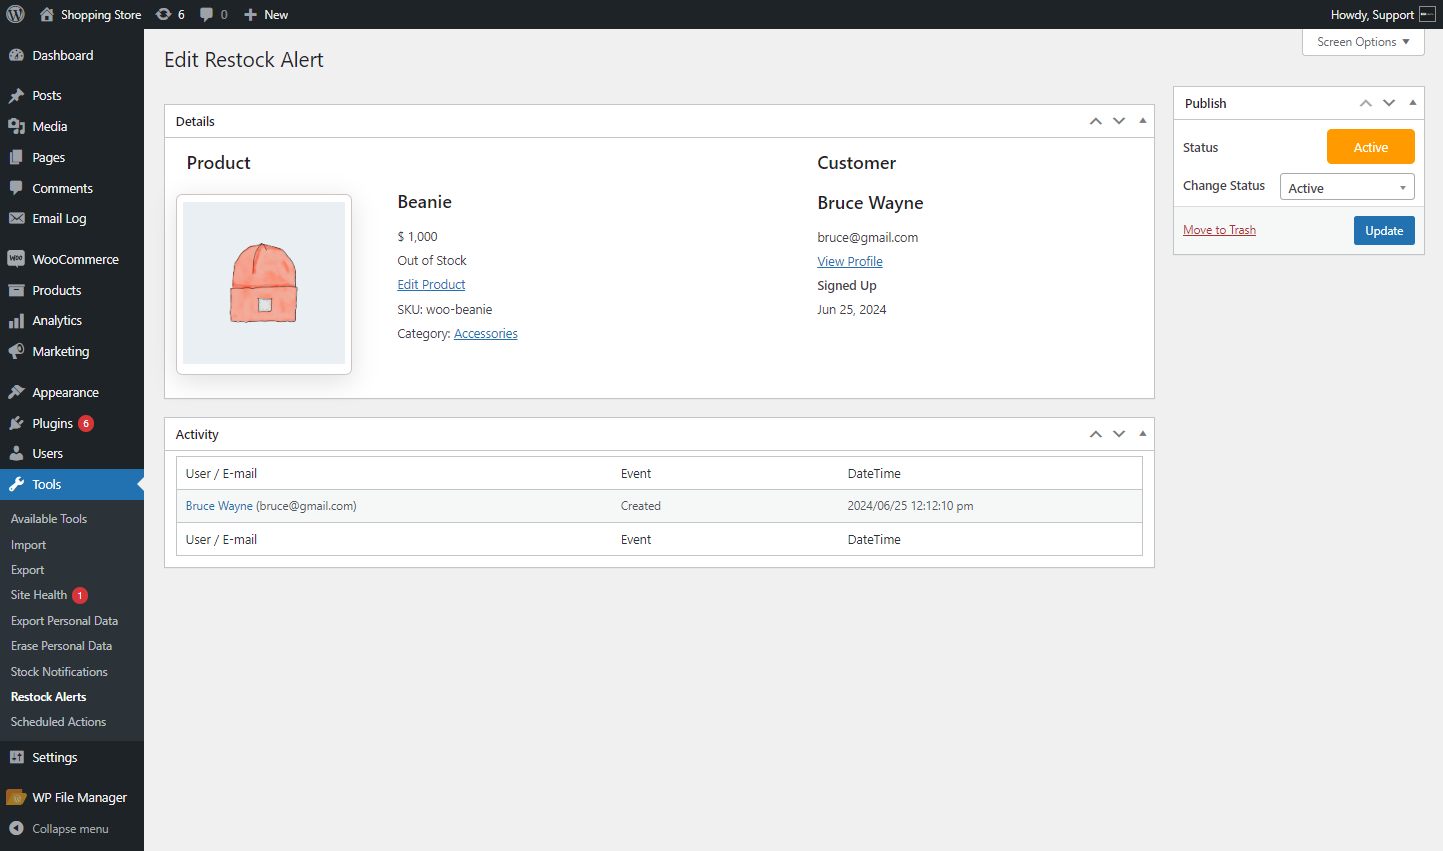
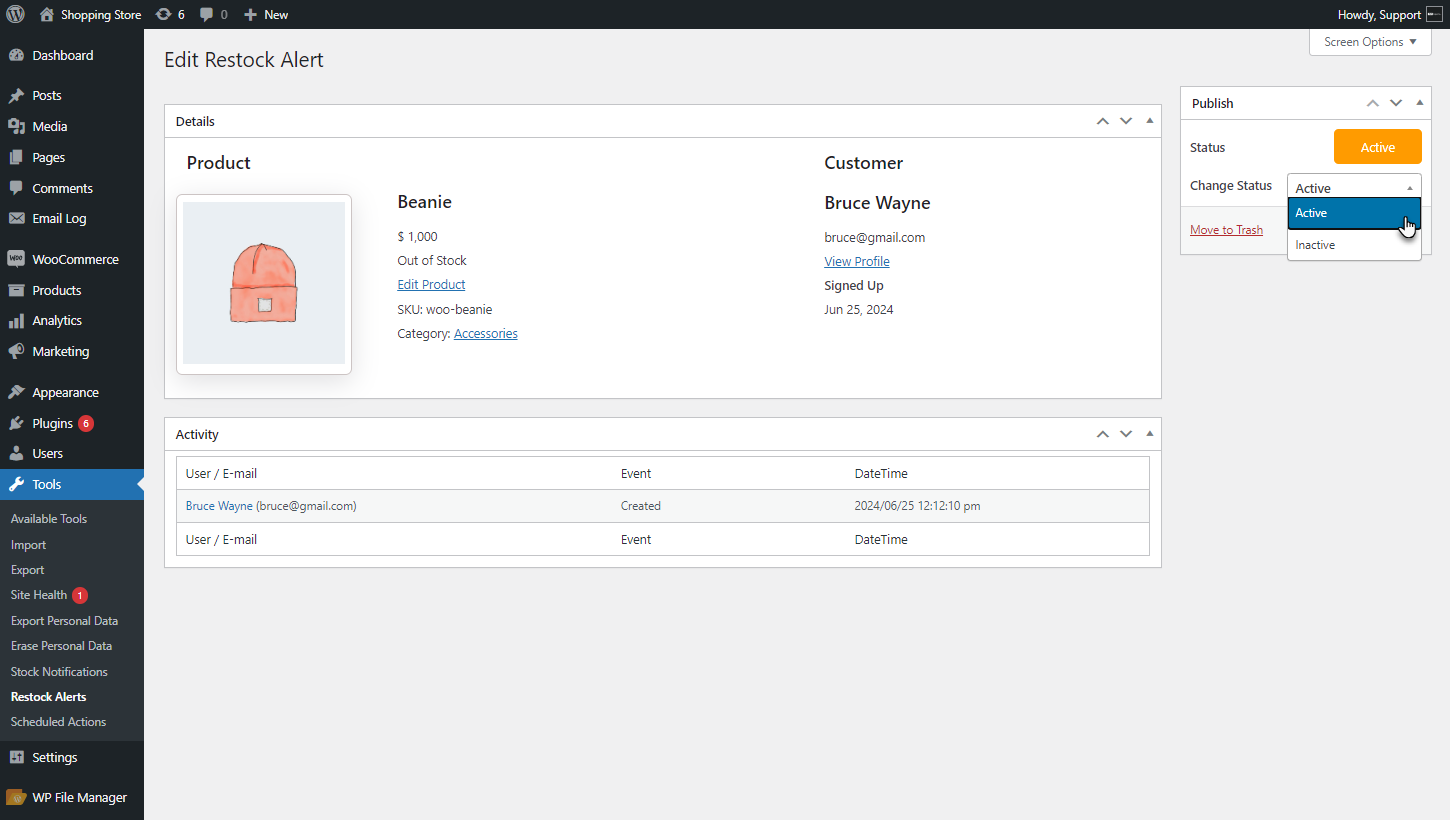
- The admin can change the Status of the Restock Alert from the Change Status drop-down.
- Click on the Update button to save your changes.

- When the product is restocked, the user will be notified via Email.

Suppliers
↑ Back to top- The admin can add suppliers, who can be used for inventory management and product settings. These suppliers can also be included in notifications to send low-stock and out-of-stock alerts, ensuring they are notified and can send product stocks.
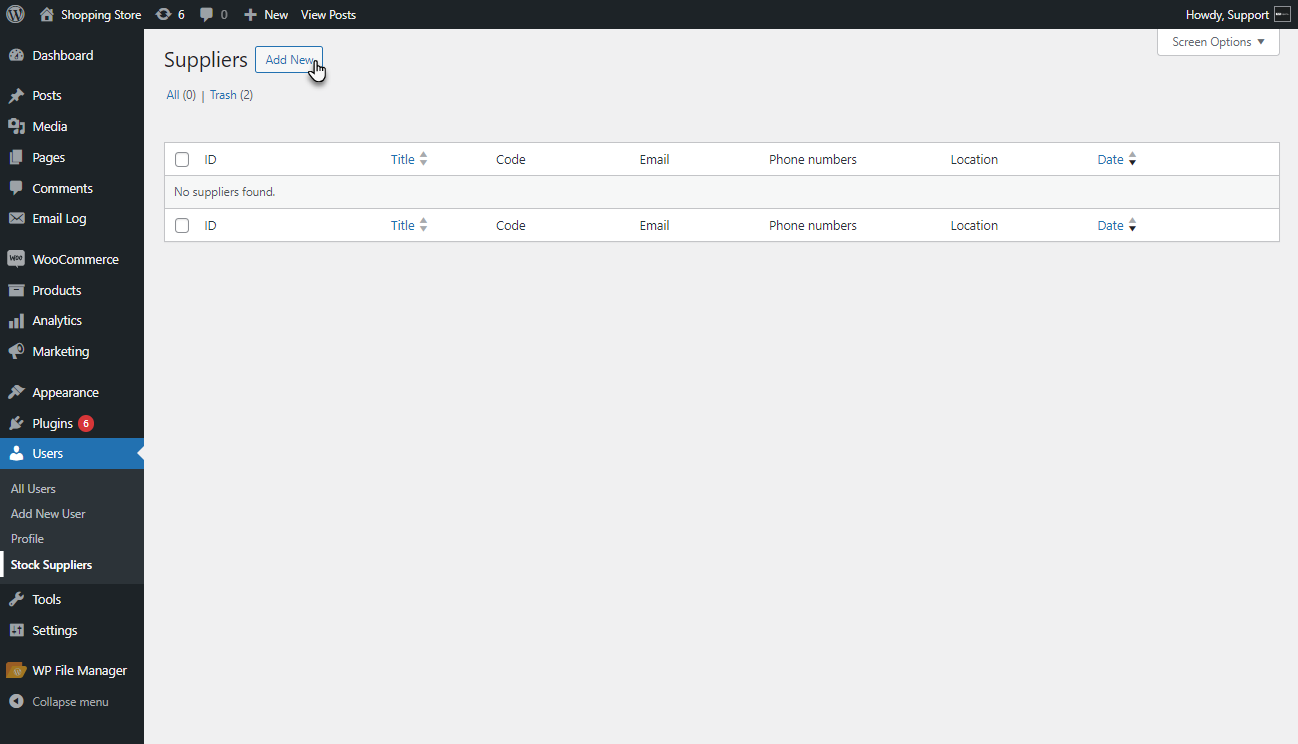
- Go to WordPress AdminDashboard > Users > Suppliers. The All Suppliers List page will appear.

- The admin can add a new supplier by clicking on the “Add New” button.
- The “Add Supplier” section includes three subsections.
- Supplier Details
- Billing Details
- Other Settings.
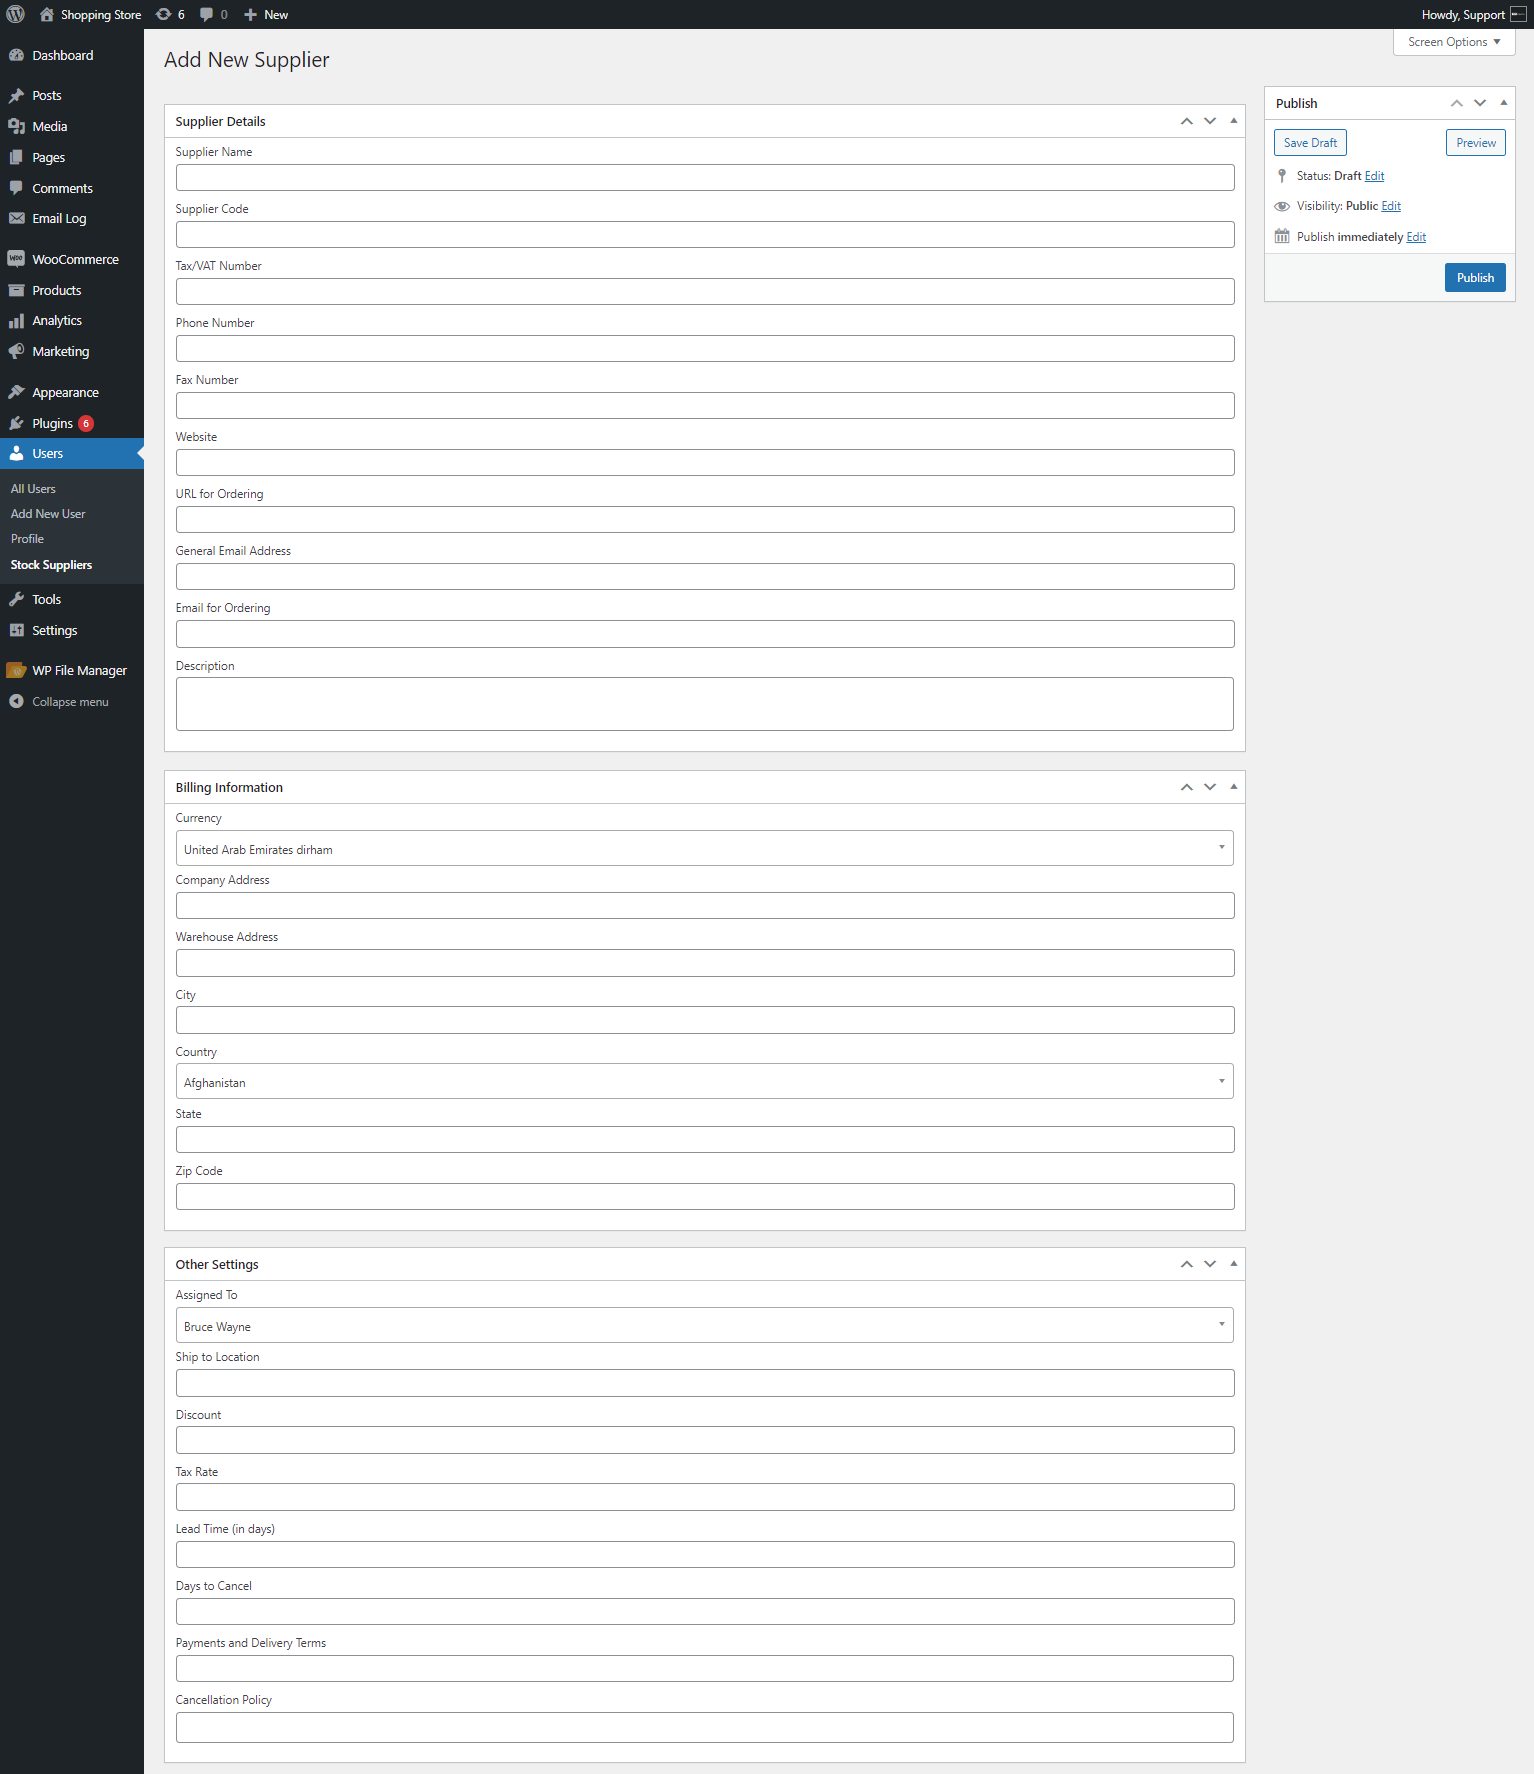
- In the Supplier Details meta box, The admin can add the following details.
- Supplier Name – The admin can add the name of the supplier. This is a required field.
- Supplier Code – The admin can assign a unique code to the supplier. This is a required field.
- Tax/VAT Number – The admin can add the Tax/VAT number of the supplier.
- Phone Number – The admin can add the phone number of the supplier.
- Fax Number – The admin can add the fax number of the supplier.
- Website – The admin can add the website of the supplier.
- URL for Ordering – The admin can add the supplier’s URL for ordering.
- General Email Address – The admin can add the general email address of the supplier. This is a required field.
- Email for Ordering – The admin can add the supplier’s email address for ordering purposes.
- Description – The admin can add a description of the supplier.
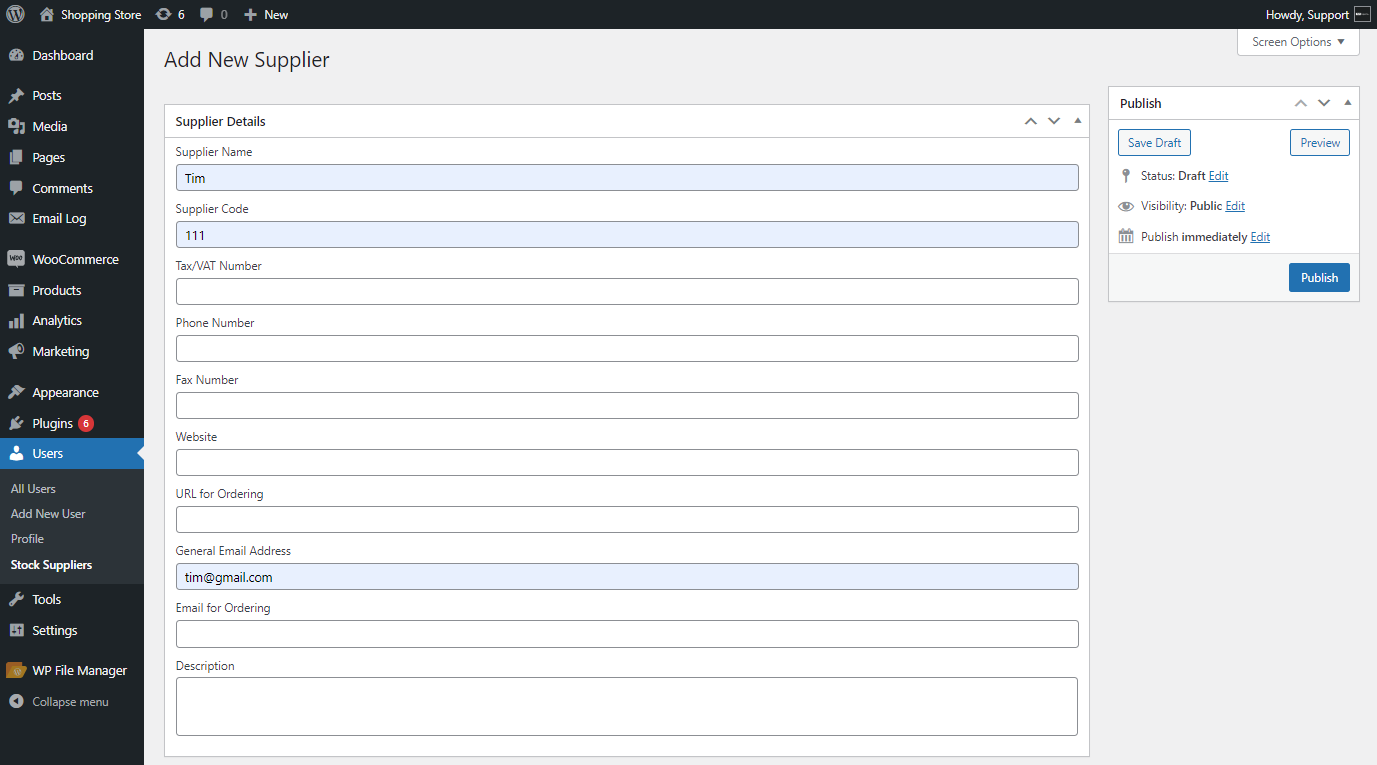
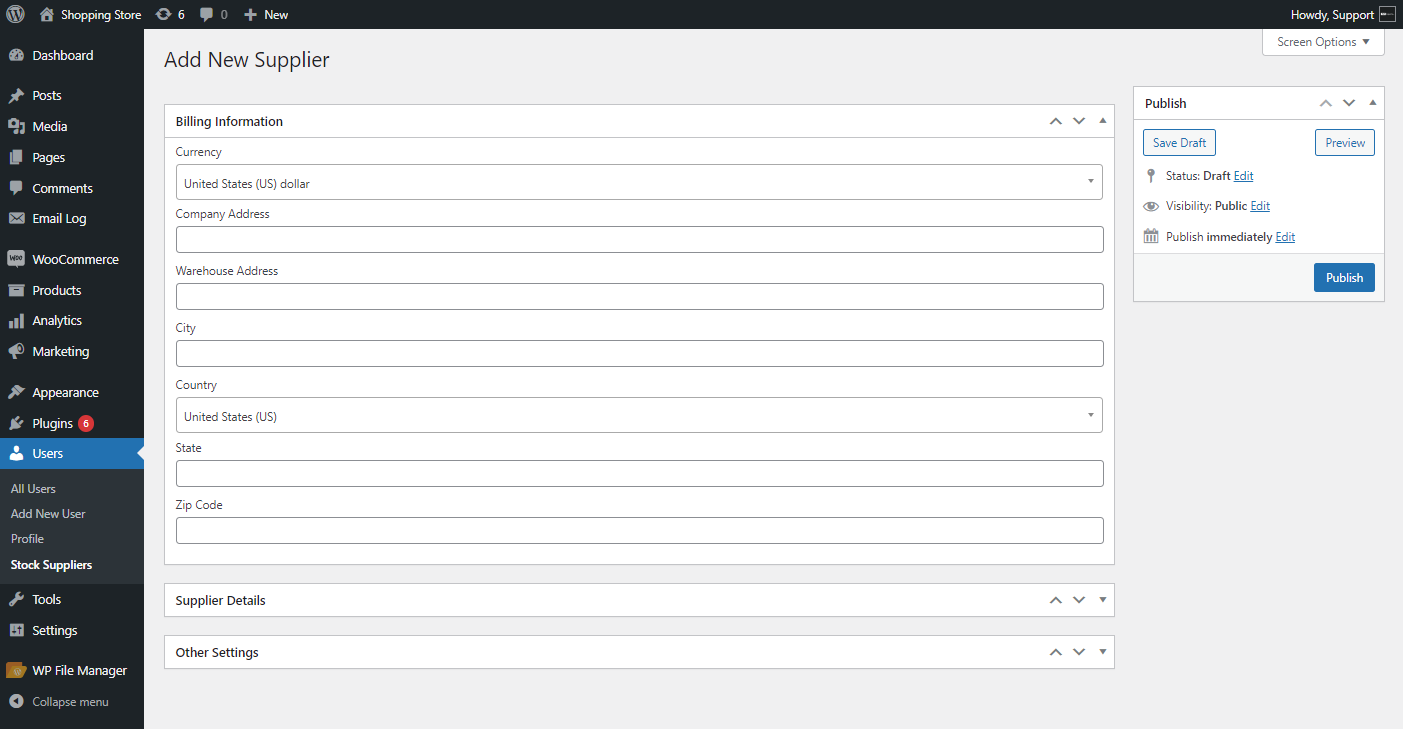
- Now move to the Billing Information meta Box. The admin can add the following details.
- Currency – The admin can select the currency used by the supplier.
- Company Address – The admin can add the company address of the supplier.
- Warehouse Address – The admin can add the warehouse address of the supplier, if applicable.
- City – The admin can select the city where the supplier is located.
- Country – The admin can select the country where the supplier is located.
- State – The admin can select the state where the supplier is located.
- Zip Code – The admin can add the postal code of the supplier.
- The admin can add additional information in the Others Setting meta box. This section includes useful settings for the admin, such as supplier lead time and the contact person for receiving stock at the warehouse or other locations. The admin can add the following details.
- Assigned To – The contact person who will be notified when a purchase order for this supplier is created.
- Ship to Location – The location of the contact person assigned to this supplier.
- Discount – The discount value offered by the supplier.
- Tax Rate – The tax rate applied by the supplier.
- Lead Time – The expected time for the order to arrive from this supplier.
- Days to Cancel – The number of days within which the admin can cancel the order from the supplier.
- Payment and Delivery Terms – The payment and delivery terms are agreed upon with this supplier.
- Cancellation Policy – The cancellation policy provided by this supplier, if any.

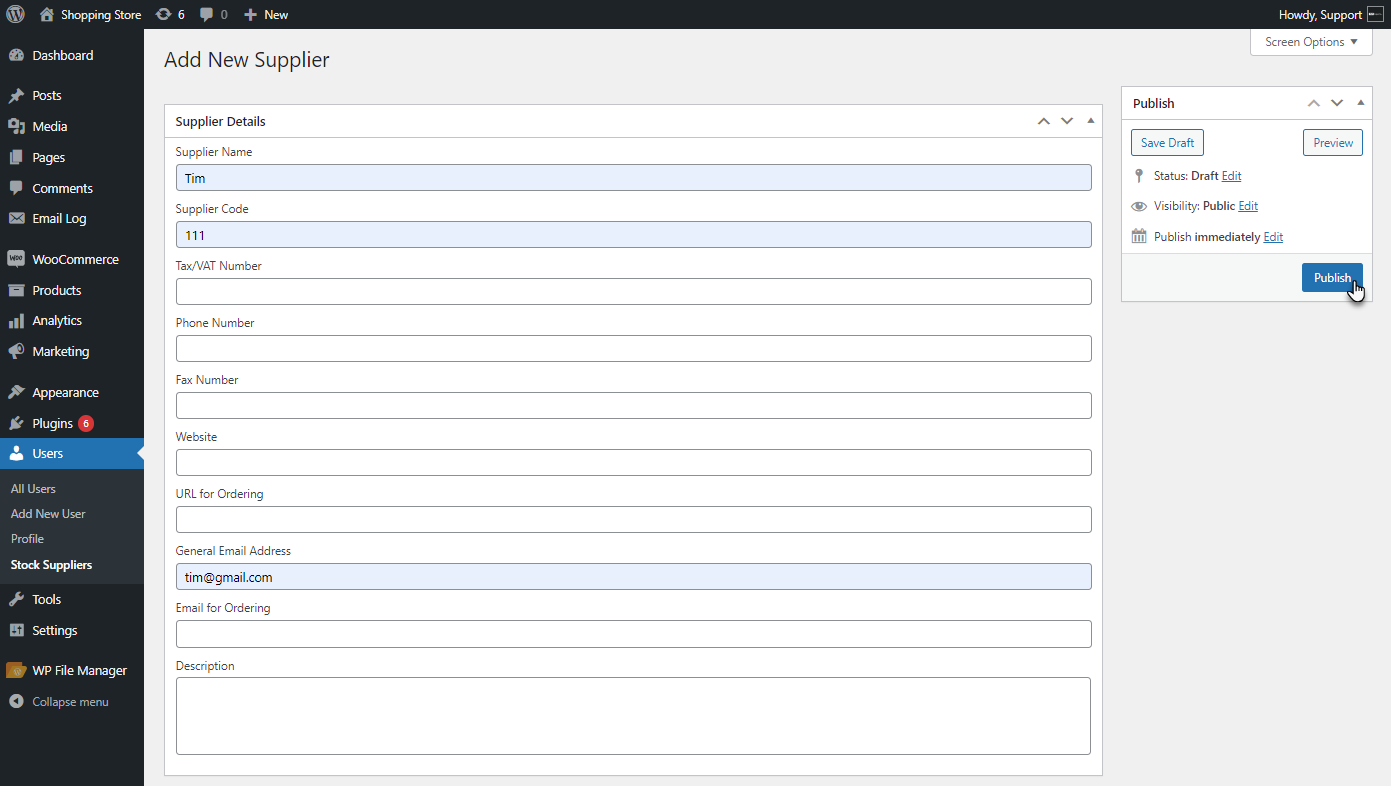
- Once done with the details of the Suppliers, Click on the Publish button to add a supplier.
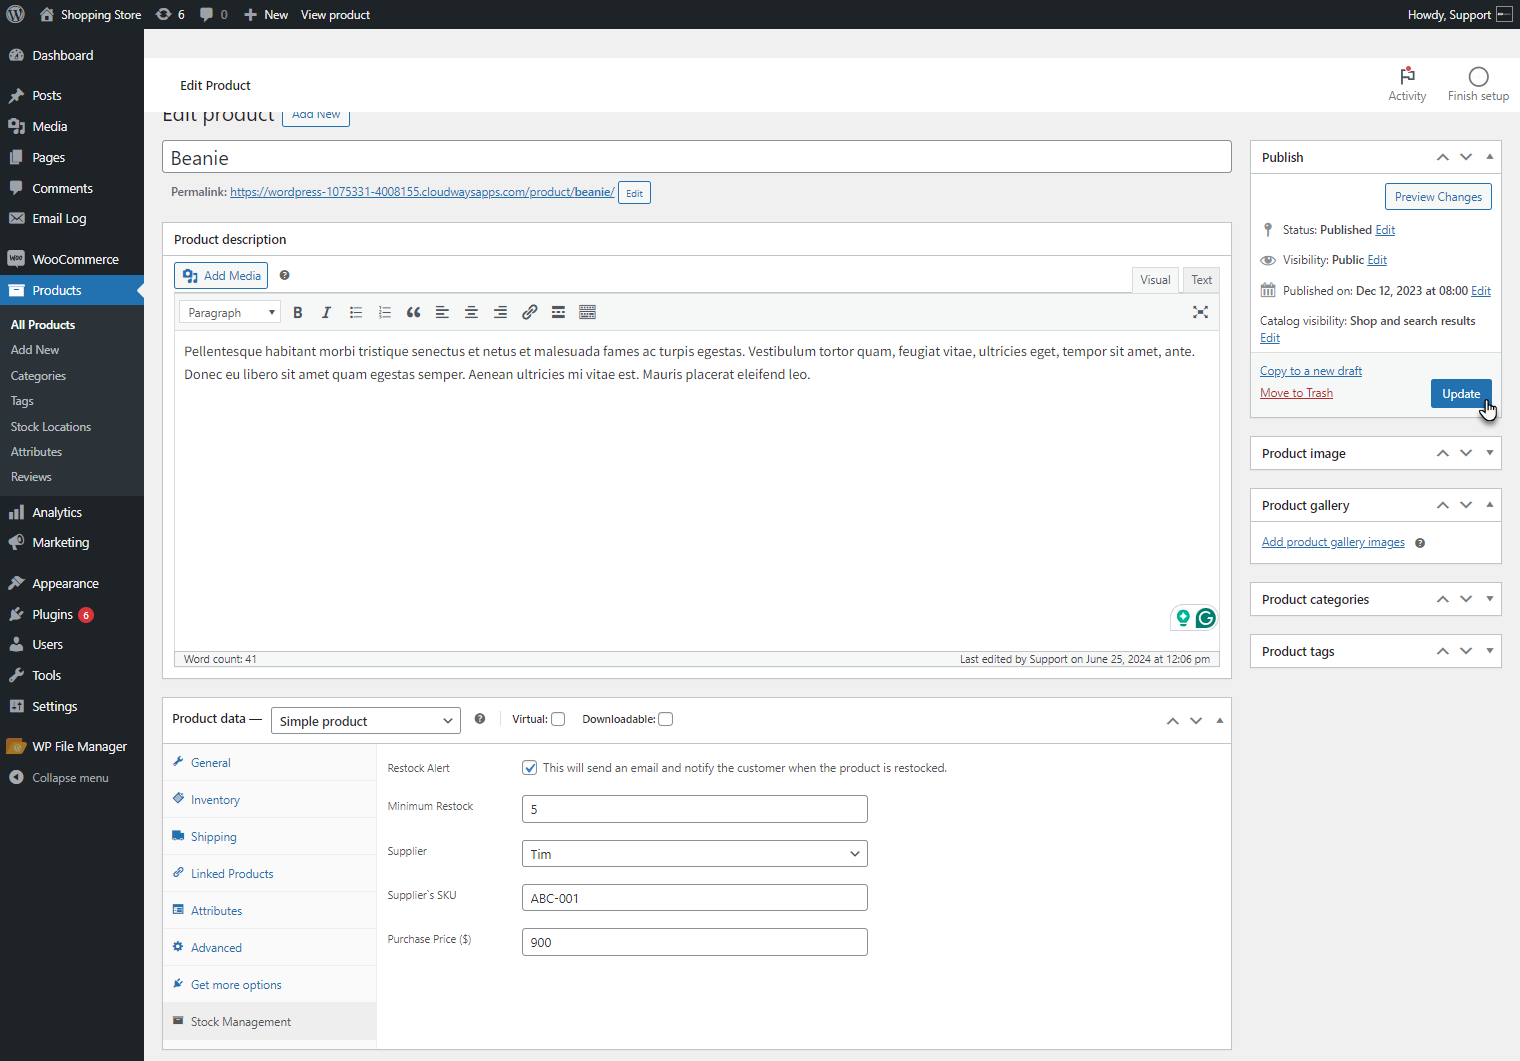
- The Supplier details will be visible on the Product settings page. Navigate to WordPress Dashboard > Products > All Products > Choose a Product.
- Scroll down to the Product Data section. Click on the Stock Management.
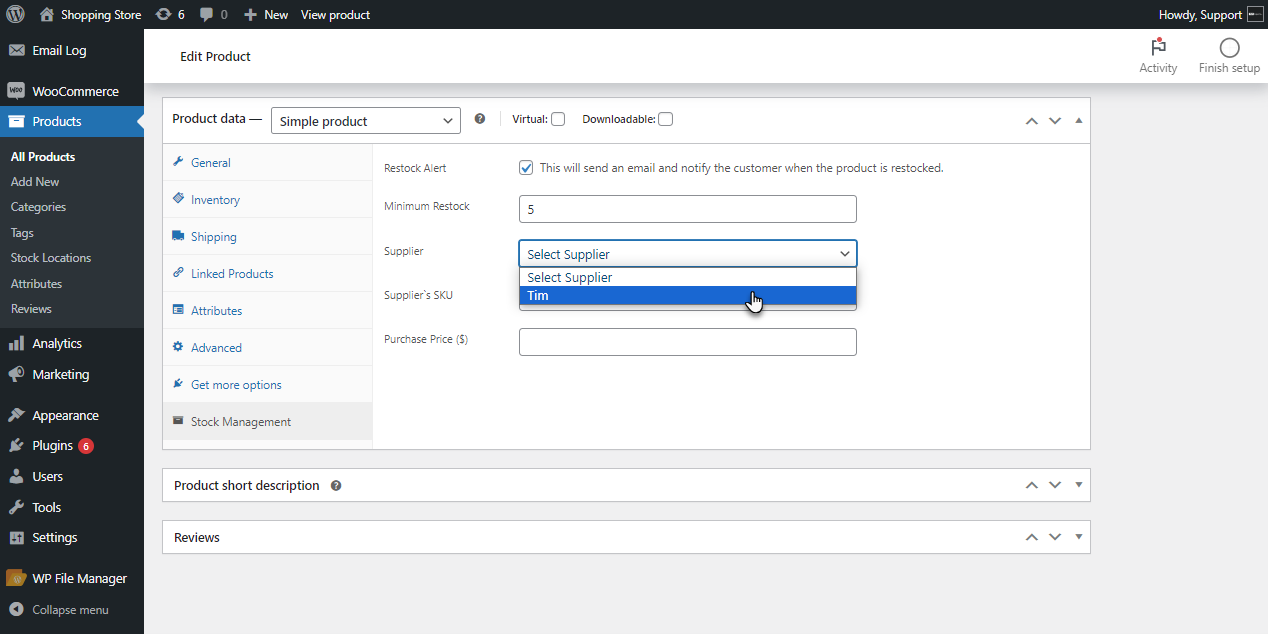
- There will be a Supplier drop-down list, the Supplier’s SKU, and the Purchase Price of the product from the supplier.
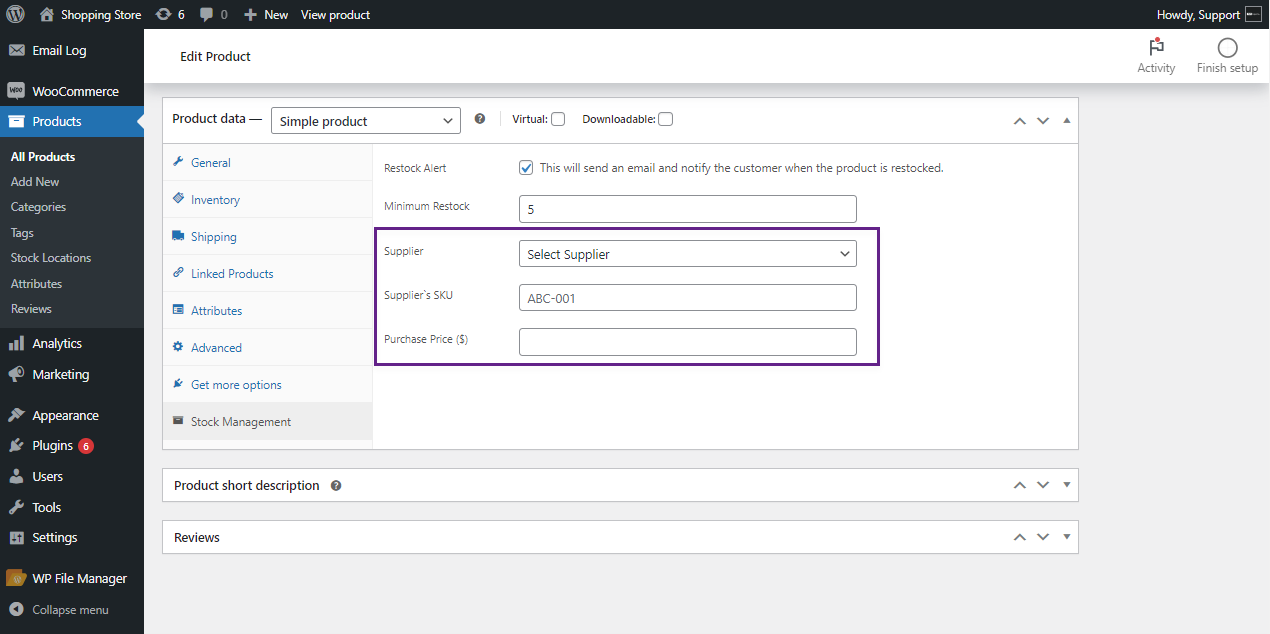
NOTE: For variable products, the supplier and supplier SKU will remain in the Stock Management section, while the purchase price will be specified for each variation.
- The admin can select the Supplier from the drop-down list.
- The admin can assign an SKU to the suppliers in the Suppliers SKU option.
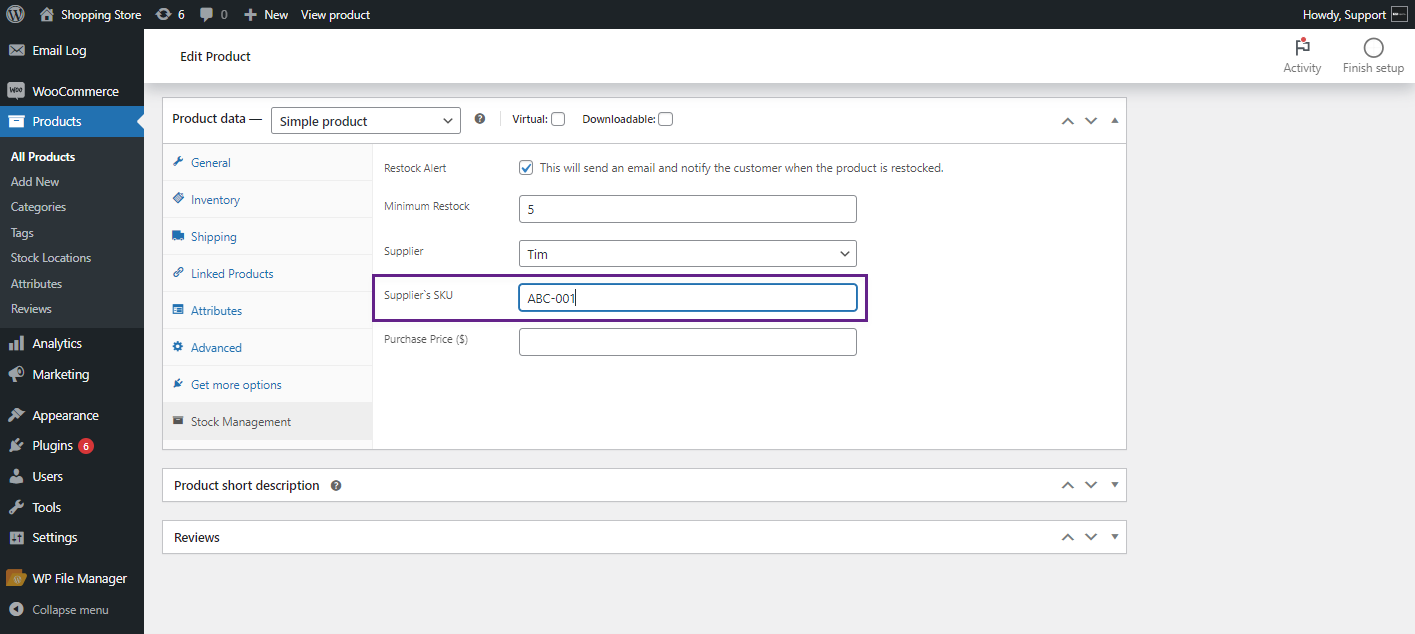
- The admin can add the Purchase Price of the product in the Purchase Price option.
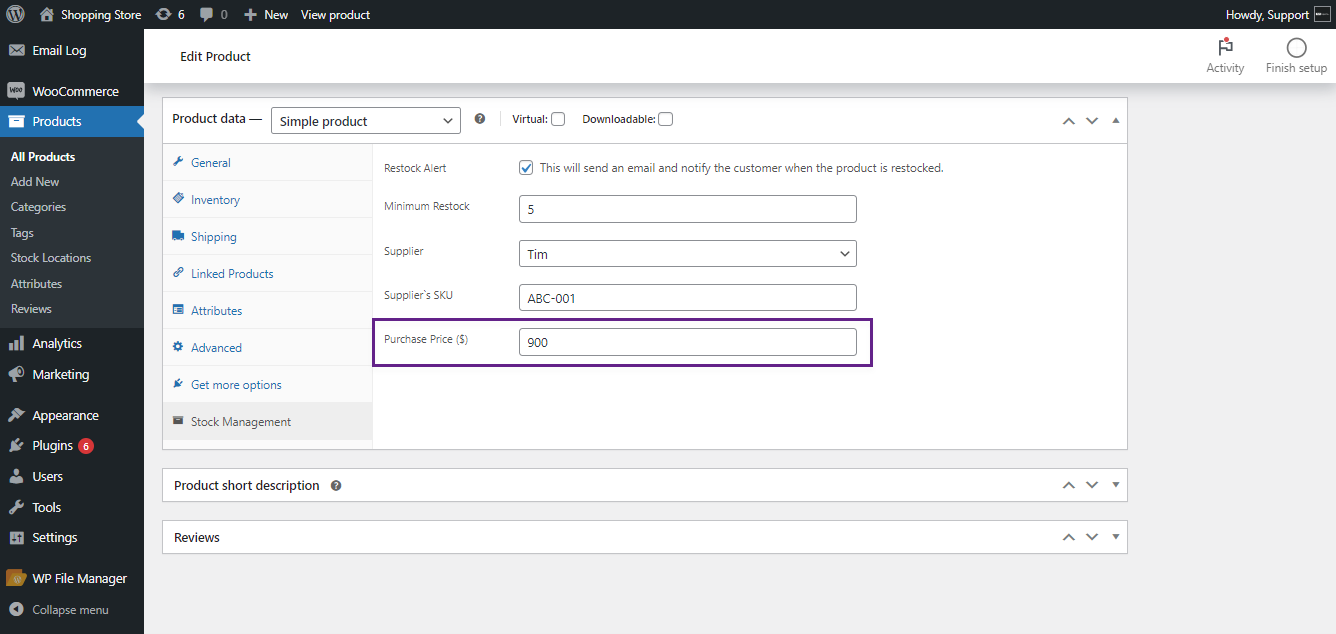
- Click on the Update button to save the Changes.
Stock Notification
↑ Back to top- This notification feature enables the admin to send email notifications to suppliers or other recipients.
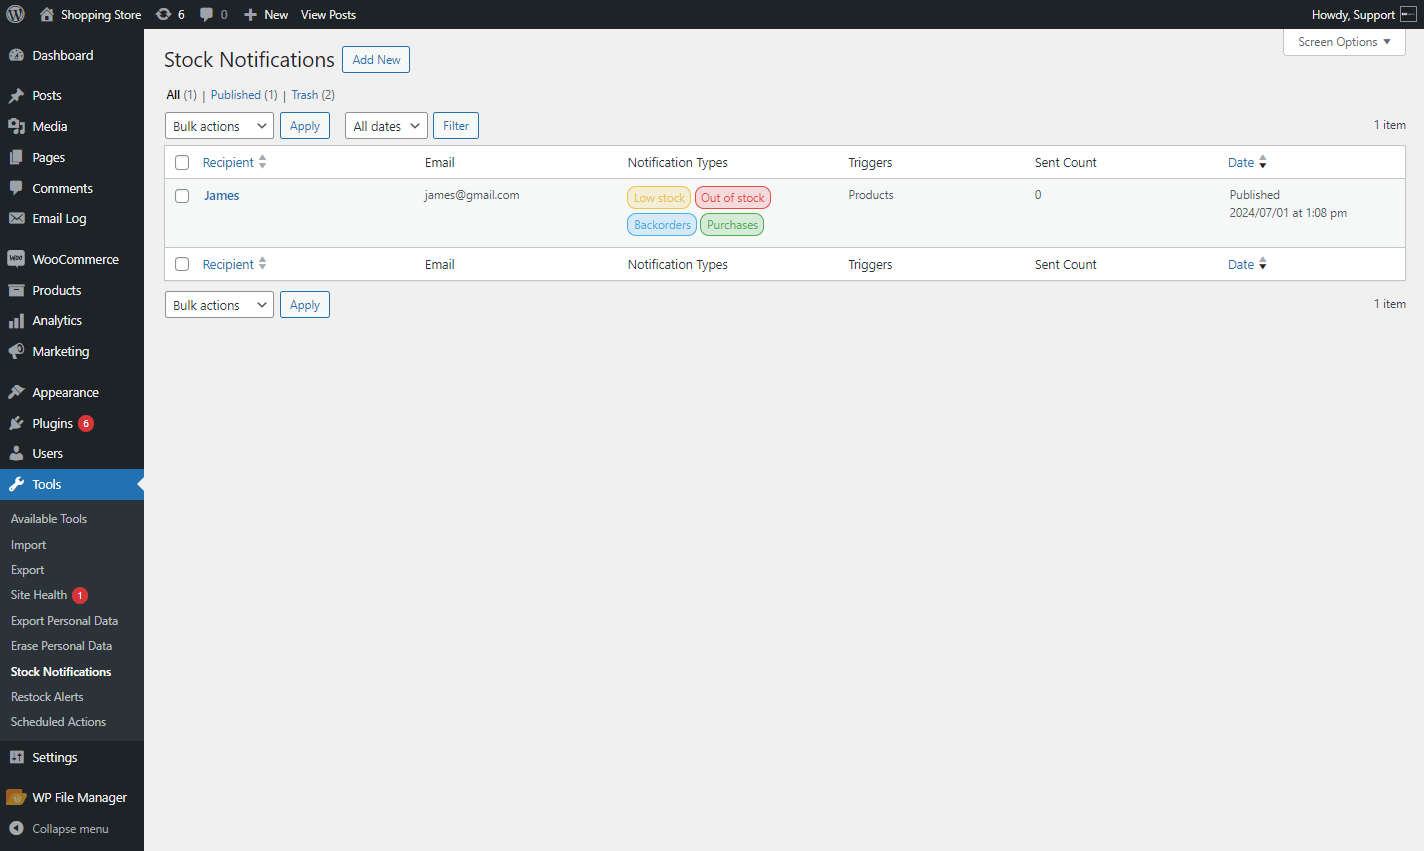
- Navigate to WordPress Dashboard > Tools > Stock Notification.

- Click on the “Add New” button on the Stock Notification list page.
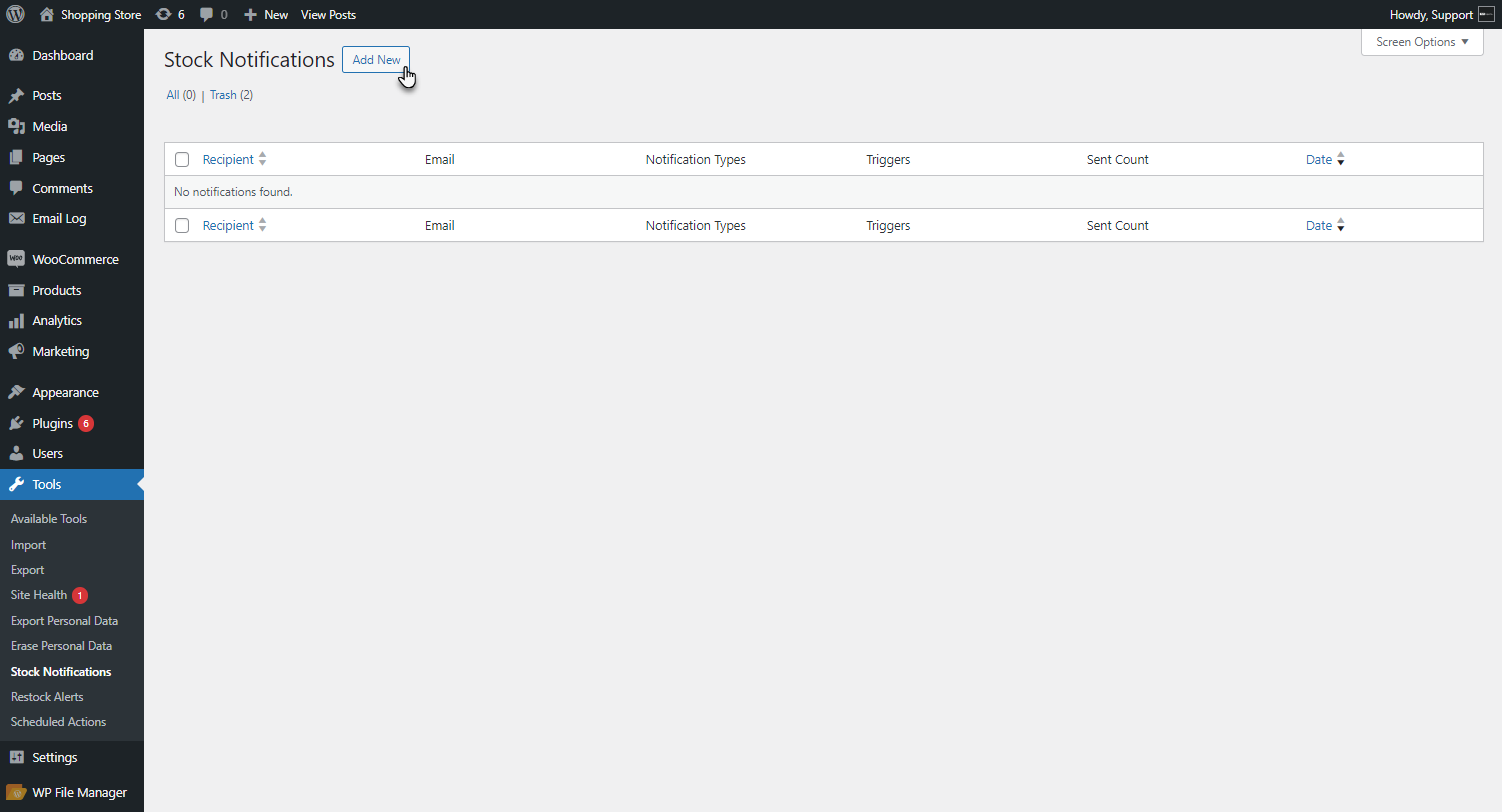
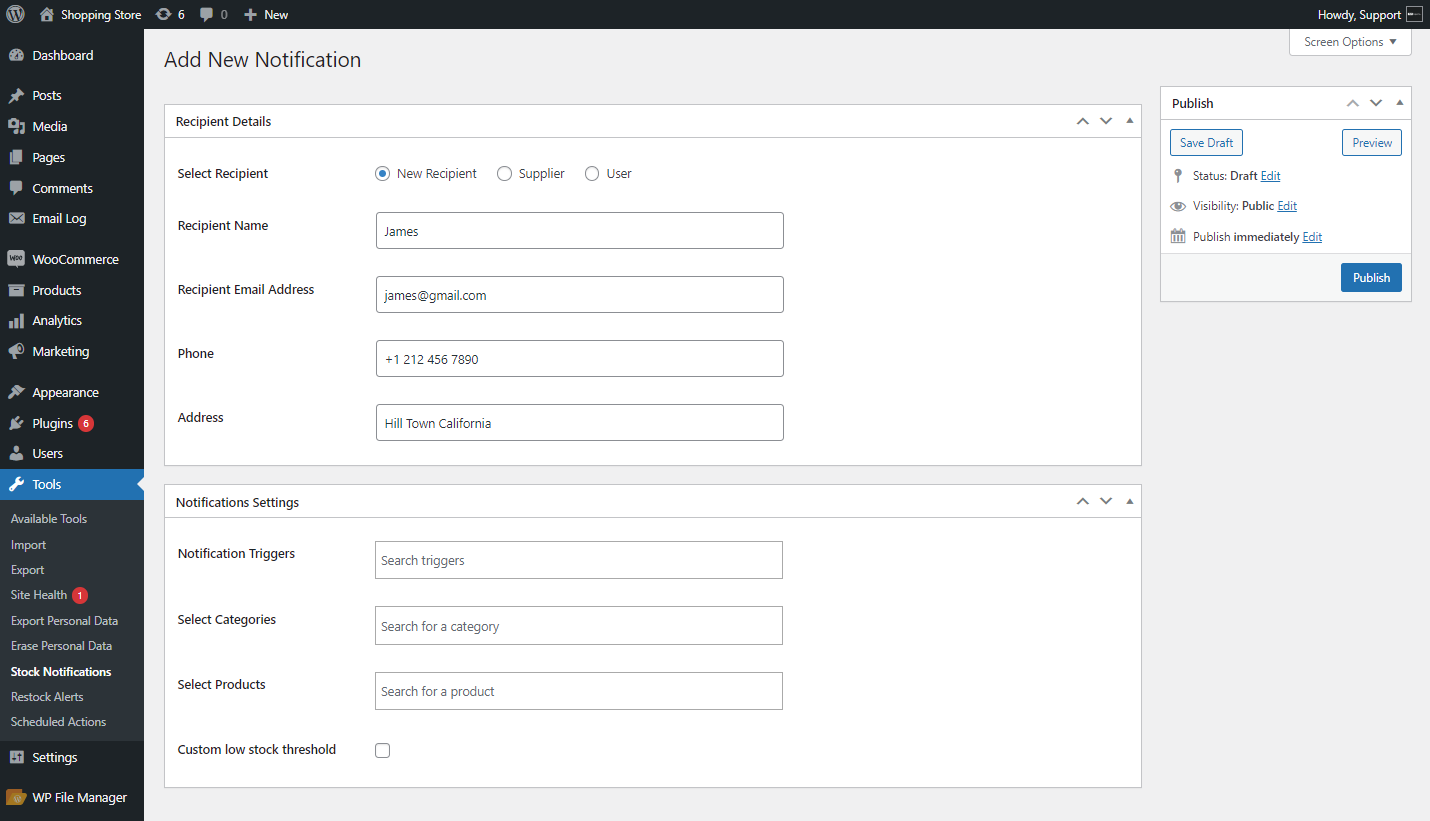
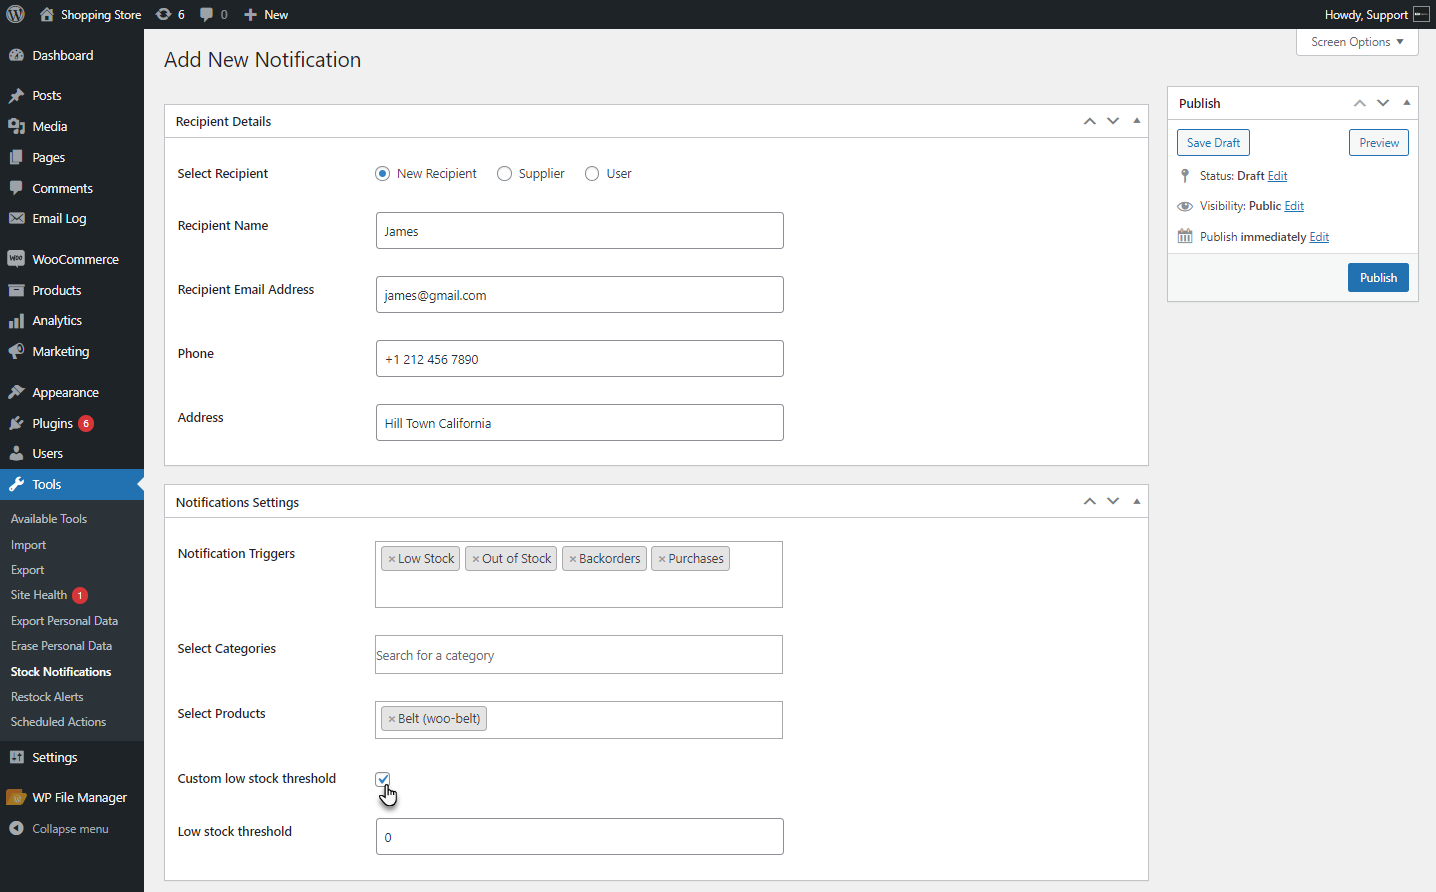
- The Add New Notification screen will appear.

- In the Recipient Details section, the admin can fill in recipient information, including recipient type, name, email address, phone number, and address.
- In the Select Recipient option, the admin can select recipients from these three options.
- New Recipient – A new recipient will be created.
- Supplier – The supplier added by the admin can be selected.
- User – The users of the website will be selected.
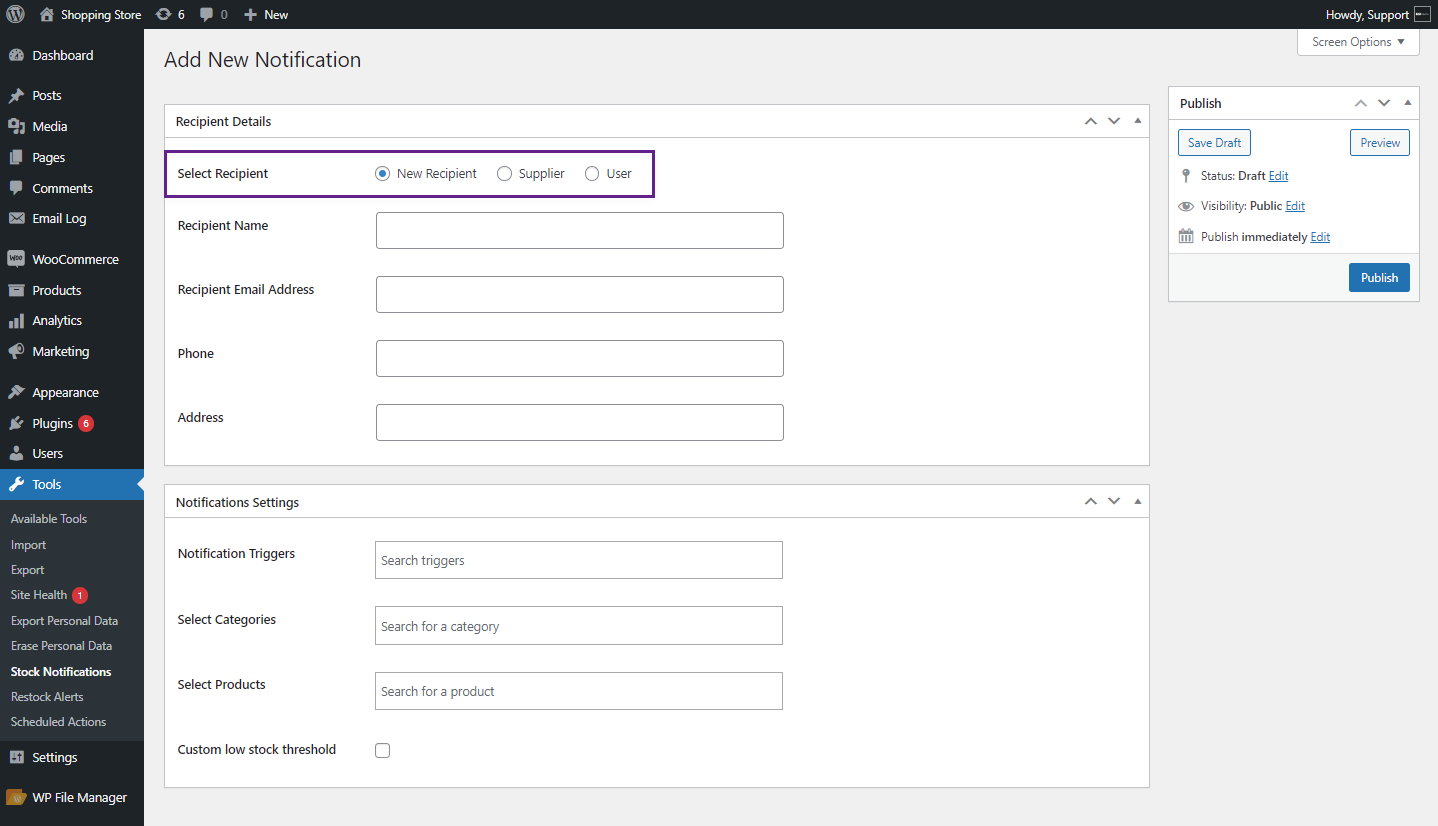
- The admin can fill up the details of the New Recipient including the Name, Email Address, Phone and Address.
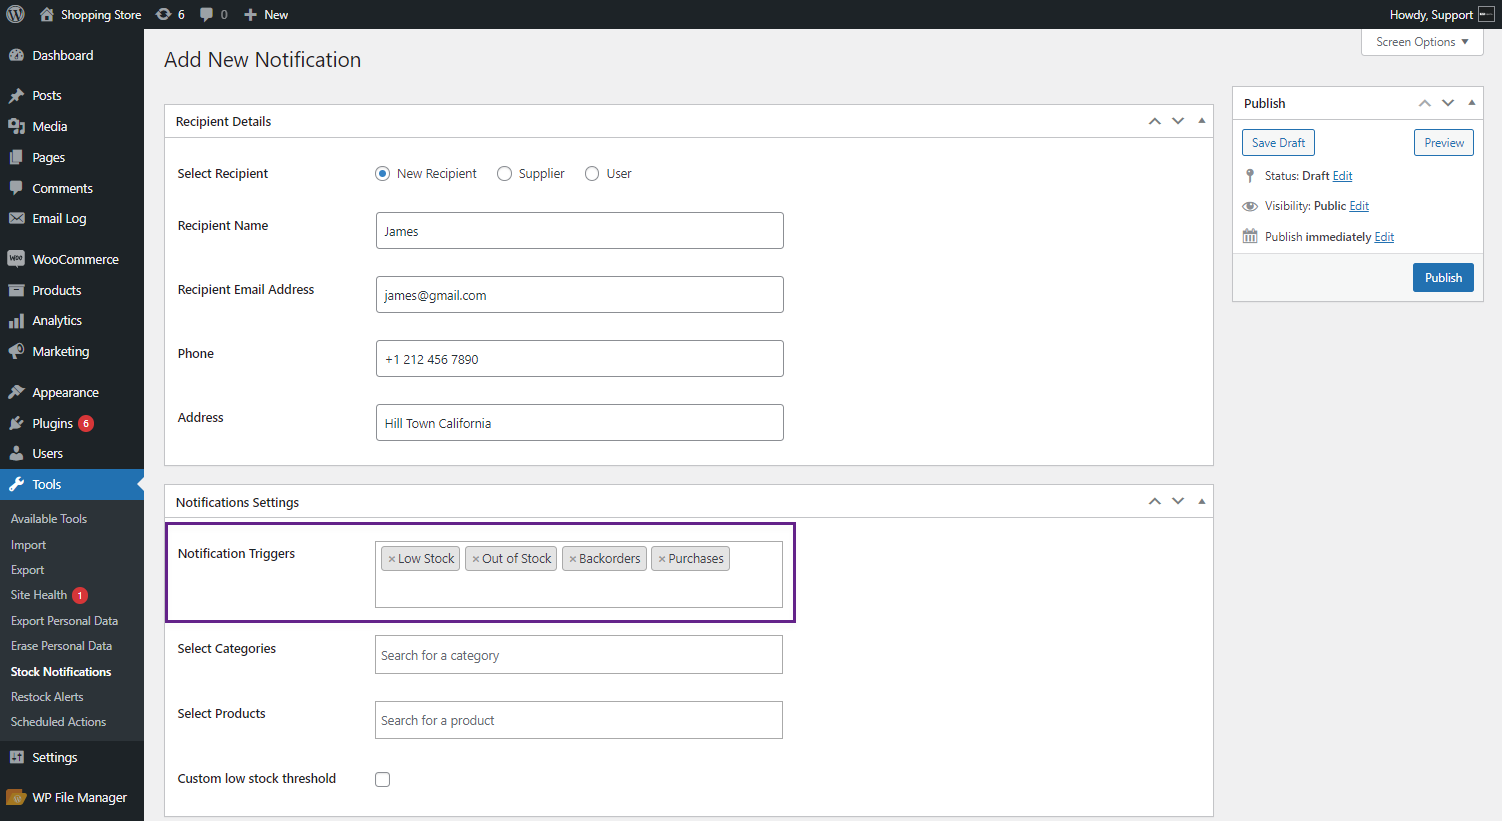
- The admin can configure notification in the Notification Settings section.
- The admin can add triggers on which notifications will be sent to the recipient.
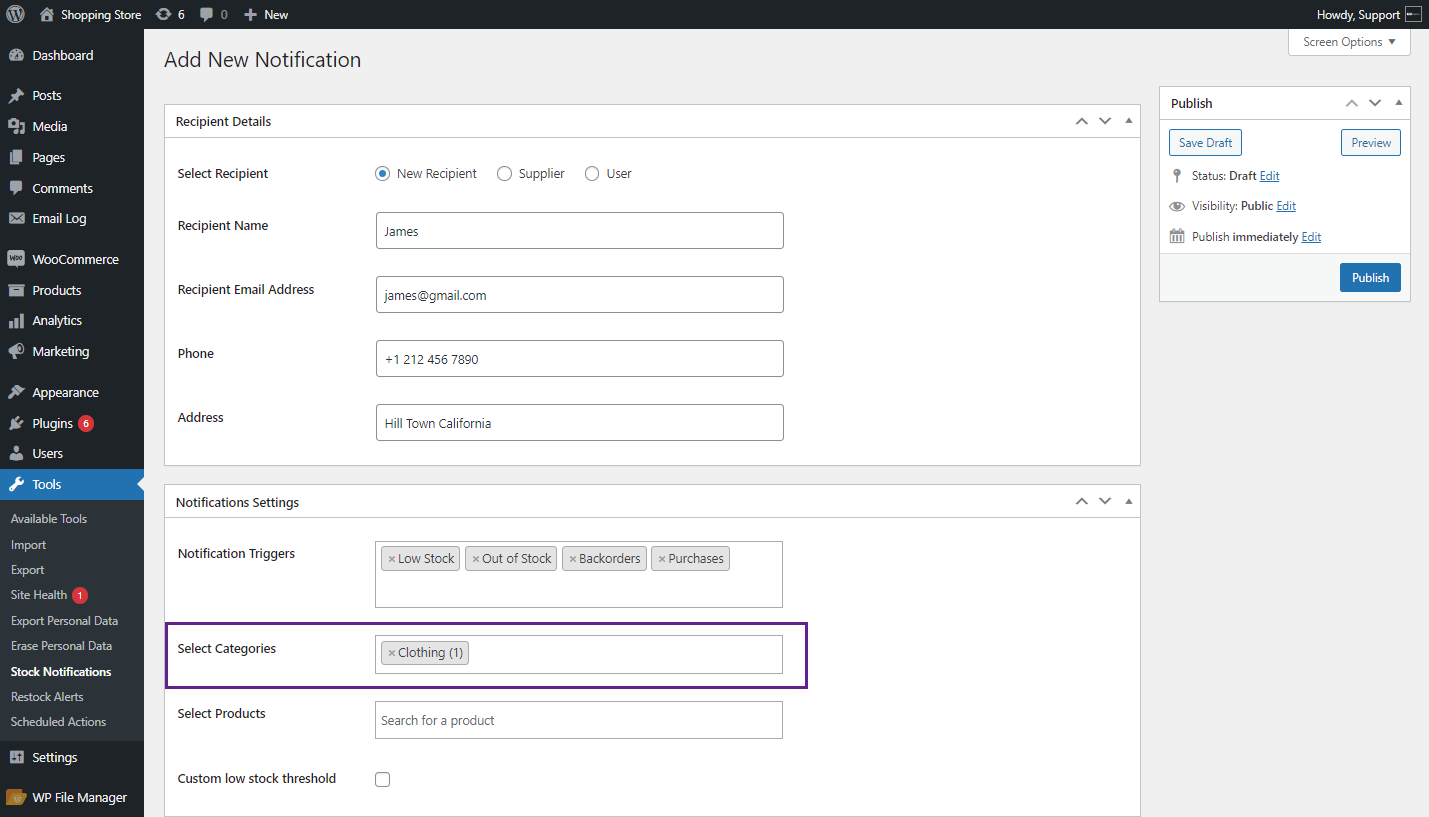
- The admin can search for a specific category on which this notification will be sent.
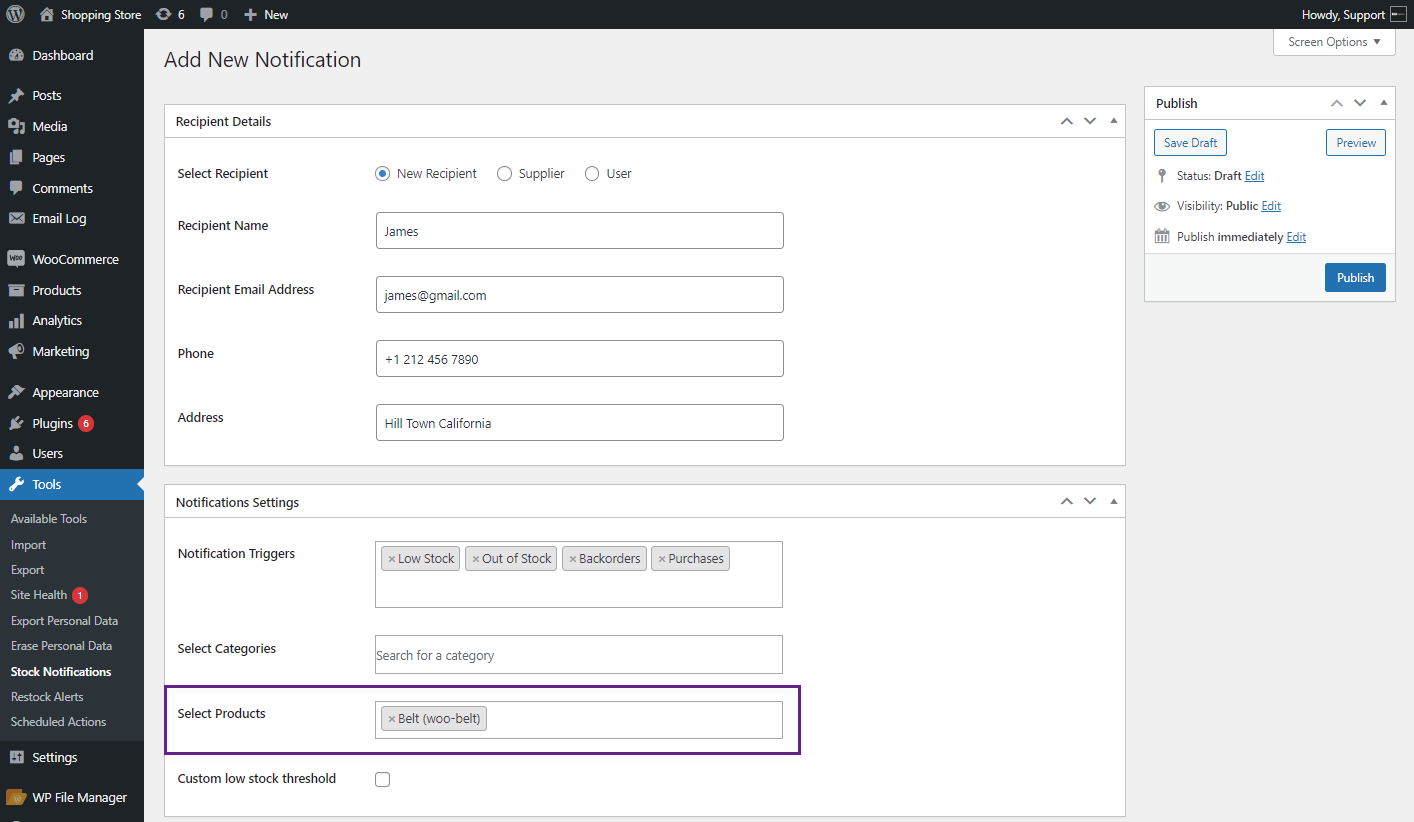
- The admin can search for a specific product for which the notification will be sent.
- The admin can add the custom low threshold for a product on which the notification will be sent.
NOTE: If this option is unchecked, each product has its low stock threshold on which a low stock trigger will work.
- The admin can set the threshold value for the product.
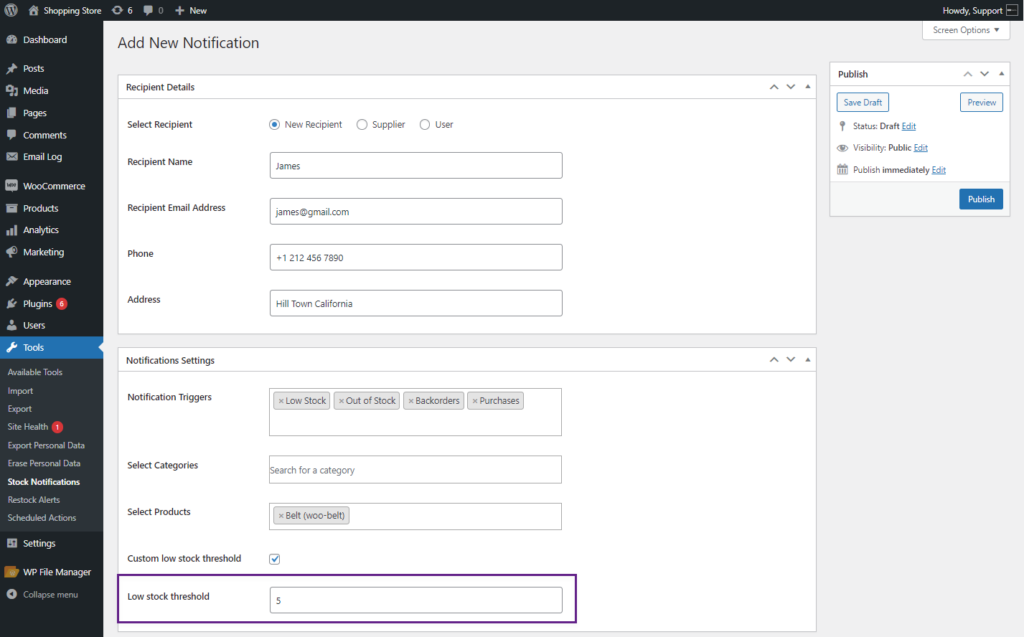
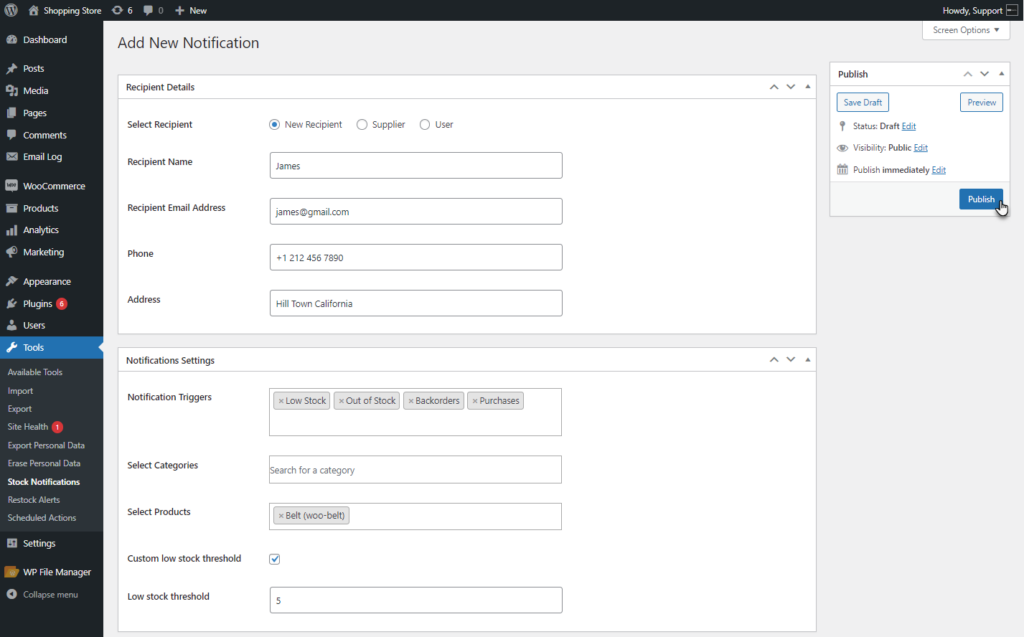
- Click on the Publish button to add a Restock Notification.
- A stock notification will be added. The recipient will receive a notification when the specified trigger activates.
Stock Notification in Product Data
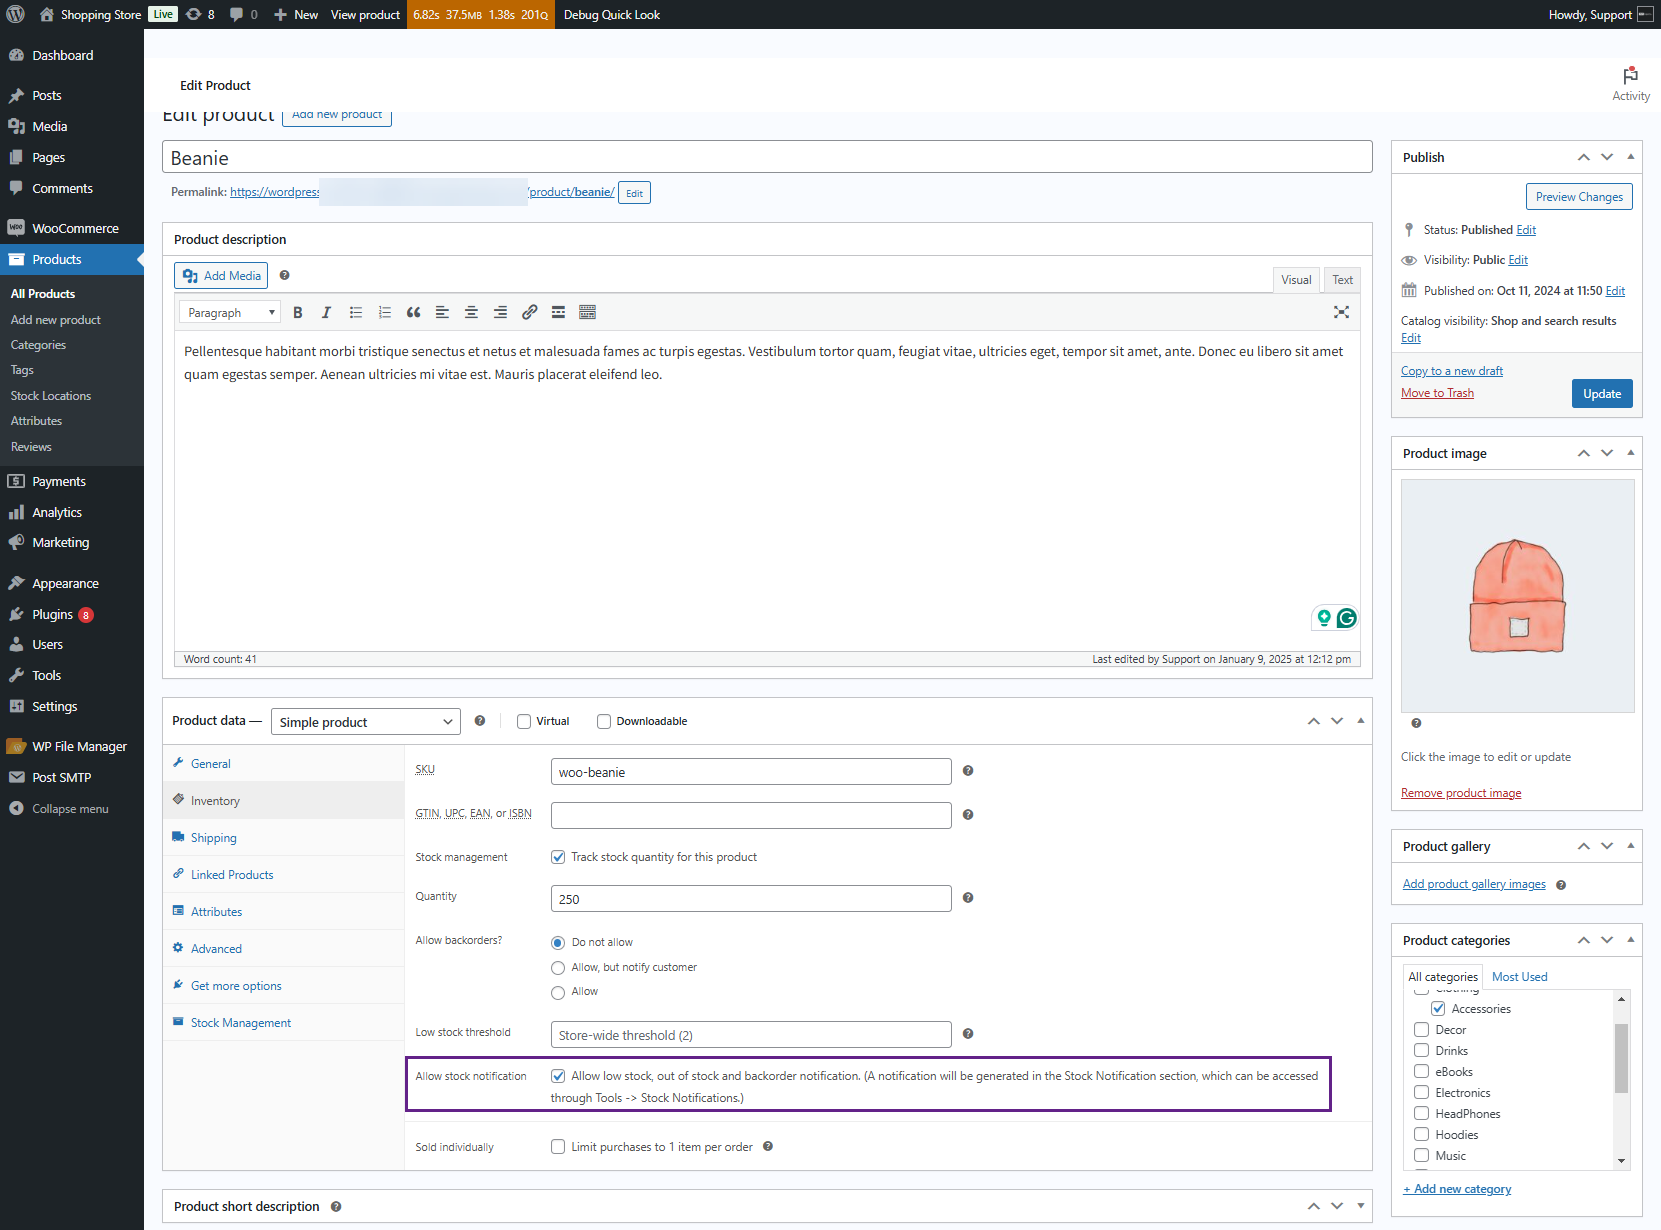
↑ Back to top- The admin can enable Allow Stock Notification from the product data settings:
- Navigate to WordPress Admin Dashboard > All Products > Edit Product.

- Go to the Inventory tab.

- Locate and enable the Allow Stock Notification option.
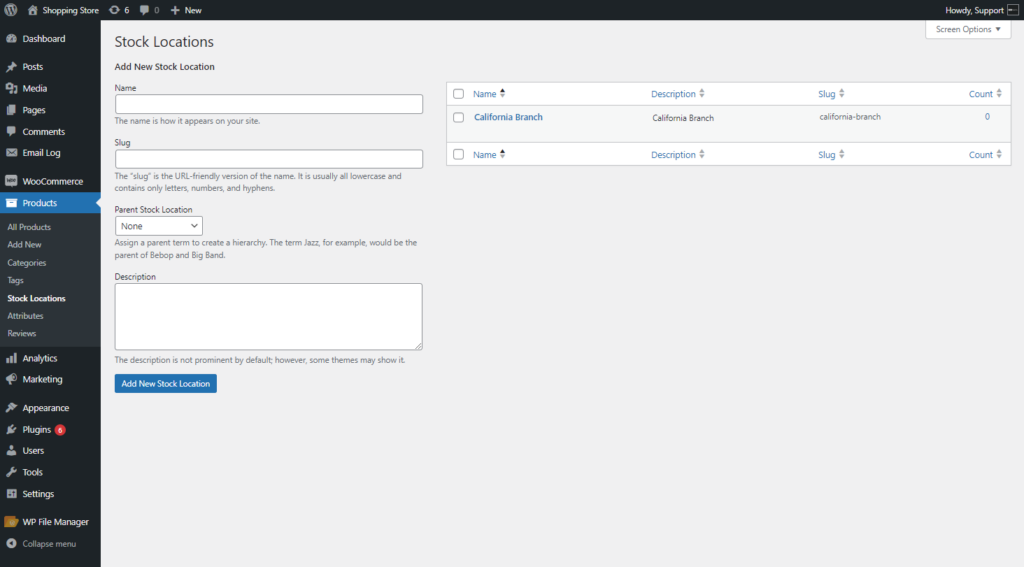
Stock Location
↑ Back to top- The Stock location indicates where a product’s stock is stored. For example, the admin can monitor which warehouse or branch currently holds the product stock.
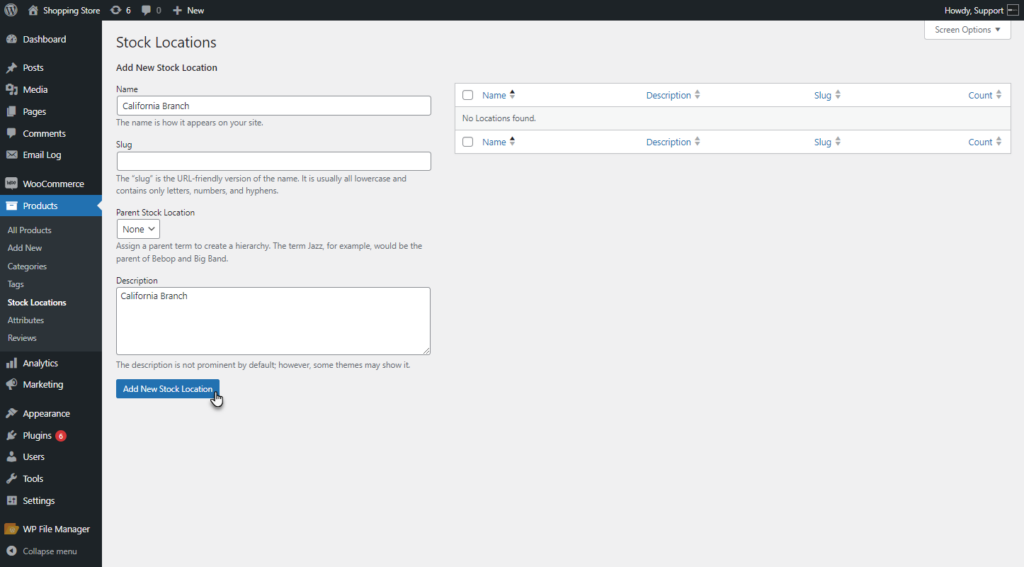
- Navigate to WordPress Dashboard > Products > Stock Location.
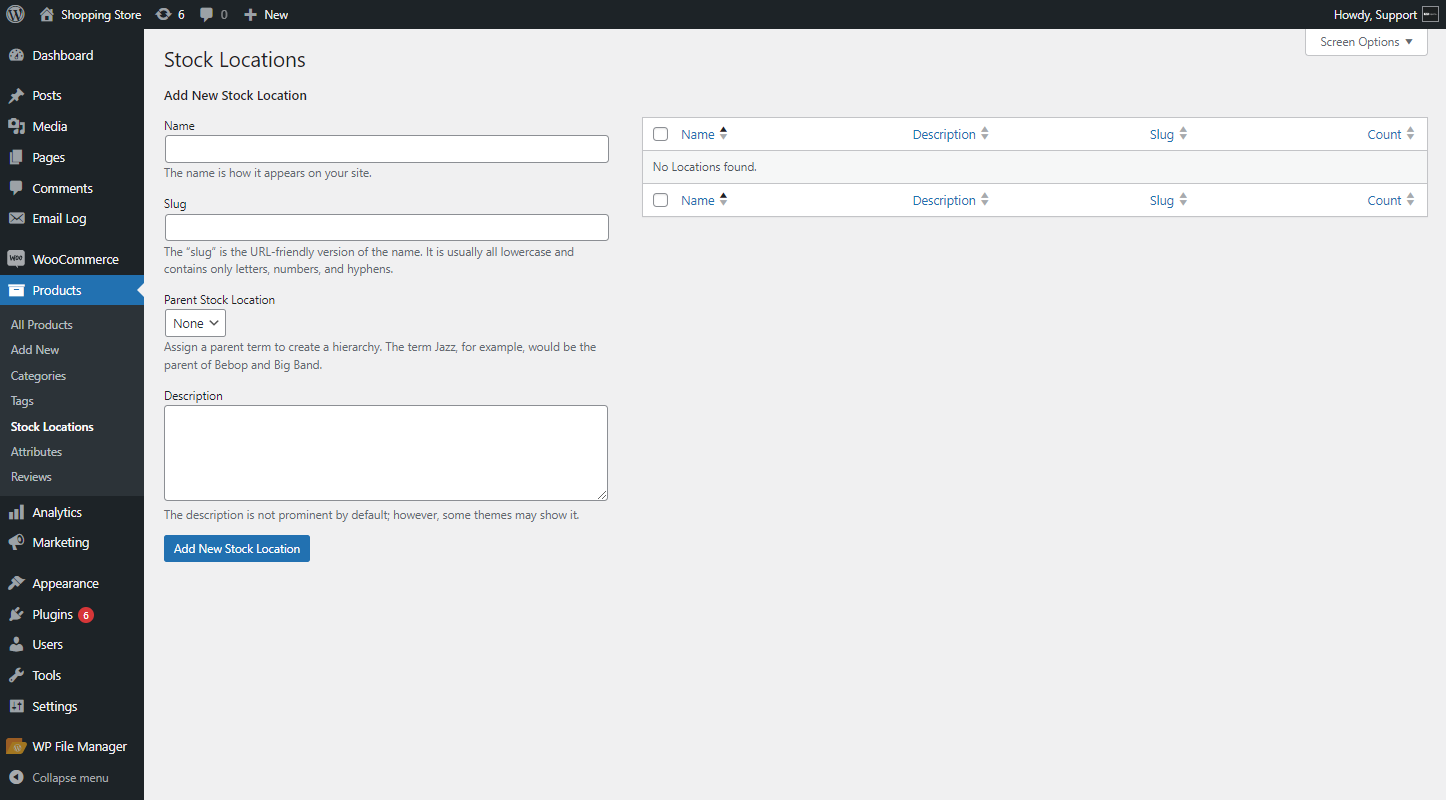
- The Add New Stock Location screen will appear. The admin can add a name, slug, Parent Stock Location, if any, and description for each stock location.
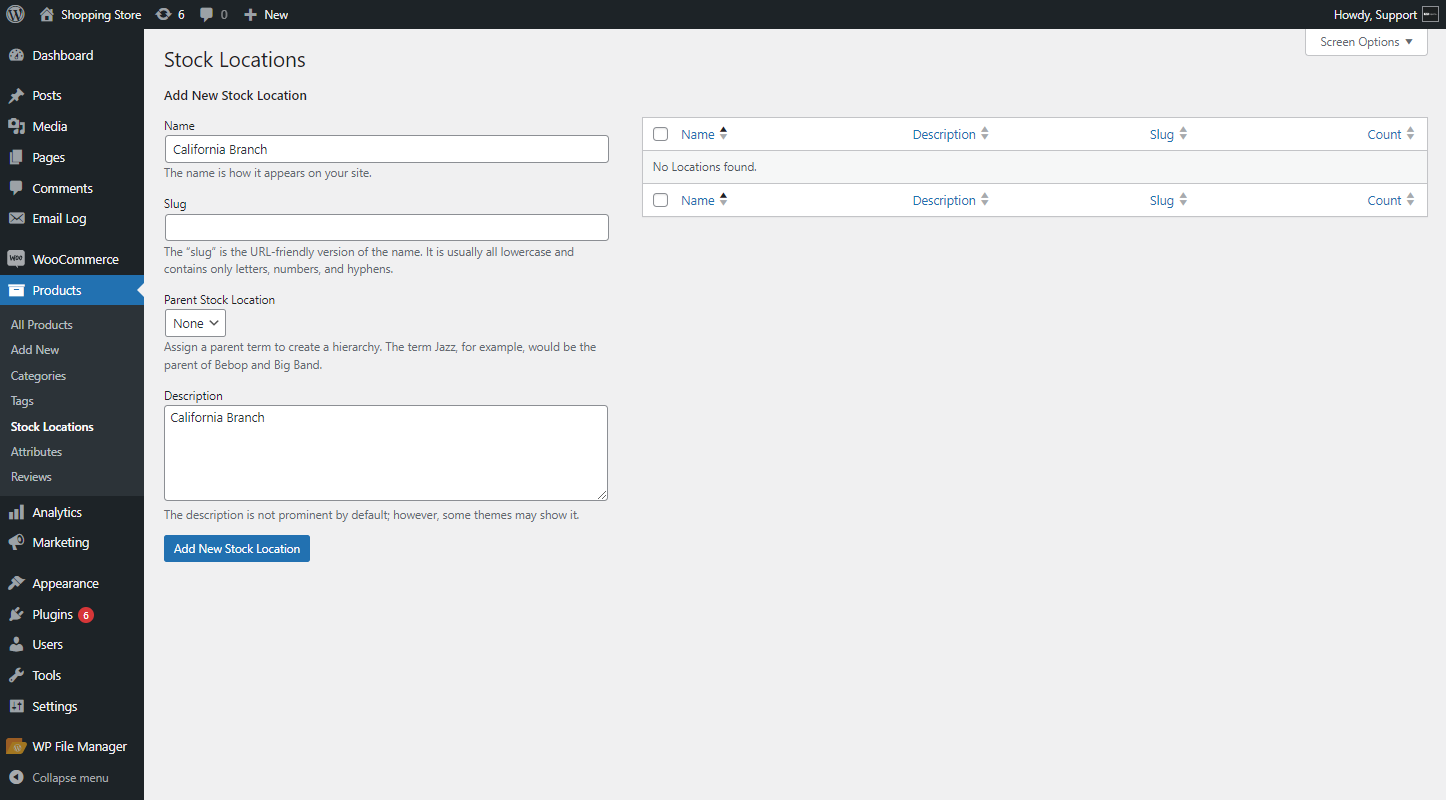
- Click on the Add new Stock Location button to add the stock location.
- The added stock location will be displayed in the list.
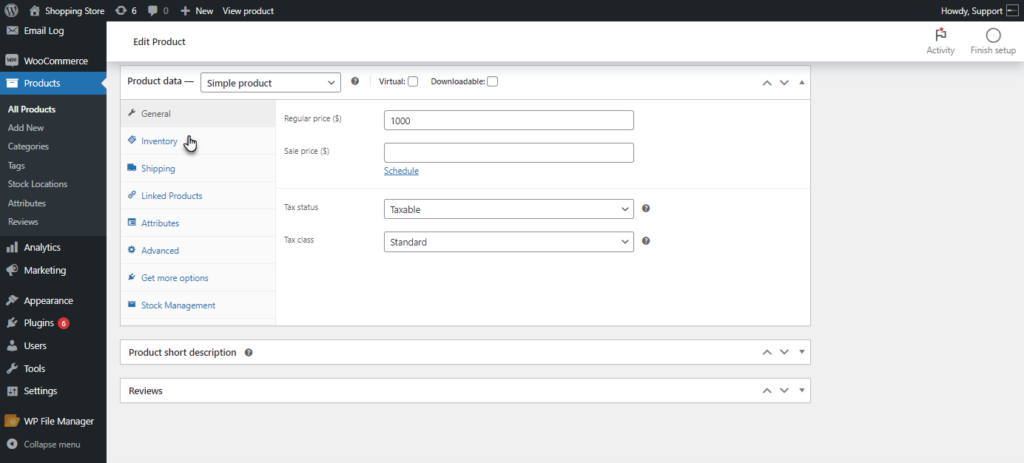
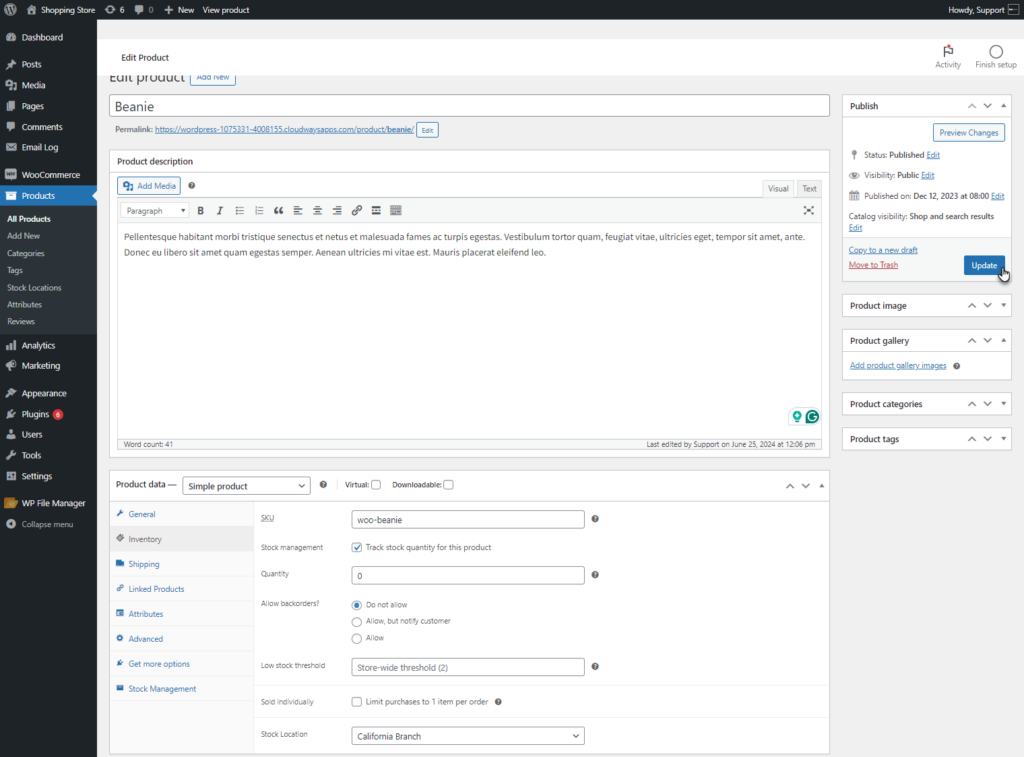
- Once done with adding a stock location, navigate to the Product Edit page.
- Go to the “Inventory” tab under the “Product Data” section.
- A Stock Location drop-down list will appear. All the created stock locations will appear in this list.
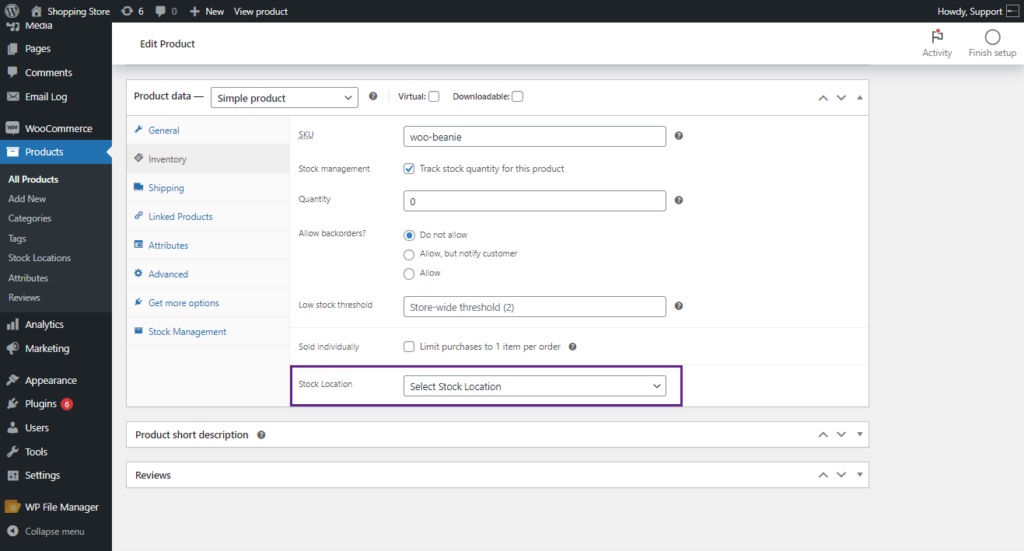
- The admin can select the stock location for the product from this drop-down.

- Click on the Update button to save the changes.
Manager in Stock Locations
↑ Back to top- The admin can add a manager to the stock location. Navigate to WordPress Admin Dashboard > Products > Stock Location.

- The Stock Location list page will appear. The admin can add a manager to an existing location or assign a manager while creating a new stock location.
- Add a name and slug for a new stock location. If applicable, select the parent stock location.

- The admin has two options: add a new manager or select an existing one.

- The following fields are available for manager details:
- Manager Name: The name of the manager at the location.
- Email: The manager’s email address.
- Phone: The contact number of the manager.
- Country/Region: The country where the inventory is located.
- Location Address: The address of the inventory/stock/warehouse.
- State: The state where the location is situated.
- City: The city where the inventory is located.
- Zip Code: The zip code of the location.
- Shipping Zone: The shipping zone assigned to the location.
- Payment Method: The payment method assigned to the location.

- Click on the Add New Stock Location to save the Stock location.

- If the admin chooses Select from Existing User, a dropdown will appear. The admin can assign a manager to the Stock Location.

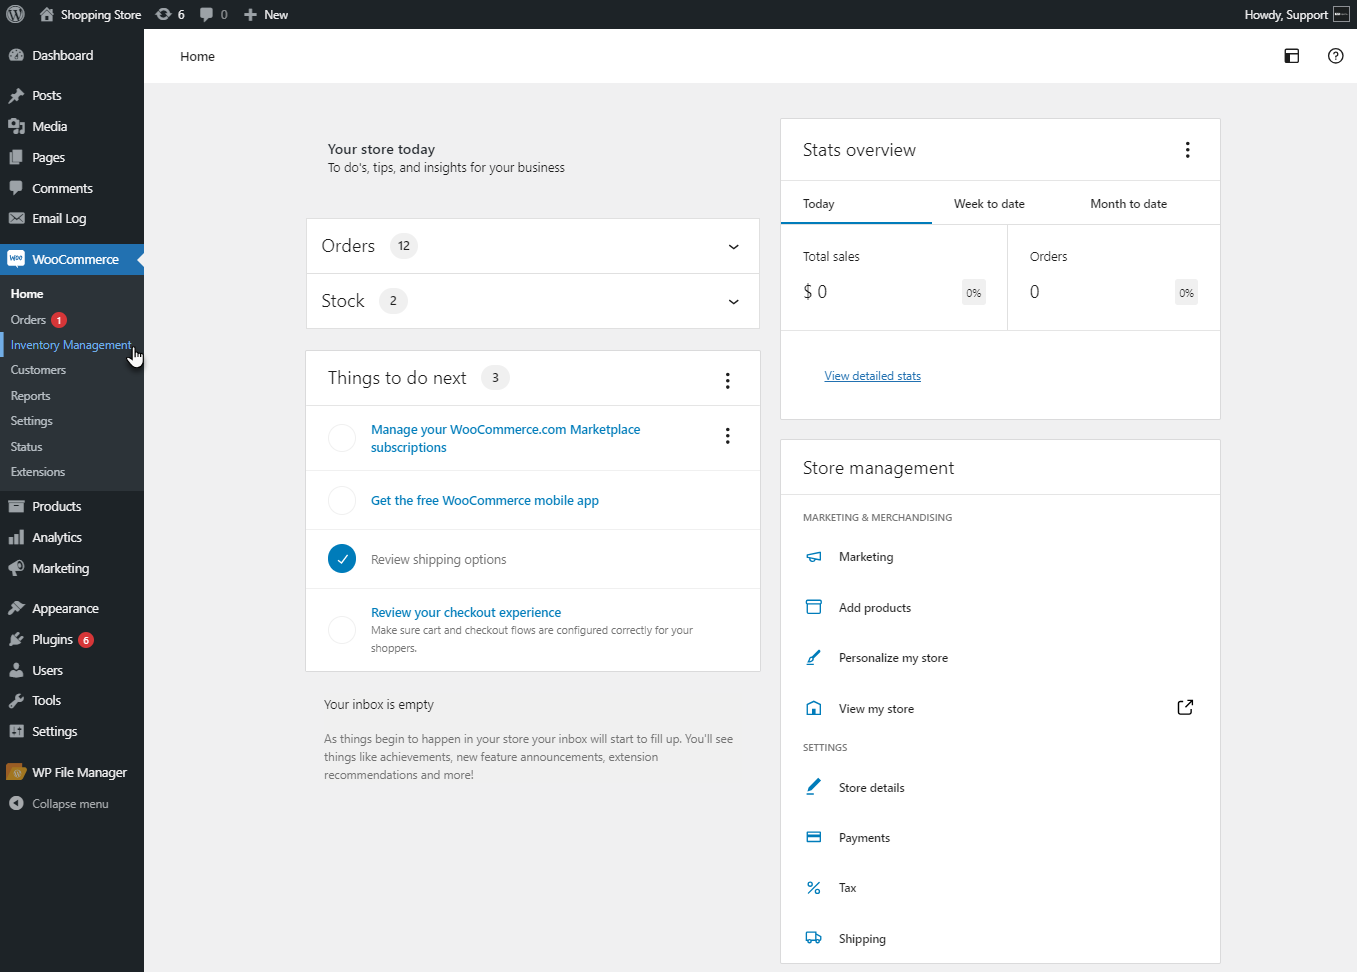
Inventory Management
↑ Back to top- Inventory management enables the admin to centrally manage all products and their stock levels.
- Navigate to WordPress Dashboard > WooCommerce > Inventory Management.
- A Product Inventory table will appear. This table displays product details, including suppliers, stock locations, purchase price, gross profit (%), stock levels, and status.
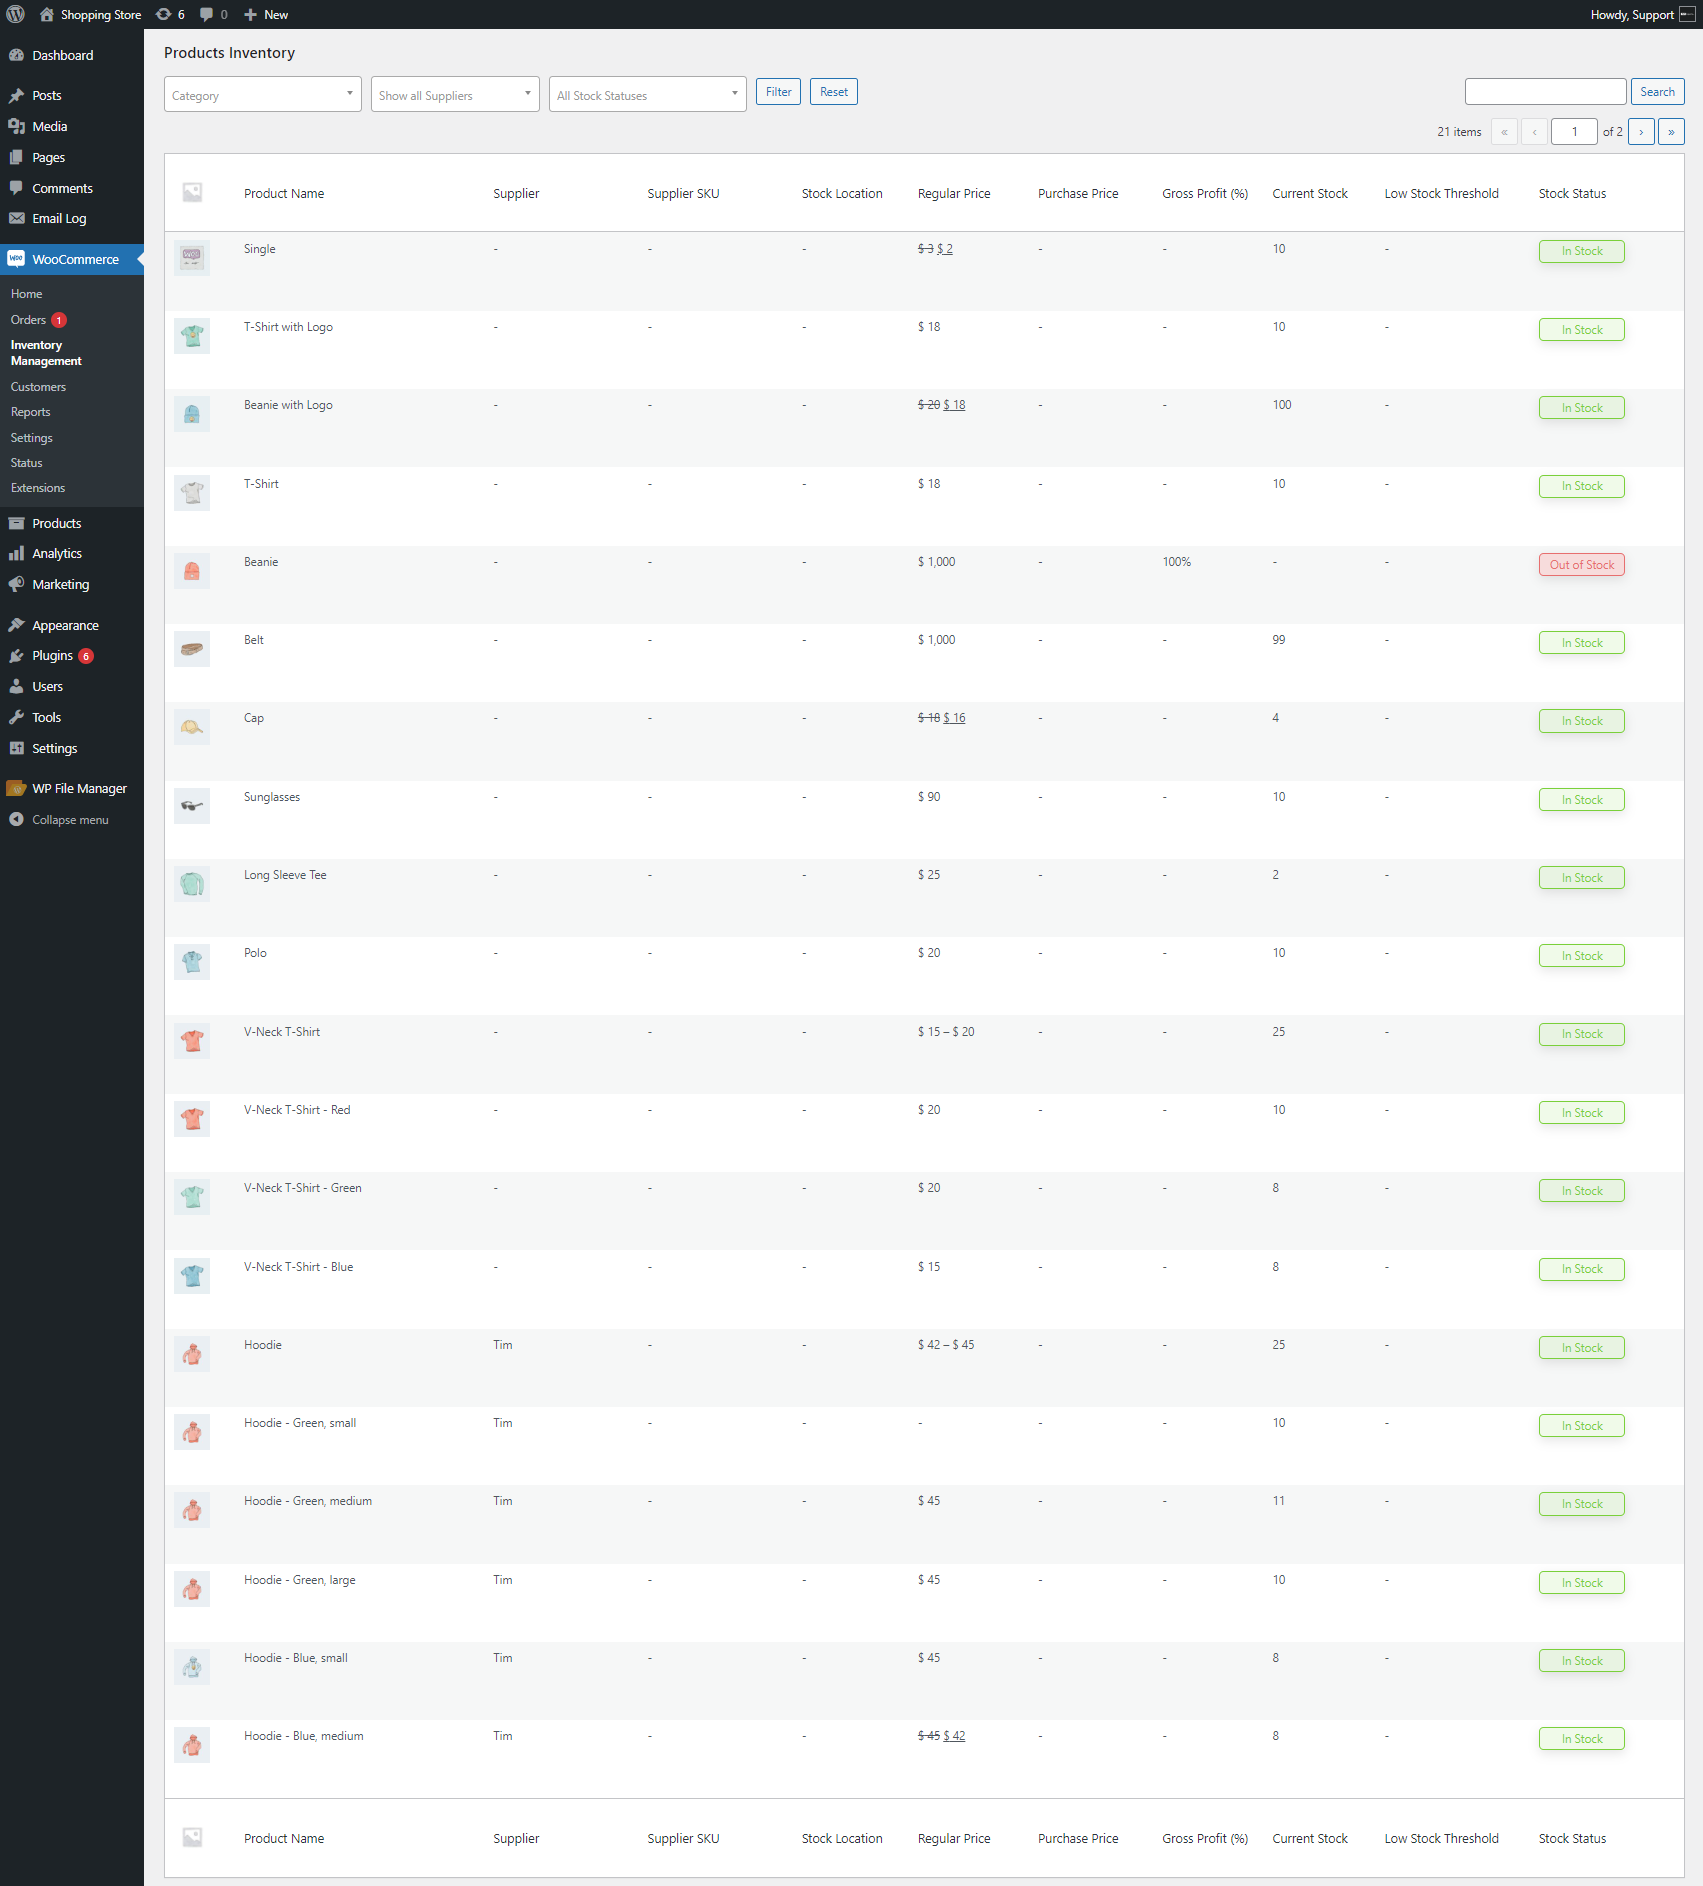
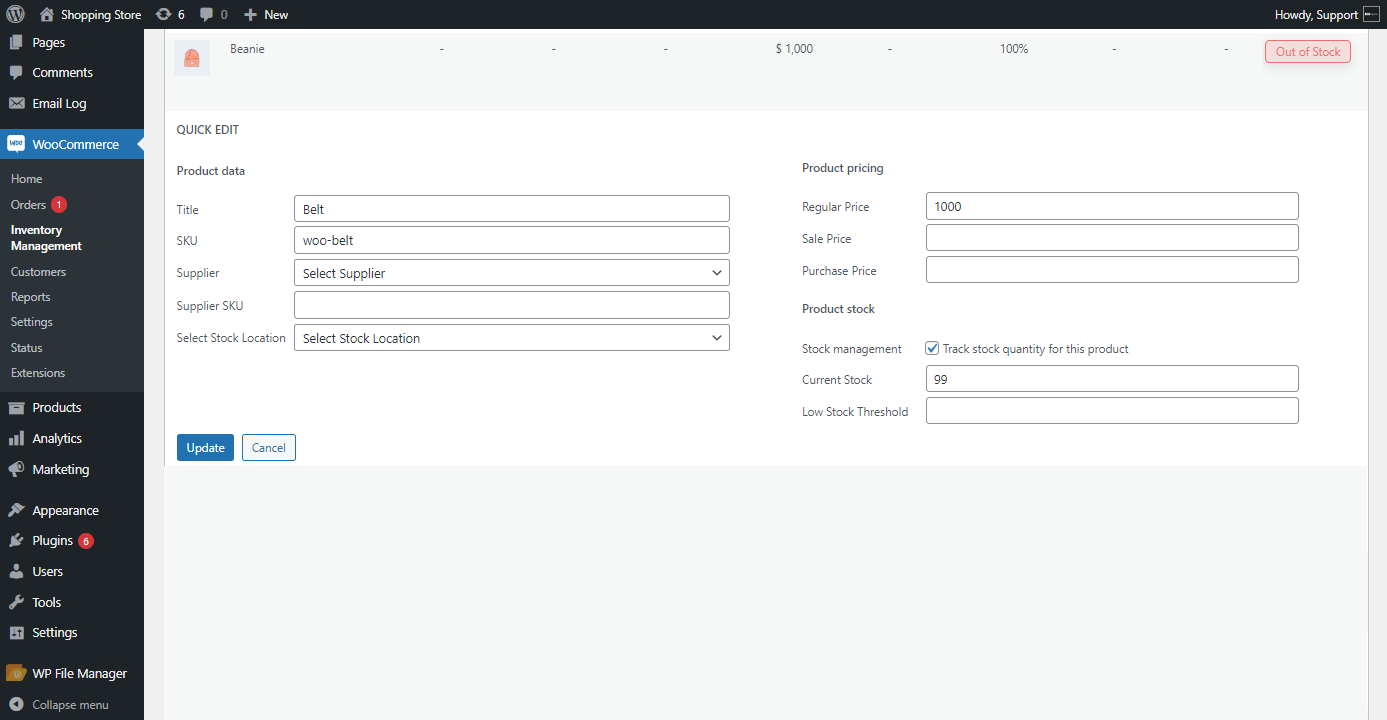
- The admin can edit any product by hovering on the Product.
- Click on the Quick Edit.
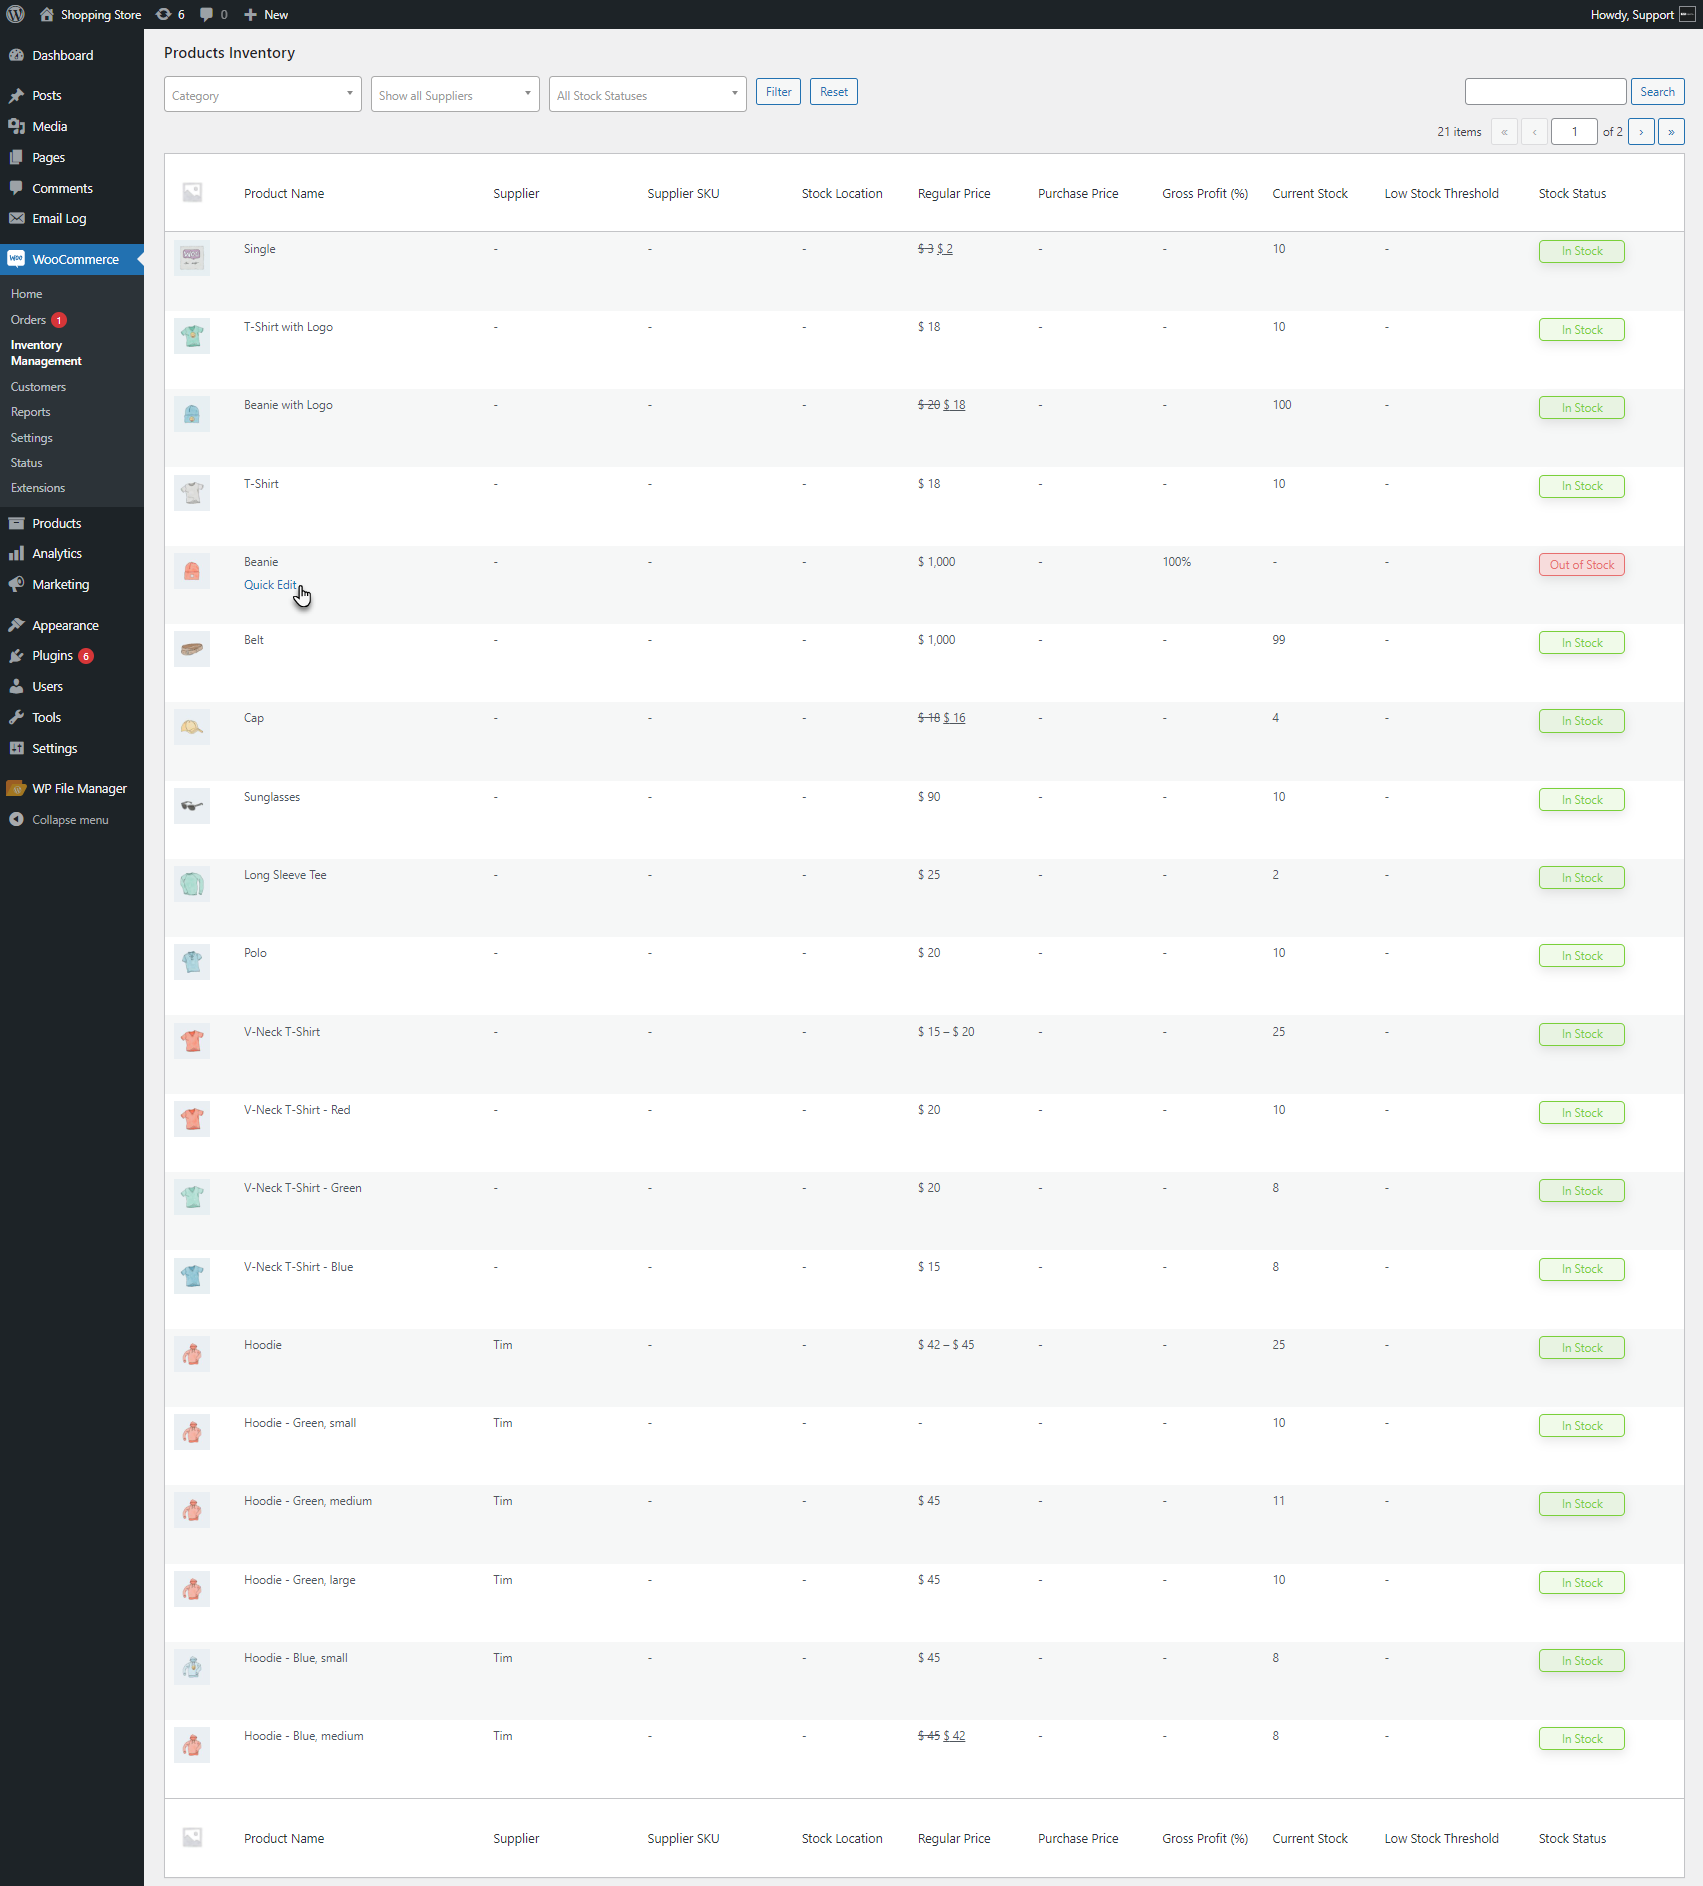
- The admin can edit Product data, pricing, and stock from here.
Email Templates
↑ Back to top- Navigate to the WordPress Dashboard > WooCommerce > Settings > Emails.
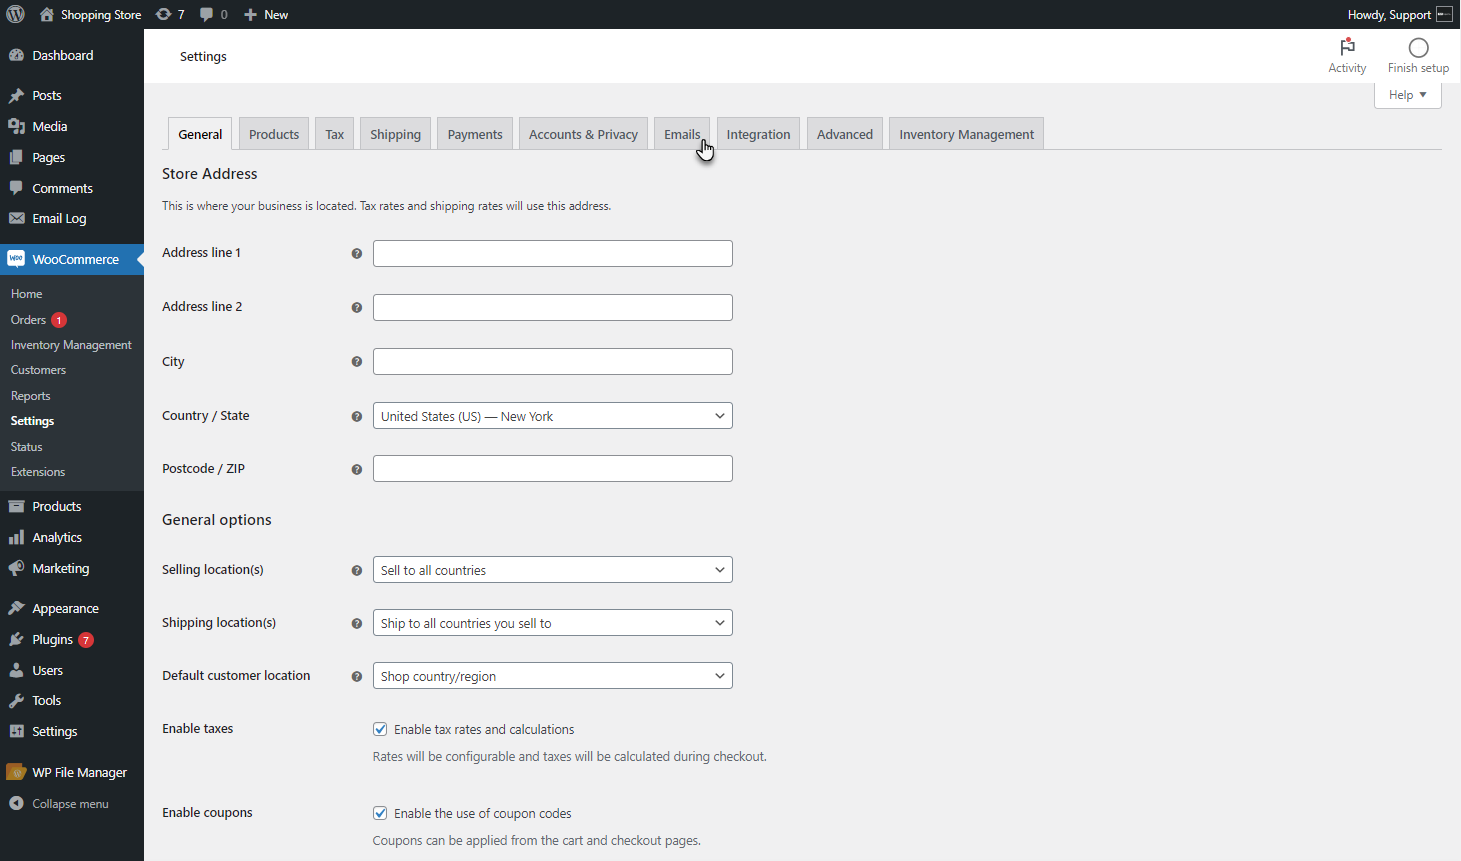
- The restock alerts to the user and supplier will be sent in the following email templates.

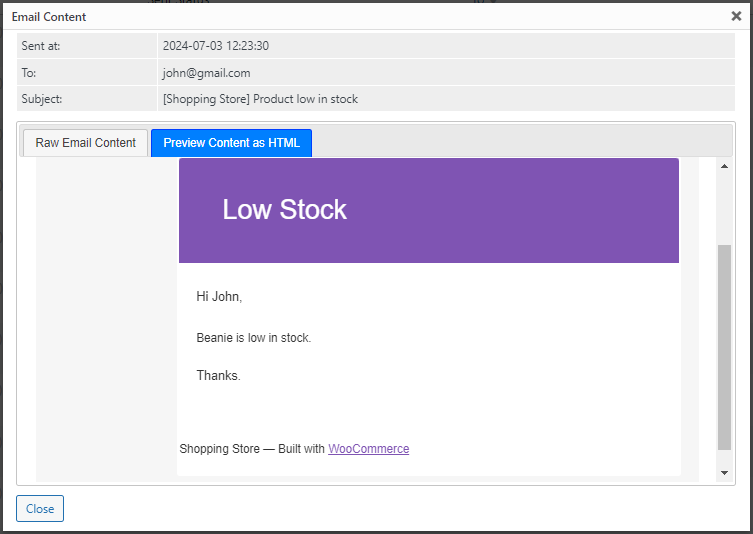
- The following restock alert email will be sent to the user who signed up for the restock alert when the product is restocked.

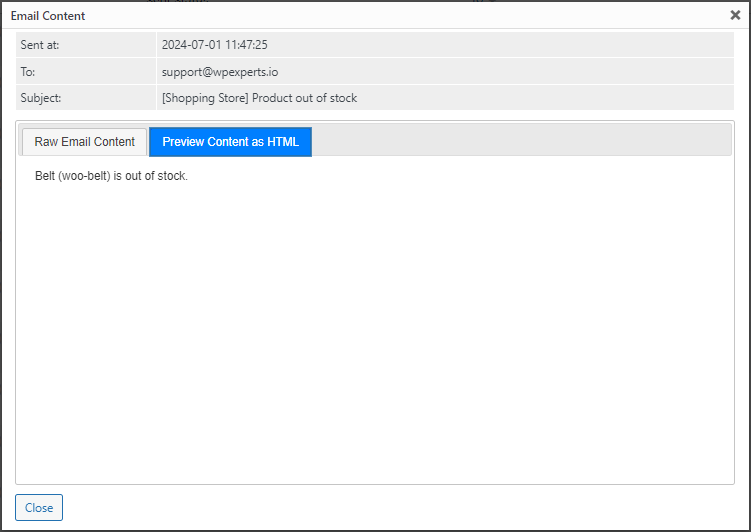
- The following out-of-stock alert email will be sent to the admin.
- The following out-of-stock alert email will be sent to the Supplier.
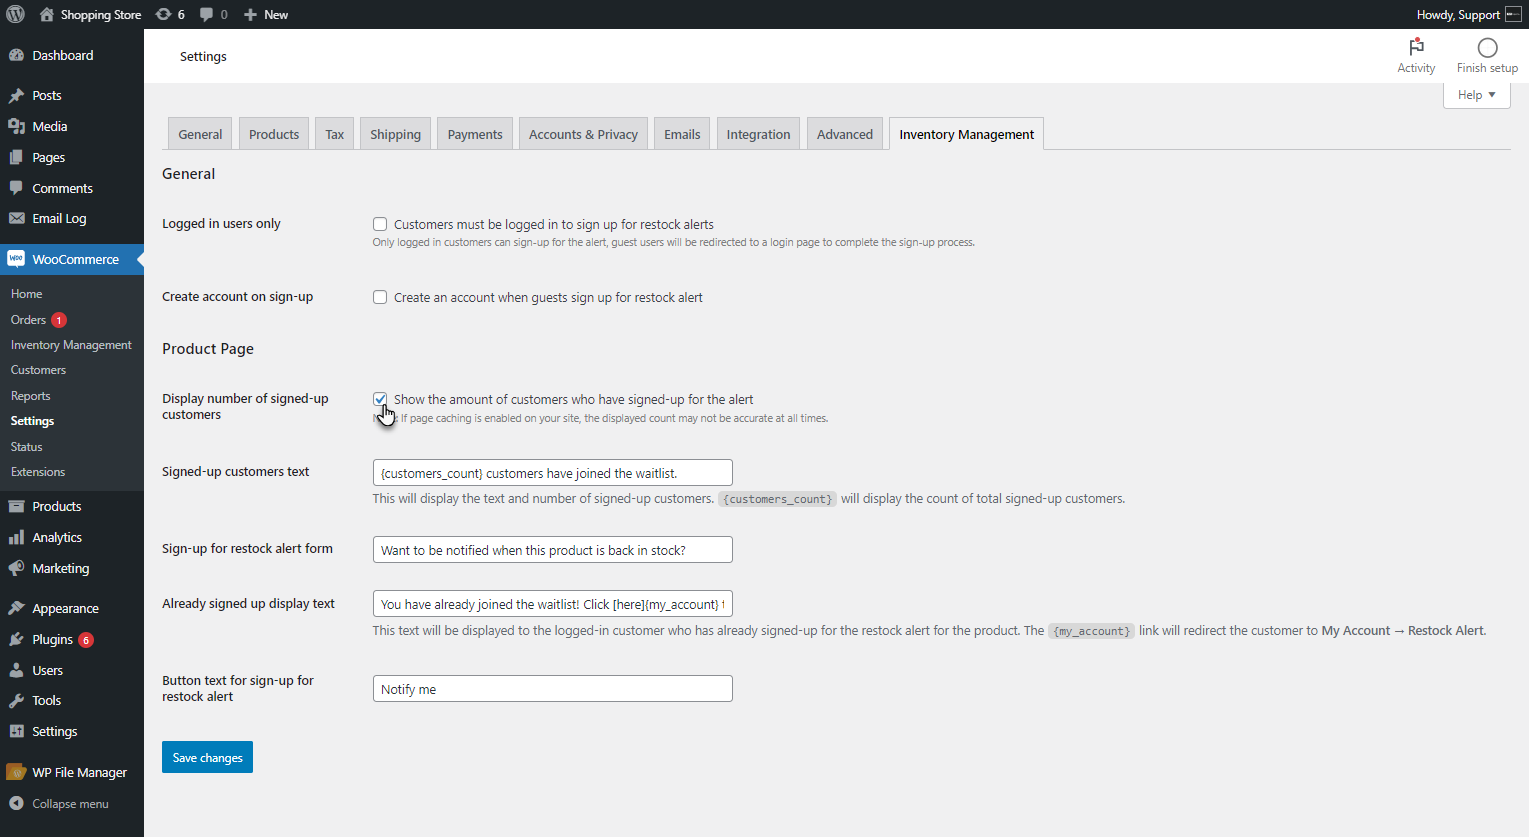
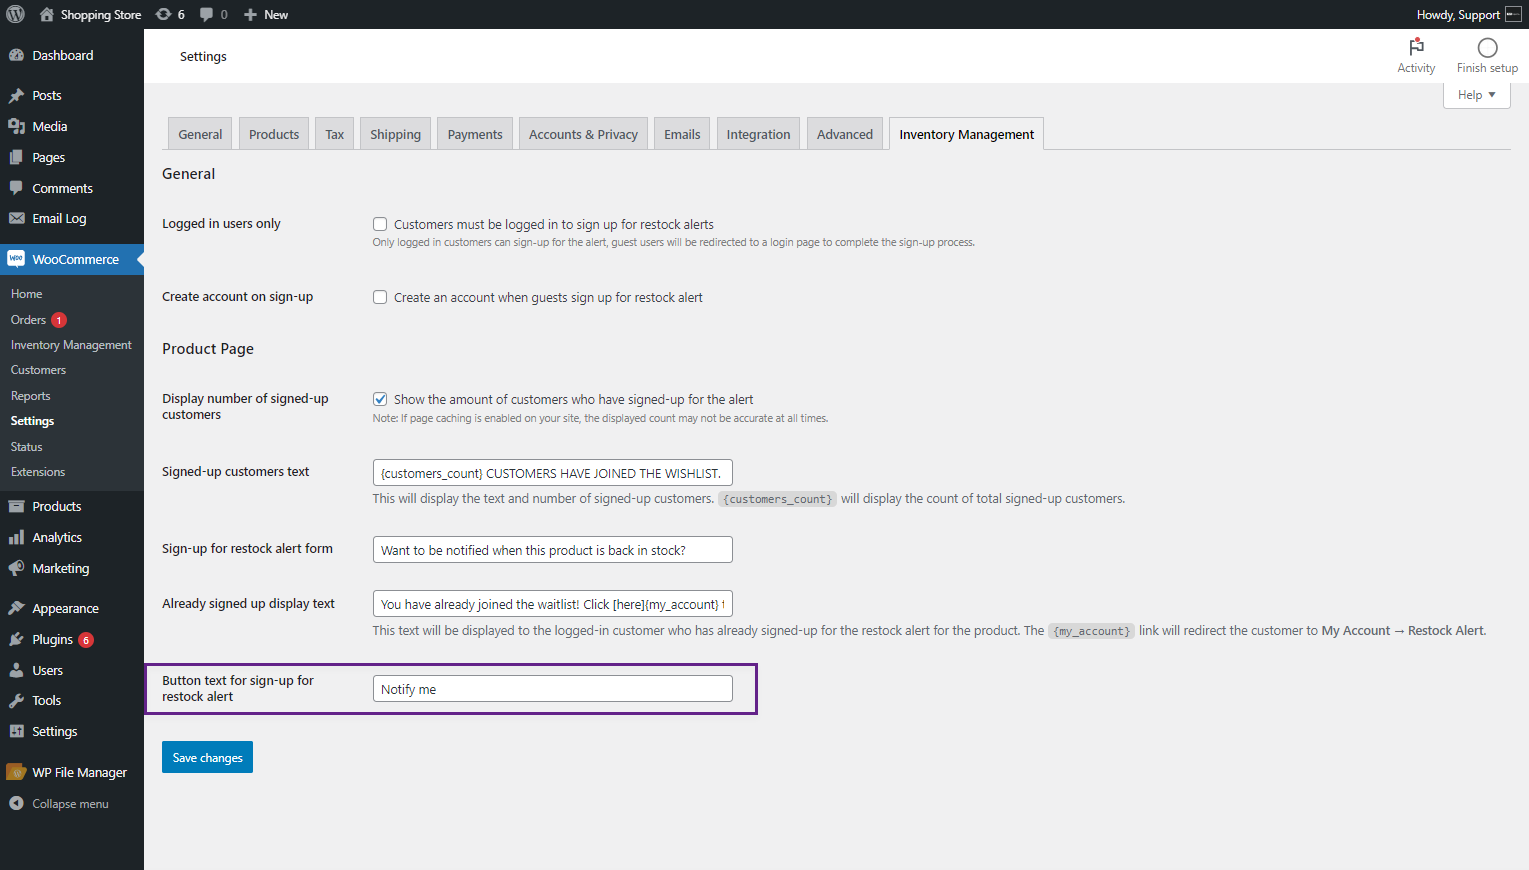
General Settings
↑ Back to top- For the General settings of the Inventory Management, navigate to the WordPress Dashboard > WooCommerce > Settings > Inventory Management.

- The admin can restrict customers to be logged in for restock alerts. Only logged-in customers can sign up for the alert. Guest users will be redirected to a login page to complete the sign-up process.

- The admin can enable an option to create an account when a guest signs up for restock alerts.
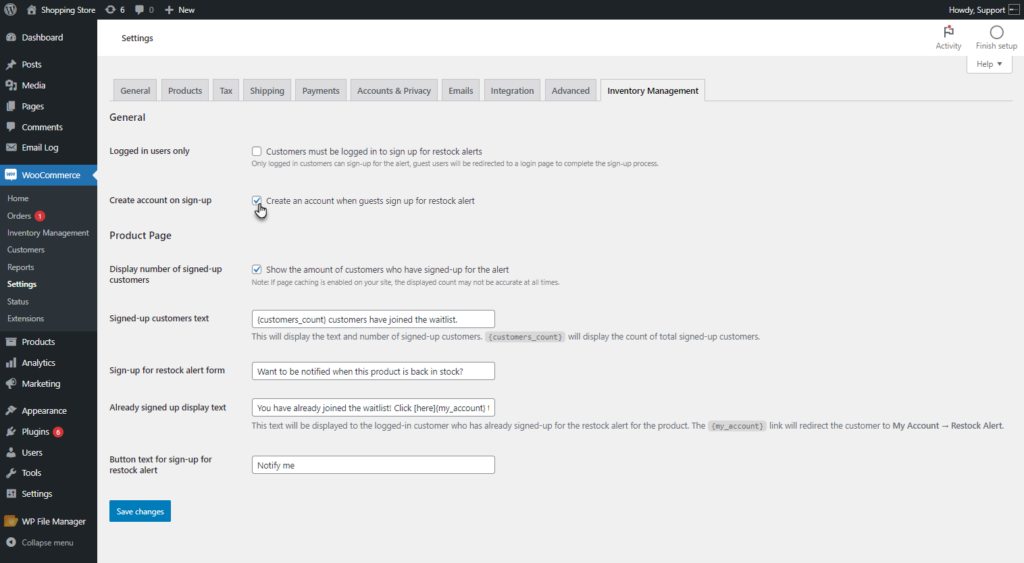
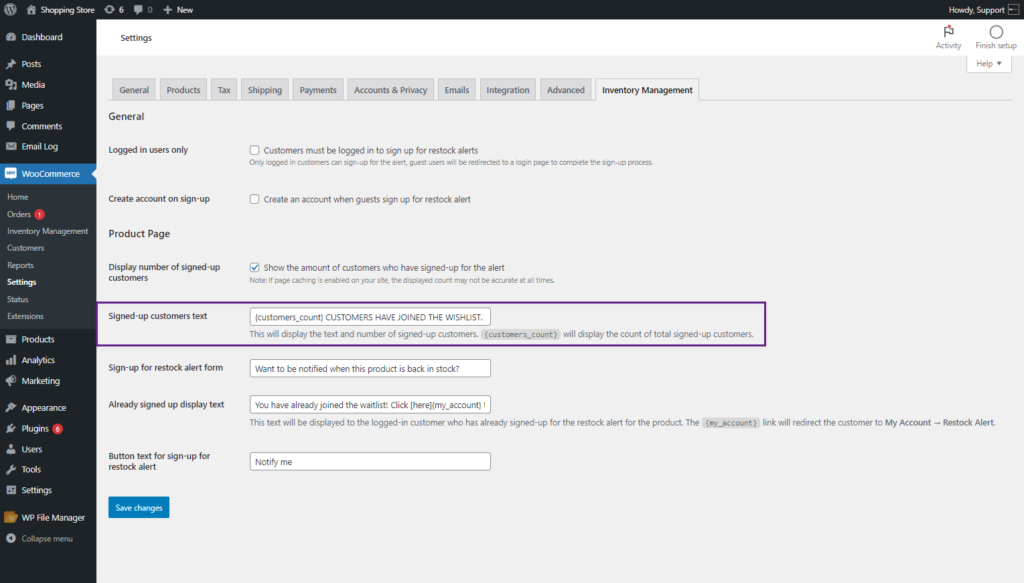
- The admin can display the number of signed-up customers on the product page by using the Display number of signed-up customers.
Front End Impact
- Login to your WordPress account.
- Go to the Product Page.
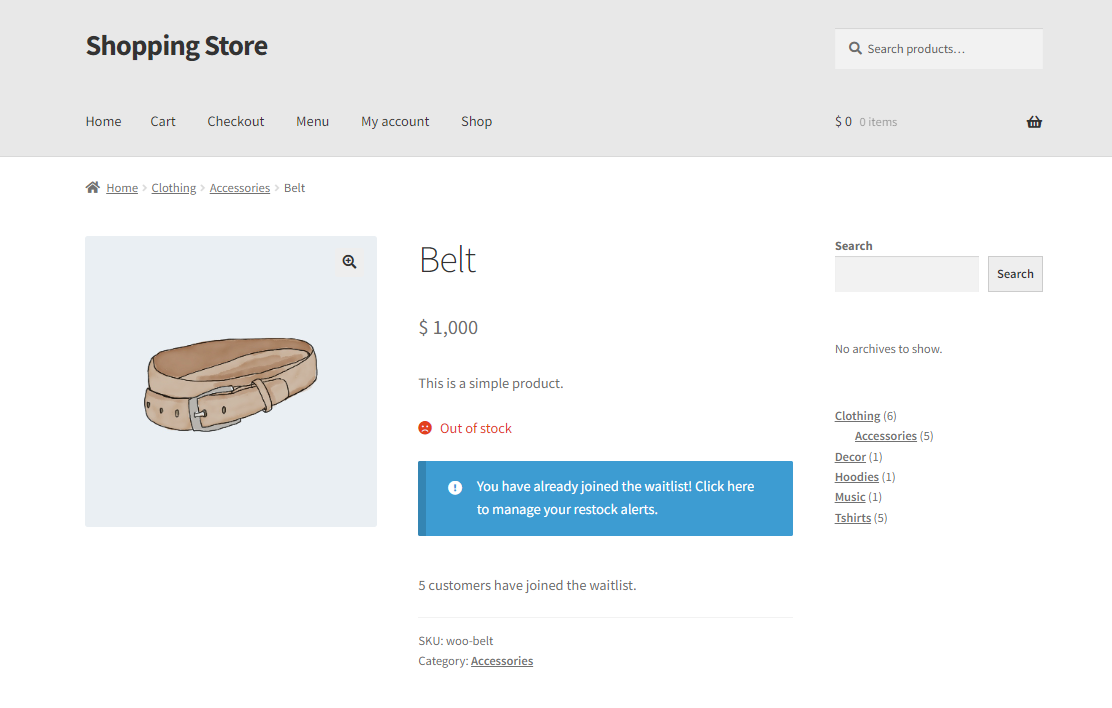
- The Number of Signed-up customers will be displayed on the product page.

- The admin can change the text of the Signed up customers.
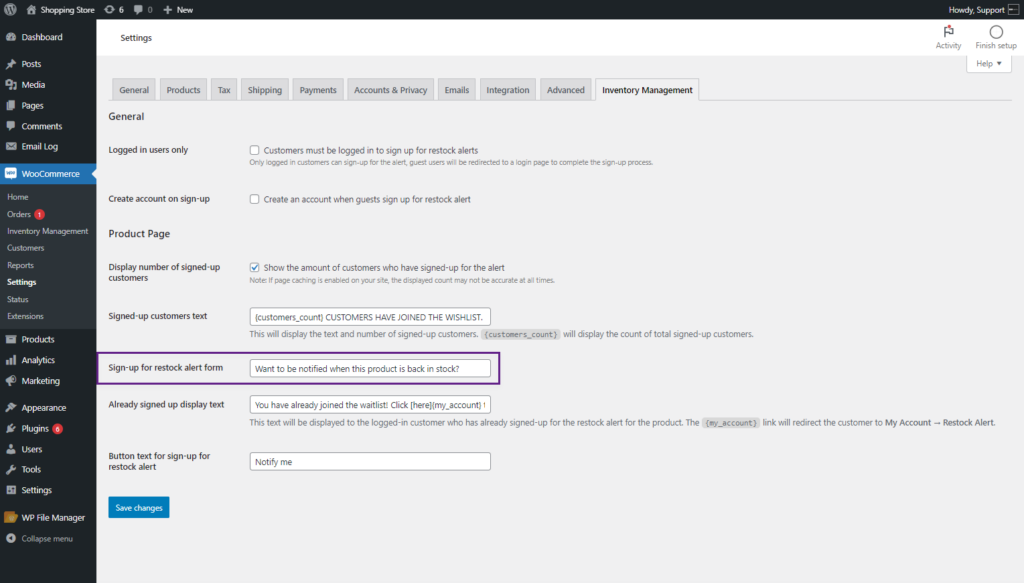
- The Admin can change the text of the Sign-up for restock alert form.
- The Admin can change the text of the Already signed up display text.
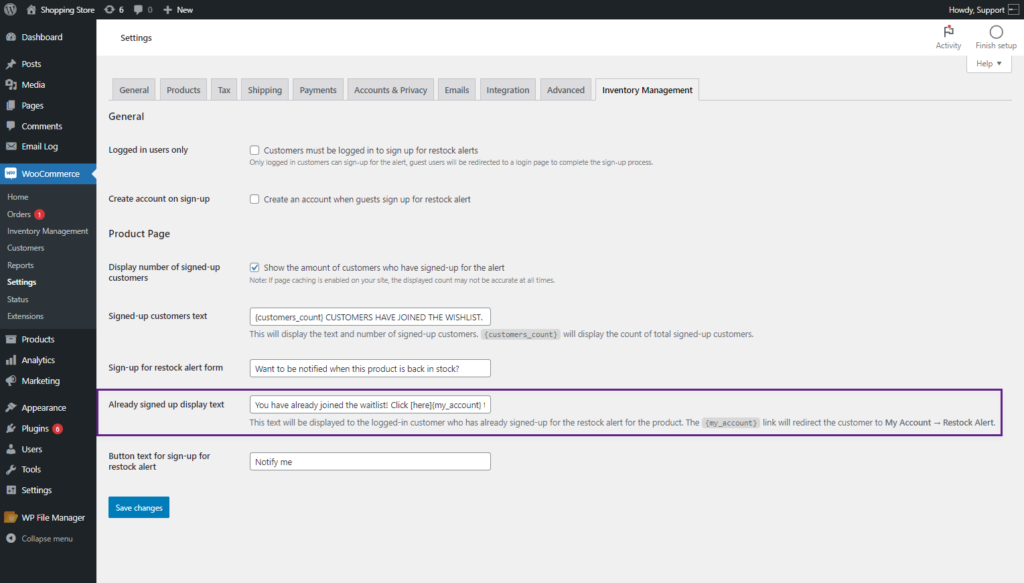
- The Admin can change the text of the Button text for sign-up for restock alert.
Multi Inventory
↑ Back to topMulti Inventory on Product page
↑ Back to top- This feature enables multiple inventories to be displayed on the product page, allowing users to choose their preferred inventory location for ordering.
- Navigate to WordPress Admin Dashboard > WooCommerce > Settings > Inventory Management.
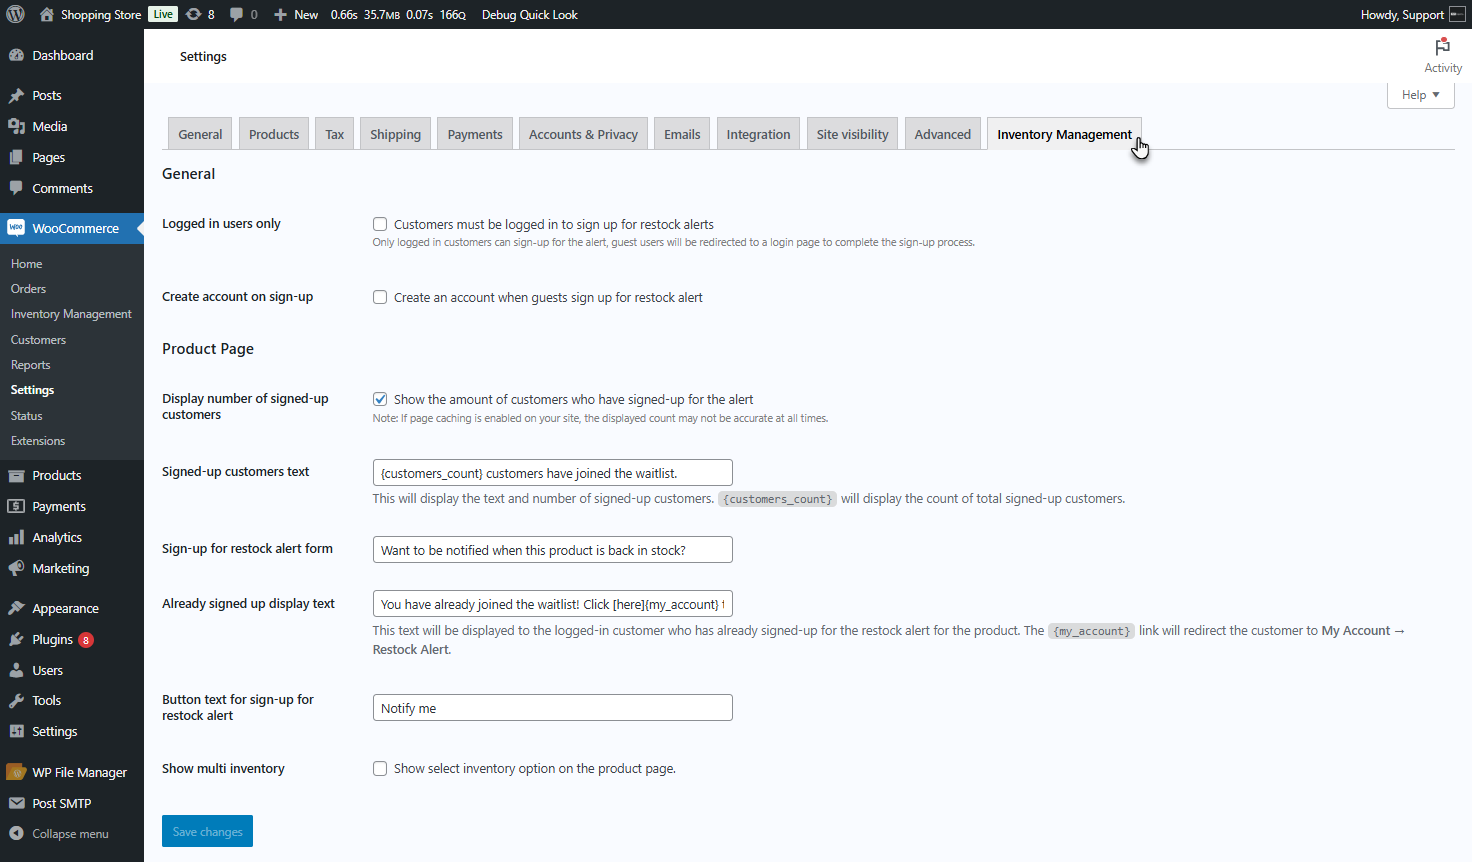
- Locate and Enable Show Multi Inventory option.

Simple Product
↑ Back to top- Navigate to WordPress Admin Dashboard > All Products > Simple Product.

Note: Ensure that the Manage Stock option is enabled in Product Data > Inventory before managing inventories.
- Go to the Stock Management tab. Locate and enable the Multi Inventory option.

Note: The Total Stock field is a non-editable field that displays the sum of all stock quantities across different inventories for this product.
- A default inventory labeled Warehouse will appear, which will later be replaced by the Stock Location selected by the admin. Click on it to expand the inventory tab, where the following details can be added:
- SKU: A unique identifier for each product or variation to track inventory.
- Supplier SKU: The SKU assigned by the supplier to track the product from their perspective.
- Supplier: The company or entity providing the product.
- Stock Location: The physical place where the product is stored.
- Stock Quantity: The number of items available in the specific inventory location.
- Regular Price: The standard retail price of the product.
- Sale Price: The discounted price when the product is on sale.
- Purchase Price: The price at which the product is bought from the supplier.
- Inventory Date: The date when the inventory data was last updated or recorded.

Note: If the admin leaves the price field empty, the regular price of the product will be applied to all the inventories.
- The admin can add multiple inventories by clicking on the Add New Inventory button.

- After filling in the necessary details, another inventory will be added.
- Click on the Update button to save changes.

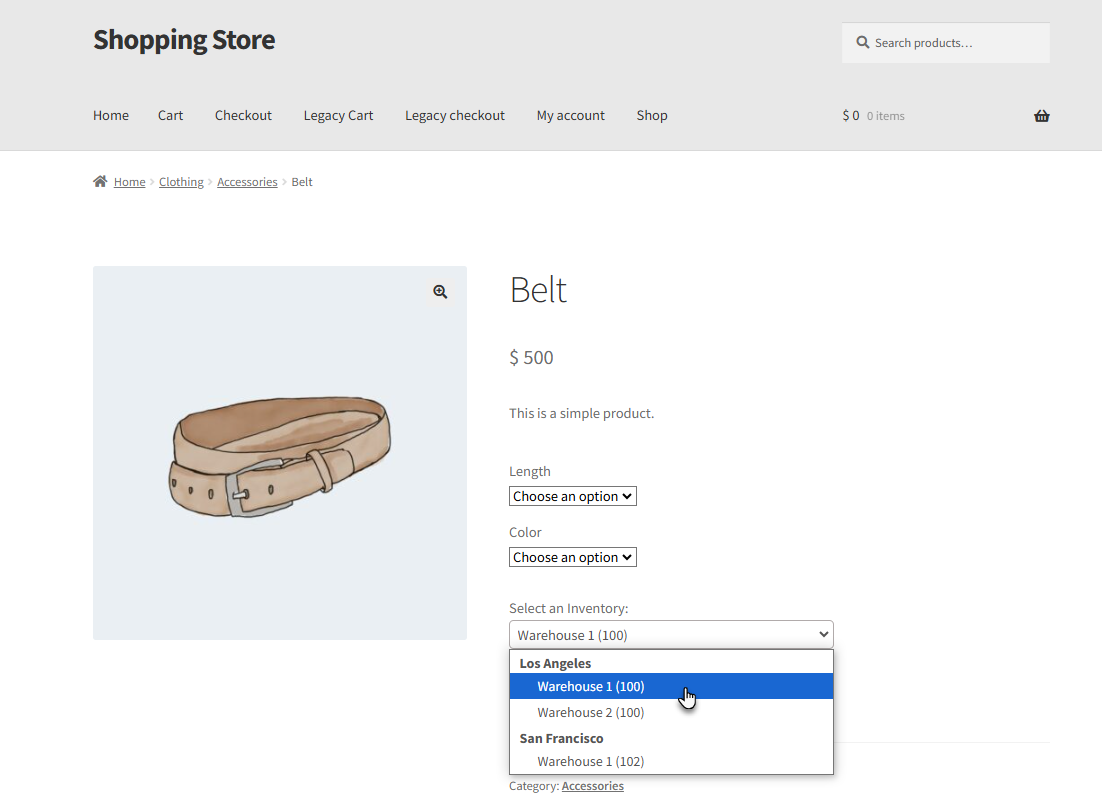
Front End Impact
- Login to your account.
- Go to the Simple Product page.
- The stock number displayed represents the quantity available in the first inventory. Once the stock in the first inventory is depleted, it will automatically update to show the stock quantity from the next inventory.

- If the Show Multi Inventory is enabled in the WordPress Admin Dashboard > WooCommerce > Settings > Inventory Management.
- A Select an Inventory dropdown will appear, allowing users to choose the desired warehouse from which to order the product.

- The selected Inventory location will appear on the Cart page.

- The selected Inventory location will appear on the Checkout page.

Variable Product
↑ Back to top- The admin can manage multiple inventories for a variable product, either as a whole for the entire product or individually for each variation.
- Navigate to WordPress Admin Dashboard > All Products > Variable Product.

- For the whole Variable Product, switch to the Stock Management tab and enable the multi-inventory option. Add inventory by filling out the details.

- For a single variation of the product, Switch back to the Variations tab. Expand the variation for which you want to manage multiple inventories.

- Enable the Manage Stock option.

- The inventory list will appear. Add inventory by filling out the details.

- Click Add New Inventory to add more inventories.

- After filling in the necessary details, another inventory will be added.
- Click Update to save changes.

Front End Impact
- Login to your account.
- Go to the Variable Product page.
- A Select an Inventory dropdown will appear, allowing users to choose the desired warehouse to order the product from.
- For a variation of the product, select the variation, and a Select an Inventory dropdown will appear, allowing users to choose the desired warehouse to order the variation of the product from.

Inventory Management
↑ Back to top- Navigate to WordPress Admin Dashboard > WooCommerce > Inventory Management.
- All the products will appear with the inventory. Find the product on which multiple inventory is managed. The admin can also manage Multi Inventory from here.
- Click on the Multi Inventory option.

- All the multiple Inventories will appear. Hover on the Inventory to Quick edit the inventory.

- A popup will appear with respect to the inventory chosen for editing.

Compatibility With Bulk Order – B2B Product Table for WooCommerce
↑ Back to top- Download and install the Bulk Order – B2B Product Table for WooCommerce.
- Follow the Bulk Order – B2B Product Table for WooCommerce documentation to set up and configure the plugin.
Getting Started
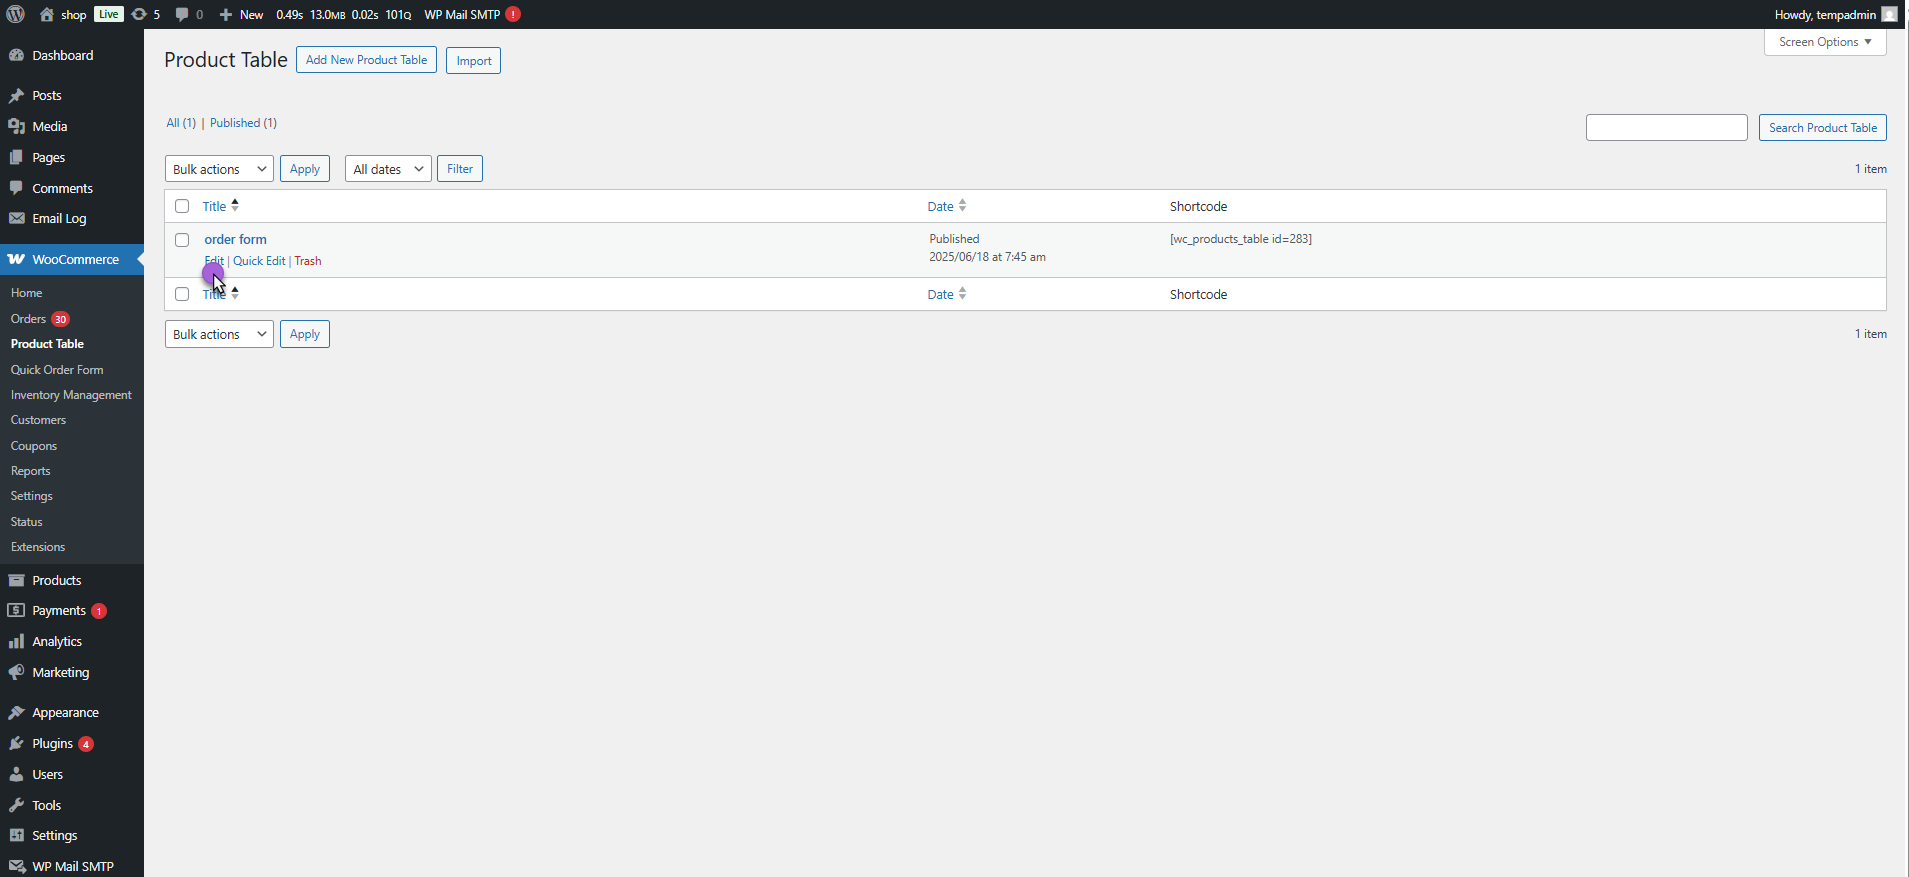
↑ Back to top- Go to the WooCommerce > Product Table.
- Click on Edit/Add new Product Table
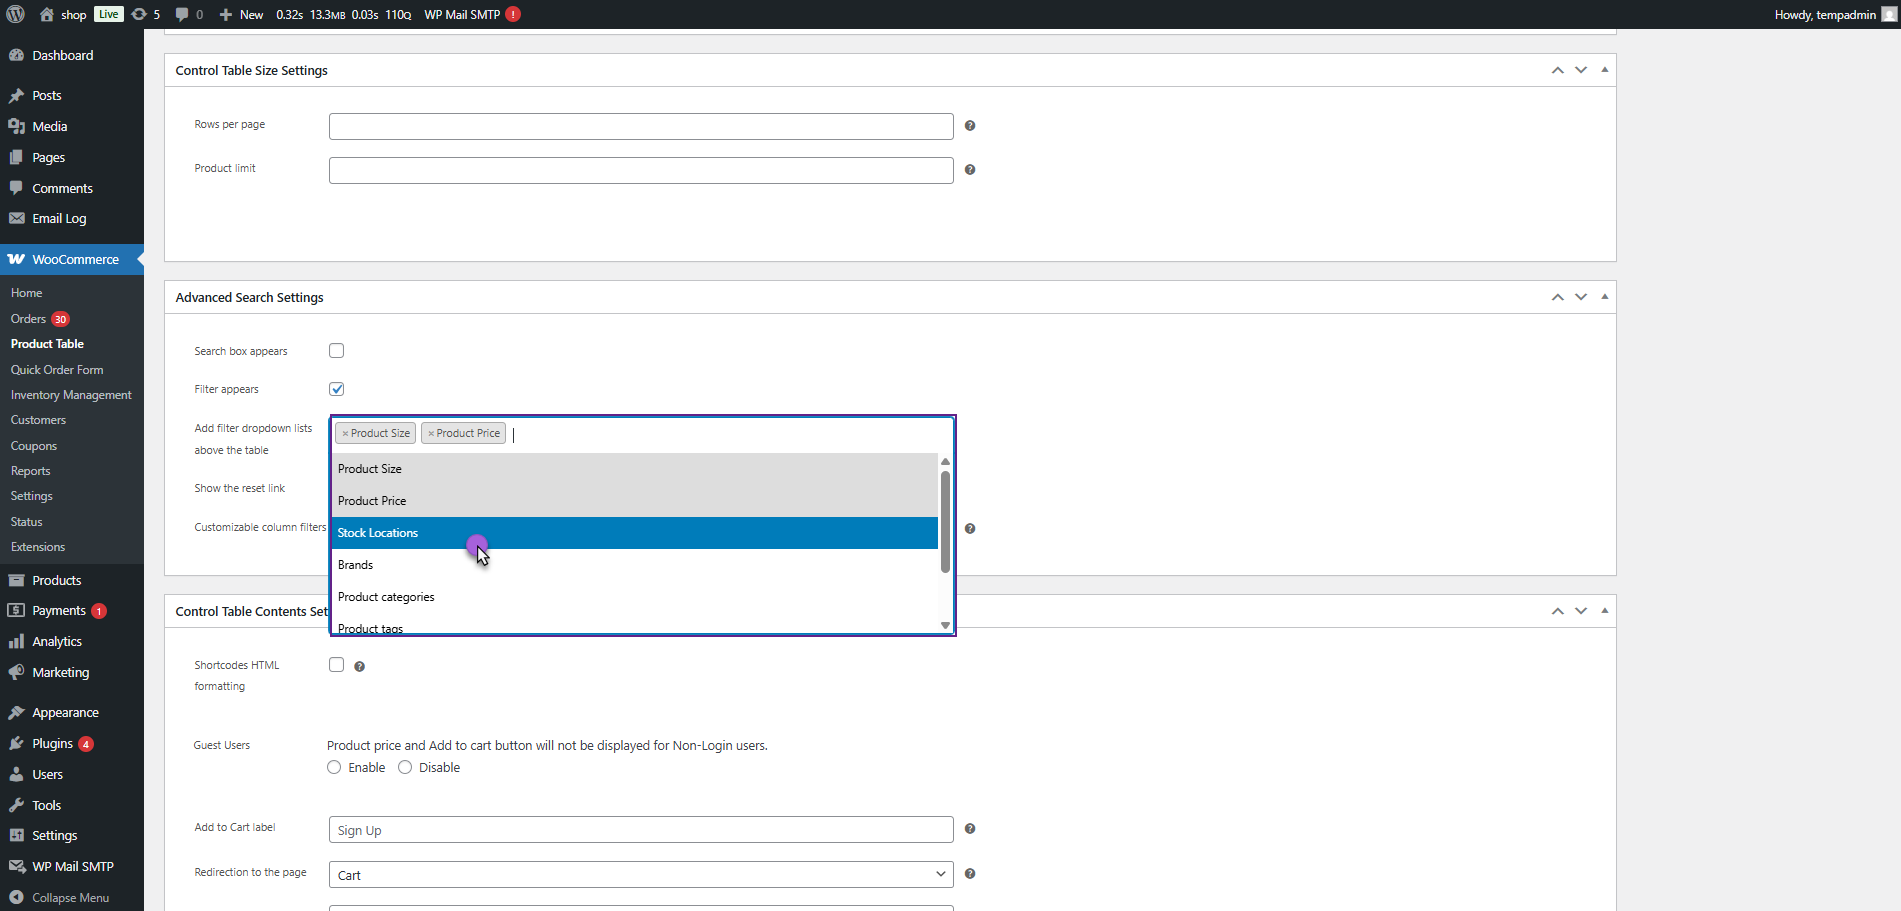
- Now, navigate to the Advanced Search Settings.
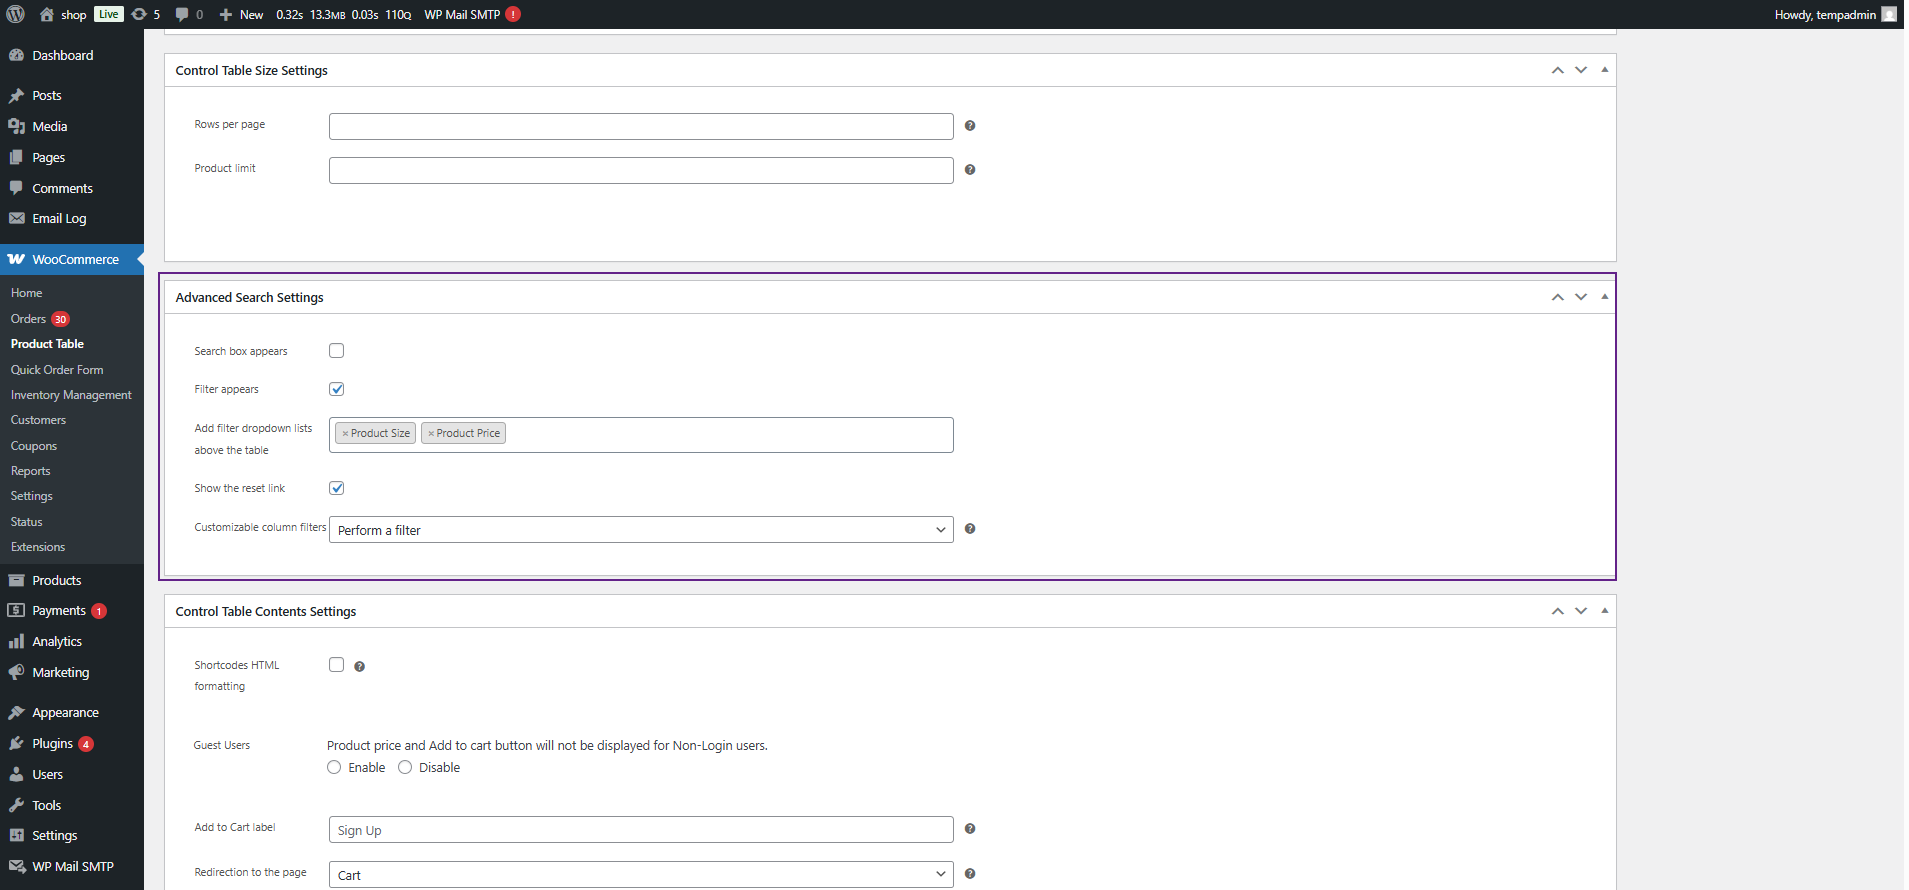
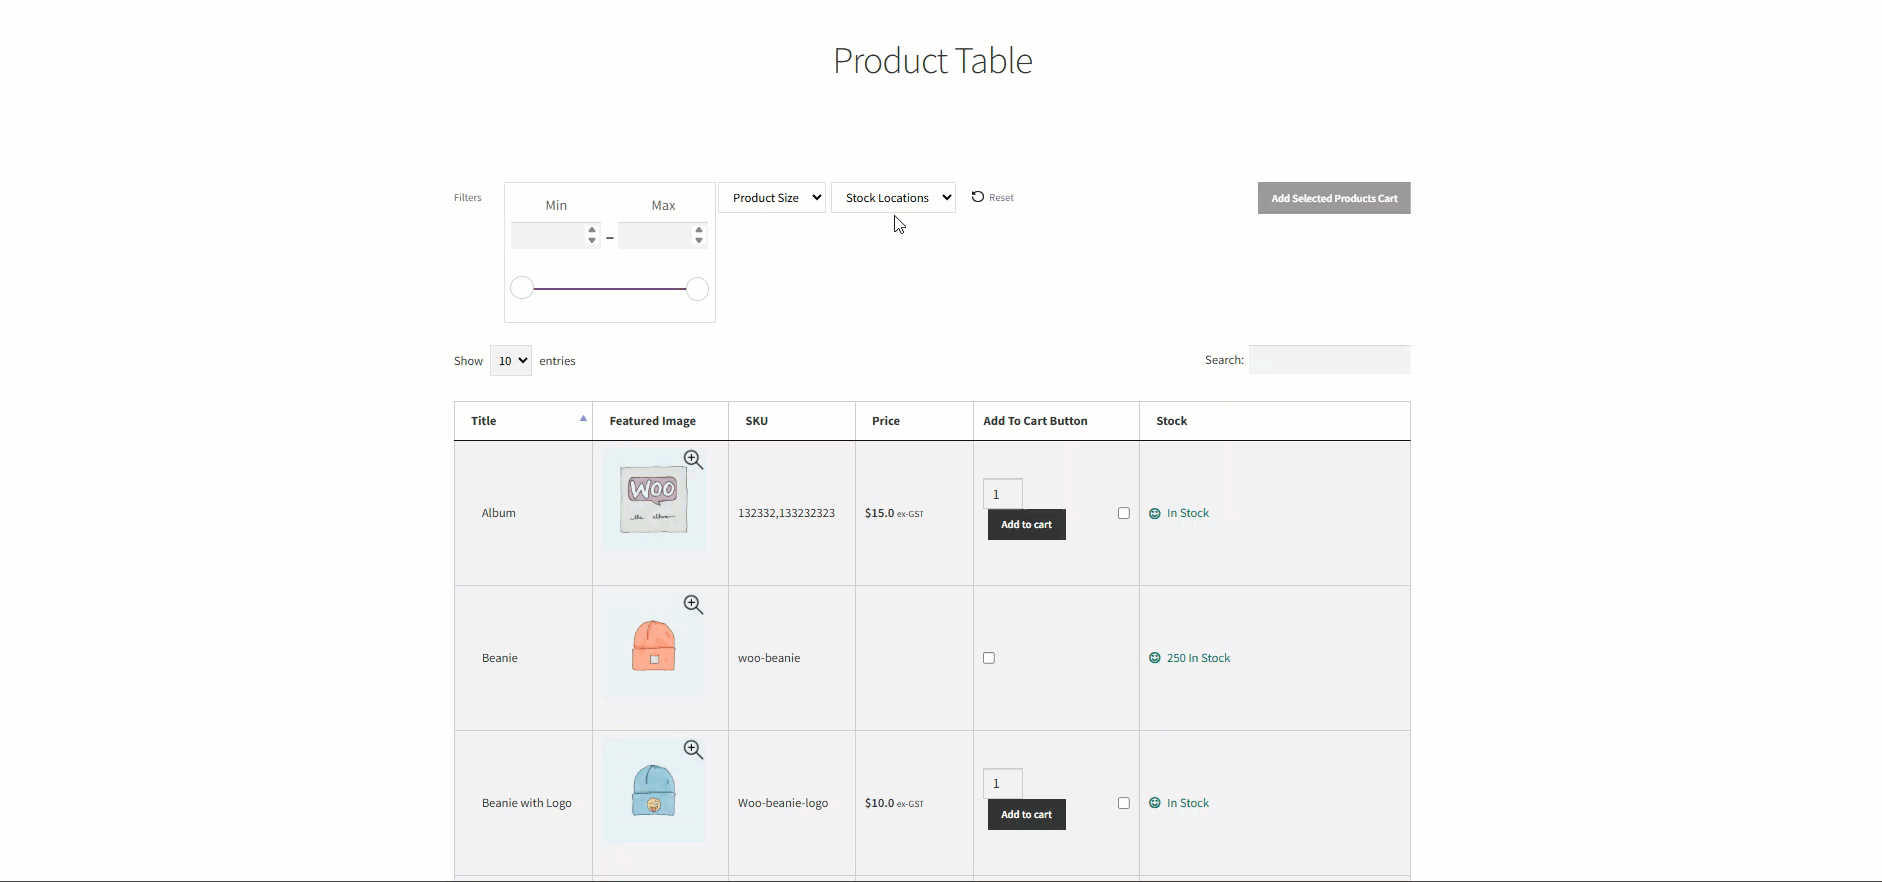
- A new dropdown filter has been added in the Add filter dropdown list above the table.
- Stock Location: Displays all stock locations created in the Smart Inventory Management plugin.
Front-End Impact
- Navigate to the Product Table page.
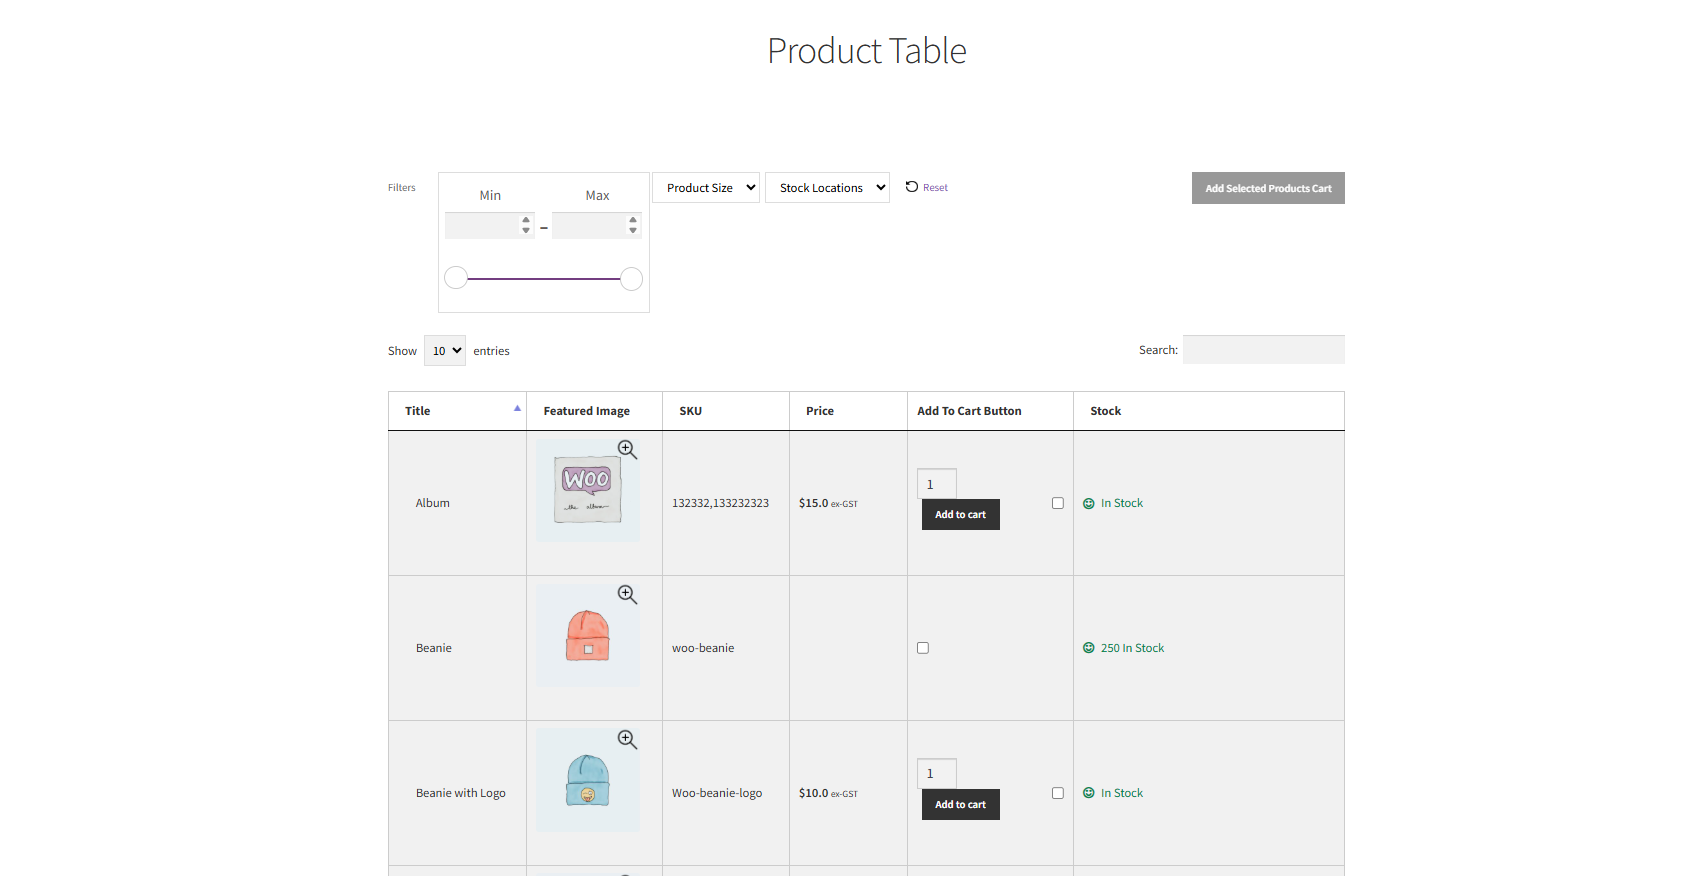
- A new Stock Location filter is available in the Bulk Order Form.
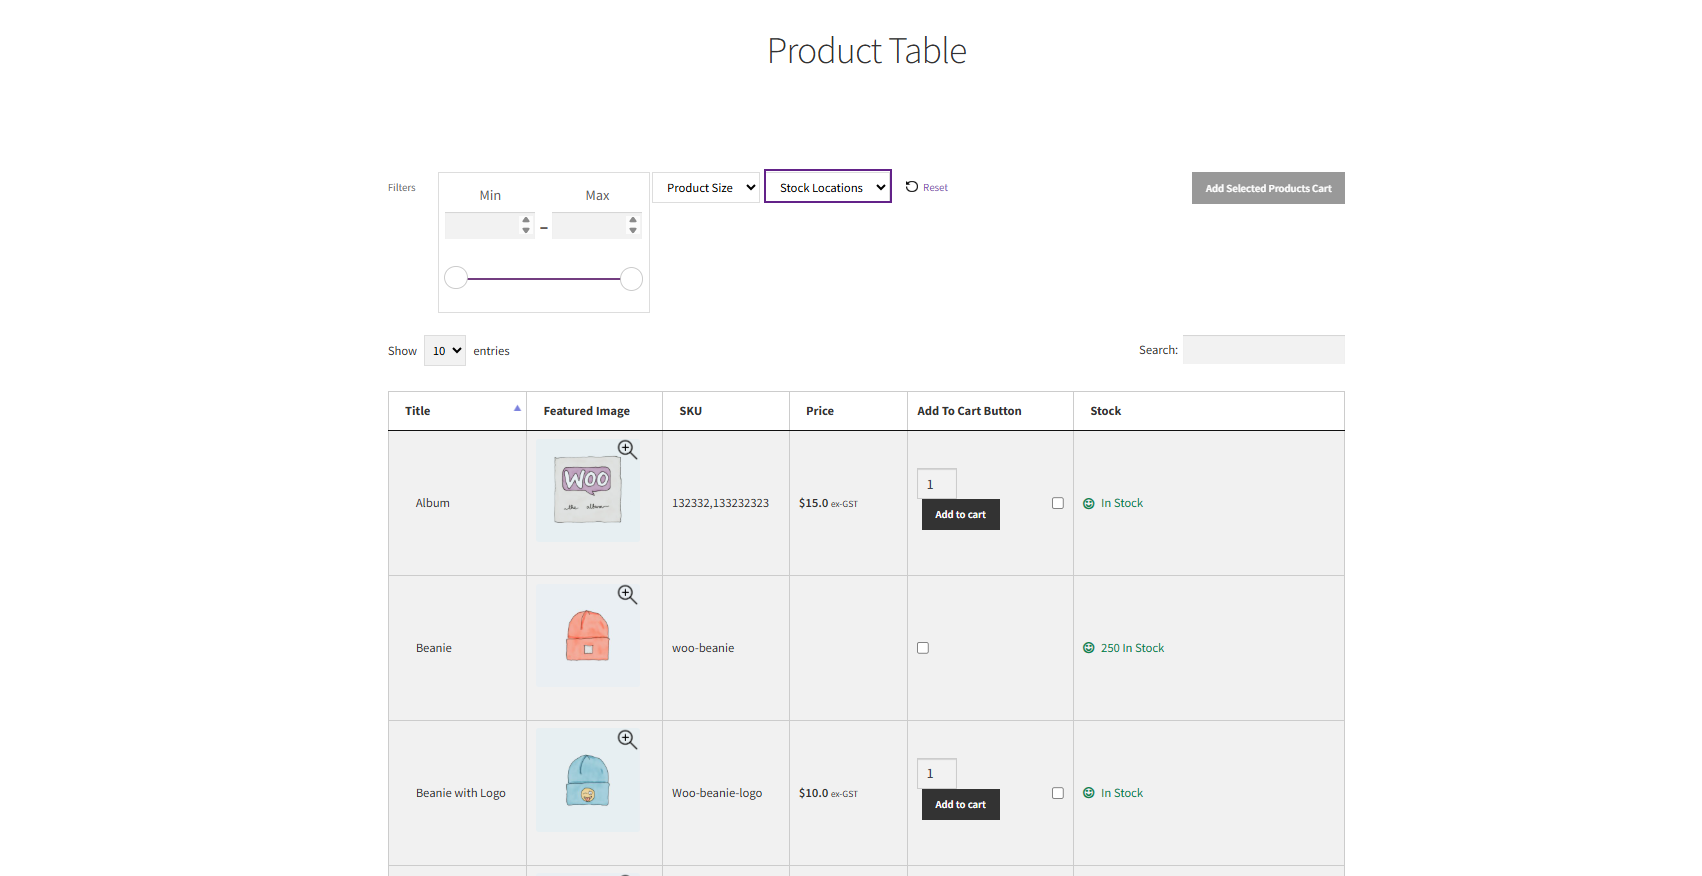
- When a specific stock location is selected, the product table will only display products associated with that location.
- This allows faster product search and selection based on warehouse or branch availability.
Description
↑ Back to topThis inventory manager plugin enables the admin to monitor stock levels and manage suppliers efficiently. The admin can activate stock and restock alerts for both suppliers and customers. Customers have the option to sign up for restock alerts and will receive an email notification when a product is restocked. All products can be managed from a single, comprehensive inventory management page. Additionally, the admin can set up custom email notifications for recipients and suppliers, which will be triggered based on the selected product and its stock status.
Features
↑ Back to top- Product restock alerts
- Stock Notifications
- Inventory management section
- Suppliers
- Stock Locations
Installation
↑ Back to top- Download the .zip file from your WooCommerce account.
- Go to WordPress AdminDashboard > Plugins > Upload Plugin > Choose File.
- Install Now and Activate Plugin.
Getting Started
↑ Back to topProduct Restock Alerts
↑ Back to top- This feature allows the admin to set customer alerts when a product is restocked. When a product is out of stock, a “Notify Me” button will appear on the product page. Customers can sign up for an alert for that specific product.
- Go to WordPress Admin Dashboard > Products > All Products > Choose a Product.
- Navigate to the Stock Management tab on the product page.
- Enable the Restock Alert option. This will send an email notification to customers when the product is restocked.
- Once the Restock Alert option is enabled, a Minimum Restock field will appear. This can be left empty, and the alert will be sent when the stock quantity in Product data > Inventory is set.
- If the admin wants to set a custom restock quantity on which the restock alert notification will be sent, then set the minimum restock limit to trigger the email notification.
NOTE: This Minimum Restock is the level of restock quantity on which the restock email will be sent to the signed-up users.
- Click the Update button to save your changes.
Front End Impact
For Logged in Users
- Login to your WordPress account.
- Go to the Product page.
- A “Notify Me” button will appear when the product is out of stock.
- Click on the “Notify Me” button to receive a notification when the product is restocked.
- A Successfully Signed up message will appear.
NOTE: The user will be notified when the product is restocked.
- The User can view all their active alerts by navigating to My Account > Restock Alerts.
- All the restock alerts for the user will be listed in the Restock Alert tab. From this tab, users can activate or deactivate the alerts.
For Guest Users
- An email box will be displayed if the user is not logged in. The guest must enter their email address, enabling the “Notify Me” button, allowing them to sign up for the alert.
Restock Alerts
- All signed-up customers and their alerts will be displayed in the “Restock Alert” section, Navigate to WordPress Admin Dashboard > Tools > Restock Alert.
- The admin can edit these alerts and view their status. By clicking the “Edit” button in the “Actions” column, the alert edit page will open, allowing further modifications.
- The Edit Restock Alert screen will appear. There will be two meta boxes present on the Edit Restock page.
- Details – The details of the Product and customer will be displayed
- Activity – The activity of the Restock alert will be listed in this section.
- The admin can change the Status of the Restock Alert from the Change Status drop-down.
- Click on the Update button to save your changes.
- When the product is restocked, the user will be notified via Email.
Suppliers
↑ Back to top- The admin can add suppliers, who can be used for inventory management and product settings. These suppliers can also be included in notifications to send low-stock and out-of-stock alerts, ensuring they are notified and can send product stocks.
- Go to WordPress AdminDashboard > Users > Suppliers. The All Suppliers List page will appear.
- The admin can add a new supplier by clicking on the “Add New” button.
- The “Add Supplier” section includes three subsections.
- Supplier Details
- Billing Details
- Other Settings.
- In the Supplier Details meta box, The admin can add the following details.
- Supplier Name – The admin can add the name of the supplier. This is a required field.
- Supplier Code – The admin can assign a unique code to the supplier. This is a required field.
- Tax/VAT Number – The admin can add the Tax/VAT number of the supplier.
- Phone Number – The admin can add the phone number of the supplier.
- Fax Number – The admin can add the fax number of the supplier.
- Website – The admin can add the website of the supplier.
- URL for Ordering – The admin can add the supplier’s URL for ordering.
- General Email Address – The admin can add the general email address of the supplier. This is a required field.
- Email for Ordering – The admin can add the supplier’s email address for ordering purposes.
- Description – The admin can add a description of the supplier.
- Now move to the Billing Information meta Box. The admin can add the following details.
- Currency – The admin can select the currency used by the supplier.
- Company Address – The admin can add the company address of the supplier.
- Warehouse Address – The admin can add the warehouse address of the supplier, if applicable.
- City – The admin can select the city where the supplier is located.
- Country – The admin can select the country where the supplier is located.
- State – The admin can select the state where the supplier is located.
- Zip Code – The admin can add the postal code of the supplier.
- The admin can add additional information in the Others Setting meta box. This section includes useful settings for the admin, such as supplier lead time and the contact person for receiving stock at the warehouse or other locations. The admin can add the following details.
- Assigned To – The contact person who will be notified when a purchase order for this supplier is created.
- Ship to Location – The location of the contact person assigned to this supplier.
- Discount – The discount value offered by the supplier.
- Tax Rate – The tax rate applied by the supplier.
- Lead Time – The expected time for the order to arrive from this supplier.
- Days to Cancel – The number of days within which the admin can cancel the order from the supplier.
- Payment and Delivery Terms – The payment and delivery terms are agreed upon with this supplier.
- Cancellation Policy – The cancellation policy provided by this supplier, if any.
- Once done with the details of the Suppliers, Click on the Publish button to add a supplier.
- The Supplier details will be visible on the Product settings page. Navigate to WordPress Dashboard > Products > All Products > Choose a Product.
- Scroll down to the Product Data section. Click on the Stock Management.
- There will be a Supplier drop-down list, the Supplier’s SKU, and the Purchase Price of the product from the supplier.
NOTE: For variable products, the supplier and supplier SKU will remain in the Stock Management section, while the purchase price will be specified for each variation.
- The admin can select the Supplier from the drop-down list.
- The admin can assign an SKU to the suppliers in the Suppliers SKU option.
- The admin can add the Purchase Price of the product in the Purchase Price option.
- Click on the Update button to save the Changes.
Stock Notification
↑ Back to top- This notification feature enables the admin to send email notifications to suppliers or other recipients.
- Navigate to WordPress Dashboard > Tools > Stock Notification.
- Click on the “Add New” button on the Stock Notification list page.
- The Add New Notification screen will appear.
- In the Recipient Details section, the admin can fill in recipient information, including recipient type, name, email address, phone number, and address.
- In the Select Recipient option, the admin can select recipients from these three options.
- New Recipient – A new recipient will be created.
- Supplier – The supplier added by the admin can be selected.
- User – The users of the website will be selected.
- The admin can fill up the details of the New Recipient including the Name, Email Address, Phone and Address.
- The admin can configure notification in the Notification Settings section.
- The admin can add triggers on which notifications will be sent to the recipient.
- The admin can search for a specific category on which this notification will be sent.
- The admin can search for a specific product for which the notification will be sent.
- The admin can add the custom low threshold for a product on which the notification will be sent.
NOTE: If this option is unchecked, each product has its low stock threshold on which a low stock trigger will work.
- The admin can set the threshold value for the product.
- Click on the Publish button to add a Restock Notification.
- A stock notification will be added. The recipient will receive a notification when the specified trigger activates.
Stock Notification in Product Data
↑ Back to top- The admin can enable Allow Stock Notification from the product data settings:
- Navigate to WordPress Admin Dashboard > All Products > Edit Product.
- Go to the Inventory tab.
- Locate and enable the Allow Stock Notification option.
Stock Location
↑ Back to top- The Stock location indicates where a product’s stock is stored. For example, the admin can monitor which warehouse or branch currently holds the product stock.
- Navigate to WordPress Dashboard > Products > Stock Location.
- The Add New Stock Location screen will appear. The admin can add a name, slug, Parent Stock Location, if any, and description for each stock location.
- Click on the Add new Stock Location button to add the stock location.
- The added stock location will be displayed in the list.
- Once done with adding a stock location, navigate to the Product Edit page.
- Go to the “Inventory” tab under the “Product Data” section.
- A Stock Location drop-down list will appear. All the created stock locations will appear in this list.
- The admin can select the stock location for the product from this drop-down.
- Click on the Update button to save the changes.
Manager in Stock Locations
↑ Back to top- The admin can add a manager to the stock location. Navigate to WordPress Admin Dashboard > Products > Stock Location.
- The Stock Location list page will appear. The admin can add a manager to an existing location or assign a manager while creating a new stock location.
- Add a name and slug for a new stock location. If applicable, select the parent stock location.
- The admin has two options: add a new manager or select an existing one.
- The following fields are available for manager details:
- Manager Name: The name of the manager at the location.
- Email: The manager’s email address.
- Phone: The contact number of the manager.
- Country/Region: The country where the inventory is located.
- Location Address: The address of the inventory/stock/warehouse.
- State: The state where the location is situated.
- City: The city where the inventory is located.
- Zip Code: The zip code of the location.
- Shipping Zone: The shipping zone assigned to the location.
- Payment Method: The payment method assigned to the location.
- Click on the Add New Stock Location to save the Stock location.
- If the admin chooses Select from Existing User, a dropdown will appear. The admin can assign a manager to the Stock Location.
Inventory Management
↑ Back to top- Inventory management enables the admin to centrally manage all products and their stock levels.
- Navigate to WordPress Dashboard > WooCommerce > Inventory Management.
- A Product Inventory table will appear. This table displays product details, including suppliers, stock locations, purchase price, gross profit (%), stock levels, and status.
- The admin can edit any product by hovering on the Product.
- Click on the Quick Edit.
- The admin can edit Product data, pricing, and stock from here.
Email Templates
↑ Back to top- Navigate to the WordPress Dashboard > WooCommerce > Settings > Emails.
- The restock alerts to the user and supplier will be sent in the following email templates.
- The following restock alert email will be sent to the user who signed up for the restock alert when the product is restocked.
- The following out-of-stock alert email will be sent to the admin.
- The following out-of-stock alert email will be sent to the Supplier.
General Settings
↑ Back to top- For the General settings of the Inventory Management, navigate to the WordPress Dashboard > WooCommerce > Settings > Inventory Management.
- The admin can restrict customers to be logged in for restock alerts. Only logged-in customers can sign up for the alert. Guest users will be redirected to a login page to complete the sign-up process.
- The admin can enable an option to create an account when a guest signs up for restock alerts.
- The admin can display the number of signed-up customers on the product page by using the Display number of signed-up customers.
Front End Impact
- Login to your WordPress account.
- Go to the Product Page.
- The Number of Signed-up customers will be displayed on the product page.
- The admin can change the text of the Signed up customers.
- The Admin can change the text of the Sign-up for restock alert form.
- The Admin can change the text of the Already signed up display text.
- The Admin can change the text of the Button text for sign-up for restock alert.
Multi Inventory
↑ Back to topMulti Inventory on Product page
↑ Back to top- This feature enables multiple inventories to be displayed on the product page, allowing users to choose their preferred inventory location for ordering.
- Navigate to WordPress Admin Dashboard > WooCommerce > Settings > Inventory Management.
- Locate and Enable Show Multi Inventory option.
Simple Product
↑ Back to top- Navigate to WordPress Admin Dashboard > All Products > Simple Product.
Note: Ensure that the Manage Stock option is enabled in Product Data > Inventory before managing inventories.
- Go to the Stock Management tab. Locate and enable the Multi Inventory option.
Note: The Total Stock field is a non-editable field that displays the sum of all stock quantities across different inventories for this product.
- A default inventory labeled Warehouse will appear, which will later be replaced by the Stock Location selected by the admin. Click on it to expand the inventory tab, where the following details can be added:
- SKU: A unique identifier for each product or variation to track inventory.
- Supplier SKU: The SKU assigned by the supplier to track the product from their perspective.
- Supplier: The company or entity providing the product.
- Stock Location: The physical place where the product is stored.
- Stock Quantity: The number of items available in the specific inventory location.
- Regular Price: The standard retail price of the product.
- Sale Price: The discounted price when the product is on sale.
- Purchase Price: The price at which the product is bought from the supplier.
- Inventory Date: The date when the inventory data was last updated or recorded.
Note: If the admin leaves the price field empty, the regular price of the product will be applied to all the inventories.
- The admin can add multiple inventories by clicking on the Add New Inventory button.
- After filling in the necessary details, another inventory will be added.
- Click on the Update button to save changes.
Front End Impact
- Login to your account.
- Go to the Simple Product page.
- The stock number displayed represents the quantity available in the first inventory. Once the stock in the first inventory is depleted, it will automatically update to show the stock quantity from the next inventory.
- If the Show Multi Inventory is enabled in the WordPress Admin Dashboard > WooCommerce > Settings > Inventory Management.
- A Select an Inventory dropdown will appear, allowing users to choose the desired warehouse from which to order the product.
- The selected Inventory location will appear on the Cart page.
- The selected Inventory location will appear on the Checkout page.
Variable Product
↑ Back to top- The admin can manage multiple inventories for a variable product, either as a whole for the entire product or individually for each variation.
- Navigate to WordPress Admin Dashboard > All Products > Variable Product.
- For the whole Variable Product, switch to the Stock Management tab and enable the multi-inventory option. Add inventory by filling out the details.
- For a single variation of the product, Switch back to the Variations tab. Expand the variation for which you want to manage multiple inventories.
- Enable the Manage Stock option.
- The inventory list will appear. Add inventory by filling out the details.
- Click Add New Inventory to add more inventories.
- After filling in the necessary details, another inventory will be added.
- Click Update to save changes.
Front End Impact
- Login to your account.
- Go to the Variable Product page.
- A Select an Inventory dropdown will appear, allowing users to choose the desired warehouse to order the product from.
- For a variation of the product, select the variation, and a Select an Inventory dropdown will appear, allowing users to choose the desired warehouse to order the variation of the product from.
Inventory Management
↑ Back to top- Navigate to WordPress Admin Dashboard > WooCommerce > Inventory Management.
- All the products will appear with the inventory. Find the product on which multiple inventory is managed. The admin can also manage Multi Inventory from here.
- Click on the Multi Inventory option.
- All the multiple Inventories will appear. Hover on the Inventory to Quick edit the inventory.
- A popup will appear with respect to the inventory chosen for editing.
Compatibility With Bulk Order – B2B Product Table for WooCommerce
↑ Back to top- Download and install the Bulk Order – B2B Product Table for WooCommerce.
- Follow the Bulk Order – B2B Product Table for WooCommerce documentation to set up and configure the plugin.
Getting Started
↑ Back to top- Go to the WooCommerce > Product Table.
- Click on Edit/Add new Product Table
- Now, navigate to the Advanced Search Settings.
- A new dropdown filter has been added in the Add filter dropdown list above the table.
- Stock Location: Displays all stock locations created in the Smart Inventory Management plugin.
Front-End Impact
- Navigate to the Product Table page.
- A new Stock Location filter is available in the Bulk Order Form.
- When a specific stock location is selected, the product table will only display products associated with that location.
- This allows faster product search and selection based on warehouse or branch availability.