Setup and Installation
↑ Back to topMigrate your WIX products, orders, and customers to your WooCommerce store in a few clicks.
Installation:
↑ Back to top- Download WIX Migration for WooCommerce and have your .zip file
- Go to the Plugins section at the WordPress admin panel, and click ‘Add New’ to upload and install the plugin you just downloaded from WooCommerce.
- Upload the .zip file to proceed with the installation.
- Wait until the plugin installs. After successful installation, activate the plugin, and move on to configuration settings.
Configuration:
↑ Back to topAt the WooCommerce admin panel go to WooCommerce > Settings > WIX to Woo for configuration. Here you will find the Six tabs: API Settings, Product Import Settings, Customers Import Settings, Orders Import Settings, Run Import, and Import Status.
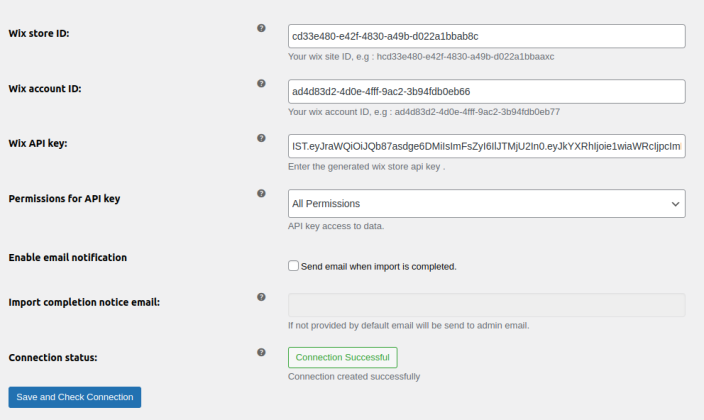
API Settings:
↑ Back to topIn this section, you can configure the API settings. Which includes:
- Wix store ID: Your Wix site ID, e.g: hcd33e480-e42f-4830-a49b-d022a1bbaaxc
- Wix account ID: Your Wix account ID, e.g: ad4d83d2-4d0e-4fff-9ac2-3b94fdb0eb77
- Wix API key: Enter the generated Wix store API key.
- Permissions for API key: API key access to data.
- Enable email notification: checkbox option to Send email when import is completed.
- Import completion notice email: Provide email If not provided by default email will be sent to admin email.
- Connection status: check the status of the connection
Note: How to Create WIX Account ID, Store ID, API Key please watch this video. Click Here
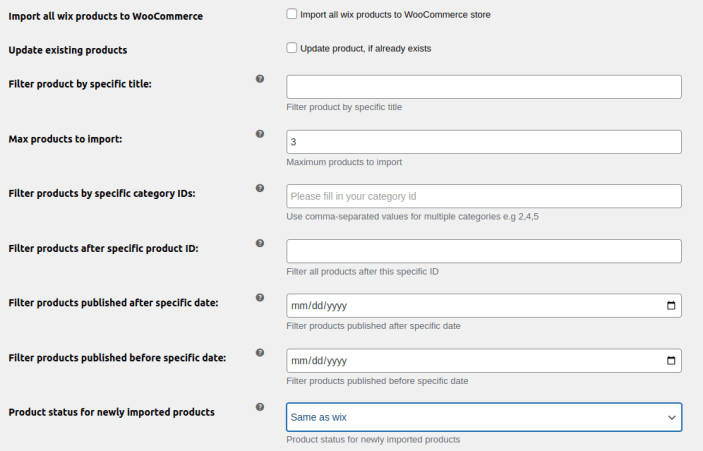
Product Import Settings:
↑ Back to top- Import all wix products to woocommerce: Import all wix products to woocommerce store.
- Update existing products: checkbox to update product, if already exist.
- Filter product by specific title: Enter specific product titles if you want to import products based on their titles.
- Max product to import: Input the maximum number of products that you want to import.
- Filter products by specific category IDs: Filter products based on their specific category IDs. Use comma-separated values for multiple categories e.g. 1,3,5,8,9.
- Filter products after specific product ID: Enter a specific product ID to filter all products after that specific ID.
- Filter products published after specific date: Select the date to filter all the products that are published after the selected date.
- Filter products published before specific date: Choose the date to filter products published before that date.
- Product status for newly imported products: Select the status of the newly imported products. You can select:
1. Published
2. Draft
3. Same as wix
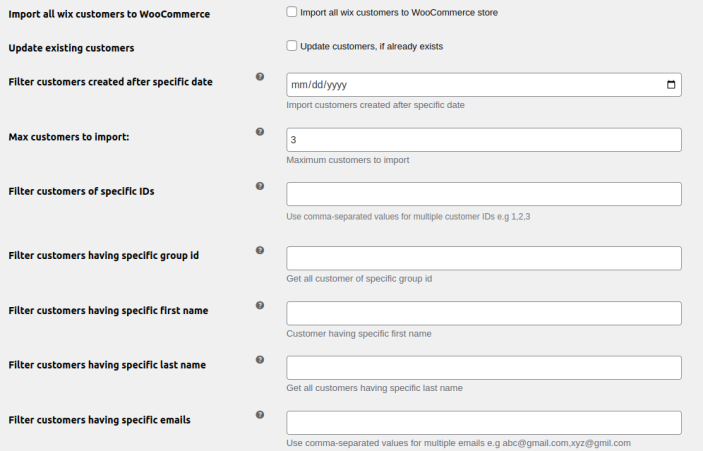
Customers Import Settings:
↑ Back to top- Import all wix customers to WooCommerce: Enable the checkbox to import all customers from wix to WooCommerce.
- Update existing customers: Update existing customers if any. If you do not want to import all customers, uncheck the box and configure the following settings.
- Filter customers created after specific date: Select a date to filter customers created after that particular date.
- Max customers to import: Enter the maximum number of customers that can be imported.
- Filter customers of specific IDs: Filter customers based on their IDs. Use comma-separated values for multiple customer IDs e.g 1,2,3.
- Filter customers having specific group id: Enter group ID to get all customers of that specific group ID.
- Filter customers having specific first name: Input specific first names to import all customers having that first name.
- Filter customers having specific last name: Enter last name to get all customers with that specific last name.
- Filter customers having specific emails: Enter email addresses to filter customers based on their email address. Use comma-separated values for multiple emails e.g abc@gmail.com,xyz@gmil.com.
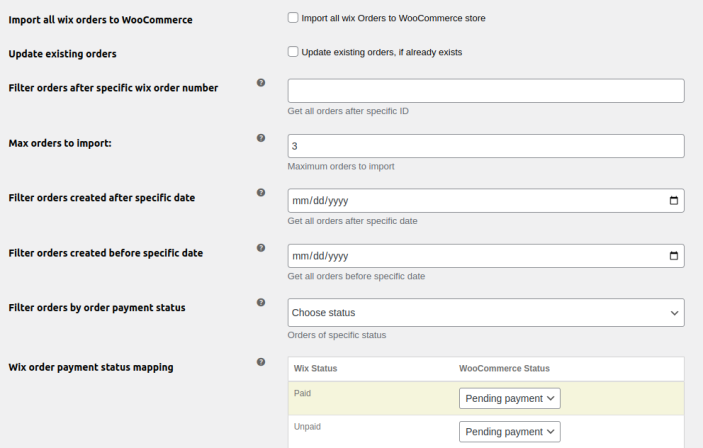
Order Import Settings:
↑ Back to top- Import all wix orders to WooCommerce: Click the checkbox to import all orders from wix to WooCommerce.
- Update existing orders: Enable the checkbox to update existing orders if any.
- Filter orders after specific wix order number: Enter a specific ID and get all orders that are created after that particular order ID.
- Max orders to import: Add the maximum number of orders that can be imported.
- Filter orders created after specific date: Enter a date to get all the orders after that specific date.
- Filter orders created before specific date: Select a date to import all the orders that were created before that specific date.
- Filter orders by order payment status: Enter the Import order status
- Order status mapping: check the mapping status of each order in wix and WooCommerce. You can select the status of each WooCommerce order as:
1. Pending Payment
2. Processing
3. On Hold
4. Completed
5. Canceled
6. Refunded
7. Failed
Run Import:
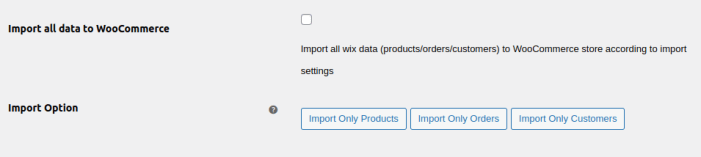
↑ Back to topIn the run import tab, you can manage the import of all products, customers, and orders.
- Import All Data to WooCommerce: Click the checkbox to import all the data including products, orders, and customers from wix to WooCommerce according to the import settings you have configured previously.
- Import Option: Choose options to import data from wix to WooCommerce. When “Import All Data to WooCommerce” is checked all data will be imported. When unchecked, you can select:
1. Import Only products
2. Import Only Orders
3. Import Only Customers
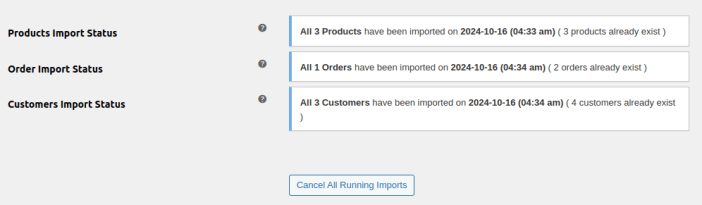
Import Status:
↑ Back to topIn this tab, you can check the status of all running imports.
- Products Import Status: Check the status of product imports.
- Order Import Status: Import status of all orders.
- Customers Import Status: Status of all customer imports.
- You can cancel all the running imports by clicking the “Cancel All Running Imports” button.