Installation
↑ Back to top- Download the .zip file from your WooCommerce account.
- Go to: WordPress Admin > Plugins > Add New and Upload Plugin. Select Choose File for the file you have downloaded.
- Click Install Now and Activate Plugin.
More information is available at Install and Activate Plugins/Extensions.
Setup and Configuration
↑ Back to topAfter activation of the Subscription Cancellation Period extension, you can access extension settings from WP Admin > WooCommerce > Settings > Subscription Cancellation Period. You can apply cancellation rule to a subscription product from product edit sheet.
Add Custom Subscription Cancellation Rule:
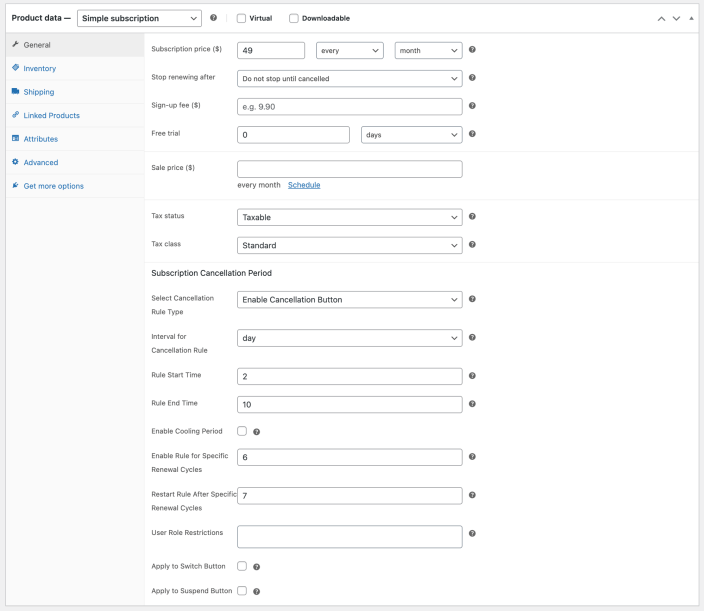
↑ Back to topGo to Subscription Product and navigate to General Settings > Subscription Cancellation Rule to add custom cancellation rule for selected product. While enabling cancellation rule you can customize following options,
Select Cancellation Rule Type:
You can choose from 2 different rule types
- Enable Cancellation Button – This will keep the cancel button active for period and user role defined below and keep hidden for the rest of the time.
- Disable Cancellation Button – This will keep the cancel button hidden for period and user roles defined below and keep visible for the rest of the time.
Interval for Cancellation Rule:
You can select a certain time for your cancellation rules, such as:
- Hour: If you choose the hours option, the rule will apply within that hour only.
- Day: You can apply rules on the basis of days
- Week/Month (if available): Implement the rule over a longer period like weeks or months.
Rule Start Time & End Time:
Depend on the above interval, you can add start and end time for the rule to be active. If you set the number to 2 & 10 and the interval is “Day,” the rule will begin on the 2nd day and end on 10th of active subscription.
Enable Cooling Period:
This option provides a buffer time before users to cancel their subscriptions. During this time the cancellation rules won’t apply. If you choose to leave this option unchecked, no cooling period will be implemented, and users in the store will be able cancel subscription according to this rules.
Enable Rule for Specific Renewal Cycles:
Choose to implement the cancellation rule for certain renewal cycles. If you enter a number like 2, the rule will apply to the second renewal cycle as well, but if you leave this option, the rule will be implemented for all renewal cycles.
Restart Rule After Specific Renewal Cycles:
When you enable rule for specific renewal cycles then you can choose to restart rule after X number of renewal cycle to reply apply cancellation conditions.
User Role Restrictions:
Select to apply restrictions on the cancellation rule to specific user roles. If you choose to leave it empty, the cancellation rule will apply to all user roles by default, but if you choose to select certain user roles, then the only the selected user roles will be affected by the cancellation rule.
Apply to Switch Button: Simply turn on/off the application of this rule to the “Switch” button. If you choose to leave it unchecked, the rule will not impact users trying to switch their subscription, but by checking this option, the rules will affect users switching their subscription plan.
Apply to Suspend Button:
Select to turn on/off the application of this rule to the “Suspend” button. If you choose to leave it unchecked, then the rule will not affect subscription suspensions.

General Settings:
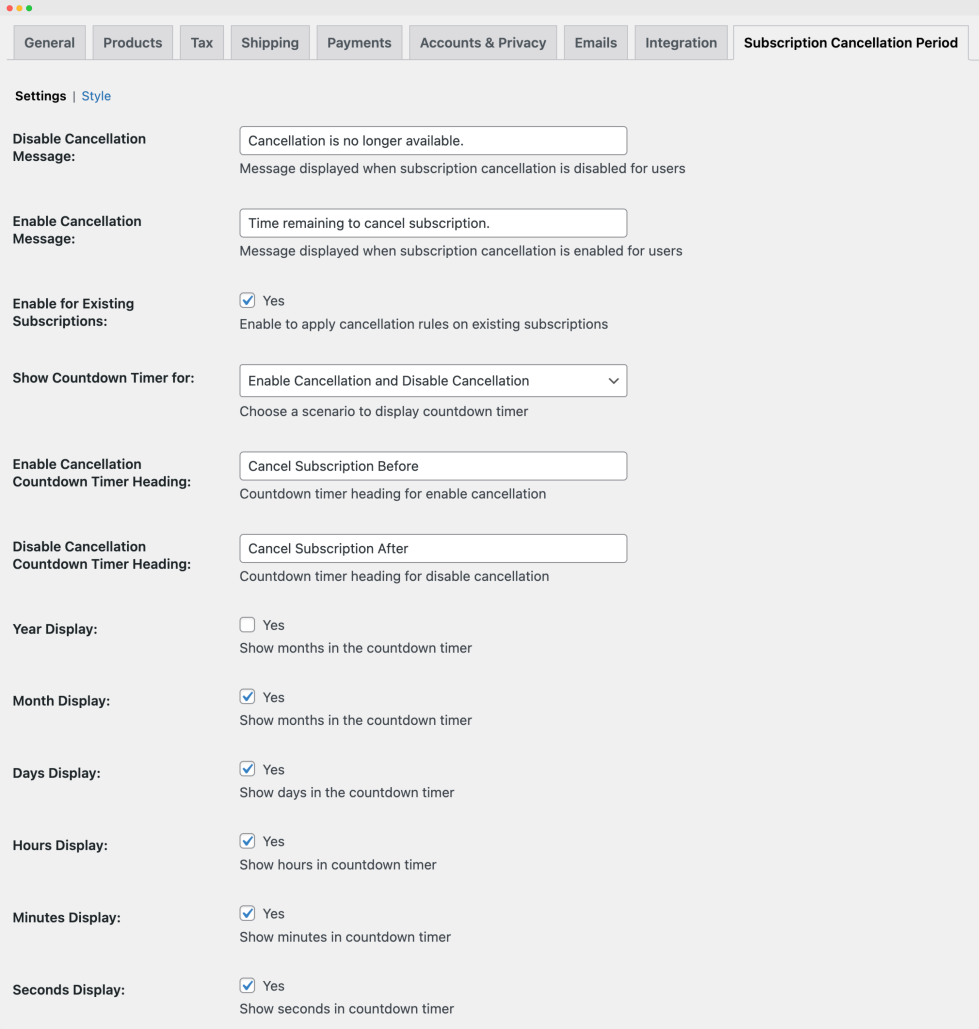
↑ Back to topDisable Cancellation Message:
You can set the message that users will see when the cancellation option is disabled on the store for their subscription.
Enable Cancellation Message:
Easily choose to define the message that users will be seeing when the cancellation button is enabled for their subscription.
Enable Existing Subscriptions:
This option lets you implement the cancellation rules for subscriptions created before the rules were set on the store.
- If you choose yes, then the cancellation rules will apply to both new and existing subscriptions. However, choosing unchecked will result in only applying the rules to subscriptions created after the rules are implemented.
Show Countdown Timer:
Choose when to display the countdown timer.
- Enable Cancellation: When cancel button is visible the timer will appear to show when it will be disabled.
- Disable Cancellation: When cancel button is inactive the timer will appear to show when it will be available.
- Enable Cancellation and Disable Cancellation: Show countdown in both cases.
- Disable Timer: You can deactivate timer and it won’t appear for customer in any case.
Enable Cancellation Countdown Timer Heading:
This heading will appear on top of the timer when cancel button is visible.
Disable Cancellation Countdown Timer Heading:
This heading will appear on top of the timer when cancel button is disabled.
Disable specific timer options:
- Year Display: Choose to display or hide the year in the countdown timer
- Month Display: Choose to show or hide the months in the countdown timer
- Days Display: Choose to display to hide the days in the countdown timer
- Hours Display: Choose to include/exclude hours in the countdown timer
- Minutes Display: Choose to allow the visibility of minutes in the countdown timer
- Seconds Display: Choose if the seconds are to be displayed in the countdown timer

Timer Styling:
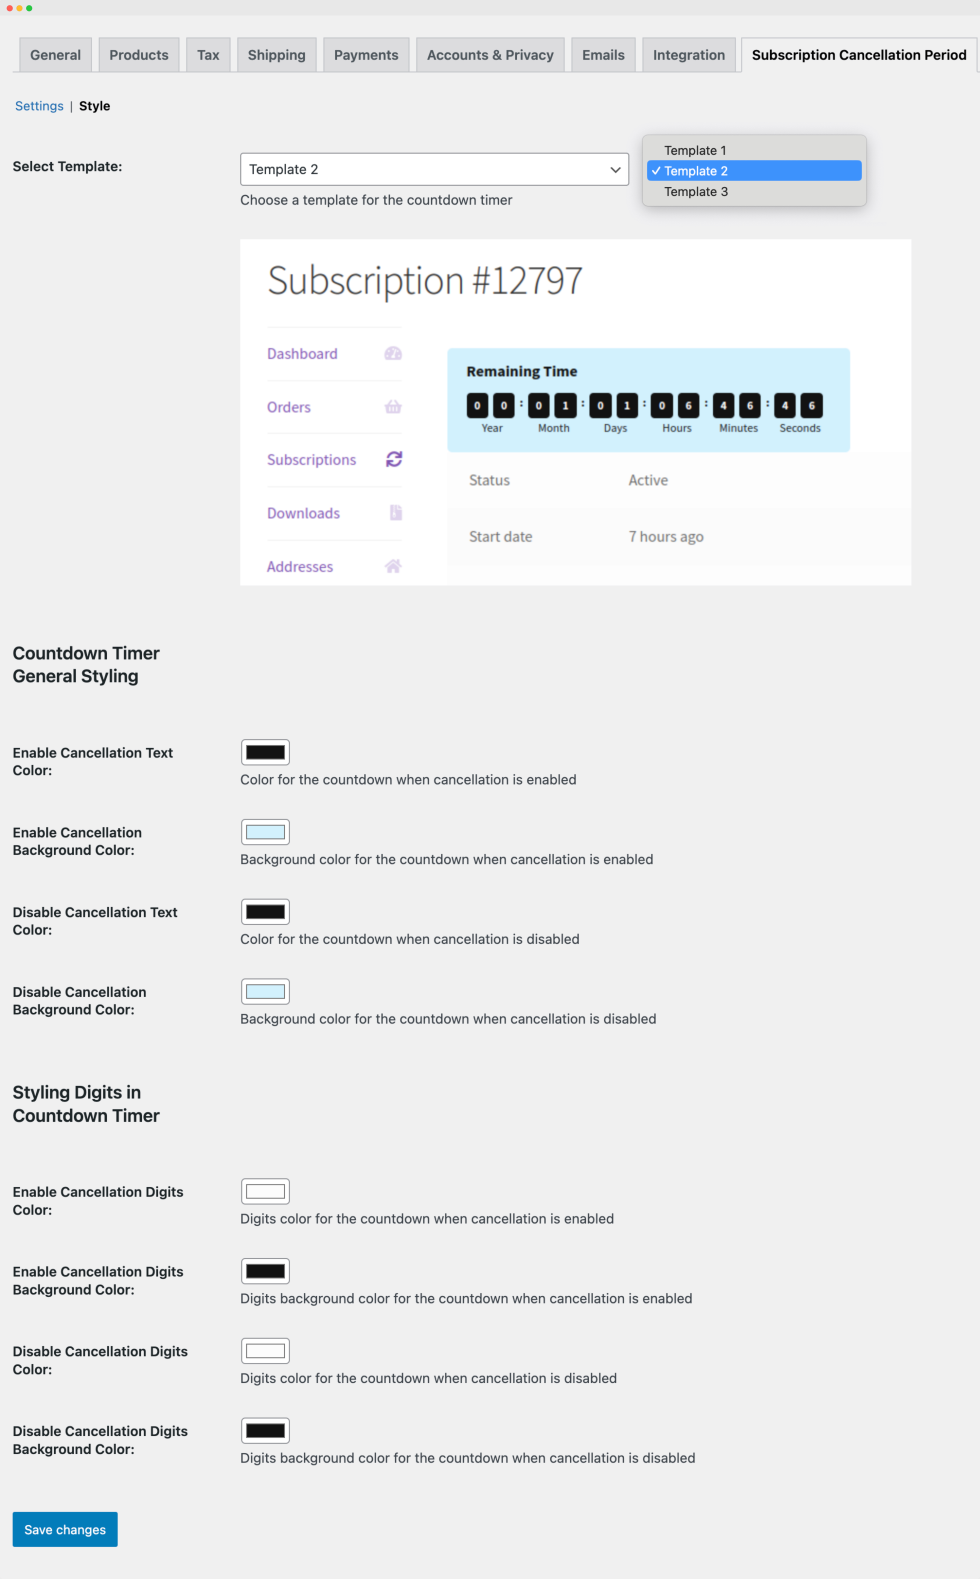
↑ Back to topSelect Template:
From the options, simply select from 3 predefined template to determine how the countdown timer will be displayed on the store for the subscription cancellation period.
Countdown Timer General Styling:
Customize timer and text color as per your business needs.
- Enable Cancellation Text Color: Select the color for the countdown timer text when the cancellation is enabled.
- Enable Cancellation Background Color: Adjust the background color of the countdown timer when the cancellation is enabled.
- Disable Cancellation Text Color: Choose a certain color for the countdown timer text when the cancellation is disabled.
- Disable Cancellation Background Color: Specify the background color of the countdown timer when the cancellation is disabled.
Styling Digits in Countdown Timer
You can personalize the layout of the countdown digits by choosing certain colors for both the digits and their background.
- Enable Cancellation Digits Color: Set the color for the digits in the countdown timer when cancellation is enabled.
- Enable Cancellation Digits Background Color: Choose the background color for the countdown digits when cancellation is enabled.
- Disable Cancellation Digits Color: Choose the color for the digits in the countdown timer when cancellation is disabled.
- Disable Cancellation Digits Background Color: Specify the background color for the countdown digits when the cancellation is disabled.
Save Changes: After making all the necessary style changes, click the “Save Changes” button to apply the new settings for the subscription cancellation countdown timer. Please note, once saved, it override the default timer colors.

