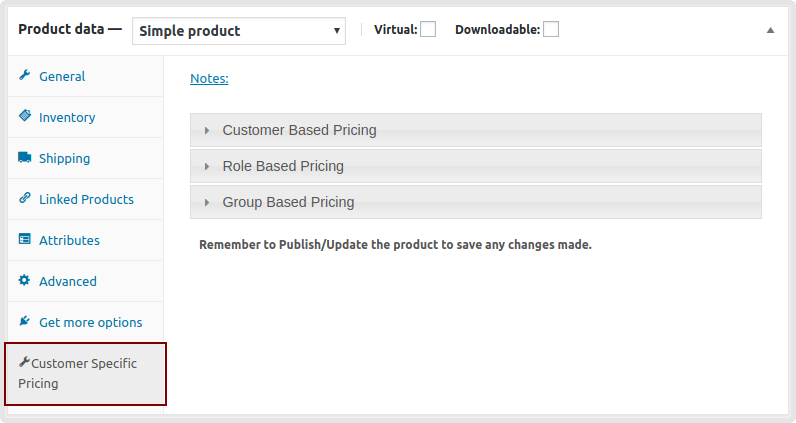
Upon installing and activating the Customer Specific Pricing for WooCommerce (CSP) plugin, an additional settings option will be added to every WooCommerce ‘Simple Product’ settings page and under every variation for ‘Variable Products’.
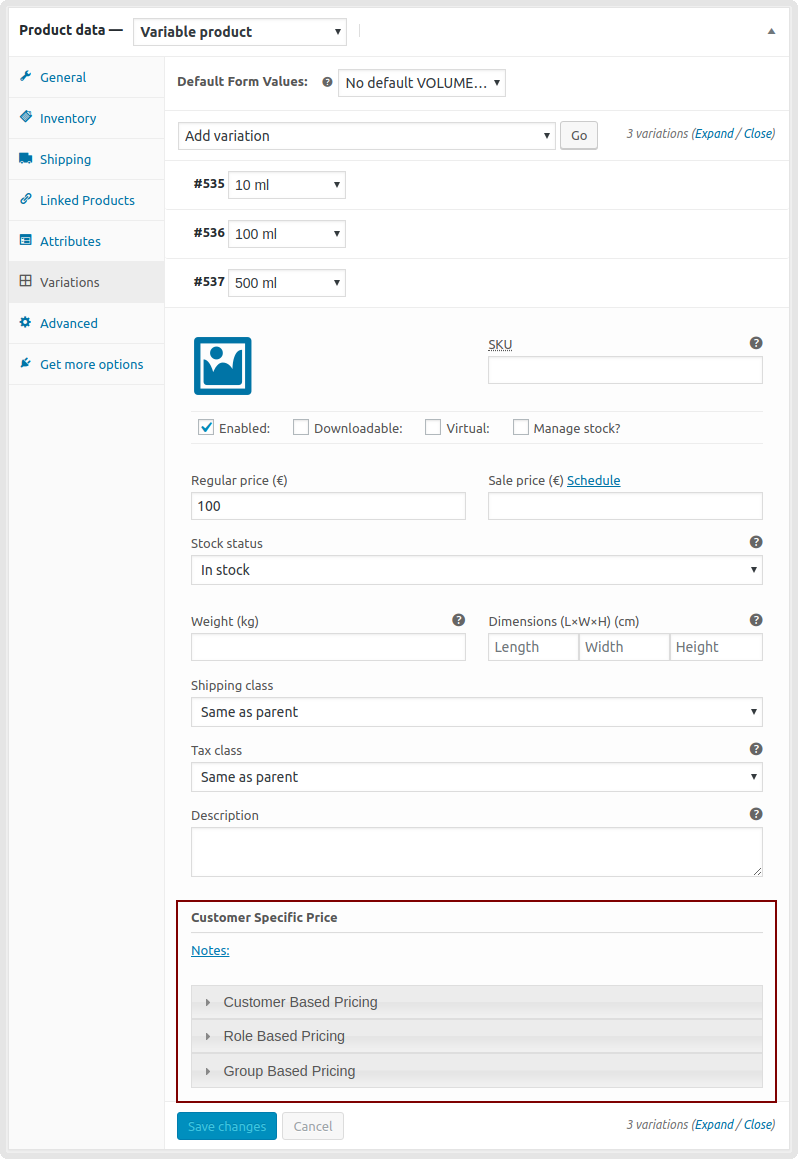
For simple products go to the ‘Customer Specific Pricing’ tab under ‘Product Data’ settings on the product page. For variable products, the plugin settings are available in the ‘Variations’ tab under each variation.
For Simple Products,
For Variable Product Variations,
CSP section – variable product variation
There are 3 pricing options available for simple & variable products,
↑ Revenir en haut
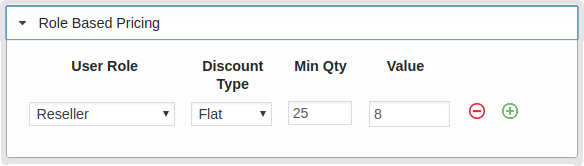
The following steps will have to be taken through to define role-based product prices for users such as Customers, Subscribers, etc defined in the system.
Expand the ‘Role Based Pricing’ tab and click on the ‘Add New Role-Price Pair’ button if the ‘Role-Price’ setting is not available. For Variable Products, there isn’t an ‘Add New Role-Price Pair’ button, you will need to use the ‘+’ button to add a Role-Price Pair.
Select a ‘User Role’ from the drop-down list, the ‘Discount Type‘, the ‘Min Qty‘, and add a ‘Value’ for that user role.
↑ Revenir en haut
If you are using the Groups plugin and need to set custom rates for user groups defined in the system the following steps will have to be carried out.
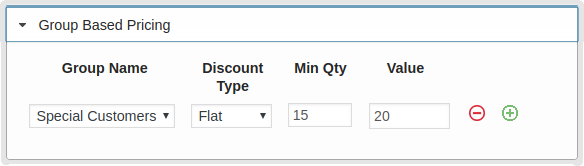
Expand the ‘Group Based Pricing’ tab and click on the ‘Add New Group-Price Pair’ button if the ‘Group-Price’ setting is not available. For Variable Products, there isn’t an ‘Add New Group-Price Pair’ button, you will need to use the ‘+’ button to add a Group-Price Pair.
Select a ‘Group Name’ from the drop-down list, the ‘Discount Type‘, the ‘Min Qty‘, and add a ‘Value’ for the selected group.
WISDM Customer Specific Pricing lets you Import or Export pricing data in the form of .csv files to automatically set pricing for individual users, roles or groups.
You can Import/Export a .csv file using one of the two options available:
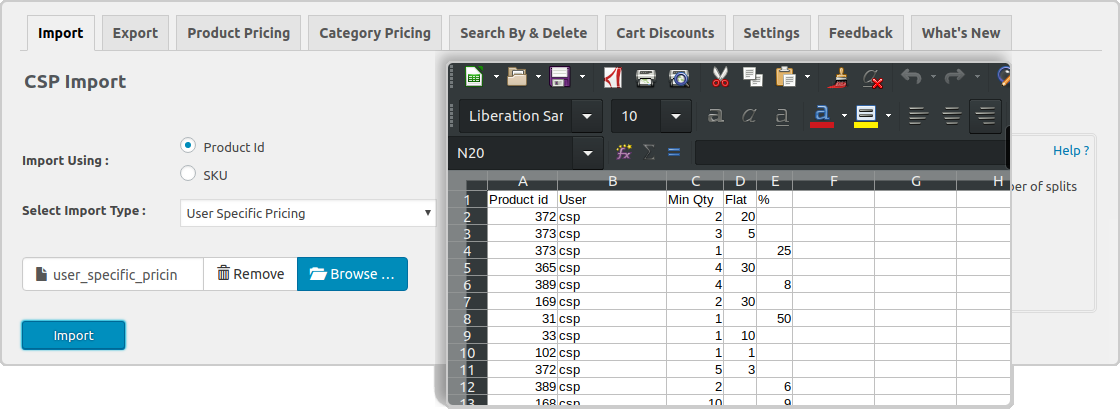
Product Id based Pricing – Creating a .csv file using Product ID: When you create a .csv file, the fields that must be added to it for WISDM Customer Specific Pricing to the process are Product ID, User/Role/Group, Min Qty, Flat, and %.
SKU based pricing – Creating a .csv file using SKU: When you create a .csv file, the fields that must be added to it for WISDM Customer Specific Pricing to the process are SKU, User/Role/Group, Min Qty, Flat, and %.
An option to download a sample file for each pricing type is available on the ‘Import’ tab for both (By Product ID and SKU ) of the WISDM Customer Specific Pricing plugin.
To Import a file:
Click on the CSP menu button on your admin panel and select Import.
Select Import using: Product ID or SKU
Choose between User Specific Pricing, Role Specific Pricing or Group-Specific Pricing according to the file you are trying to import.
Browse for the file on your system and select Import.
WISDM Customer Specific Pricing will then automatically take in corresponding values from your files to update records accordingly.
The following are some images of the import page.
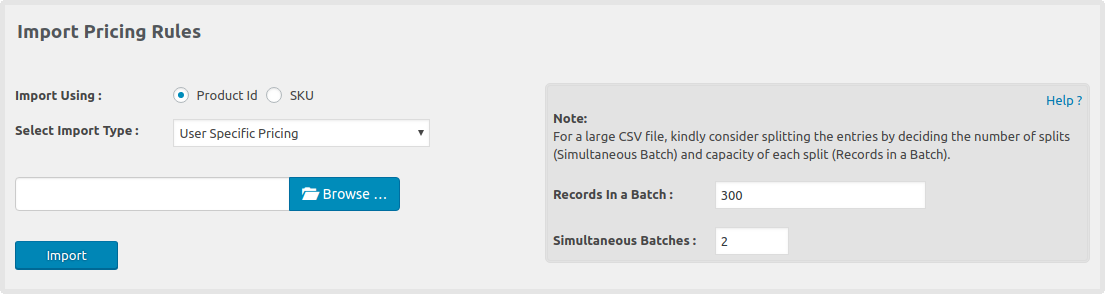
Settings are shown on the right side.
Records in a batch. – Define the records to be processed in one go.
Simultaneous Batches. – A number of such batches to be processed at the same time.
After completion of the import process, there’s will be an option to download the status of the import & will give you the details of the import operation.
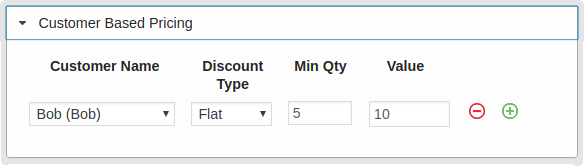
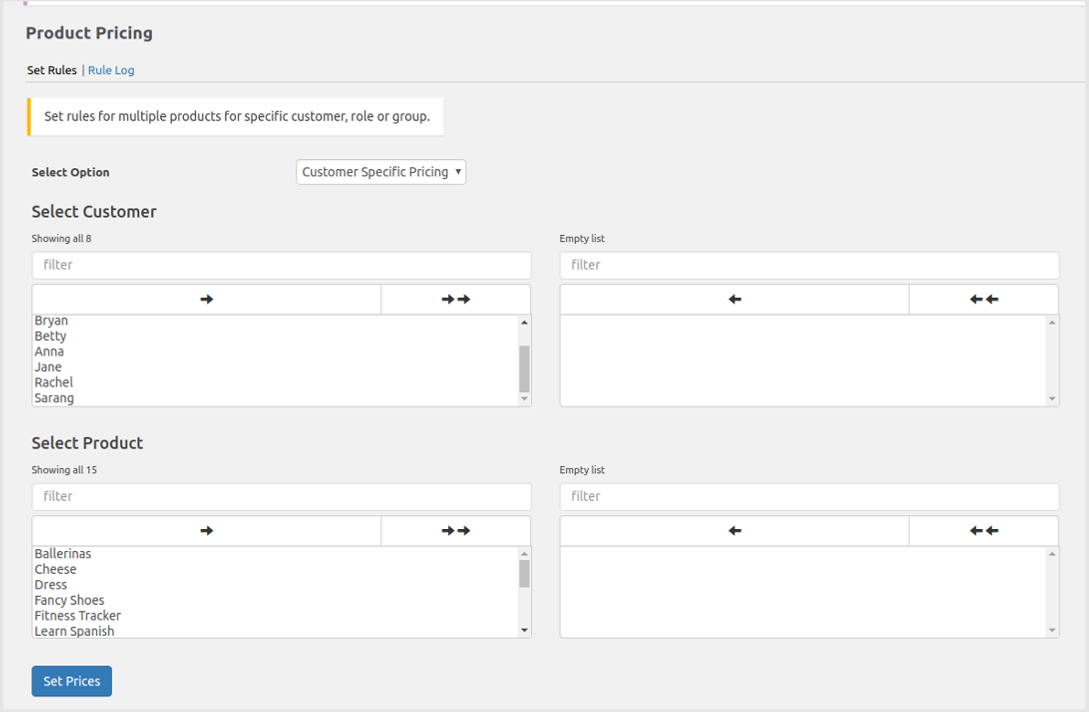
To set prices for a particular customer, select Customer Specific Pricing from the Options drop-down list.
Select the customer/customers from the Select Customer drop-down list.
To select an individual product click on the Product name and click on the single arrow sign. To select all the products at once, click on the double arrow sign.
Refer to the image below,
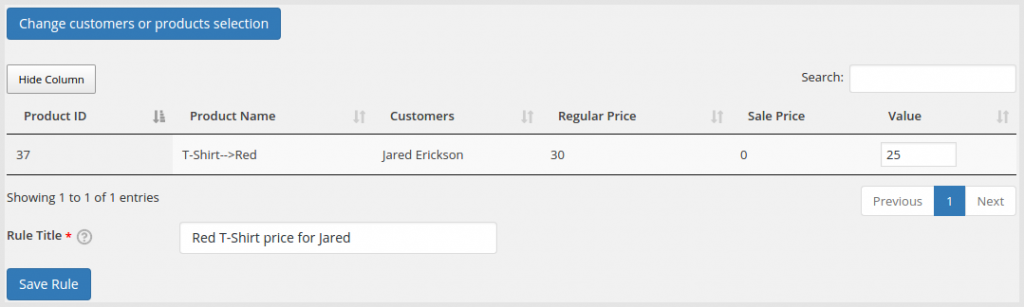
By clicking on the Set Prices button, you should see a table to help you set the prices for the Customer for the selected products.
The Rule Title will help in identifying each rule generated for the selected customer/s or product/s.
Refer to the image below,
Clicking on Change customer or product selection will let you edit the customer or products chosen previously and set the prices again.
Set Rules: Set Prices for the User Roles
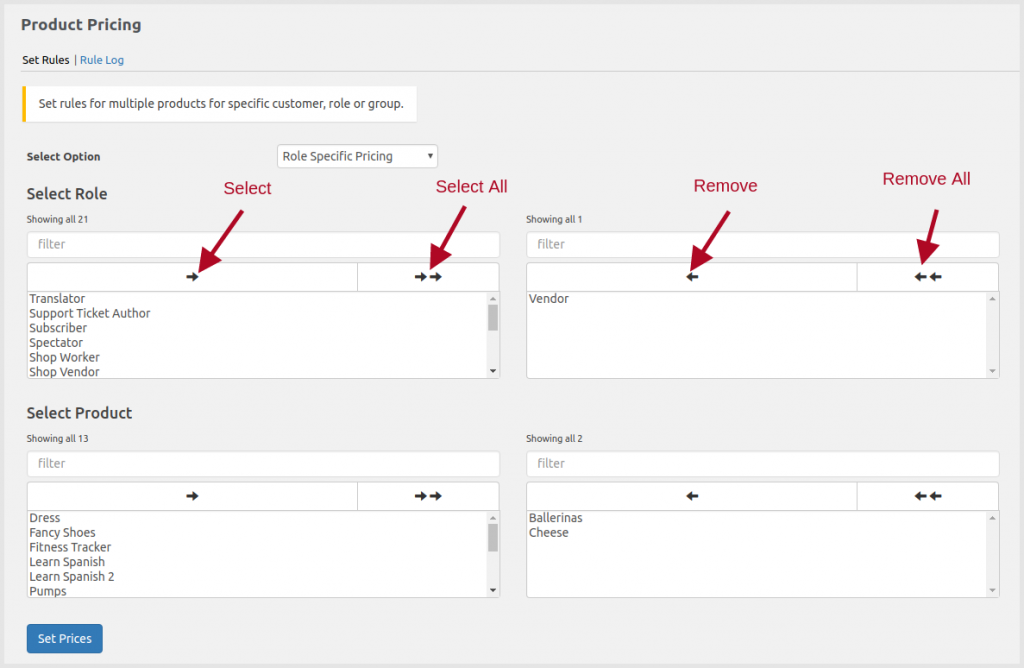
To set prices for a particular role, select Role Specific Pricing from the Select Option drop-down list.
Select a Role from the Select Role drop-down list.
To select an individual product click on the Product name and click on the single arrow sign. To select all the products at once, click on the double arrow sign.
Refer to the image below,
By clicking on the Set Prices button, you should see a table to help you set the prices for the Role for the selected products.
The Rule Title will help in identifying each rule generated for the selected role/s or product/s.
Refer to the image below,
Clicking on Change roles or product selection will let you edit the role or products chosen previously and set the prices again.
Set Rules: Set Prices for the User Groups
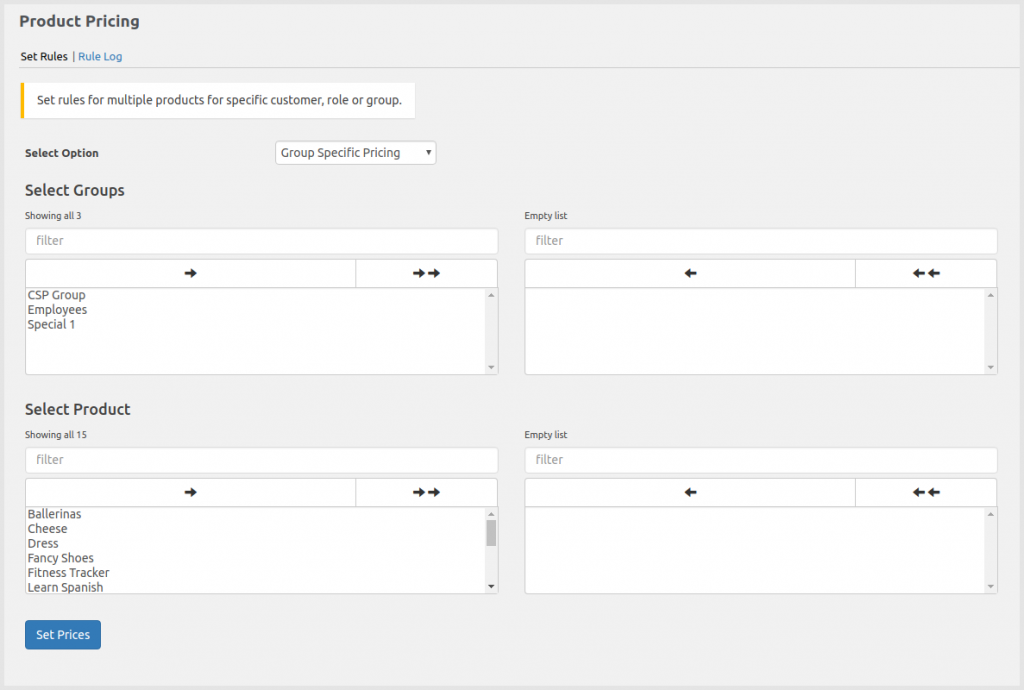
To set prices for a particular group, select Group Specific Pricing from the Select Option drop-down list.
Select a Group from the Select Groups drop-down list.
To select an individual product click on the Product name and click on the single arrow sign. To select all the products at once, click on the double arrow sign.
Refer to the image below,
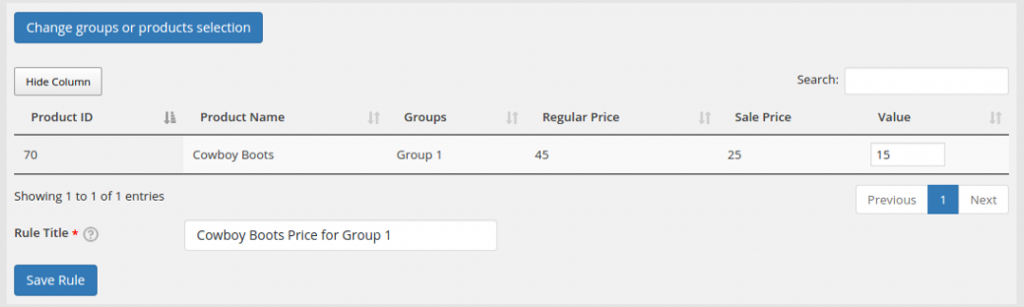
By clicking on the Set Prices button, you should see a table to help you set the prices for the Group for the selected products.
The Rule Title will help in identifying each rule generated for the selected Group/s or product/s.
Refer to the image below,
Clicking on Change Groups or product selection will let you edit the group or products chosen previously and set the prices again.
↑ Revenir en haut
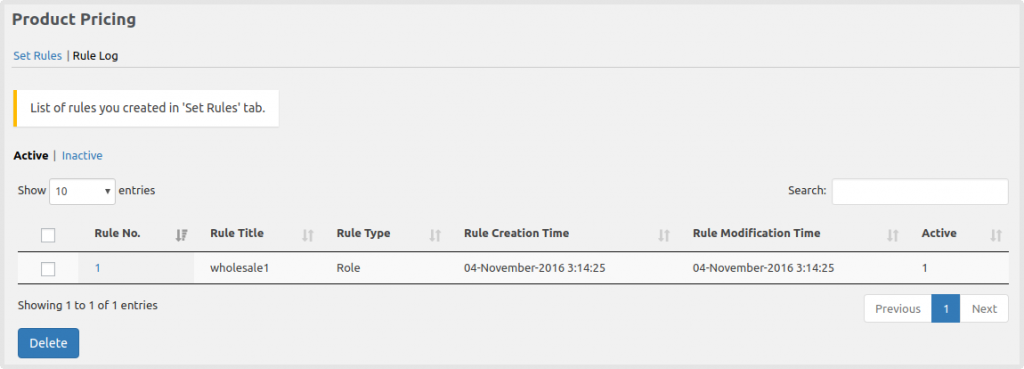
The Rule Log settings page will display a list of all the queries generated.
The Rule log will display a column with Rule No, Rule Title, Rule Type, Rule Creation Time, Rule Modification Time and Active.
All the active rules will be shown under the Active option.
The inactive option will display the inactive rules which are not being used anymore and let you delete those rules.
Prices set directly on the product page (with the source as ‘direct’) will not be displayed in the Rule Log.
Clicking on Rule No. will redirect you to the Set Rules page which will have all the data displayed for the particular Customer/Role/Group type.
To delete rule/s select the checkbox against the rule/s and click on the ‘Delete’ button. Deleting a rule will delete the prices set for Customer/Role/Group. Do note, rules once deleted cannot be restored.
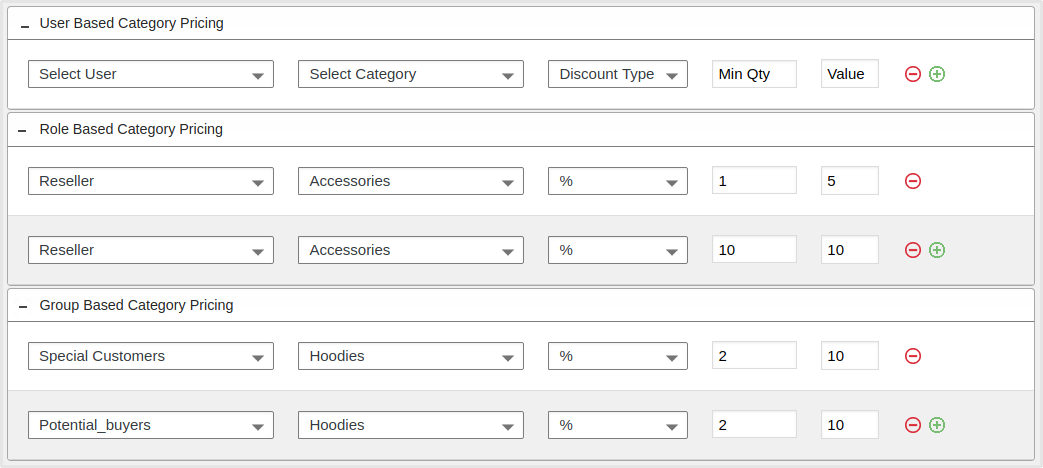
To set prices for a particular customer, role, or group, go to the dashboard -> CSP -> Category Pricing.
Select the appropriate section based on whether you want to set category based pricing for customer, role, or group.
Based on the section, add the details like the User’s name (for user-based category pricing), Role (for role-based category pricing), or group (for group-based category pricing); the category of the product, discount type, the minimum quantity, and the value.
Refer to the image below,
Introduction to the Category Pricing Feature & How to apply category based User/Role/Group-specific pricing.
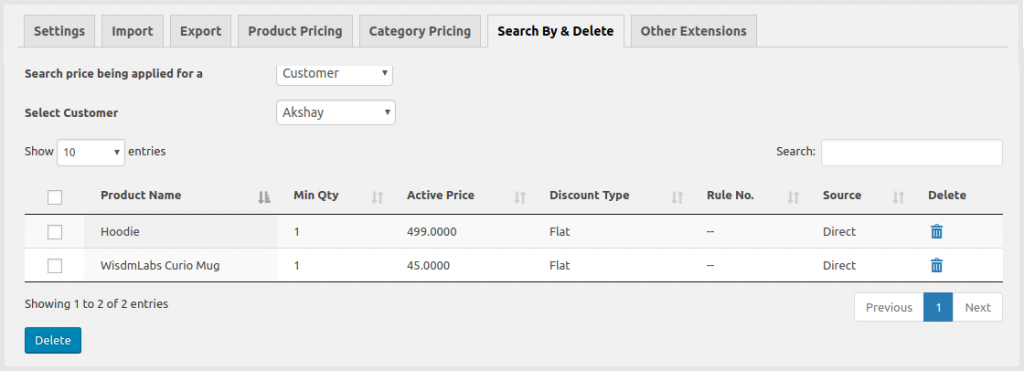
The Search By and Delete page helps you search previously set pricing rules for customers, user roles or groups. You can also directly delete the pricing rules from here. To search and delete rules set for a particular customer/user role/ group, here’s what you’d have to do:
Click on the Search By tab and select Customer from Search price being applied for a drop-down list and select a customer from Select Customer drop-down list.
A table with Product Name, Active Price, Rule No. (generated automatically), Source and Delete for the particular customer will be displayed.
The rule title source indicates the option using which the price has been set. ‘Direct’ indicates that the price for the user/role/group has been set directly from the product page.
Clicking on Rule No. will redirect you to the Set Rules page which will have all the data displayed for the particular Customer.
To Delete rule/s select the Delete Icon against the rule/s. You can delete multiple rules by selecting the checkbox and then clicking on the ‘Delete’ button. Deleting a rule will delete the prices set for Customer. Do note, rules once deleted cannot be restored.
Refer to the image below,
Similarly, you can check rules set for user roles or groups, by selecting the ‘Role Specific Pricing’, or ‘Group Specific Pricing options’.
↑ Revenir en haut
To add personalized discount rules on cart values, you’ll find a new option under CSP -> Cart Discounts. Activate the option to be able to set discount percentages. You’ll have three options here:
First-time Buyers,
Existing Buyers
Guest Users
Cart Discounts PageHow cart discounts work
All of the above sections have the same options – to help you create rules, set a maximum discount value, marketing messages to pitch for an upsell, and more.
Let’s take the case of the options available under First-time Buyers (the options for Existing Buyers and Guest Buyers would be the same)
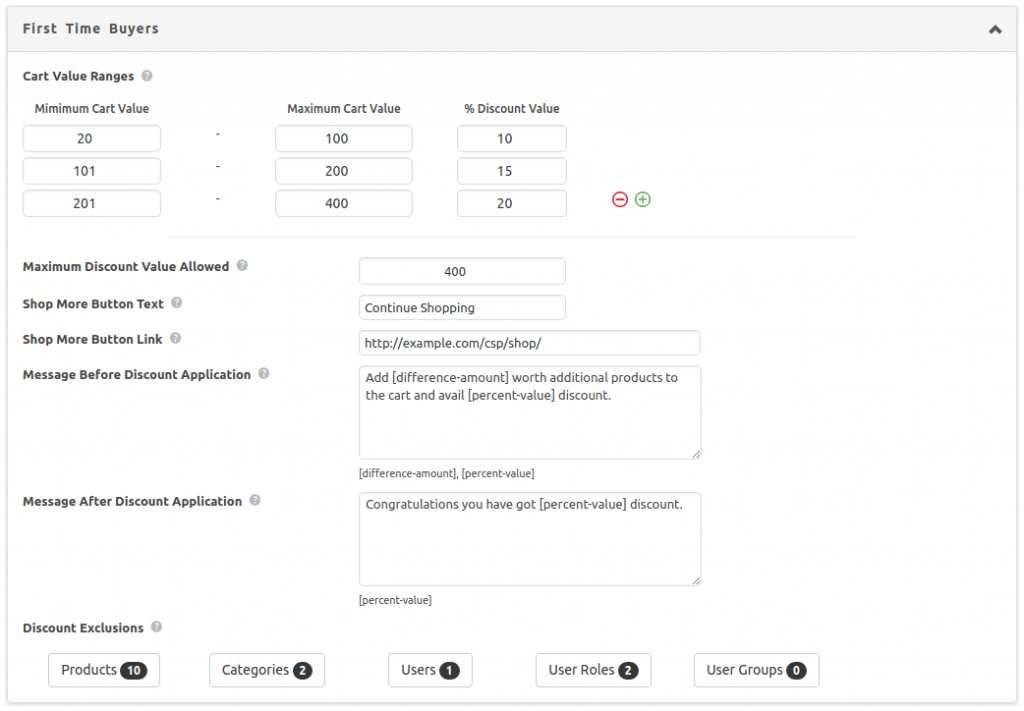
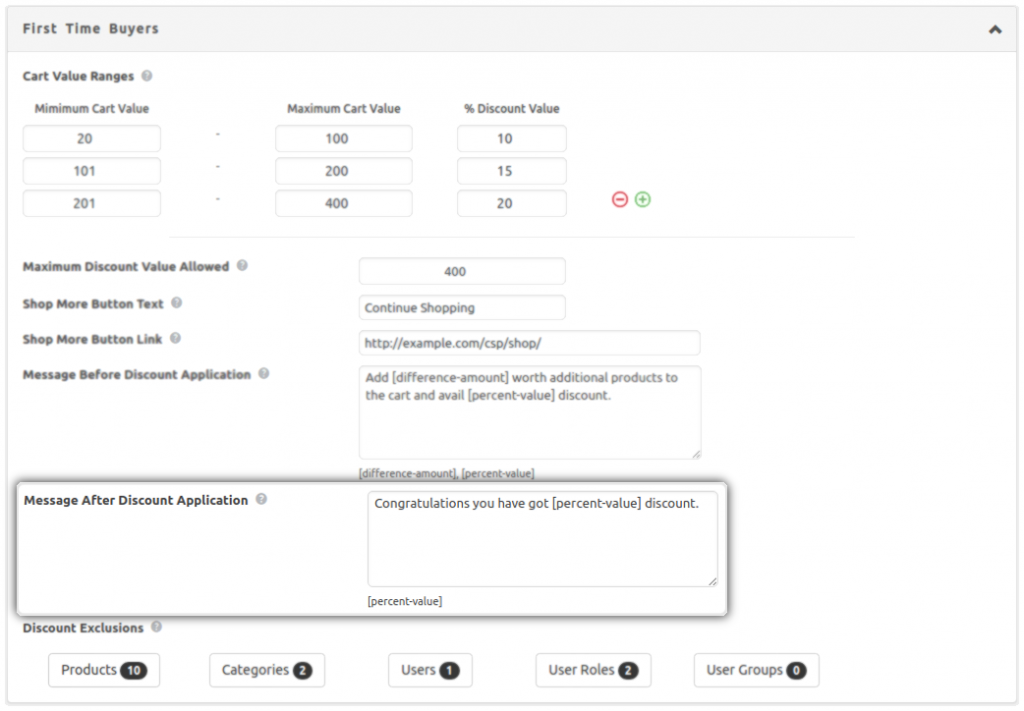
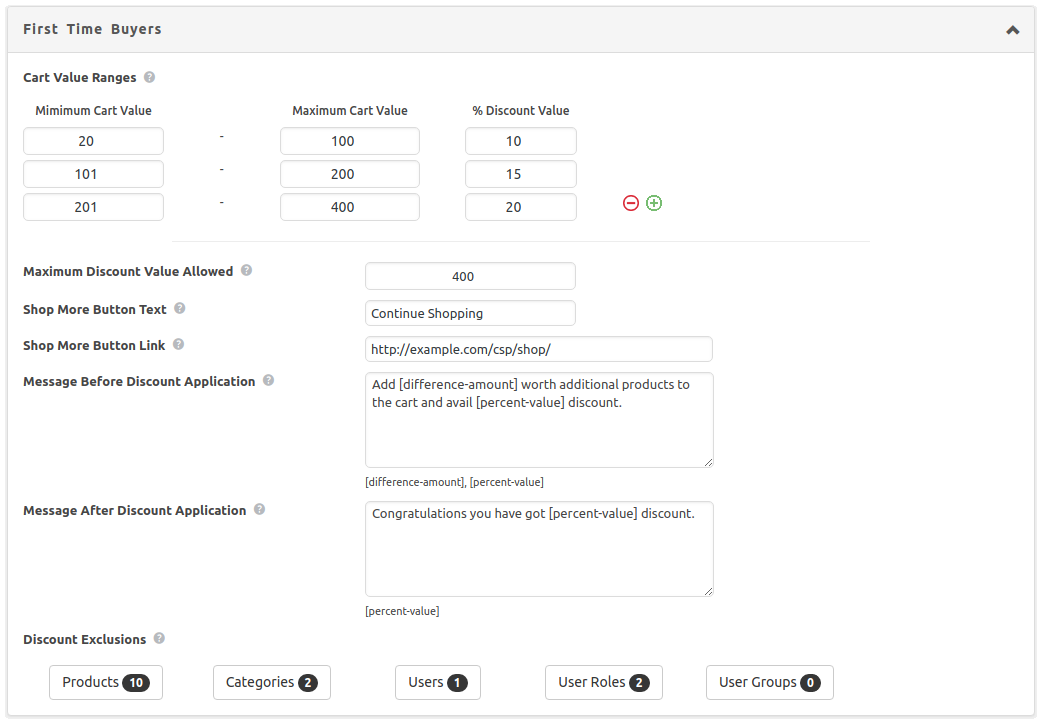
Cart discount rule edit section for first-time buyers
↑ Revenir en haut
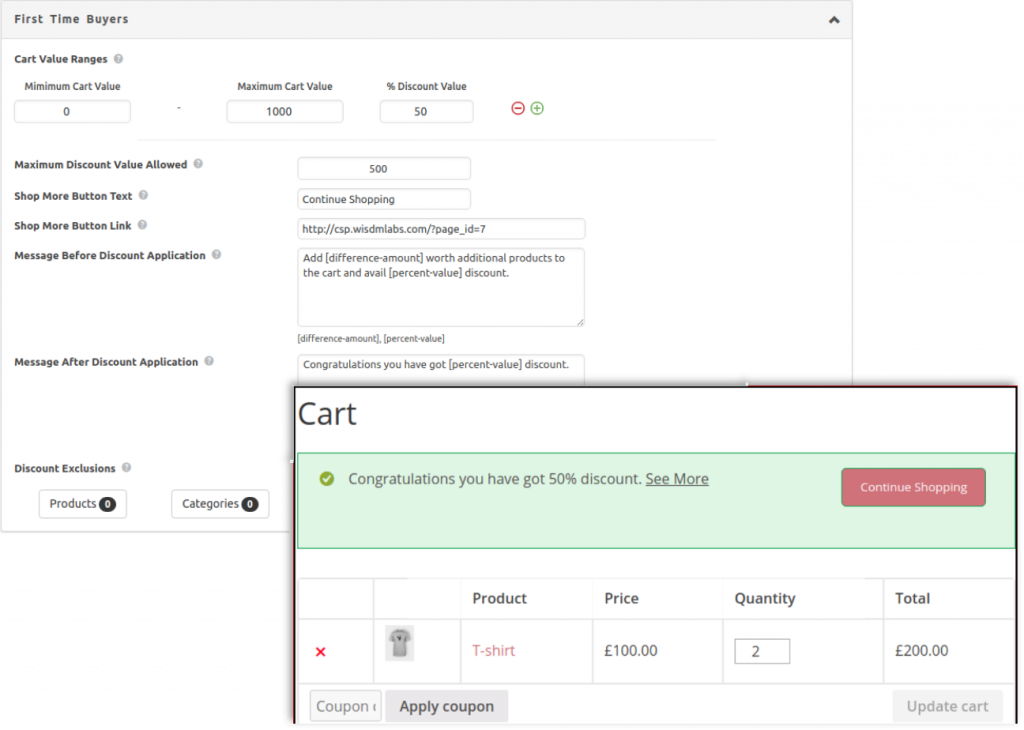
Here’s where you can decide the range of cart value and associate it with a discount. For example, let’s say you want to offer a 10% discount on a cart value of $100 and above. You have to set the Minimum Cart Value as 100, (do not set the Maximum Cart Value if there’s no upper limit), and the % Discount Value as 10.
Now, let’s say things change, and you want to offer higher discounts on orders of above $200. You have to set the rules as follows:
↑ Revenir en haut
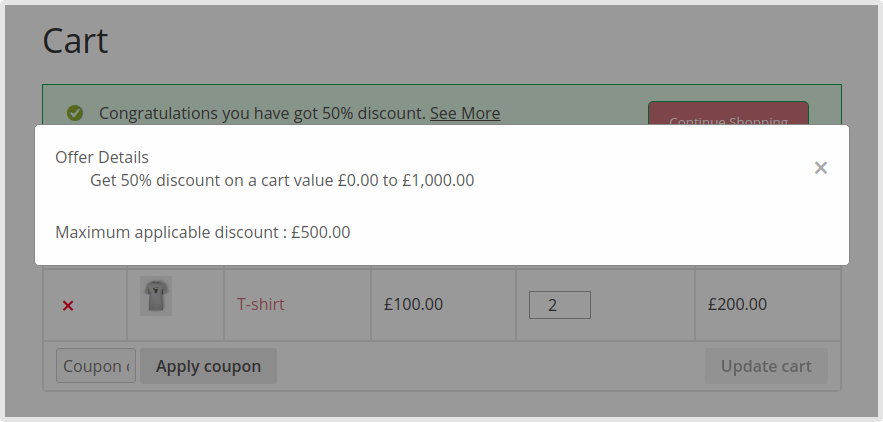
Let’s say you want to have a limit on the maximum saving amount that can be availed through cart discounts. For example, “Get 20% off on purchases above $200 till up-to $500”. You’d have to set the field value to $500.
However, it’s important to note that the limit is applied only to cart discount values. A customer can use a coupon along with the discount for additional savings.
Cart Discounts Front End Offer PopUp
↑ Revenir en haut
Offer customers an easy way to go back to the shop page and continue shopping with a link to the page right on the cart page.
This link can be modified to redirect the users to the specific product listing pages.
Continue Shopping button in the offer notification on the shop page
↑ Revenir en haut
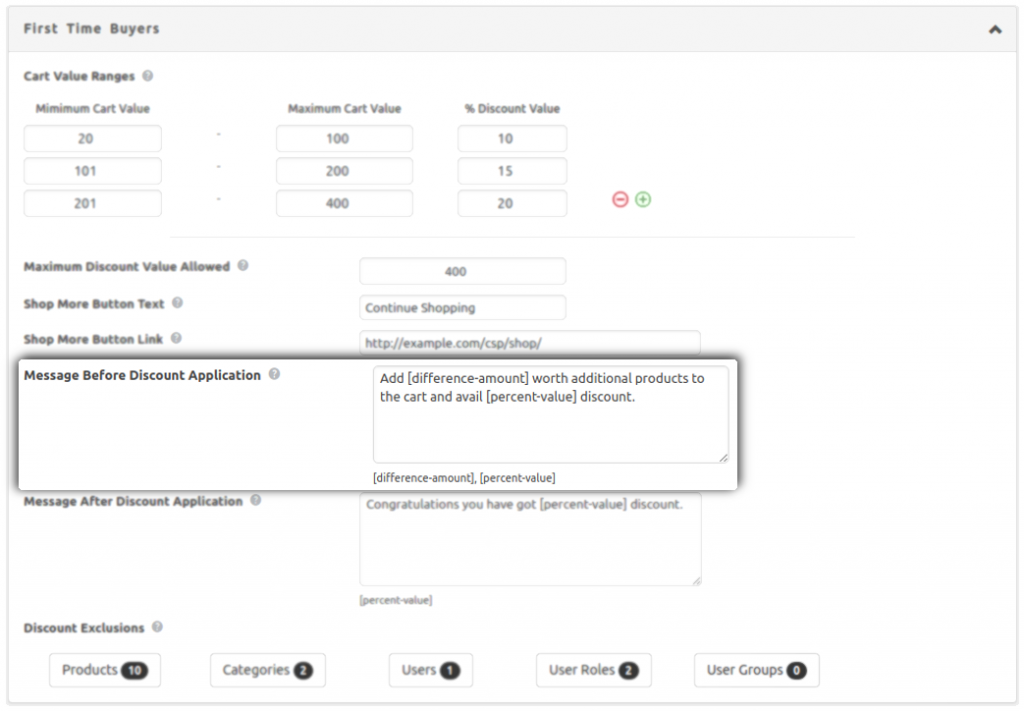
Get customers to buy more by making them aware of the savings in-store with a custom message. You can use two placeholders here:
[difference-amount] – the amount of additional purchase they’d have to make to qualify for a discount
[percent-value] – the percentage of discount applicable
For example,
To display the message as “You’re $10 away from getting a 20% discount”
you can set the content as “You’re [difference-amount] away from getting a [percent-value] discount”.
Cart discount “Message Before Discount Application” Setting
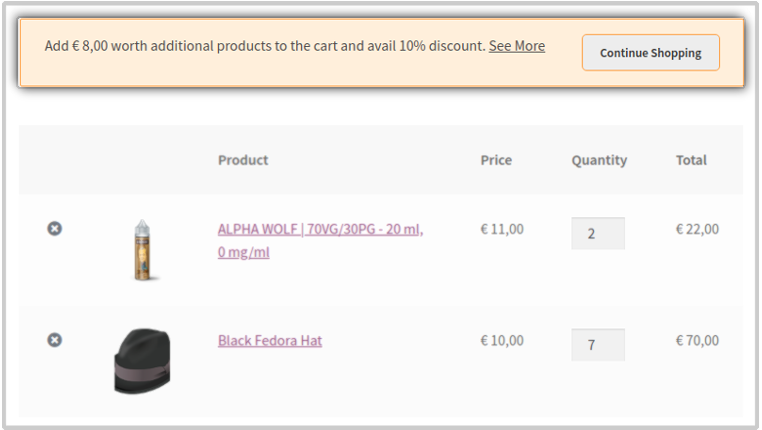
Do note, this message is displayed only when no cart discount is applied. For example, let’s say the minimum amount a buyer needs to add to the cart is $100 to get a 10% discount. And currently, the buyer has $92 worth products added. Then this message will be displayed as shown below.
Offer message when users cart total is close to getting the discounts
Once a discount has been applied the message won’t be shown again.
↑ Revenir en haut
Display a custom message once a discount has been applied. The placeholder [percent-value] can be used to display the percentage amount saved.
Cart discount “Message After Discount Application” Setting
You can set the trigger to display this message on the cart page. Cart discounts settings option under the cart discounts tab will have the option to set the percentage of the cart value from when the user will see the cart offer message.
↑ Revenir en haut
You can easily exclude certain Products and Product Categories from being part of the discounts. Or certain Users, User Roles, or User Groups from being eligible for the savings.
With the options available, you have to select the needed and save.
Cart Discount Exclusions
↑ Revenir en haut
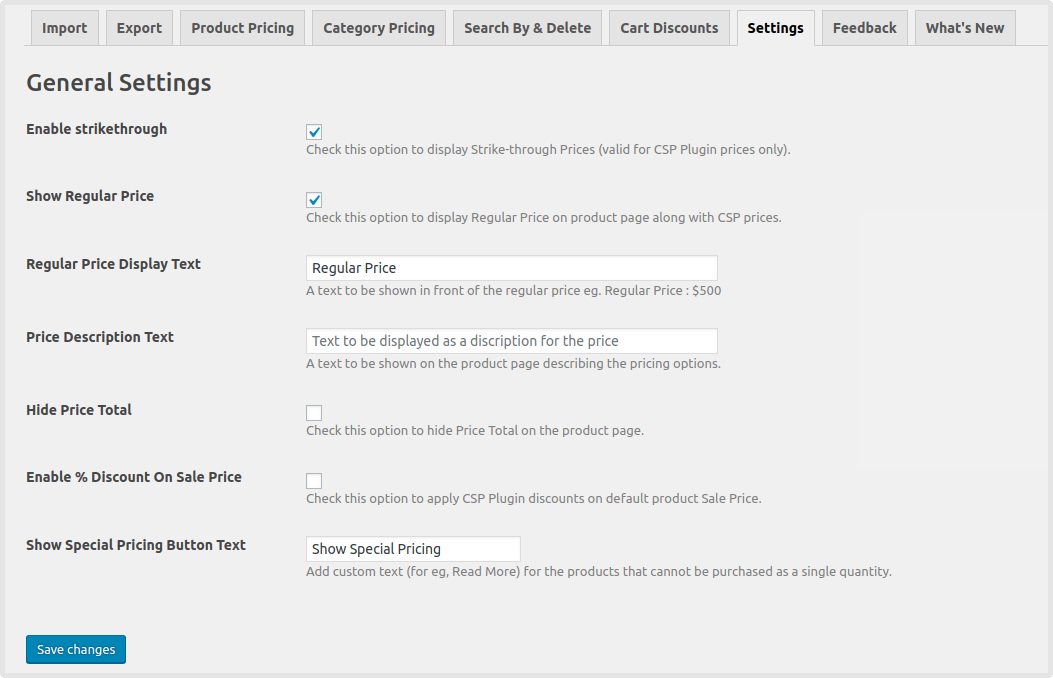
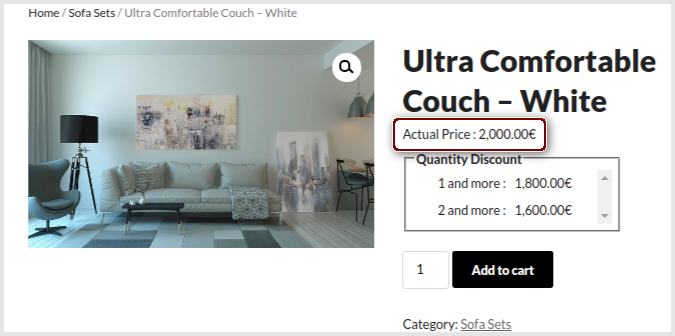
Enabling this option allows displaying the regular price of the product before the CSP price table & the text you want to display in front of the regular price.
Show Regular Price & Regular Price Text SettingShowing Regular Price & Regular Price Text On The Product Page
↑ Revenir en haut
The text mentioned in this field will be displayed over the CSP custom price table on the single & variable product page.
This option can be used to explain the pricing table to the customer.
↑ Revenir en haut
CSP by default shows the Price Total (Total amount to be paid for the selected quantity) on updating the quantity field on the product page.
You can enable the option “Hide Price Total” to hide this.
↑ Revenir en haut
Enabling this option allows you to apply the % discount on the sale price instead of applying it on the regular price of the product.
If the sale price is empty the discount will be calculated on the regular price
If the sale price is specified but the sale is out of scheduled time then the % discount will be calculated on the regular price of the product.
↑ Revenir en haut
When a regular price for the product is not specified & CSP is applied to the quantity greater than 1. for such products a special pricing button will be displayed.
The text mentioned in this field will be used as the button text.
We and our partners process your personal data (such as browsing data, IP Addresses, cookie information, and other unique identifiers) based on your consent and/or our legitimate interest to optimize our website, marketing activities, and your user experience.