Getting Started
↑ Back to topInstallation
↑ Back to top- Download the Infusionsoft for WooCommerce .zip file from your Woo.com account.
- Go to: WordPress DashboardAdmin > Plugins > Add New Plugin to upload the file you downloaded.
- Choose the file and click Install.
- Activate the plugin.
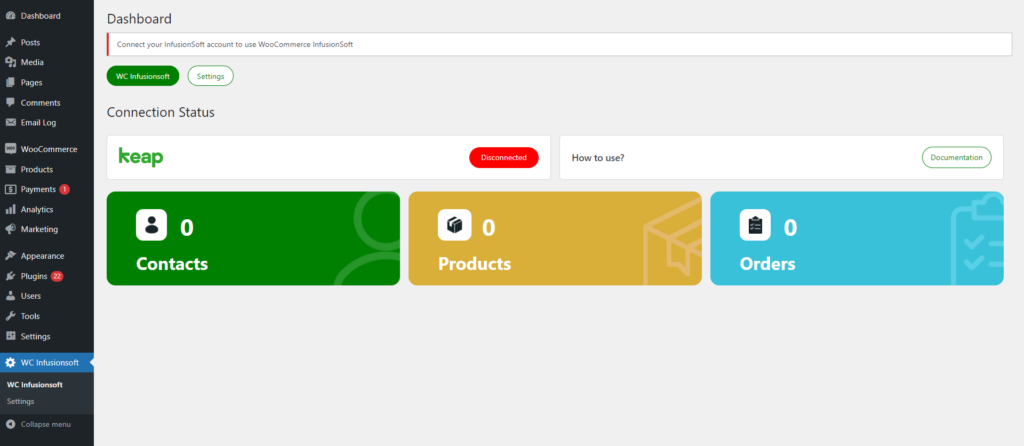
- After plugin activation, the plugin dashboard will be shown.
Setup and Configuration
↑ Back to topNote: You must have an InfusionSoft Developer account & Keap account. Create a Keap Account:
Keap Account
↑ Back to top- First, you need to create a Keap account.
- Go to: https://signin.infusionsoft.com/registration/createInfusionsoftId
- Create an account.
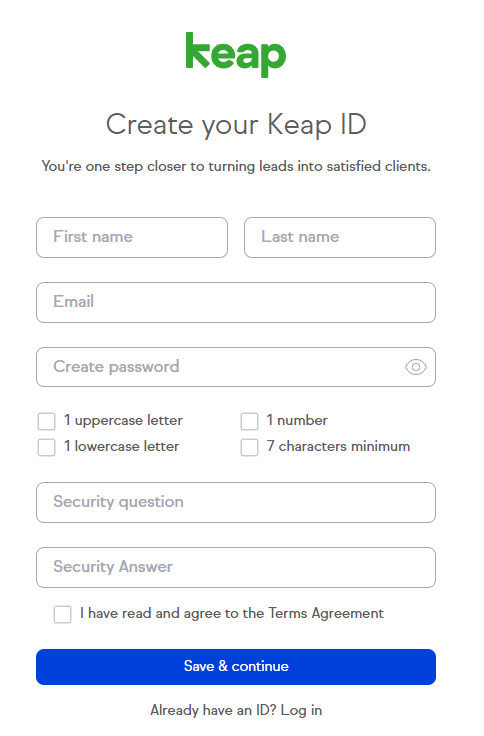
- After creating the Keap account, you will be redirected to the Keap Dashboard.
Keap Developer Account
↑ Back to top- Now, you need to create a Keap Developer Account.
- Go to: https://keys.developer.keap.com/
- Create a new developer account.
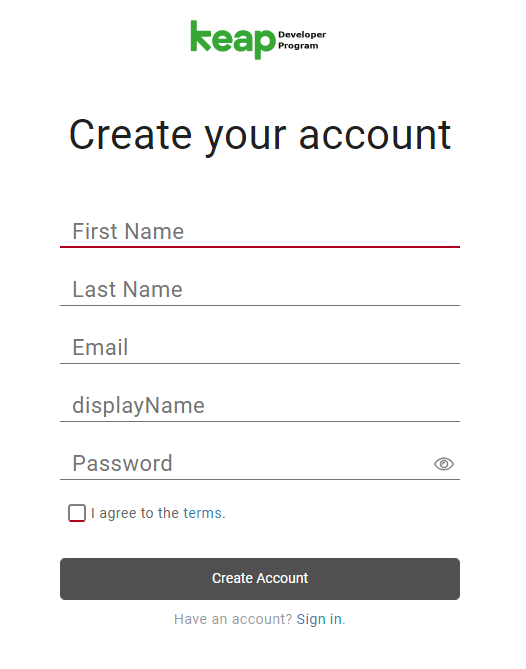
- After creating the account, go to your developer account.
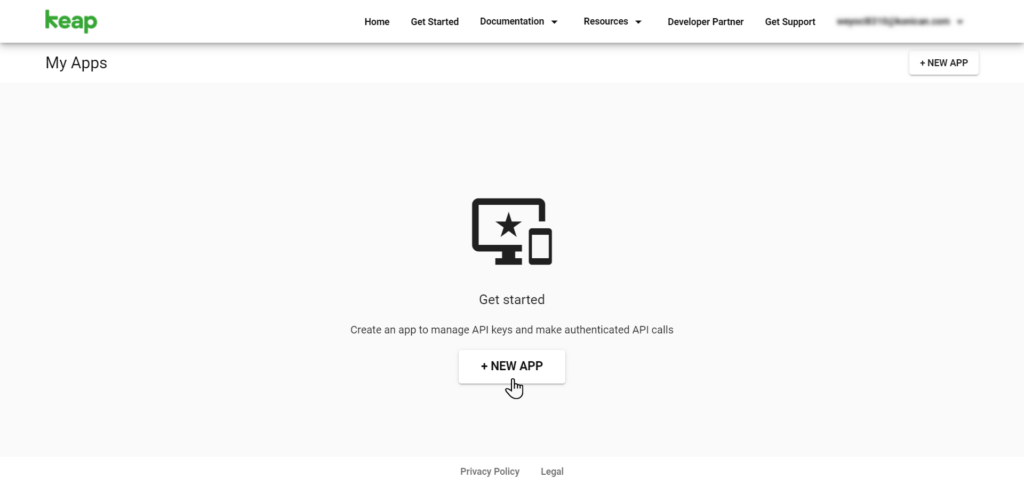
- Click on the user profile and select Apps.

- In the My Apps, add a new App.
- Add App Name and Description.
- Enable API.
- Click on the Save button.
- New App will be added in the My Apps.
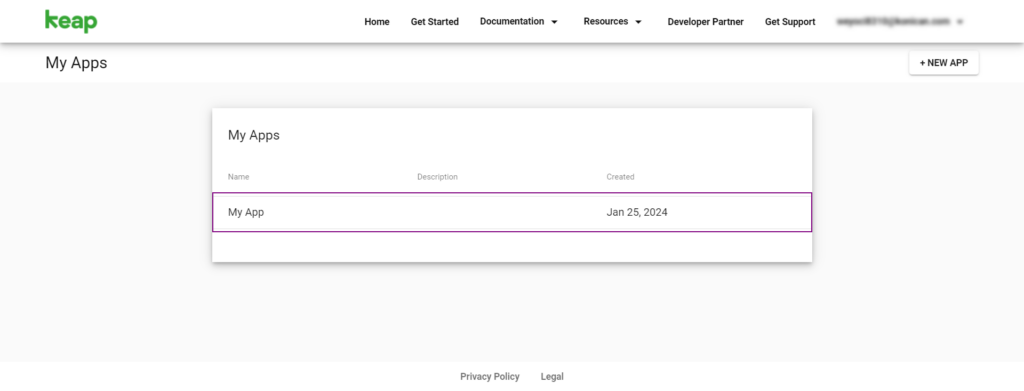
- Go to the App.
- Here you will get App Key and Secret Key.
- Click on the Show Secret button to show the Secret Key
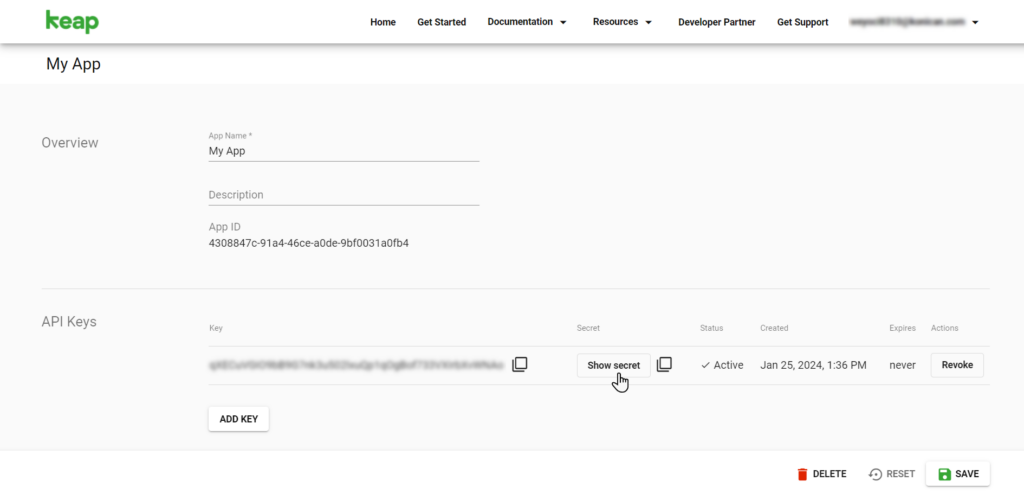
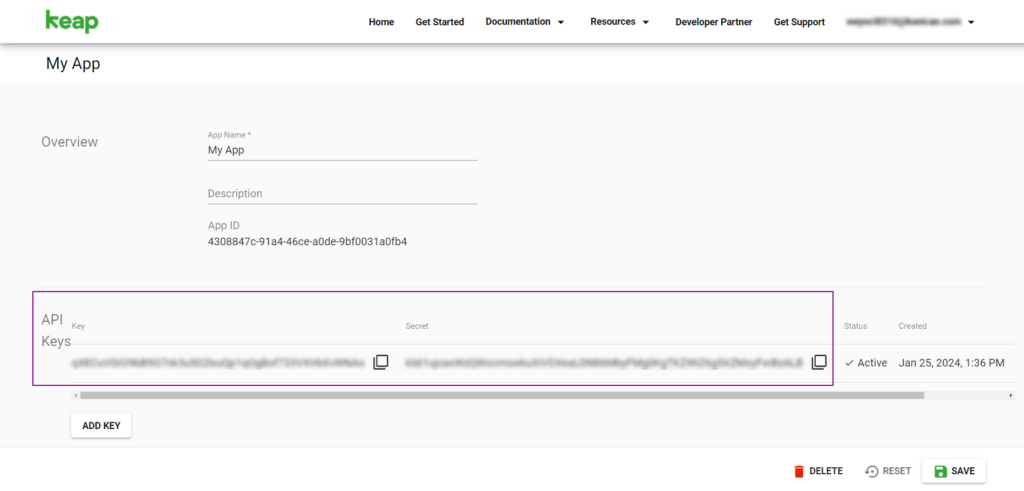
- Copy the App Key and Secret Key.
- These keys will be used to connect the WooCommerce Infusionsoft with the Keap account.
Connection with Keap
↑ Back to top- In order to connect the Keap account with the plugin, navigate to the WordPress Admin > WC Infusionsoft > Settings.
- Here in the Connection Settings section, add App Key and App Secret Keys.
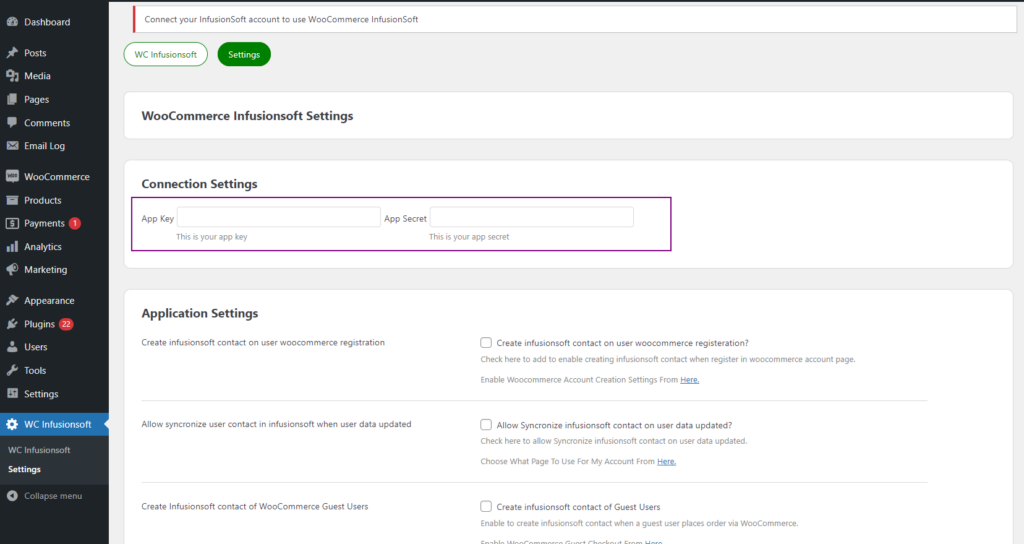
- You can find the App Key and Secret Key in the Keap Developer Account > Apps.
- Copy the keys from your App and paste them in App Key and App Secret.
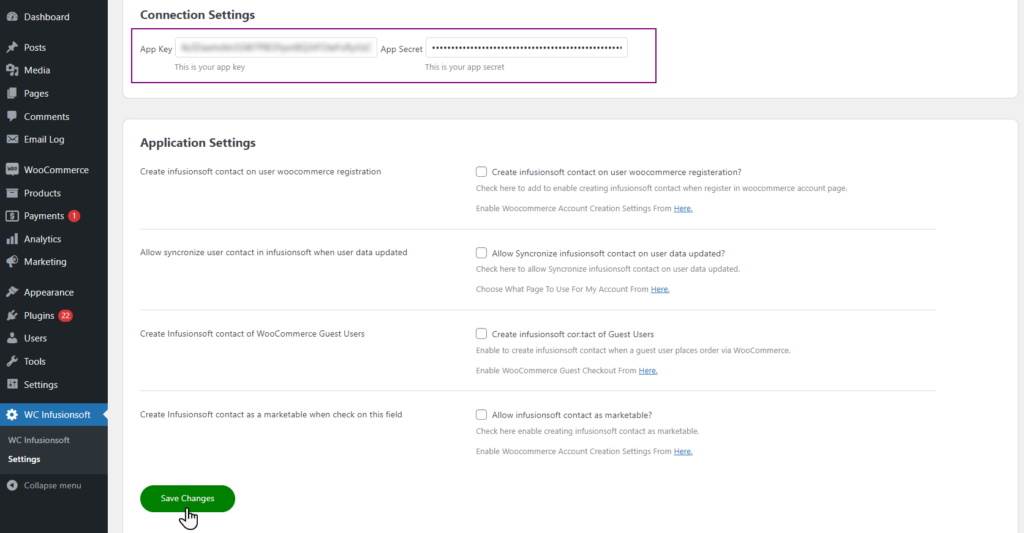
- Click on the Save Changes button to connect.
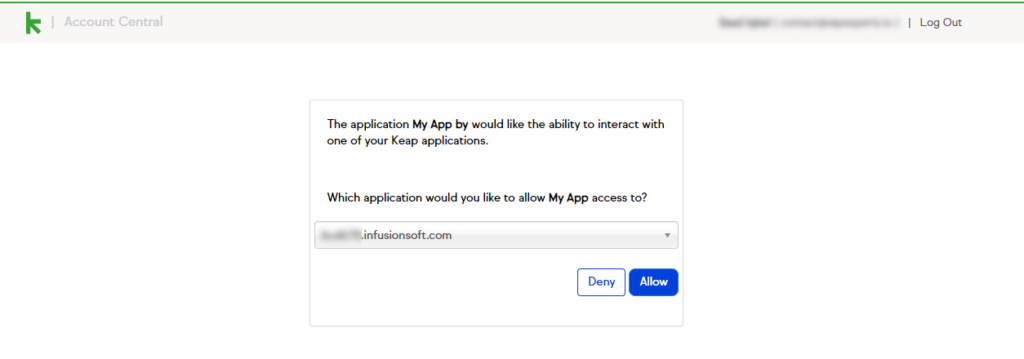
- Allow the access to connect with the Keap account.
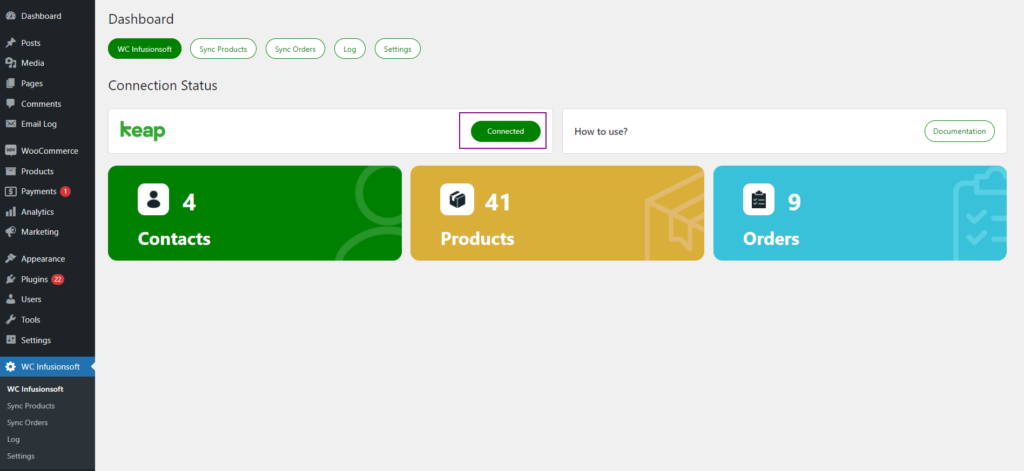
- Once the Keap connection is successful, the Connected status will be displayed in the WC Infusionsoft dashboard.
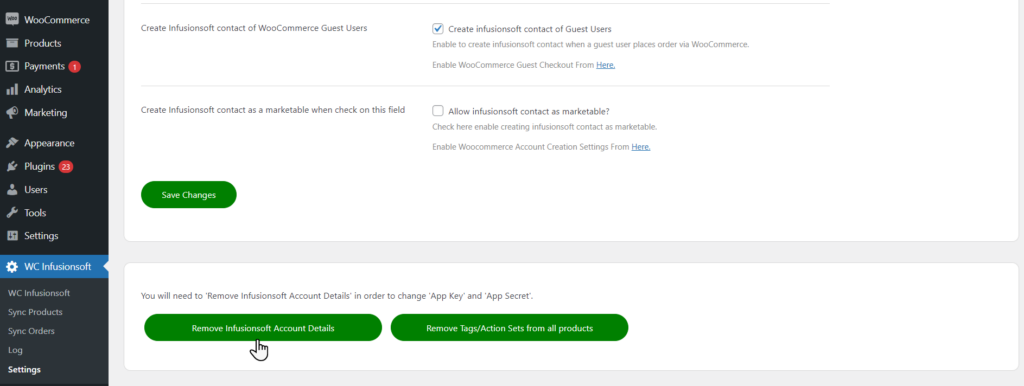
- If the admin wants to remove the Keap Infusionsoft Account, navigate to the WordPress Admin > WC Infusionsoft > Settings.
- Click on the Remove Infusionsoft Account Details to remove the account.
User Registration
↑ Back to topWhen a user registered through Woocommerce My Account Page or during Checkout, the contact will also be added into your Keap contact list. Make sure to enable Account Creation settings from Woocommerce Accounts & Privacy tab also, map My Account page in Advanced tab.
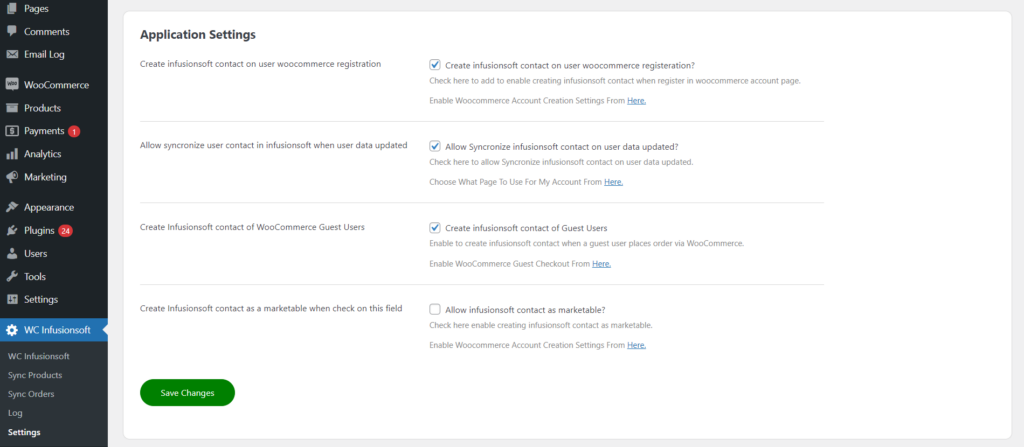
- Go to WC Infusionsoft > Settings.
- Navigate to Application Settings.
- Enable Create infusionsoft contact on user woocommerce registration. This will create a user contact in Keap when a new user registers an account on WooCommerce.
- Enable Allow synchronize user contact in infusionsoft when user data is updated. This will update the user details on Keap when a user is updated on WooCommerce.
- Enable, Create Infusionsoft contact of WooCommerce Guest Users. This will create the contact of a guest user on Keap when the guest user places an order on WooCommerce.
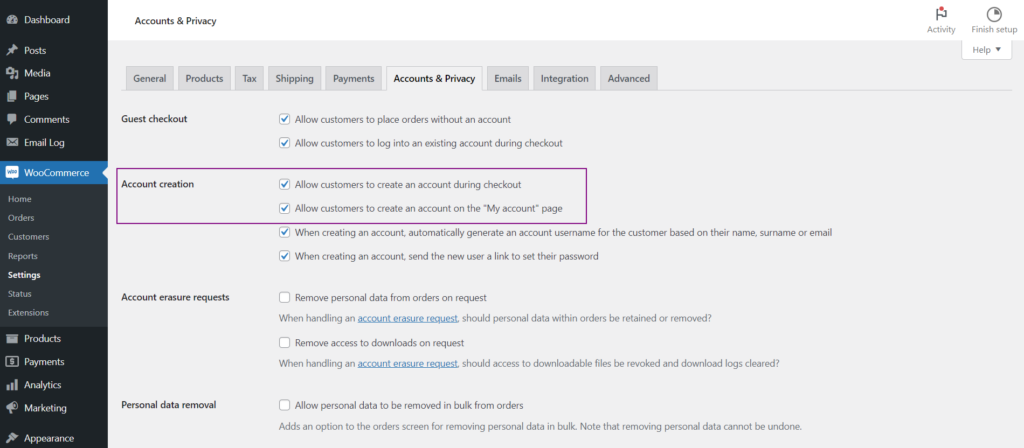
- Go to WooCommerce > Settings > Accounts & Privacy.
- Checkbox to enable customers to create an account either during checkout or on My account page.
- Save changes.
- Go to WooCommerce > Settings > Advanced tab.
- Select what page to use for My Account from the dropdown.
- Save changes.
- Visit the link to setup WooCommerce pages: https://woo.com/document/woocommerce-pages/

Front-End Impact (Create Account)
↑ Back to topWooCommerce My Account Page
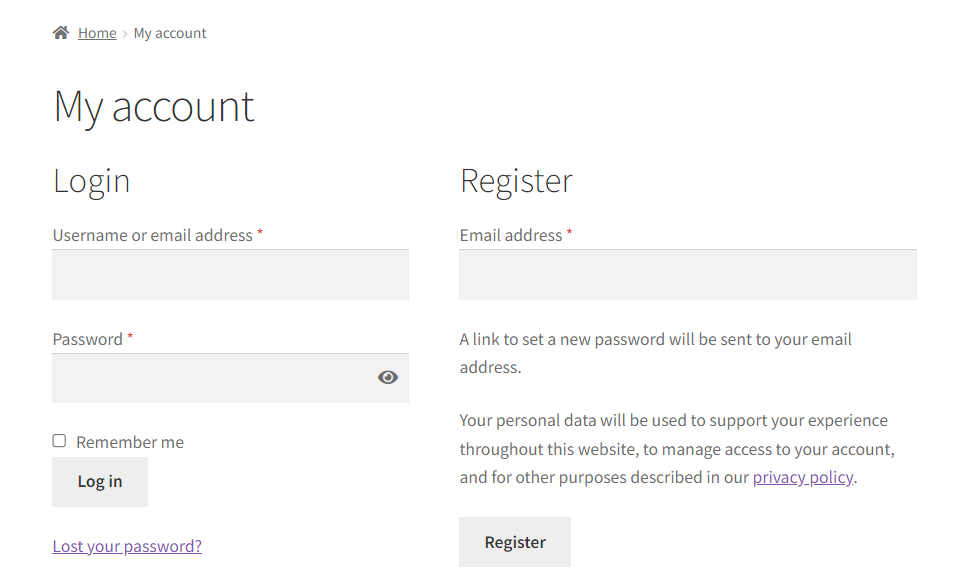
↑ Back to top- Go to WooCommerce > My Account Page.
- Enter the email address and register the new account from the Register section.
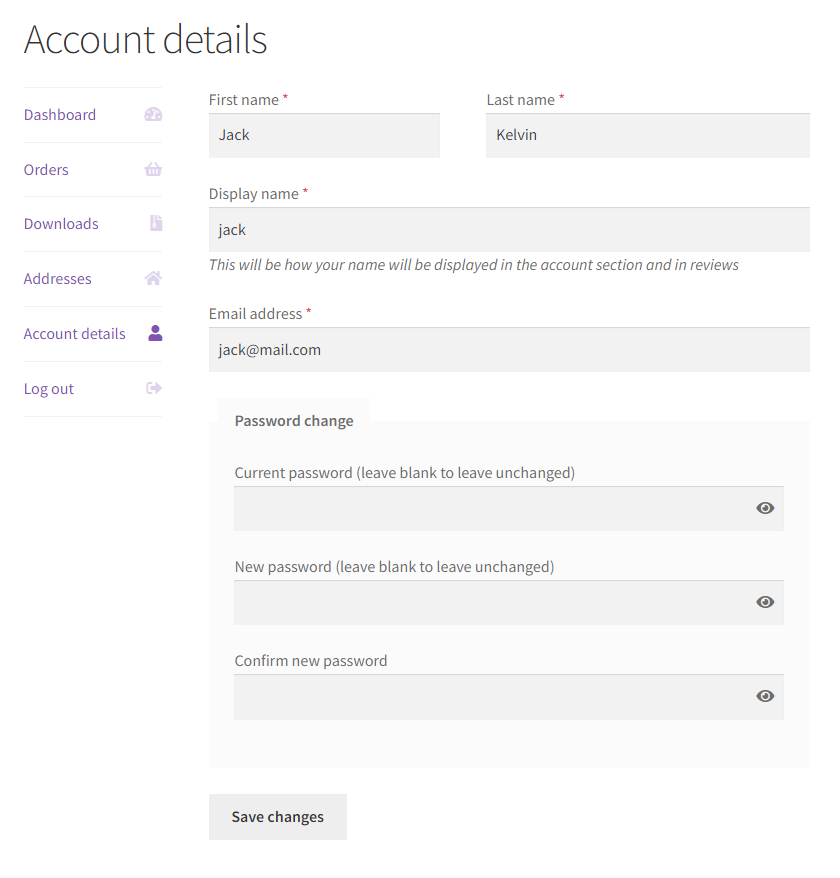
- After registering the new account, the user can set up account details in My Account > Account details.
- After inserting the required account details, click on the Save Changes button.
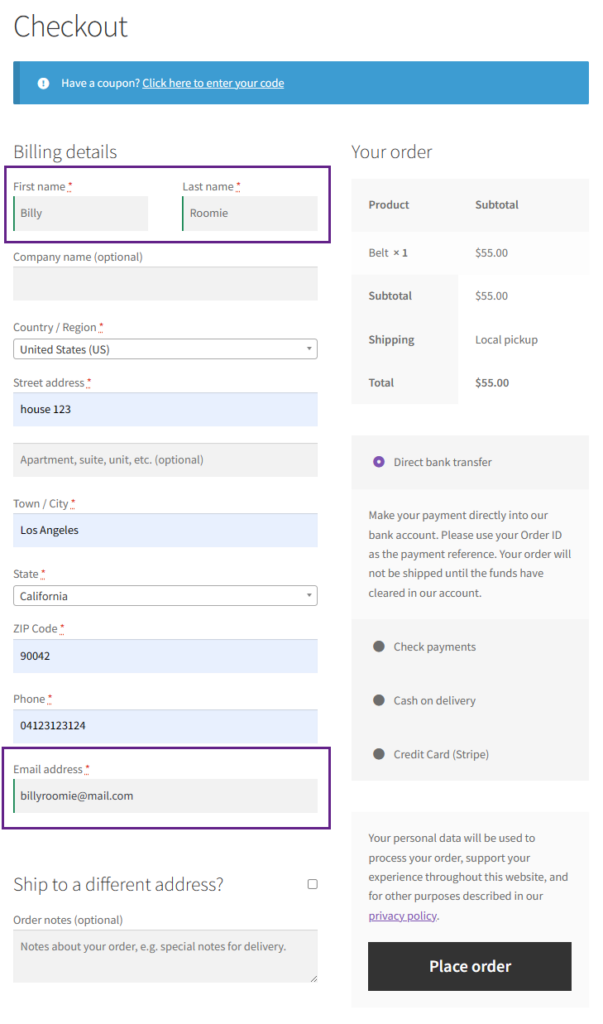
WooCommerce Checkout Page
↑ Back to top- Another way to create a user account and a user Contact in Keap is by creating an account at the time of checkout. This contact will be created and synced on the Keap when the order is placed and the user is created on WooCommerce.
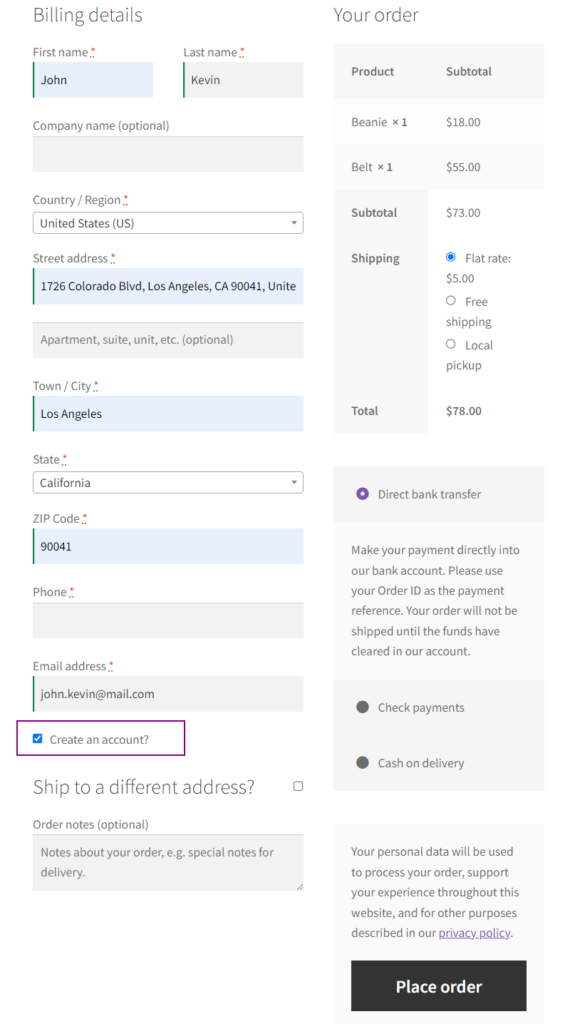
- Go to WooCommerce > Checkout page.
- Select Create an account.
- This will create a user account when the customer places an order.
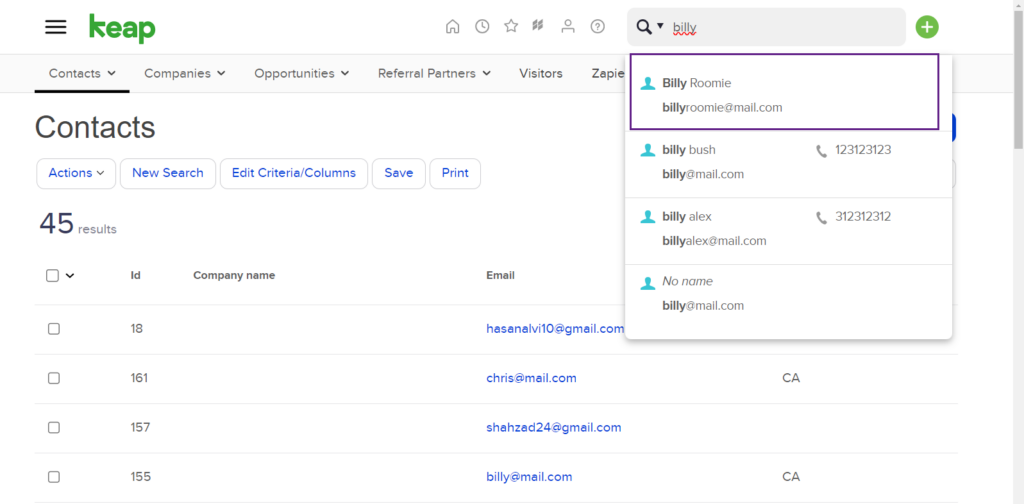
Keap User Sync
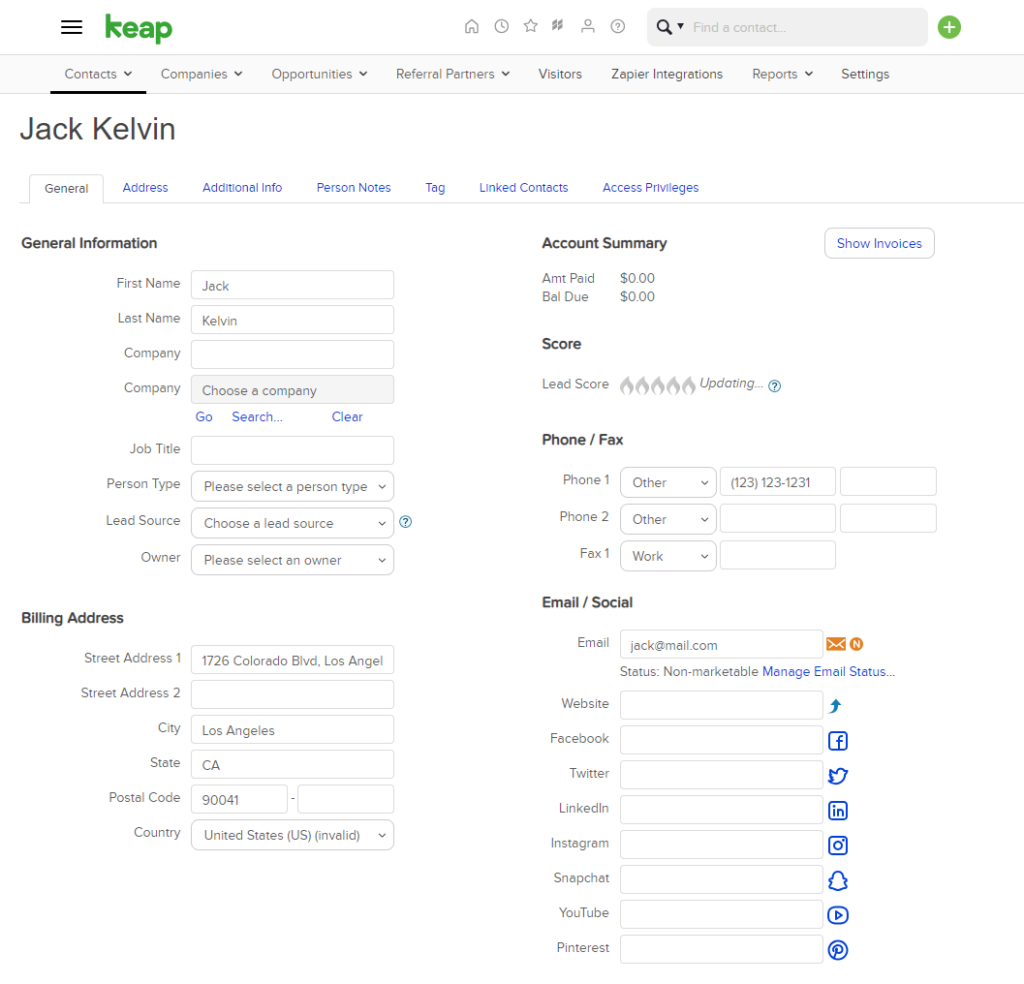
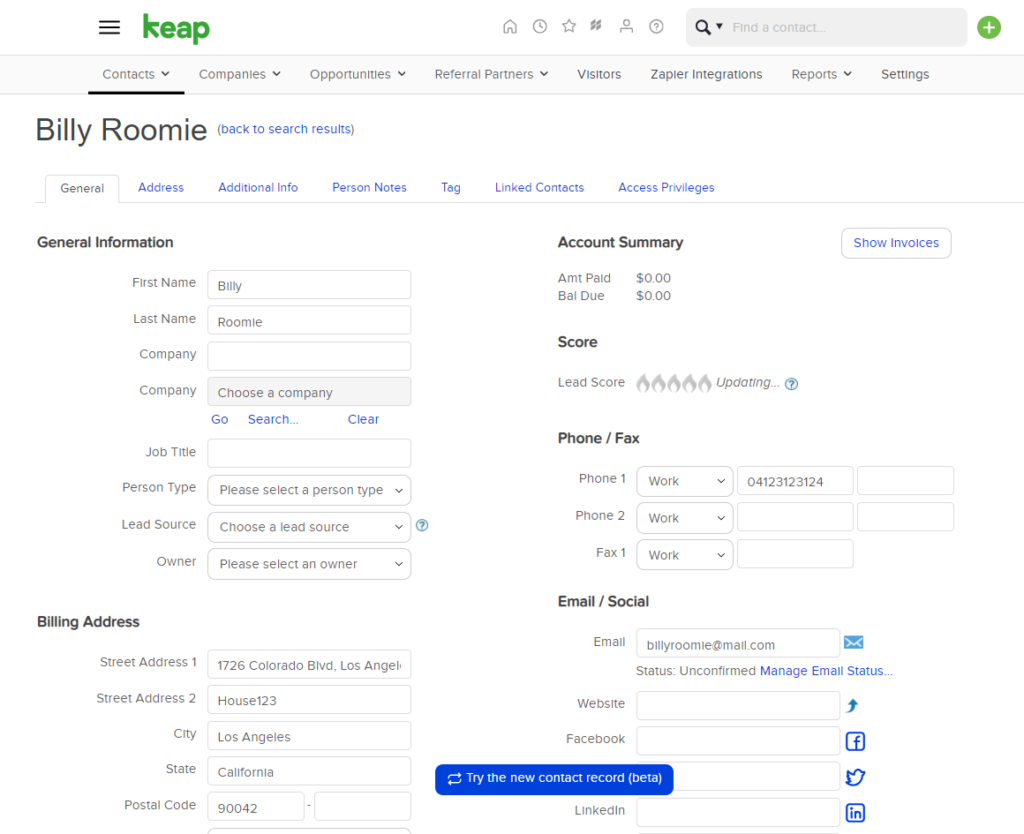
- User accounts will be automatically generated or updated in the Keap contact list. You can search to find the contact with all relevant details.
- Go to the Keap dashboard > Contacts.
Tags for Simple and Variable products
↑ Back to top- The user can now add tags for simple and variable products which will be added in the contact in Keap.
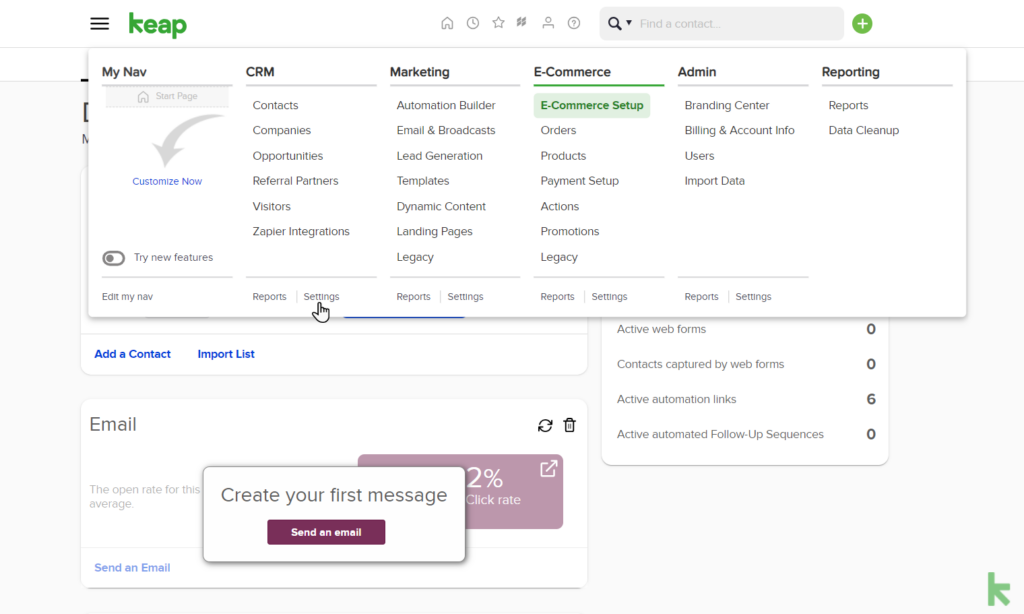
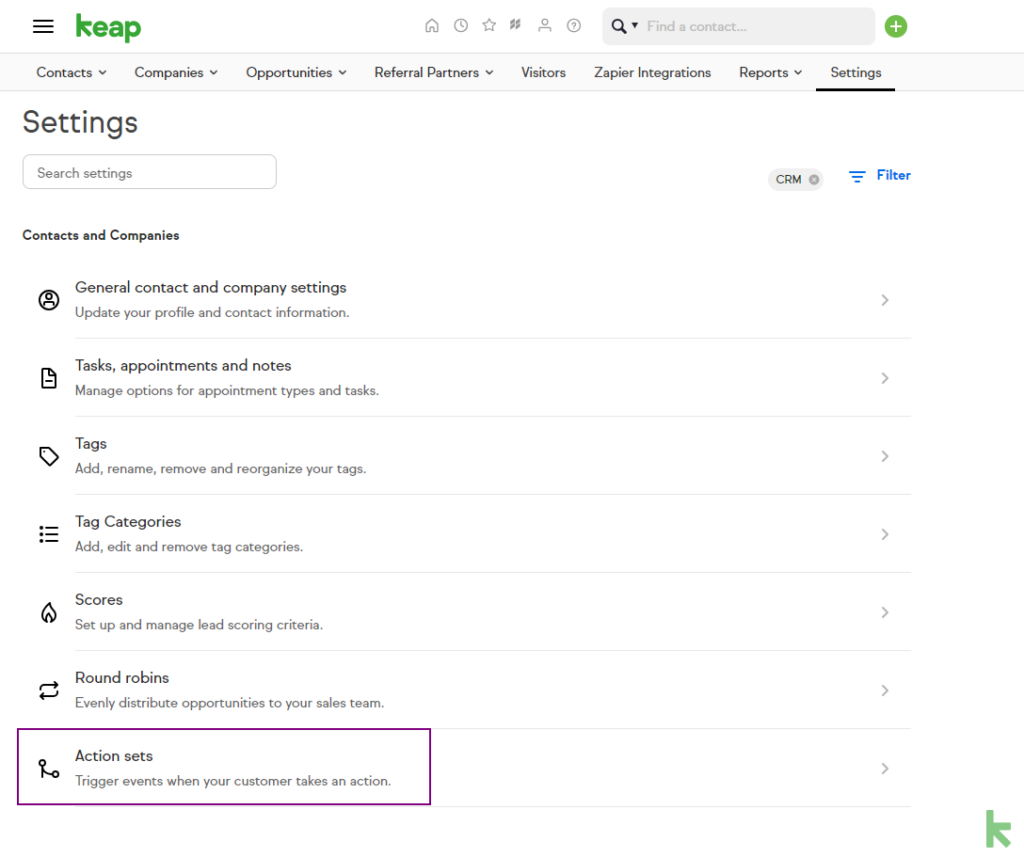
- In order to add tags, first go to Keap > CRM > Settings.
- In Settings, go to the Tags.
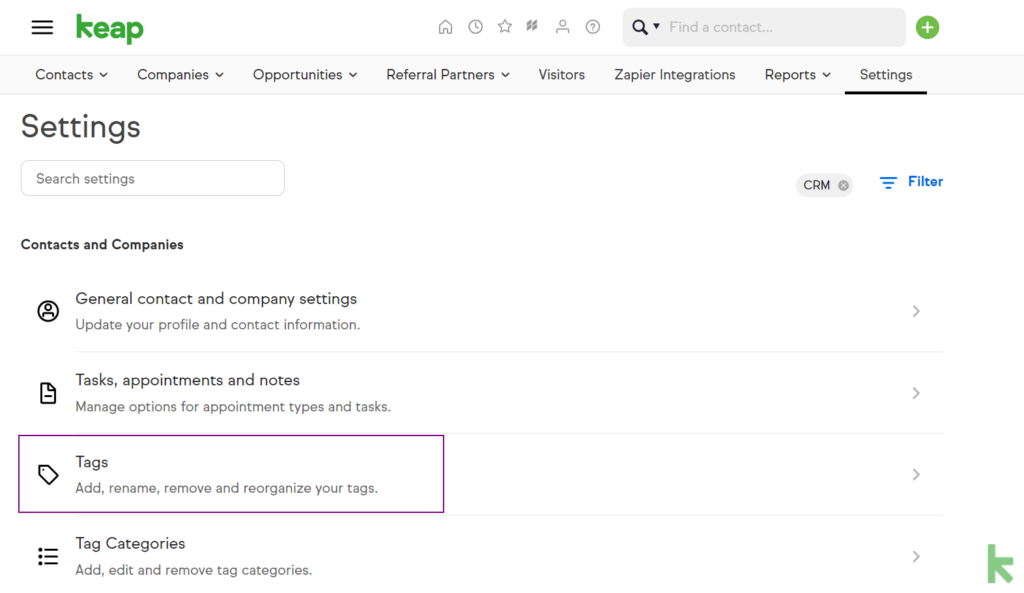
- Add a new Tag.
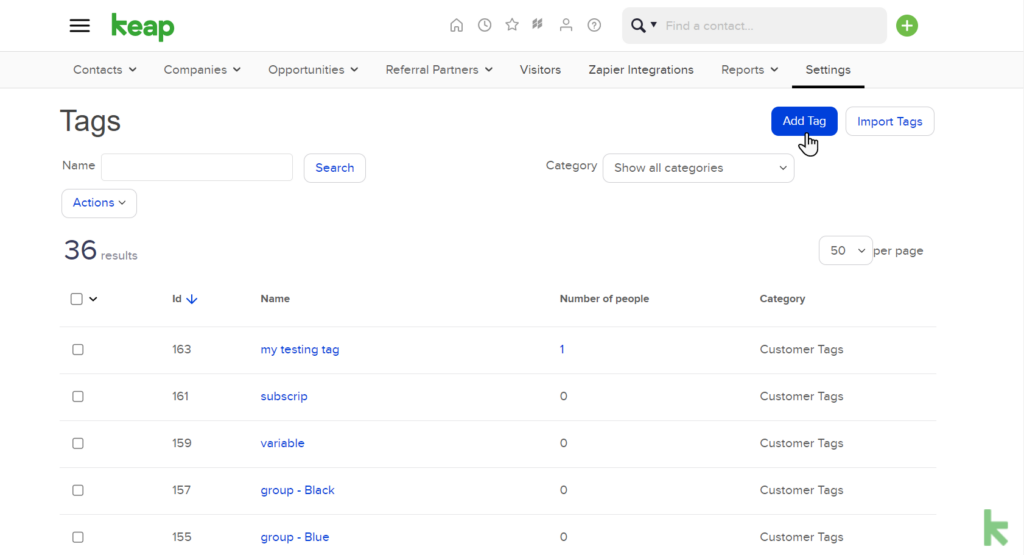
Note: For more details on how to create a tag, visit here: https://help.infusionsoft.com/help/create-a-tag
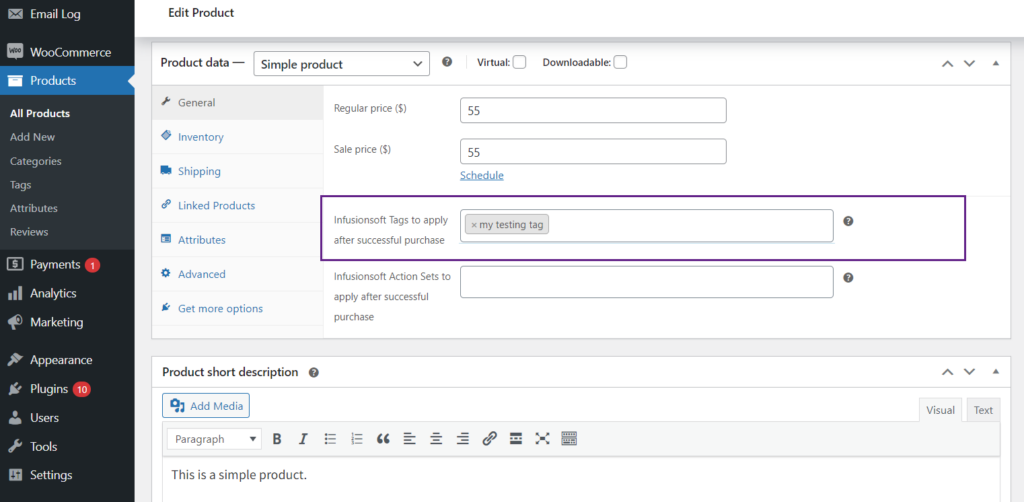
- After adding a new Tag, go to WooCommerce > Product.
- Add/Edit a simple or variable product and navigate to the Product data.
- In the General tab, select tags in Infusionsoft Tags to apply after successful purchase.
Note: Tags will be applied when order status is processing or completed.
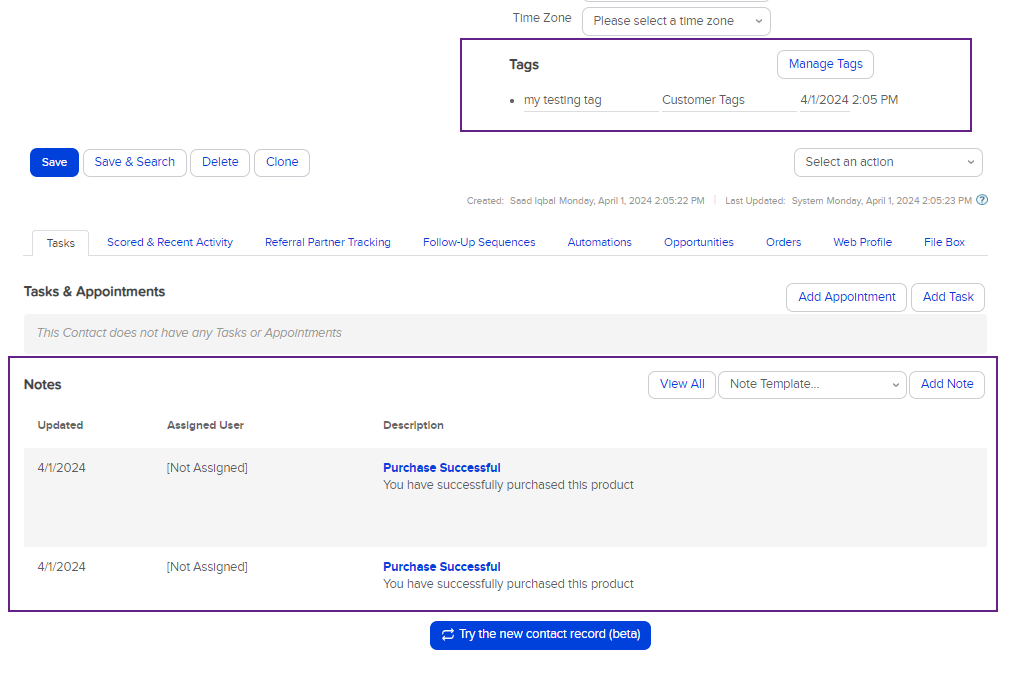
- Now when an order contains a product which has tags, and the order status is updated to Processing or Completed then these tags will be shown in the contact who has purchased the product.
- Go to Keap > Contacts.
- Select the contact who has placed an order containing tag products.
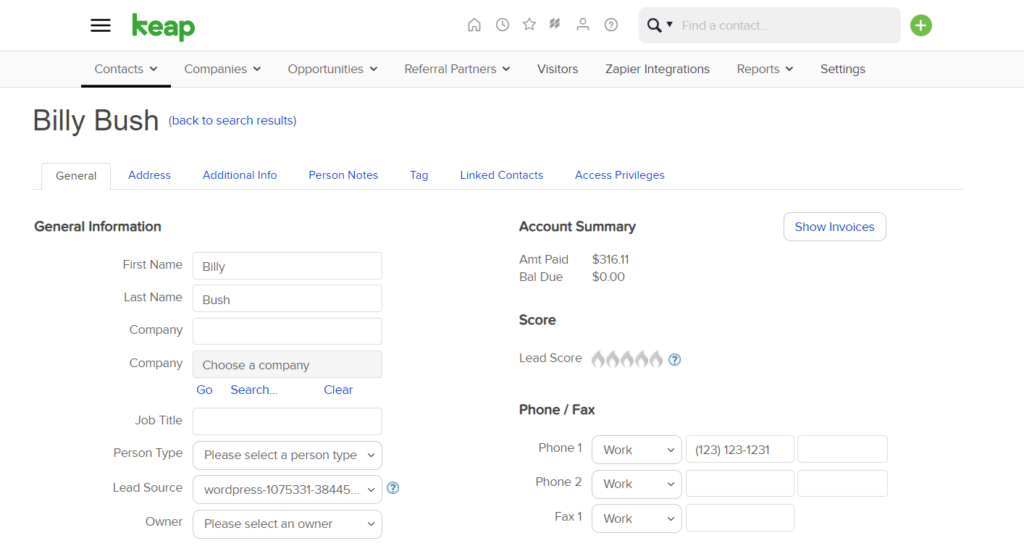
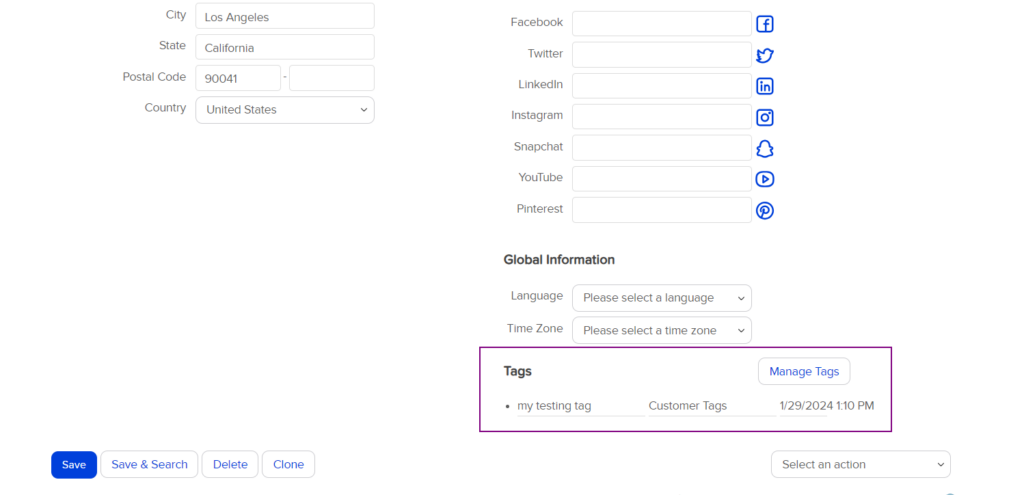
- Scroll down to Tags.
- All the tags will be displayed here.
Actions for Simple and Variable products
↑ Back to top- The user can now add Action triggers for simple and variable products which will be triggered on successful purchase of WooCommerce orders.
- In order to add tags, first go to Keap > CRM > Settings.
- Select Action set.
- In the Action Sets, click on the Add an Action set button to add a new action set.
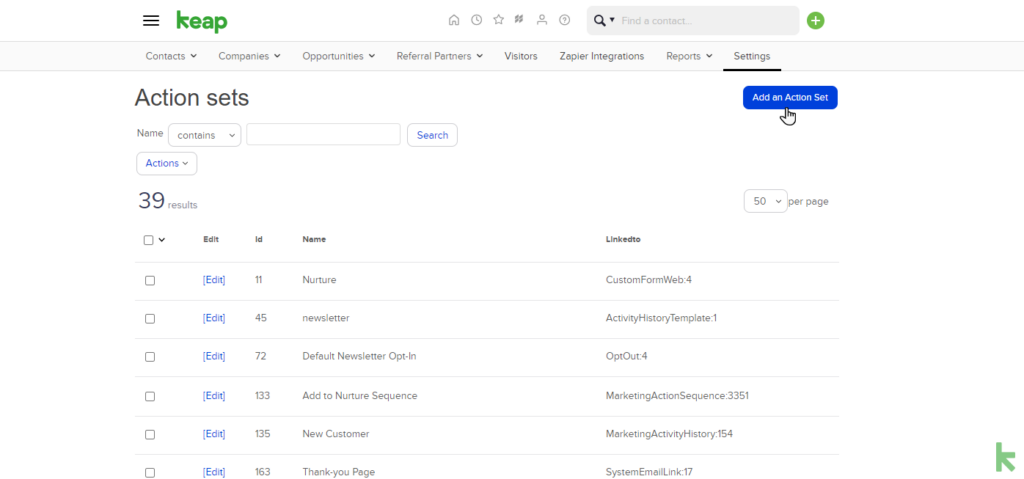
- The Manage Action Set section will be opened in the browser.
- Enter a Name of an action set.
- Select an Action from the drop down.
- Select the Template and relevant options of the action.
- Click on the Save button to save and action.
- After adding a new Action set, navigate to WooCommerce > Product.
- Add/Edit a simple or variable product and navigate to the Product data.
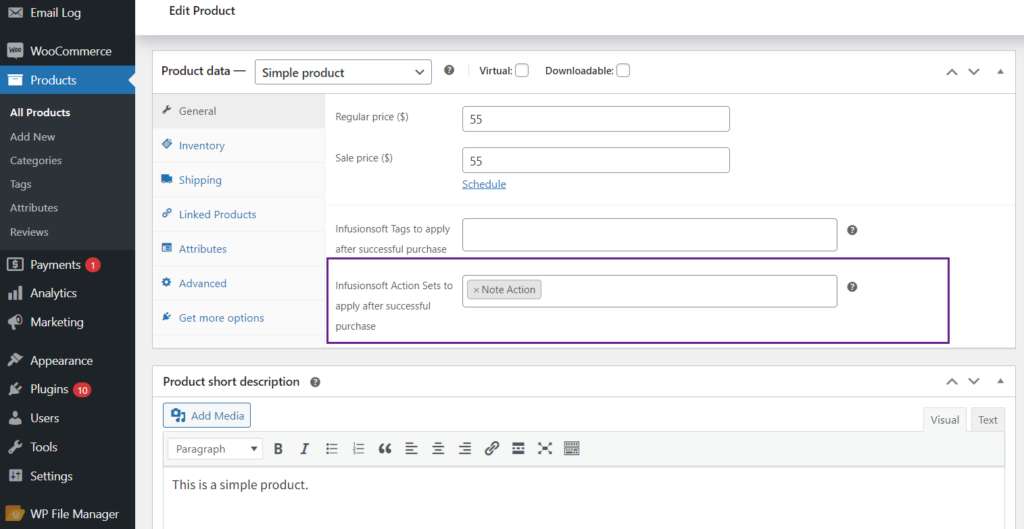
- In the General tab, select action in Infusionsoft Action Sets to apply after successful purchase.
Note: Actions will be triggered when order status is processing or completed.
- Now when an order contains a product which has an action, update the product status of the order to Processing or Completed then this action will be triggered and shown in the contact who has purchased the product.
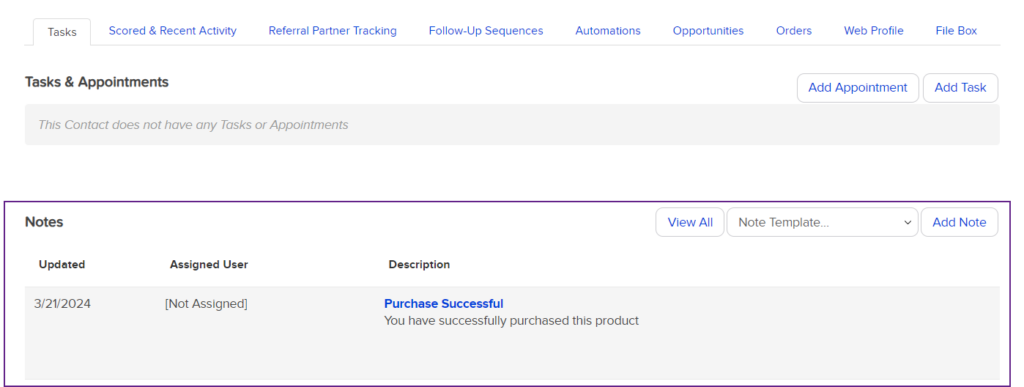
- Go to Keap > Contacts.
- Select the contact who has placed an order containing action.
- Scroll down to the Tasks.
- We selected Notes as the Action Set, so the Notes that were added as Action Set with the order will be shown.
Keap Tags and Actions for Simple and Variable Subscriptions Products
↑ Back to top- The user can add Tags and Action triggers for simple and variable subscriptions products which will be triggered on successful purchase of WooCommerce orders.
- Navigate to WooCommerce > Product.
- Add a new product and select a Simple subscription or Variable subscription in Product data.
- In the General section, the user can add Infusionsoft Keap Tags and Actions Sets.
- The user can also add Infusionsoft Actions Sets for the following cases:
- Subscription Activation
- Subscription Cancelled
- Subscription On Hold
- Subscription Expired
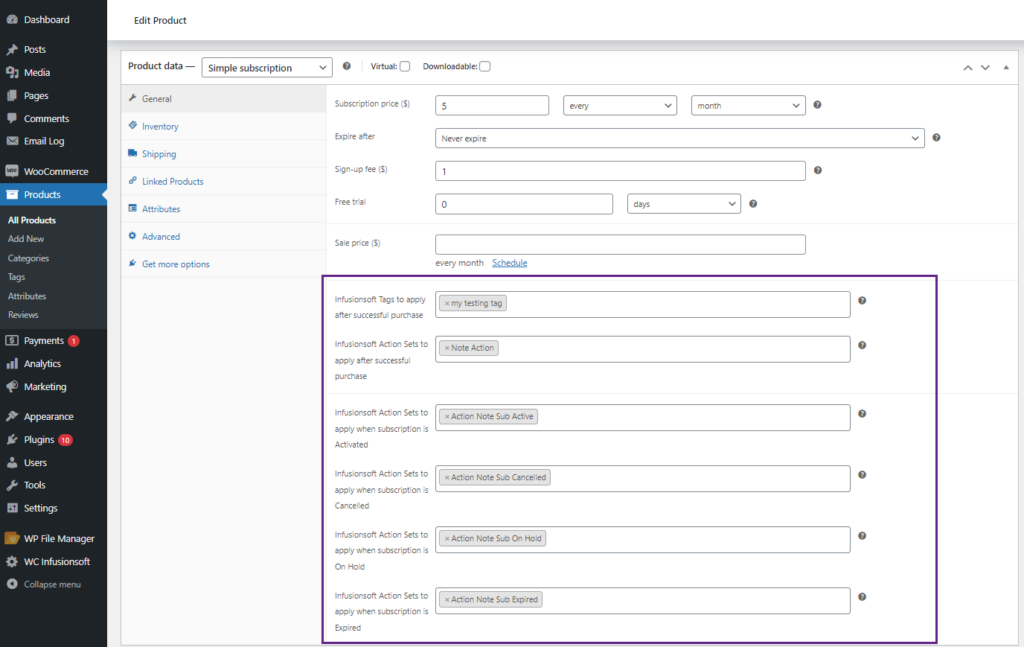
Note: tags and actions on subscription [activated, cancelled, onhold and expired], will apply when order is processing or completed. The cancelled action set will be applied when the subscription is successfully cancelled. Tags and actions can be found in the settings tab on your Infusionsoft Dashboard.
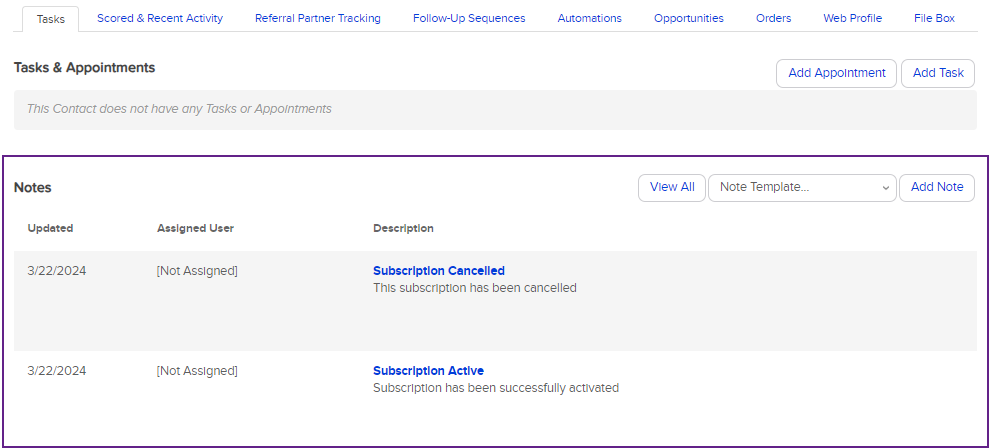
Tags and Actions are linked with the contact profile. You can check the tags and actions associated with the contact in Infusionsoft profile. Tags can be easily found under the tags tab.
- Go to Keap > Contacts.
- Select the contact who has placed an order containing action.
- Scroll down to the Tasks.
- We selected Notes as the Action Set, so the Notes that were added as Action Set with the order will be shown.
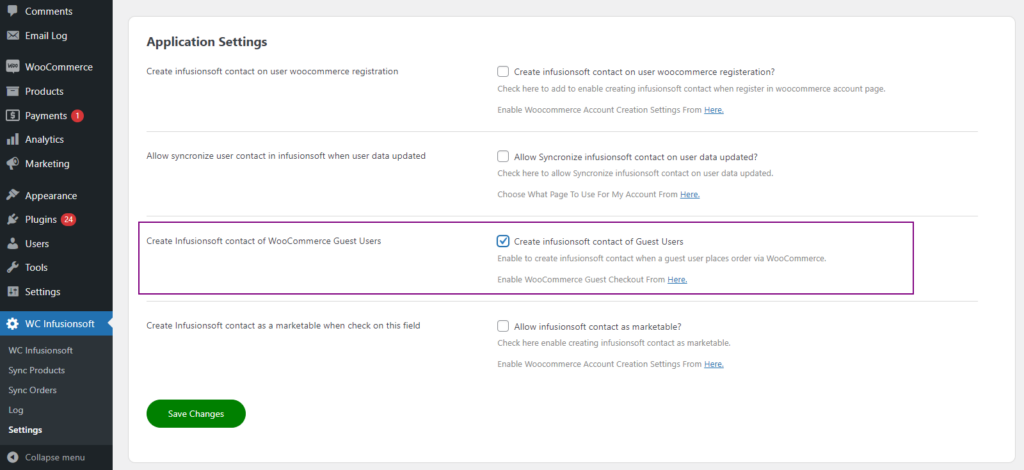
Enable Guest Checkout
↑ Back to top- Go to WordPress Admin > WC Infusionsoft > Settings
- Enable the Create Infusionsoft Contact Of Guest Users.
- Click Save Changes Button.
Guest Checkout
↑ Back to top- Go to WooCommerce > Settings > Account and Privacy tab.
- Navigate to Guest Checkout.
- Enable Allow customers to place orders without an account.
- Click Save Changes Button.
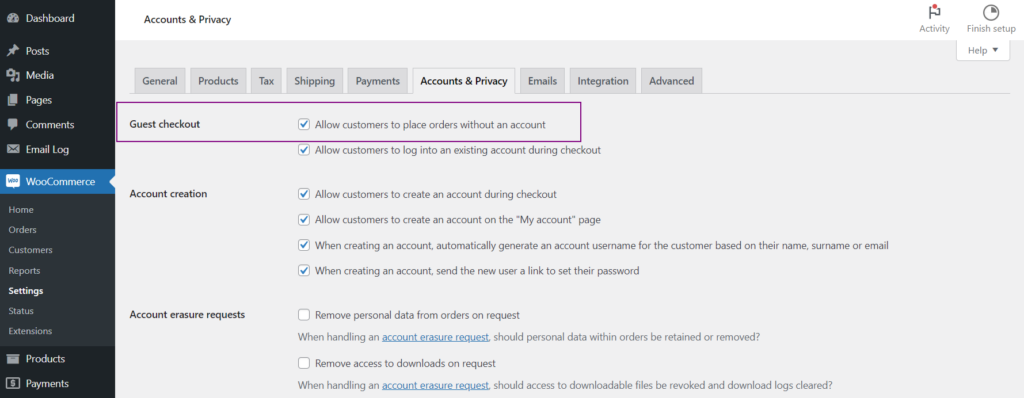
- Now when a non-logged-in user places an order on your website. User’s details will be synced with your Infusionsoft Keap account applying all the tags and actions associated with the product.
WooCommerce Checkout
↑ Back to top- Go to the Shop page.
- Add a product in the cart containing Keap tags and action sets.
- Go to the Checkout page and place an order using a Guest (non-logged in) user details.
- After placing the order, navigate to the WooCommerce > Orders.
- Change the order status to Processing or Complete.
Note: The order status should be processing or completed in order to create and sync a guest contact in Keap.

Keap Infusionsoft Contact
↑ Back to top- Navigate to the Keap Dashboard > Contacts.
- Search for the guest contact name.
- All the details of the guest user will be shown in the Keap contact.
- All the tags and action sets of the product added in the order will also be synced.
Sync Products
↑ Back to top- Now, the admin can sync products between WooCommerce and Keap. If any product is updated in the WooCommerce, it will also be updated in the Keap after successful synchronization. The admin has to import or export products from this section in order to keep all the products updated.
- In order to sync products, go to WordPress Admin > WC Infusionsoft > Sync Products.
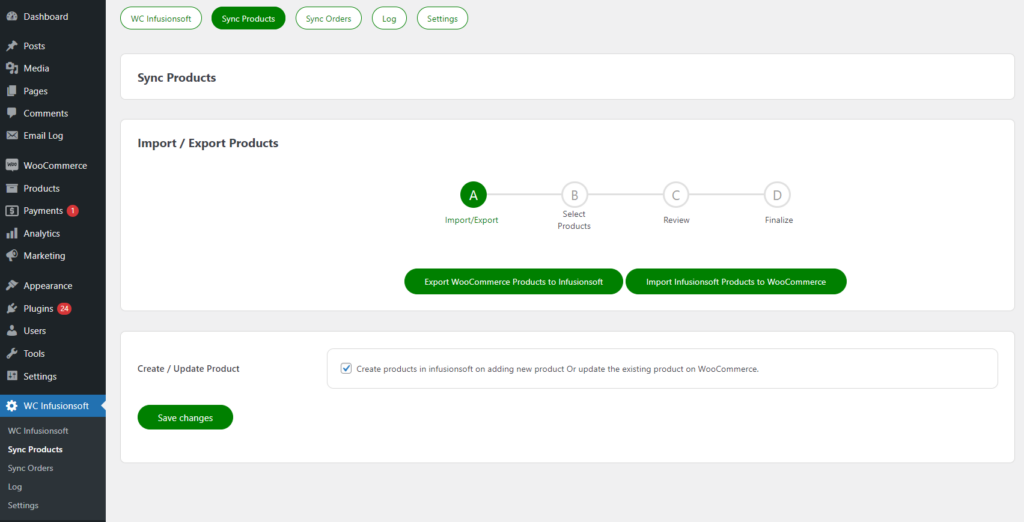
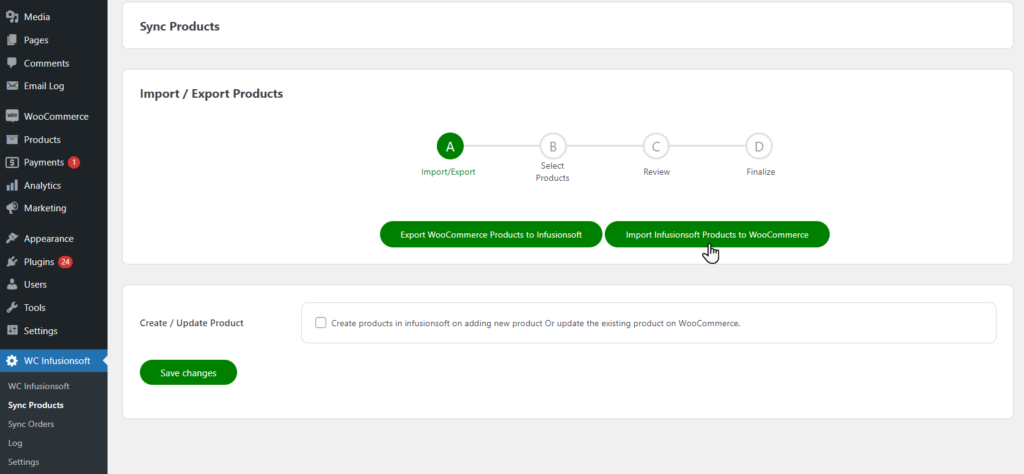
- The admin can Export WooCommerce products to Keap Infusionsoft and Import Keap Infusionsoft products to WooCommerce.
Export WooCommerce Products to Keap Infusionsoft
↑ Back to top- The admin can export WooCommerce products to Keap Infusionsoft.
- In Sync Products, navigate to Import/Export Products.
- Click on Export WooCommerce Products to Infusionsoft.
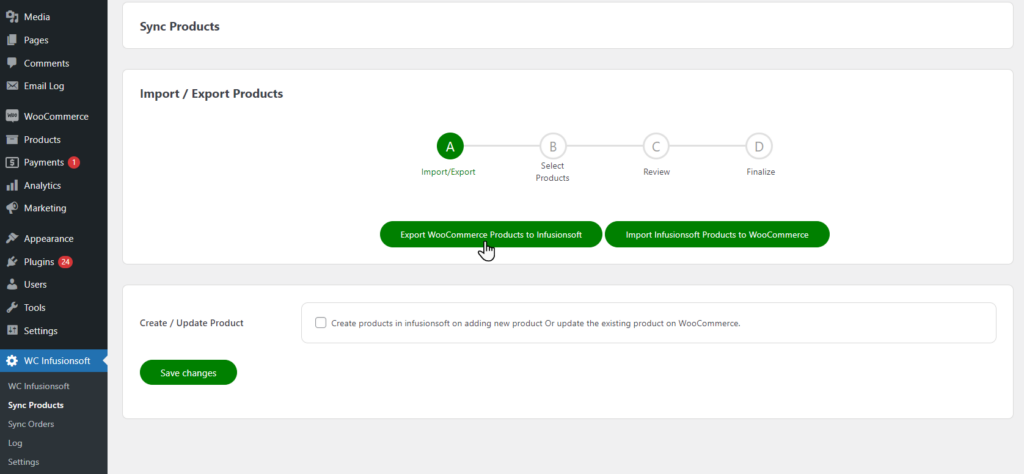
- The next step will be Select Products.
- In this step the admin has to select if the admin wants to export all products, products from specific categories or products by specific IDs.
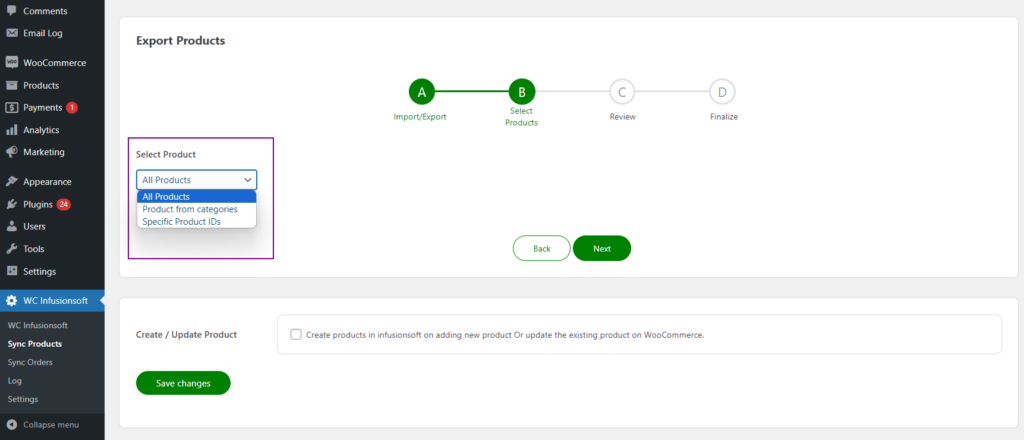
- If the admin selects All Products, it will export all the WooCommerce products to the Keap.
- Click Next to move to the next step.
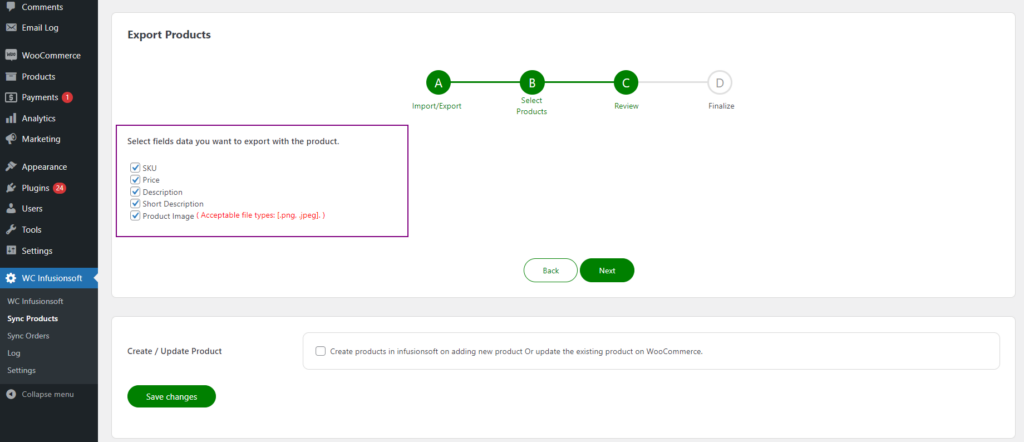
- The next step is Review, in this step the admin will select which field data will be exported with the product.
- Checkmark those fields which the admin wants to export with the product.
- Click on the Next button to proceed and start the export.
Note: Product Image should be in .png or .jpeg format.
- The exporter will start exporting WooCommerce products to the Keap.
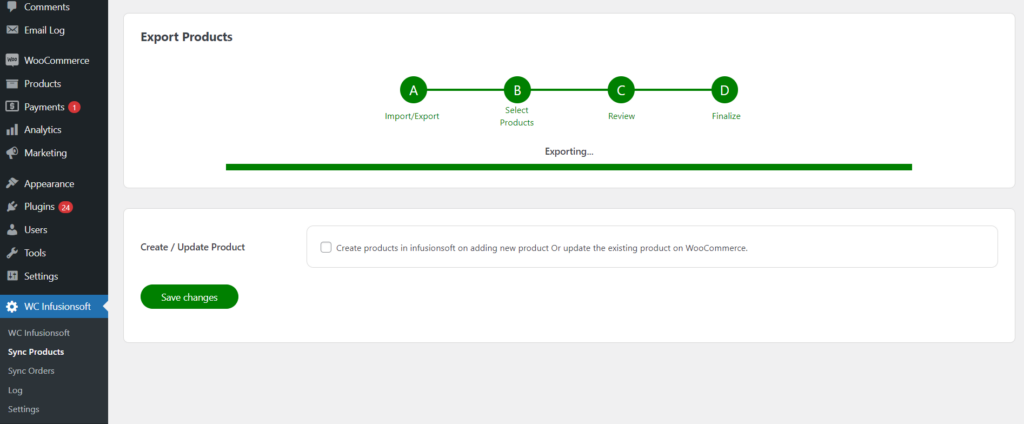
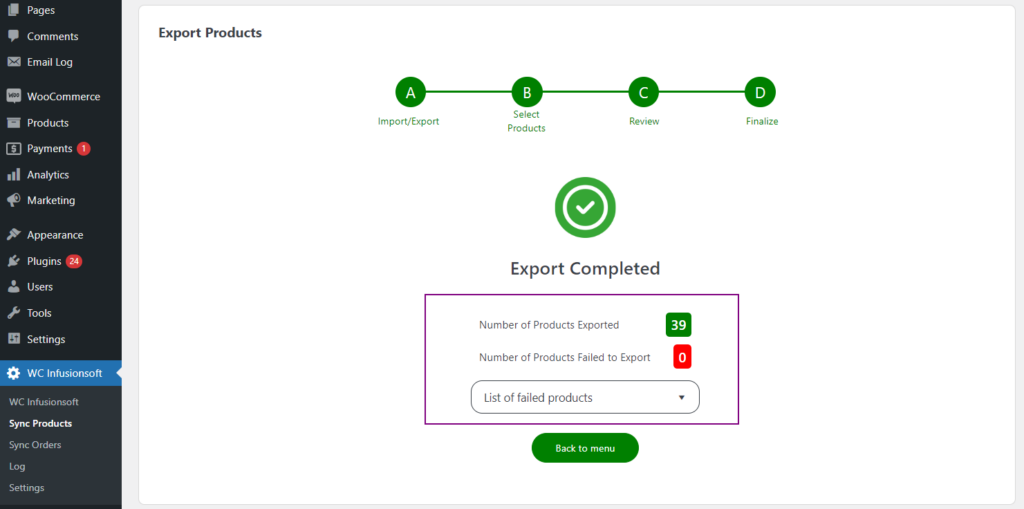
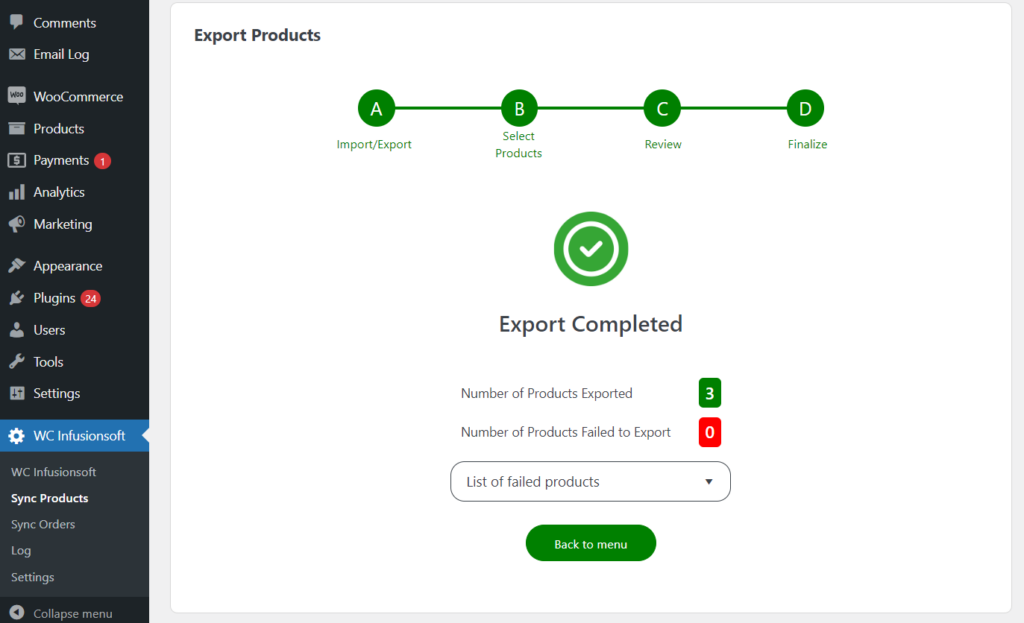
- Once the export is successfully completed, the total number of products exported will be displayed.
- The total number of products failed to export will also be displayed.
- The admin can check the failed products in the List of failed products section.
- Click on the Back to menu button to go back to the Import/Export step.
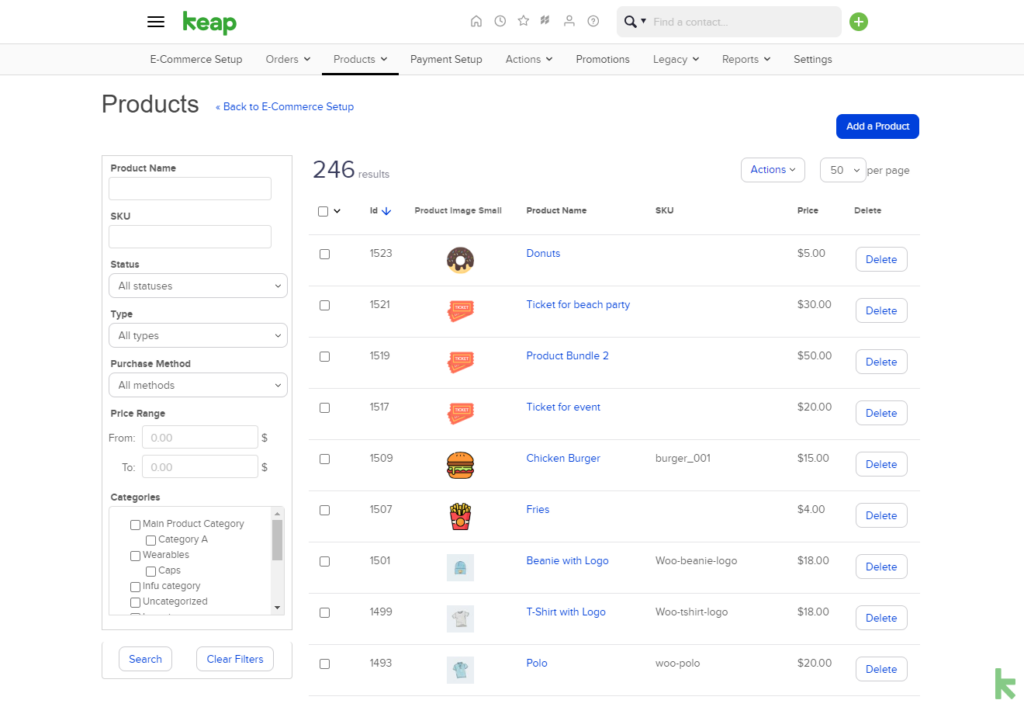
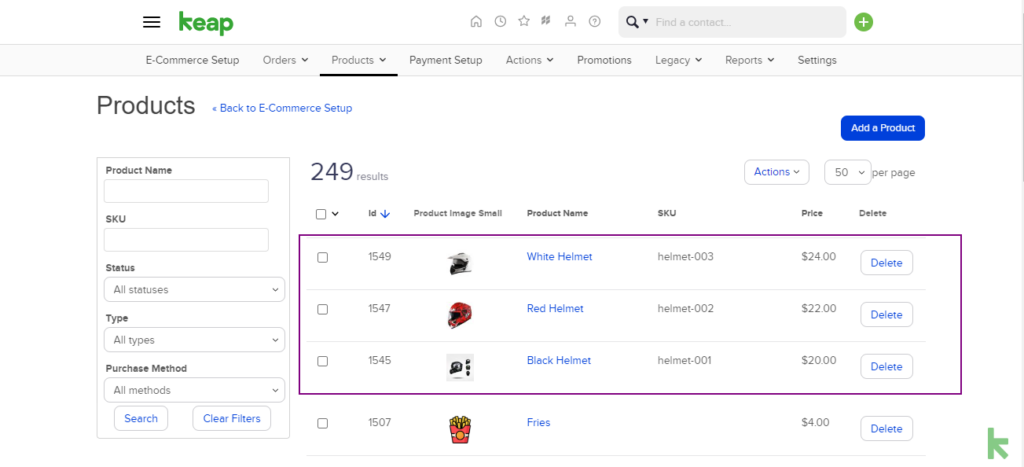
- After the export, navigate to the Keap dashboard > E-Commerce > Products.
- All the exported products will be displayed.
Export By Product Category
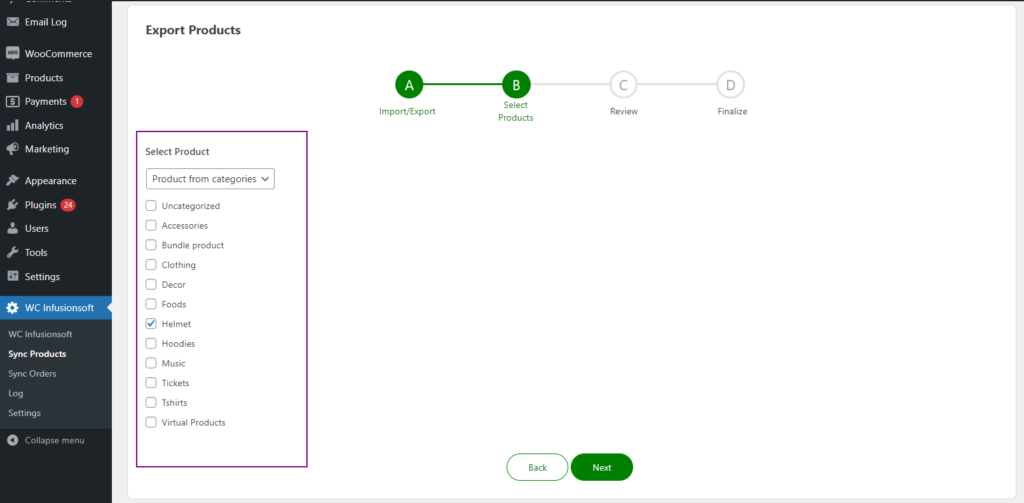
- The admin can export products from specific categories instead of exporting all the products.
- In the Select Products step, select Product from categories, all the WooCommerce categories will be displayed.
- Select categories from which the products will be exported.
- Click Next to move to the next step.
- The next step is Review, in this step the admin will select which field data will be exported with the product.
- Checkmark those fields which the admin wants to export with the product.
- Click on the Next button to proceed and start the export.
- Once the export is successfully completed, the total number of products exported will be displayed.
- The total number of products failed to export will also be displayed.
- The admin can check the failed products in the List of failed products section.
- Click on the Back to menu button to go back to the Import/Export step.
- After the export, navigate to the Keap dashboard > E-Commerce > Products.
- All the exported products will be displayed.
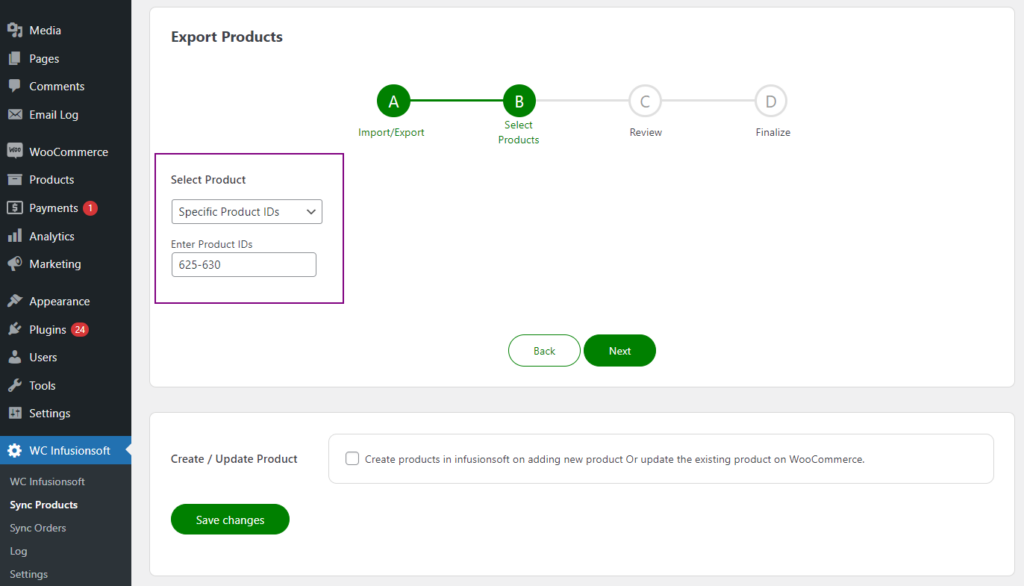
Export By Product Specific ID
- The admin can export individual and a range of products using specific product IDs.
- In the Select Products step, select Specific Product IDs.
- Insert the ID or range of IDs of products that the admin wants to export in, insert product ID Enter Product IDs.
- Click Next to move to the next step.
- The next step is Review, in this step the admin will select which field data will be exported with the product.
- Checkmark those fields which the admin wants to export with the product.
- Click on the Next button to proceed and start the export.
- Once the export is successfully completed, the total number of products exported will be displayed.
- The total number of products failed to export will also be displayed.
- The admin can check the failed products in the List of failed products section.
- Click on the Back to menu button to go back to the Import/Export step.

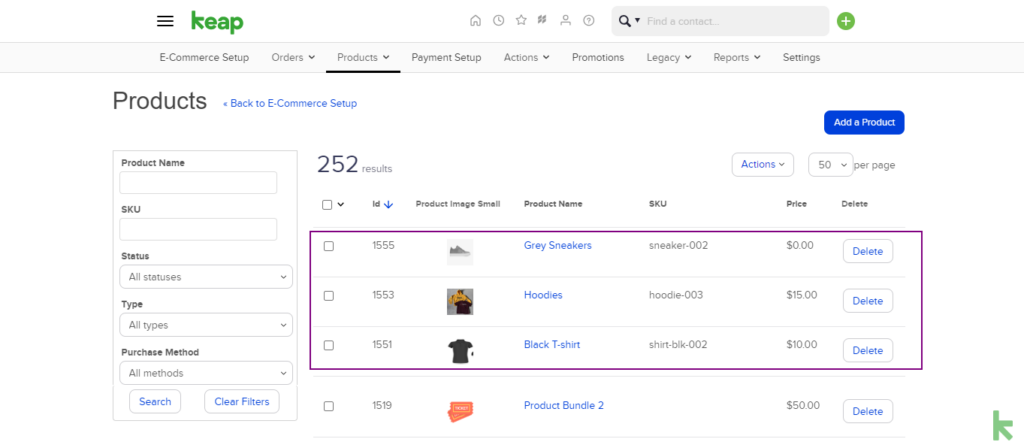
- After the export, navigate to the Keap dashboard > E-Commerce > Products.
- All the exported products will be displayed.
Import Keap Infusionsoft Products to WooCommerce
- The admin can import Keap Infusionsoft products to WooCommerce.
- In Sync Products, navigate to Import/Export Products.
- Click on Import Infusionsoft Products to WooCommerce.
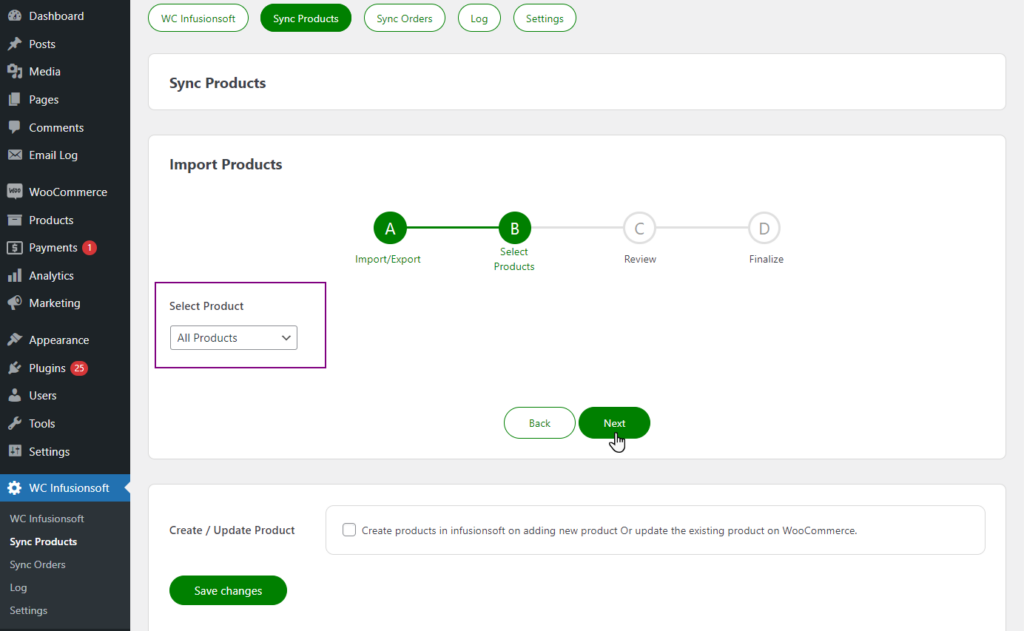
- The next step will be Select Products.
- In this step the admin has to select if the admin wants to import all products or products via specific IDs from Keap Infusionsoft.
- Select All Products from Select Product dropdown.
- This will import all the Keap Infusionsoft products to WooCommerce.
- Click on the Next button to proceed to the next step.
- If the admin selects All Products, it will import all the Keap Infusionsoft products to WooCommerce.
- Click Next to move to the next step.
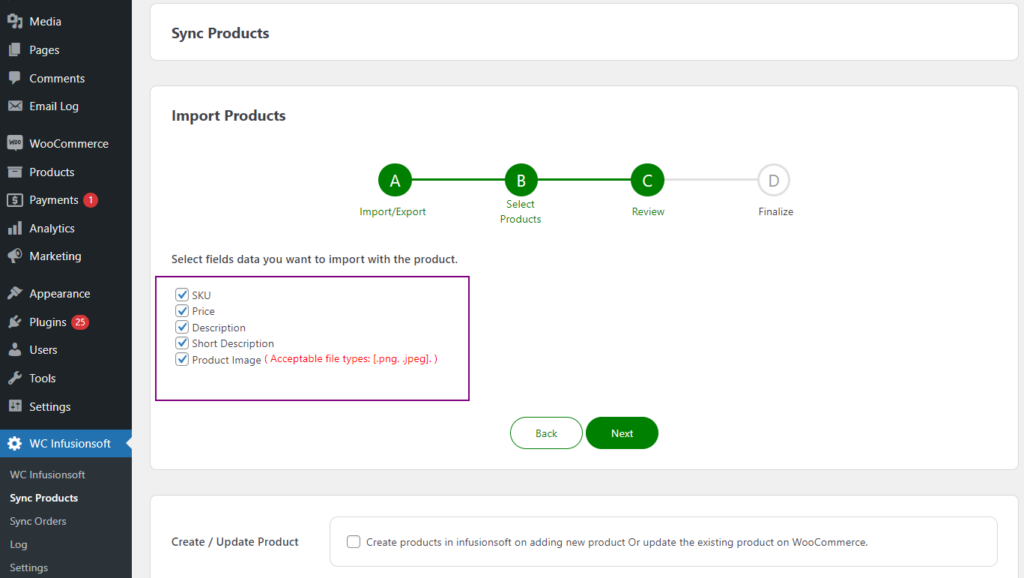
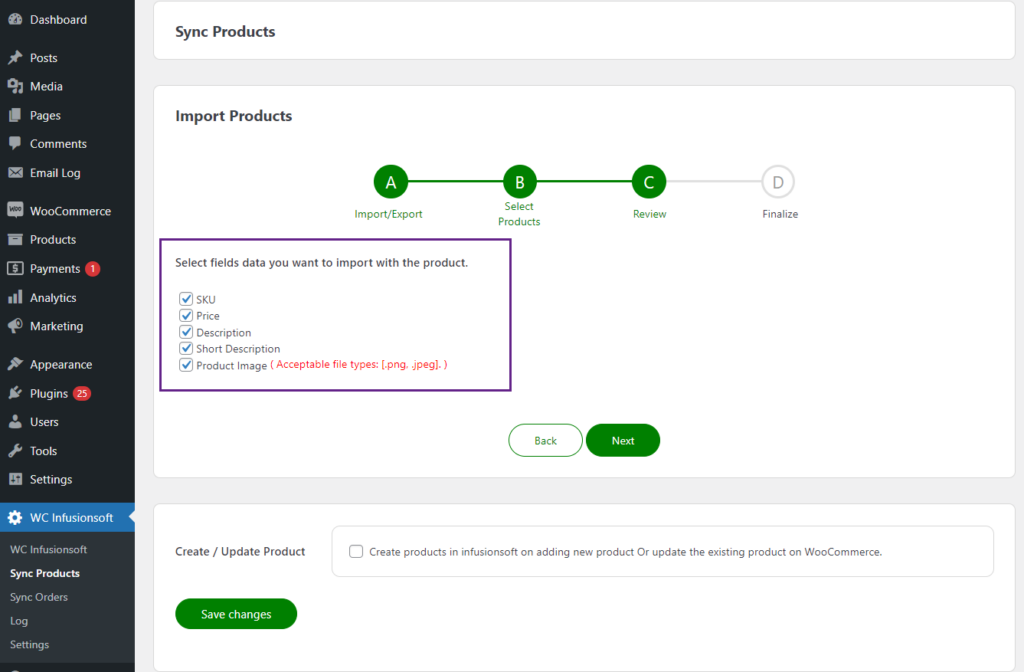
- The next step is Review, in this step the admin will select which field data will be imported with the product.
- Checkmark those fields which the admin wants to import with the product.
- Click on the Next button to proceed and start the import.
Note: Product Image should be in .png or .jpeg format.
- The importer will start importing Keap products to WooCommerce.
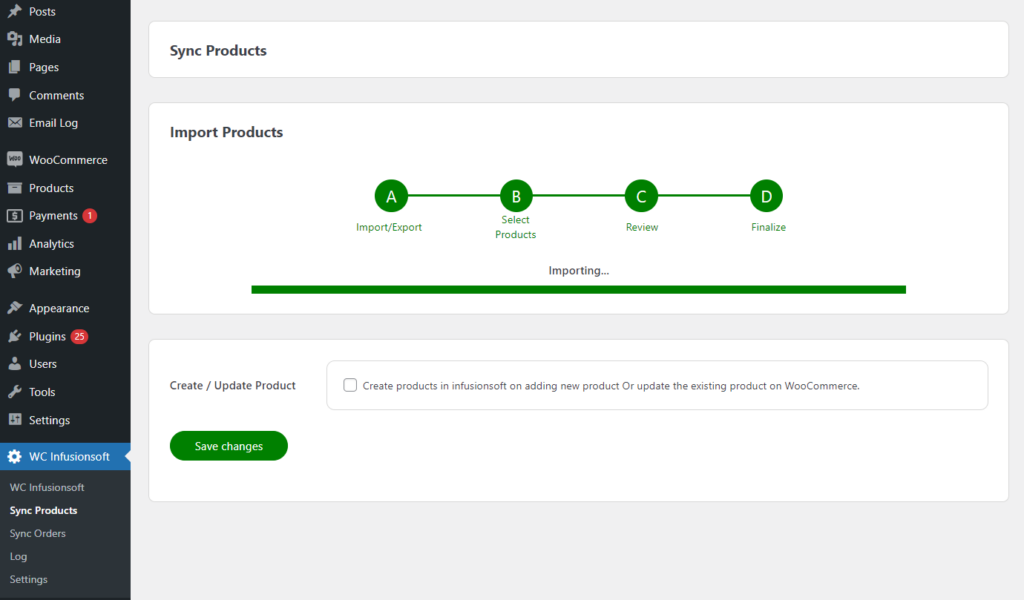
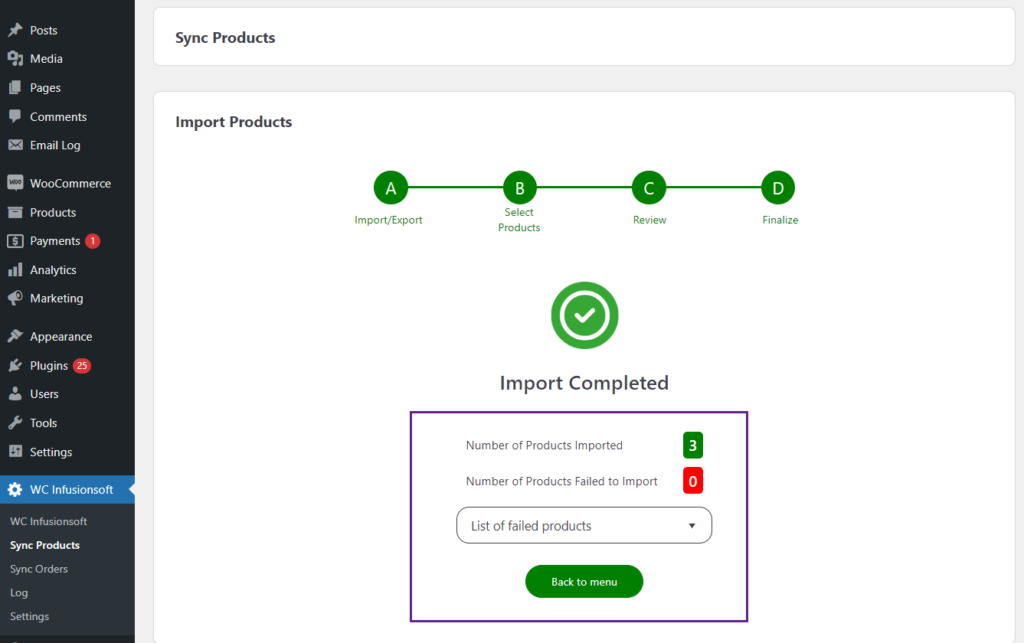
- Once the import is successfully completed, the total number of products imported will be displayed.
- The total number of products failed to import will also be displayed.
- The admin can check the failed products in the List of failed products section.
- Click on the Back to menu button to go back to the Import/Export step.

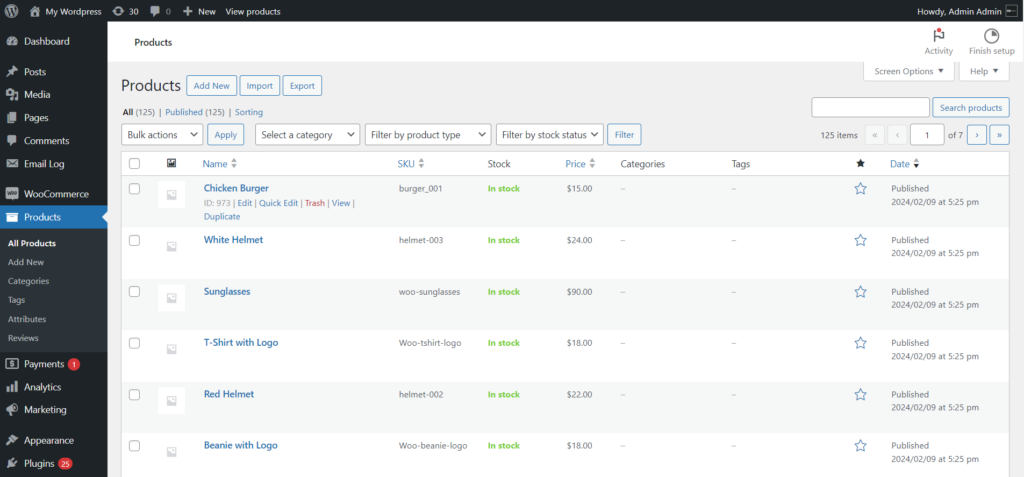
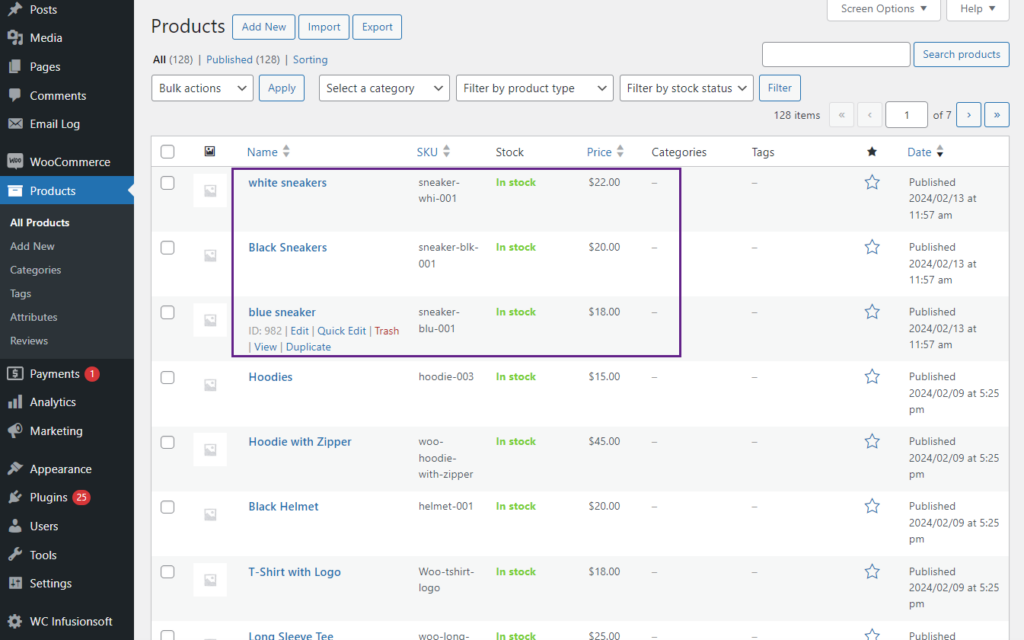
- After the import, navigate to the WordPress Admin dashboard > Products > All Products.
- All the imported products will be displayed.
Note: The images that are added as Legacy Images in Products from Keap will be imported only.
Note: The products that are already created with the same SKU will be updated.
Import By Product Specific ID
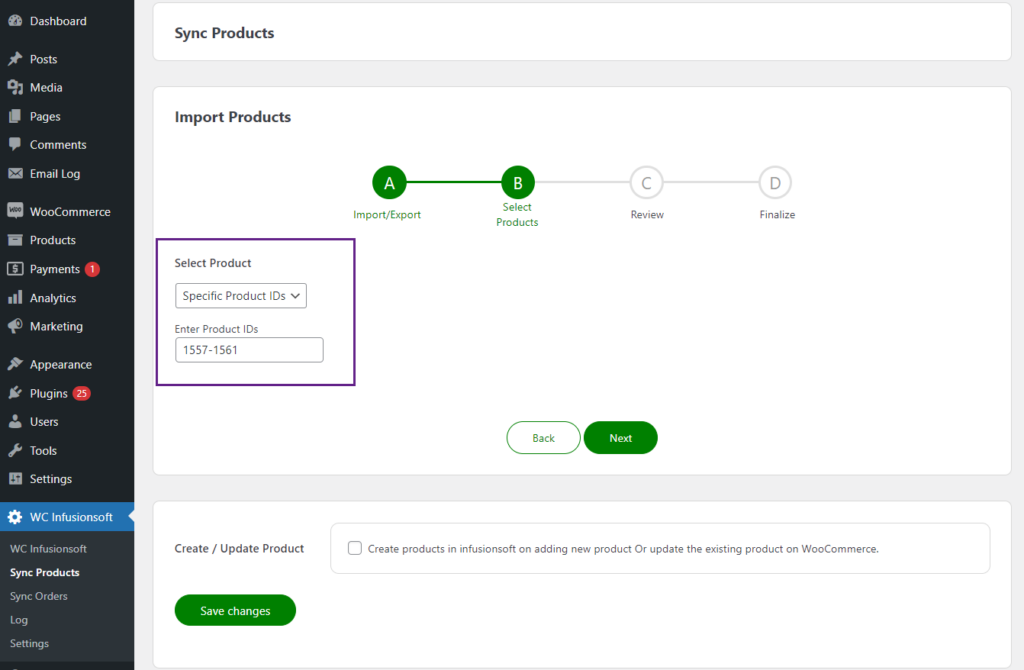
- The admin can import individuals and a range of products using specific product IDs.
- In the Select Products step, select Specific Product IDs.
- Insert the ID or range of IDs of products that the admin wants to import, insert product ID in Enter Product IDs.
- Click Next to move to the next step.
- The next step is Review, in this step the admin will select which field data will be imported with the product.
- Checkmark those fields which the admin wants to import with the product.
- Click on the Next button to proceed and start the import.
- Once the import is successfully completed, the total number of products imported will be displayed.
- The total number of products failed to import will also be displayed.
- The admin can check the failed products in the List of failed products section.
- Click on the Back to menu button to go back to the Import/Export step.
- After the import, navigate to the WordPress Admin > Products > All Products..
- All the imported products will be displayed.
Sync Orders
↑ Back to top- Now, the admin can sync orders between WooCommerce and Keap. If any order is updated in the WooCommerce, it will also be updated in the Keap after successful synchronization. The admin has to import or export products from this section in order to keep all the products updated.
- In order to sync products, go to WordPress Admin > WC Infusionsoft > Sync Orders.
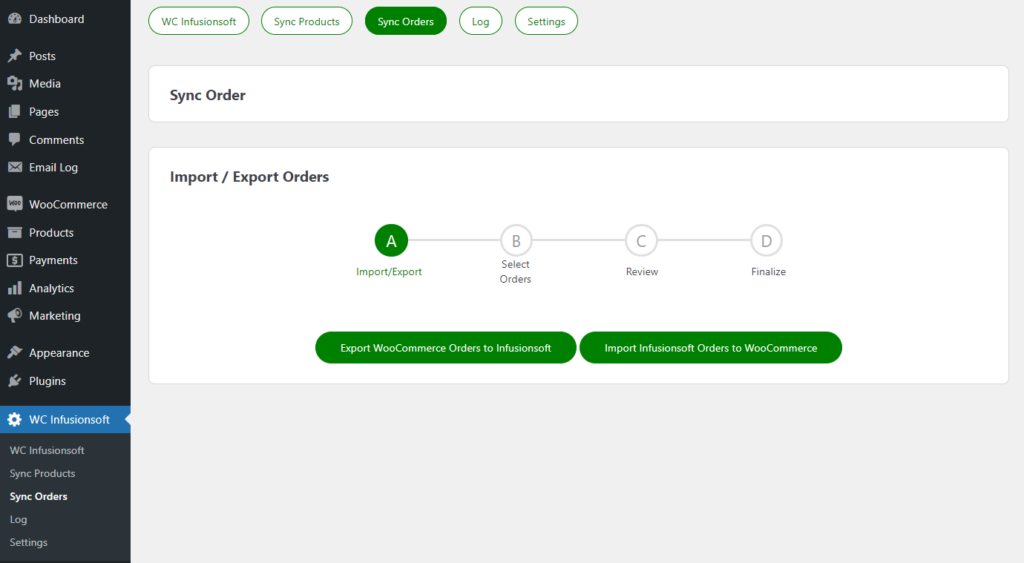
- The admin can Export WooCommerce orders to Keap Infusionsoft and Import Keap Infusionsoft orders to WooCommerce.
Export WooCommerce Orders to Keap Infusionsoft
↑ Back to top- The admin can export WooCommerce orders to Keap Infusionsoft.
- In Sync Orders, navigate to Import/Export Products.
- Click on Export WooCommerce Orders to Infusionsoft.
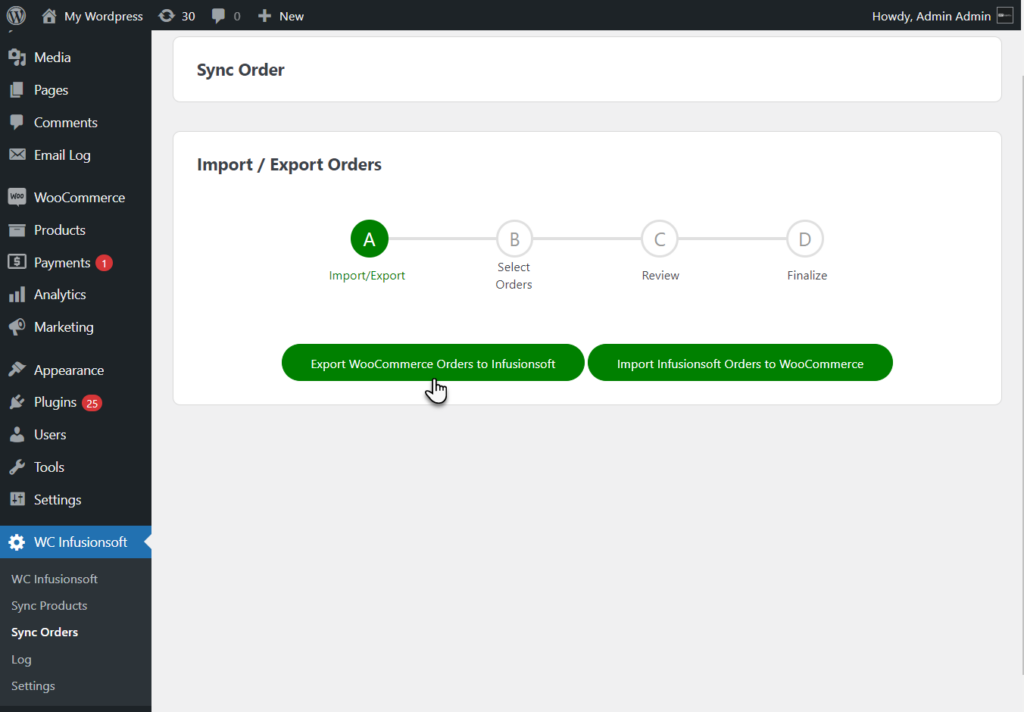
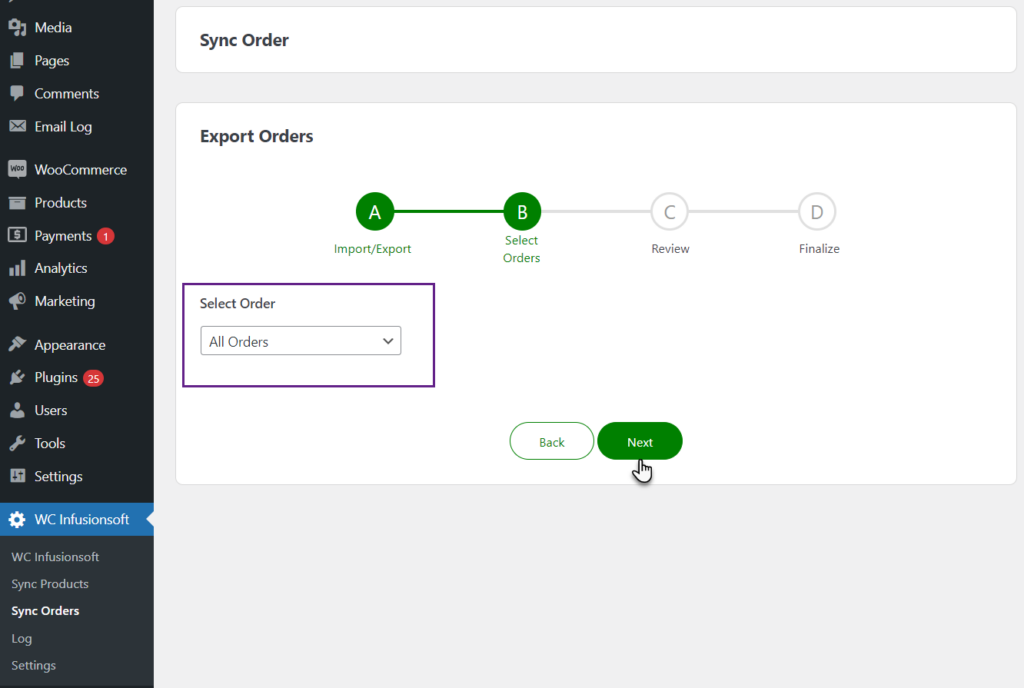
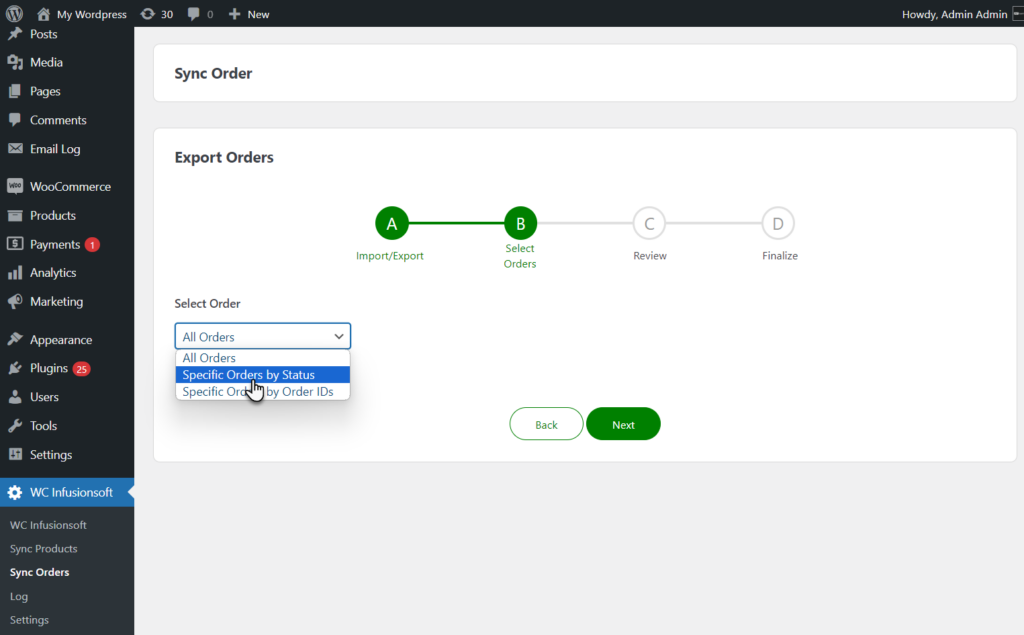
- The next step will be Select Orders.
- In this step the admin has to select if the admin wants to export all orders, orders from specific status or order by specific Order IDs.
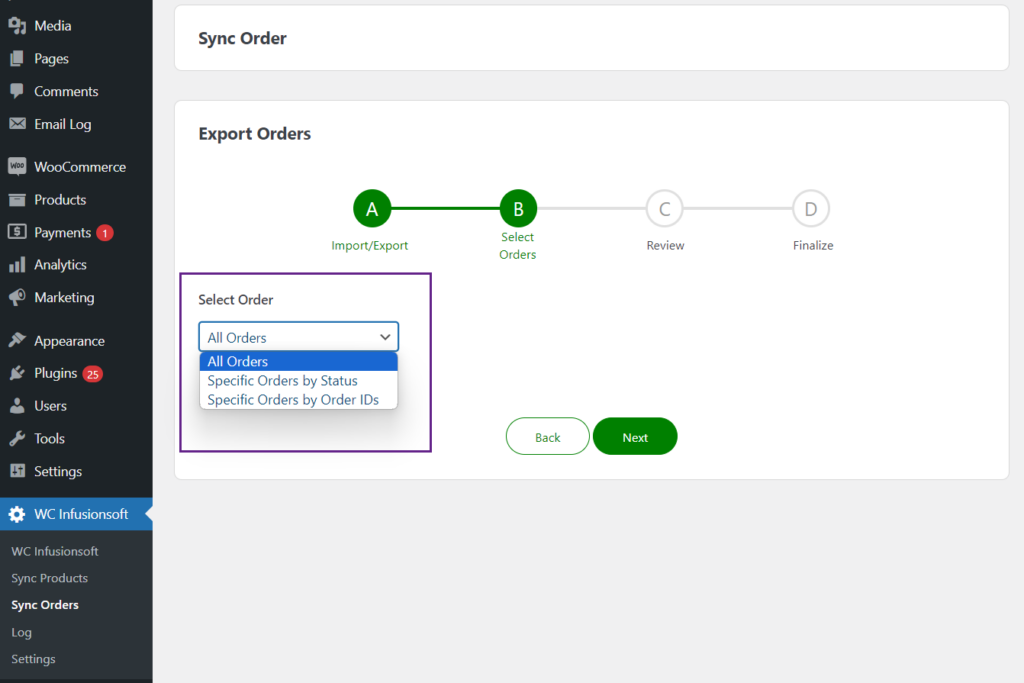
- If the admin selects All Orders, it will export all the WooCommerce orders to the Keap.
- Click Next to move to the next step.
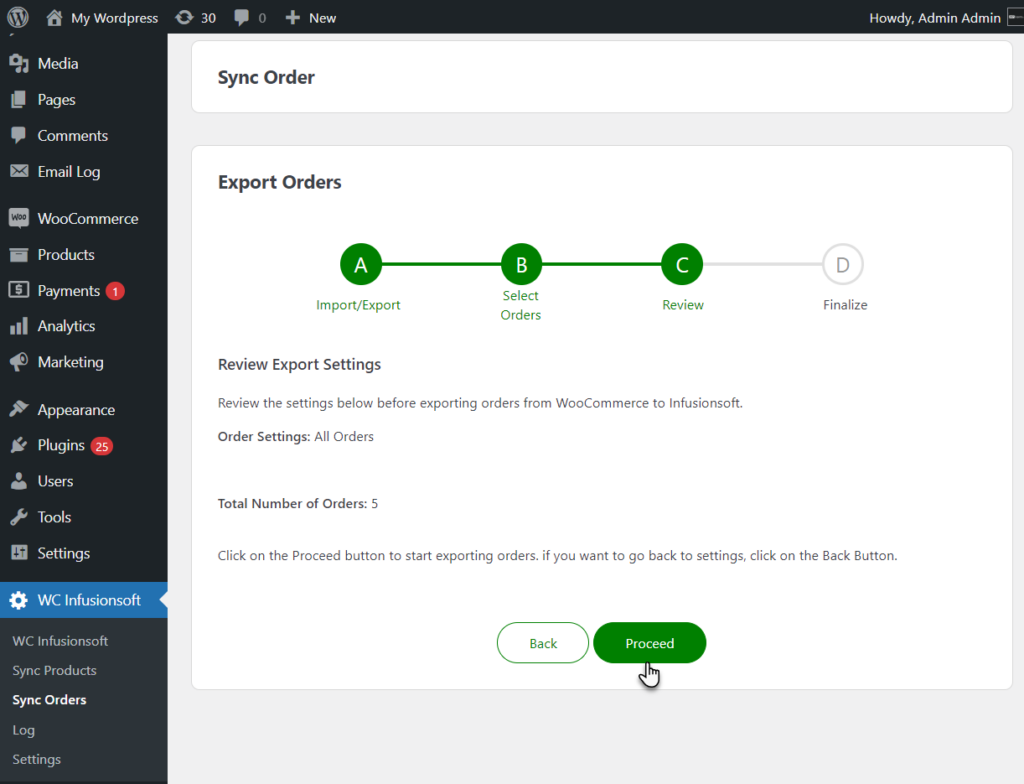
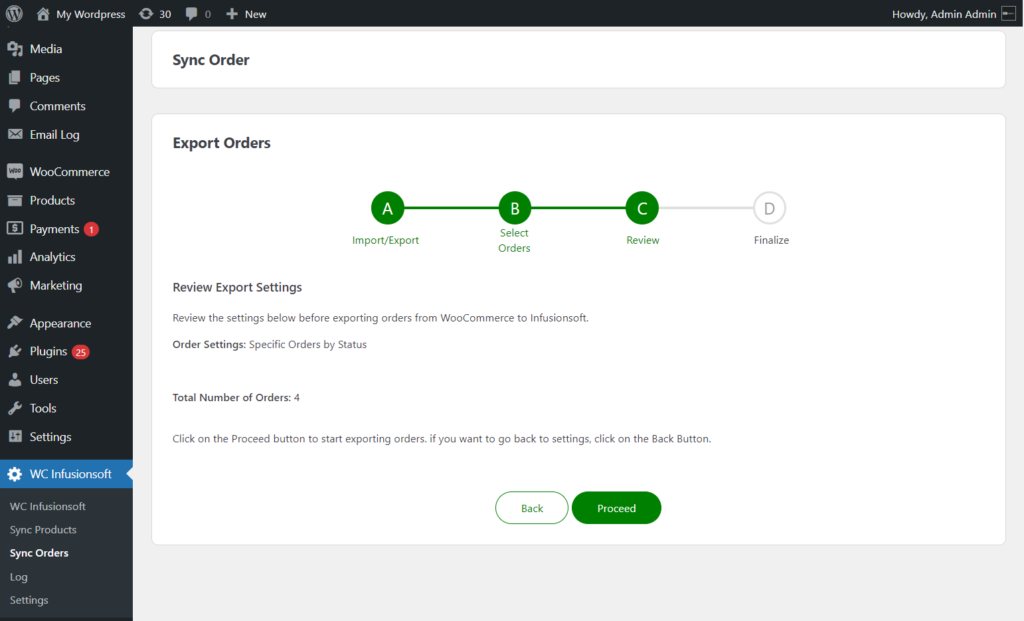
- The next step is Review, in this step the admin will review the Order setting and the number of orders that will be exported to the Keap.
- Click on the Proceed button to proceed and start the export.
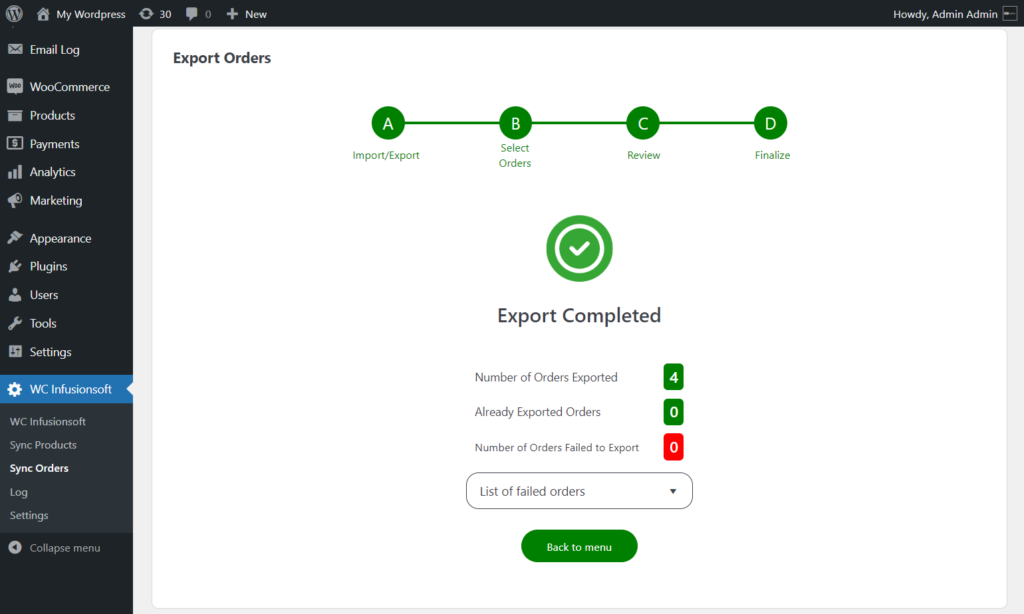
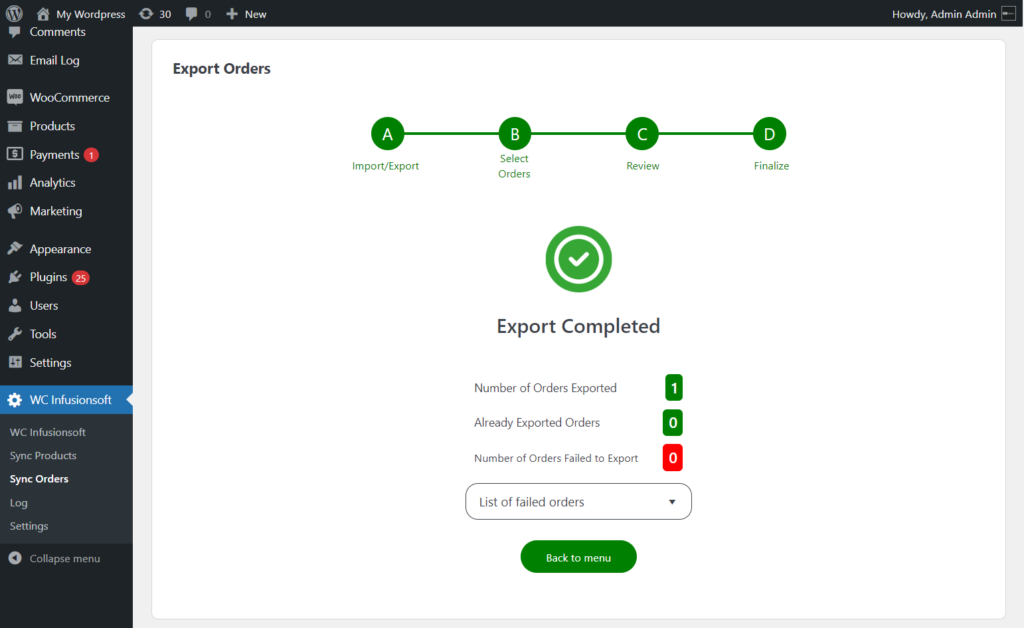
- Once the export is successfully completed, the total number of orders exported will be displayed.
- Click on the Back to menu button to go back to the Import/Export step.
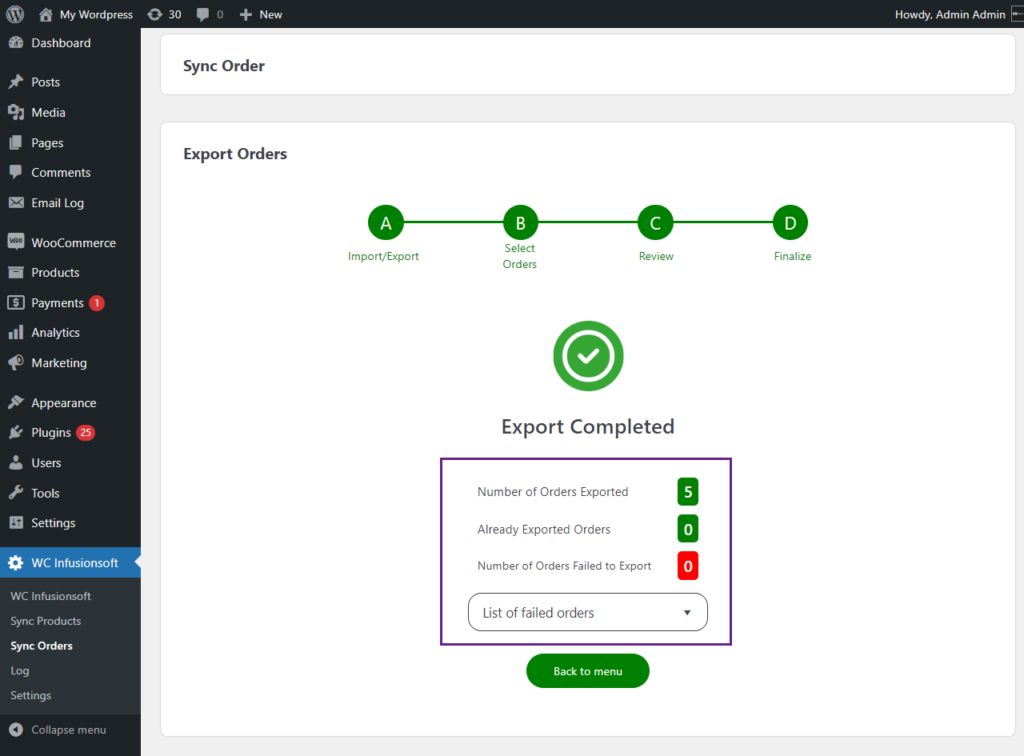
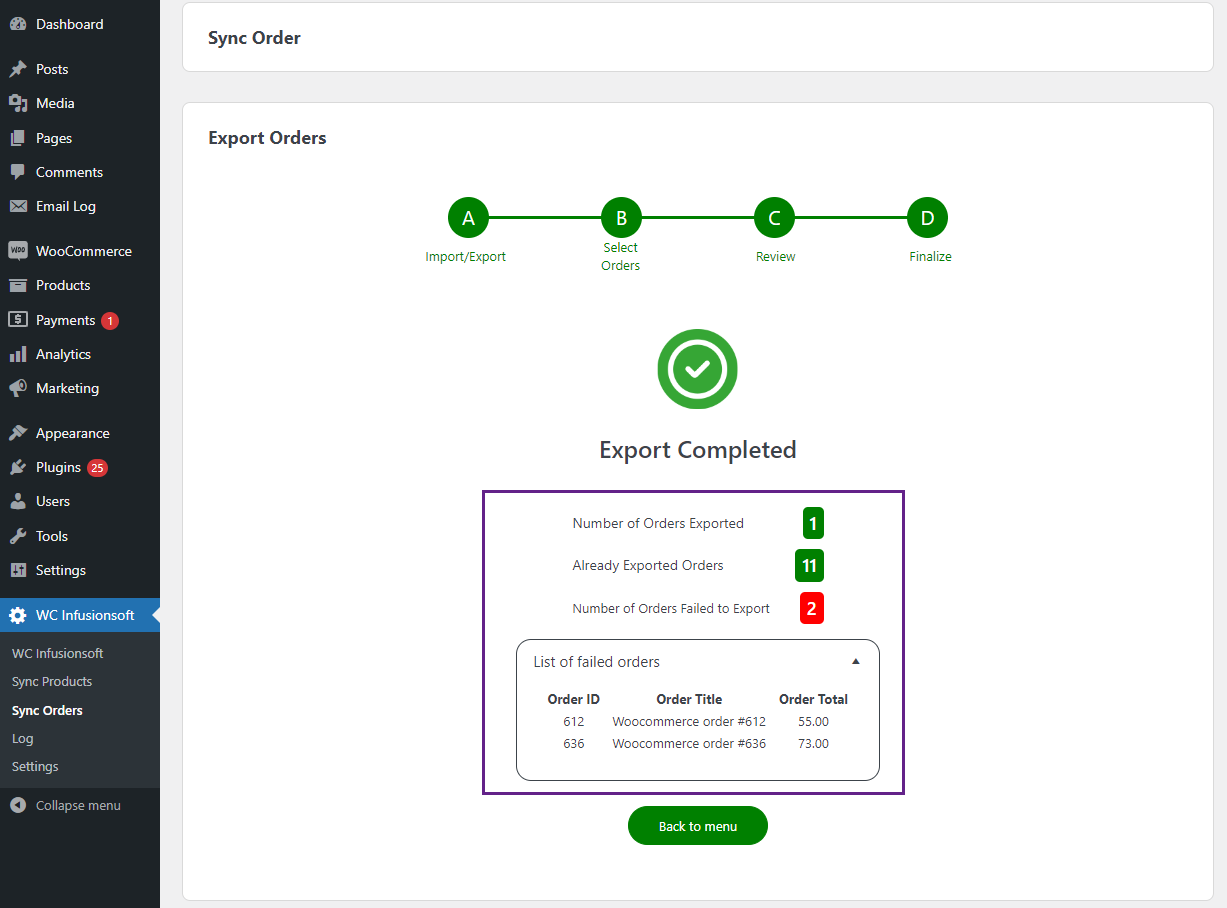
- In case, if the orders failed to export, the total number of orders failed to export will also be displayed.
- The admin can check the failed orders in the List of failed orders section.
- The orders that already existed in the Keap will not be exported and the number of already existed orders will be displayed.
- After the successful export, navigate to the Keap dashboard > E-Commerce > Orders.
- All the exported orders will be displayed.
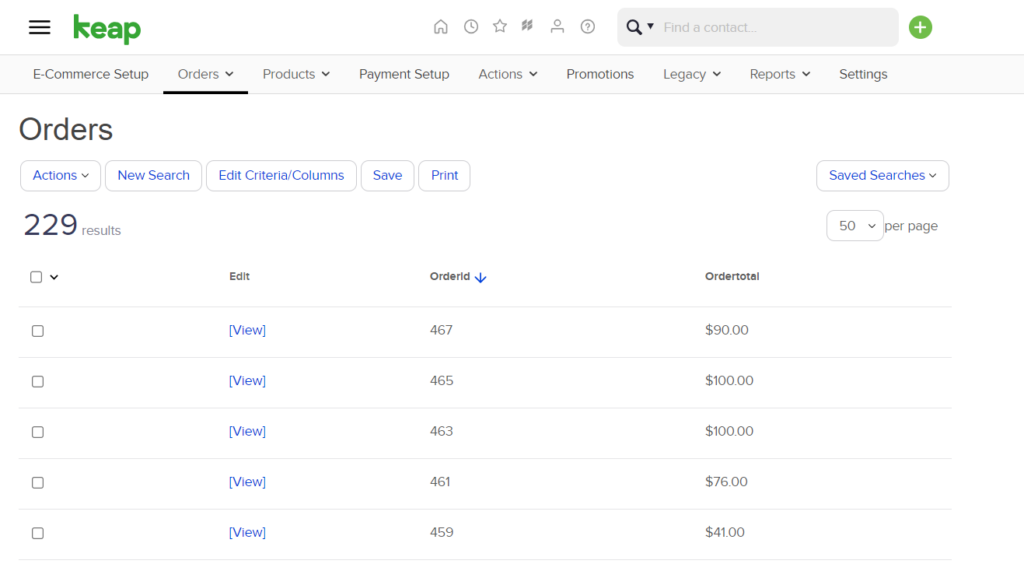
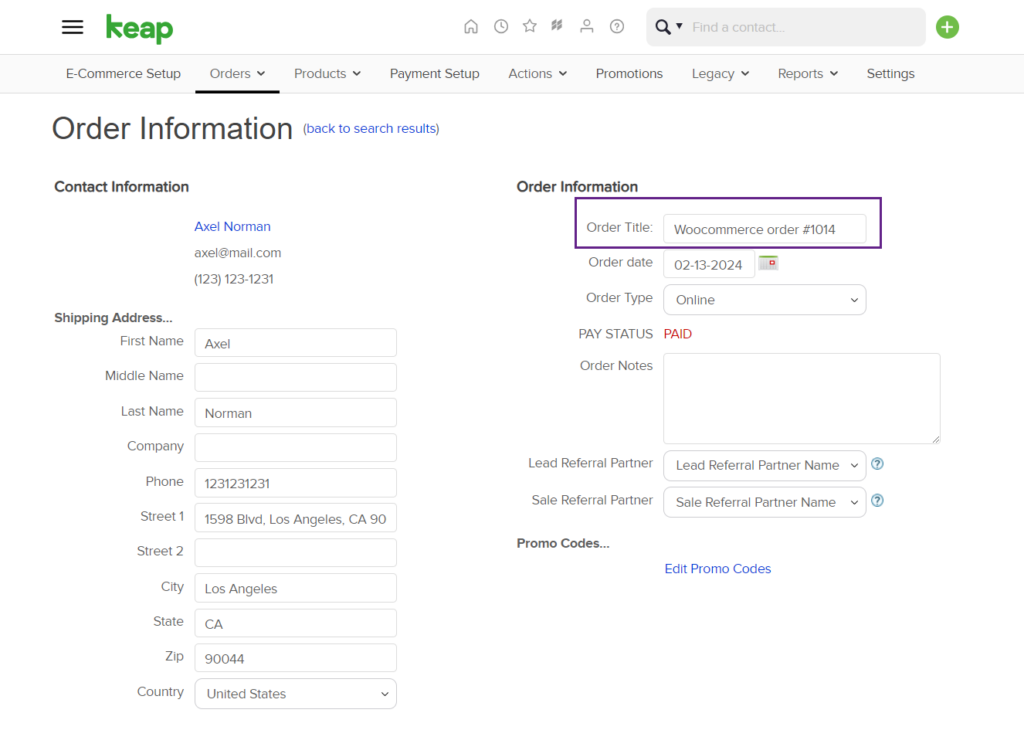
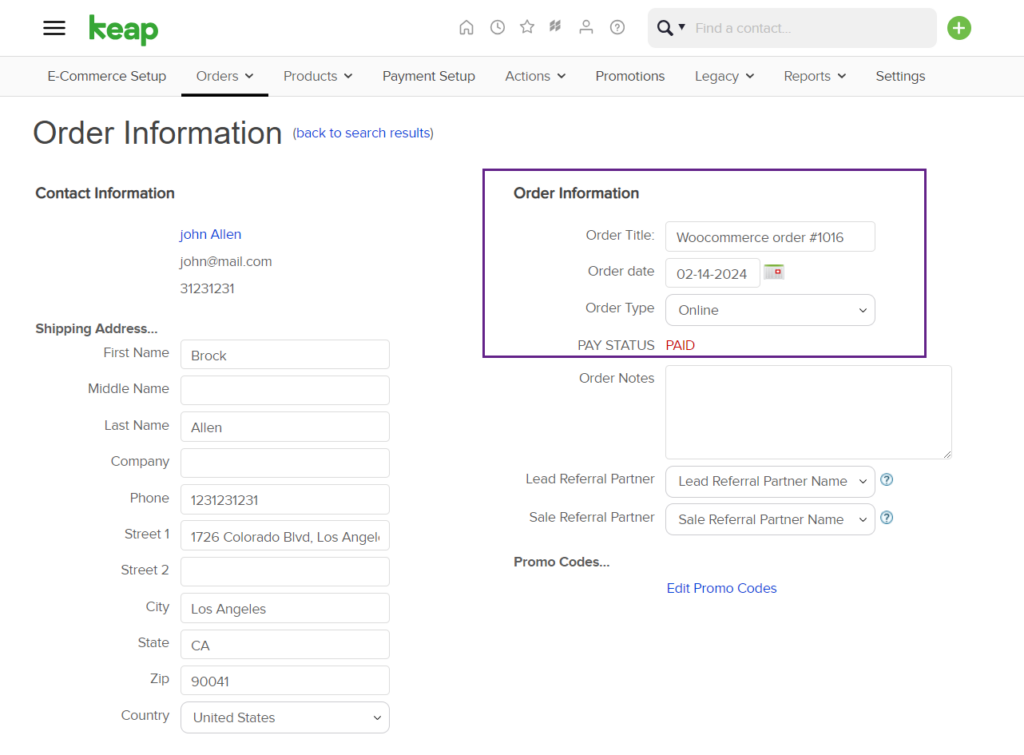
- Click on the order to view details.
- WooCommerce order number will be displayed in Order Title.
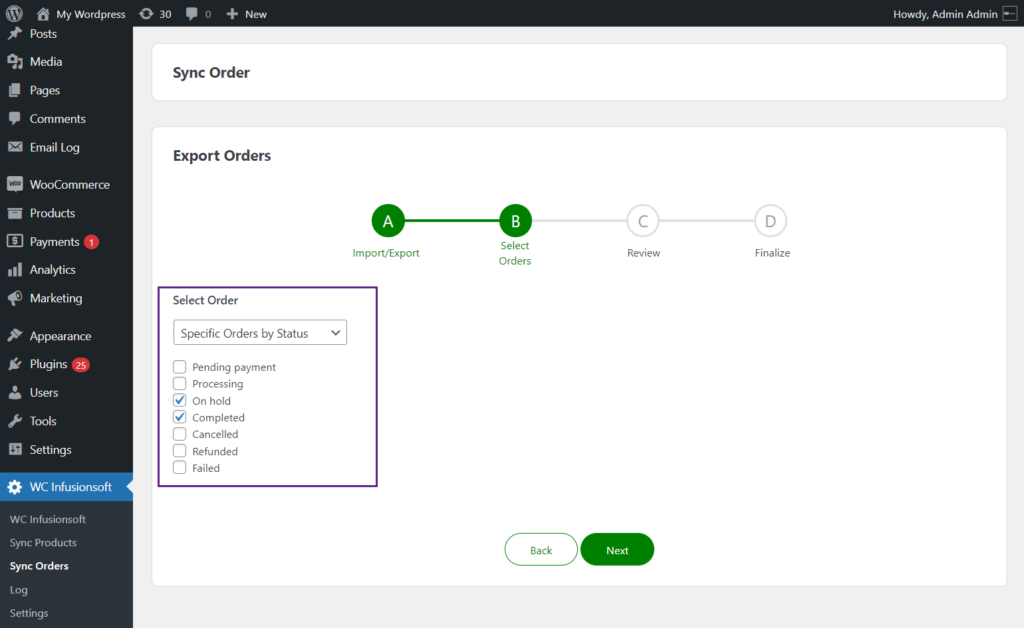
Export Orders By Specific Status
- The admin can export orders by specific status instead of exporting all the orders.
- In the Select Orders step, select Specific Orders By Status.
- All the WooCommerce order statuses will be displayed.
- Select statuses by which the orders will be exported.
- Click Next to move to the next step.
- The next step is Review, in this step the admin will review the Order setting and the number of orders that will be exported to the Keap.
- Click on the Proceed button to proceed and start the export.
- Once the export is successfully completed, the total number of orders exported will be displayed.
- Click on the Back to menu button to go back to the Import/Export step.
- After the successful export, navigate to the Keap dashboard > E-Commerce > Orders.
- All the exported orders will be displayed.
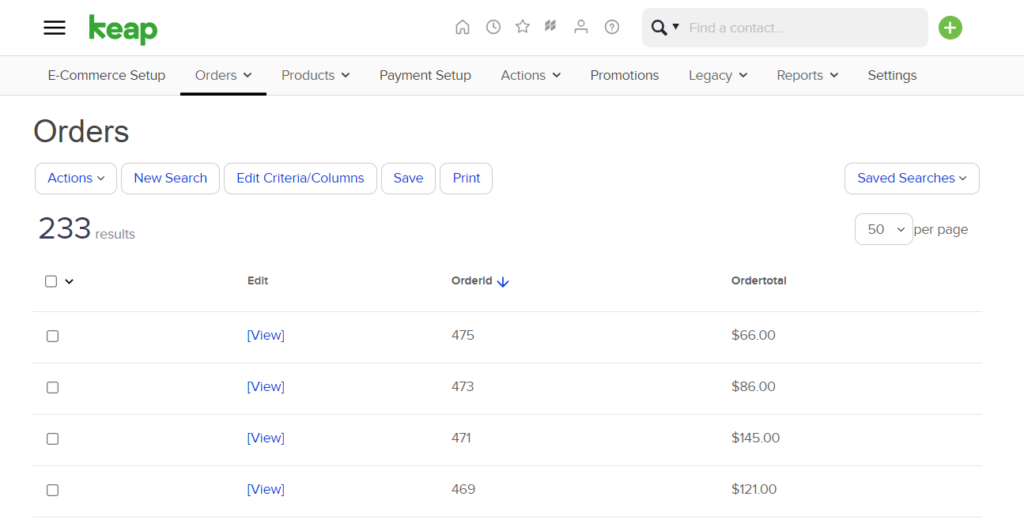
- Click on the order to view details.
- WooCommerce order number will be displayed in Order Title along with Pay Status.
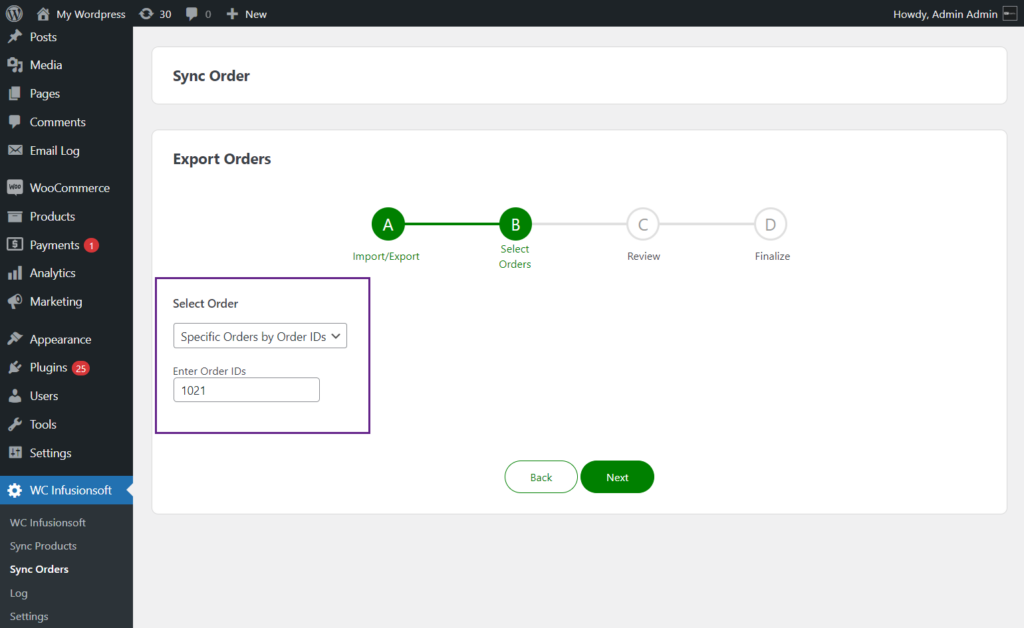
Export Orders By Specific Order IDs
- The admin can export orders by specific order IDs instead of exporting all the orders.
- In the Select Orders step, select Specific Orders By Order IDs.

- After selecting the Specific Orders by Order IDs, an input box Enter Order IDs will appear.
- Insert the ID or range of IDs of orders that the admin wants to export, insert order ID in Enter Order IDs.
- Click Next to move to the next step.
- The next step is Review, in this step the admin will review the Order setting and the number of orders that will be exported to the Keap.
- Click on the Proceed button to proceed and start the export.

- Once the export is successfully completed, the total number of orders exported will be displayed.
- Click on the Back to menu button to go back to the Import/Export step.
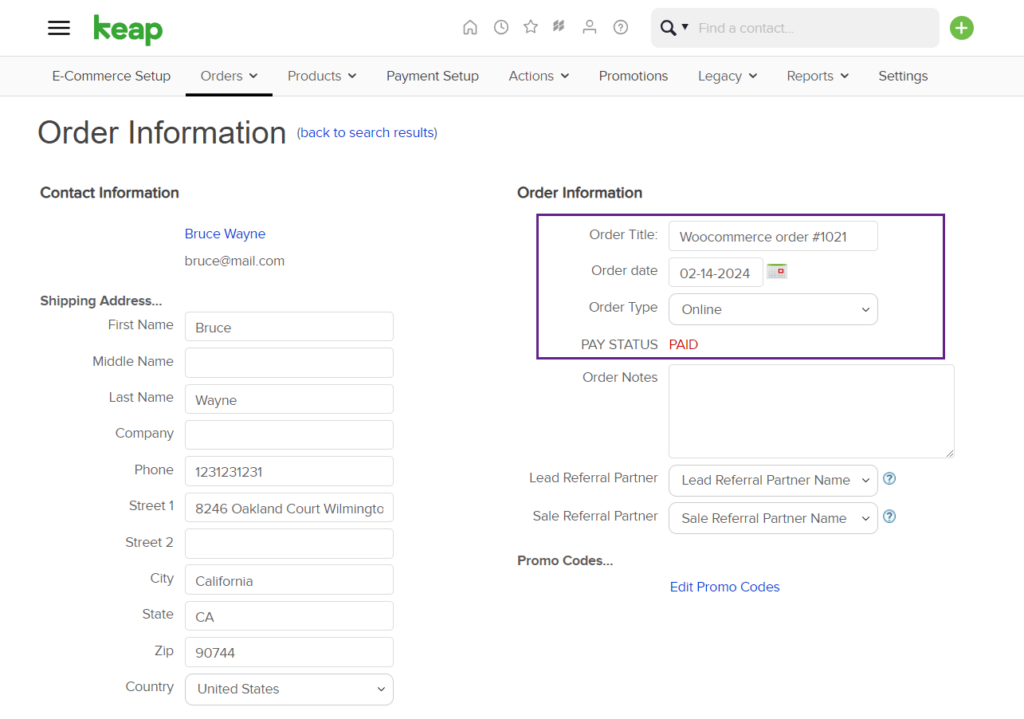
- After the successful export, navigate to the Keap dashboard > E-Commerce > Orders.
- Click on the recently exported order to view details.
- WooCommerce order number will be displayed in Order Title along with Pay Status.
Import Keap Infusionsoft Orders to WooCommerce
↑ Back to top- The admin can import Keap Infusionsoft orders to WooCommerce.
- In Sync Orders, navigate to Import/Export Orders.
- Click on Import Infusionsoft Orders to WooCommerce.
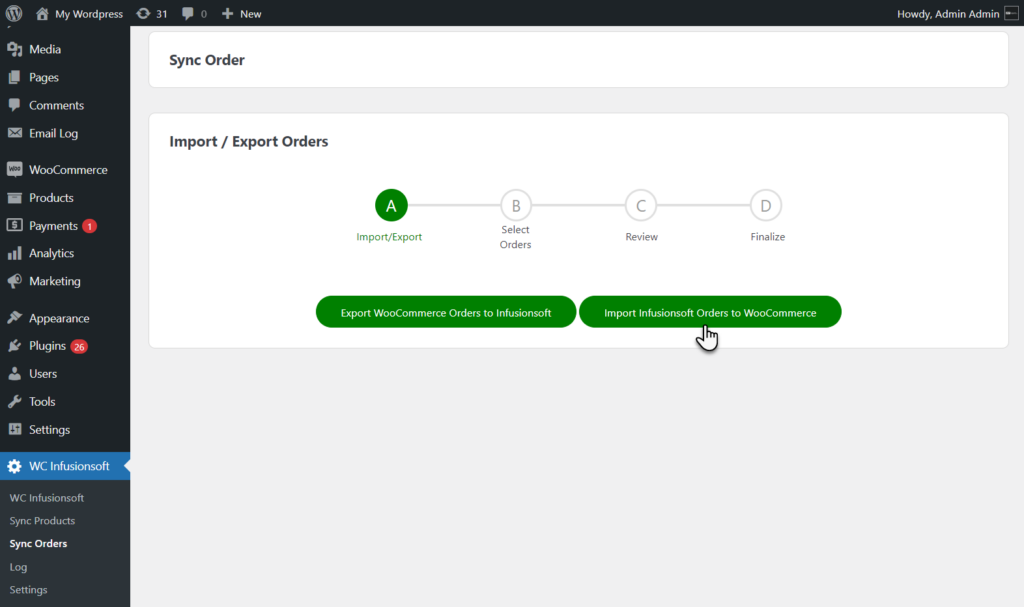
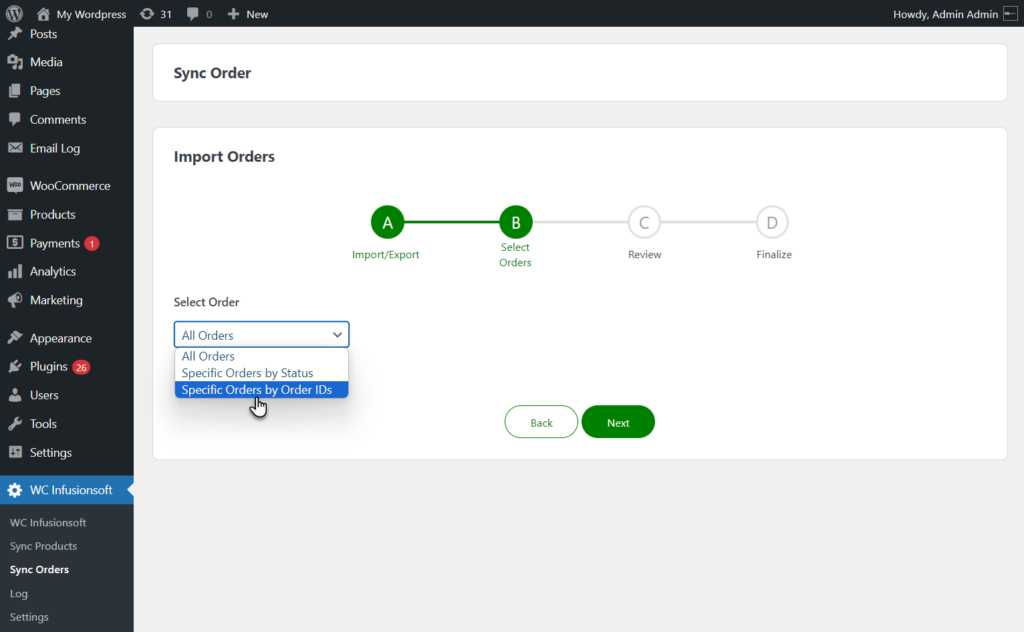
- The next step will be Select Orders.
- In this step the admin has to select if the admin wants to import all orders, orders from specific status or order by specific Order IDs.
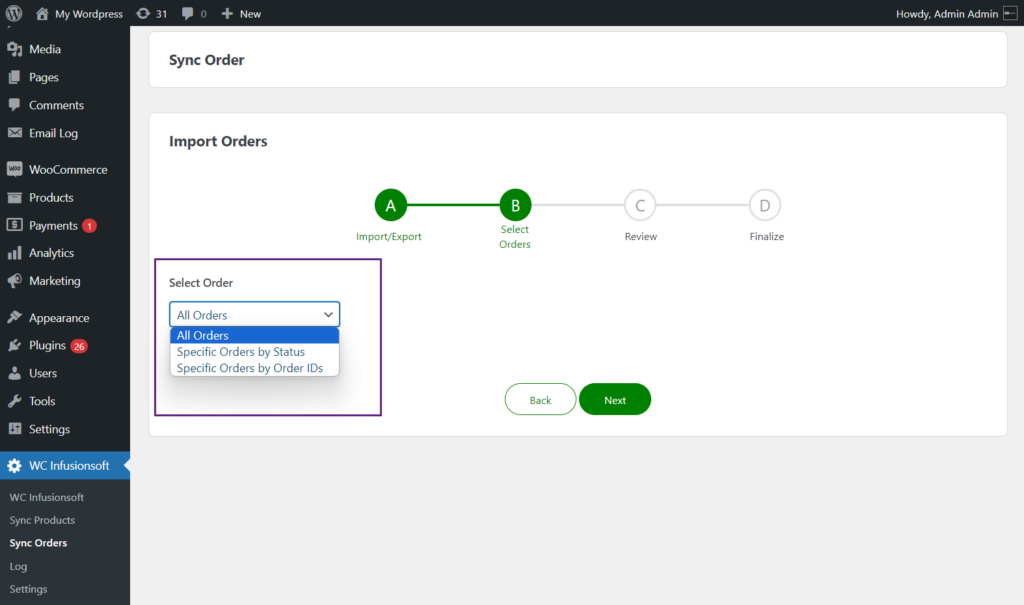
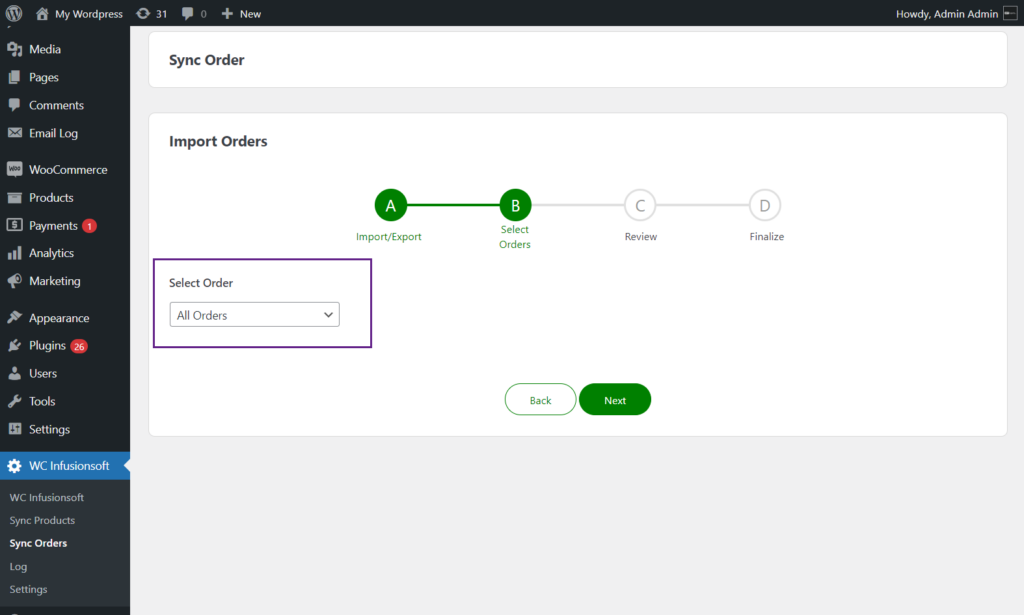
- If the admin selects All Orders, it will import all the Keap orders to WooCommerce.
- Click Next to move to the next step.
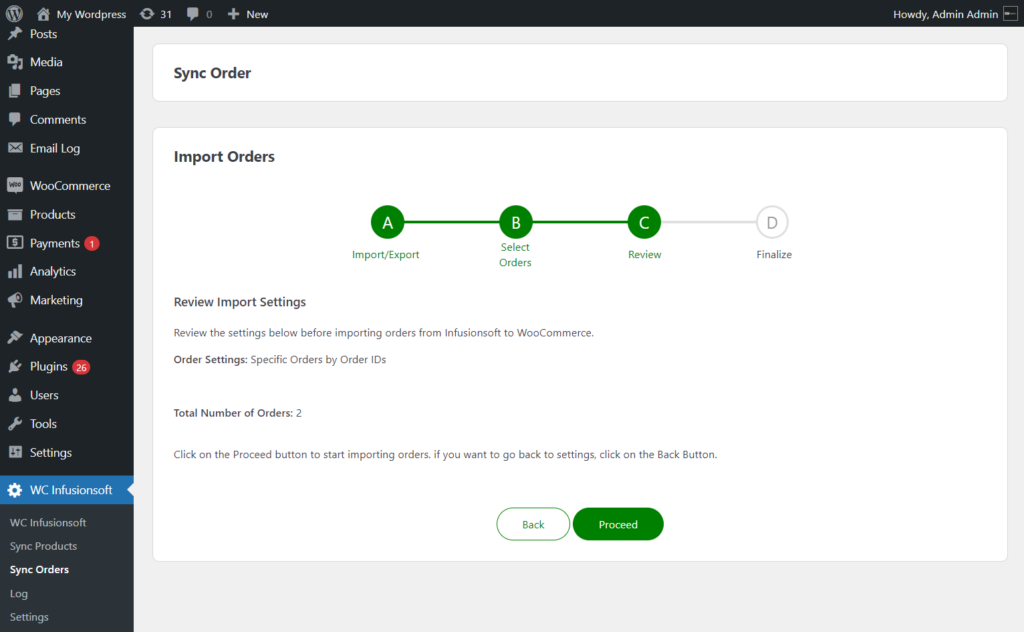
- The next step is Review, in this step the admin will review the Order setting and the number of orders that will be imported to WooCommerce.
- Click on the Proceed button to proceed and start the import.

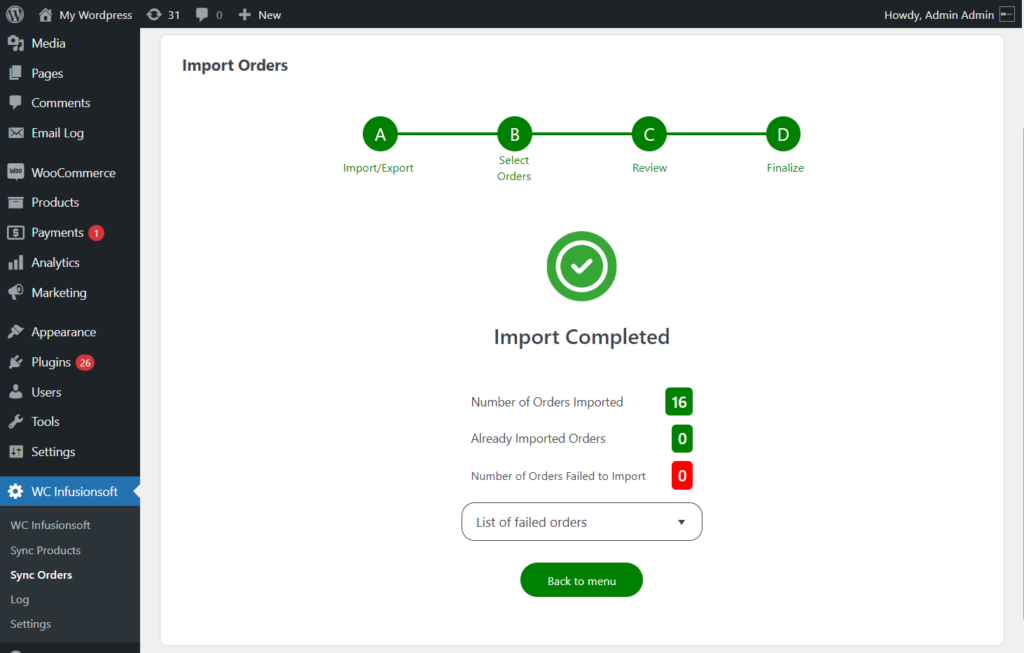
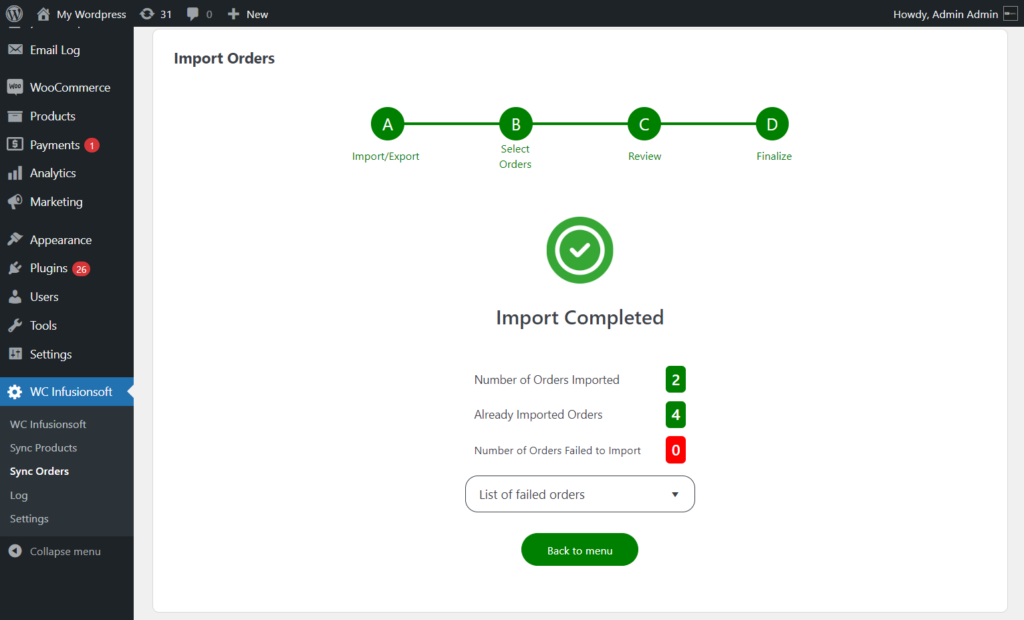
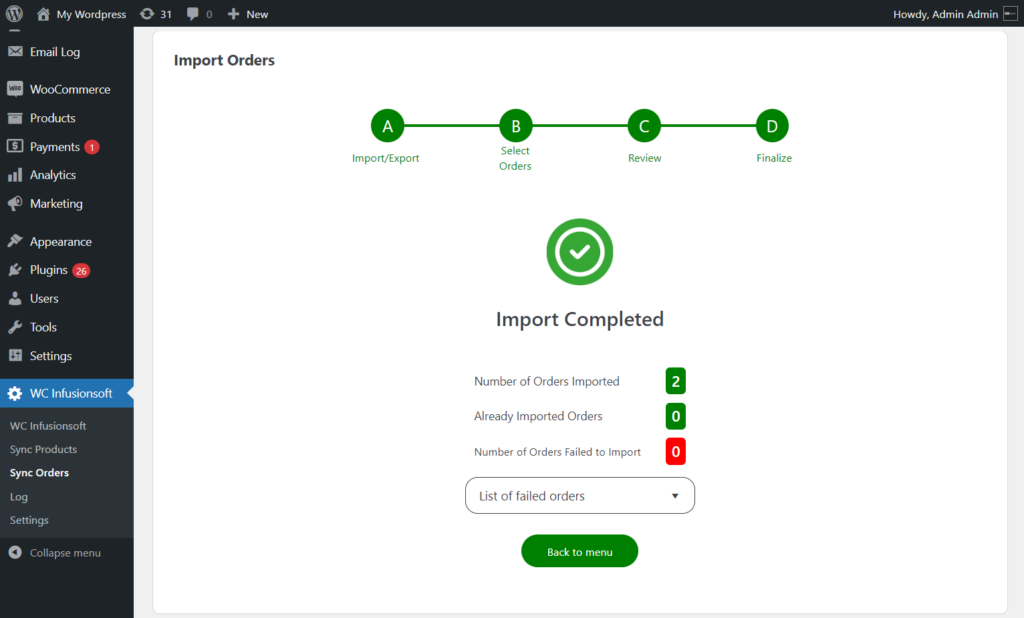
- Once the import is successfully completed, the total number of orders imported will be displayed.
- The total number of orders that already exist will be displayed in Already Imported Orders.
- The number of orders that failed to import will be displayed in the Number of Orders Failed to Import. The admin can view the failed orders.
- Click on the Back to menu button to go back to the Import/Export step.
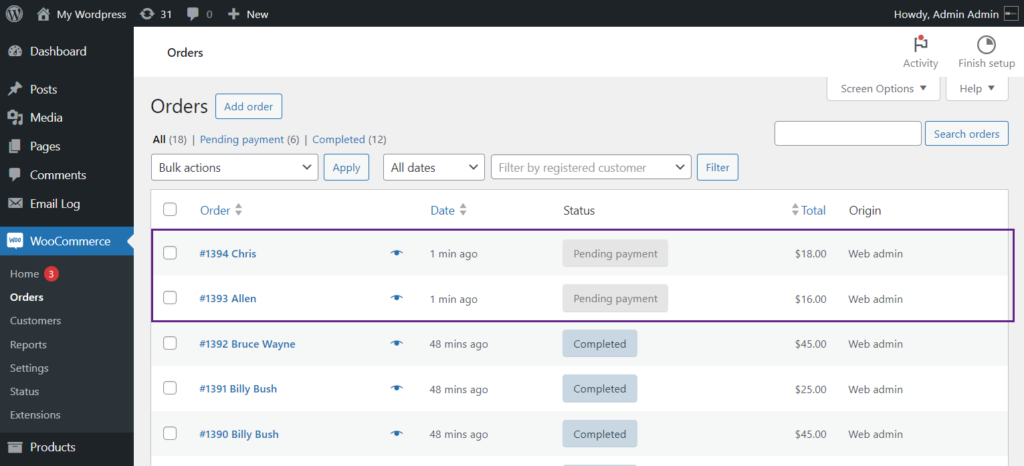
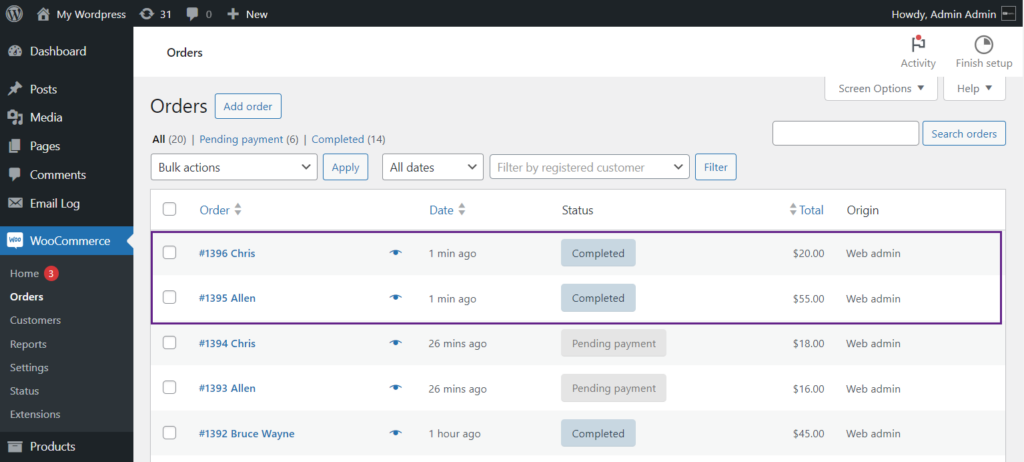
- After the successful import, navigate to the WordPress Admin > WooCommerce > Orders.
- All the imported orders will be displayed.

Import Orders By Specific Status
- The admin can import orders by specific status instead of importing all the orders.
- In the Select Orders step, select Specific Orders By Status.
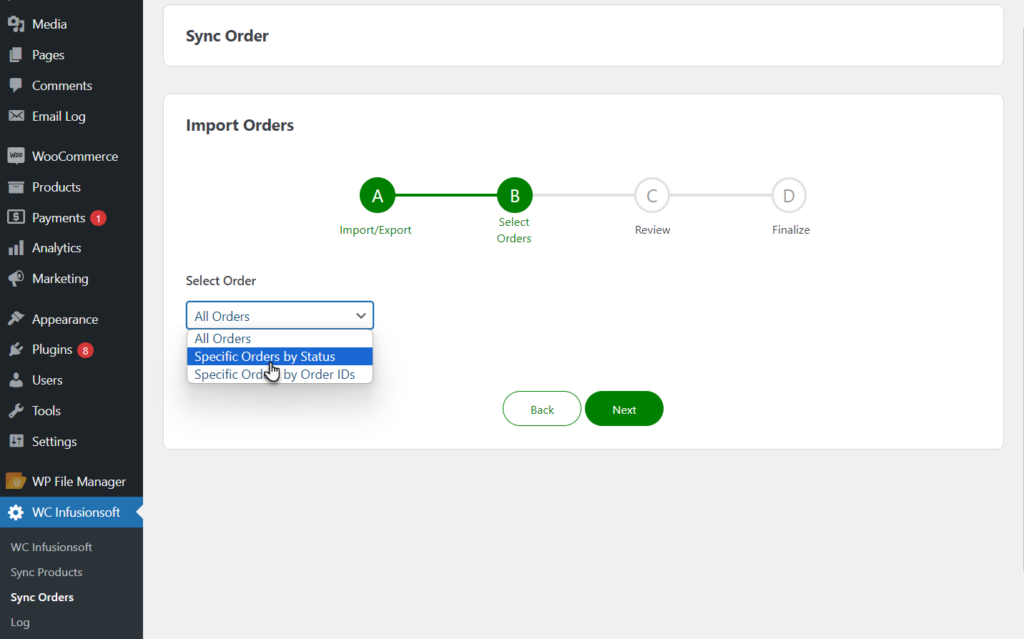
- Paid and Unpaid order statuses of Keap Infusionsoft orders will be displayed.
- Select statuses by which the orders will be imported.
- Click Next to move to the next step.

- The next step is Review, in this step the admin will review the Order setting and the number of orders that will be imported to WooCommerce.
- Click on the Proceed button to proceed and start the import.

- Once the import is successfully completed, the total number of orders imported will be displayed.
- The total number of orders that already exist will be displayed in Already Imported Orders.
- The number of orders that failed to import will be displayed in the Number of Orders Failed to Import. The admin can view the failed orders.
- Click on the Back to menu button to go back to the Import/Export step.
- After the successful import, navigate to the WordPress Admin > WooCommerce > Orders.
- All the imported orders will be displayed.
Import Orders By Specific Order IDs
- The admin can import specific orders by order IDs instead of importing all the orders.
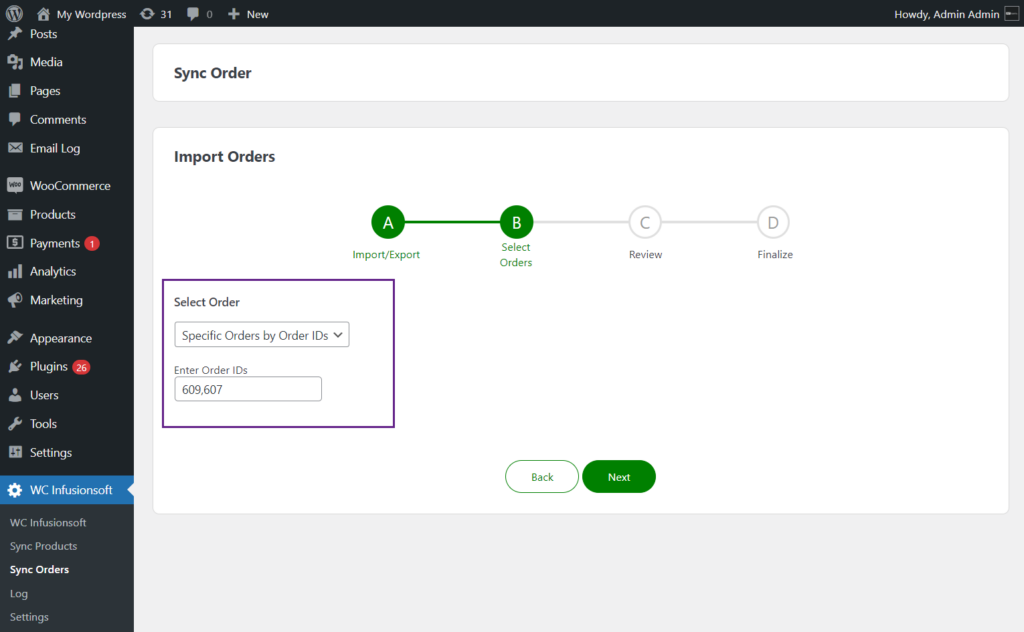
- In the Select Orders step, select Specific Orders By Order IDs.
- After selecting the Specific Orders by Order IDs, an input box Enter Order IDs will appear.
- Insert the ID or range of IDs of orders that the admin wants to import, insert order ID in Enter Order IDs.
- Click Next to move to the next step.
- The next step is Review, in this step the admin will review the Order setting and the number of orders that will be imported to WooCommerce.
- Click on the Proceed button to proceed and start the import.
- Once the import is successfully completed, the total number of orders imported will be displayed.
- Click on the Back to menu button to go back to the Import/Export step.
- After the successful import, navigate to the WordPress Admin > WooCommerce > Orders.
- All the imported orders will be displayed.
Logs
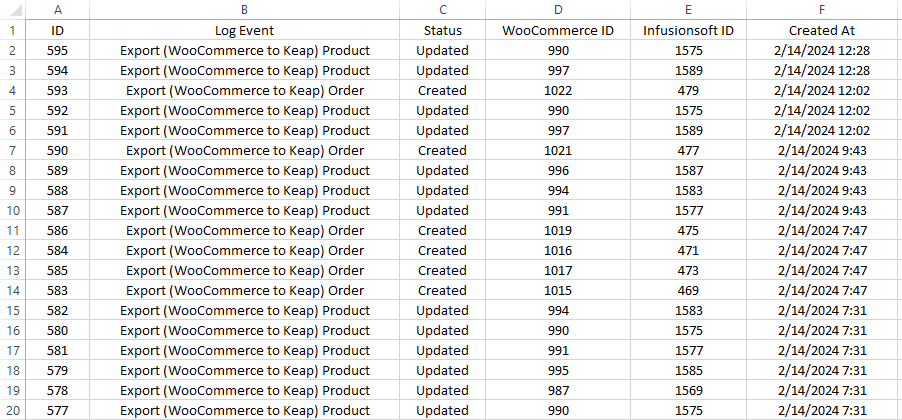
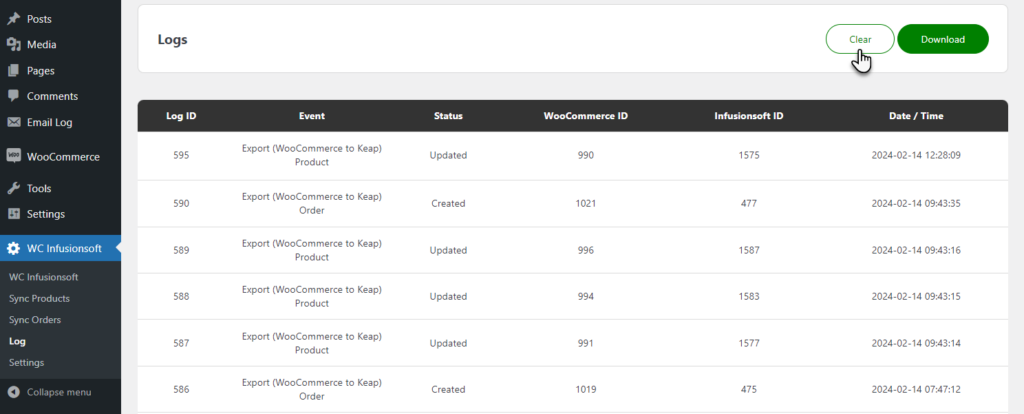
↑ Back to top- All the logs of Import/Export of Orders and Products will be saved in Logs.
- The Logs section contains the Log ID, Event that has recorded, the Status of the event, WooCommerce ID and Keap Infusionsoft ID of orders and products.
- Navigate to the WordPress Admin > WC Infusionsoft > Logs.
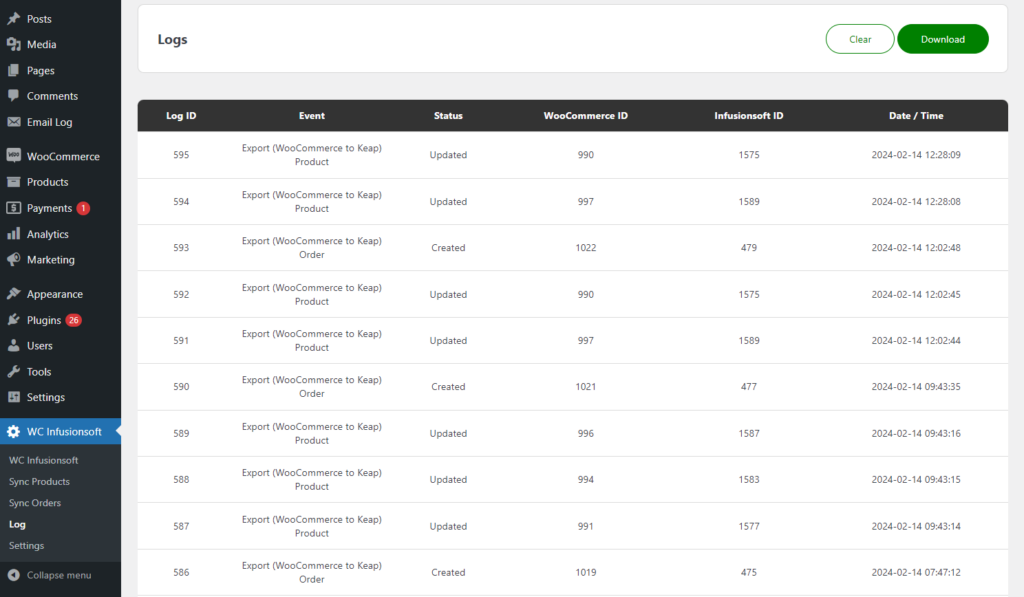
- The admin can clear all logs, click on the Clear button.
Download Logs
- The admin can download the logs.
- In order to download the logs, click on the Download button.
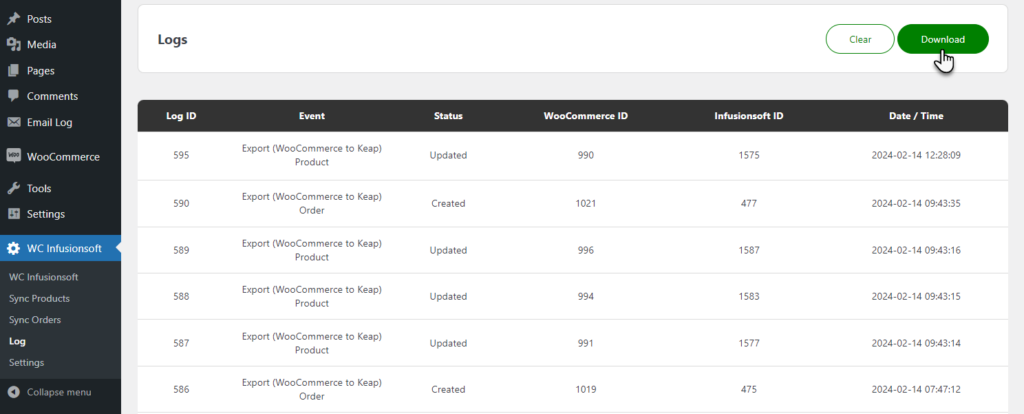
- The log.csv file will be downloaded containing all the logs.