Name of your extension/add-on allows your WooCommerce store to ____________ .
Installation
↑ Back to topThe simplest way to start using a product from WooCommerce.com is to use the “Add to store” functionality on the order confirmation page or the My subscriptions section in your account.
- Navigate to My subscriptions.
- Find the Add to store button next to the product you’re planning to install.
- Follow the instructions on the screen, and the product will be automatically added to your store.
Alternative options and more information at:
Managing WooCommerce.com subscriptions.

Add-On Image Mapper for WooCommerce allows you to dynamically switch the main product image based on customer selections in WooCommerce Product Add-Ons.
Perfect for:
- Clothing stores (color, size previews)
- Custom furniture (fabric, finish)
- Print-on-demand setups
- Any product where visual options improve buying confidence
Installation
↑ Back to top- Download the plugin ZIP or clone it from GitHub.
- Upload the folder to
/wp-content/plugins/. - Activate the plugin in Plugins > Installed Plugins.
- Ensure the following plugins are also active:
- WooCommerce
- WooCommerce Product Add-Ons (official)
Setup and Configuration
↑ Back to topGetting started
↑ Back to topStep 1: Enable the Plugin
How to Set Up Add-On Image Mapping
↑ Back to topStep 1: Create Product Add-Ons
↑ Back to top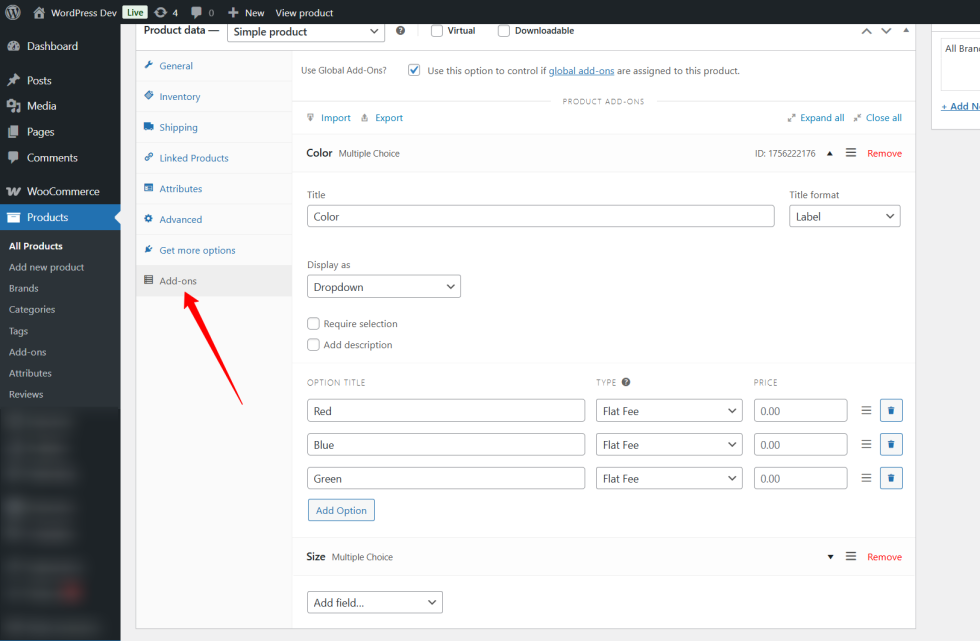
Before you map images to add-on options, you first need to create product add-ons using the WooCommerce Product Add-Ons plugin.
- Go to the Product Edit screen for the product you want to configure.
- In the Product Add-Ons section, create options such as Color, Size, Material, etc.
- Add the individual option values (e.g., Red, Blue for Color; Small, Large for Size).
- Save or update the product.
Step 2: Configure Add-On Image Mapper
↑ Back to top
After the add-ons are created and saved:
- Scroll up to the Add-On Image Mapper for WooCommerce meta box (as shown in the screenshot).
- You will see rows representing combinations of add-on values (e.g., Red + Large, Blue + Small).
- For each combination, select the corresponding image that visually represents the option selection.
- Click “Select Image” to choose or upload an image from the media library.
- To add more combinations, click “+ Add New Row”.
- For each row, you can add multiple product options by clicking “+ Add Product Option”.
- Remove any row or option by clicking the “×” icon.
- Once finished, click Update or Publish the product.
Front-End Overview of Add-On Image Mapper for WooCommerce
↑ Back to topWhen a customer visits your WooCommerce product page, the Add-On Image Mapper enhances their shopping experience by dynamically updating the main product image based on the options they select from the WooCommerce Product Add-Ons.
Key Front-End Features:
↑ Back to topMobile-Friendly and Responsive:
Works perfectly on all devices, whether desktop, tablet, or mobile, ensuring consistent visual feedback.
Real-time Image Switching:
As customers select product options (e.g., color, size, material), the main product image updates immediately to reflect their choice, providing an accurate visual preview.
Supports Multiple Add-On Combinations:
Images can be mapped to single options or combinations of options, ensuring customers see the exact product variant they are customizing.
Seamless User Experience:
The image update happens smoothly without page reloads, maintaining the natural flow of product browsing and selection.
How it Works on the Front-End
↑ Back to top- Initial Product Image:
When the product page loads, the default product image is shown. - Option Selection:
Customers choose from the available add-on options, such as color or size, through dropdowns, radio buttons, or other add-on fields. - Image Mapping Triggered:
Once an option or combination of options is selected, the plugin looks for a mapped image associated with that choice. - Main Image Update:
The main product image changes instantly to the mapped image for that option, giving the customer a live preview. - Cart Integration:
The selected image ID is saved with the cart item, so the customized product’s image remains consistent through checkout and order confirmation.
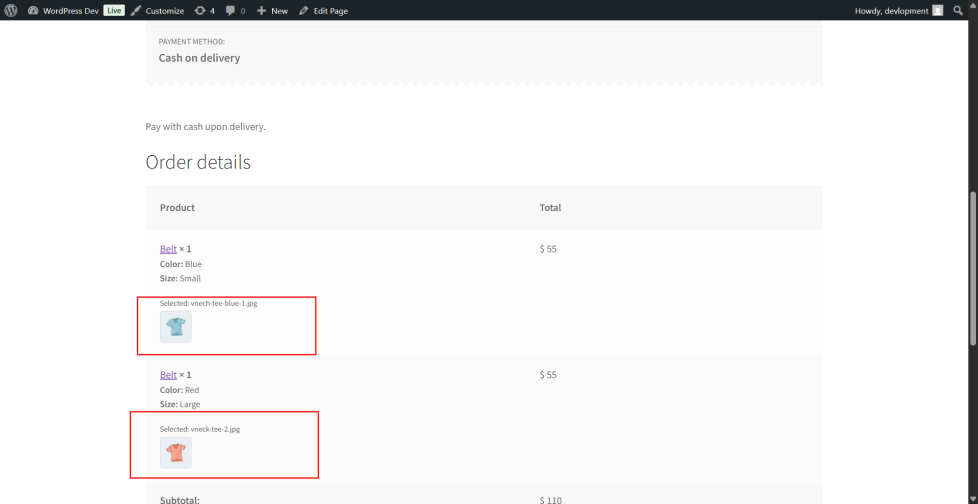
Displaying Selected Images on the Thank You and Order Pages
↑ Back to topYour customers will not only see dynamic product images on the product page but also throughout the entire shopping experience, including the Thank You (Order Confirmation) page and the Order Details page in their account. This reinforces their purchase decision and reduces confusion.
Backend Order View
↑ Back to top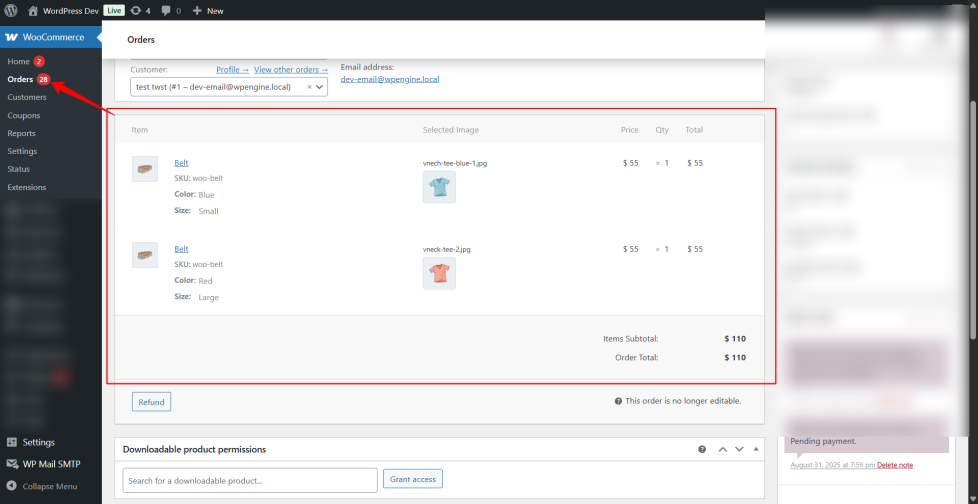
Usage
↑ Back to topBenefits to Your Customers
↑ Back to top- Clearer Visualization: Customers see exactly what they will receive based on their choices.
- Reduced Returns: Less confusion or miscommunication about product variations.
- Increased Engagement: Interactive, dynamic pages encourage more confident buying decisions.
- Professional Presentation: Enhances your store’s image with modern, user-friendly product pages
Troubleshooting
↑ Back to topIf you encounter any issues or need further assistance with the Add-On Image Mapper for WooCommerce plugin, please don’t hesitate to reach out to our support team at infotechminer@gmail.com. We’re here to help!
FAQs
↑ Back to topHelp customers by answering commonly asked questions.