Allow customers upload files on product, category, cart, and checkout pages, and upload or modify files on the Thank You and My Account pages.
Setup and Installation
↑ Back to topInstallation:
↑ Back to topAt the WooCommerce admin panel go to WooCommerce > Settings > File Uploader for configuration. Here you have three tabs which are:
- Download the WooCommerce Upload File plugin and go to your .zip file
- At the WordPress admin panel, Go to the Plugins section, and click ‘Add New’ to upload and install the plugin you just downloaded from WooCommerce.
- Upload the .zip file to proceed with the installation.
- Wait until the plugin installs. After successful installation, activate the plugin and move on to configuration settings.
Configuration:
↑ Back to top- Add Rule
- Manage Rule
- Recaptcha Settings
Add Rule:
↑ Back to top- Enable / Disable: Select the option to enable/ disable the rule
- Rule Name: Set the name of the rule
- Display on: Select the options on which pages you want to display the WooCommerce upload file
- Product Page
- Cart Page
- Checkout Page > After Notes
- Thank you Page
- Account Page
- Cart Page (Alongside Cart Items)
- Checkout Page (Alongside Cart Items)
- After Order Completion (Thank You/Account Page)

- Main upload rules: You can configure the file upload WooCommerce rule and button.
- Label: Set the custom button that you want to display on the front end
- Allowed Extension: Set the allowed file types by inserting the extension name
- Price: Set the price for the uploaded file
- Discount type: Enable a discount for each file upload. You can set a fixed or a percentage discount.
- Discount Price: Enter the desired discount amount.
- Description: Set a custom description that will be shown in the WooCommerce upload file pop-up.
- Upload File Button Text: Customize the upload file button text.
- Maximum Upload Size: Set the maximum upload size of the file. You can set in MBs and KBs.
- Customer Notes: Checkbox to enable customer notes
- Required: Click the checkbox to make the customer’s note mandatory
- Allow Upload Modification: Click on the checkbox to allow customers modify the uploaded file.
- Price per File Upload: Select to charge customers for each file they upload.
- Apply file fee to item subtotal: Check box to charge customers one time on multiple file uploads regardless of product quantities.
- Customer Notes Labels: Set custom notes label
- Maximum File Upload: Enter the maximum number of files allowed to be uploaded by customers.
- Background Color: Personalize the background color of the button.
- Text Color: Set the custom text color of the button
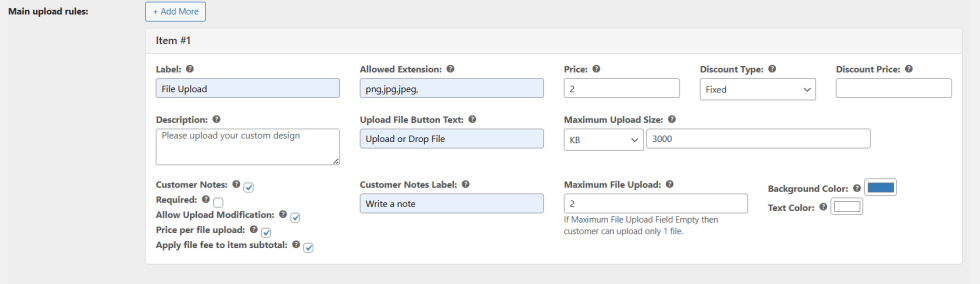
Click on the Add More button to create a new file upload button in the same rule and configure it likewise.
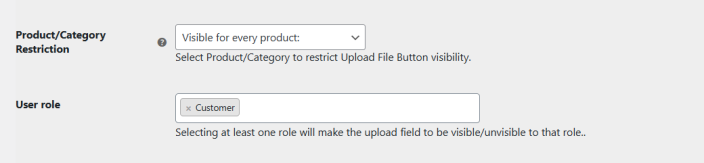
- Product/Category Restriction: Display the upload file button on specific products or categories. Upon selecting the preferred option, select the product or categories from multiselect box.
- User Role: Display the upload file button for specific user roles.
Manage Rule:
↑ Back to topAll rules of customer upload files for WoCommerce are listed within the Manage Rule tab. The admin can modify and apply pre-set rules at any time from this section.
Recaptcha Settings:
↑ Back to top- Enable/Disable Recaptcha: Enable disable recaptcha on file upload WooCommerce.
- Recaptcha Site Key: Enter recaptcha site key.
- Recaptcha Secret Key: Enter Recaptcha Secret Key.
File Uploader ShortCode:
↑ Back to topYou will find the shortcode for the file upload button form in the notice, i.e [extendons_upload_button]. Simply place the code anywhere on your page. It primarily works with page builders.
Additional Settings:
↑ Back to top- Upload Folder Path: Set the custom folder path for the customer’s uploaded file.
- Enable Google Drive Uploads: Check box to enable customer file upload in Google Drive.
- Google Drive OAuth Credentials JSON: Upload the Google Drive OAuth credentials JSON file to connect drive.
- Google Drive Folder Name: Enter the name of the Google Drive folder on which you want customer uploaded files to be saved.
How to Connect Google Drive to Your Store via File Uploader for WooCommerce?
↑ Back to topThis explains how to configure Google Cloud Console for Google Drive integration, upload the credentials to the plugin, and perform the OAuth authorization flow.
Prerequisites
- A Google account with access to Google Cloud Console.
- Administrative access to your WordPress site (to install/upload credentials and perform authorization in plugin settings).
- The WooCommerce file Upload plugin is installed and active.
1. Create a Google Cloud Project
- Go to https://console.cloud.google.com/ and sign in.
- From the project drop-down (top-left), click “New Project”.
- Enter a project name (e.g., “AFU Google Drive”) and click “Create”.
- Wait until the project is created and selected.
2. Enable the Google Drive API
- From the left menu go to “APIs & Services” → “Library”.
- Search for “Google Drive API” and open it.
- Click “Enable”.
3. Configure the OAuth Consent Screen
- In the Cloud Console, go to APIs & Services → OAuth consent screen.
- Choose “External” (public) or “Internal” depending on your organization, and click “Create”.
- Fill in the App name, Support email, and Developer contact email.
- Under “Scopes” you can add the Drive scopes your plugin requires. Typical recommended scopes:
- https://www.googleapis.com/auth/drive.file (per-file access created/opened by the app)
- https://www.googleapis.com/auth/drive.metadata.readonly (optional, for metadata)
- Avoid requesting a full drive scope unless absolutely required.
- Save and continue. You do not need to publish the app for testing with your own Google account if using internal or test users (for External apps, add test users under the OAuth screen if not publishing).
4. Create OAuth 2.0 Credentials
- Go to “APIs & Services” → “Credentials”.
- Click “Create Credentials” → “OAuth client ID”.
- Select “Web application” (or the type recommended by the plugin) as Application type.
- In “Authorized redirect URLs,” add the callback/redirect URL that the plugin shows in its Google Drive settings. Important:
- Open the Upload file for WooCommerce plugin settings page → Google Drive section and copy the Redirect/Callback URL shown there.
- Paste that exact URL into the Authorized redirect URLs list in Cloud Console.
- If the plugin does not show a URL, common examples are:
- Always prefer the exact URL displayed by the plugin; otherwise, OAuth will fail with a redirect mismatch.
- Click “Create”.
- After creation, click the download icon next to the client to download the JSON credentials (client_secret_*.json). Keep this file safe.
5. Upload / Enter Credentials in the Plugin
- In WordPress, go to the File upload WooCommerce settings → Google Drive configuration.
- The plugin provides a file upload field to upload the downloaded JSON credentials.
- Upload the JSON and save settings.
6. Perform Authorization (OAuth Flow)
- After saving credentials, click the plugin button that says “Connect Google Drive” or “Authorize Google Drive”.
- A Google consent screen will open. Choose the Google account to use and click “Allow”.
- After granting permission, you should be redirected back to your site, and the plugin should show a success message or connected status.
- If the plugin shows an error about redirect URL, re-check the Authorized redirect URLs in the Cloud Console and ensure they exactly match the plugin’s callback URL (including trailing slash, query params, and http/https).
7. Token Storage & Refresh
- The plugin will store the access token and refresh token (if requested) in its settings or in the database. Refresh tokens allow the plugin to renew access without repeated user intervention.
- If you lose authorization or tokens expire, re-run the authorization step.
8. Testing Uploads
- Use the front-end upload form or the plugin’s test upload feature to send a file to Google Drive.
- Check the configured Google Drive account to confirm the file arrived in the expected folder (or the app’s folder if using appDataFolder).
9. Troubleshooting
- redirect_uri_mismatch: Verify the exact redirect URL in Cloud Console matches the plugin-provided callback.
- Consent screen errors: Ensure the OAuth consent screen is configured and, if required, you have added test users or published the app.
- Insufficient permissions on Drive: Confirm the scopes requested match the plugin’s requirements.
- 403 or permission denied: Check that the target Drive account has enough storage and is not restricted by organization policies.
10. Revoke Access
- To revoke plugin access to the Google account, go to https://myaccount.google.com/ permissions, find your app, and remove access.
- After revoking, re-authorize from the plugin if needed.