Installation
↑ Back to top- Download the .zip file from your WooCommerce account.
- Go to: WordPress Admin > Plugins > Add New and Upload Plugin. Select Choose File for the file you have downloaded.
- Click Install Now and Activate Plugin.
More information is available at Install and Activate Plugins/Extensions.
Setup and Configuration
↑ Back to topAfter activation of the Pay What You Want – Name Your Price extension, navigate to the extension settings menu under WP Admin > WooCommerce > Settings > Pay What You Want. You can enable extension feature from product edit sheet or using global rules under WooCommerce > Pay What You Want.
Global Rule for Pay What You Want:
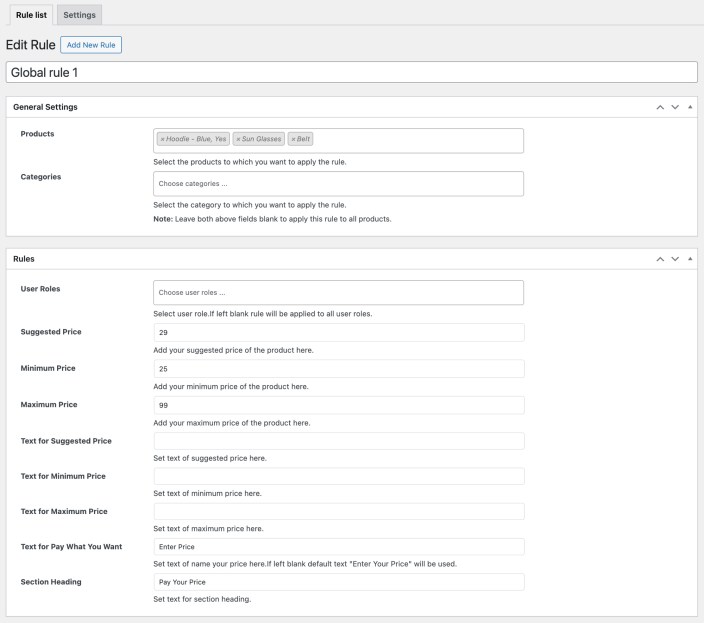
↑ Back to topNavigate to WooCommerce > Pay What You Want and click the “Add New Rule” button from the top. After clicking it, you will see a new page where you have to provide the essential information, such as the following:
- Add Title:Enter a specific title for the Name Your Price” while creating a new rule.
- Products: Choose to select the products to which you want to apply the rule.
- Categories: Choose to select the category to which you want to implement the rule.
Note:Leave both above fields blank to apply this rule to all products.
- User Roles:Select user roles to apply the pricing rule.
-
- If you select the option, only the select customers with those specific rules will be affected. If you opt to leave the box unchecked, the rule will be implemented to all user roles, including visitors who aren’t logged in to your store.
- Suggested price: Choose to integrate the suggested price of the product.
-
- The price will encourage customers to consider paying this amount. If you opt not to display the suggested price, you will be allowing customers to pay what they want without any guidance.
- Minimum Price: Set the minimum price of the product that customers can pay.
-
- You can require customers not to submit an offer below the minimum amount entered. If you choose not to enter a price, the customer will pay any amount, such as $1, for the products.
- Maximum Price: Set the maximum price of the product that the customer can pay.
-
- If the price is entered in the store, customers will not pay a price higher than the mentioned amount. But if you don’t enter the amount, then there will be no upper limit on the amount customers can pay.
- Text for Suggested Price: Set the custom text for the suggested price that will appear on the product page.
-
- If you choose to leave this section blank, no text will be displayed next to the suggested price to inform customers.
- Text for Minimum Price: Set the text for the maximum price on the product page.
-
- The provided text will be displayed alongside the price, but if you choose to leave it blank, minimum price won’t appear on frontend.
- Text for Maximum Price: Set custom text for the maximum price.
-
- The text will be displayed on the maximum price side, but leaving it blank will result in displaying no maximum message on frontend.
- Text for Pay What You Want: Set the text for the “Name Your Price” option
-
- Display the custom message to guide customers in naming their prices easily. If you choose to leave it, the default text “Enter Your Price” will be shown.
- Section Heading: Set text for the prices section.
-
- Leaving this blank will result in a default section heading to be used.

Product Level Settings for Pay What You Want:
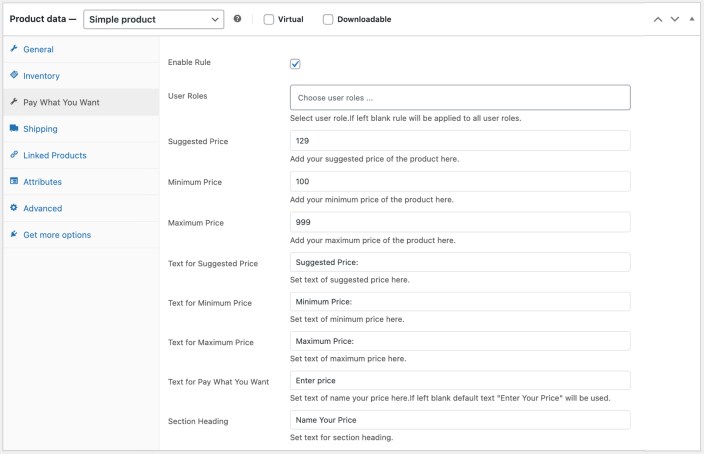
↑ Back to topFrom the WordPress Admin Panel > Products > Select a product > Edit > Product Data section.
Following are the steps you can follow to set the countdown timer for products:
- After clicking on the specific product a product page will appear on the store.
- Find the “Product Data” section
- Click the “Pay What You Want” option.
- Choose to enable the “Enable Rule” option.
After enabling the rule option, you will be able to see a few more product-level settings of rules, such as the following:
- User Roles: Select user roles to apply the pricing rule.
- Suggested price: Choose to integrate the suggested price of the product.
- Minimum Price: Set the minimum price of the product that customers can pay.
- Maximum Price: Set the maximum price of the product that the customer can pay.
- Text for Suggested Price: Set the custom text for the suggested price that will appear on the product page.
- Text for Minimum Price: Set the text for the maximum price on the product page. Leave empty to not show the minimum price limit on frontend.
- Text for Maximum Price: Set custom text for the maximum price. Leave empty to not show the maximum price limit on frontend.
- Text for Pay What You Want: Set the text for the “Name Your Price” option
- Section Heading: Set text for the prices section.

Configure General Settings
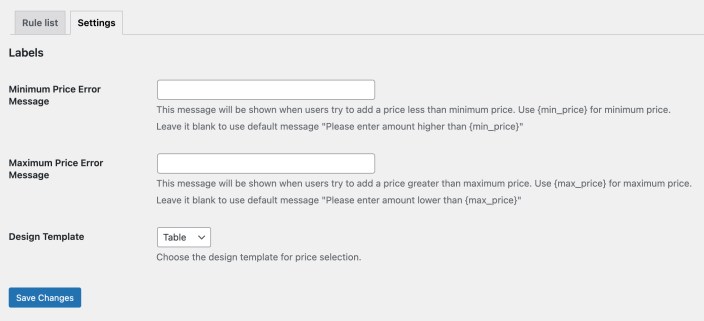
↑ Back to topMinimum Price Error Message: This message appears when users try to add a price less than the minimum price.
- Use {min_price} for a minimum price.
- Leave it blank to use the default message “Please enter an amount higher than {min_price}.”
Maximum Price Error Message: This message will appear when users try to add a price greater than the maximum price.
- Use {max_price} for maximum price.
- Leave it blank to use the default message “Please enter an amount lower than {max_price}.”
Design Template: Choose the design template for price selection like:
- Table
- Simple

