Provide users with a seamless payment experience through Antom Payment. The payment methods we support include popular wallets in Southeast Asia, bank transfers, credit cards, and more.
Installation
↑ Back to topYou can follow the following steps to install the Antom Payment extension.
- Log in to WordPress as an administrator.
- In the left menu, go to Plugins > Add New.
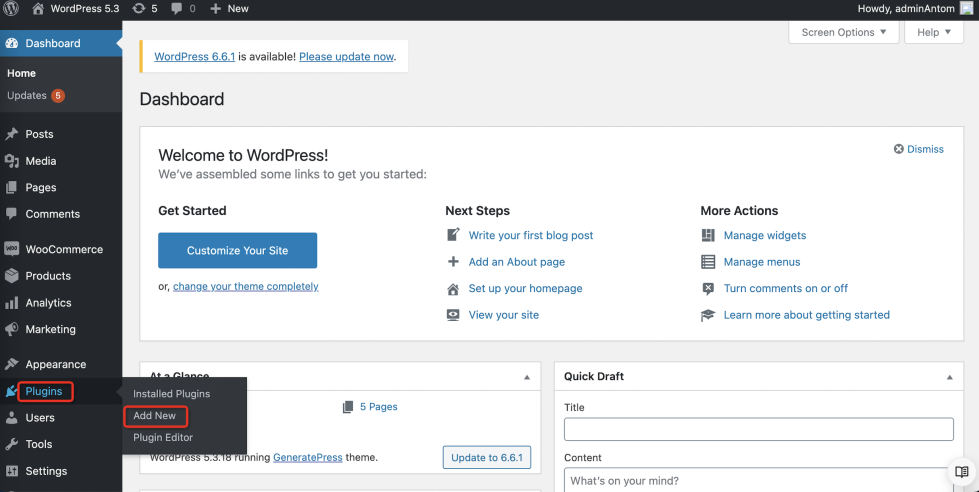
- Search for Antom Payments in the search bar on the right.
- Click Install Now.
- Click Activate.
Requirements
↑ Back to top- To create an Antom account, you will need to obtain a client ID, Antom public key, and your private key. Please note that the client IDs for test mode and live mode are different.
- Your need to config the webhook url from in antom account Developer->Notification URL page.
- WordPress version 6.1 or Higher
- PHP version 7.2 or higher
- WooCommerce version 7.2 or higher
Register Antom Account
↑ Back to topAfter installing and activating the plugin, click Register new account on the Payments page of the plugin to register an account.

After registering your account, you need to activate it to obtain the required configuration information. Refer to the Activate your account section for detailed process.
Configure the plugin
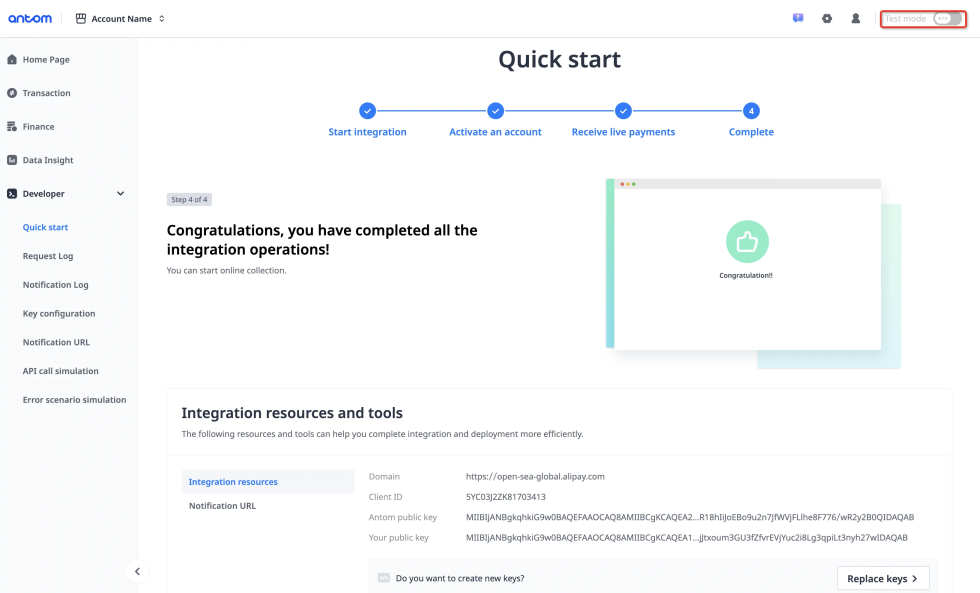
↑ Back to topOnce your Antom account is activated, click Connect your account to enter the plugin’s configuration page for the first time.
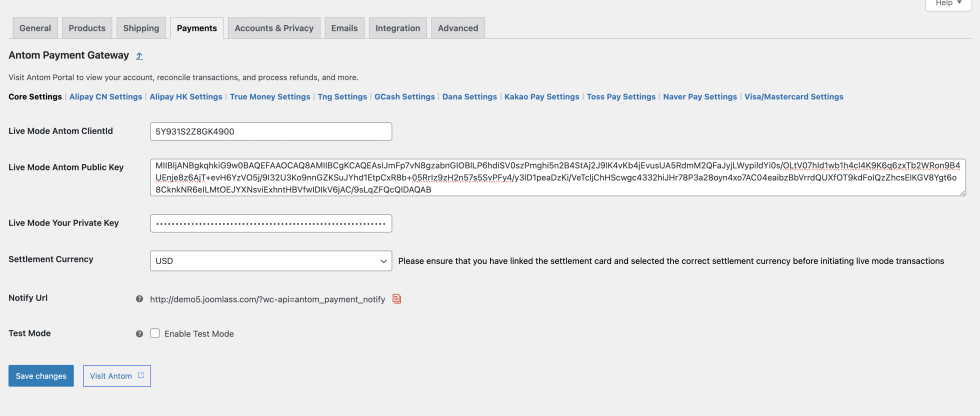
- Click Visit Antom and switch your account to live mode to obtain the following configuration information:
- Live Mode Antom ClientId: The unique ID assigned to your account in live mode.
- Live Mode Antom Public Key: The public key provided to you in live mode.
- Live Mode Your Private Key: The key used for authentication that matches the public key you configured on Antom Dashboard. You can generate a pair of key in Developer->Key configuration page.
- View the bound settlement card and settlement currency on the Settlement overview page.
Before initiating a transaction in live mode, ensure that you have completed the settlement card binding in Antom Dashboard and specified the corresponding currency on the plugin configuration page.
Configure the notification URL
↑ Back to topAfter setting up the plugin configuration information, you need to configure the notification URL in live mode to receive payment notifications as following steps.
- Obtain the notification URL in the Notify Url option of the Antom Payments plugin.
- Set alipay.ams.payments.payNotify and alipay.ams.payments.captureNotify on Notification URL page in live mode.

Use the sandbox
↑ Back to topBefore you officially open the plugin to users, we recommend testing the plugin in sandbox mode, according to the following steps:
- Click Connect your account or Settings to access the plugin configuration page.
- Check the Enable Test Mode box.
- Click Visit Antom to obtain configuration information in test mode. Refer to Antom Dashboard for the detailed process.
Configure the Notification URL in test mode to receive payment notifications. - Go to your store and add a product to your cart.
- Proceed to checkout.
- Select the wallet payment provided by the Antom Payments plugin.
- Click Place order. You’ll be redirected to the code-scanning page. Use the wallet app scan the code and complete the payment.
- Sign in to your WordPress account as an administrator.
- Select WooCommerce in the left menu. Your test order is displayed with a Processing/Completed status. You can also view this order payment request in Antom Dashboard.
Go Live
↑ Back to topAfter completing the above configuration and checking the following items,you can use the plugin to initiate real transactions.
- ✅Ensure you have completed a payment in sandbox and the order status has been successfully updated.
- ✅Ensure the Enable Test option is unenabled on the plugin setting page.
- ✅Ensure the payment method has been activated on Antom Dashboard Payment methods page.
- ✅Ensure the notification address has been configured on Antom Dashboard Notification URL page.