Description
↑ Back to topB2B Payments is a buy now pay later plugin which allows the admin to keep a track of partial payments of every order. The admin can create various BNPL payment plans and allow the customer to select a buy now pay later payment plan. These plans will split the payments accordingly and the customer then has to pay the amount depending on the selected plan. The admin can also select various conditions/restrictions to restrict the BNPL plan for particular user roles or payment methods.
Features
↑ Back to top- Multiple payment plans.
- Payment Plans breakdown.
- Payment Plan conditions.
- Payment Plan breakdown on checkout page.
- Payment Plan status in orders.
Installation
↑ Back to top- Download the plugin .zip file from your WooCommerce account.
- Go to WordPress Admin Dashboard > Plugins > Upload Plugin > Choose File.
- Install Now and Activate Plugin.
Getting Started
↑ Back to topB2B Payments Settings
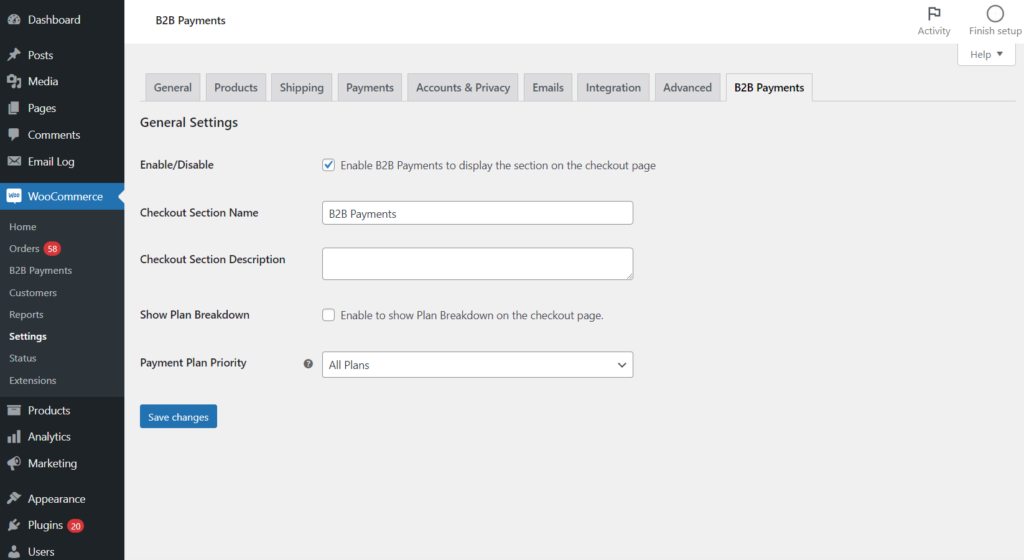
↑ Back to top- Navigate to the WordPress Admin Dashboard > WooCommerce > Setting > B2B Payments.
- All the B2B Payment settings will be displayed here.
Enable/Disable
- The admin has to enable the B2B payments from the settings using the Enable/Disable toggle button. By default, this will be disabled.
- When this is enabled, only then the B2B Payments will be displayed in the checkout box.
- Click on the Enable/Disable checkbox to enable it.
Checkout Section Name
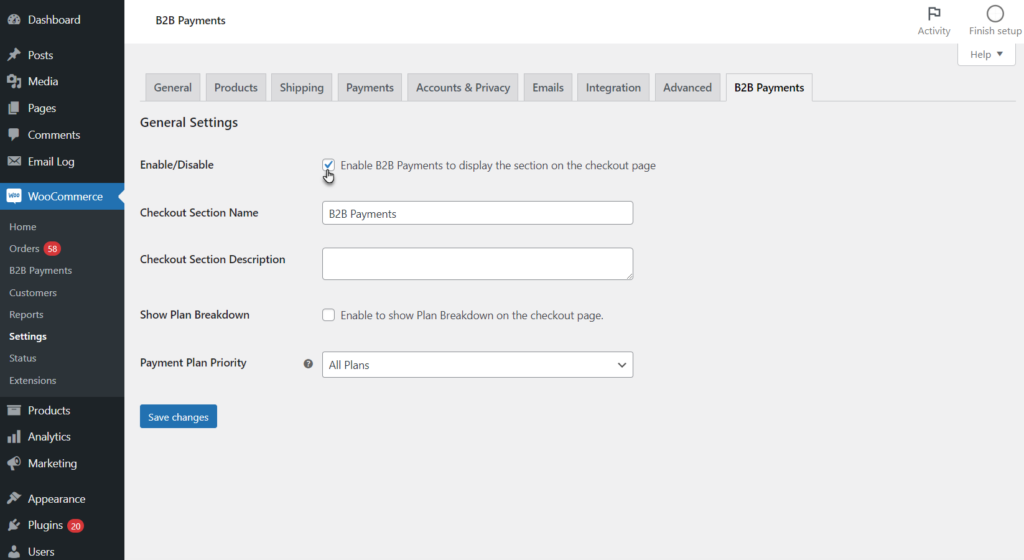
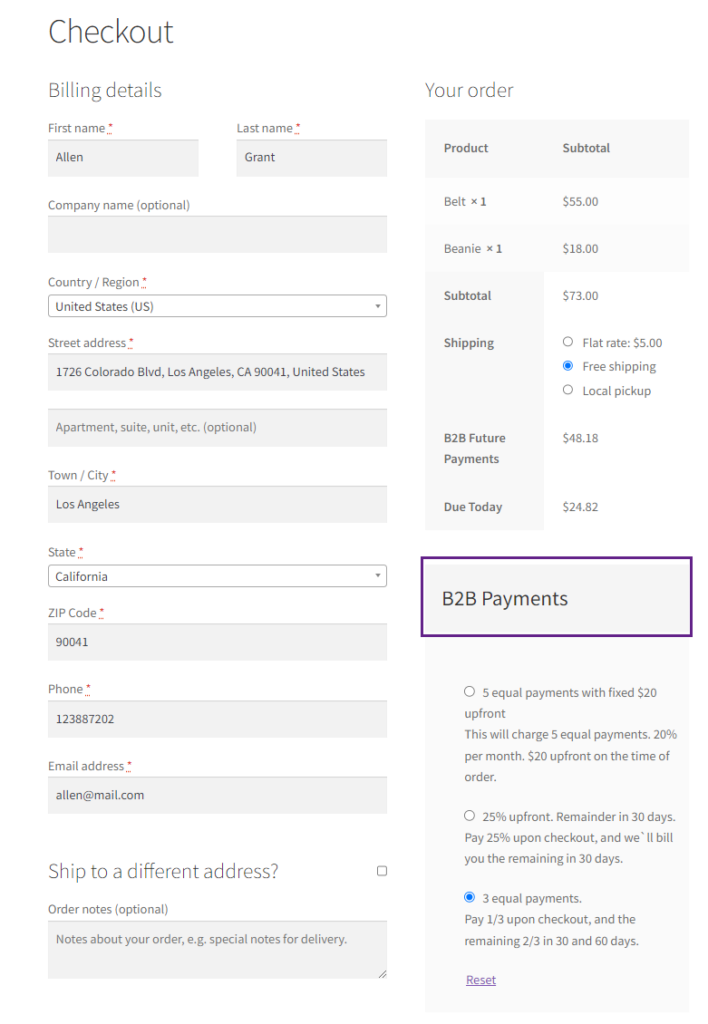
- The admin can edit the section name for the B2B Payments, which will be displayed on the checkout page.
- Enter the section name in the Checkout Section Name input box.
- By default, it will be empty, and the section name will be B2B Payments on the checkout.
Front-End Impact
- Login to the user account.
- Add the products to the cart.
- Proceed to the checkout page.
Checkout Section Description
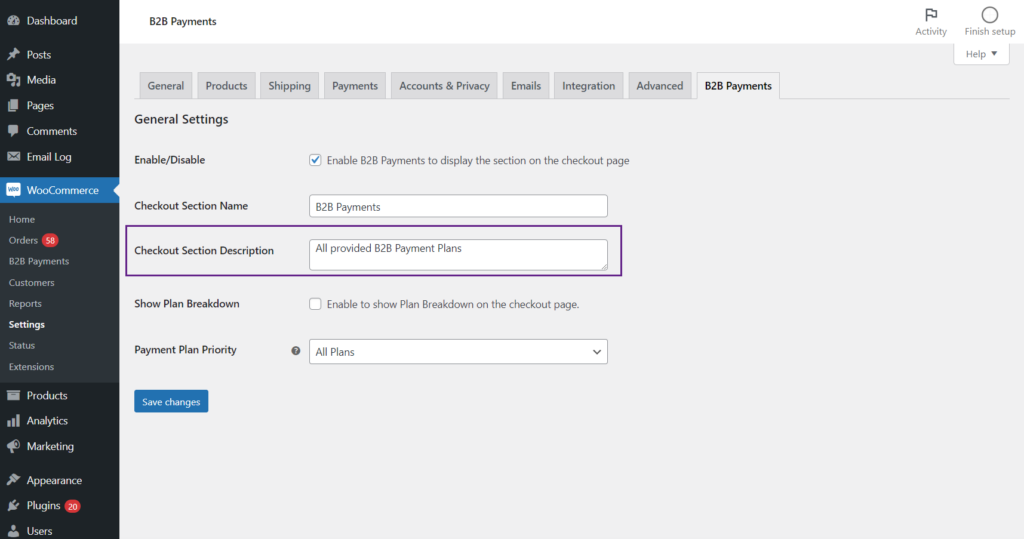
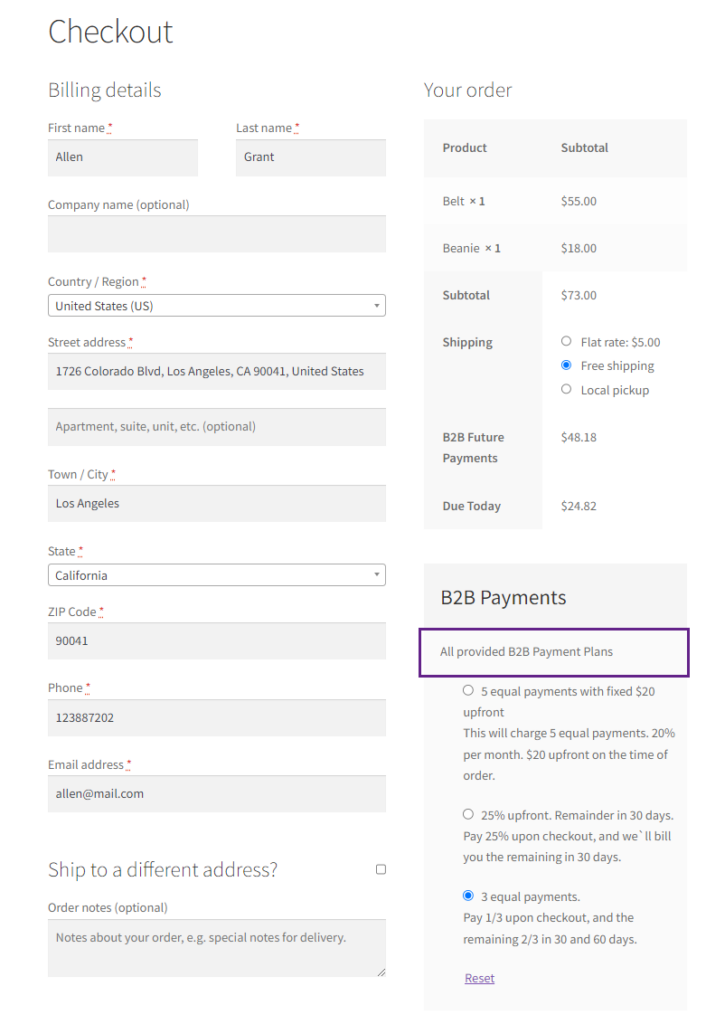
- The admin can edit the section description for the B2B Payments which will be displayed in the B2B Payments section in the checkout page.
- Enter the section description in the Checkout Section Description input box.
- By default, it will be empty, and the section description will be All provided B2B Payment Plans.
Front-End Impact
- Login to the user account.
- Add the products to the cart.
- Proceed to the checkout page.
Show Plan Breakdown
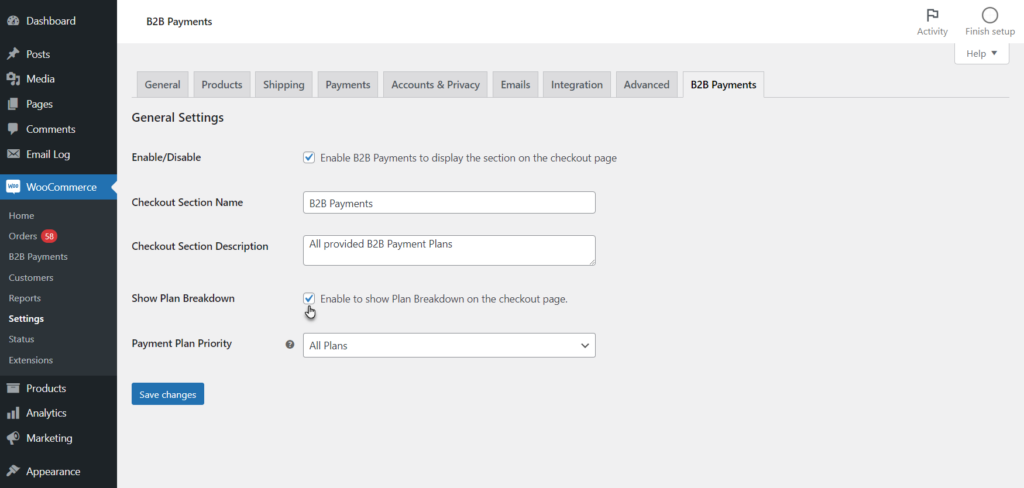
- Click on the Show Plan Breakdown checkbox.
- It will show a breakdown plan after the B2B payments plan sections when a payment plan is selected.
Front-End Impact
- Login to the user account.
- Add the products to the cart.
- Proceed to the checkout page.
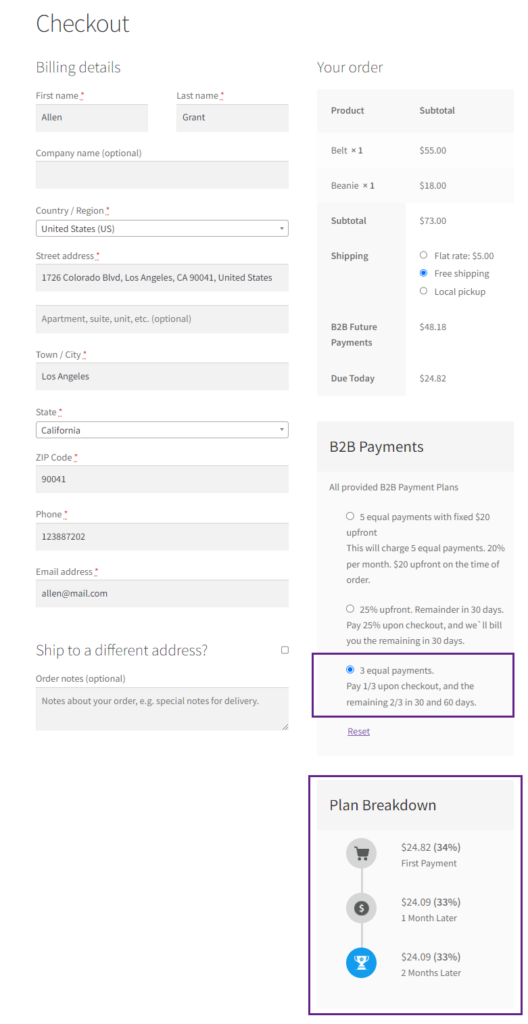
- Select a payment plan, the Plan Breakdown will be displayed.
Payment Plan Priority
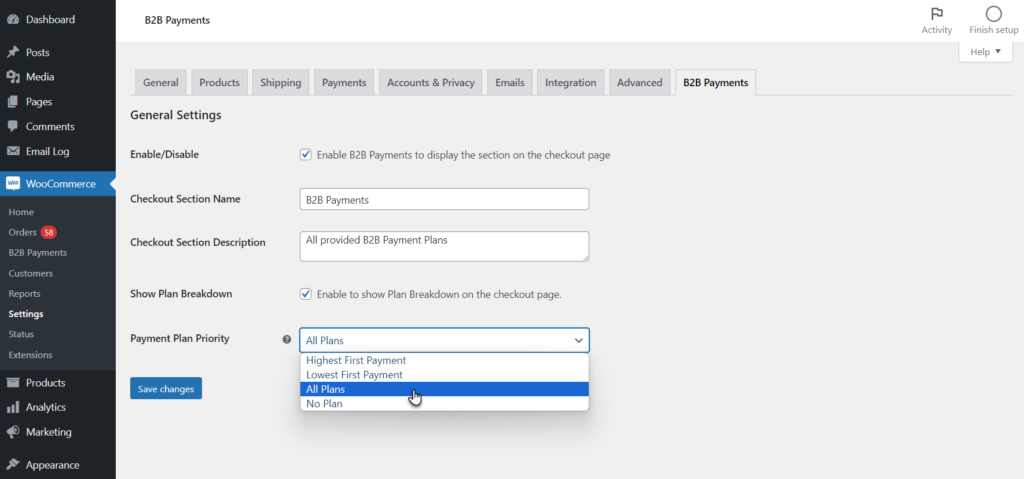
- Select the priority from the Payment Plan Priority drop down according to which the payment plans will be shown on the checkout page if there is any conflict.
- Highest First Payment: In case of conflicting conditions of the payment plan, if this priority is selected, then the plan which contains the highest first payment will be displayed in the checkout box. For example: If two plans have product conditions and both products are in the cart, then this will conflict with which payment plan will be displayed. Here, plan A’s first payment is 30%, and plan B’s first payment is $50. Then, the plan whose first payment amount is highest will be displayed.
- Lowest First Payment: In case of conflicting conditions of payment plan, if this priority is selected, then the plan which contains lowest first payment will be displayed in the checkout box.
- All Plans: In case of conflicting conditions of payment plan, if this priority is selected then both plans will be shown.
- No Plan: In case of conflicting conditions of payment plan, if this priority is selected then no plan will be shown.
B2B Payments
↑ Back to top- In order to set up a new B2B payments plan, navigate to the WordPress Admin Dashboard > B2B Payments.
- The admin can use the predefined templates of the B2B payments or add a new payment plan accordingly.
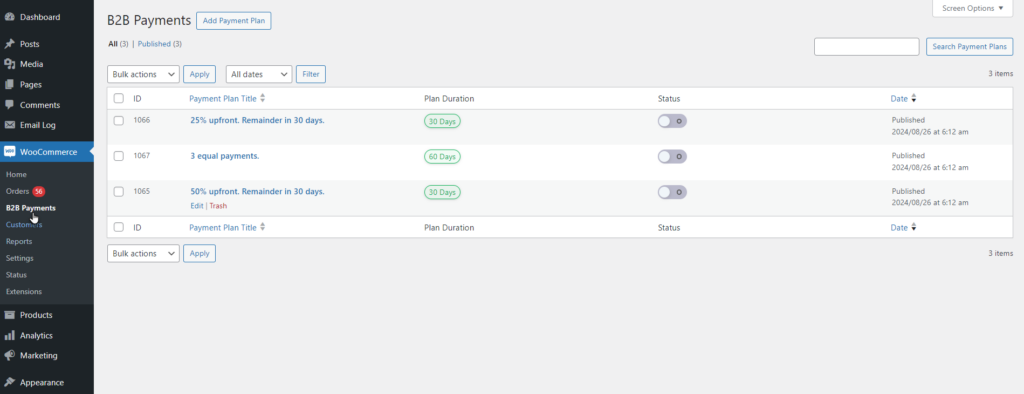
- The admin can also edit the predefined templates.
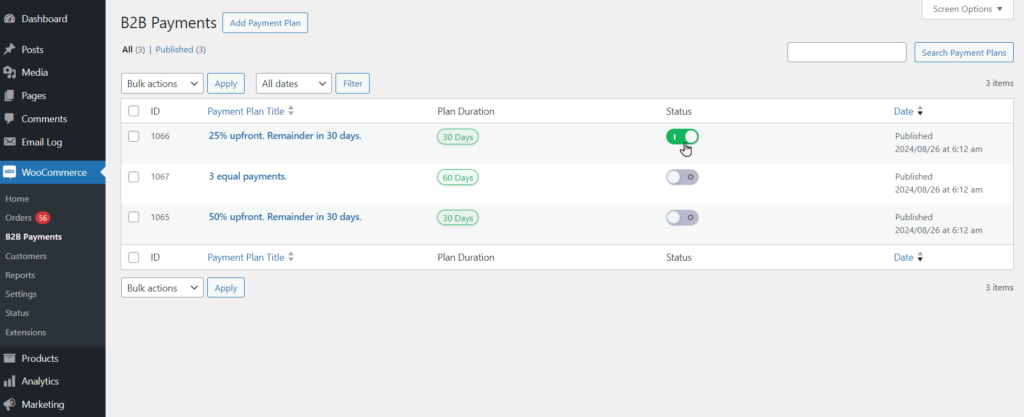
- The admin can enable/disable the payment plan from the B2B Payments table using the toggle button in the Status column.
- In order to add a new payment plan, click on the Add Payment Plan button.
Add New Payment Plan
↑ Back to top- In the Add New Payment Plan, there are three sections:
- General.
- Payment Plan Breakdown.
- Payment Plan Condition.
- Add a new title for the payment plan.
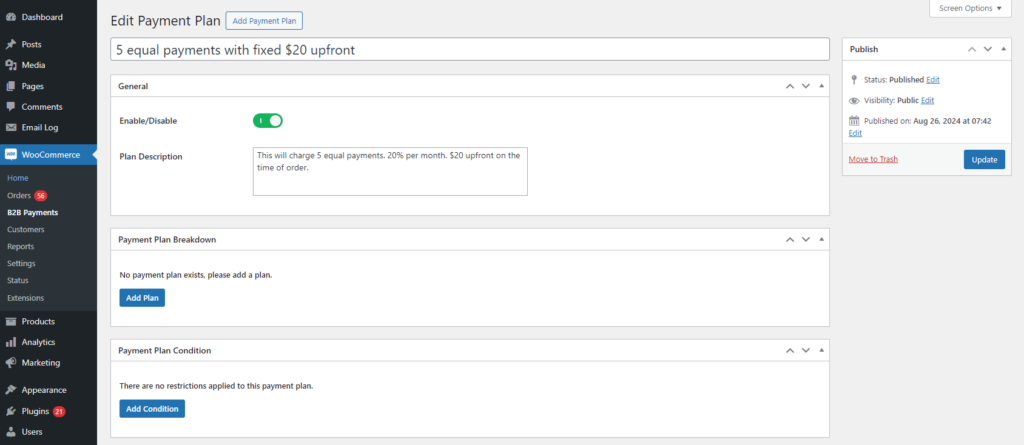
General
- Click on the Enable/Disable toggle button in order to enable the payment plan. The admin can enable/disable a particular plan for the checkout page.
- Add a description in the Plan Description text box. This description will be shown in the B2B Payments section in the checkout page under the specific plan.
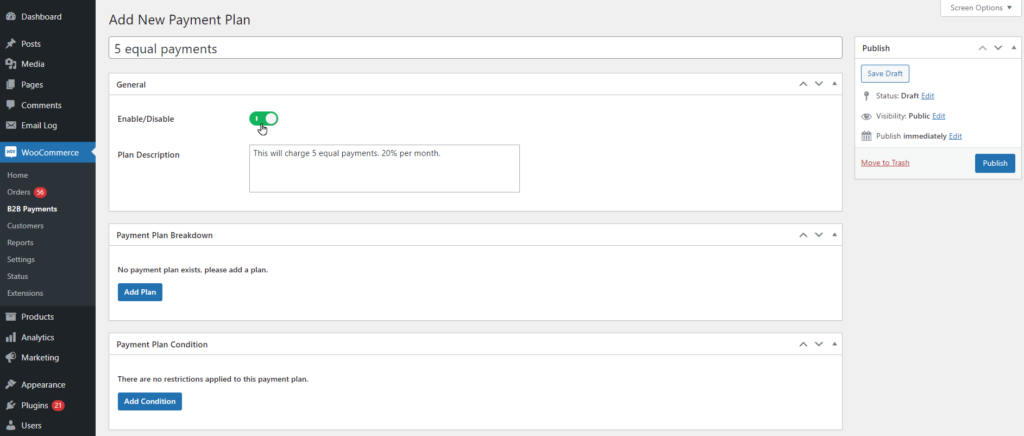
Payment Plan Breakdown
- This section will contain the total breakdown of the plan, the plan will depend on the amount and the duration entered here and the plan title will be shown on the checkout page.
- By default there will be no plan added in the breakdown.
- Click on the Add Plan button to add a new plan in the breakdown .
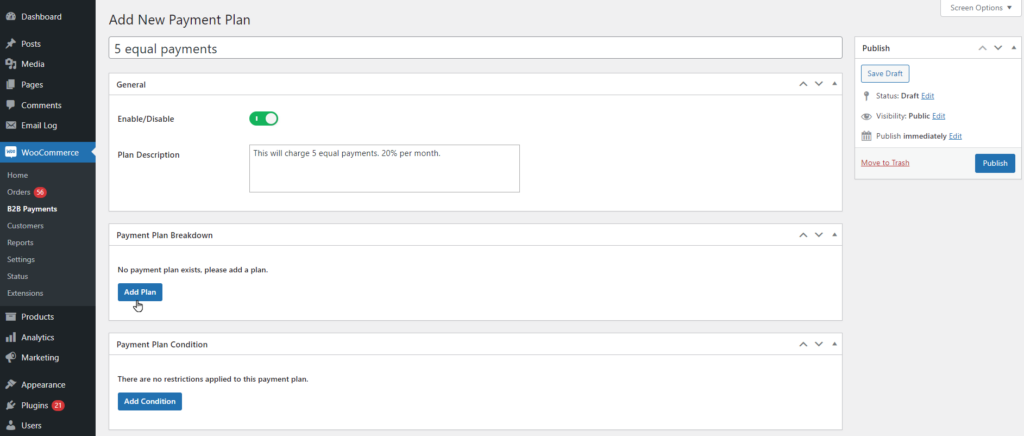
- After clicking on the Add New button, a section will be added.
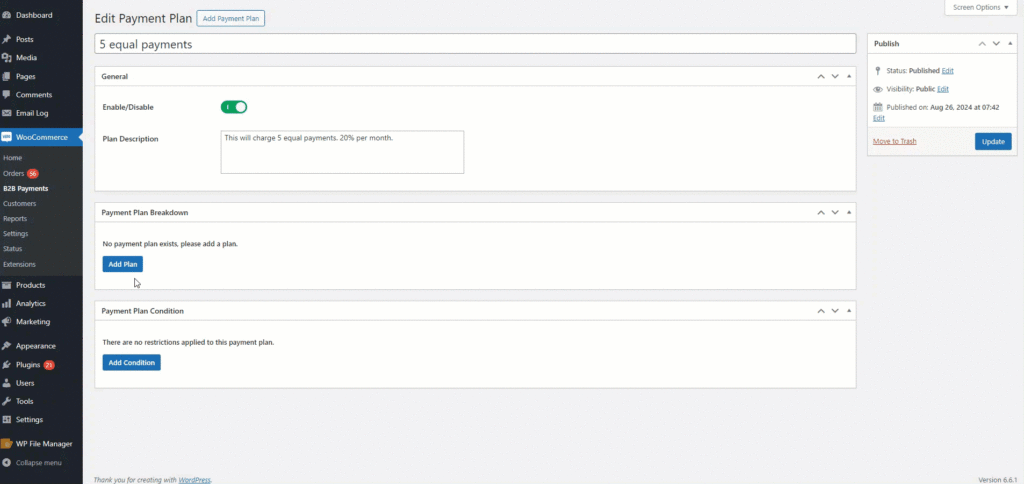
- This will contain the following components.
- Days: This is the number of days after order when the payment is due. If the admin adds 0 then the payment is due on the same day as the order date and the user has to pay the first payment on the same day.
- If the admin wants to charge a payment after 2 months of order date then the admin has to enter 60 days. This will be counted as 2 months after the order date.
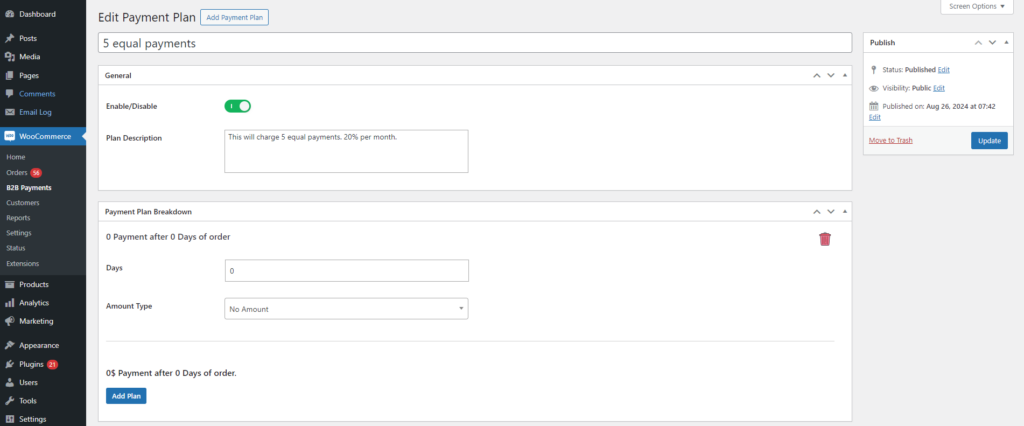
- Amount Type: This amount type contains the following options.
- Percentage (%)
- Fixed Amount ($)
- No Amount
- There will be no input value box if No Amount is selected.
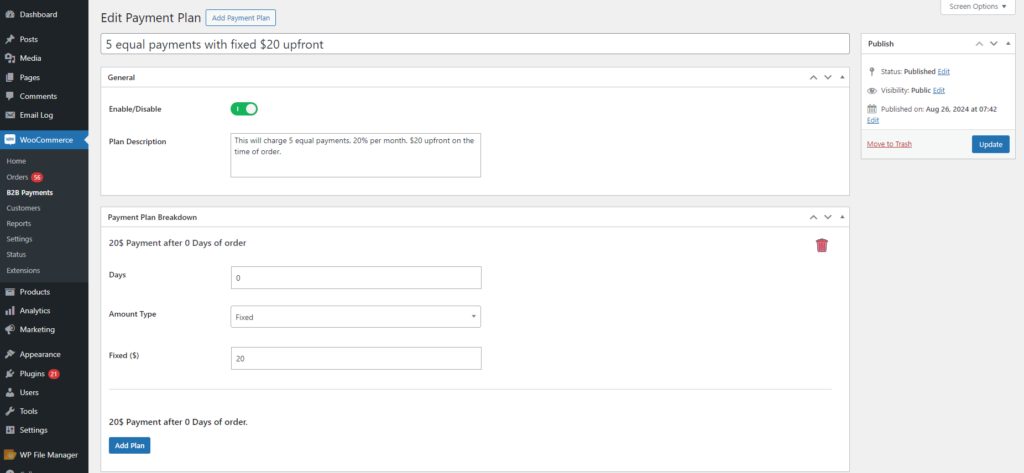
- Select Fixed amount from the Amount Type drop down box.
- A new Amount($) input box will be displayed after the selection. This will split the payments depending on the entered amount.
- Enter the amount for this plan in the Amount($) input box.
Note: If all Fixed Amounts are selected in a plan breakdown, then that payment plan will be shown on the checkout only when the order total matches the sum of all fixed amount plans added in a breakdown of a payment plan .
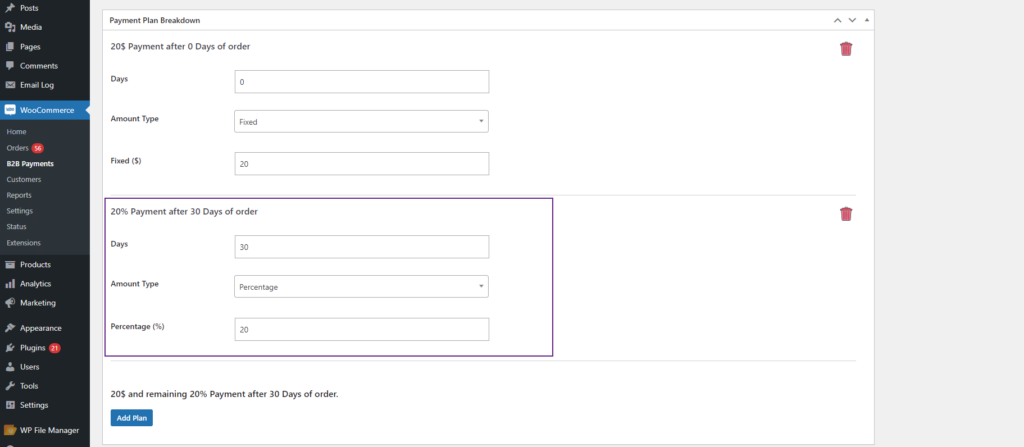
- Select Percentage from the Amount Type drop down box.
- A new Percentage(%) input box will be displayed after the selection. This will split the payments depending on the entered percentages.
- Enter the percentage for this plan in the Percentage(%) input box.
Note: If a percentage is selected, then the plan should be added till it reaches 100%. If the plan percentage is not the total of 100% then it would not be saved.
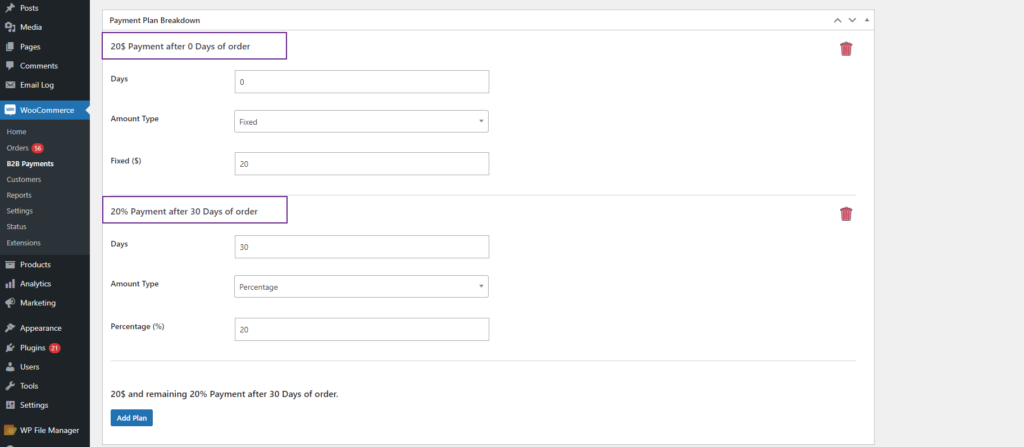
Note: If an amount and percentage is added in the plan breakdown then the plan should be added till the percentage value reaches 100%. If the plan percentage is not the total of 100% then it will not be saved.
- When a payment plan is added in the breakdown, a label will be displayed on the top of every plan.
- The admin can delete the plan breakdown using the Delete button.
- Plan total will be displayed at the bottom of the breakdown section to show the admin if the plan breakdown has reached to the total of 100% or not.

- Click on the Publish button to save and publish the payment plan.
Note: The payment plan will be displayed after enabling the B2B Payment from the WooCommerce Settings > B2B Payments.
Front-End Impact
- Login to your account.
- Go to the Shop page.

- Add products in the cart.
- Proceed to the Checkout page.
- The B2B Payments section will be displayed in the checkout page.

- After selecting the payment plan from the B2B Payments section, B2B Future Payments and the Due payment will be displayed.
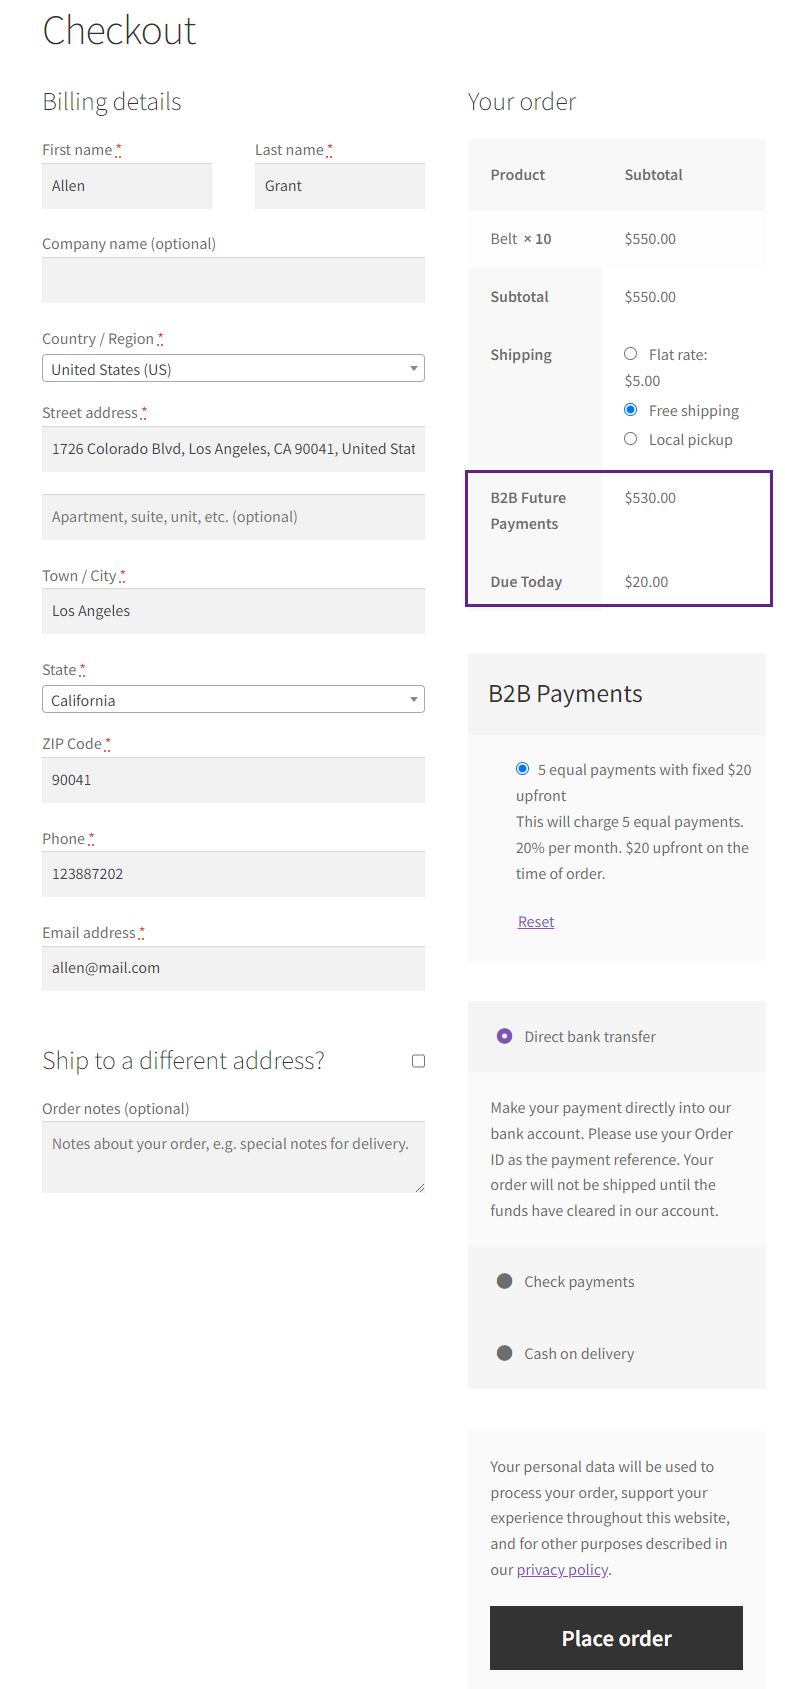
- Click on the Place Order button to place an order.
- After successfully placing the order, the B2B Payments section will be displayed on the Order Received page.
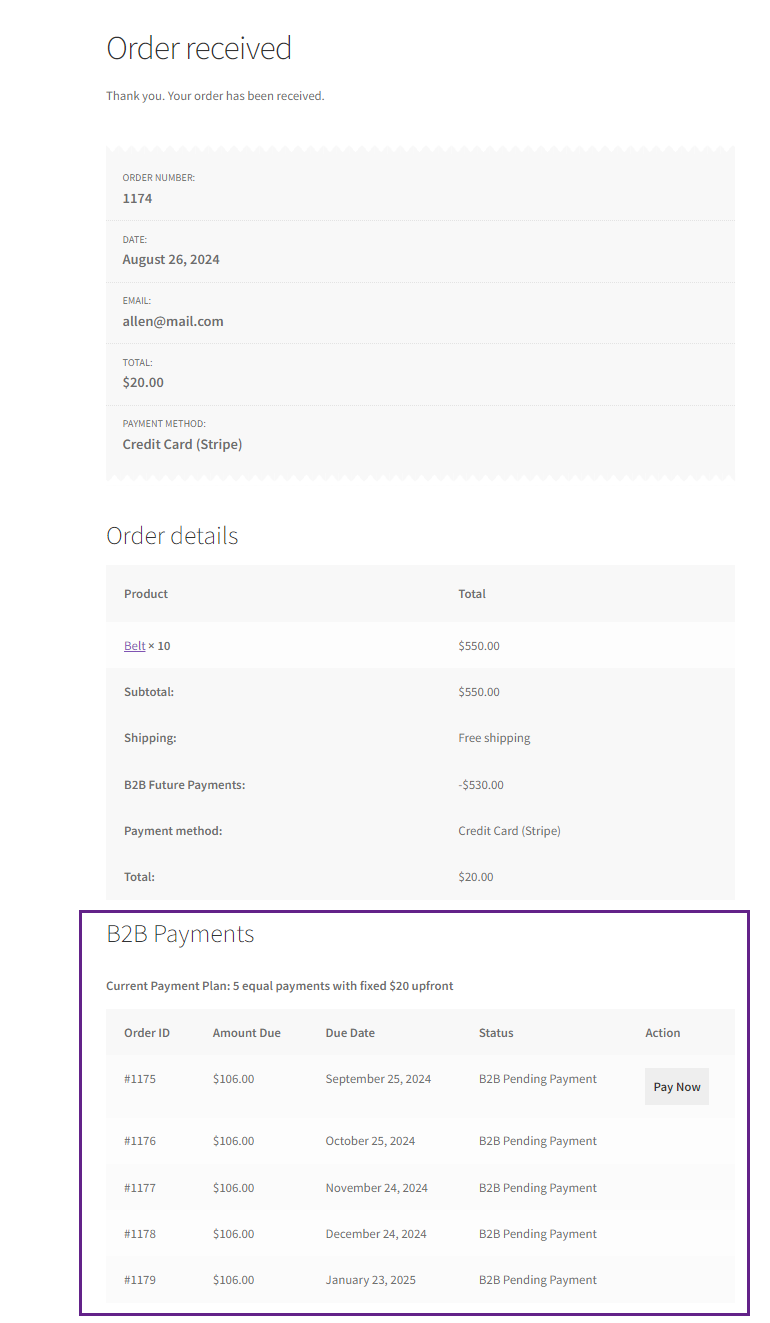
- Users can pay the future amount by clicking on the Pay Now button.
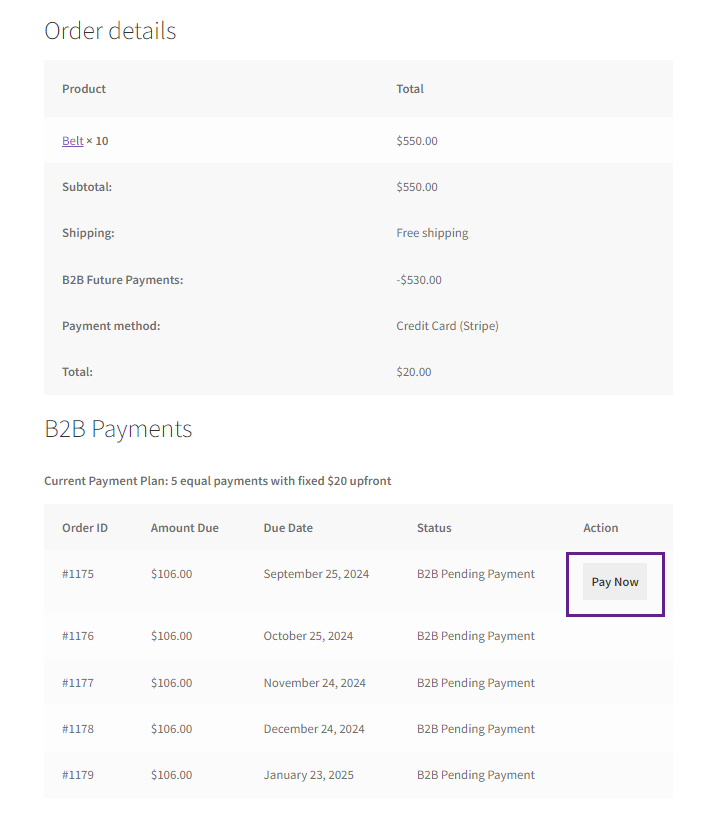
- When the Pay Now button is clicked, it will redirect the user to the Pay For Order page.
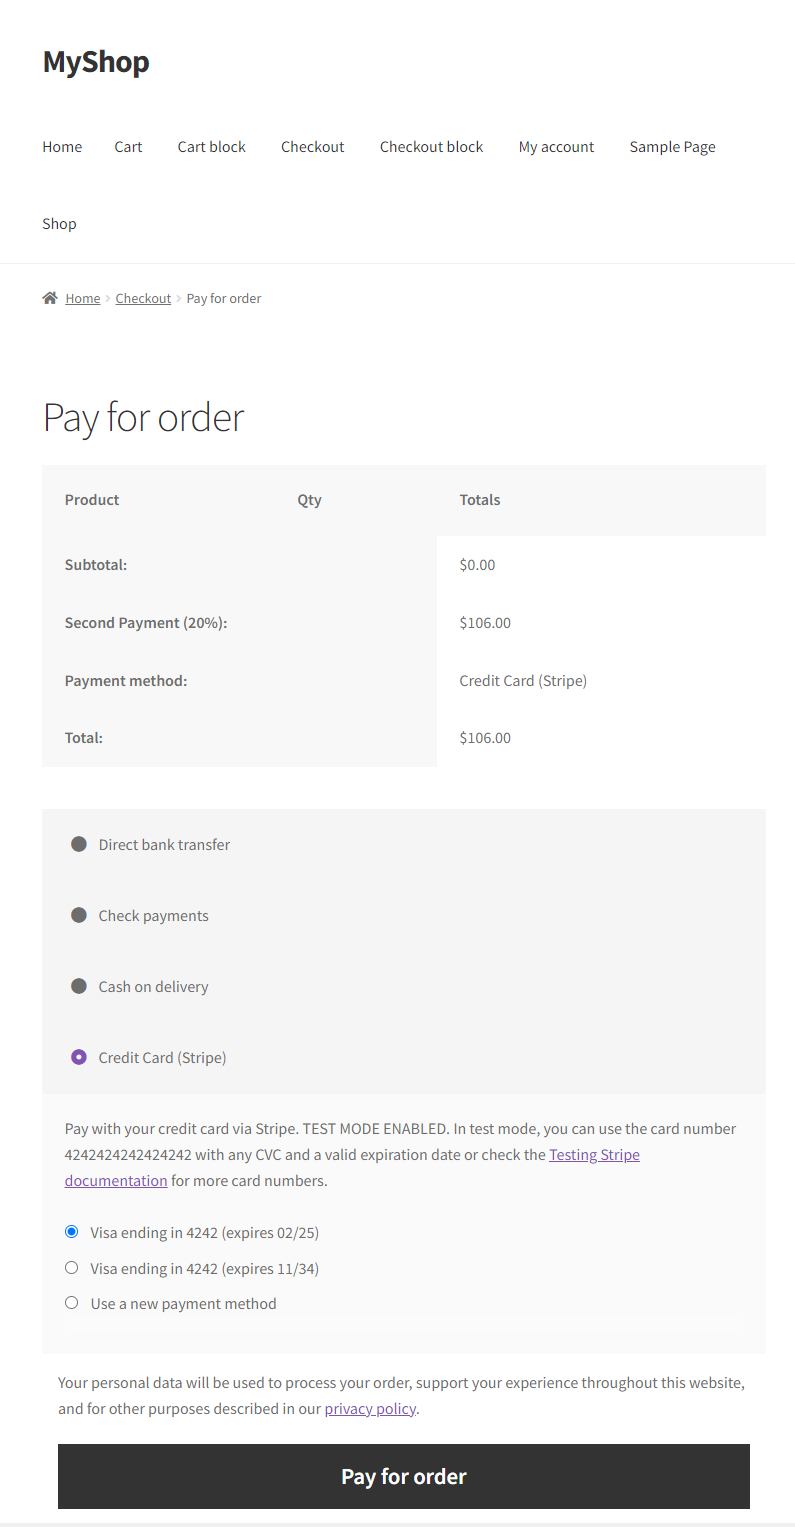
- Here the user will be able to pay for the current due payment. Click on the Pay for Order button to make a payment.
- Once the payment is made successfully, the Pay Now button will be available for the next pending payment.

- The user can also pay the pending payment from My Account.
- Navigate to the My Account > Orders.
- Select the parent order and click on View.
- B2B Payments table will be displayed in the order details.

- Click on the Pay for Order button to make a payment.
WooCommerce Orders Page
- In order to view the B2B pending payments, navigate to the WordPress Admin Dashboard > WooCommerce > Orders.
- Select the parent order.

- B2B Future Payments will be displayed in the order.
- Scroll down to the B2B Payments table to view all the pending payments.
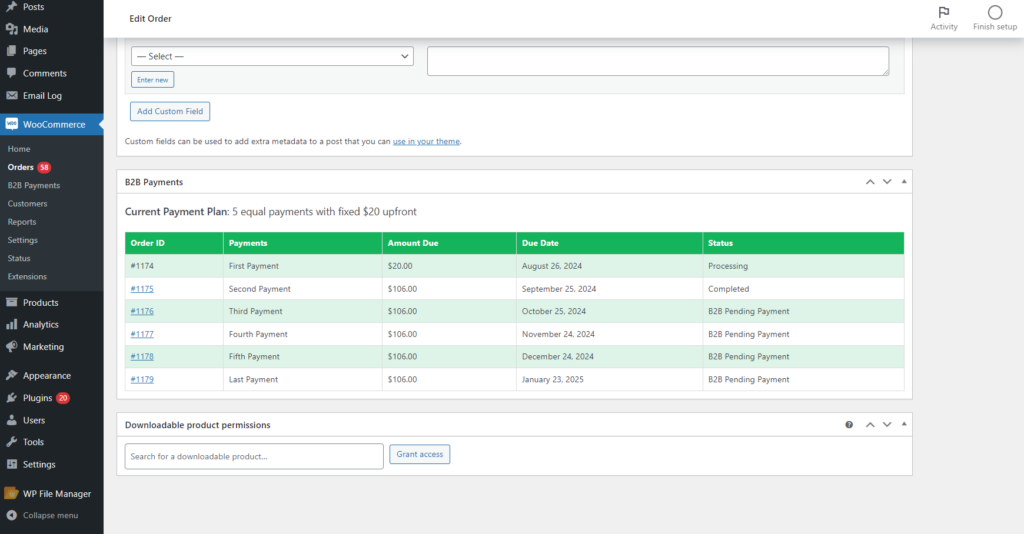
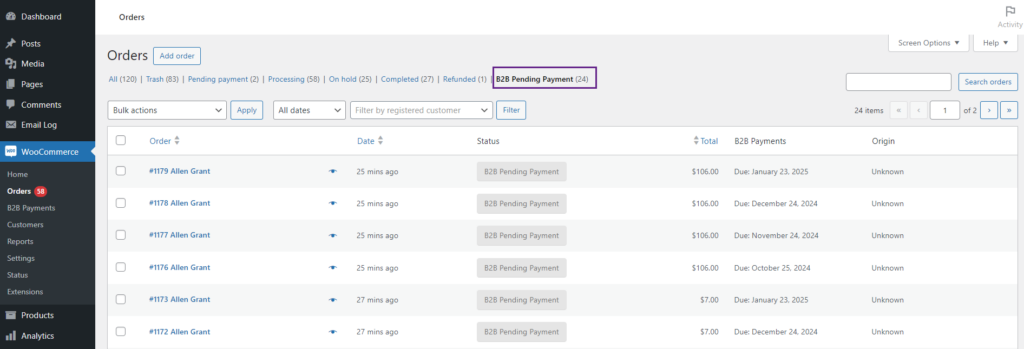
- On the Orders page, the admin can view the B2B Pending Payments.
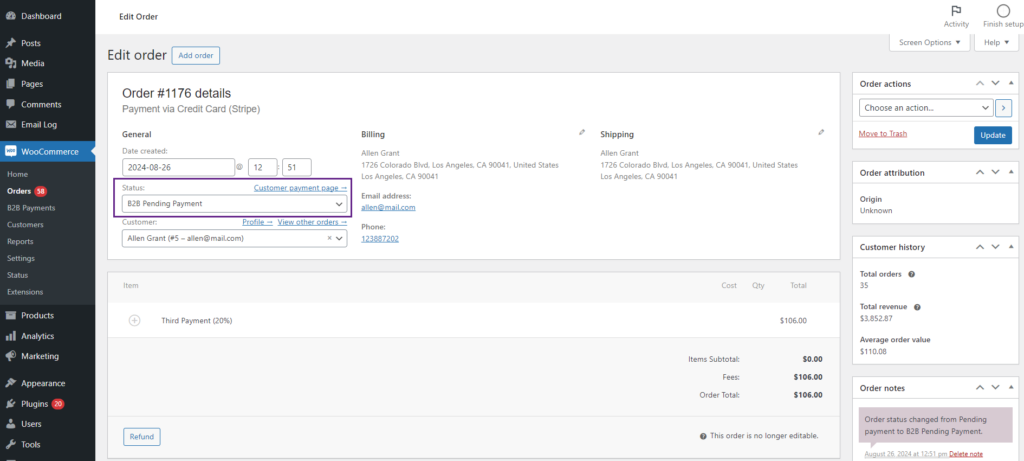
- The order status will be B2B Pending Payment.
Payment Plan Conditions
- This section contains the conditions that the admin can add in order to restrict and show the payment plan on the front-end accordingly.
- By default there will be no payment plan condition added.
- Click the Add Condition button in order to add a new condition.
- The admin can add multiple conditions in a single payment plan.
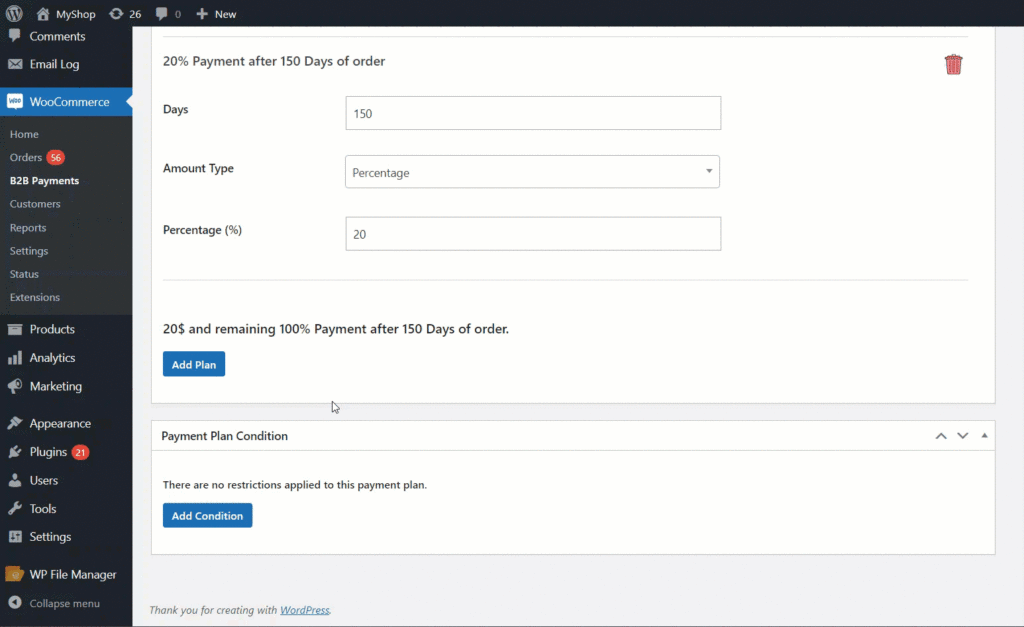
- Condition Type contains all the conditions, when a condition is added, the further selection will be according to the selected condition.
- Select a condition from the Condition Type drop down.
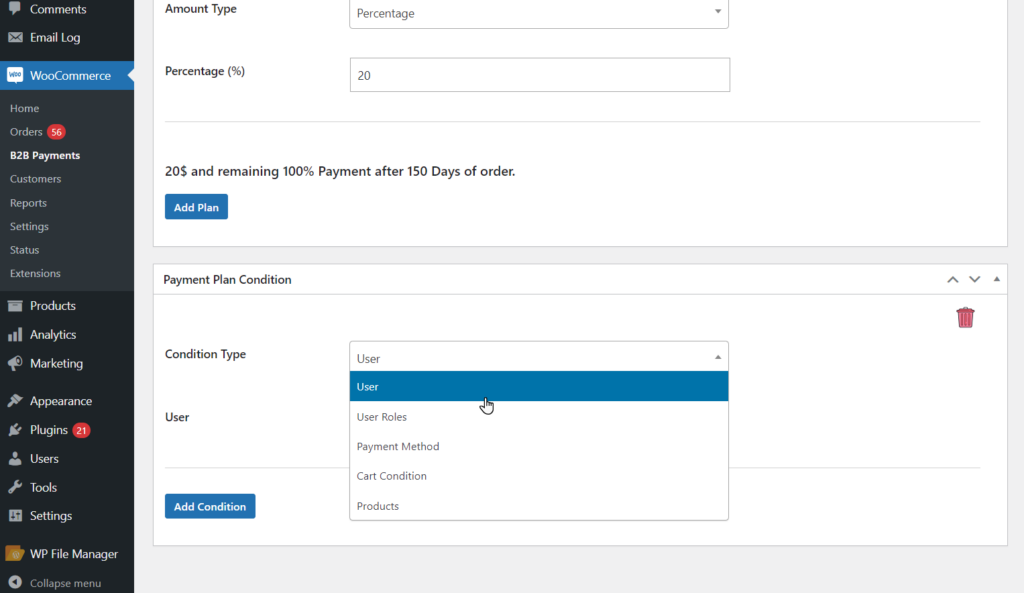
User Condition
- When the User is selected from the Condition Type, the user multi selector box will be displayed.
- The admin can select specific users from the User multi selector box.
- If a specific user is selected then on the front end, this payment plan will be shown to the selected users only.
- Click on the Condition Type drop down box and select User.
- Select a single or multiple users from the User multi selector box.
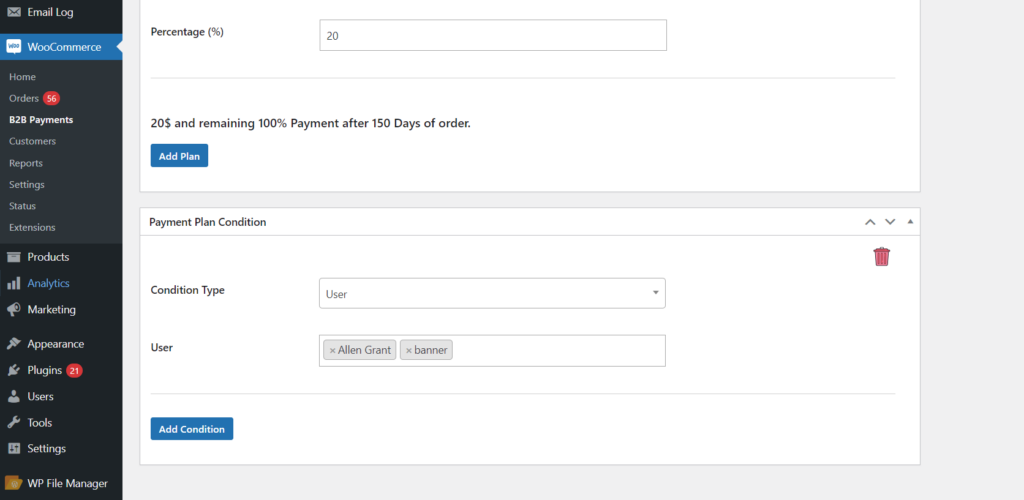
Front-End Impact
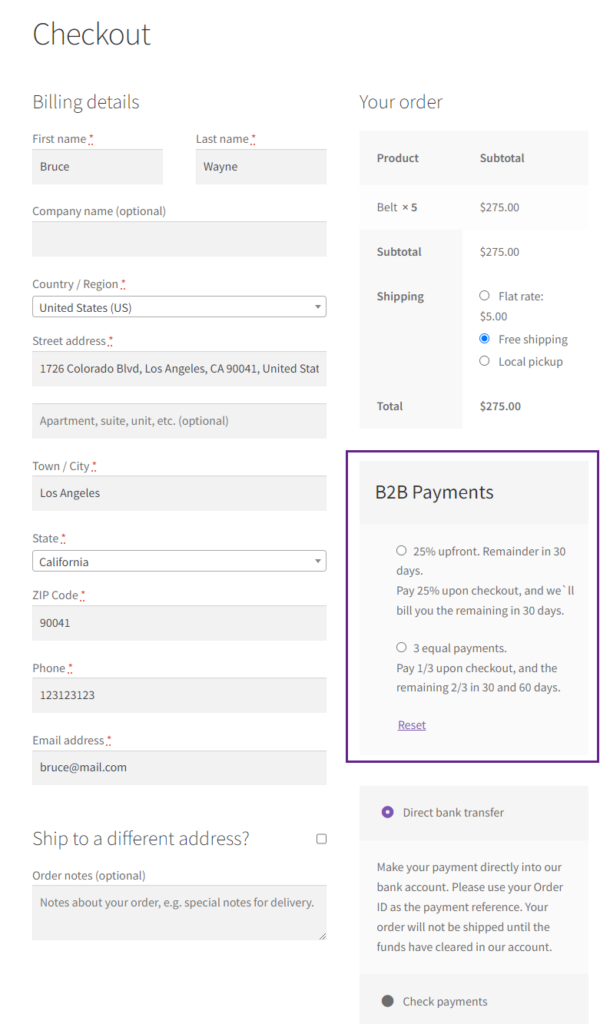
1. Non Selected User:
- Login to a non-selected user account.
- Select a product and proceed to checkout.
- The specific payment plan will not be shown to this user.
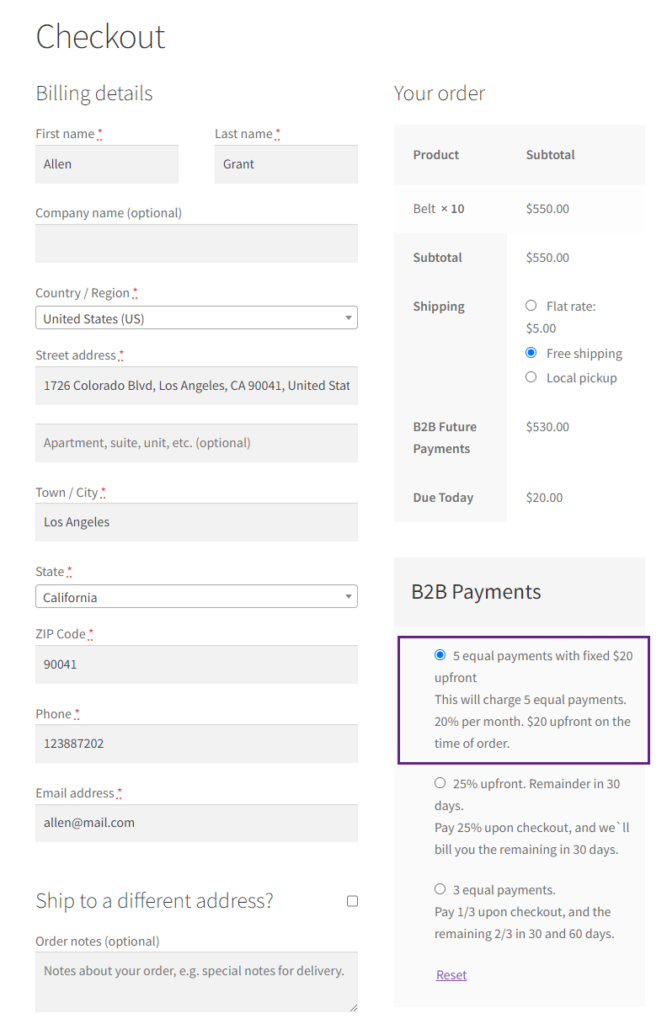
2. Selected User:
- Login to a selected user account.
- Select a product and proceed to checkout.
- The specific payment plan will be shown to this user.
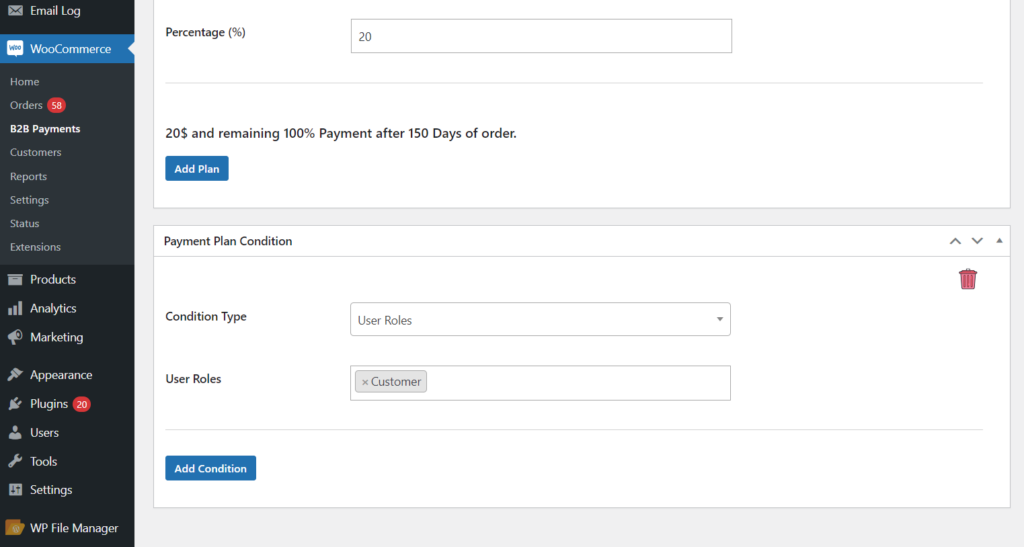
User Role Condition
- When the User Role is selected from the Condition Type, the user role multi selector box will be displayed.
- The admin can select specific user roles from the User Roles multi selector box.
- If a specific user role is selected then on the front end, this payment plan will be shown to the selected user roles only.
- Click on the Condition Type drop down box and select User Roles.
- Select a single or multiple user roles from the User Role multi selector box.
Front-End Impact
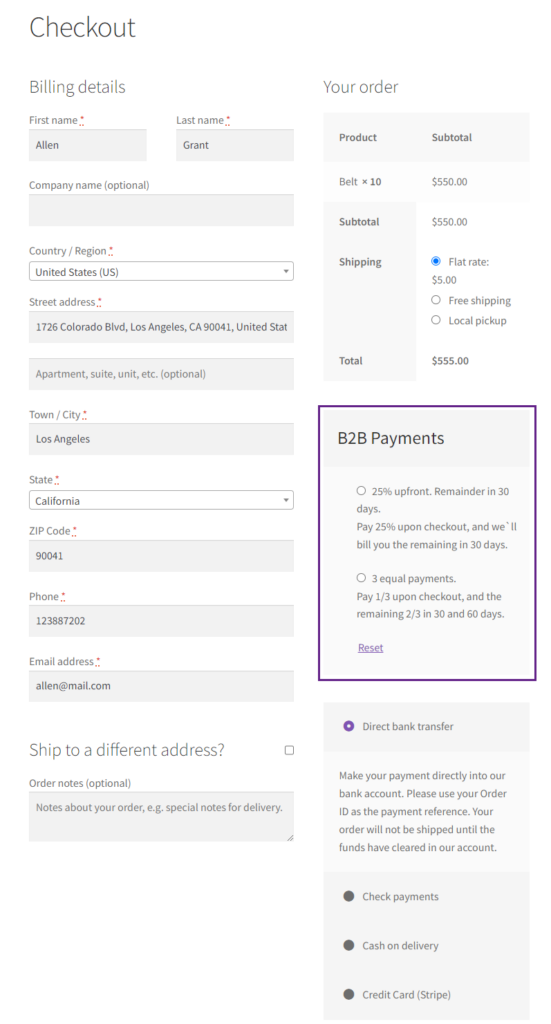
1. Non-Selected User Roles:
- Login to a non-selected user role account.
- Select a product and proceed to checkout.
- The specific payment plan will not be shown to this user role.
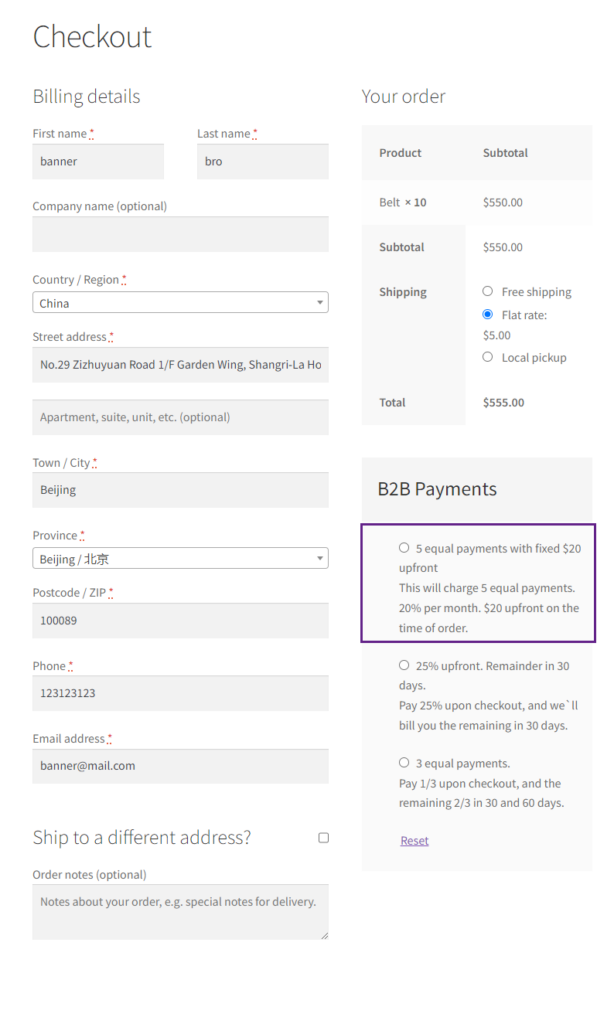
2. Selected User Roles:
- Login to a selected user role account.
- Select a product and proceed to checkout.
- The specific payment plan will be shown to this user role.
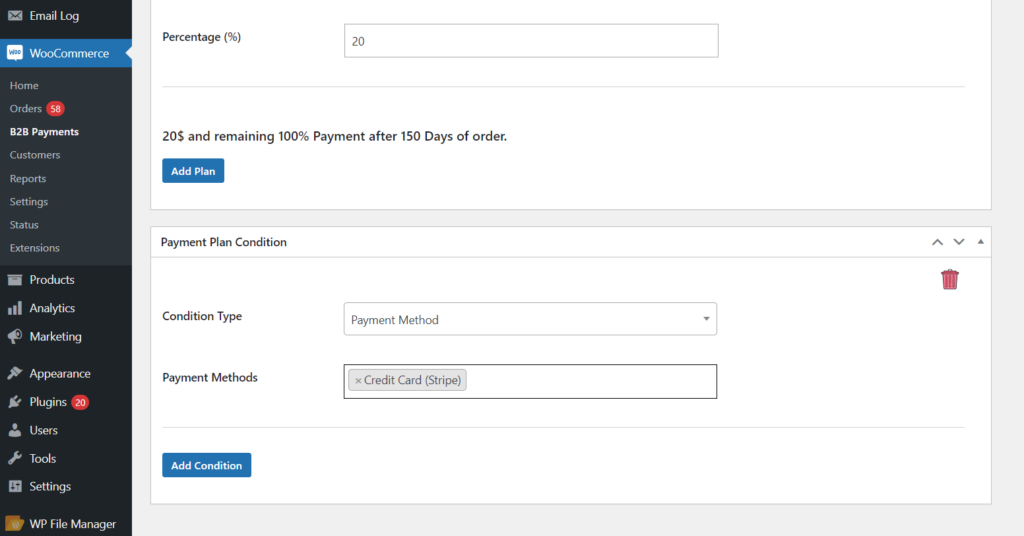
Payment Method Condition
- When the Payment Method is selected from the Condition Type then the payment method multi selector box will be displayed.
- The admin can select a specific payment method from the Payment Method multi selector box.
- The payment plan will be displayed and the specific payment method is selected in the checkout.
- Click on the Condition Type drop down box and select Payment Method.
- Select a single or multiple payment methods from the Payment Method multi selector box.
Front-End Impact
- Login to the user account.
- Select a product and proceed to checkout.
- Select a payment method on which the payment plan is allowed.
Cart Condition
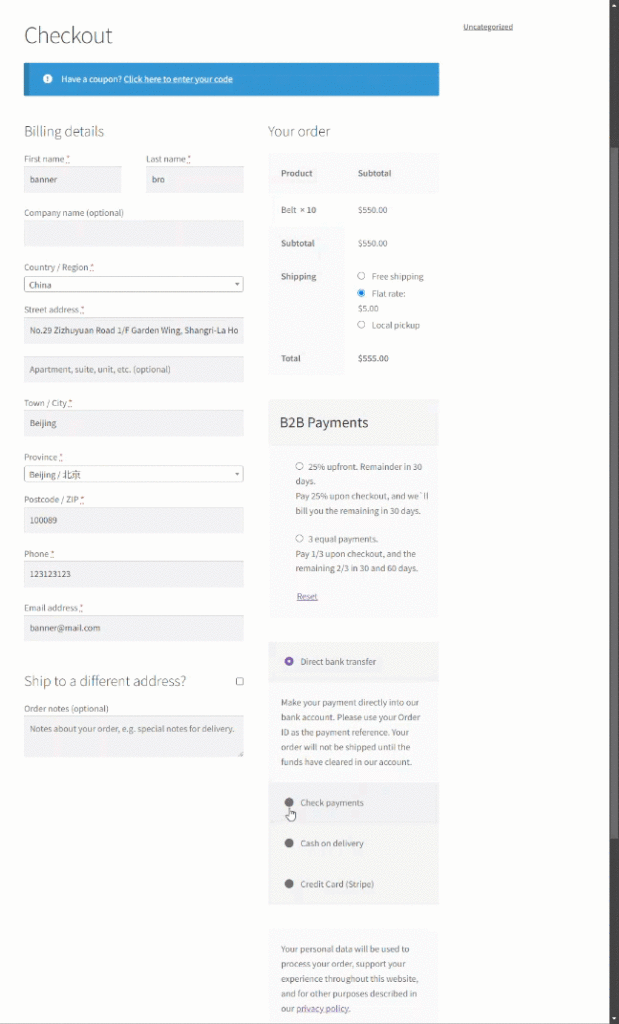
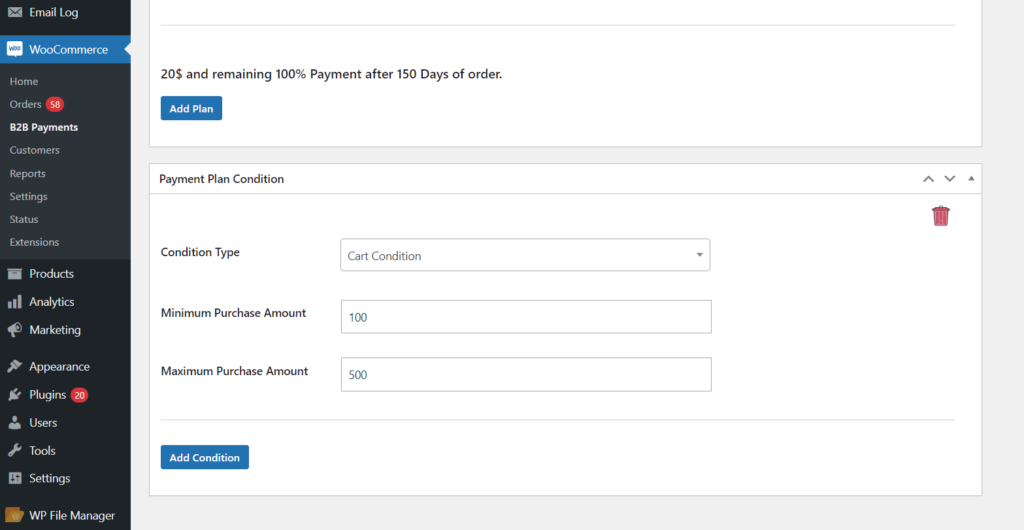
- When the Cart Condition is selected from the Condition Type then there will be two input boxes shown, Minimum Purchase Amount and Maximum Purchase Amount.
- The admin can add either the minimum amount of the cart or maximum total amount of the cart or both.
- In this case, the cart amount will be checked on the front end and if the amount matches the required amount for the plan, only then the payment plan will be displayed on the checkout page.
- Select Cart Condition from the Condition Type drop down.
- Enter the minimum purchase amount in the Minimum Purchase Amount box.
- Enter the maximum purchase amount in the Maximum Purchase Amount box.
Front-End Impact
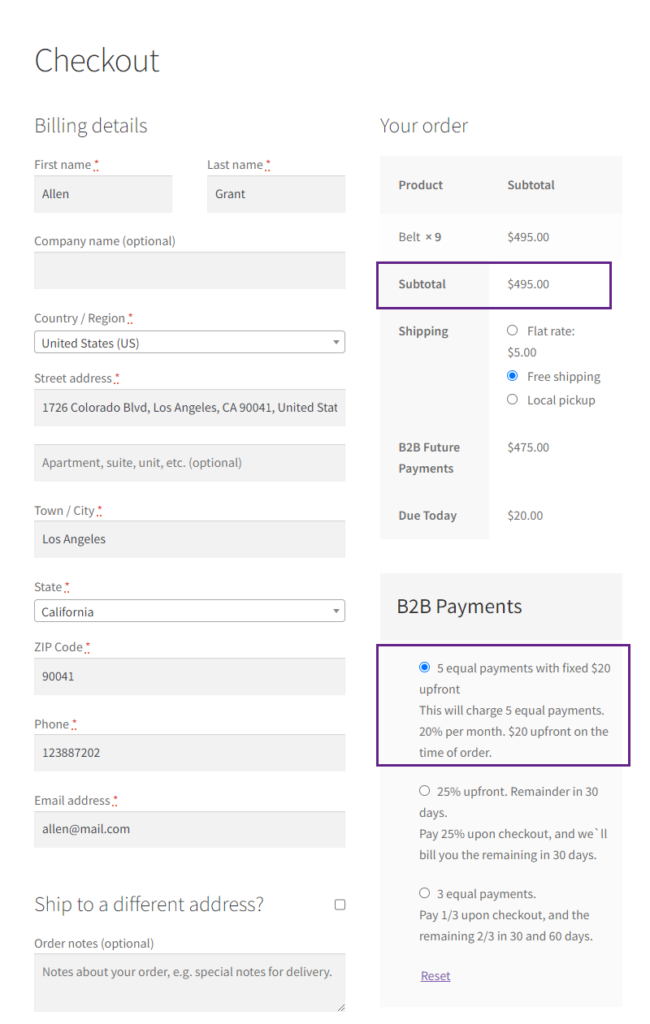
- Login to the user account.
- Add the products to the cart to fulfil the cart condition.
- Once the purchase amount is matched the payment plan will be shown on the checkout page.
Products Condition
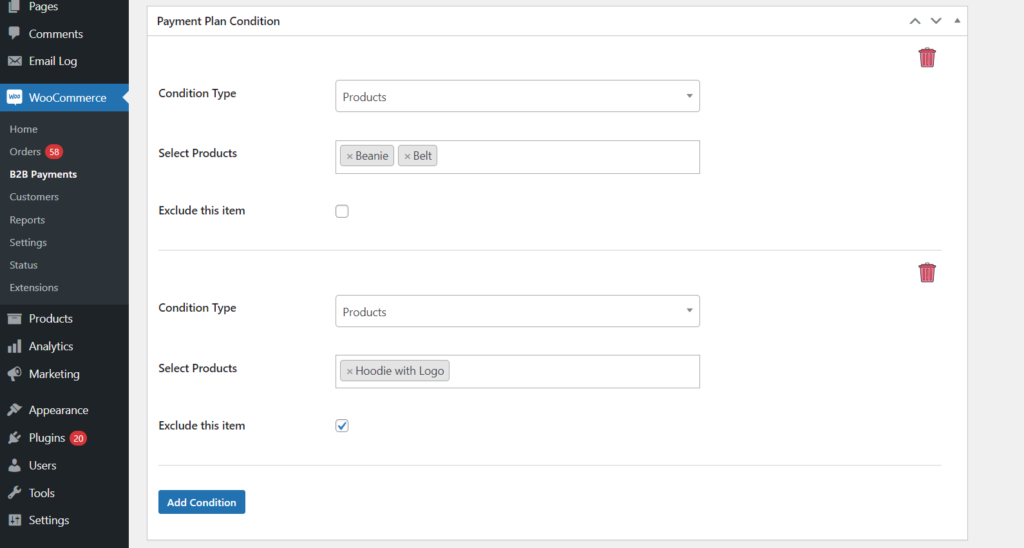
- When the Products is selected from the Condition Type then there will be a Select Products multi selection box.
- Select the Products from the Condition Type drop down menu.
- Select the specific products from this Select Products multi selector box.
- The admin can also exclude the payment plan for the selected products by checking the Exclude this item checkbox.
- On the front end, if the selected products are added in the cart, only then the payment plan will be shown.
Front-End Impact
- Login to the user account.
- Add the products to the cart.
- Proceed to the checkout page.
- If the products that are excluded from the B2B Payment plans are added in the cart, that plan will not be displayed on the checkout page.
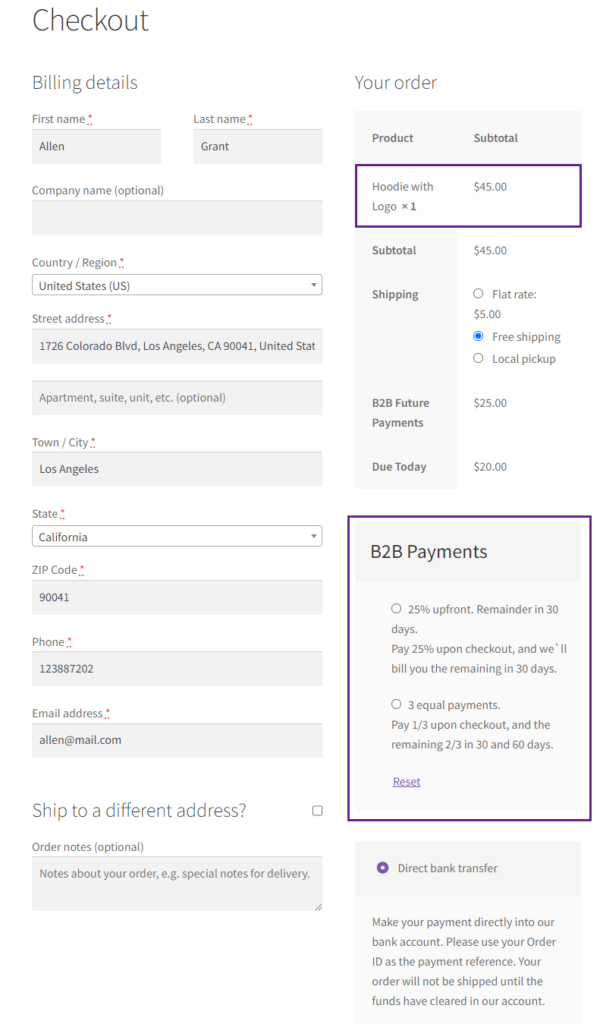
- If the products that are included in the B2B Payment plan are added in the cart, that plan will be displayed on the checkout page.
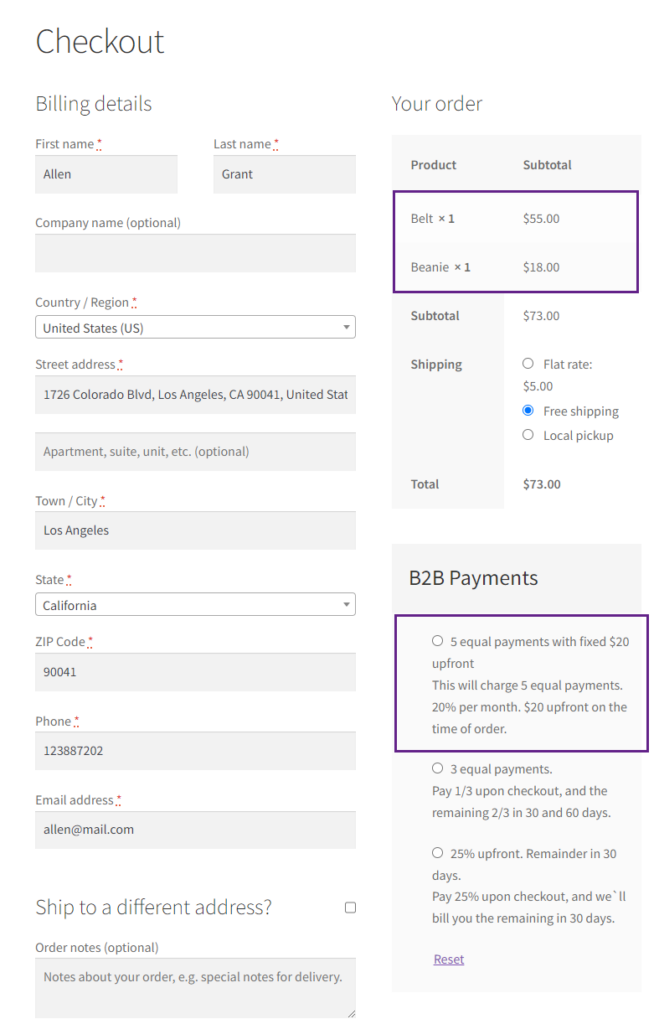
B2B Payments Email
↑ Back to top- B2B Payments email will be sent to the user when they make an order using the B2B Payments Plan. The emails will be sent for the Overdue payment and payment Reminder.
- Navigate to the WordPress Admin Dashboard > WooCommerce > Setting > Email.
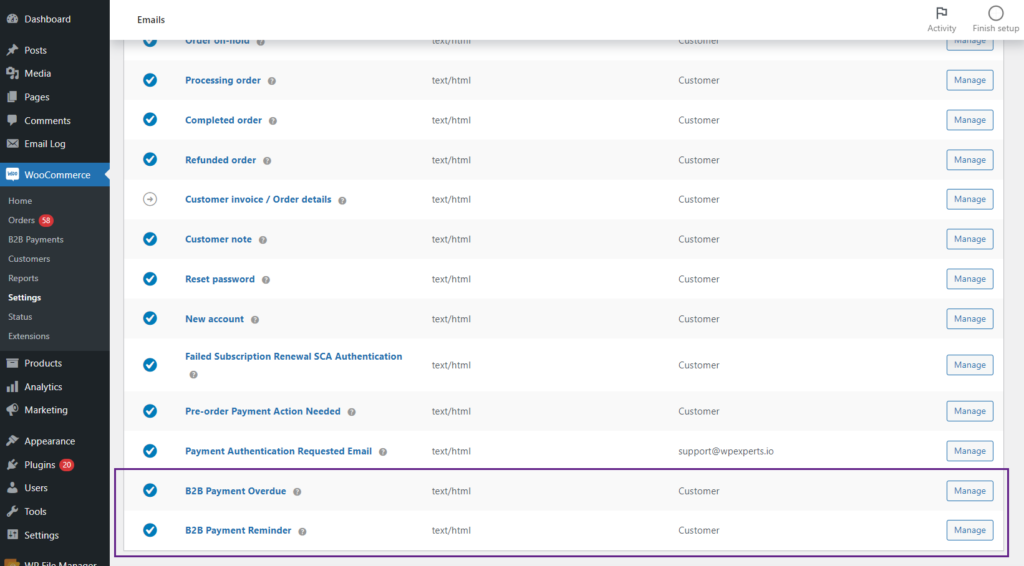
- When the payment is made, a B2B payment table will be sent in the paid email to the customer, notifying them when their next payment is due.
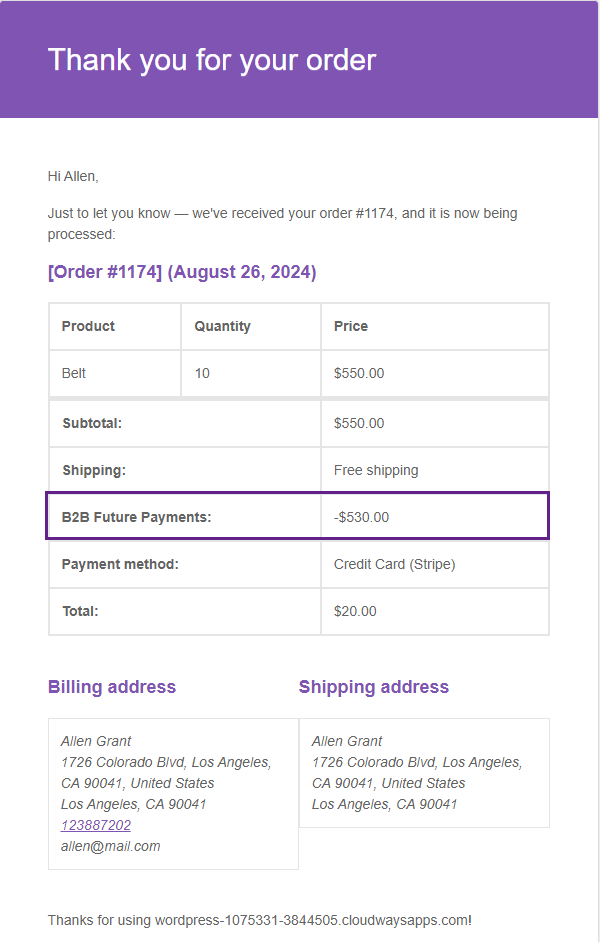
- B2B Future Payments will be sent in the order email.
