Credit Line or Credits for WooCommerce allows you to offer credits to your customers. Your customers can use the credits to make purchases in your site and the credits can be repaid later.
Installation
↑ Volver al principio- Download the .zip file from your WooCommerce account.
- Go to: WordPress Admin > Plugins > Add New and Upload Plugin with the file you downloaded with Choose File.
- Install Now and Activate the extension.
More information at: Install and Activate Plugins/Extensions.
Creating Rules
↑ Volver al principioThe first step in configuring the plugin is to create rules. Without creating rules, Credit Line can be approved only in manual mode. i.e. add credit line for each user manually.
If you don’t want to manually do it for each customer manually, then you have to create Rules and to create rules go to “Credits > Settings > Rules”.
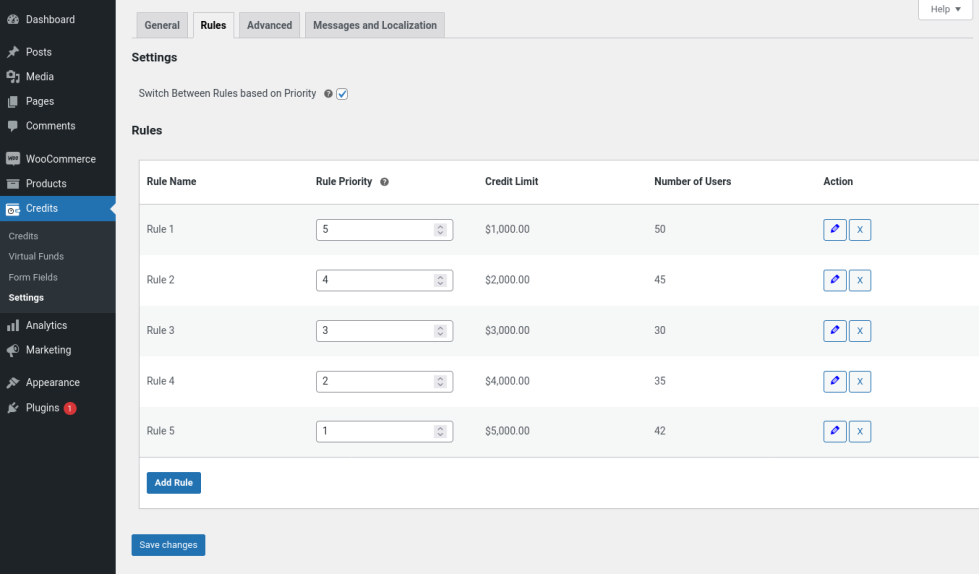
Settings
Switch Between Rules Based on Priority: If your requirement is to automatically increase or decrease the credit limit automatically for customers based on the set criteria, then enable this option. If disabled, the initially approved credit line only will be available for the customer throughout.
Rules
- To create a new rule, click “Add Rule” button and a popup window will be displayed where you have to configure the values for the rule.
Rule Name: Give the name for the rule for your reference.
Criteria: Using AND and OR combinations, you can set multiple criteria for each rule.
Credit Limit: Set the Credit line to be given for the customers if the set criteria matches.
- After configuring the above, click “Save Rule” button.
- Using the above steps, create multiple rules as per your requirement.
- Then, for each rule you have to set the Rule Priority. 1 is the highest priority. The plugin will check for the criteria from highest priority to lowest priority. i.e. first it will check for rule with priority set as 1 and if the criteria doesn’t match, then it will move on to rule with priority set as 2 and so on. The credit limit set in the higher priority rule will be approved for customers.
- Finally, click Save changes button so that rules will be saved.
Rule Creation
Fund Types
↑ Volver al principioThis plugin supports two fund types,
- Admin Funds
- Virtual Funds
To select the fund type, go to “Credits > Settings > Advanced > Advanced Settings > Credit Line has to be Given to Users” and select “From Admin Funds/From Virtual Funds”.
Admin Funds
↑ Volver al principioIn this type, first admin has to add funds to their Admin account and from Admin funds credits can be approved to other users on the site. If there is no enough balance in Admin account, then Credits can’t be approved to users.
If you have selected “From Admin Funds”, then you have to select the admin user(only 1 admin can be assigned). To assign the admin, go to “Credits > Settings > General > General Settings > User to Add Funds” and select the admin. In “Low Funds Threshold” option, set the low threshold for which admin needs to get notified by email in order to remind admin to add funds.
Adding Funds to Admin Account
- Go to frontend “My Account Page > Add Funds”.
- In “Amount to Add” field, set the amount and click “Add Amount” button.
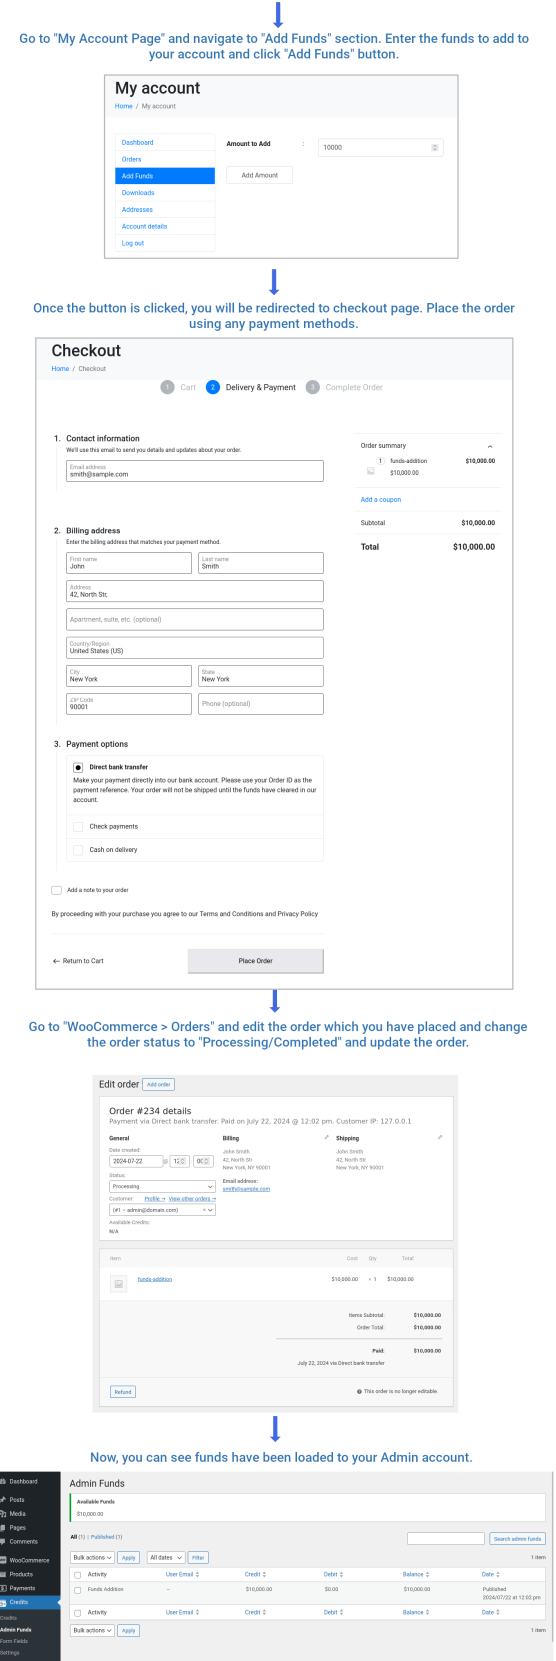
Adding Admin Funds
- Proceed to checkout and place the order.
- Update the order status to “Processing/Completed” so that admin funds will get loaded. To check this, go to “Credits > Admin Funds”. Here you can keep track of Credit and Debit from your Admin funds. Whenever you add funds, it will be listed under “Credit” and whenever you approve credit line to a user, it will be listed under “Debit”.
Virtual Funds
↑ Volver al principioIn this type, you don’t have to do anything. Funds will be approved for customers from a virtual kind of account. You just won’t easily able to track how much funds you have approved totally.
Creating Application Form Fields
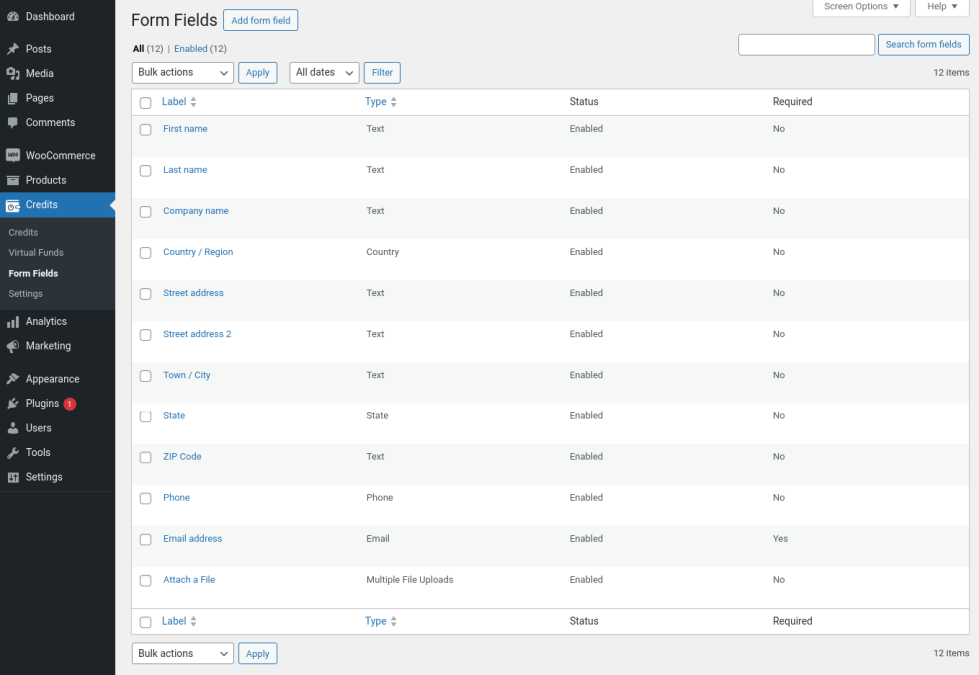
- Application form is not mandatory. You need to configure application form only if your requirement is to get application submitted by the customers in order to approve credit line.
- While activating the plugin for the first time, most of the needed form fields will be automatically created where you can find in “Credits > Form Fields”.
- Using “Bulk Actions” you can simply “Enable/Disable” and set the fields “Optional/Mandatory” as per your requirement.
Application Form Fields
- To create a new form field, click “Add form field” button.
Field label: Give the title for the field here.
Form Field Data: Choose the field type in this option.
Field Default Value: Enter the default value to be set in the field here.
Field Placeholder: Set the placeholder value to be displayed in the field here.
Field Description: If you want to give any information about the field, then you can describe here.
If field type is “Radio/Select/Multiselect”
Field Options: Click “Add” button to add an option and click “Remove” button to remove an option. For each option added, set the key value in “Field Option Key”(which won’t be displayed for the customer) and set the label in “Field Option Label”(this will be displayed as option name for the customer).
Field Default Value: From the list of values added in “Field Options”, enter the “Field Option Key” of the respective option which you need to set as default value.
Form Field Actions
Status: Set the status as “Enabled/Disabled” to show/hide the form field.
Required: If this option is enabled, then customer must to fill/select the option in order to submit the form.
Is unique: If this option is enabled, the field option filled by the customer must be unique. i.e. if customer A fills “Test” in the field, then customer B can’t able to submit the form if they fill the field as “Test”. In that case, they have to give another value.
Plugin Settings
↑ Volver al principioTo configure the plugin settings, go to “Credits > Settings”.
General
General Settings
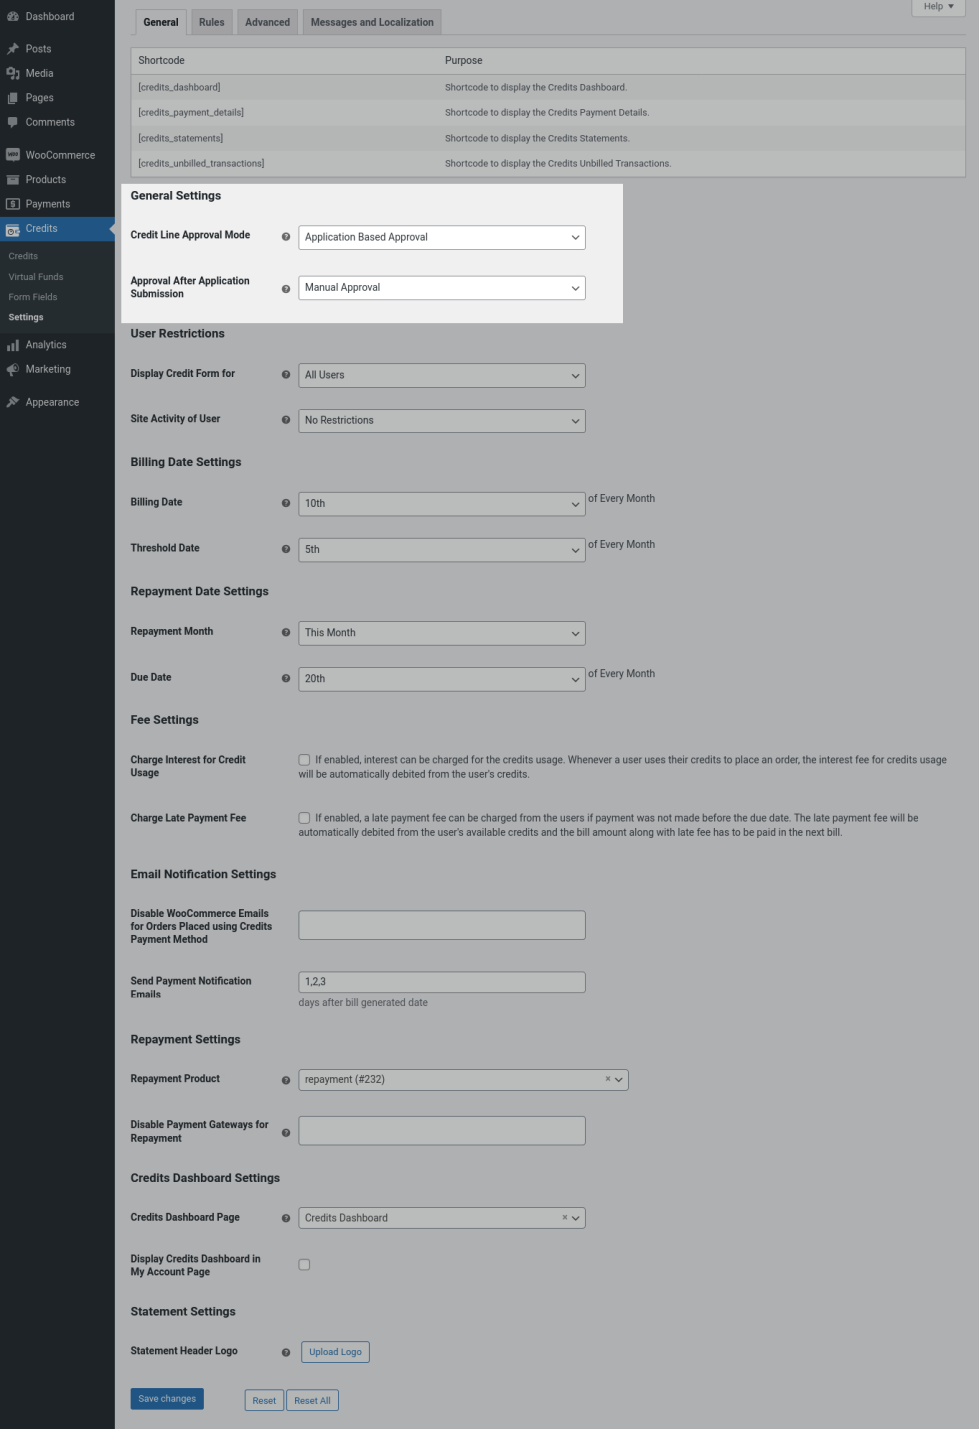
Credit Line Approval Mode: If “Auto Approval” option is selected, if criteria set in the rule matches, credit line will be automatically approved for the customers. There is no process needed from customer side if this option is selected. If “Application Based Approval” is selected, then customers have to submit application form in order to get credit line.
If Application Based Approval is selected,
Application After Application Submission: Select “Manual Approval” if you want to review the application submitted by the customers. You have to manually approve/reject the application. Select “Auto Approval” if you want the application to be automatically approved as soon as customer submits the application if any of the set rule gets satisfied. Else, the application will be rejected automatically.
User Restrictions
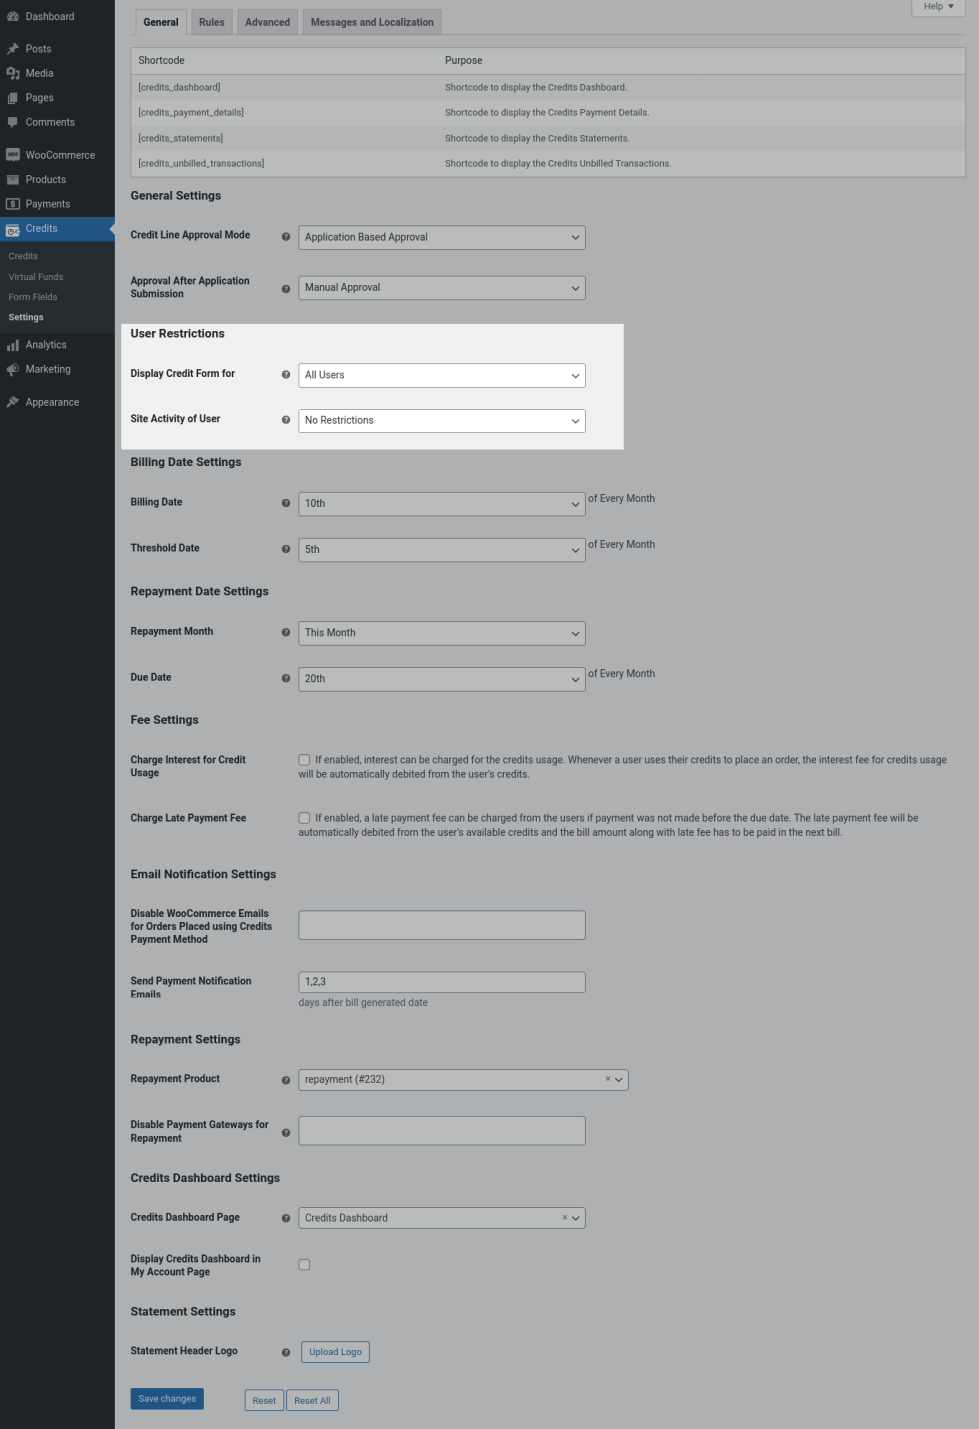
User Restrictions
Display Credit Form for: Credits dashboard will be be displayed only for the selected users.
Site Activity of User: If you want to show the credits dashboard only for the users previous purchase history, then select “Minimum Number of Orders Placed/Minimum Amount Spent on Site” option and set the value accordingly.
Billing Date Settings
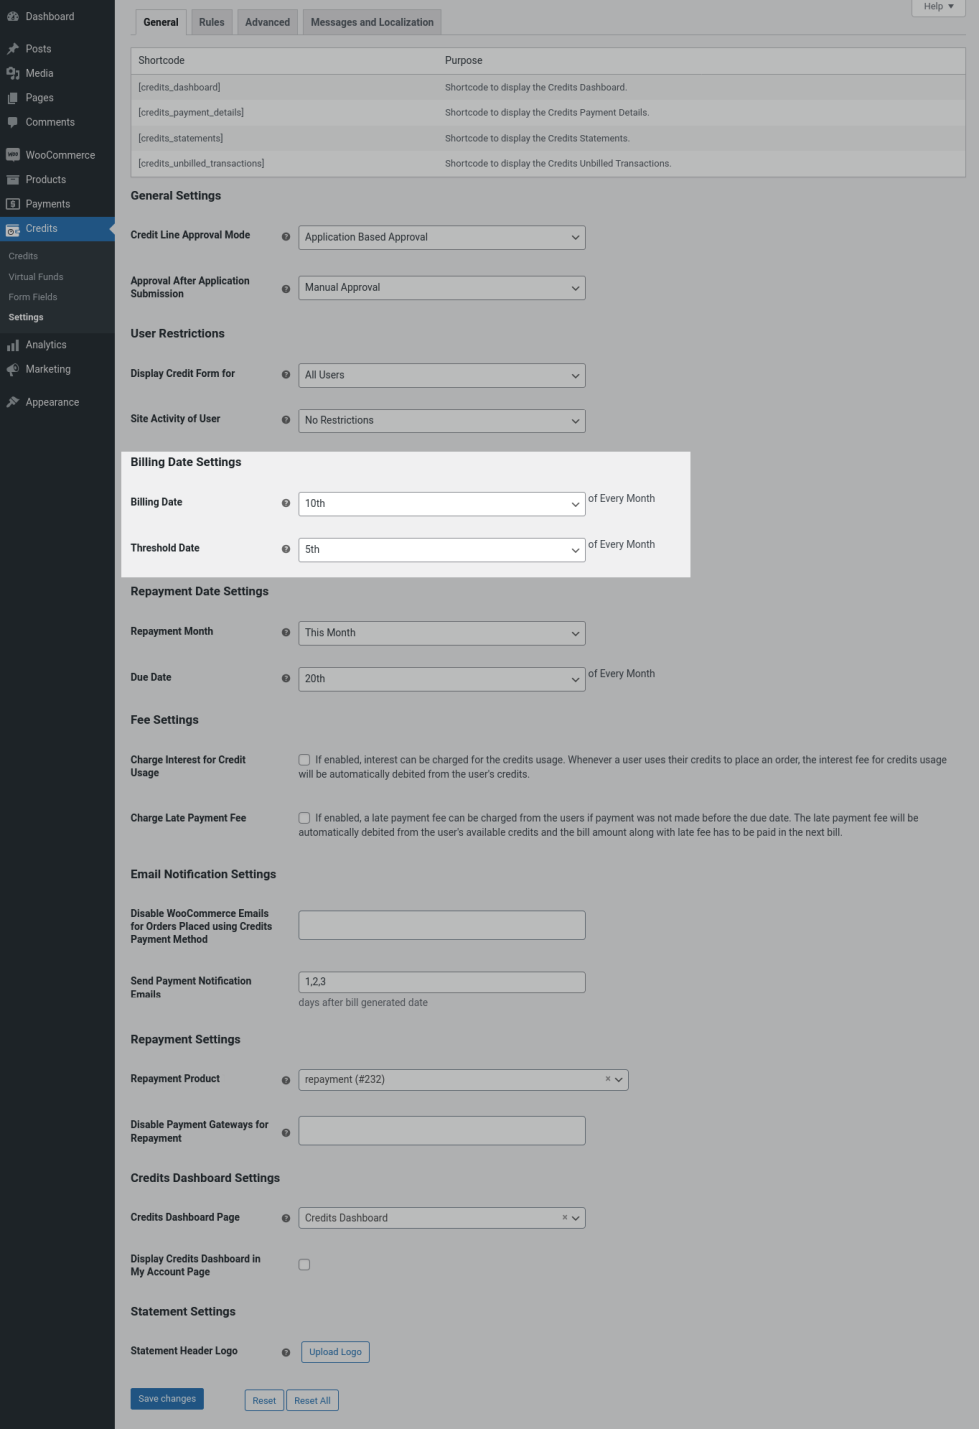
Billing Date Settings
Billing Date: You can set the billing date between 1st and 27th of the month. On the set date here, bill will be generated for all the customers.
Threshold Date: You can also set a threshold date to decide the first billing date of a newly approved customer. By default, the value of the Threshold Date is set to 15. What this means is that suppose when a new customer is getting approved before 15th December, their first bill will be generated on January 1. In case, if the customer was approved after 15th of December, their 1st bill will be generated only on February 1.
Modify Billing Date of Customers
You can update the billing date of each customer. To do so, go to “Credits > Credits > Edit the respective credits account” and go to “Credits” section.
Disable the “Use Global Billing Date” option and you will be able to change the billing date in “Billing Date” option.
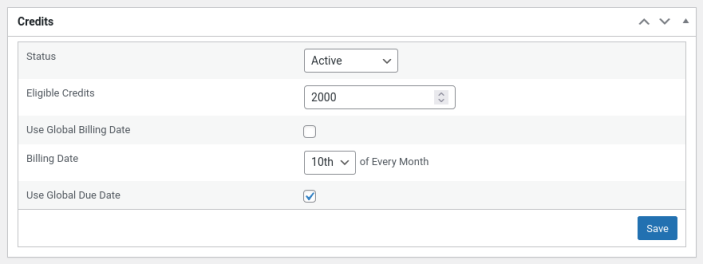
Modifying Billing Date of Customers
Repayment Date Settings
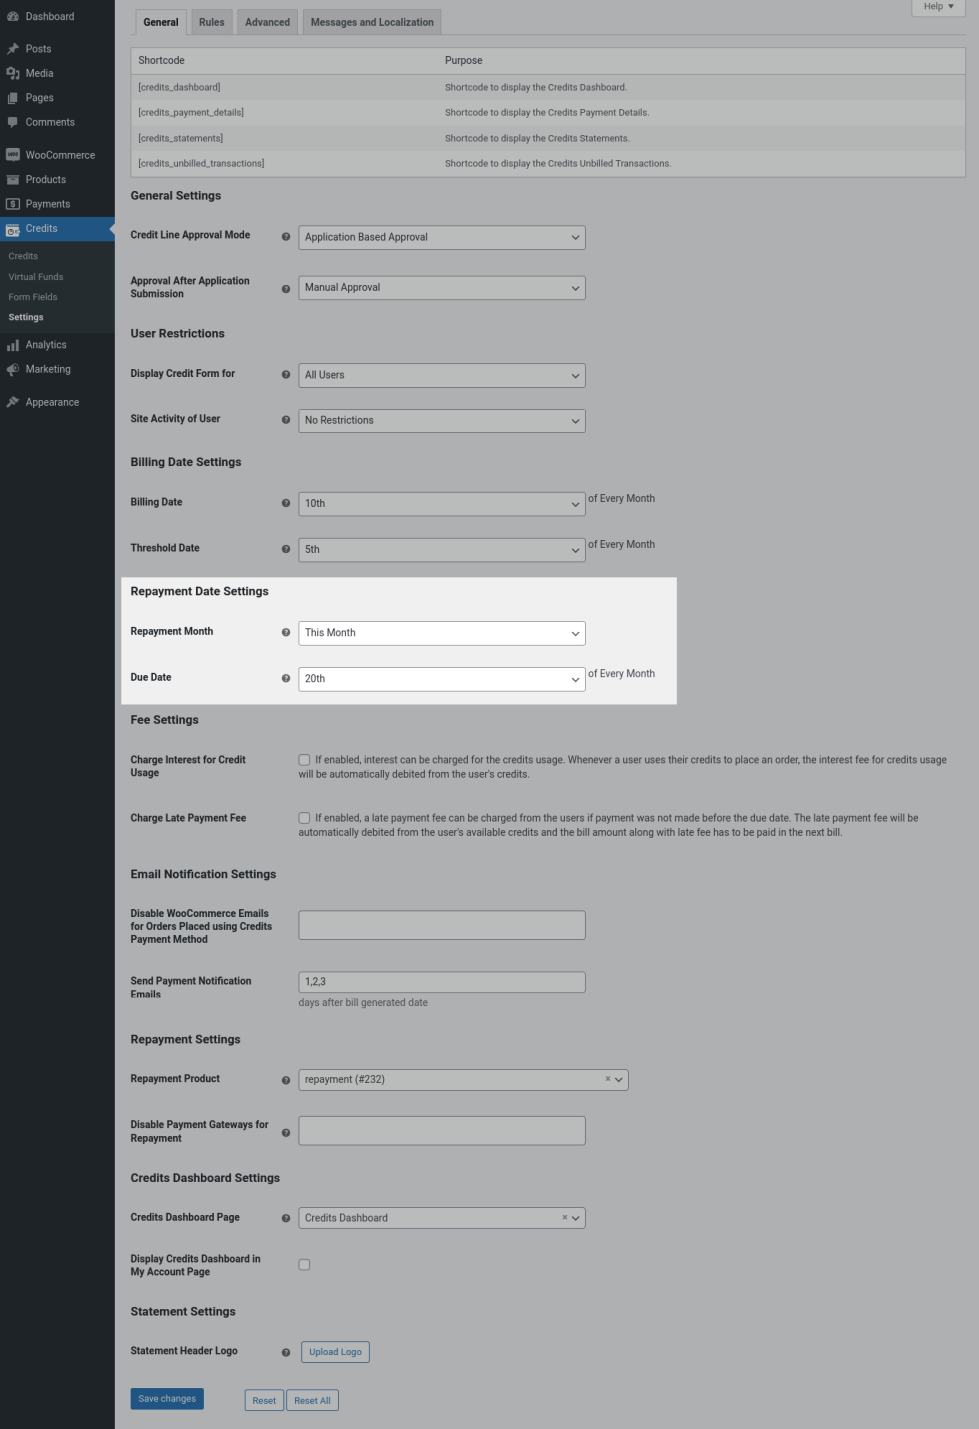
Repayment Date Settings
Once the bill is generated, the customer will have specified number of days before which they have to complete their repayment.
By default, the Date is set to “This Month 20th”. What this means is that when a bill is generated on the 1st of December, the repayment has to be paid on or before 20th of that month(December).
When you set the value as “Next Month 20th”, what this means is that when a bill is generated on the 1st of December, the repayment has to be paid on or before 20th of next month(January).
Note
The availability of a due date is based on the Billing date chosen.
Modify Repayment Date of Customers
You can update the repayment date of each customer. To do so, go to “Credits > Credits > Edit the respective credits account” and go to “Credits” section.
Disable the “Use Global Due Date” option and you will be able to change the due date in “Due Date” option.
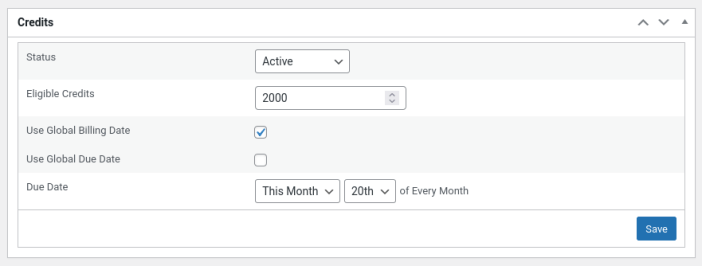
Modifying Due Date of Customers
Fee Settings
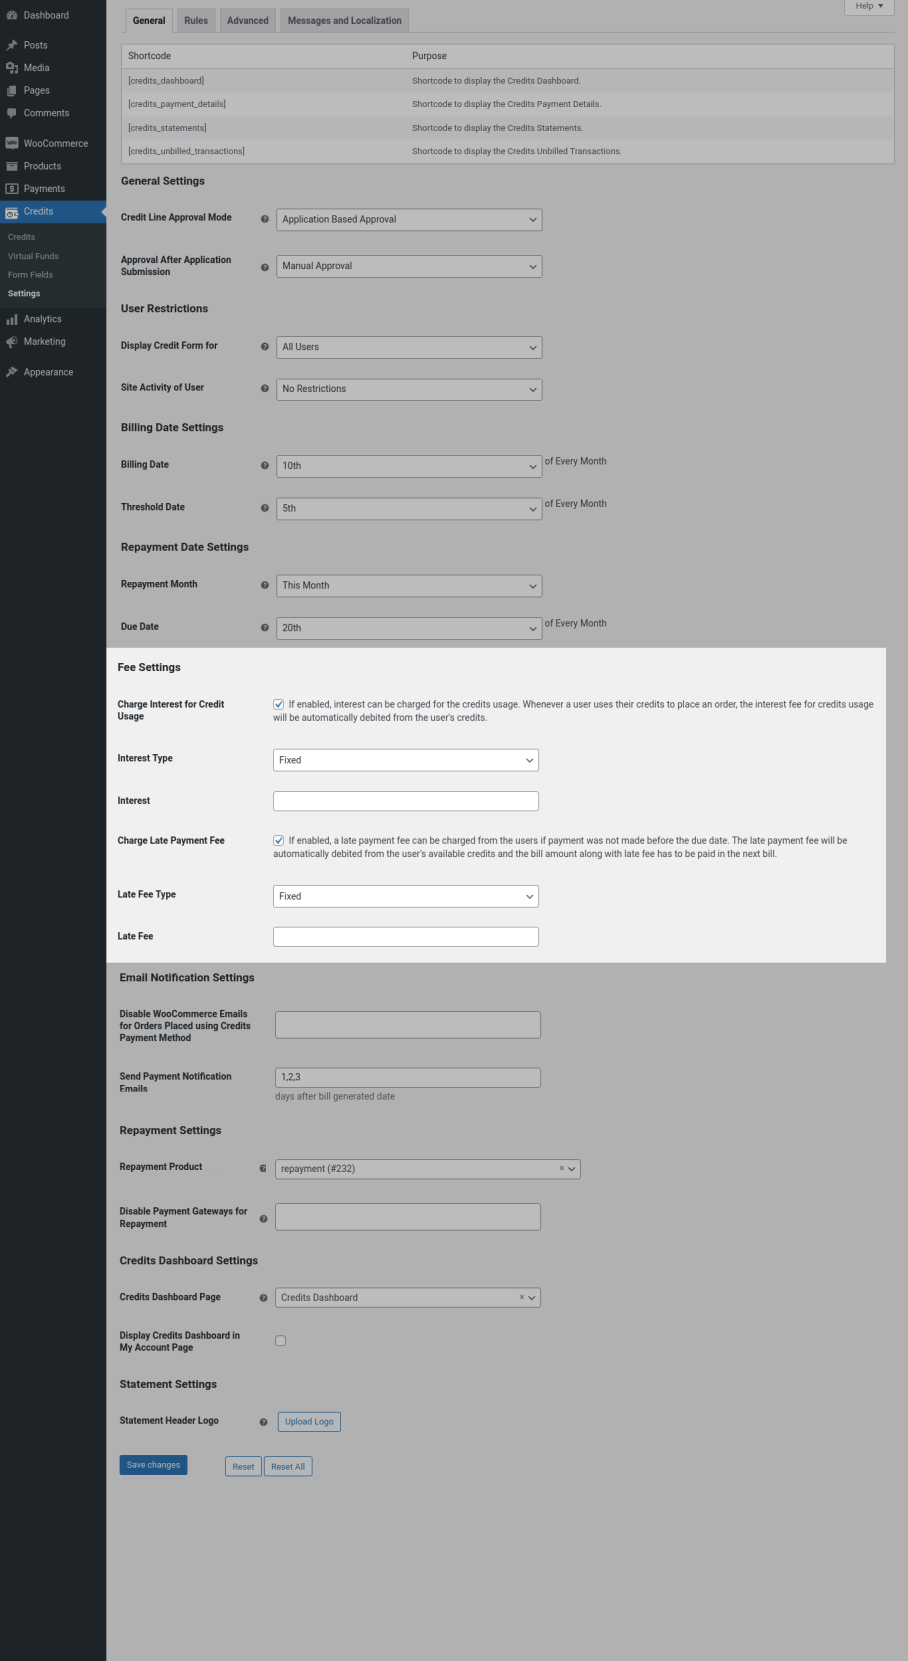
Fee Settings
Charge Interest for Credits Usage: If you want to charge a fee whenever customer uses credits to place orders, then enable this option. Interest will be debited from customer’s account automatically as soon as customer place the order using Credits payment method.
Interest Type: If your requirement is to charge a fixed cost as interest amount, then select “Fixed” and if you want to charge certain percentage of order amount as interest, then select “Percentage”.
Interest: Set the amount or percentage in this field.
Charge Late Payment Fee: If you want to charge a fee if customer doesn’t make the payment on/before the due date, then enable this option. Late payment fee will be debited from customer’s account next day after due date and will be listed in Unbilled transactions.
Late Fee Type: If your requirement is to charge a fixed cost as late fee irrespective of the billing amount, then select “Fixed” and if you want to charge certain percentage of billing amount as late payment fee, then select “Percentage”.
Late Fee: Set the amount or percentage in this field.
Note:
If you have enabled late fee globally and want to disable late fee for certain customers, then go to “Credits > Credits > Edit the credits account for the respective customer” and navigate to “Late Fee Actions” section and disable the “Charge Late Fee” option. Similarly, if you have disabled globally and want to enable it for specific customers, then you can enable the option.
Email Notification Settings
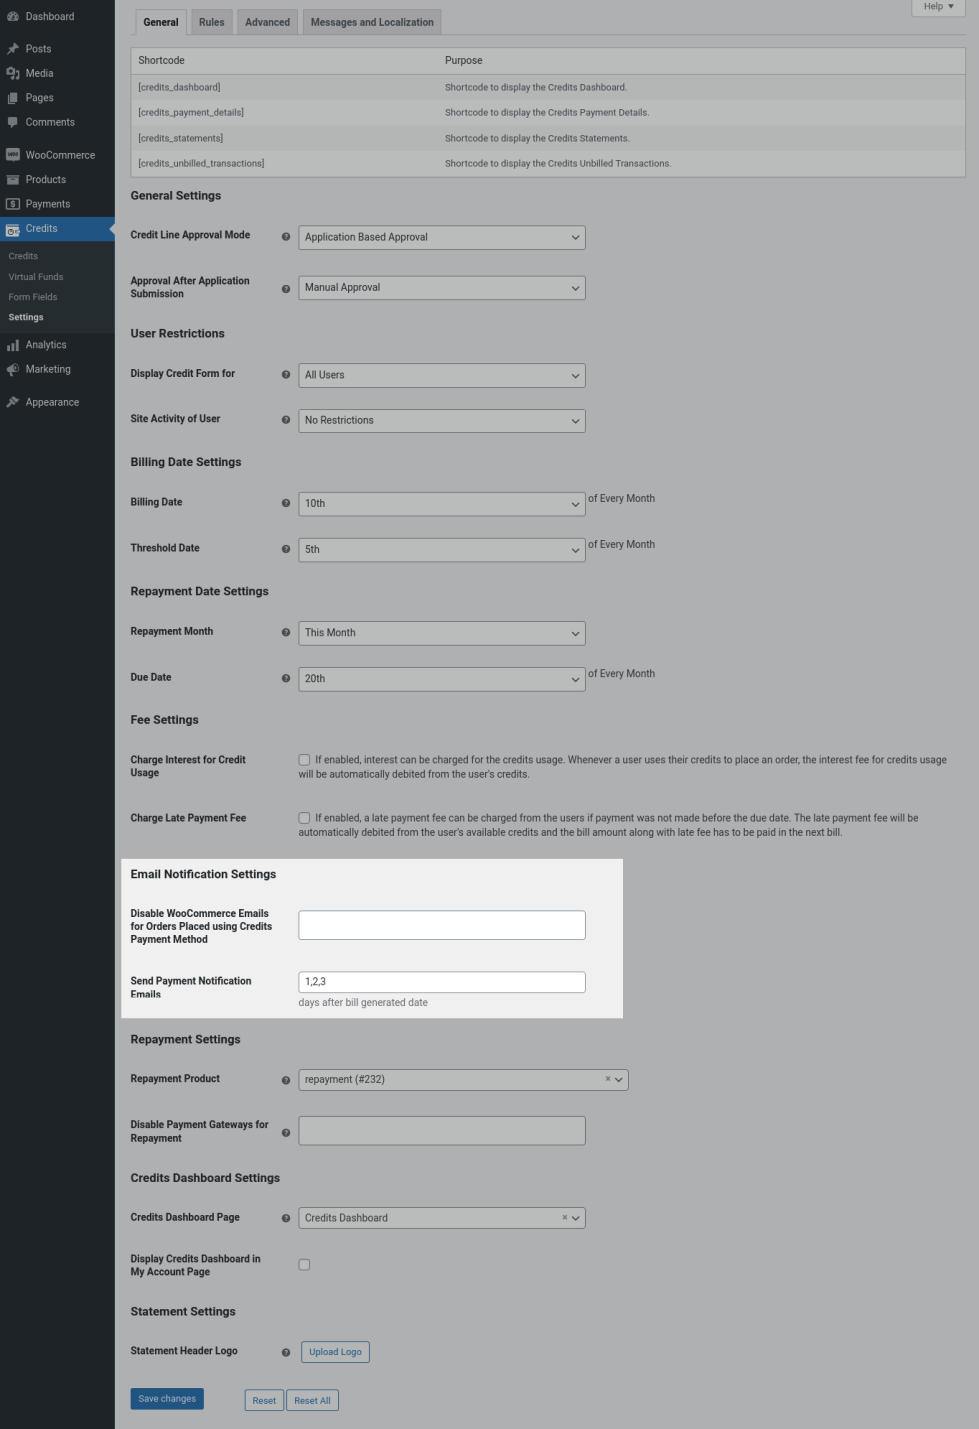
Email Notification Settings
Disable WooCommerce Emails for Orders Placed using Credits Payment Method: If you want any specific emails not to be sent when placing orders using Credits, then select the email templates which you don’t want to send in this option.
Send Payment Notification Emails: The plugin will automatically send repayment notification email to the customers. When to send the email can be controlled here. If you have set 1,2,3 here then notifications will be sent after 1, 2 and 3 days after billing date.
Repayment System
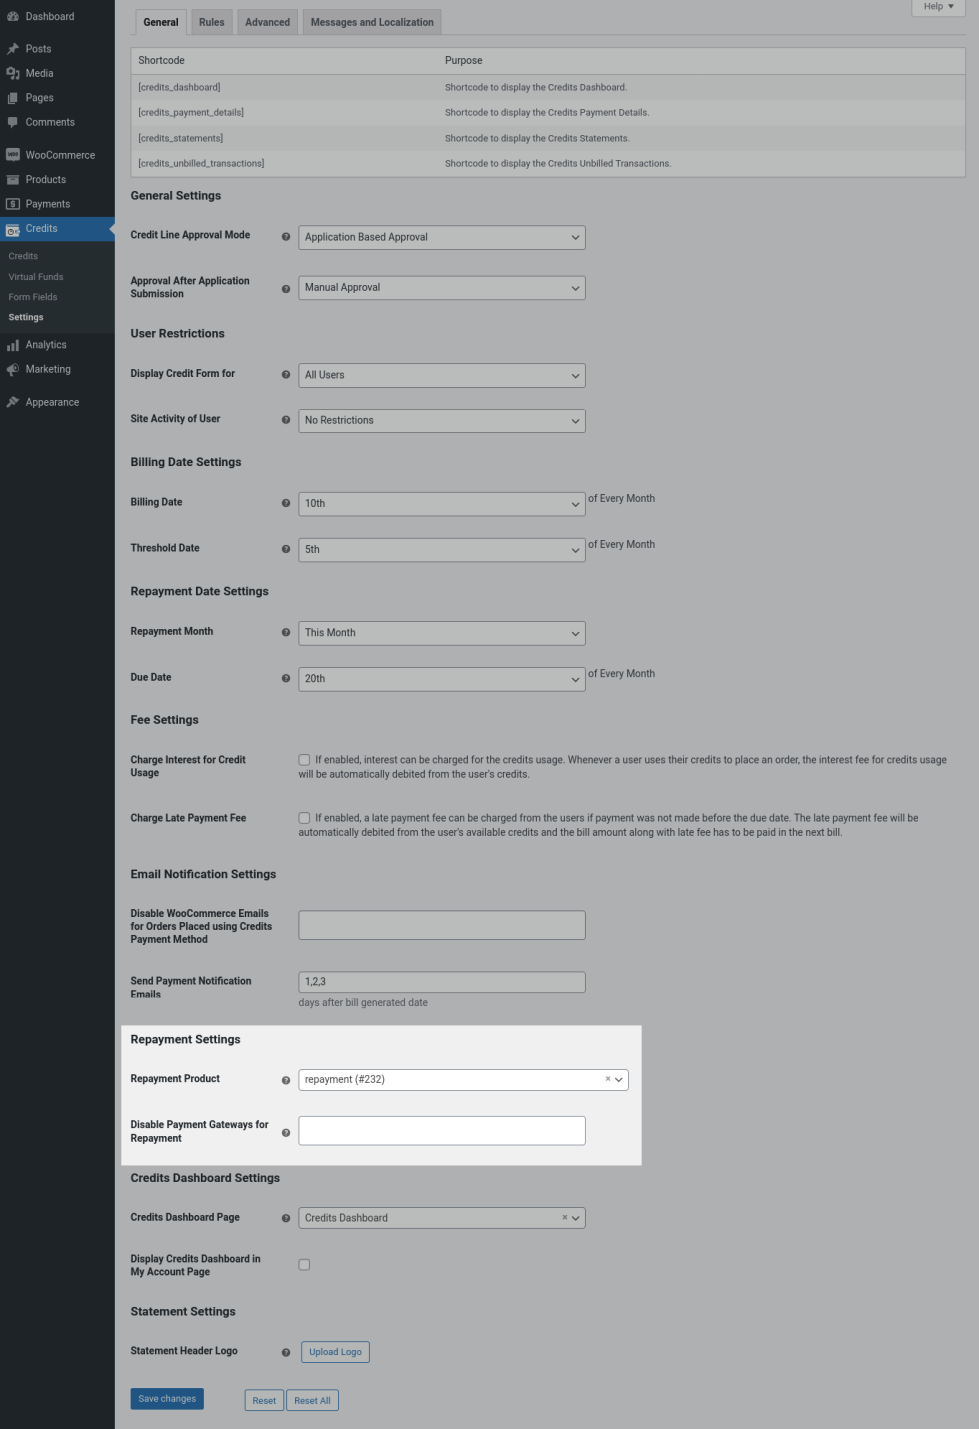
Repayment Settings
Repayment Product:Repayments will be done through WooCommerce checkout. So, a product is needed in order to process the repayment. While activating the plugin for the first time, a product named “Credits Repayment” will be automatically created and set as repayment product which won’t be displayed for the customers in Shop/Category pages. If you want to rename the product, then go to edit product page of this product and rename it. You can also set a different product here if needed.
Disable Payment Gateways: If you want to hide any specific payment methods for credits repayments, then select the payment methods to be hidden in this option.
Credits Dashboard Settings
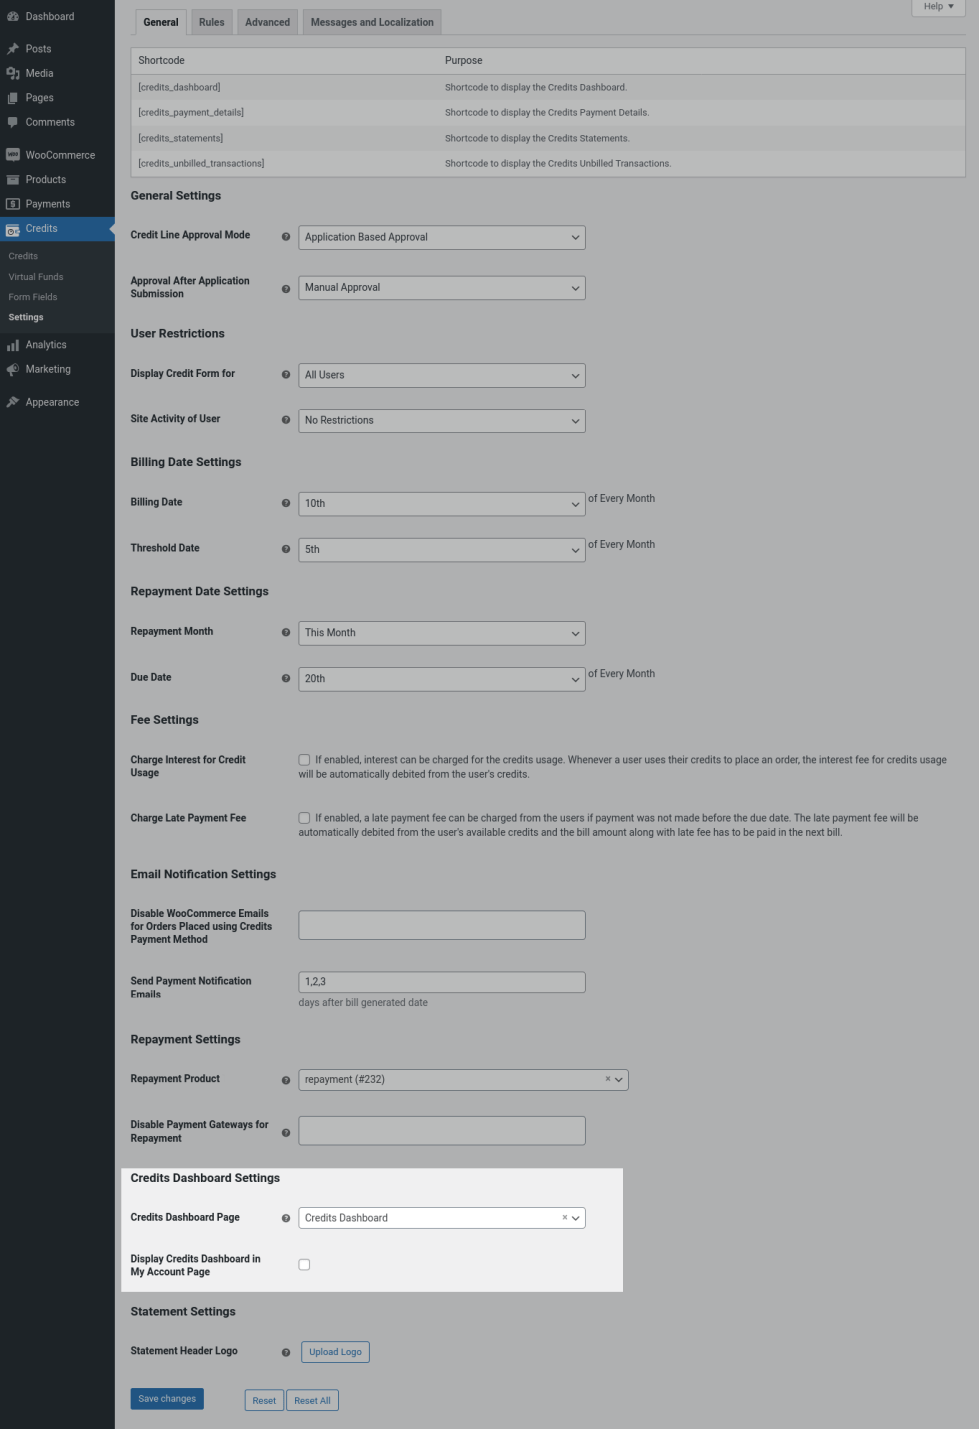
Credits Dashboard Settings
Credits Dashboard Page: When activating the plugin for the first time, a new page named “Credits Dashboard” will be automatically created and set as dashboard page. If you wan to set a different page as dashboard page, then select the page here.
Display Credits Dashboard in My Account Page: If you want to show Credits dashboard in My Account page of customers(“Credits” section will be displayed), then enable this option.
Advanced
Advanced Settings
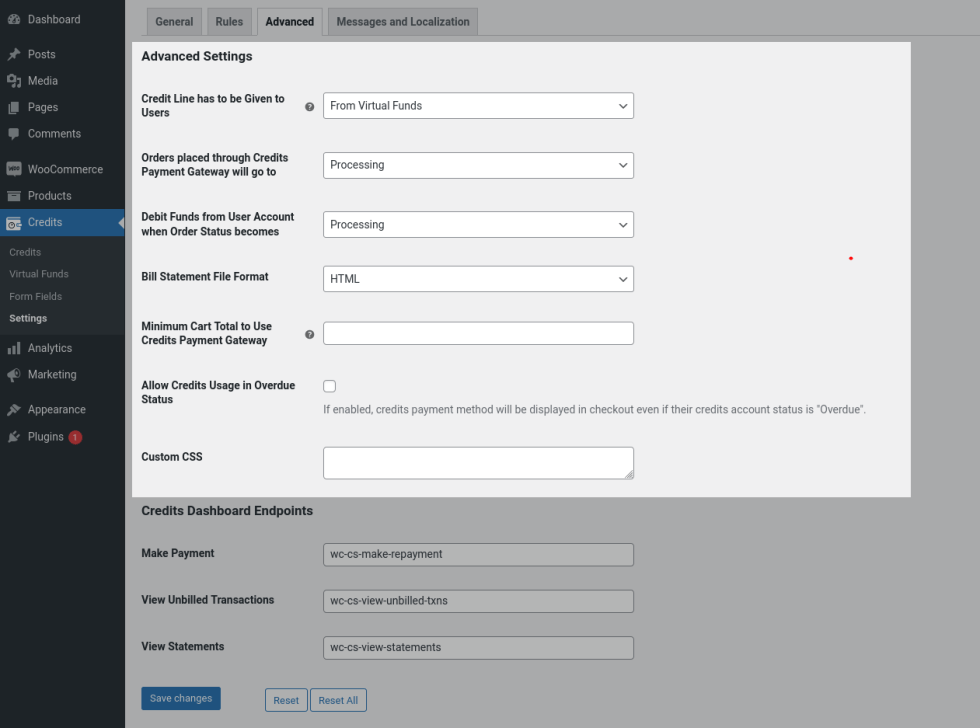
Advanced Settings
Credit Line has to be Given to Users: Select “Admin Funds” in this option if you want to approve credit line to customers from admin funds. Select “Virtual Funds” to approve credit line from virtual kind of account without any restrictions or management.
Orders Placed Through Credits Payment Gateway will Go to: Select the order status be which the orders to be moved when placed using credits payment method.
Debit Funds from User Account when Order Status Becomes: Select the order status to debit credits from the user account when placing the orders using credits payment method.
Bill Statement File Format: Choose the file format of credits statements(PDF/HTML).
Minimum Order Total to Use Credits Payment Gateway: If you want to show credits payment method only when the order total is more than a set value, set the minimum amount here.
Allow Credits Usage in Overdue Status:If customer doesn’t make the repayment even after due date, then their Credits account will move to “Overdue” status. If you want to allow the customers to use their Credits even in Overdue status, then enable this option. If you want to hide Credits payment method in Overdue status, then disable this option.
Custom CSS: If you want to add your own CSS, then you can update it here.
Credits Dashboard Settings

Credits Dashboard Endpoints
You can customize the credits related URL endpoints here.
Messages and Localization
Credits related messages displayed in frontend can be customized in “Messages” section and frontend labels can be customized in “Localization” section.
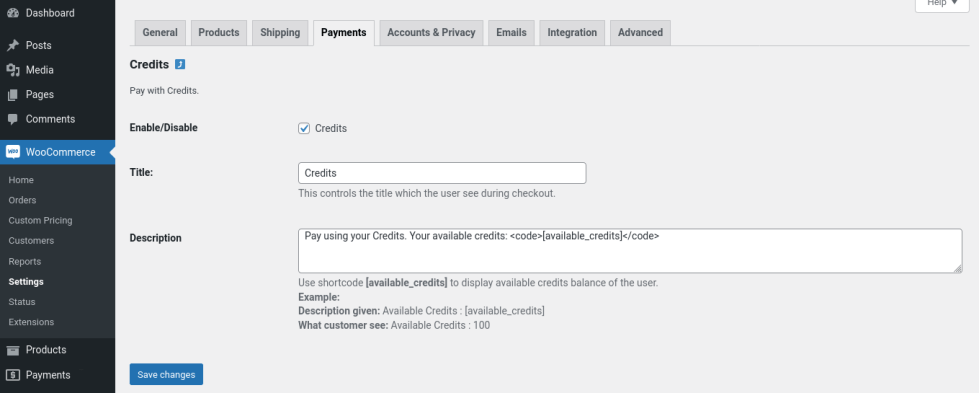
Credits Payment Method Configuration
To enable Credits payment method and to configure the gateway, go to “WooCommerce > Settings > Payments > Credits” and click “Manage” button.
Enable/Disable: Enable this checkbox to display Credits payment method in checkout page.
Title: The title given in this field will be displayed as payment method name.
Description: In this field you can describe about credits payment method.
Credits Payment Method Configuration
Usage
↑ Volver al principioCredits Approval
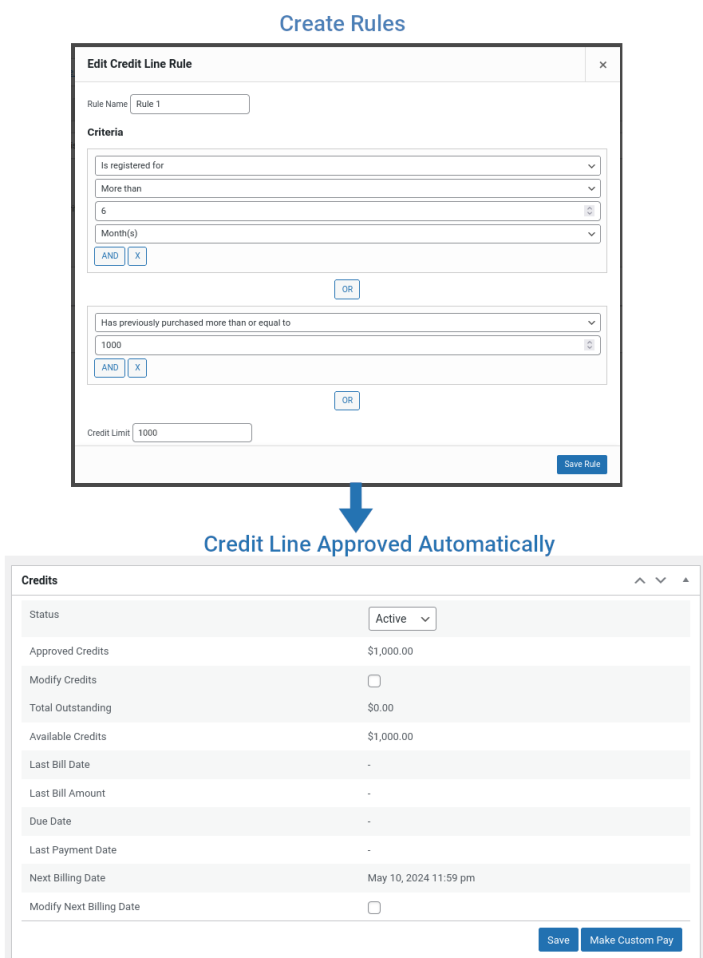
↑ Volver al principio1. Credit Line Approval Mode – Auto Approval
- Create rules in “Credits > Settings > Rules”.
- As soon as the criteria set in the rule matches, credit line will be approved for the customers and it will be listed in “Credits > Credits”.
Credits Auto Approval – Workflow
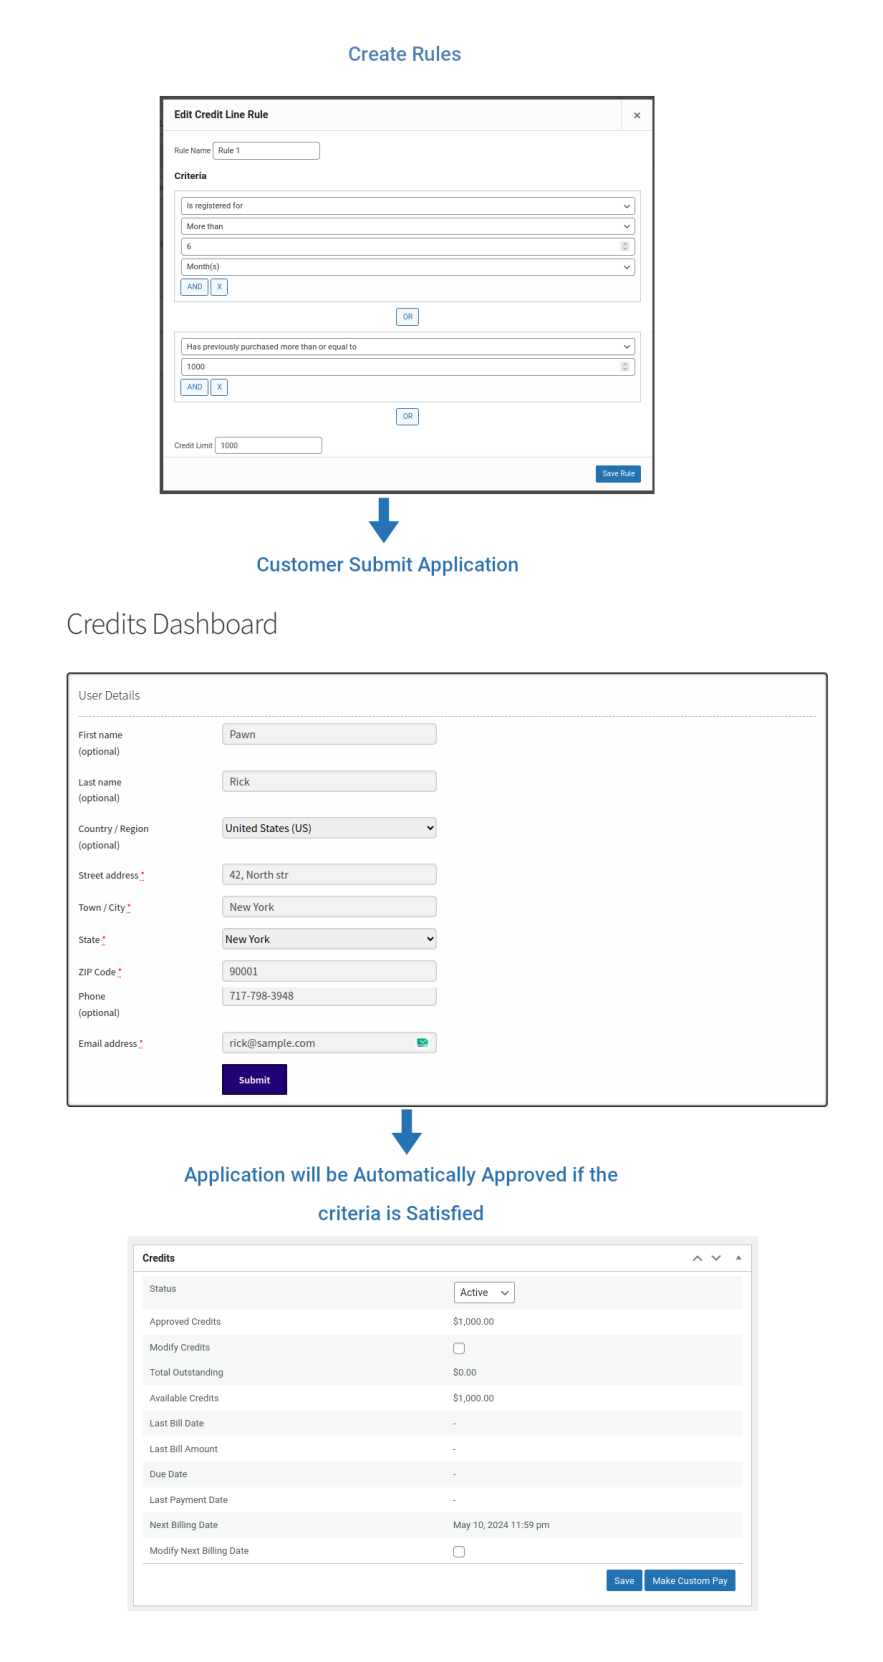
2. Credit Line Approval Mode – Application Based Approval | Approval After Application Submission – Manual Approval
- Create rules in “Credits > Settings > Rules”.
- Customers need to submit application form from the Credits Dashboard page.
- As soon as application is submitted, it will be listed in “Credits > Credits” with status set as “Pending”.
- Edit the Credits account and navigate to “Credits” section.
- Change the status to “Active” so that based on rules, how much credits the customer is eligible will be displayed in “Eligible Credits” option. If no rules are matched, then 0 will be displayed here.
- Update the status to “Active” to accept the application and select “Rejected” to reject the application. Finally click “Save” button.
Credits Application Based Manual Approval – Workflow
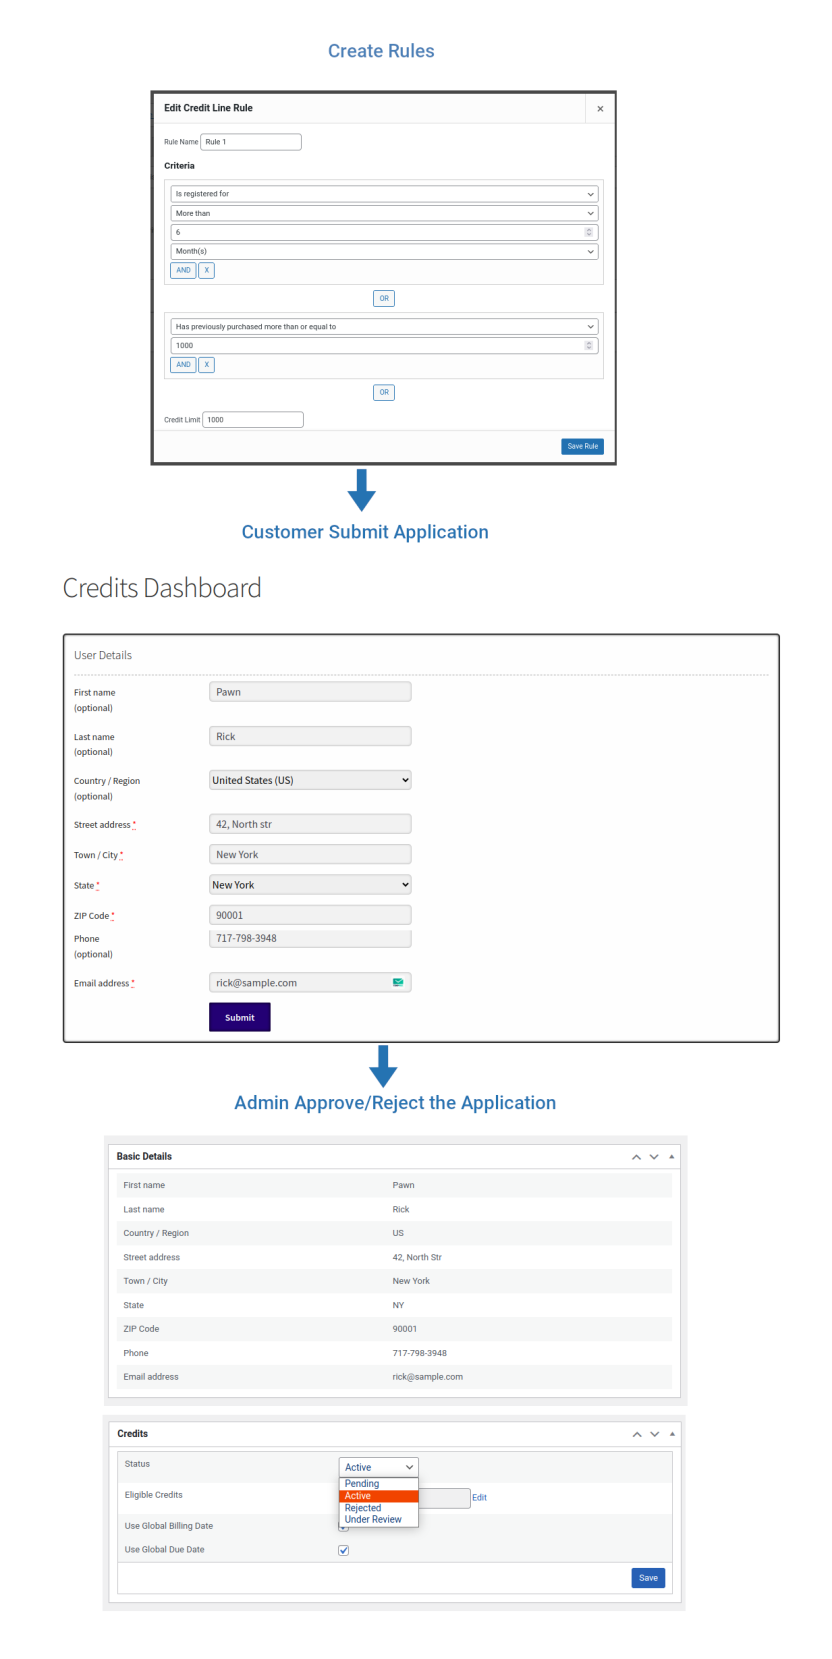
3. Credit Line Approval Mode – Application Based Approval | Approval After Application Submission – Auto Approval
- Create rules in “Credits > Settings > Rules”.
- Customers need to submit application form from the Credits Dashboard page.
- As soon as application is submitted, the plugin will check the rules and their application will be approved automatically and Credit Line will be given based on rules. If any of the rules doesn’t match, then their application will be rejected.
Note: In this mode, we are using a Hook “wc_cs_credits_background_process” which will run every 5 minutes to automatically check the rules and it may take up to 5 minutes to approve/reject the application.
Credits Application Based Auto Approval – Workflow
4. Giving Credit Line Manually
The first 3 methods requires Rules to be created. But, in this method rules are not necessary.
- Go to “Credits > Credits”.
- Click “Add Credits” button.
- Search for the user whom you need to give credits in “Register Credits to New User” pop-up window.
- After reviewing the customer details, click “Proceed to Register” or to abort the registration click “Cancel” button.
- Once registered, update the “Status” to “Active”.
- In “Eligible Funds” option, if they have satisfied with any of set Rules, then the credit line will be displayed. If you want to update the credit limit, then click on “Edit” link and add the Credit Line and finally click “Save” button.
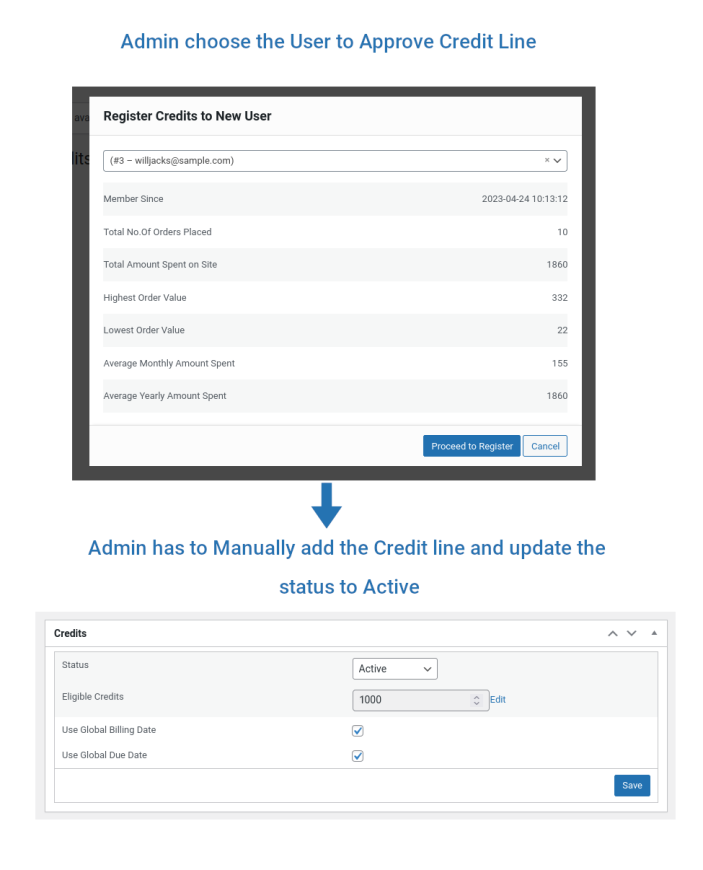
Manually Approving Creditline – Workflow
Customers Placing Orders Using Credits
↑ Volver al principio- Customers adds product(s) to the cart.
- In checkout page, along with other payment methods, “Credits” payment method will be displayed if they have eligible credits in their account. If the order amount is more than the available credits in their account, then “Credits” payment method won’t be displayed for the customer.
- Once the order is placed, amount will be debited from the customers account and will be listed in “Unbilled Transactions” in their dashboard.
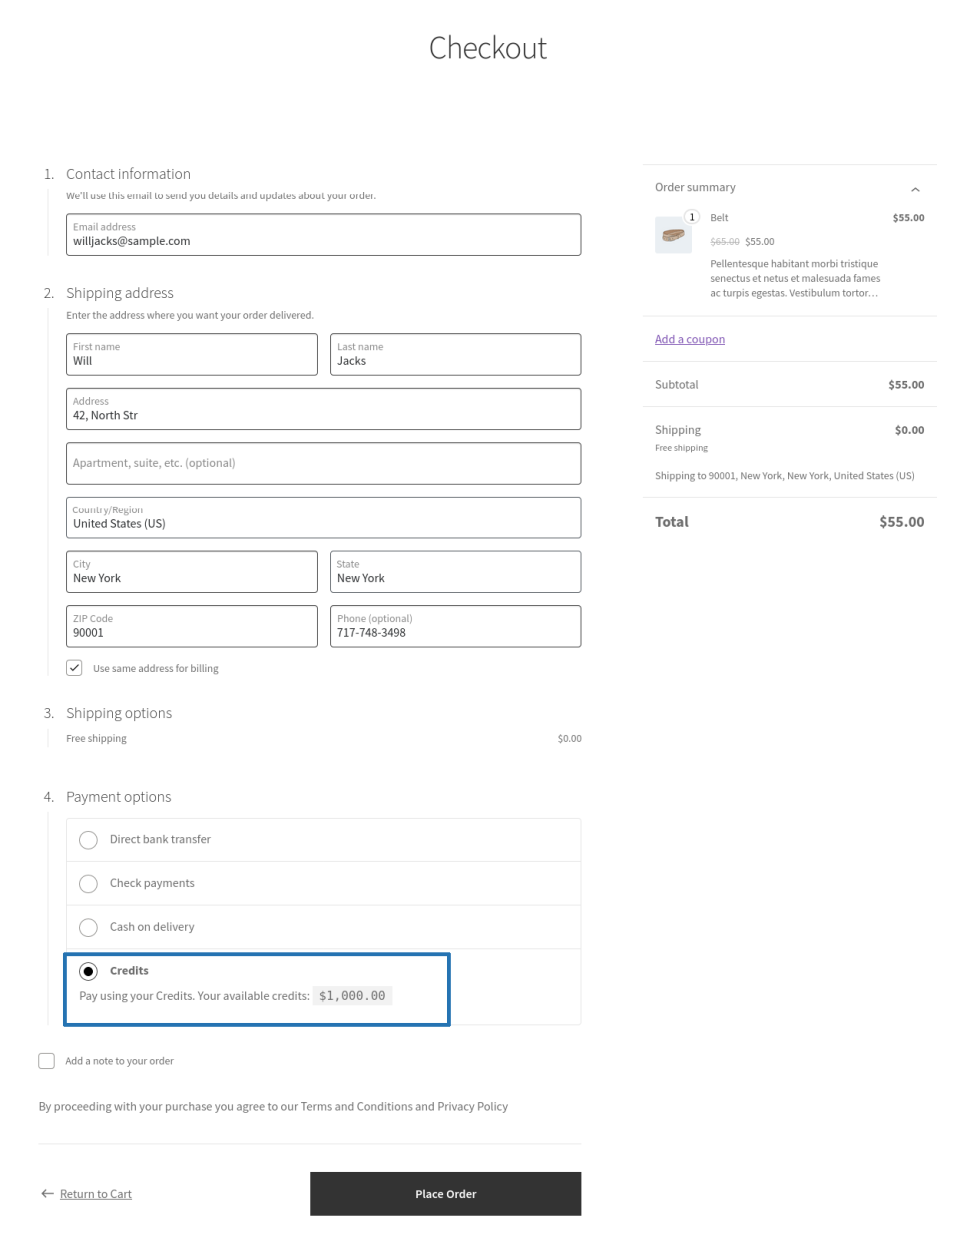
Customers Placing Orders Using Credits Payment Method
Customers Making Advance Payments/Repayments
↑ Volver al principioTo make advance payments/repayments, customers have to go to their Credits Dashboard.
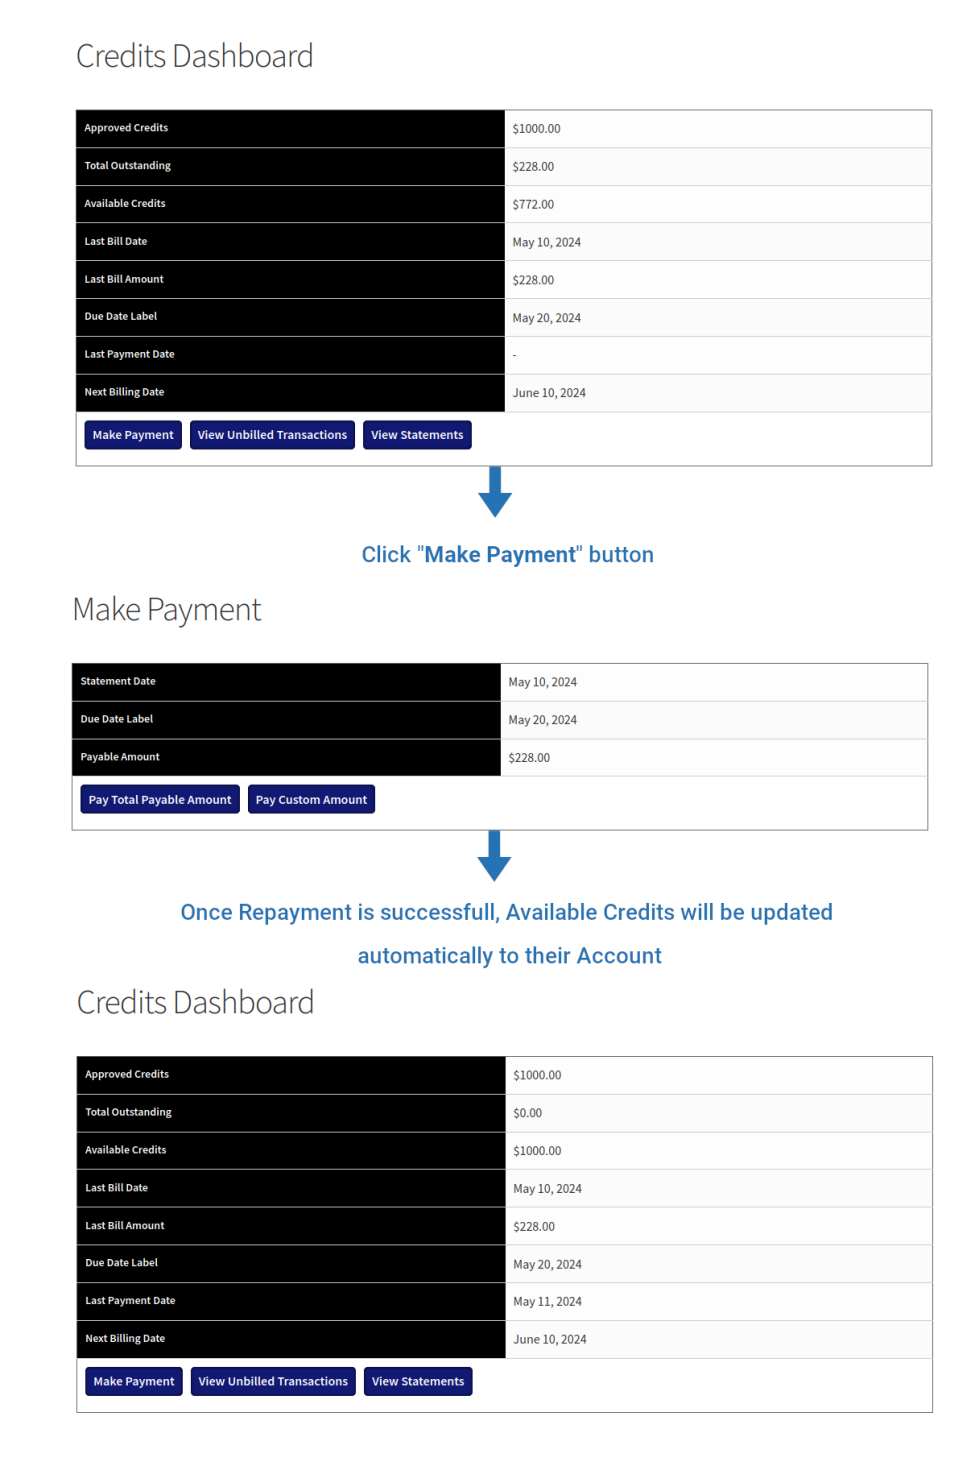
Customers Making Payments
Making Advance Payments
↑ Volver al principio- If the bill is not generated, then customers will be able to make advance payments.
- For doing this, customers need to go to their Credits Dashboard.
- Click on “Make Payment” button and then click “Pay Custom Amount” button.
Making Repayments
↑ Volver al principio- If the bill is generated, then customers can pay their bill.
- For doing this, customers need to go to their Credits Dashboard.
- Click on “Make Payment” button and then click “Pay Total Payable Amount” button.
- Now, enter the advance amount in the popup window and click “Proceed to Pay” button.
- They will be redirected to checkout page and they can make the payment just like placing orders on the site.
- Once the order status becomes Processing/Completed, payment will be added in their Available Credits.
Admin Updating Payments on Behalf of Customers
↑ Volver al principioIf customers have paid you in any offline mode(outside WooCommerce) and to update the payments, go to “Credits > Credits > Edit the credits account of the respective user” and navigate to “Credits” section.
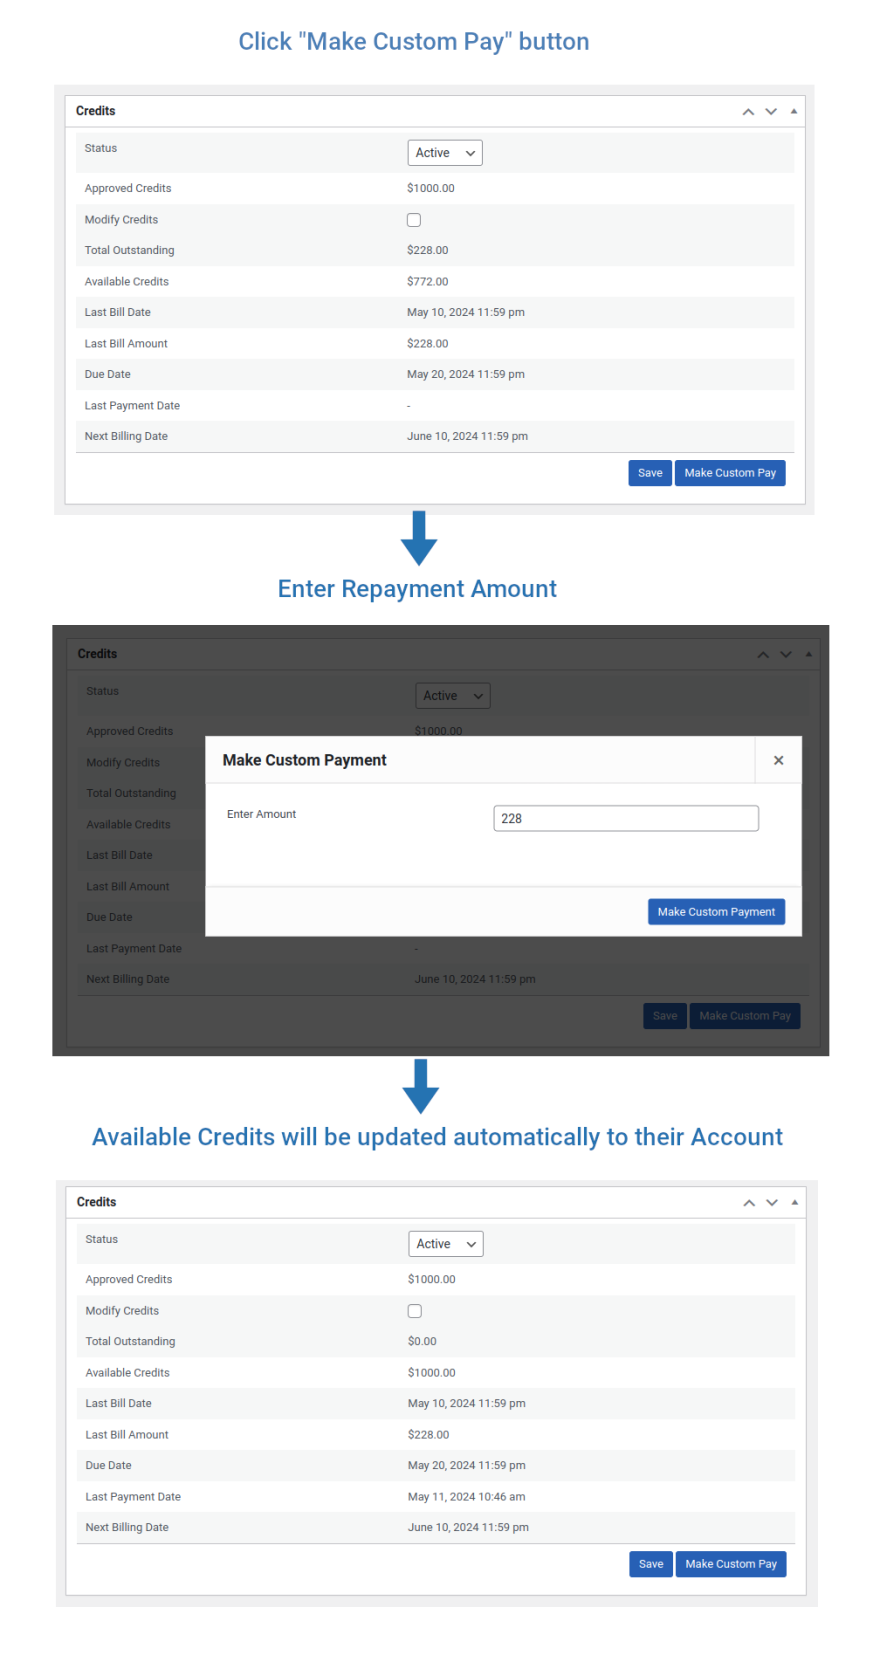
Offline Repayments by Admin
Click “Make Custom Pay” button and you will be asked to enter the amount and finally click on “Make Custom Payment” button so that payment will be updated.
Admin Manually Credit/Debit Funds from Customer’s Account
↑ Volver al principioTo credit/debit funds, go to “Credits > Credits > Edit the credits account of the respective user” and navigate to “Transactions” section.
Click “Credit/Debit Funds” button and a popup window will be displayed.
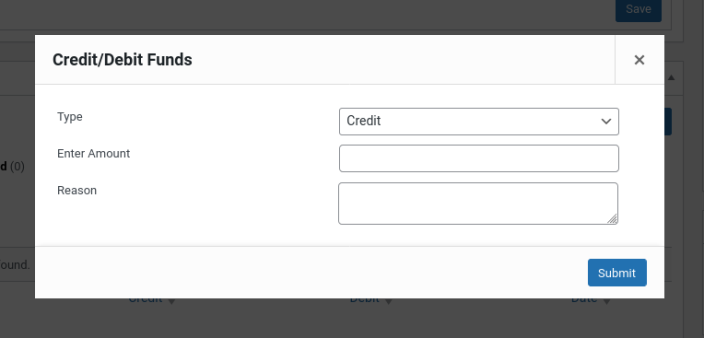
Admin Manually Credit or Debit Funds
- In “Type” option, select “Credit” if you want to add funds to customer’s account and select “Debit” to reduce funds from their account.
- Enter the funds to credit/debit in “Enter Funds” option.
- In “Reason” field give the details about credit/debit.
- Finally, click “Submit” button.
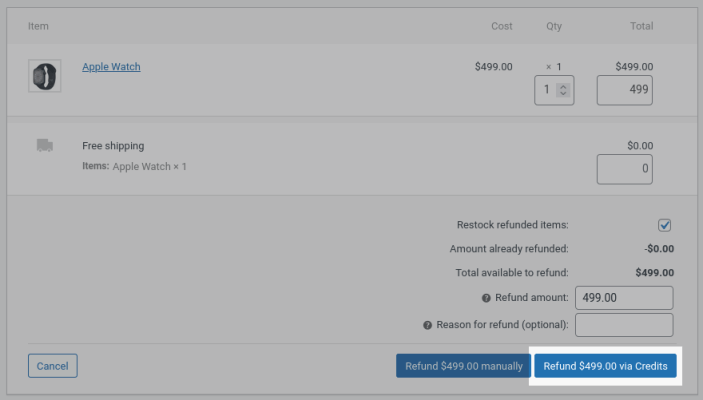
Refunding Credits
↑ Volver al principio- If order is placed using “Credits” payment method, then it is possible to refund directly to customer’s credits account.
- To refund, go to “WooCommerce > Orders > Edit the order which you want to give refund”.
- Click “Refund” button and after filling the refund amount, finally click “Refund $xx Via Credits” button so that refund amount will be directly added to the customer’s credits account.
Refunding Directly via Credits
Credits Workflow Flowchart
↑ Volver al principioVirtual Funds with Manual Approval – Flowchart
↑ Volver al principio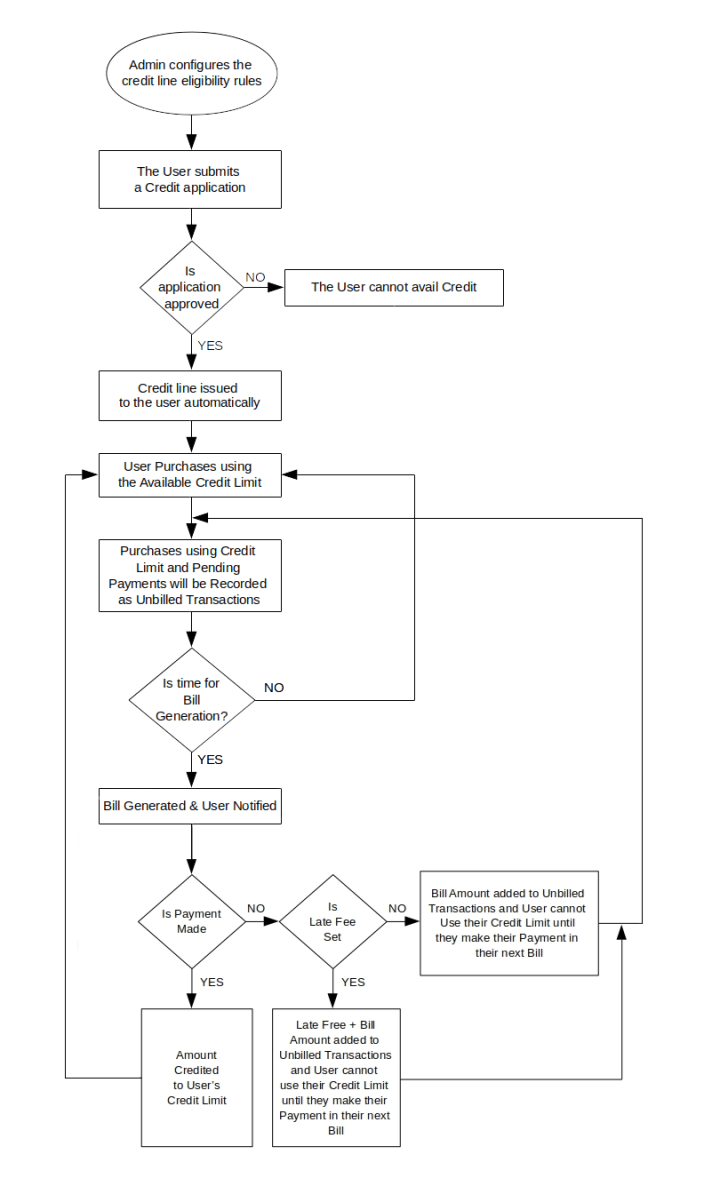
Virtual Funds with Auto Approval – Flowchart
↑ Volver al principio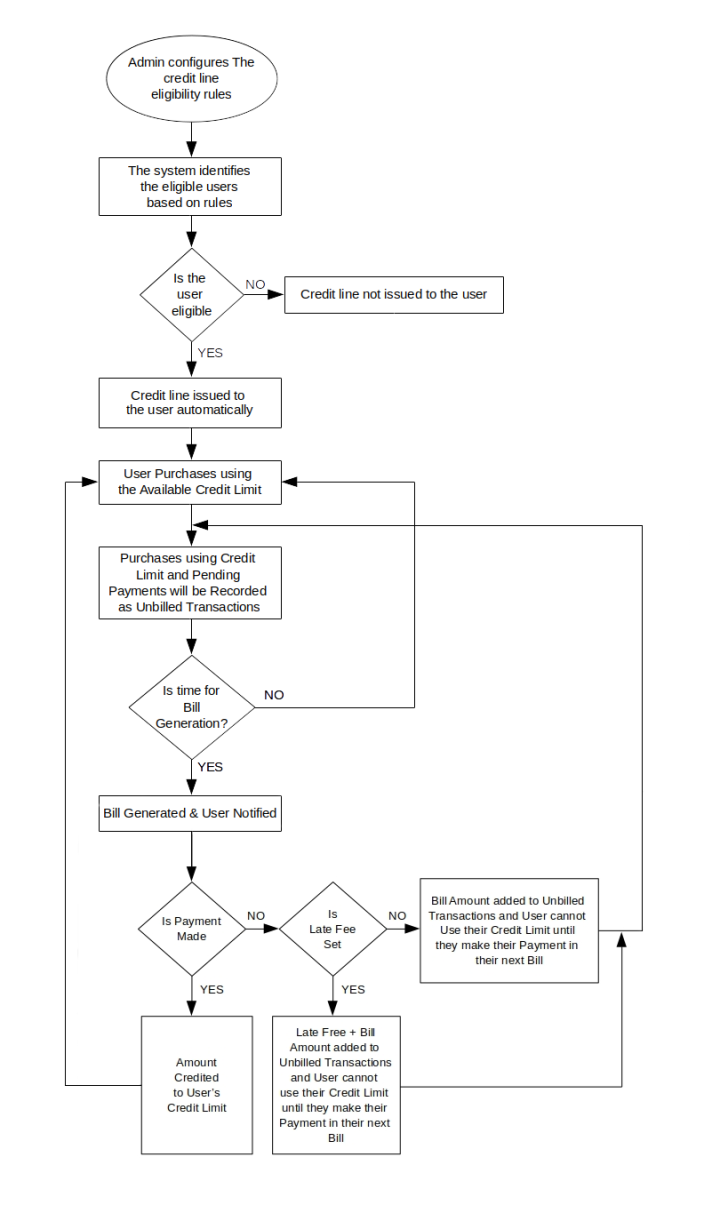
Admin Funds with Manual Approval – Flowchart
↑ Volver al principio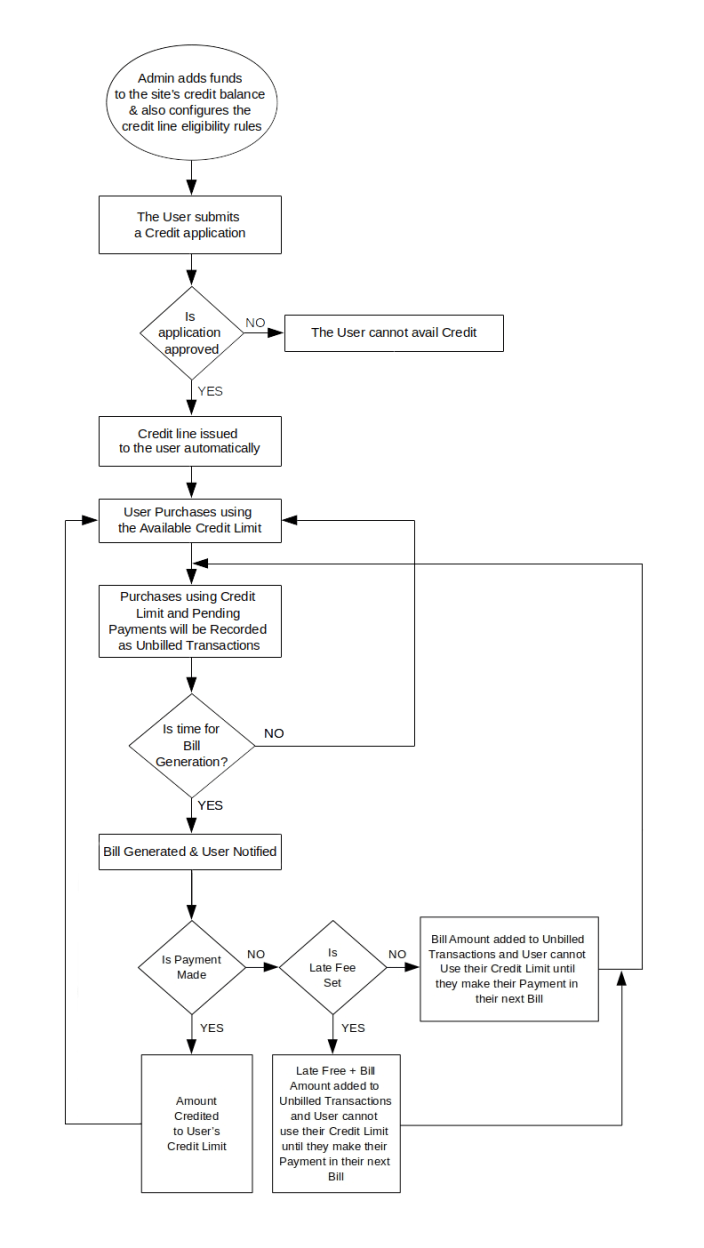
Admin Funds with Auto Approval – Flowchart
↑ Volver al principio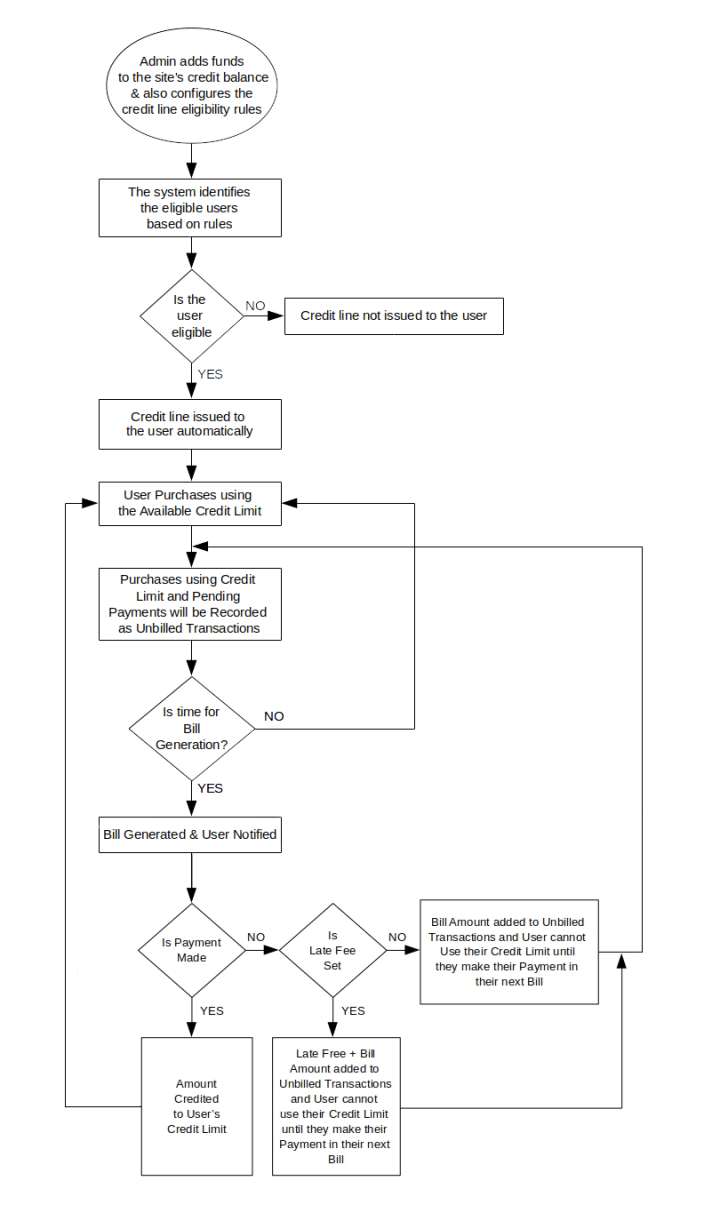
Credits Repayment by Admin
↑ Volver al principioSite admin can manually make the repayment for any user in case if they make the payment offline.
To make the payment from admin dashboard, go to Edit Credits page of the user for whom you want to make the repayment and click the Make Payment button so that their repayment will be processed.
Note: Make Payment button will be displayed only when the bill is generated for the user.
Translation
↑ Volver al principioCredit Line or Credits for WooCommerce is translation ready, meaning you can edit the po files by which you can translate the text to any language. Steps to perform the translation are as follows. For example, a translation to French.
- Download and install Poedit
- Open the file credits-for-woocommerce > languages > credits-for-woocommerce.pot using Poedit.
- Create a new translation file by clicking Create new translation button.
- Choose the Source text and set its corresponding French text in Translation Text Area.
- Save the changes.
- Save the file name as credits-for-woocommerce-fr_FR.po.
- If you are using WordPress Version 3.9.13 or below, then in wp-config.php define the WPLANG as French. Syntax is define(‘WPLANG’, ‘fr_FR’);
- If you are using WordPress Version 4.0 or above, then go to WordPress dashboard > Settings > General and select the Site Language as French.
FAQ
↑ Volver al principioQ: What’s the difference between “Admin Funds” and “Virtual Funds”?
In “Admin Funds”, the site admin has to load credits to their own account in order to give credit line to other customers. In case if there is no enough credits in your account, you won’t be able to give a credit line to the customers.
In “Virtual Funds”, site admin doesn’t need to load credits to their account. A Credit line can be given to customers.
Q: How to style the bill statement?
It is not possible to style the bill statement.
Q: Refunds are not credited to the customer account. Why?
Updating the status to “Refunded” won’t credit the refund amount to the customer account. Follow the below steps while processing the refund to credit the refund amount directly to the customer’s account.
- Edit the order that you want to refund.
- Click the “Refund” button.
- Update the refundable product quantity.
- Click the “Refund $x.xx via Credits” button.
Q: Why bill is not generated from the plugin?
Bill will be generated automatically using cron. Please cross check whether cron is running properly on your site. If the cron is not running, then that is the reason why the bill is not generating.
Q: Is it possible to get the application form submitted with the phone number field as mandatory instead of the email address field?
We are getting customer details using the Email address and hence it is not possible to disable the email address field and it is not possible to give the email address field as optional.
Q: How to generate bill every week instead of every month?
Weekly billing is not possible. Only monthly billing is possible.
Q: I need to set the repayment date exactly after specific days of purchasing date. Is that possible?
It is not possible. Only a specific date of the month can be set as a repayment date.
Questions and Feedback
↑ Volver al principioHave a question before you buy? Please fill out this pre-sales form.
Already purchased and need some assistance? Get in touch with us via the Help Desk.