The Customize My Account for WooCommerce plugin allows you to take full control of your WooCommerce My Account page.
With this plugin, you can easily add, remove, and organize account menu items, customize the layout and design, and enhance the overall user experience for your customers.
Installation
- Download the .zip file from your WooCommerce account.
- Go to WordPress Admin > Plugins > Add New.
- Click Upload Plugin and choose the .zip file you downloaded.
- Click Install Now and then Activate the plugin.
After the installation, let’s get onto the plugin itself. Here’s a quick overview of the main interface sections you’ll be working with:
1. Top Section
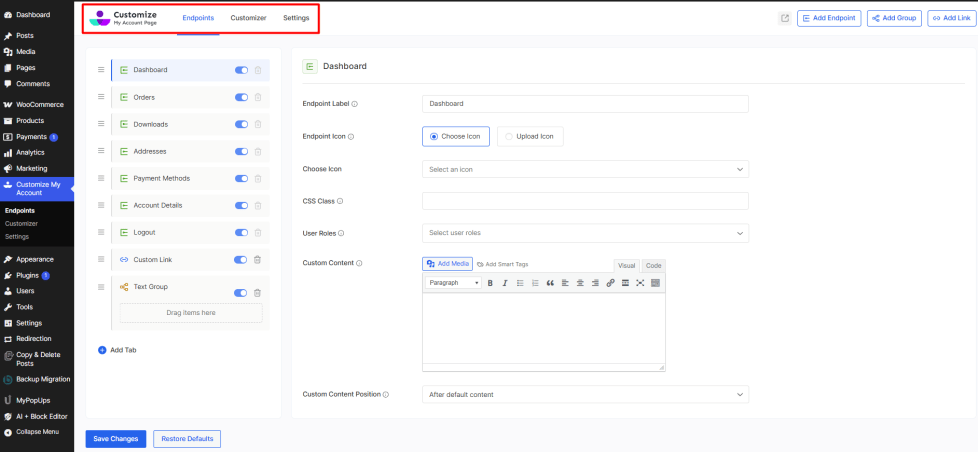
This is your control center containing:
- Main Navigation: Switch between Endpoints, Customizer, and Settings
- Quick Action Buttons: Add Endpoint, Add Group, and Add Link for rapid content creation
- View My Account Page: Opens the live My Account page in a new tab for immediate preview
2. Left Panel
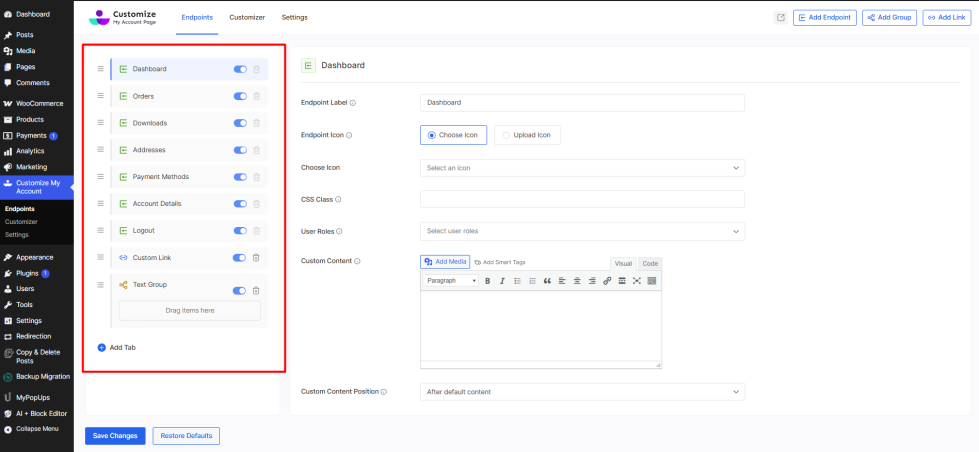
Your navigation management hub featuring:
- Complete endpoint list: All available menu items (Dashboard, Orders, Downloads, etc.)
- Drag-and-drop functionality: Reorder items with the hamburger menu icons
- Enable/disable toggle: Enable/disable endpoints with simple switches
- Visual indicators: Icons and colors show whether items are Endpoints, Groups, or Links. Group, Endpoint, or a Link are represented by icons with yellow, green, or blue colors.
- Add Tab button: Opens a pop-up to create new custom endpoints; Add Endpoint, Add Group, and Add Link.
3. Main Content Area
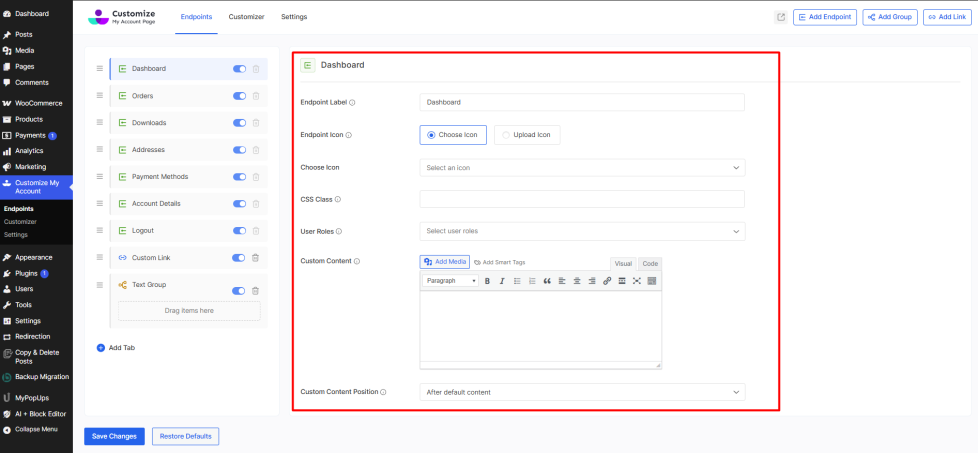
The detailed settings workspace where you:
- Customize individual endpoints: Labels, icons, user roles, and custom content
- Add rich content: Use the visual editor to create engaging endpoint content
- Set access permissions: Control which user roles can see specific endpoints
- Apply styling: Add CSS classes for custom design elements
These options differ depending on whether the tab is Default Endpoint, Custom Endpoint Link, or Group. More about them in their individual section.
4. Bottom Section
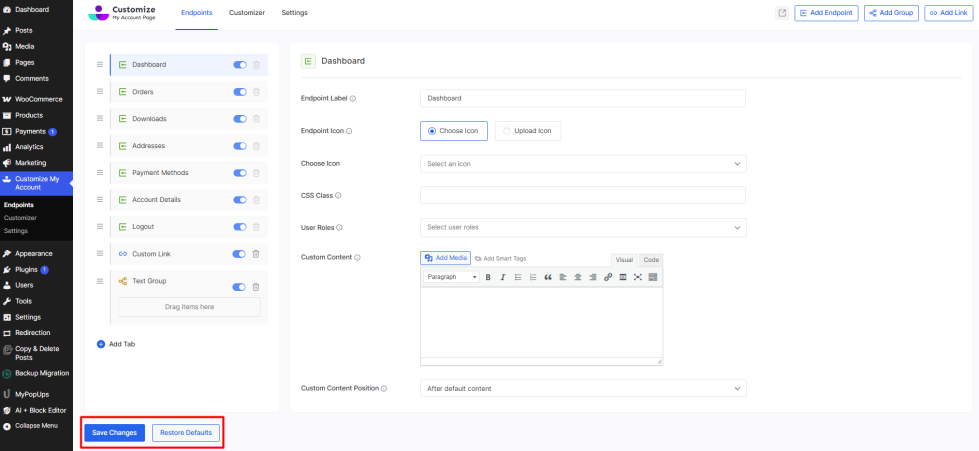
Essential action buttons for:
- Save Changes: Apply all your modifications
- Restore Defaults: Reset settings back to the original plugin state. Removes customizations and custom endpoints.
Now, let’s understand the endpoint configuration.
Endpoints Setup and Configuration
Manage and organize the navigation items that appear in your My Account page menu with full control over visibility, ordering, and functionality.
Endpoint Controls
Each endpoint in the list includes the following controls:
- Drag Handle – Use the hamburger menu icon “≣” to reorder endpoints by dragging them up or down in the list
- Enable/Disable Toggle – Use the blue toggle switch to show or hide each endpoint from the My Account menu
- Delete Button – Remove custom endpoints, groups, or links using the trash icon (not available for default WooCommerce endpoints)
Endpoints Customization Options
Here you will find multiple options to customize an endpoint. You will also be able to create Groups, Links, and add new Endpoints. Every feature is described below.
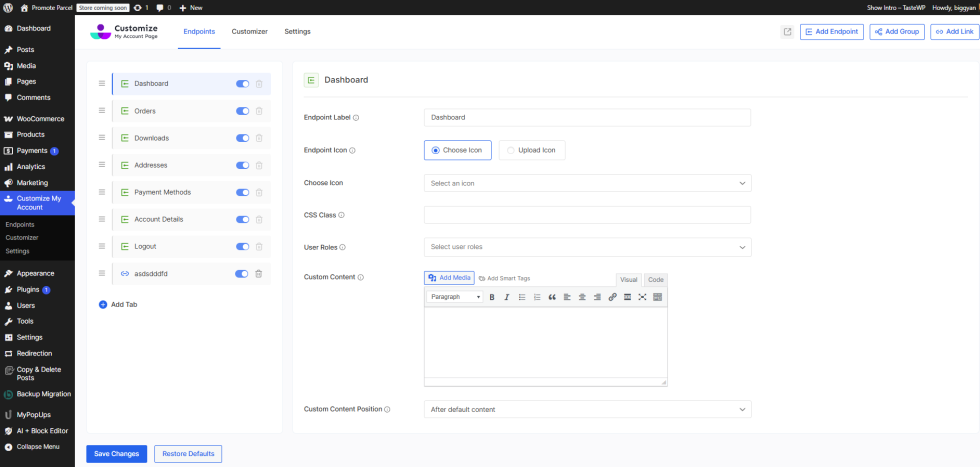
An endpoint that appears by default or a created endpoint has the following options that can impact its appearance on the My Account Page:
- Endpoint Label: You can type a name for your endpoint in this input box.
- Endpoint Icon: Choose an icon to display alongside your endpoint from multiple icons.
- Choose Icon: Choose the Endpoint Icon from the icon library or upload your custom icon.
- CSS Class: You can add additional classes for advanced styling for that endpoint.
- User Roles: Select one or more user roles. The endpoint will only be visible to users with the chosen roles. If left blank, it will be displayed to all user roles.
- Custom Content: Type in your custom content to display in this endpoint. It could be links, shortcodes, media, text, smart tags, etc. You can dynamically load parameters using smart tags.
- Custom Content Position: Select a position for your custom content. Place your content before, or after the default content, or override the default content.
How to Add a New Endpoint?
↑ Back to topYou can add as many endpoints as needed, allowing you to fully customize the account page.
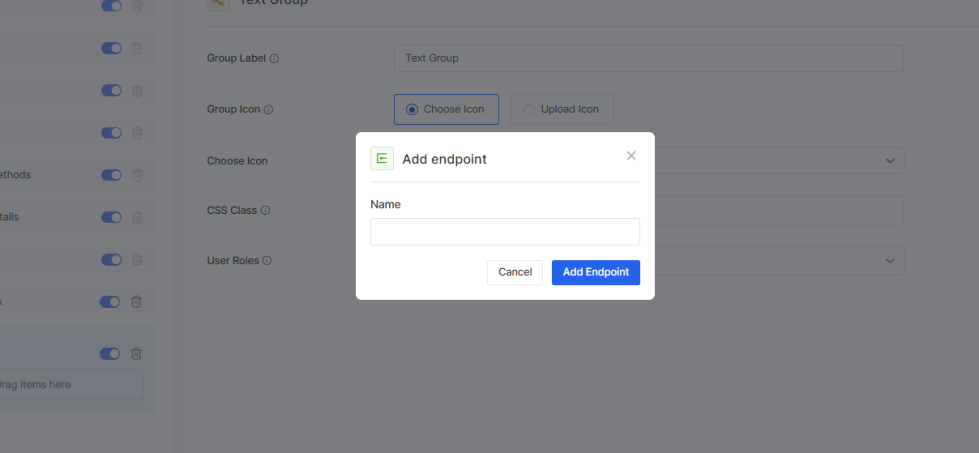
- Click on the Add Endpoint on the top right (or inside “Add Tab” below the Endpoints list), and you will be asked to enter the Endpoint Name.
- Type in the name of the endpoint and hit enter.
- After creating an endpoint, you will see it listed in the left section, where other endpoints are listed.
The options for a custom endpoint are similar to those already explained in the Endpoints section. However, a new endpoint also requires a unique slug.
Slug: The text that appears at the URL for this endpoint.
Add Group
This option will allow you to make a group of endpoints. It will act as a parent, and it can have sub-items inside it. The sub-items can be any endpoint.
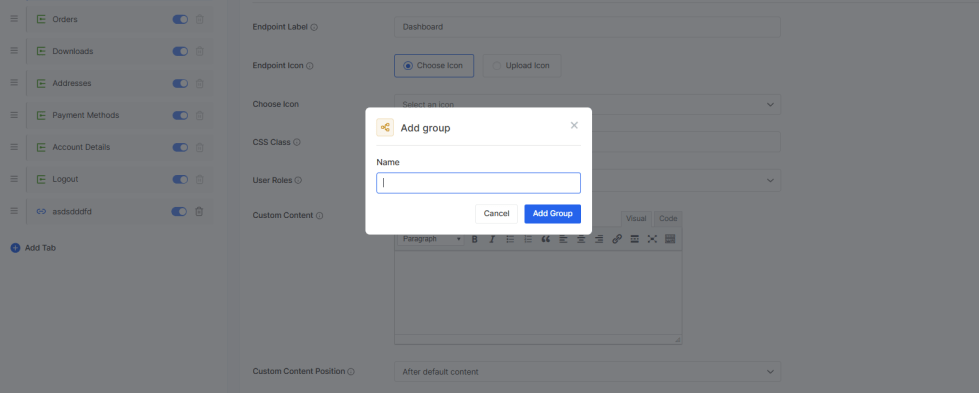
- Click on the Add Group link on the top right (or inside “Add Tab” below the Endpoints list), and you will be asked to enter the Group Name.
- Type in the name of the group and hit enter.
- After creating a group, you will see it listed in the left section, where other endpoints are listed.
- You can then click “≣” and drag an existing endpoint/link or create and drag an endpoint/link to the group that you made.
The options for a custom Group are similar to those already explained in the Endpoints section. However, a Group endpoint doesn’t have custom content.
Add Link
↑ Back to topThis option will allow you to add a link to the account page. You can add as many links as you want.
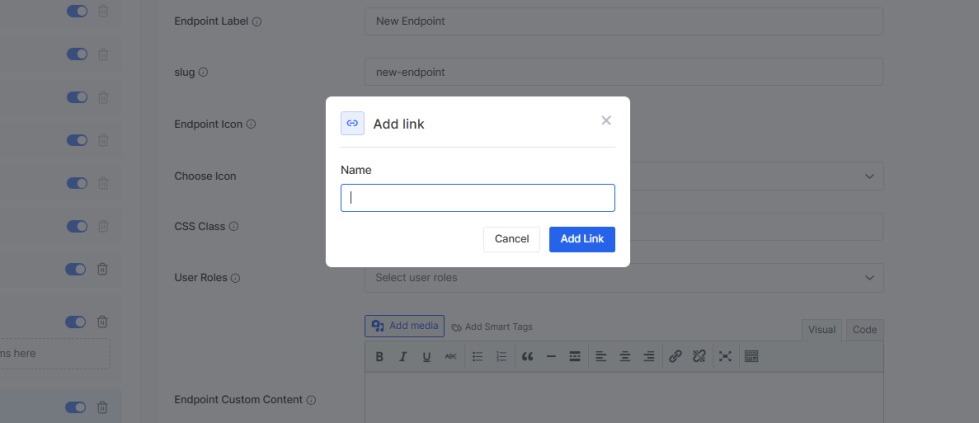
- Click on the Add Link button on the top right (or inside “Add Tab” below the Endpoints list) and you will be asked to enter the Link Name.
- Type in the name of the link and hit enter.
- After creating a link, you will see it listed in the left section where other endpoints are listed.
Except for URL & Open Link In a New Tab?, all other options of the group will seem familiar since they were already described in the Endpoints section.
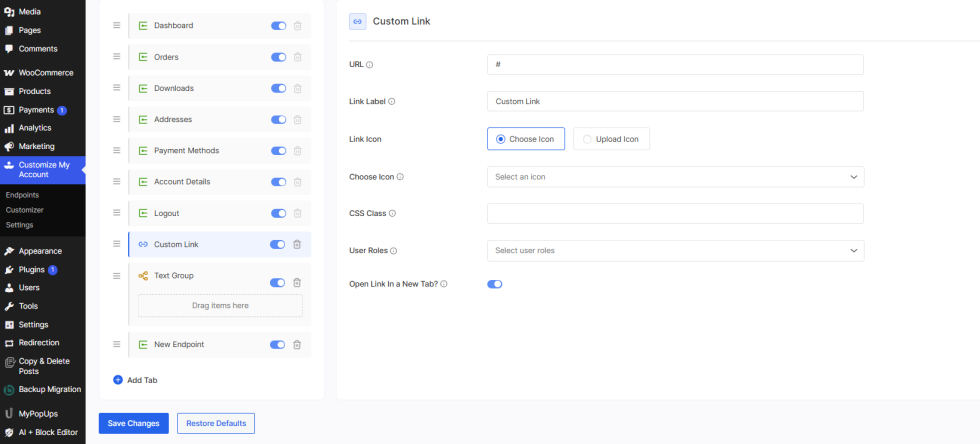
- URL: Enter the URL of the page that you want to visit. Example: https://themegrill.com/plugins/
- Open Link In a New Tab?: Enabling this option will open the link in a new tab when you click on it.
Note: You will need to hit the Save Changes button if you want all the changes to be saved.
My Account Page Style Customizer
Click on Customizer to open the style customization page for your WooCommerce My Account page.
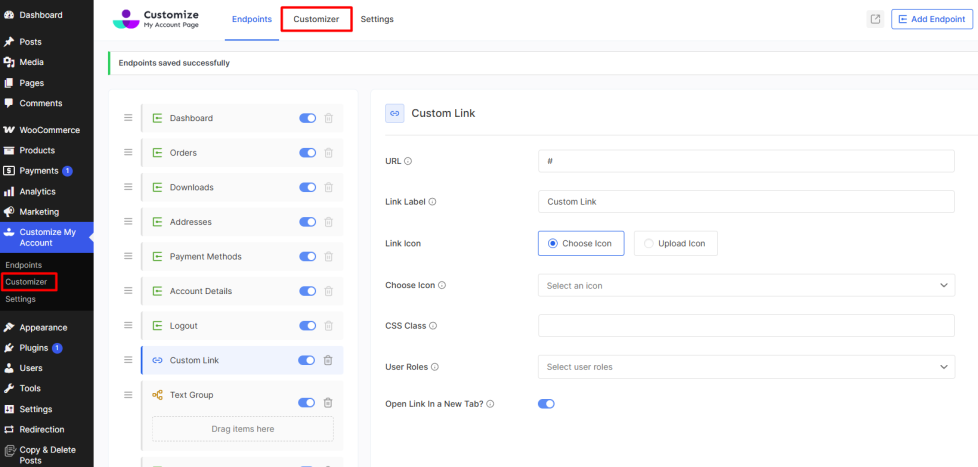
Here, you’ll find multiple customization tools, which are explained below.
Layout & Design
The Layout & Design section provides comprehensive options to customize the visual appearance and positioning of your My Account page navigation menu.
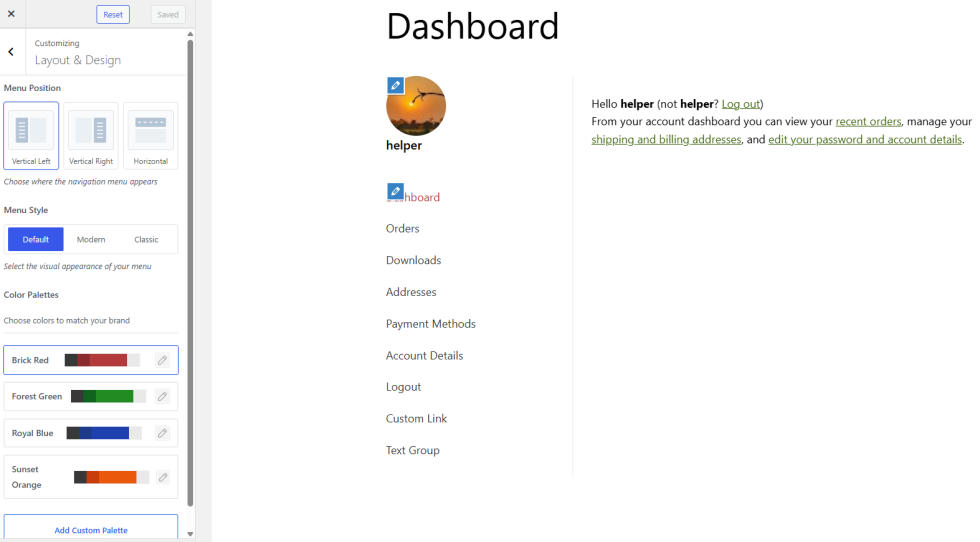
- Menu Position – Choose where the navigation menu appears (Vertical Left, Vertical Right, Horizontal)
- Menu Style – Select the visual appearance of your menu (Default, Modern, Classic)
- Color Palettes – Choose from predefined color schemes (Brick Red, Forest Green, Royal Blue, Sunset Orange) or add custom palettes. Depending on the Menu Style chosen, the user can customize colors like:
- Button Text
- Button Background
- Navigation Background
- Navigation Border
- Navigation Box Shadow
- Item Text
- Item background
- Item Border
You can also add a custom color palette by clicking “Add Custom Palette” extending the existing palette. Add a name and select a palette and click on Add.
Customizing Navigation Menu
Customize the appearance and functionality of your My Account navigation menu with options for typography, visual elements, and menu behavior.
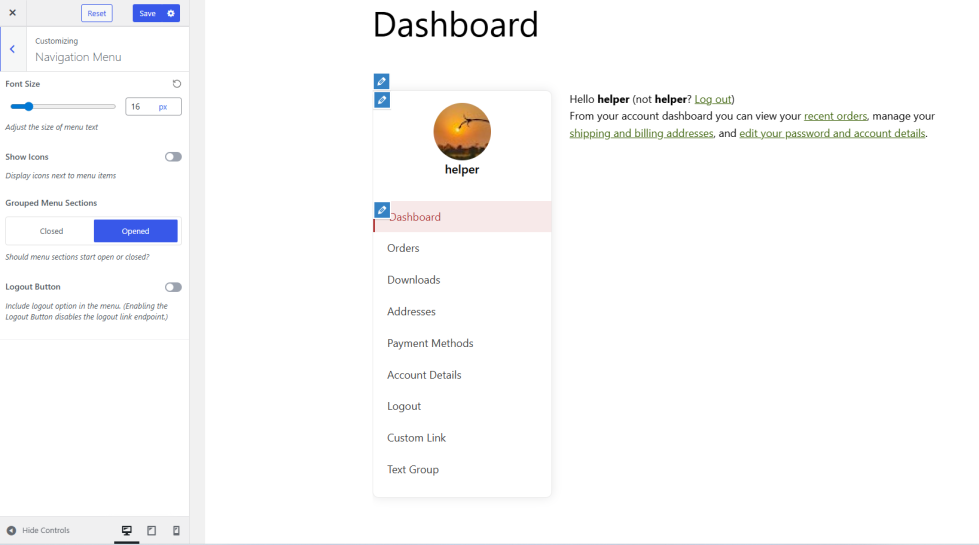
- Font Size – Adjust the size of menu text
- Show Icons – Display icons next to menu items
- Grouped Menu Section – Choose whether to close or show the Group elements by default. Available on vertical menu position only.
- Logout Button – Include a logout button on the My Account Page. (Enabling the Logout Button disables the logout link endpoint.)
Customizing Profile Settings
Configure profile picture options and settings to control how user avatars appear and function on the My Account page.

- Profile Picture Placeholder – Set a default image for users without profile pictures
- Profile Picture Size Limit – Set maximum file size (KB) for uploaded images
- Profile Picture Style – Choose display format (Square or Circle)
Spacing
Control the spacing and layout of various elements on your My Account page with precise margin and padding adjustments.
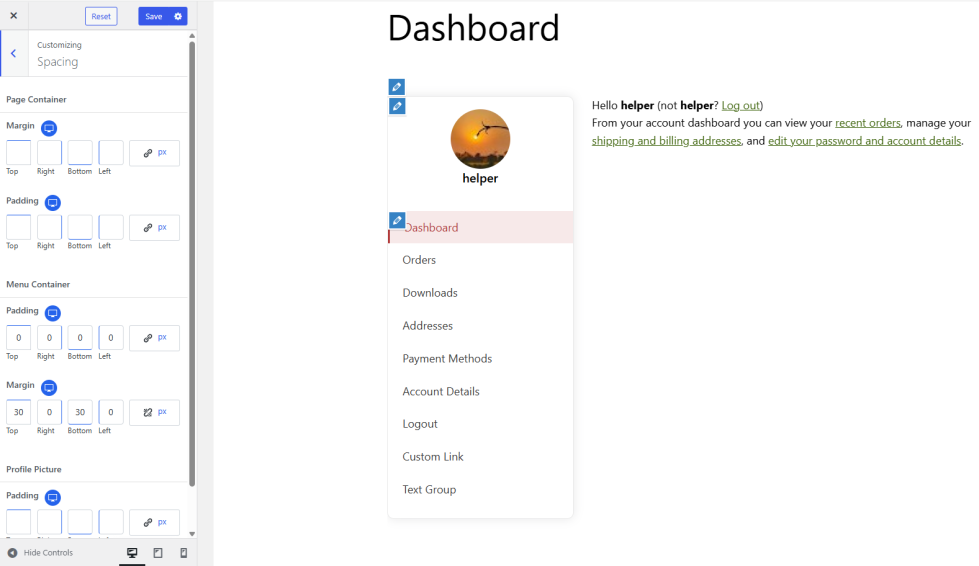
- Page Container – Set margin and padding values (Top, Right, Bottom, Left) for the overall page container
- Menu Container – Adjust padding and margin spacing for the navigation menu container
- Profile Picture – Configure padding spacing around the profile picture element
Customizing Additional CSS
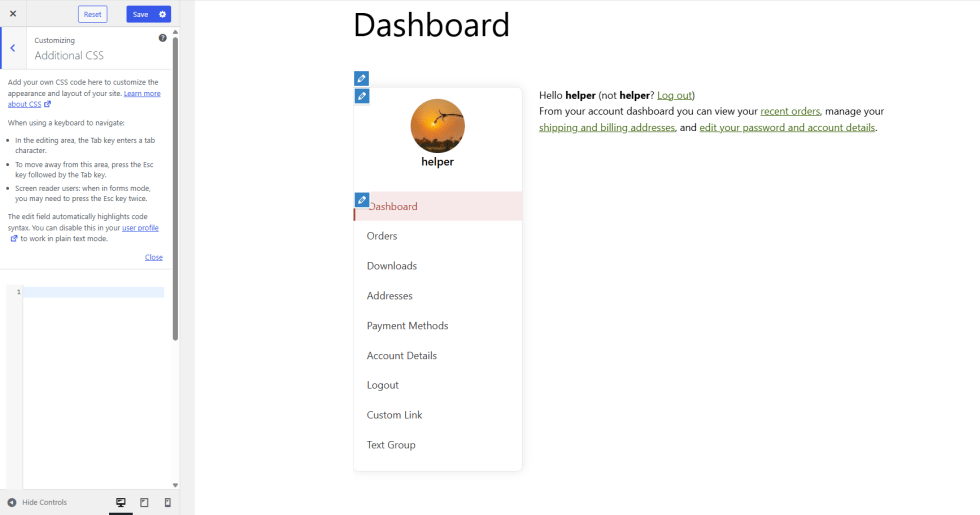
Additional CSS can be used to add your own CSS code to customize your account page, the way you want. You can see a CSS editor in the customizer, where you can add all the CSS code you want.
Preview Controls
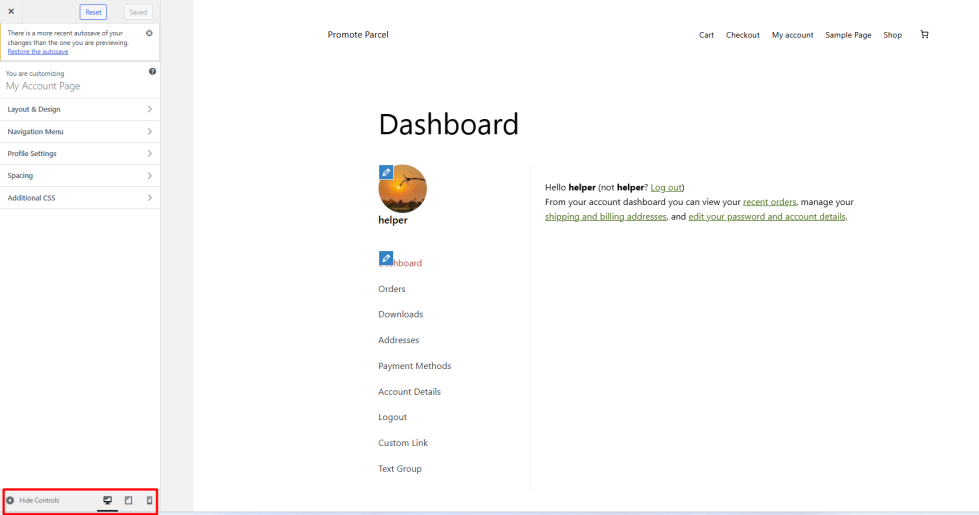
- Hide Controls – Toggle to hide or show the customization panel for an unobstructed view of your My Account page design
- Device Preview Options – View your My Account page as it appears on different screen sizes:
- Desktop – Full desktop computer view
- Tablet – Tablet device responsive view
- Mobile – Mobile phone responsive layout
Restoring the Settings and Customization
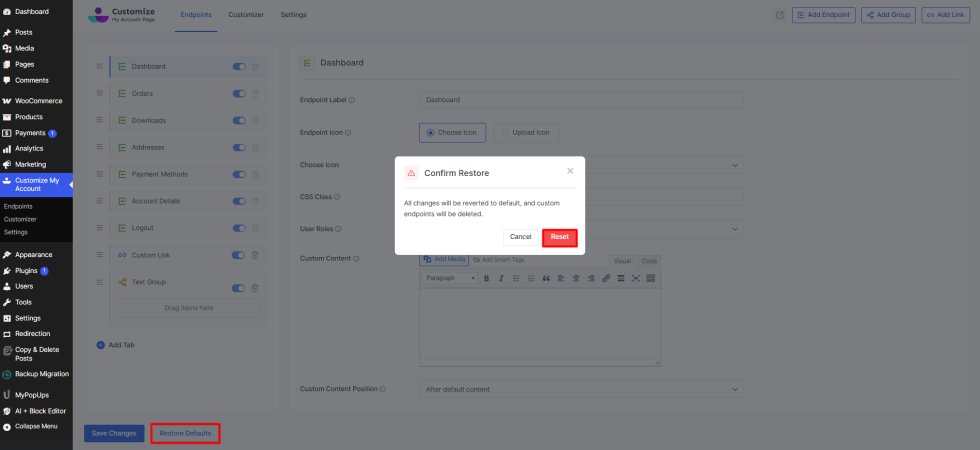
To restore your settings:
- Click on Customize My Account > Endpoints.
- At the bottom left, right next to the Save Changes button, you will see the Restore Defaults button.
- Click on it and the restore dialogue box will appear.
- Click on Reset.
After restoring, all the changes will revert to the default. For the customizer, there’s a Reset button at the top of the customizer tab.
Settings
Configure global plugin settings and functionality options to control the behavior and performance of your My Account page customization.
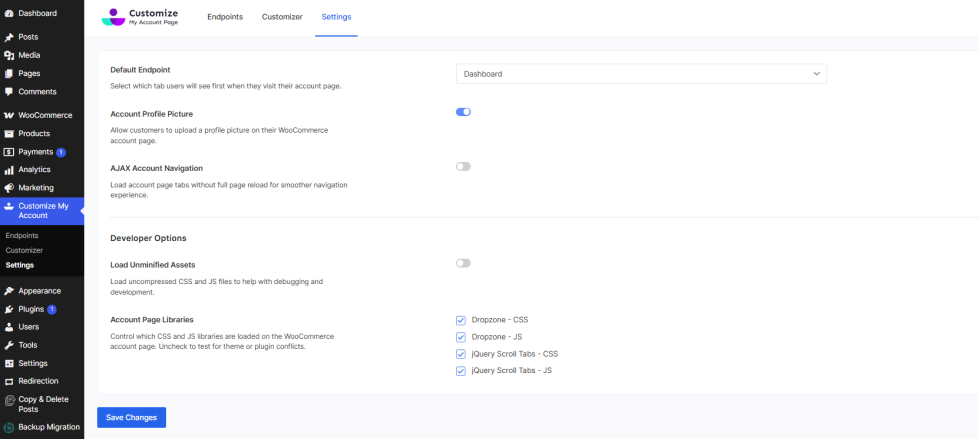
General Settings
- Default Endpoint – Select which tab users will see first when they visit their account page (Dashboard, Orders, Downloads, Addresses, Payment Methods, Account Details, Logout, custom endpoints)
- Account Profile Picture – Allow customers to upload a profile picture on their WooCommerce account page
- AJAX Account Navigation – Load account page tabs without full page reload for a smoother navigation experience
Developer Options
Advanced settings for developers and troubleshooting purposes.
- Load Unminified Assets: By default, WordPress loads minified versions of CSS and JS files so as to lower the load times. If you enable it, it will automatically load the non-minified versions of all CSS and JS files for debugging and development.
- Account Page Libraries: You can also enable/disable CSS and JavaScript libraries that are loaded in WooCommerce MyAccount Page to resolve library conflicts with other plugins. By default, all the CSS and JS libraries will load on the front end. Only in the case of a conflict, you can disable the libraries from loading on the front end and check if this resolves the conflict issue.
- Dropzone – CSS – Styling for file upload functionality
- Dropzone – JS – JavaScript for drag-and-drop file uploads
- jQuery Scroll Tabs – CSS – Styling for scrollable tab navigation
- jQuery Scroll Tabs – JS – JavaScript for enhanced tab functionality
Save Changes
Click Save Changes to apply all settings modifications. Changes will take effect immediately on your My Account page.
Compatibility with Third-Party WooCommerce Plugins
↑ Back to topCurrently, the plugin is by default compatible with the following plugins:
- WooCommerce Bookings by WooCommerce
- WooCommerce Subscription Downloads by WooCommerce
- WooCommerce Subscriptions by WooCommerce
- WooCommerce Memberships by SkyVerge