Description
↑ Back to topIntroducing our Dynamic and Role-Based Pricing add-on, a powerful tool designed to revolutionize your pricing strategy. This innovative plugin offers a range of dynamic pricing options tailored to individual usernames and user roles, providing unparalleled flexibility and precision in your e-commerce setup.
With this plugin, you can implement various pricing types, including Fixed Price, Fixed Increase, Fixed Decrease, Percentage Decrease, and Percentage Increase. Tailor your pricing dynamically based on user-specific attributes, providing a personalized and adaptive shopping experience. Elevate your pricing strategy with this feature-rich and user-friendly plugin.
Installation
↑ Back to top- Download the .zip file from your WooCommerce account.
- Go to WordPress Admin Dashboard > Plugins > Upload Plugin > Choose File.
- Install Now and Activate Plugin.
Getting Started
↑ Back to topRule Setup
↑ Back to top- Go to WordPress Admin Dashboard > Dynamic Pricing > Add Rule.
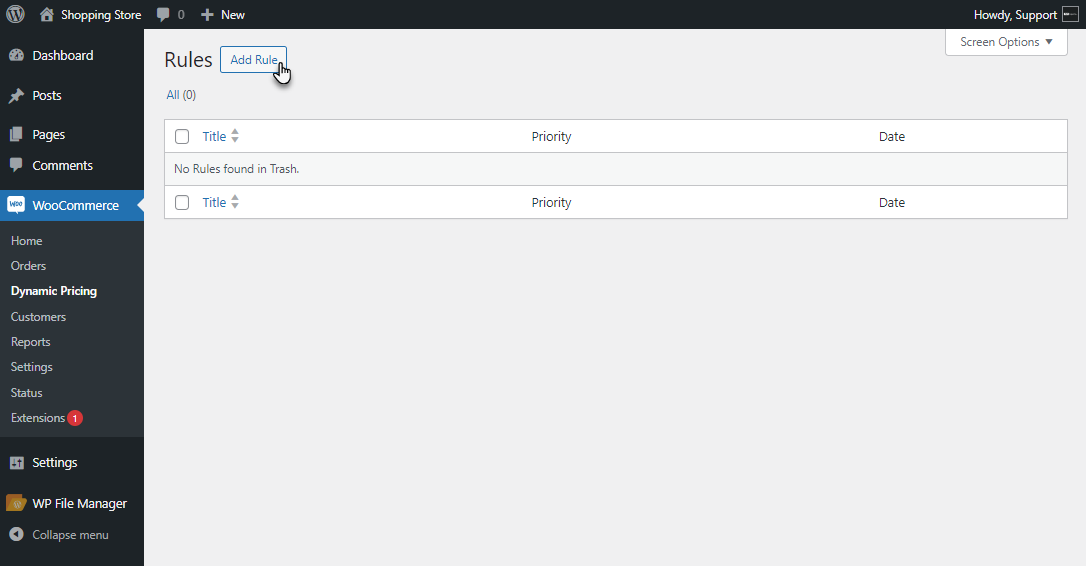
- Add New Rule screen will appear.
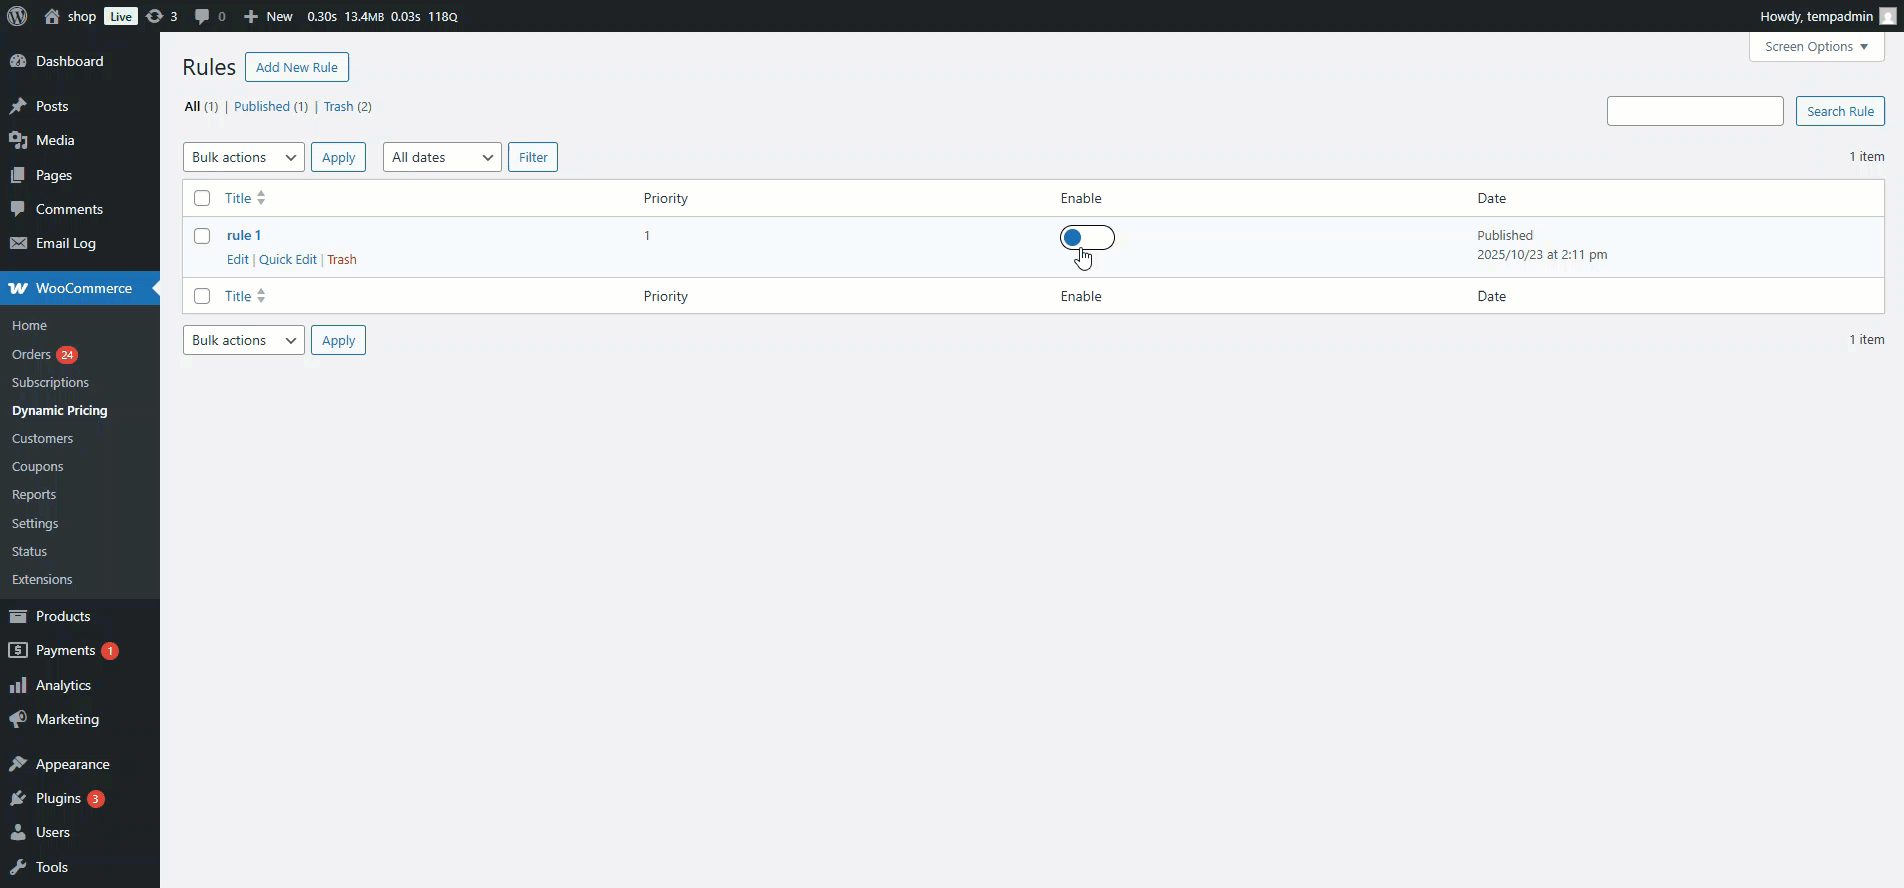
Enable/Disable Toggle Button for Rule
↑ Back to topThe Enable/Disable Toggle Button feature allows the admin to quickly activate or deactivate any Dynamic Pricing rule without deleting or moving it to the trash.
- You will see the Rules Table displaying all created rules.
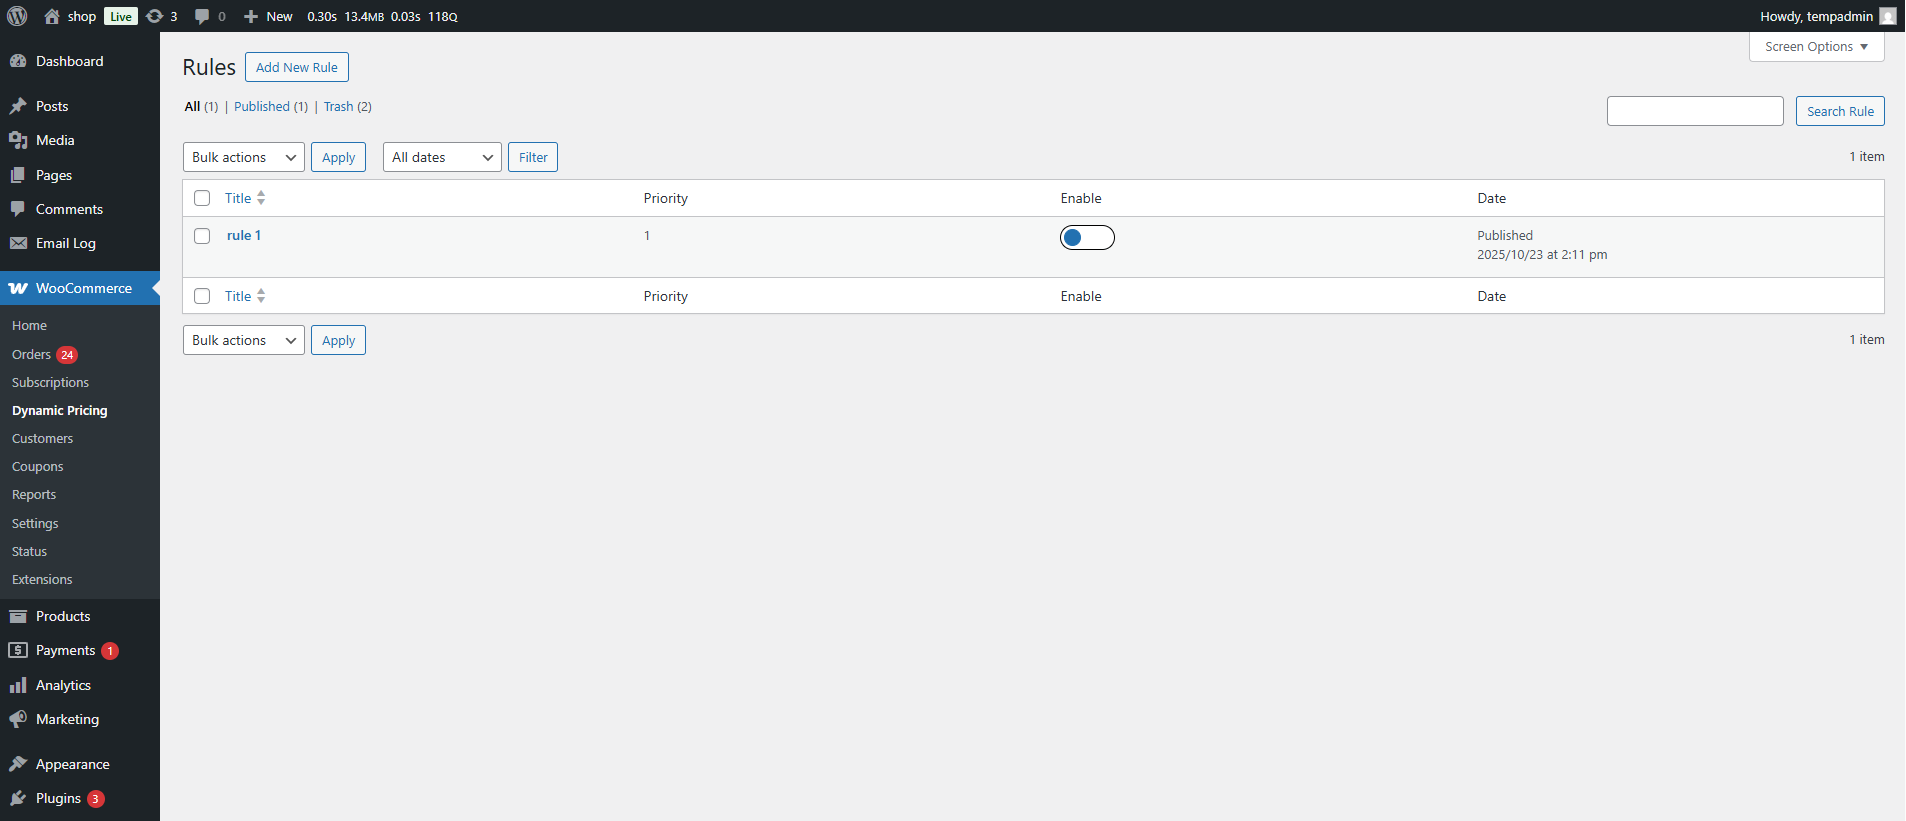
- A new column named Enable has been added to the table.
- This column features a toggle button for each rule, allowing you to enable or disable it instantly.
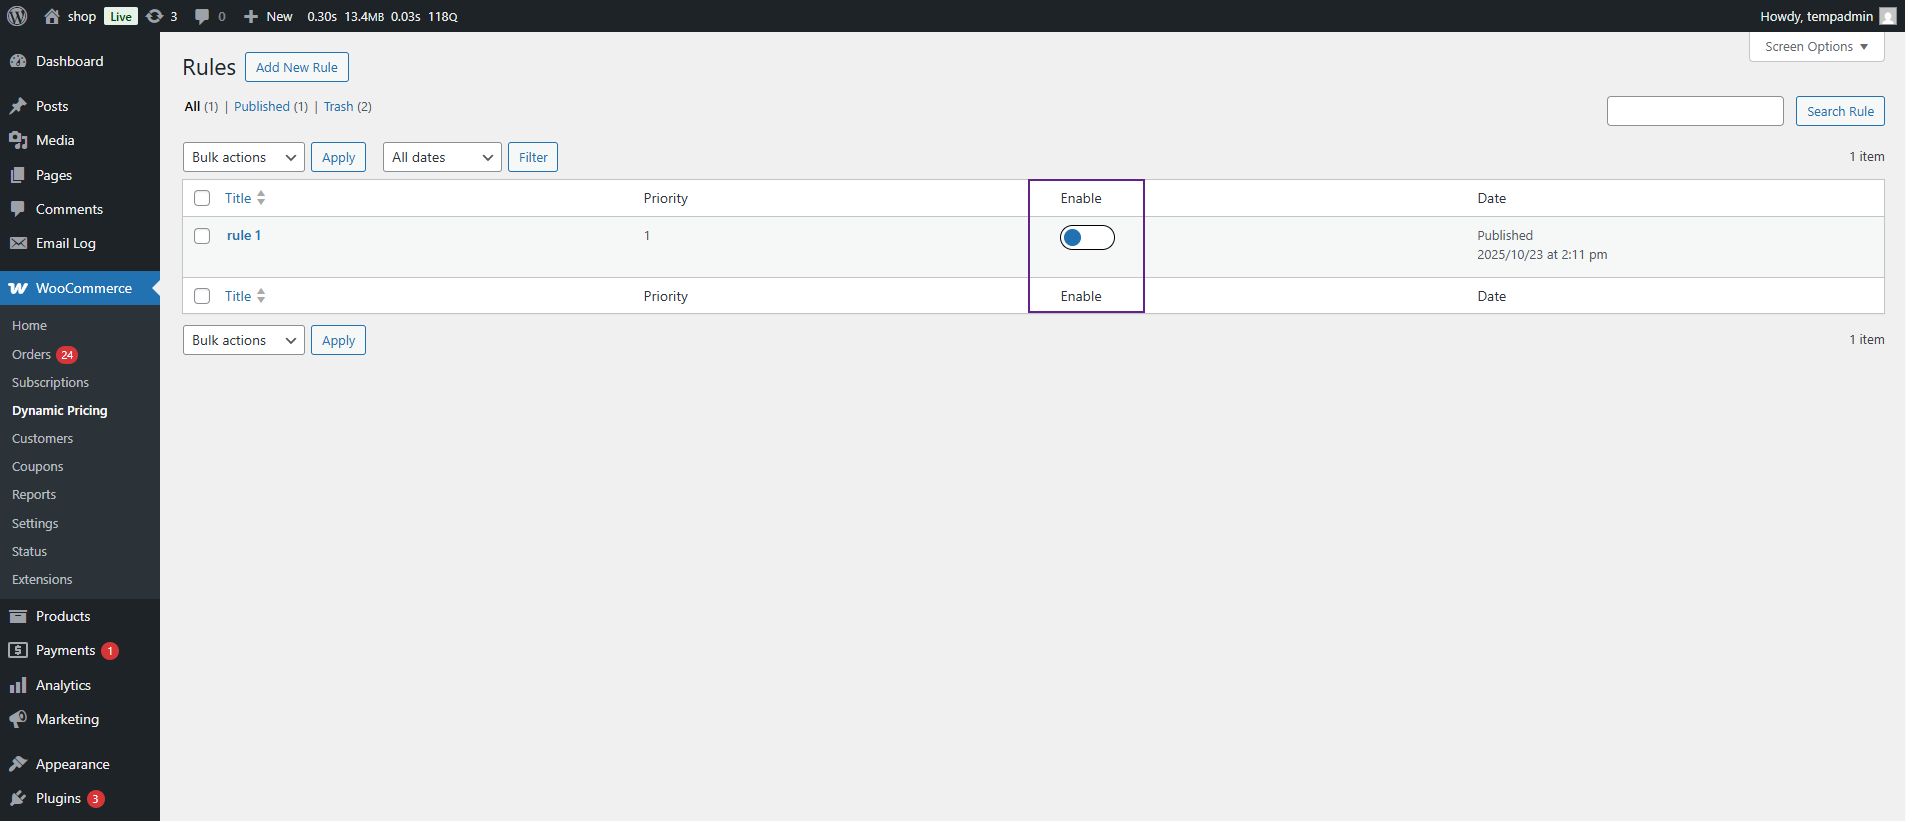
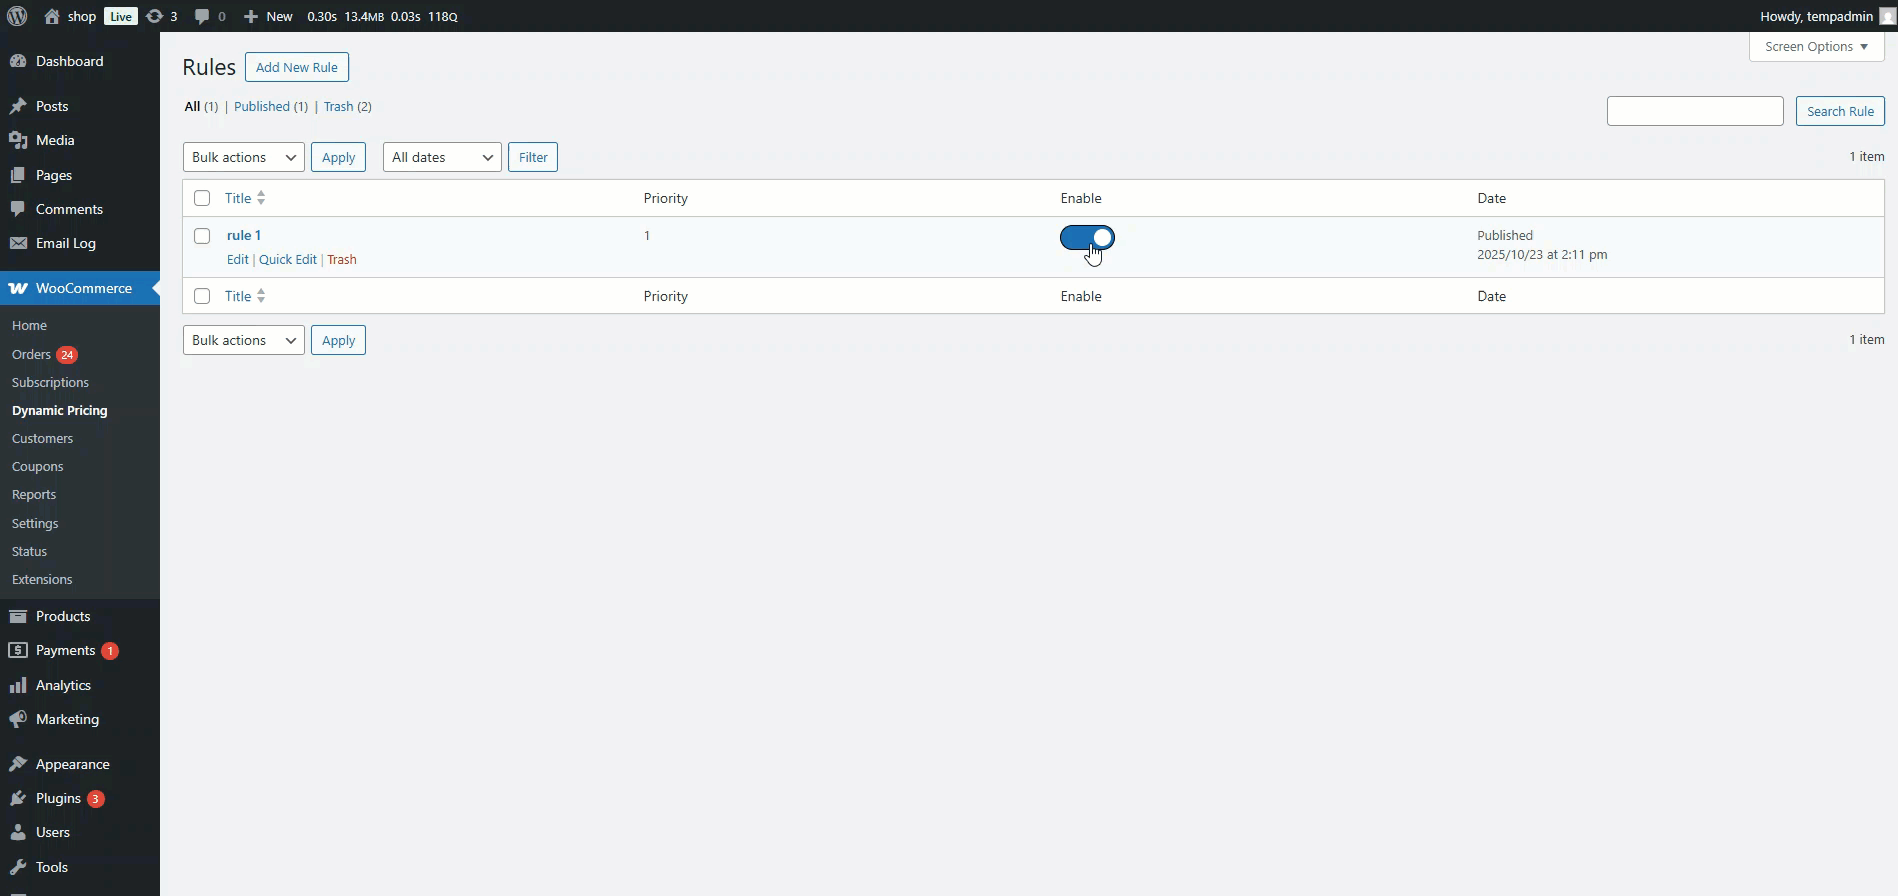
Enable Rule
- Now, click the toggle switch to turn it ON.
- Once enabled, the rule will take effect immediately on products based on its defined conditions.
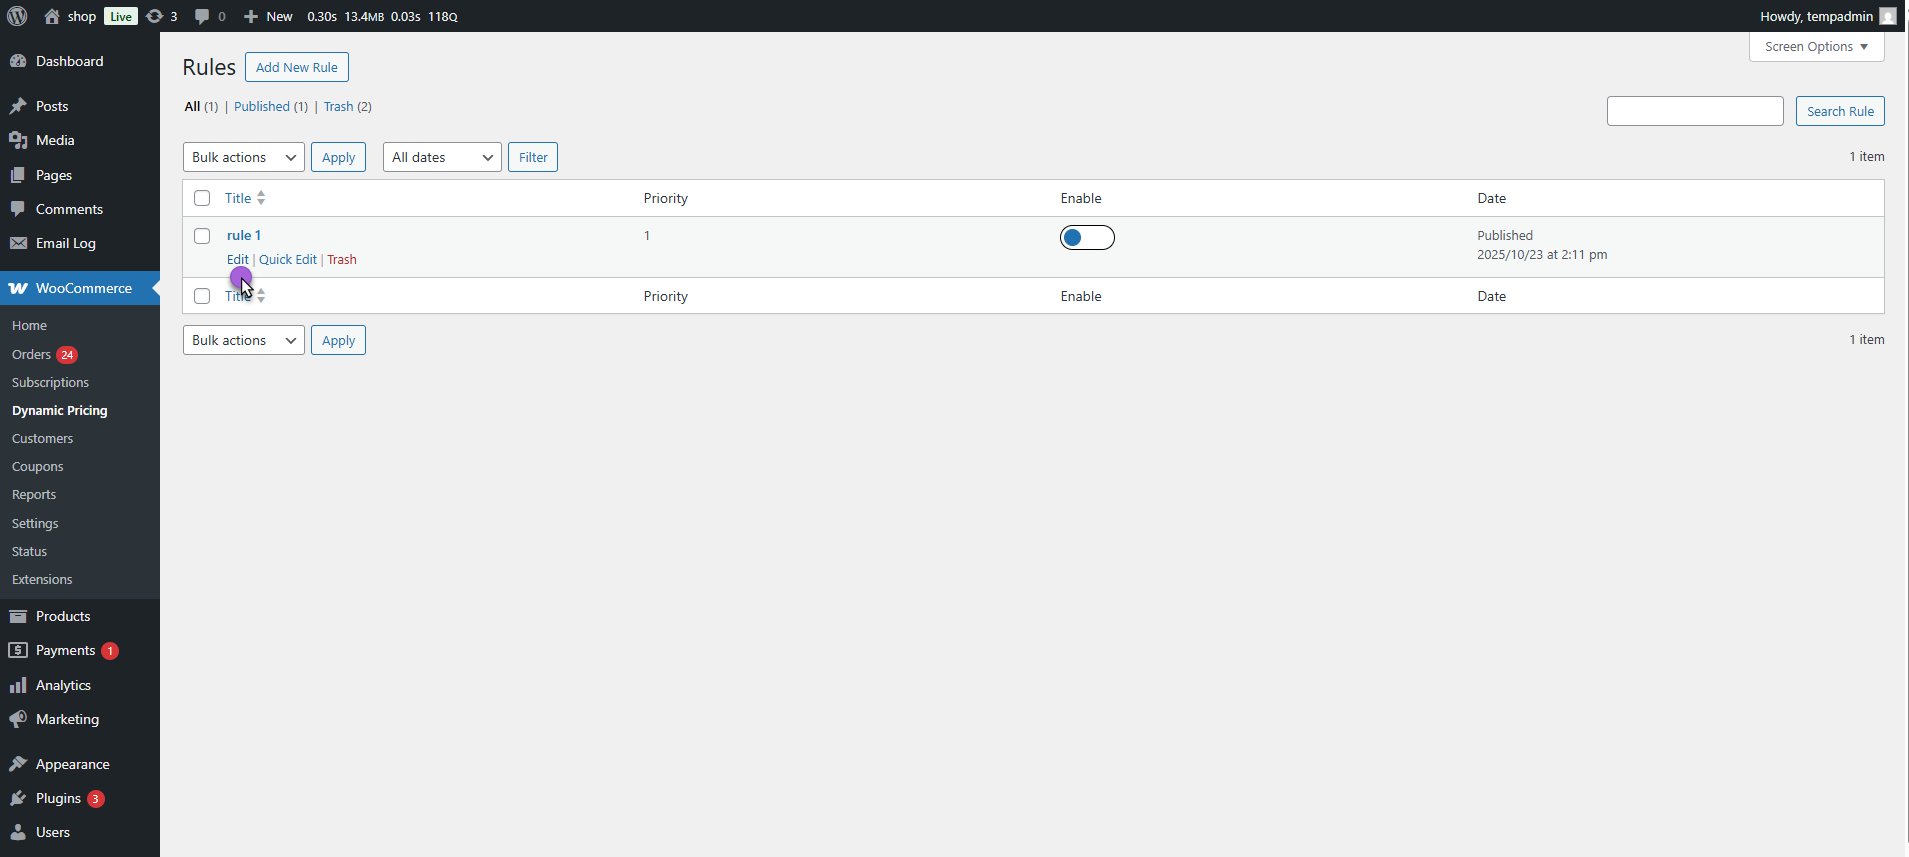
Disable Rule
- Click the toggle switch to turn it OFF.
- When disabled, the rule will not affect any product prices on the Front End.
- Now, click on Edit / Add New Rules.
- Inside the Rule page, at the top of the settings section, you will find a new toggle button labeled Enable Rule.
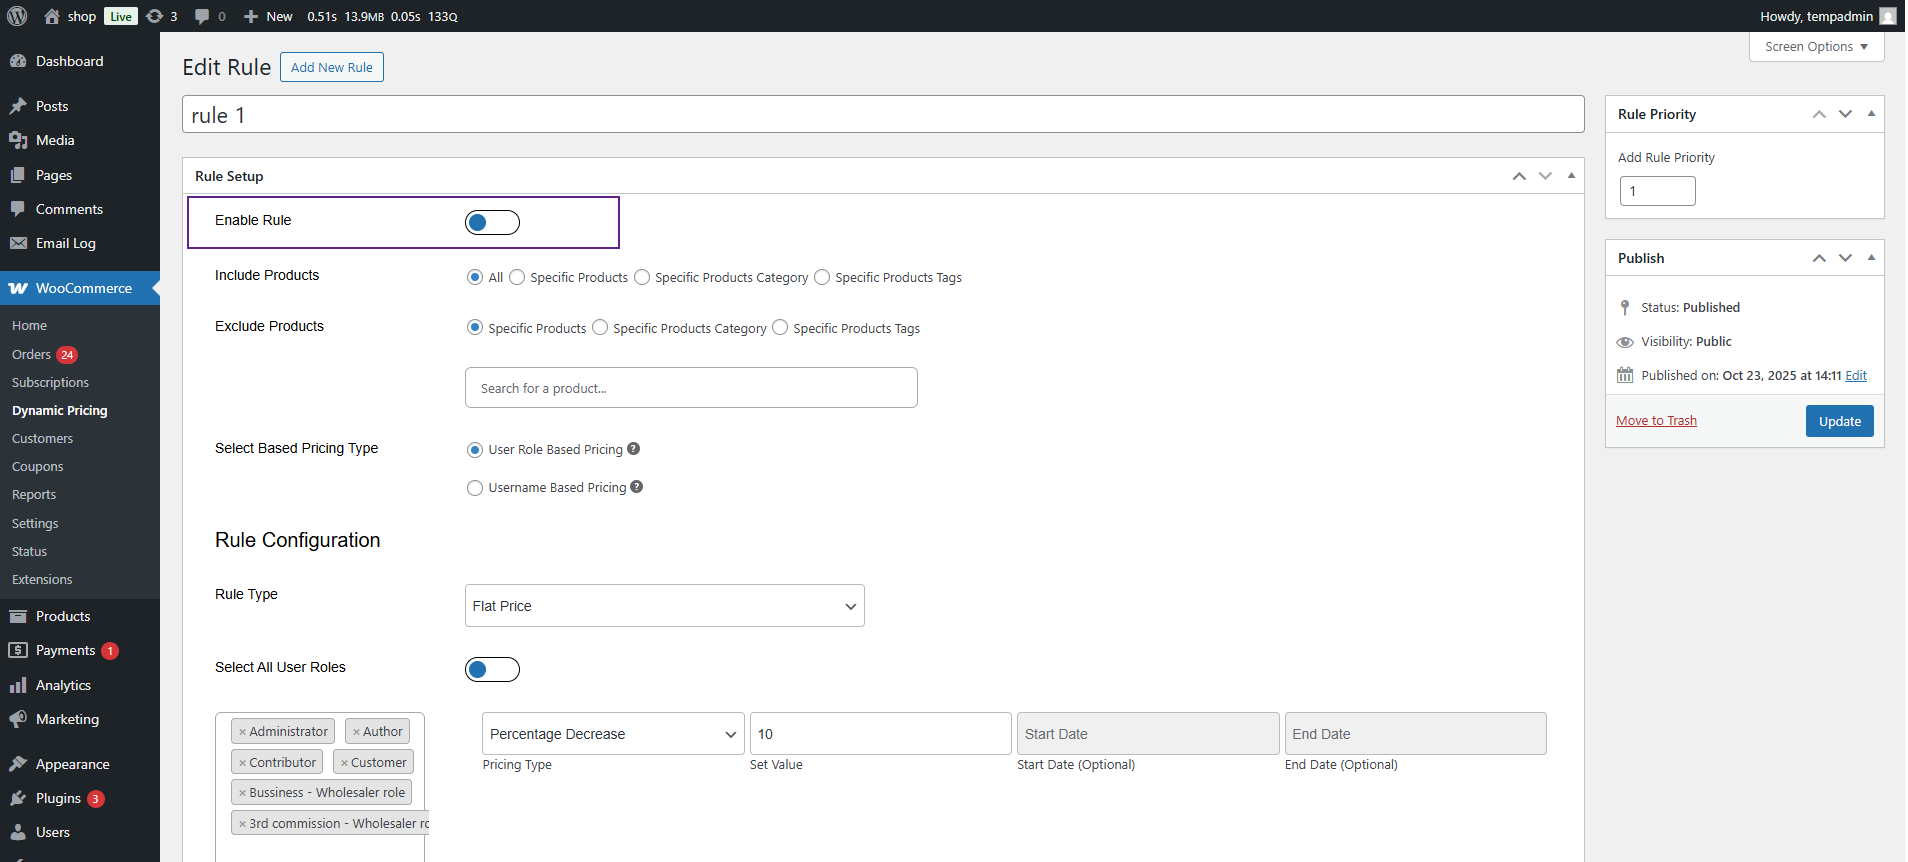
- You can also use this toggle to turn the rule ON or OFF instantly.

Rule Title
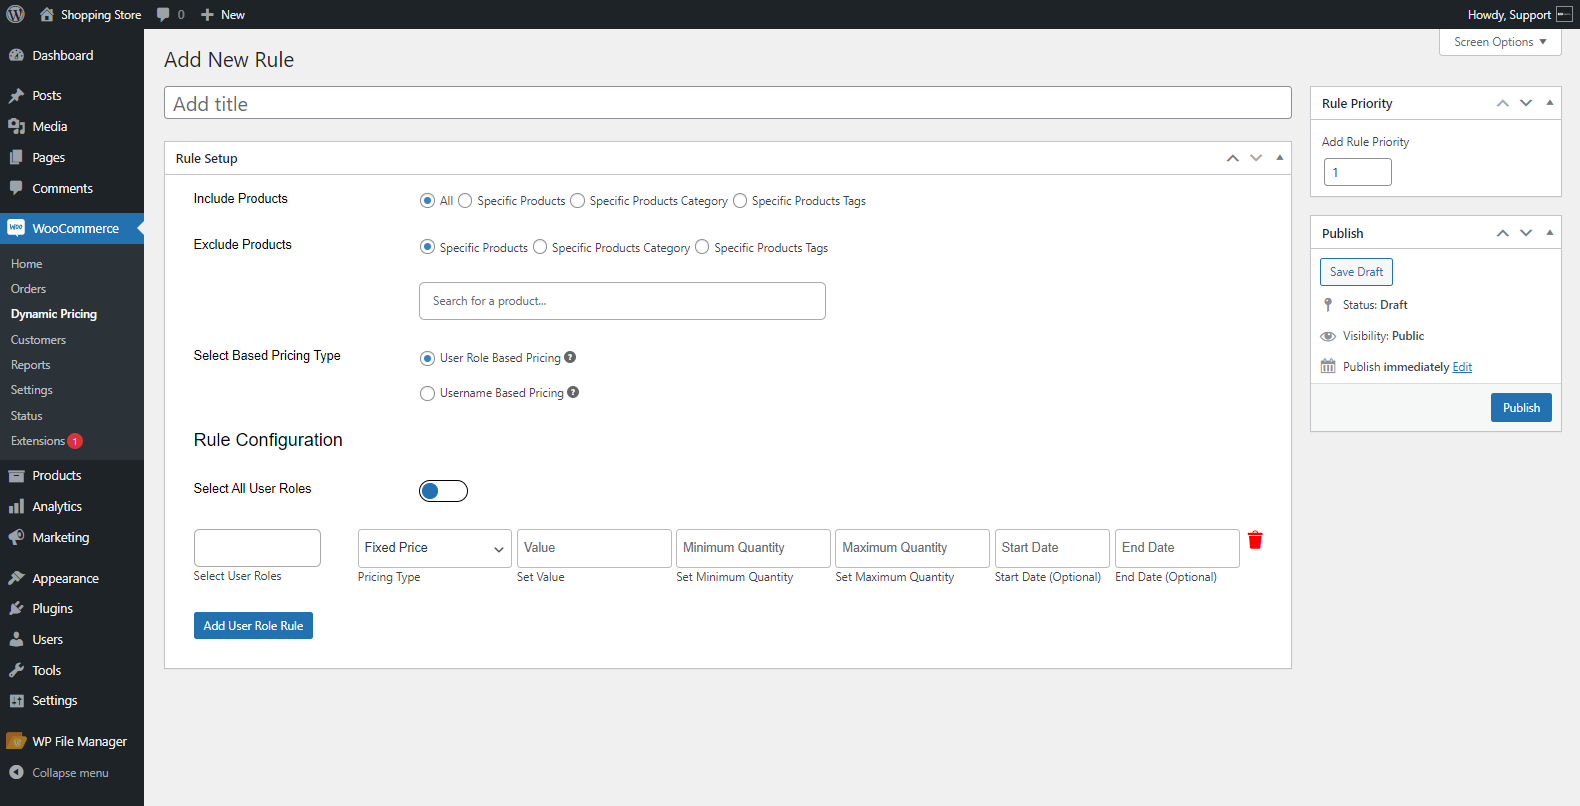
↑ Back to top- Add a title to your Rule in the Add Title field.

Include Products
- Navigate to the Rule Setup section.
- In the Include Products option, four options are present.
- All
- Specific Products
- Specific Products Category
- Specific Products Tags
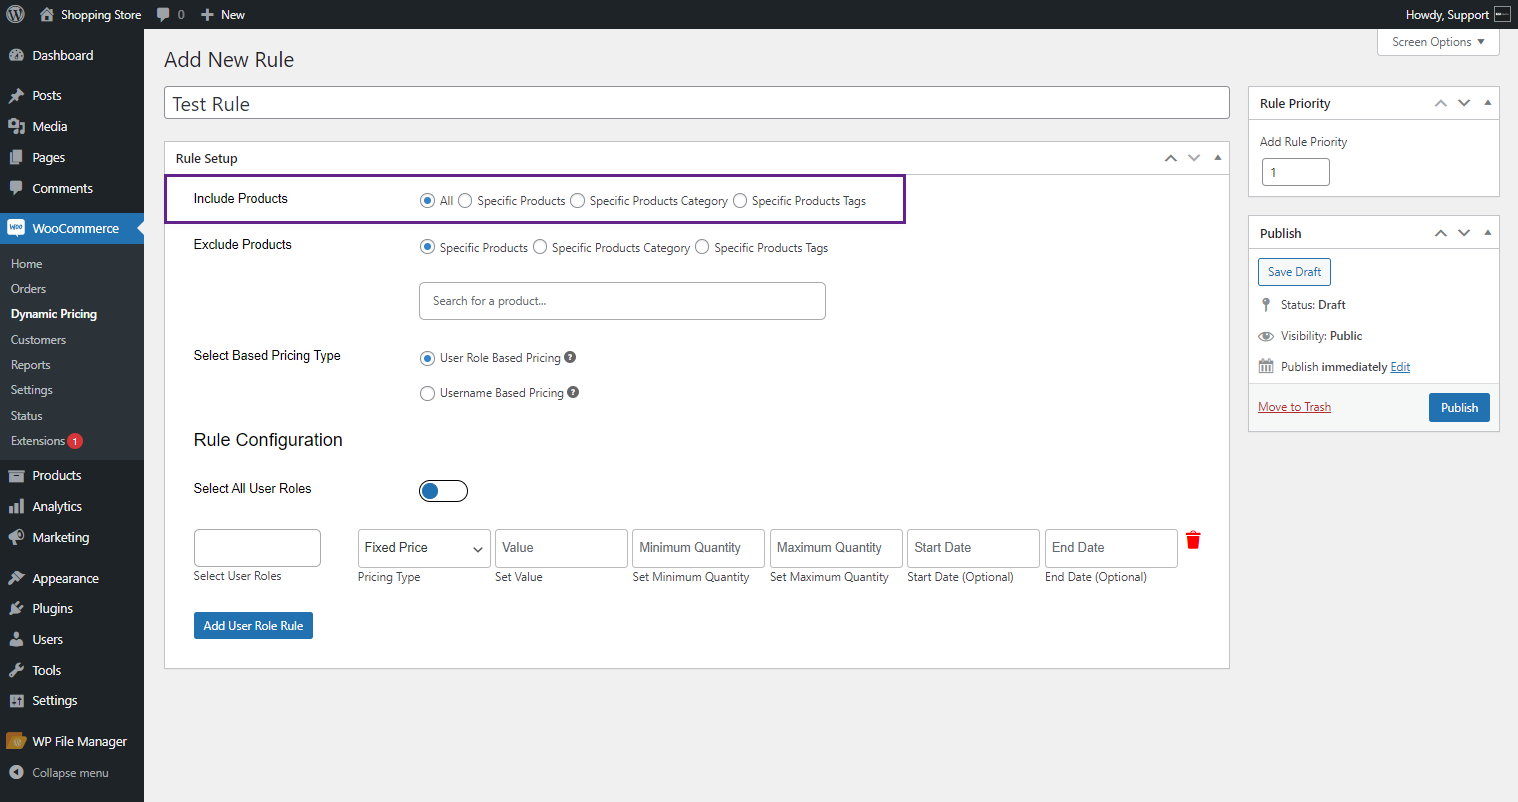
- This option is REQUIRED.
All – Include Products
- Select ALL radio button. This will include All Products.

Specific Products – Include Products
- Select the Specific Products radio button; this will only add selected products.

- Search for the Specific Product in the Search for a product field.
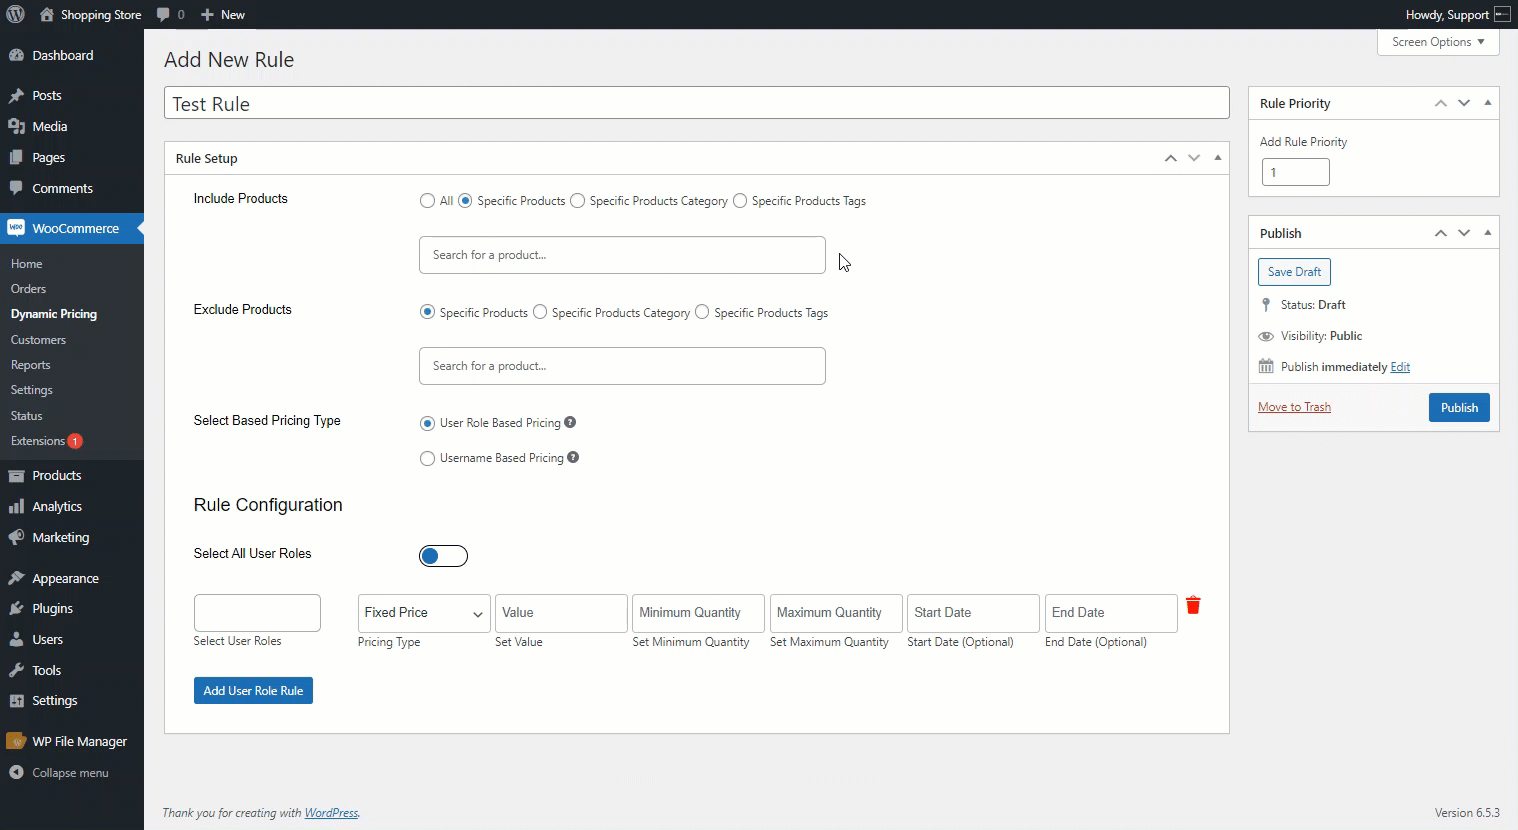
PLEASE NOTE: If the SPECIFIC PRODUCTS radio button is selected but no product is added, then no product is considered selected. Once published/updated, it will switch to the ALL radio button.
Specific Products Category – Include Products
- Select the Specific Products Category radio button. This will add only the selected products category.

- Search for the Specific Product Category in the Search for a Category field.
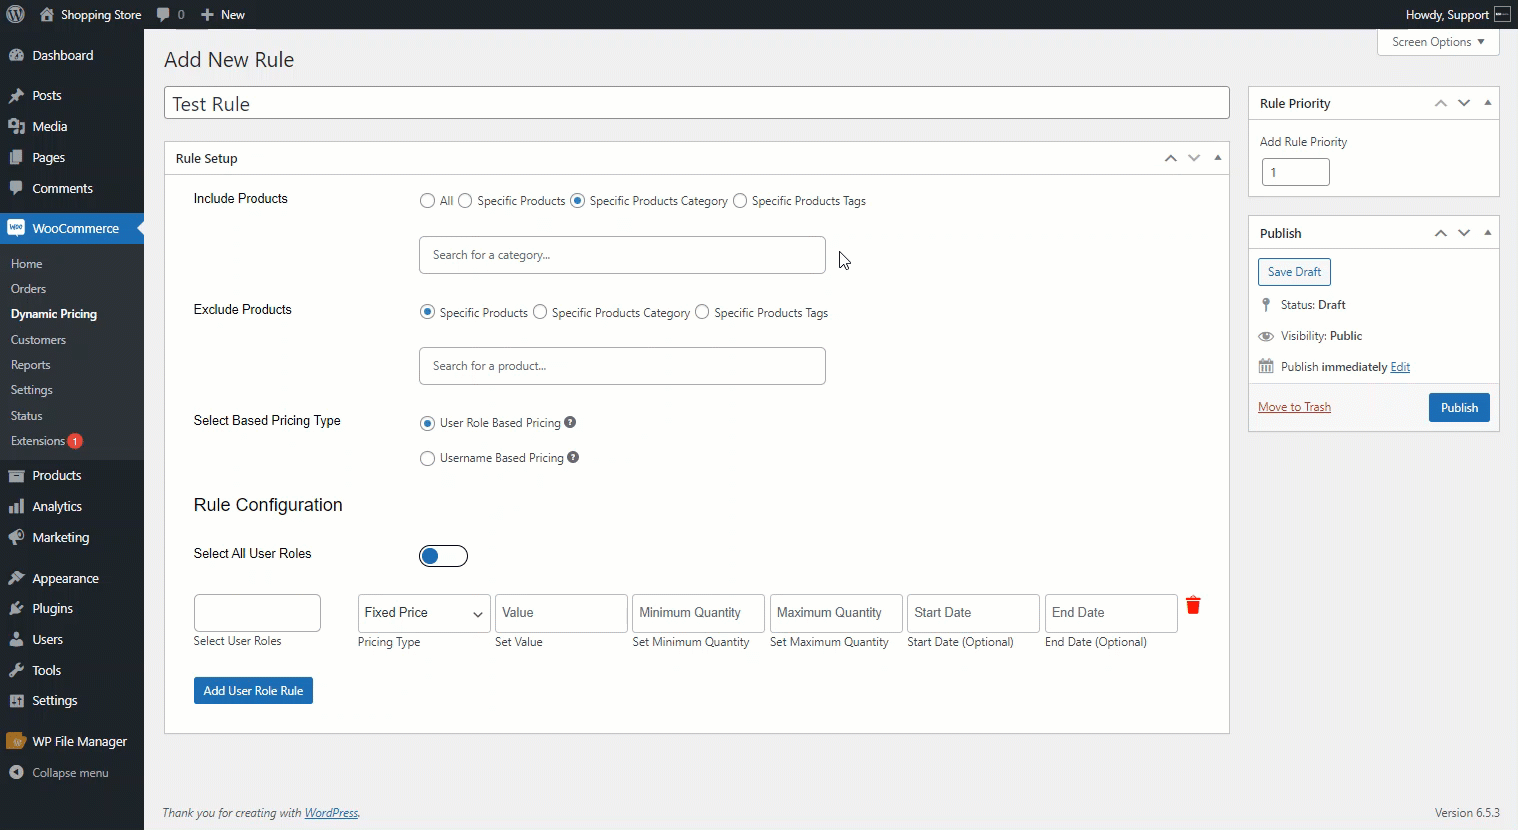
PLEASE NOTE: If the SPECIFIC PRODUCTS CATEGORIES radio button is selected but no product category is added, then no product category is considered selected. It will switch to the ALL radio button once published/updated.
Specific Products Tags – Include Products
- Select the Specific Products Tags radio button; this will only add selected product tags.
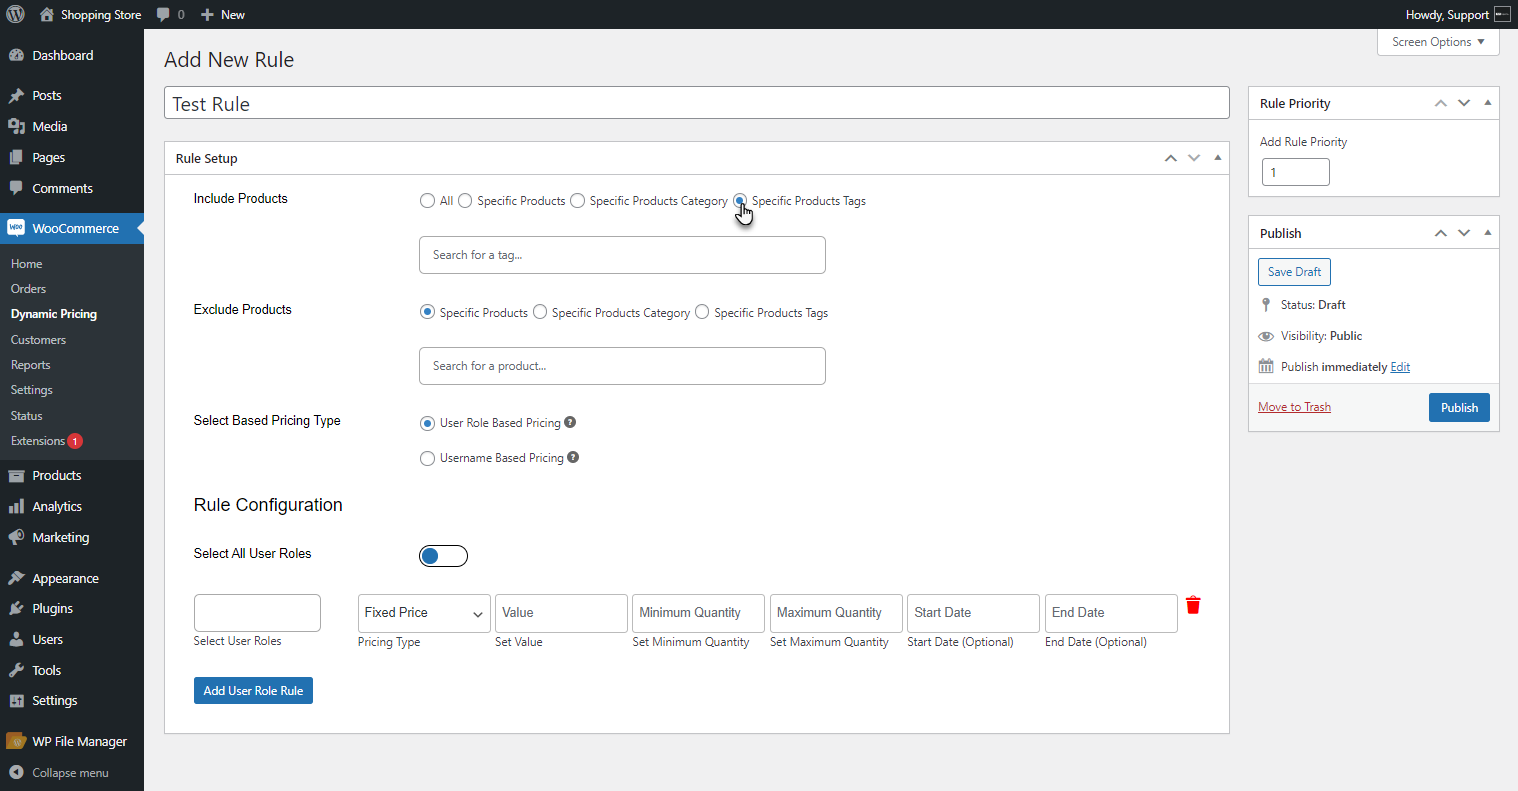
- Search for the Specific Product tags in the Search for a tag field.

PLEASE NOTE: If the SPECIFIC PRODUCTS TAGS radio button is selected but no product tag is added, then no product tag is considered selected. It will switch to the ALL radio button once published/updated.
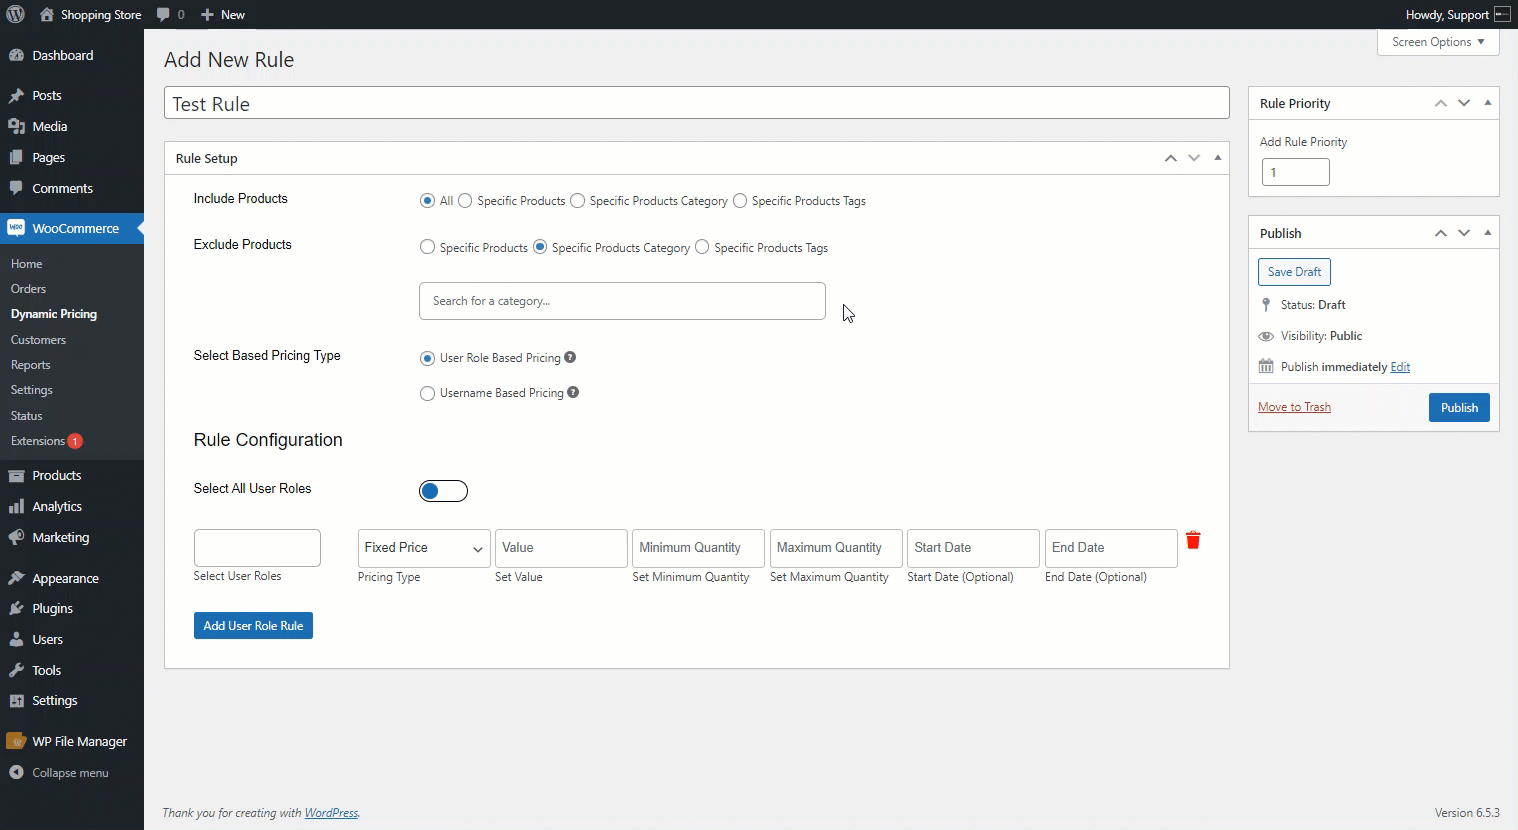
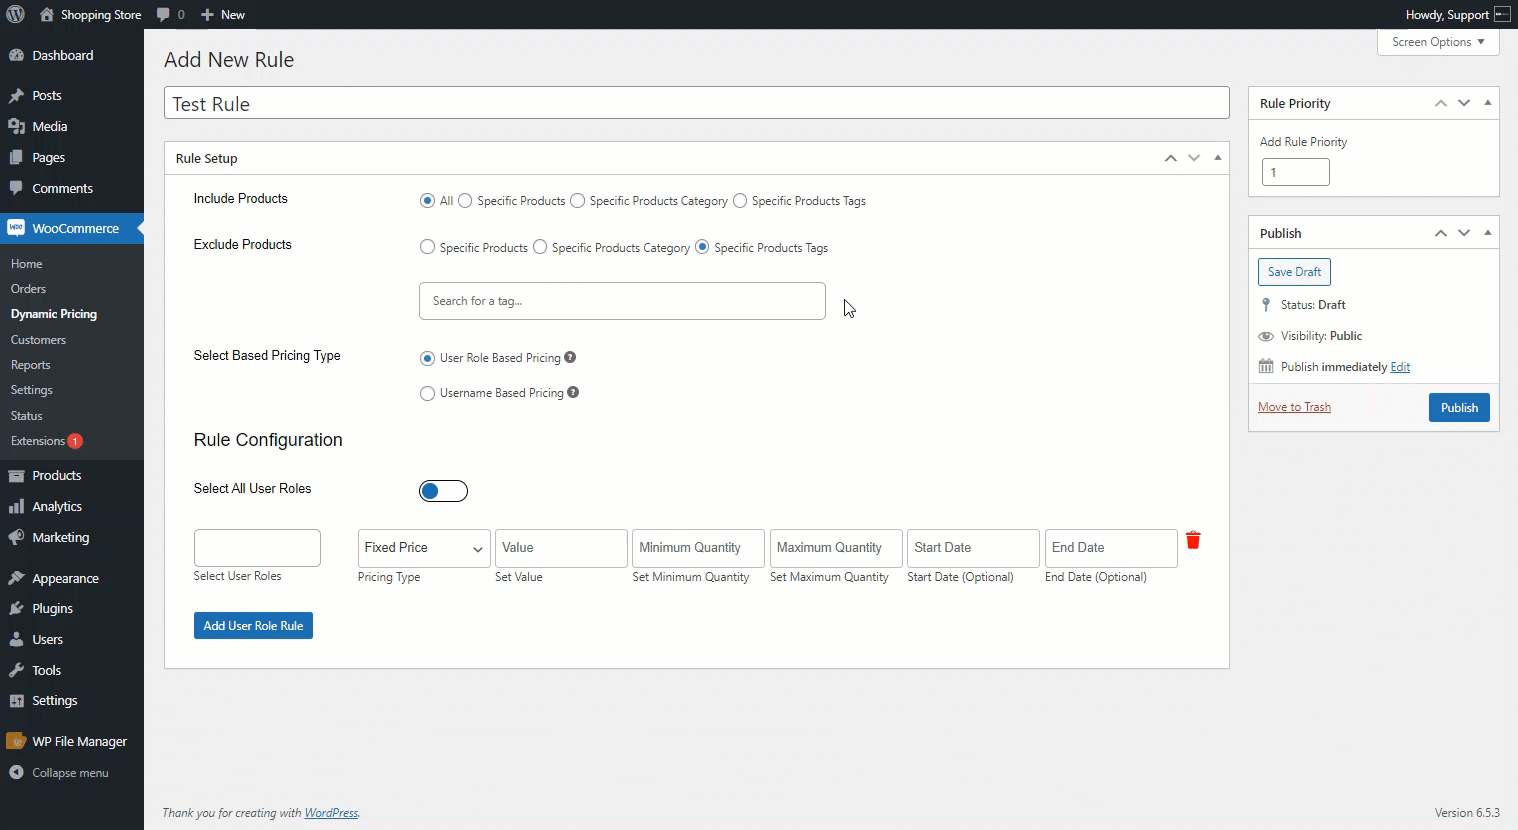
Exclude Products
↑ Back to top- In the Exclude Products option, three options are present.
- Specific Products
- Specific Products Category
- Specific Products Tags
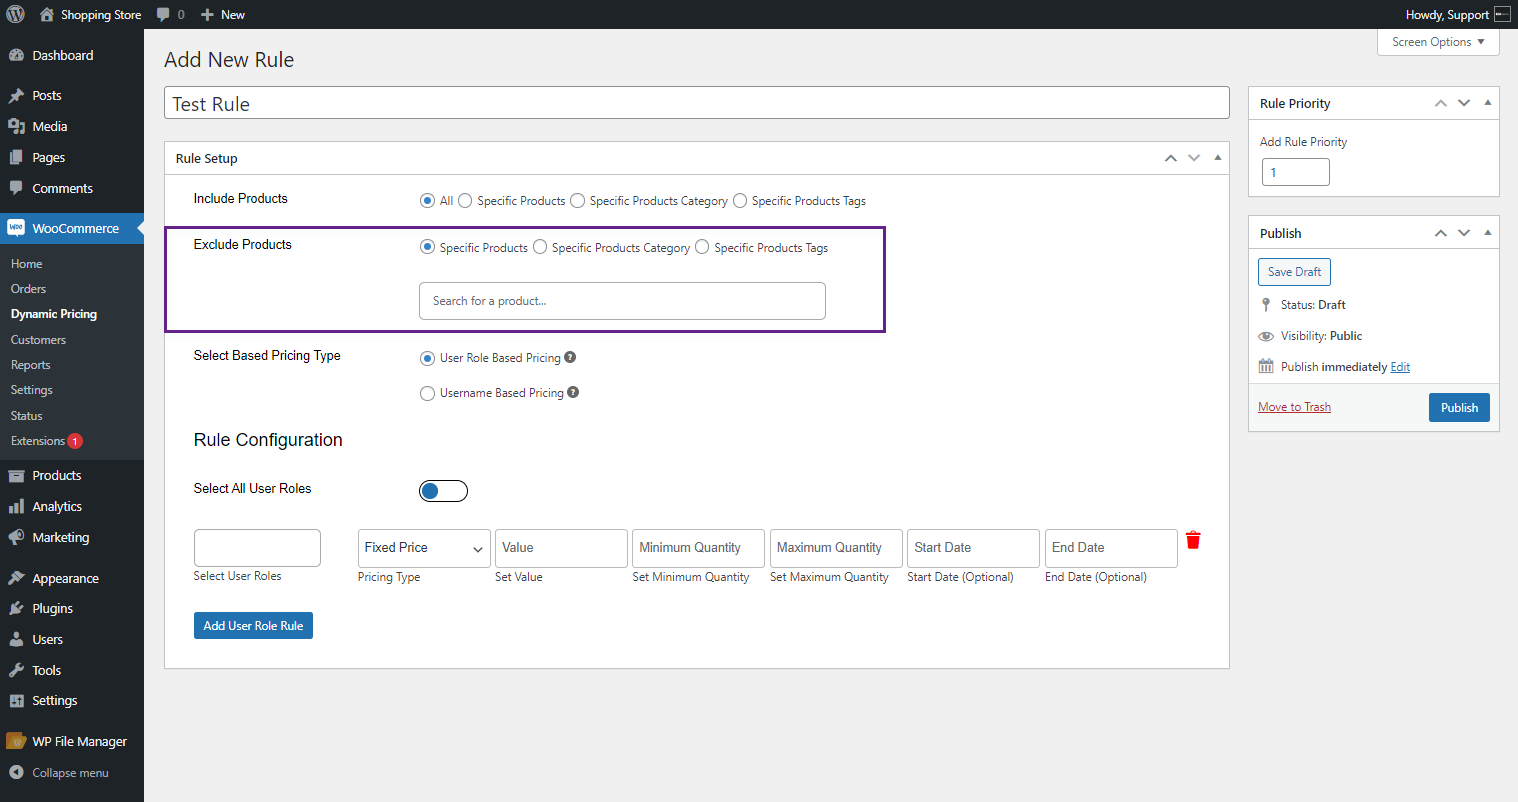
- This option is OPTIONAL.
ALERT: When a Product, Product Category, and Product Tag are included, and that same Product, Product Category, and Product Tag are also excluded then it will be considered excluded.
Specific Products – Exclude Products
- Select the Specific Products radio button, this will exclude the selected products.
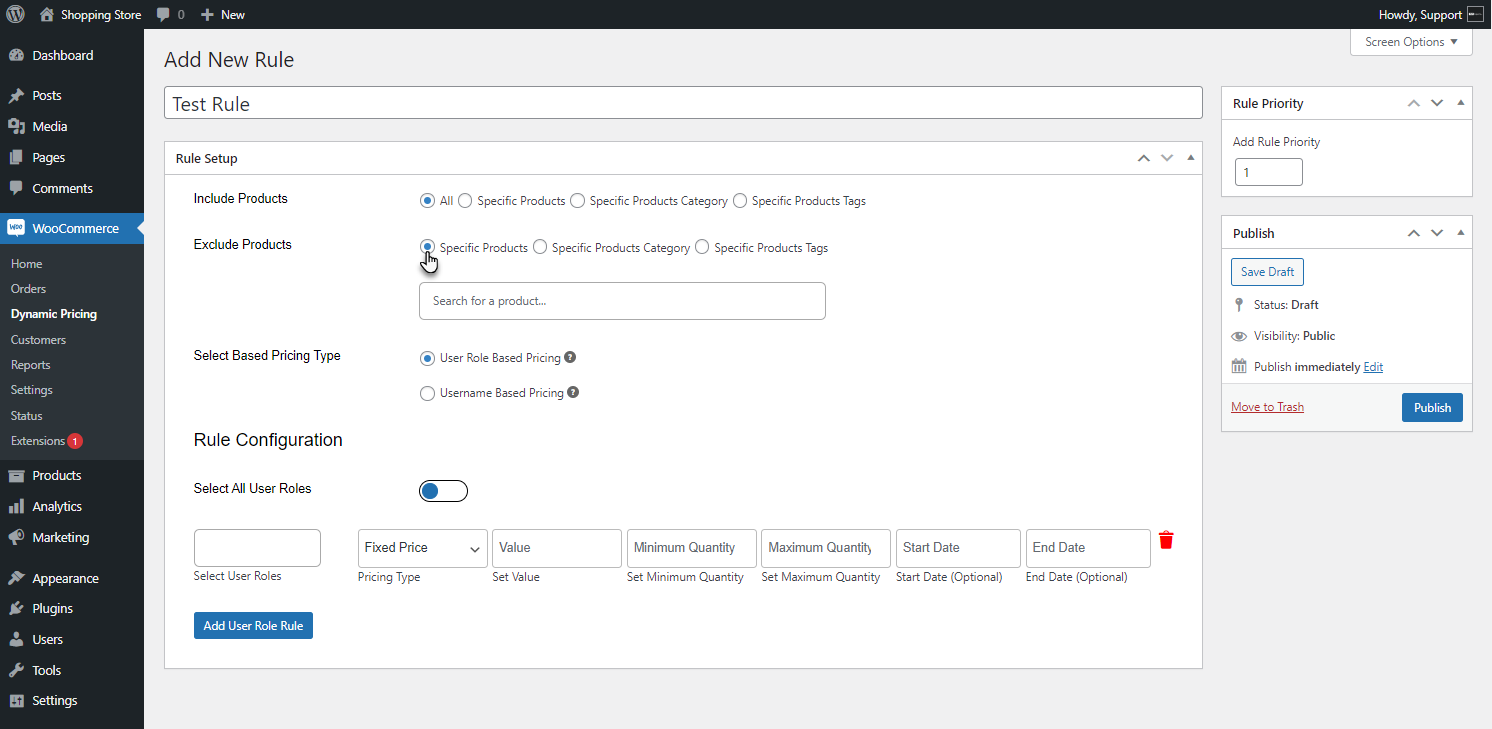
- Search for the Specific Product in the Search for a product field.
Specific Products Category – Exclude Products
- Select the Specific Products Category radio button, this will exclude only the selected product category.
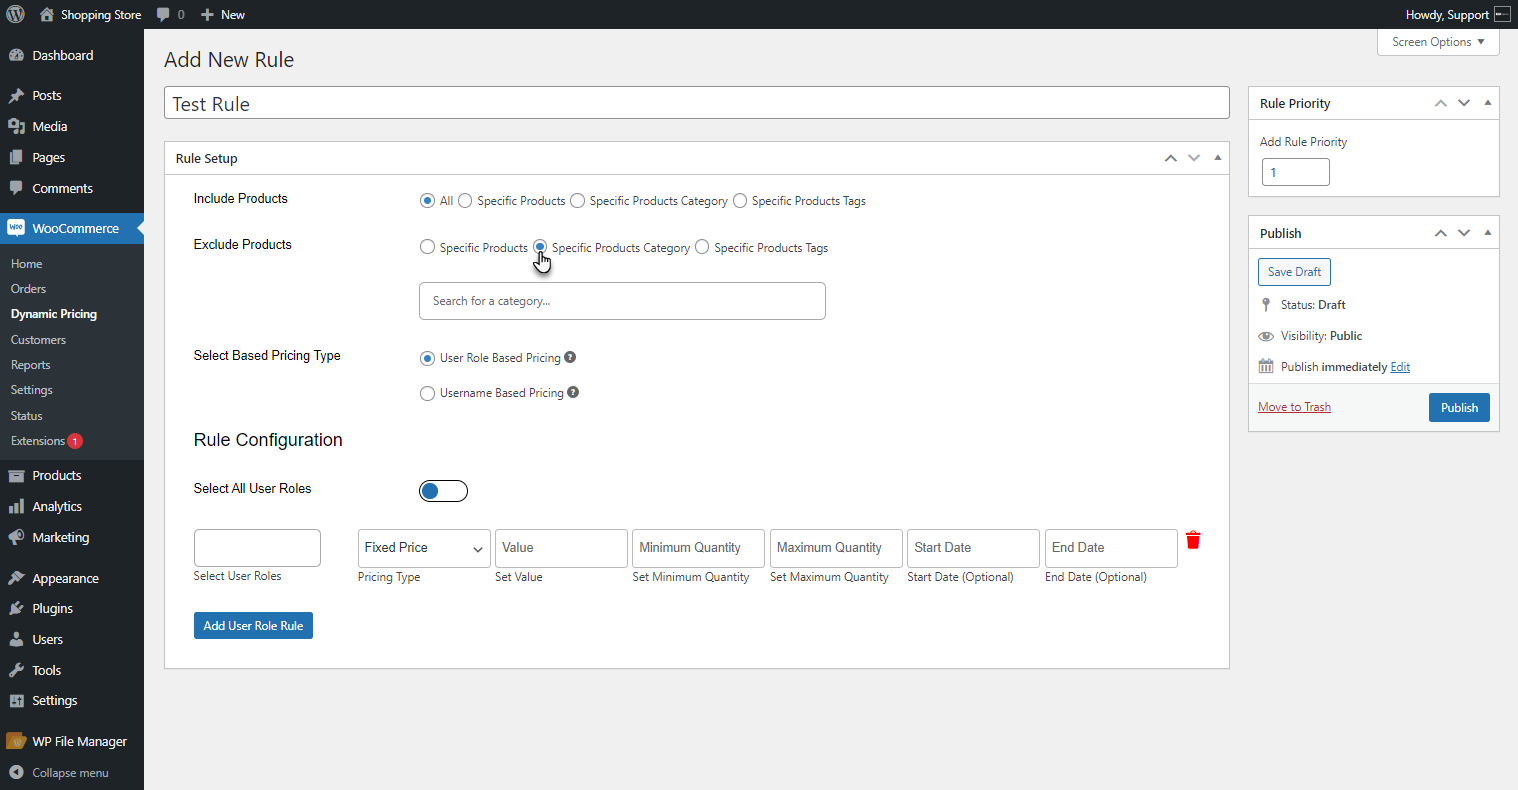
- Search for the Specific Product Category in the Search for a Category field.
Specific Products Tags – Exclude Products
- Select the Specific Products Tags radio button, excluding only selected product tags.
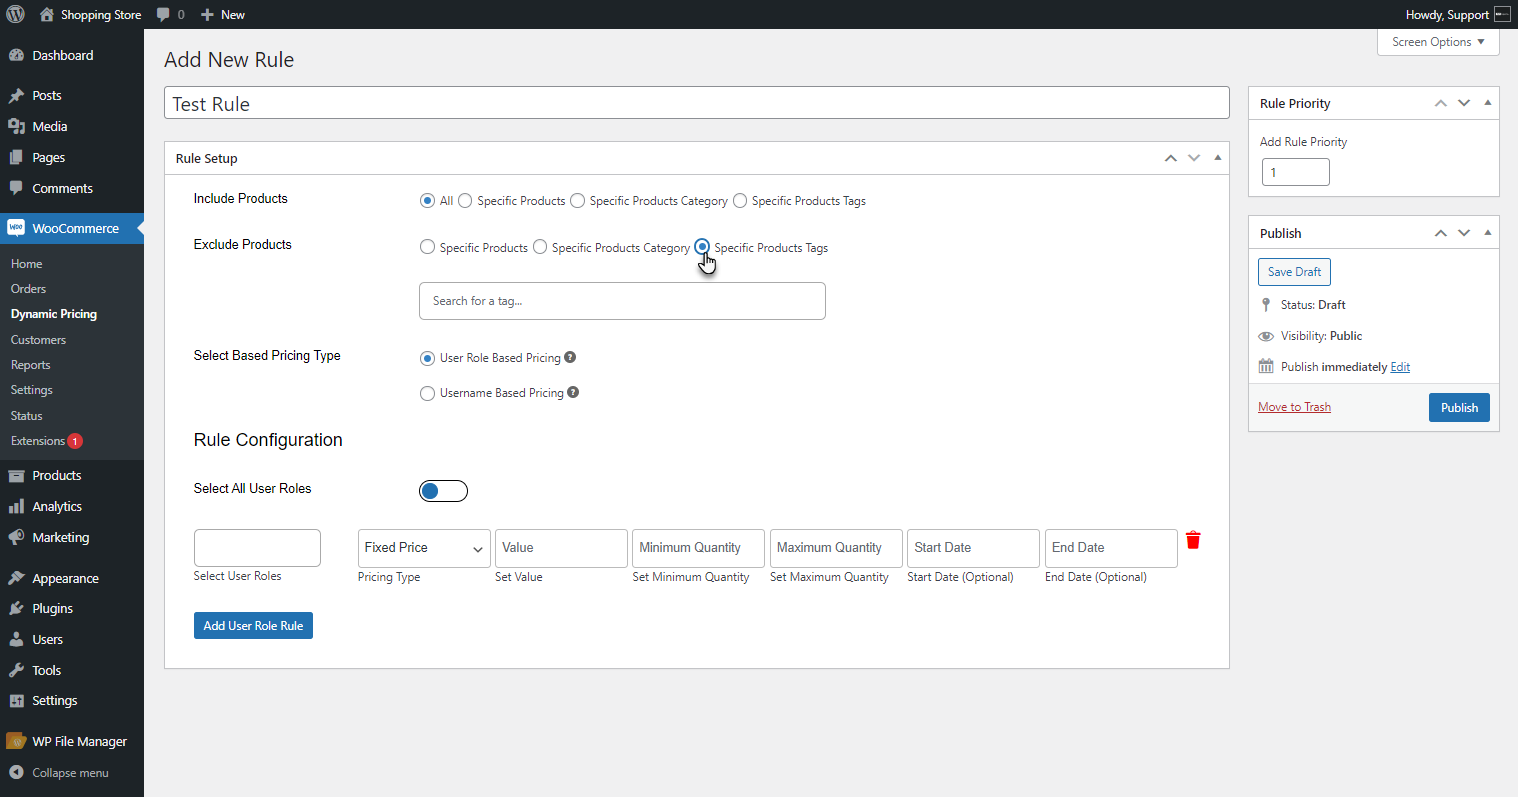
- Search for the Specific Product tag in the Search for a tag field.
Select Based Pricing Type
↑ Back to top- Navigate to the Select Based Pricing Type option. This option allows the admin to select the pricing type for the rule.
- In this option, we have two options.
- User Role Based Pricing
- Username Based Pricing
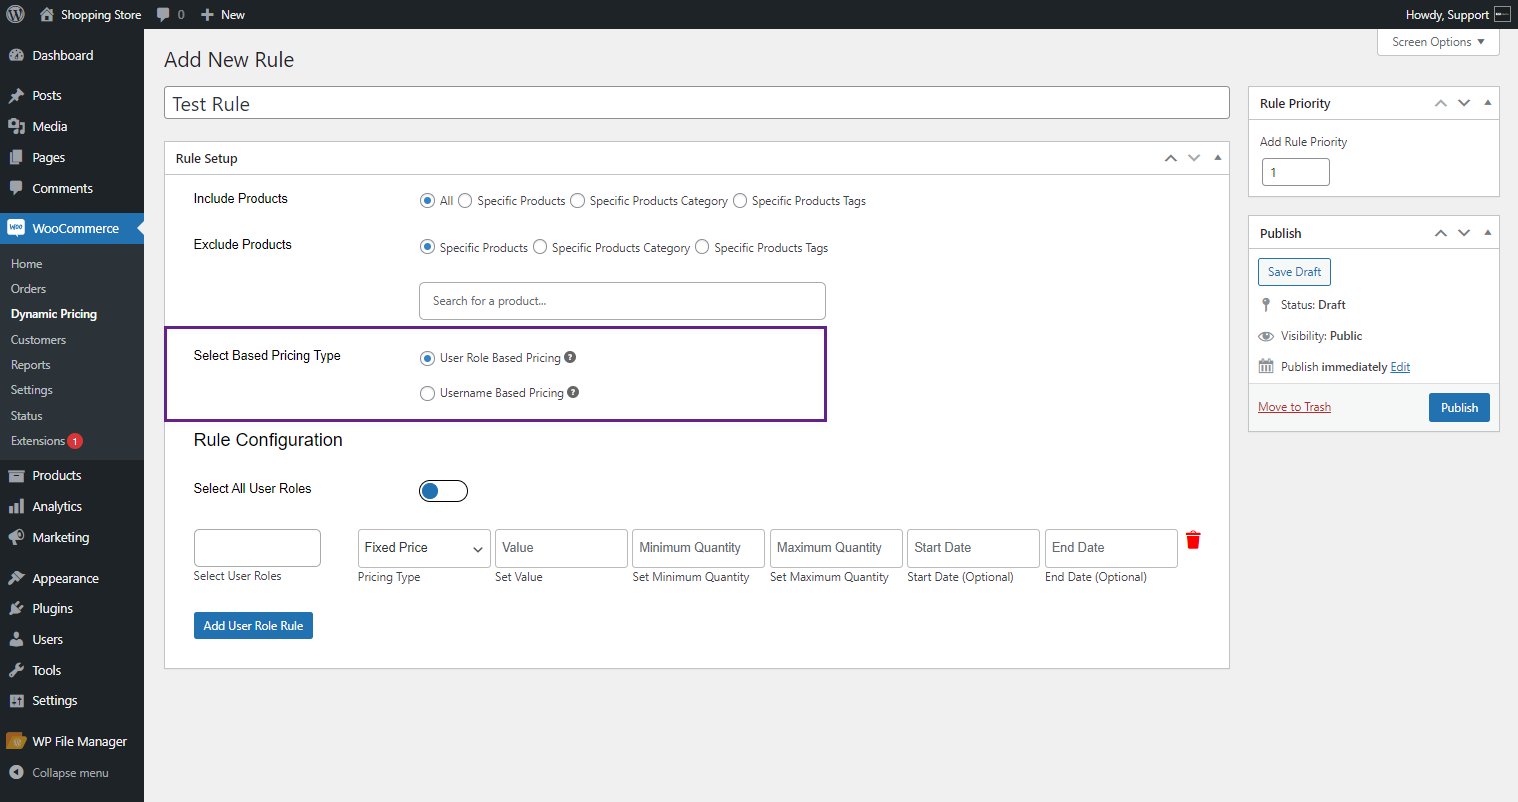
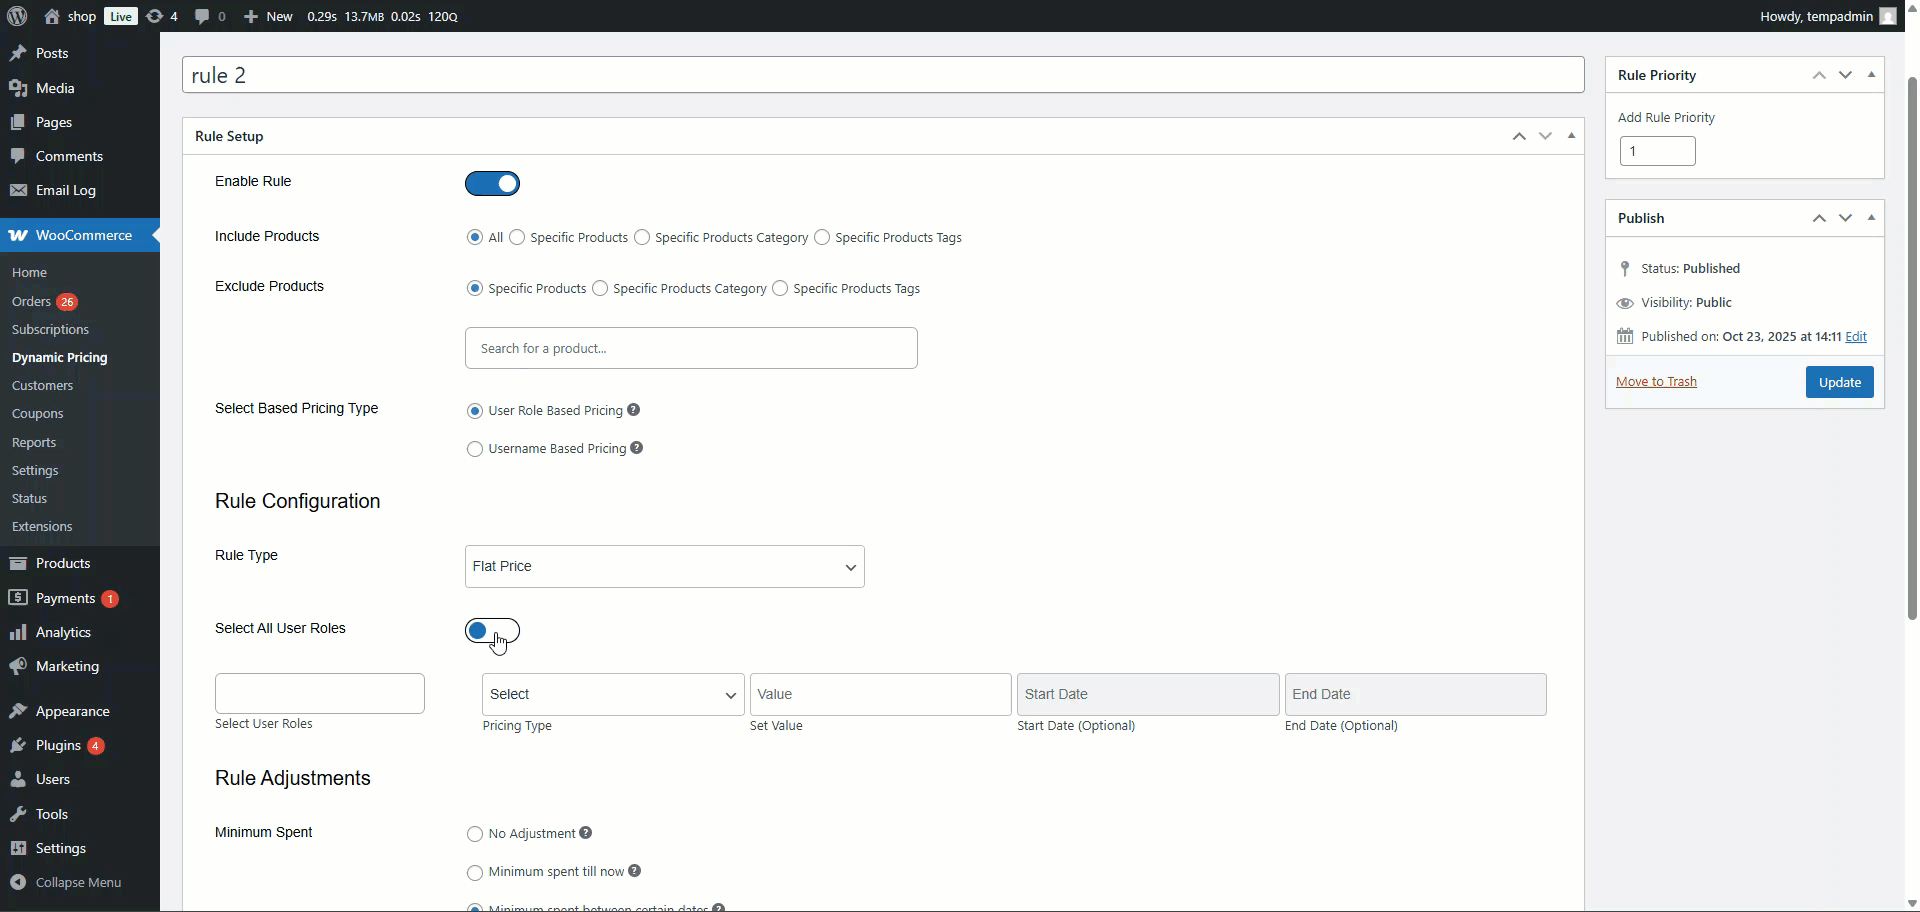
User Role Based Pricing
- Select the User Role-Based Pricing radio button, which will bring up all the configurations from the User Role-Based perspective.
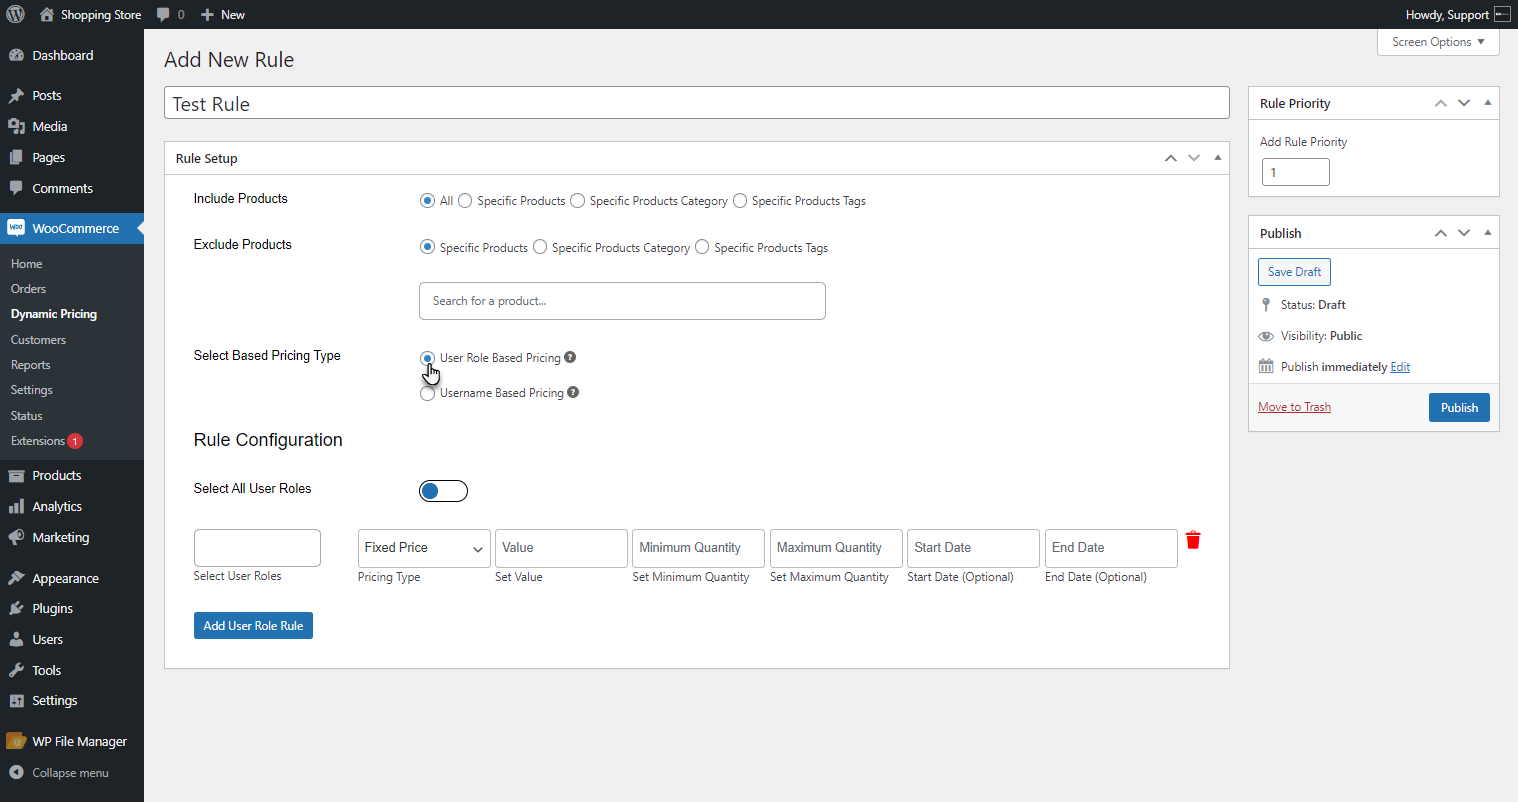
- This option will bring the Select All User Roles option and the Select User Role(s) field in the Rule Configuration section.
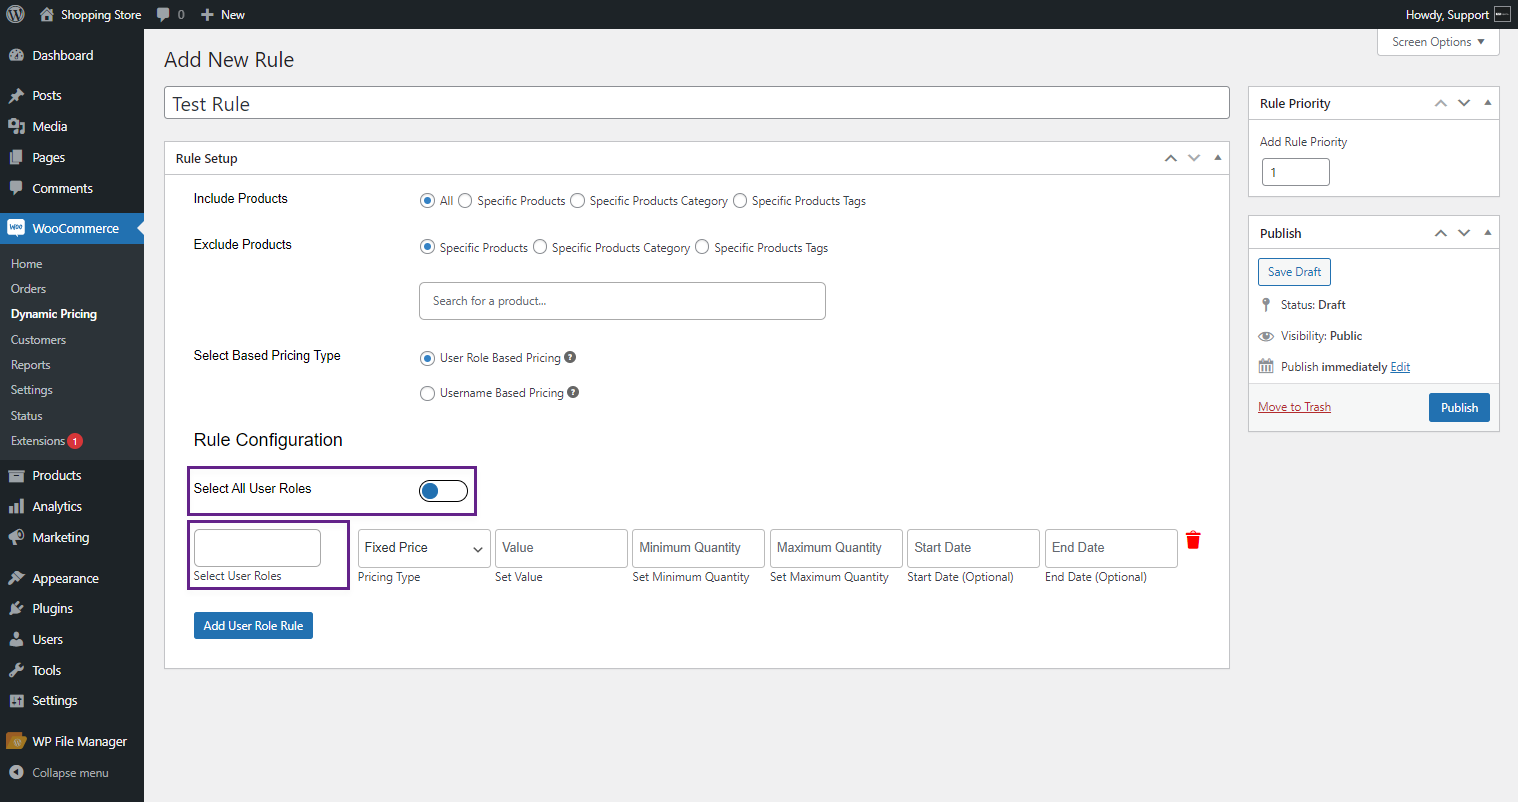
- The admin can select All the User Roles by enabling the Select All User Roles toggle button.

- The admin can select specific roles for the rule in the Select User Roles field.
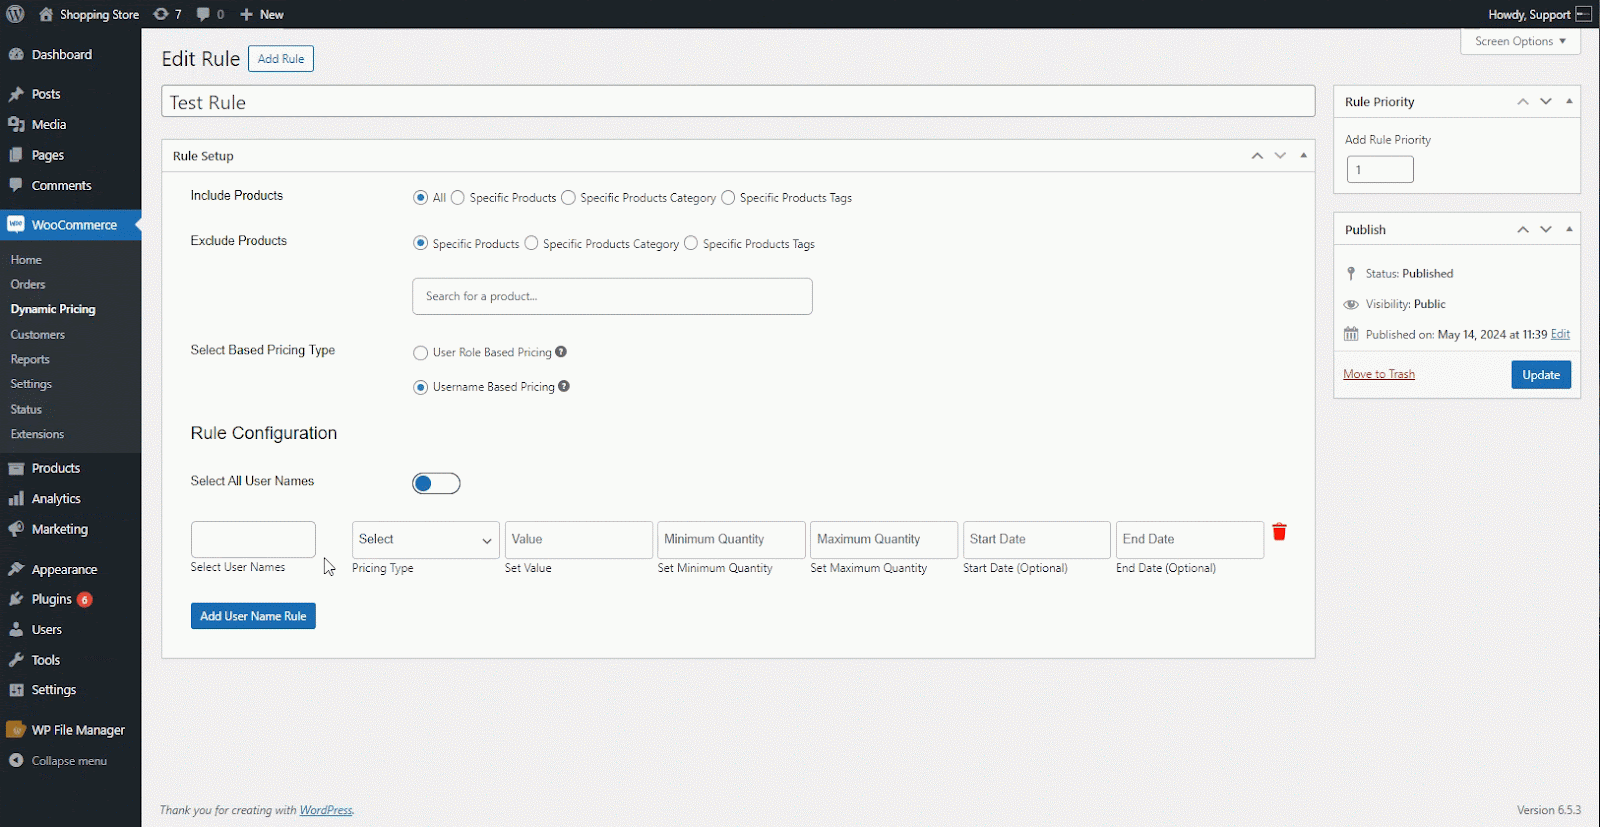
Username Based Pricing
- Select the Username Based Pricing radio button, which will bring up all the configurations from the Username Based perspective.
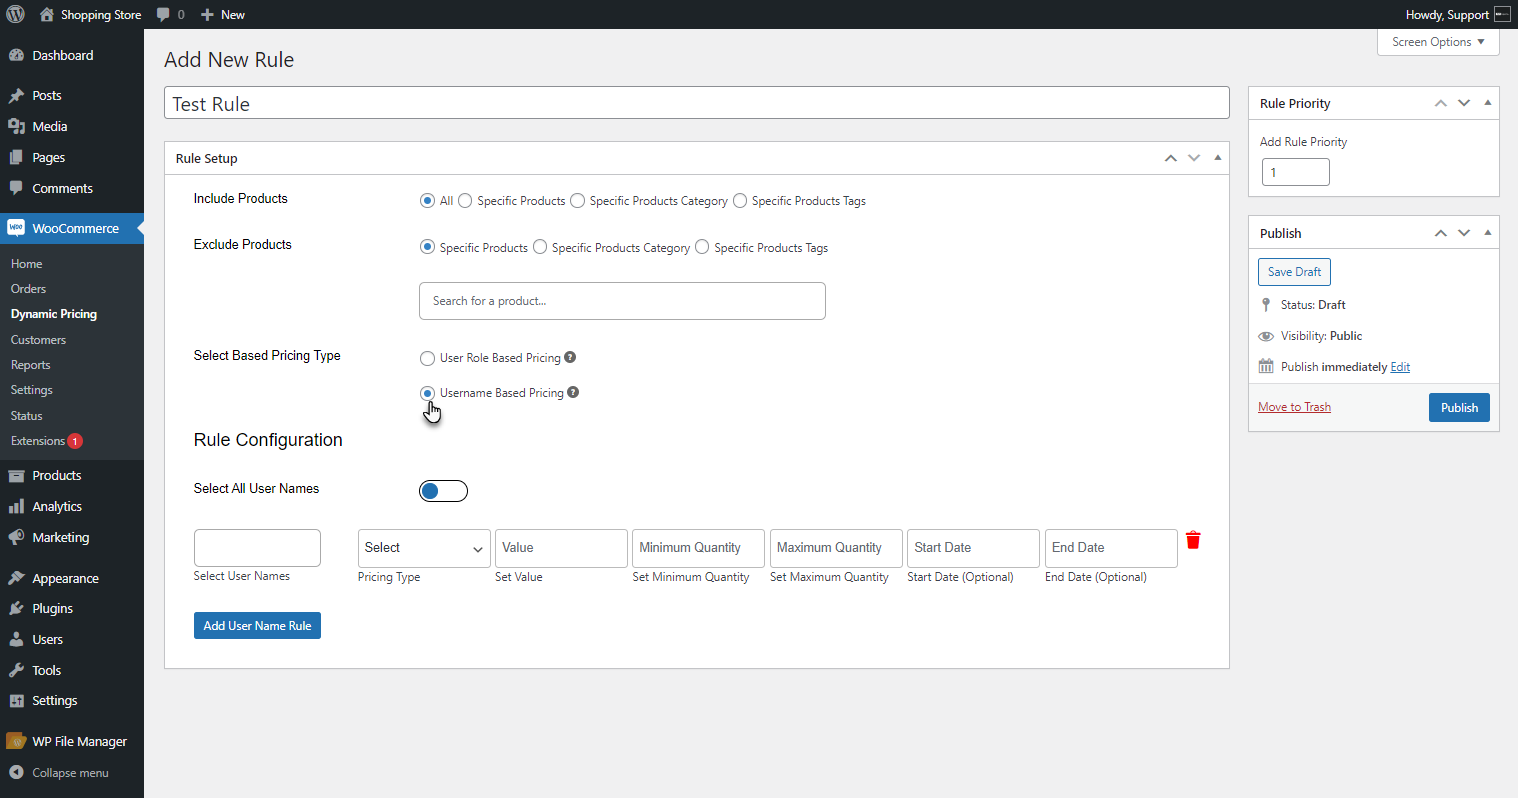
- This option will bring the Select All User Names option and the Select User Names field in the Rule Configuration section.

- The admin can select All the User Names by enabling the Select All User Names toggle button.
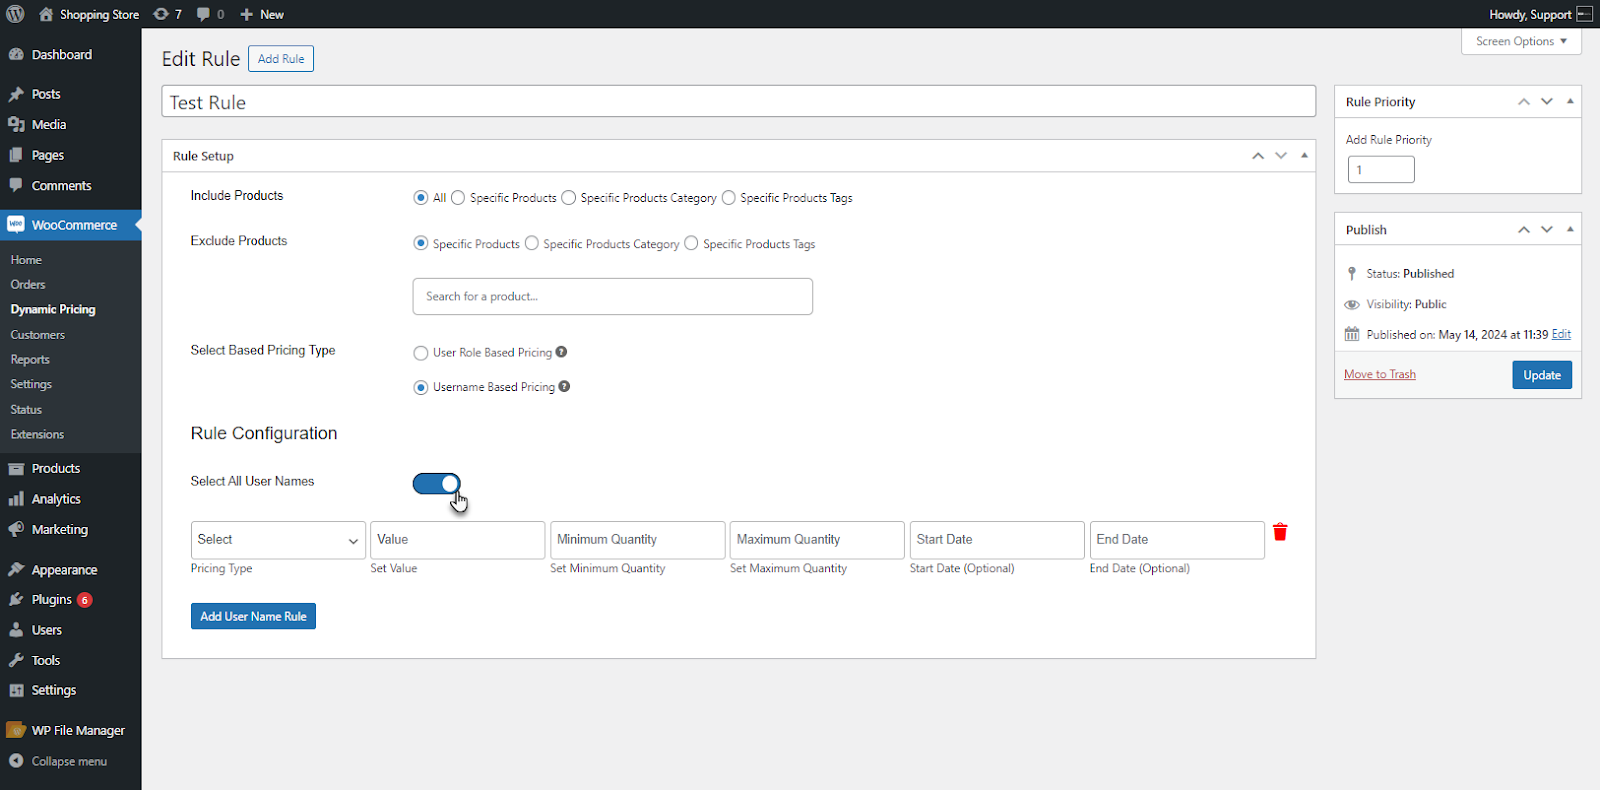
- The admin can select specific user names for the rule in the Select User Names field.
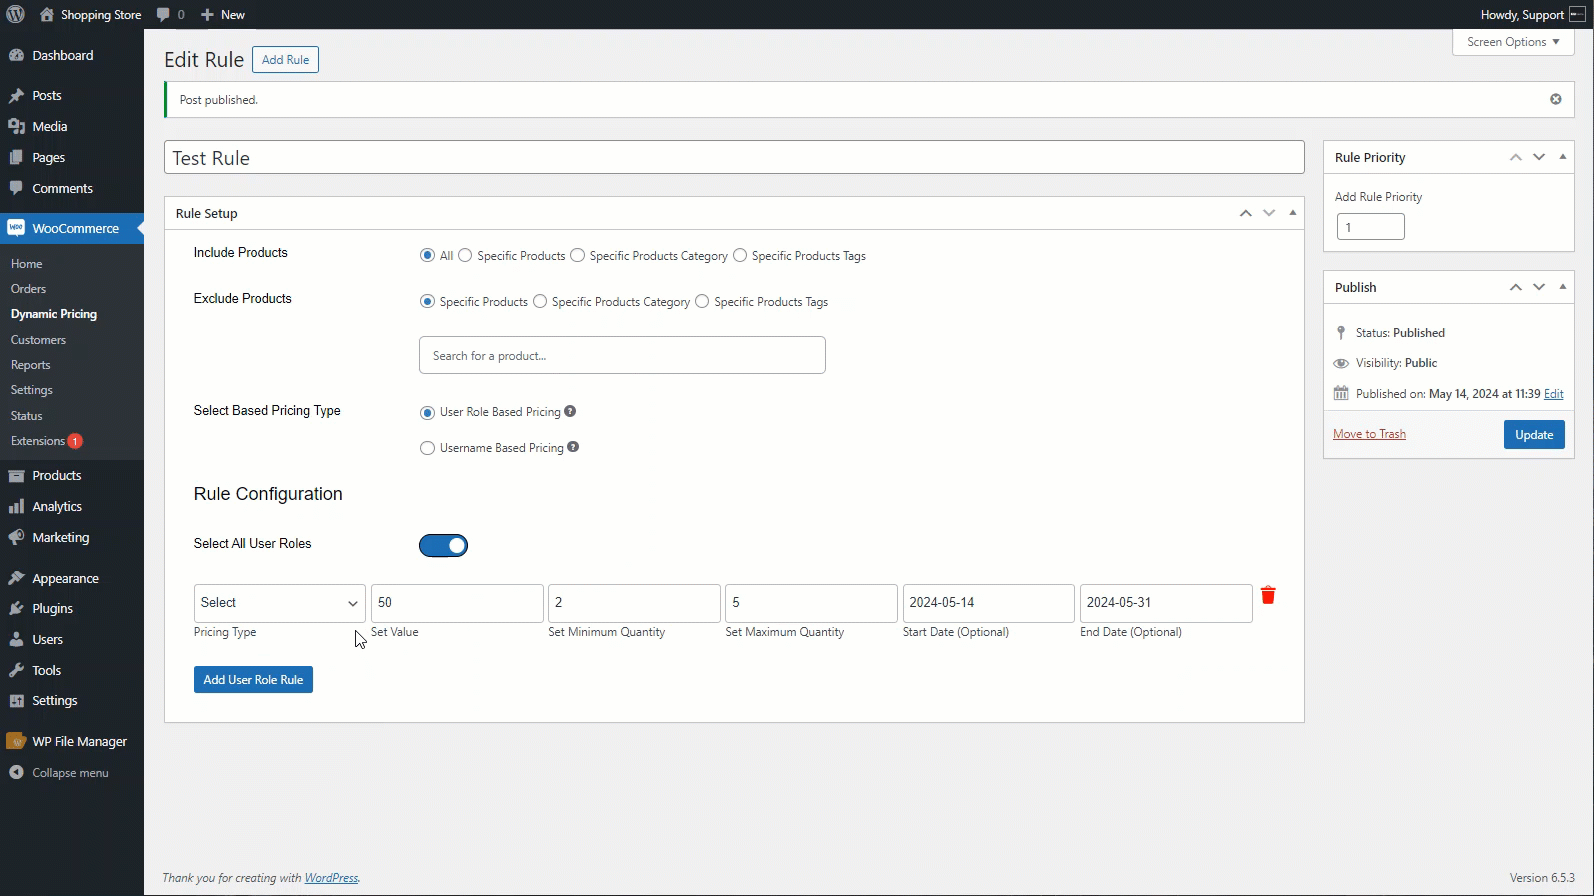
Rule Configuration
↑ Back to top- Move to the Rule Configuration section. The configuration of the rule is done in this section.
The Rule Type dropdown includes the following options:
- Flat Price
- Dynamic Pricing

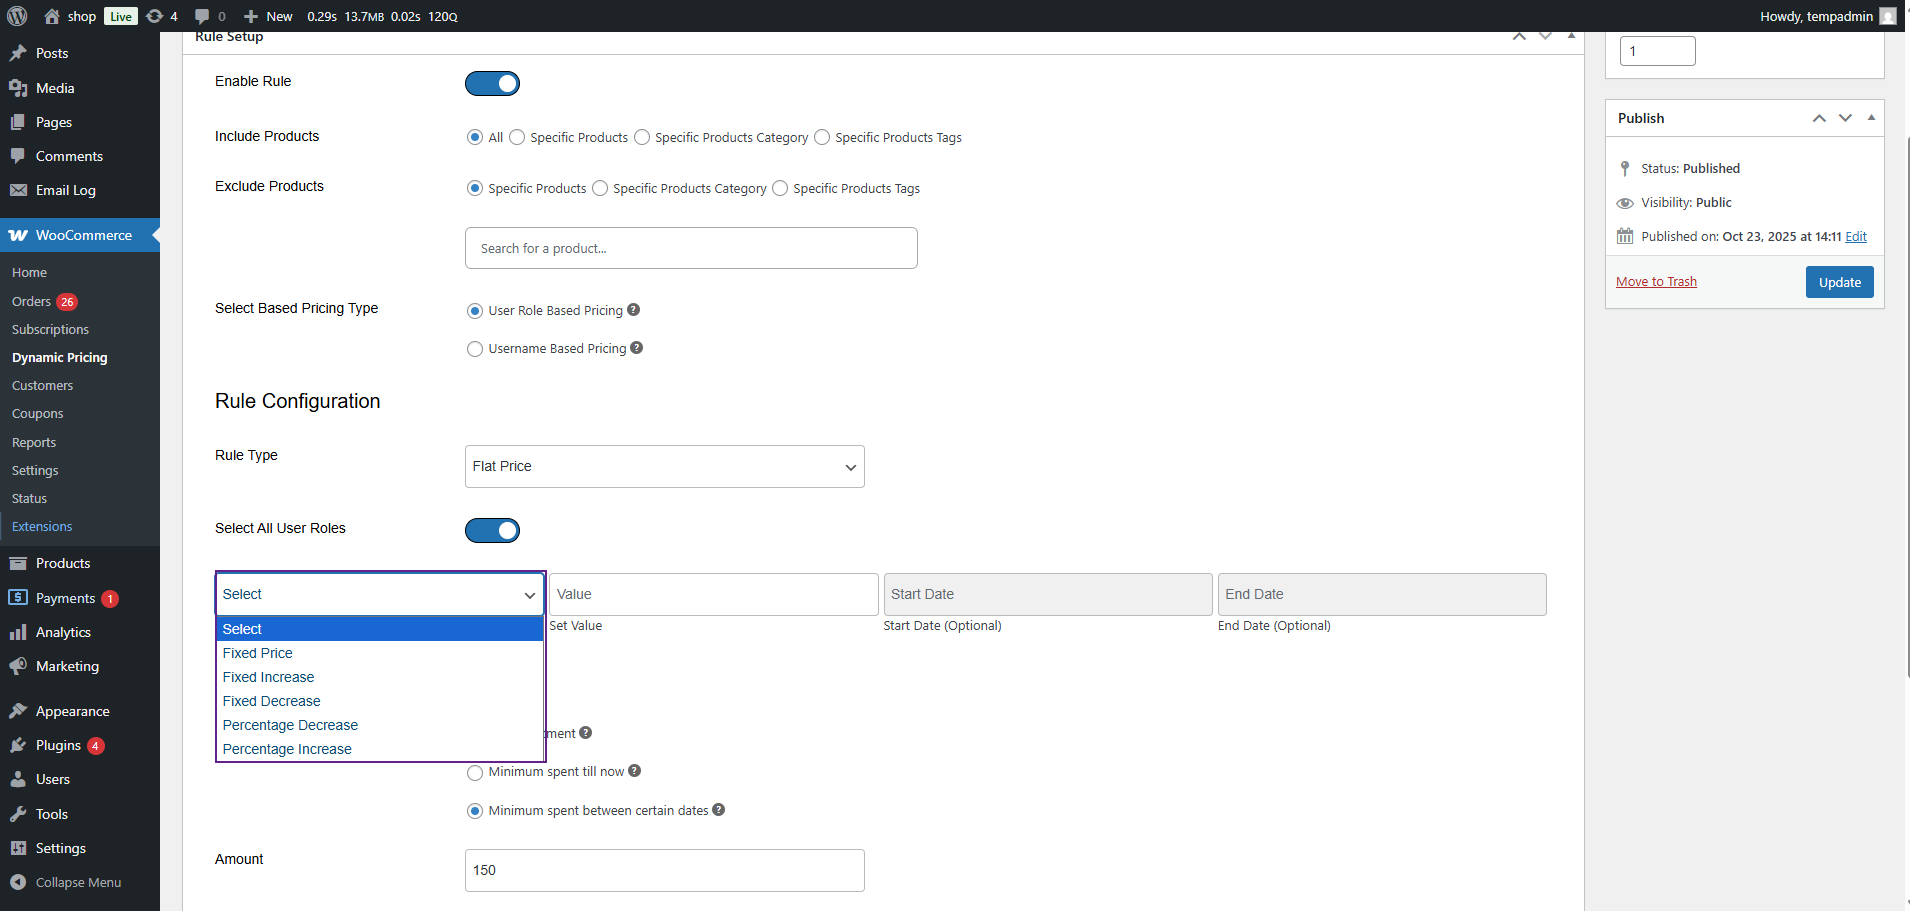
Flat Price
- When Flat Price is selected from the Rule Type dropdown, the following fields will appear on the Rule creation page:
Select All User Roles
- Enable this option to apply the Flat Price rule to all user roles.
- If disabled, you can manually select specific roles (e.g., Administrator, Customer).
Select
- Choose the pricing method for the flat price adjustment.
- Available options include:
- Fixed Price: Set a specific price for the selected products.
- Fixed Increase: Add a fixed amount to the product price.
- Fixed Decrease: Deduct a fixed amount from the product price.
- Percentage Decrease: Apply a percentage-based discount.
- Percentage Increase: Apply a percentage-based price increase.
Set Value
- Enter the numerical value that corresponds to the selected pricing method.
Start Date (Optional)
- Set a start date for when the Flat Price rule becomes active.
- Leave blank to activate it immediately upon saving.
End Date (Optional)
- Set an expiration date for the Flat Price rule.
- Leave blank for the rule to remain active until manually disabled.
Front-End Impact
- Navigate to the Shop Page or any Product Page where the Flat Price Rule is applied.

- The product will display the new Flat Price instead of tiered or dynamic prices.
- Quantity-based pricing tables will not appear.
- Customers will see a single fixed price across all quantities.
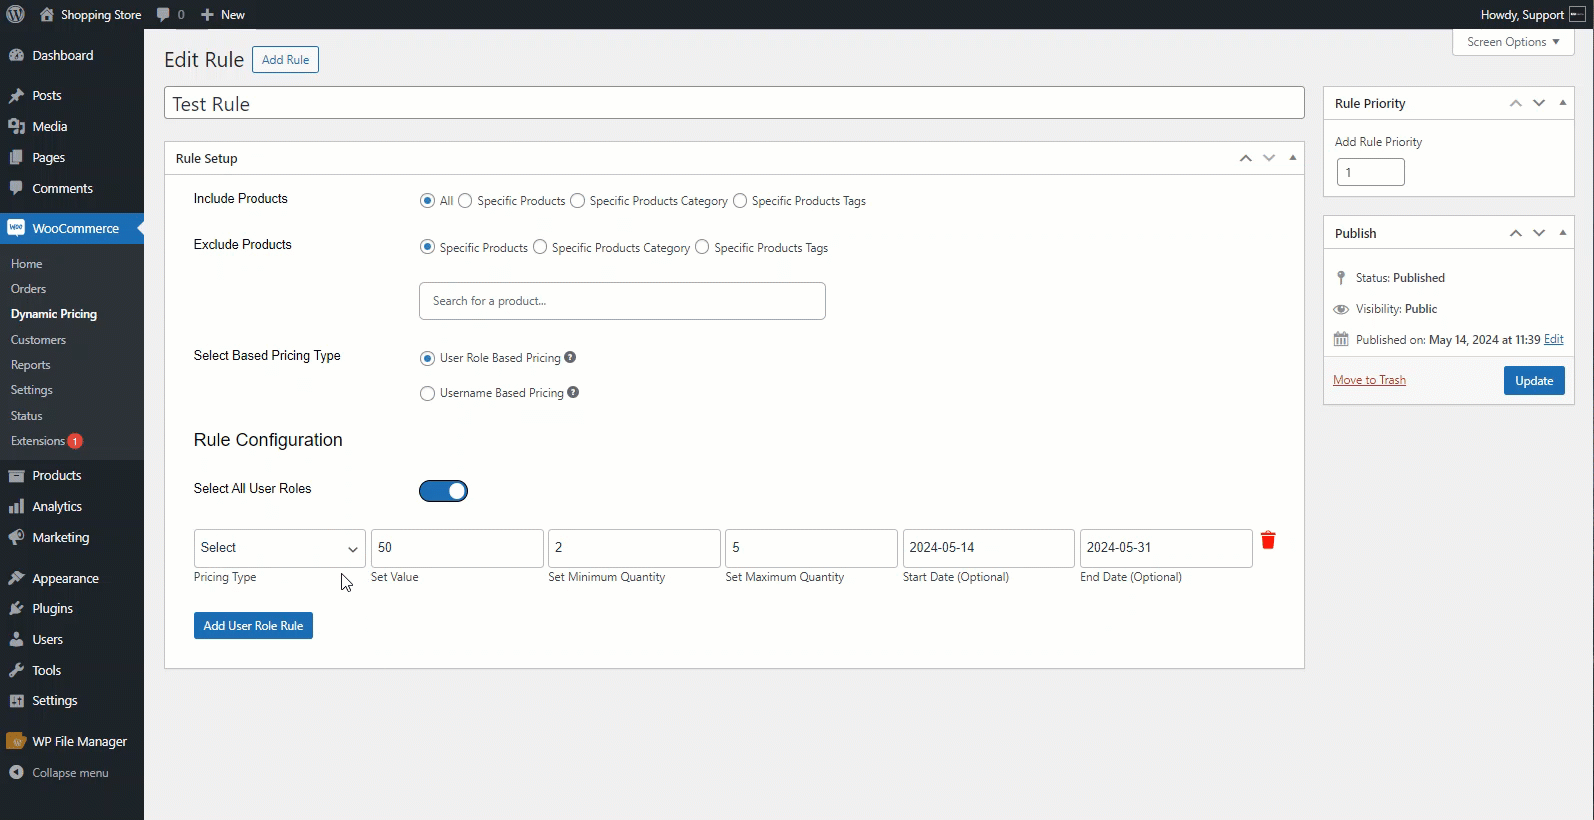
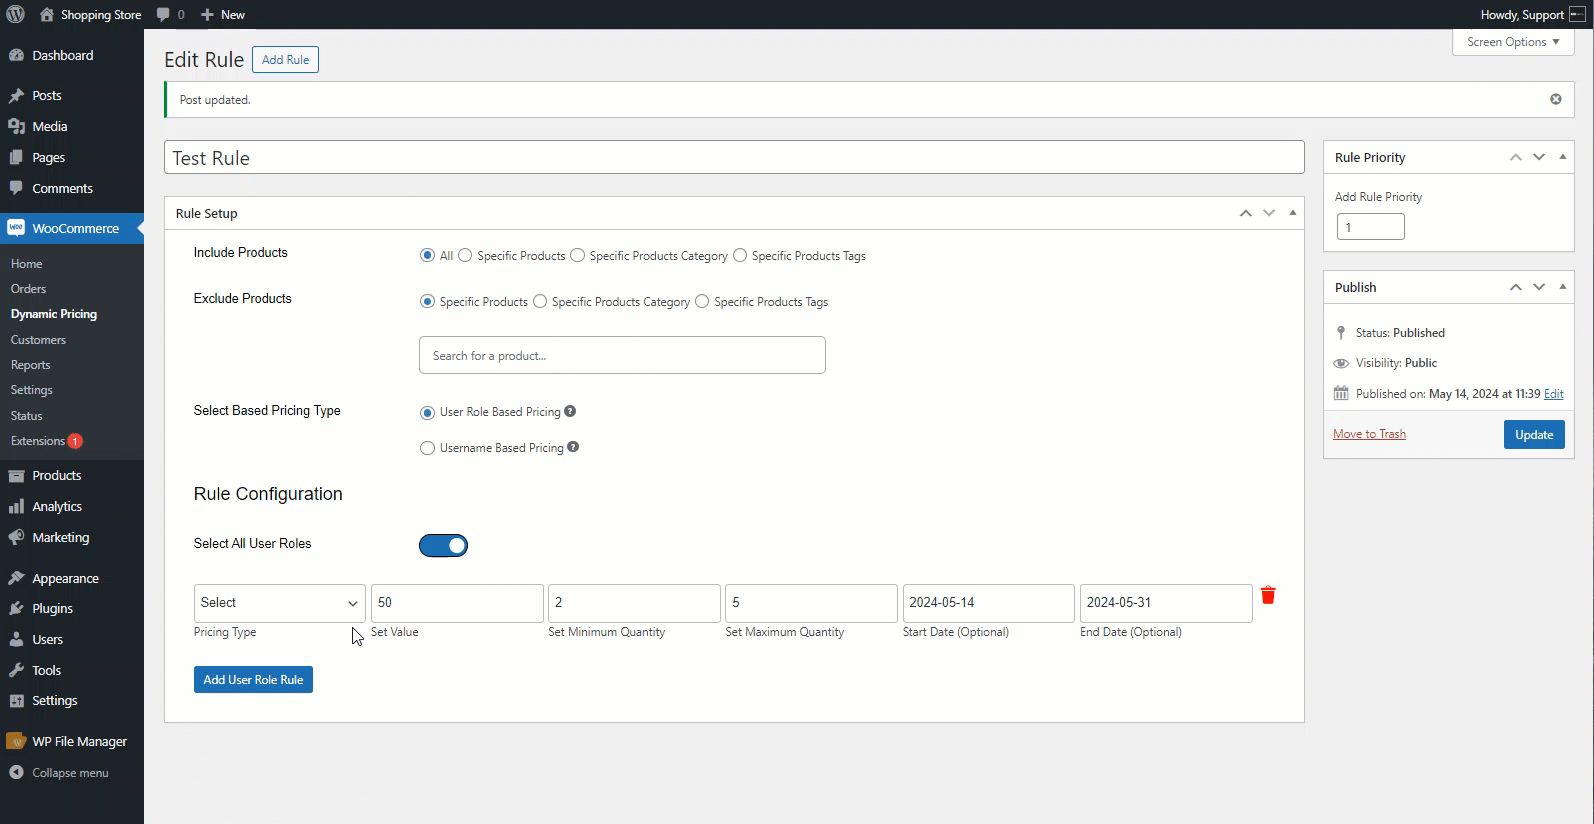
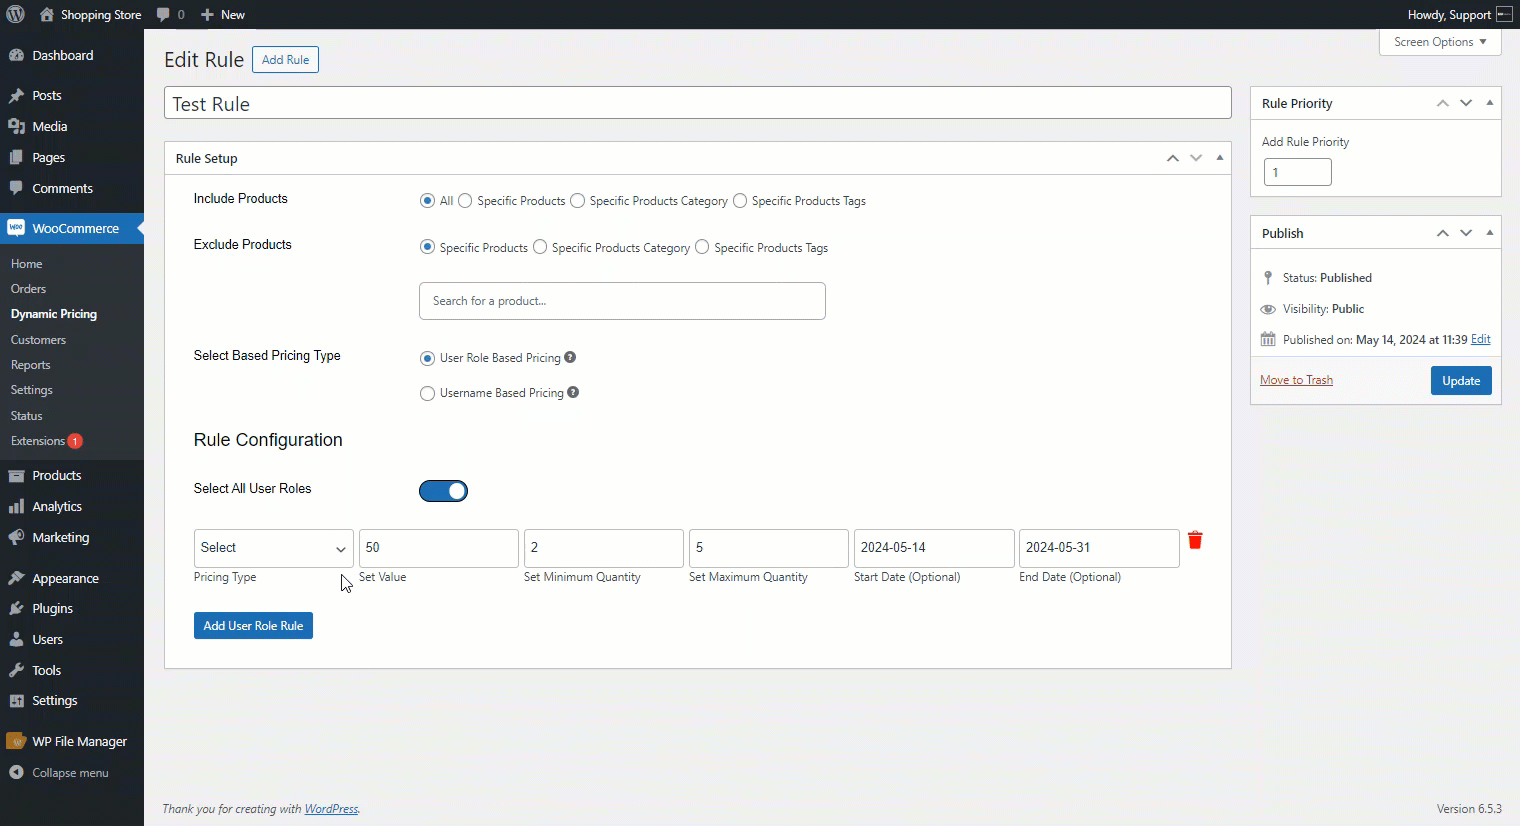
- Enable the Select All User Roles option.
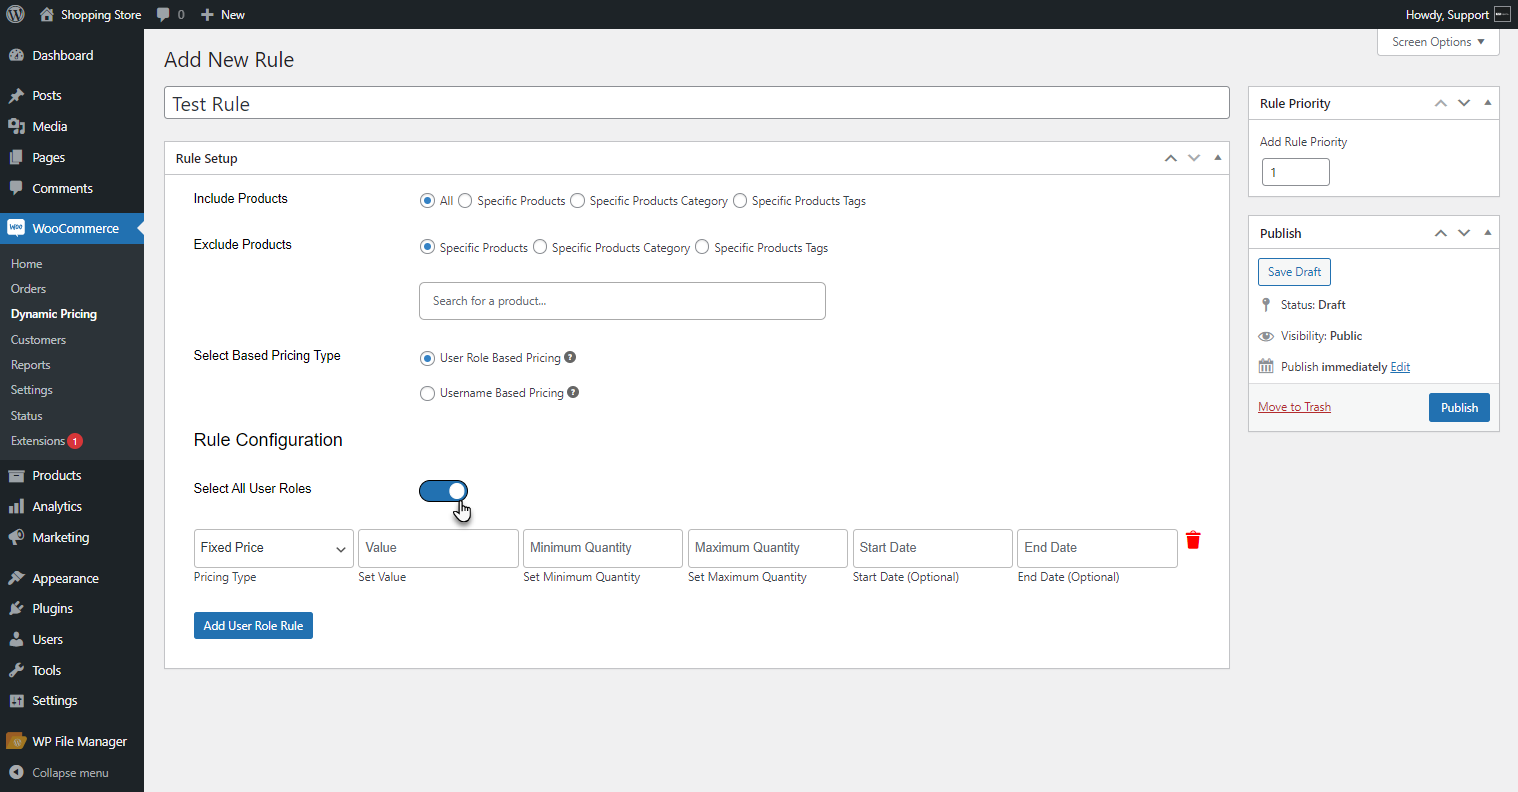
- Six fields are provided to the admin for configuring the rule.
- Pricing type
- Set value
- Set Minimum Quantity
- Set Maximum Quantity
- Start Date ( Optional )
- End Date ( Optional )
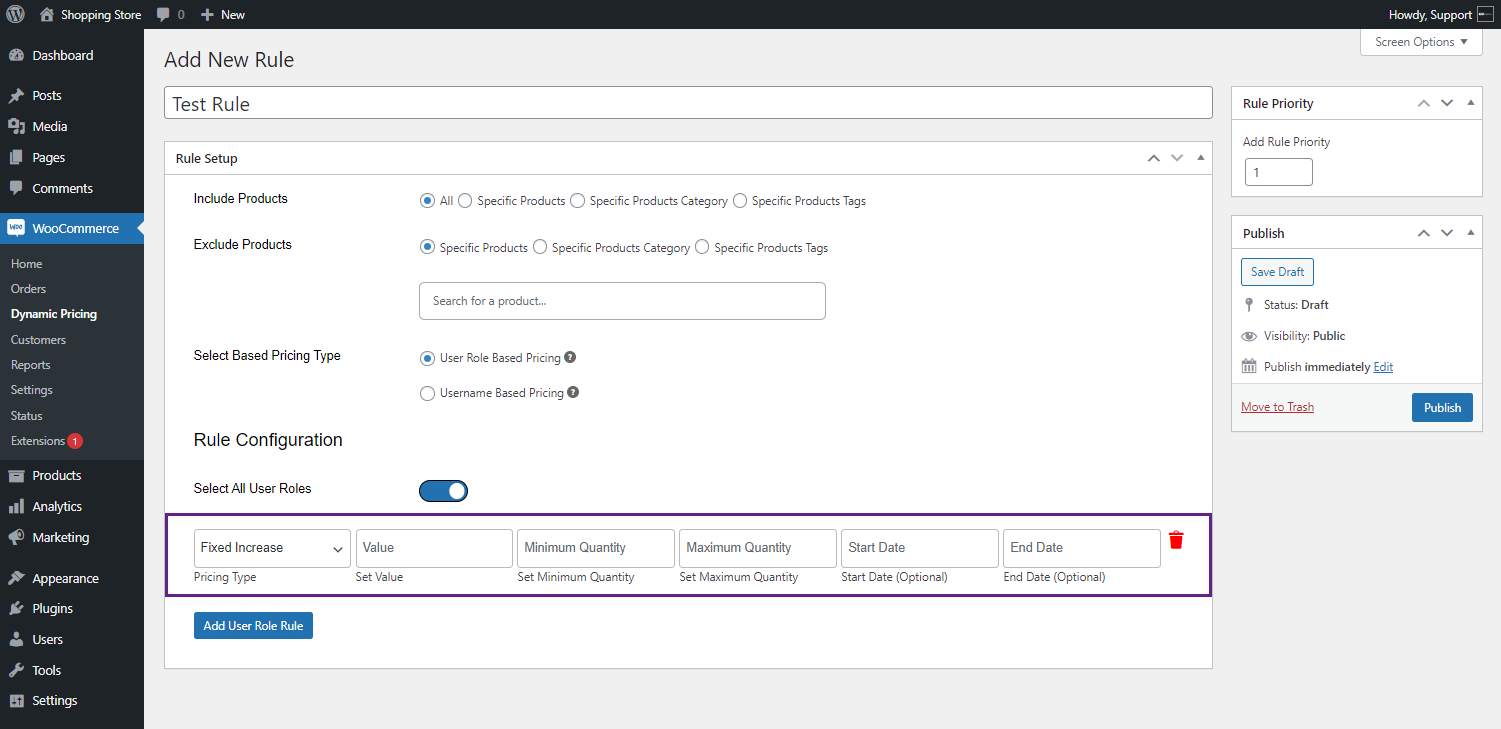
- There are five types of Pricing provided for the admin to set up a rule.
- Fixed Price
- Fixed Increase
- Fixed Decrease
- Percentage Increase
- Percentage Decrease
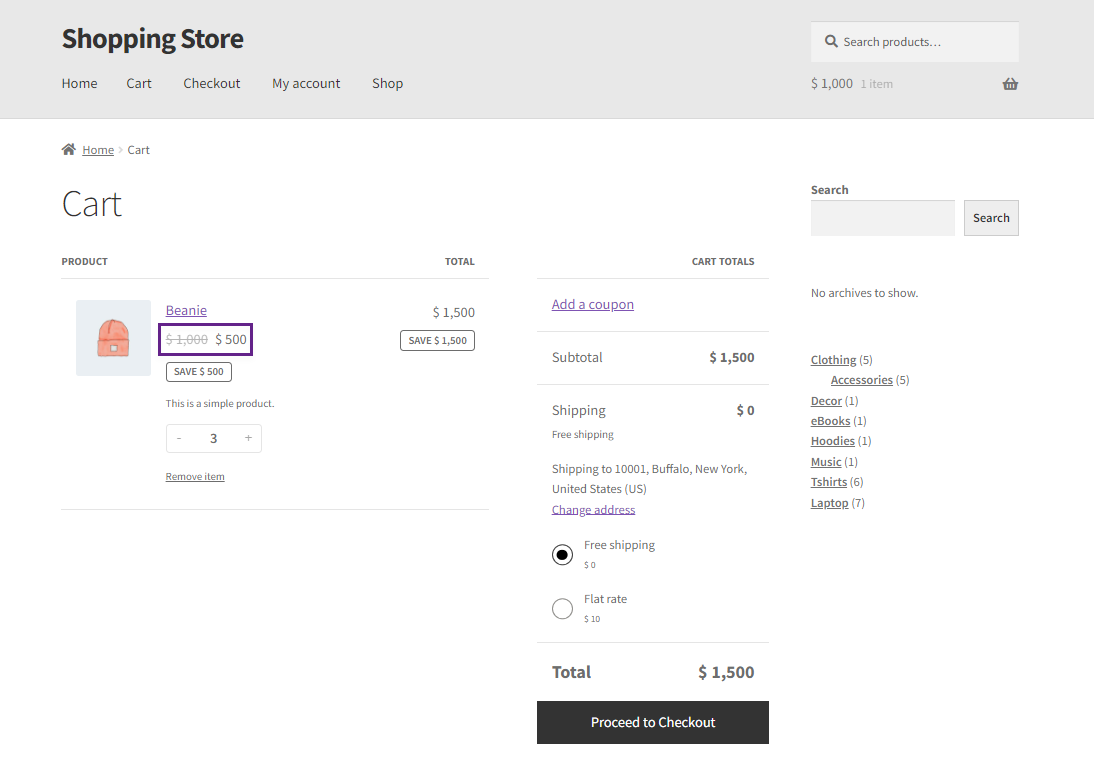
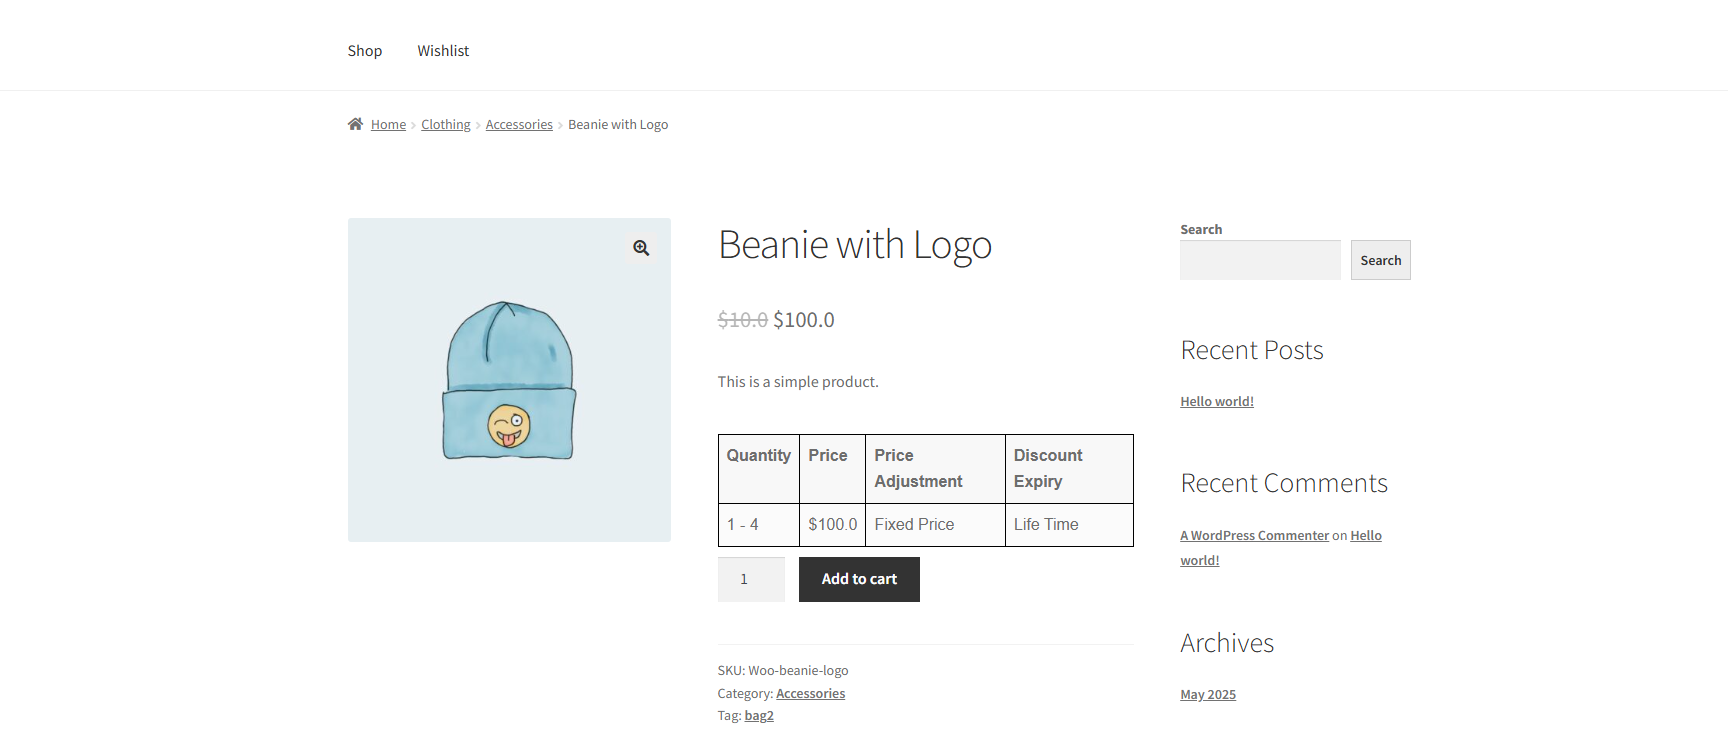
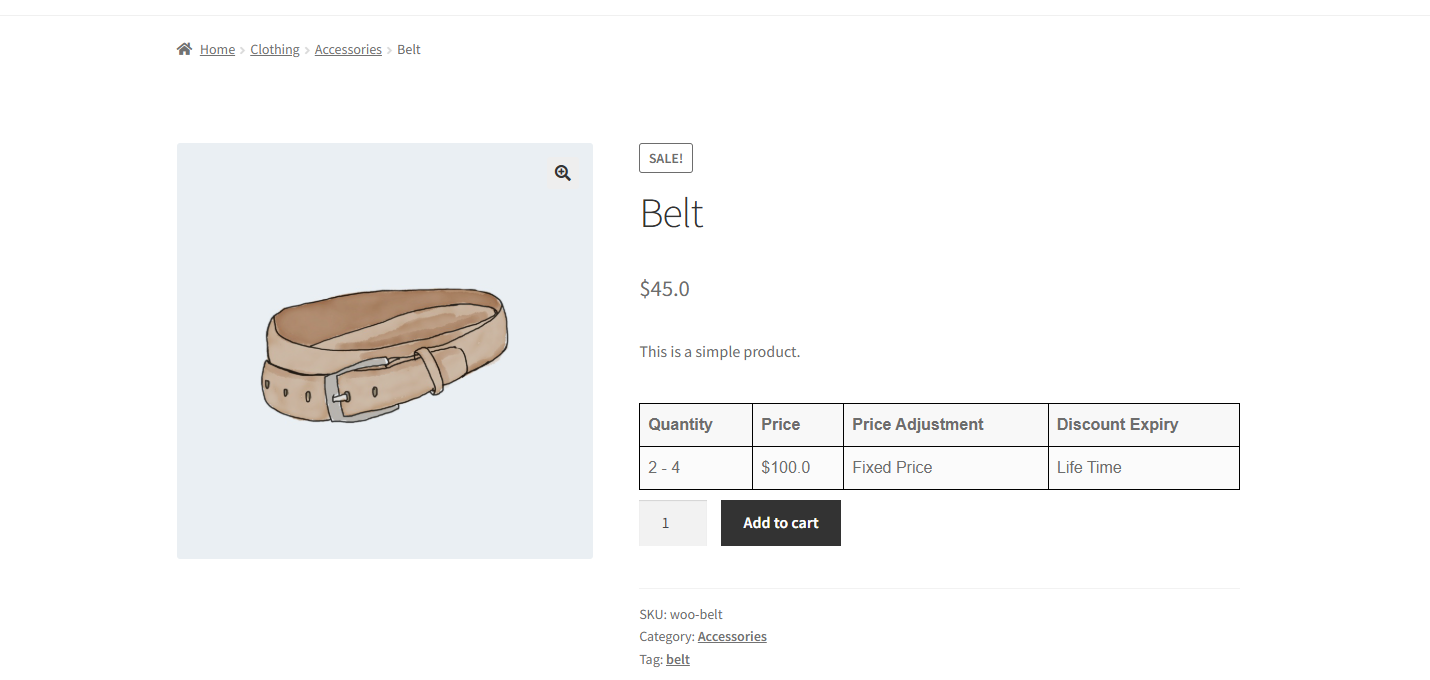
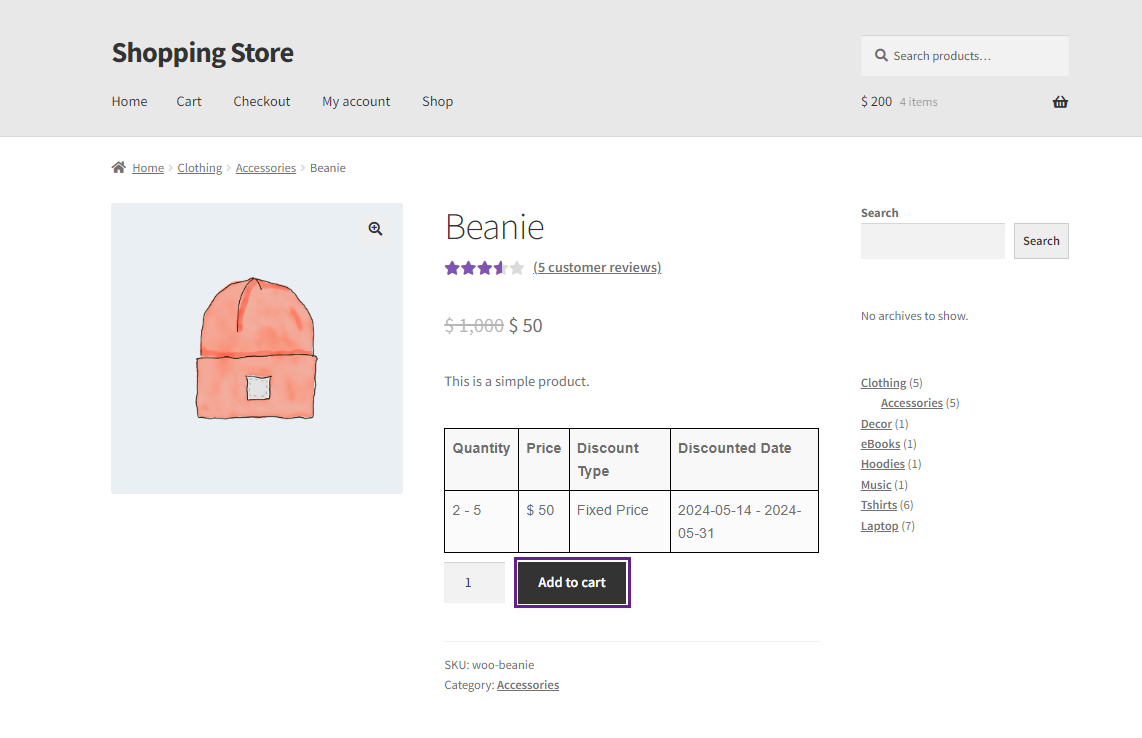
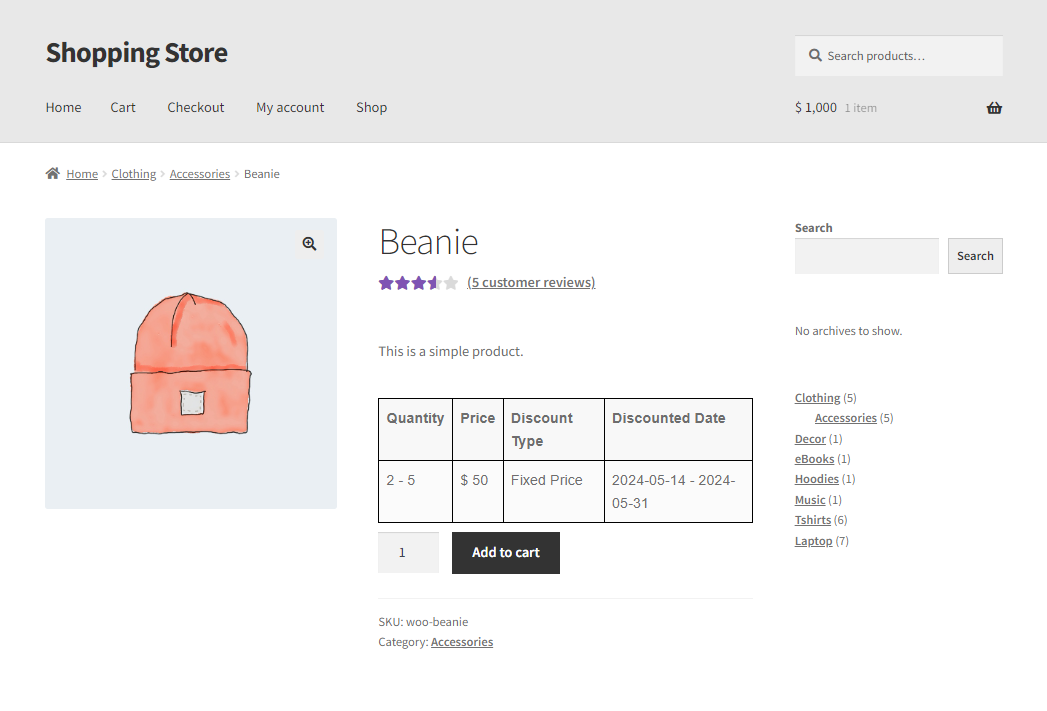
Fixed Price
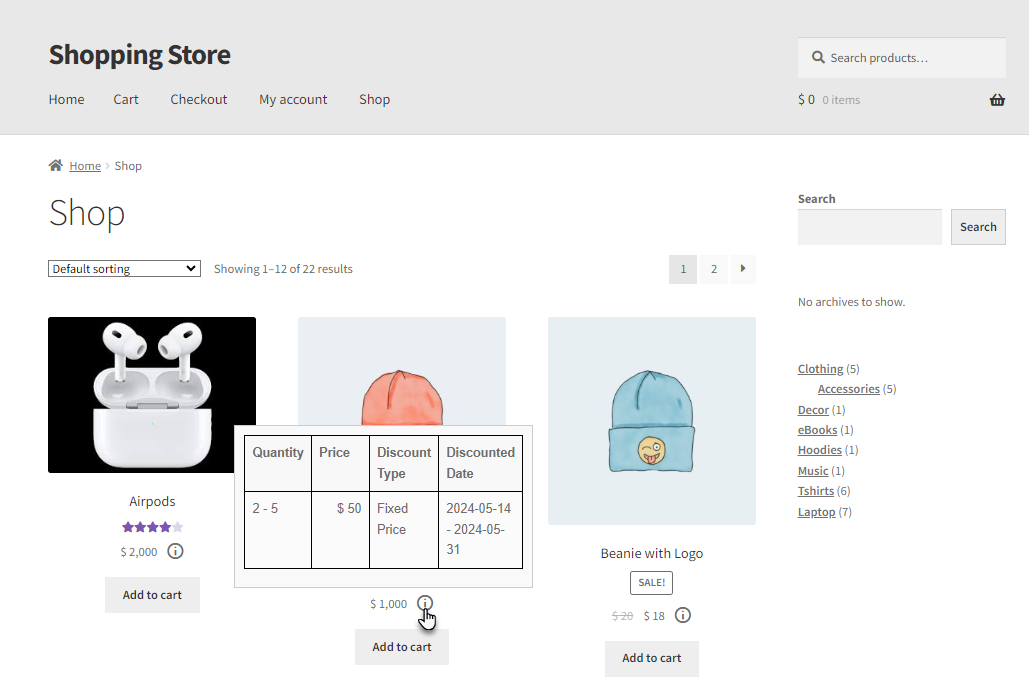
↑ Back to top- Select the Fixed Price option from the Pricing type drop-down list. This option updates the product price to the value specified by the admin in the “Set Value” field.
- Set the value in the Set Value field as per the selected pricing type.
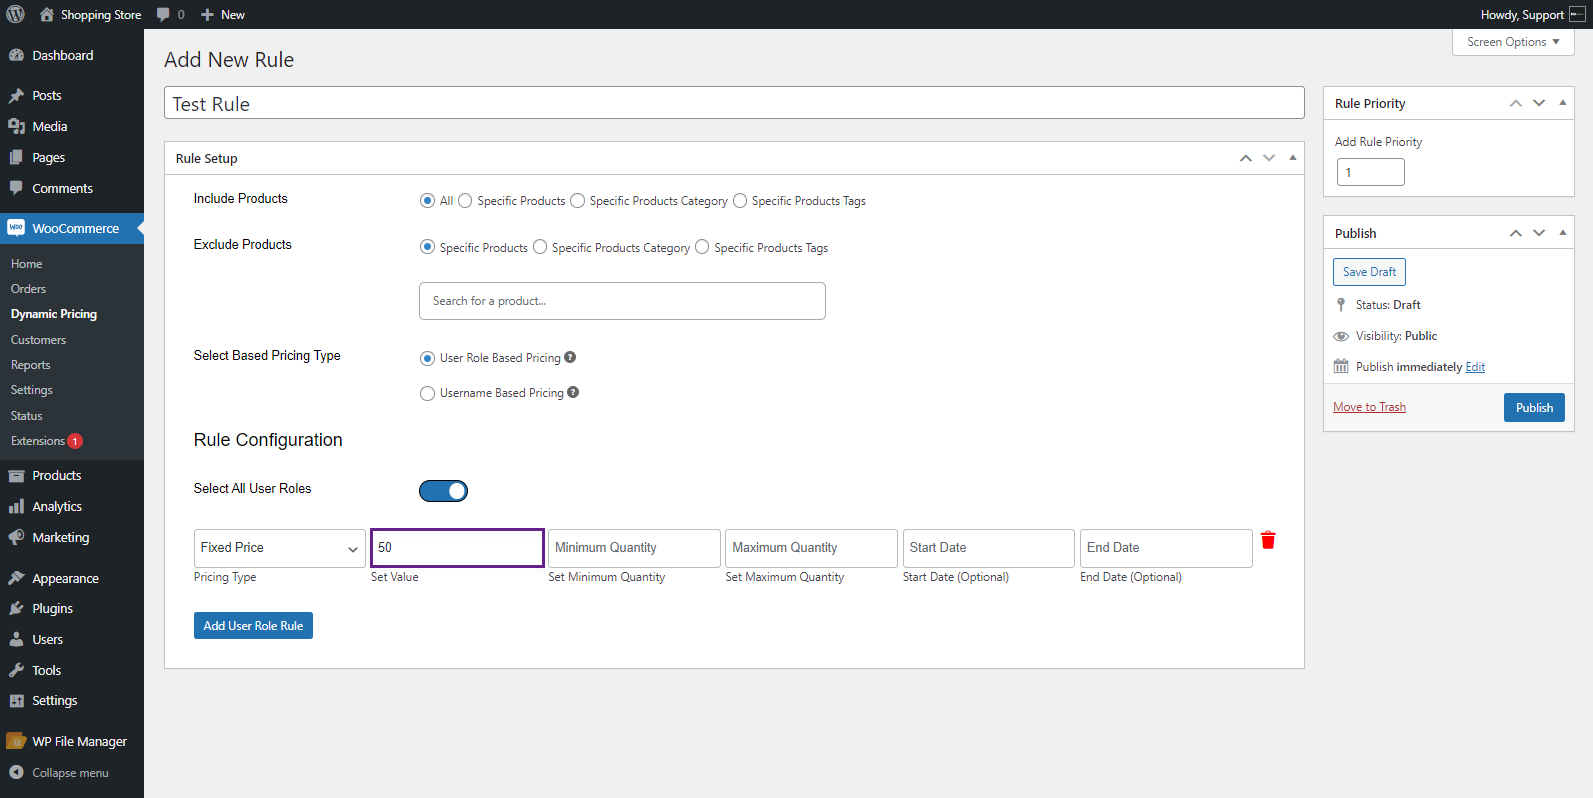
- Set the Minimum Value of the Product to meet the Rule Condition.
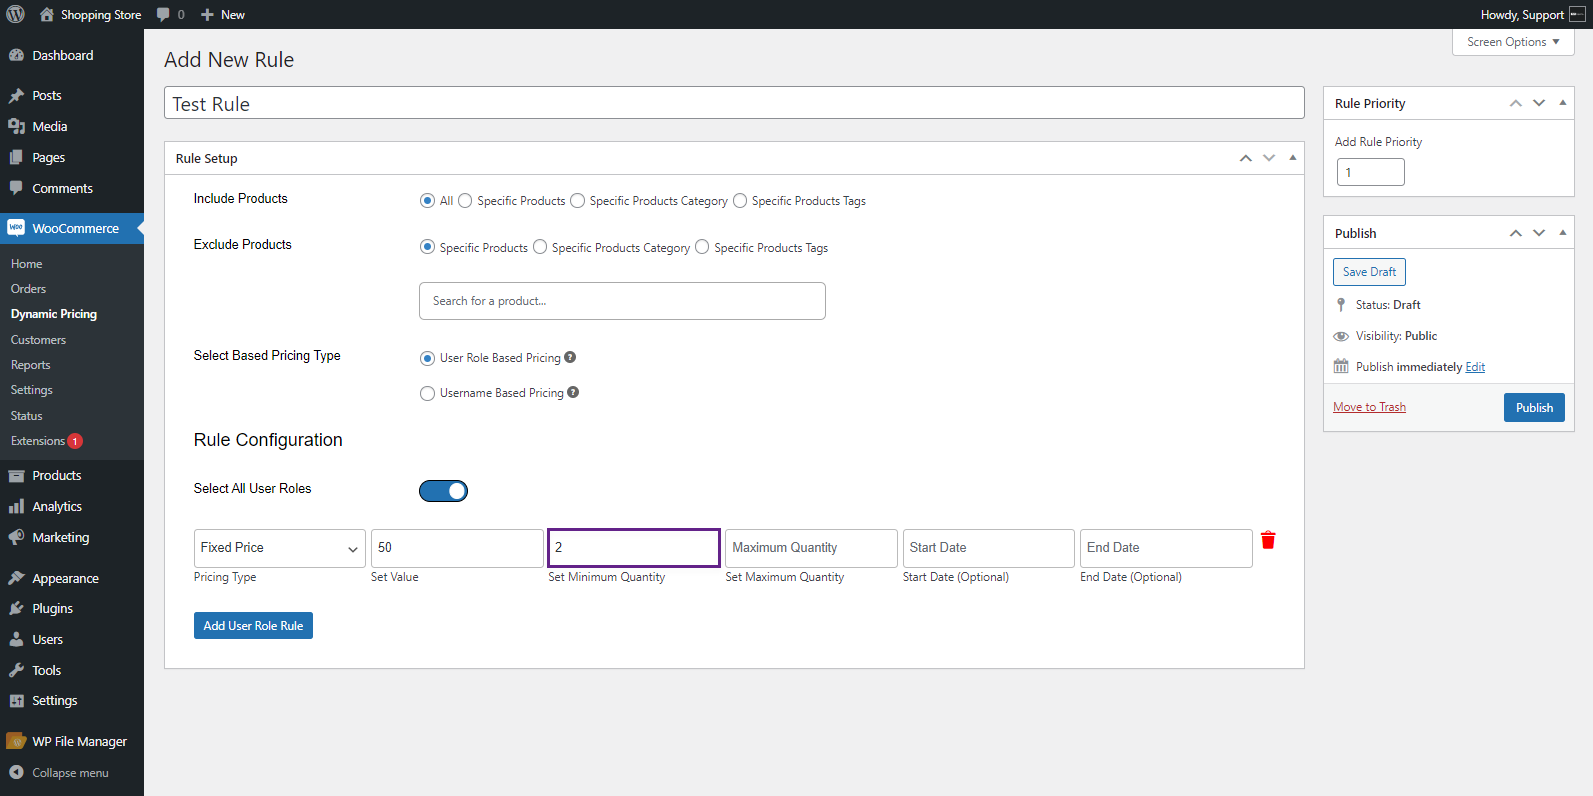
- Set the Maximum Value of the Product for meeting the Rule Condition.
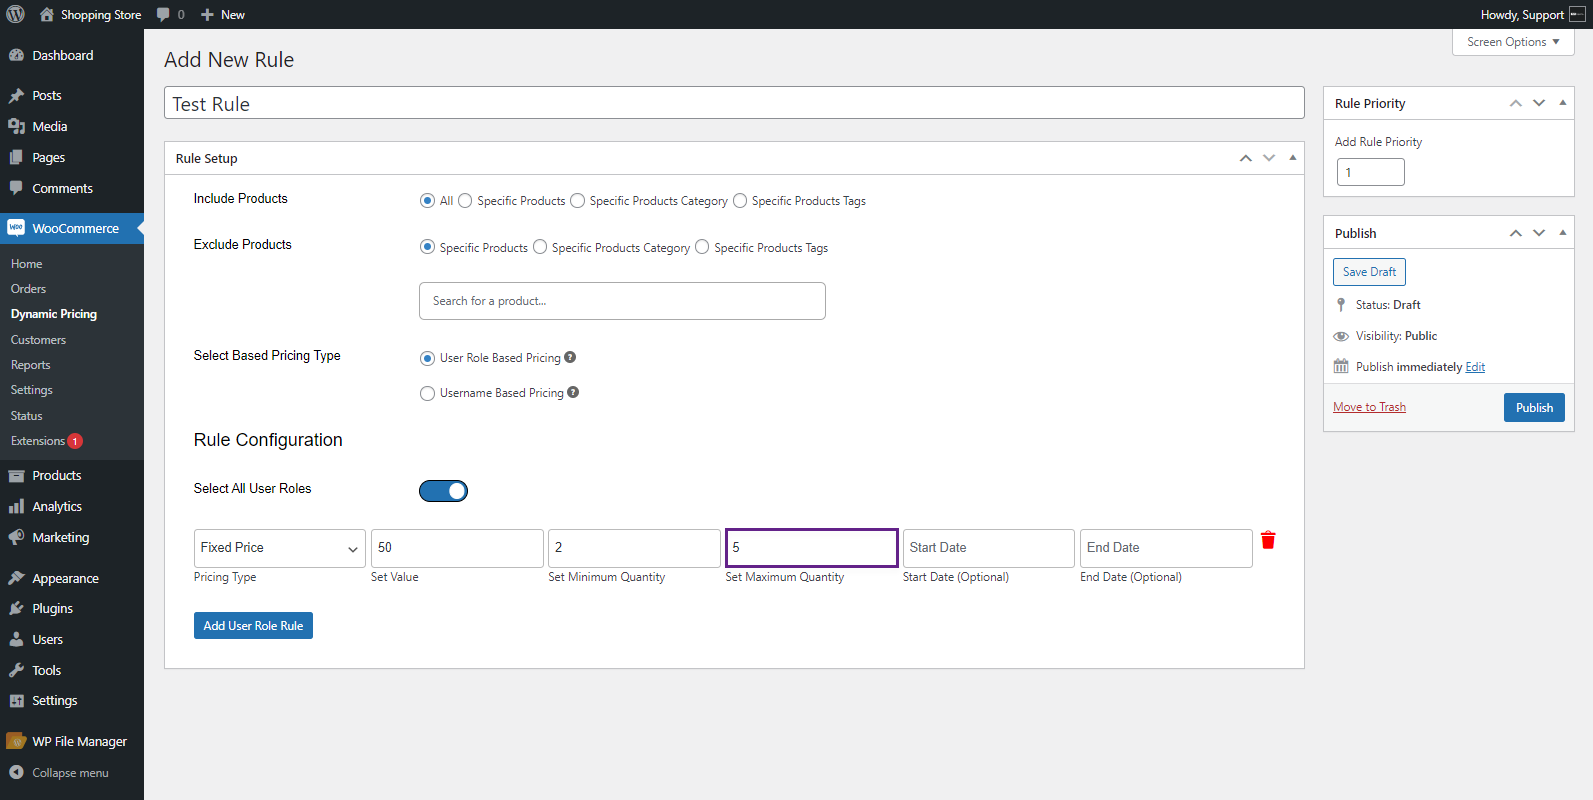
- The Admin can set the start date to implement the rule in the Start Date field. This field is optional.
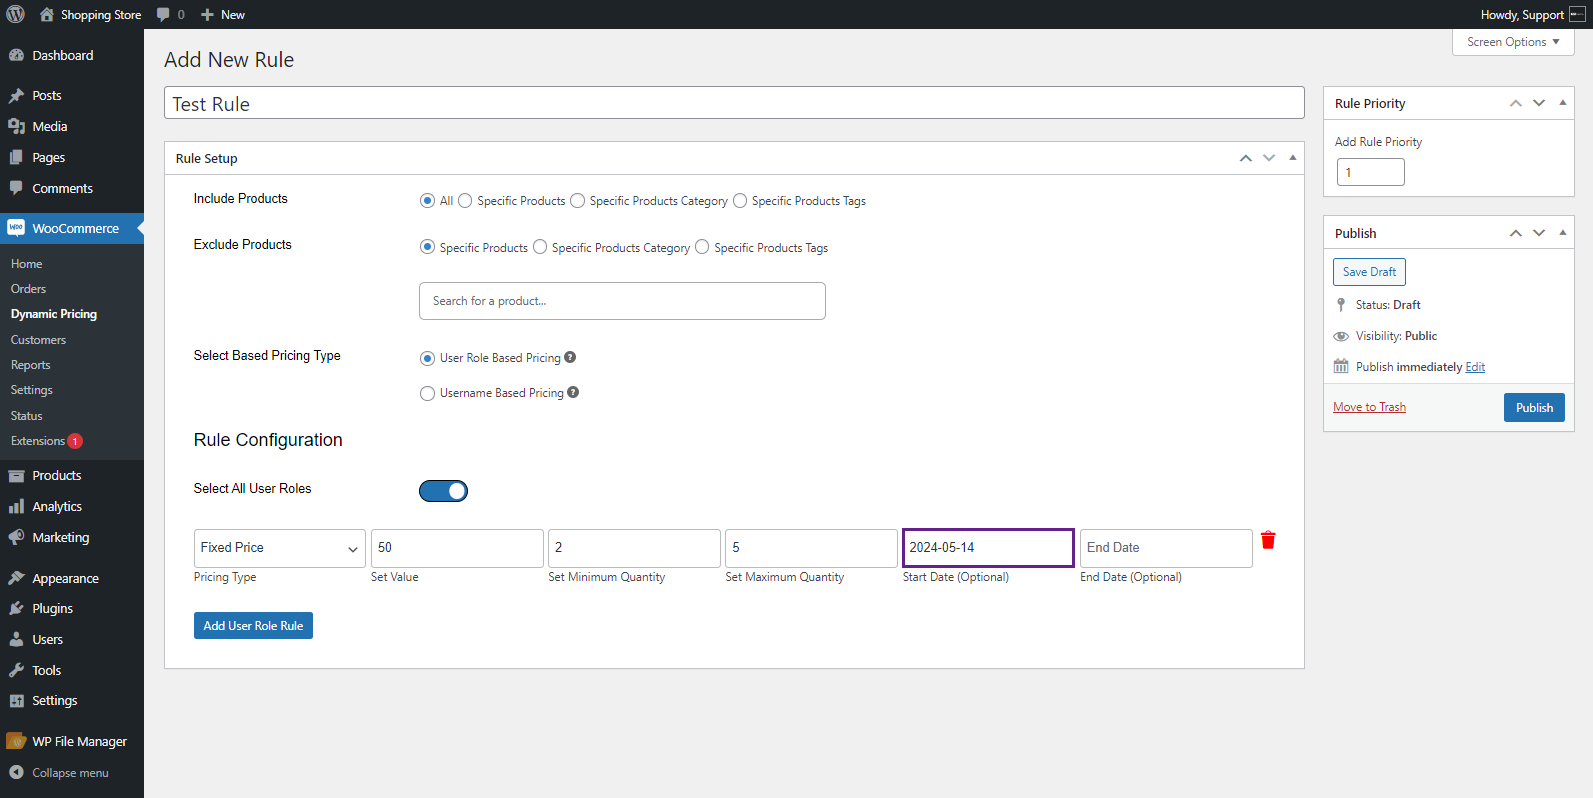
- The rule will be disabled automatically by setting the End Date if needed.
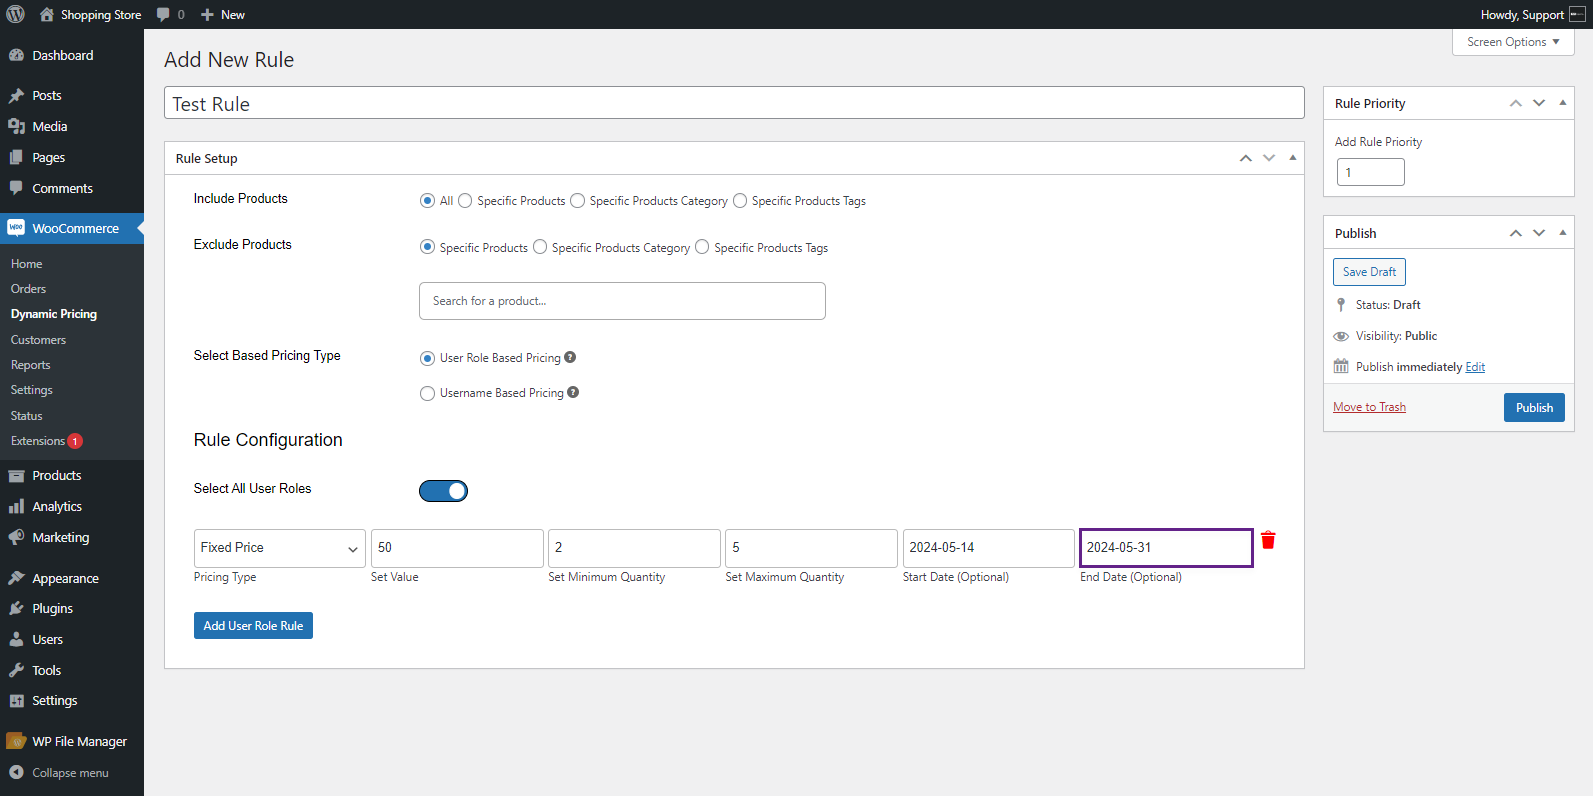
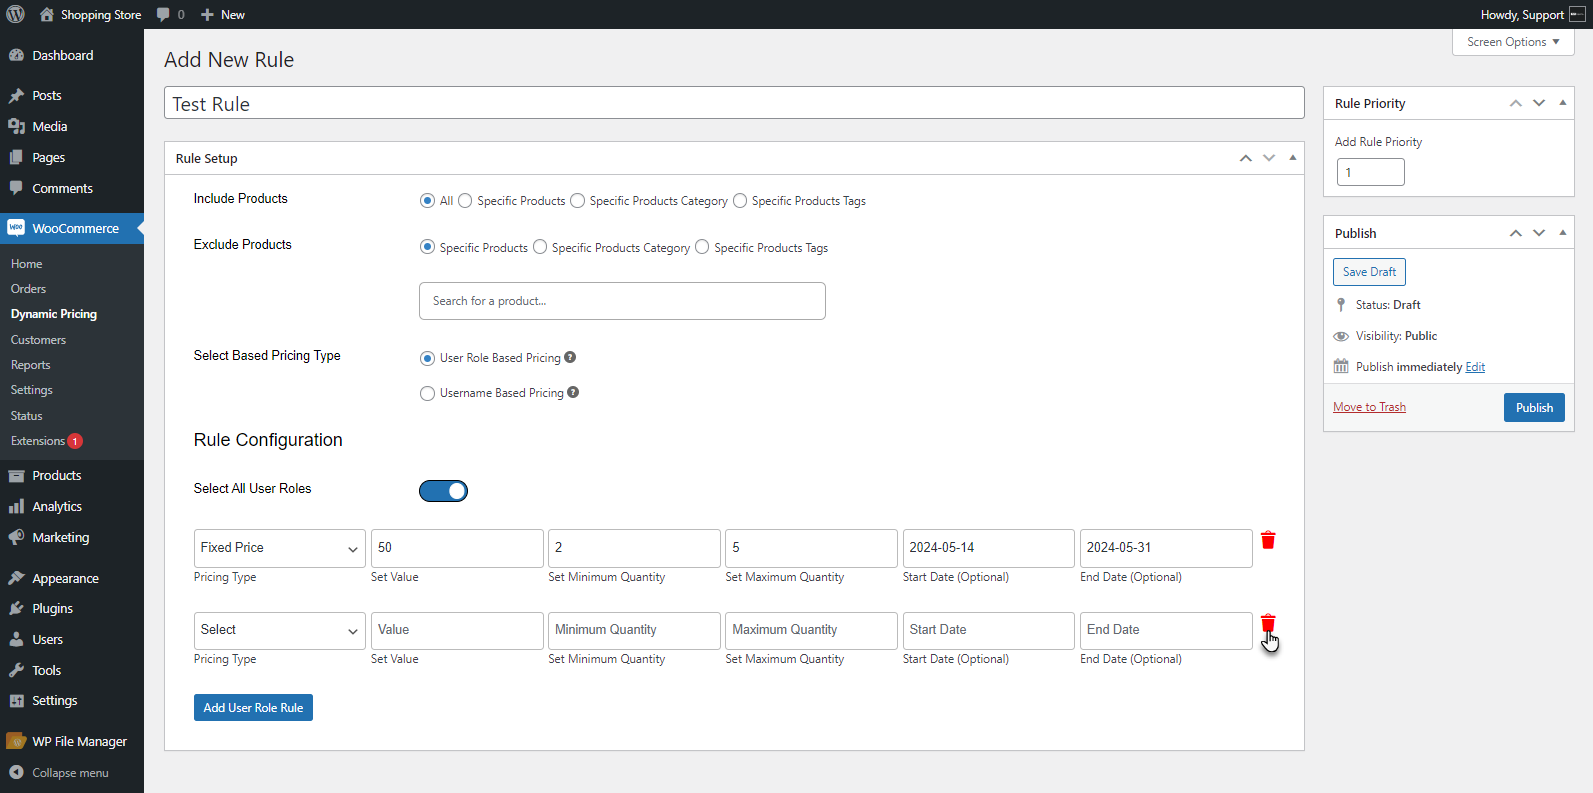
- The admin can add multiple rules based on the User Role by clicking the Add User Role Rule button.
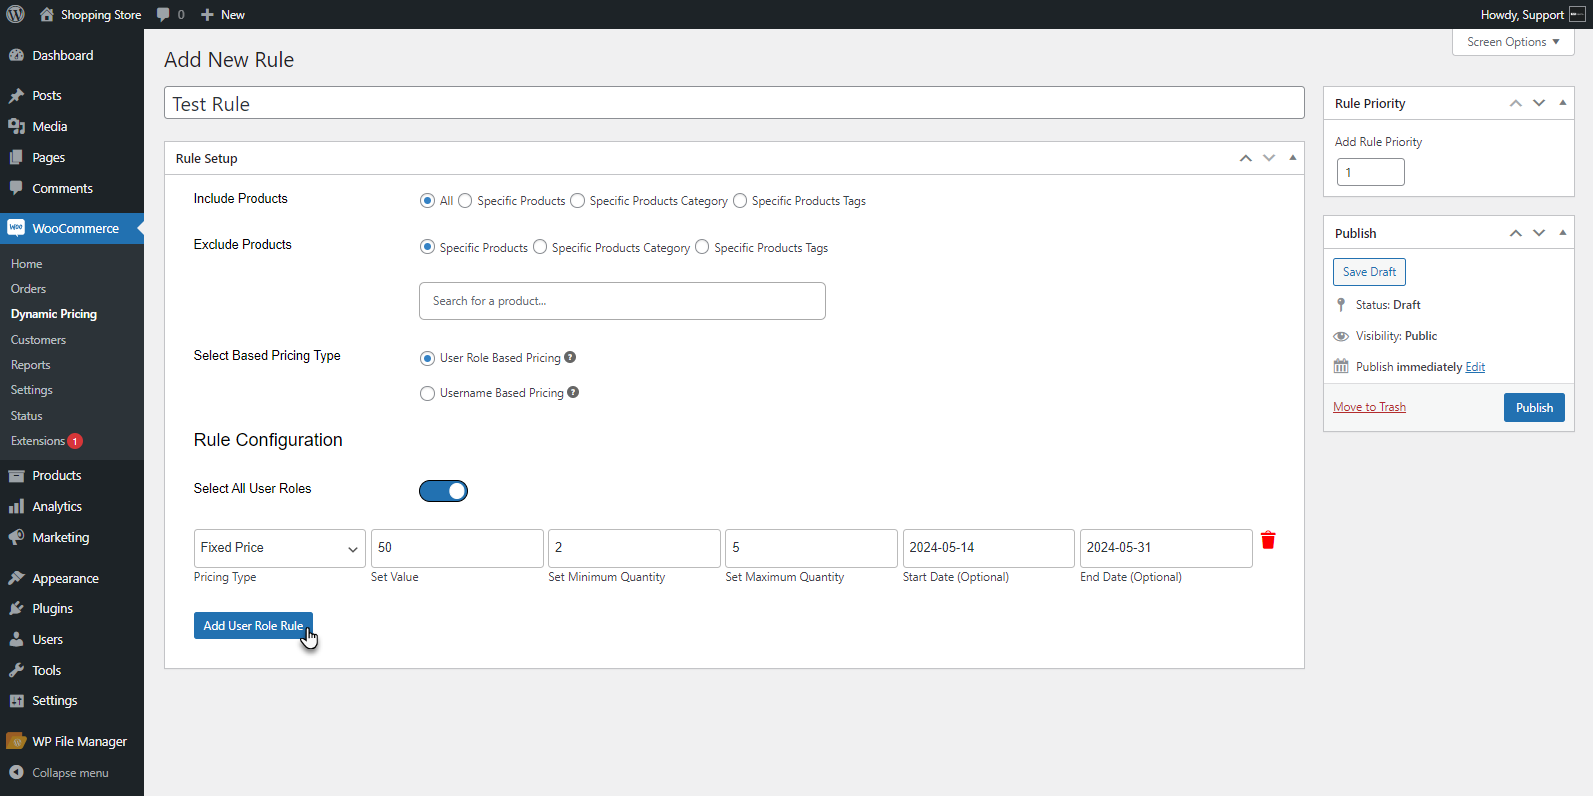
- The admin can delete the rule by clicking on the Bin icon.
- The admin can set Rule Priority for the rule if multiple rules are configured. The Rule Priority can be set from 1 to 100, where 1 indicates the highest and 100 is the lowest priority.
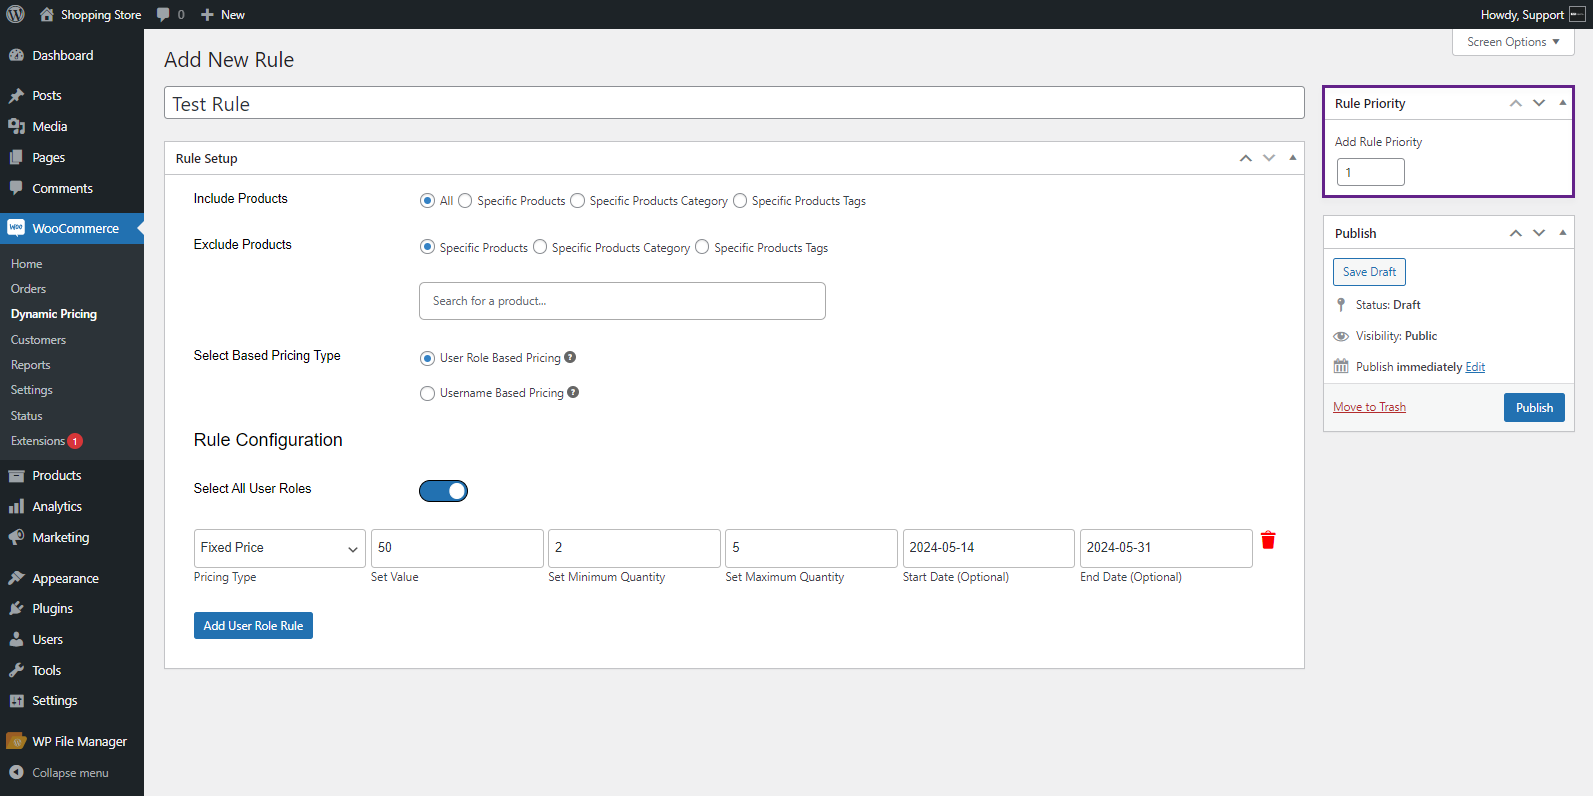
PLEASE NOTE: If more than one rule has the same priority number, the rule added/updated last will be applied.
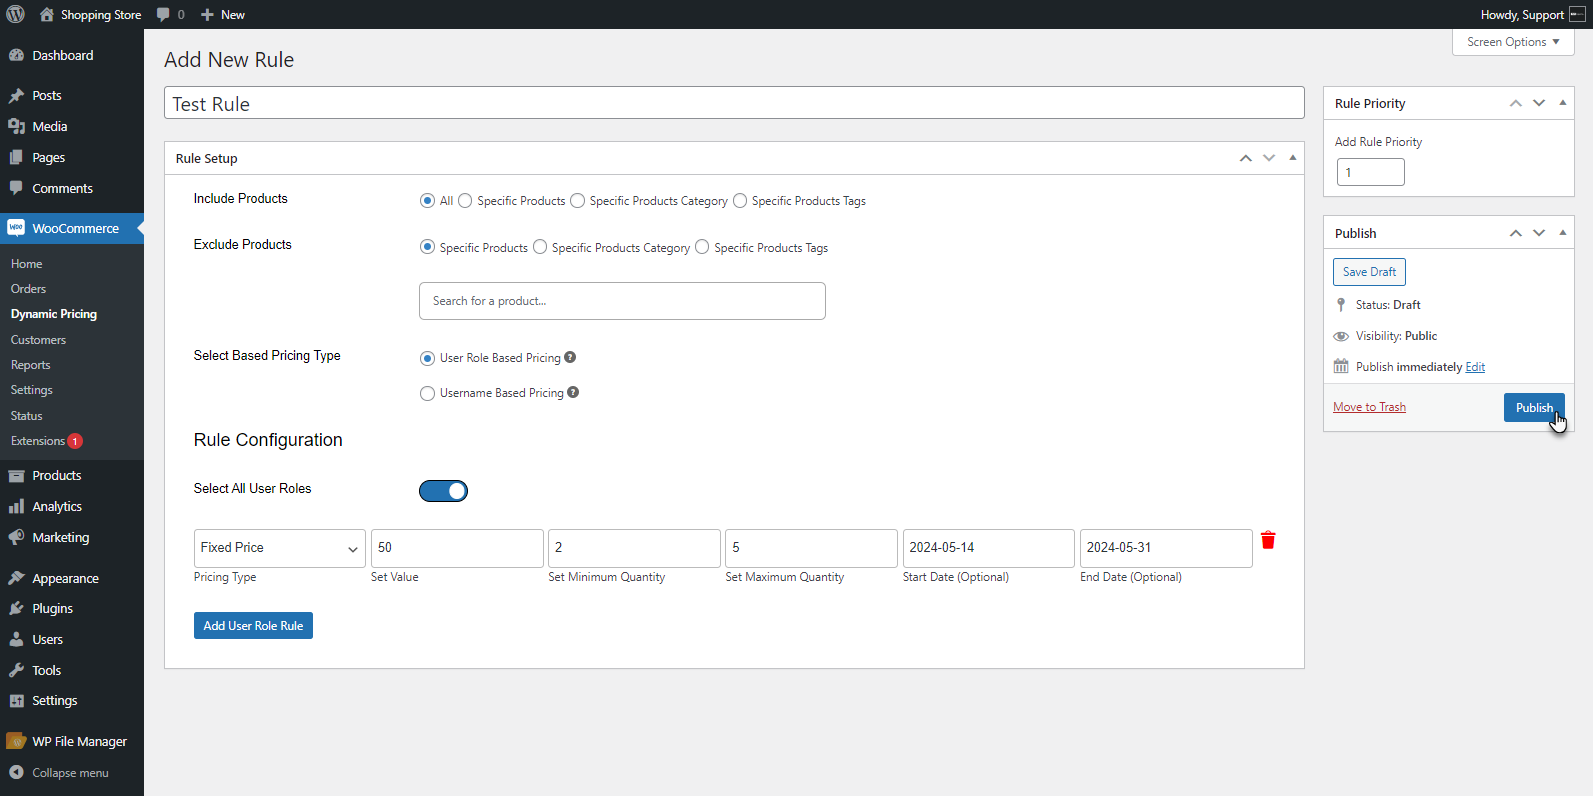
- Click on the Publish button. Your Rule will be published.
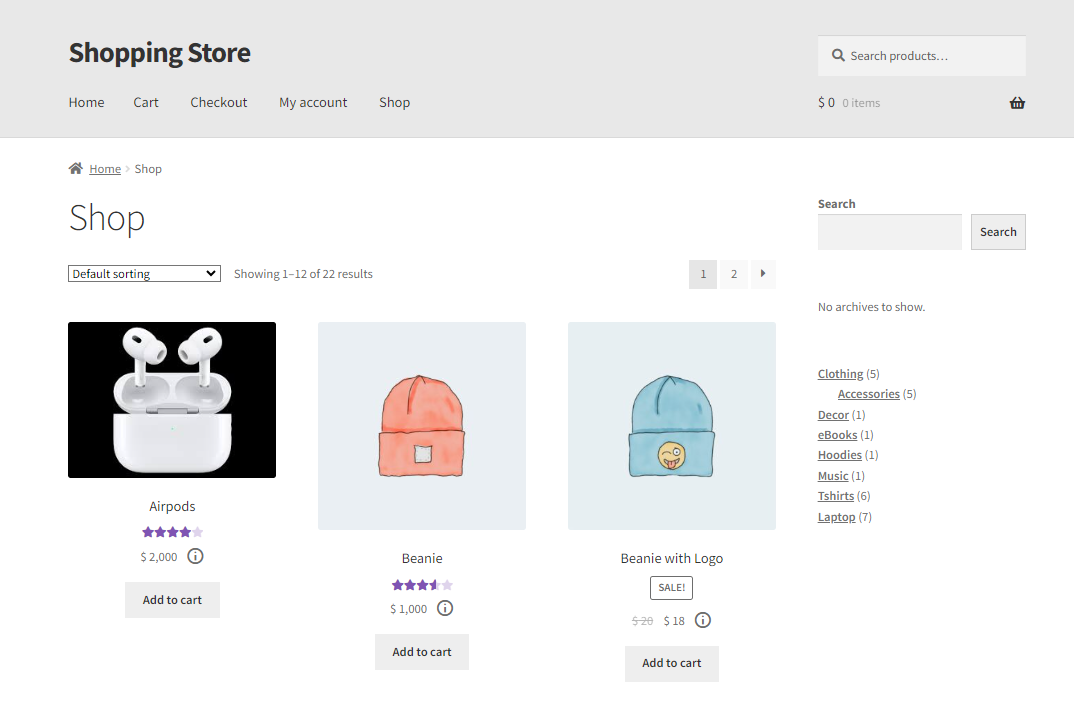
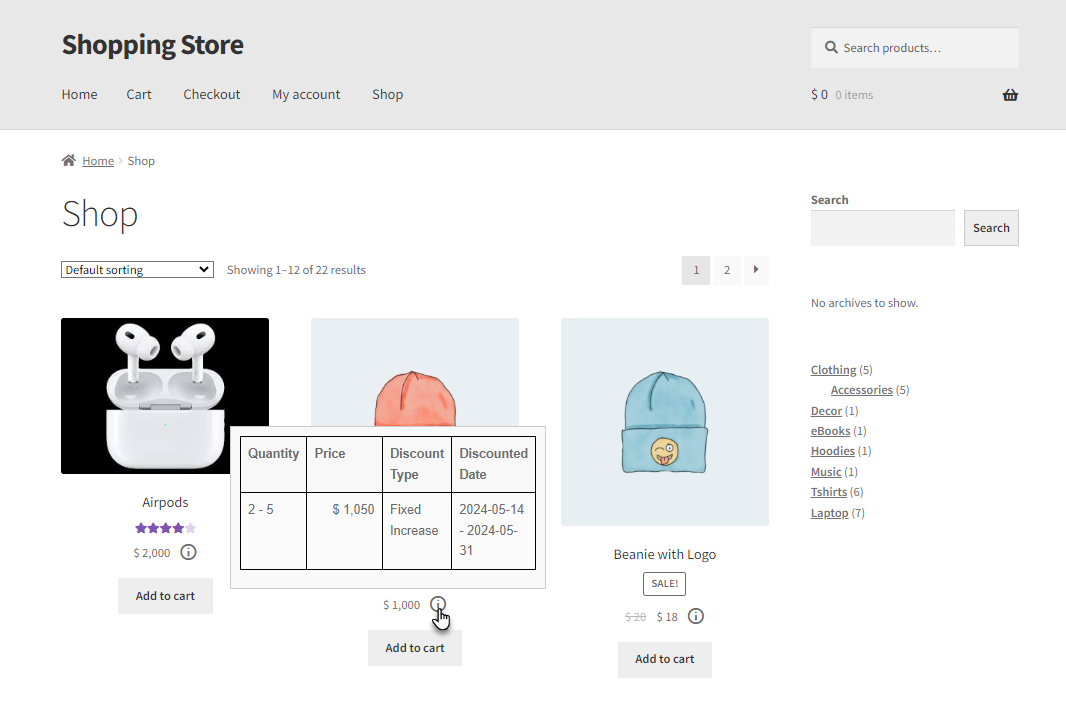
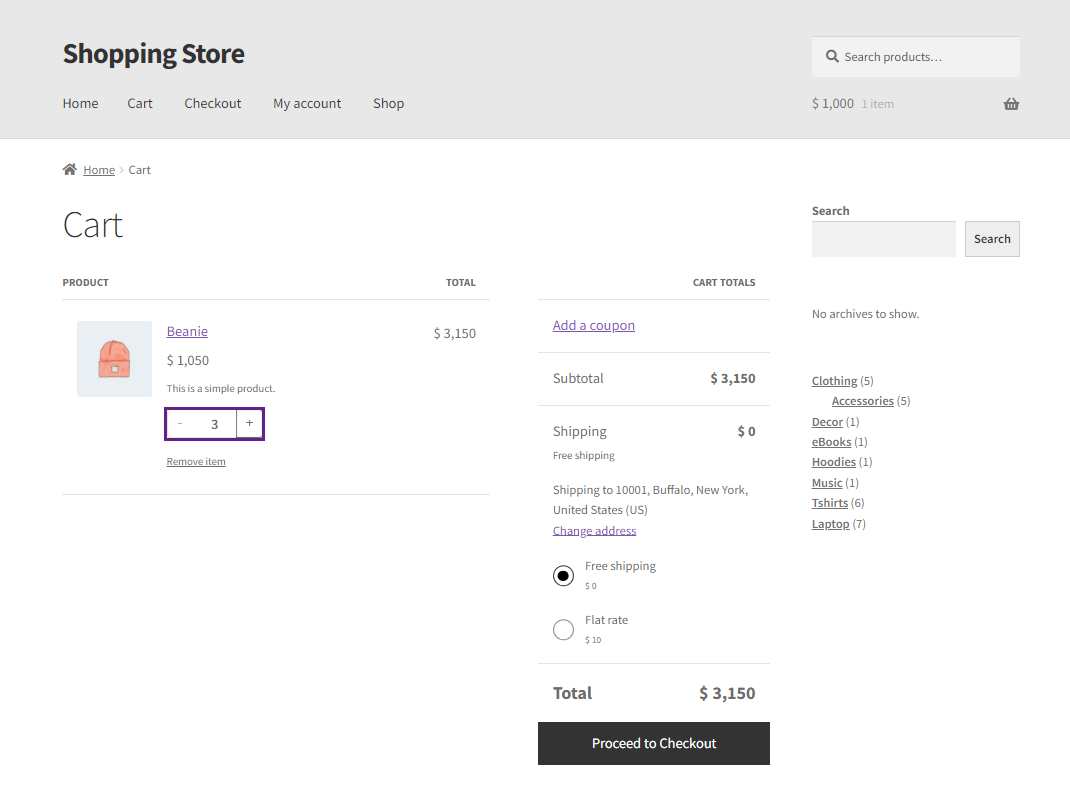
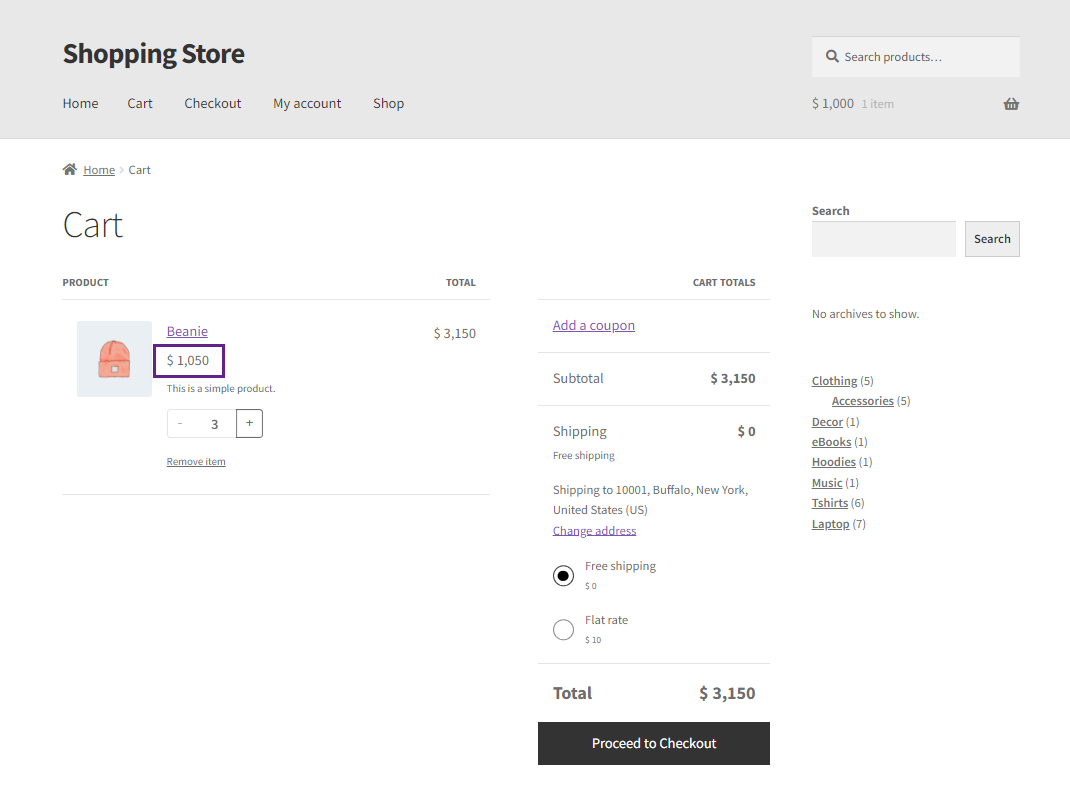
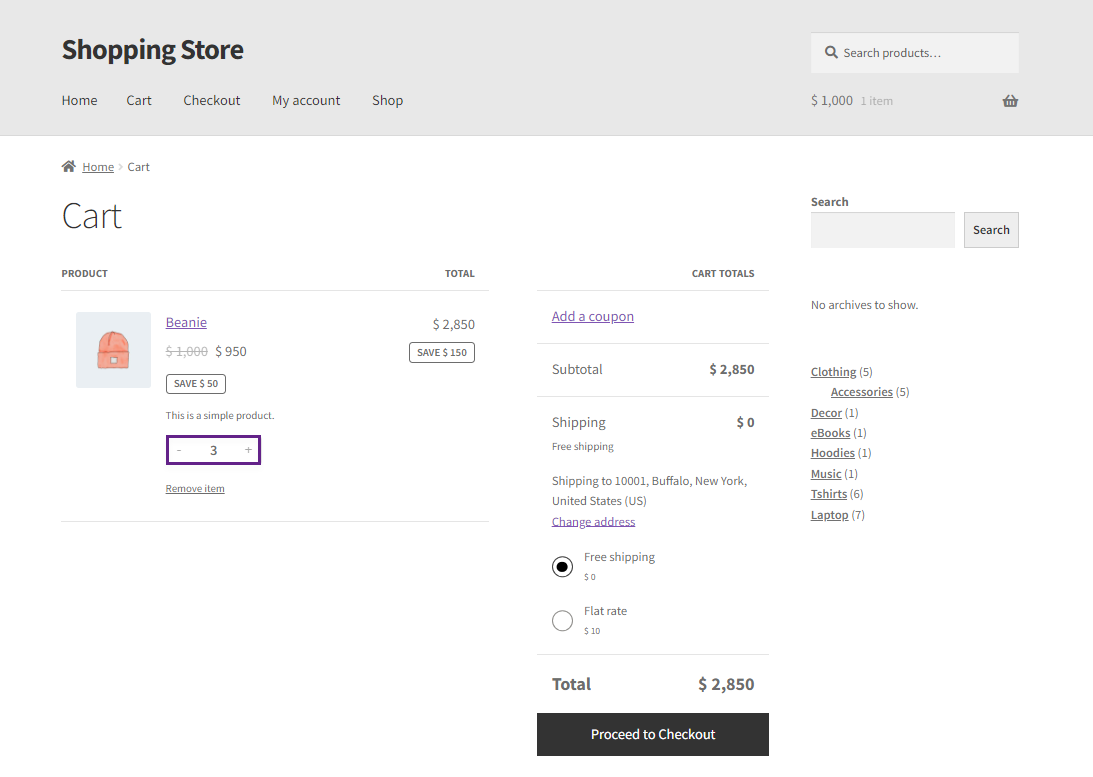
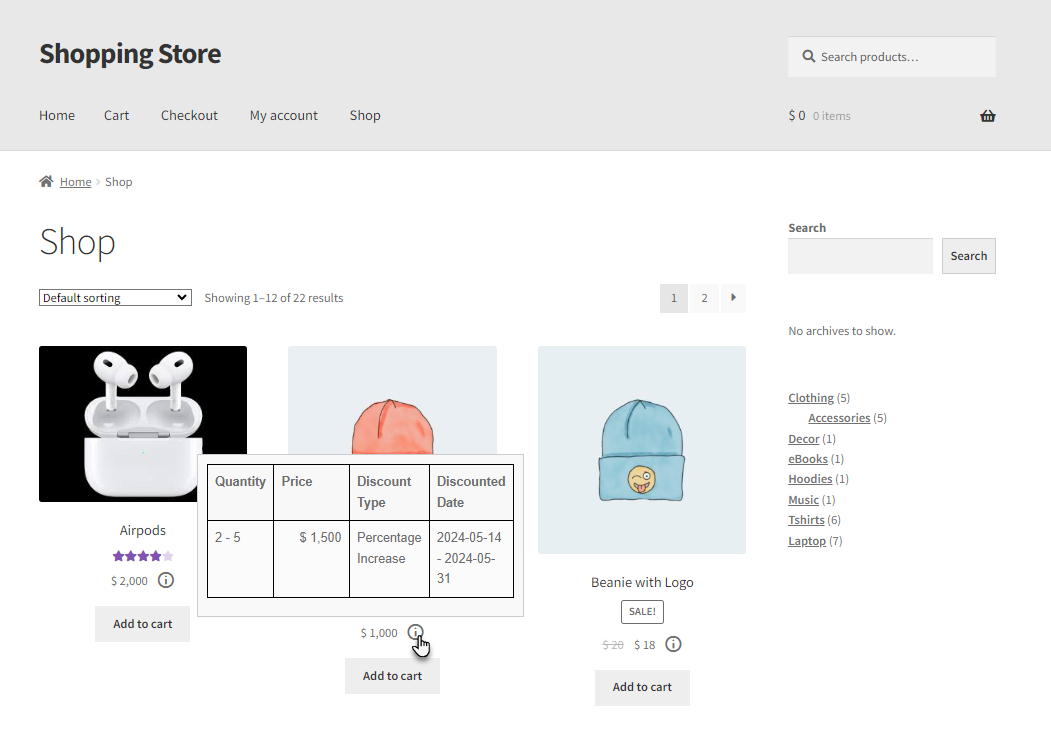
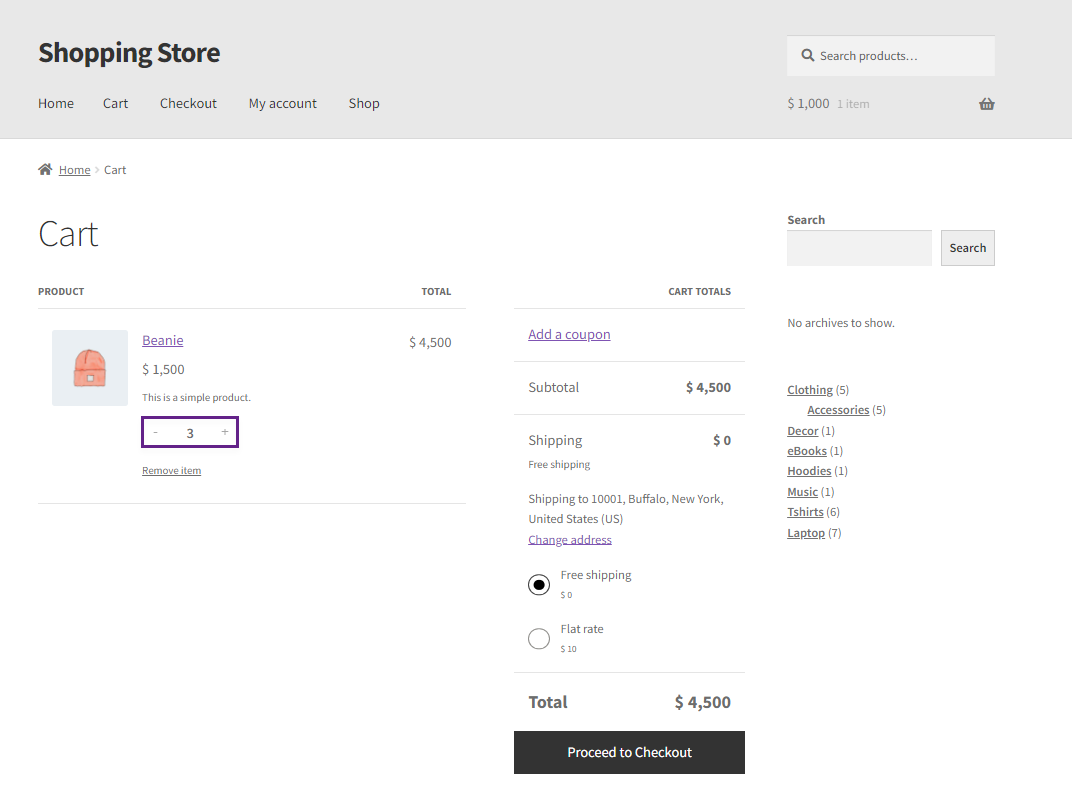
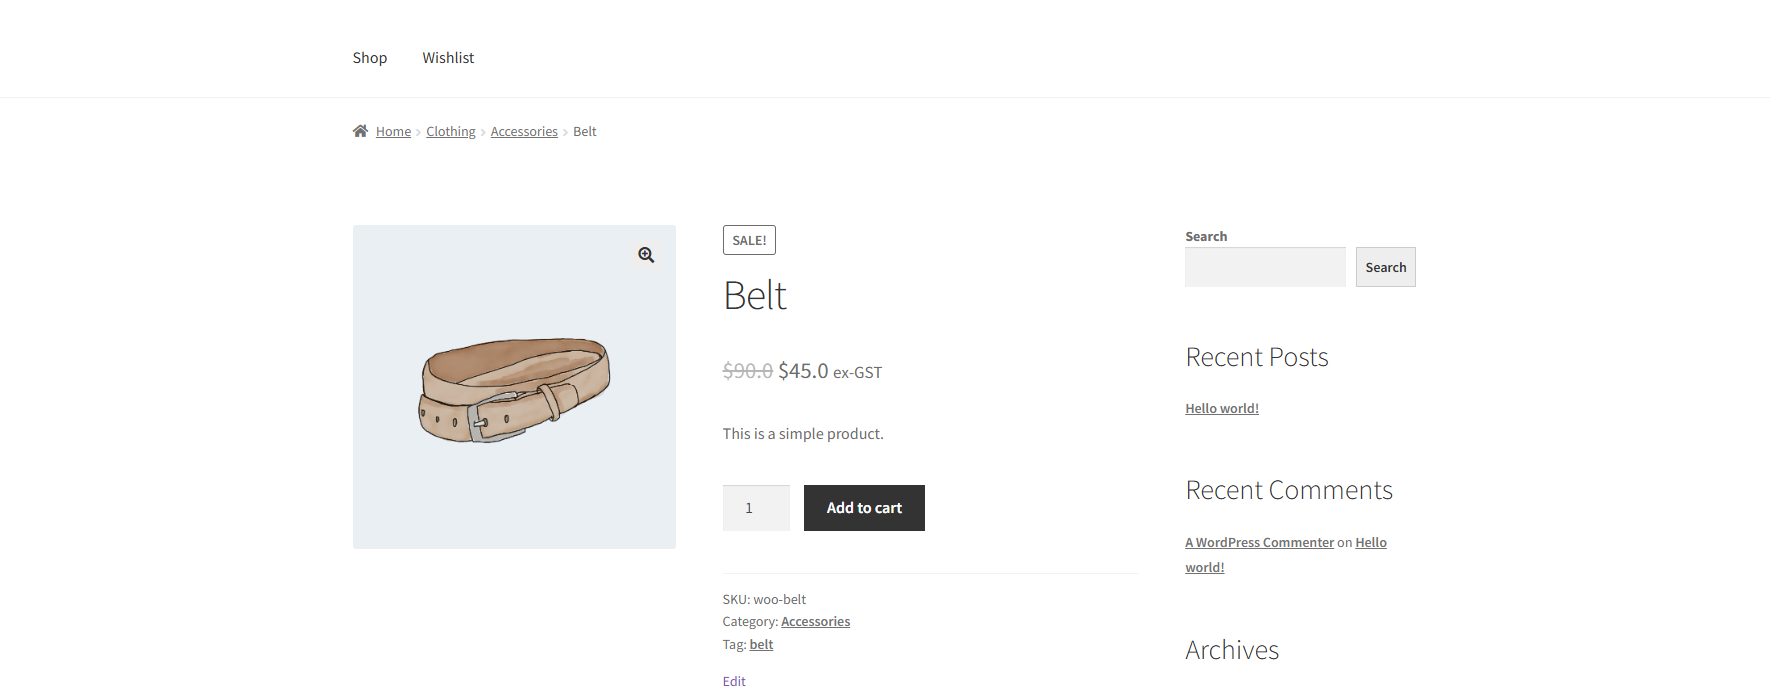
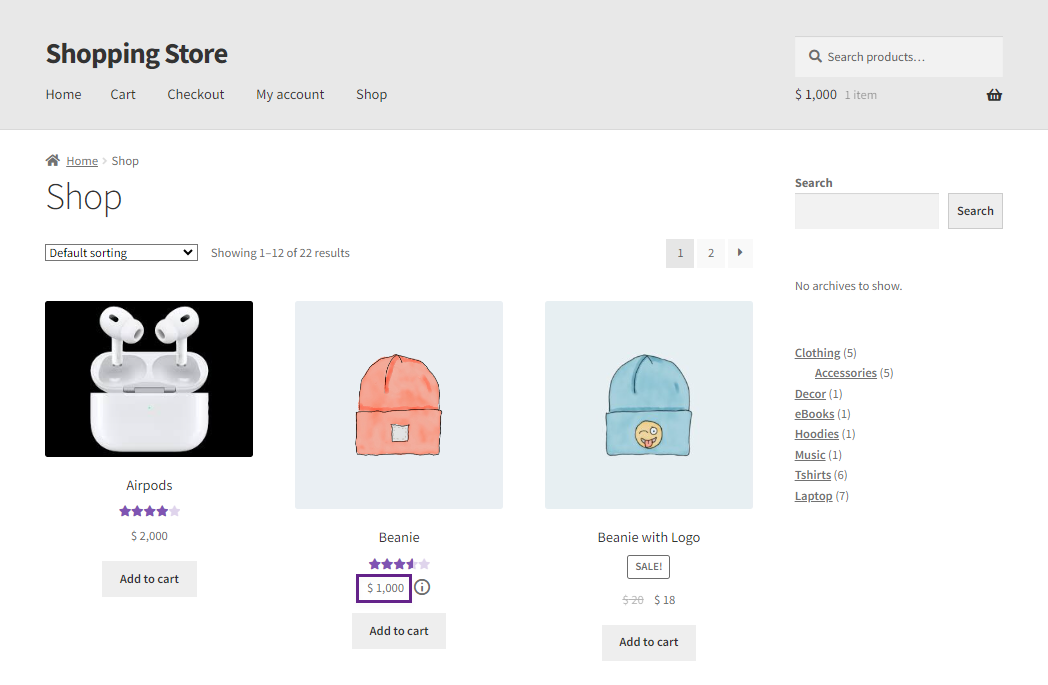
Front End Impact
- Go to the Shop Page. A tooltip will appear indicating the Dynamic Pricing of the Product.

- Hover on the tooltip for the offered pricing.
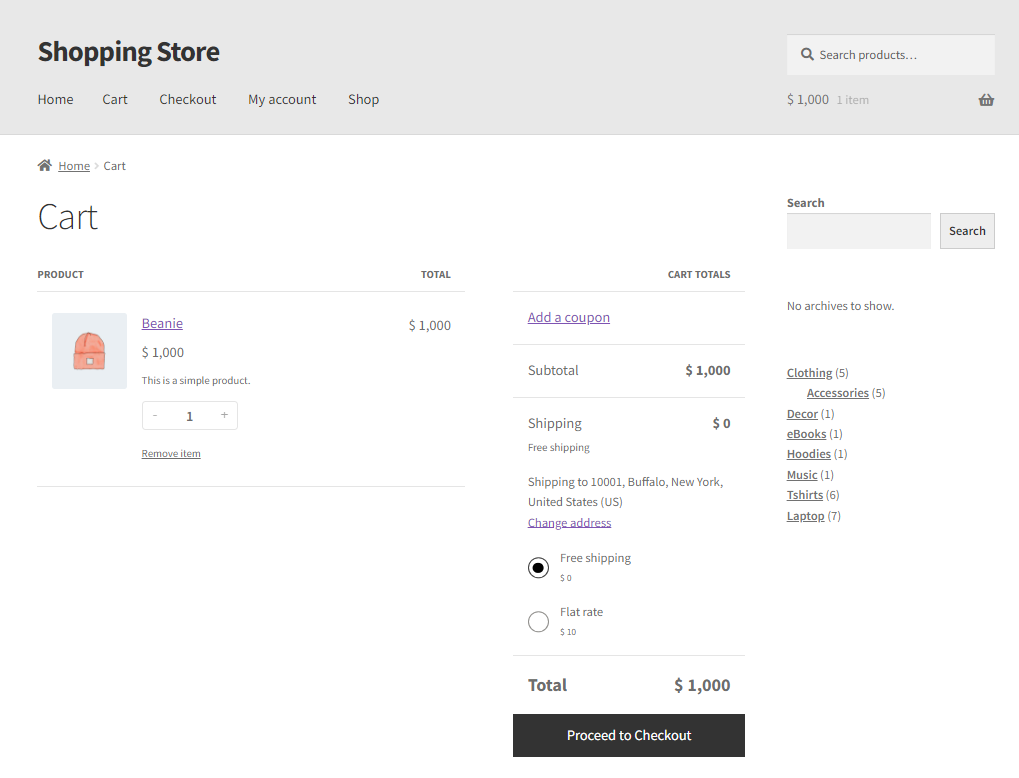
- Add an item to the cart. Go to the Cart page.

- Match the condition set in the backend.
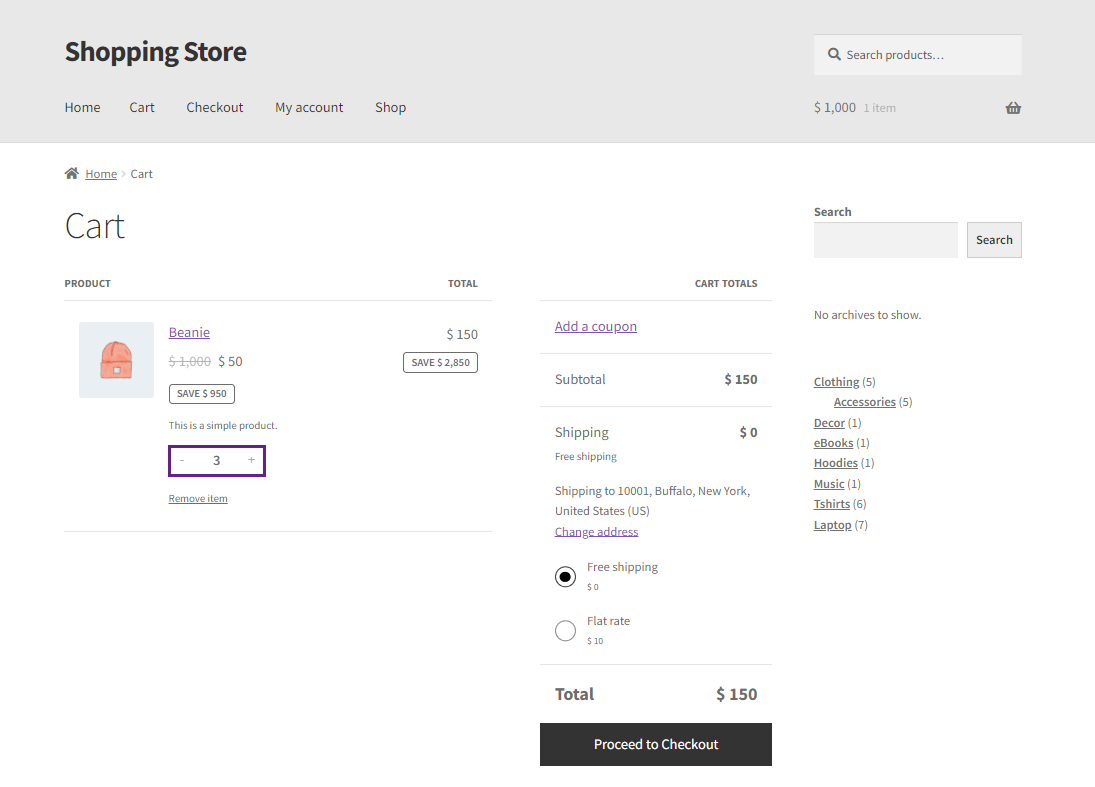
- The value set in the Set Value field will replace the product’s original price.

- Click on the Proceed to Checkout page.
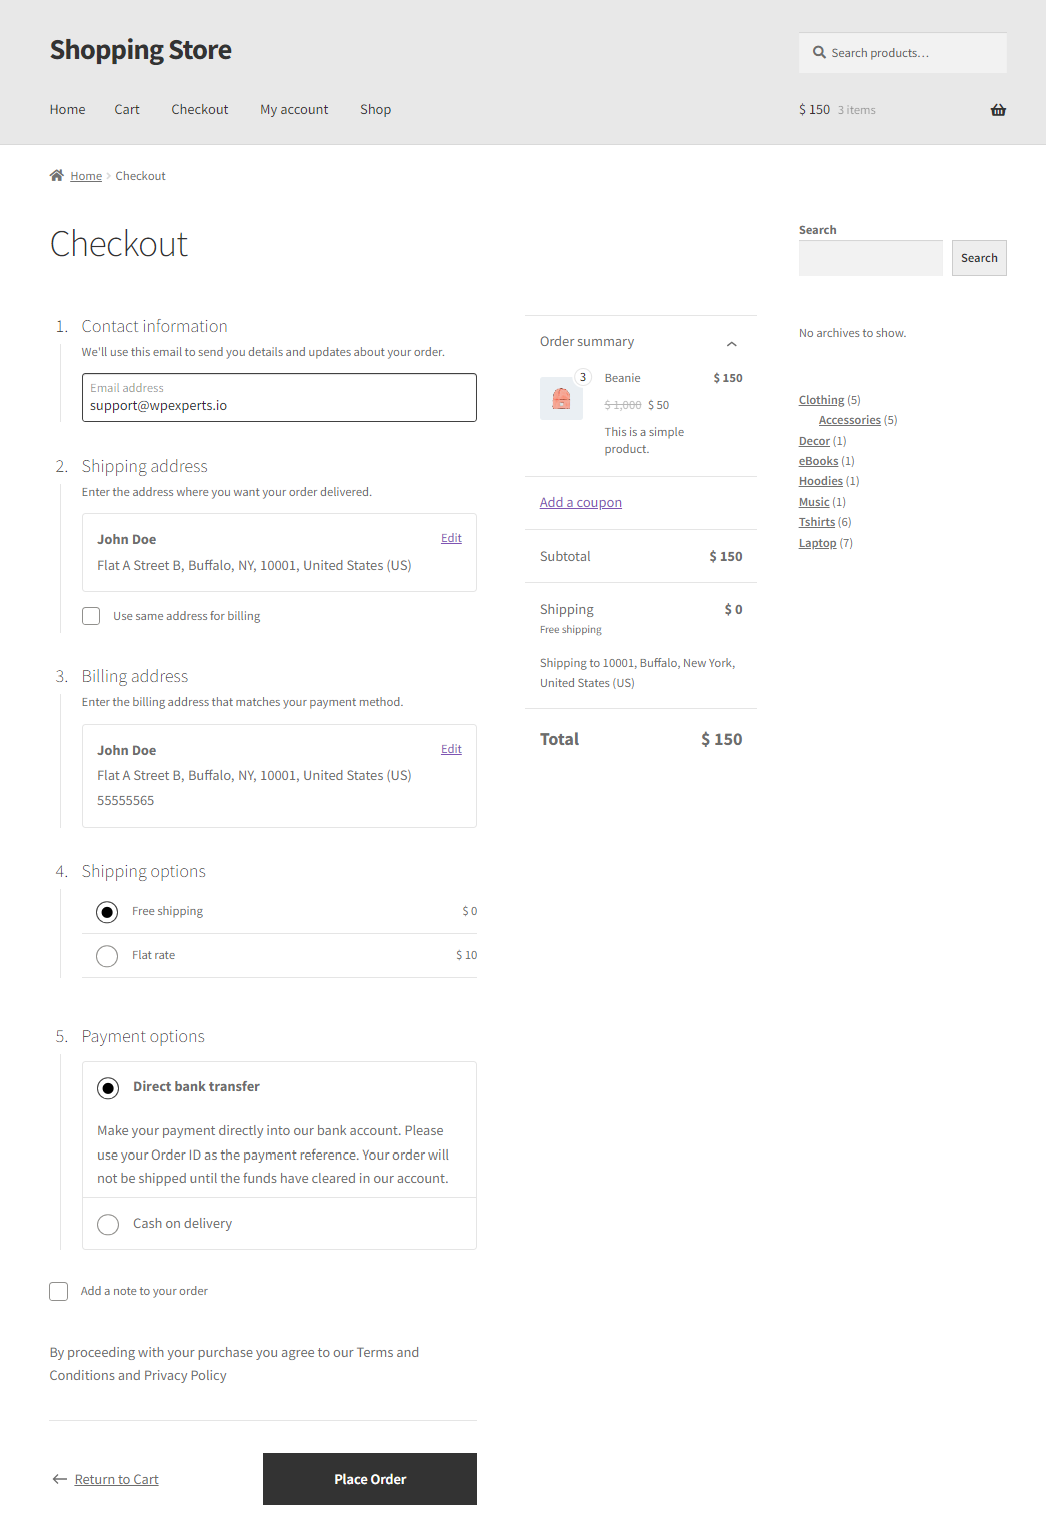
- Click on the Place Order button to place your order.

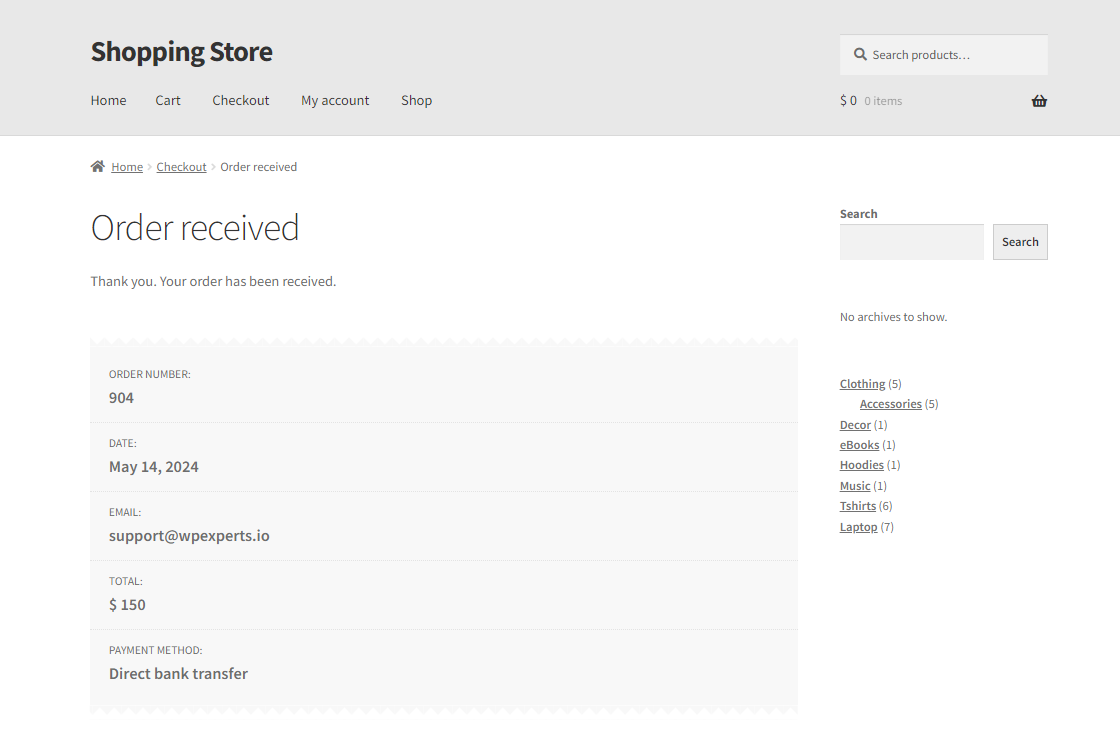
- Your order will be placed.
Fixed Increase
↑ Back to top- Select the Fixed Increase option from the Pricing type drop-down list. This option will increase the product price by the value specified in the “Set value” field.
Front End Impact
- Go to the Shop Page. A tooltip will appear indicating the Dynamic Pricing of the Product.
- Hover on the tooltip for the offered pricing.
- Add an item to the cart. Go to the Cart page.
- Match the condition set in the backend.
- The value set in the Set Value field will be added to the product’s original price.
Fixed Decrease
↑ Back to top- Select the Fixed Decrease option from the Pricing type drop-down list. This option will decrease the product price by the value specified in the “Set value” field.
Front End Impact
- Go to the Shop Page. A tooltip will appear indicating the Dynamic Pricing of the Product.

- Hover on the tooltip for the offered pricing.
- Add an item to the cart. Go to the Cart page.

- Match the condition set in the backend.
- The value set in the Set Value field will be deducted from the product’s original price.

Percentage Decrease
↑ Back to top- Select the Fixed Decrease option from the Pricing type drop-down list. This option will decrease the product price by the percentage specified in the “Set value” field.
Front End Impact
- Go to the Shop Page. A tooltip will appear indicating the Dynamic Pricing of the Product.

- Hover on the tooltip for the offered pricing.
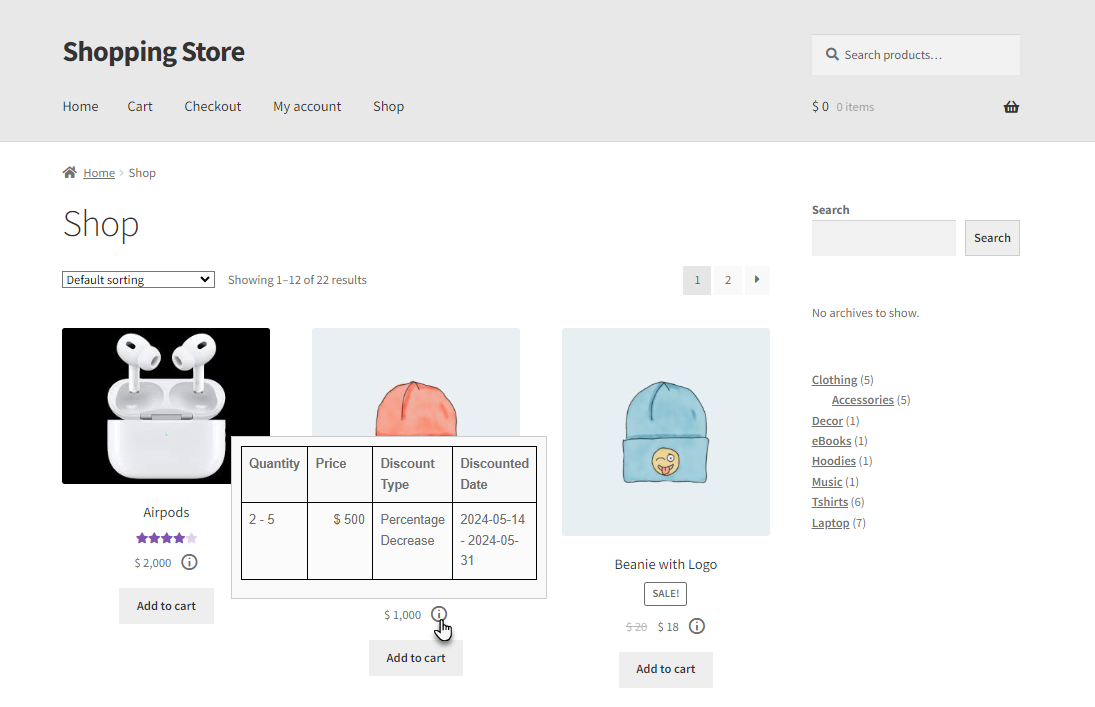
- Add an item to the cart. Go to the Cart page.

- Match the condition set in the backend.
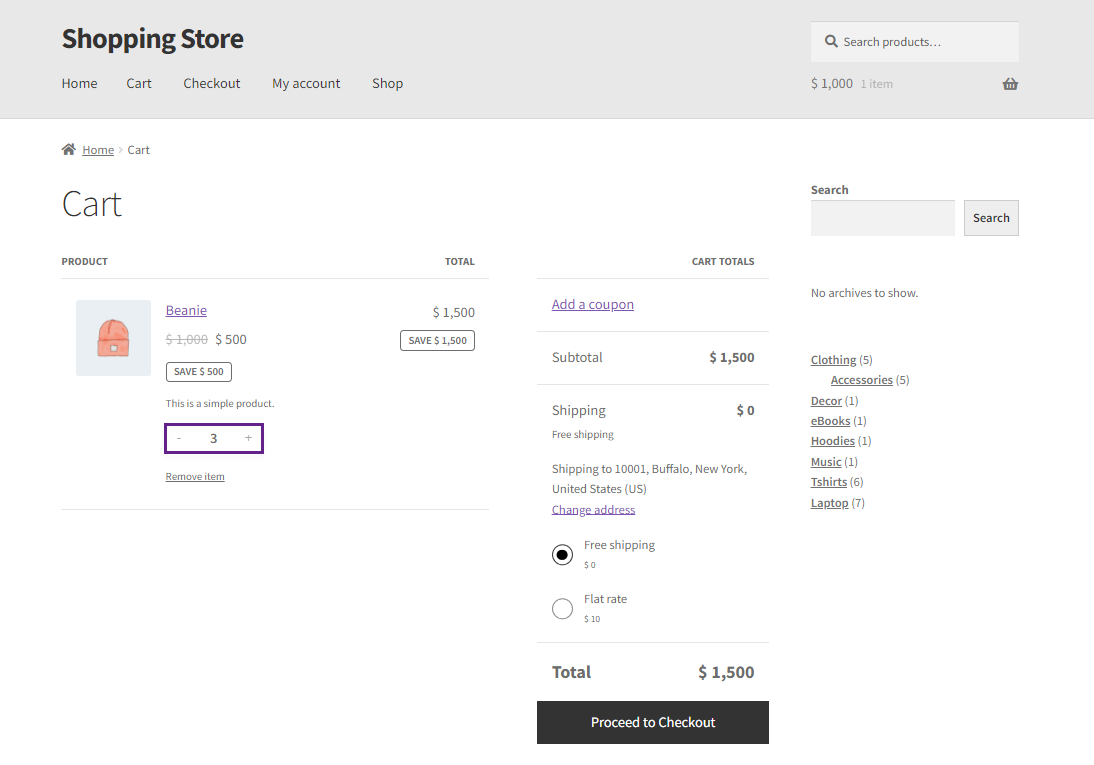
- The percentage value set in the Set Value field will be deducted from the product’s original price.
Percentage Increase
↑ Back to top- Select the Fixed Increase option from the Pricing type drop-down list. This option will increase the product price by the percentage specified in the “Set value” field.
Front End Impact
- Go to the Shop Page. A tooltip will appear indicating the Dynamic Pricing of the Product.

- Hover on the tooltip for the offered pricing.
- Add an item to the cart. Go to the Cart page.

- Match the condition set in the backend.
- The percentage value set in the Set Value field will be added to the product’s original price.

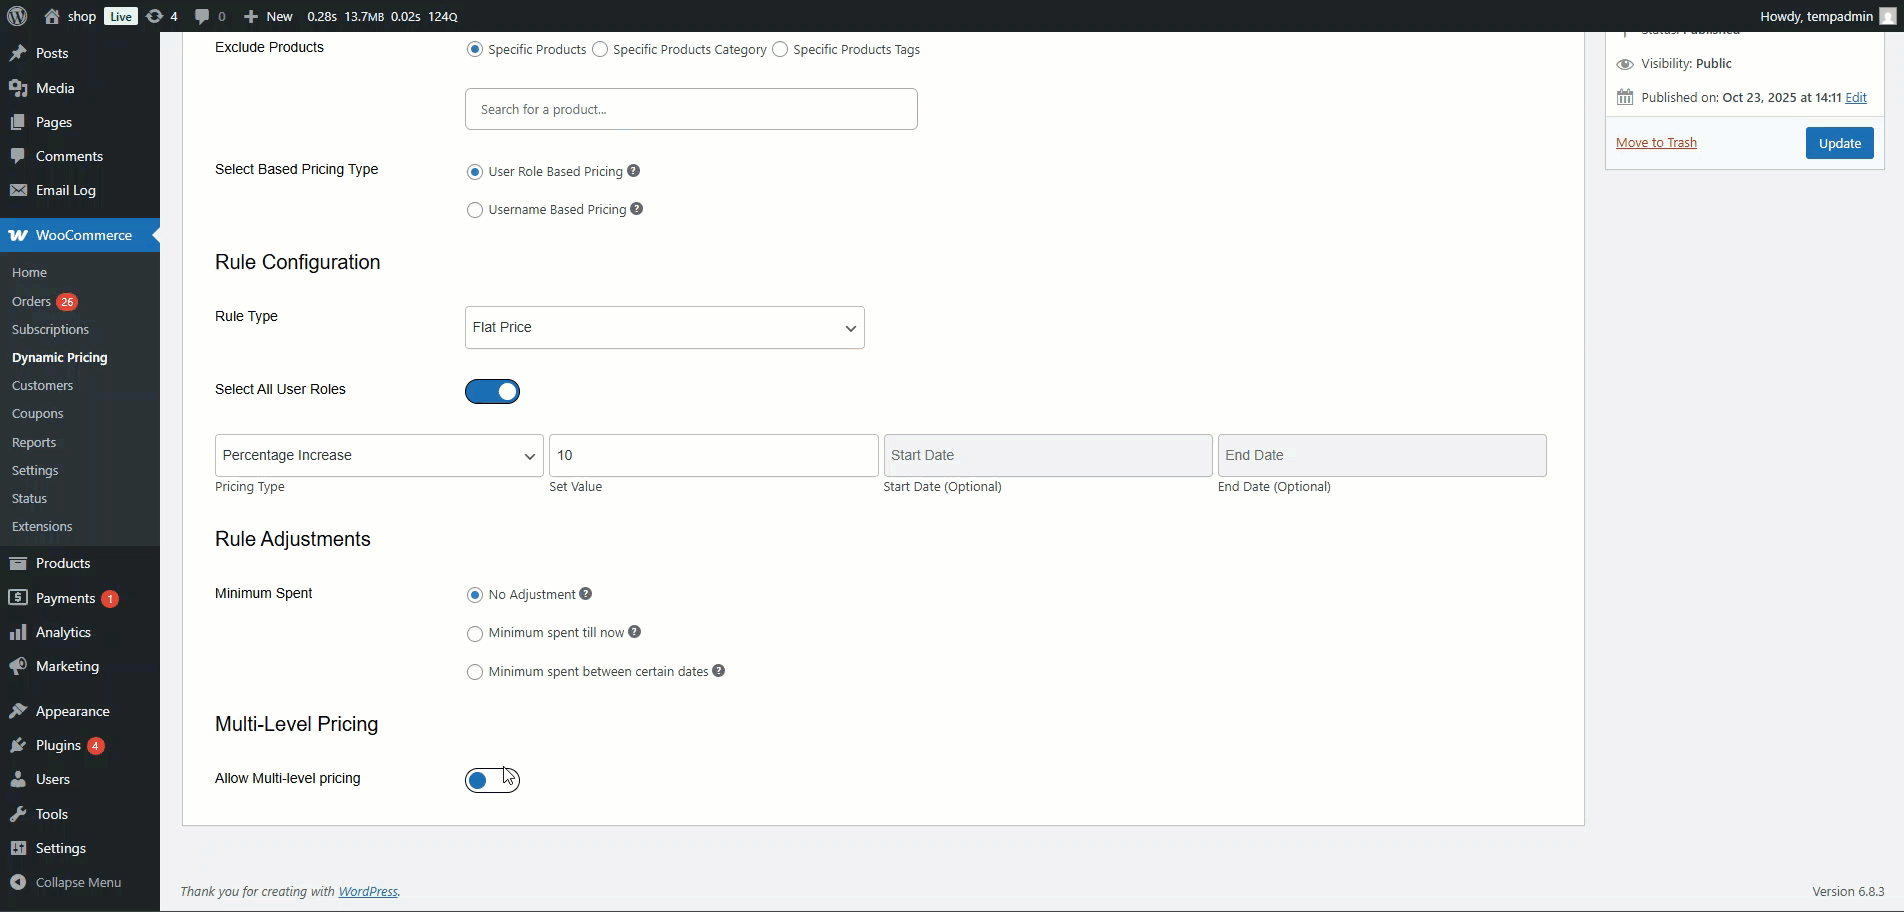
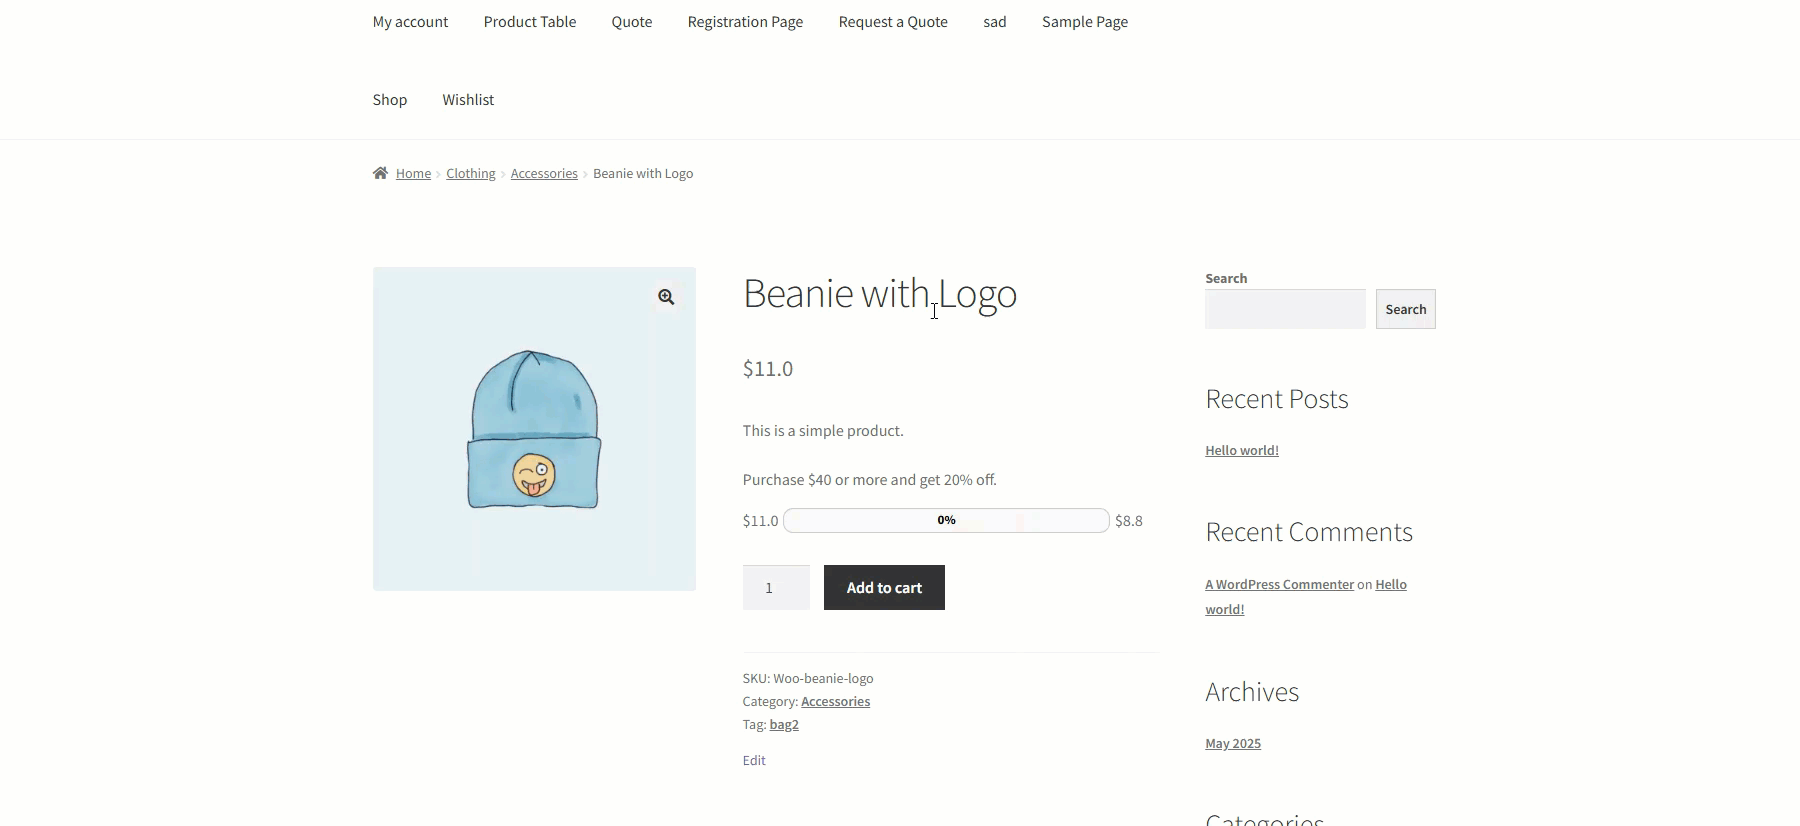
Multi-Level Pricing
↑ Back to topThe Multi-Level Pricing feature enhances the Flat Price rule type by allowing the admin to apply an additional discount over the rule-based price. This discount is applied based on the Quantity or Product Subtotal Value once a specific condition is met.
- Dashboard > WooCommerce > Dynamic Pricing > Add/Edit Rule.
- In the Rule Type, select Flat Price.
- A new section named Multi-Level Pricing will appear below the rule configuration.
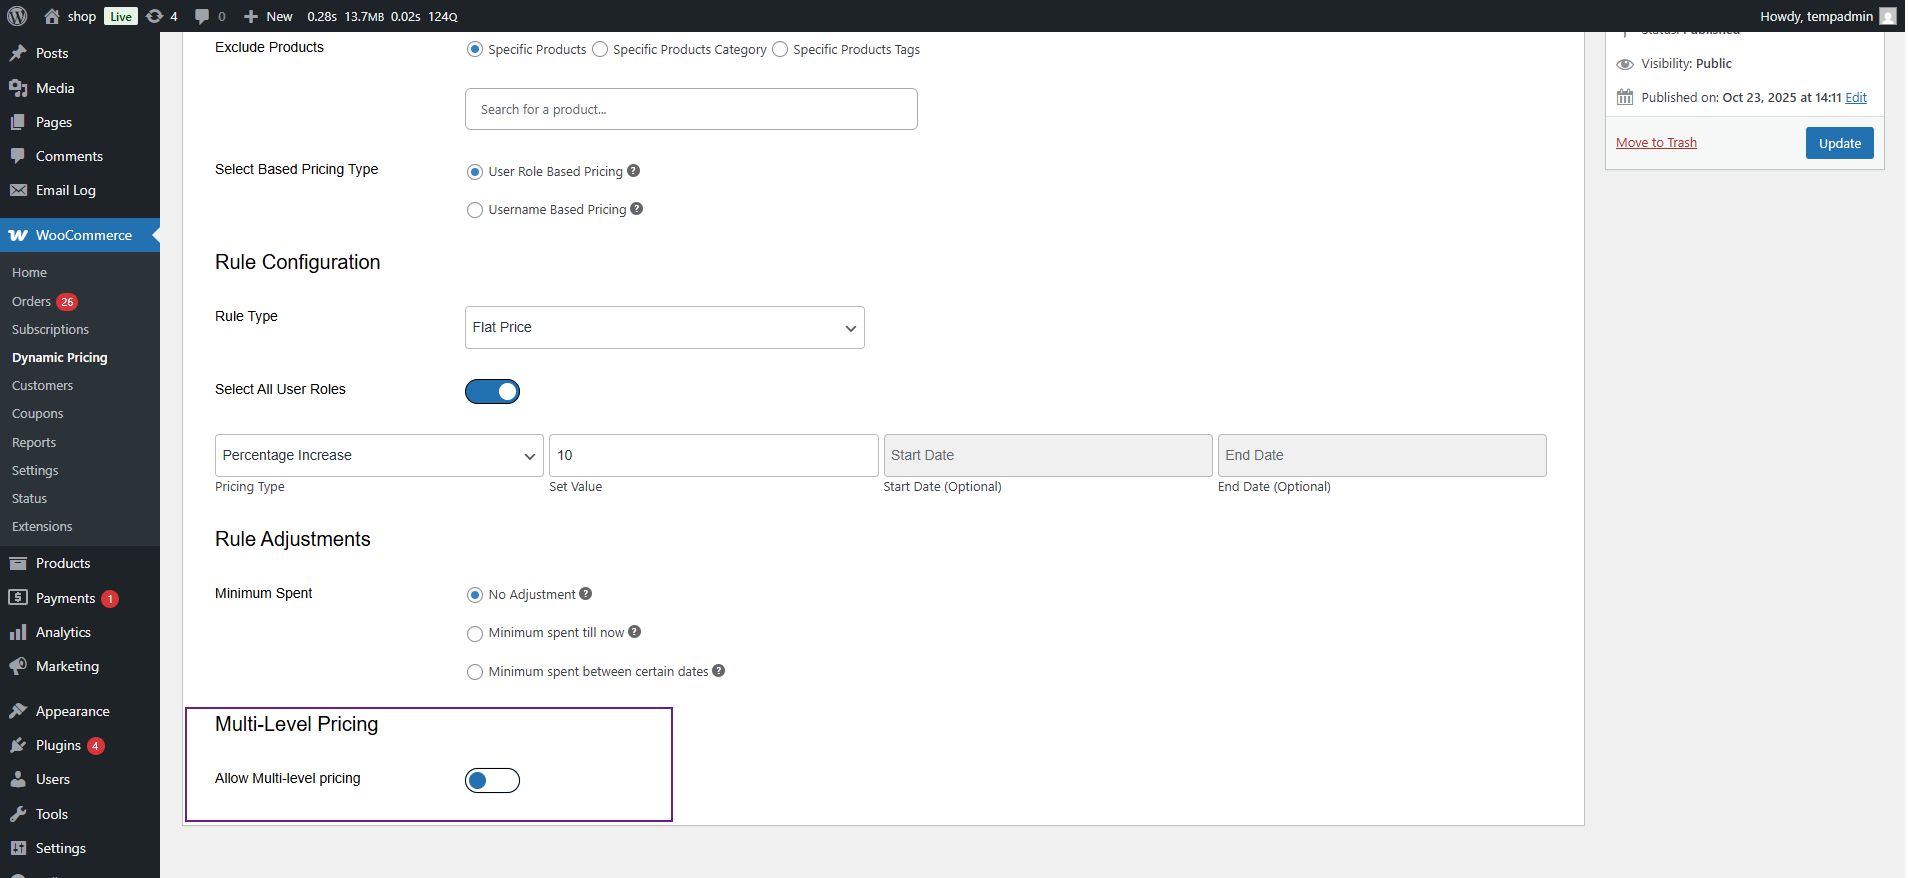
- Now, you will see a Toggle Button labeled Allow Multi-Level Pricing.
- Check this option to activate the Multi-Level Pricing setting.
- After enabling, a radio group will appear with two options:
- Quantity
- Product Subtotal Value
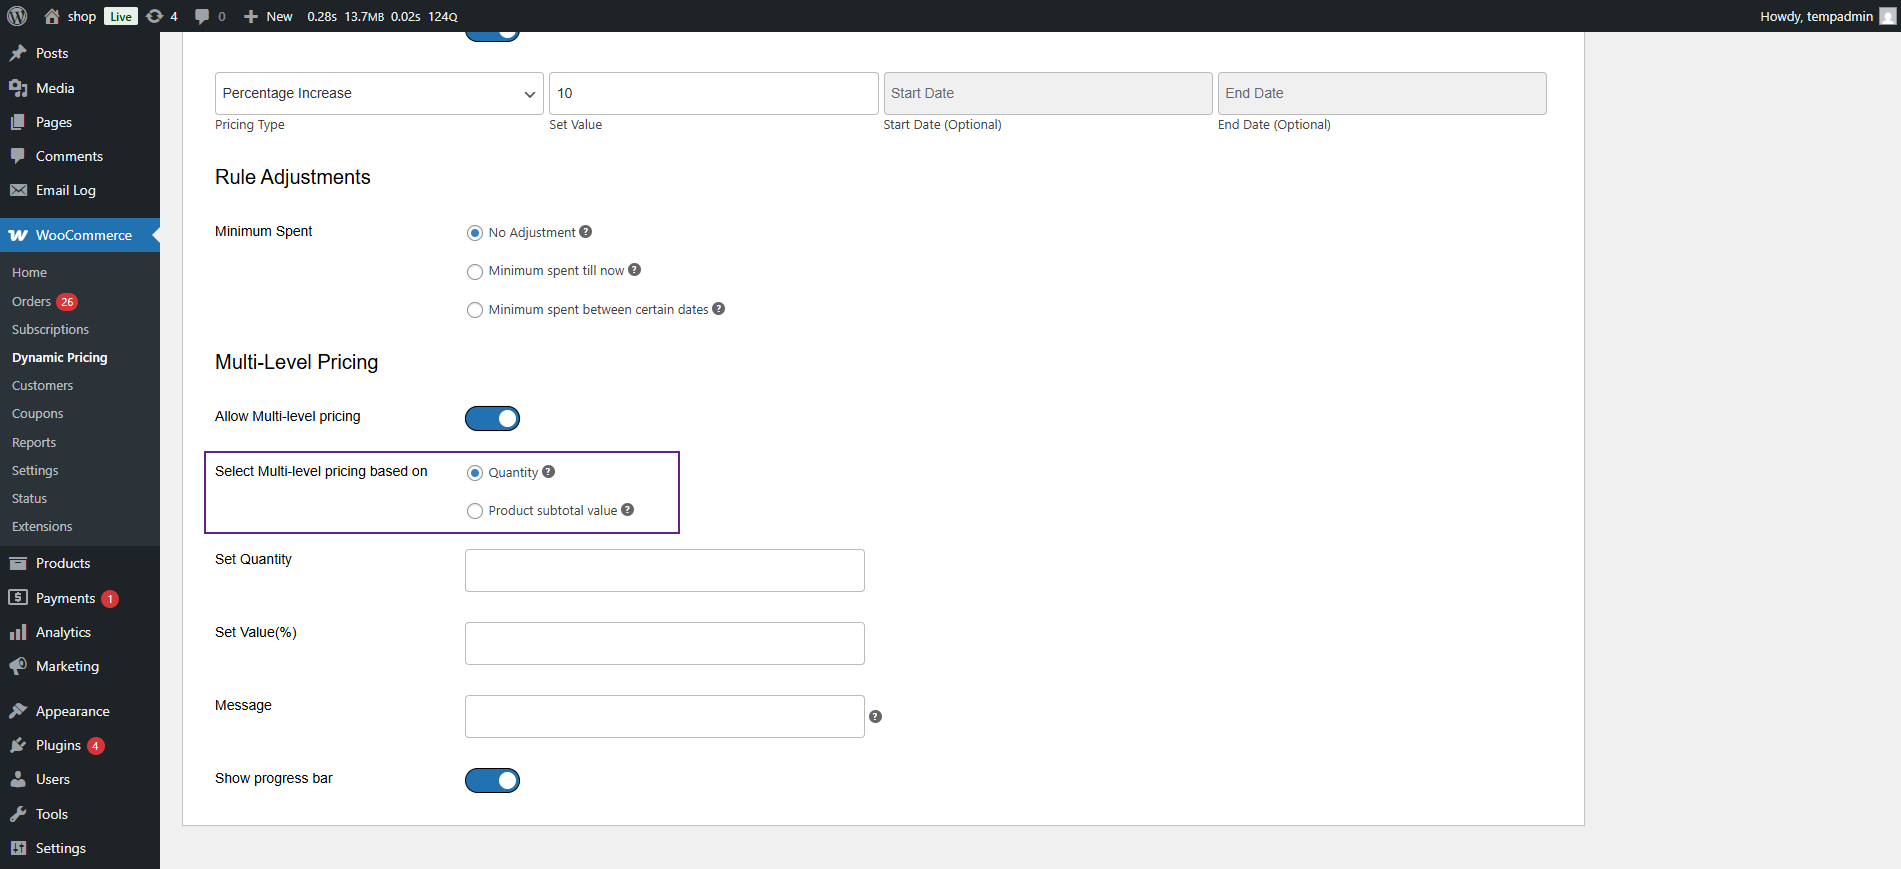
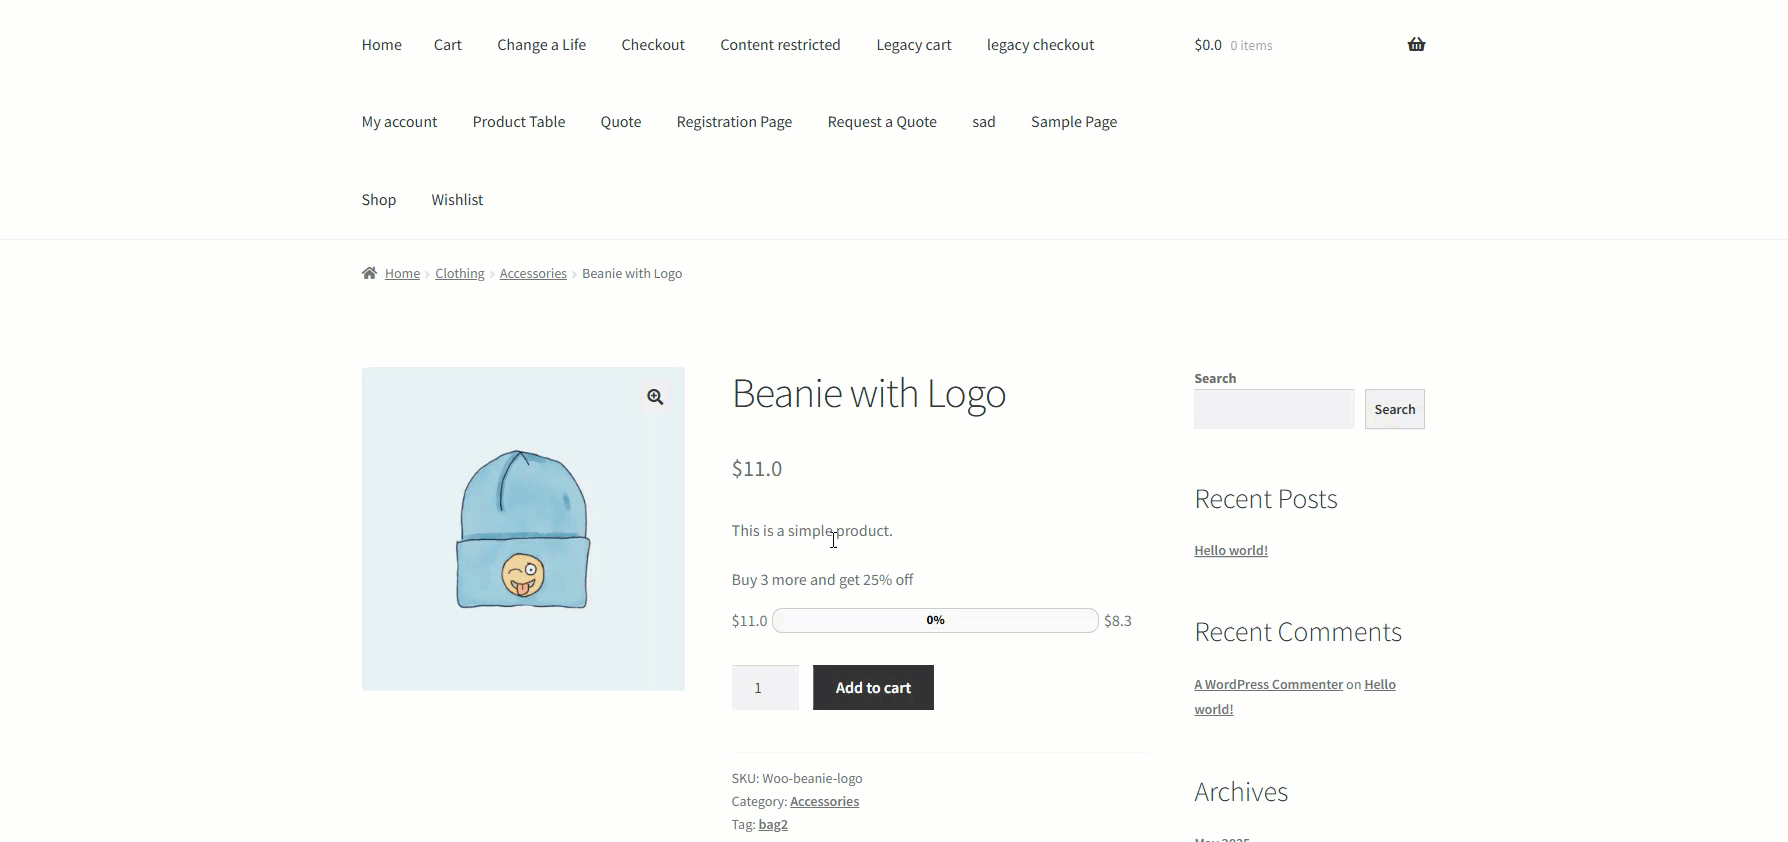
Quantity-Based Multi-Level Pricing
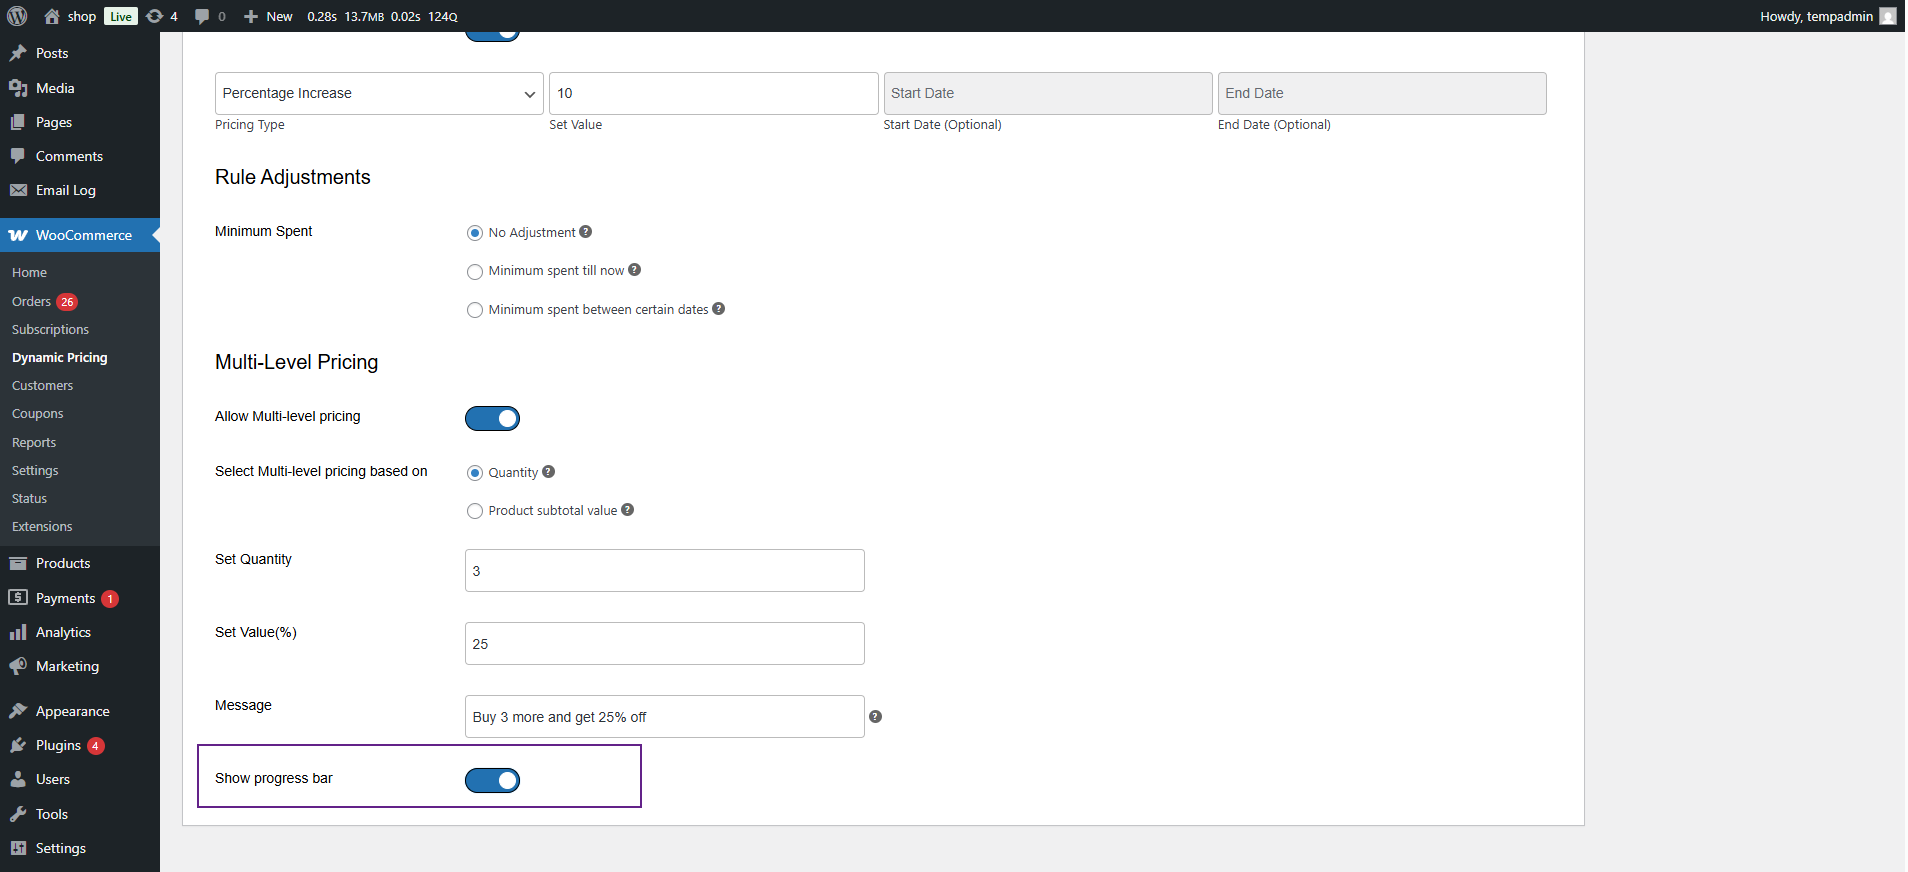
↑ Back to topWhen Quantity is selected, the following input fields will appear:
- Set Quantity: Number of additional products required for the discount to activate
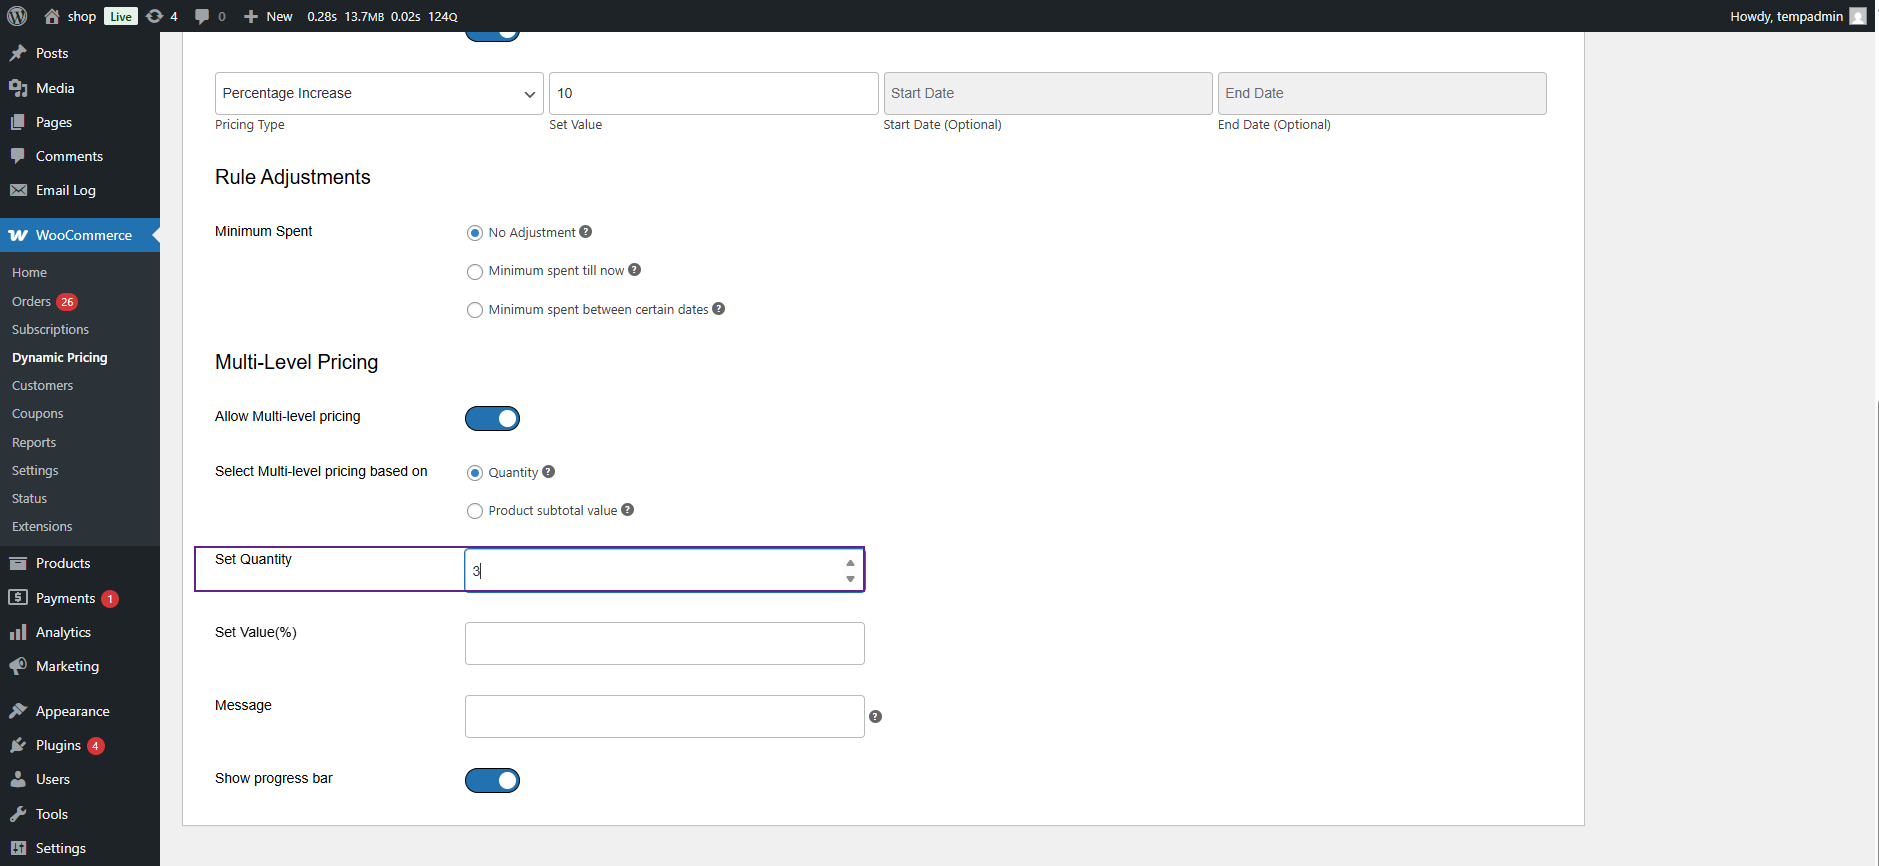
- Set Value (%): The percentage discount to apply over the existing rule-based price.
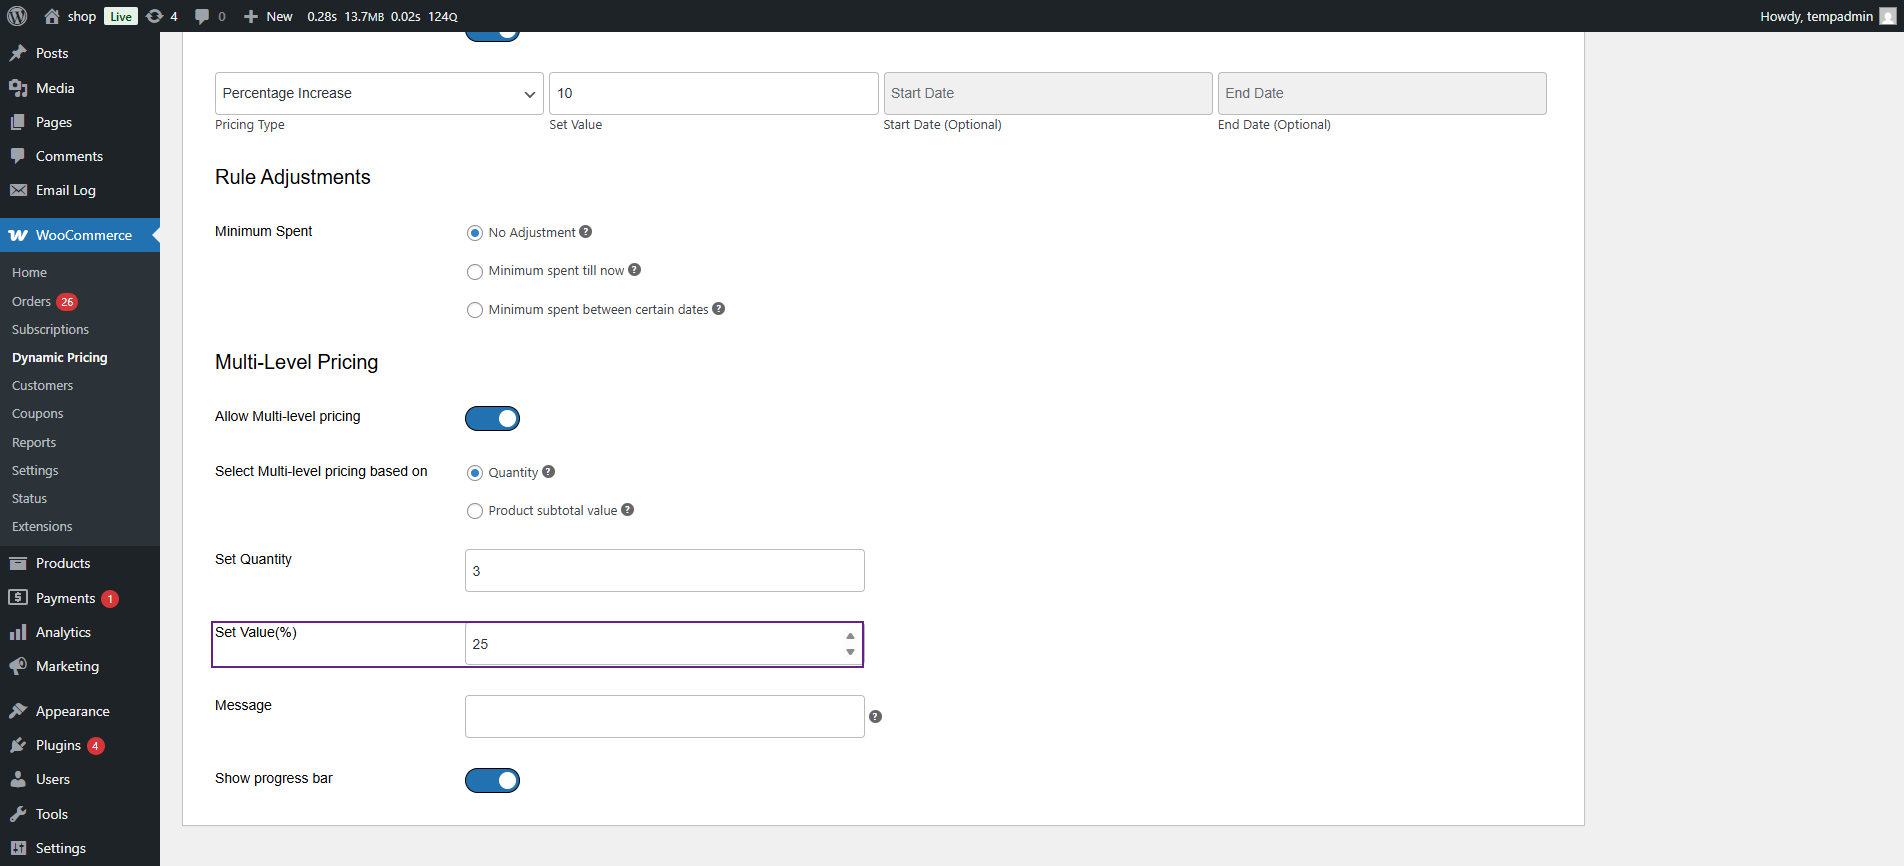
- Message: A custom message displayed on the frontend (e.g., Buy 4 more and get 20% off).
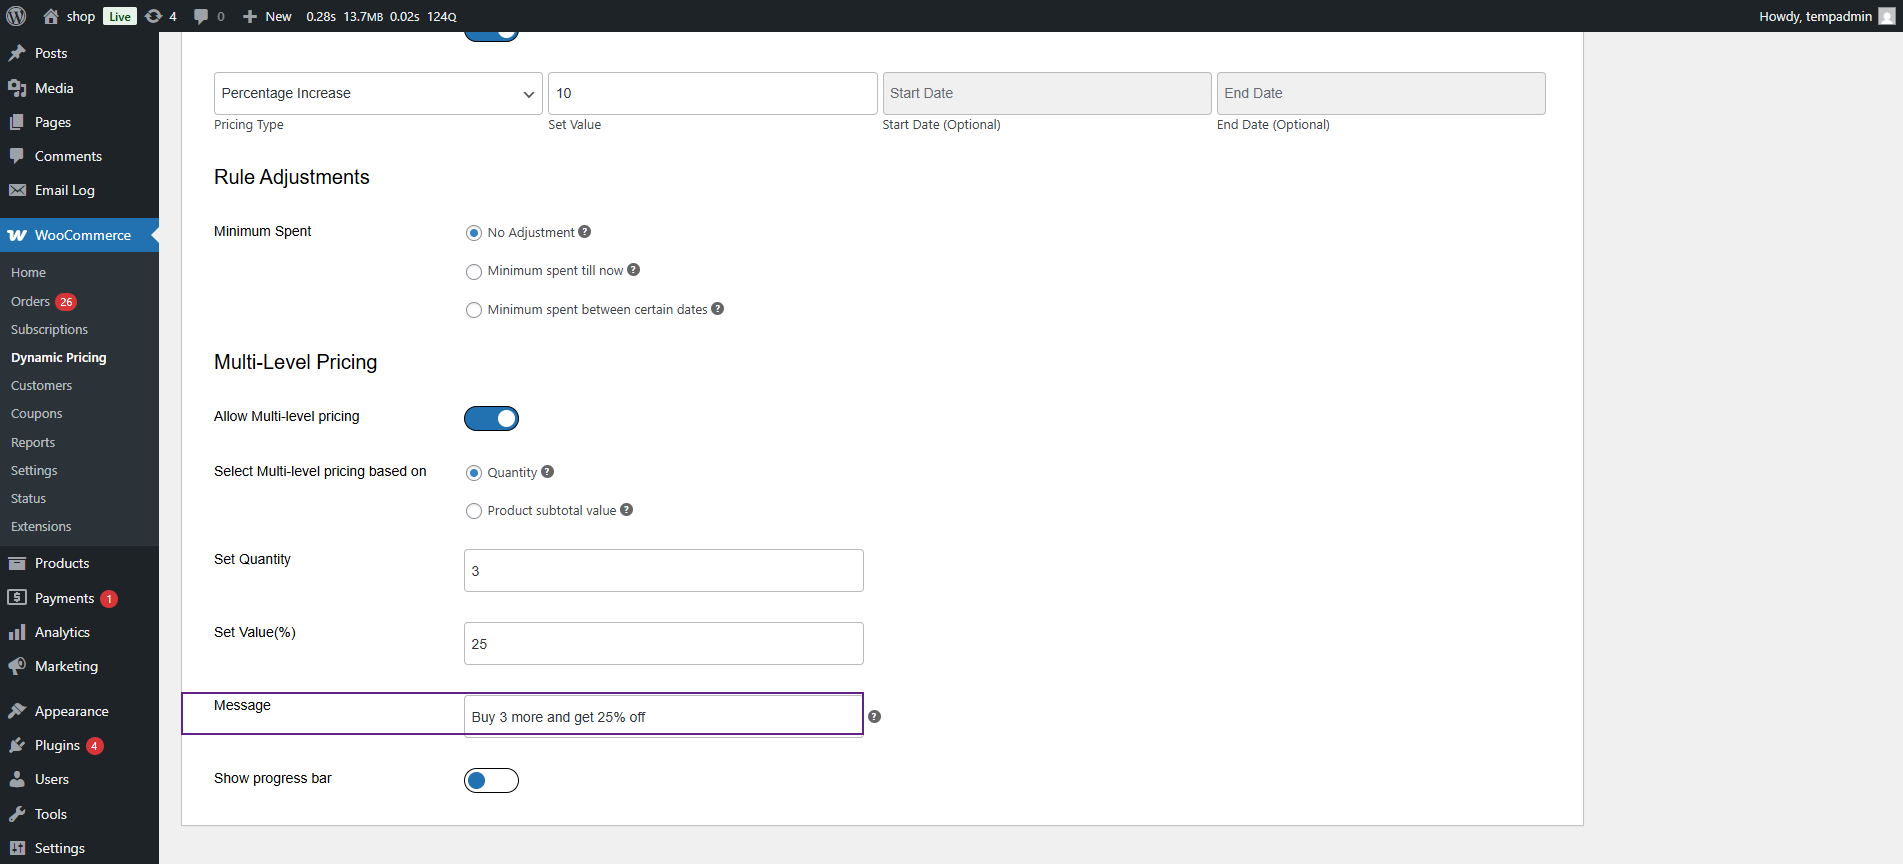
- Show Progress Bar: Enables a visual progress bar that updates as users add products.
Product Subtotal Value-Based Multi-Level Pricing
↑ Back to topWhen Product Subtotal Value is selected, the following input fields will appear:
- Set Subtotal Value: Minimum purchase amount for the discount to activate.

- Set Value (%) : The percentage discount applied to the rule-based price.
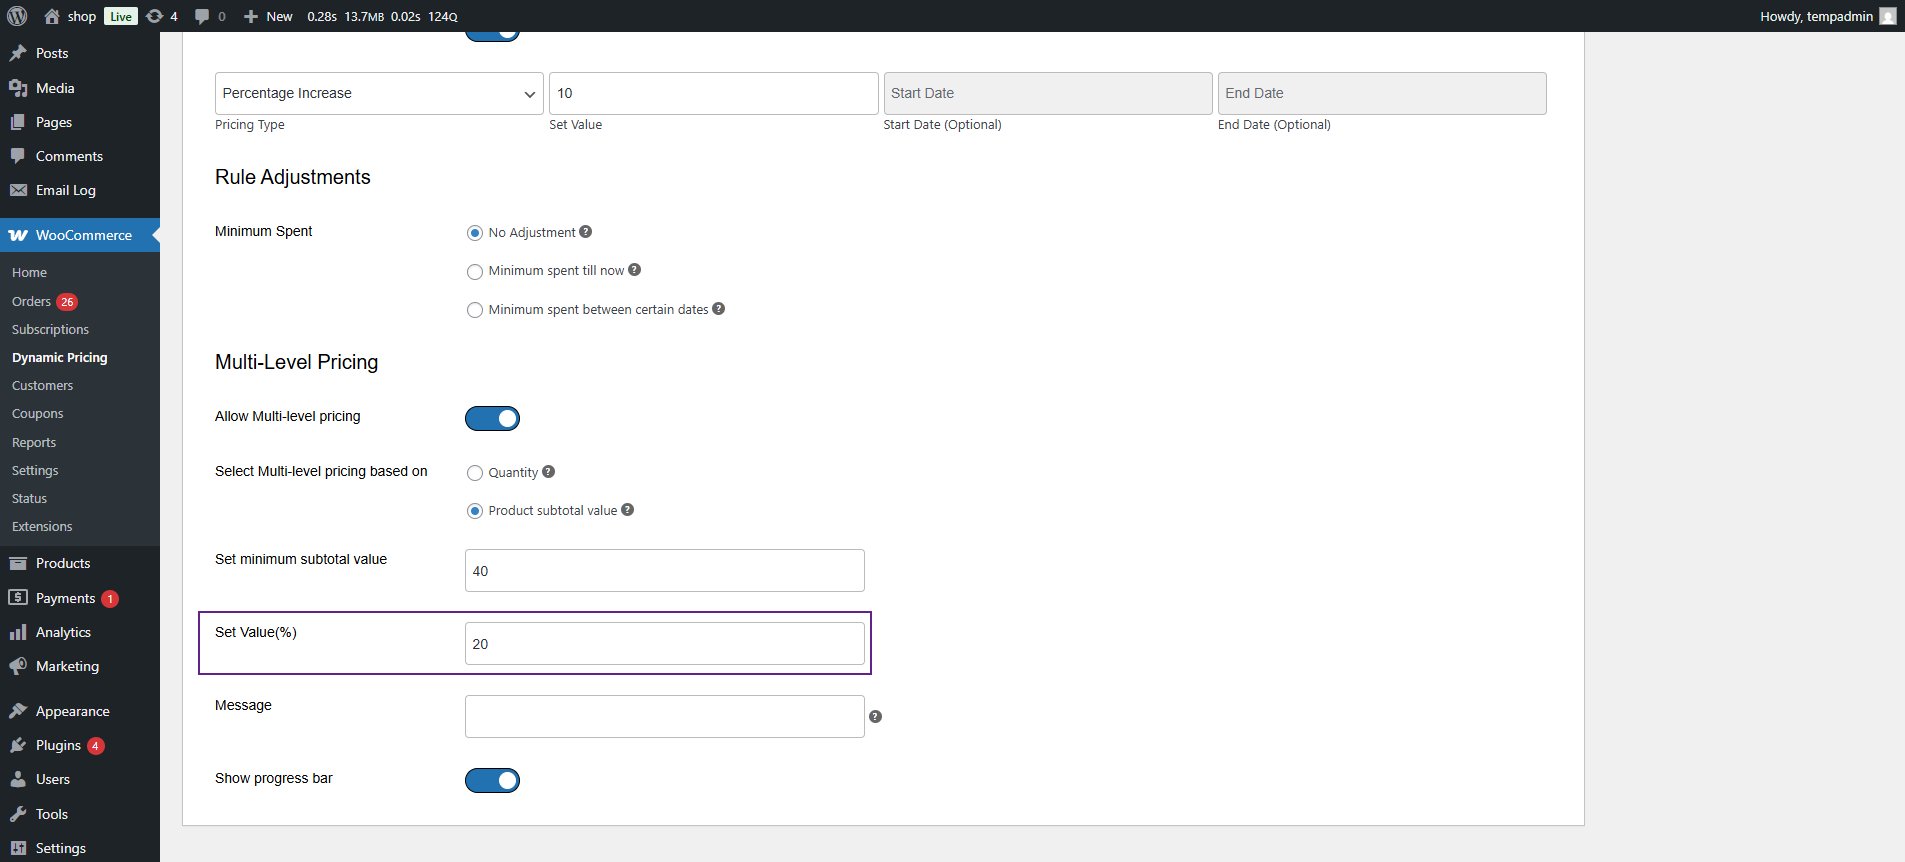
- Message: A message displayed on the product page.
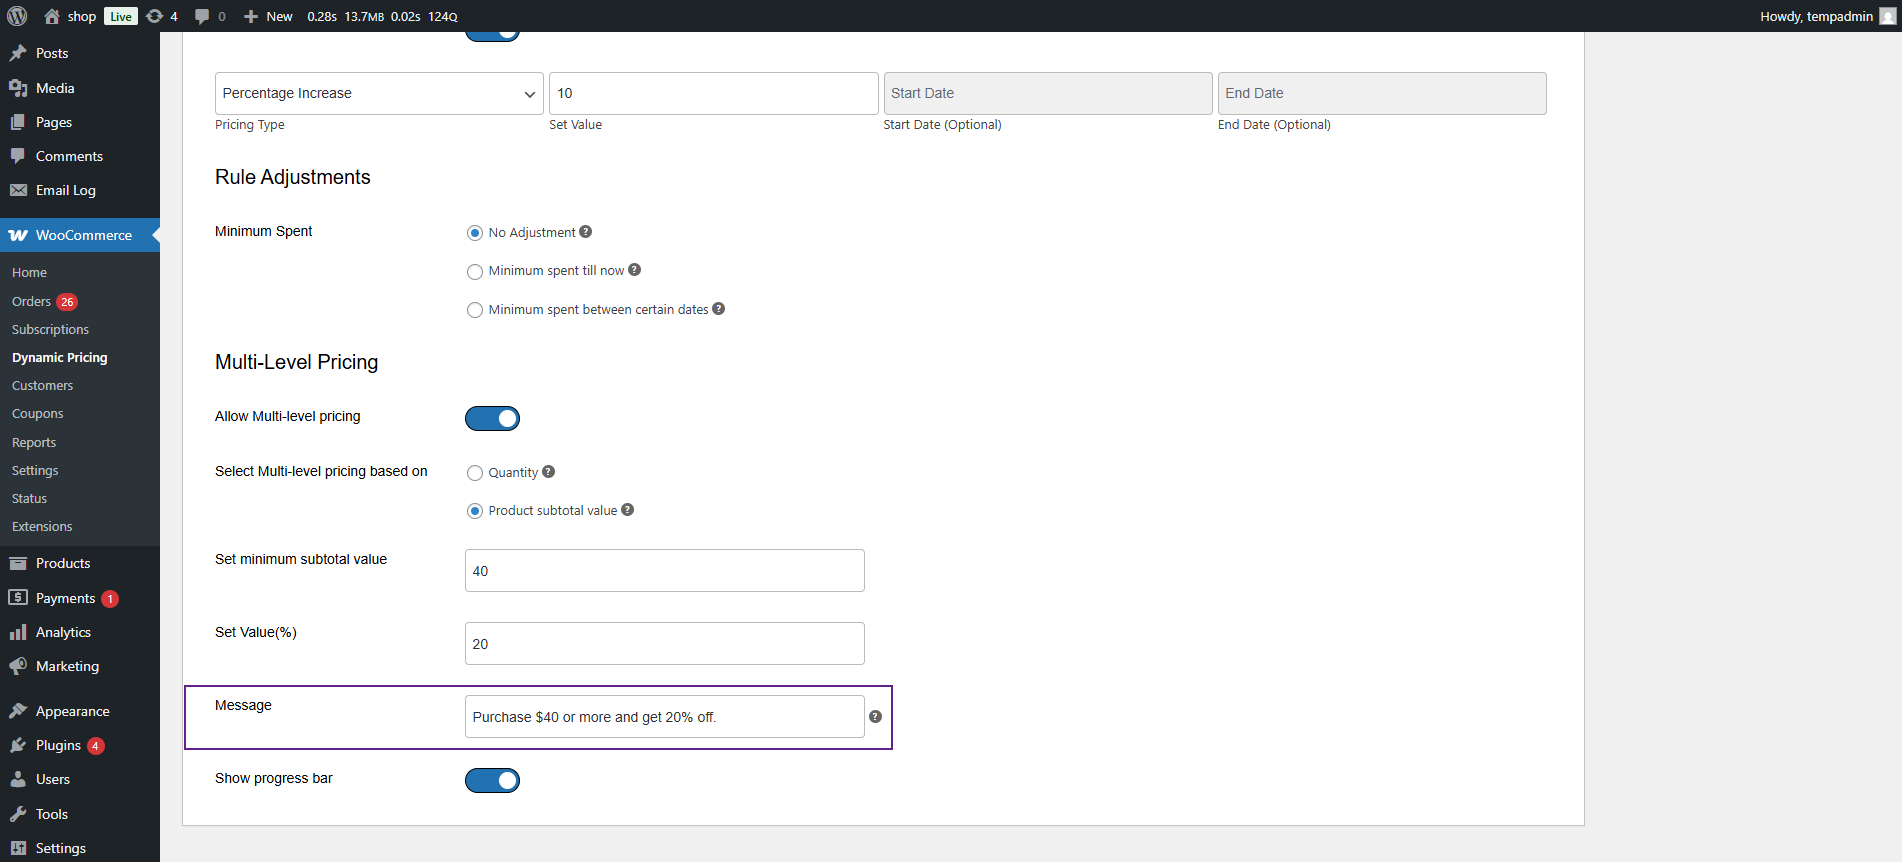
- Show Progress Bar: Displays a progress bar based on the subtotal progress.

Front-End Impact
- Navigate to the Shop Page or any Product Page where the Flat Price Rule with Multi-Level Pricing is active.
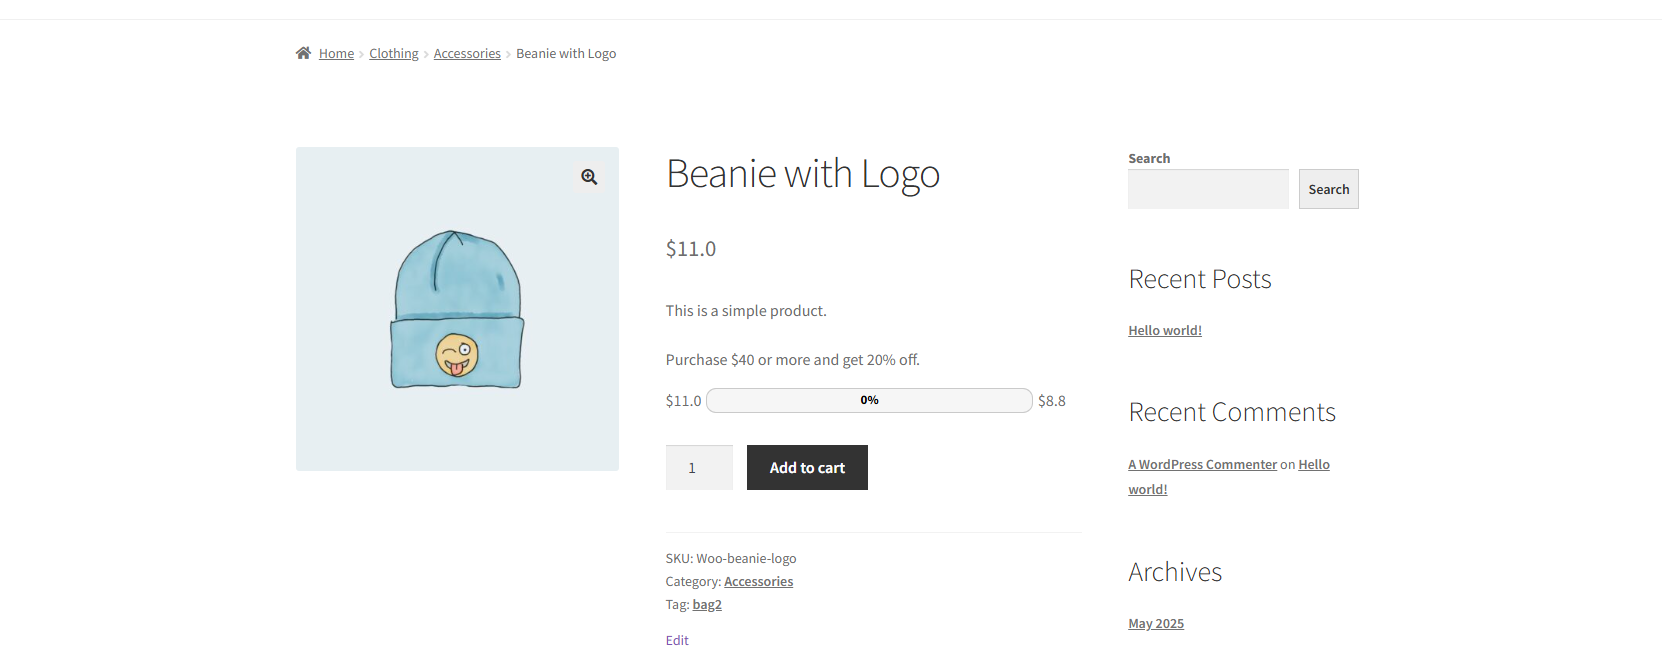
Product Display
- The product will initially display the Flat Price set under the rule.
- If Multi-Level Pricing is enabled, the discount message will appear below the product price (e.g., Buy 4 more and get a 20% discount).
- A progress bar will be visible (if enabled), showing how close the user is to the target quantity or subtotal.
Quantity-Based Behavior
- As the product quantity increases, the progress bar dynamically updates.
- When the defined quantity is reached (e.g., 4 items), the additional percentage discount automatically applies to the product price.
- The price display updates to show the new discounted price in real-time.
Product Subtotal-Based Behavior
- The progress bar tracks the total product subtotal in the cart.
- Once the subtotal meets or exceeds the defined amount (e.g., $40), the additional discount is automatically applied.
- The message updates to reflect the discount being applied.
Rule Adjustment
↑ Back to topThe Rule Adjustment section allows the admin to apply additional conditions to pricing rules based on customers’ past spending behavior.
- Go to Dashboard > WooCommerce > Dynamic Pricing > Rules > Add/Edit Rule

- Now, scroll down to find the new section labeled Rule Adjustment.
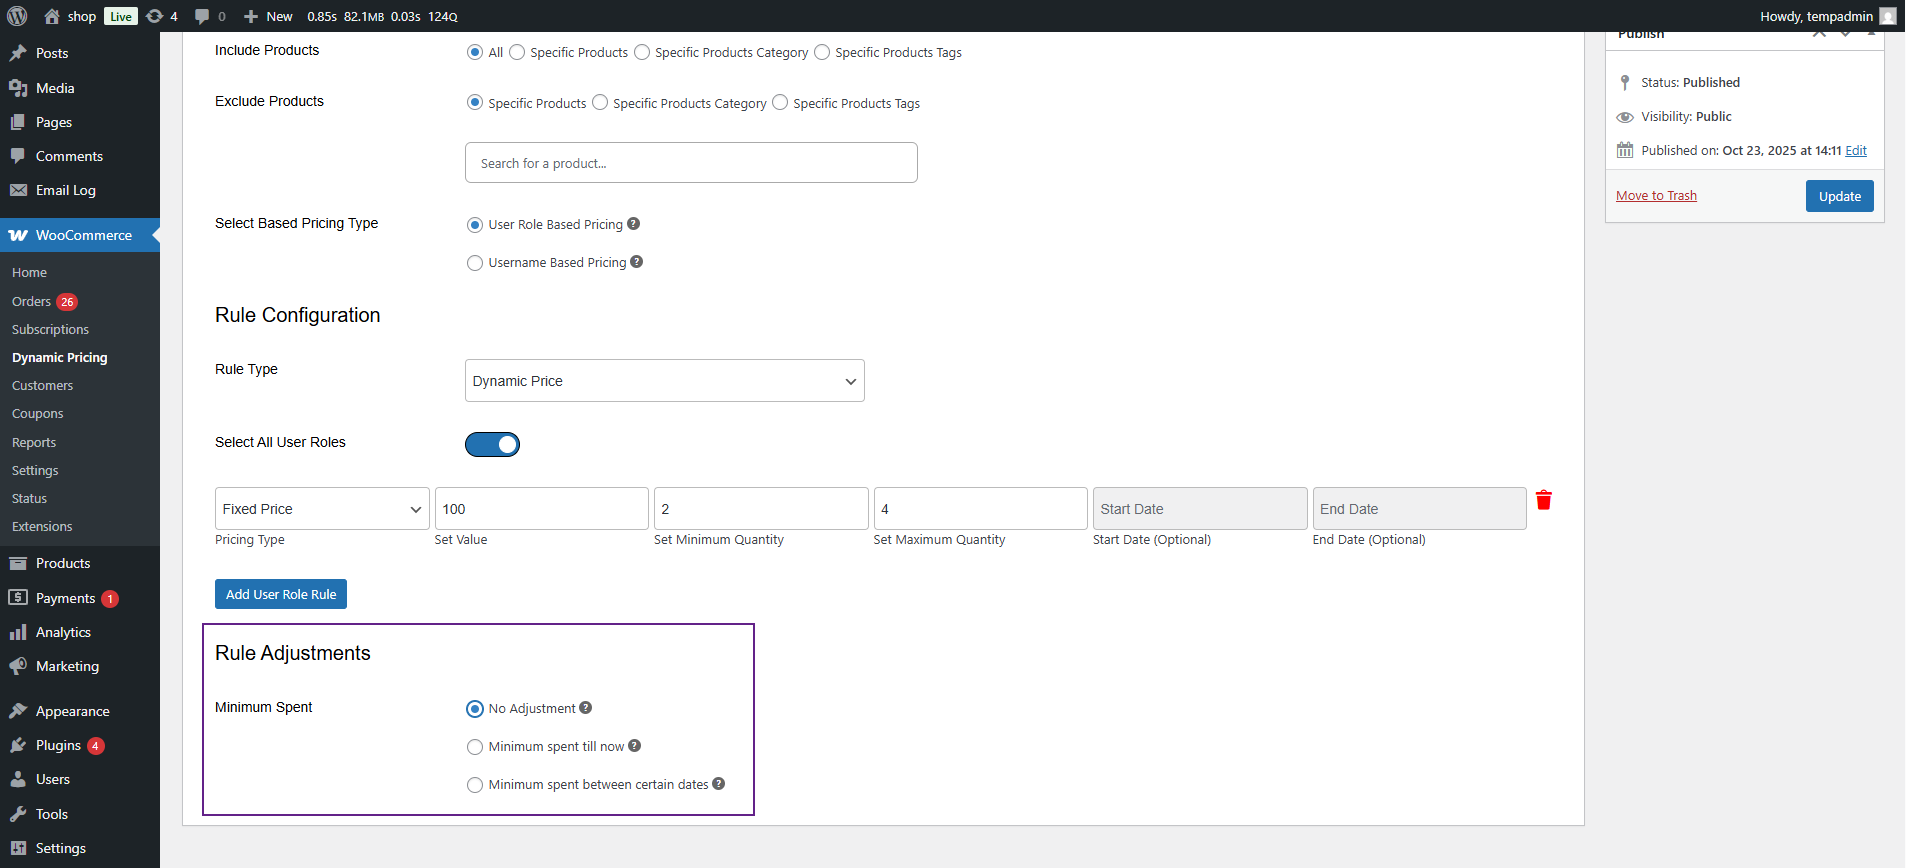
This section includes an option group titled Minimum Spent, containing the following choices:
- No Adjustment (selected by default)
- Minimum spent till now
- Minimum Spent between certain dates
No Adjustment
- Select No Adjustment if you don’t want to apply any spending-based condition.
- The rule will apply to all customers as usual, regardless of their purchase history.

Minimum spent till now
When you select Minimum Spent till now, an Amount input box will appear.
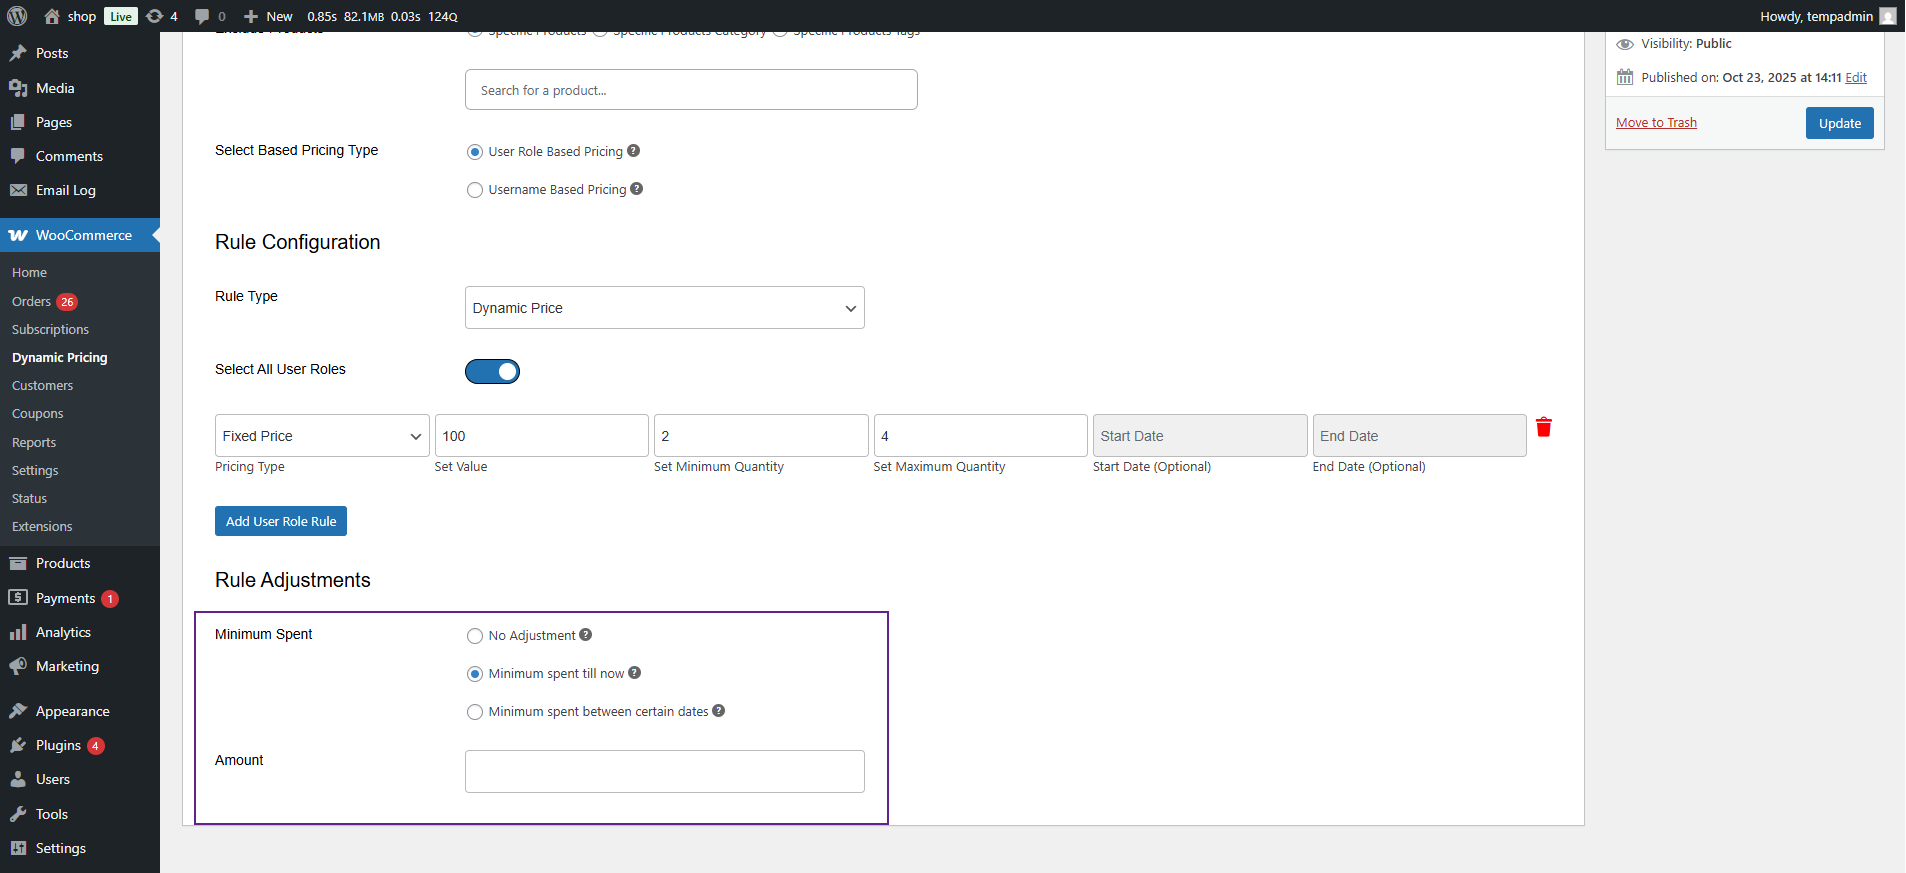
- Enter the total amount a customer must have spent in all their past orders to qualify for this rule.
- Only orders with Processing or Completed status will be counted.

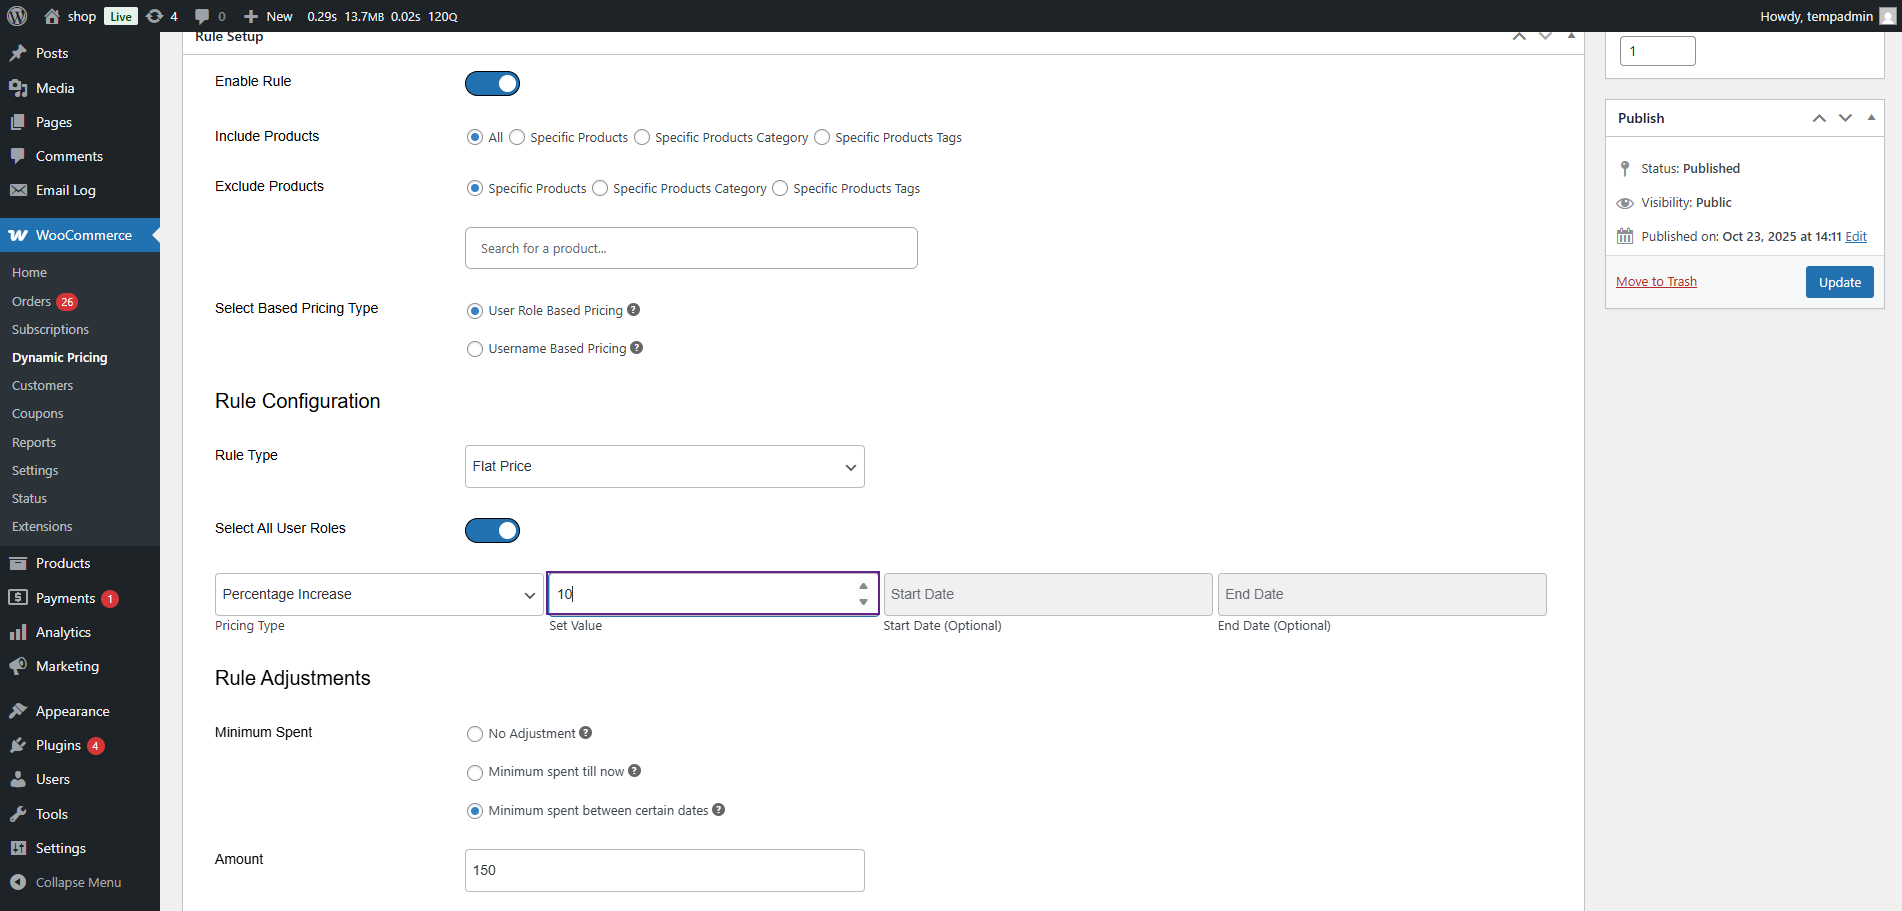
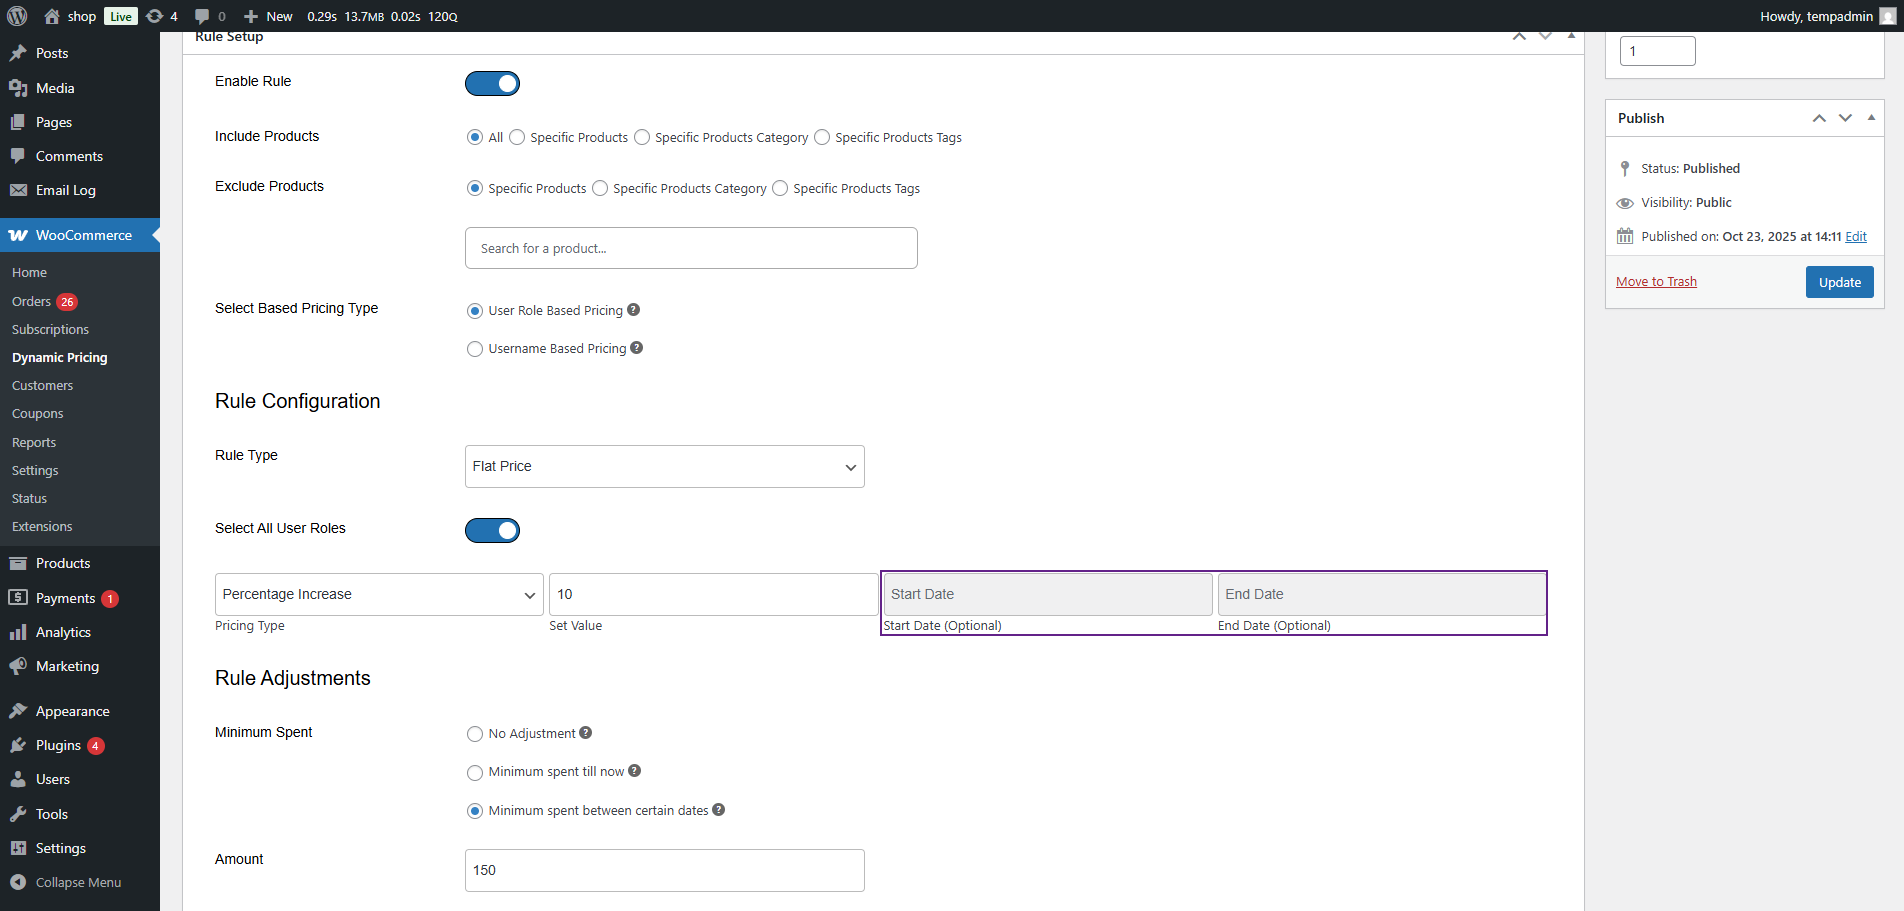
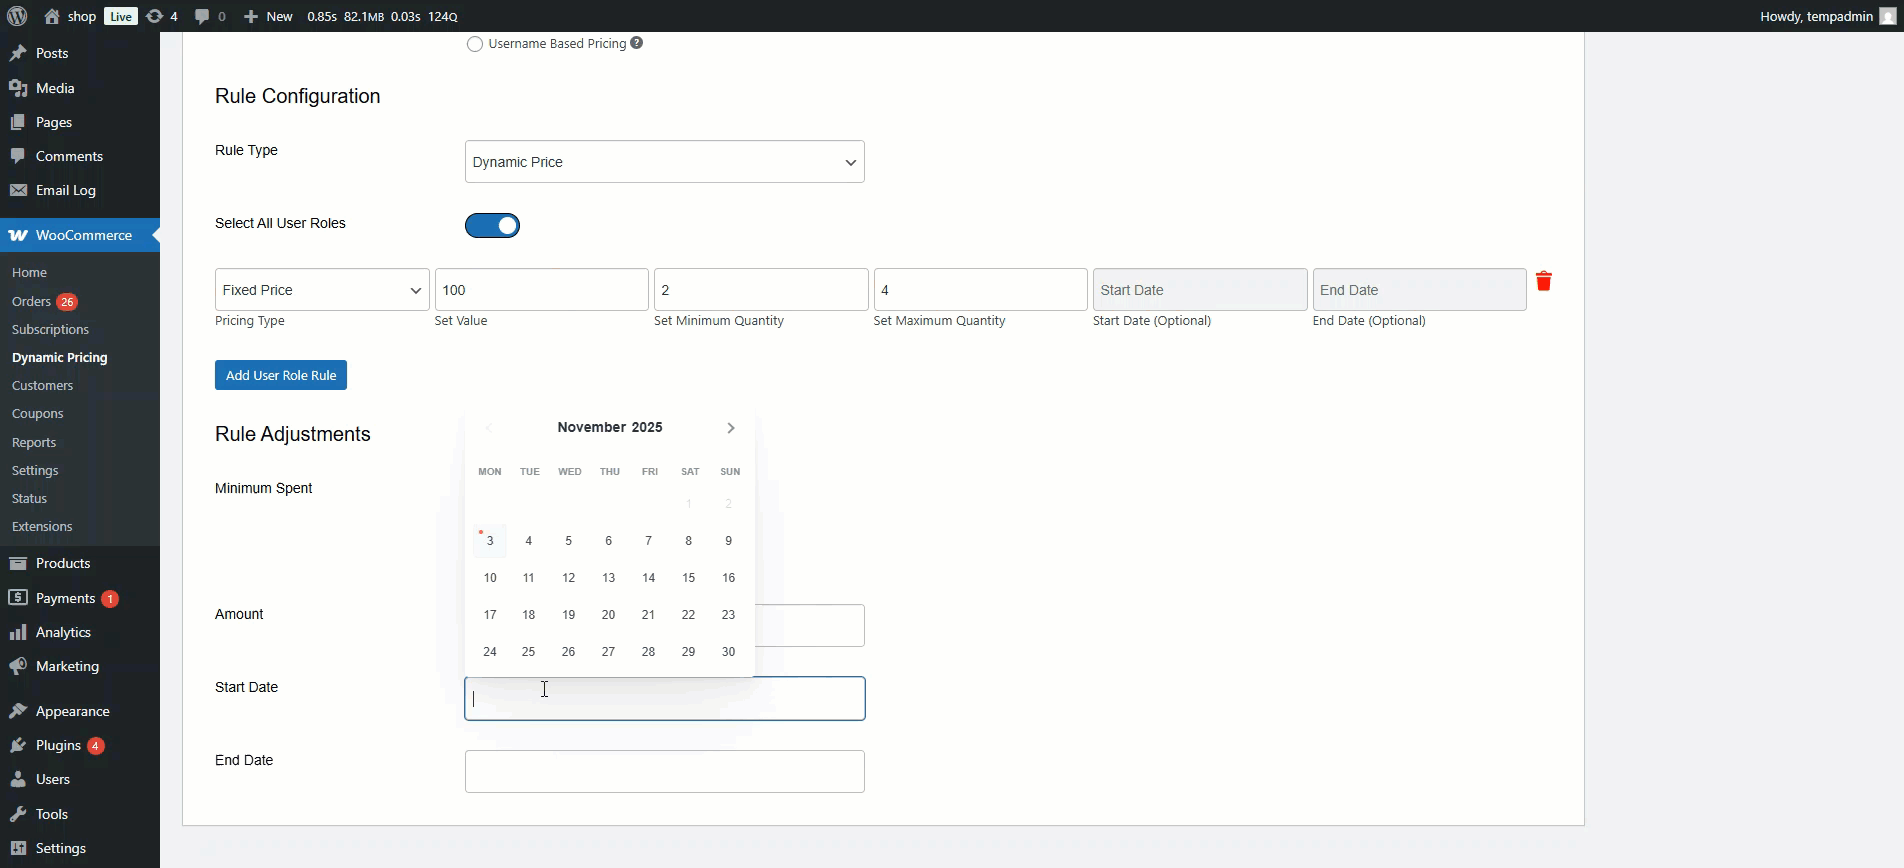
Minimum Spent between certain dates
When you select Minimum Spent between certain dates, the following fields will appear:
- Amount input box
- Start Date selector
- End Date selector
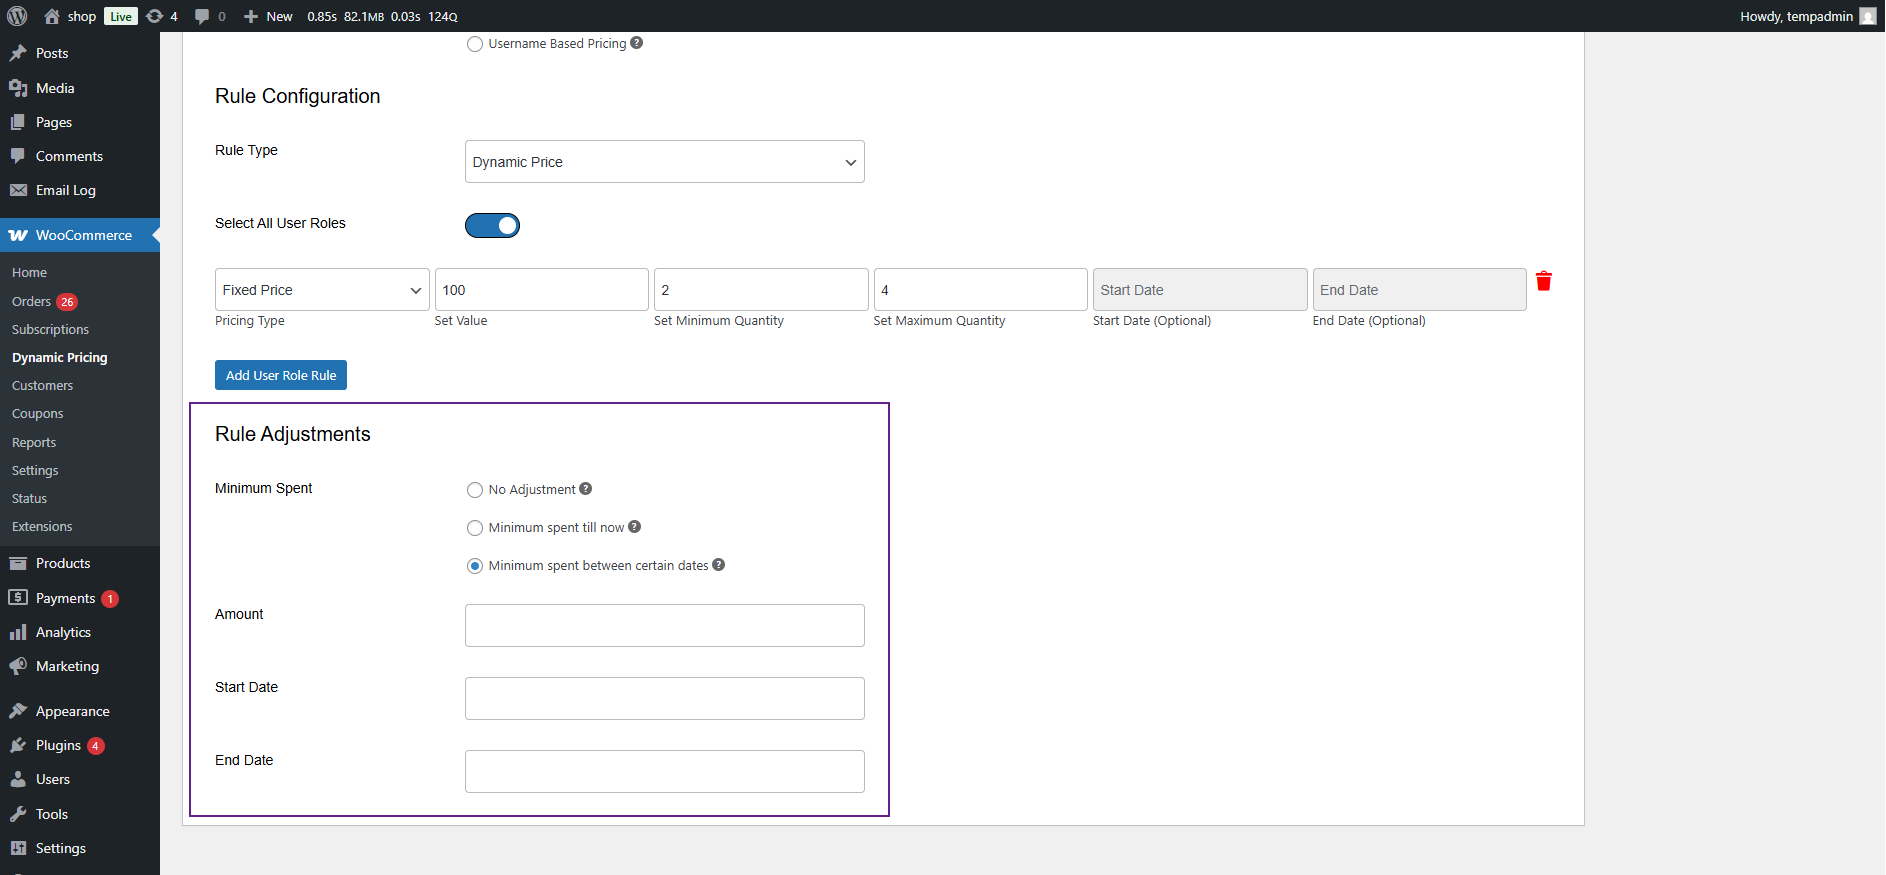
- Enter the minimum spend amount required.
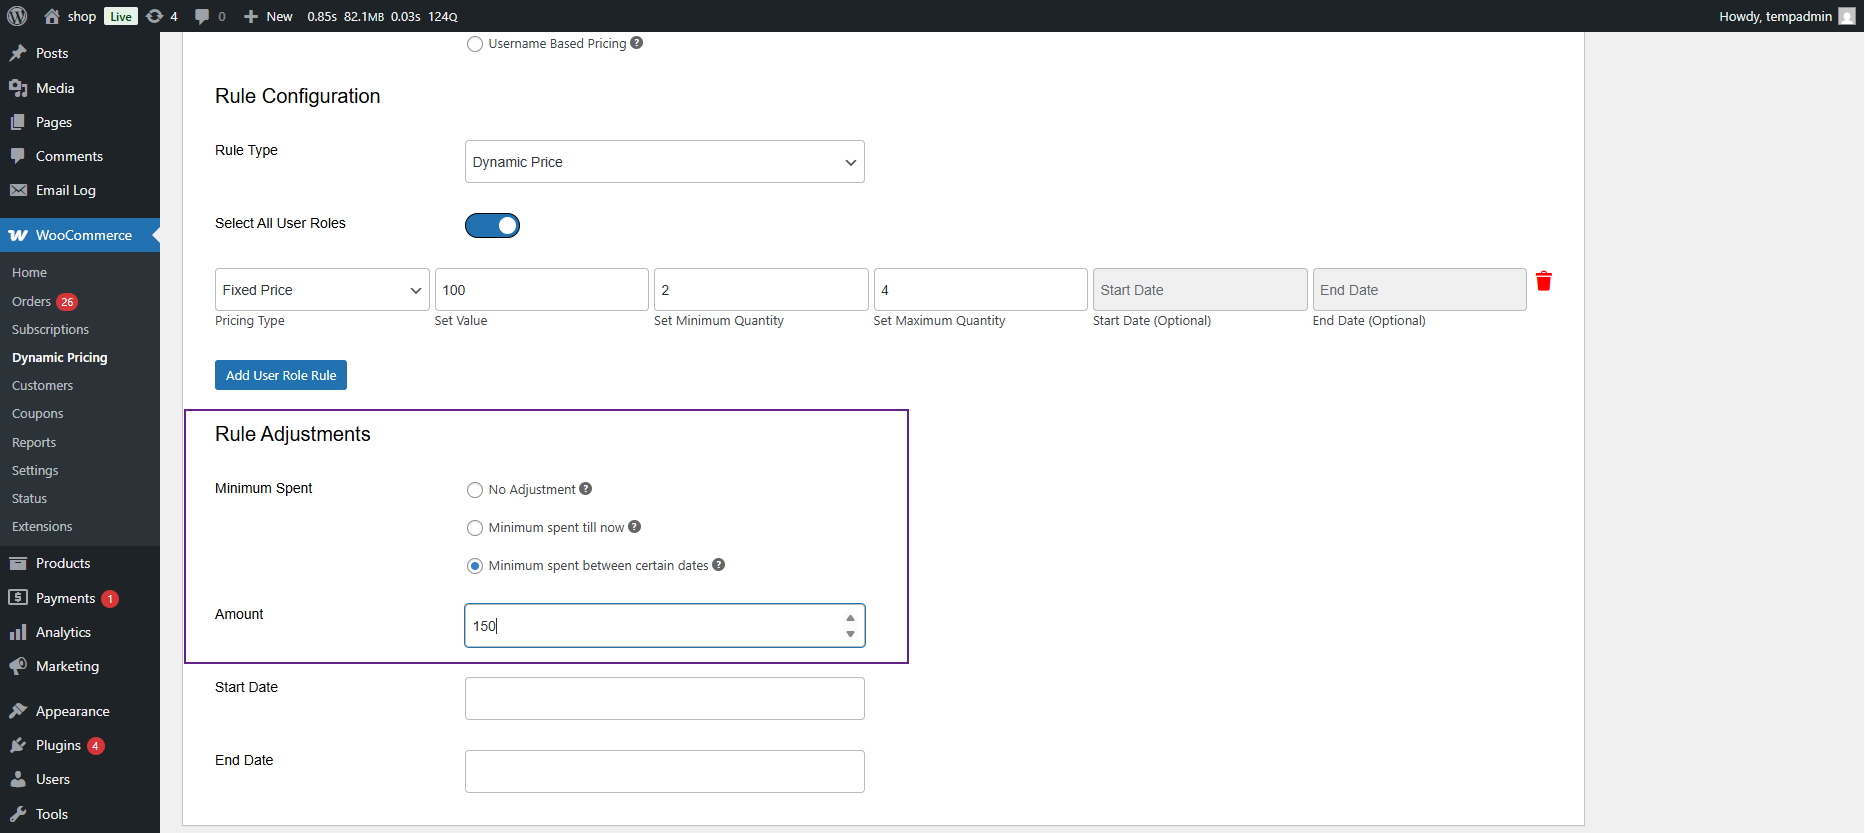
- Select the Start Date and End Date to define the time range for calculating total spending.
- Only orders placed within this date range and having a Processing or Completed status will be included.
Front-End Impact
- Navigate to the Shop Page.
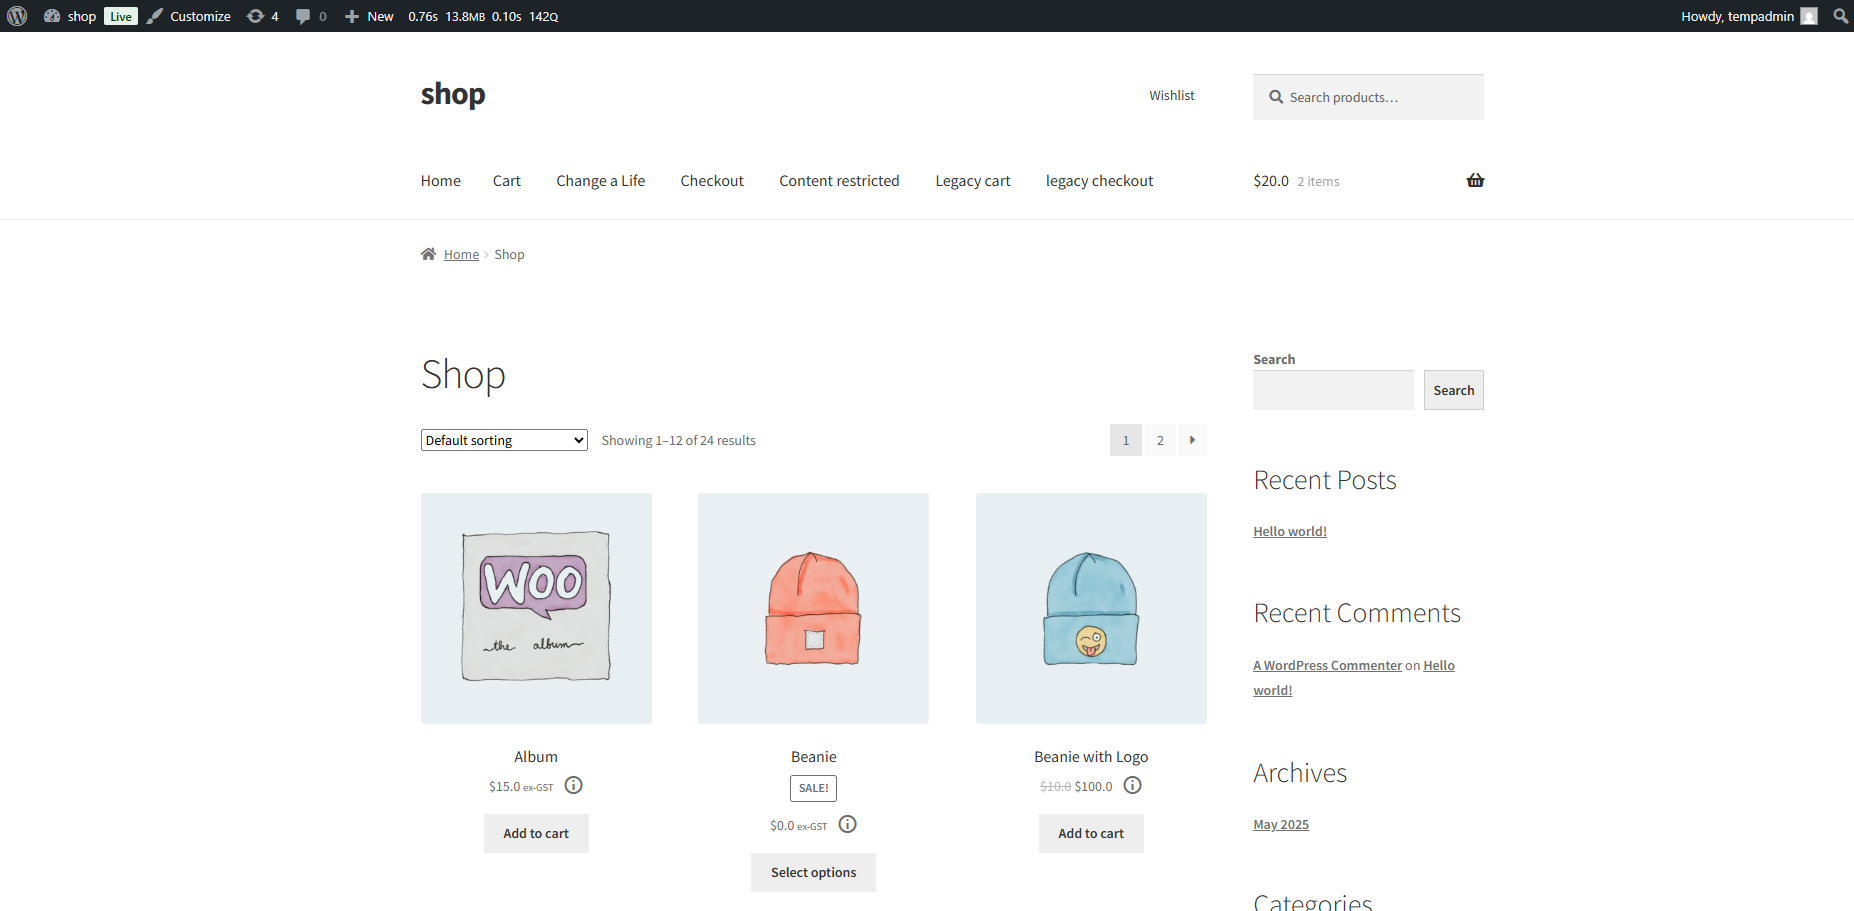
- Open any Product that is linked to the configured Dynamic Pricing rule.

No Adjustment
- The rule will be applied to all customers.
- Both guest and logged-in users will see the discounted or adjusted prices on the Shop, Product, and Cart pages.
- No spending-based condition will be checked.
Minimum Spent till now
- The system will check the total amount the logged-in customer has spent on all Completed or Processing orders.
- If the total spending meets or exceeds the specified minimum amount, the discounted or adjusted prices will appear on the Shop, Product, and Cart pages.
- If the customer’s total spending is below the defined amount, the regular prices will remain visible, and the rule will not apply.
- Guest users or new customers without an order history will not qualify for this rule.
Minimum Spent between certain dates
- The system will calculate the customer’s total spending within the specified date range.
- Only Completed or Processing orders placed between the selected Start and End dates will be considered.
- If the spending during this period meets or exceeds the entered amount, the pricing rule will be applied automatically on the Shop, Product, and Cart pages.
- If not, the customer will continue to see regular product prices.
General Settings Page
↑ Back to top- For the General Settings of Dynamic and Role-Based Pricing, Go to WordPress Admin Dashboard > WooCommerce > Settings.
- Click the Dynamic Role Pricing Tab.
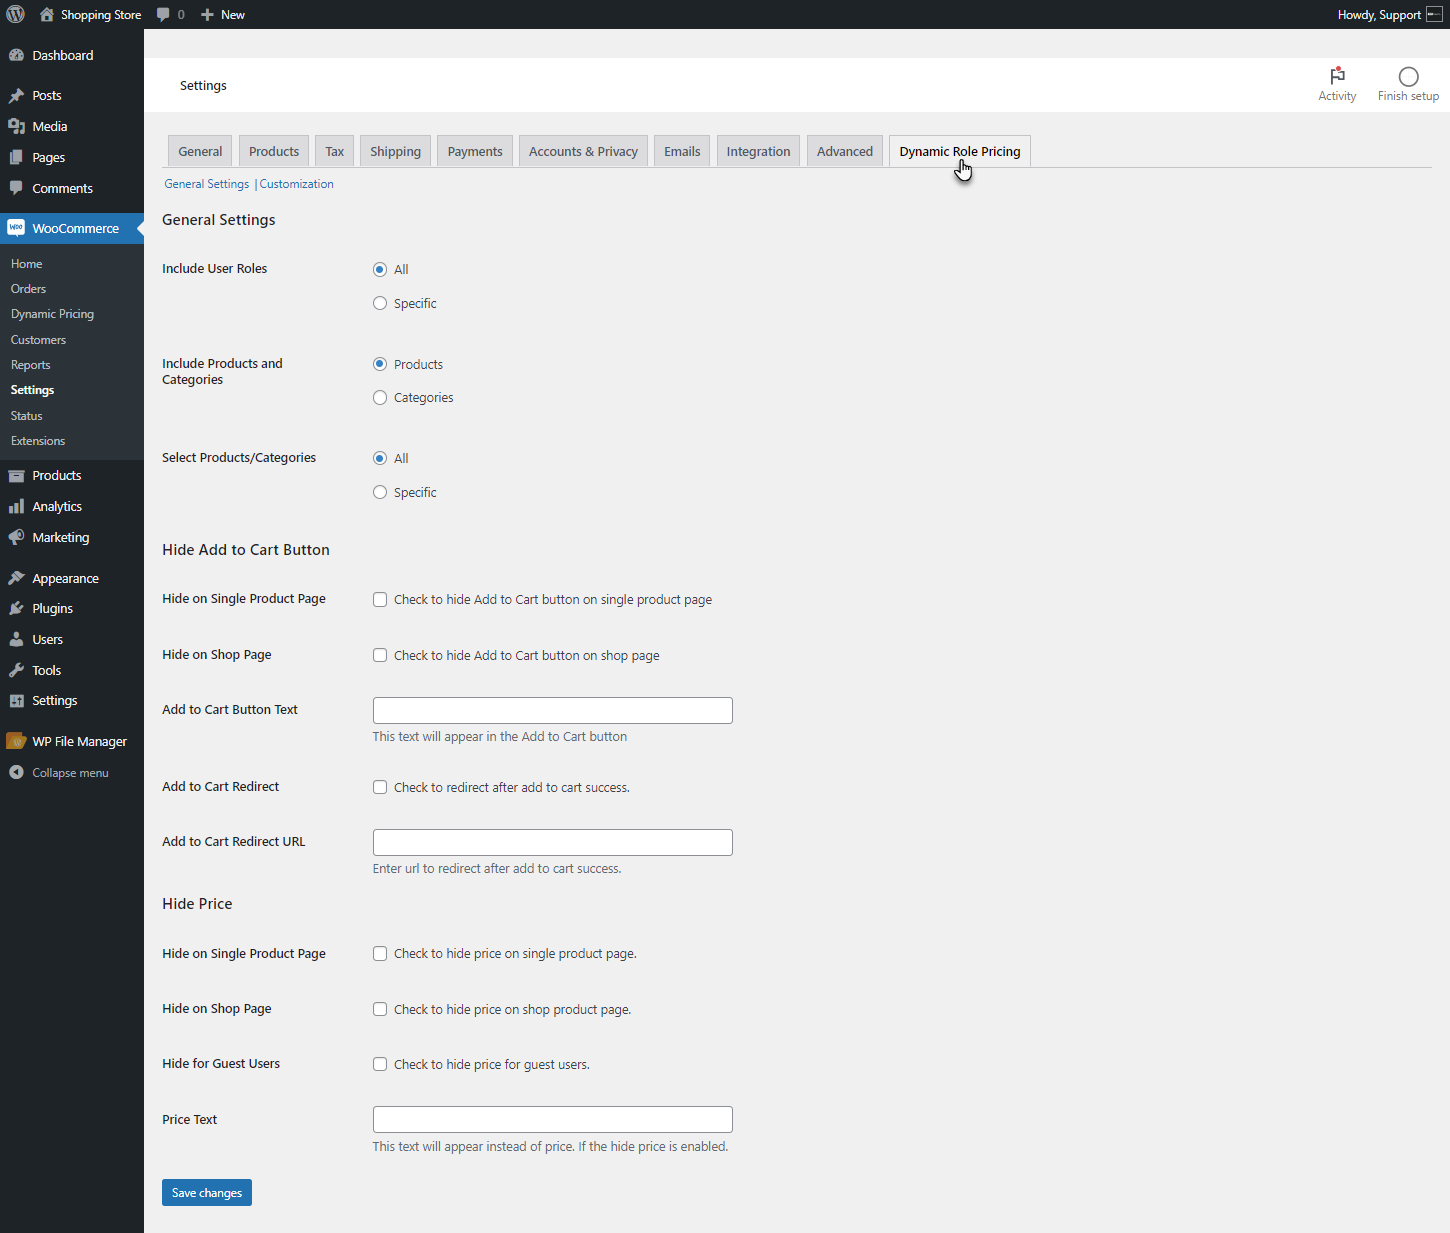
- There will be two tabs to configure.
- Customization
- General Settings
General Settings
↑ Back to topGeneral Configuration
↑ Back to top- The General Settings of Dynamic Role-Based Pricing are as follows.
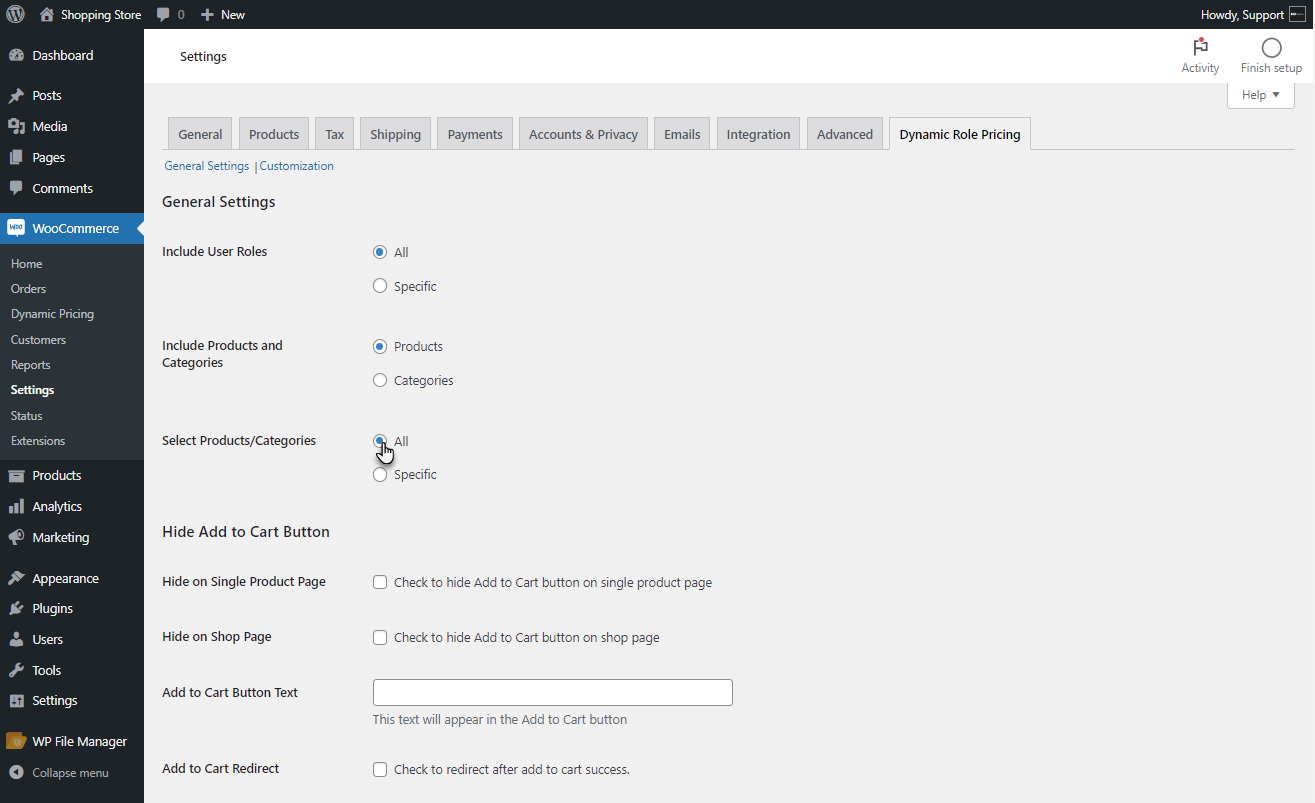
Include User Roles
- This option allows the admin to define and manage access permissions based on different user roles. The admin can specify user roles that can configure the access controls.
- Select the All radio button, this will include all the user roles.

- Select the Specific radio button, which will only include the selected user roles. Selecting this option will bring up the Select Roles field.

- Select the specific role in the Select Roles field.
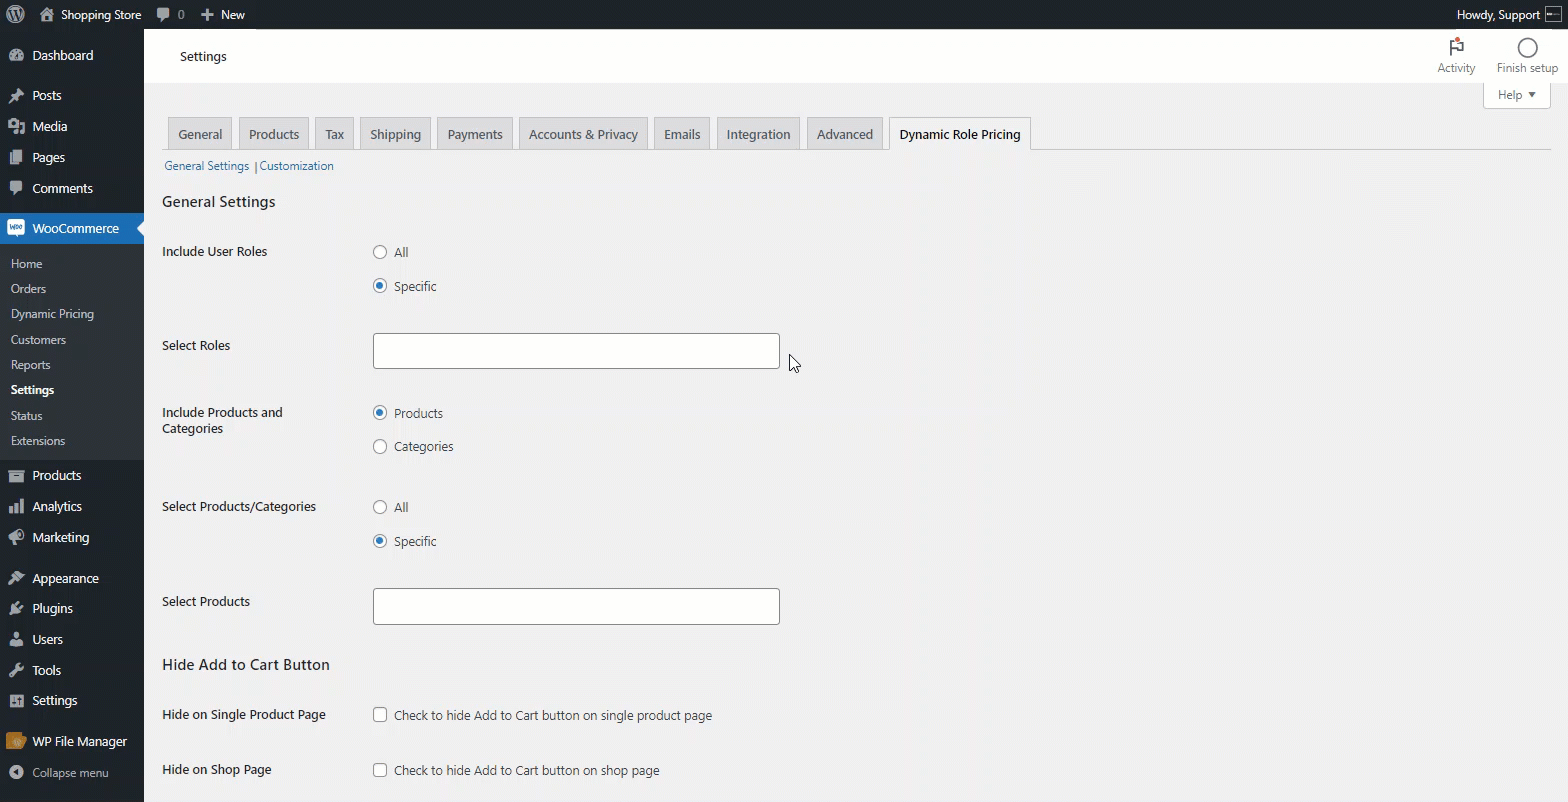
Include Products and Categories
- This option allows the Admin to manage the access and visibility of products and categories.
- Select the Products radio button, and all the general settings will be applied to the products only.

- Select the Categories radio button, and all the general settings will be applied to the categories only.

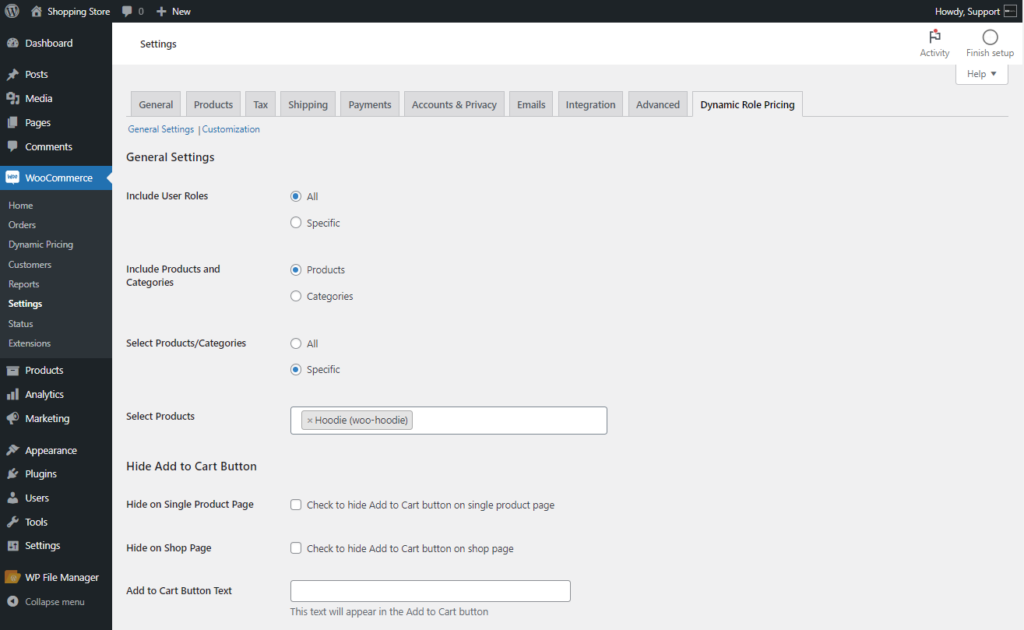
Select Product/Categories
- This option allows the admin to select All Products/Categories or Specific Products/Categories on which general settings will be applicable.
- Select the All radio button, and which will add all the products/categories.
- Select the Specific radio button, and this will add only the selected Products/categories. Selecting this option will bring up the Select Product/Categories field.
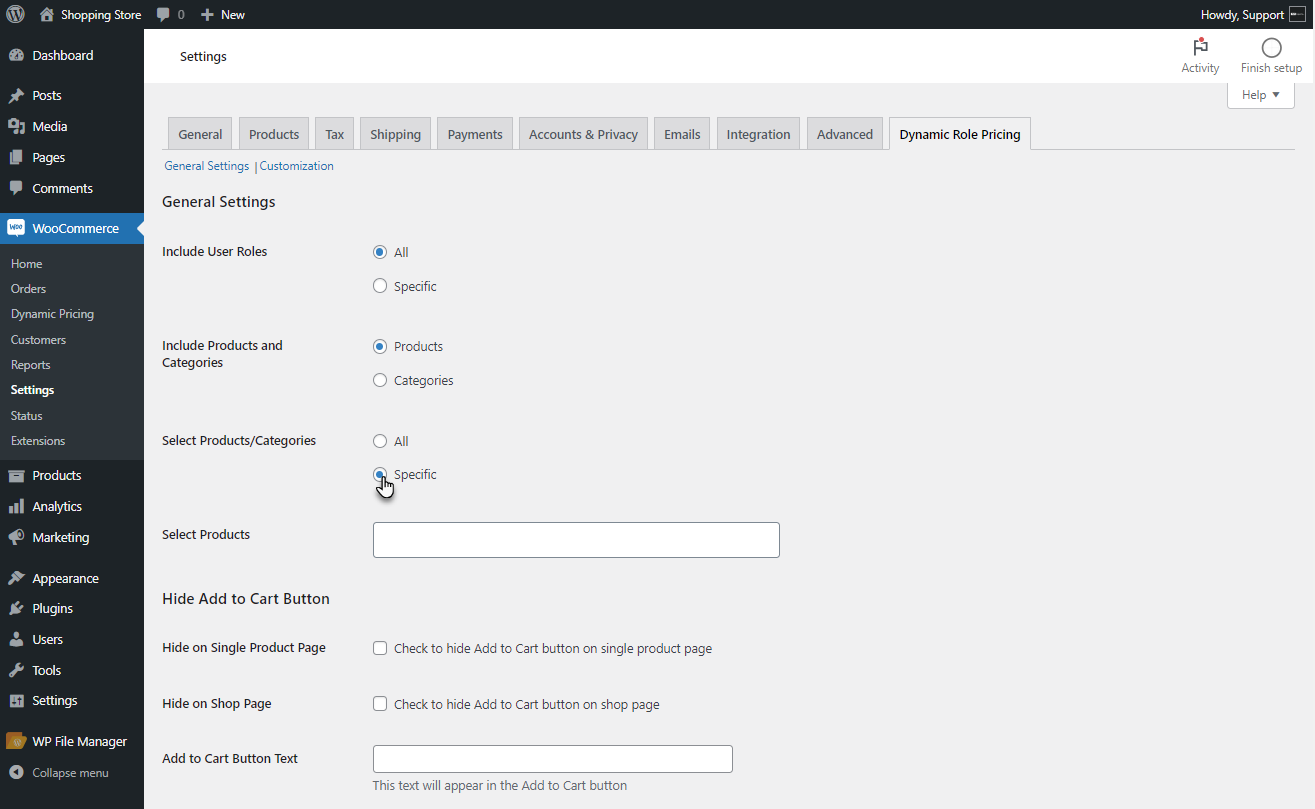
- Select the specific Product/Categories in the Select Product/Categories field.
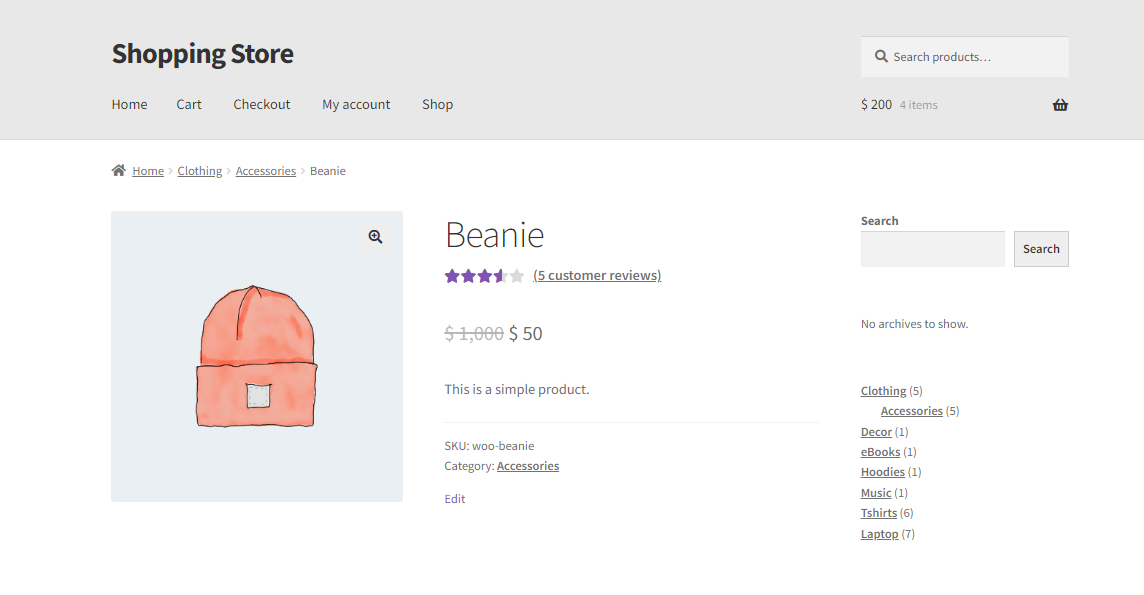
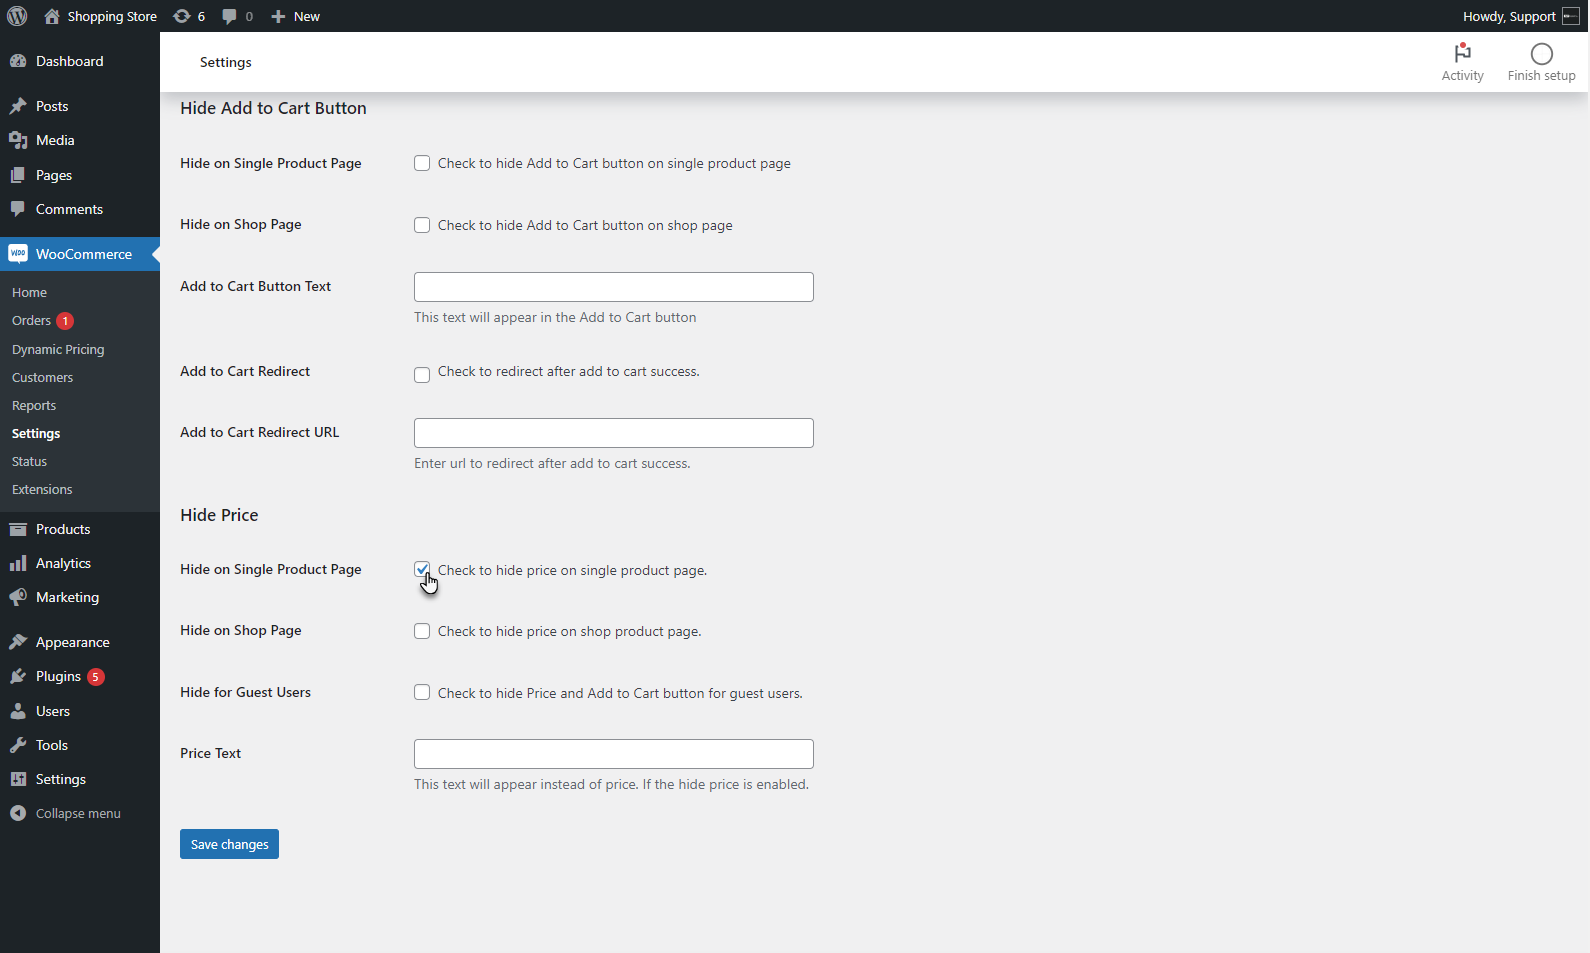
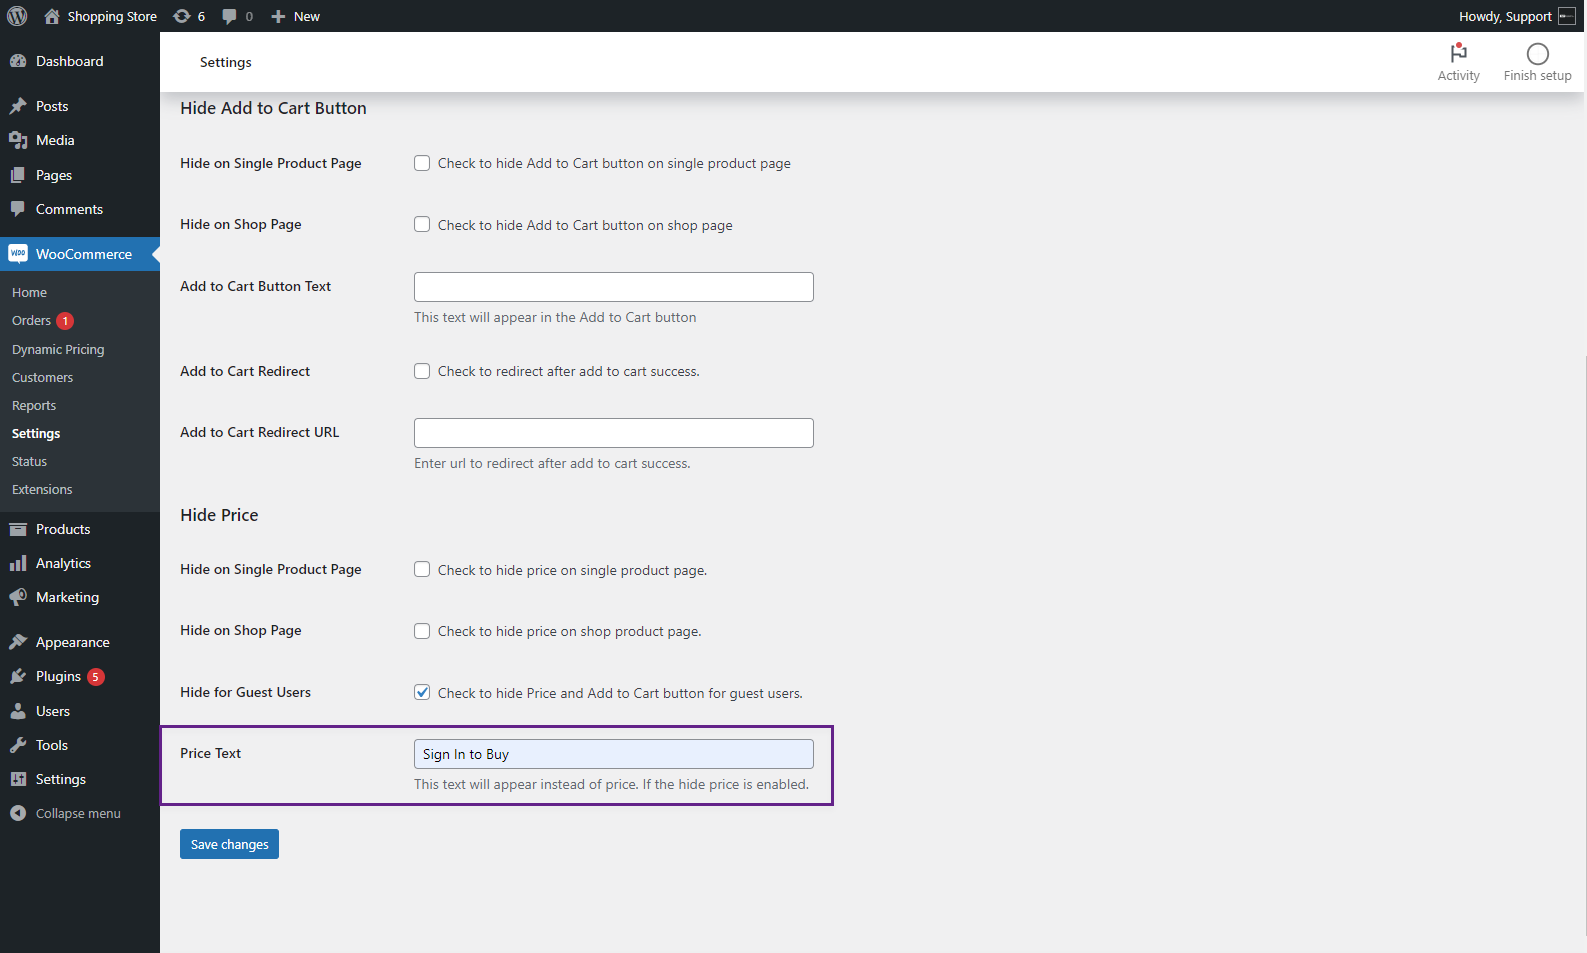
Hide Add to Cart Button
↑ Back to top- Once done with the general configuration, move to the Hide Add to Cart Button section.
Hide on the Single Product Page
- This option will hide the Add to Cart Button on the single product page.

Front End Impact
- Login to your account.
- Go to the Single Product Page.
- The Add to Cart button will be hidden.
Before
After
Hide on the Shop Page
- This option will hide the Add to Cart button on the Shop page.

Front End Impact
- Login to your account.
- Go to the Shop Page.
- The Add to Cart button will be hidden.
Before

After
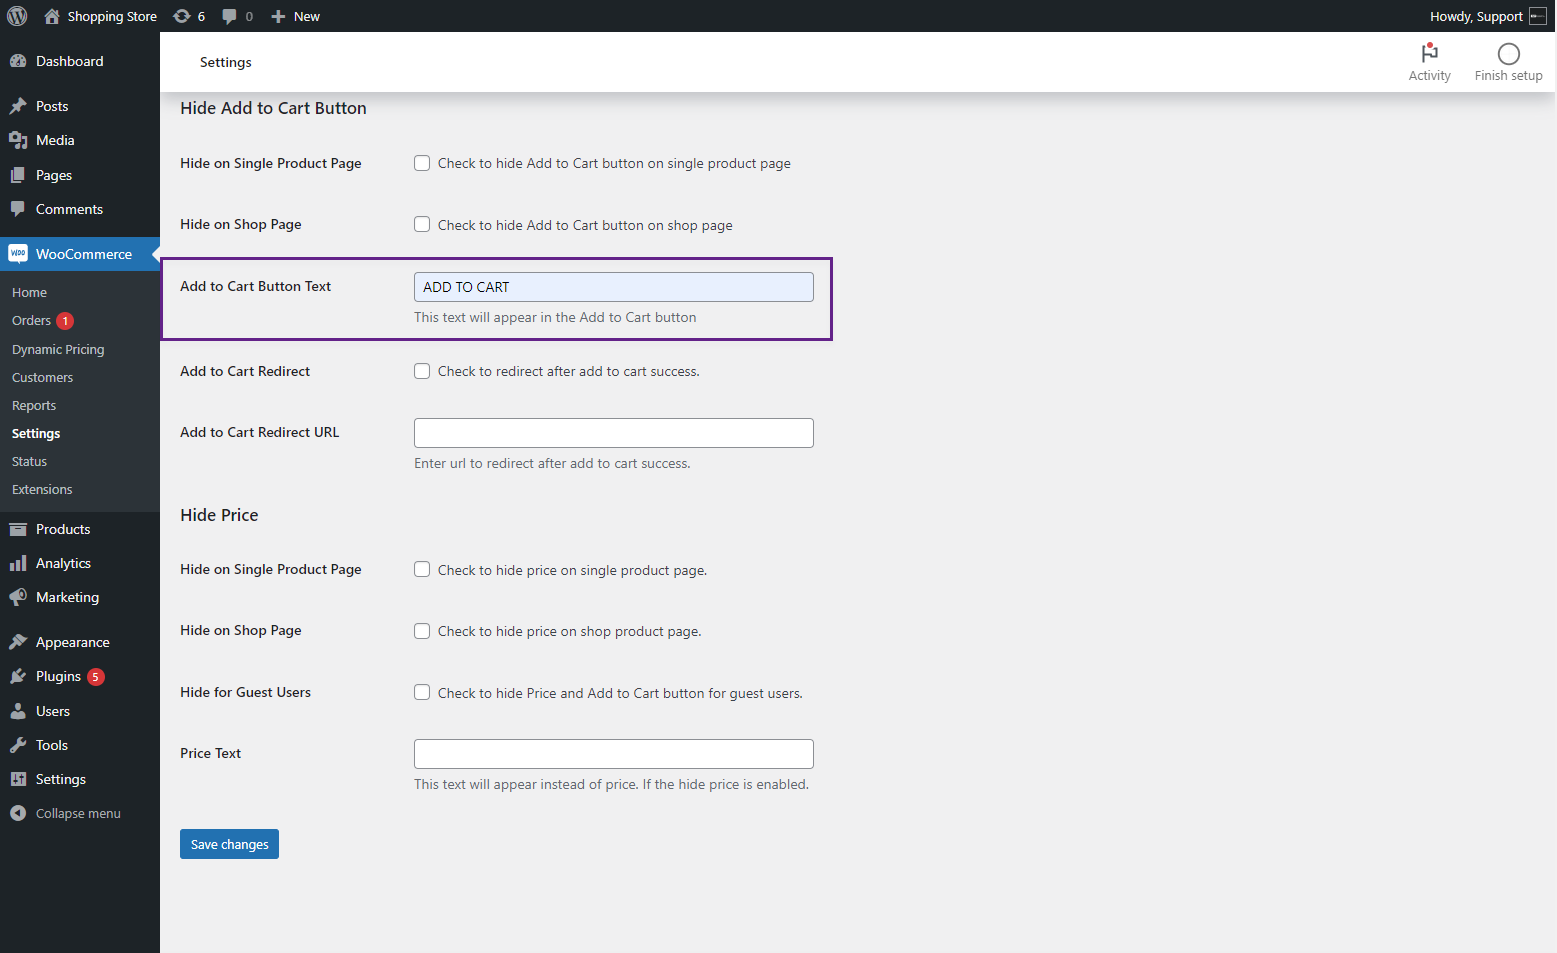
Add to cart Button text
- This option allows the admin to change the text of the Add to Cart button.
Front End Impact
- Login to your account.
- Go to the Shop Page.
- The Add to Cart button text will be updated.
Before
After

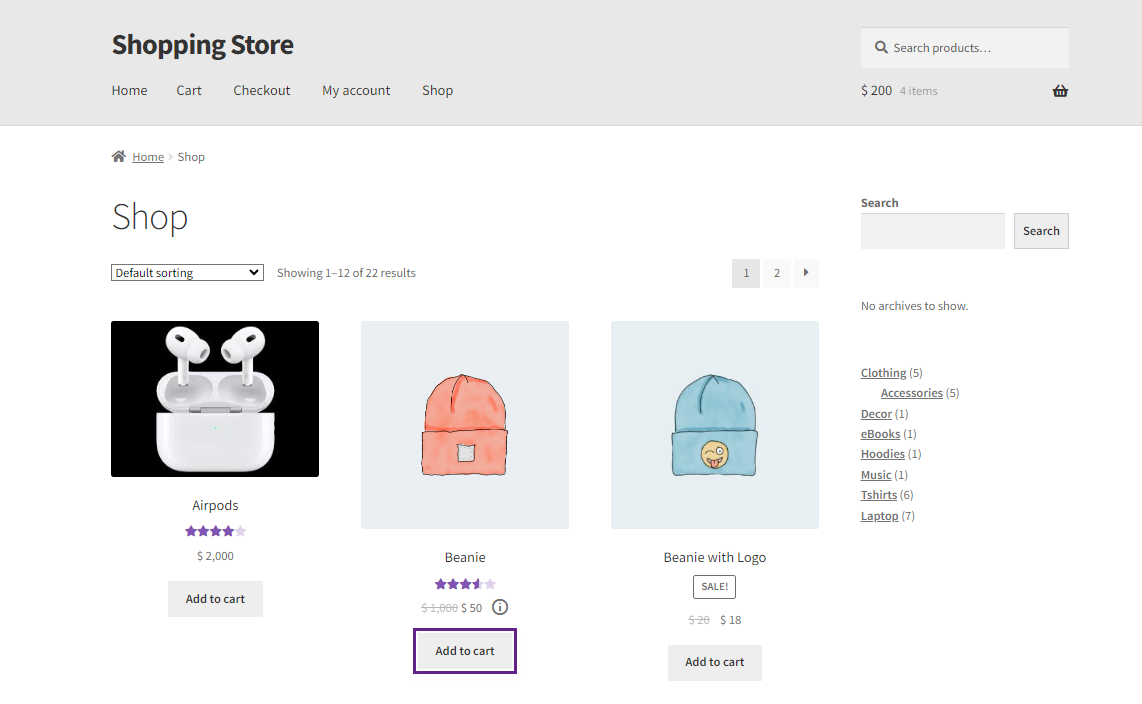
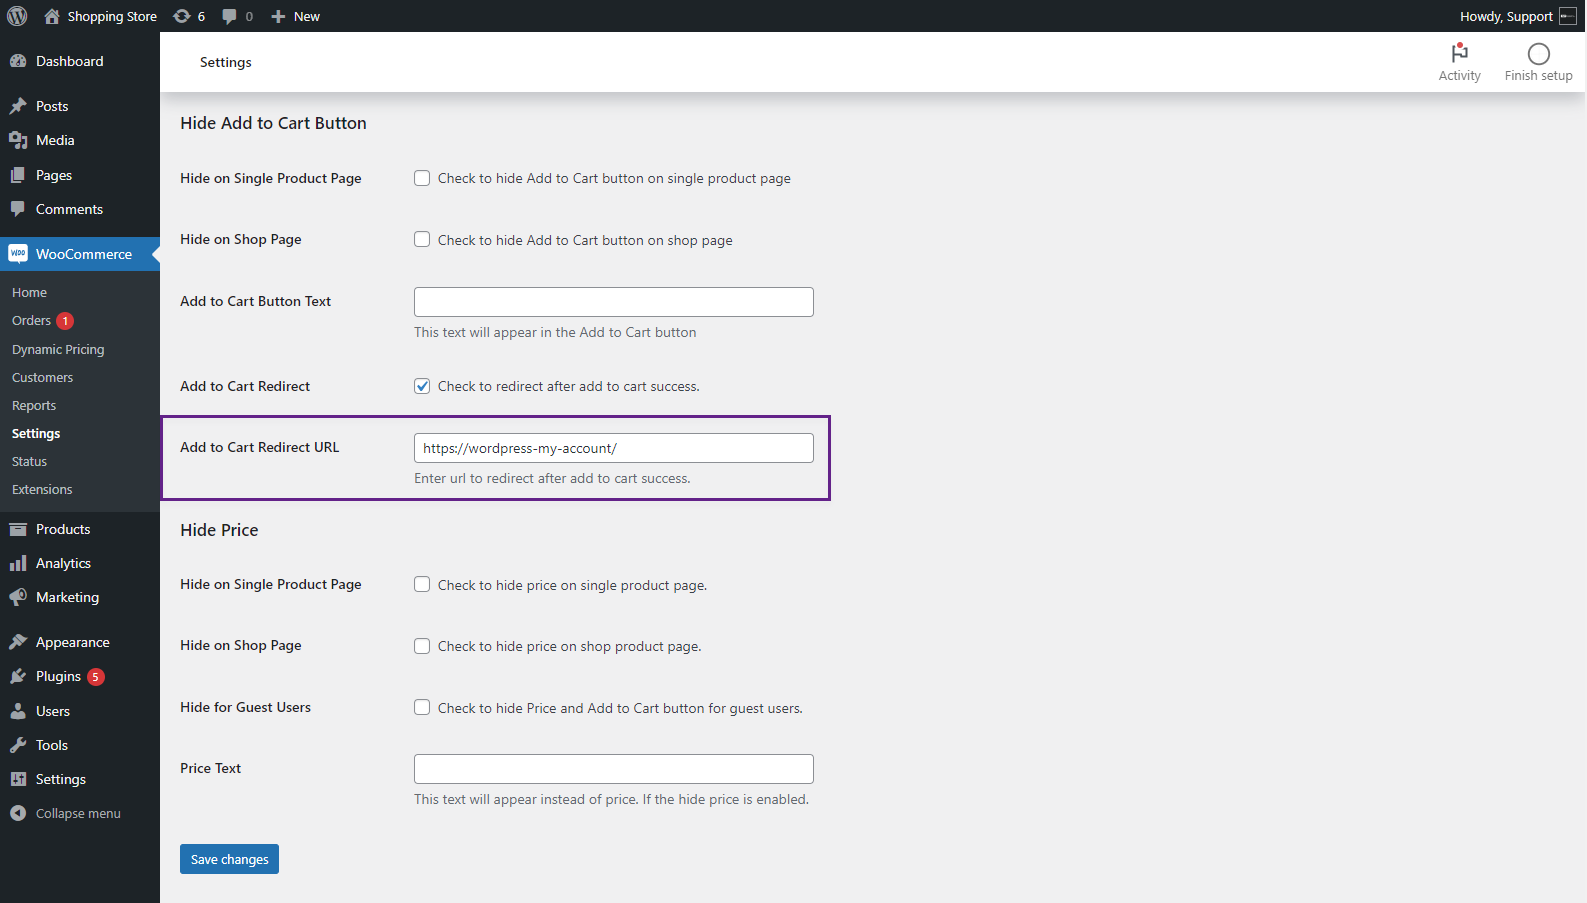
Add to Cart Redirect
- This option allows the admin to redirect the user to a specific URL after the Add to Cart success.

Add to Cart Redirect URL
- Enter a URL to which the user will be redirected after the Add to Cart success.
Front End Impact
- Login to your account.
- Go to the Single Product Page Page.
- Click on the Add to Cart Button. This will direct the user to the given URL.
Hide Price
↑ Back to top- Move to the Hide Price section.
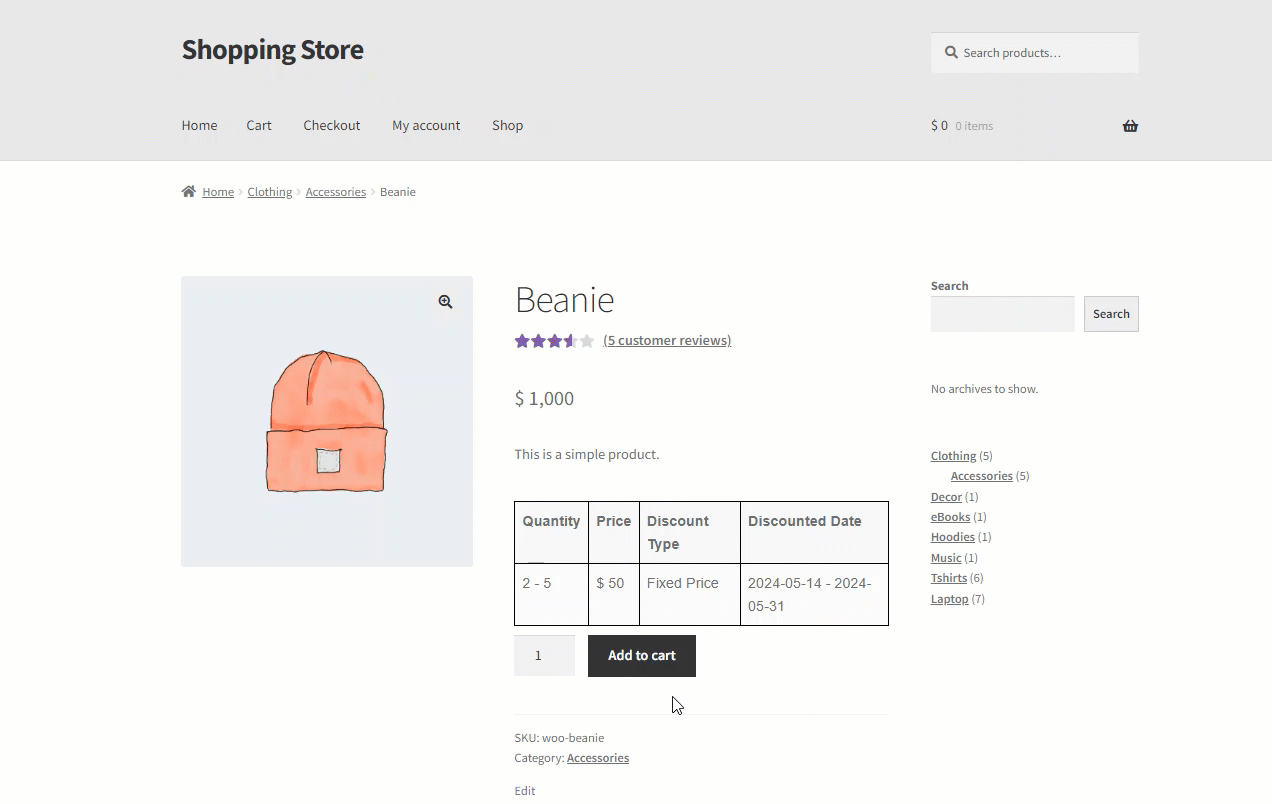
Hide Price on Single Page
- This option will hide the Product Price on the single product page.
Front End Impact
- Login to your account.
- Go to the Single Product Page.
- The Price of the product will be hidden.
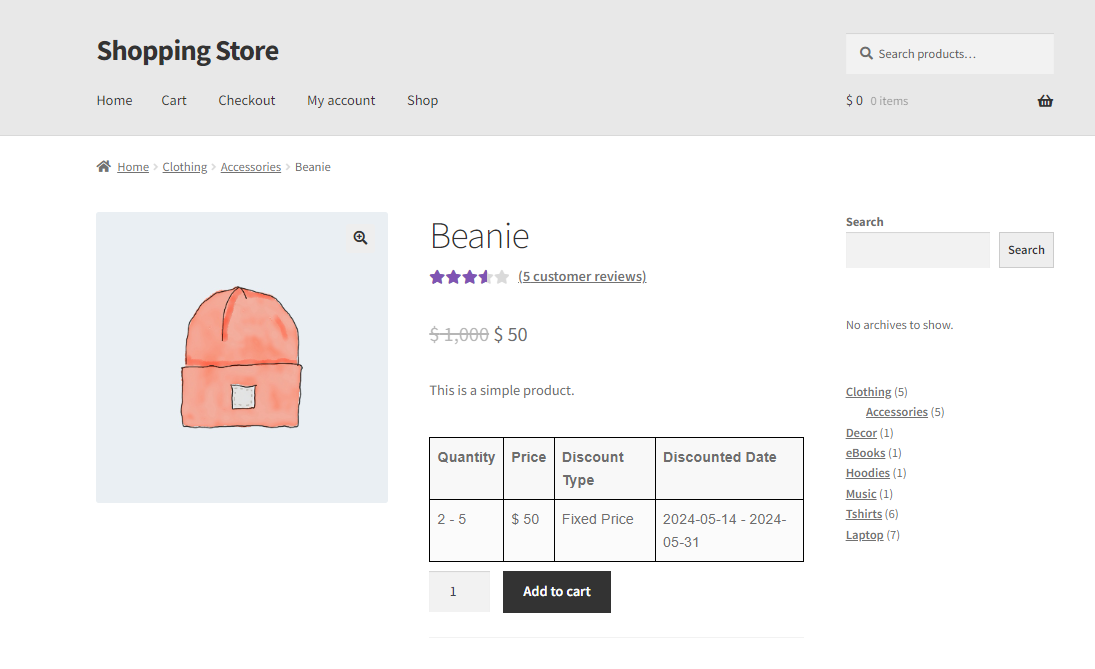
Before
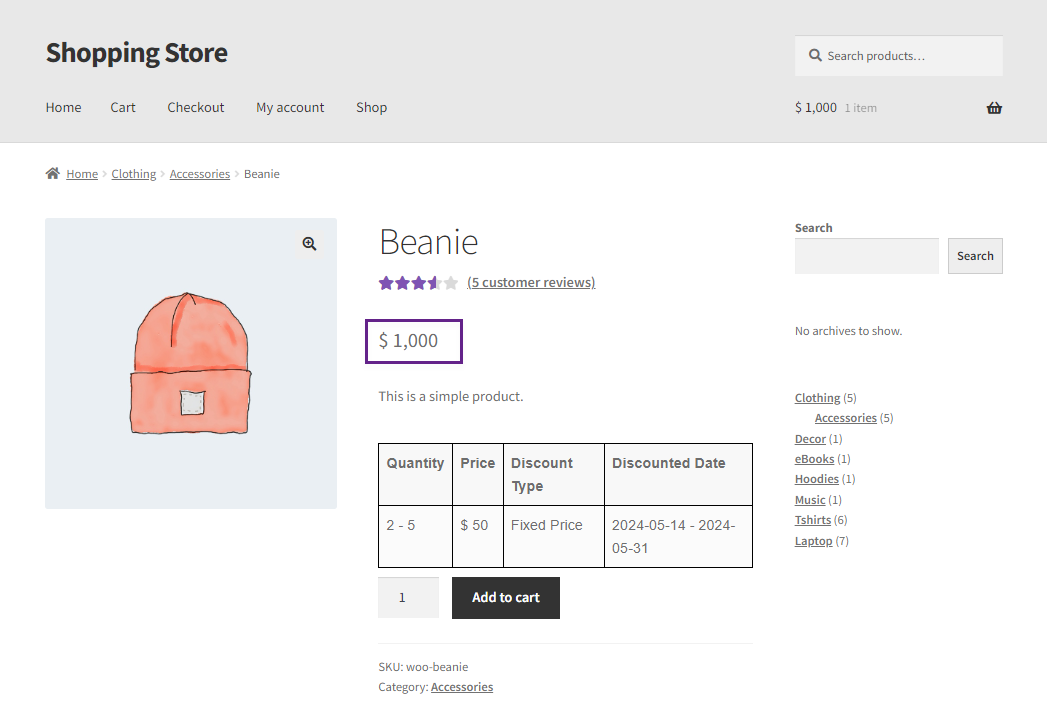
After
Hide on the Shop Page
- This option will hide the Product Price on the Shop page.

Front End Impact
- Login to your account.
- Go to the Shop Page.
- The Price of the product will be hidden.
Before
After

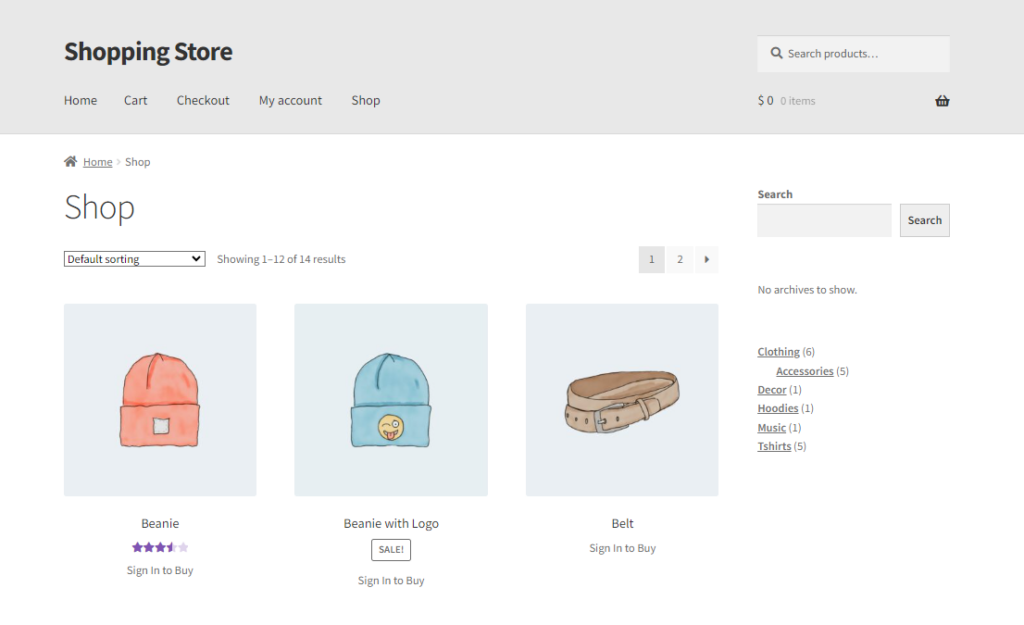
Hide for Guests Users
- This option will hide the Product Price and Add to Cart button from the Guest users.

Front End Impact
- The Product Price and Add to Cart button will be hidden for Guest users.
Price Text
- This option allows the admin to display text when the Hide price option is enabled.
- Click on Save Changes to save your settings.
Front End Impact
- The Price will be hidden for Guest users, and text will appear instead of the price.
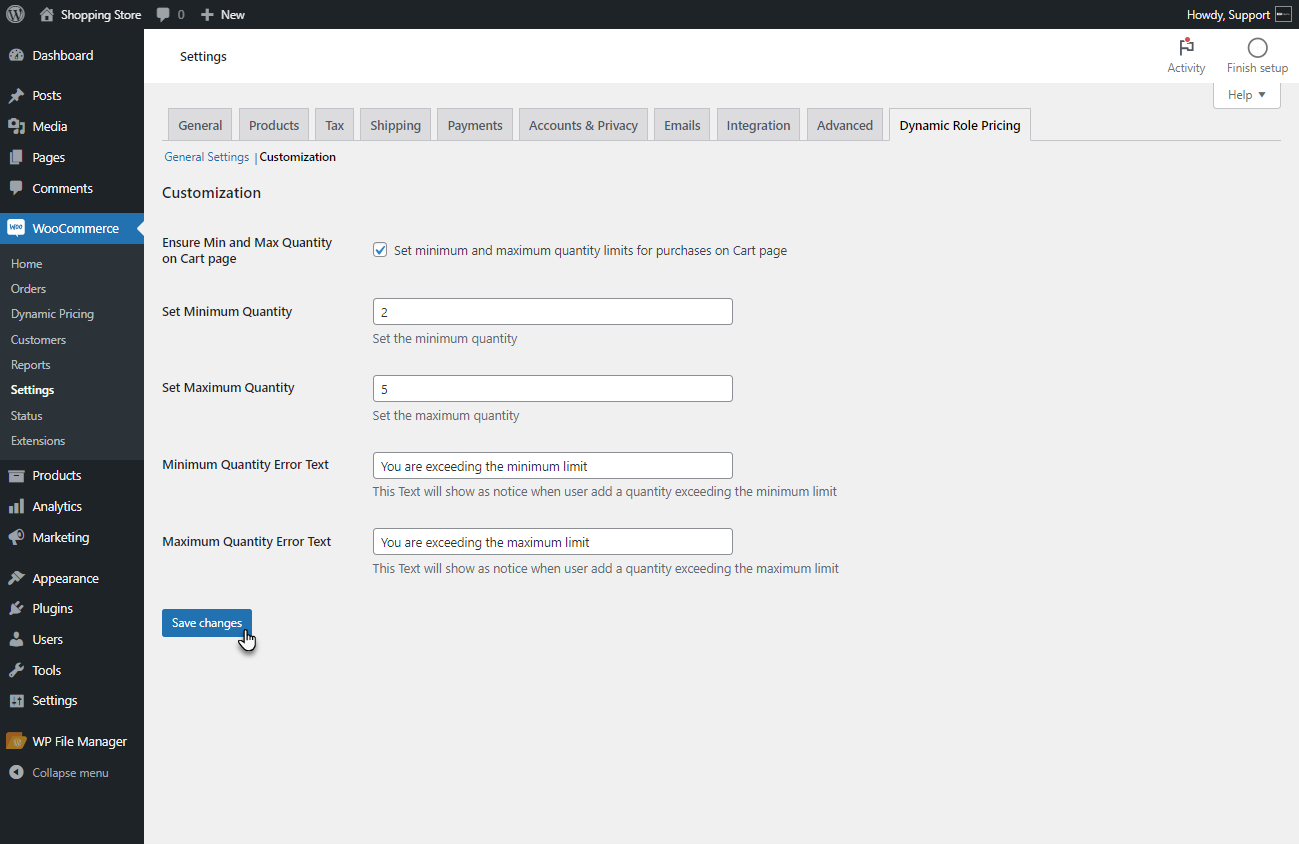
Customization
↑ Back to top- Switch to the Customization tab in the Dynamic Role Based Pricing General settings.
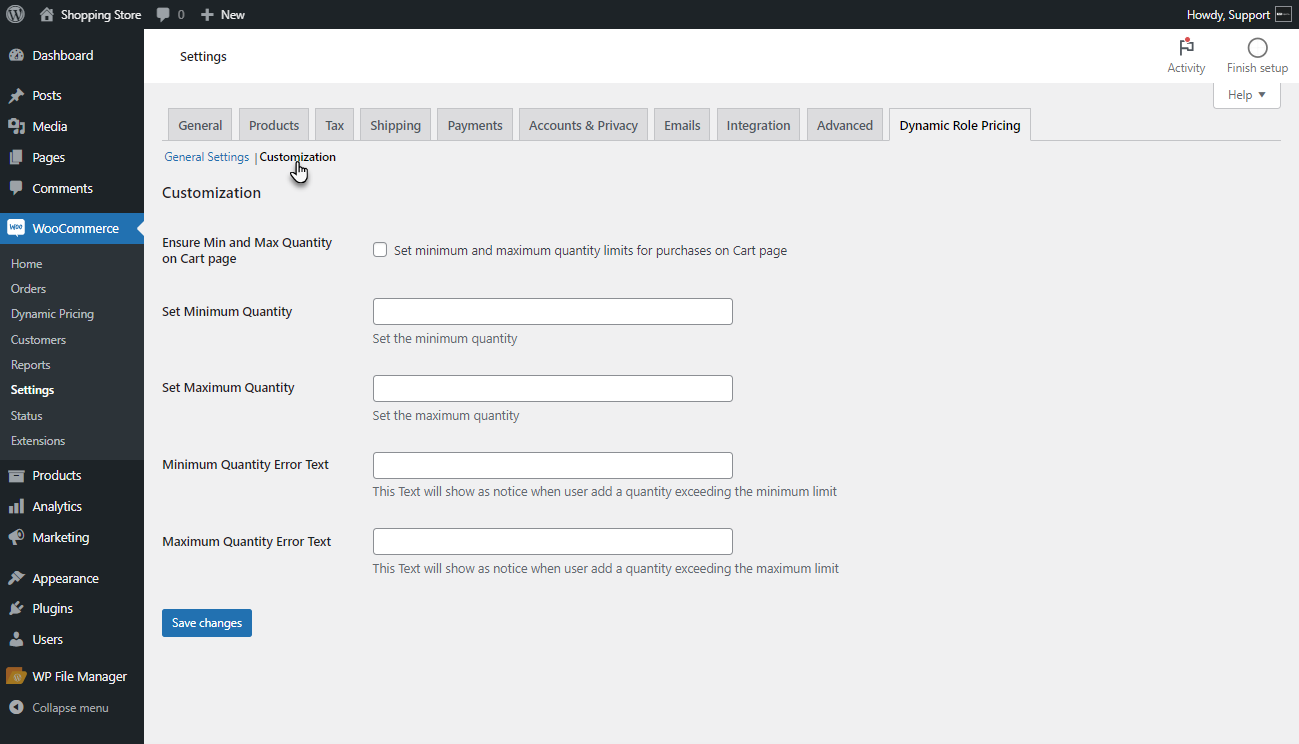
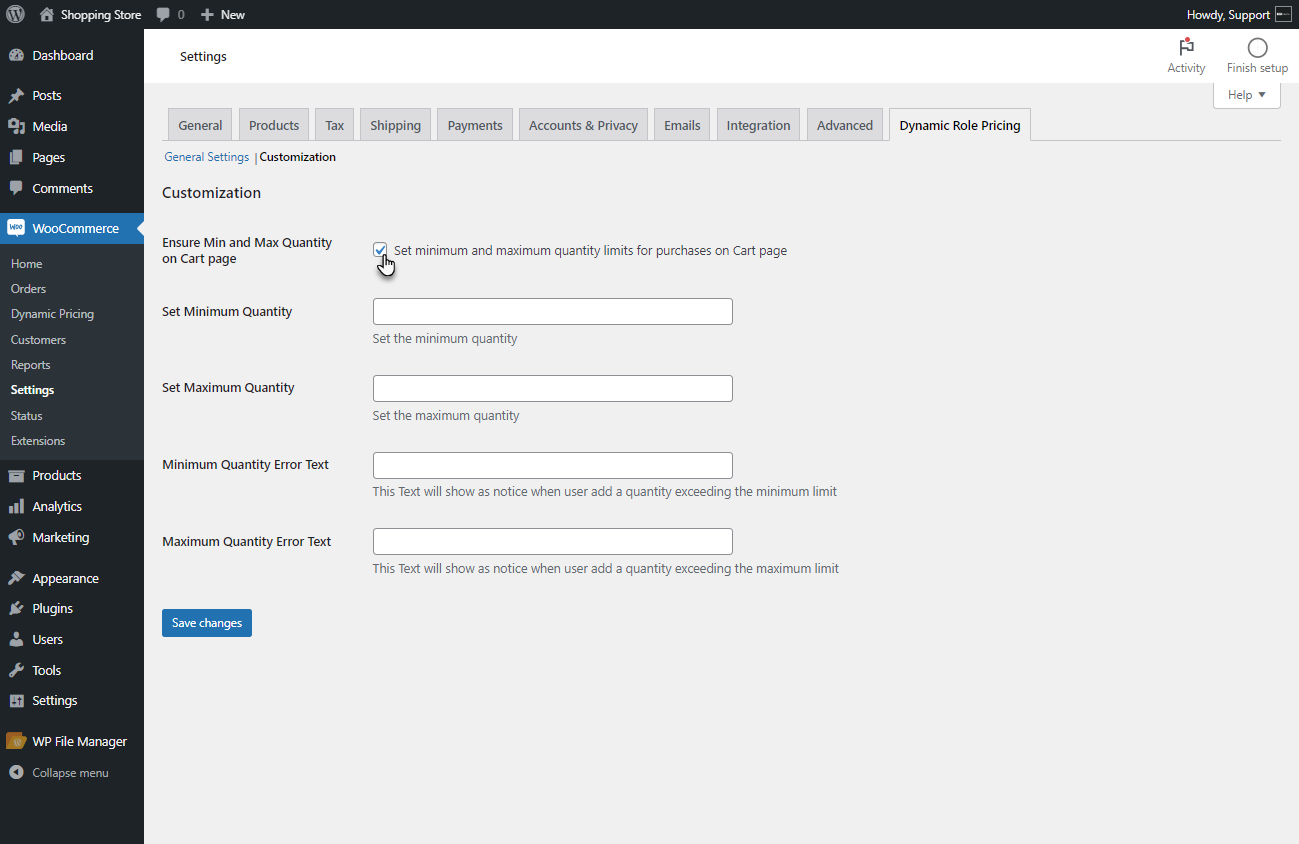
Ensure Minimum and Maximum Quantity on the Cart Page
↑ Back to top- This option allows the Admin to enable or disable the enforcement of minimum and maximum quantity limits.
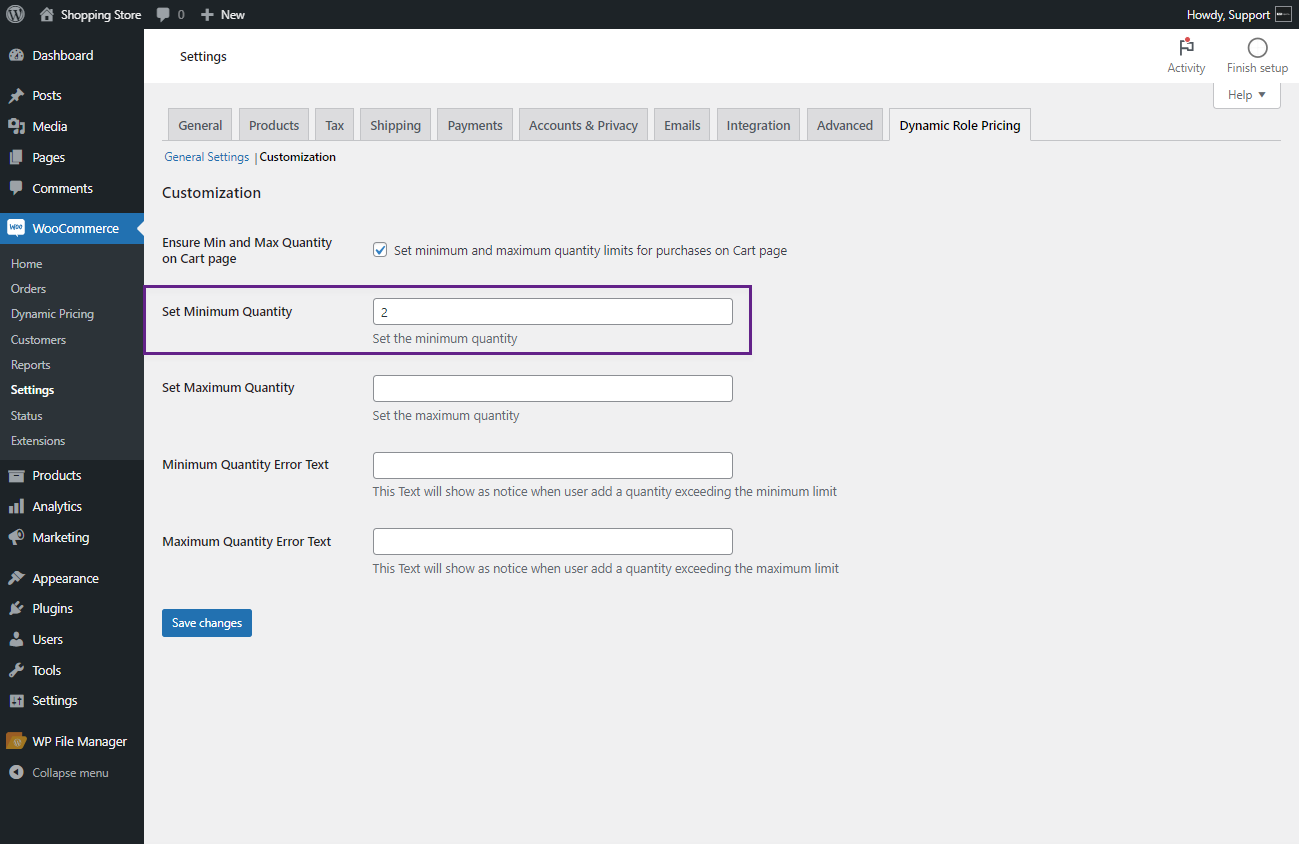
Set Minimum Quantity
↑ Back to top- Enter the minimum quantity of product to be met in the cart.
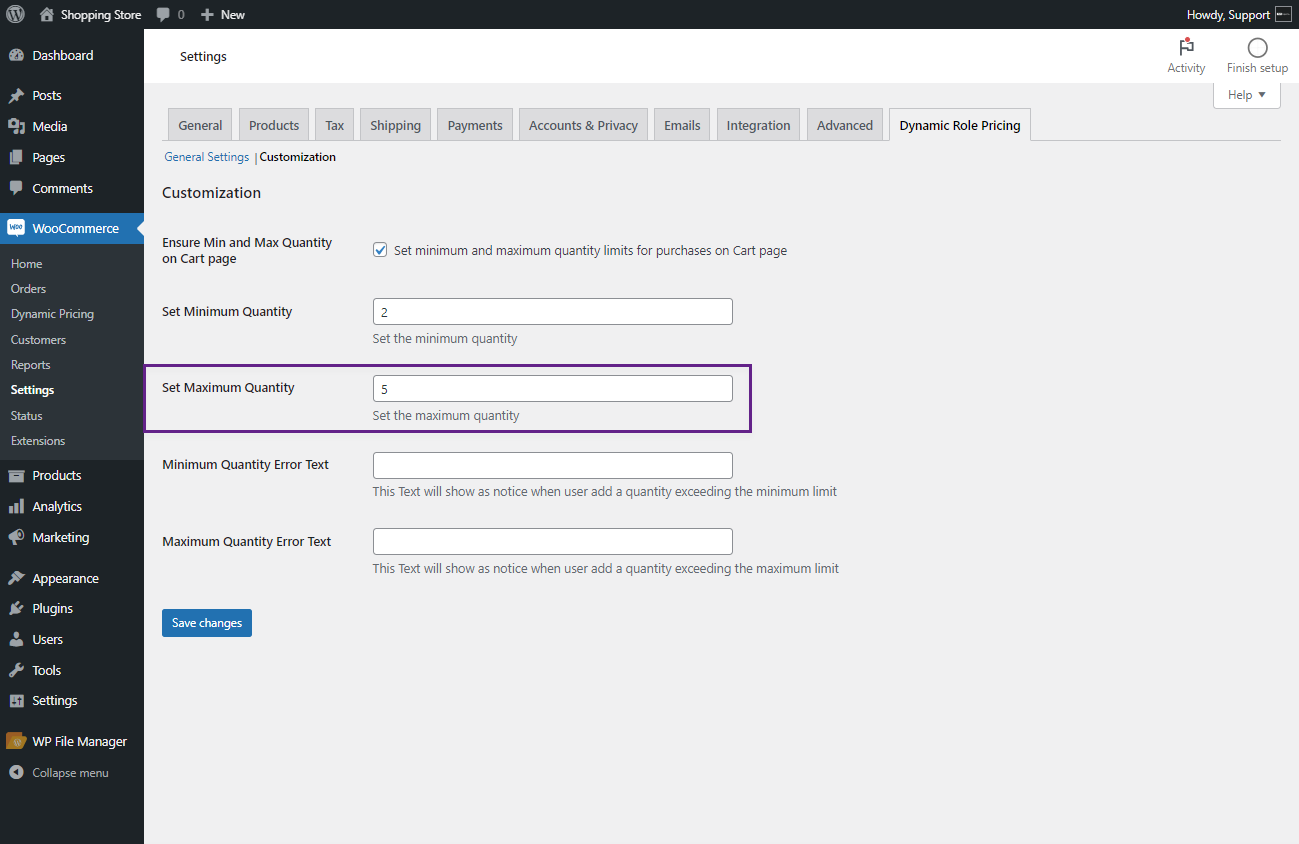
Set Maximum Quantity
↑ Back to top- Enter the maximum quantity of product to be met in the cart.
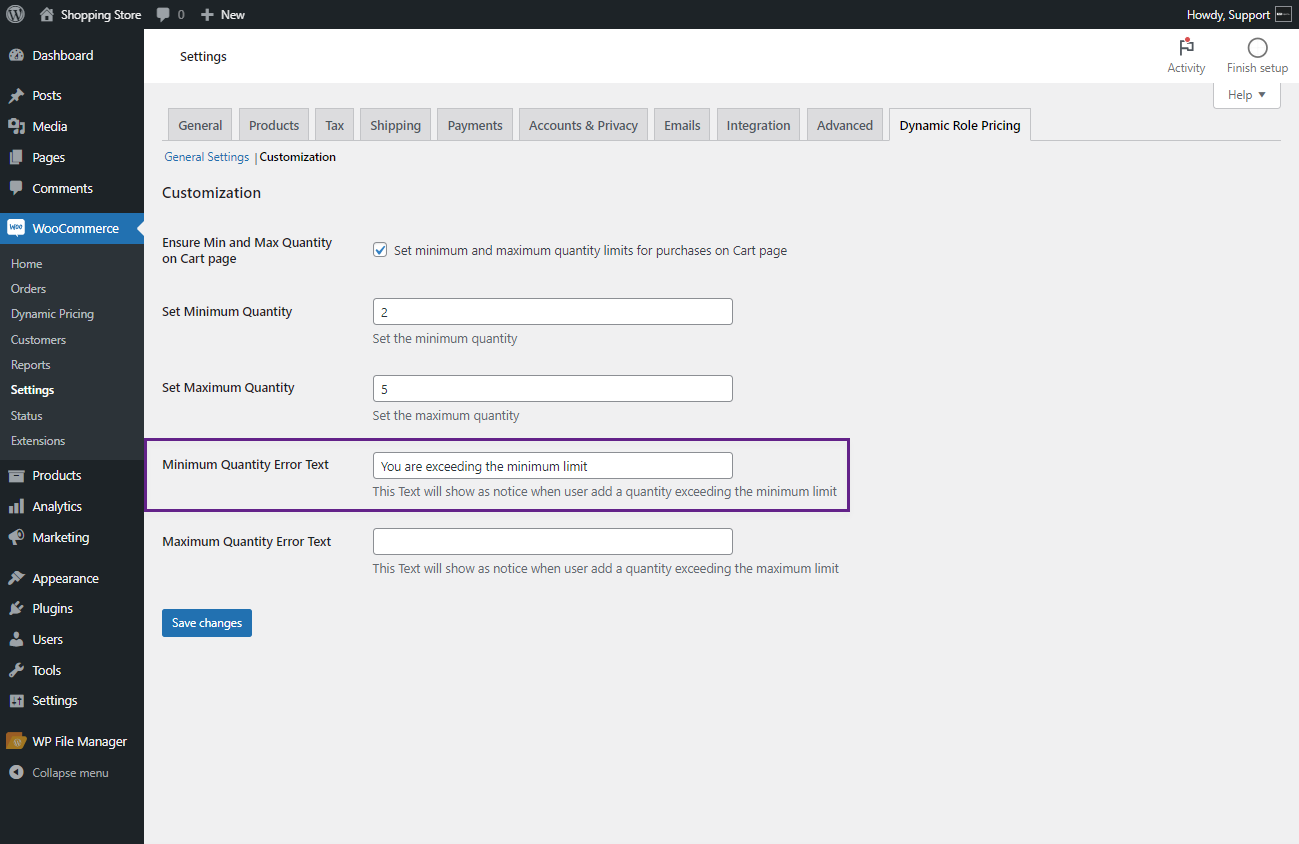
Minimum Quantity Error Text
↑ Back to top- This Text will show a notice when the user adds a quantity exceeding the minimum limit.
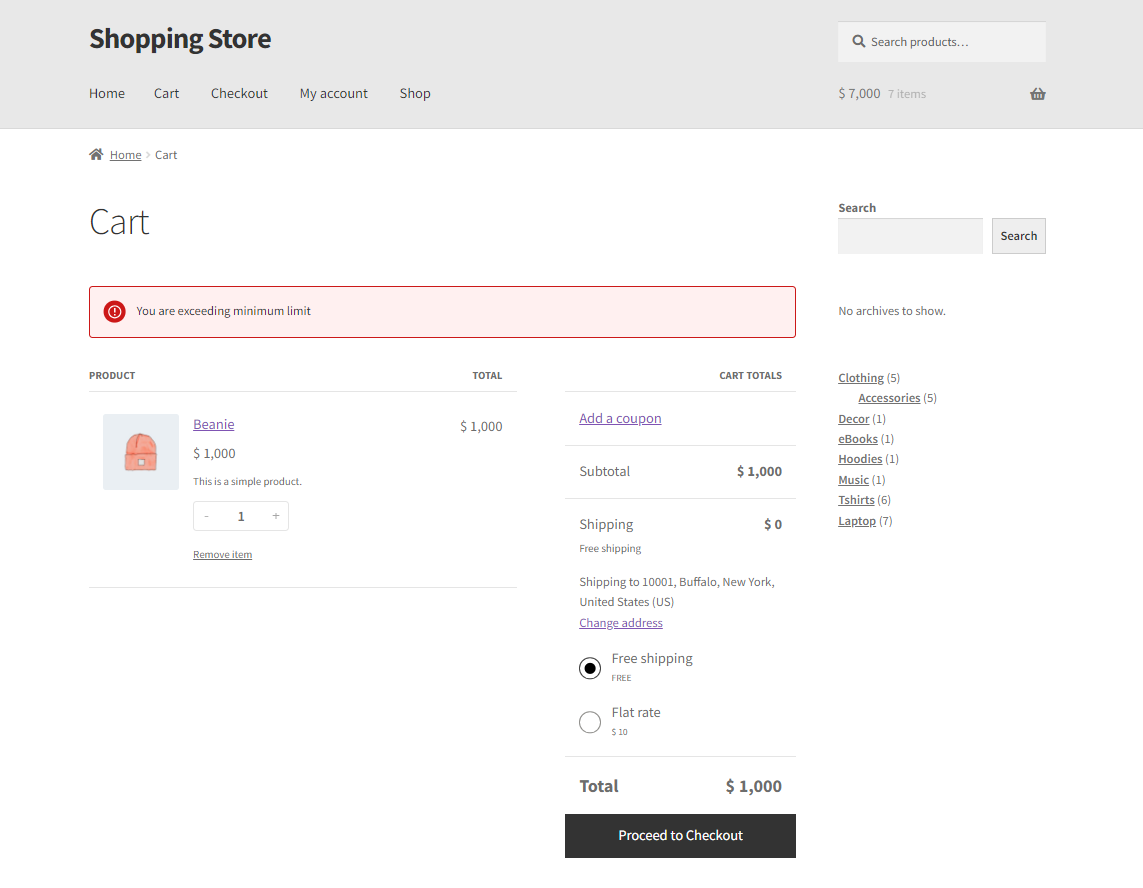
Front End Impact
- Go to the shop page. Add an item to the cart.
- Go to the cart page.
- Exceed the defined limit of minimum quantity. A warning will appear for the user.
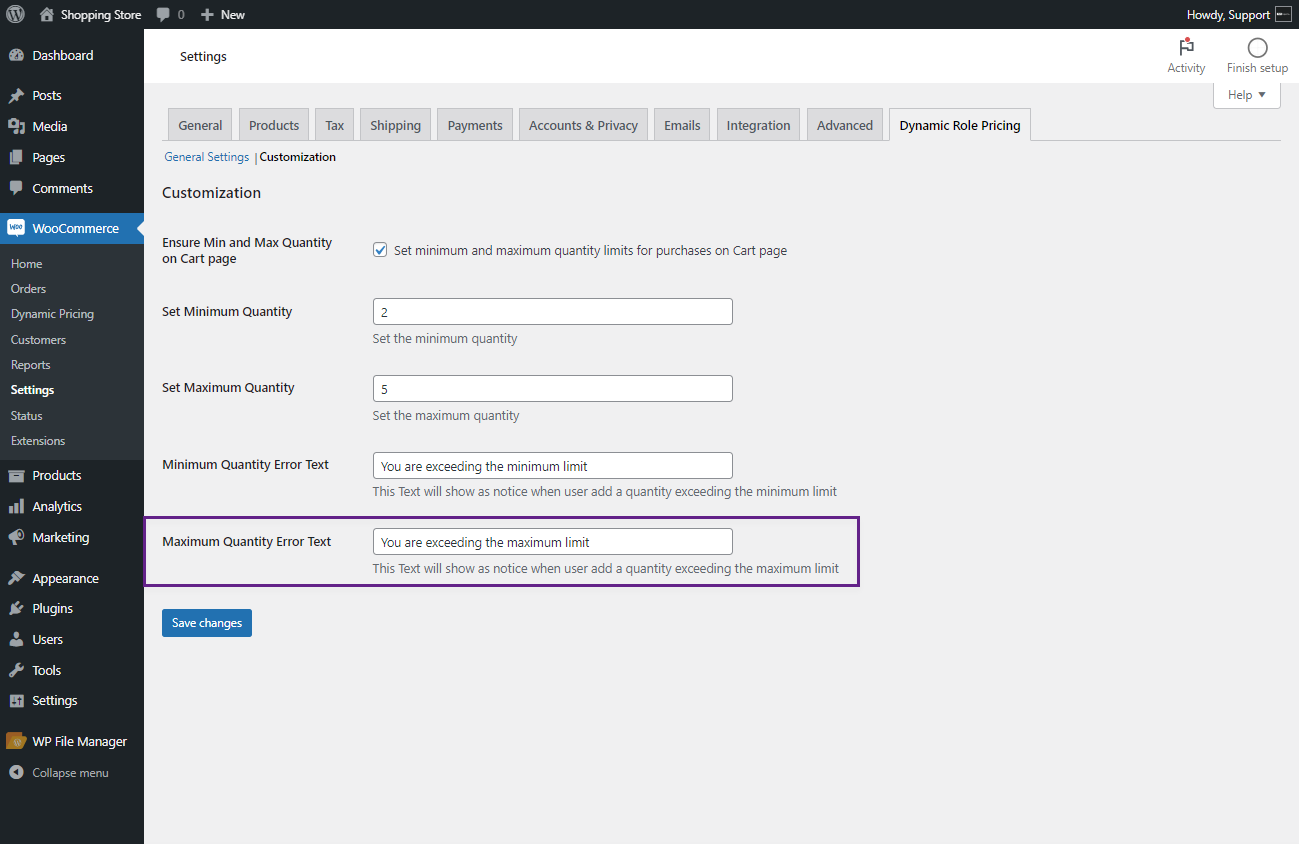
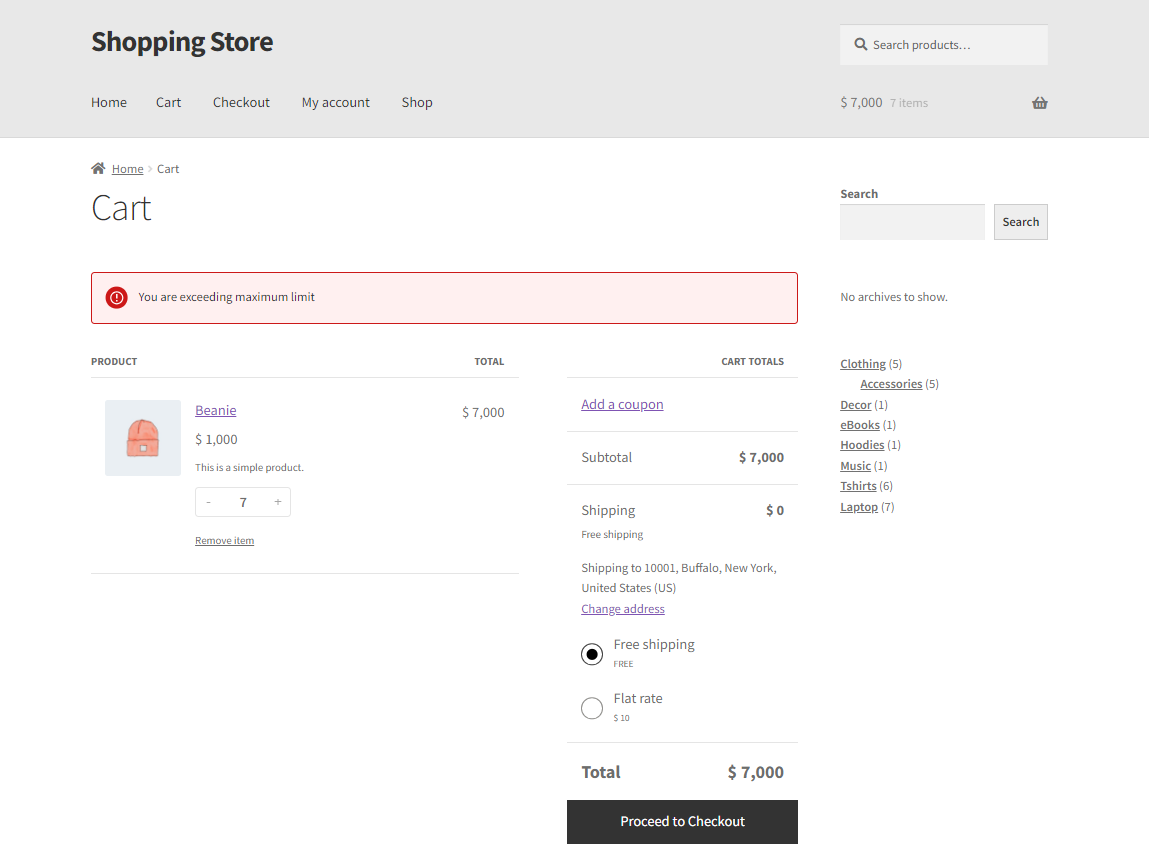
Maximum Quantity Error Text
↑ Back to top- This Text will show notice when the user adds a quantity exceeding the maximum limit.
- Click on the Save Changes button to save your settings.
Front End Impact
- Go to the shop page. Add an item to the cart.
- Go to the cart page.
- Exceed the defined limit of maximum quantity. A warning will appear for the user.
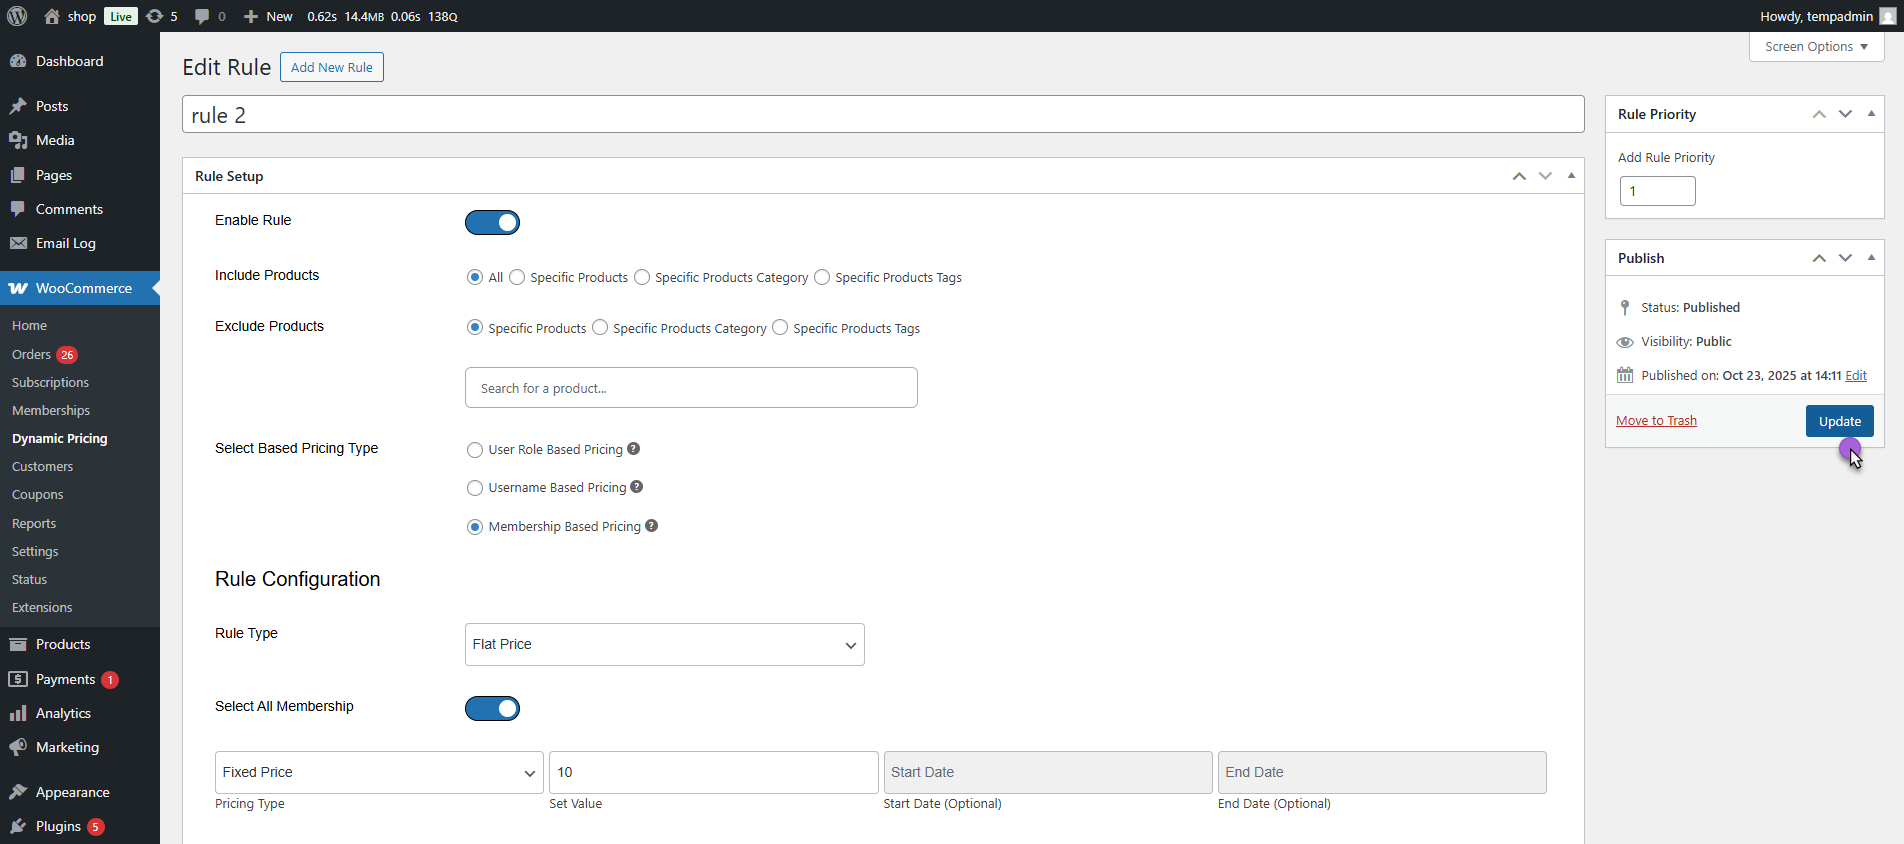
Compatibility with Woo Membership (by SkyVerge)
↑ Back to topDynamic Pricing is now compatible with the Woo Membership plugin by SkyVerge.This allows you to apply pricing rules based on membership plans, so only users with specific membership plans can avail of the pricing rule (Dynamic or Flat).
- Make sure the Woo Membership plugin is installed and activated.
- Navigate to: WooCommerce > Dynamic Pricing > Add/Edit Rule

- Under Select Based Pricing Type, choose Memberships Based Pricing.
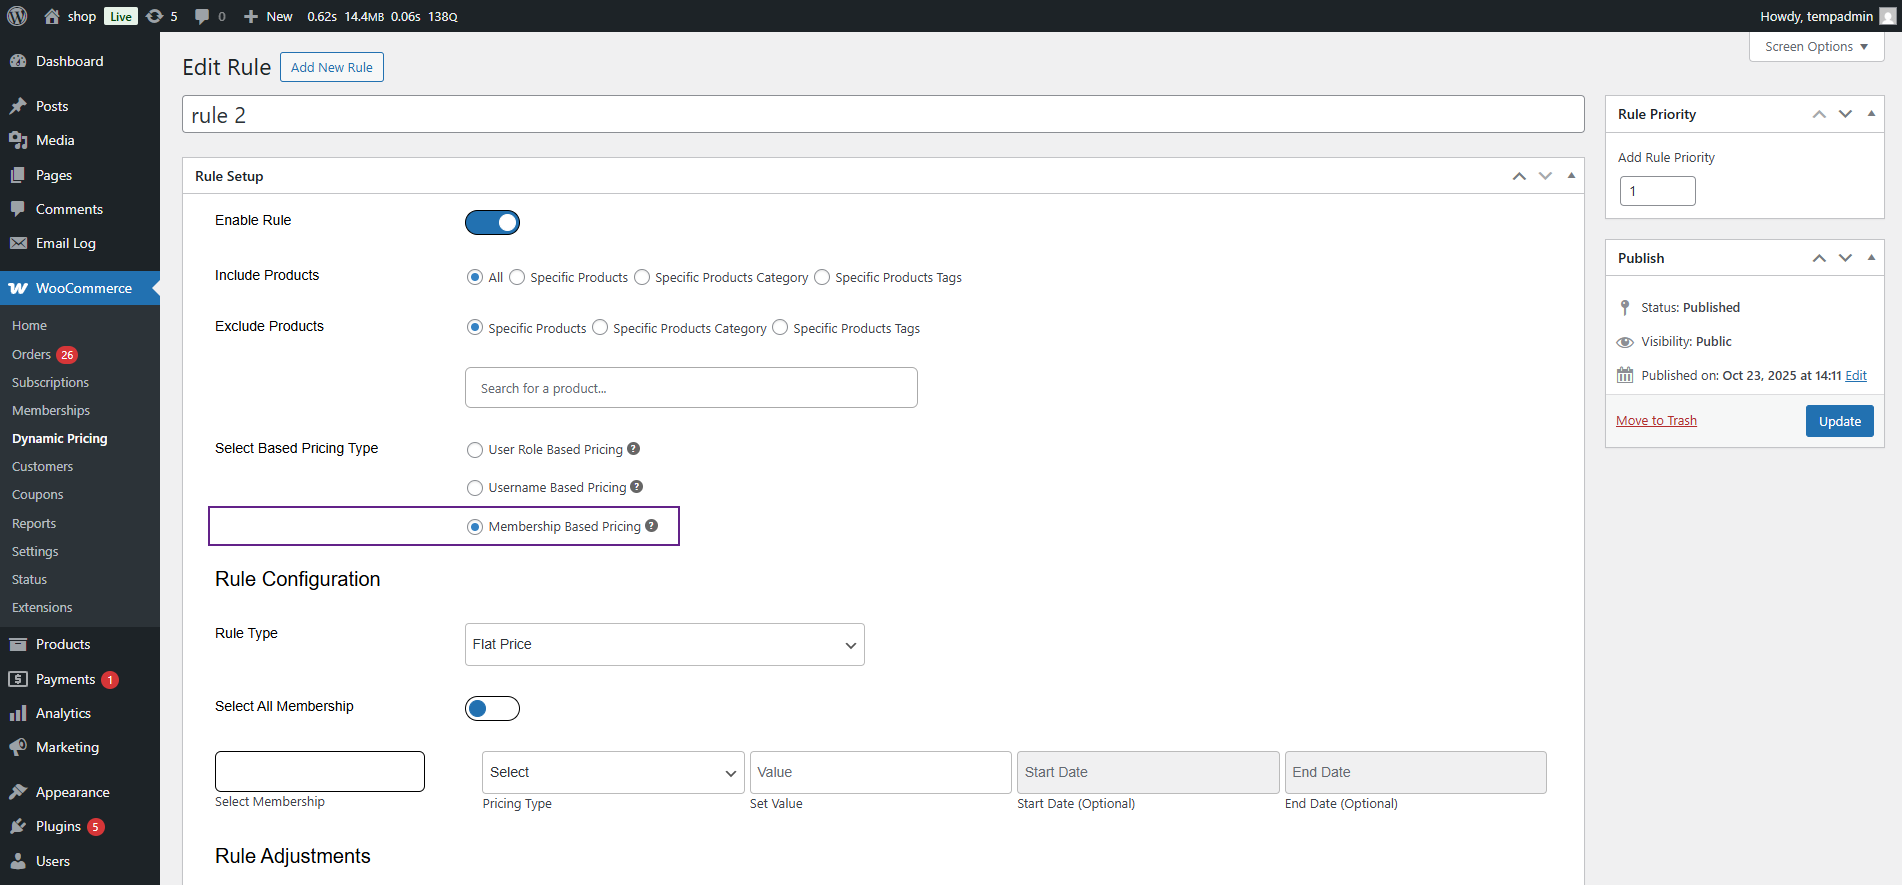
- A Select Memberships field will appear, allowing you to choose the desired membership plans.
- You’ll also see a Select All Memberships toggle — enable it to apply the rule to all membership plans.
- Publish or update the rule.
Note: If anything is unclear or you need more help with group configuration, please visit the official plugin documentation: Woo Membership Plugin Documentation