Google introduced Consent Mode in March 2024 to comply with privacy laws in the EEA/UK region. This means website visitors from these regions must now explicitly grant consent for cookies before any analytics tracking occurs.
Without consent, Google Analytics (GA4) and Google Ads won’t capture user data in these locations. The extension does not provide any UI, like a cookie banner, to let your visitors grant consent for tracking. However, it’s integrated with WP Consent API, so you can pick another extension that provides a user interface that meets your needs.
Due to this new requirement, you may notice a discrepancy between your store and Google Analytics/Ads data, as users must grant consent for analytics data to be captured on Google’s platforms.
Google Analytics for WooCommerce connects your store to your Google Analytics account for basic ecommerce and site analytics, providing valuable metrics on your store’s performance.
For advanced Google Analytics features, we recommend Google Analytics Pro for WooCommerce.
Not sure if you need this free extension or the Pro version? Check out our comparison.
Installation
↑ Back to topTo start using a product from WooCommerce.com, you can use the “Add to store” functionality on the order confirmation page or the My subscriptions section in your account.
- Navigate to My subscriptions.
- Find the Add to store button next to the product you’re planning to install.
- Follow the instructions on the screen, and the product will be automatically added to your store.
Alternative options and more information at:
Managing WooCommerce.com subscriptions.

Setup and configuration
↑ Back to topSet up Google Analytics 4 (G-)
↑ Back to topYou can configure GA4 in your store’s WP Admin dashboard by navigating to WooCommerce > Settings > Integration > Google Analytics (tab), and adding your Google Analytics 4 (GA4) Measurement ID beginging with “G-“:
How to find your GA4 measurement ID
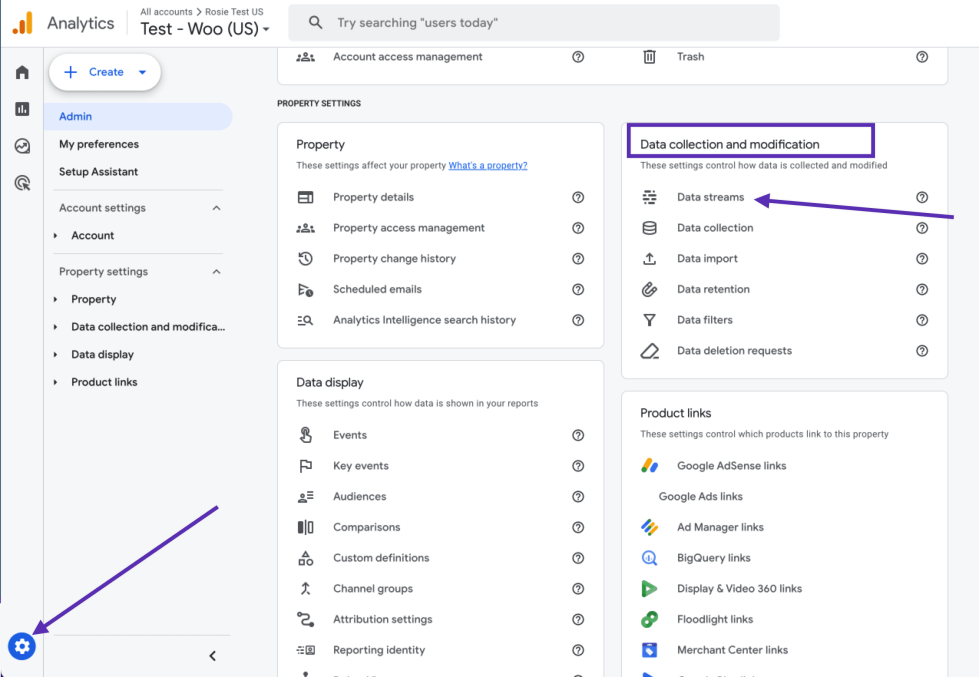
- Sign in to Google Analytics and click Admin, at the bottom of the left-hand navigation.
- In the Data collection and modification column, click Data Streams.
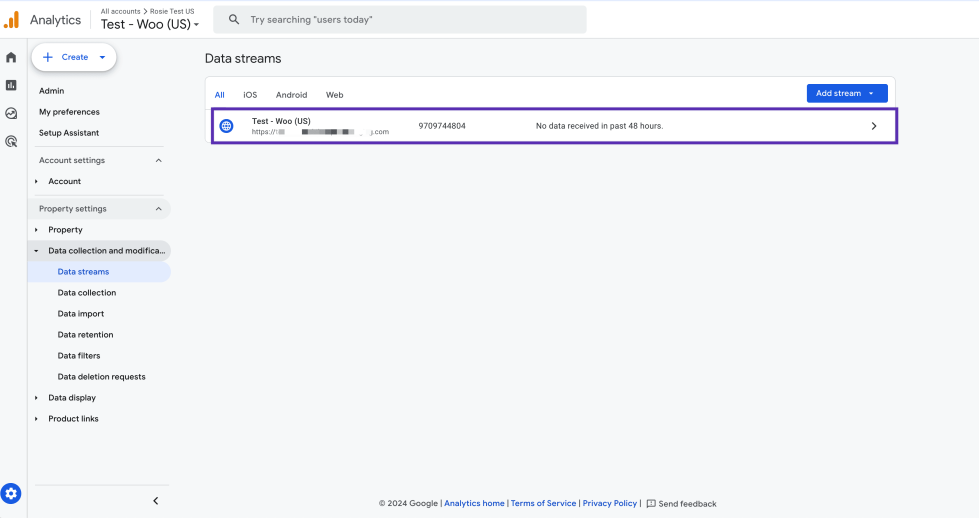
- On the Data Streams page, select the data stream that corresponds to your website.
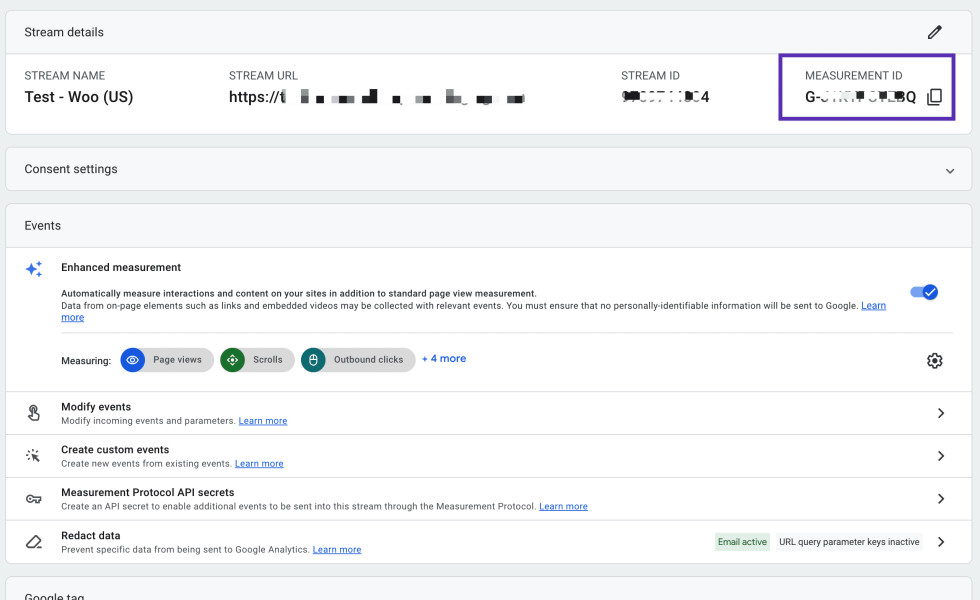
- Locate and copy your Measurement ID beginning with G- at the top right of the page. Please note it can take up to 48 hours for the connection to start working.
Tracking options
- “Display Advertising” Support: Check this box if you intend to run ads on the Google Display Network and would like these tracked in your analytics account.
- Track 404 (Not found) Errors: This allows you to find broken or dead links. To see how many times this occurs, go to your Google Analytics account > Behavior > Events > Overview > Error.
- Purchase Transactions: Track purchases on your site. This requires a payment gateway that redirects to the thank you/order received page after payment.
Some popular options that do this are: - Add to Cart Events: Track when customers add a product to their cart. This allows you to see more specific details about your customers’ experience and better understand where they might be dropping off.
- Remove from Cart Events: Understand what products customers remove from their cart before placing an order.
- Product Impressions from Listing Pages: Track what lists of products customers see on your website (For example, the primary Shop page and Related Product sections).
- Product Clicks from Listing Pages: Track what individual products your customers are clicking on.
- Product Detail Views: Track the products your customers view the full details of.
- Checkout Process Initiated: Track the moment your customers begin the checkout process.
Setting up Google Analytics goals and funnels
↑ Back to topLearn more about setting up conversion events and funnels.
Testing analytics tracking
↑ Back to topTo test your analytics tracking and ensure it’s sending the correct data to Google, we recommend using the Google Tag Assistant website. While not required, the Tag Assistant Companion Chrome extension can be used alongside it to enable additional troubleshooting features. This tool will analyze the tracking code on your page and notify you of any warnings or errors.
To verify analytics tracking with tag assistant:
- Visit https://tagassistant.google.com or click the Tag Assistant Companion extension.
- Enter your website URL and click Connect.
- On your website, grant consent on the cookies banner.
- Return to the Tag Assistant tab and click Continue.
- Click on the tag ID (
GA-xxxfor Google Analytics for WooCommerce) and click the Hits Sent tab. - On the site tab, simulate user actions like adding products to the cart, initiating checkout, etc. If analytics tracking is working as expected, you should see these events being captured in the Tag Assistant’s Hits Sent tab.
Keep the following points in mind:
- Pageviews are not tracked for logged-in admin users (make sure you are logged out).
- Multiple tracking code instances on the same page can cause issues.
- Tracking can take a while to show up in your Google dashboard (it’s recommended to wait 24 hours or try real-time tracking reports).
- Any JavaScript errors on the page could prevent tracking from occurring. You can use your browser’s developer tools to check if any errors are showing up in the console.
- Confirm that there are no browser extensions or ad blockers that might block the tracking. Disable these tools if necessary to ensure accurate tracking.
- If you experience any warnings or errors, or if multiple tracking instances are found on your page, the best way to identify the source is to perform a conflict test. See our detailed guide on conflict testing.
Cookie banners, consent mode, and analytics tracking
↑ Back to topConsent mode facilitates the communication of visitors’ cookie consent preferences to Google tags. To comply with privacy laws, users in the EEA, UK, and Switzerland must grant cookie consent before analytics tracking is activated.
To implement cookie consent, we recommend using one of Google’s recommended CMPs that offers a WordPress plugin compatible with the WP Consent API. Each of those plugins may require additional setup or registration.
For analytics data to be sent to Google Analytics, your consent mode integration must update consent states after visitors grant consent. You can follow Google’s guide to test if the consent state is correctly updated.
If you find the consent state is not updated by your cookie plugin, please contact that plugin’s developers for assistance in ensuring compatibility with Google Analytics for WooCommerce or with WP Consent API.
Hooks and filters
↑ Back to topScope of support:
We are unable to provide support for customizations under our Support Policy. If you need to customize a snippet or extend its functionality, we recommend working with a Woo Agency Partner or a WooCommerce developer on Codeable.
This is an advanced feature; please proceed with caution. In case of issues please check the Testing Analytics section.
Customize the product identifier sent to Google
↑ Back to topBy default, this extension will use the WooCommerce Product ID to identify products to Google. In some instances it might be necessary to modify the default behaviour. This can be done using the filter woocommerce_ga_product_identifier.
Modify the default consent state for EEA regions
↑ Back to topThe filter woocommerce_ga_gtag_consent_modes gives you the ability to modify the default consent values sent to Google during initialization. For more information see the consent documentation on GitHub.
Use a custom name for the tracking function
↑ Back to topAs is fairly standard when using Google Analytics, there is a global function named gtag which is used to push data. If you need to change the default name, that can be done using the filter woocommerce_gtag_tracker_variable.
Alter the default tag configuration
↑ Back to topWhile all configuration changes should be managed via the administration interface, if you need to overwrite the settings used to set up the tracker, use the filter woocommerce_ga_gtag_config.
Include more than one tracking ID
↑ Back to topThe following hook can be used for adding extra calls to the gtag function on your page:
wp_add_inline_script(
	'woocommerce-google-analytics-integration',
	'gtag( "config", "..." );'
);
Frequently asked questions
↑ Back to topHow can I set up cross-domain measurement?
↑ Back to topIf you’re tracking multiple domains or tracking subdomains, we recommend reviewing Google’s documentation on setting up cross-domain measurement.
This extension overwrites the consent mode defaults set by another extension
↑ Back to topIf the additional CMP extension you chose to provide UI for cookie consent sets its own default state of consent modes that are different to the ones we set, and you would like to make sure we’ll not overwrite that, use the woocommerce_ga_gtag_consent_modes filter to change or disable our setup.
How can I stop firing the page_view event when the page loads?
This is a matter of the default tag config. You can change the send_page_view property using the woocommerce_ga_gtag_config filter.