Seamlessly migrate your products, customers and orders from Magento to WooCommerce in a few clicks without any data loss.
Installation
↑ Back to top- Download Magento Migration for WooCommerce and have your .zip file
- At the WordPress admin panel, go to the Plugins section, and click ‘Add New’ to upload and install the plugin you just downloaded from WooCommerce.
- Upload the .zip file to proceed with the installation.
- Wait until the plugin installs. After successful installation, activate the plugin, and move on to configuration settings.
Configuration
↑ Back to topAt the WooCommerce admin panel go to WooCommerce > Settings > Magento to Woo for configuration. Here you will find the Six tabs: API Settings, Product Import Settings, Customers Import Settings, Orders Import Settings, Run Import, and Import Status.
Note: This Module is only Works for for Magento 2
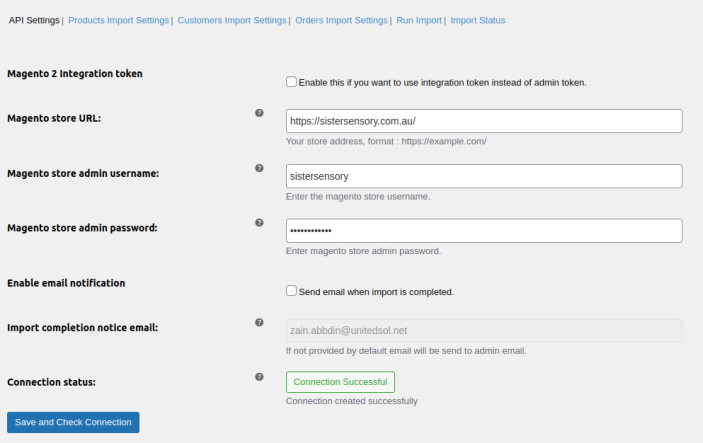
API Settings
↑ Back to topIn API settings, you can provide your Magento 2 Integration Token, Magento store URL, Magento Store Admin Username, Magento Store Admin Password, Enable email notifications, Import completion notice email, and Connection Status.
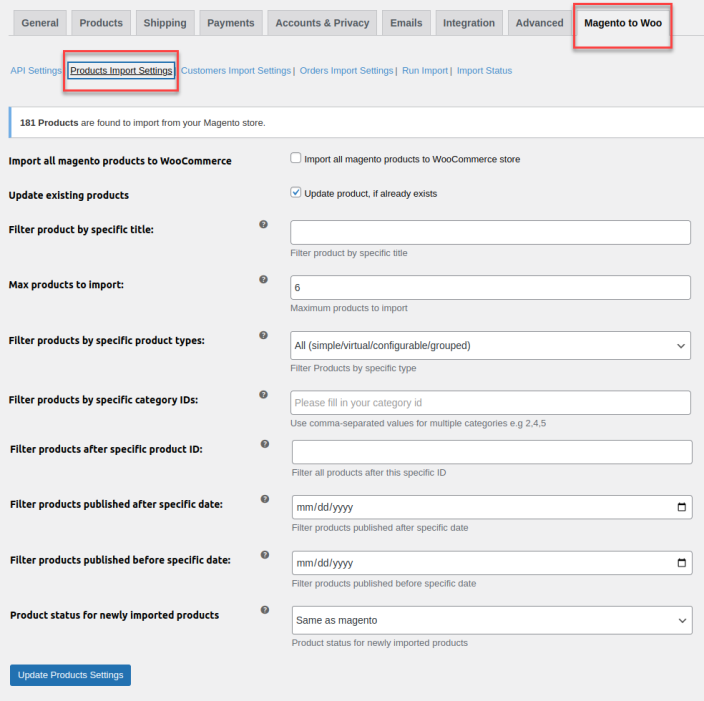
Product Import Settings
↑ Back to topHere you can manage all the import settings. There are different import setting sections as follows.
- Import all Magento products to WooCommerce: Enable the checkbox to import all products from Magento to WooCommerce.
- Update Existing Products: Click the checkbox to update already existing products. If you do not want to import all products, uncheck the box and the following settings will appear.
- Filter Product by Specific Title: Enter specific product titles if you want to import products based on their titles.
- Max Products to Import: Input the maximum number of products that you want to import.
- Filter Products by Specific Product Types: Filter all products based on their types. You can choose from the following
- All (simple/virtual/configurable/grouped)
- Simple/Virtual
- Configurable
- Grouped
- Filter Products by Specific Category IDs: Filter products based on their specific category IDs. Use comma-separated values for multiple categories e.g 2,4,5.
- Filter Products After Specific Product ID: Enter a specific product ID to filter all products after that specific ID.
- Filter Products Published After Specific Date: Select date to filter all the products that are published after the selected date.
- Filter Products Published Before Specific Date: Choose the date to filter products published before that date.
- Product Status for Newly Imported Products: Select the status of the newly imported products. You can select:
- Published
- Draft
- Same as Magento
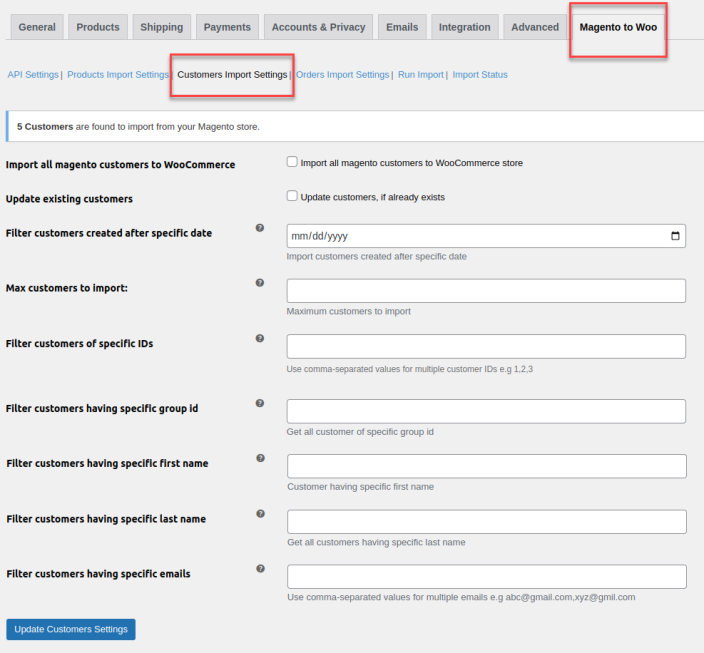
Customers Import Settings
↑ Back to top- Import All Magento Customers to WooCommerce: Enable the checkbox to import all customers from Magento to WooCommerce.
- Update Existing Customers: Update existing customers if any. If you do not want to import all customers, uncheck the box and configure the following settings.
- Filter Customers Created After Specific Date: Select a date to filter customers created after that particular date.
- Max Customers to Import: Enter the maximum number of customers that can be imported.
- Filter Customers of Specific IDs: Filter customers based on their IDs. Use comma-separated values for multiple customer IDs e.g 1,2,3.
- Filter Customers Having Specific Group ID: Enter group ID to get all customers of that specific group ID.
- Filter Customers Having Specific First Name: Input specific first names to import all customers having that first name.
- Filter Customers Having Specific Last Name: Enter last name to get all the customers having that specific last name.
- Filter Customers Having Specific Emails: Enter email addresses to filter customers based on their email address. Use comma-separated values for multiple emails e.g abc@gmail.com,xyz@gmil.com.
Note: User’s passwords will not be imported as Magento APIs do not provide password data for security reasons.
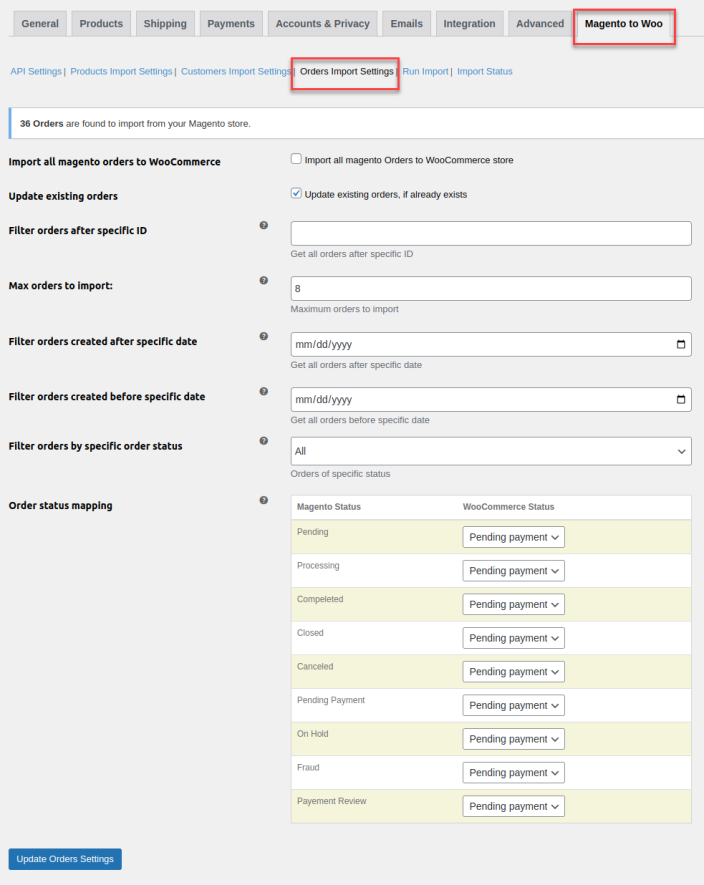
Orders Import Settings
↑ Back to top- Import All Magento Orders to WooCommerce: Click the checkbox to import all orders from Magento to WooCommerce.
- Update Existing Orders: Enable the checkbox to update existing orders in any. If you do not want to import all orders, uncheck the box and the following settings will appear.
- Filter Orders After Specific ID: Enter a specific ID and get all orders that are created after that particular order ID.
- Max Orders to Import: Add the maximum number of orders that can be imported.
- Filter Orders Created After Specific Date: Enter a date to get all the orders after that specific date.
- Filter Orders Created Before Specific Date: Select a date to import all the orders that were created before that specific date.
- Filter Orders by Specific Order Status: Filter orders based on their status. You can choose order status as:
- Pending
- Processing
- Completed
- Closed
- Canceled
- Pending Payment
- On Hold
- Fraud
- Payment Review
- Order Status Mapping: Check the mapping status of each order in Magento and WooCommerce. You can select the status of each WooCommerce order.
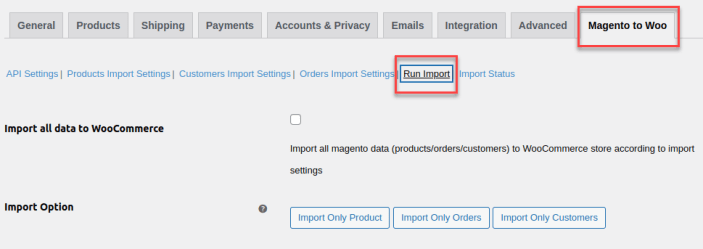
Run Import
In the run import tab, you can manage the import of all products, customers, and orders.
- Import All Data to WooCommerce: Click the checkbox to import all the data including products, orders, and customers from Magento to WooCommerce according to import settings you have configured previously.
- Import Option: Choose options to import data from Magento to WooCommerce. When “Import All Data to WooCommerce” is checked all data will be imported. When unchecked, you can select:
- Import Only products
- Import Only Orders
- Import Only Customers
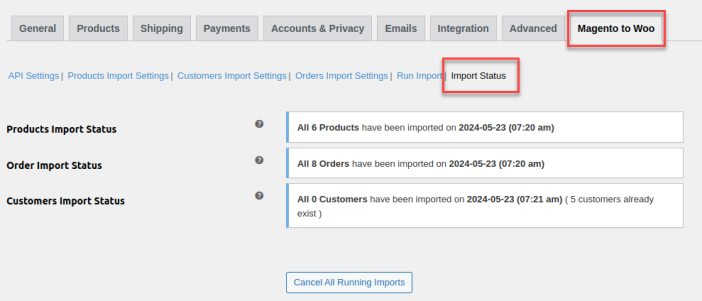
Import Status
In this tab, you can check the status of all running imports.
- Products Import Status: Check the status of product imports.
- Order Import Status: Import status of all orders.
- Customers Import Status: Status of all customer imports.
You can also cancel all the running imports by clicking the “Cancel All Running Imports” button.