The NetSuite Integration for WooCommerce plugin syncs your orders, product inventory/prices, and customers. Its features offer deep enhancement capabilities when you use it with advanced mappings like currencies, subsidiaries, shipping methods, custom forms, sales reps, and classes or any other NetSuite field with conditional mapping features. We also provide an additional feature to sync item inventory/prices manually.
To establish the connection between NetSuite and WooCommerce “General Settings” are the most important.
General Settings
↑ Back to topSteps to get credentials to our NetSuite Integration for WooCommerce
- NetSuite Host URL
- NetSuite Account ID
- NetSuite Consumer Key
- NetSuite Consumer Secret
- NetSuite Token ID
- NetSuite token Secret
To get the values for these fields, follow the below mention steps:
1. The first step is to get the NetSuite Host URL and NetSuite Account ID
- Login to your NetSuite account
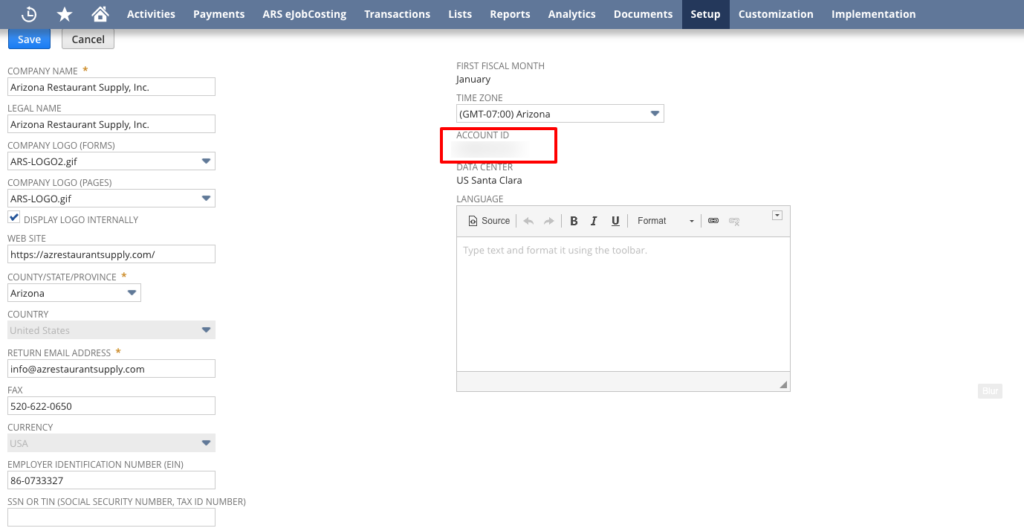
- Go to Setup >> Company >> Company Information
- Here you will get the Account ID. Copy the account id and paste it into WooCommerce
- To get the Host URL, scroll down
- Go to Company URLs
- Copy the URL under SUITETALK (SOAP AND REST WEB SERVICES), and paste it into WooCommerce

2. To get the NetSuite Consumer Key and NetSuite Consumer Secret
- Go to the Setup >> Integration >> Manage Integrations >> New
- Enter the name of the application (name could be of your choice for example, “TM WC NetSuite”)

- Uncheck the following two checkboxes:
- TBA: AUTHORIZATION FLOW
- AUTHORIZATION CODE GRANT
- Make sure the following two checkboxes are checked:
- TOKEN-BASED AUTHENTICATION
- USER CREDENTIALS
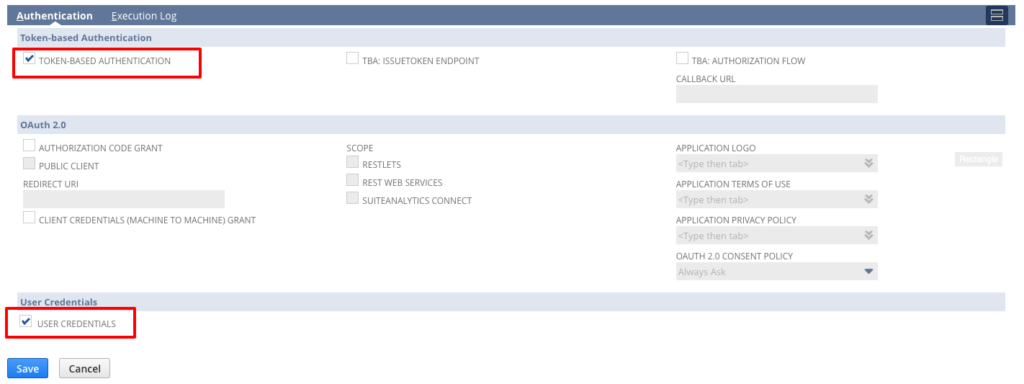
- Click the Save button
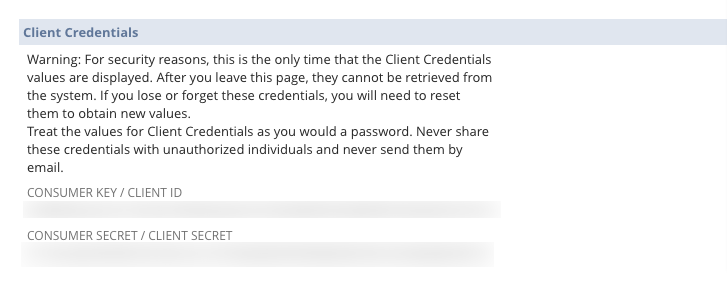
- After saving the Integration form You will get the CONSUMER KEY / CLIENT ID and CONSUMER SECRET / CLIENT SECRET
- Copy the Consumer Key and Consumer Secret and paste it into WooCommerce
3. To get the NetSuite Token ID and NetSuite Token Secret
*NOTE: make sure your current user role has the required permissions
- Go to the Home icon >> Dashboard
- Click on Manage Access Tokens
- Click on New My Access Token button
- Select the Application name that you have created in New Integration form
- Click the Save button, and you will get the Token ID and Token Secret
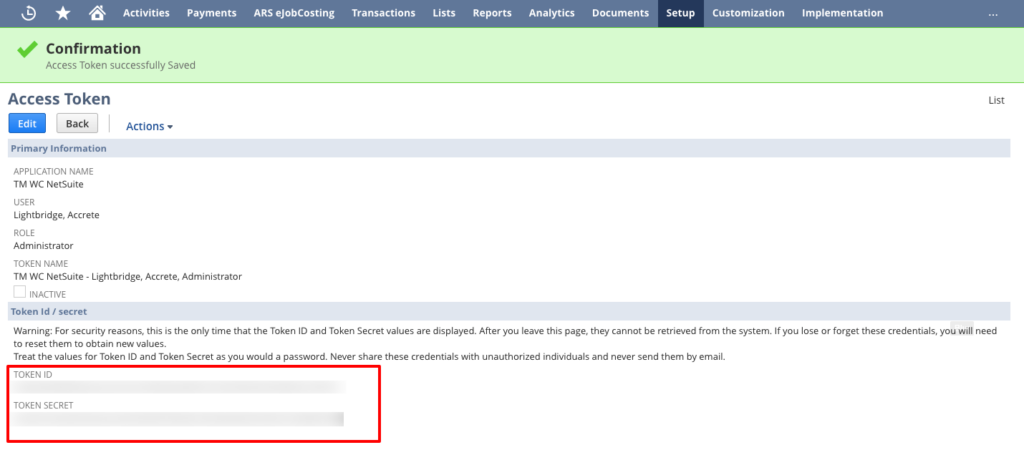
- Copy the Token ID and Token Secret and paste it into WooCommerce
4. Signature Algorithm Method
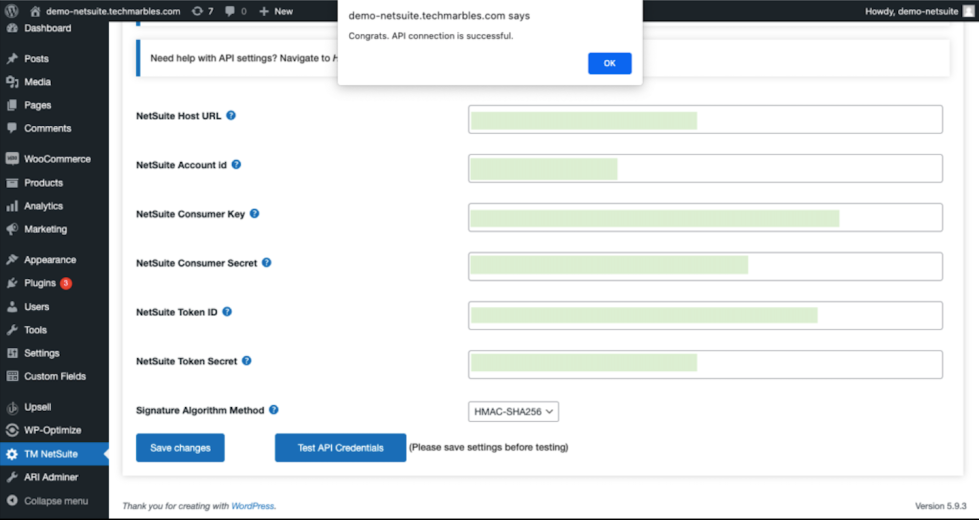
- Select the” HMAC-SHA256 ” method
- Click Save changes button
After saving the settings, we need to check if the connection is established successfully or not. To check that “Test API Credentials”. If the connection is successfully established then a pop up will show with the success message “Congrats. API connection is successful.”.
Required User Role Permissions:
- Go to Setup > User Roles > Manage Roles
- Select your user role and check the permissions if they are as mentioned below. If not, click “Edit” and change the permission levels, as explained in the following steps.
- Under TRANSACTION Tab, set permission levels for the fields as mentioned below:
- Sales Order – Full
- Item Fulfillment – Full
- Fulfil Sales Order – Full
- Under REPORTS Tab, set permission levels for the fields as mentioned below:
- SuiteAnalytics Workbook – Full
- Under LIST Tab, set permission levels for the fields as mentioned below:
- Items – View
- Location – View
- Currency – View
- Promotions – Full
- Shipping items – View
- Under SETUP Tab, set following mentioned permission levels, to the below fieldsCompany information
- User Access Tokens – Full
- Integration Application – Full
- SOAP Web Services – Full
- Accounting Lists – Full
- Click Save
Creating roles on NetSuite:
- To create a new Role, navigate through the following steps in Netsuite.
- Setup > User Roles > Manage Roles > New.
- Enter the name of the Role.
- In the CENTRE TYPE field select ACCOUNTING CENTRE in General settings.
- Check option DO NOT RESTRICT EMPLOYEE FIELDS in General settings.
- In SUBSIDIARY RESTRICTIONS check the option SELECTED.
- In AUTHENTICATION enable option WEB SERVICES ONLY ROLE.
- Assign the above mentioned permissions to the user role.
- Click Save
Inventory Settings
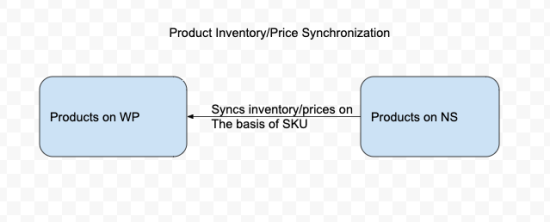
↑ Back to topIn the Product/Inventory Sync Settings, we can configure settings related to inventory Stocks and Prices. Inventory Stocks and Prices are automatically synced from NetSuite to WooCommerce based on these settings. There is also an option to manually sync this data.
Stock Management
↑ Back to top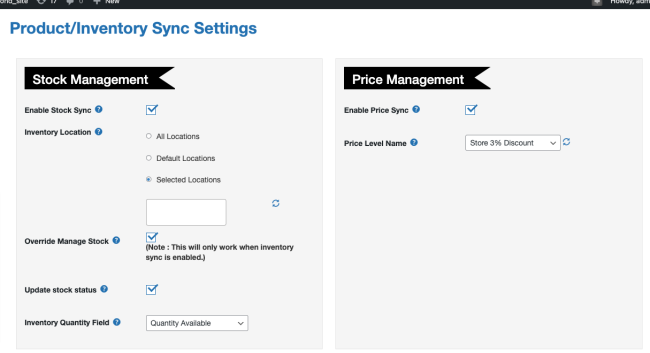
- Enable Stock Sync: By enabling this option Stocks/Inventory will sync from NetSuite to WooCommerce if their SKU/defined identifier matches
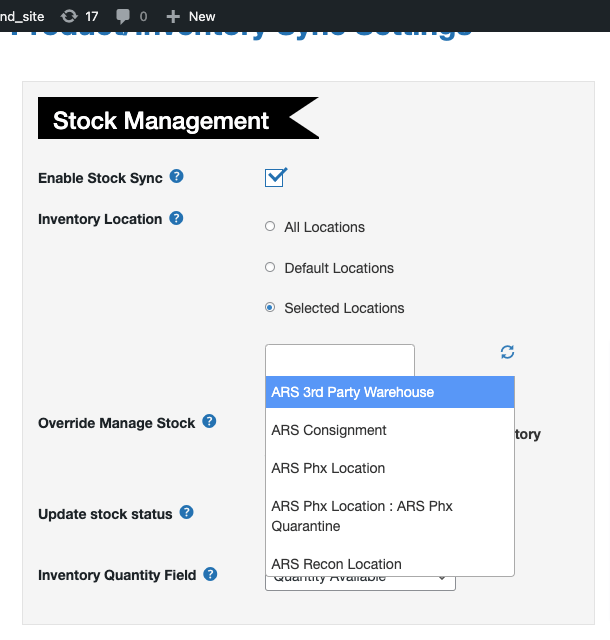
- Inventory Location: Select the locations from where we need to pull the Inventory.
- All Location: Inventory will be combined from all the locations
- Default Location: Inventory will be fetched from the default locations for the item.
- Selected Location: Select the locations from where inventory sync is required. Inventory levels will be combined for all selected locations.
- Override Manage Stock: If disabled, the plugin will not override Manage Stock on Product Level. If enabled, then Manage Stock will be overridden.
- Update stock status: If disabled, the plugin will not override the Stock Status on the Product Level. If enabled, the plugin will override the stock status according to the stock quantity.
- Inventory Quantity Field: With this option, you can select the NetSuite field from where the stock will be synchronised. It can be “Quantity Available” or “Quantity on hand”.
Price Management
↑ Back to top- Enable Price Sync: If enabled, the price for the product gets updated on WooCommerce from NetSuite.
- Price Level Name: Select the price level name to use for the Price Sync
Common Settings
↑ Back to top- Map Product SKU: This option helps you to map the WooCommerce product SKU to different fields on the NetSuite item. Available Options
- By product Name / Numer:
- By UPC code: UPC code is SKU. SKU (SKU, is a code number, typically used as a machine-readable bar code, assigned to a single item of inventory.) is used in WooCommerce and in NetSuite SKU is known as UPC code
- Display Name / Code:
- Vendor Name / Code
- Custom Field: If you are selecting this option then you have to enter the “Custom field id” from NetSuite
- Automated Inventory Sync Frequency: Select the frequency for the automated cron. The Stocks and Prices will be auto-updated at the specified internal. Available Options
- Hourly: Every hour
- Twice Daily: Every 12 hours
- Daily: Every 24 hours
Manual Sync
↑ Back to topYou can also sync Stocks and prices manually by clicking on the “Manual update inventory and(or) price” button.
Customer Sync & Conditional Mapping
↑ Back to topGeneral Settings
↑ Back to top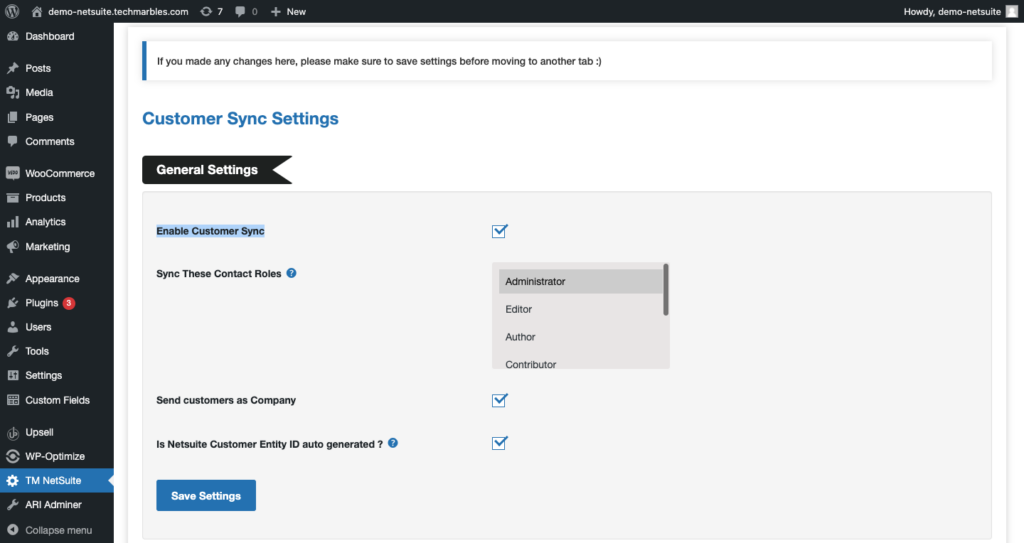
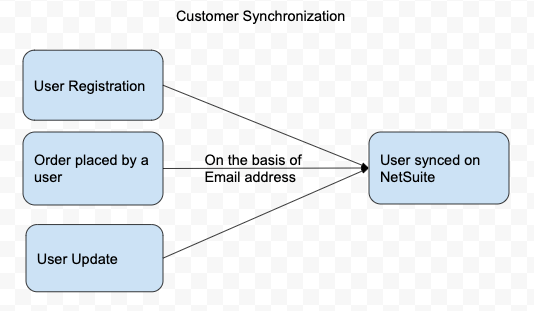
- Enable Customer Sync: This feature ensures that the customer syncs with NetSuite when they register or update information or place an order in WooCommerce.
- Sync These User Roles: With this feature, we can select which user roles will sync with NetSuite. You can select multiple user roles.”Customer” role should be selected for customers to sync. Other options can be selected based on your requirement.
- Send customers as Company: You can even send customers as a company customer on NetSuite.This picks up the Company Name from the Customer Billing Address. If the company name is missing on any customer information it clubs the first name and last name and sends it to NetSuite as the Company Name.
- Is Netsuite Customer Entity ID auto generated: This means entity ID is being auto-generated on NetSuite. It’s a setting in NetSuite. If enabled WooCommece will not send an entity ID with customer data.
Reference link:
https://docs.oracle.com/en/cloud/saas/netsuite/ns-online-help/section_161133364548.html
Conditional mapping feature:
↑ Back to topThis feature allows you to map NetSuite data like currencies, subsidiaries, custom form, sales rep, classes or any other NetSuite field from WC be it a fixed value or a value of a WC field without any help from the support team.
Operation:
This is the first field you will see when you commence mapping the fields to NetSuite. The operation can be any of the following based on your requirements.
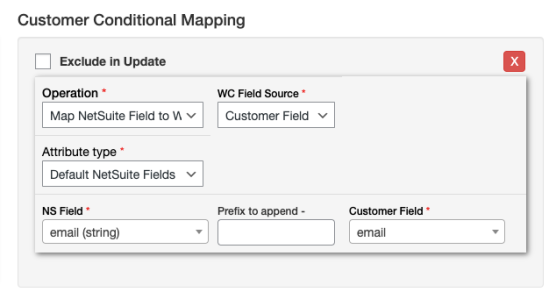
- Map NetSuite Field to WC Value: In this operation, you can send any Fixed Value to the desired Netsuite Field. And if you choose this operation the fields further will be visible as follows –
- WC Field Source
This contains customer related fields that are used to map the values to NetSuite. It provides us with a pre-defined list of customers that can be mapped and also the option to insert meta key to get customer-related data. - Attribute Type
Here you can choose whether the field you are mapping is a Default NetSuite field or Custom NetSuite Field. - NS Field
Select the name of the field from the dropdown list if it’s a default field or enters the NetSuite Field name if it’s a custom field. - Prefix to append
Here you can enter any value to want to sync with the respected field. Leave blank if none. - Customer Field
Select the WC field from the drop-down based on which you want to set a condition for mapping.
Map NetSuite Field to Fixed Value :
In this operation, you can send any Fixed Value to the desired Netsuite Field. And if you choose this operation the fields further will be visible as follows –
- Attribute Type
Here you can choose whether the field you are mapping is a Default NetSuite field or Custom NetSuite Field. - NS Field
Select the name of the field from the dropdown list if it’s a default field or enters the NetSuite Field name if it’s a custom field.
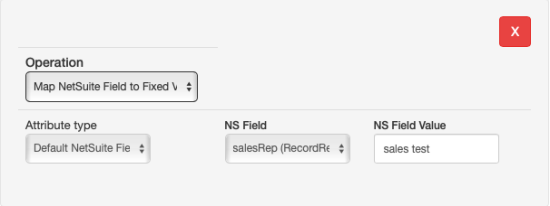
- NS Field Value
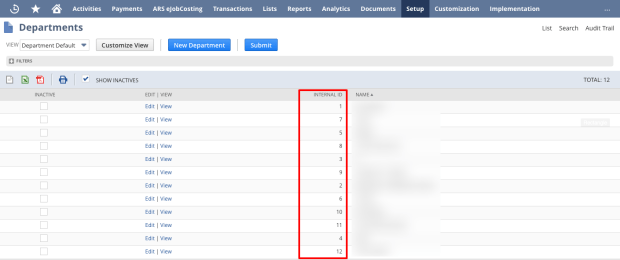
This needs to be selected record’s internal ID from NetSuite. For example, if you need to setup your subsidiary, navigate to Setup > Company > Departments
3. Map NetSuite Field to Fixed Value Based on WC Field Value :
With this operation, you can set a condition that if a WC Field has a certain value then you can send a fixed value to NetSuite Field. And if you choose this operation the fields further will be visible as follows –
- WC Field Source
This contains customer related fields that are used to map the values to NetSuite. It provides us with a pre-defined list of customers that can be mapped and also the option to insert meta keys to get customer-related data. - Customer Field
Select the WC field from the drop-down based on which you want to set a condition for mapping. - Where
Here you can select the condition type. We offer 4 types of conditions:- IS
- IS NOT
- CONTAINS
- DOES NOT CONTAINS
- WC Field Value
Enter the value that you want to check corresponding to the Customer field or Customer meta field. - Attribute Type
Here you can choose whether the field you are mapping is a Default NetSuite field or Custom NetSuite Field. - NS Field Type
Select the type of custom field such as String, Boolean etc.
*Note: You will only see this field for your custom NetSuite fields and not for the default ones. - NS Field
Select the name of the field from the dropdown list if it’s a default field or enters the NetSuite Field name if it’s a custom field.
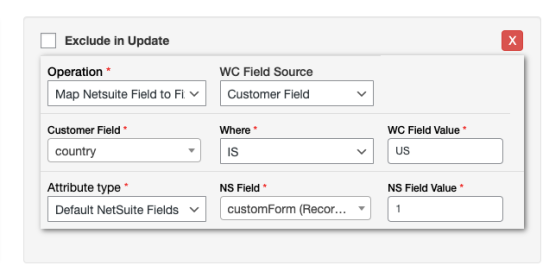
- NS Field Value
This needs to be selected record’s internal ID from NetSuite. For example, if you need to setup your subsidiary, navigate to Setup > Company > Classes

3. Map NetSuite Field to Fixed Value Based on WC Field Value :
With this operation, you can set a condition that if a WC Field has a certain value then you can send a fixed value to NetSuite Field. And if you choose this operation the fields further will be visible as follows –
- WC Field Source
This contains customer related fields that are used to map the values to NetSuite. It provides us with a pre-defined list of customers that can be mapped and also the option to insert meta keys to get customer-related data. - Customer Field
Select the WC field from the drop-down based on which you want to set a condition for mapping. - Where
Here you can select the condition type. We offer 4 types of conditions:- IS
- IS NOT
- CONTAINS
- DOES NOT CONTAINS
- WC Field Value
Enter the value that you want to check corresponding to the Customer field or Customer meta field. - Attribute Type
Here you can choose whether the field you are mapping is a Default NetSuite field or Custom NetSuite Field. - NS Field Type
Select the type of custom field such as String, Boolean etc.
*Note: You will only see this field for your custom NetSuite fields and not for the default ones. - NS Field
Select the name of the field from the dropdown list if it’s a default field or enters the NetSuite Field name if it’s a custom field.

- NS Field Value
This needs to be selected record’s internal ID from NetSuite. For example, if you need to setup your subsidiary, navigate to Setup > Company > Classes

Order Settings & Conditional Mapping
↑ Back to top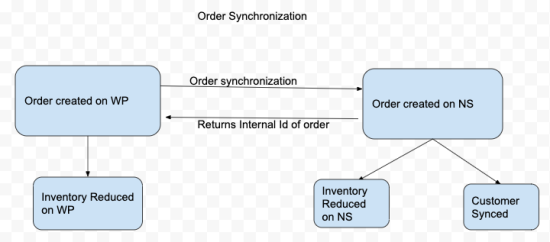
The order sync setting is used to sync the order from WooCommerce to NetSuite. Orders are synced when created, updated or deleted. Orders can be synced manually or automatically. Along with default settings, there is a feature for Conditional Mapping as well. With Conditional Mapping, you can map all NetSuite Order’s default and custom fields. Like SalesRep, Location, Class or any other custom field.
General Settings
↑ Back to top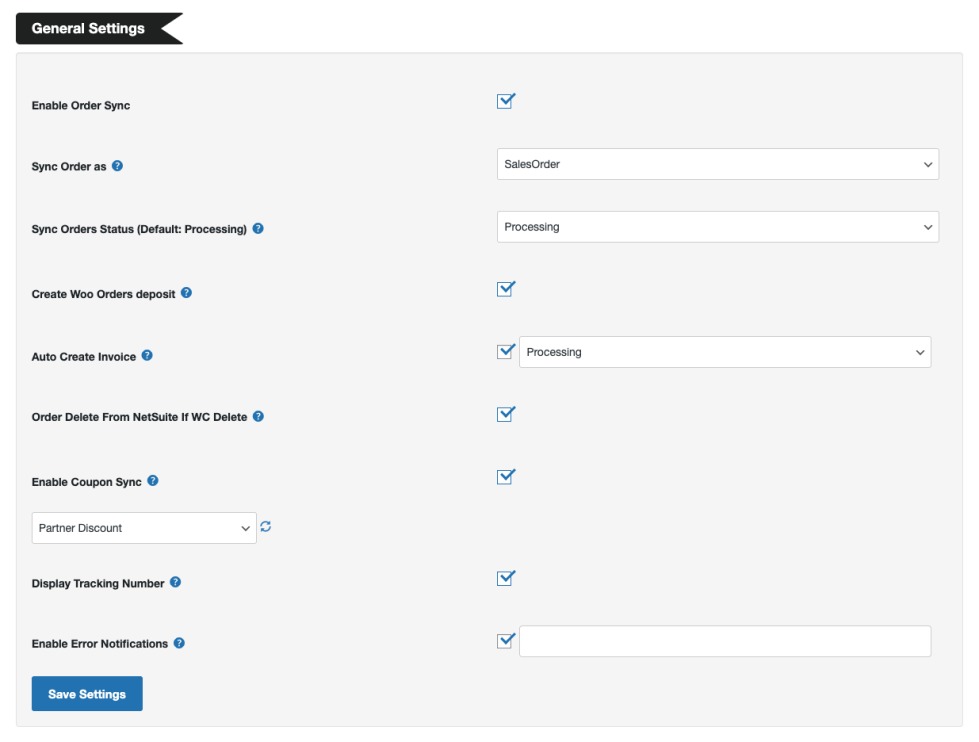
- Enable Order Sync: Enable for Order Sync.
- Sync Order As: Enables syncing of an order either as a ‘Sales Order’ or ‘Cash Sale’
- Sync Orders Status (Default: Processing): Select the WooCommerce Order status on which the order will sync to NetSuite.
- *Note: If left empty, order syncs on Processing status by default.
- Create Woo Orders Deposit: Enable it if you want to create customer deposit transaction records.
- Auto Create Invoice: Enable it if you want to create invoice for sales order, for the selected order status.
- Order Delete on NetSuite on WC Delete: If enabled, orders will be deleted from NetSuite when deleted on WooCommerce
- Enable Coupon Sync: with this option, you can sync coupons WooCommerce to NetSuite. Please make sure to select NS Promo Custom Form ID and NS Promo Discount ID.
- Display Tracking number: If enabled, it will display NetSuite order tracking number on Customer My Account dashboard.
Order Line Item Settings
↑ Back to top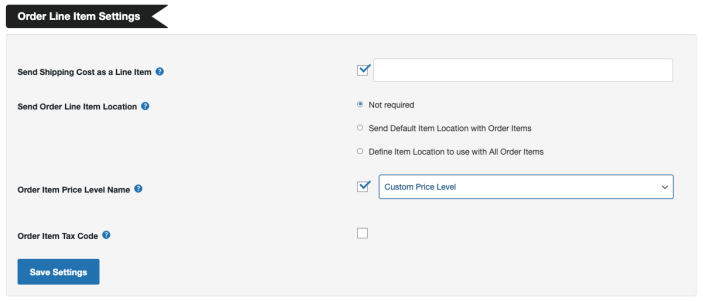
- Send Shipping Cost as a Line Item: Using this feature, you can send the Shipping Cost as an Order Item. You will need to specify the Shipping Item Internal ID from NetSuite.
- Send Order Line Item Location: Using this, you can send the location with order line items. You can select the default item location or set a custom location for the items.
- Order Item Price Level Name: If enabled, the price level will be sent with order items. Select the Price Level from the dropdown list.
- Order Item tax Code: You can enable it and select the taxcode of the Order Item you want to be synced with the order detail.
Refund Settings
↑ Back to top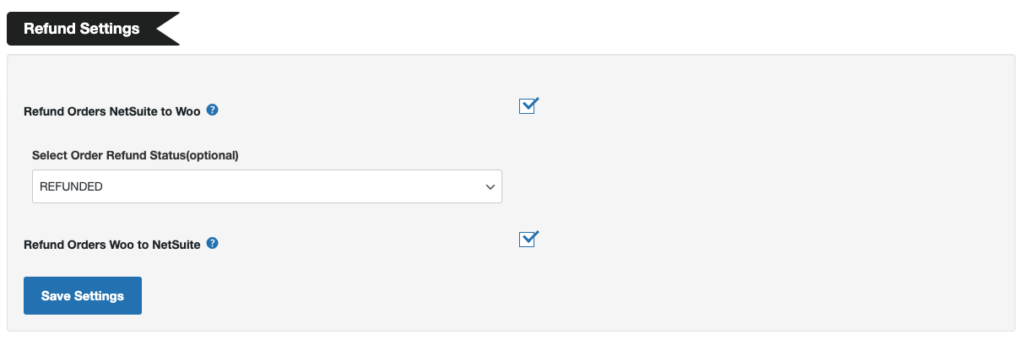
- NetSuite to Woo: If enabled, the refunded orders will sync from NetSuite to WooCommerce.
- Woo to NetSuite: If enabled, the refunded orders will sync from Woocommerce to NetSuite.
Steps to refund from WooCommerce and NetSuite
Fulfilment Sync
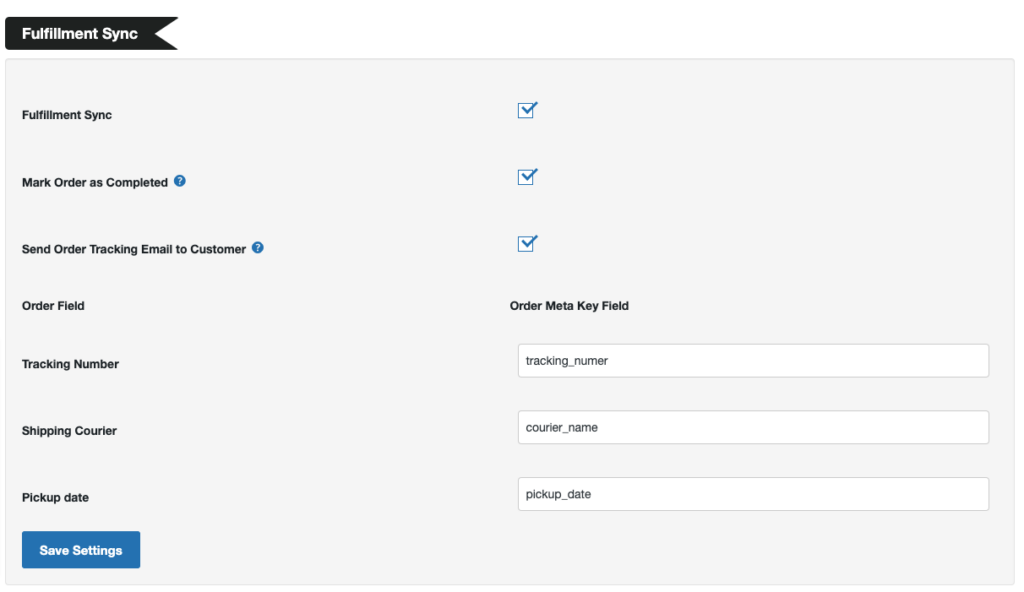
↑ Back to top- Fulfilment Sync: By enabling this option, you can sync the fulfilled order from NetSuite to WooCommerce. Further options will be displayed after enabling this.
- Mark Order as Completed: With this option, fulfilled/billed orders will be marked as “Completed” in WooCommerce.
- Send Order Tracking Email to Customer: With the help of this option, an email including the tracking number will be sent to the customer on order fulfilment.
- Order Field with Order Meta Key Field:
- Tracking Number: In the Tracking number field, enter the value (for example – tracking_number) of the database field, where you want to save the tracking number, for any further use.
- Shipping Courier: In the Shipping Courier field, enter the value (for example – courier_name) of the database field, where you want to save the shipping courier name, for any further use.
- Pickup date: In the Pickup date field, enter the value (for example – pickup_date) of the database field, where you want to save the pickup date, for any further use.
The value you enter in the “Order Meta Key” is where the value for these three fields will be stored in database. These filed values will be sent to the customer when an auto email is sent to them after getting the tracking number from NetSuite.
Conditional mapping feature:
↑ Back to topThis feature allows you to map NetSuite data like classes, tax code, shipping method, payment method or any other NetSuite field from WC be it a fixed value or a value of a WC field without any help from the support team.
Operation:
↑ Back to topThis is the first field you will see when you commence mapping the fields to NetSuite. The operation can be any of the following based on your requirements.
1. Map NetSuite Field to Fixed Value Based on WC Field Value :
With this operation, you can set a condition that if a WC Field has a certain value then you can send a fixed value to NetSuite Field. And if you choose this operation the fields further will be visible as follows –
- WC Field Source
This contains orders related fields that are used to map the values to NetSuite. It provides us with a pre-defined list of orders that can be mapped and also the option to insert a meta key to get order-related data. - Order Field
Select the WC field from the drop-down based on which you want to set a condition for mapping. - Where
Here you can select the condition type. We offer 4 types of conditions:- IS
- IS NOT
- CONTAINS
- DOES NOT CONTAINS
- WC Field Value
Enter the value that you want to check corresponding to the Order field or Order meta field. - Attribute Type
Here you can choose whether the field you are mapping is a Default NetSuite field or Custom NetSuite Field. - NS Field Type
Select the type of custom field such as String, Boolean etc.
Note*- You will only see this field for your custom NetSuite fields and not for the default ones. - NS Field
Select the name of the field from the dropdown list if it’s a default field or enters the NetSuite Field name if it’s a custom field. - NS Field Value
This needs to be selected record’s internal ID from NetSuite. For example, if you need to setup your subsidiary, navigate to Setup > Company > Subsidiary
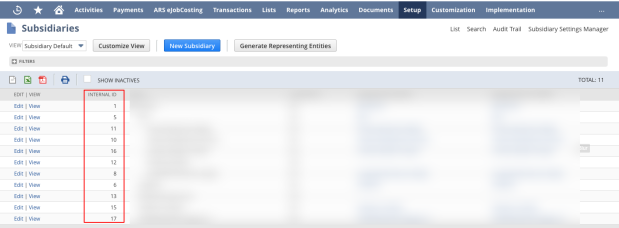
2. Map NetSuite Field to Fixed Value :
In this operation, you can send any Fixed Value to the desired Netsuite Field. And if you choose this operation the fields further will be visible as follows –
- Attribute Type
Here you can choose whether the field you are mapping is a Default NetSuite field or Custom NetSuite Field. - NS Field
Select the name of the field from the dropdown list if it’s a default field or enters the NetSuite Field name if it’s a custom field. - NS Field Value
This needs to be selected record’s internal ID from NetSuite. For example, if you need to set up your subsidiary, navigate to Setup > Company > Location
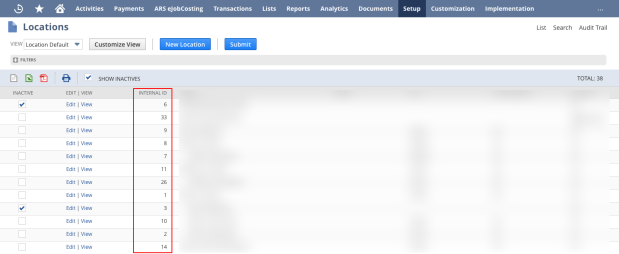
3. Map NetSuite Field to WC Field :
In this operation, you can send any Fixed Value to the desired Netsuite Field. And if you choose this operation the fields further will be visible as follows –
- WC Field Source
This contains orders related fields that are used to map the values to NetSuite. It provides us with a pre-defined list of orders that can be mapped and also the option to insert meta key to get order-related data. - Attribute Type
Here you can choose whether the field you are mapping is a Default NetSuite field or Custom NetSuite Field. - NS Field
Select the name of the field from the dropdown list if it’s a default field or enters the NetSuite Field name if it’s a custom field. - Prefix to append
Here you can enter any value to want to sync with the respected field. Leave blank if none. - Order Field
Select the WC field from the drop-down based on which you want to set a condition for mapping.
Steps to Refund Sync
↑ Back to topBy enabling this feature, you can display information about the refunded products WC to NetSuite and NetSuite to WC. Follow the following steps to refund
Steps to refund the from NetSuite to WC:
- Go to the NetSuite account
- Go to Transaction > Sales > Enter Sales Order > list
- Click on view
- On the order details page click Fulfill
- On the item Fulfil page change Status “Picked” to “Shipped” and add the location of the product
- To check the product location click the link under “Created from” and it will redirect to the “Sales Order” page, scroll down, here you will see a box with product details. Now click on the link under “Model No” (will be like -SL this is the item name)
- On click on the link, it will redirect to the “Inventory Item” page, scroll down till you can’t find the values in front of a particular location. Now select that location in the location field on the “Item Fulfill” page
- After changing, the Status and Location click on the Save button
- Now again go to sales order and click on view
- Click on the “Authorize Return” button
- Select the location of the item and save
- It will redirect to the “Return Authorization” page, now click on the “Receive” button and it will redirect to the “Item Receipt To be Generates” page
- Select the option from “Restock Item” (accordion to your requirement Either Yes or no) click on save and
- It will redirect to the “Return Authorization” page, now click on “Refund”
Steps to refund the from WC to NetSuite:
- Go to the NetSuite account
- Go to Transaction > Sales > Enter Sales Order > list
- Click on view
- On the order details page click Fulfill
- On the item Fulfil page change Status “Picked” to “Shipped” and add the location of a product
- To check the product location click the link under “Created from” and it will redirect to the “Sales Order” page, scroll down, here you will see a box with product details. Now click on the link under “Model No” (will be like -SL this is the item name)
- On click on the link, it will redirect to the “Inventory Item” page, scroll down till you can’t find the values in front of a particular location. Now select that location in the Location field on the “Item Fulfill” page
- After changing, the Status and Location click on the Save button
- Now go to your WC orders, and refund the product

