Note:
The experimental block-based product editor has been deprecated since 10.1, and its feature toggle is now removed from the WooCommerce admin UI for most users.
If you already had the block product editor enabled prior to updating, you will continue to have access to it and its toggle in the settings. The editor is not forcibly disabled for existing users.
If you disable the block product editor, the option to re-enable it will be removed from the UI. You will not be able to turn it back on through the settings screen.
Note:
Development on the new product editor (v2) has been paused as we evaluate the best path forward. Merchants can continue using the classic product editor without any disruption. Developers and contributors can find more details in our official update: What’s Next in the Product Editor?
The new product editor in WooCommerce is designed to enhance your product management experience. It addresses the need for a simplified yet powerful product creation and editing process.
The new experience will allow you to create and edit product listings faster than our classic editor. We’re upgrading our technology behind the scenes to work with block-based editing, which means faster performance for you and less time spent on settings. This also paves the way for more improvements in the future in other store management areas.
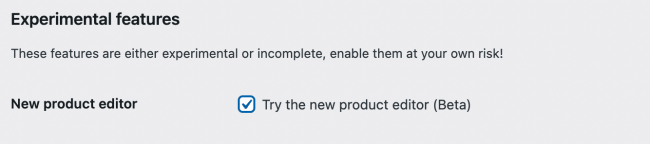
Enable New Product Editor
↑ Back to topYou can enable the new product editor by following the below steps:
- Navigate to WooCommerce > Settings > Advanced > Features.
- Check “Try new product editor (Beta)” and save changes.
Adding a Product
↑ Back to topOnce the new product editor is enabled, you can go to Products > Add new to add a new product and view the new interface.
Features
↑ Back to topWith its intuitive interface, you can easily navigate through the tabs: General, Organization, Pricing, Inventory, Shipping, Variations, and Linked products. This allows you to streamline and customize your product details, ensuring efficient management and a seamless product editing experience.
General
↑ Back to top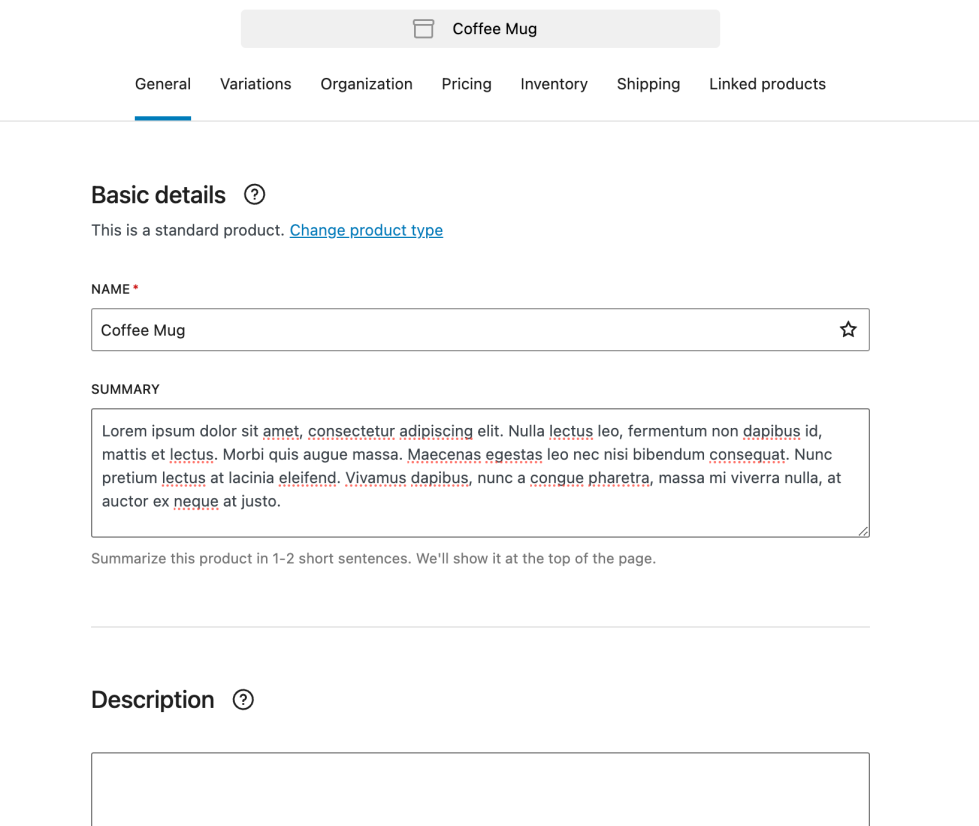
The general tab is where you add your product’s Basic details, Description, and Images.
- Basic Details
- Product type: You can click on the text Change product type to get a list of other product types that you can select for your product
- Name
- Summary (Product Short description)
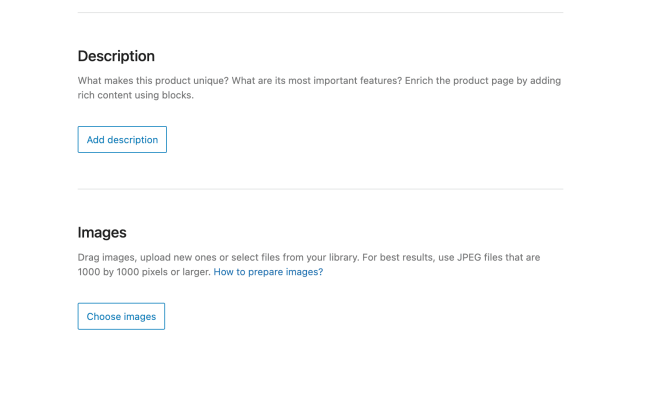
- Description: You can add a product description here using a wide range of blocks to present your content.
- Images: Add images for your product. You can drag and drop images to this area to upload new ones or select files from your media library. For best results, use JPEG files that are 1000 by 1000 pixels or larger.
Organization
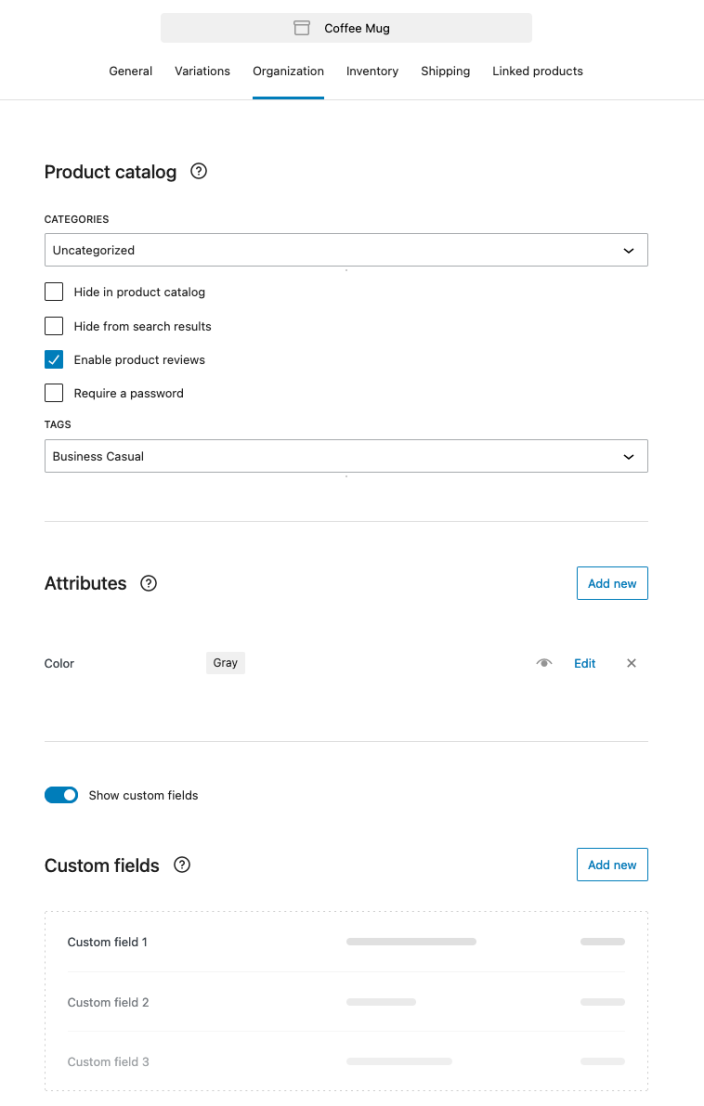
↑ Back to top- Categories & Tags: You can add categories and tags to your products under this section to help customers find this product easily or feature it across your sales channels. Product categories and tags help organize and classify products into specific groups based on their characteristics, features, or intended use.
- Visibility: You set the visibility setting for your product from here. The visibility options are:
- Hide in the product catalog
- Hide from search results
- Require a password
- Enable product reviews: Enable the option to allow customers to submit reviews for products.
- Attributes: You can add descriptive pieces of information that customers can use to filter and search for this product. You can learn more about product attributes here in this document.
- Custom Fields: Custom fields are additional metadata of your products, which you can use to display extra information, tailor the shopping experience, or provide specific product details that aren’t covered by the default product fields. Learn more about using custom fields on products in this document.
Pricing
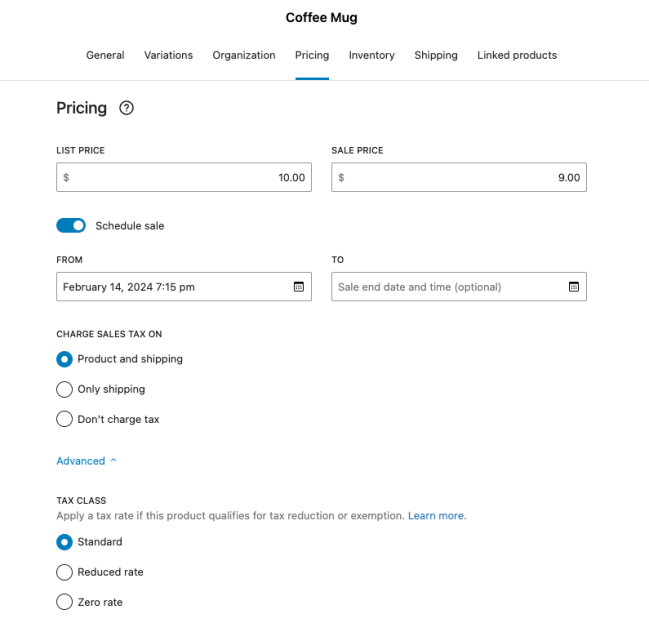
↑ Back to topThe Pricing tab includes the following options for your product:
- List price (Regular Price): This option allows you to specify the regular price of a product.
- Sale Price: It lets you define a discounted price for a product. When a sale price is set, it overrides the regular price temporarily, allowing you to offer promotional or discounted prices to customers.
- Schedule Sale: By enabling this option, you can schedule the start and end dates for the sale price of a product. The “From” field indicates when the sale price should become effective, and the “To” field specifies when the sale price will automatically revert to the regular price.
- Charge Sales Tax On
- Product and Shipping: This option enables the calculation and charging of sales tax on both products and shipping costs based on the tax settings and rules defined in your WooCommerce settings.
- Only Shipping: It enables the charging of sales tax only on the shipping costs.
- Don’t charge tax: No tax is charged.
- Tax Class: Under the Advanced settings, you can choose which tax class should be applied to the product. You can learn more about tax classes here in this document.
Inventory
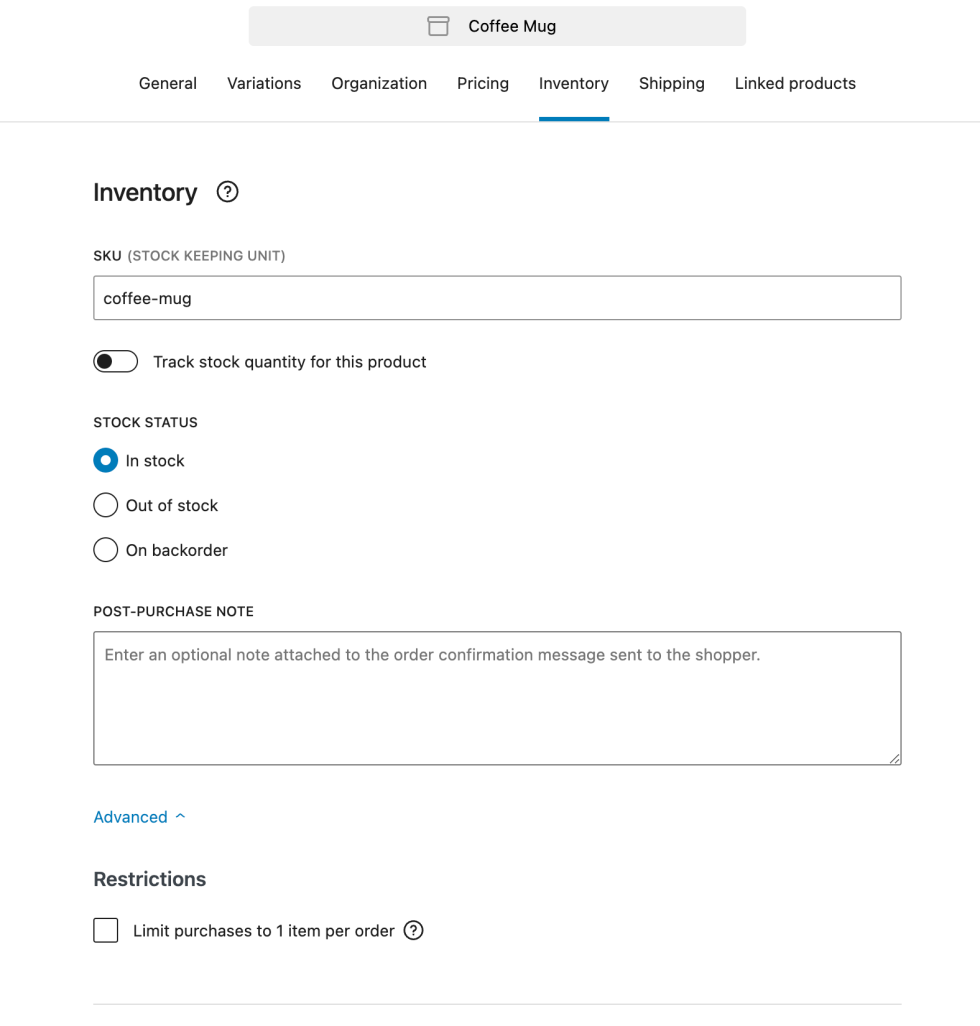
↑ Back to topThe Inventory tab includes the following options for your product:
- SKU (Stock Keeping Unit): SKU stands for Stock Keeping Unit, a unique identifier assigned to each product in your inventory. It helps you track and manage your products effectively by providing a specific reference for each item. Setting SKUs to your products allows you to easily identify and locate particular items within your inventory system.
- Track Stock Quantity: Enabling this option allows WooCommerce to keep track of the available stock quantity for the product. It accurately records how many product units are currently in stock.
- Available Quantity: This option displays the current quantity of a product available for purchase. You can specify the available quantity of the product here. It reflects the real-time stock level, allowing customers to know how many units are in stock before making a purchase.
- When Out Of Stock: This setting determines the behavior of a product when it goes out of stock. You have three options to choose from:
- Allow Purchases: Even if a product is out of stock, customers can still add it to their cart and proceed with the purchase. This option allows backorders or enables customers to place orders that will be fulfilled once the product is back in stock.
- Allow purchases, but notify customers: When a product is out of stock, customers can add it to their cart, but they will be informed that the item is available for backorder.
- Don’t allow purchases: If a product goes out of stock, customers will not be able to add it to their cart or complete the purchase. This option prevents customers from ordering items that are currently unavailable.
- Email Me When Stock Reaches: If you have enabled stock tracking, this option allows you to receive email notifications when the stock quantity of a product reaches a specified threshold. It helps you stay informed about low stock levels, allowing you to take timely action, such as reordering or restocking, to ensure the continuity of sales. The email is sent to the Notification recipient under WooCommerce > Settings > Product > Inventory.
- Post-purchase note: This allows you to personalize each order confirmation email with any additional messages, terms, or other information for the customer regarding their purchase. The message here will be included in order confirmation emails sent to customers.
- Restrictions – Limit purchases to 1 item per order: This option limits the maximum quantity of a product a customer can purchase in a single order. By limiting purchases to 1 item per order, you can prevent customers from ordering multiple quantities of the same item in a single transaction.
Shipping
↑ Back to topThe Shipping tab includes the following options for your product:
- Shipping Class: The shipping class setting allows you to categorize products based on their shipping requirements. You can assign a specific shipping class to your product to differentiate shipping methods, rates, or other shipping-related specifications. You can view how to add a new shipping class below and read more about Shipping Classes in this document.
- Dimensions: The dimensions setting allows you to specify the physical size of a product for shipping purposes. It helps determine the appropriate packaging and shipping rates based on the product’s size.
- Width
- Length
- Height
- Weight: The weight setting allows you to specify the weight of a product for shipping purposes. It plays a crucial role in determining shipping costs, as carriers often calculate rates based on weight. Accurate weight helps ensure that the appropriate shipping fees are applied to the product during checkout.
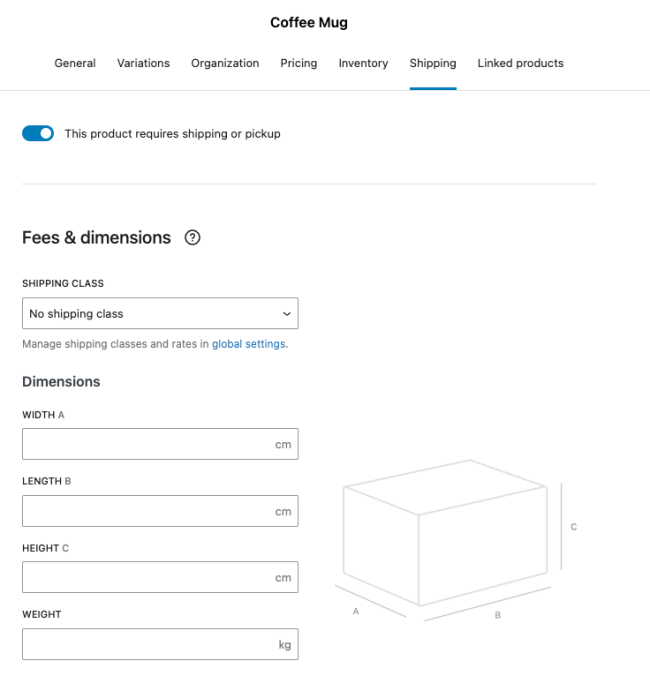
- Add a New Shipping Class: You can add a new shipping class from the dropdown option. You can learn more about Shipping Classes in this document.
Variations
↑ Back to topAdd Variation Options
↑ Back to topTo create a variation, first, you need to add variation options. Click on the “Add variation options” button:
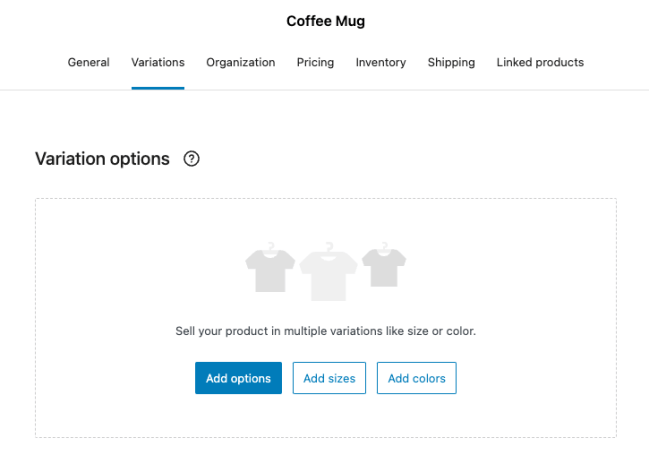
You can select from existing attributes or create new ones to add new variations to your product:

Once, you add the variation options, variations will be created using them. The variations are created without assigned prices, you can easily set their prices by referring to the Editing Variations section.
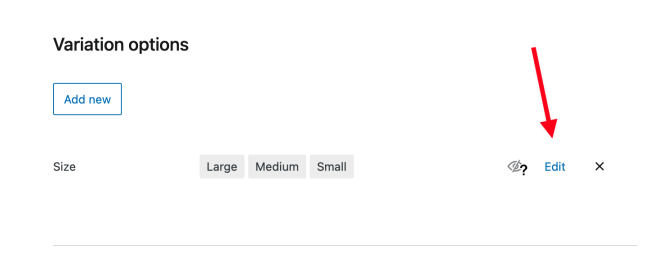
Editing Variation Options
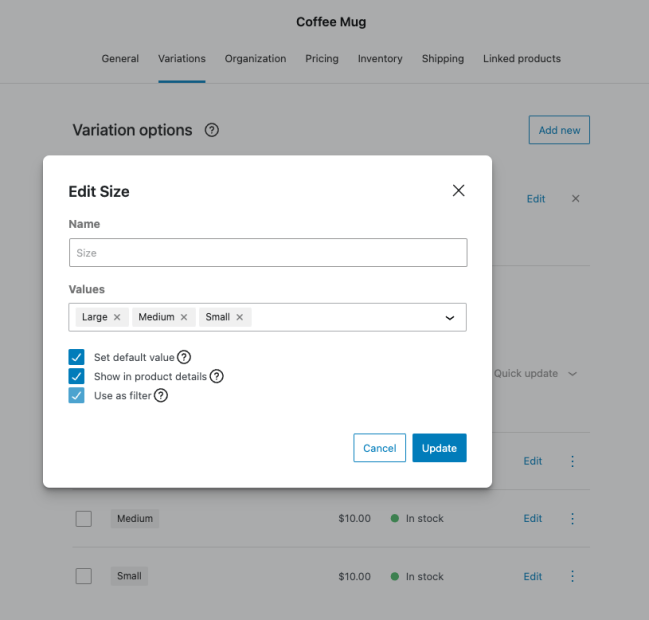
↑ Back to topTo edit your Variation Options, click on the ‘Edit’ button corresponding to the variation you wish to edit, it will trigger a pop-up window to appear.
Within this window, you can:
- Add New Values: Within the pop-up window, you have the ability to add new values to your Variation Options. This allows you to expand the choices available to your customers.
- Set Default Variation: You can choose to set the specific Variation Option as the default. This means that when customers visit the product page, the first choice will be automatically selected for them.
- Display Options in Product Details: Decide whether you want to display the Variation Options and their corresponding values in the product details section on the product page.
- Use Variation Options as Filters: This feature enables customers to refine their product search based on specific attributes, enhancing their shopping experience.
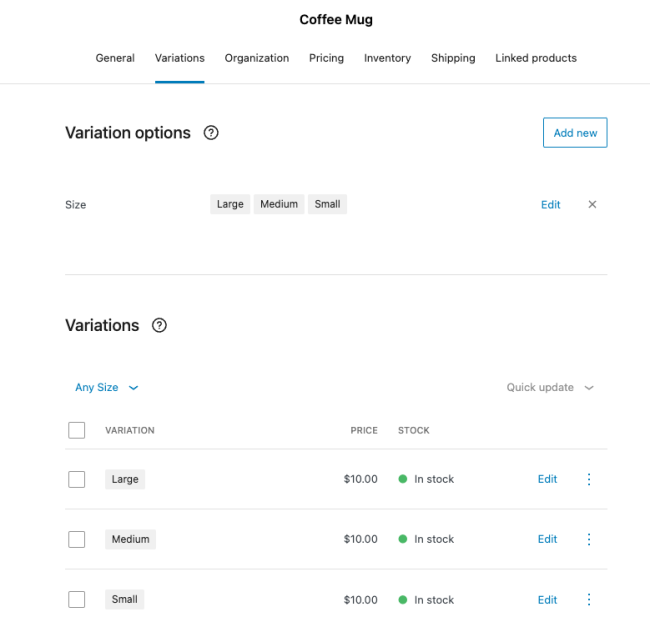
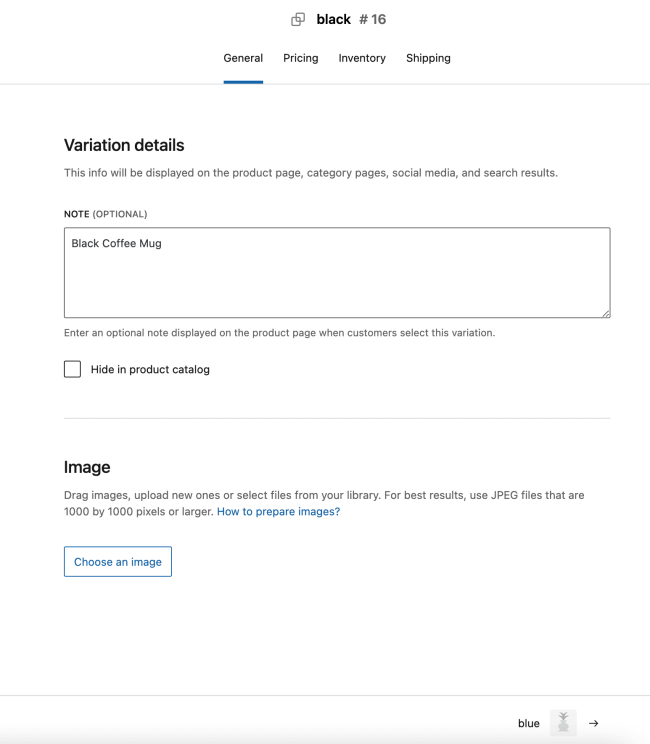
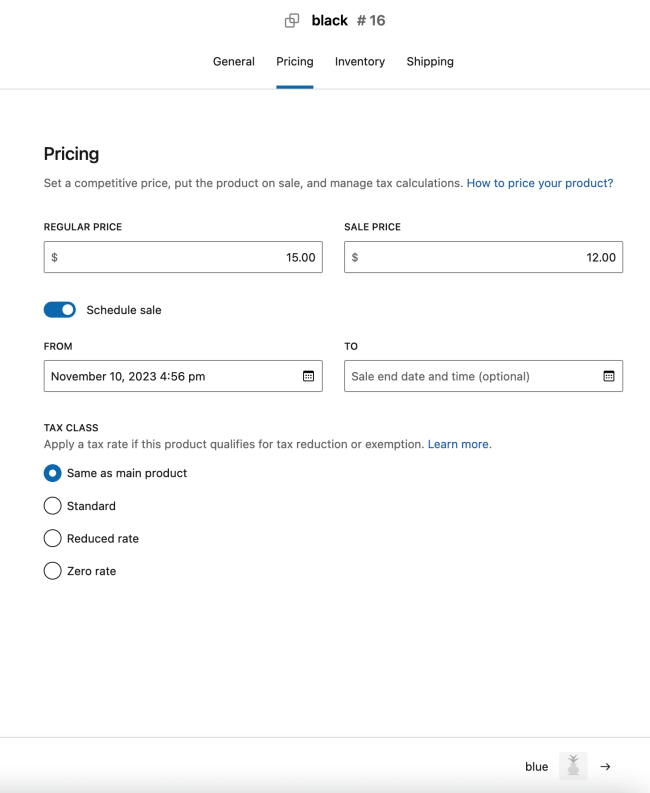
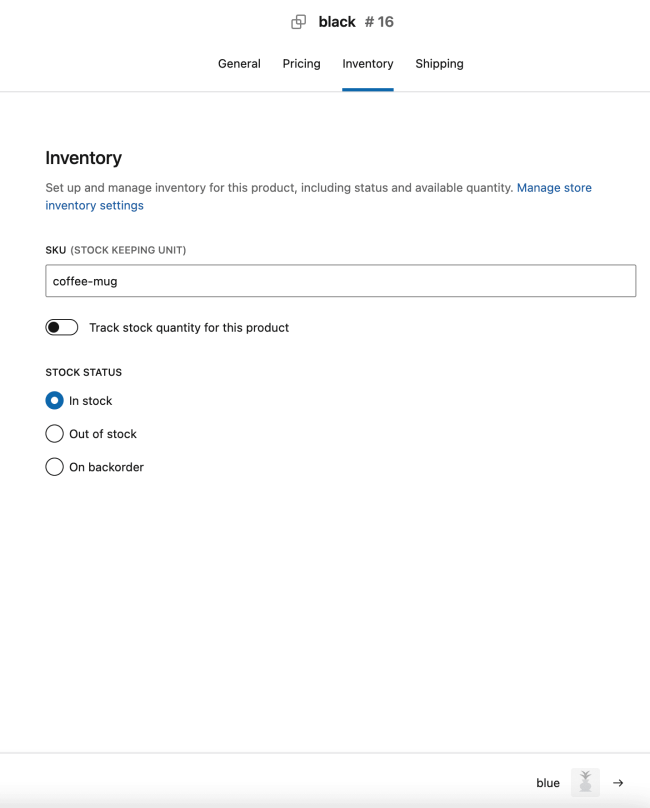
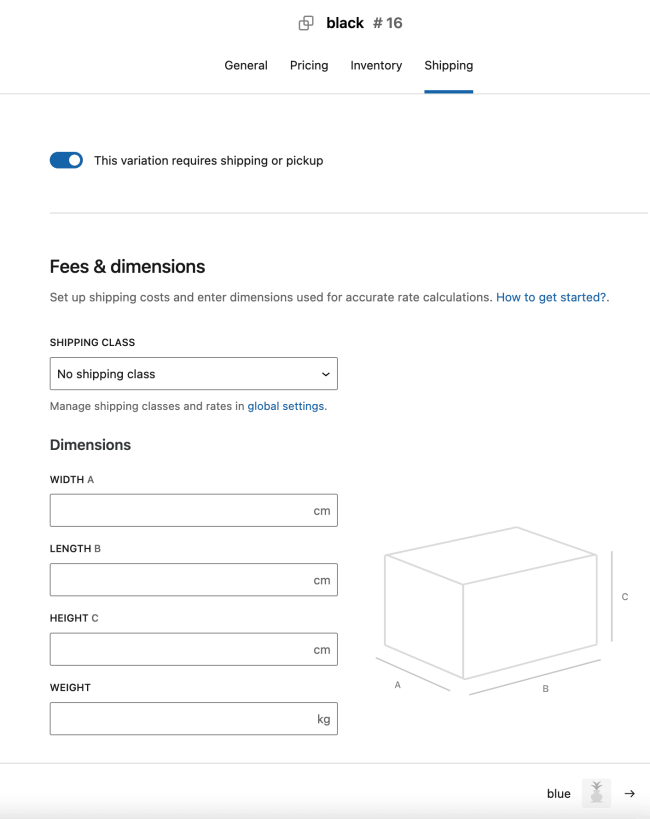
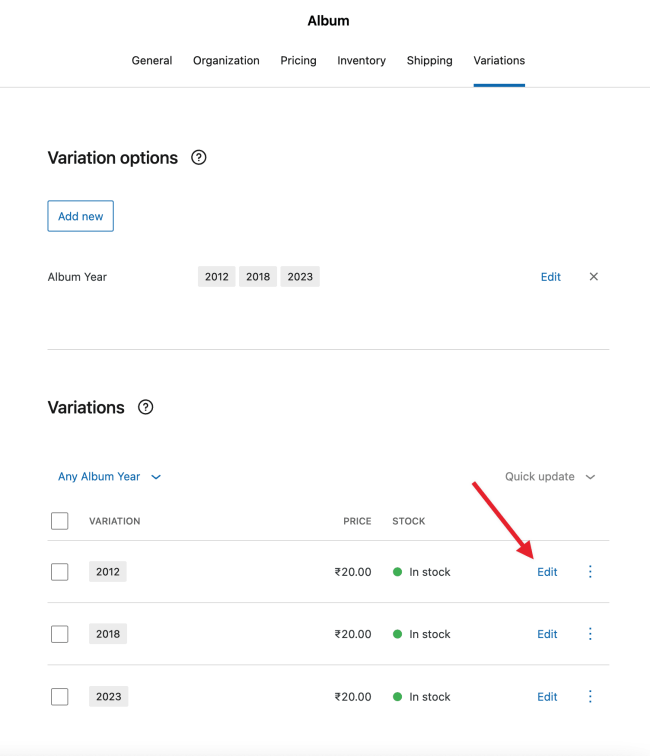
Editing Variations
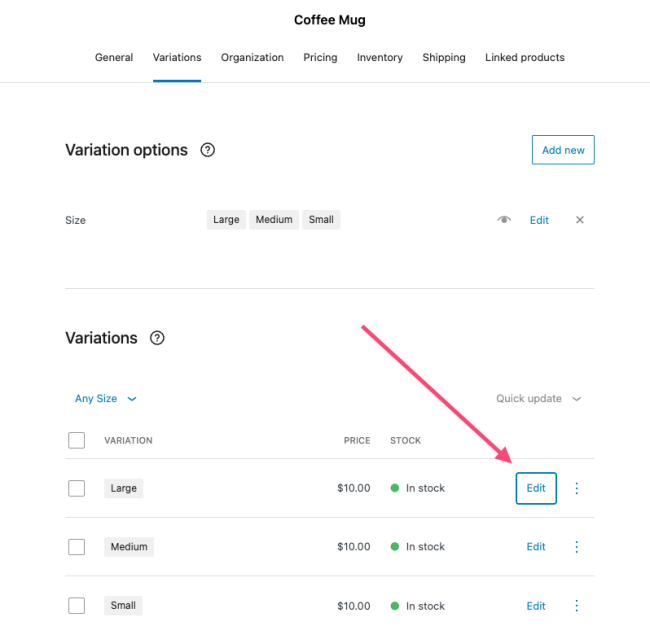
↑ Back to topTo edit variations, you can easily do so by clicking on the edit button next to the variation:
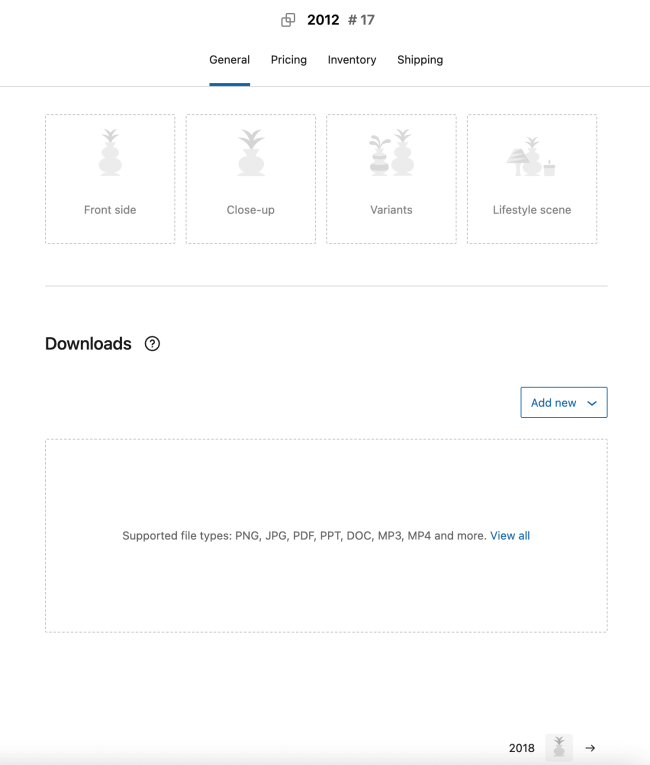
It will open a new screen allowing you to customize the variation and input relevant details. You’ll be presented with 4 tabs to fine-tune your variation:
- General: Add variation details and images that will be displayed on the product page when customers select this variation.
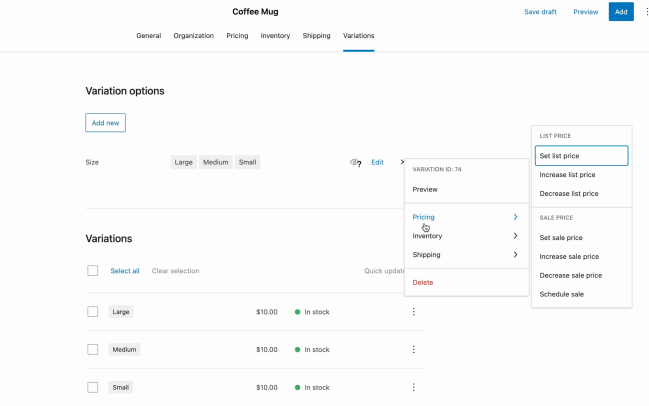
- Pricing: Modify the price of the variation with options to adjust the list and sale prices, and its tax class.
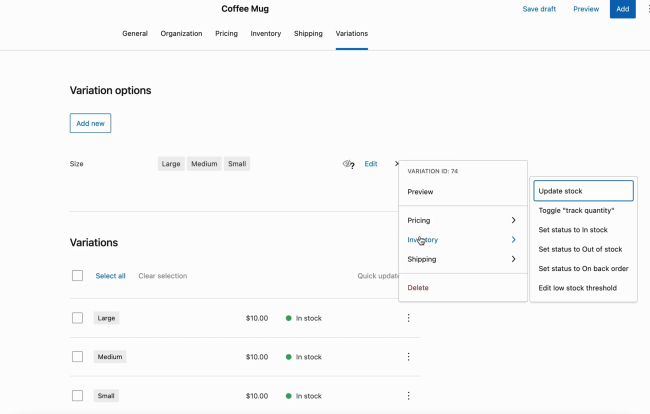
- Inventory: Manage inventory settings for the variation.
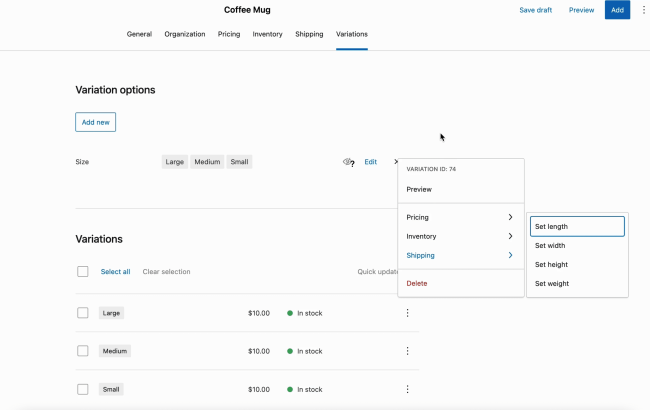
- Shipping: Customize shipping settings such as shipping class, length, width, height, and weight for the variation.
You can also preview, and navigate between variations or go back to the main product easily from the edit variation screen:
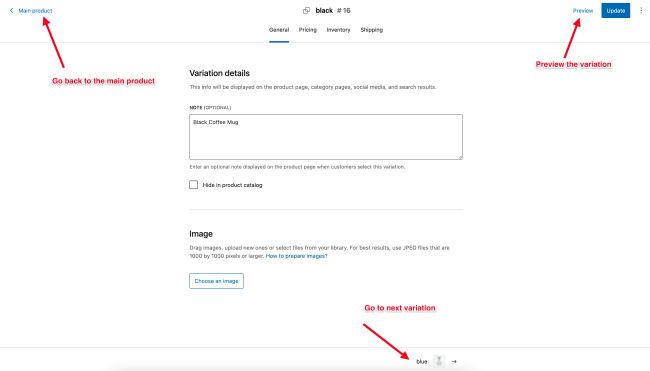
To edit variation details directly from the product editor, click on the ellipsis (three dots) corresponding to the variation:
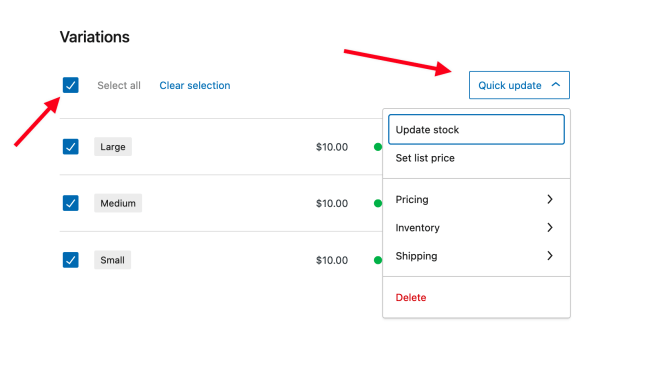
Bulk Edit Variations
↑ Back to topYou have the option to make bulk edits to the variations. To do this, simply check the “Select All” box and then select “Quick update” to apply updates to all the details at once:
Linked Products
↑ Back to topThis tab allows you to add upsells and cross-sells. You can click on Choose products for me to have five products automatically added for you based on your product categories and tags.
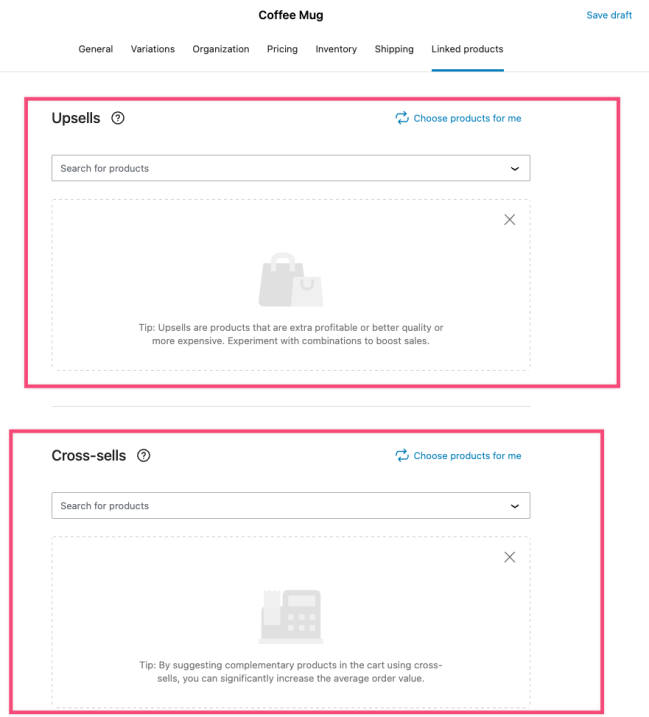
Upsells
↑ Back to topUpsells are products that you recommend instead of the currently viewed product. You can use upsells to offer customers alternative products that are more profitable, better quality, or more expensive.
Cross-sells
↑ Back to topCross-sells are complimentary products that you promote on the cart page, based on the product(s) a customer has already added. You can use cross-sells to significantly increase the average order value.
Virtual Products
↑ Back to topA virtual product is one that doesn’t require shipping, for example, a service. You can transform any product or variation into a virtual one by toggling off the shipping requirement under the “Shipping” tab.
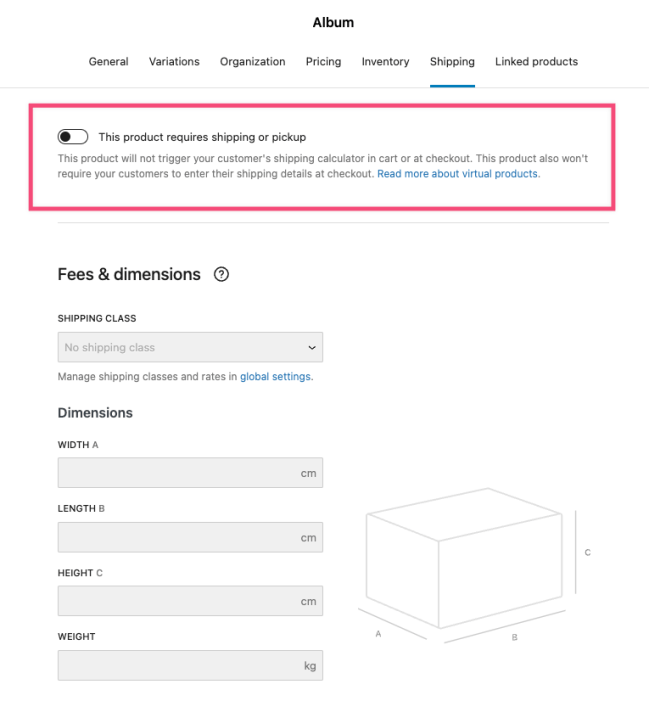
A virtual product will not trigger your customer’s shipping calculator in the cart or at checkout. Read more about virtual products.
Digital/Downloadable Products
↑ Back to topWooCommerce 8.4 introduces the capability to include downloadable files using the new product editor for customers to download after purchasing a product.
Follow the below steps to seamlessly integrate downloadable files into your product:
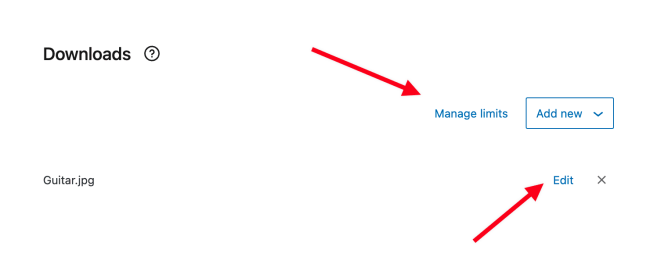
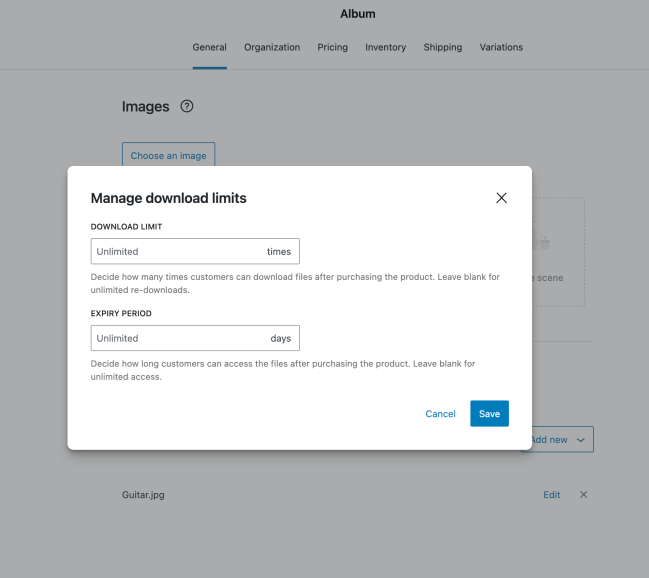
- In the General tab, scroll down to the ‘Downloads’ section. Here, you can add files by choosing them from the Media Library or inserting them via a URL.

- After adding the files, you can customize the file details according to your preferences. This includes modifying the file name and managing download limits and expiry durations. These options are available on the same screen:
If your product has variations, you can also add downloadable files to each variation:
- Click the ‘Edit’ button for the desired variation to access the editing variation screen.
- While on the variation editing screen, scroll down to the ‘Downloadable’ section under the General tab. From here, you can insert the necessary files to associate them specifically with that variation.
You can read more about Digital/Downloadable Product Handling.
Grouped Products
↑ Back to topIn WooCommerce 8.5, Grouped product types are only available through the “Add products” task in WooCommerce > Home > Add Products. In upcoming releases, we plan to implement a product type selector for a more streamlined experience.
WooCommerce 8.5 supports the creation of Grouped Products using the new product editor. To create a Grouped product:
- Go to WooCommerce > Home > Add Products
- Select Grouped product
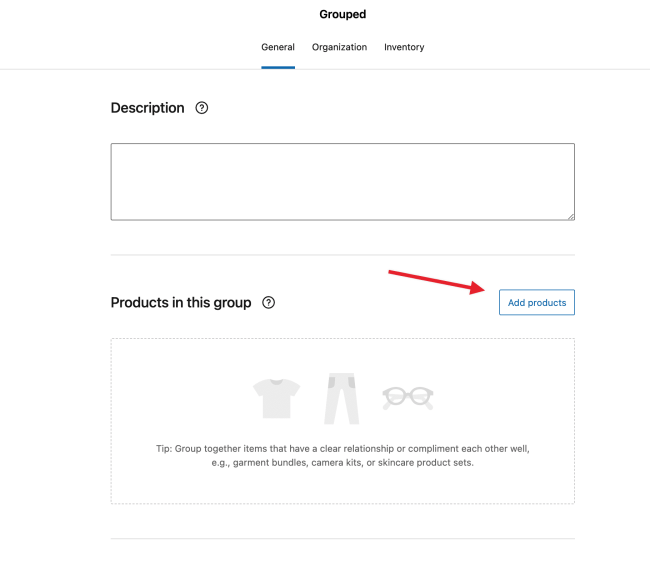
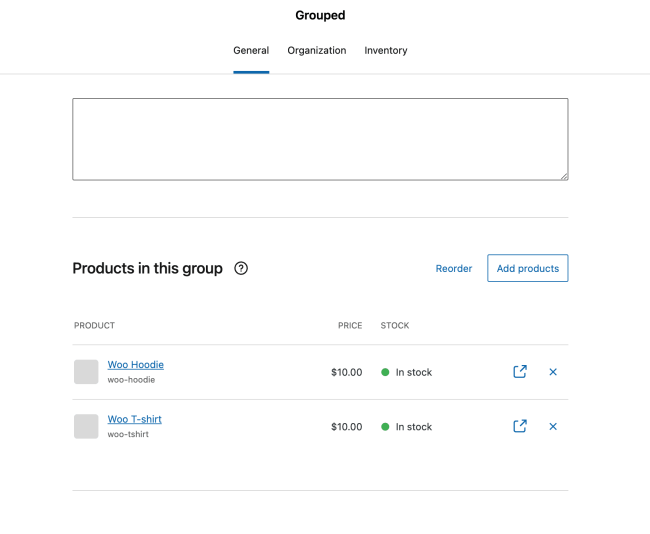
- Scroll down to the Products in this group section after the Description section under the General tab.
- From here, you can add products to make a collection of related products, enabling customers to purchase multiple items together.
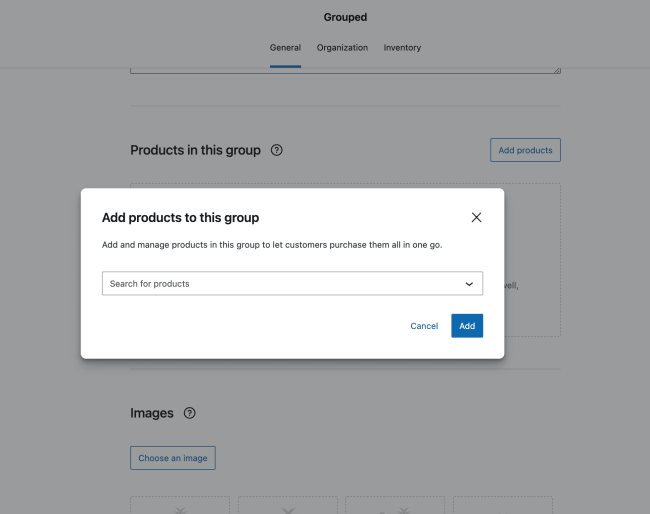
- To add products to be grouped, click on the “Add Products” button, and a pop window will be displayed.
- From here, you can search for products by name and add them to the group. You can add multiple products and delete products directly in the modal.
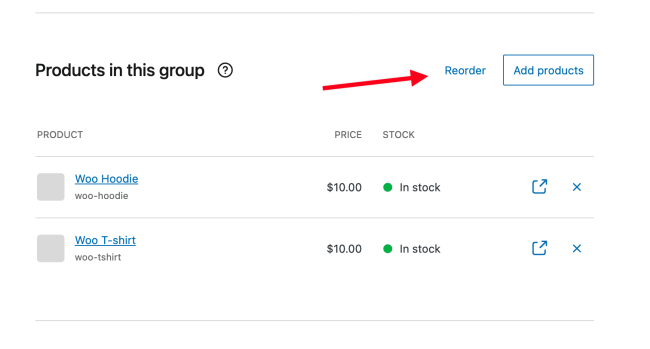
You can re-order the products in the group by clicking on the “Re-order” button:
External/Affiliate Products
↑ Back to topIn WooCommerce 8.5, External/Affiliate product types are only available through the “Add products” task in WooCommerce > Home > Add Products. In upcoming releases, we plan to implement a product type selector for a more streamlined experience.
WooCommerce 8.5 supports the creation of External/Affiliate Products using the new product editor. To create an External/Affiliate products:
- Go to WooCommerce > Home > Add Products
- Select View More Product Types and select External product
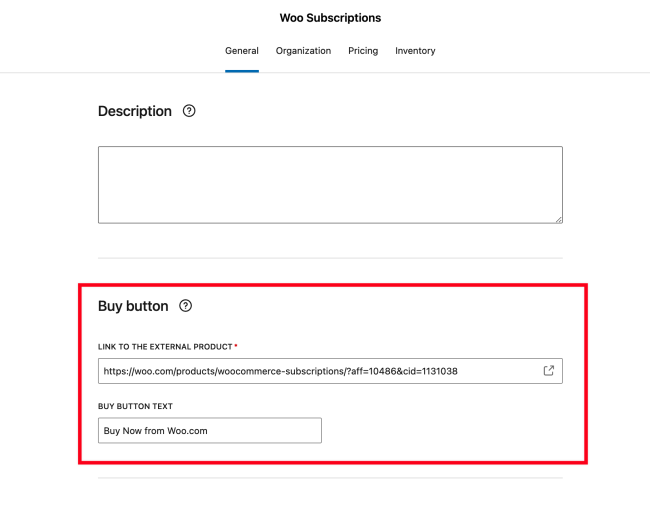
- Scroll down to the Buy button section after the Description section under the General tab.
- From here, you can add a link to the external product and choose a label for the button linked to a product sold elsewhere.
Disable New Product Editor
↑ Back to topIf you’d like to opt out of testing the new product editor and revert back to the original experience, you can do so in one of the following ways:
- Within the new product editor, head to the menu located in the top right of the product editing area. You’ll then see an option to “Turn off the new product form”.
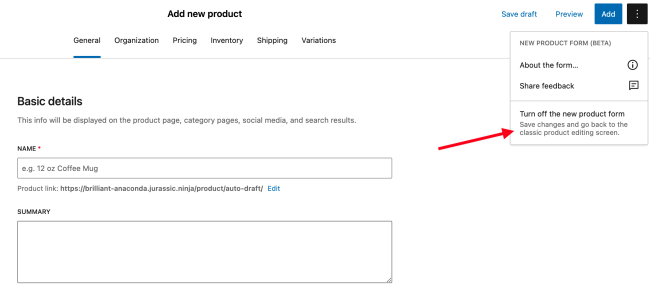
- After saving or publishing a product, a bar will appear at the bottom of the screen inviting you to leave feedback or turn off the new interface.
- Go to WooCommerce > Settings > Advanced > Features, uncheck “Try new product editor (Beta)”, and save.
Incompatible Plugins
↑ Back to topIf there are any incompatible plugins, the checkbox to enable the feature will be disabled. Please disable the incompatible plugins to use the new experience.

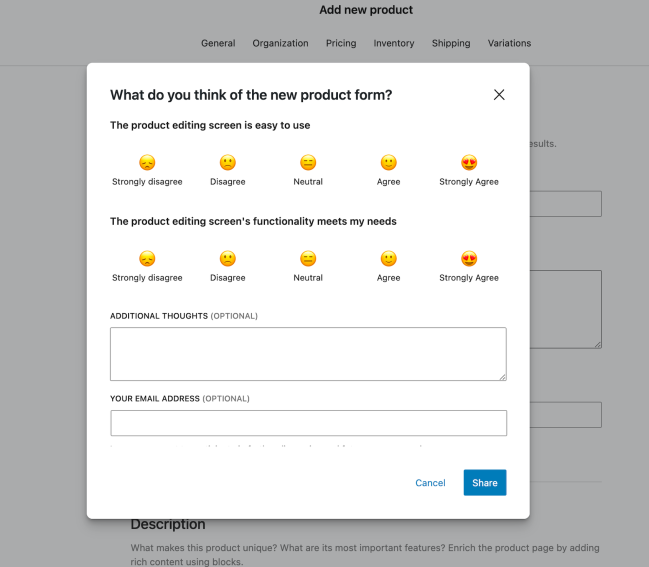
Feedback
↑ Back to topYou can share feedback about your experience with new product editor by following the below steps:
- Go to Product > Add New
- Click on the ellipsis (three-vertical-dots) on the top right
- Click on the “Share Feedback” option

- The feedback form will be presented, allowing you to share your experience regarding the new product editor.
Frequently Asked Questions
↑ Back to topWhat’s the purpose of the new product editor?
↑ Back to topThe new experience will allow you to create and edit product listings faster than using our classic editor. We’re upgrading our technology behind the scenes to work with block-based editing, which means faster performance for you and less time spent on settings. This also paves the way for more improvements in the future to other store management areas.
Are there any specific requirements or qualifications to enable this?
↑ Back to topFor now, the new product editing form will only work with simple physical products, and you won’t be able to use extensions that leverage the product options — such as WooCommerce Subscriptions, for example. We’ll update this page with new features as they become available — stay tuned!
Can I integrate third-party plugins or extensions with the new product editor?
↑ Back to topWith the current beta stage, you cannot use extensions that rely on product listings, such as WooCommerce Subscriptions. We will continue to roll out additional features to support products with variations, extensibility, and many other features.
Is there a dedicated support channel for this new feature to report issues or seek assistance?
↑ Back to topTo provide feedback about your experience with the new editor, you’ll be given the option to do so in a bar that will appear at the bottom of the screen after you’ve saved or published a product.
Alternatively, navigate to the menu in the top right of the product editing experience and select “Share feedback”. If you encounter any issues, don’t hesitate to contact our support team.