Payfast Payment Gateway allows you to process payments via the South African payment processor, Payfast. Payment from any country may be accepted, but it is required to use ZAR as the store currency.
Installation
↑ Back to top- Download the .zip file from the Downloads section in your WooCommerce account.
- In your WP Admin dashboard, go to WordPress Admin > Plugins > Add New and Upload Plugin with the file you downloaded via Choose File.
- Click Install Now and Activate the extension.
Learn how to install and activate extensions in WooCommerce.
Requirements
↑ Back to top- A Payfast account to obtain a Merchant ID and Merchant Key. Note that Merchant IDs for developers and live sites are different, so you may need to update those on your live site.
- Instant Transaction Notification (ITN) should be enabled. Replace the following with your domain name for the Notify URL:
https://yourdomain.com/?wc-api=WC_Gateway_Payfast - WooCommerce version 7.2 or higher
- WordPress version 6.1 or higher
- PHP version 7.2 or higher
Sign up for a Payfast account
↑ Back to top- Visit the Payfast website to sign up and verify your account.
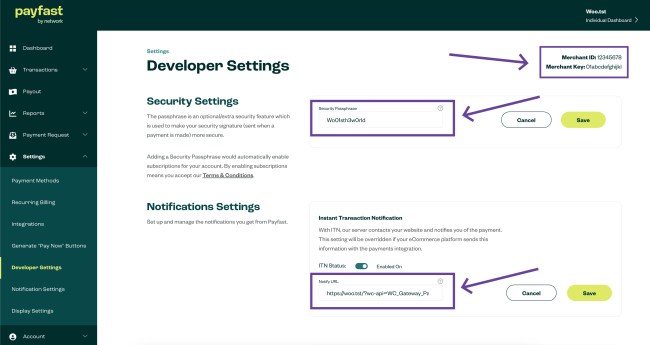
- Then, from your Payfast account dashboard, navigate to Payfast > Settings > Developer Settings.
- Copy your Merchant ID and Merchant Key (top right) to use during setup. You can leave this window open after signup.
- Add and copy your Security Passphrase, then click Save.
- Finally, enter your Notify URL under Instant Transaction Notification by replacing the following with your domain name:
https://yourdomain.com/?wc-api=WC_Gateway_Payfast. - Click Save.
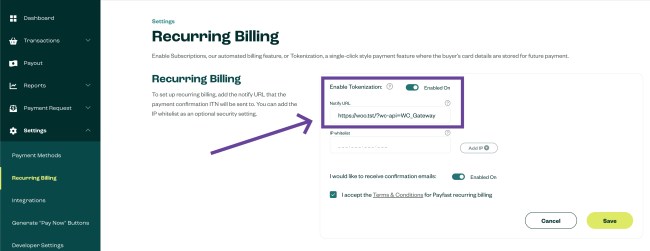
If you’re using the WooCommerce Subscriptions and/or WooCommerce Pre-Orders, extensions, confirm that Ad hoc Payments are enabled in the Recurring Billing section.
Setup and configuration
↑ Back to top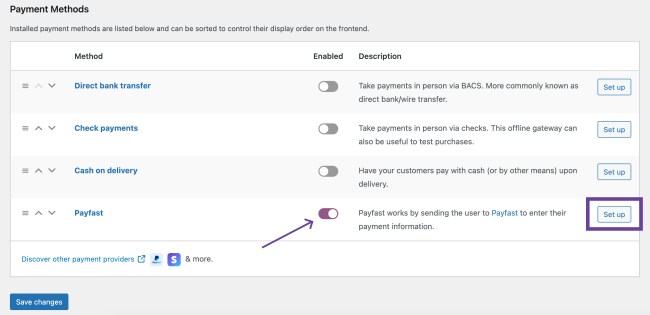
To connect your store to Payfast:
- From your store’s WP Admin dashboard, navigate to WooCommerce > Settings > Payments > Payfast.
- Use the toggle under Enabled to enable Payfast.
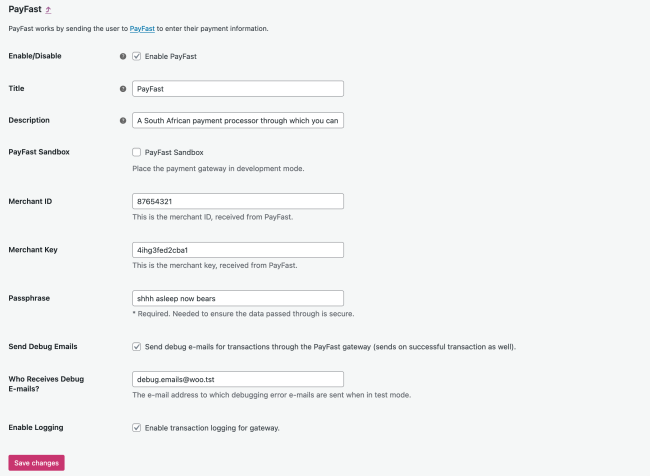
- Click the Set up button to be taken to the settings screen. From here, you’ll see the following options displayed:
- Enable/Disable: Check this box to enable Payfast as an option on the checkout page.
- Title, Description: Shown to customers at checkout (optional).
- Payfast Sandbox: Check this box if you are developing your website and are not ready to accept payments and/or wish to test this integration.
- Merchant ID, Merchant Key, Passphrase: Obtained from your Payfast account as outlined in Sign up for a Payfast account above.
- Send Debug Emails, Who Receives Debug Emails?: Check this box and enter an email address to receive email notifications for each transaction (optional).
- Enable Logging: When checked, this option creates a log in WooCommerce > Status > Logs to record transaction event information. This is useful for troubleshooting.
- Save changes.
This extension uses the Merchant ID and Merchant Key fields to send cart information to your Payfast account.
Compatibility with other extensions
↑ Back to topPayfast works well with several extensions. Please bear in mind is the initial charge may not be less than R5.00 ZAR.
WooCommerce Subscriptions
↑ Back to topPayfast works with WooCommerce Subscriptions (separate purchase). Configure a simple or variable subscription product as described in the extension’s documentation.
Using Payfast with WooCommerce Subscriptions:
- Basic features: Subscription suspension and subscription cancellation
- Advanced features: Recurring total modification, payment date modification, customer payment method changes
While one user can own multiple subscriptions at the same time, Payfast is unable to process the purchase of multiple subscriptions in the same transaction. Two subscriptions cannot be added to the cart at the same time.
Cancellation works from both the WooCommerce store and the Payfast side. If you cancel via the store, the token is canceled at Payfast. If you cancel via Payfast, the order is canceled locally.
WooCommerce Pre-Orders
↑ Back to topPayfast works with WooCommerce Pre-Orders (separate purchase). Configure the products as described in the extension’s documentation.
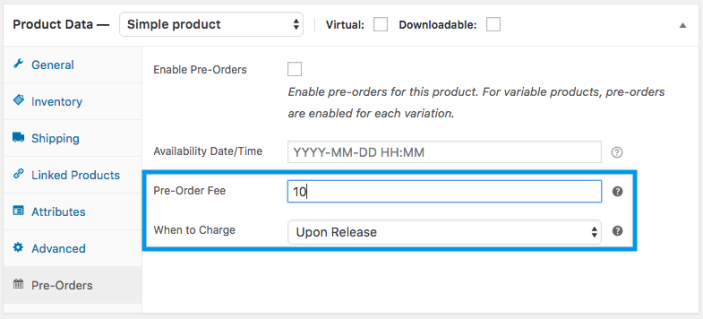
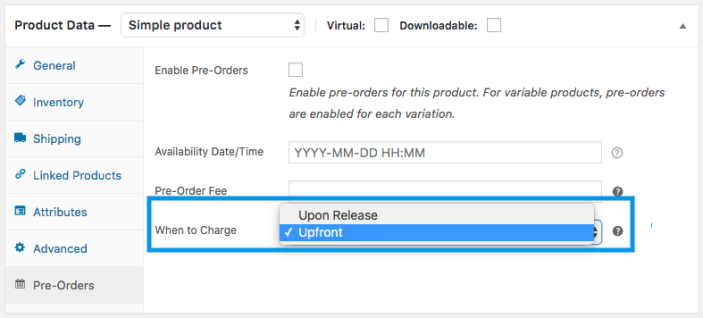
WooCommerce Pre-Orders will not work if no initial fee is charged. To address this, there are two options:
- If you want to charge Upon Release, you first need to set a Pre-Order Fee.
- If you charge the full amount Upfront, setting a Pre-Order Fee is optional.
Testing Payfast
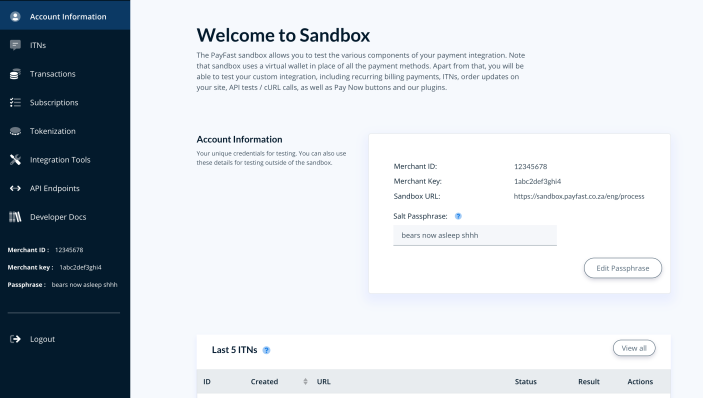
↑ Back to topYou can test this Payfast Payment Gateway before going live using Payfast Sandbox credentials.
To do this:
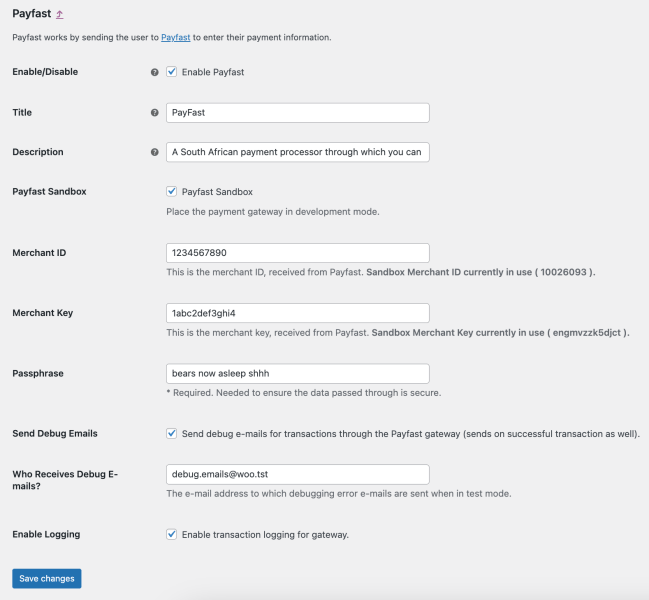
- In your WP Admin dashboard, go to WooCommerce > Settings > Payments > Payfast.
- Tick the Payfast Sandbox checkbox to put the gateway in test mode.
- Replace your Merchant ID, Merchant Key, and Passphrase with the equivalents in your Payfast Sandbox.
- Click Save changes.
Note: Once you’re ready to go live, be sure to untick the Payfast Sandbox checkbox and review your live credentials again. Your Merchant ID and Merchant Key must be entered correctly in the appropriate fields, even when using Sandbox mode — otherwise, there will be a checkout error. Merchant IDs for developers and live sites are different, so you may need to update those on your live site after testing.
Troubleshooting Payfast
↑ Back to topHere are the common issues encountered with WooCommerce Payfast and how to solve them. These errors are usually visible in the Payfast logs that are generated and stored under WooCommerce > Status > Logs, provided that Enable Logging is checked in the Payfast settings.
Error occurred: Security signature mismatch
↑ Back to topThis error can be caused by the Passphrase in the site settings not matching the Payfast account. Double-check the Payfast account settings. If it does appear to match, change it to something new and save the passphrase in the Payfast account settings, then copy-paste the new passphrase to the site settings. Be sure to save the settings when done.
Error occurred: Bad source IP address
↑ Back to topThe error can be caused when a notification is being received from an unexpected IP address. Payfast may occasionally add or change the IP addresses that returns the ITN or payment notifications. If this issue persists, the following filter can be used to disable the check.
Note: snippet is offered as is. Our Happiness Engineers are not able to help with implementation or testing code snippets. If you choose to use it, please add it to a child theme’s functions.php file, or via a code snippet plugin to ensure it persists after updates.
add_filter( 'woocommerce_gateway_payfast_is_valid_ip', '__return_true' );
If the snippet above doesn’t help, please contact your website host’s support and ask them to check that these Payfast IP addresses are on your site’s Allowed List.
Questions and feedback
↑ Back to topNeed some assistance? Get in touch with a Happiness Engineer via the Help Desk.

