Paymob is a leading payment service provider in Egypt, United Arab Emirates (UAE), Oman, Saudi Arabia (KSA), and Pakistan. Since its launch, Paymob has empowered enterprises and SMEs to accept online and in-store payments, revolutionizing payment infrastructure across the MENA-P region.
Sign up for a Paymob account
↑ Back to top- Click here to register, upload your business documents, and choose the payment methods you want to integrate. The process is simple and can be resumed anytime from where you left off.
- Once all steps are completed, document verification will take up to 3 days. If there are any issues with your documents, you will receive an email notification, and our sales representative will assist you in completing the remaining steps.
- After your documents are verified, you will receive an email notification.
- Once the live payment integrations you requested are set up, you will be notified via email.
Install the Paymob extension
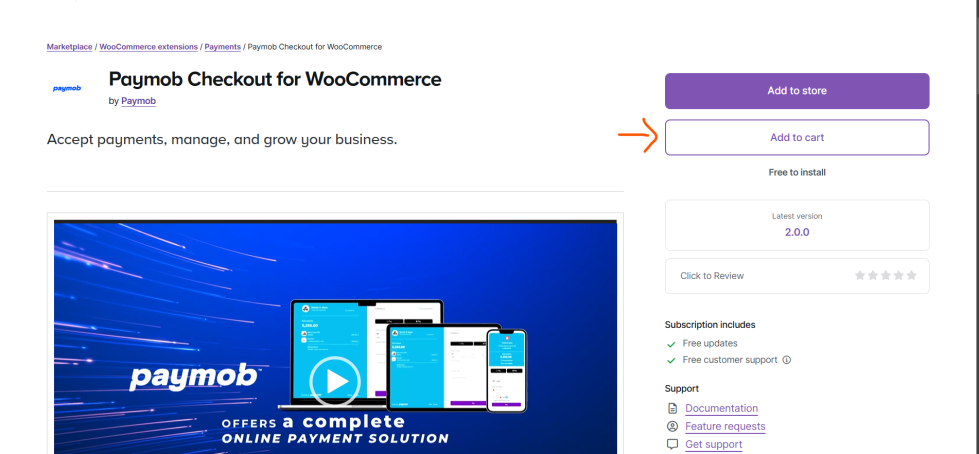
↑ Back to top- Place Order for Paymob Payments for free from woocommerce.com
- Click on Add to Cart and complete the Checkout Process .
3. Download the .zip file from the My subscriptions section of your WooCommerce account.

4. In your store’s WP Admin dashboard, navigate to Plugins > Add New Plugin.
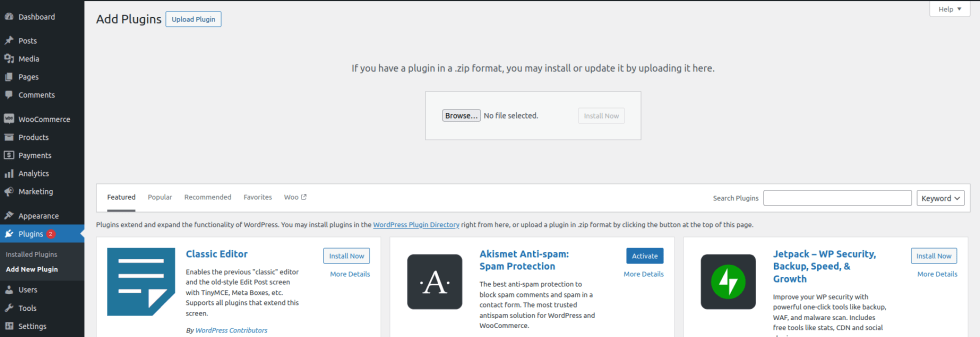
5. Click the Upload Plugin button, then Browse..., and select the downloaded zip file from your computer.
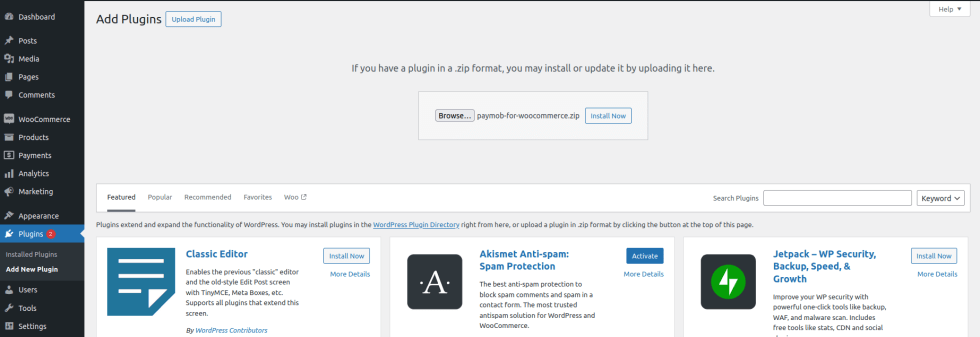
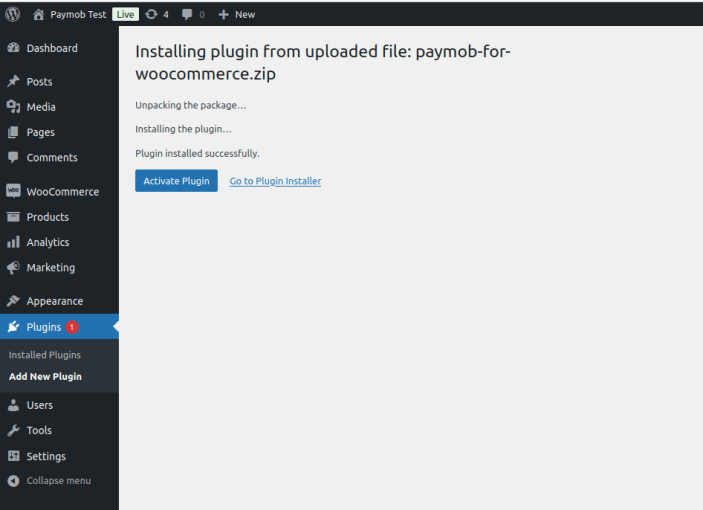
6. Once the file has been uploaded, click Install Now.
7. After the extension has been installed successfully, click Activate Plugin (see image below).
8. After activation, Paymob for WooCommerce will be listed under Plugins (see image below).
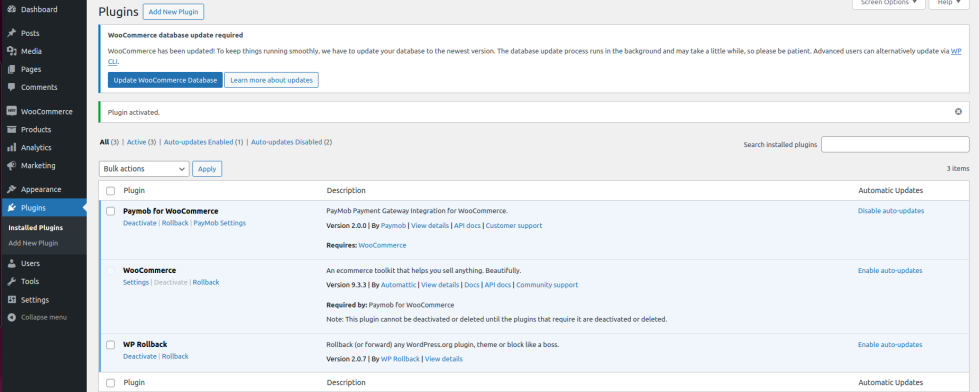
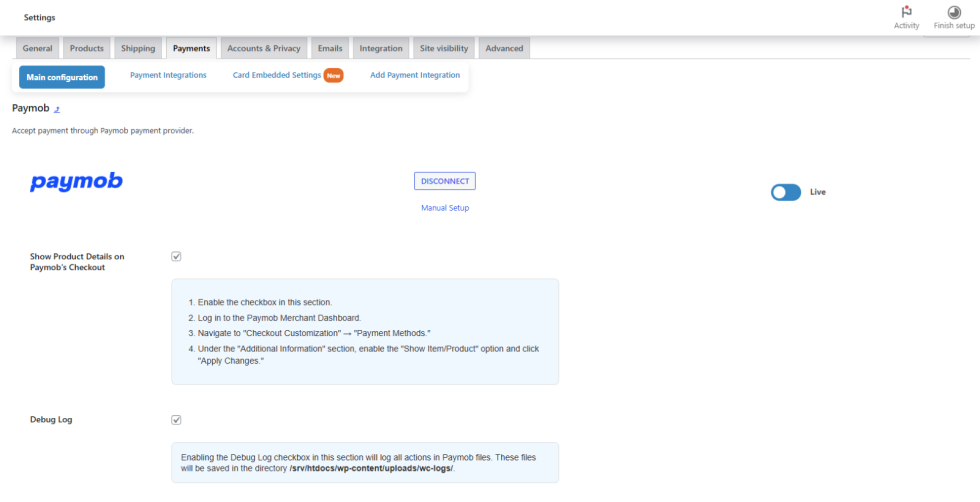
9. Click the Paymob Settings link below the extension’s name; this will take you to the main configuration page.
Main configuration
↑ Back to top- Follow either Step 1.1 OR 1.2 to configure the Plugin for use
1.1 Click on “Connect your Paymob Account” to be redirected to the sign-in page. Select your country, enter your username or mobile number along with your password, and verify your account using an OTP. Once authenticated, you will be taken to the main configuration section. Your plugin is now ready to use & will be enabled by default on the Store.

Note – If your onboarding is not yet complete, click on “Connect your Paymob Account” to proceed with the onboarding steps.
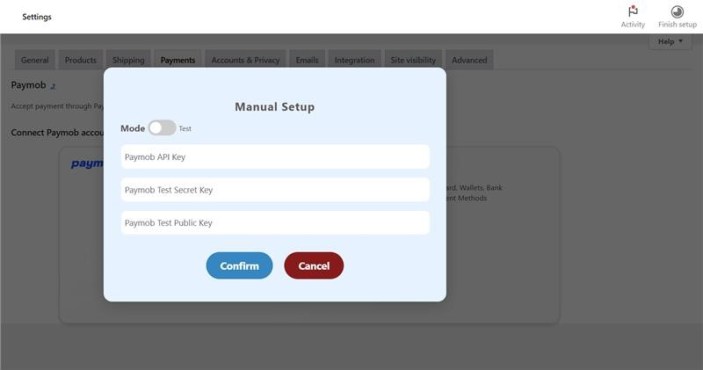
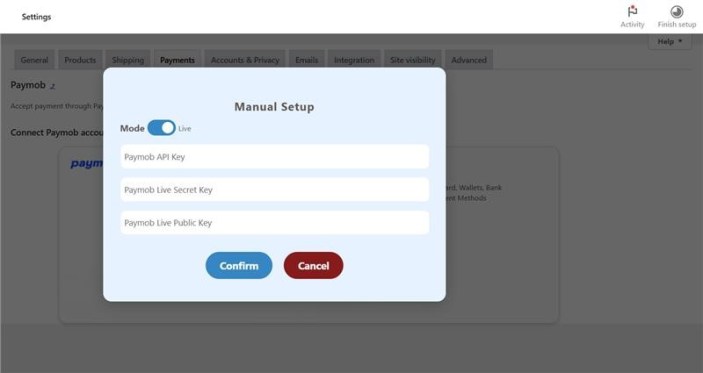
1.2 You can also click on “Manual Setup”, enter the API Key, Public Secret Key & Client Key and click on Confirm to connect your account. Once the Keys are validated, your plugin is now ready to use & will be enabled by default on the Store.
Keys are different for Test Mode and Live Mode.
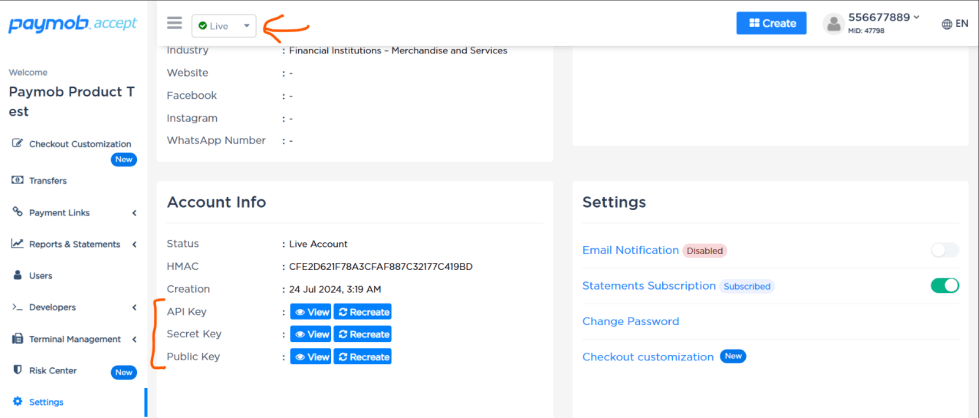
Where to find API Keys?
Log in to the Paymob Dashboard and navigate to Settings -> Account Info. Click on“View” to access the details. Ensure the correct mode is selected, as highlighted on the top panel: choose LIVE to access Live Keys or TEST to access Test Keys.
Paymob Dashboard Link :
Egypt – https://accept.paymob.com/portal2/en/login
UAE – https://uae.paymob.com/portal2/en/login
Oman – https://oman.paymob.com/portal2/en/login
KSA – https://ksa.paymob.com/portal2/en/login
Test Mode –
Live Mode –
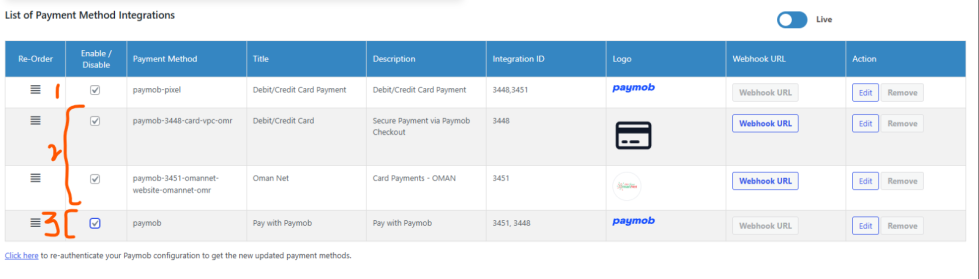
2. Once your account is authenticated through Step 1.1 or 1.2, your LIVE & TEST payment method integrations will be displayed in the Payment Integrations tab
The store mode is indicated in the Main Configuration section, and you can toggle between modes as needed.
- In LIVE Mode, your store will use live payment method integrations.
- In TEST Mode, your store will use test payment method integrations.
If you make any changes, such as switching the mode, enabling/disabling Show Product Details on Paymob’s Checkout, or adjusting the Debug Log, be sure to click “Save Changes” to apply them.
Payment method integration settings
↑ Back to top- This section displays both Live and Test Payment Method Integrations, with the ability to toggle between Test and Live modes.
Paymob provides flexible checkouts options.
Refer to Payment Method Header:
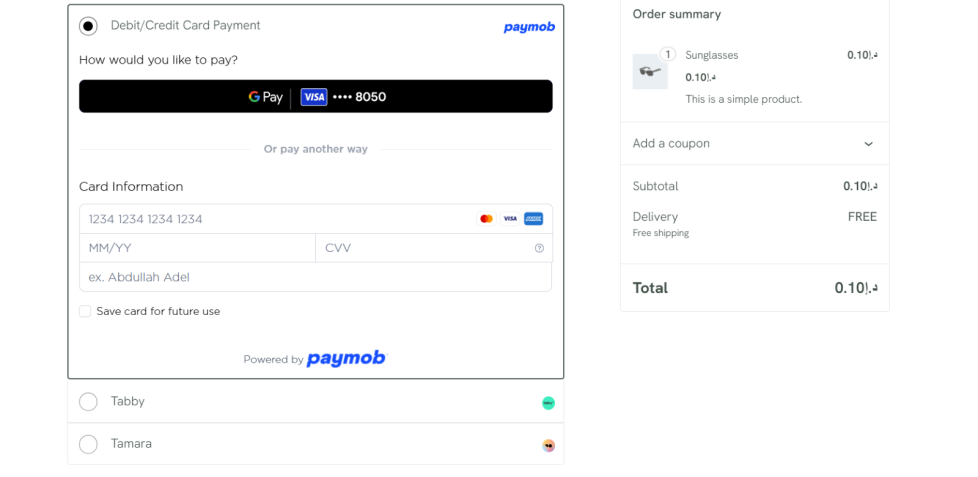
Option 1. paymob-pixel (Card Embedded Settings)
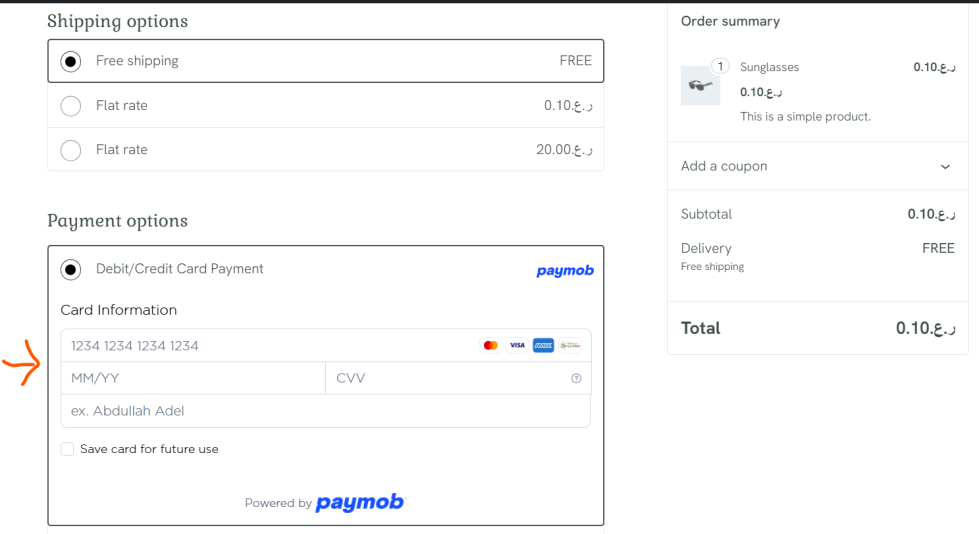
Enable seamless payments directly on your WooCommerce store for Cards, Apple Pay, and Google Pay without redirecting users to Paymob’s Hosted Checkout.
- By default, this option is enabled on your store with Card Payments only. To enable Apple Pay or Google Pay via Paymob Pixel, please contact your account manager or email us at support@paymob.com. Make sure to receive confirmation from Paymob before enabling Apple Pay or Google Pay via the Card Embedded Settings section.
- Payment methods for this setup can be managed through the Card Embedded Settings section.
- This will appear as the first option in your payment method list.
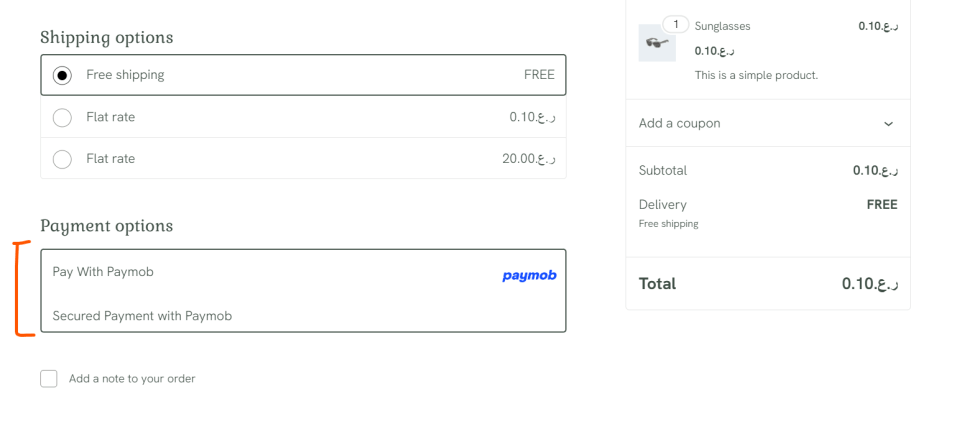
Option 2: Display payment methods as a list on your WooCommerce store.
Users will select a payment method and be redirected to Paymob’s Hosted Checkout to enter their payment details and complete the transaction.
Enabling a payment method in this section will make it visible on your WooCommerce store.

Option 3: Using Paymob Main App
Paymob’s main app is disabled by default.
If enabled, users selecting this option will be redirected to Paymob’s Checkout, where
they can choose from all available payment methods. This will appear as the last option in your payment method list.
You can have all set-up’ enabled or a combination of any.
The best recommendation is to use paymob-pixel for Cards, Apple Pay, and Google Pay while displaying other payment methods as a list.
Customization Options
- Rearrange payment methods by dragging and dropping them to your preferred order.
- Edit titles and descriptions or enable/disable payment methods as needed.
- It is recommended not to modify payment method logos.
Payment methods will appear in the WooCommerce checkout in the same order as listed here.
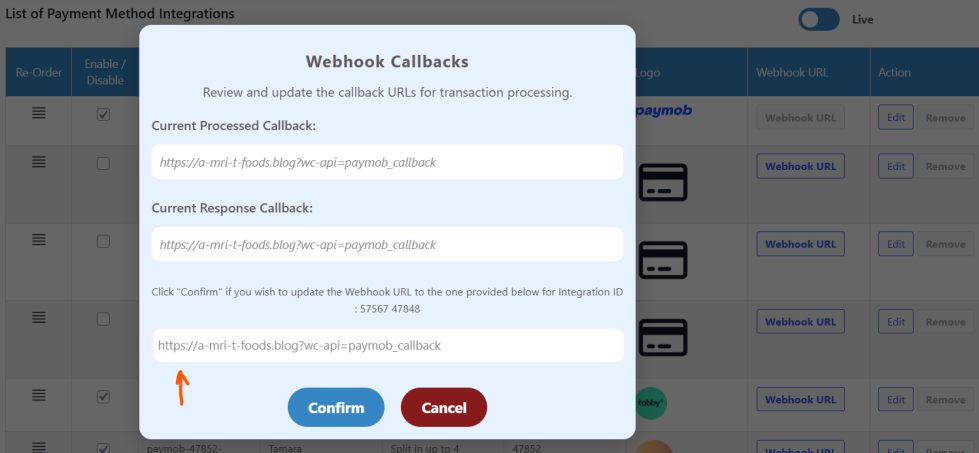
Webhook Settings
Webhooks will be automatically configured for all payment method integrations. Merchants can view the current Webhook URL by clicking on the “Webhook URL” option.
The correct format for the Webhook URL is your_store_url/? wc-api=paymob_callback
Upon Clicking on “Webhook URL”, a dialog pop-up will display the current Webhook URL. If the displayed Webhook URL does not match the correct format, merchants can click “Confirm” to update it to the correct Webhook URL for their store.
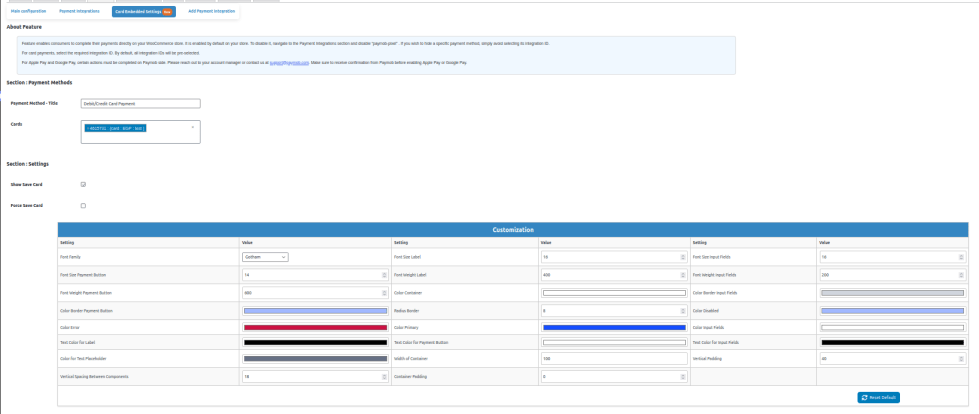
Section – Card Embedded Settings
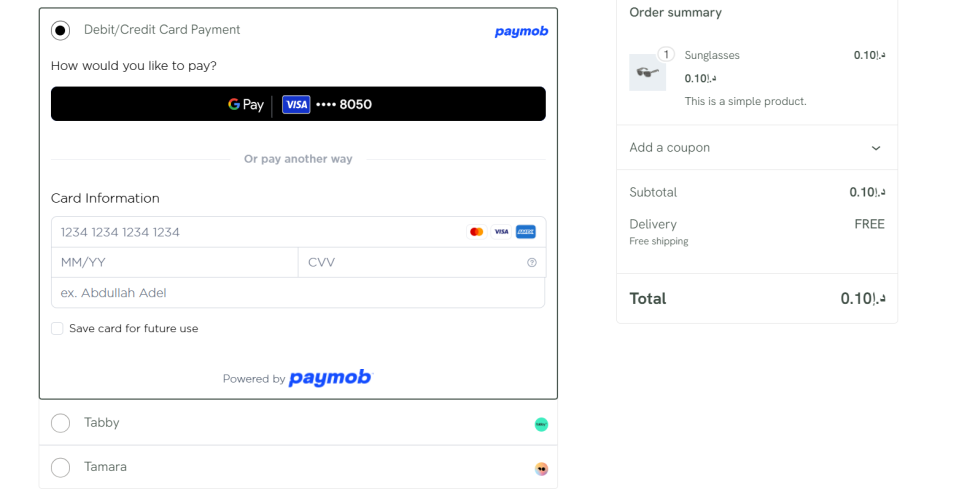
Feature enables consumers to complete their payments directly on your WooCommerce store. It is enabled by default on your store. To disable it, navigate to the Payment Integrations section and disable “paymob-pixel”. If you wish to hide a specific payment method, simply avoid selecting its integration ID.
For card payments, select the required integration ID. By default, all integration IDs will be pre-selected.
- For Apple Pay and Google Pay, certain actions must be completed on Paymob side. Please reach out to your account manager or contact us at support@paymob.com. Make sure to receive confirmation from Paymob before enabling Apple Pay or Google Pay for the embedded experience.
- Payment Method – Title: Merchants can customize the title of the payment method displayed at checkout.
- Cards, Google Pay & Apple Pay: Select the Integration ID to be used for payments. If integration id is not selected, payment method will not be displayed .
- Show Save Card: Allows users to save their card for future transactions if they provide consent.
- Force Save Card: When enabled, cards are automatically saved after a transaction without user consent. Users will be notified that their card will be saved on Checkout.
- Customization: Customize the component using CSS properties. Default settings are applied initially, and you can click the “Reset Default” button to restore them.
Remember to save your changes for them to reflect on the checkout.
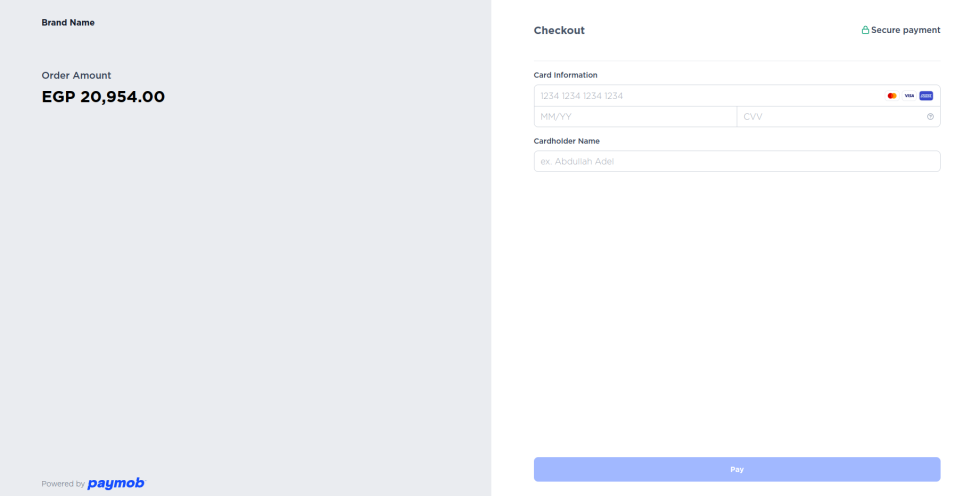
Checkout
↑ Back to topWooCommerce checkout page
↑ Back to top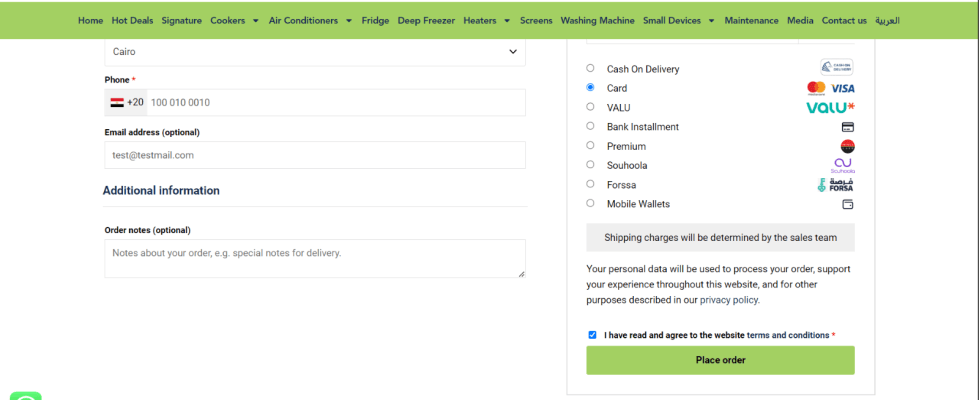
Paymob checkout page
↑ Back to top