Table of contents
↑ Back to top- Introduction
- Installation
- Configuring Price Rules for Your Store
- Price List Rules Management
Introduction
↑ Back to topAbout the Plugin
↑ Back to topThe Price List extension allows you to create and manage custom pricing rules for your store. You can adjust product prices by either reducing them by a percentage or setting a fixed new price. The extension provides an intuitive interface where you can define rules, set their priority in ascending order, and assign them to specific user roles, individual customers, or geo-locations. This ensures that the appropriate pricing is applied based on your configured criteria.
Key Features
↑ Back to top- Create custom price lists for products in bulk.
- Create custom pricing rules by setting percentage-based reductions or fixed new prices.
- Apply pricing adjustments to specific customers, user roles, or geo-locations.
- Prioritize multiple price rules in ascending order for structured pricing control.
- Automatically update and apply new prices across the store.
Installation
↑ Back to topInstalling the Plugin
↑ Back to top- Download the .zip file from your WooCommerce account.
- Go to WordPress Admin > Plugins > Add New > Upload and select the ZIP file you downloaded in step 1.
- Install Now and Activate the extension.
More information is at Install and Activate Plugins/Extensions.
Activating the Plugin
↑ Back to topAfter activation, the Price List extension will be ready for your WooCommerce store.
Configuring Price Rules for Your Store
↑ Back to topCreating Price List Rules
↑ Back to top1. Navigate to Price List Rules
↑ Back to topIn your WordPress dashboard, go to WooCommerce > Price List Rules.

2. Add a New Rule
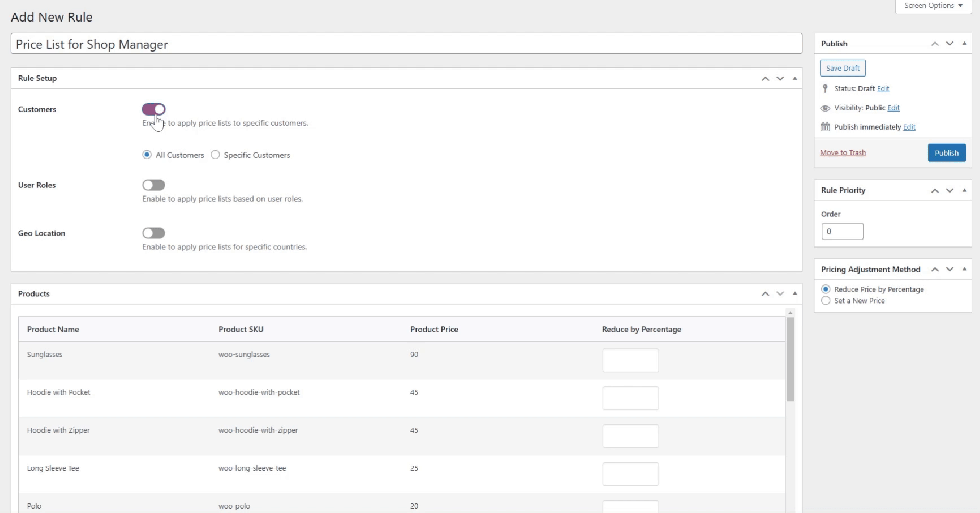
↑ Back to topClick “Add New Rule” to create a new price list rule.
3. Enter Title for Price List Rule
↑ Back to topEnter the title for the Price List Rule. This title will help you easily identify and manage the rule later on the Manage Price List Rules screen.

4. Define the Rule Criteria
↑ Back to topOnce on the rule setup section, you can define the criteria for the price list rule based on the following options:
- Customers: Choose to apply the price list rule to either All Customers or Specific Customers. This allows you to target pricing based on customer selection.
- User Roles: Apply the price list rule based on all User Roles or Specific Roles, ensuring specific roles configured in the wooCommerce get the intended pricing.
- Geo-location: Set the rule for Specific Countries or All Countries, giving you control over location-based pricing adjustments.
Note: You can create a rule that targets a single entity (e.g., specific customers) or combine multiple entities (e.g., customers, user roles, and geo-location) depending on your business needs.
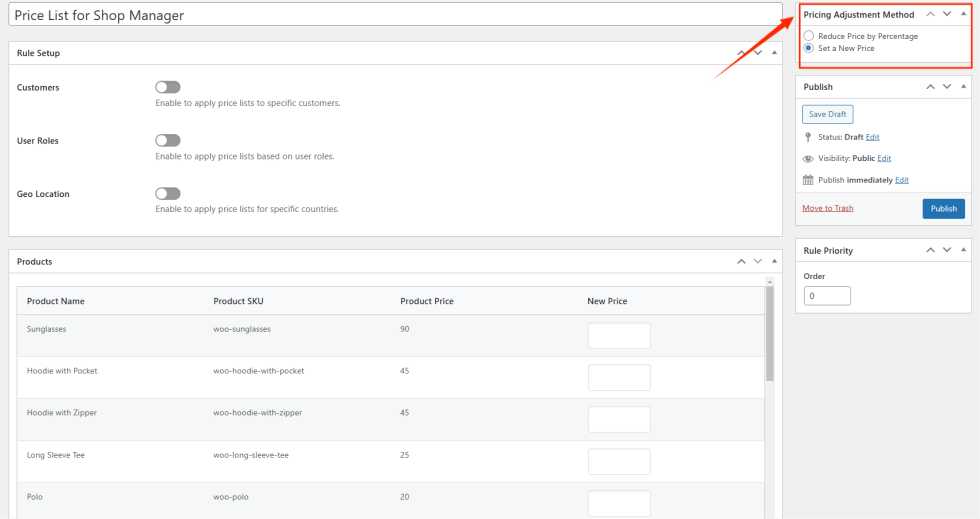
5. Select Pricing Adjustment Method
↑ Back to topChoose how you’d like to adjust product prices:
- Reduce Price by Percentage:
Selecting this option will deduct the specified percentage from the original price. For example, entering “10” will subtract 10% from the original price. - Set a New Price:
This option allows you to replace the original price with a fixed amount. The new price you enter will be reflected on your store’s product page.
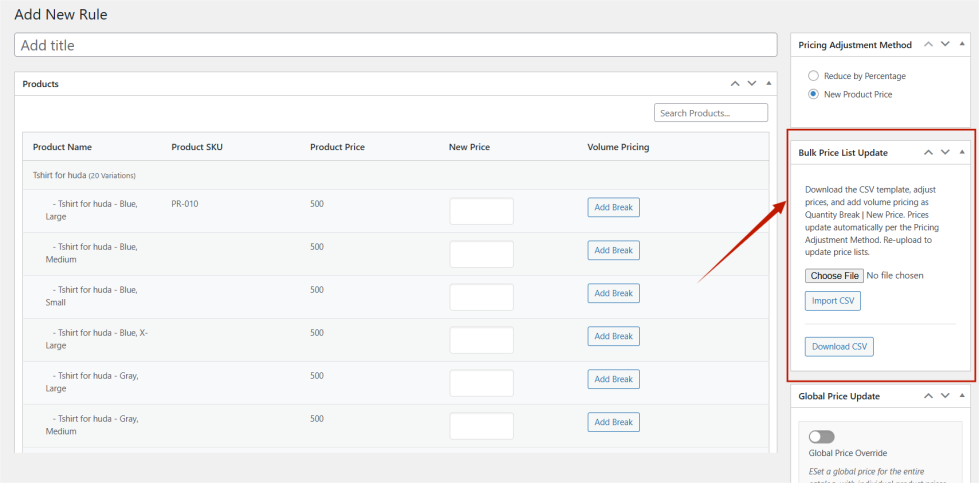
6. Configure Product List
↑ Back to topManual Entry Via UI
In the Products Box, you’ll see all your store’s products listed along with their SKUs, Current Price, and the chosen pricing adjustment method.
- If you select Reduce Price by Percentage, the entered number (e.g., 10) will be deducted from the current price of each product.
- If you select Set a New Price, the fixed price you enter will override the current price for the selected product(s).

Bulk Price List Update via CSV
- Download the CSV template, which contains the following columns:
- Price List ID
- Product Names
- SKU
- Product ID
- Description
- Original Price
- Updated Price
- Volume Pricing
- Add the updated prices in the Updated Price column and define volume pricing rules.
- Format volume pricing rules as: Quantity | Price (e.g., 5|30, 6|50).
- Upload the completed CSV to update the prices efficiently instead of manual entry.
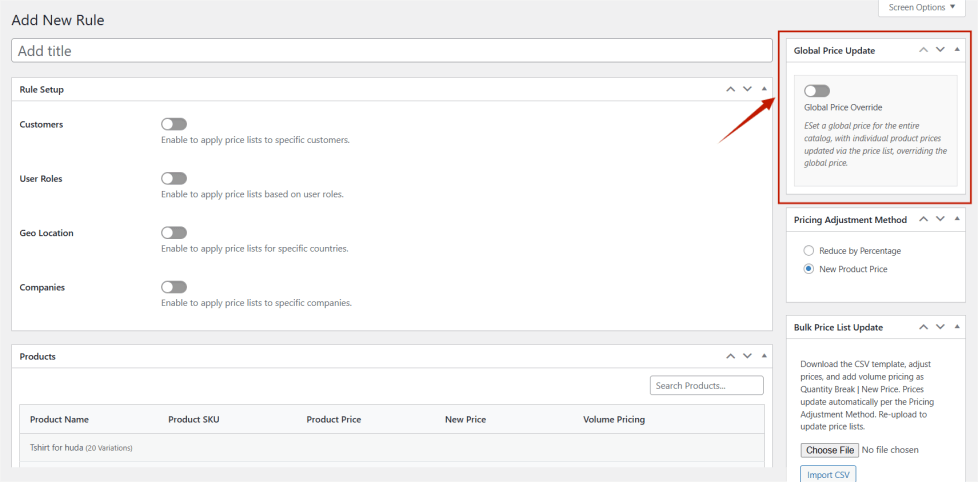
7. Global Price Update
↑ Back to top- Enable this option to apply a single default price across the entire catalog.
- If you update a price in a specific price list, only that product’s price will change, while the rest will retain the default price.
8. Set Rule Priority
↑ Back to topThe rule priority operates in ascending order. A rule with a priority of 0 will be applied first.
You can adjust the rule priority to control the order in which the rules are applied.

9. Publish the Rule
↑ Back to topOnce you’ve configured all the rule settings, click Publish to apply the price list rule. Your new rule will then be active and reflected on the Manage Price List Rules screen for further management.
Price List Rules Management
↑ Back to top1. Once the rules are published, they will appear under the Manage Price List Rules screen.
2. Here, you can edit existing rules, delete rules, or search and filter and sort the existing rules
