Product Tables For WooCommerce Documentation Menu
↑ Back to top- Requirements
- Installation
- Configuration
- Settings and Options
- How to Embed Product Table on Your Store Pages
- Plugin Support
Requirements
↑ Back to top- WooCommerce 3.3+.
Installation
↑ Back to top Upload the zip file that you have purchased. and from the sidebar, click on Plugins > Installed Plugins.
The Installed Plugins page will have a list of all the plugins that have been installed on your WP site. Navigate to, or search for: “WooCommerce Product Tables”.
Note: Below the plugin name, if it shows an “Activate | Delete” option, click on “Activate”. If it’s showing a “Deactivate” option, it means that the plugin is already installed and you don’t have to do anything. However, in most cases after installation, you’ll be presented with the first option.
Upload the zip file that you have purchased. and from the sidebar, click on Plugins > Installed Plugins.
The Installed Plugins page will have a list of all the plugins that have been installed on your WP site. Navigate to, or search for: “WooCommerce Product Tables”.
Note: Below the plugin name, if it shows an “Activate | Delete” option, click on “Activate”. If it’s showing a “Deactivate” option, it means that the plugin is already installed and you don’t have to do anything. However, in most cases after installation, you’ll be presented with the first option.
Configuration
↑ Back to topOnce the plugin is successfully activated:
-
Go to your WordPress Admin Dashboard.
-
Navigate to WooCommerce → Product Table → Add New Product Table.
This opens the configuration screen where you can create and customize your product table.
Settings and Options
↑ Back to topCatalog Source
↑ Back to topChoose which products should appear in the product table.
-
Include Entire Catalog
Enable this to display all products in your store.
If disabled, you can choose one of the following:
-
Include Specific Products — Select individual products to display.
-
Include Specific Categories — Select one or more categories to display.
This allows you to create targeted tables for specific collections or audiences.
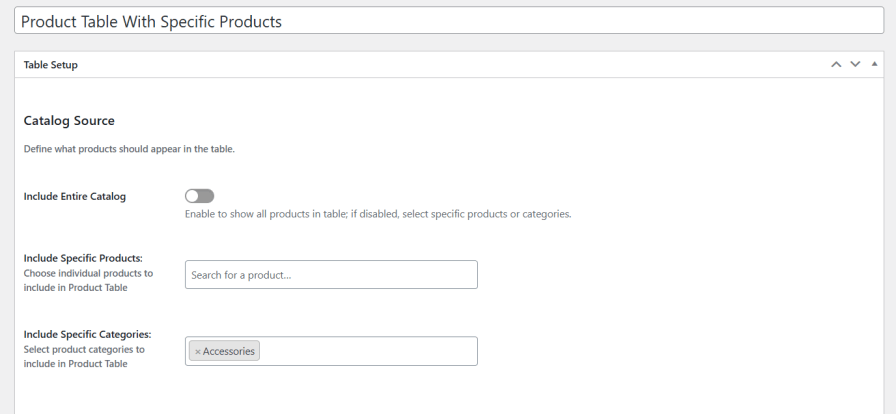
Table Columns
↑ Back to topControl what information is displayed for each product.
Table Content
Choose which product data appears as columns in the table. For example:
-
Product Thumbnail
-
Product Name
-
Product Price
-
Add to Cart Button
-
Product Description
- Product Quantity
- Cart Action
You can add, remove to match your needs.
Column NamesAssign a custom label for each column. This is the text that will appear in the table header 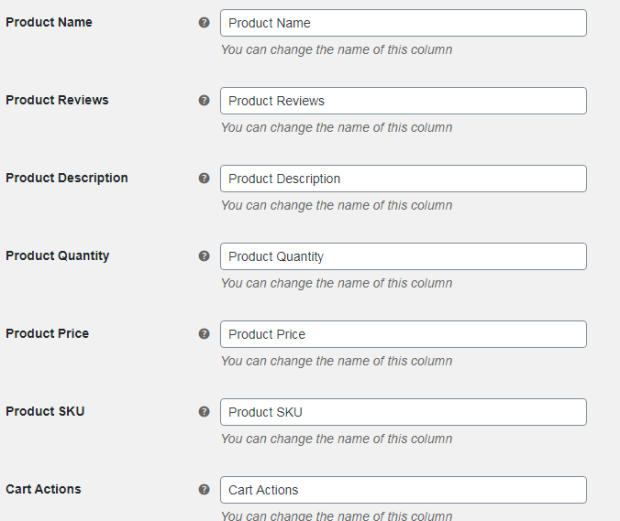
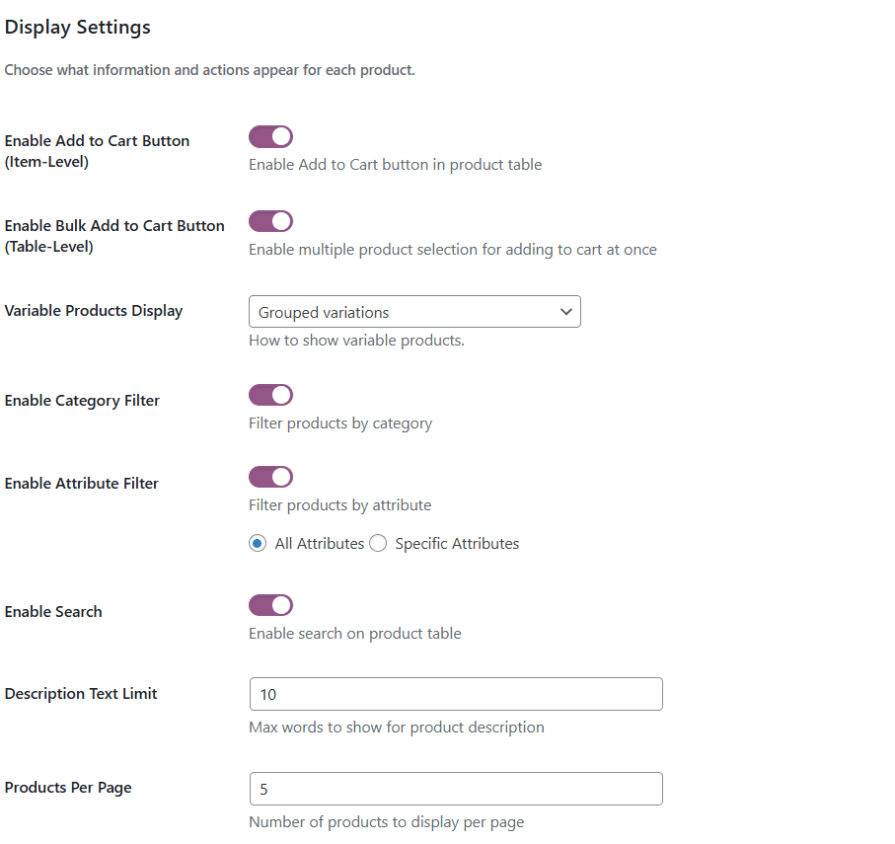
Display Settings
↑ Back to topControl the behavior and interactivity of the product table.
-
Enable Add to Cart Button (Item-Level) — Adds an Add to Cart button on each row.
-
Enable Bulk Add to Cart Button (Table-Level) — Allows customers to select multiple products and add them to cart in one click.
-
Variable Products Display — Configure how variable products are shown in the table.
-
Enable Category Filter — Allows filtering by product category.
-
Enable Attribute Filter — Allows filtering by variation attributes (e.g., size, color).
-
Enable Search — Adds a live search bar to the table.
-
Description Text Length — Set the number of characters shown for product descriptions.
-
Products Per Page — Set how many products are displayed per page before pagination appears.
Saving the Table
↑ Back to topOnce your configuration is complete:
-
Click Publish.
-
Copy the shortcode will be generated for this product table.
This shortcode represents the table and can be used anywhere on your site.
How to Embed Product Tables On Your Store Pages
↑ Back to topTo display a product table on your store:
-
Copy the generated shortcode from the product table settings screen.
-
Go to Pages → Add New (or edit an existing page).
-
Enter a page title.
-
Paste the shortcode into the content area.
-
Click Save.
