NOTE
This product is no longer available on WooCommerce.com. This document has been left available for existing users, but will no longer be updated.
Sendcloud is Europe’s leading shipping platform that seamlessly integrates with your WooCommerce store, to help you process your orders and automate your shipping workflow, all in one convenient platform. Your WooCommerce orders are automatically imported into the Sendcloud panel, where you can choose your shipping methods and create shipping labels in bulk.
- Access 80+ shipping carriers
- Print shipping labels in seconds
- Manage returns with a personalized return portal
- Ship on Sendcloud’s rates or connect your own carrier contract
- Go global with international shipping methods
- Automatically generate customs documents
- Customize your checkout page with Dynamic Checkout
- Offer same-day, next-day and nominated day delivery
- Send custom-branded tracking notifications
- Automate manual tasks with shipping rules
Installation
↑ Back to top- Go to WooCommerce > Plugins > Add New and search for Sendcloud
- Click Install now and Activate the plugin
- Go to WooCommerce > Sendcloud > Connect with Sendcloud
- Enter your Sendcloud login details and click Connect
- Click Activate
- A new tab entitled Sendcloud will appear in the side-menu. Click on the tab and then click on Connect.
- Click Connect to Authenticate the connection with Sendcloud
- You will be redirected to the Sendcloud panel, where your orders from the last 30 days will begin importing into the Incoming Order overview.
If you have already installed the Sendcloud plugin, in your WooCommerce back end, go to Plugins and ensure Enable auto-updates is selected.
More information can be found at: Sendcloud Help Center
Setup & Configuration
↑ Back to topTo begin shipping with Sendcloud, you first need to complete basic account set up. For more help, see: Getting started with Sendcloud.
Once you’ve completed account setup and connected your WooCommerce store, your orders from within the last 30 days will appear in the incoming order overview in the Sendcloud panel. From here, you can make changes to order details, select a shipping method, add insurance, and process your orders into shipping labels. Learn more about how to process orders on the Sendcloud Help Center.
Set up your account
↑ Back to top- Login to Sendcloud and go to Settings > Addresses > Sender addresses to add your Sender address
- Next, go to Settings > Addresses > Invoice address and add your invoice address
- Finally, go to Settings > Financial > Direct debit and click Enable direct debit. Complete the payment verification process to enable direct debit payments.
Choose your carriers
↑ Back to top- In your Sendcloud account, go to Settings > Carriers & Pricing
- Click enable to activate your chosen carriers
- If you have a carrier contract, you can add your contract details in the My contracts tab
Set up shipping zones
↑ Back to topShipping zones let you offer different shipping methods and rates on your checkout page, based on the customer’s country or region. You can use shipping zones to differentiate between domestic shipments and international shipments, apply different rates to specific locations, and to allow customers to choose between different shipping options.
You can either create shipping zones in the WooCommerce dashboard, or create them in your Sendcloud panel using Dynamic Checkout. Dynamic Checkout lets you customize the delivery journey of your customers by offering any combination of delivery options (such as same day, next day and nominated day) to your customers on your WooCommerce checkout page.
To set up shipping zones in Sendcloud:
- Login to your Sendcloud account and go to Dynamic Checkout
- Under the Not configured list, you will see your WooCommerce integration. Click the Configure button.
- Click New delivery zone, select a Country of delivery from the dropdown menu and click Save zone
Once you’ve created your delivery zone, click New delivery method to begin configuring your checkout for this zone. During the configuration step, you’ll be able to select a shipping method, decide which additional shipping functionalities you want to offer, and enable rates. - You can add multiple delivery methods per shipping zone, allowing you to present a variety of shipping options to your customers at checkout.
- Publish your Dynamic Checkout configuration to have it appear live on your WooCommerce checkout page.

For help setting up Dynamic Checkout, see: Sendcloud Help Center
To set up shipping zones in WooCommerce:
- In your WooCommerce dashboard, go to WooCommerce > Settings > Shipping > Shipping zones
- Select Add shipping zone
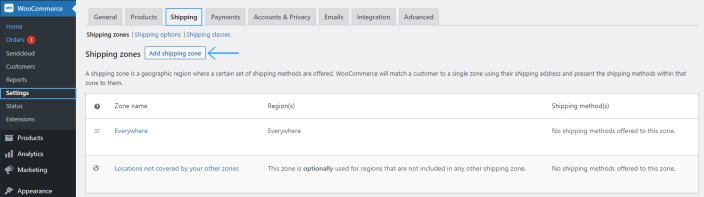
- Enter a name for the zone and select the regions you want to include
- Click Add shipping method to add your preferred methods to the shipping zone
- Once the shipping method is added to your shipping zone, click Edit
- You can now enter the rates you want to charge per product shipping class
Adding rates in WooCommerce:
- Once the shipping method is added to your shipping zone, click Edit
- You can now enter the rates you want to charge per product shipping class
When adding a new shipping method, select from one of the following options:
- Fixed rate: Set a unique delivery fee
- Free delivery: Grant a free delivery for your customers
- Local pickup: Customers will pick up the order themselves
If you select a fixed rate delivery method:
- You can set a delivery fee, which will be charged to your customer.
- Offer a weight-based price is not possible by default on WooCommerce: You will need to install an additional plug-in from the Plug-in/Extensions tab (Table Rate, Flexible Shipping or Weight-based Shipping for instance). This solution works for home delivery only, it is not compatible with service points methods.
- You also have the possibility to set a fee for a “delivery class” (for instance light products or heavy products). You first need to have the related delivery classes created in the tab WooCommerce > Settings > Shipping > Delivery Class. You can then set the price in the last field below.
For more help setting up shipping zones and methods in WooCommerce, see our Help Center.
Note: You decide the shipping zones, the shipping methods, and how much your customer pays for the options you offer. Shipping zones do not influence the pricing on the Sendcloud platform.
Set up service point delivery
↑ Back to top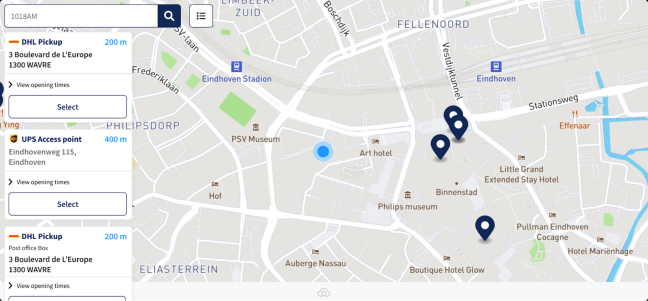
You can configure service point delivery for your WooCommerce store directly from the Sendcloud panel via Dynamic Checkout. Once you’ve published your configuration, the service point picker map will appear on your checkout page, so your customers can select a delivery location.
Set up service point delivery in Sendcloud:
- Login to Sendcloud and go to Dynamic Checkout
- Next to your WooCommerce integration, click Edit
- Create a delivery zone by following the steps above
- Select New Delivery Method > Service point delivery
- Select your sender address & time zone from the dropdown menu
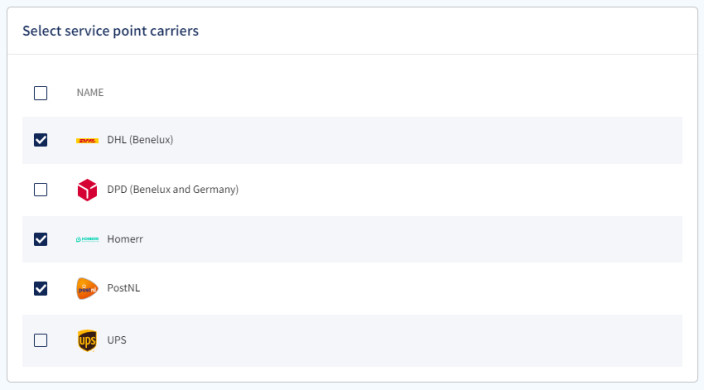
- Select the carriers you want to enable for this delivery method:
- To create pricing for this method, click to Enable shipping rates and enter a flat fee which will apply to all service point delivery methods
- Don’t forget to Save your configuration
- To apply your configuration to your WooCommerce checkout, click on Publish next to the name of the integration in the Dynamic Checkout tab
For more help setting up service point delivery, see our Help Center.
If you prefer to set up service point delivery rates and methods manually, or if you choose not to use Dynamic Checkout, you can enable them in WooCommerce as follows:
- Login to Sendcloud and go to Settings > Integrations
- Find your WooCommerce integration in the list and click Edit
- Check the box to Enable service points and select applicable carriers
- Click Save
- Go to WooCommerce > Settings > Shipping > Add shipping zone
- Click Add shipping zone > Service Point Delivery (Legacy) > Add shipping method
- Edit the shipping method you just created and enter a method name
- In the field Carrier selection, enter the name of your carrier in lowercase letters (e.g. mondial_relay)
For more help setting up service point delivery manually, see our Help Center.
Tracking messages
↑ Back to topYou can send branded tracking notifications to your customers to keep them informed about the status of their delivery. You can decide when emails or SMS messages will be automatically sent, and customize their appearance from the Sendcloud panel.
To enable tracking emails:
- Login to your Sendcloud account and go to Settings > Brands > Create new brand
- Fill in the required fields, upload your brand logos (screen and print) and select your brand color
- Click Save
- Go to Settings > Tracking messages
- Select the brand you just created from the dropdown menu
- To determine when a tracking email will be sent, toggle the switch to Active next to the statuses you want to enable
- You can edit the content of the email using dynamic tags and by selecting a shipping country from the drop down menu
- Click Save
For more help setting up tracking messages, see our Help Center
Troubleshooting
↑ Back to topFor help with your WooCommerce integration, please see our troubleshooting guide.
Questions and Feedback
↑ Back to topHave a question? Get in touch with our shipping experts.
Already made a Sendcloud account and need some assistance? Email our support team.