The ShipStation extension helps you get your orders from WooCommerce with ShipStation and expedite the shipping process as part of your order fulfillment steps.
ShipStation is a web-based shipping service that streamlines the order fulfillment process for online retailers, handling everything from order import and batch label creation to customer communication. ShipStation is a great fit for businesses with any number of users or locations.
Installation
↑ Nach obenTo start using a product from WooCommerce.com, you can use the “Add to store” functionality on the order confirmation page or the My subscriptions section in your account.
- Navigate to My subscriptions.
- Find the Add to store button next to the product you’re planning to install.
- Follow the instructions on the screen, and the product will be automatically added to your store.
Alternative options and more information at:
Managing WooCommerce.com subscriptions.

Requirements
↑ Nach obenTo use this integration, you must have:
- A ShipStation monthly plan. More info at ShipStation.com.
- A REST API key with Read/Write permissions. ShipStation for WooCommerce can generate this for you on the WooCommerce > Settings > Integration > ShipStation page (see REST API Keys). Advanced users can still create one manually on the WooCommerce > Settings > Advanced > REST API page.
Setup and Configuration
↑ Nach obenAfter installing and activating the ShipStation extension, you can view your Authentication Key and configure the settings on the WooCommerce > Settings > Integration > ShipStation page.
Authentication Key
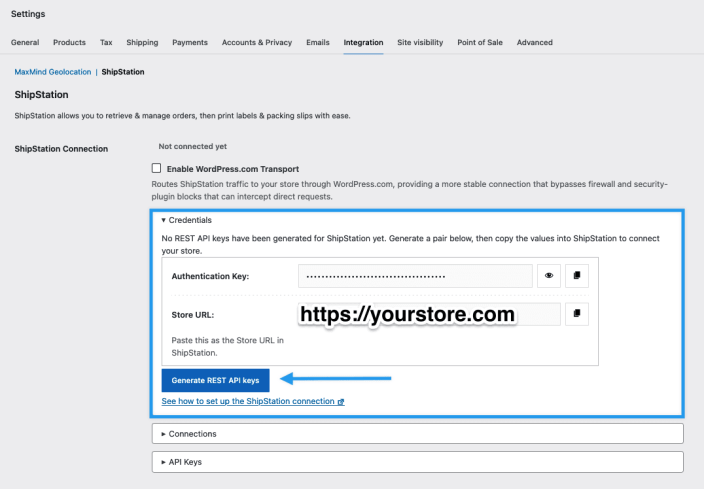
↑ Nach obenThe Authentication Key is shown in the ShipStation Connection section, under Credentials, alongside the other values ShipStation needs. It is generated automatically and is unique to your store. This is one of the required keys you will need when connecting your store in your ShipStation.com account dashboard.
Export Order Statuses
↑ Nach obenSelect the WooCommerce order statuses that you want sent to ShipStation. We recommend sending only orders that have been paid for; those would be the following statuses: Processing, Completed, and possibly On-Hold/Cancelled.
Shipped Order Status
↑ Nach obenNext, set the order status an order should be changed to once marked shipped in ShipStation. We recommend Completed, as that usually means the order requires no further action.
Gift
↑ Nach obenOur integration can sync gift information from WooCommerce directly to ShipStation’s native gift features, eliminating the need for manual workarounds and allowing for streamlined gift order fulfillment.
Enable Gift Order Functionality
To activate this feature, navigate to WooCommerce > Settings > Integration > ShipStation and check the box for Enable gift order option at checkout.
When this setting is enabled, new options will appear on your store’s checkout page. If disabled, the checkout process remains unchanged.
Once an order is placed, the gift status and message will be displayed in the shipping details section of the WooCommerce order details page. This provides visibility for you and your staff.
This message can’t be edited after the order is placed. To ensure data consistency between WooCommerce and ShipStation, the gift status and message are not editable in WooCommerce after the order is submitted. If a change is required, it must be made directly within the order in your ShipStation account.
The Customer Experience

Once enabled, customers will see a new checkbox on the checkout page titled “Mark order as a gift.”
If a customer selects this checkbox, a text field will appear, allowing them to enter a gift message. By default, this message is limited to 255 characters. This limit can be customized via a filter below.
Customizing the Gift Message Character Limit
By default, the gift message field at checkout is limited to 255 characters. While ShipStation’s API supports up to 1,000 characters, you can adjust this limit using the woocommerce_shipstation_gift_message_max_length filter.
The following snippet demonstrates how to increase the character limit to 500.
<?php
// Add this code to your theme's functions.php file or a custom plugin.
add_filter( 'woocommerce_shipstation_gift_message_max_length', 'wc_shipstation_custom_gift_message_limit' );

/**
 * Set custom character limit for ShipStation gift messages.
 *
 * @param int $limit The current character limit.
 * @return int The new character limit.
 */
function wc_shipstation_custom_gift_message_limit( $limit ) {
    // New character limit. Can be any value between 0 and 1000.
    return 500;
}
How Gift Data Syncs to ShipStation
When a customer places an order marked as a gift, the plugin saves the gift status and message to the WooCommerce order. During the sync, this data is sent directly to ShipStation’s dedicated <Gift> and <GiftMessage> fields.
In ShipStation, these orders will be clearly identified with a gift icon in the Orders grid and in the Order Details screen. The message will populate the “Gift Message” field.
This allows you to use ShipStation’s powerful features, such as Automation Rules, to create custom packing slips that hide prices, apply specific gift-wrapping instructions, or easily filter for all gift orders. For more ideas on handling gift orders, see ShipStation’s Help Center article.
Logging
↑ Nach obenIf you’ve run into any issues, enable logging here. This can be helpful for troubleshooting things. You can view the logs at WooCommerce > System Status > Logs. Then in the logs dropdown, find the appropriate ShipStation log files.
Finally, select Save changes.
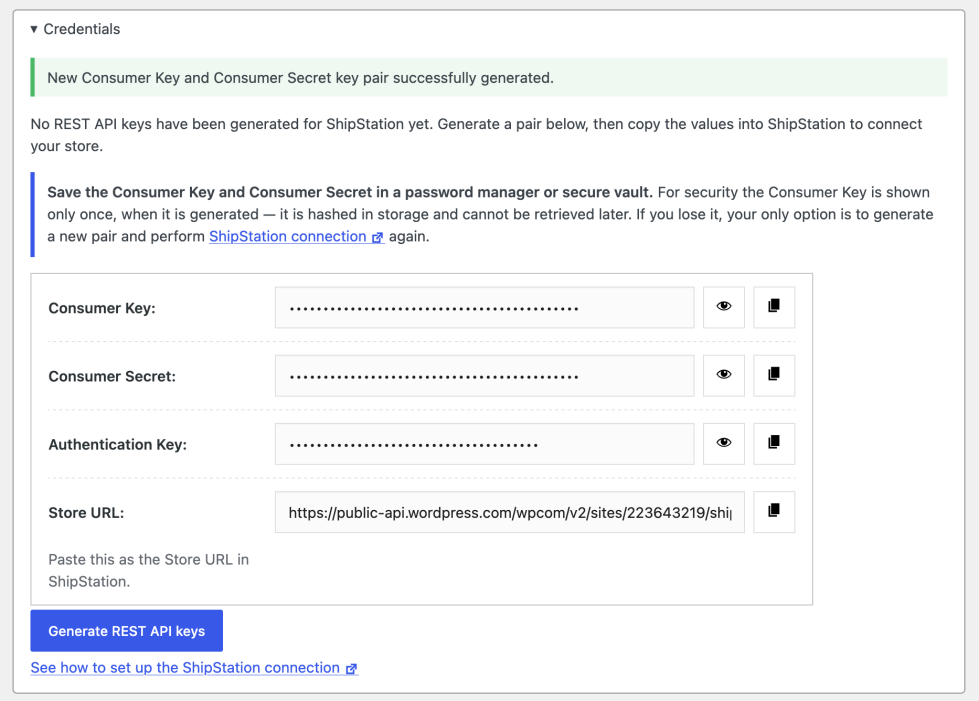
REST API Keys
↑ Nach obenIn the past, the ShipStation connection only required the Authentication Key and the store URL. ShipStation now connects via the REST API, so you will also need a Consumer Key and Consumer Secret when connecting your site in your ShipStation.com account dashboard.
Generating the Consumer Key and Consumer Secret
↑ Nach obenYou can generate the Consumer Key and Consumer Secret directly from the ShipStation for WooCommerce plugin’s settings page.
- Go to WooCommerce > Settings > Integration > ShipStation.
- In the ShipStation Connection section, expand Credentials.
- Select Generate REST API keys. The plugin creates a key pair and shows the Consumer Key, Consumer Secret, and Authentication Key, along with the Store URL to use.
- Copy the Consumer Key now and store it somewhere safe. For security it is shown only once, right after you generate it. It is hashed in storage and cannot be retrieved later, so if you lose it you will need to generate a new pair.
If you prefer, advanced users can still create a key manually: on the WooCommerce > Settings > Advanced > REST API page, select Add key, set Permissions to Read/Write, and select Generate API key. Either key works with ShipStation.
Connect to ShipStation
↑ Nach obenAfter setting up the ShipStation extension and generating the REST API Consumer Key and Consumer Secret on your site, the next step is to connect your WooCommerce store to your ShipStation.com account. If you don’t have a ShipStation account yet, you can sign up by clicking the “Connect to ShipStation.com” button below.
After signing up, you’ll be prompted to pick a Selling Channel to connect to your WooCommerce store. If you’re an existing ShipStation user, you can find this page by logging into your account on ShipStation.com and going to My Profile > Selling Channels and clicking Connect a Store. Select the WooCommerce store connection option to continue.

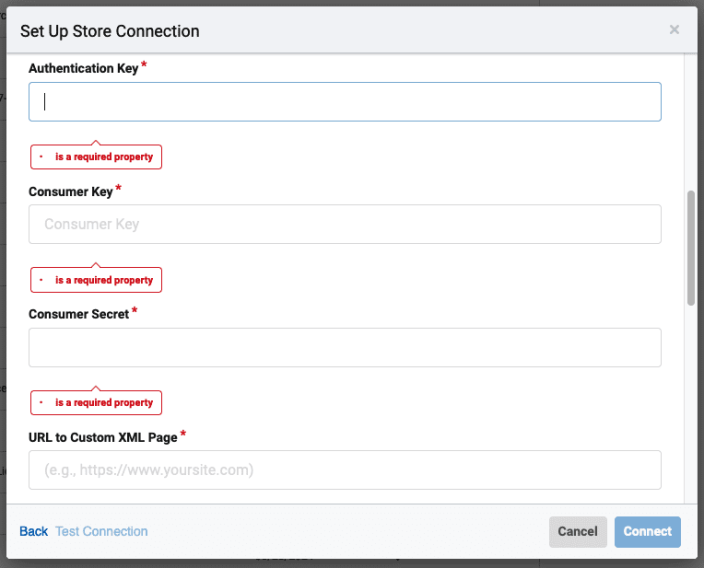
In a separate browser window or tab, go to the WooCommerce > Settings > Integration > ShipStation page in your site admin and expand Credentials in the ShipStation Connection section. Copy each value and paste into the matching field in ShipStation. The fields are listed in the same order ShipStation asks for them:
- Consumer Key: part of the REST API key shown under Credentials. It begins with
ck_. - Consumer Secret: part of the REST API key shown under Credentials. It begins with
cs_. - Authentication Key: the unique key shown under Credentials.
- Store URL: copy the Store URL shown under Credentials. Do not type your domain by hand. If you route ShipStation through WordPress.com, this value is a WordPress.com address rather than your site URL, and copying it from here keeps it correct in both modes.
Once you have entered all of that info, select Test Connection to test it, then select Connect to finalize the connection.
Note : ShipStation’s current field label for the store URL is still “URL to Custom XML Page”..
WordPress.com Transport Connection
↑ Nach obenShipStation for WooCommerce can route the traffic between ShipStation and your store through WordPress.com instead of having ShipStation reach your site directly. A routed (proxied) connection is more reliable on stores where a firewall, CDN, or security plugin blocks or rate-limits ShipStation’s direct requests, because the request arrives over the same trusted channel that WooCommerce and Jetpack already use.
This option is off by default. Existing direct connections keep working exactly as before until you turn it on, and you can switch back to a direct connection at any time.
When to use it
↑ Nach obenConsider routing through WordPress.com if you see any of the following on a direct connection:
- ShipStation reports authentication errors (401 or 403) even though your keys are correct.
- Orders stop importing into ShipStation, or tracking stops flowing back to WooCommerce.
- A security plugin, web application firewall (WAF), or CDN such as Cloudflare is blocking or challenging ShipStation’s requests.
- Your host rate-limits or filters incoming API traffic.
If your direct connection already works well, you do not need to change anything.
Before you begin
↑ Nach obenTo route ShipStation through WordPress.com, you need:
- ShipStation for WooCommerce version 5.2 or newer.
Note: The WordPress.com transport uses the REST API. ShipStation authenticates with a REST API key pair (Consumer Key and Consumer Secret) plus an Authentication Key, all generated for you in the Credentials section described below.
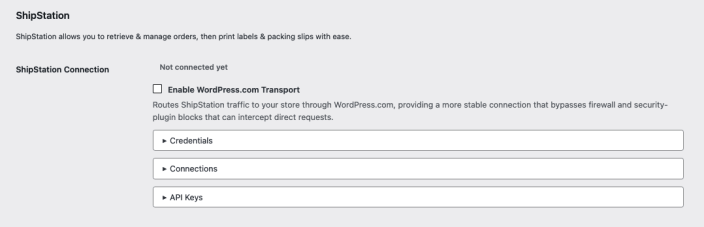
The ShipStation Connection section
↑ Nach obenGo to WooCommerce > Settings > Integration > ShipStation. The ShipStation Connection section is at the top of the tab and brings every connection control together in one place:
- A status pill that summarizes the overall sync state: Connected, Action needed, or Not connected yet.
- A message banner that appears only when there is something to finish or fix, with a button that jumps to the right control.
- The Enable WordPress.com Transport checkbox and, when it is selected, the WordPress.com connect and disconnect controls.
- Three expandable areas:
- Credentials holds the values ShipStation needs (Consumer Key, Consumer Secret, Authentication Key, and Store URL), with a button to generate a new key pair.
- Connections lists where ShipStation has connected from and how recently.
- API Keys lists the key pairs the plugin has generated so you can remove the ones you no longer use.
Enable the WordPress.com connection
↑ Nach oben1. Go to WooCommerce > Settings > Integration > ShipStation.
2. In the ShipStation Connection section, select Enable WordPress.com Transport. A reminder appears letting you know that you will update your store connection in ShipStation after you save.
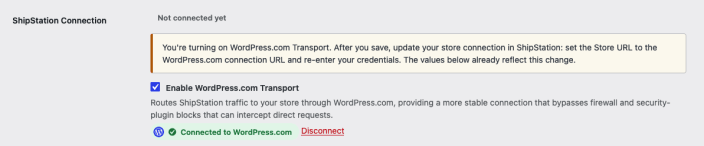
3. Select Save changes. The page reloads with the transport turned on and the WordPress.com connection controls visible.
4. Select Connect to WordPress.com and approve the connection when prompted. You return to the settings page, where the status now reads Connected to WordPress.com.
5. Expand Credentials and copy each value into the matching field in ShipStation, from top to bottom: Consumer Key, Consumer Secret, Authentication Key, and Store URL. While the transport is on and your site is connected, the Store URL shown here is the WordPress.com address, so ShipStation routes through WordPress.com automatically. If no keys have been generated yet, select Generate REST API keys first; for security the Consumer Key is shown only once, right after you generate it, so copy it and store it somewhere safe before leaving the page.
6. In ShipStation, open your store’s connection settings, paste the Store URL and credentials, and save the connection. For where these fields live in ShipStation, see Connect to ShipStation.
7. Confirm the connection is live: the section status pill reads Connected, and the Connections area lists a WordPress.com route marked Active after ShipStation’s next sync.
Note: ShipStation syncs on its own schedule, so a brand-new route can take a few minutes to appear as Active. You can also trigger a sync from ShipStation to confirm right away.
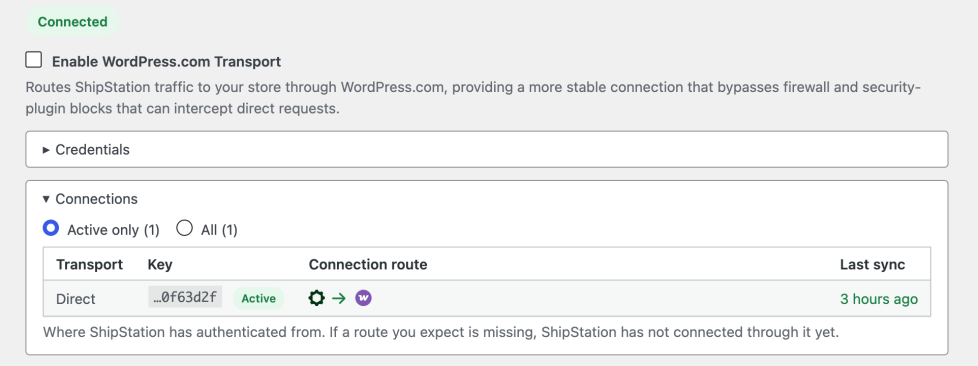
Check your connections
↑ Nach obenExpand Connections to see every place ShipStation has connected from and how recently. Each row shows:
- Transport: whether the request came in Direct or through WordPress.com.
- Key: the last characters of the API key used, with a status pill.
- Connection route: the path the request takes, drawn as ShipStation, then WordPress.com (for a routed connection), then your store. A small marker between each step shows whether that hop is healthy.
- Last sync: when ShipStation last reached your store on that route.
Use the Active only and All filter above the list to focus on live routes or see the full history. The status pill on each row tells you the state of that route:
| Status | What it means | What to do |
|---|---|---|
| Active | ShipStation is connected and syncing through this route. | Nothing. The connection is healthy. |
| Inactive | ShipStation has not synced on this route lately. It may have stopped, or it may just be idle. | Check ShipStation if you expected recent activity. |
| Rejected | The WordPress.com transport is off, so your store is turning this routed connection away. | Turn on Enable WordPress.com Transport, or remove the route in ShipStation. |
| Disconnected | WordPress.com is disconnected, so ShipStation cannot reach your store through it. | Reconnect to WordPress.com (see below). |
| Mismatch | Your site address changed and no longer matches this connection. | Repair the connection, then update the Store URL in ShipStation (see Repair the connection after a site address change, below). |
| Deleted | The API key for this connection was deleted, so ShipStation can no longer sign in with it. | Generate a new key in Credentials and update ShipStation. |
Manage your API keys
↑ Nach obenExpand API Keys to see the key pairs the plugin has generated for ShipStation. Each row shows the key, the transport it has connected over, and when it last synced, with a button to delete it.
Generating a new key pair never deletes an existing one, because an older pair might still be the one configured in ShipStation. Delete a key only when you are sure ShipStation no longer uses it. A deleted key stops working immediately. A freshly generated key that ShipStation has never used is removed automatically after a while, so you do not have to clean those up yourself.

Turn off the WordPress.com connection
↑ Nach obenThere are two ways to stop routing through WordPress.com, depending on whether you want to keep the WordPress.com connection itself.
Switch back to a direct connection
Use this when you want ShipStation to reach your store directly again but want to keep your site connected to WordPress.com (for example, because other features use it).
- In the ShipStation Connection section, clear the Enable WordPress.com Transport checkbox. A reminder appears letting you know to confirm your direct connection in ShipStation.
- Select Save changes.
- In ShipStation, open your store’s connection settings and set the Store URL back to your site address, then re-enter your credentials and save. The Store URL shown in the Credentials area now reflects your site address, so you can copy it from there.
Note: A direct connection can keep reading as Active for up to a day after ShipStation last reached it, so the status may not yet reflect a change you have since made in ShipStation. Before you rely on it, open ShipStation and confirm the store still uses your site address as the Store URL with current credentials.
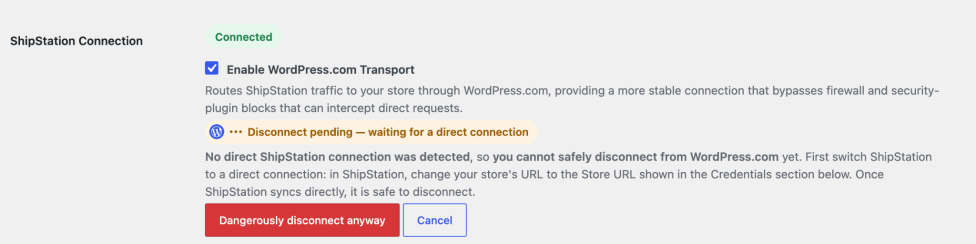
Disconnect from WordPress.com
Use this to remove the WordPress.com connection entirely. To protect your order sync, the plugin guides you through a safe disconnect.
- In the ShipStation Connection section, select Disconnect next to Connected to WordPress.com. The status changes to Disconnect pending.
- What happens next depends on whether ShipStation already has a working direct connection:
- If a direct connection is detected, you can finish right away. Select Safe disconnect from WordPress.com.
- If no direct connection is detected, disconnecting now would leave ShipStation with no way to reach your store. First switch ShipStation to a direct connection: in ShipStation, change your store’s URL to the Store URL shown in the Credentials area. Once ShipStation syncs directly, return here and finish the disconnect.
- To stop without disconnecting, select Cancel.
Note: If another plugin on your site also uses the WordPress.com connection (for example Jetpack or WooCommerce Shipping & Tax), the plugin does not offer a Disconnect button, because disconnecting would break those plugins too. To stop routing ShipStation through WordPress.com in that case, clear Enable WordPress.com Transport instead.
Repair the connection after a site address change
↑ Nach obenIf your site address changes (for example, you move from a staging domain to your live domain, or switch to a new URL), WordPress.com keeps delivering ShipStation traffic to the old address and the connection can no longer reach your store. The section shows a WordPress.com connection needs repair message.
- Select Reconnect to WordPress.com. This re-establishes the connection for your current address.
- Expand Credentials and copy the new Store URL.
- In ShipStation, update your store’s Store URL to the new value and save.
If you cannot change the connection here
↑ Nach obenA couple of situations limit the connection controls on purpose:
- Another plugin set up the WordPress.com connection. If a plugin such as Jetpack or WooCommerce Shipping & Tax is also using the WordPress.com connection, ShipStation does not show a Disconnect button, so the connection cannot be removed from this screen (see Disconnect from WordPress.com, above). To stop routing ShipStation through WordPress.com, clear Enable WordPress.com Transport instead.
- The transport is switched on in your site configuration. On some sites the WordPress.com transport is turned on in the site’s configuration rather than from this screen. When that happens, the Enable WordPress.com Transport checkbox stays selected and cannot be changed here, and a note on the checkbox explains why. If you need it changed, contact whoever manages your site’s setup.
Troubleshooting the WordPress.com Transport connection
↑ Nach obenThe status shows “Action needed.” Open the ShipStation Connection section and read the banner at the top. It names the issue and provides a button that jumps to the control that fixes it, such as generating credentials, connecting to WordPress.com, or repairing the connection.
Orders stopped syncing after I enabled the transport. ShipStation still has your old, direct Store URL. Expand Credentials, copy the WordPress.com Store URL and credentials, and update your store connection in ShipStation.
The Connections list shows a “Rejected” route. A routed connection is rejected when the transport is off. Select Enable WordPress.com Transport and save, or remove that route in ShipStation.
The Credentials area says the REST API keys are missing. The keys previously generated for ShipStation are no longer in WooCommerce. They may have been deleted, removed by a security plugin, or lost in a backup restore. Select Generate REST API keys, then update the new values in ShipStation.
A connection shows “Deleted.” The API key that connection used was deleted, so ShipStation can no longer sign in with it. Generate a new key in Credentials and update ShipStation.
Frequently asked questions about the WordPress.com Transport connection
↑ Nach obenDoes this change my ShipStation credentials? No. The same REST API key works for both a direct and a routed connection, and you only change the Store URL in ShipStation when you switch between them. If you do not have a key pair yet, select Generate REST API keys in the Credentials section and enter the new values in ShipStation.
Do I need a paid Jetpack plan? No. The WordPress.com connection used here is free and is the same one many WooCommerce features rely on.
Can I switch back to a direct connection later? Yes. Clear Enable WordPress.com Transport, save, and set the Store URL in ShipStation back to your site address. You can keep the WordPress.com connection in place or disconnect it.
Will turning this on affect my other plugins? No. Enabling the transport only changes how ShipStation reaches your store. If other plugins share the WordPress.com connection, the plugin protects them by not letting you disconnect WordPress.com from this screen.
Shipped Orders
↑ Nach oben
When marking an order shipped via ShipStation there is an important checkbox to select. Be sure to select/enable the “Notify Marketplace?” checkbox. This is required so ShipStation notifies your store, which then does the following in WooCommerce:
- Changes the order status to your Shipped Order Status, which was set under the setting covered above
- Adds a customer note with carrier and tracking information.
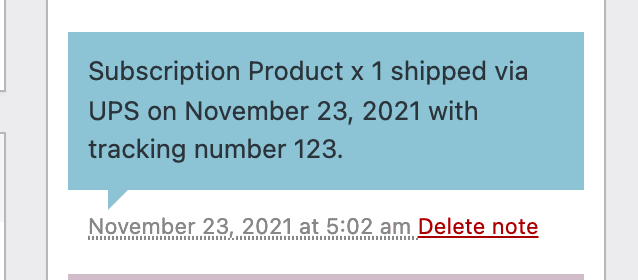
If you are using our WooCommerce Shipment Tracking extension, then the tracking information is added using the extension instead.
Export Custom Field Data to ShipStation
↑ Nach obenScope of support:
We are unable to provide support for customizations under our Support Policy. If you need to customize a snippet or extend its functionality, we recommend working with a Woo Agency Partner or a WooCommerce developer on Codeable.
ShipStation supports up to three custom fields that may contain extra data you want sent to the ShipStation orders section.
Custom Field 1 contains coupon codes used in an order. Enabled by default.
Custom Fields 2 and 3 can be customized with a snippet in which you define the name of the metadata you want to export. Example:
<?php
// Add this code to your theme's functions.php file or a custom plugin.

/**
 * Set custom field 2 for ShipStation export.
 *
 * @return string The meta key for custom field 2.
 */
add_filter( 'woocommerce_shipstation_export_custom_field_2', 'shipstation_custom_field_2' );
function shipstation_custom_field_2() {
    return '_meta_key'; // Replace this with the key of your custom field.
}

/**
 * Set custom field 3 for ShipStation export.
 *
 * @return string The meta key for custom field 3.
 */
add_filter( 'woocommerce_shipstation_export_custom_field_3', 'shipstation_custom_field_3' );
function shipstation_custom_field_3() {
    return '_meta_key_2'; // Replace this with the key of your custom field.
}
We are unable to provide support for customizations under our Support Policy. If you are unfamiliar with code and resolving potential conflicts, select a WooExpert or developer for assistance.
Usage
↑ Nach obenHow ShipStation works with your ShipStation account:
- Customer places an order on your WooCommerce shop that requires shipping.
- ShipStation.com makes an API call to the merchant’s store to the extension’s endpoint.
- The extension looks at the setup and generates an XML output response to the ShipStation API. This XML includes order details, items, customer information, and, if enabled, the order’s gift status and gift message. ShipStation imports those orders into their system.
- Merchant’s shipping person/people go into ShipStation.com, sees orders that need shipment, and generates shipping labels (aka: “ships them”).
- Once a label is generated, ShipStation.com sends a notification to the merchant’s store via the extension’s endpoint.
- The extension updates the order to Shipped Order status (typically ‘Completed’) and stores the shipping info within the order.
Troubleshooting
↑ Nach obenOrders are not imported into ShipStation
↑ Nach obenCaching plugins providing file minification can generate this kind of issue. Make sure that you disable file minification and try to import orders again.
Orders are not importing into ShipStation because requests are being blocked
↑ Nach obenIf orders are not importing into ShipStation and your logs show an HTML response, CAPTCHA page, or redirect instead of the expected API response, your host or a security layer may be blocking ShipStation’s requests.
This can happen when a firewall, security plugin, CDN protection, or host-level bot protection treats requests to the WooCommerce REST API as suspicious traffic. For example, this has been seen on some sites hosted with SiteGround, where anti-bot protection may intercept requests to /wp-json/wc-shipstation/ endpoints and return a CAPTCHA challenge instead of the expected API response.
Resolution:
- Check whether your site is using a security plugin, firewall, CDN security feature, or host-level bot protection.
- Review your server or security logs for blocked requests to
/wp-json/wc-shipstation/. - If you use SiteGround, check whether its security or anti-bot protection is challenging requests to these endpoints.
- Ask your host or security provider to exclude the ShipStation REST API endpoints from bot protection or CAPTCHA checks.
- Coordinate with your host to whitelist relevant IPs (e.g., 35.173.55.253) at the server level.
- Test the connection again in ShipStation after making these changes.
If the issue continues, contact your hosting provider and ShipStation support so they can help confirm which requests are being blocked.
Alternative fix: instead of allowlisting ShipStation at your firewall, you can route ShipStation through WordPress.com. This sends ShipStation’s requests over the WordPress.com connection, which bypasses firewall, CDN, and security-plugin blocks on direct requests. See WordPress.com Connection. Allowlisting (below) is still the right choice if you prefer to keep a direct connection.
Orders are not exporting to ShipStation
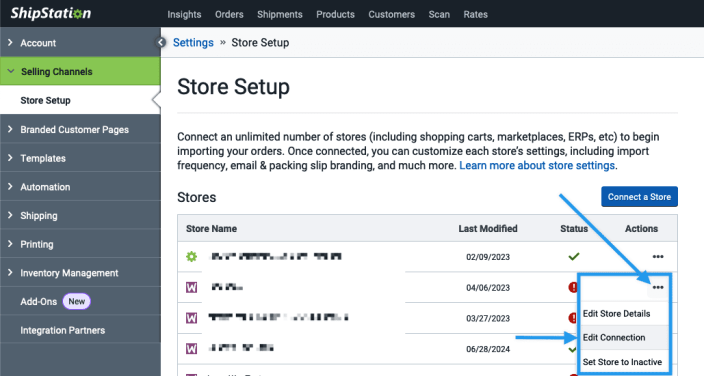
↑ Nach obenIf orders are in an Export Status but are not being exported to ShipStation (i.e., no “Order has been exported to ShipStation” note is added to the order and the ShipStation logs show “Exported 0 orders”), check the connection in your ShipStation.com dashboard.
To achieve this, log in to ShipStation.com and go to My Profile > Selling Channels. Click the ... icon in the “Actions” column and choose “Edit Connection” (as seen in the screenshot below). Make sure all the connection fields are filled out and select “Test Connection.” If the Consumer Key and Consumer Secret fields are empty, follow the instructions to generate those REST API keys and add them to those respective fields.
Testing the XML Export
↑ Nach obenThe XML feed for ShipStation can be tested at a specific URL. It’s formatted as per this example below that looks at orders from 1 Feb 2022 until 30 April 2022. https://example.com/?wc-api=wc_shipstation&auth_key=YOUR_AUTH_KEY&action=export&start_date=02/01/2022%2000:05&end_date=04/30/2022%2021:00
Be sure to replace example.com with your site’s URL and YOUR_AUTH_KEY with your authentication key. The link should then load an XML view of orders from your store, which is what ShipStation reads.
Cloudflare or firewall blocking ShipStation requests (500 Internal Server Error)
↑ Nach obenIf ShipStation returns an Internal Server Error (HTTP 500) when importing orders or posting shipment updates, your store’s firewall — most commonly Cloudflare — may be blocking ShipStation’s requests before they reach WooCommerce.
This can affect:
- Order imports — ShipStation cannot pull new orders from your store.
- Shipment notifications — ShipStation cannot post tracking numbers back to WooCommerce, so orders stay in a “Processing” status instead of updating to “Completed.”
How ShipStation communicates with your store
ShipStation uses two types of requests to sync with WooCommerce:
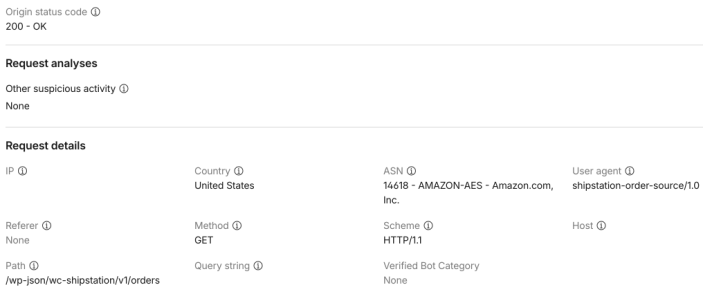
GET requests are used to import orders from your store. These are sent to /wp-json/wc-shipstation/v1/orders. In your Cloudflare Security Analytics, GET traffic from ShipStation looks like this:
POST requests are used to send shipment tracking data back to WooCommerce (also known as ShipNotify). These are sent to /wp-json/wc-shipstation/v1/orders/shipments. In Cloudflare, POST traffic from ShipStation looks like this:
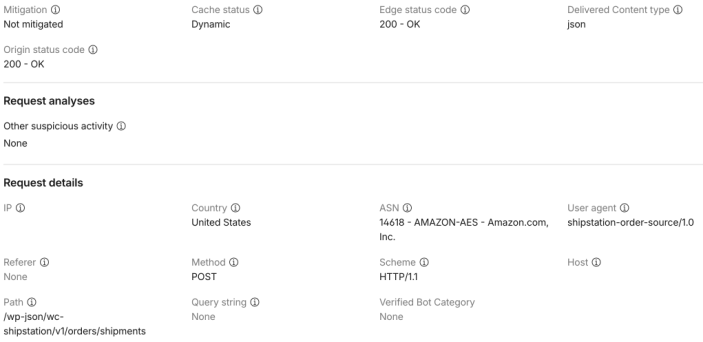
Both request types share these identifiers, which you can use to locate ShipStation traffic in any firewall log:
| Field | Value |
|---|---|
| User-Agent | shipstation-order-source/1.0 |
| ASN | 14618 (Amazon AWS) |
| Country | United States |
Confirming Cloudflare is blocking ShipStation
If your store uses Cloudflare, follow these steps to check whether it is intercepting ShipStation’s requests:
- Log in to your Cloudflare dashboard.
- Select your store’s domain.
- Go to Security → Analytics and click the Traffic tab.
- Use the filter bar at the top of the traffic table to narrow results by path. Filter for requests matching any of these:
/wp-json/wc-shipstation/v1/orders/wp-json/wc-shipstation/v1/orders/shipments/?wc-api=wc_shipstation
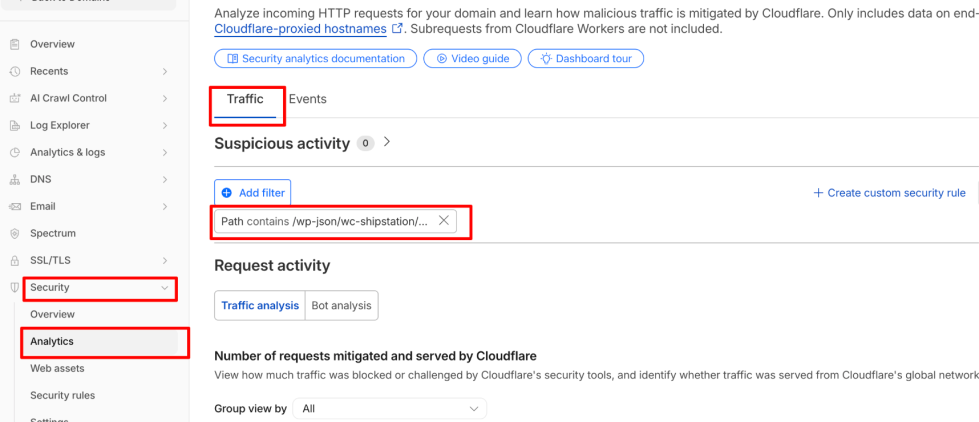
- Click on any matching request to expand its details. The key field to check is Mitigation:
- “Not mitigated” means Cloudflare is passing the request through normally. The issue is elsewhere.
- Block, Challenge, JS Challenge, or Managed Challenge means Cloudflare is intercepting the request — this is your problem.
200. If it shows403,429, or500while the origin would normally return200, the edge layer is blocking the request.

Fixing the issue in Cloudflare
Option 1: Route ShipStation through WordPress.com (no Cloudflare rules needed)
Because the request reaches your store over the WordPress.com connection instead of arriving directly from ShipStation’s servers, Cloudflare and other firewalls no longer see it as outside traffic to block. See WordPress.com Connection. If you would rather keep the direct connection, use the Cloudflare rule in Option A below.
Option 2: Create a WAF custom rule
This is the most precise fix. It tells Cloudflare to skip security checks only for ShipStation’s known request pattern, without affecting the rest of your site’s protection.
- Go to Security → Security rules.
- Click Create rule and choose Custom rules.
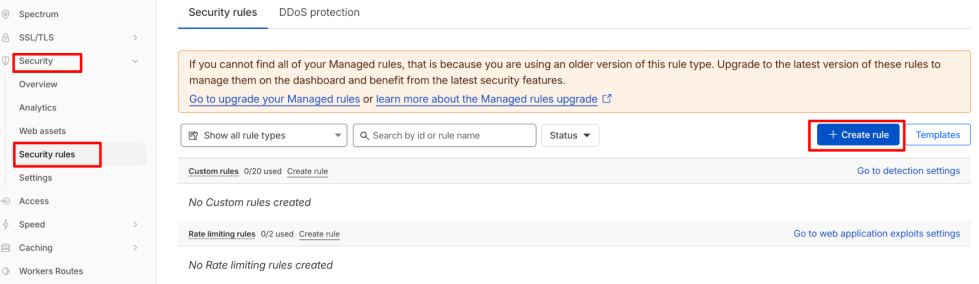
- Give the rule a name, for example:
Allow ShipStation. - Click Edit expression and enter the following:
(http.user_agent contains "shipstation-order-source") or (ip.geoip.asnum eq 14618 and http.request.uri.path contains "wc-shipstation")- Set the Action to Skip → All remaining custom rules.
- Click Save and deploy.
When configured correctly, the completed rule should look like this:
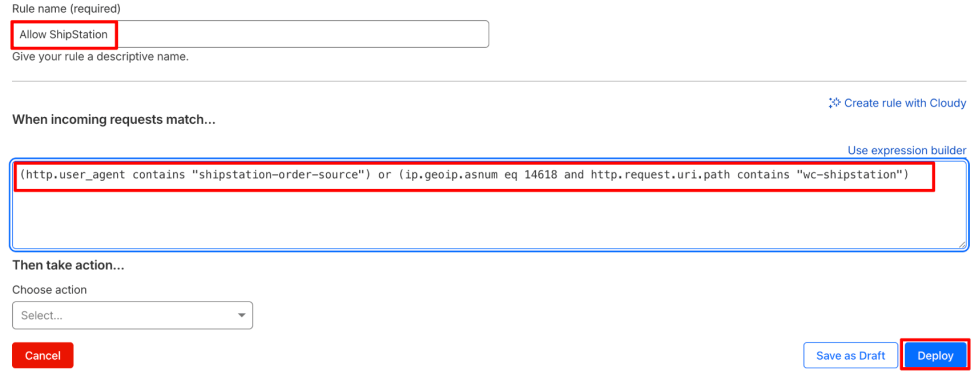
Note: The ASN condition (
14618) alone is broad — it covers all of Amazon AWS. Combining it with the path condition keeps the rule tight so it only affects ShipStation endpoints on your store.
Option 3: Disable Bot Fight Mode for the API path
If you have Bot Fight Mode or Super Bot Fight Mode enabled, it may be challenging ShipStation’s automated requests.
- Go to Security → Bots.
- Check whether Bot Fight Mode is enabled.
- Bot Fight Mode cannot be disabled per-path from the Cloudflare UI. The cleanest approach is to use a WAF Skip rule (Option A above) to exempt the ShipStation paths. Alternatively, you can disable Bot Fight Mode entirely, though this affects all traffic to your site.
Option 4: IP allowlist
ShipStation runs on Amazon AWS infrastructure. Because AWS IPs can change over time, this approach is less reliable than the User-Agent + path method above. If you still prefer to allowlist by IP:
- Go to Security → WAF → Custom rules.
- Create a rule matching the specific ShipStation IPs visible in your Security Analytics logs.
- Set the action to Skip.
Fixing the issue in other WAFs
The same principle applies to any WAF or security plugin (for example, Sucuri, Wordfence, NinjaFirewall, or server-level ModSecurity):
- Allowlist by User-Agent:
shipstation-order-source/1.0 - Allowlist by path:
/wp-json/wc-shipstation/v1/and/?wc-api=wc_shipstation - Allowlist by ASN:
AS14618(Amazon AWS)
Consult your WAF or security plugin’s documentation for the exact steps to create an allowlist or exception rule.
Verifying the fix
After applying the rule:
- In ShipStation, trigger a manual sync or re-import.
- Go back to Cloudflare → Security → Analytics → Traffic and confirm that ShipStation requests now show “Not mitigated” and an Edge status code of 200.
- In WooCommerce, check that new orders appear in ShipStation and that shipped orders update to “Completed” in your store.
If requests are still being blocked after adding the rule, check whether Cloudflare’s DDoS protection rules are also active — these are separate from WAF custom rules and may need their own override.
Frequently Asked Questions
↑ Nach obenDoes ShipStation provide real-time shipping quotes that can be used at checkout?
No. Store owners need a real-time shipping quote extension such as USPS, FedEx, UPS, etc., or have an alternate way to show shipping quotes (e.g., the built-in Flat rate method).
Does ShipStation send data when not being used (e.g., Free Shipping)?
↑ Nach obenYes, there isn’t conditional exporting. If the data is there, we export it!
Why am I getting an “Unable to connect to the remote server” error?
↑ Nach obenCheck if you have security plugins active—security plugins usually restrict the accessibility of endpoints/URLs on a WP online store. The security plugin may not be allowing ShipStation to connect to the server. If it is, disable the security plugin and test again.
If the error is still not resolved, then please check with your host if they have a firewall enabled. If they do, please ask them to disable that and check again. Moreover, make sure to whitelist ShipStation IPs.
If a security plugin or host firewall keeps blocking ShipStation, you can also route ShipStation through WordPress.com to bypass the block. See WordPress.com Connection.
Why do multiple line items in an order on the WooCommerce side get combined when they reach ShipStation?
↑ Nach obenThis is most likely because unique Product SKUs have not been configured for each product and variation in the store. To ensure that order line items show up correctly in ShipStation, we recommend assigning a unique SKU to each product as well as each variation within a product.
Why don’t orders show as Completed in WooCommerce after being Shipped in ShipStation?
↑ Nach obenMost likely causes are:
- A misconfiguration—Check WooCommerce > Integrations > ShipStation to ensure that “Shipped Order Status” is set to Completed.
- A conflict with security plugins usually restricts the accessibility of endpoints/URLs on your store. Although orders may be exporting fine, the security plugin you use may not be allowing ShipStation to POST shipping information to the server. If you have “Shipped” an Order in ShipStation (created a label or used “Mark as shipped”), but the order is not being updated to Completed, check to see if your site is using a security plugin. If it is, disable the security plugin and test again. If disabling the plugin resolves the issue, see if it can whitelist your endpoints.
If the above two items do not resolve the issue, first contact ShipStation.com support to request further information on the error their system is seeing when communicating with your site.
Once ShipStation has responded with the technical information, share the information with WooCommerce Support for further investigation.
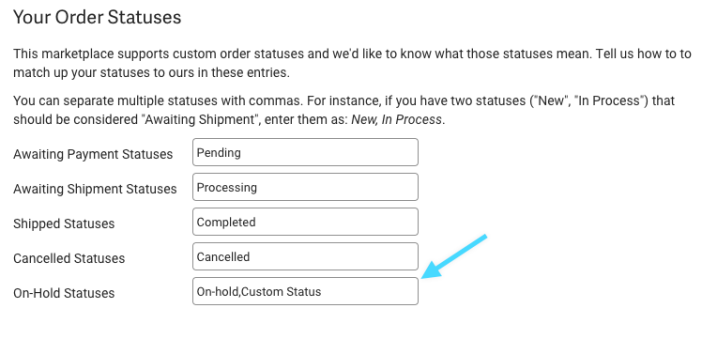
Using a custom order status with ShipStation
↑ Nach obenShipStation supports custom order statuses, but these must be set in your ShipStation account. You can find this in your Account > Store Setup > Your Order Statuses. If you add a custom order status, then you will need to use the slug (case insensitive) to match it to a ShipStation order status. You can use the WooCommerce Order Status Manager for creating a custom order status in WooCommerce.
How to change the Authentication Key
↑ Nach obenTo change the Authentication Key, please go to your WordPress options page here: https://yoursitename.com/wp-admin/options.php and look for a field that’s called woocommerce_shipstation_auth_key.

Delete the value of the field and click save. This allows a new Authentication Key to be generated, which you can find here: WooCommerce > Settings > Integration > ShipStation
On multisite installations, the woocommerce_shipstation_auth_key data can be deleted in the store settings for each site. Doing this can help resolve issues related to non-unique key generation problems.
SSL/TLS Certificates
↑ Nach obenShipStation only works with SSL certificates up to TLS v1.2. TLS v1.3 cannot be used at this time, but this could change in the future.
Are Product Dimensions included in the order import to ShipStation?
↑ Nach obenThe XML data used for the order imports includes product weights but not dimensions. If you would like to have product dimensions included as well, please do add your vote to the Feature Request here.
Is ShipStation compatible with Sequential Order Numbers plugins?
↑ Nach obenCurrently, the Sequential Order Numbers plugins from SkyVerge and WebToffee are supported, but some other plugins may work as well. However, if you’re using a different Sequential Order Numbers plugin that isn’t compatible, you might encounter issues with order statuses not updating due to missing XML data in the ShipNotify request. If the custom order number is being used instead of the actual order ID. When this occurs, the logs will show the Missing ShipNotify XML input error message.
For developers working on compatibility: When the ShipNotify request is received, the “real” order number is needed to be able to update the correct order. The plugin uses the function get_order_id and the order number can be adjusted by using a filter, like the example pictured below:
<?php
// Force Shipstation to use Order ID - https://wordpress.org/support/topic/get-the-original-post-id/

add_filter( 'woocommerce_shipstation_get_order_id', function( $order_id ) {
    global $wpdb;

    /**
     * Fetch the real WooCommerce order ID from custom order number.
     * Handles sequential order number plugins that store custom numbers in postmeta.
     */
    $real_order_id = $wpdb->get_var(
        $wpdb->prepare(
            "SELECT post_id FROM {$wpdb->postmeta} WHERE meta_key = %s AND meta_value = %s",
            '_alg_wc_full_custom_order_number',
            $order_id
        )
    );

    // Use found order ID, otherwise fallback to the original.
    return ! empty( $real_order_id ) ? absint( $real_order_id ) : absint( $order_id );
} );
Questions and support
↑ Nach obenDo you still have questions and need assistance?
- Get in touch with a Happiness Engineer via our Help Desk. We provide support for extensions developed by and/or sold on WooCommerce.com, and Jetpack/WordPress.com customers.
- If you are not a customer, we recommend finding help in the WooCommerce support forum or hiring a Woo Agency Partner. These are trusted agencies with a proven track record of building highly customized, scalable online stores. Learn more about Woo Agency Partners.