Description
This plugin is designed to offer discounts, giving users the flexibility to create a variety of discount offers for their shop. It features a range of discount types tailored to different scenarios, visible across the shop, product, cart, and checkout pages. Users can apply these discounts to specific products or categories, or all products, with customizable conditions.
Discount Types
↑ Back to topThis plugin offers the following discount types:
- On Product Discounts
- On Cart Discounts
- Free Shipping
- Bulk Product Discounts
- BOGO Discount
Installation
↑ Back to top- Download the .zip file from your WooCommerce account.
- Go to WordPress Admin Dashboard > Plugins > Upload Plugin > Choose File.
- Install Now and Activate Plugin.
Getting Started
↑ Back to topCreating Discounts
↑ Back to topOn Product Discount
- In the On Product Discount, the discount will be applied directly to the product.
- Go to WordPress Admin Dashboard > Discounts & Coupons > Add New Discount.
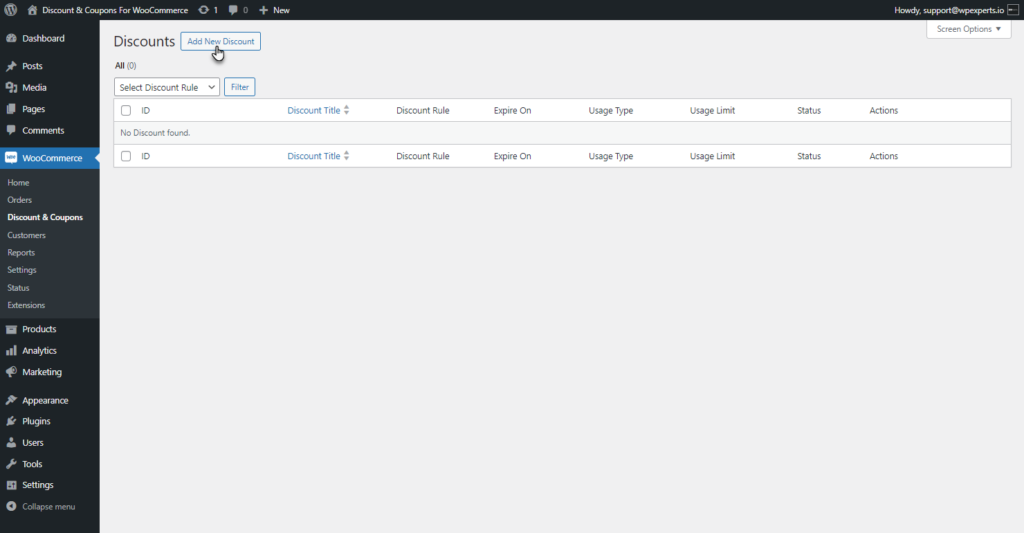
- Add New Discount screen will appear.
- Add a title to your Discount
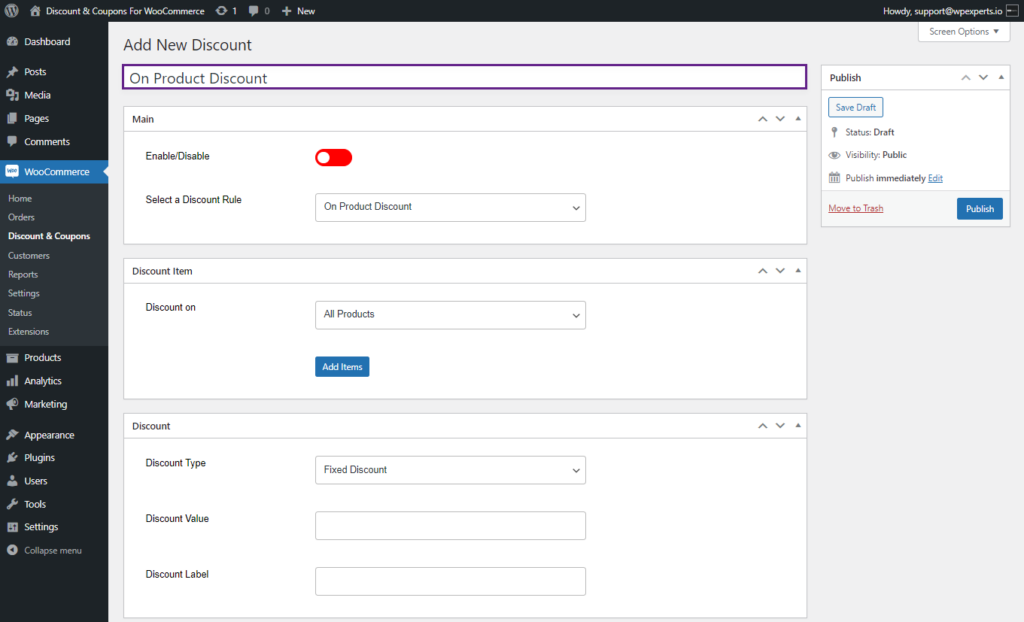
- There will be five tabs to configure your Discount.
- Main
- Discount Item
- Discount
- Discount Restrictions
- Coupon
Main Tab
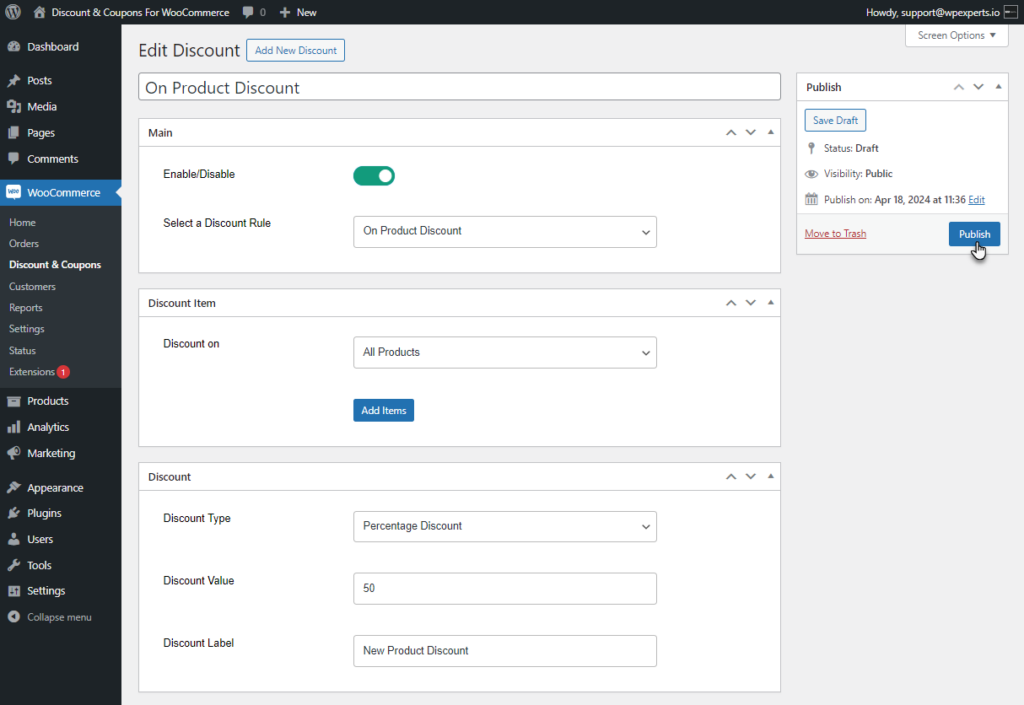
- The admin can enable and select the discount rule in the Main tab.
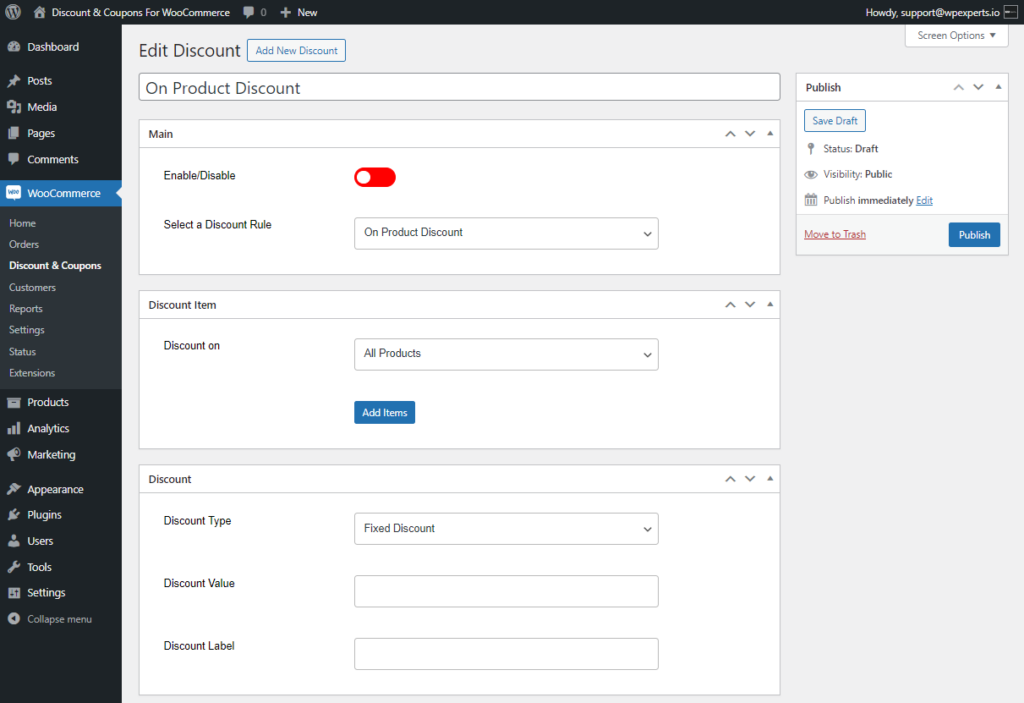
- Enable the discount by using the Enable/Disable toggle button.
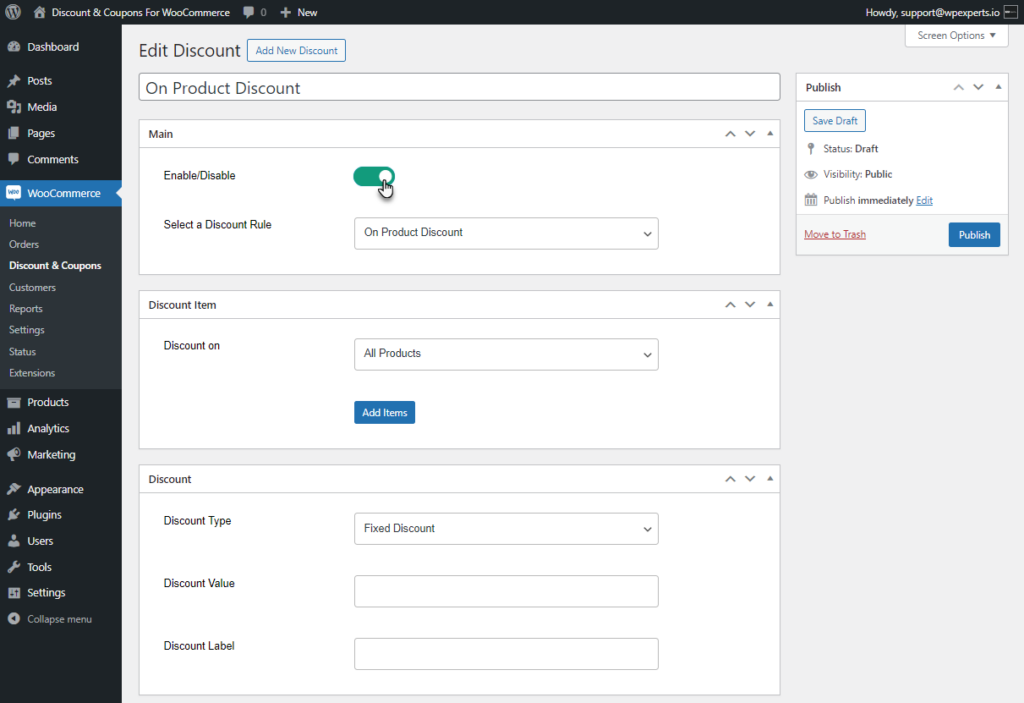
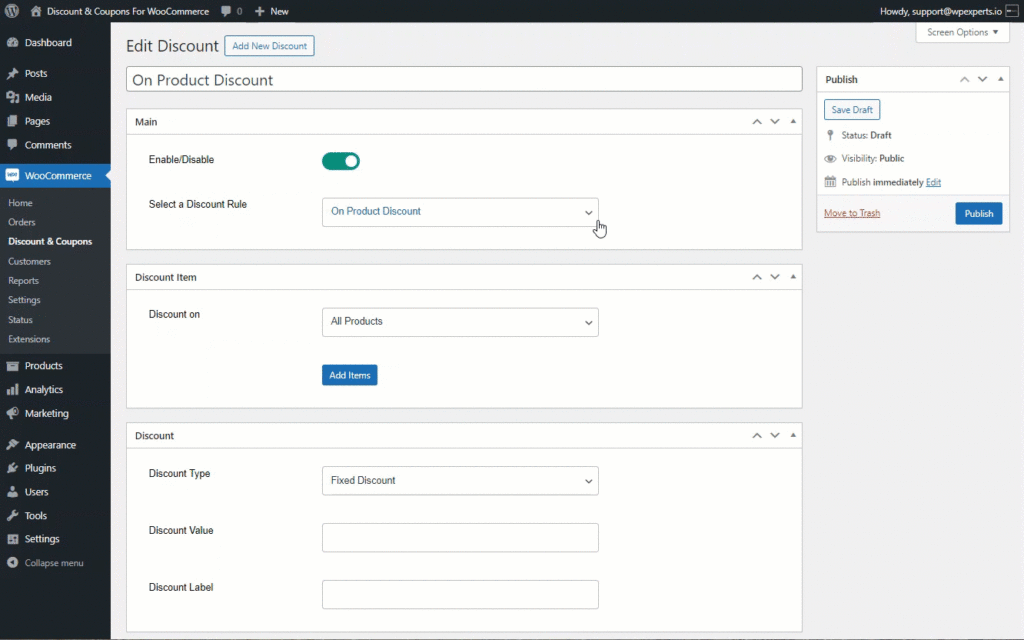
- Select the discount rule from the Select a Discount Rule drop-down list. By default, the On Product Discount rulewill be selected.
Discount on Product Tags
- This feature enables the admin to apply discounts based on product tags.
- Navigate to WordPress Admin Dashboard > WooCommerce > Discount & Coupons > Add New / Edit Discount.

- In the Discount Item metabox, select Product Tags from the Discount On dropdown list.
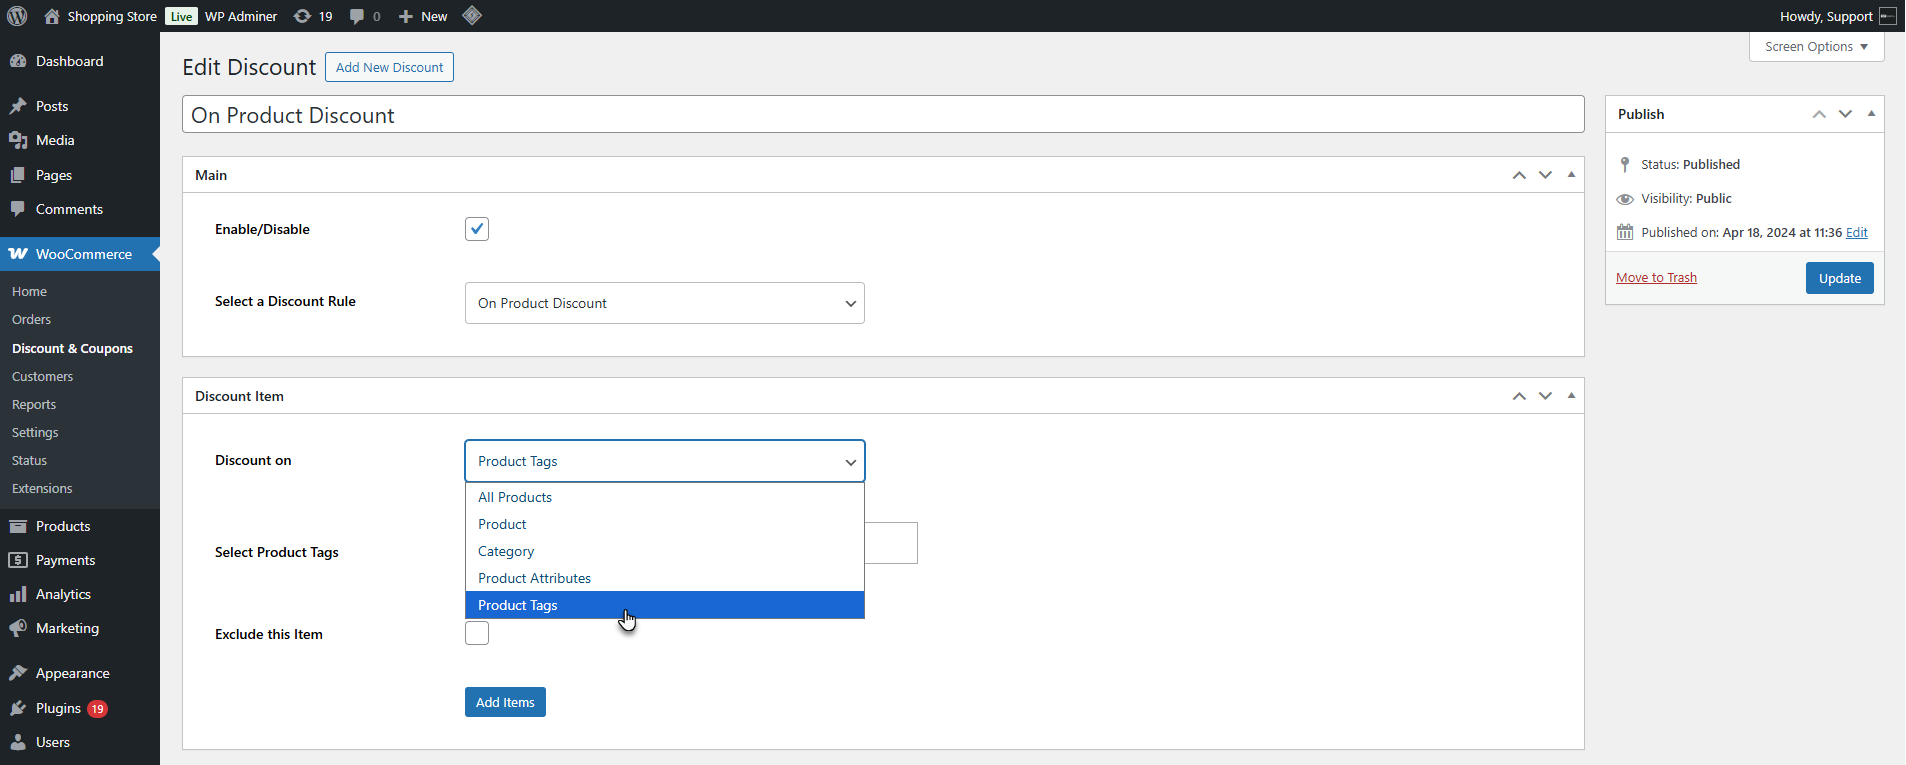
- Choosing Product Attributes will display a new field: Select Product Tags. In the Select Product Tags field, choose the Tags(s) on which the discount should apply. If left blank, the rule will apply to all Tags.

- Use the Exclude this item option to exclude the selected tag from the discount rule.

- Click the Update button to save your changes

Front End Impact
- Log in to your account.
- Navigate to the product that has the selected tag in the discount rule. The discount label will appear.
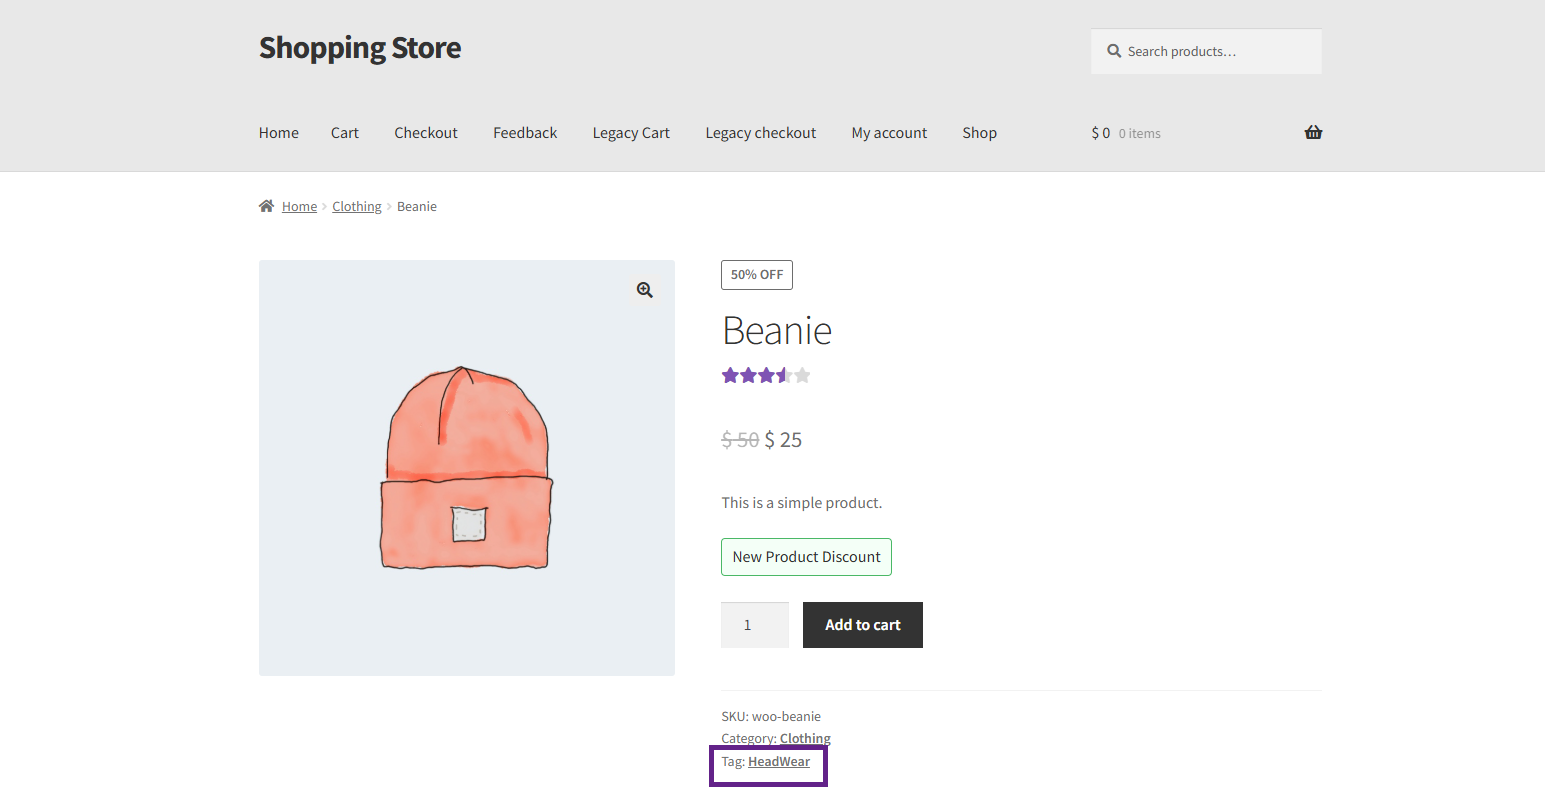
- The discount will be applied on the cart page and checkout page.

Bundle Product Discount
↑ Back to top- This feature enables the admin to apply discounts based on product bundles, e.g., 20% off when purchasing exactly four shirts.
- Navigate to WordPress Admin Dashboard > WooCommerce > Discount & Coupons > Add New / Edit Discount.

- In the Main metabox, select Bundle Product Discount from the Select a Discount Rule dropdown list.

- Once selected, go to the Discount metabox. Enter the Quantity of products required for the bundle (e.g., four shirts).

- Select the Discount Type from the dropdown list.
- Fixed Price Per Bundle
- Sets a fixed price for the entire bundle.
- Example: If one shirt is $20 and the bundle has 4 shirts, instead of $80, the full bundle price could be set to $60.
- Fixed Discount Per Item
- Applies a fixed discount on each item in the bundle.
- Example: If a shirt costs $50 and the discount is $10, the new price per shirt is $40, making the bundle of 4 shirts $160.
- Percentage Discount Per Item
- Applies a percentage discount on each item in the bundle.
- Example: If a shirt is $50 and the discount is 30%, each shirt becomes $35, making the 4-item bundle $140.
- Fixed Price Per Bundle

- Enter the discount value based on the selected discount type. Add a discount label, which will appear on the frontend for the user.

- Use the Add Items button to add multiple bundles if needed.

- The bundles have been added.

- Once configured, click the Update button to save changes.

Front End Impact
↑ Back to top- Log in to your account.
- Go to the Product page. The Bundle Product Discount table will appear.

- When the user updates the quantity, the discount will change according to the bundle discounts.

- The discount rule will be applied on the Cart and Checkout pages.

Discount Item Tab
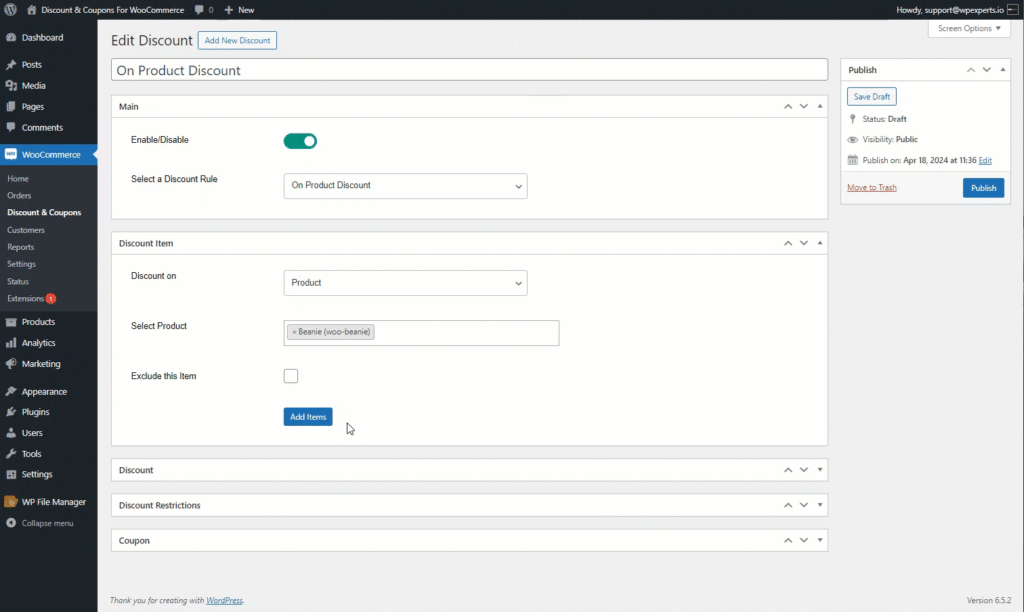
- Once done with the Main tab, scroll down to the Discount Item tab. This tab allows the admin to specify the product or category for which the discount will apply.
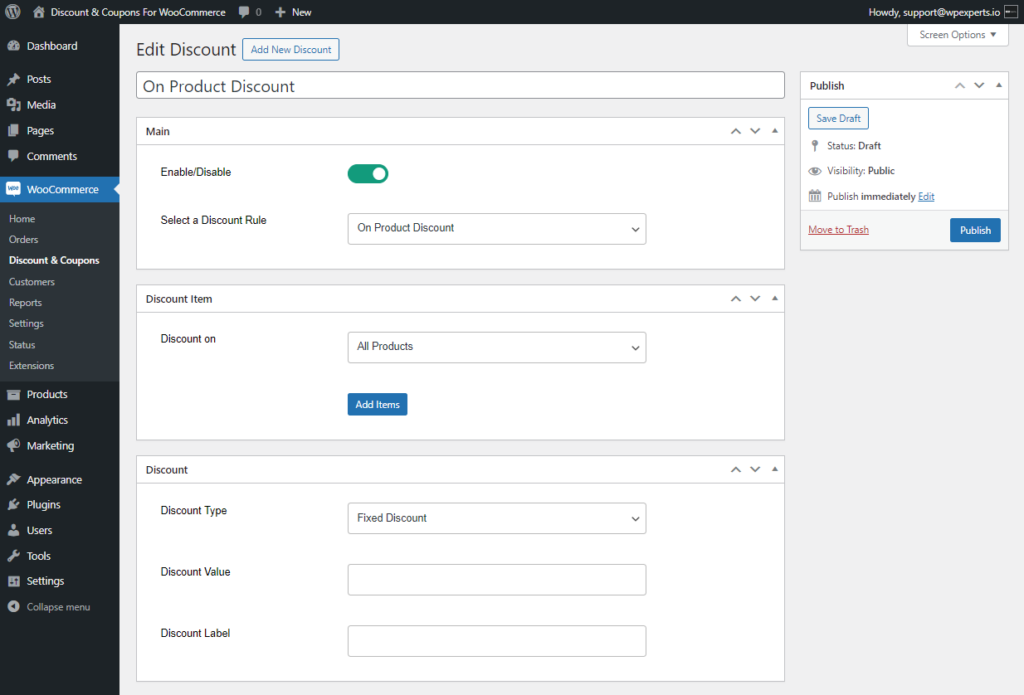
- Select the Product or Category from the Discount on the drop-down list.
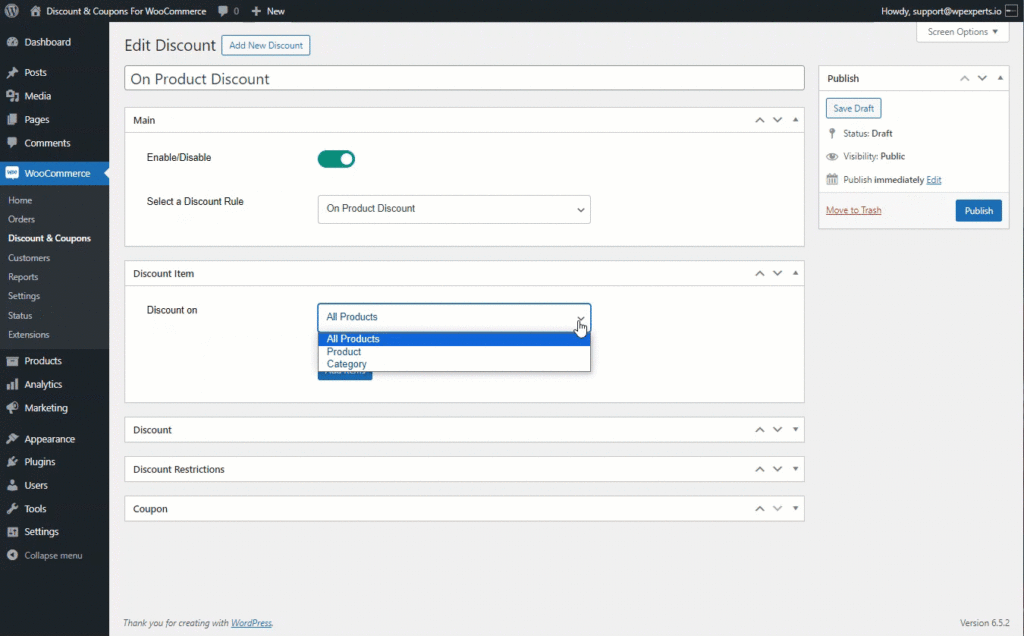
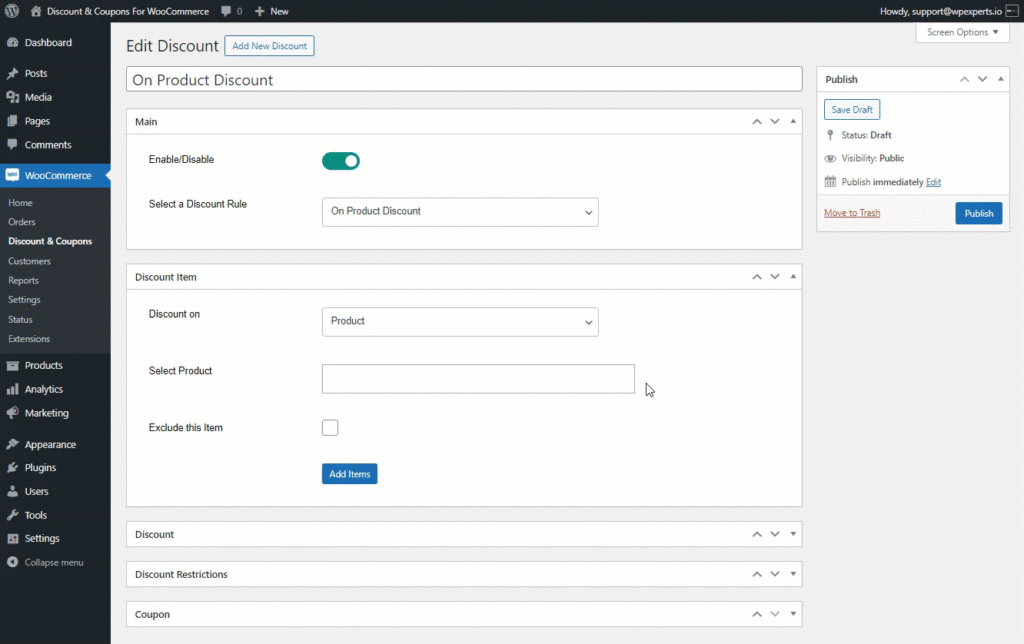
- Select the specific Product or Category from the Select Product or Select Category option.
- Select the Exclude this Item check button to exclude the selected Product or Category from the discount.
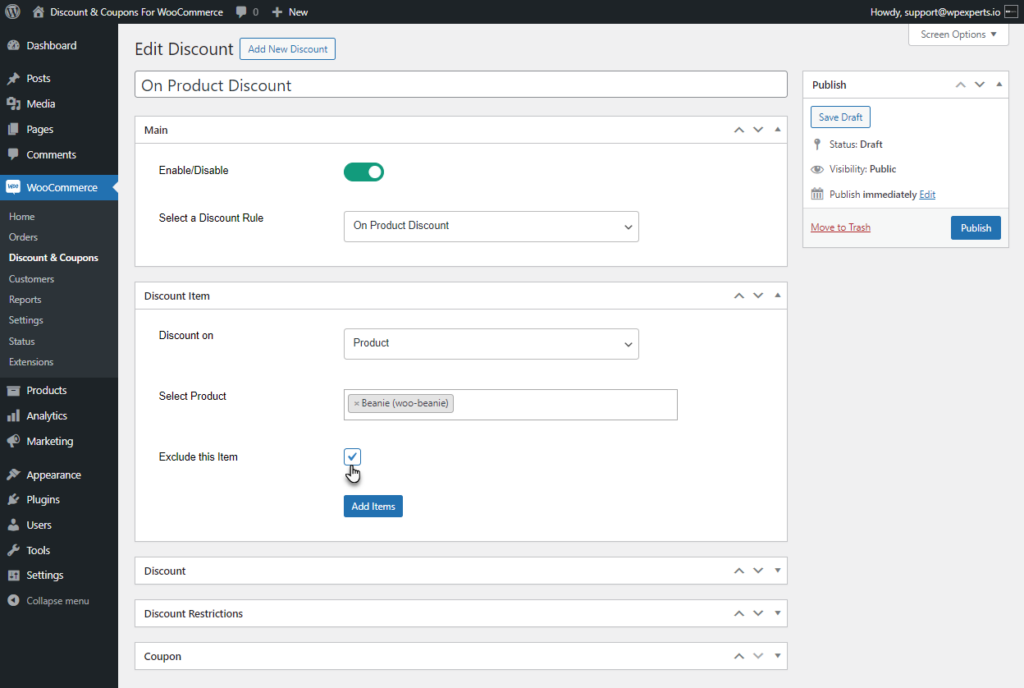
- Admin can add multiple Items using the Add Items Button.
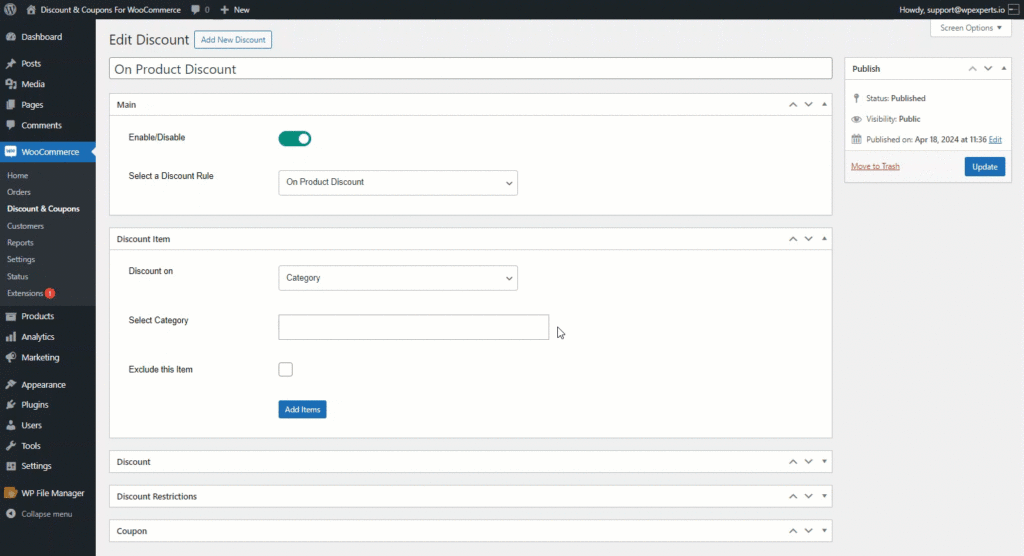
For Category
- Select Category in the Discount on option.
- Select the desired Category for which the discount will be applicable.
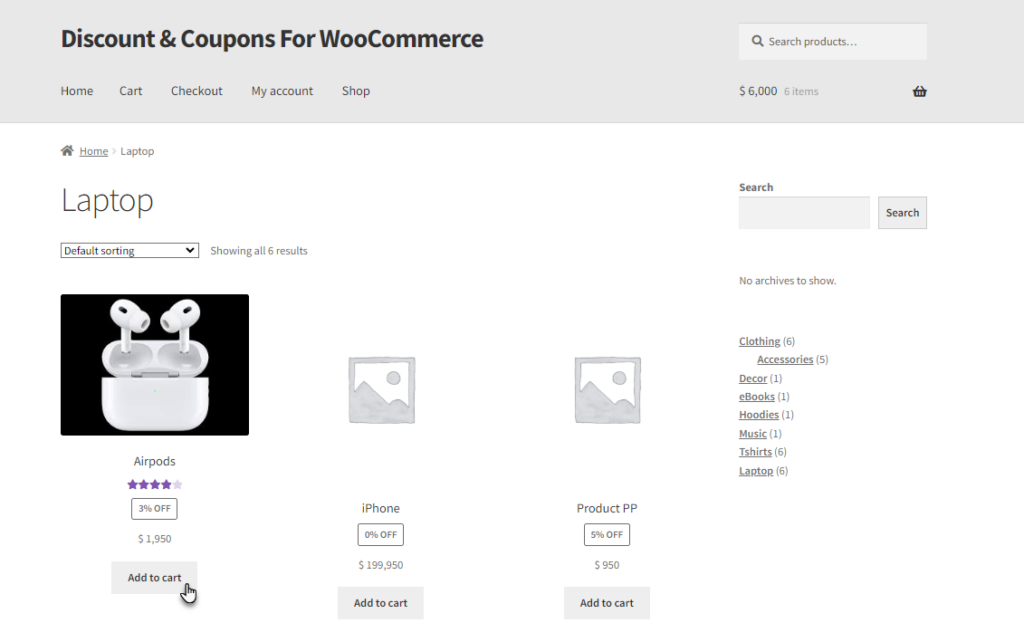
Front End Impact
- Go to the Shop page.
- Add the item from the Discounted Category to the cart.
- Go to the Cart page.
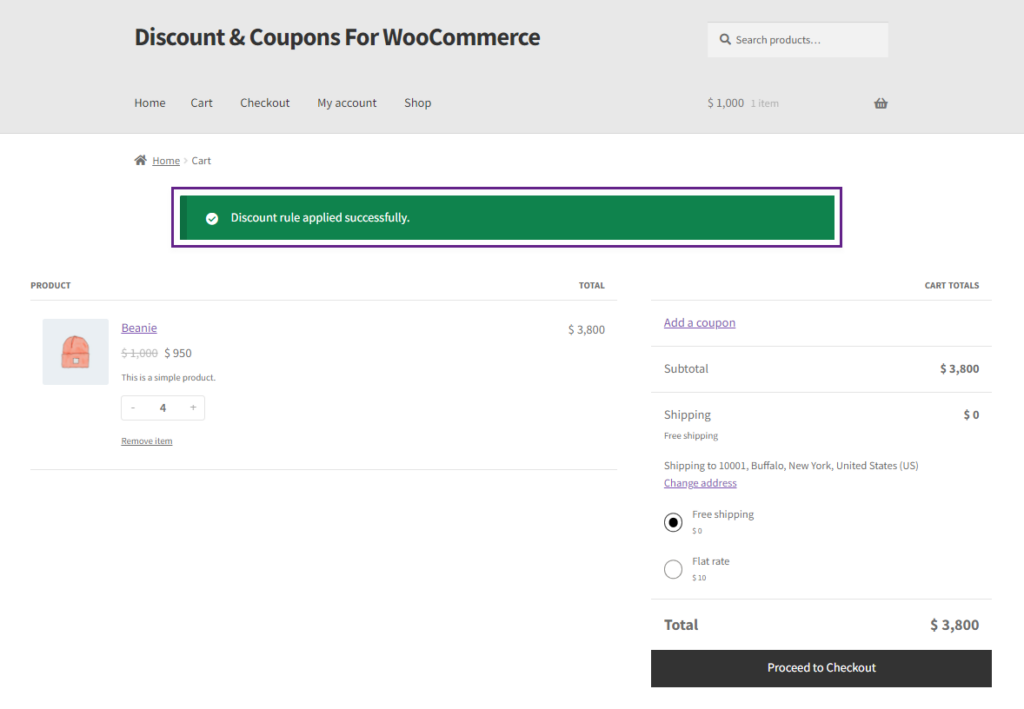
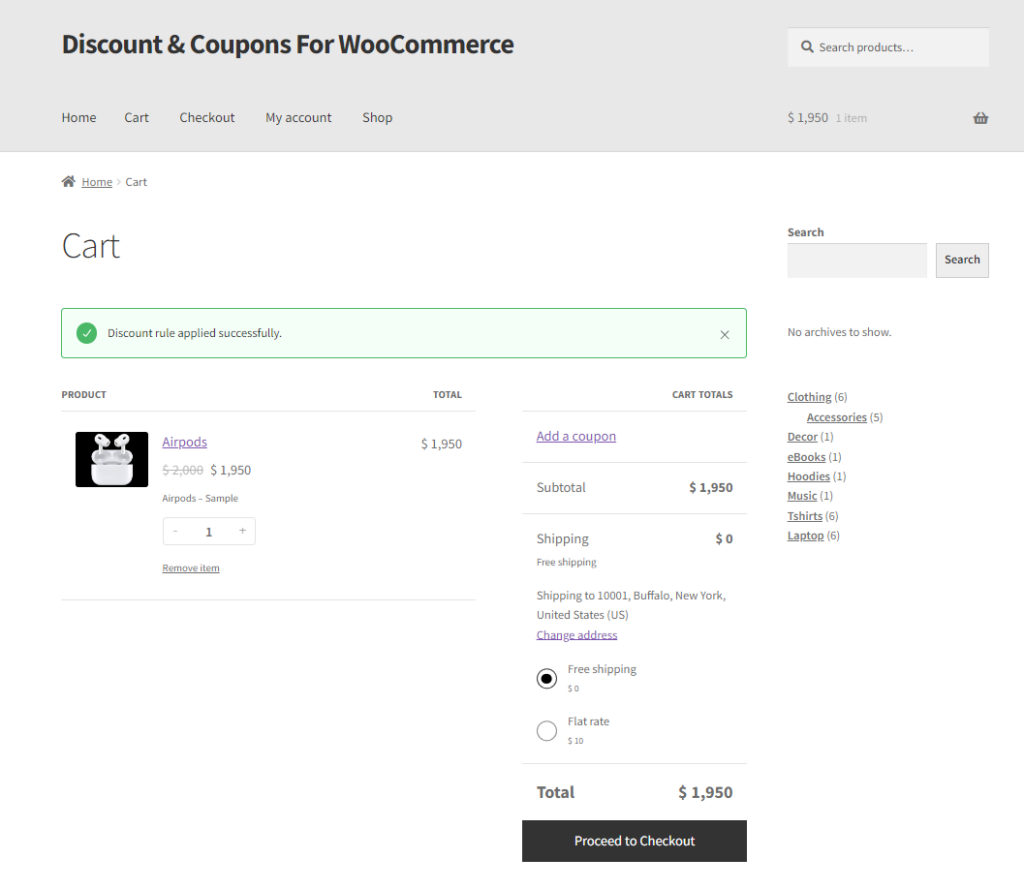
- The Discount Rule Applied message will be displayed in the cart and the discounted price will be displayed.
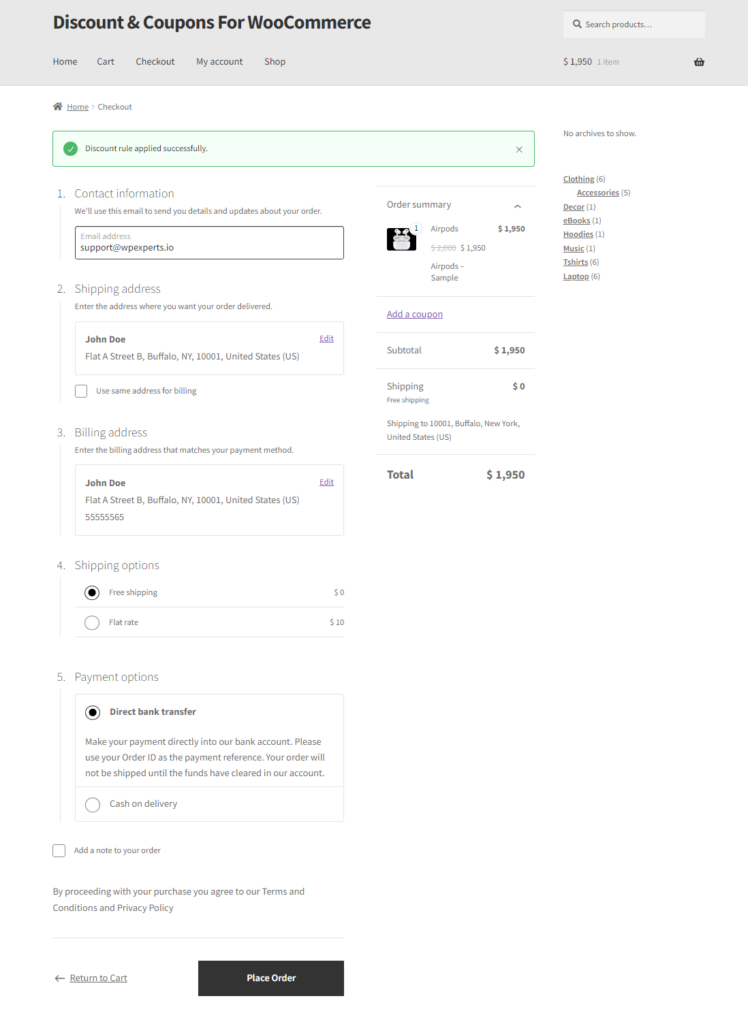
- The Discount Rule Applied message and the discounted price will also be displayed on the Checkout page.
For All Products
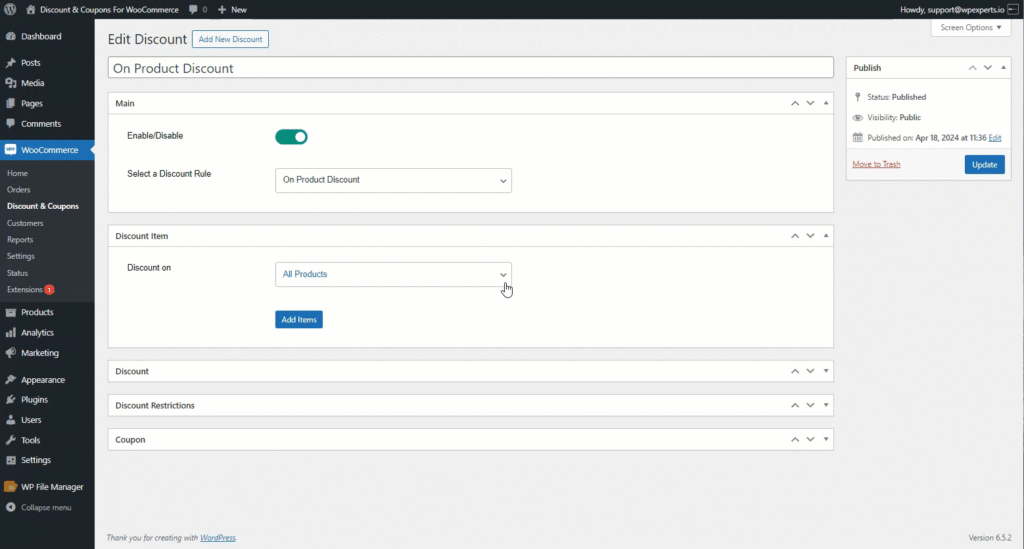
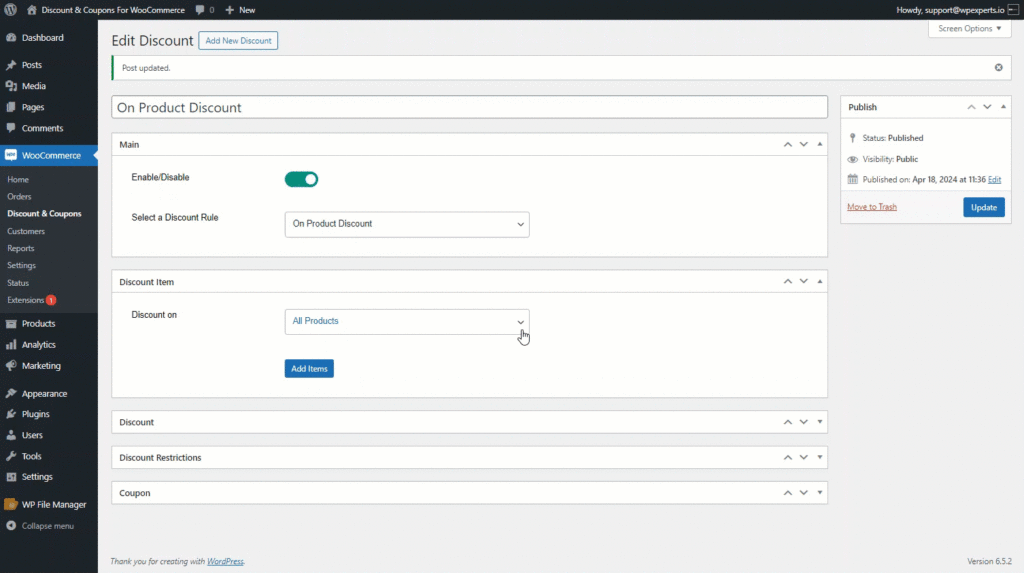
- Select All Products in the Discount on option.
Front End Impact
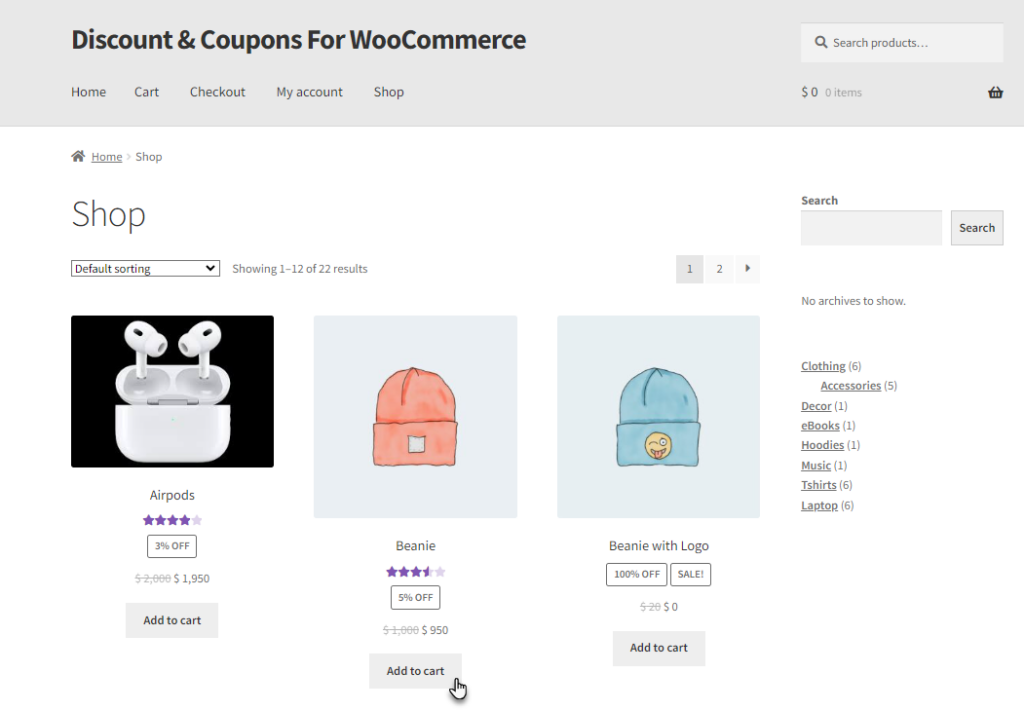
- Go to the Shop page.
- The Discount will be applied to all products.
- Add any Discounted item to the cart.
- The Discount Rule Applied message will be displayed in the cart and the discounted price will be displayed.
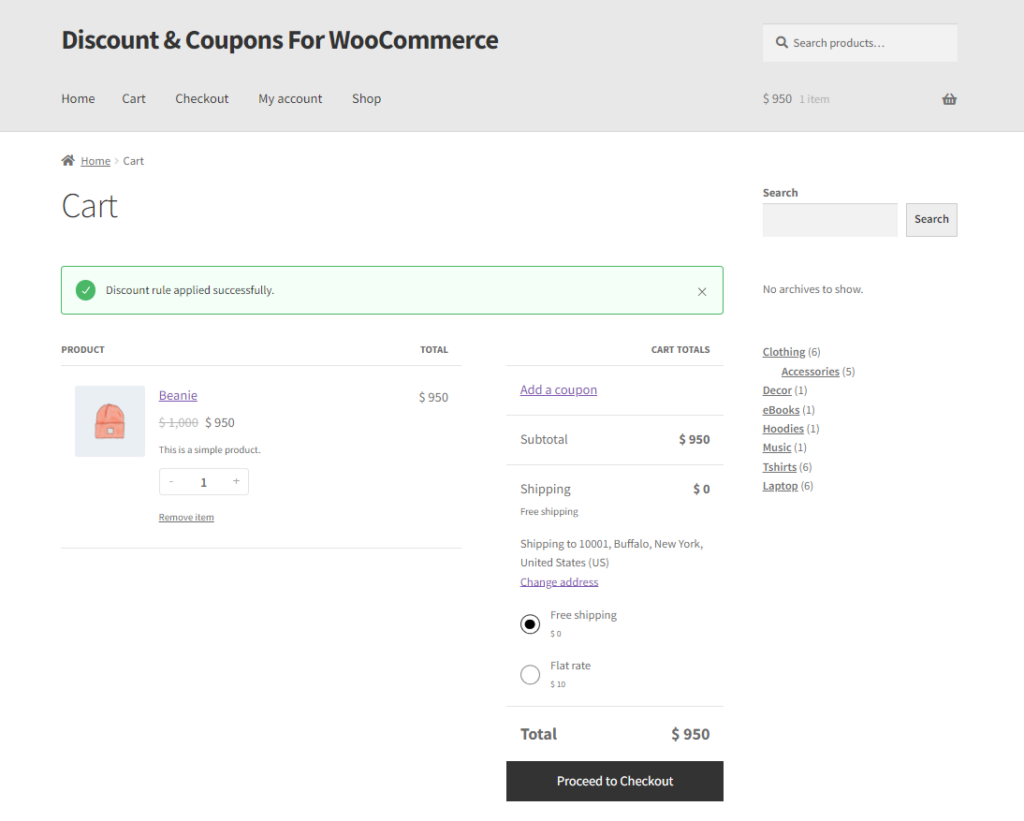
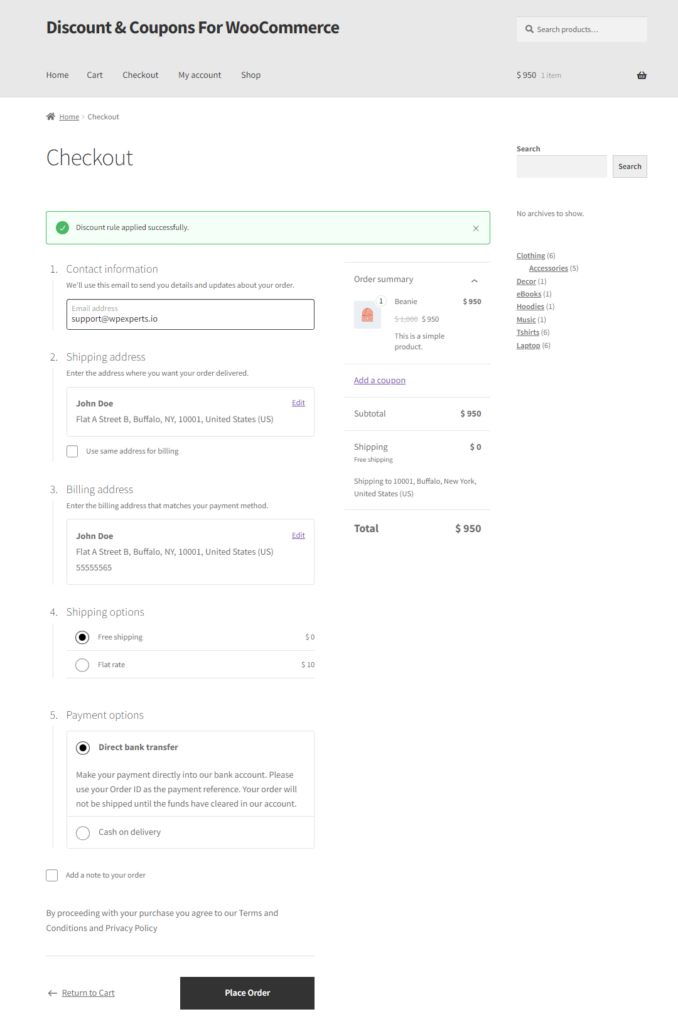
- The Discount Rule Applied message and the discounted price will also be displayed on the Checkout page.
Discount on Product Attributes
- This feature enables administrators to apply discounts based on product attributes, such as size, color, or shape.
- Navigate to WordPress Admin Dashboard > WooCommerce > Discount & Coupons > Add New / Edit Discount.

- In the Discount Item metabox, select Product Attributes from the Discount On dropdown list.

- Choosing Product Attributes will display two new fields: Select Attribute and Select Attribute Value.

- In the Select Attribute field, choose the attribute(s) (e.g., Size, Color) to which the discount should apply. If left blank, the rule will apply to all attributes.

- In the Select Attribute Value field, specify the value(s) for the selected attribute(s) (e.g., Large, Red). If left blank, the rule will apply to all values of the selected attribute(s).

- Use the Exclude this item option to exclude the selected attribute or value from the discount rule.

- Click the Update button to save your changes.

Front End Impact
- Log in to your account.
- Go to the Variable Product page. The discount label will appear on the Variable page.

- Select the Attributes from the given options.

- The discount will be applied on the cart page and checkout page.

Discount Tab
- After finishing the Discount Item tab, move to the Discount tab. In this tab, the admin can select the discount type, specify its value, and assign a label to the discount.
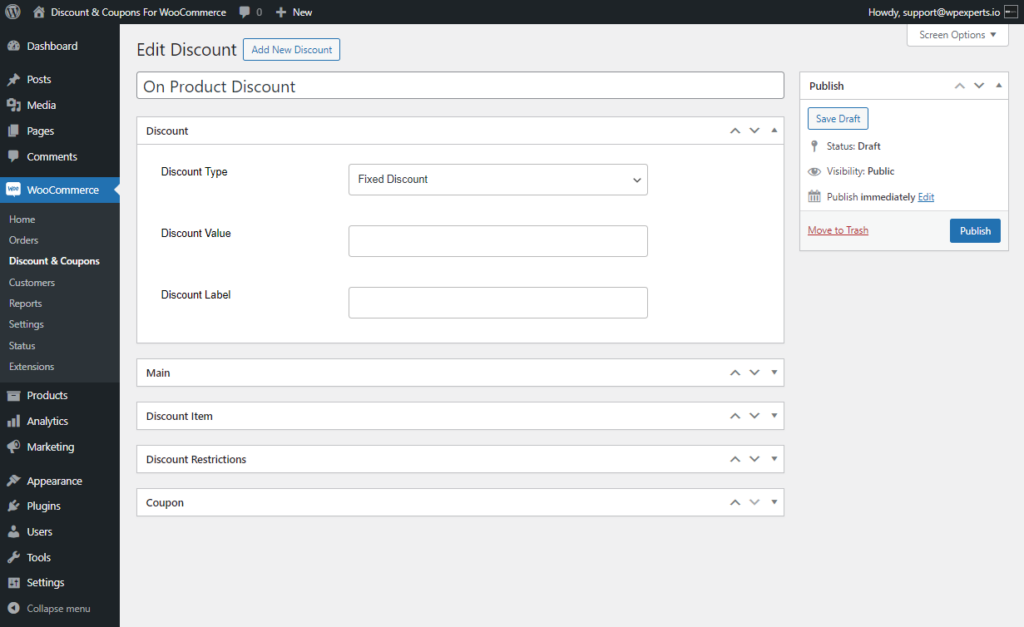
- In the Discount Type, three types of discounts are provided.
Fixed Discount
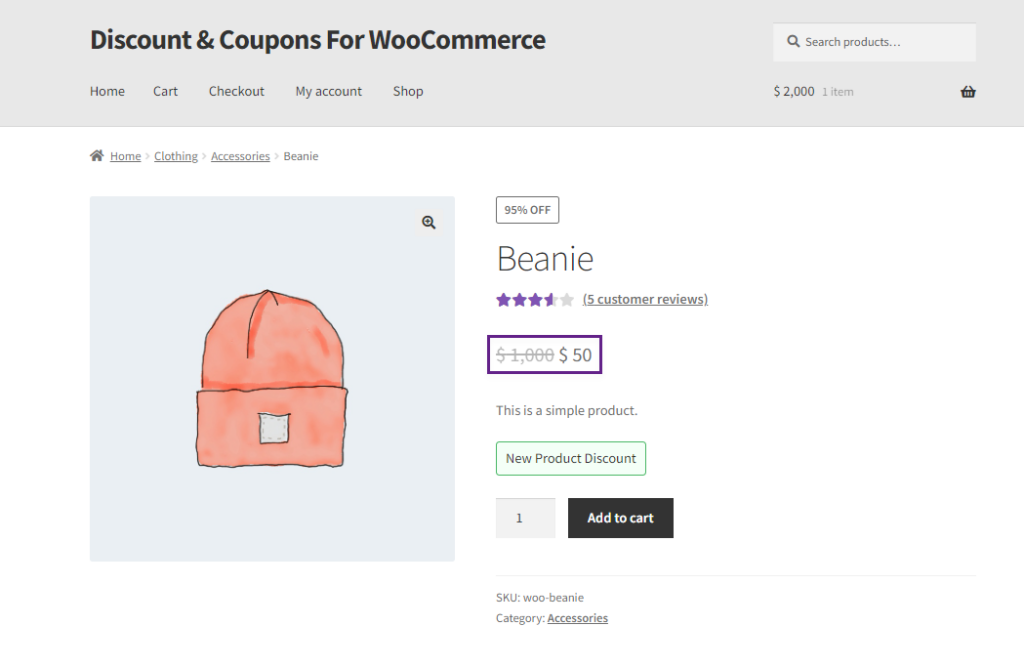
- Select the Fixed Discount option from the Discount Type drop-down list. A specific amount will be deducted from the product’s total price.
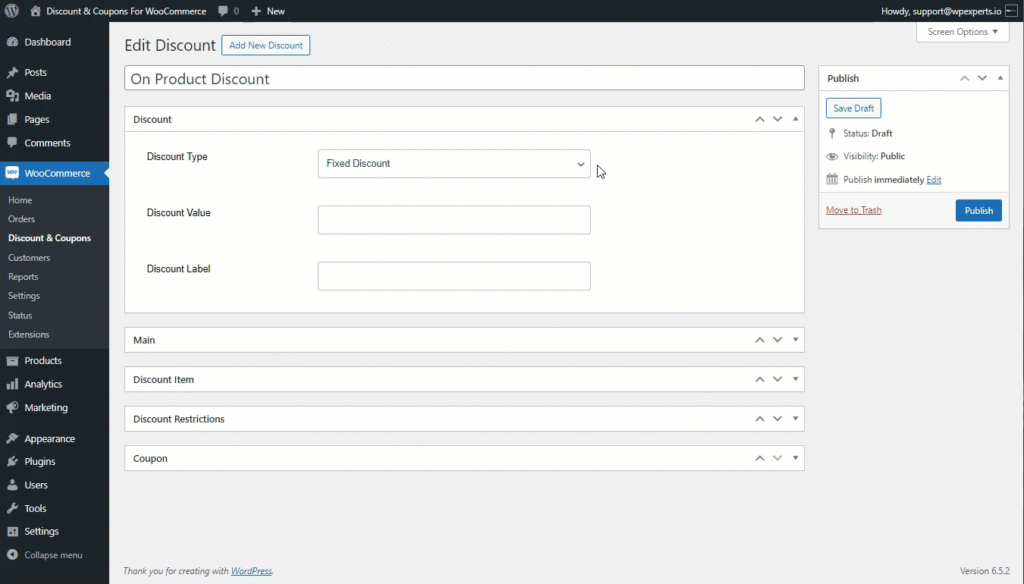
- Enter the desired discount amount into the Discount Value field to apply the discount.
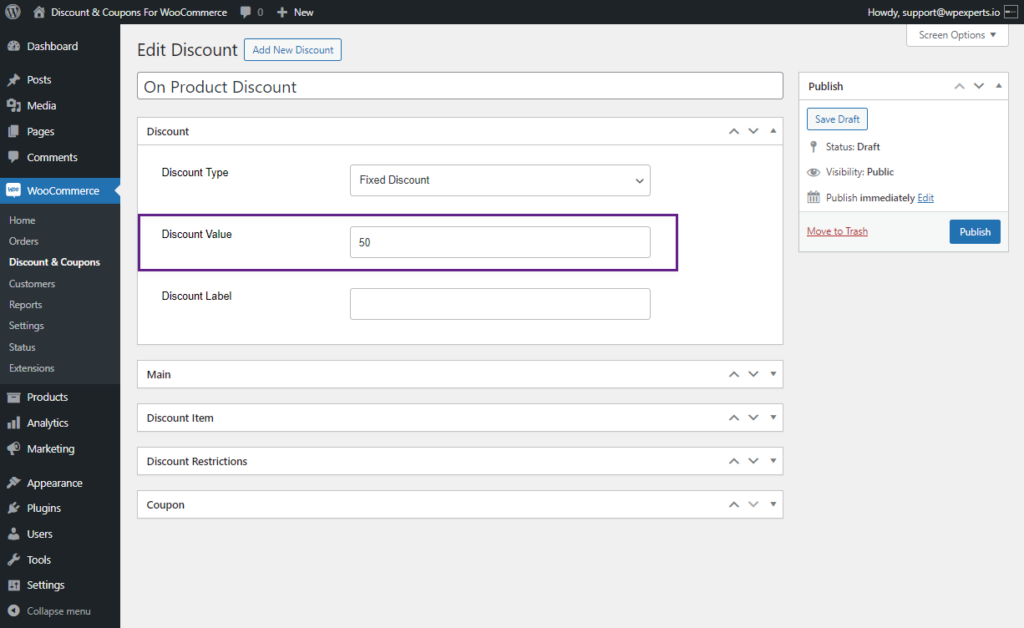
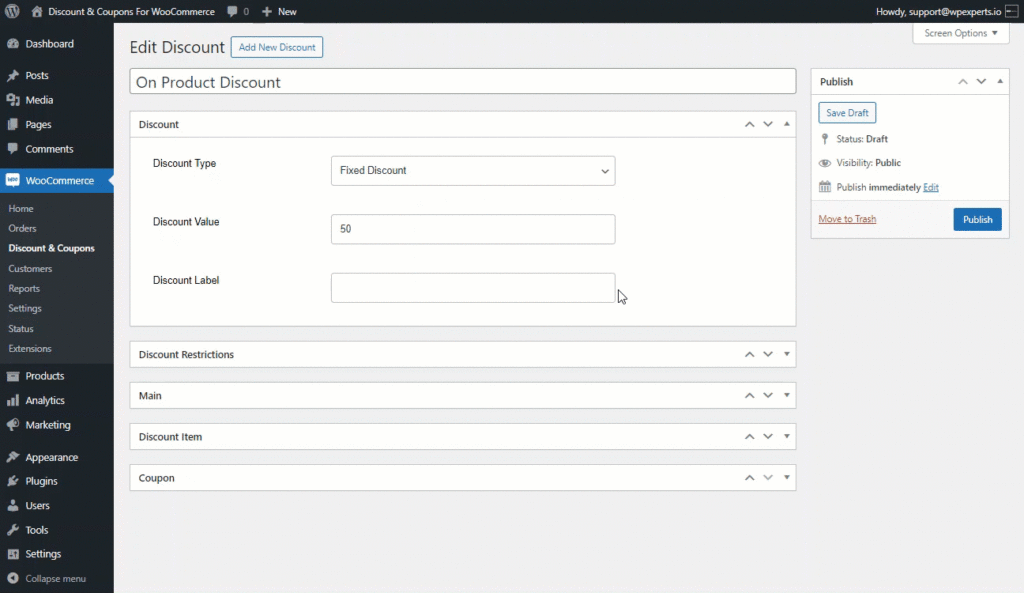
- Admin can assign a label to the discount in the Discount Label field.
Front End Impact
- Go to the Shop Page.
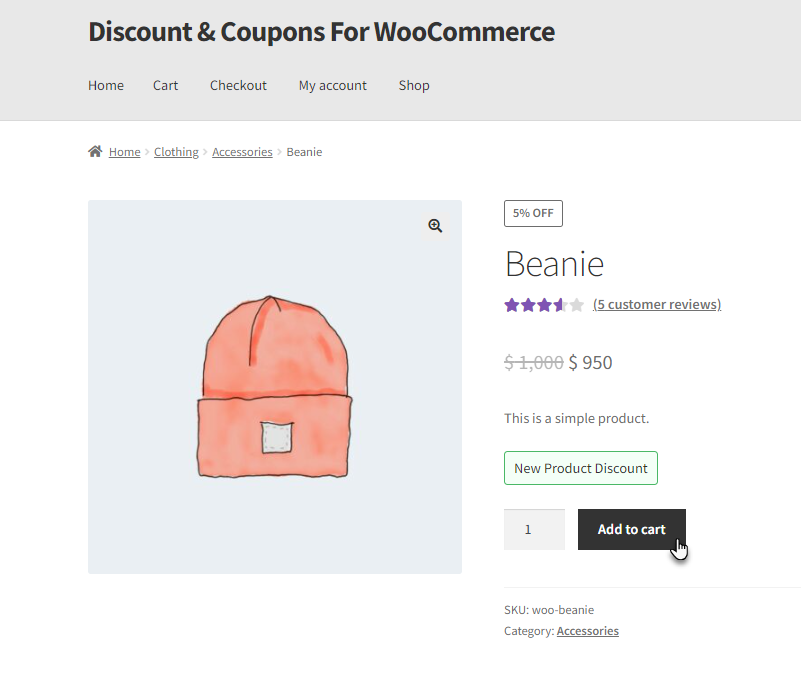
- The selected Discount type will be applied to the product.
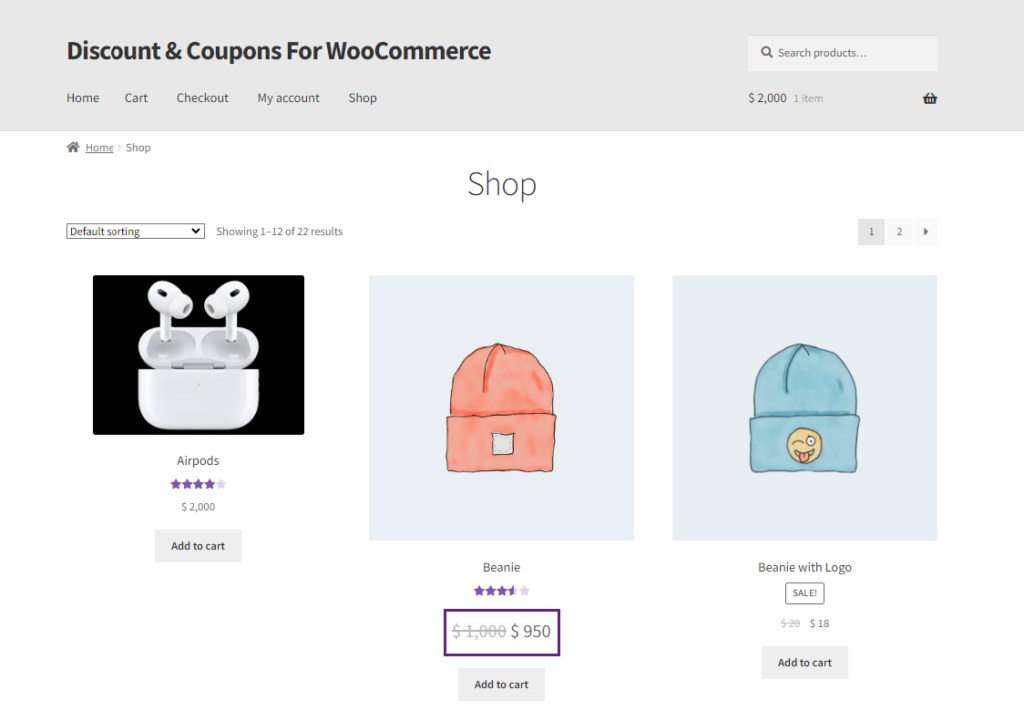
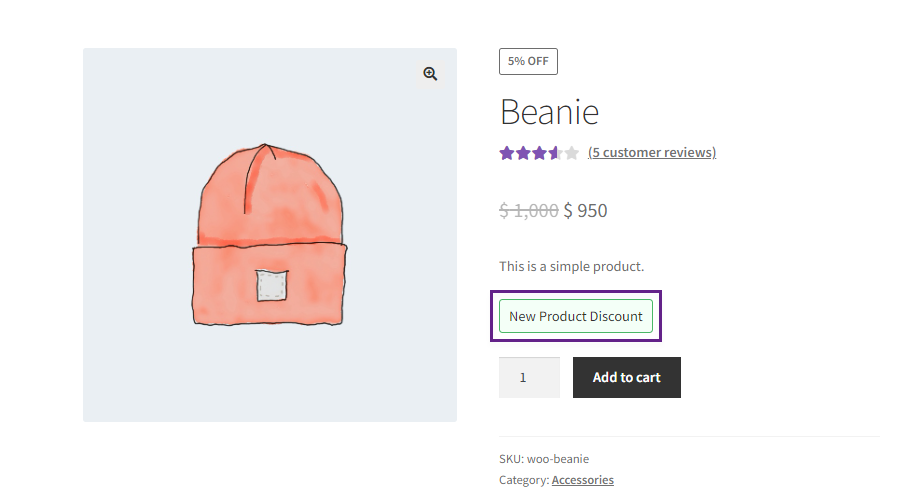
- The discounted price will also be shown on the Product page.

- The Discount label will be displayed on the product page.
- Add the item to the cart by Clicking the Add to Cart button.
- The Discount Rule Applied message will be displayed on the Cart page and the discounted price will be displayed.
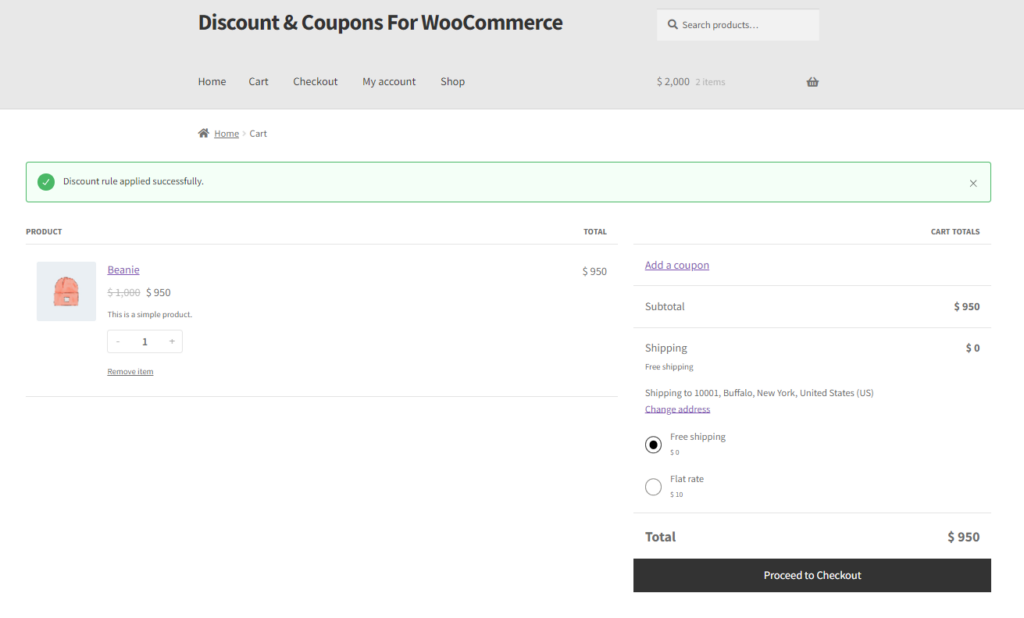
- Now Proceed to the Checkout page by Clicking on the Proceed to Checkout Page.
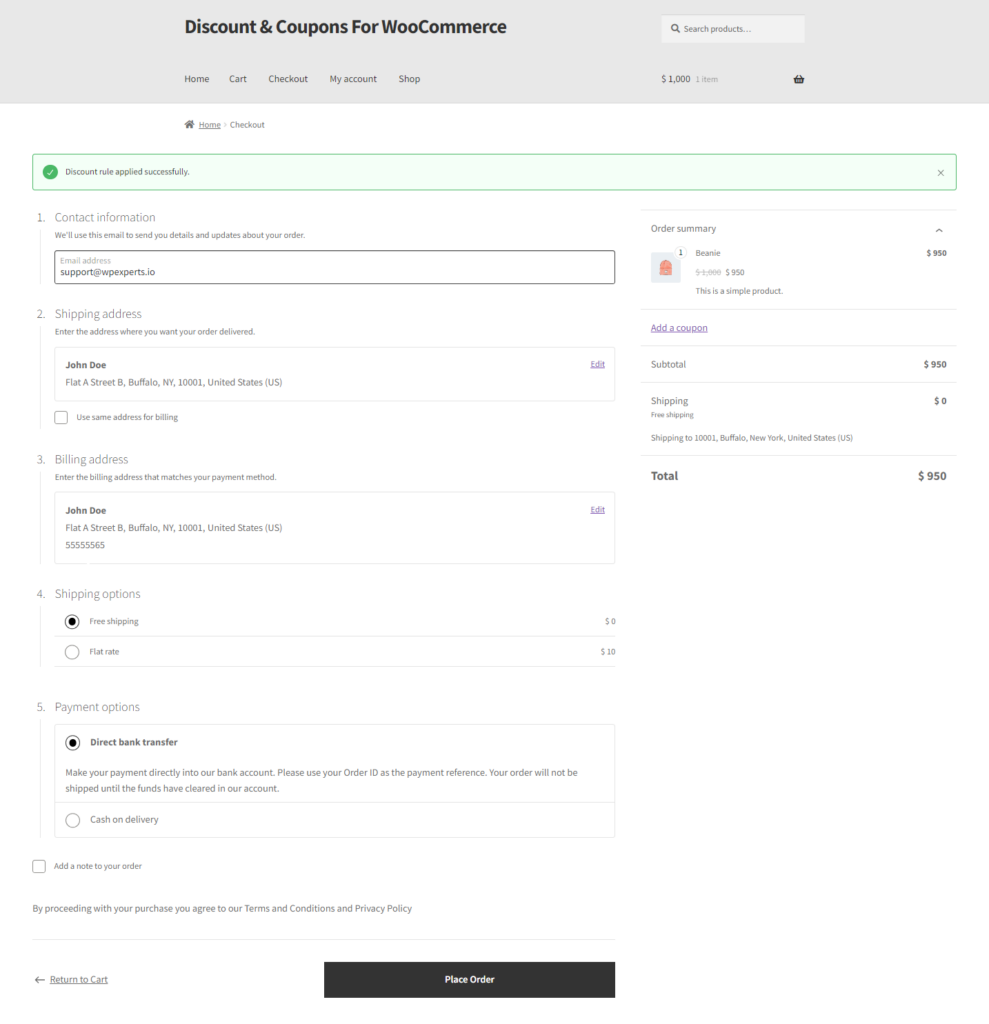
- Place your Order by Clicking on the Place Order button. Your Order will be placed.
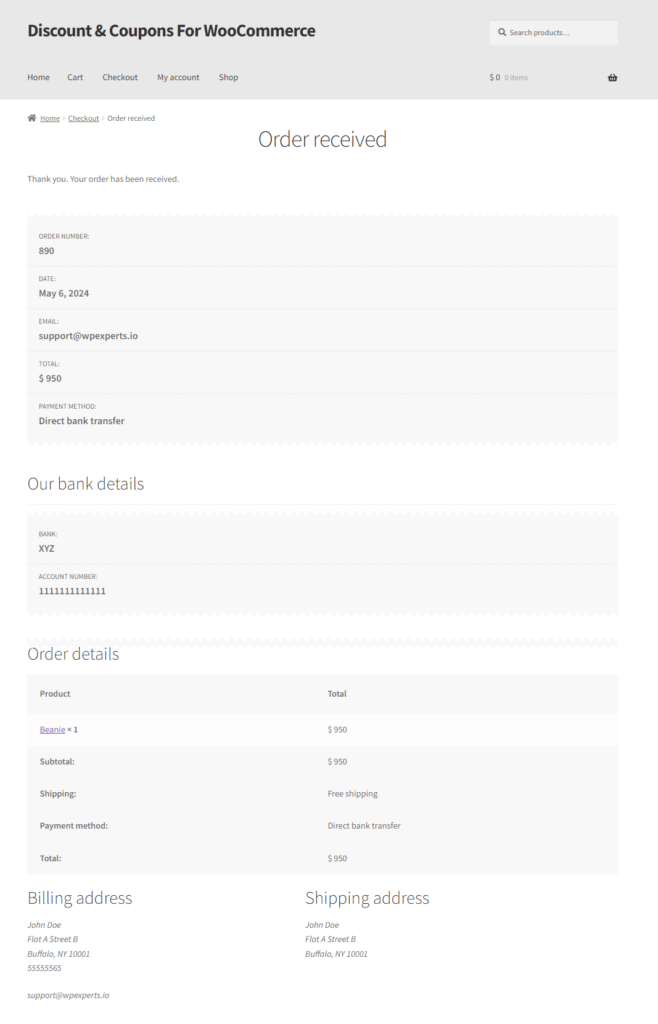
- Now navigate to WordPress Admin Dashboard > WooCommerce > Orders.
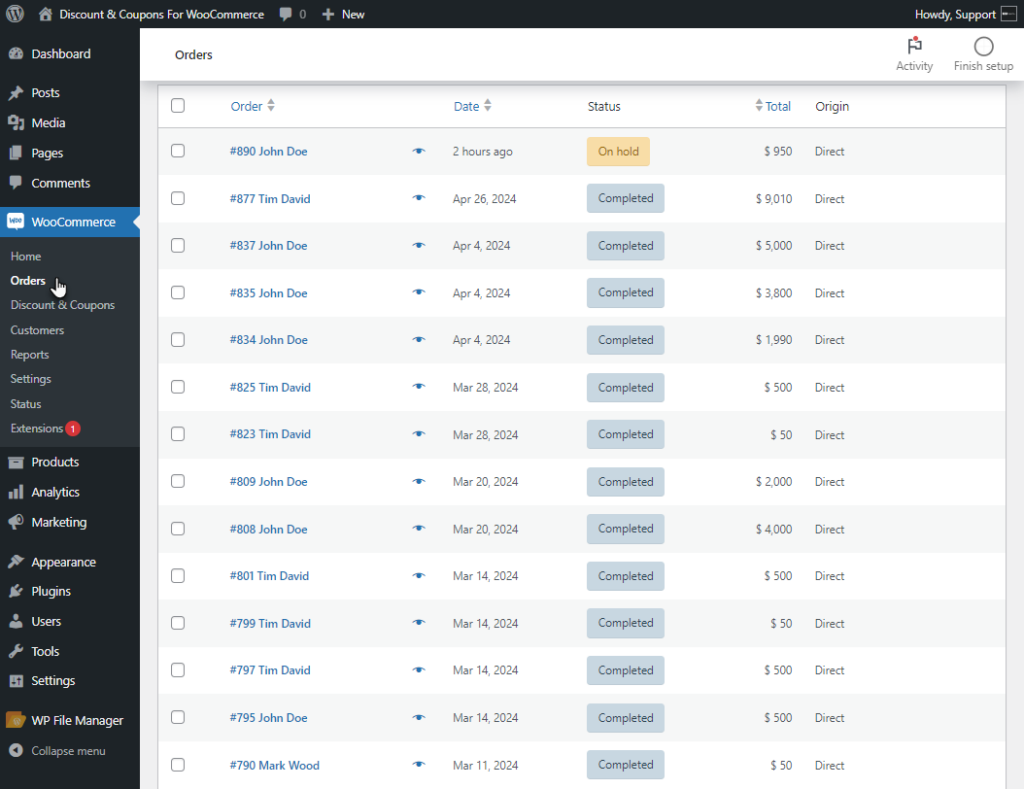
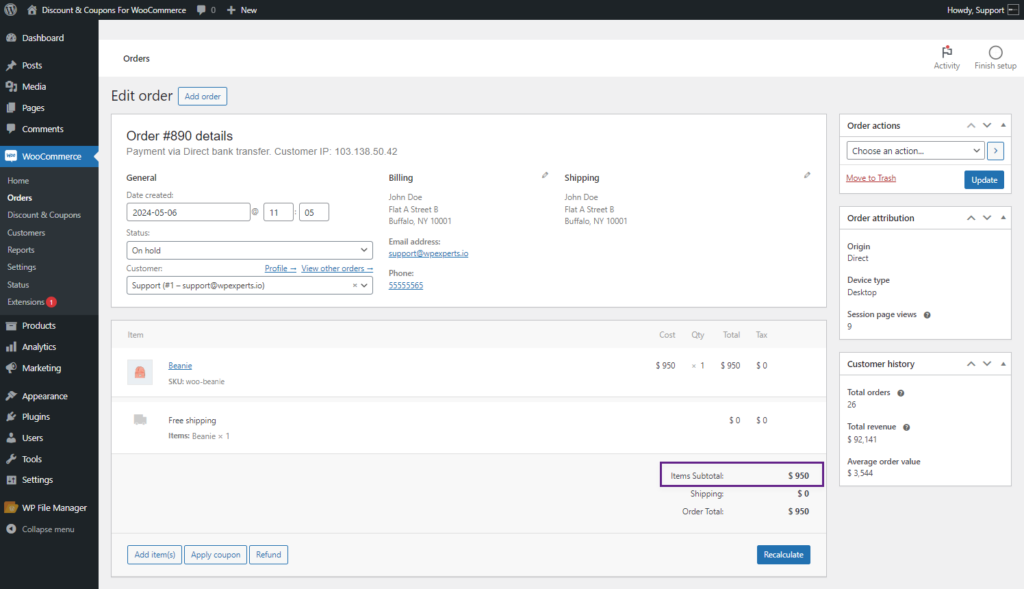
- Click on the order to see the details of the order. The order will be placed based on the Discounted Price.
Fixed Price Per Item Discount
- Select the Fixed Price per item Discount option from the Discount Type drop-down list. This discount type will replace the original price of the product with the specified amount entered in the discount value field.
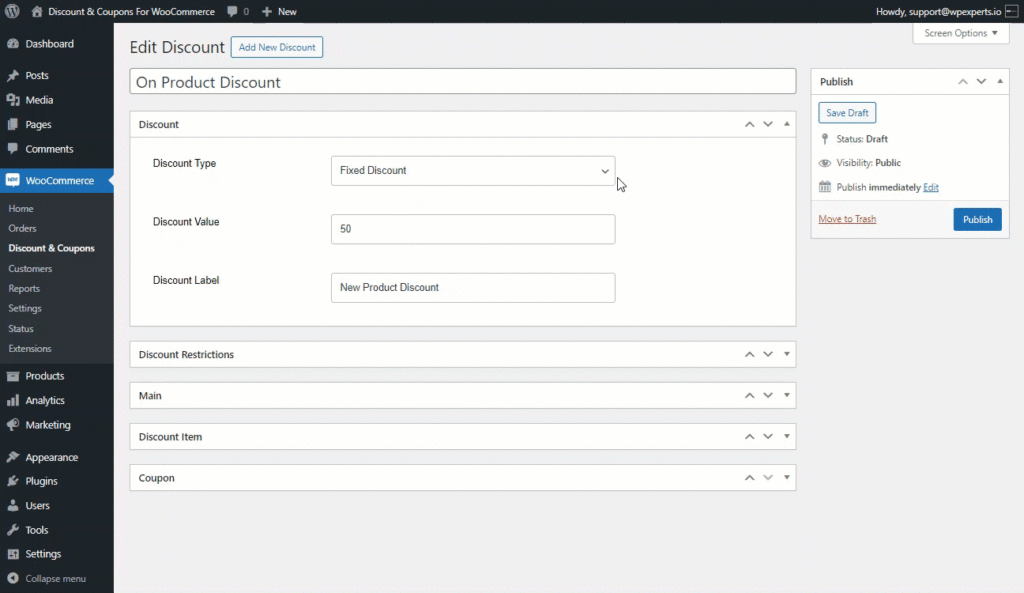
PLEASE NOTE: The Discount Value and Discount Label settings can be changed as per requirement.
Front End Impact
- Go to the Shop Page.
- The selected Discount type will be applied to the product.
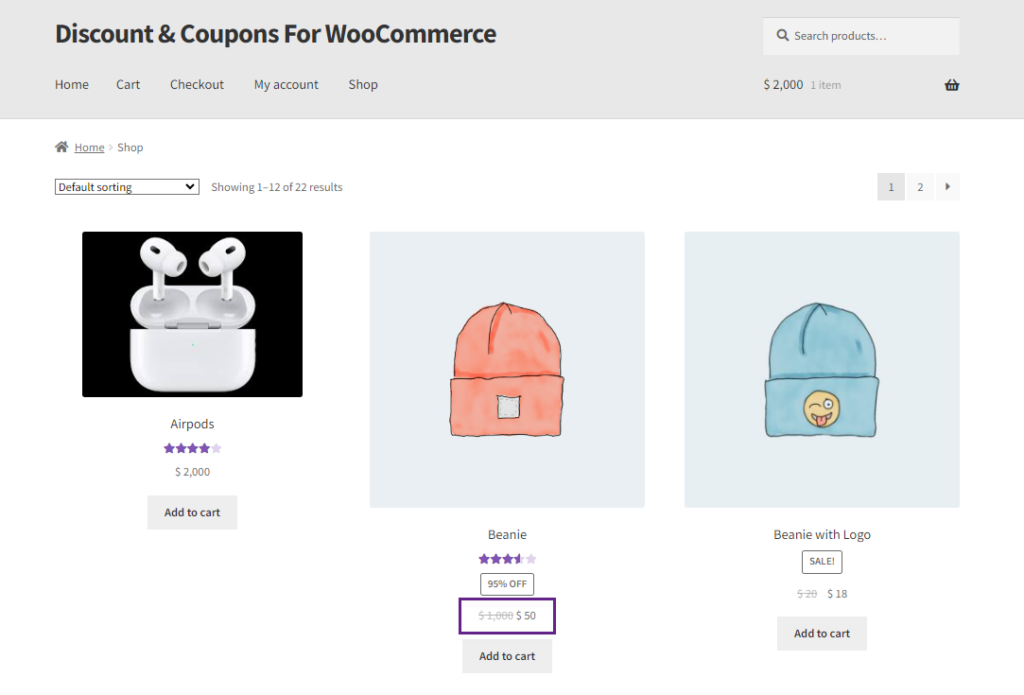
- The discounted price will also be shown on the Product page.
Percentage Discount
- Select the Percentage Discount option from the Discount Type drop-down list. This discount type will substitute the desired percent of the original price of the product.
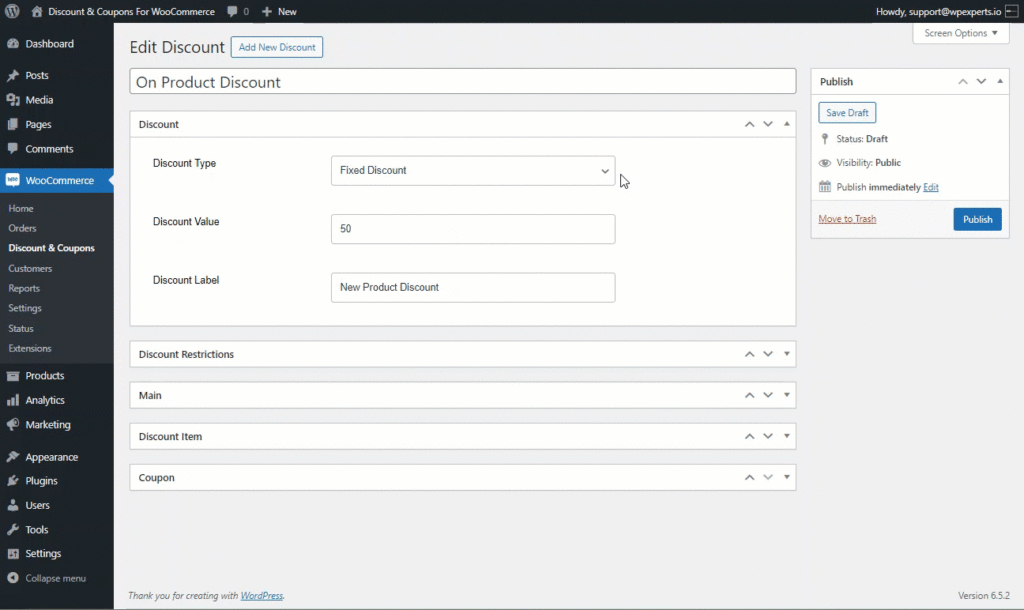
PLEASE NOTE: The Discount Value and Discount Label settings can be changed as per requirement.
- After Configuring required tabs click on the Publish button. The discount type will be published.
Front End Impact
- Go to the Shop Page.
- The selected Discount type will be applied to the product.
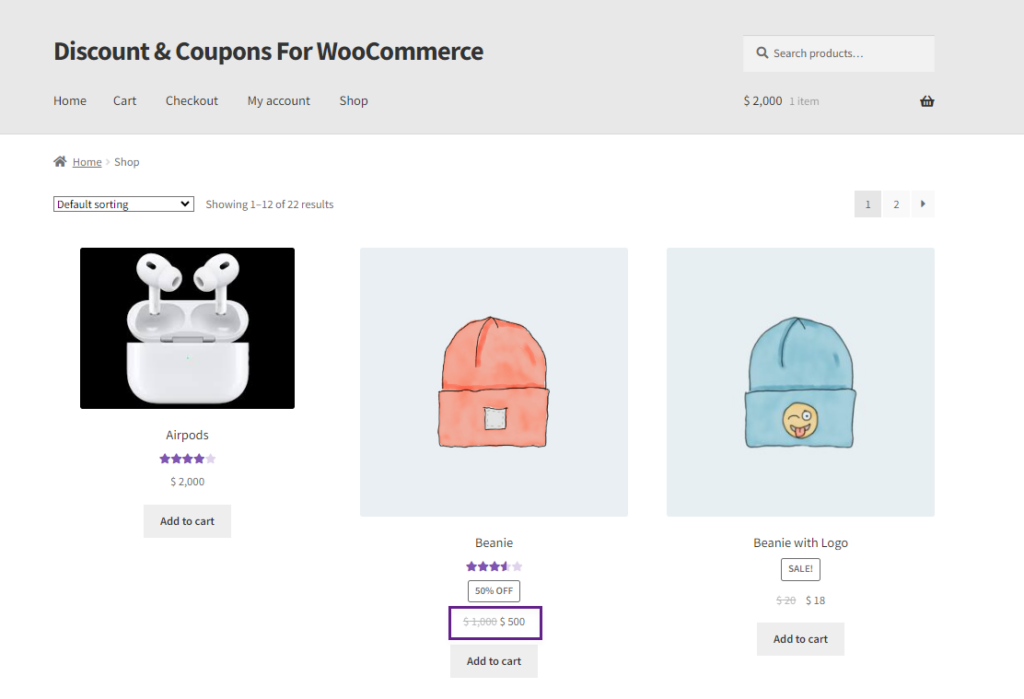
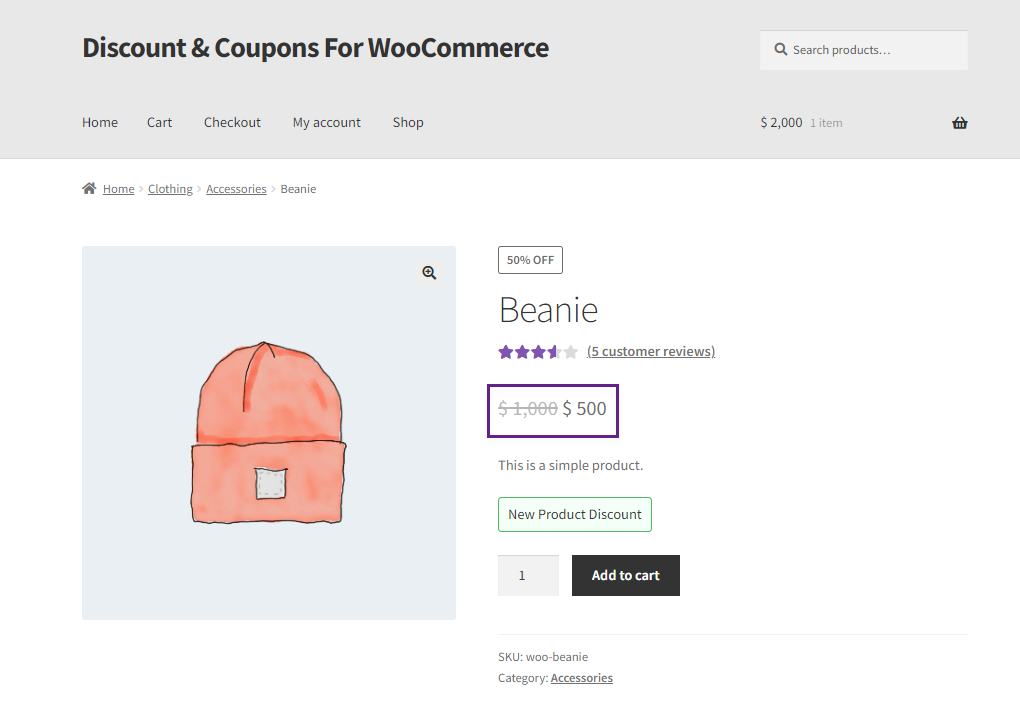
- The discounted price will also be shown on the Product page.
Discount Restrictions Tab
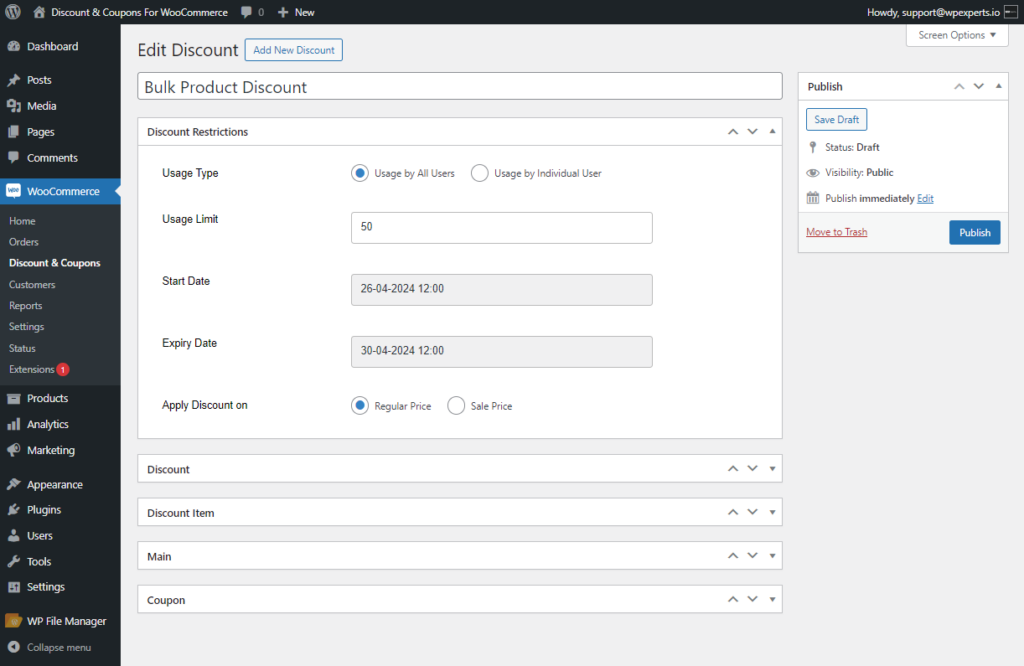
- Navigate to the Discount Restrictions Tab. This tab allows the admin to restrict the Discount usage and set Discount Conditions as per requirements.
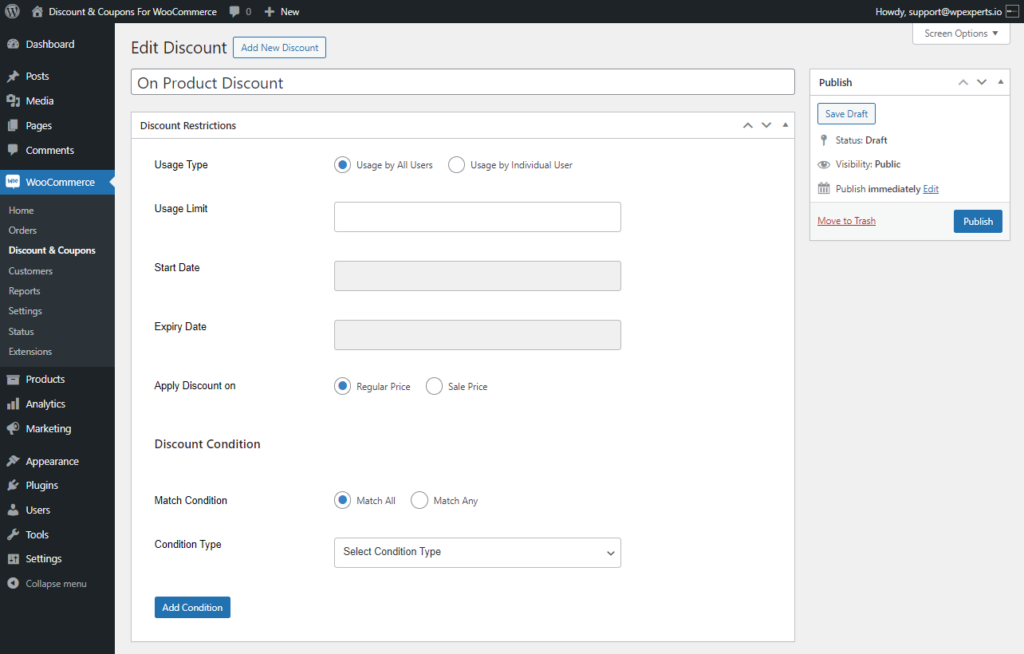
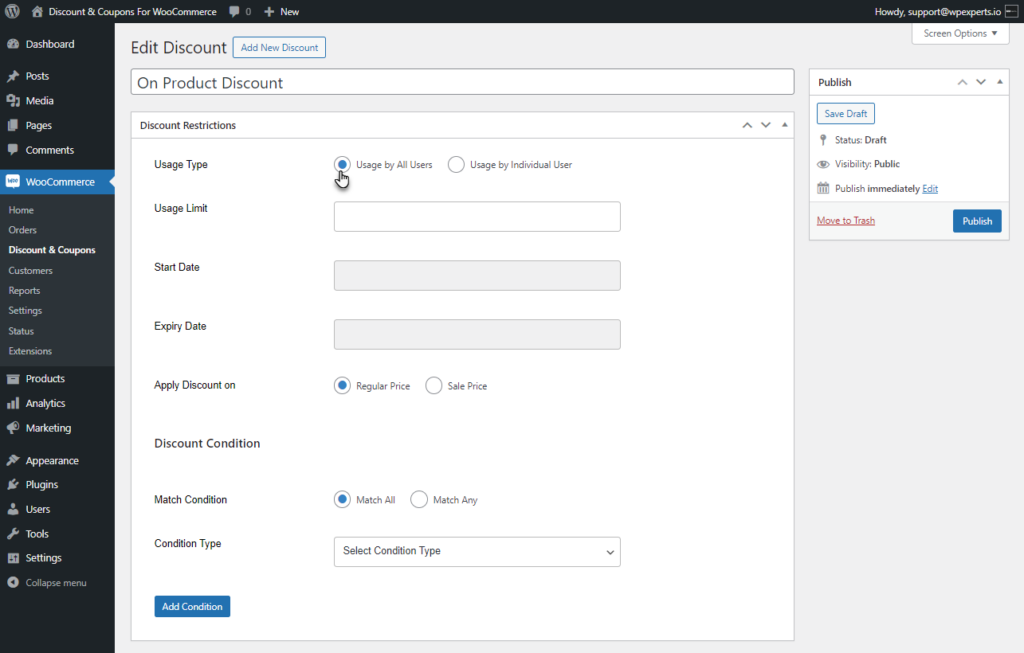
- The discount usage limit can be restricted to all users or individual users. For this Usage Type provide two options.
- Usage by all Users
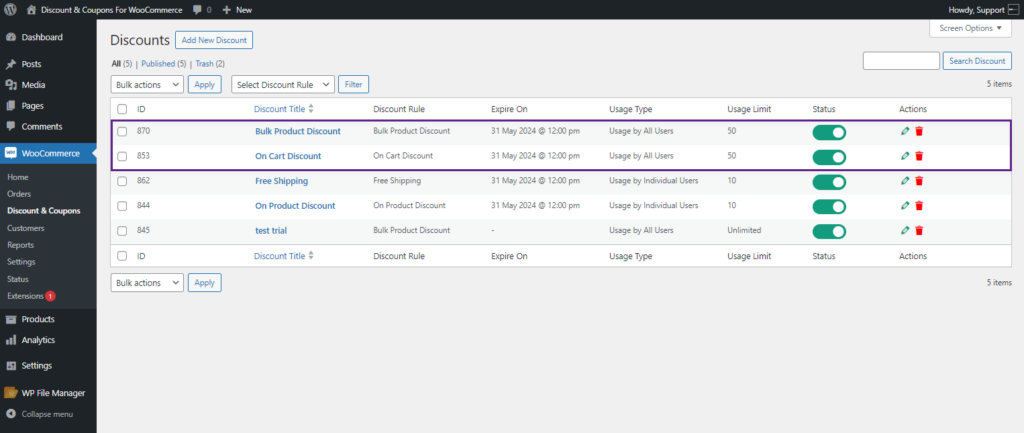
- Select Usage by All Users if the admin wants to restrict the Discount limit to all users.
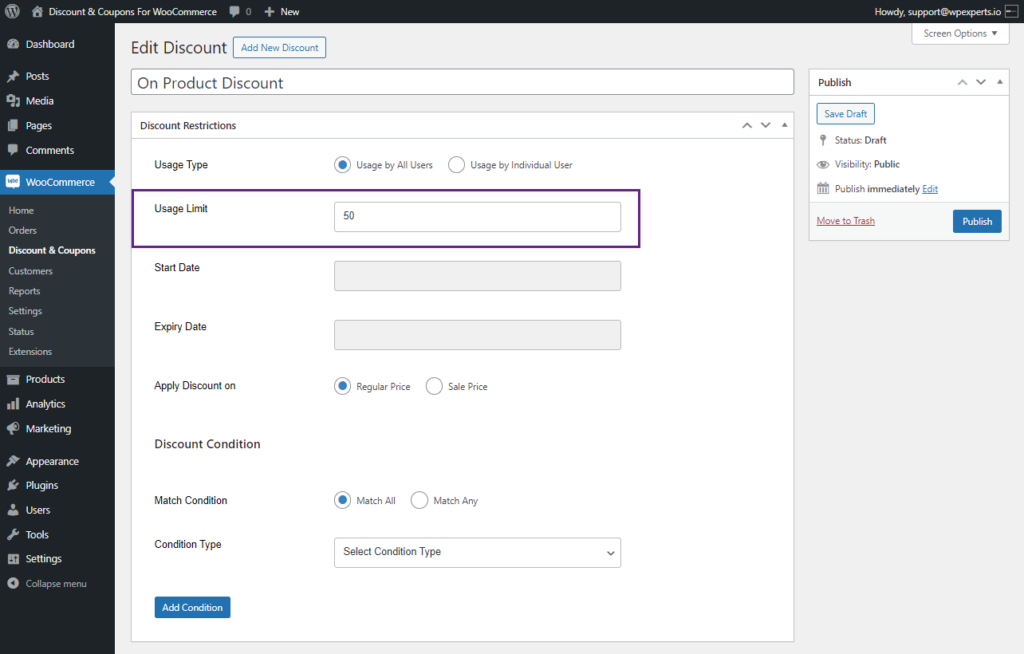
- Enter the discount Usage limit value in the Usage Limit field.
- Navigate to WordPress Admin Dashboard > Discounts & Coupons to check the usage limit of the discount.
- Usage by Individual Users
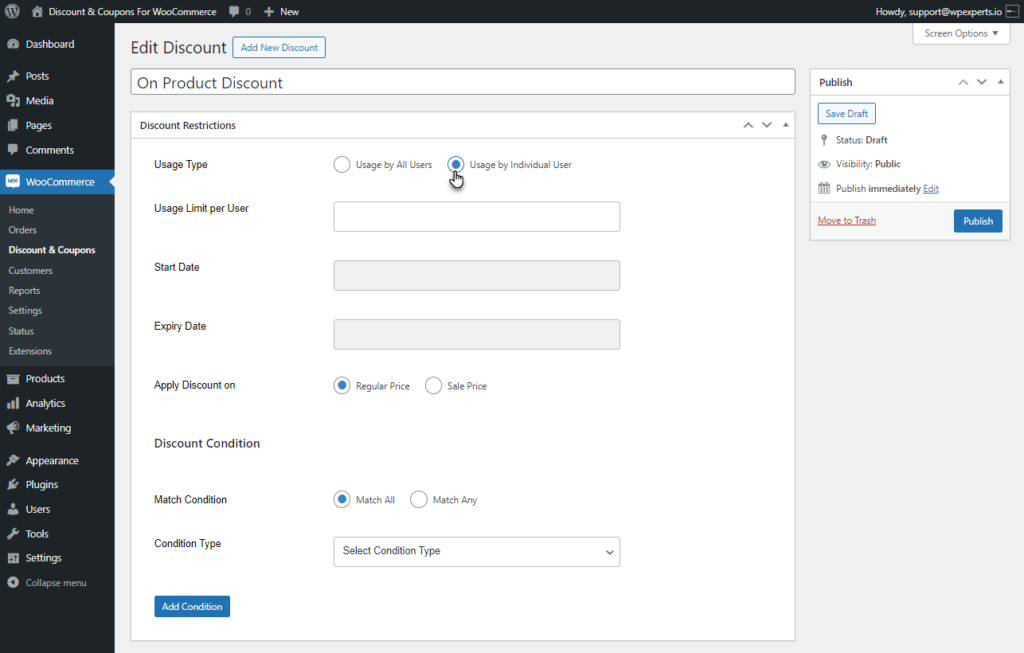
- Select Usage by Individual user if admin wants to restrict the Discount limit to Individual user.
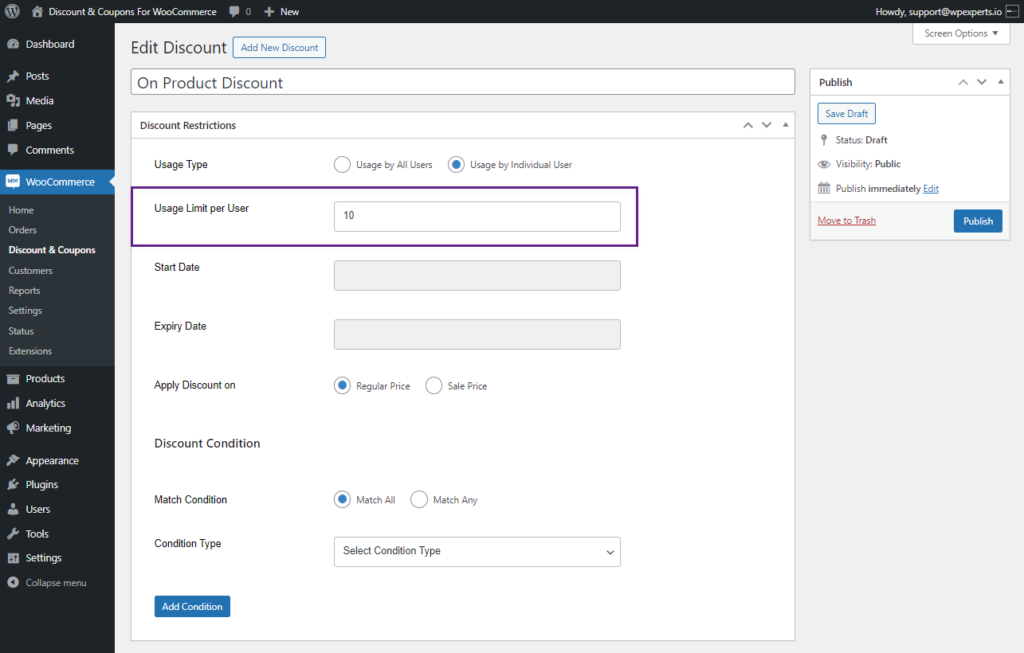
- Enter the discount Usage limit value in the Usage Limit field.
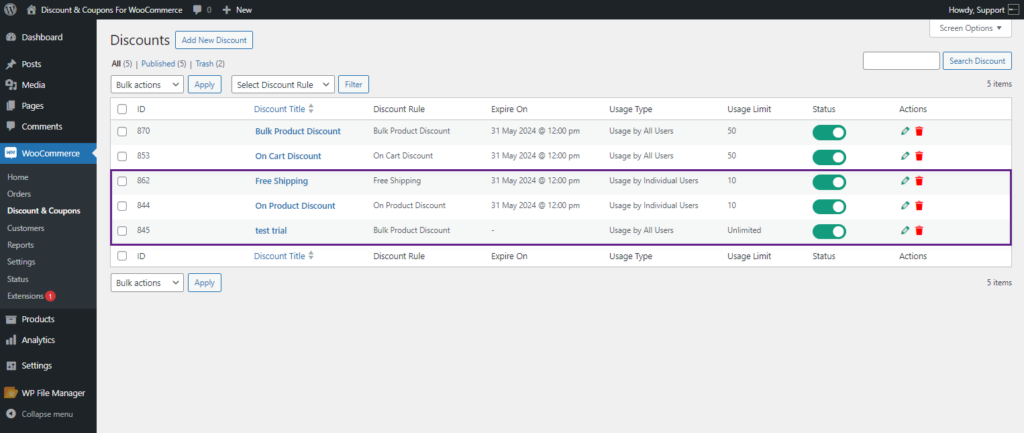
- Navigate to WordPress Admin Dashboard > Discounts & Coupons to check the usage limit of the discount.
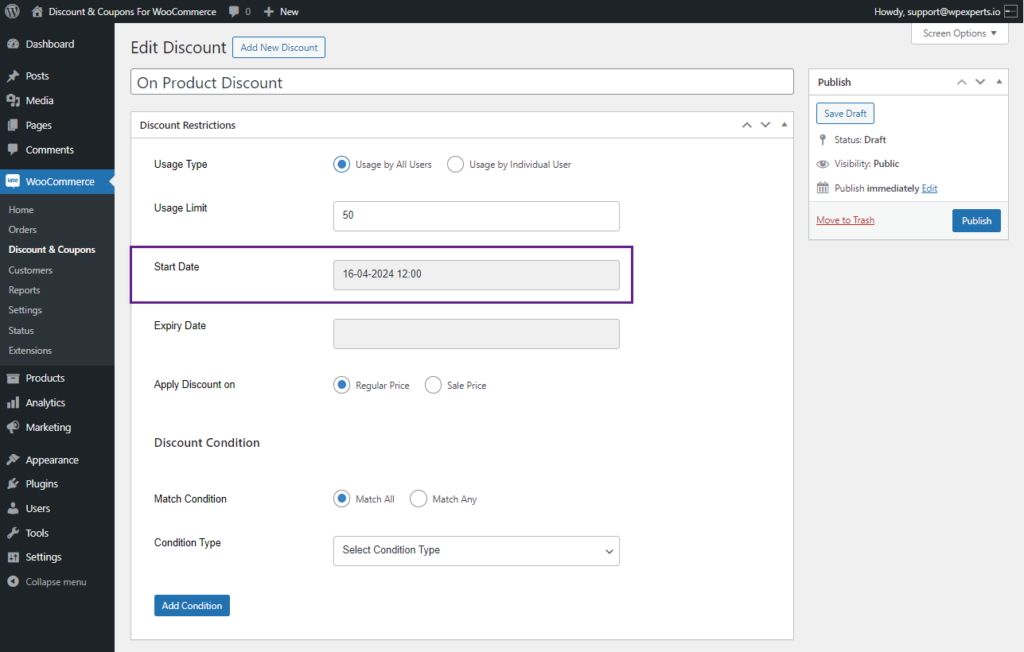
- Select the Start Date from which the Discount will be given.
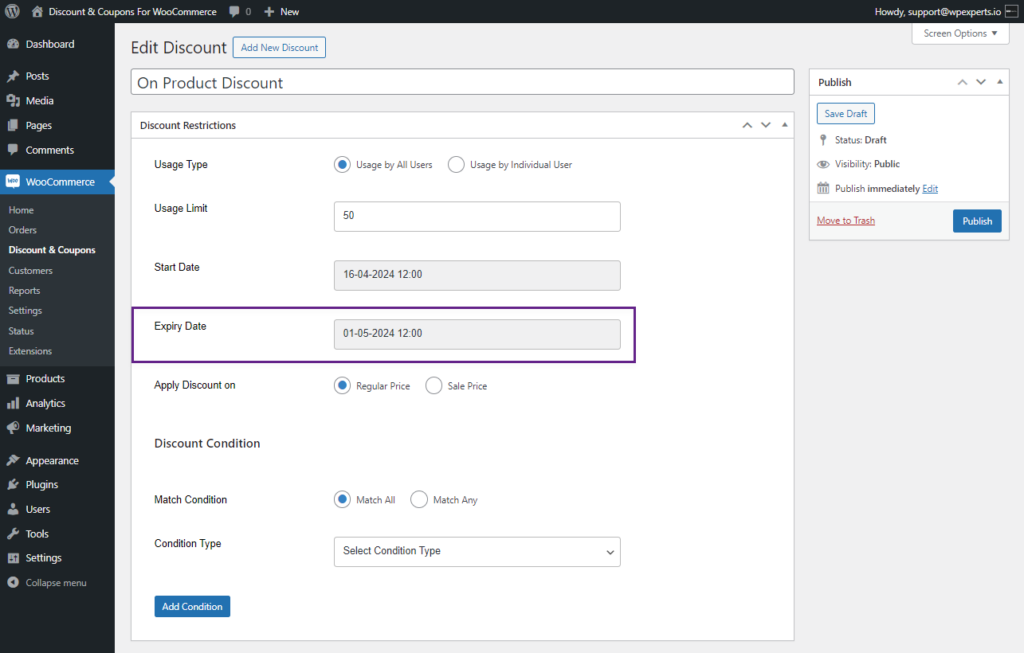
- Select the Expiry Date to which the discount will be disabled automatically.
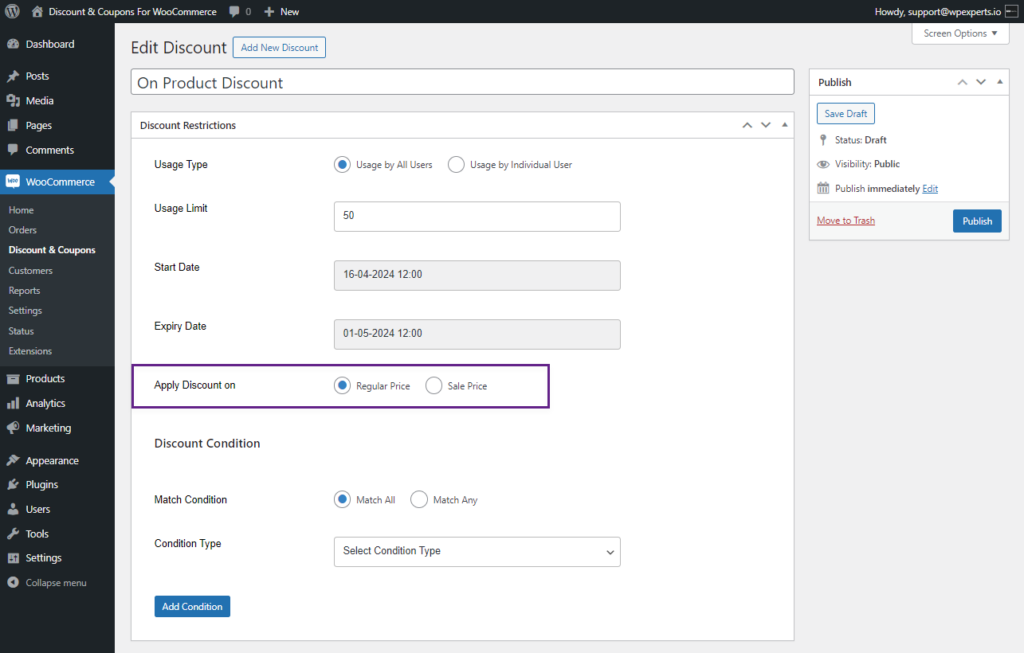
- Select the Regular Price or Sale Price on which discount will be applicable from the Apply Discount on option.
Discount Conditions
- This option allows the admin to set a Discount Condition. The admin can use multiple conditions as needed.
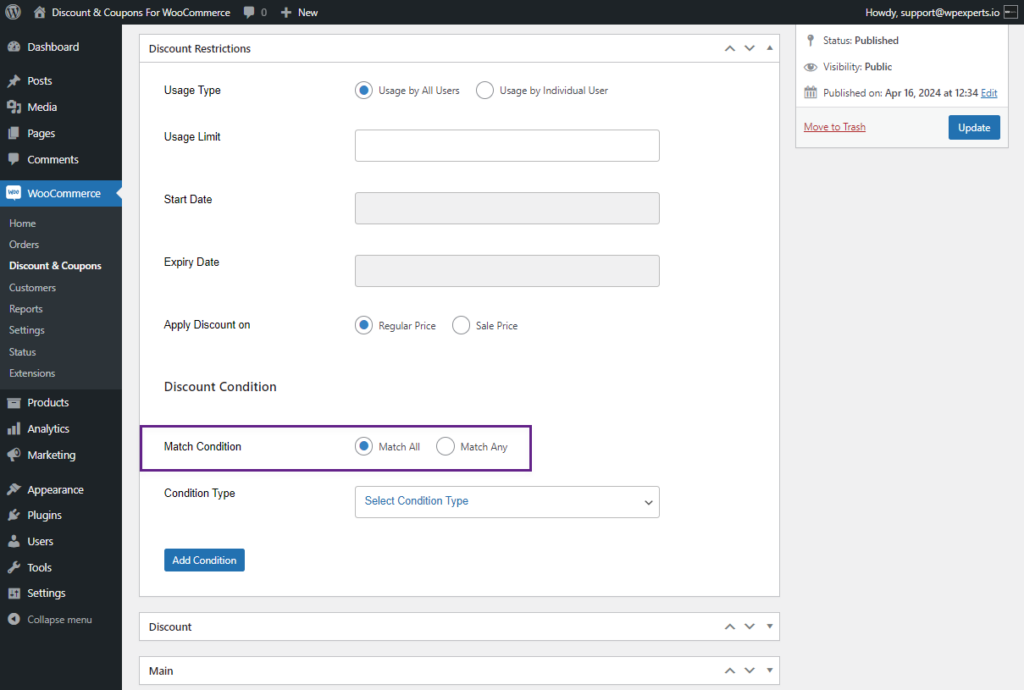
- If the admin sets multiple conditions, the Match Condition option allows the admin to choose between Match All or Match Any condition option.
- In case of Match All, all the discount conditions should be met in order to apply the discount.
- In case of Match Any, if any one discount condition is matched, the discount will be applied.
- There are five Discount Conditions provided in the Condition Type drop-down list.
- Cart Item Quantity
- Product Quantity
- Payment Methods
- User Roles
- Logged in Users
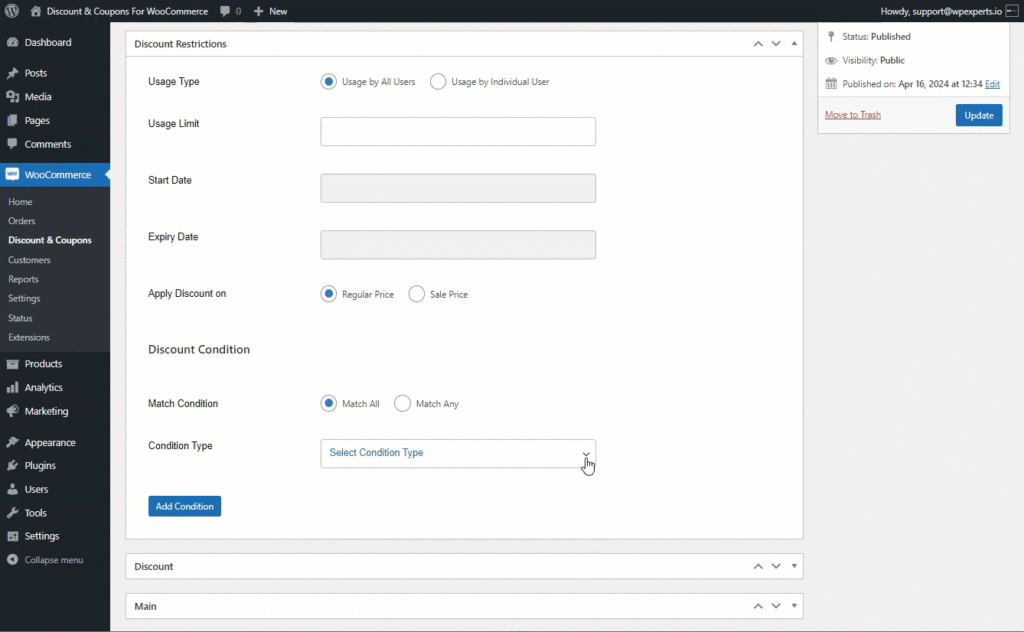
Cart Item Quantity
- Select Cart item Quantity from the Condition Type drop-down list. When this condition is chosen, the total number of items in the cart will be checked to meet the condition before the discount is applied.
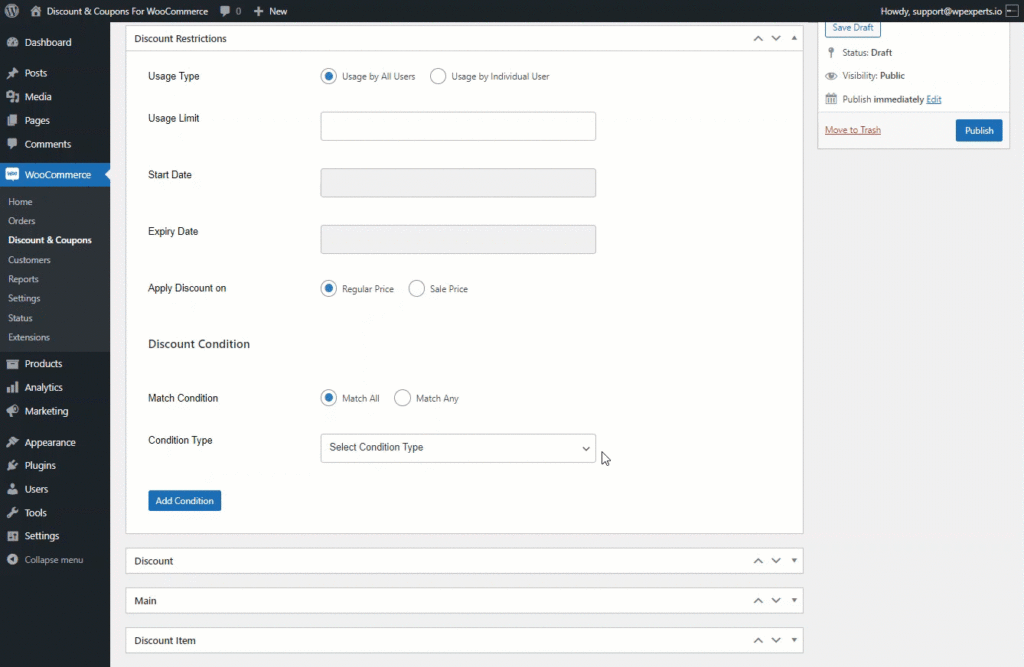
- Enabling this will provide the admin option to select conditions for the Cart item Quantity. Admin can set different conditions for Discount from the drop-down list.
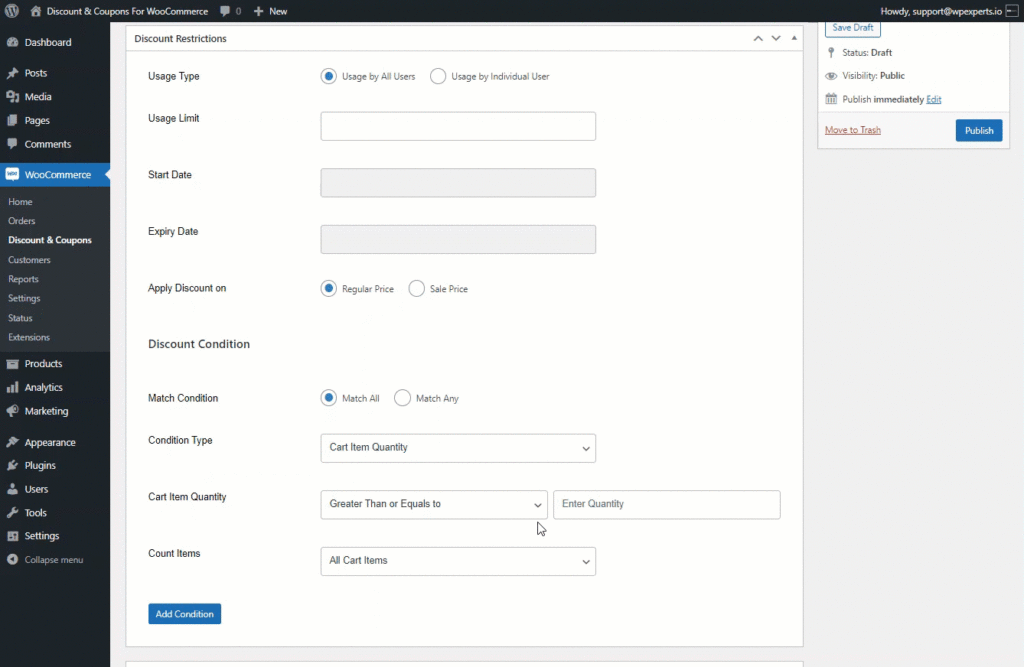
- Set the Quantity with respect to the condition set in the Cart item Quantity option.
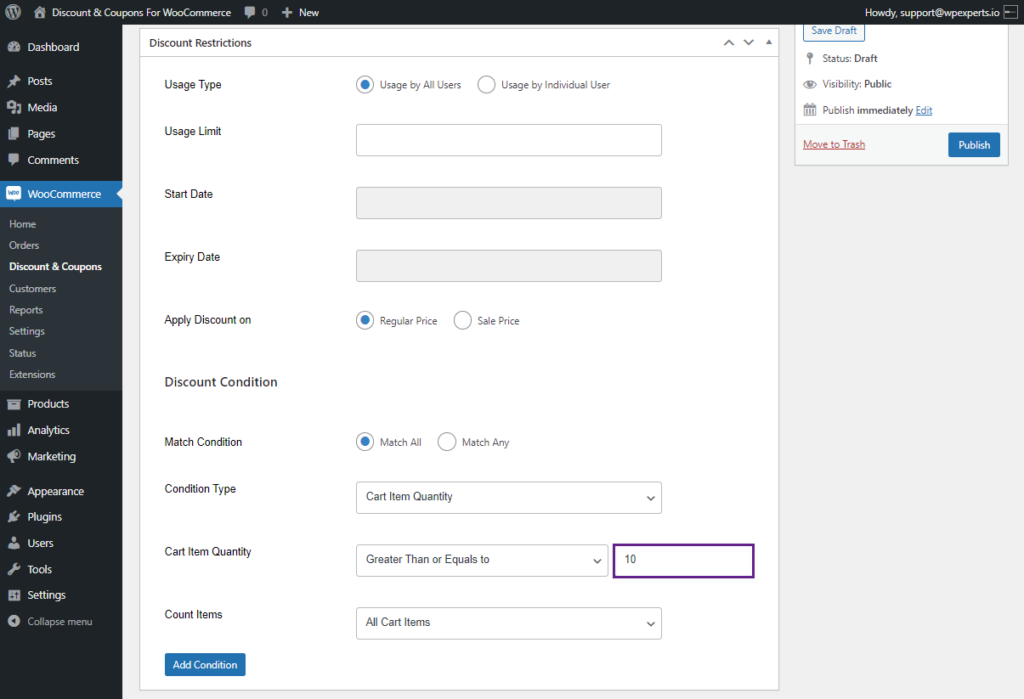
- Select the items that are applicable for the discount in the Count Items. This option allows the admin to choose all cart items or only discounted items to satisfy the condition set before this option.
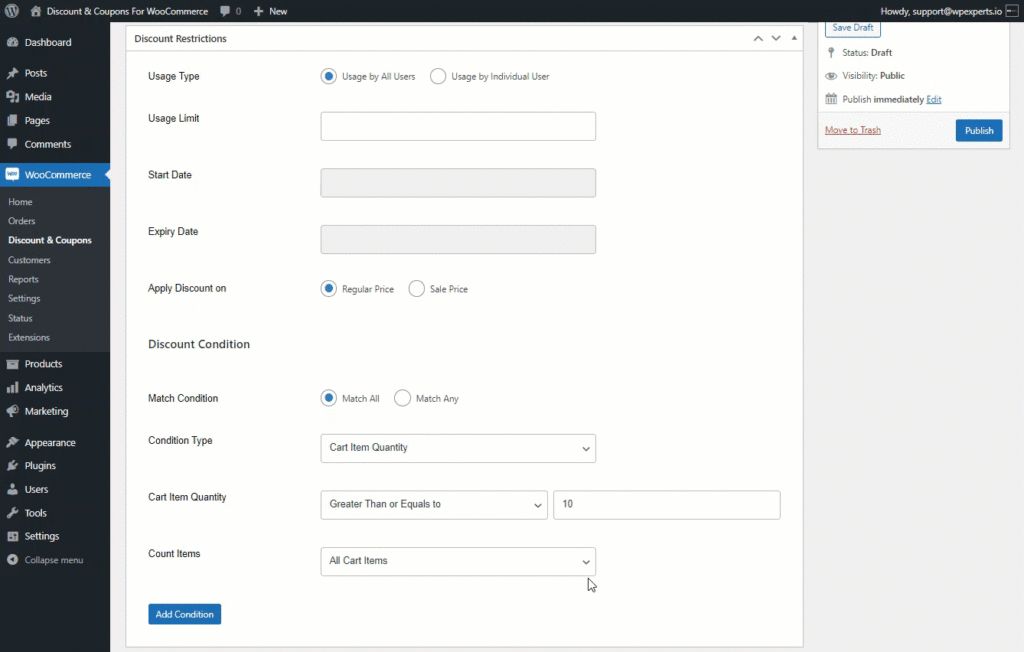
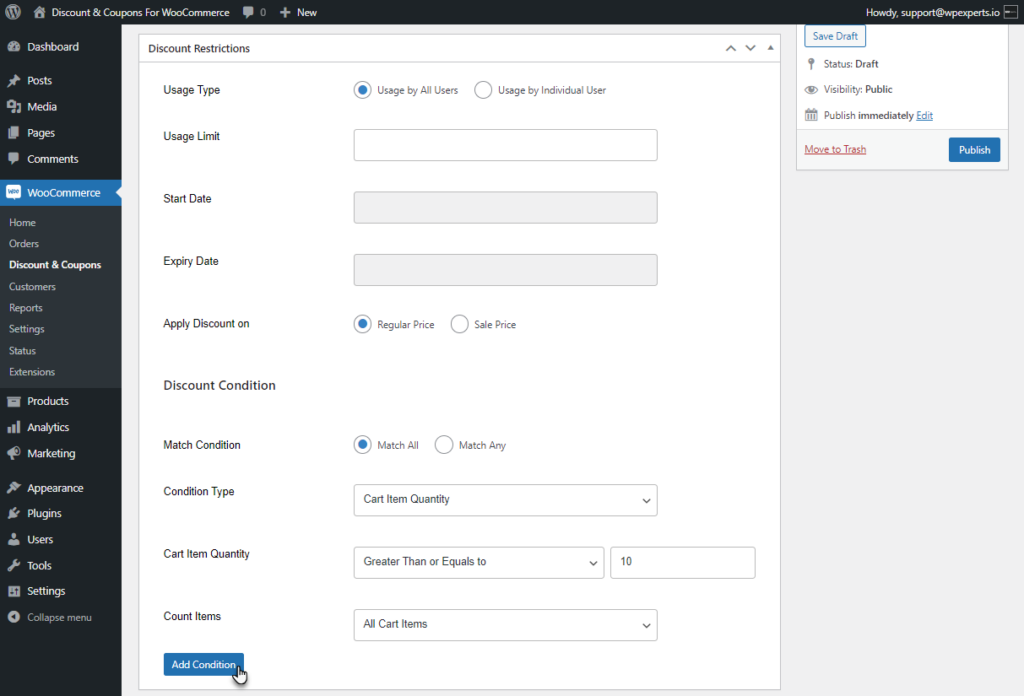
- The admin can add multiple conditions using the Add Condition button.
Front End Impact
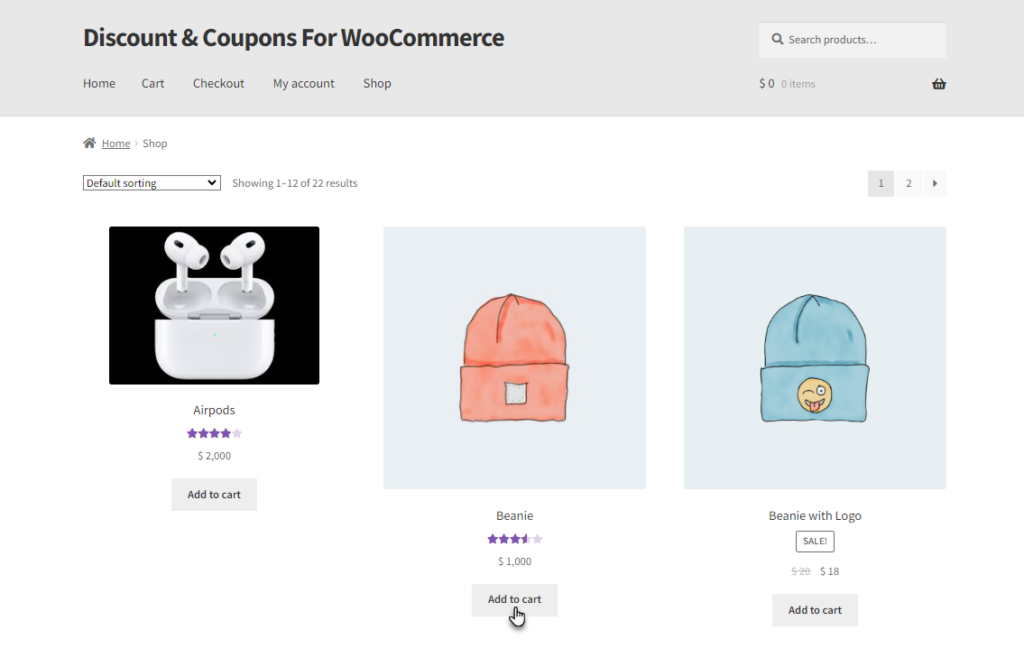
- Go to the Shop page.
- Add the items to the cart.
- Match the Condition of the discount in the cart.
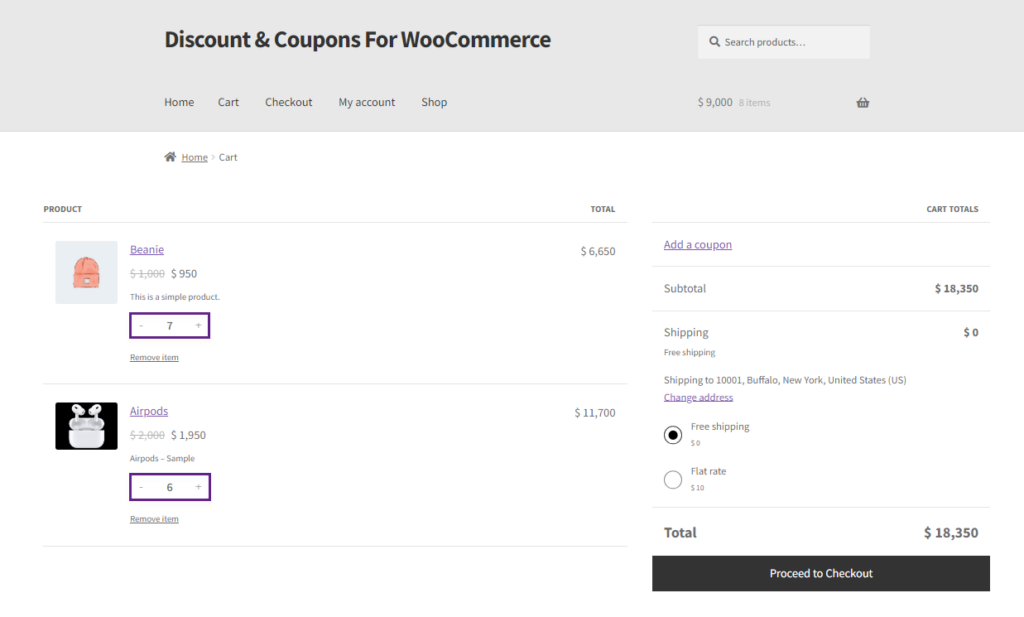
- The Discount Rule Applied message will be displayed in the cart and the discounted price will be displayed.
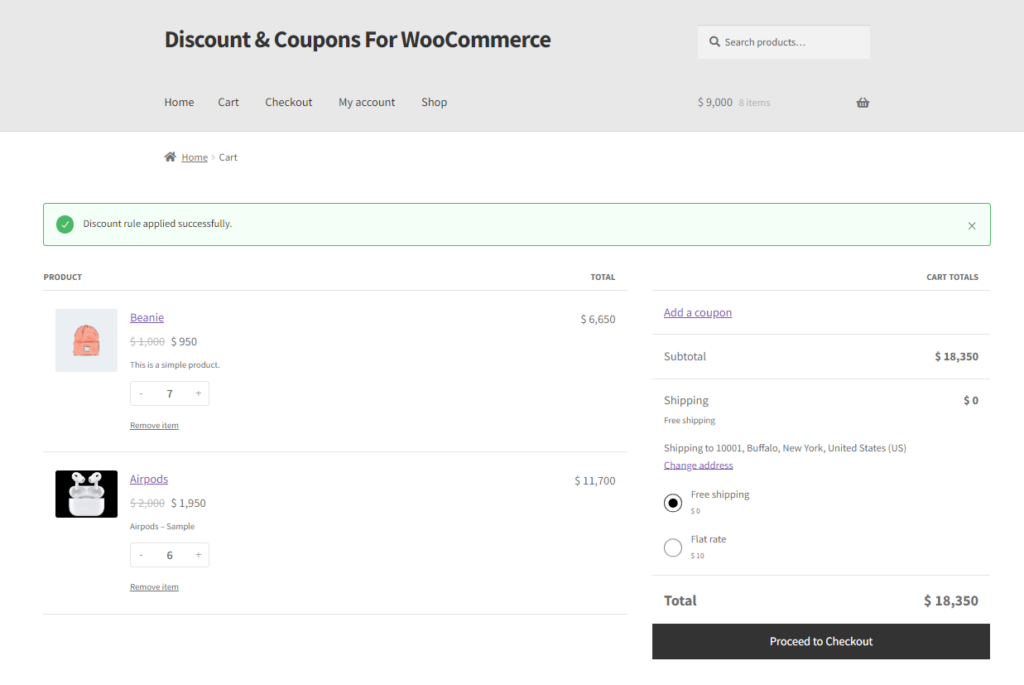
Product Quantity
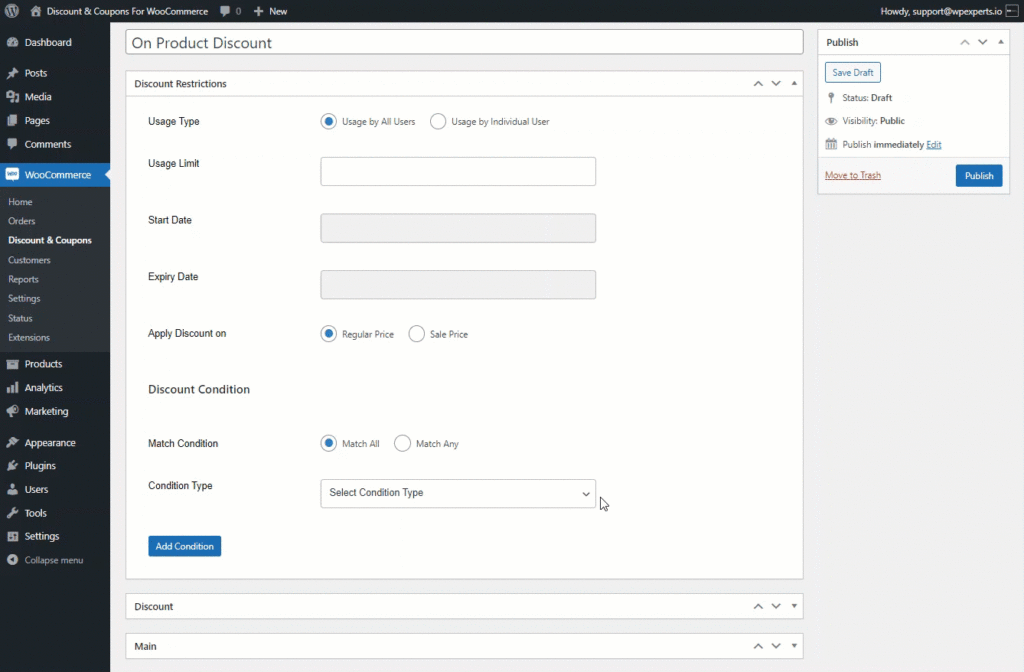
- Select Product Quantity from the Condition Type drop-down list. When this condition is chosen, the quantity of a specific product will be checked to meet the condition before a discount is applied.
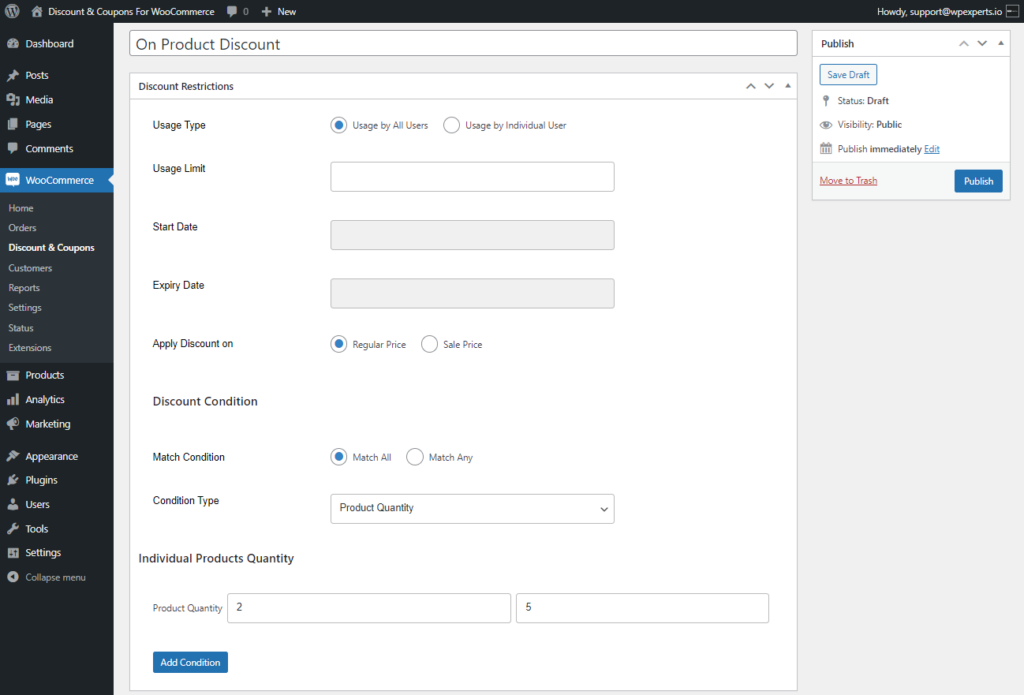
- Enter the Minimum Quantity and Maximum quantity for the product in the Product Quantity field.
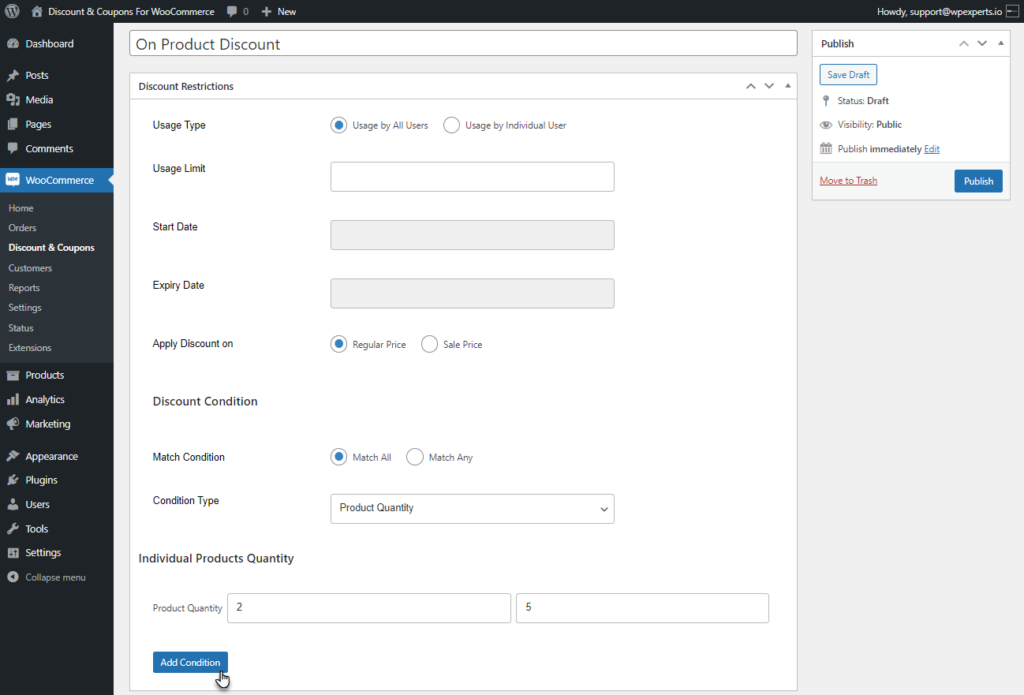
- The admin can add multiple conditions using the Add Condition button.
Front End Impact
- Go to the Shop page.
- Add the Discounted item to the cart.
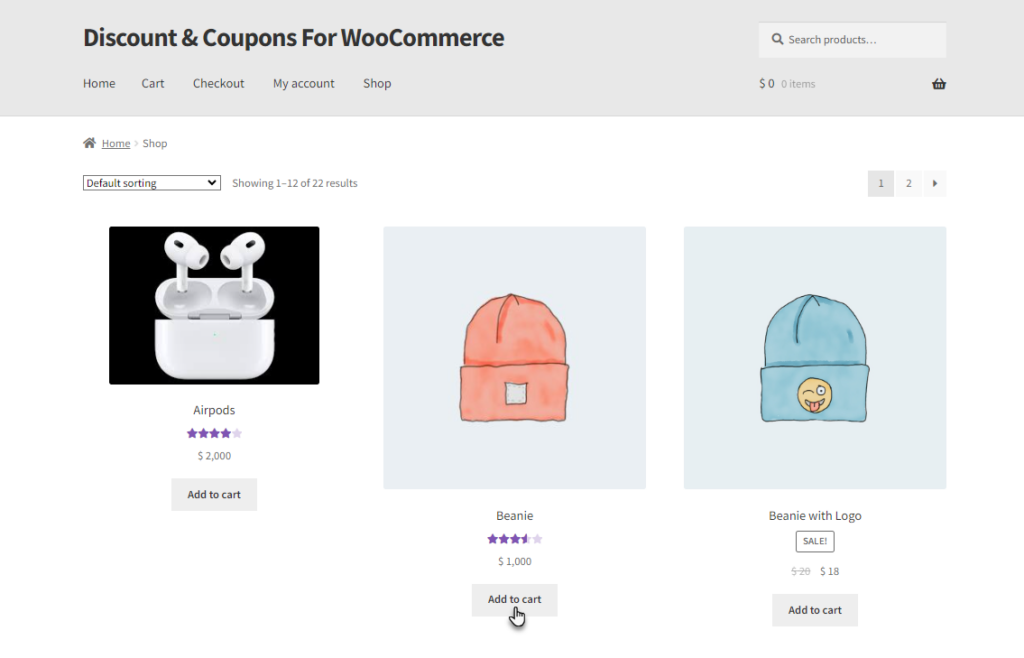
- Match the Condition of the discount in the cart.
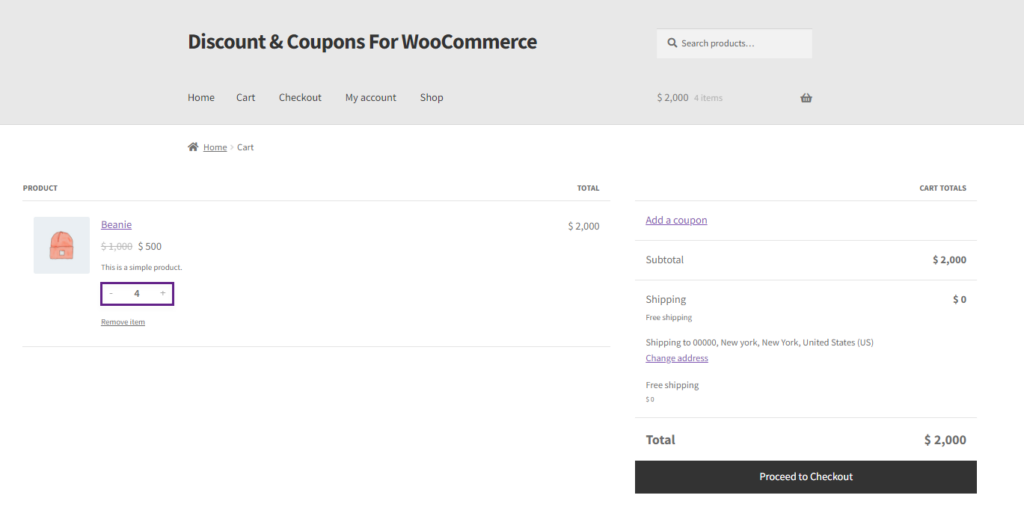
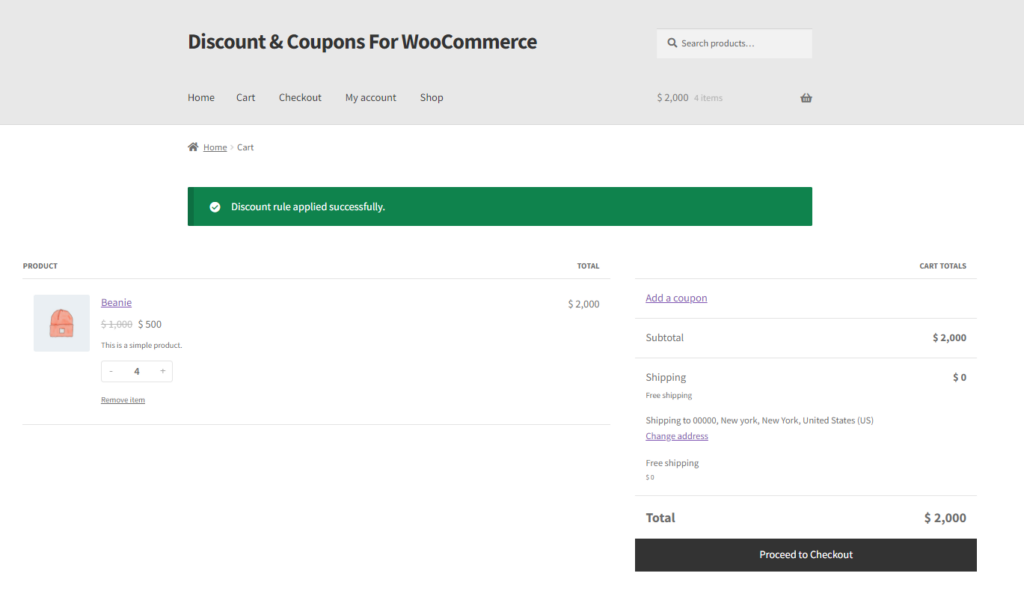
- The Discount Rule Applied message will be displayed in the cart and the discounted price will be displayed.
Payment Methods
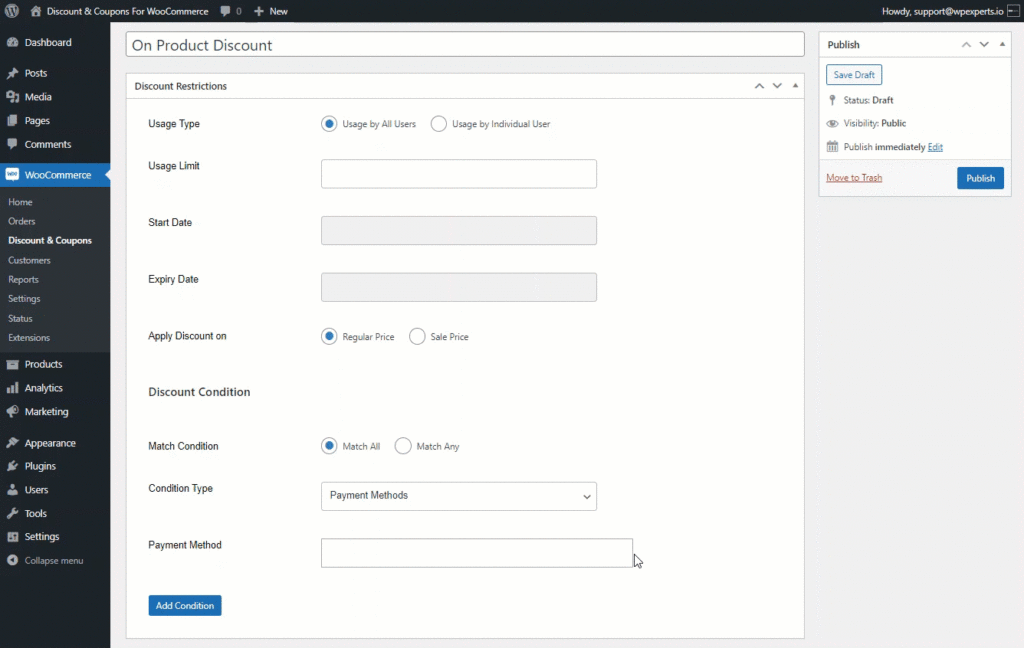
- Select Payment Methods from the Condition Type drop-down list. When this condition is chosen, the discount will be applied to the specified payment methods.
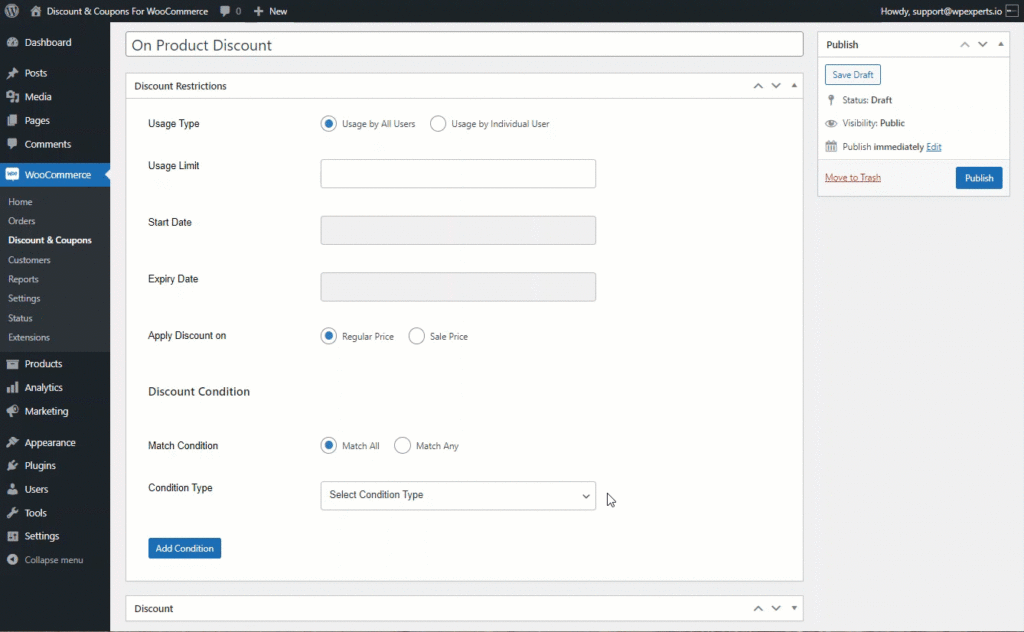
- Select the Payment methods for which the discount will be applicable in the Payment Method field.
Front End Impact
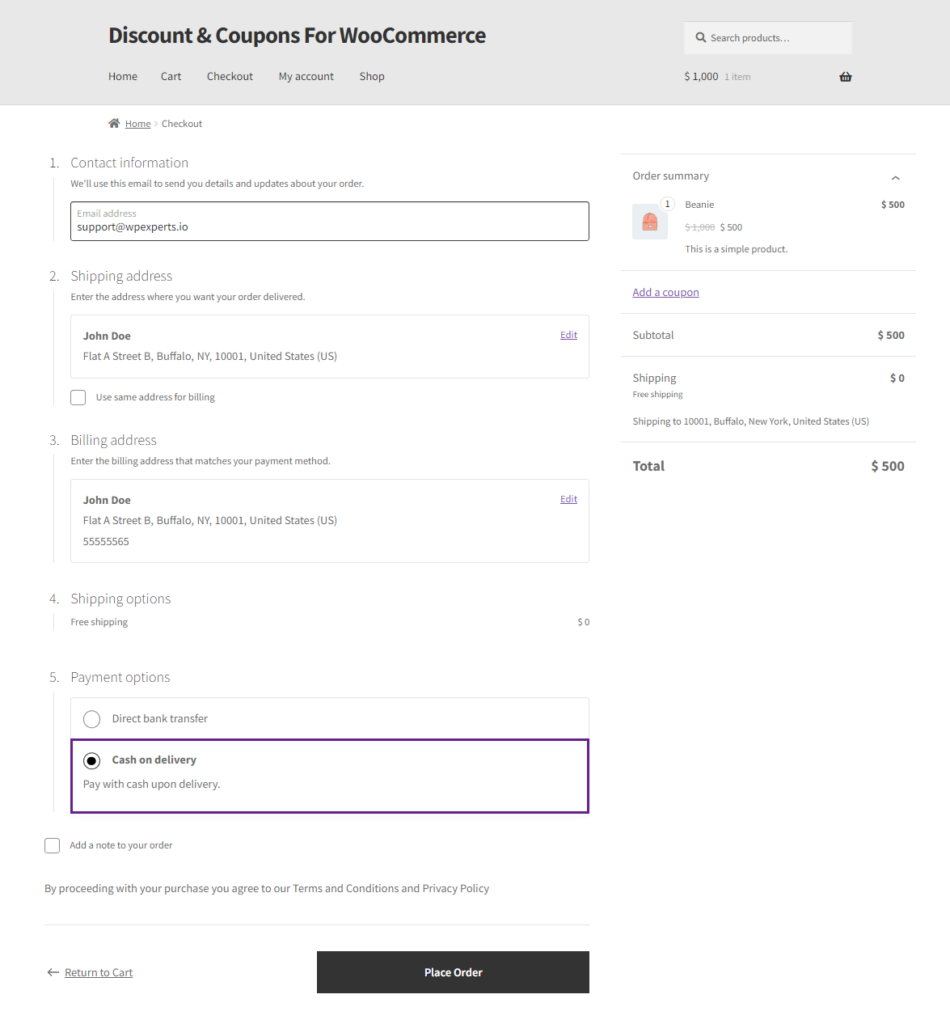
- Go to the Shop page.
- Add the Discounted item to the cart.

- Match the Condition on the checkout page by selecting the Payment method set by the admin.
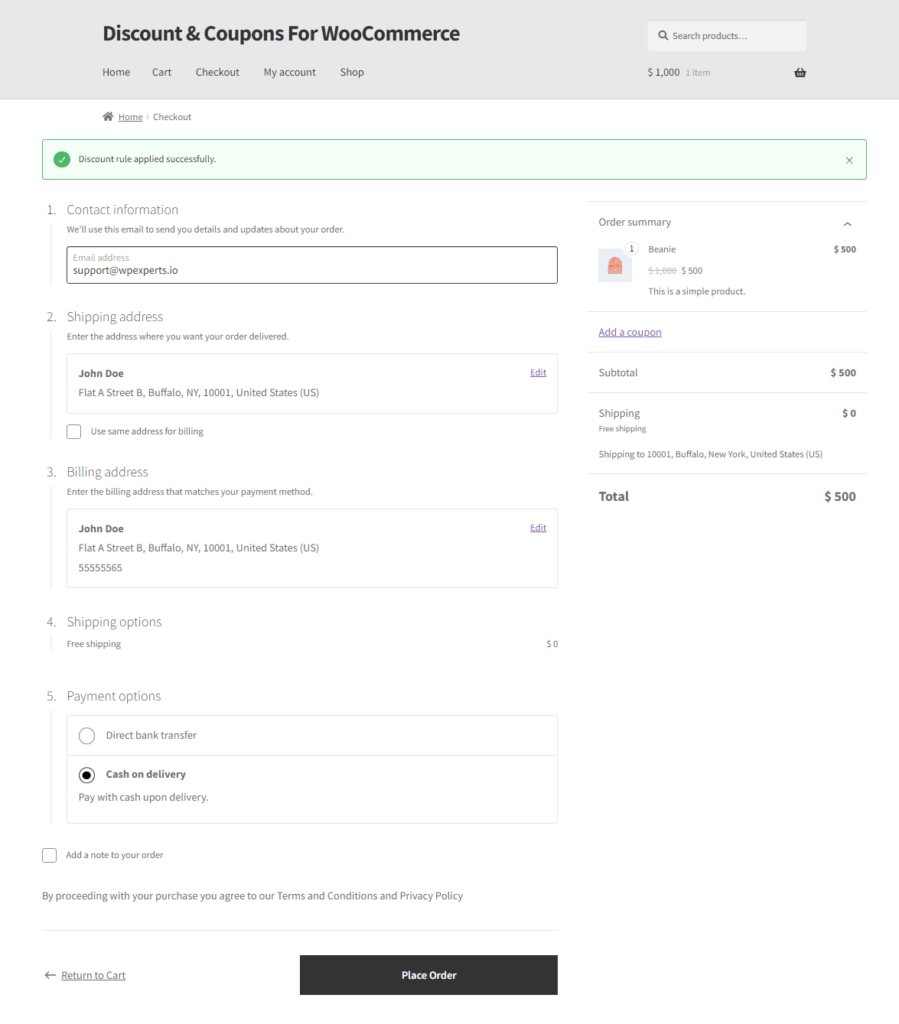
- The Discount Rule Applied message will be displayed on the checkout page and the discounted price will be displayed.
User Roles
- Select User Roles from the Condition Type drop-down list. When this condition is chosen, only users with specific user roles will be eligible to receive the discount.
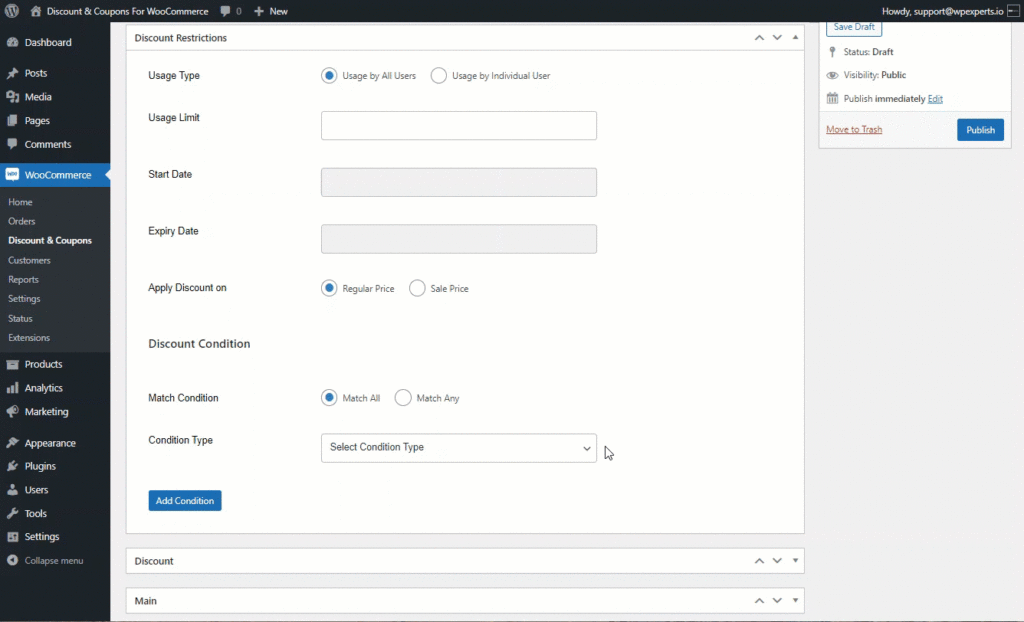
- Add the User Roles in the User Role field.
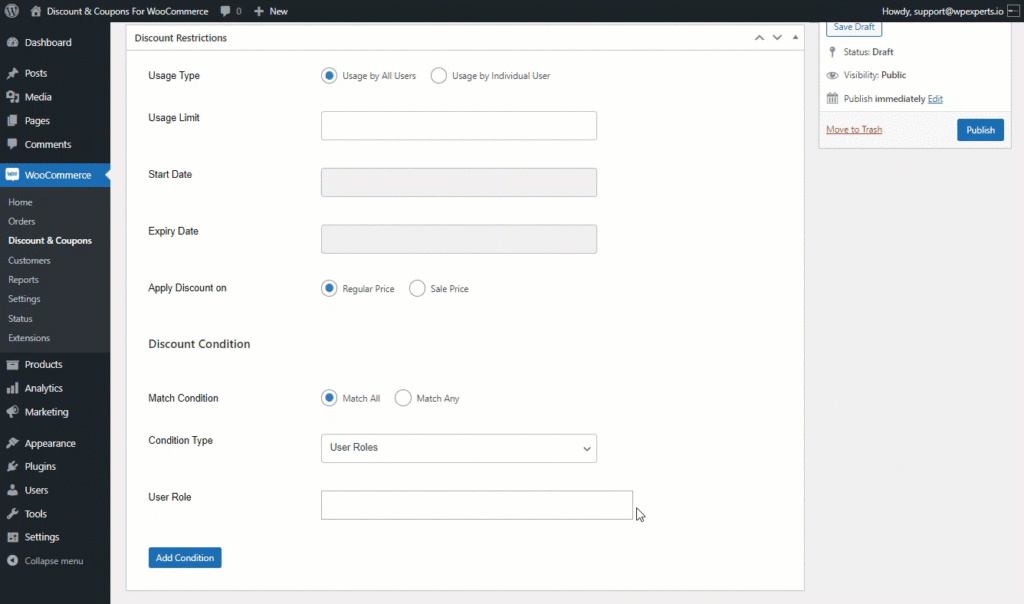
PLEASE NOTE: The chosen role will be able to avail of the discount.
Logged in Users
- Select Logged in Users from the Condition Type drop-down list. When this condition is selected, the admin has the option to limit the discount to users who are logged in, not logged in, or both.
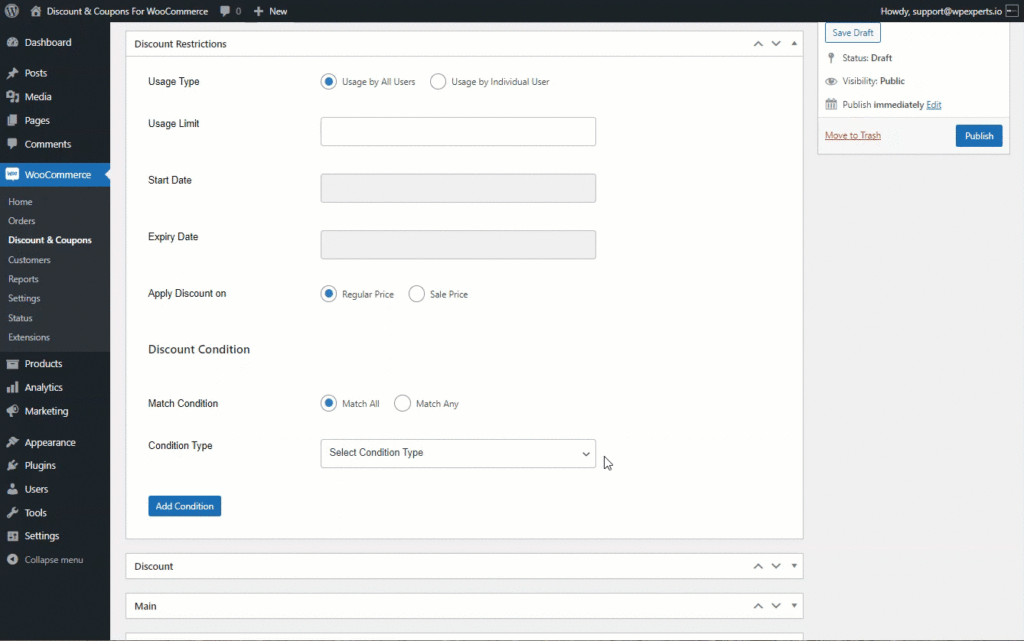
- Select the logged-in status of the user from the Is Logged in drop-down.
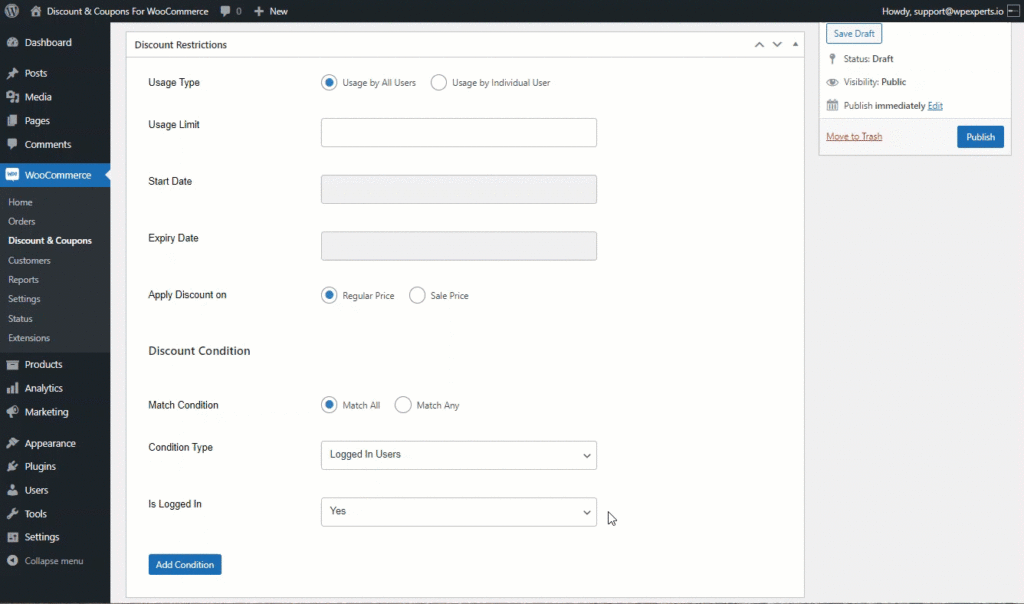
- Now, only logged-in users will be able to avail the discount.
- In case of No logged-in user, then only Guest users will be able to avail of the discount.
- In the case of Both, the discount can be availed by both logged-in and logged-out users.
Coupon Tab
- Once done with the Discount Restrictions, move to the Coupon Tab which enables the admin to use this discount as a coupon.
- Enable the coupon by checking the Make this discount type a Coupon check button.
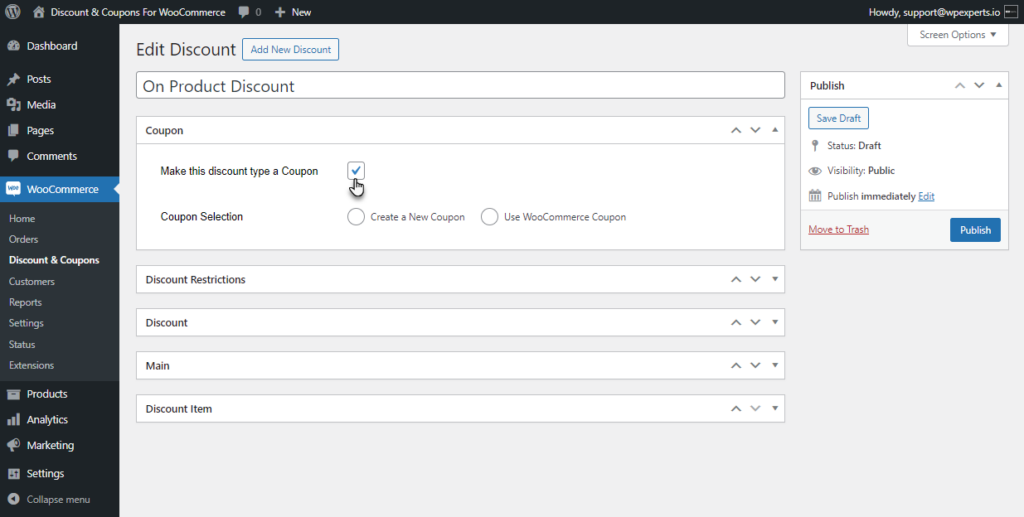
- Enabling the coupon will provide the admin with two options
- Create New Coupon
- Use WooCommerce Coupon
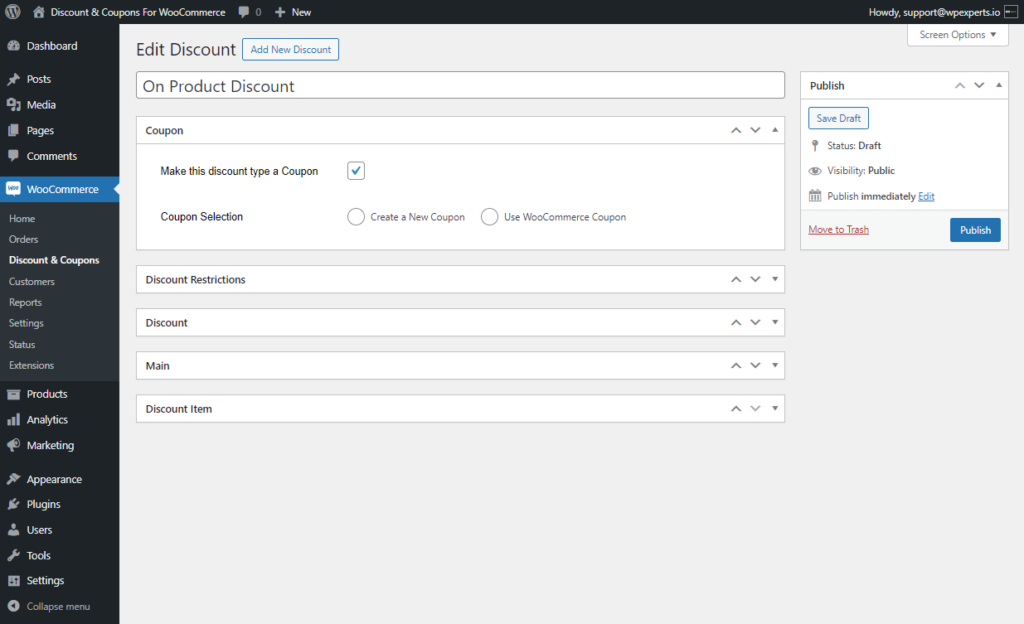
Create New Coupon
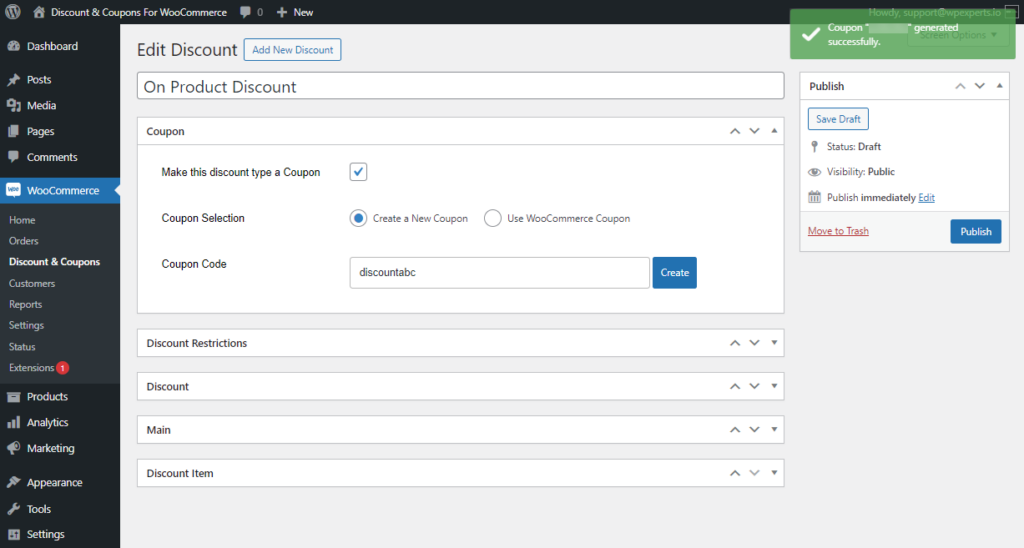
- Select the Create a New Coupon radio button in the coupon Selection option. This will create a new coupon for the discount.
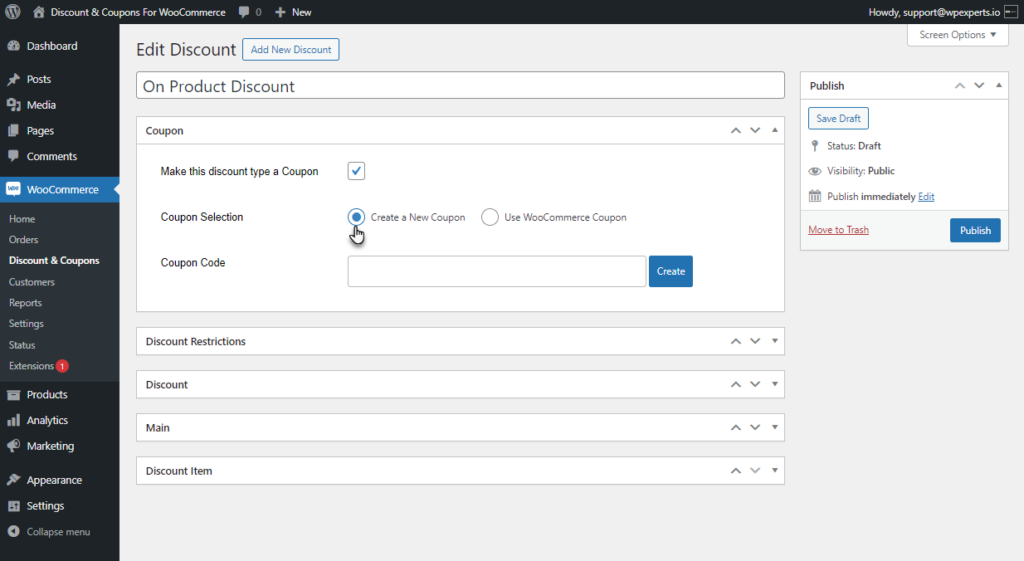
- The admin can create a coupon code using the Coupon Code option.
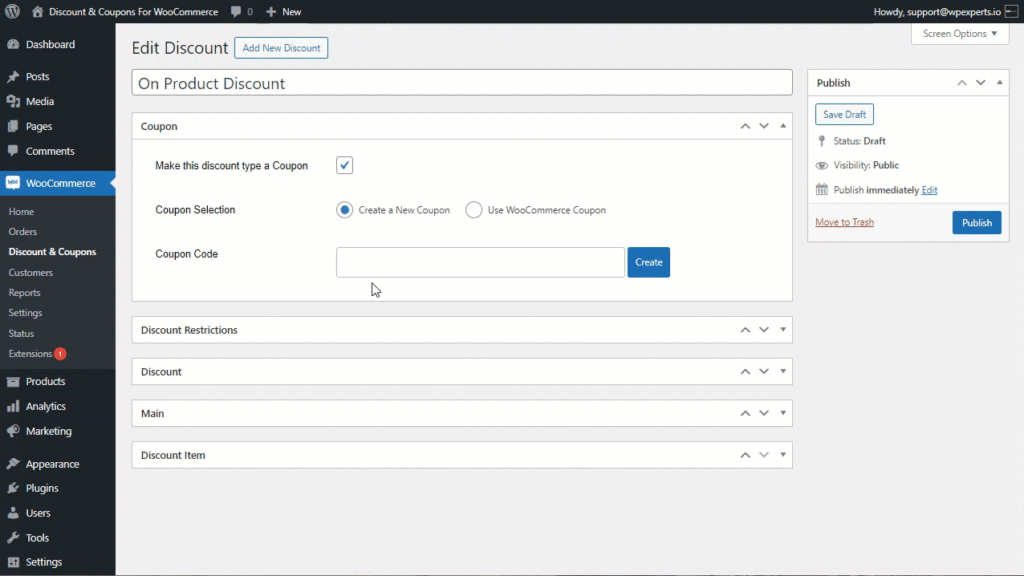
- Once done with creating the Coupon Code, Click on the Create button. A new Coupon Code will be generated.
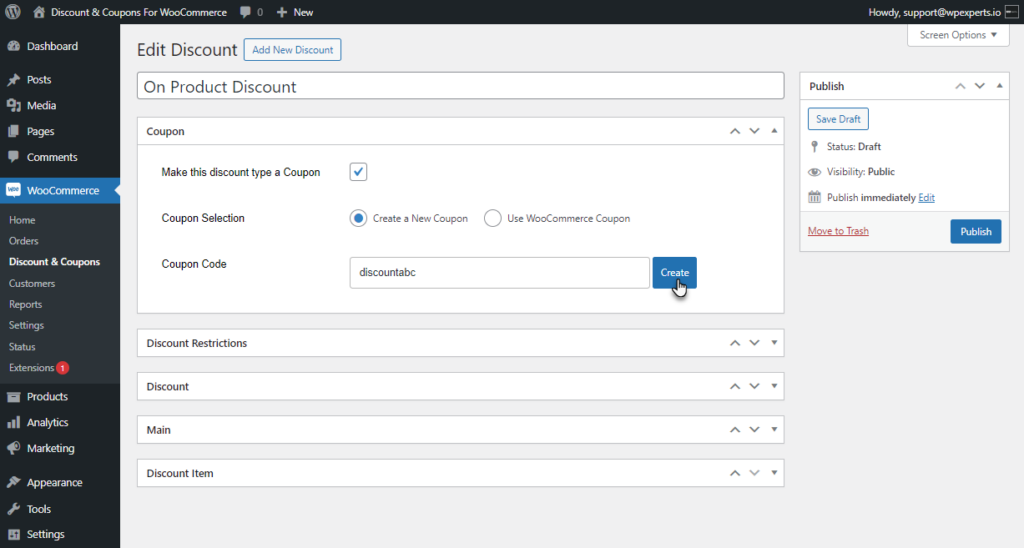
- A message Coupon Created Successfully will pop up on the screen.
Front End Impact
- Go to the Shop page.
- Add the Discounted item to the cart.

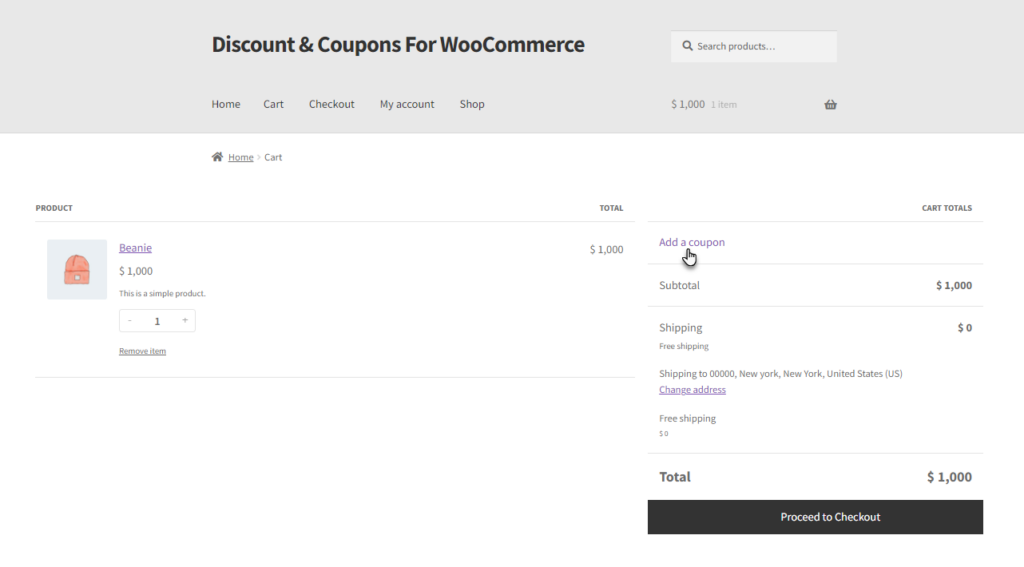
- Navigate to the Cart page. There will be an Add a coupon option on the cart page. Click on the Add a Coupon option.
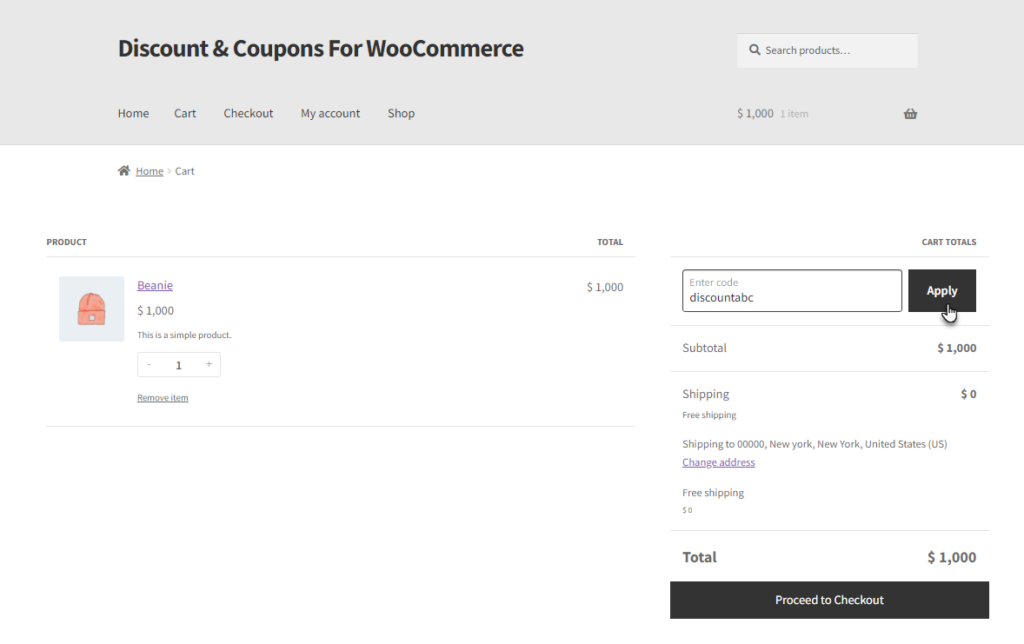
- Enter the coupon code in the Enter Code field and click on Apply.
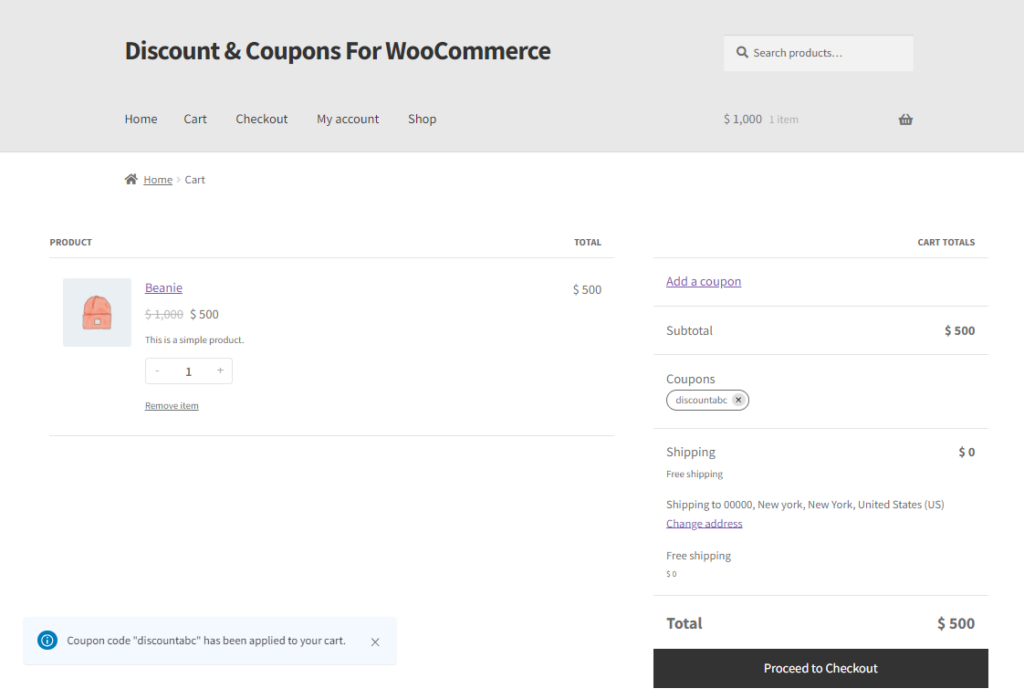
- A coupon discount will be applied to your product. The price will be updated and a message will appear on the screen.
Use WooCommerce Coupon
- Select the Use WooCommerce Coupon radio button in the coupon Selection option. This will allow the admin to use the WooCommerce Coupons.
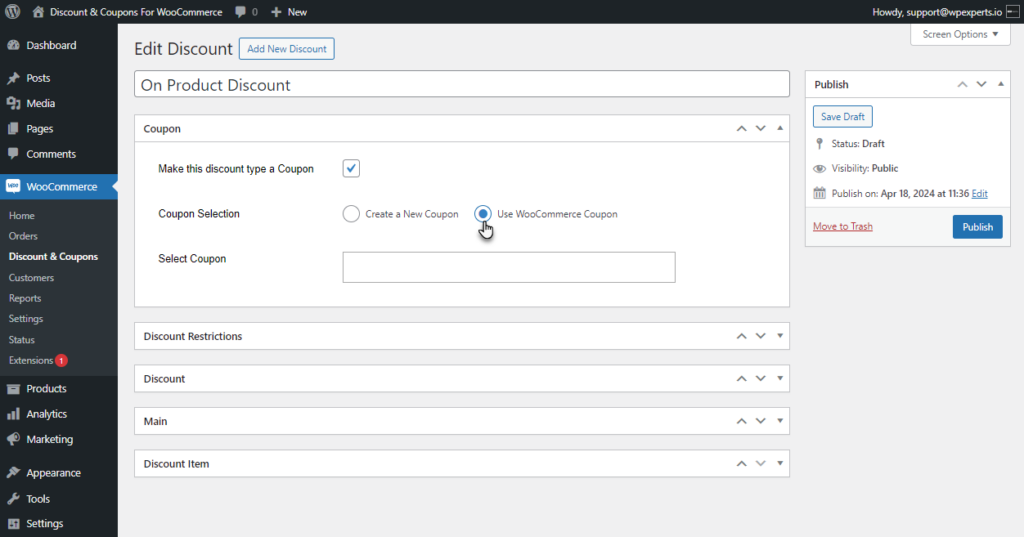
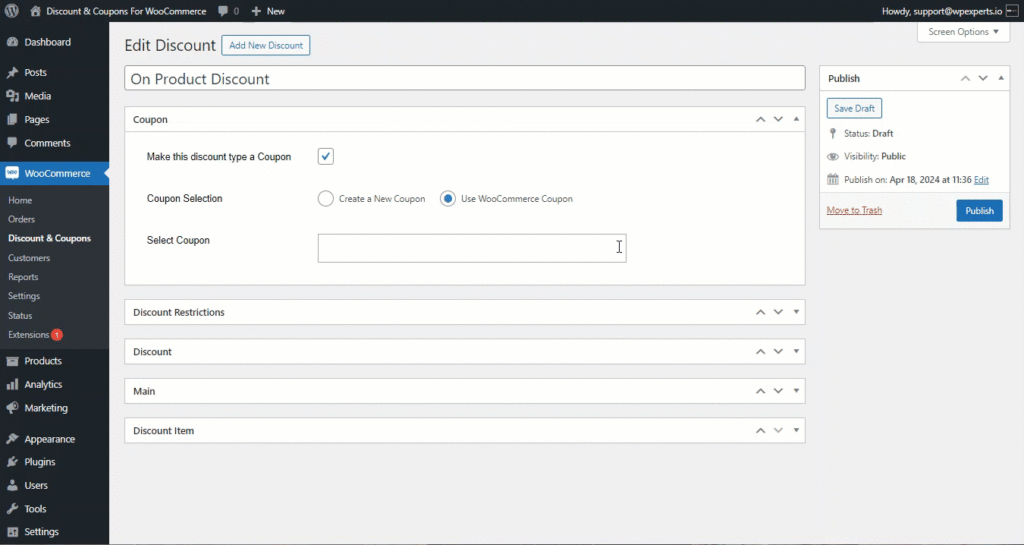
- Choose the WooCommerce Coupons through the Select Coupon field. This option will provide the list of WooCommerce Coupons available. Choose the coupon from the list.
Front End Impact
- Go to the Shop page.
- Add the Discounted item to the cart.

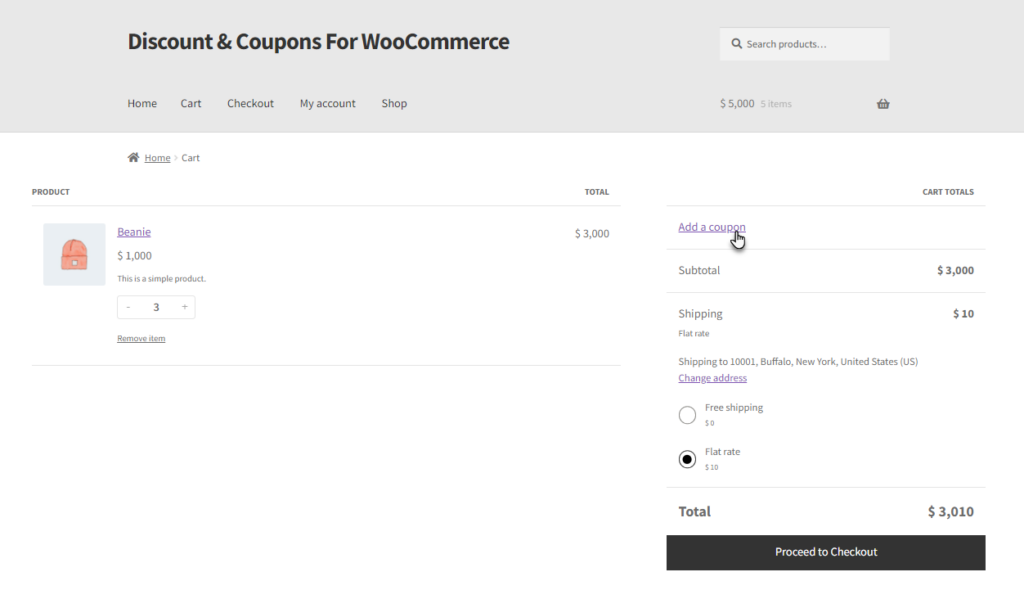
- Navigate to the Cart page. There will be an Add a coupon option on the cart page. Click on the Add a coupon option.
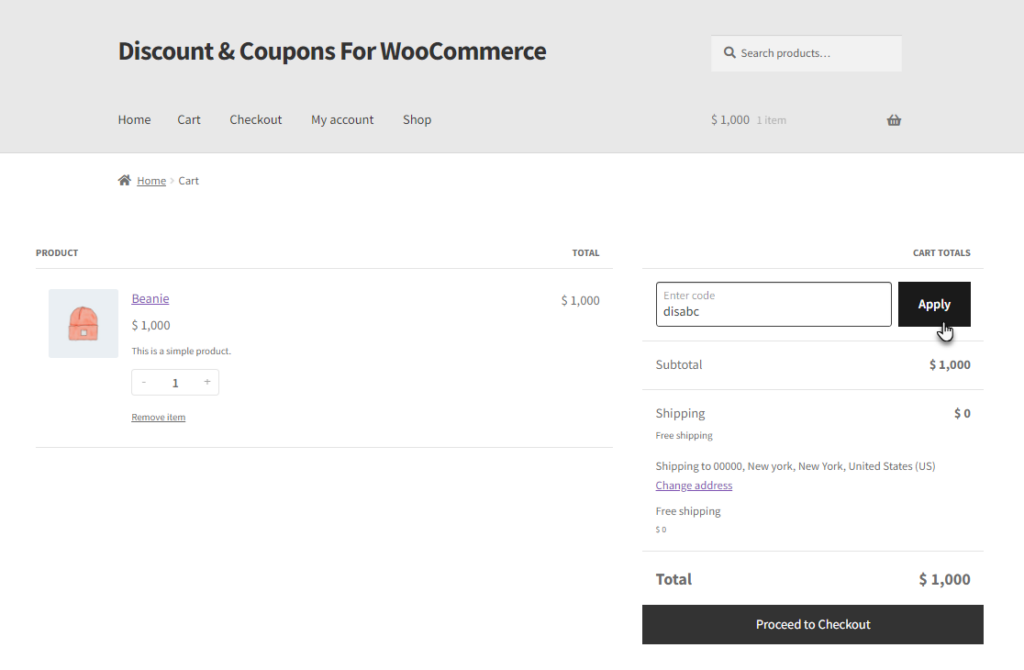
- Enter the coupon code in the Enter Code field and click on Apply.
- A coupon discount will be applied to your product. The price will be updated and a message will appear on the screen.
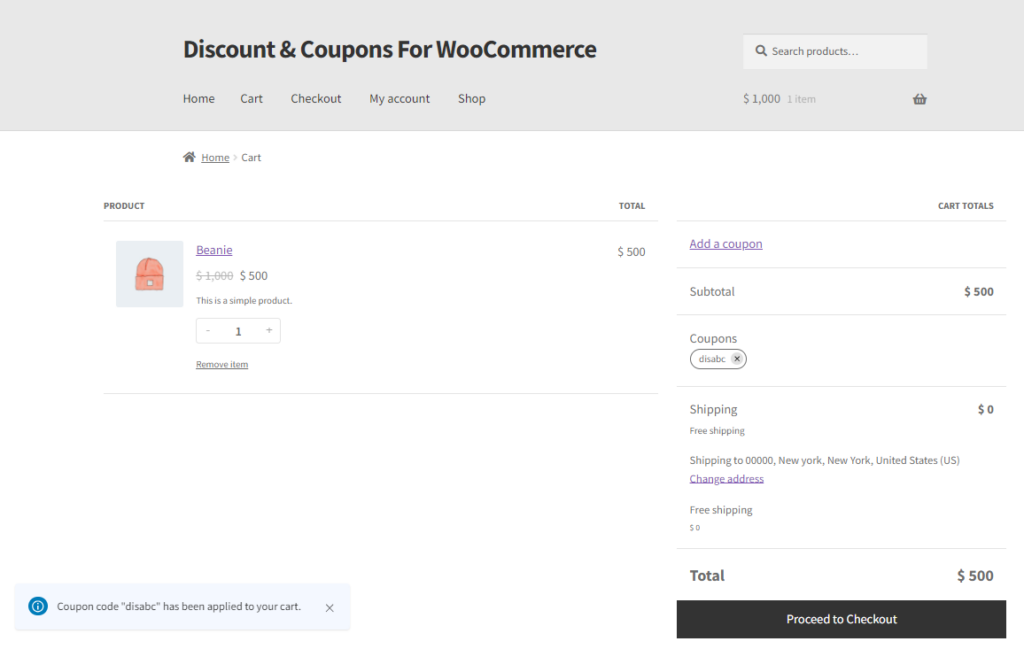
On Cart Discount
- In the On Cart Discount, the discount will be applied directly to the cart’s subtotal amount.
- Go to WordPress Admin Dashboard > Discounts & Coupons > Add New Discount.
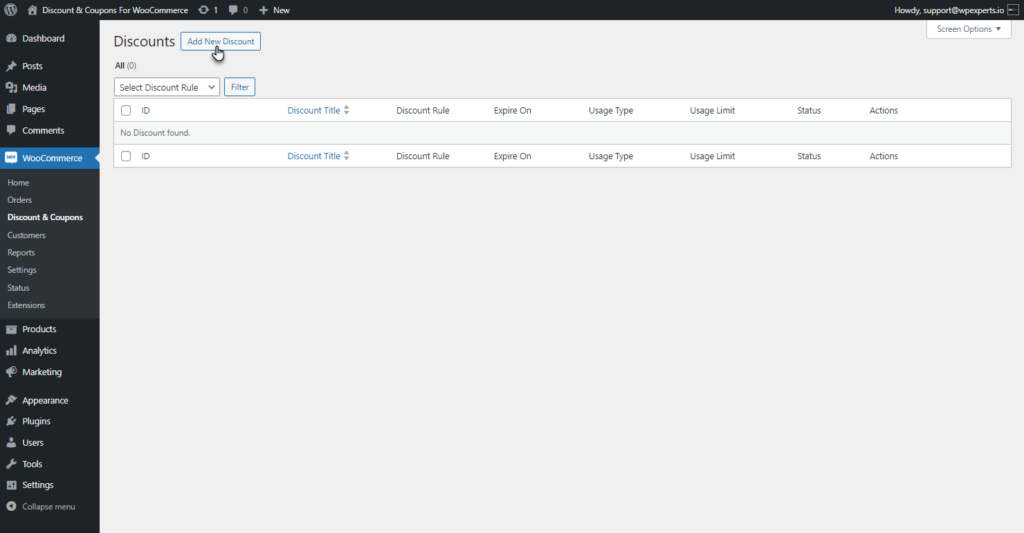
- Add New Discount screen will appear.
- Add a title to your Discount.
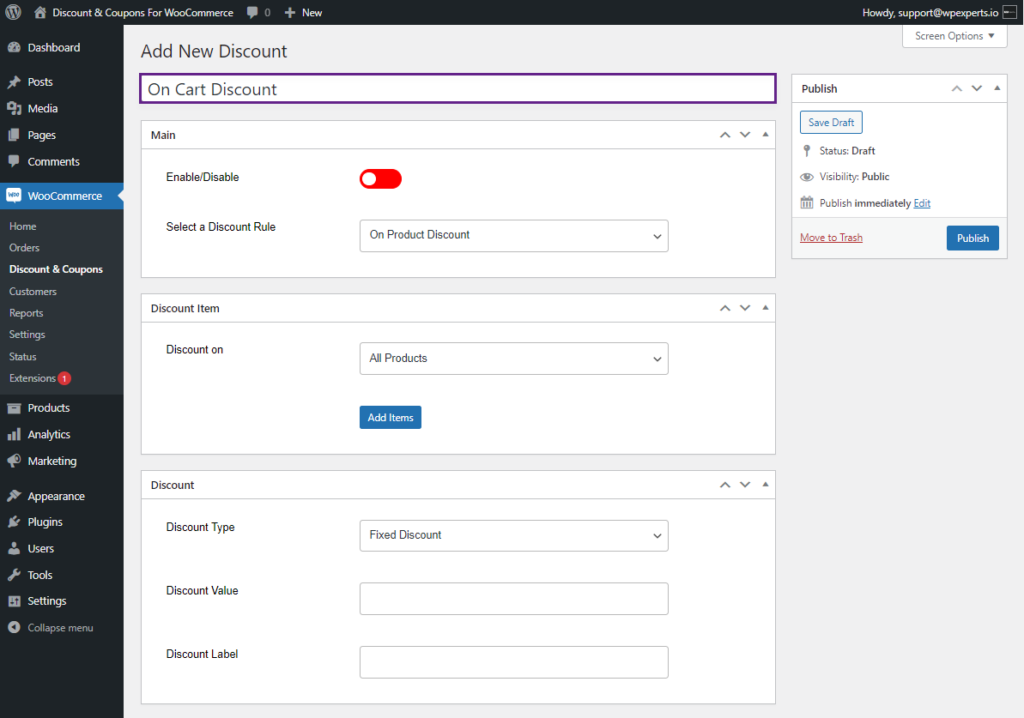
- There will be five tabs to configure your Discount.
- Main
- Discount Item
- Discount
- Discount Restrictions
- Coupon
PLEASE NOTE: The Discount Item, Discount, and Coupon tab Settings can be configured by the same process described in the On Product Discount Type. The setting of these tabs can be configured as per needs.
Main Tab
- The admin can enable and select the discount rule in the Main tab.
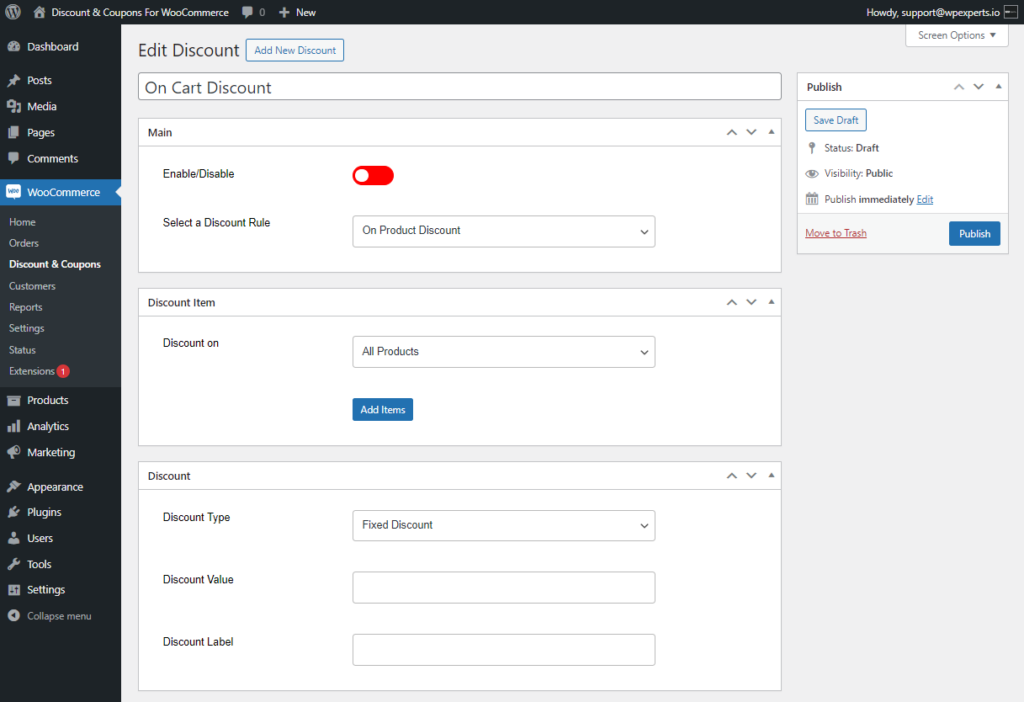
- Enable the discount by using the Enable/Disable toggle button.
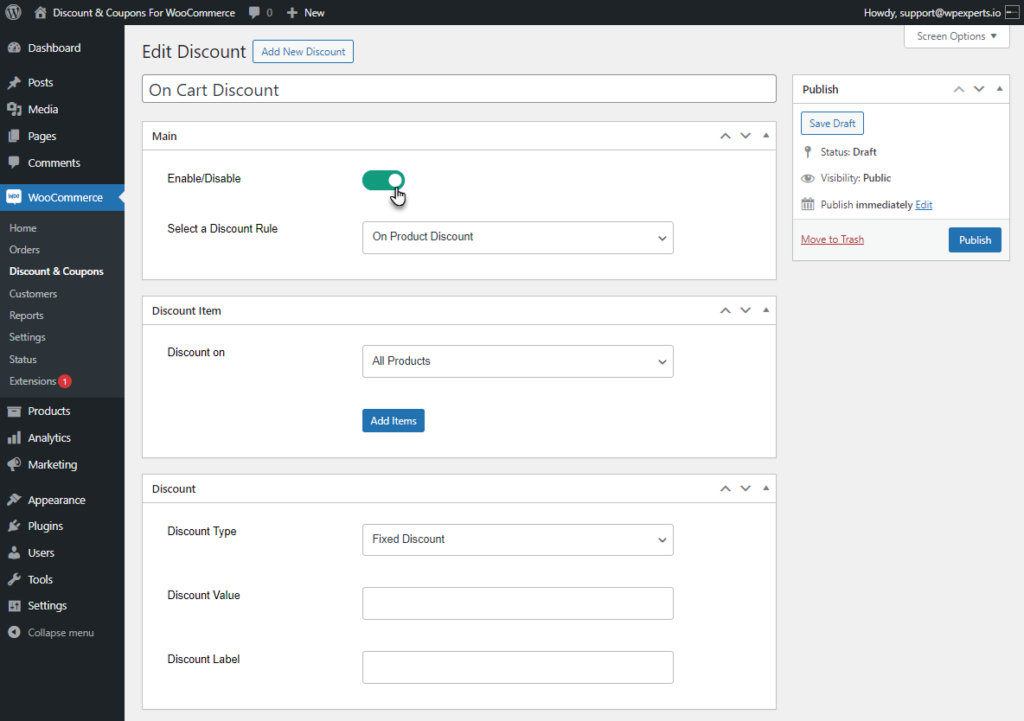
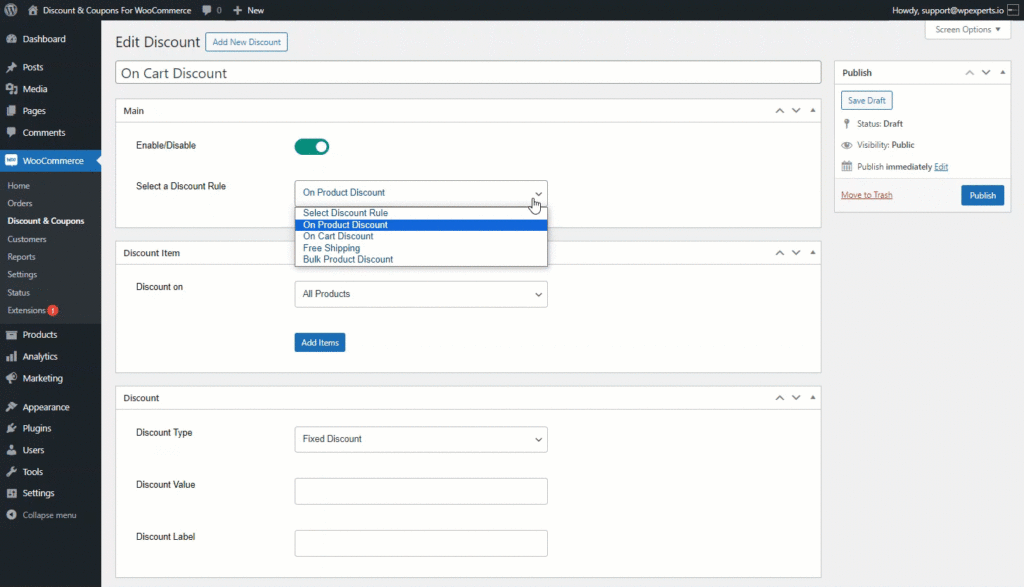
- Select the discount rule from the Select a Discount Rule from the drop-down menu. By default, the On Product Discount rulewill be selected.
Discount Item Tab
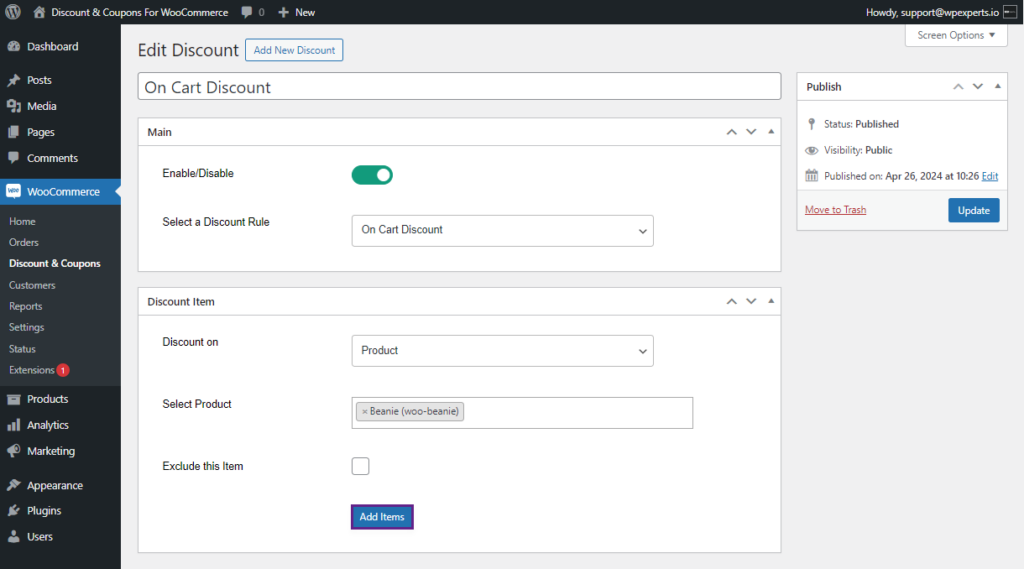
- The Discount Item tab is configured by the process explained in the On Product Discount type. A single product or category can be selected in the Discount Item tab.
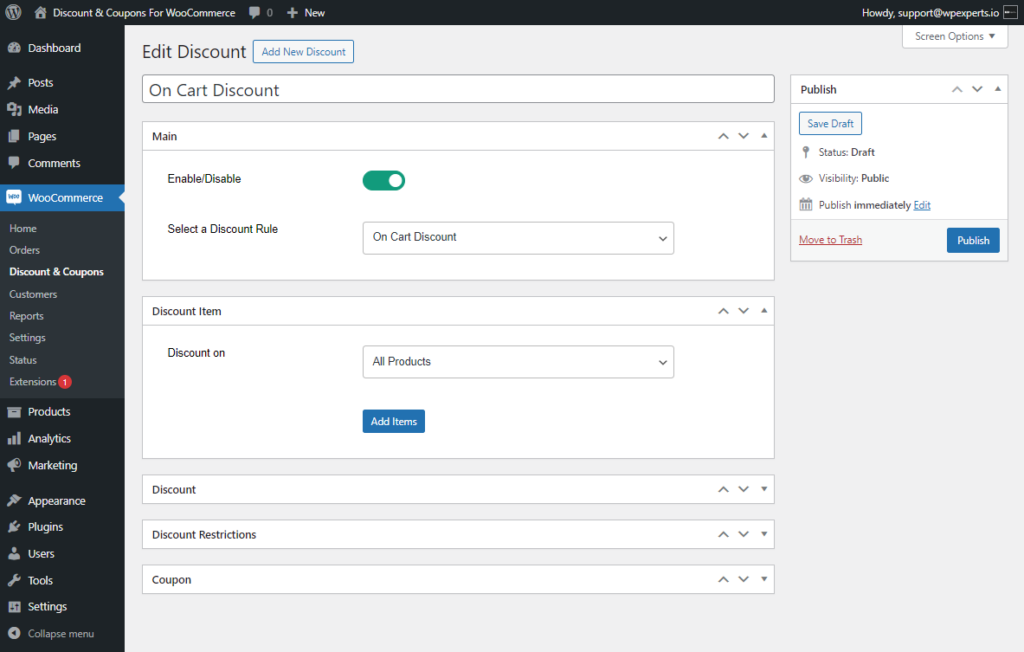
- Admin can add multiple Items using the Add Items Button.
Discount Tab
- This tab can be configured by the process defined in the On Product Discount Type. In this tab, users can select the discount type, specify its value, and assign a label to the discount.
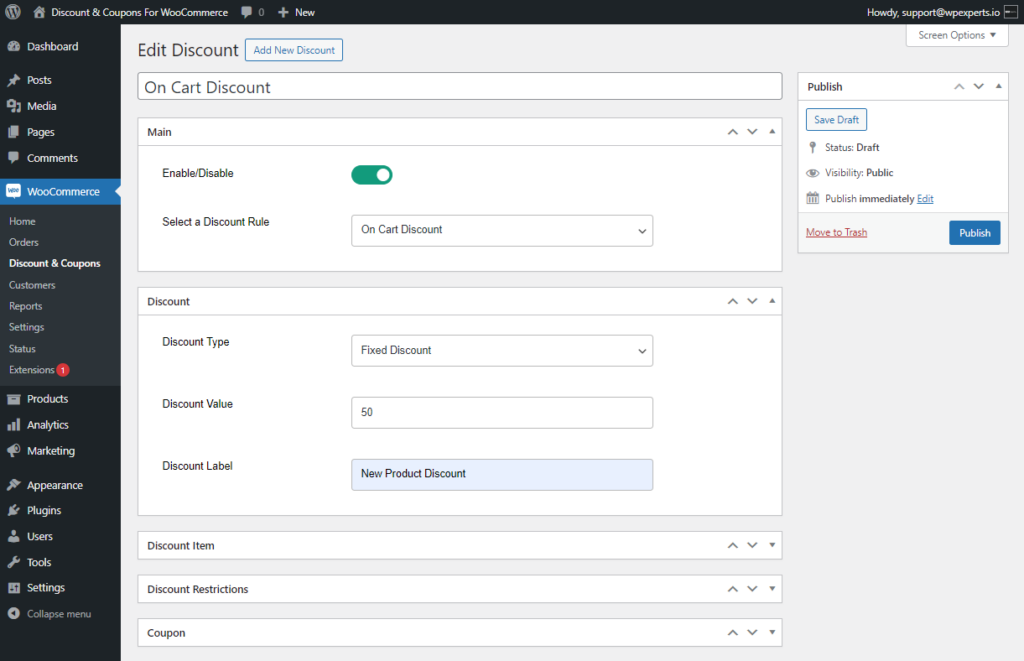
- In the Discount Type, three types of discounts are provided.
Fixed Discount
- Select the Fixed Discount option from the Discount Type drop-down list. A specific amount will be deducted from the subtotal on the cart.
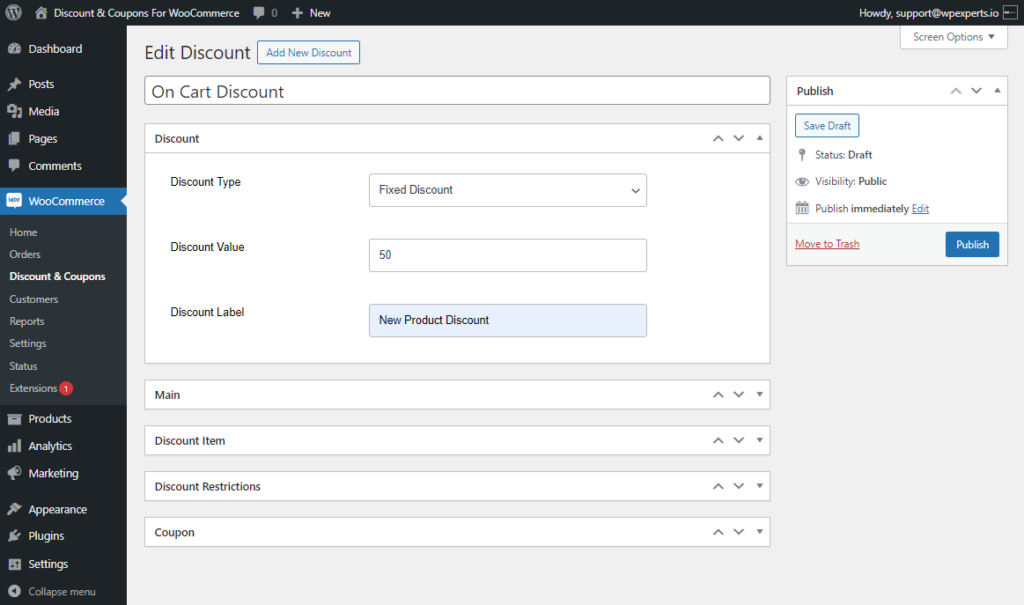
PLEASE NOTE: The Discount Value and Discount label option is briefly explained in the On Product Discount type.
Front End Impact
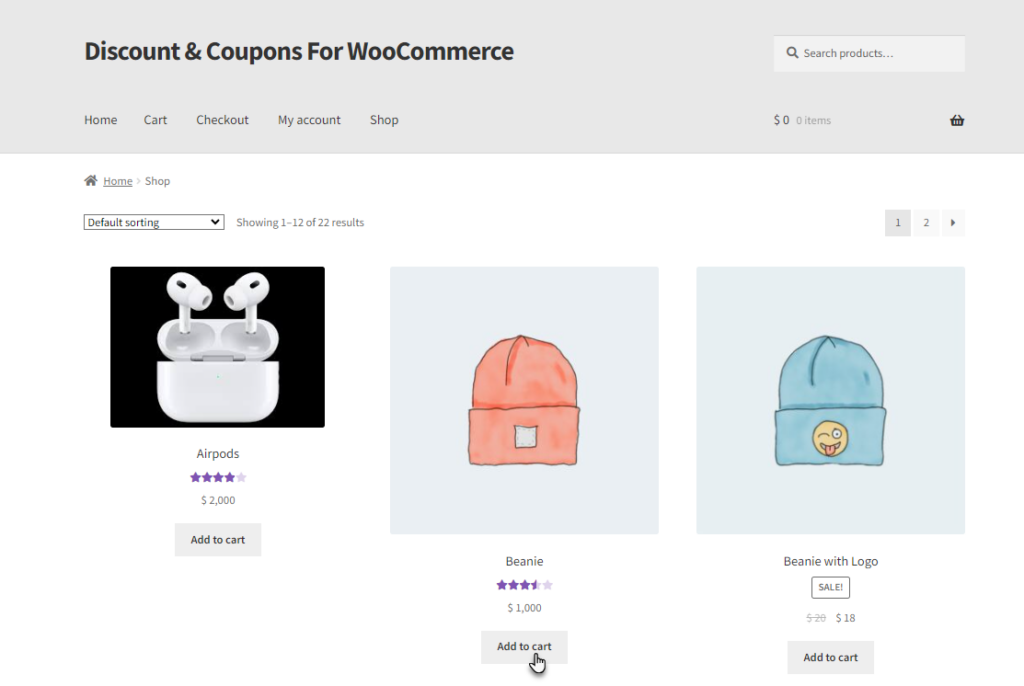
- Go to the Shop Page.
- Add the Discounted item to the cart.
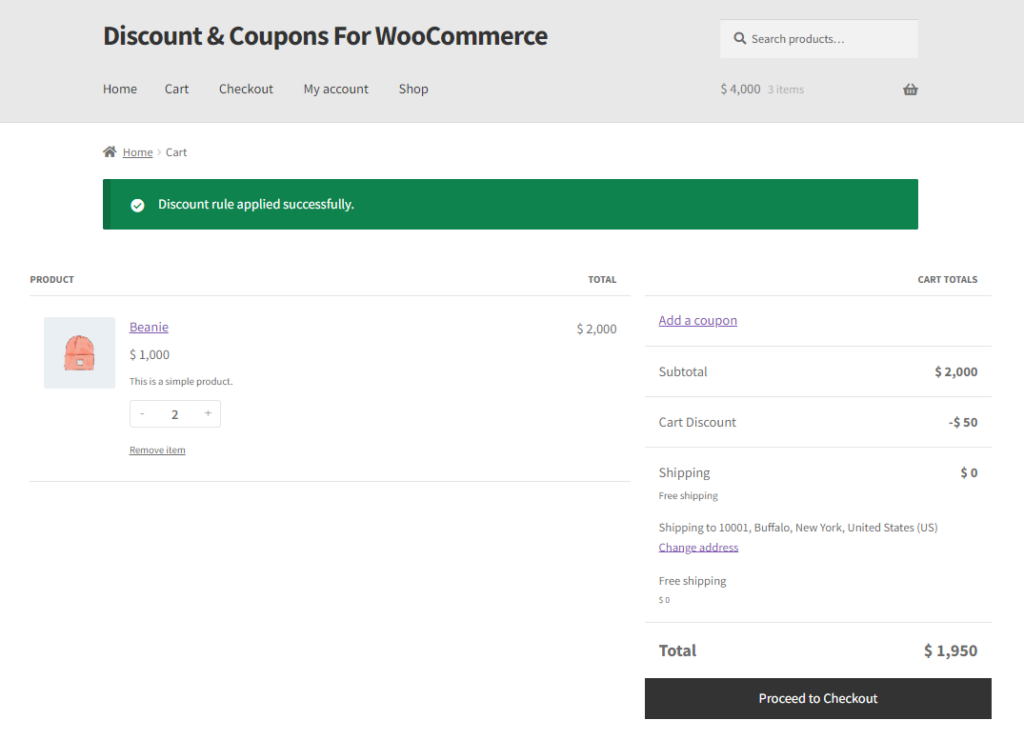
- Go to the Cart page. The Fixed amount will be deducted from the subtotal amount.
Fixed Price Per Item Discount
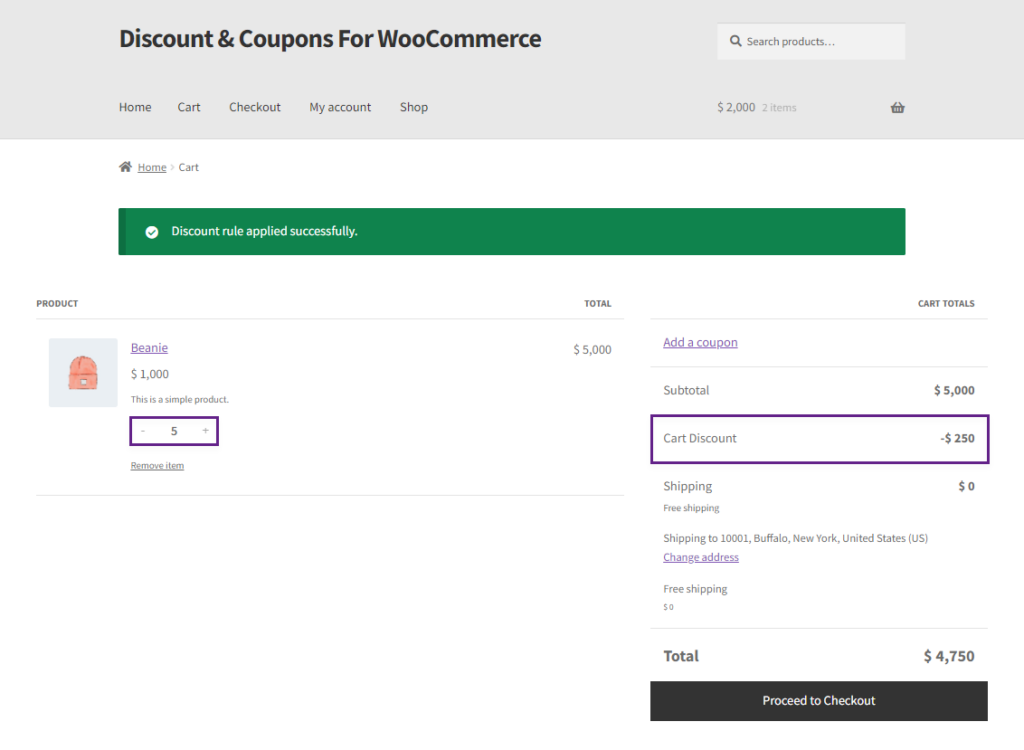
- Select the Fixed Price per item Discount option from the Discount Type drop-down list. This discount type will deduct the set discount price from each item in the cart.
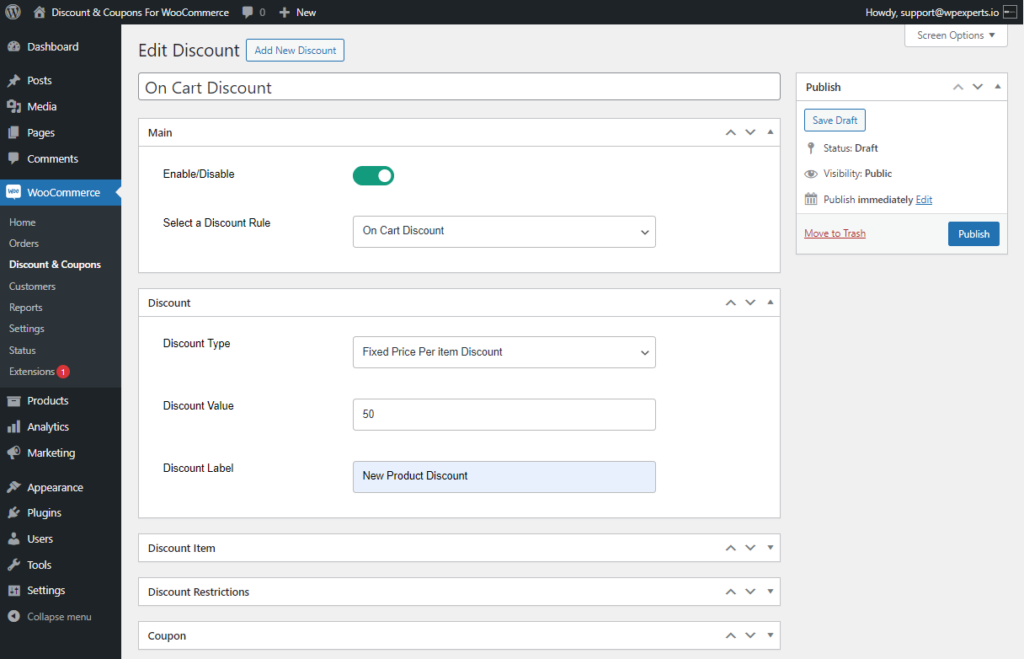
PLEASE NOTE: The Discount Value and Discount Label settings can be changed as per requirement.
Front End Impact
- Go to the Shop Page.
- Add the Discounted item to the cart.

- Go to the Cart page. Discount rule will be applied and a message will appear on the screen.
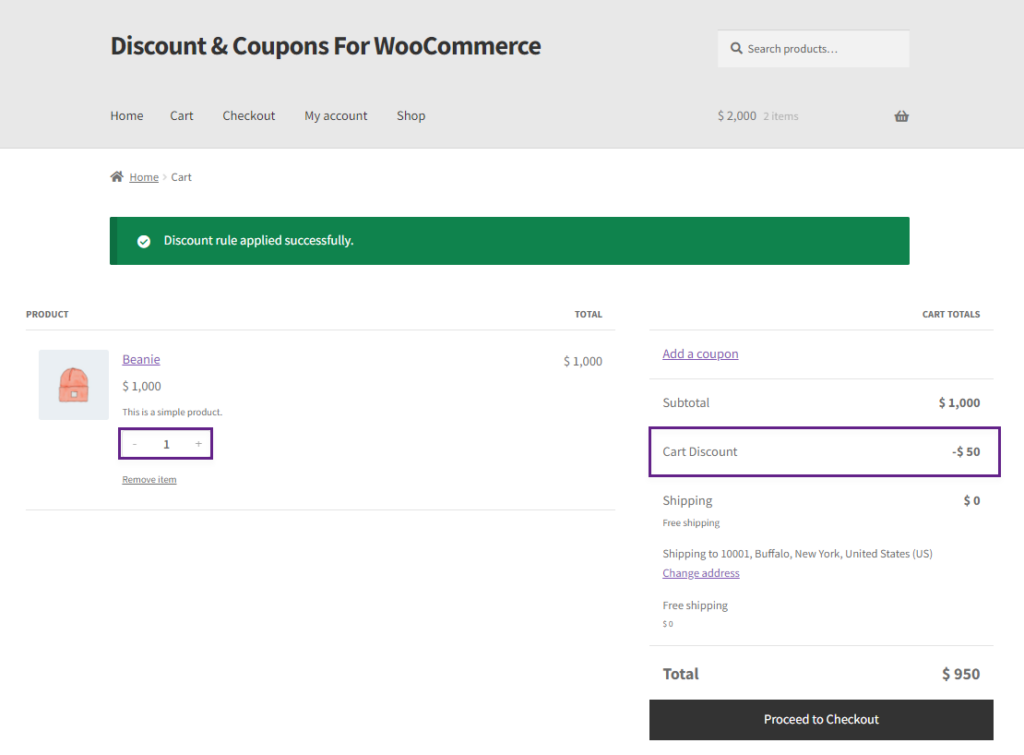
- As the quantity of discounted items increases, the cart discount per item also increases.
Percentage Discount
- Select the Percentage Discount option from the Discount Type drop-down list. This discount type will substitute the desired percent of the original price of the product on which the discount rule is applied..
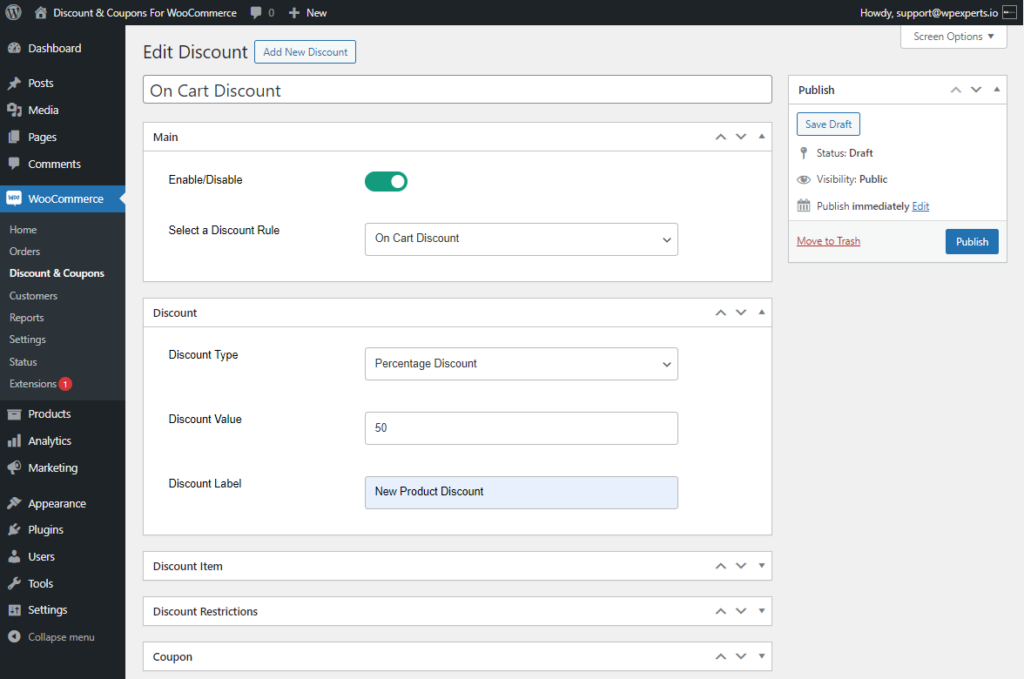
PLEASE NOTE: The Discount Value and Discount Label settings can be changed as per requirement.
Front End Impact
- Go to the Shop Page.
- Add the Discounted item to the cart.

- Go to the Cart page. Discount rule will be applied and a message will appear on the screen.

- The discount will be applied to each item to which the discount rule is applied.
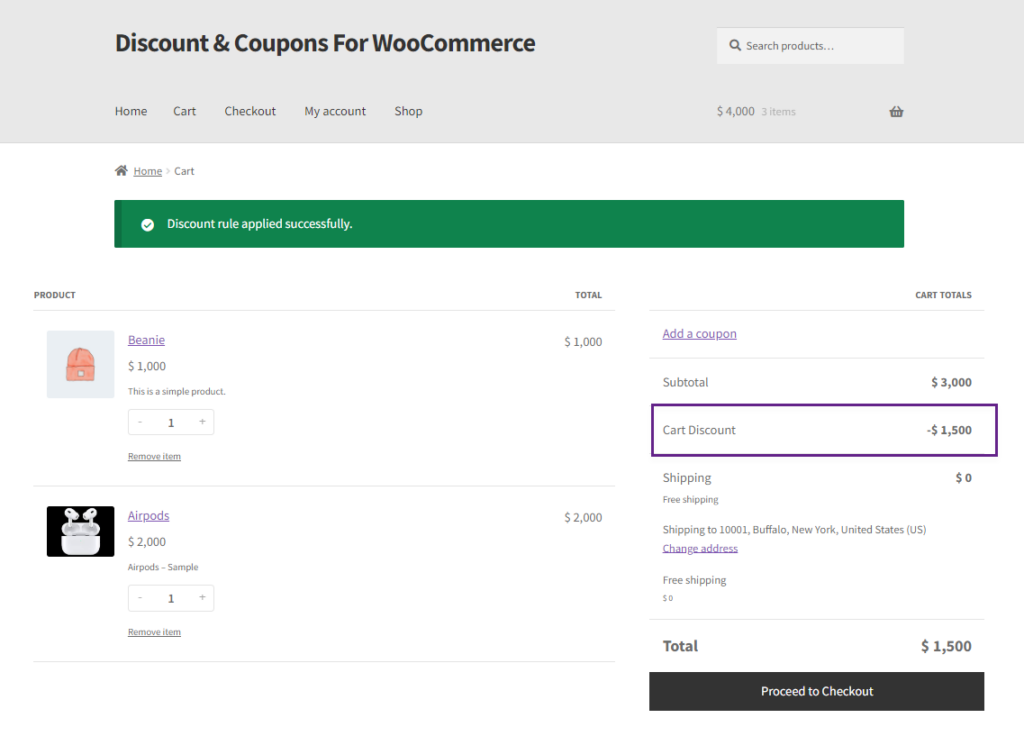
Discount Restrictions Tab
↑ Back to top- Once done with the Main tab scroll down to the Discount Restrictions Tab. This tab allows the admin to restrict the Discount usage and set Discount Conditions as per requirements.
- The Discount Restrictions Tab is configured by the process explained in the On Product Discount.
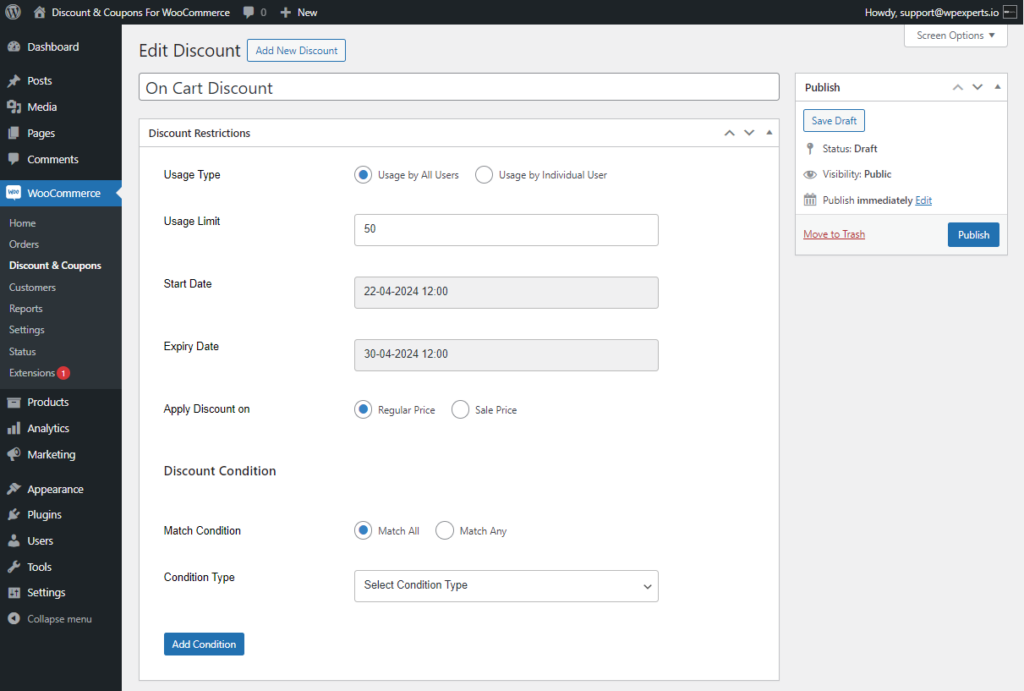
2. Move to the Condition Type in the Discount Conditions sub-tab.
Discount Conditions
- This option allows the admin to set a Discount Condition. The admin can use multiple Conditions as needed.
- If the admin sets multiple conditions, the Match Condition option allows the admin to choose between Match All or Match Any condition option.
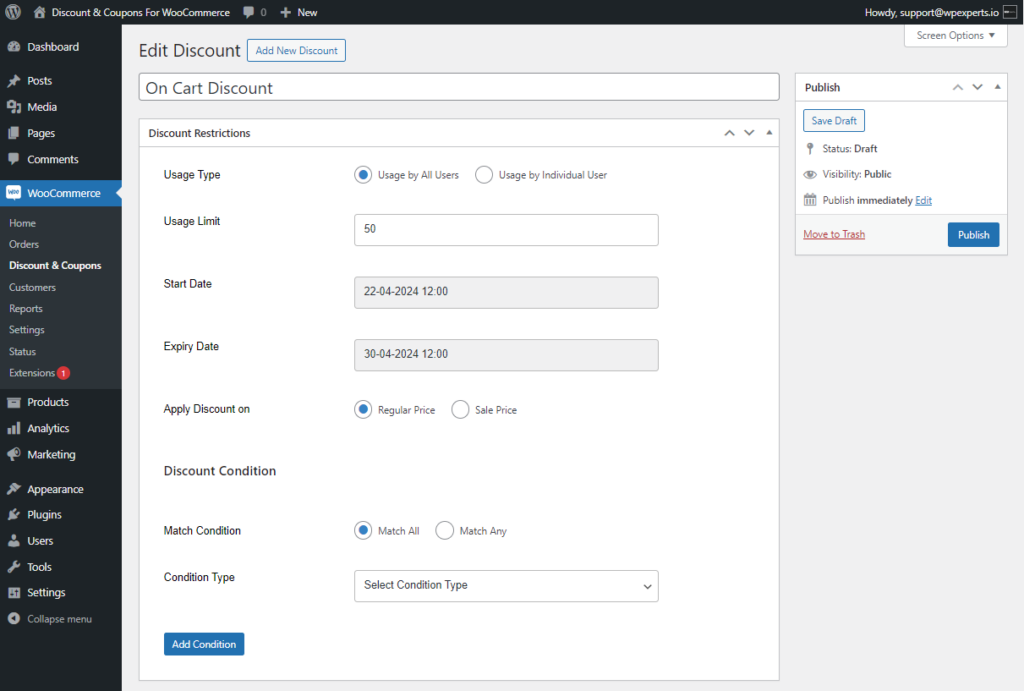
- There are six discount conditions that are provided in the Condition Type drop-down list.
- Subtotal
- Cart Item Quantity
- Product Quantity
- Payment Methods
- User Roles
- Logged in Users
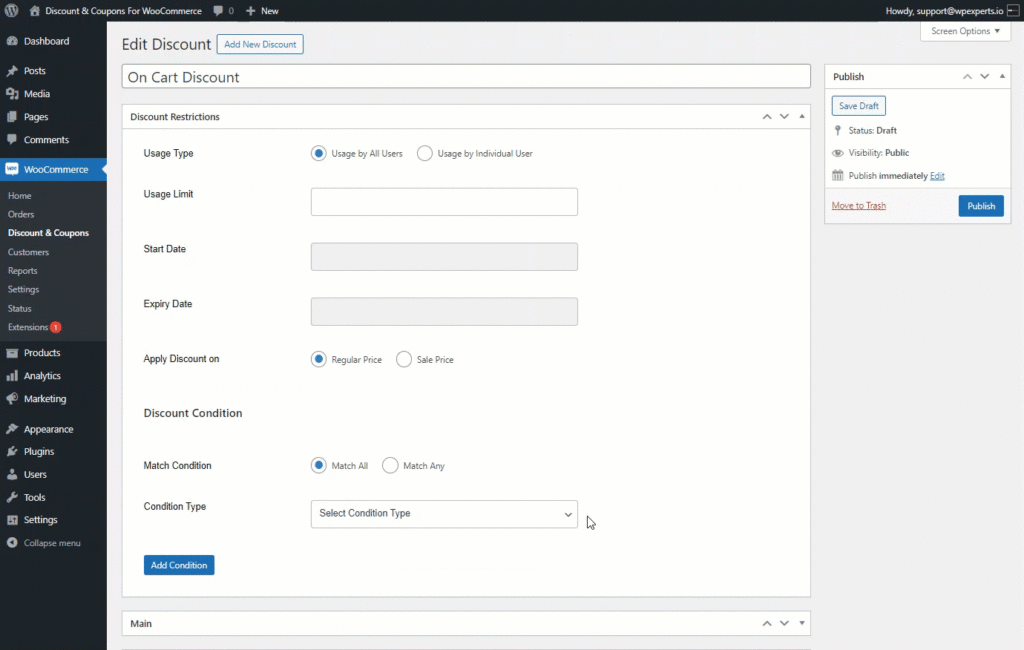
Subtotal
- Select Subtotal from the Condition Type drop-down list. When this condition is chosen, the Free Shipping will be effective on the Cart and Checkout page once the specified subtotal amount is reached on the Cart page and Checkout page.
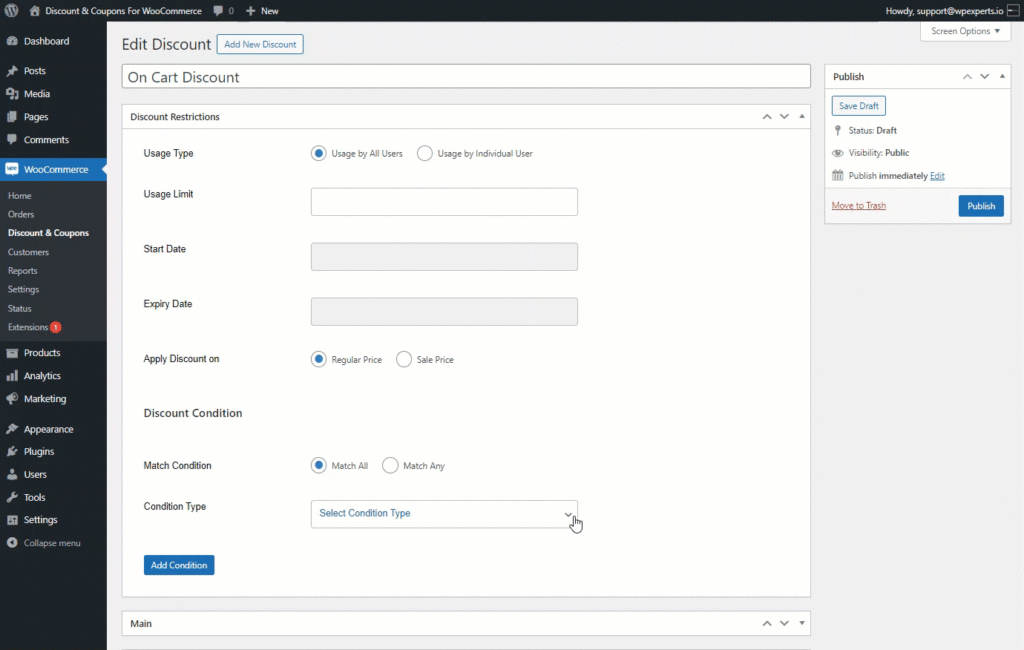
- Enabling this will provide the admin option to select conditions for the Subtotal Amount. Admin can set different conditions for Discount from the drop-down list.
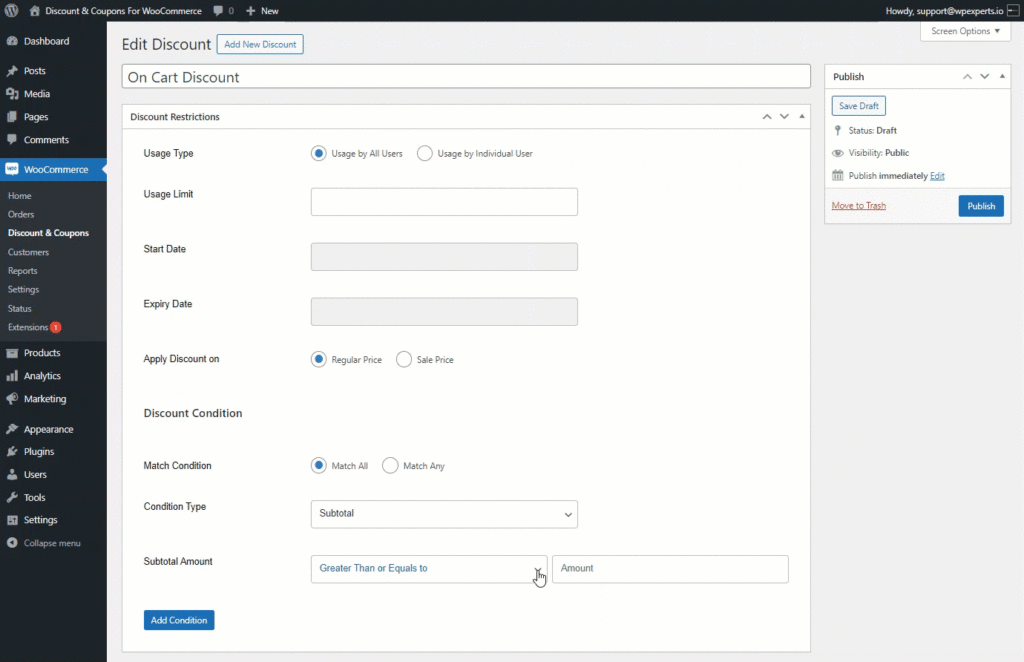
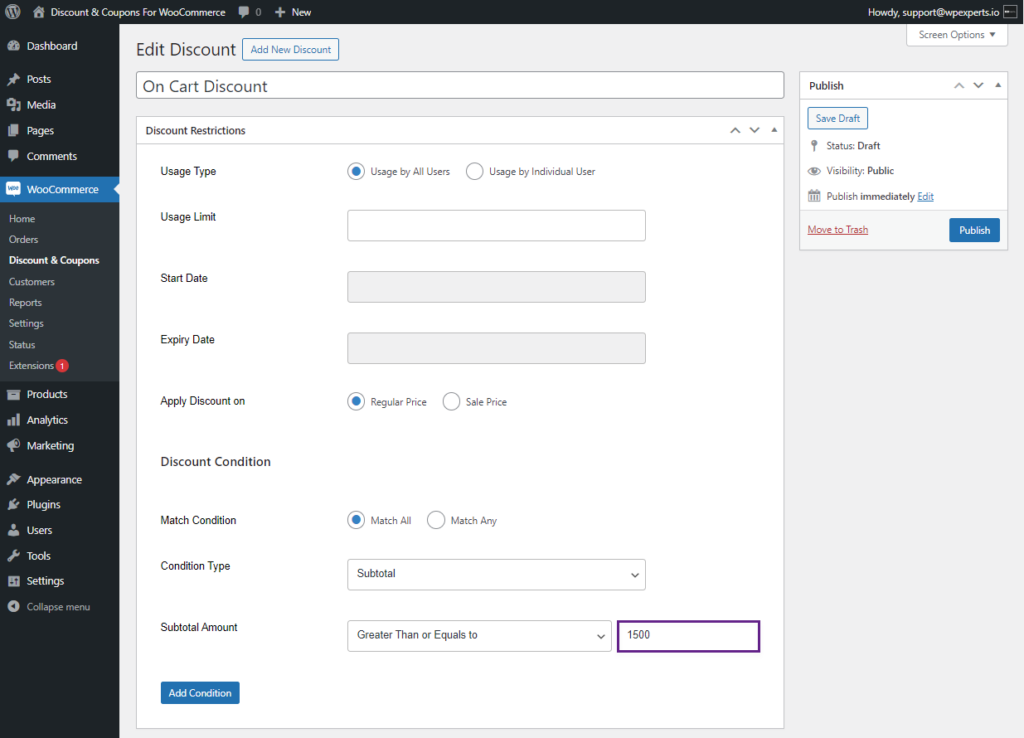
- Enter the amount in the Amount field with respect to the condition set in the Subtotal Amount option.
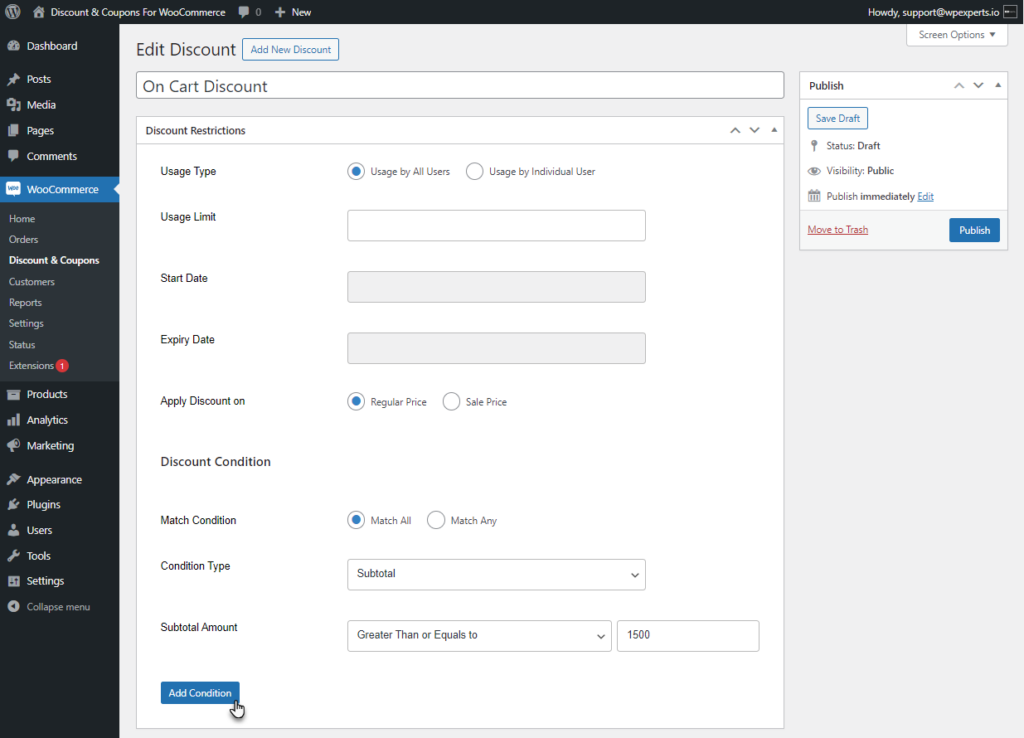
- The admin can add multiple conditions using the Add Condition button.
Front End Impact
- Go to the Shop page.
- Add the Discounted item to the cart.
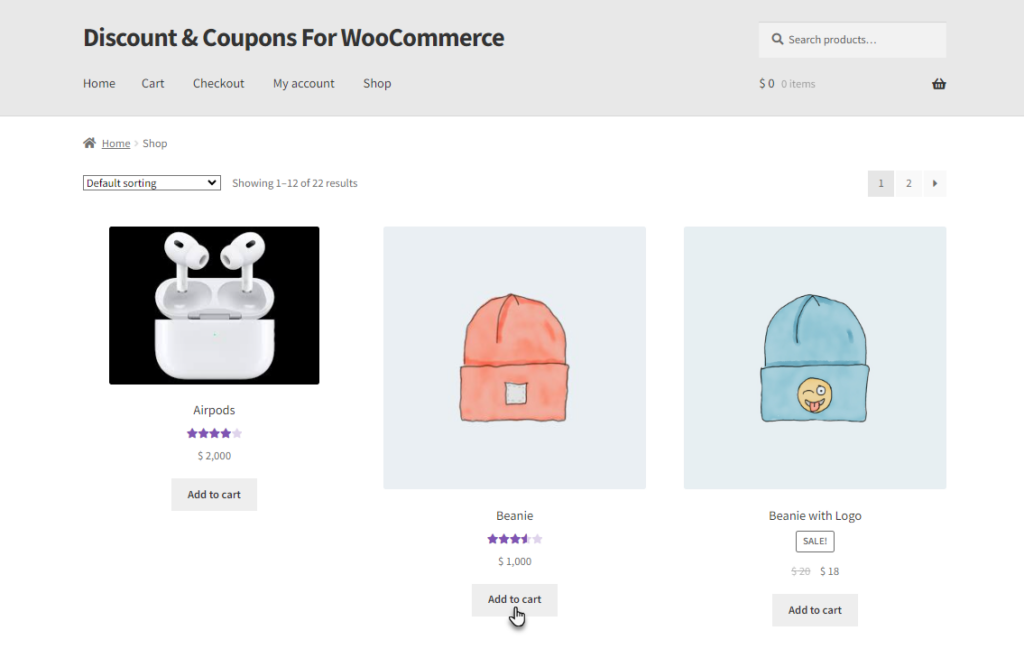
- Go to the Cart page. Since the Subtotal amount is less than the set amount, no discount rule is applied.

- Match the Condition of the discount in the cart.

- The Discount Rule Applied message will be displayed in the cart and the discounted price will be displayed.

Cart Item Quantity
- Select Cart item Quantity from the Condition Type drop-down list. When this condition is chosen, the total number of items in the cart will be checked to meet the condition before the discount is applied.
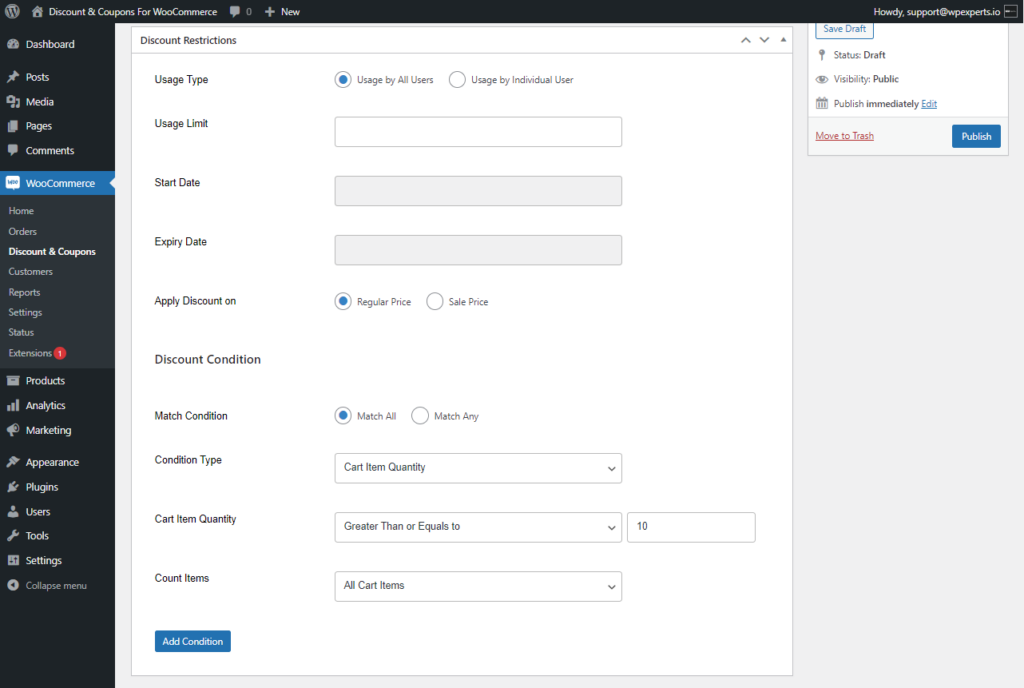
PLEASE NOTE: The Cart Item Quantity and Count Items options are briefly explained in the On Product Discount type.
Front End Impact
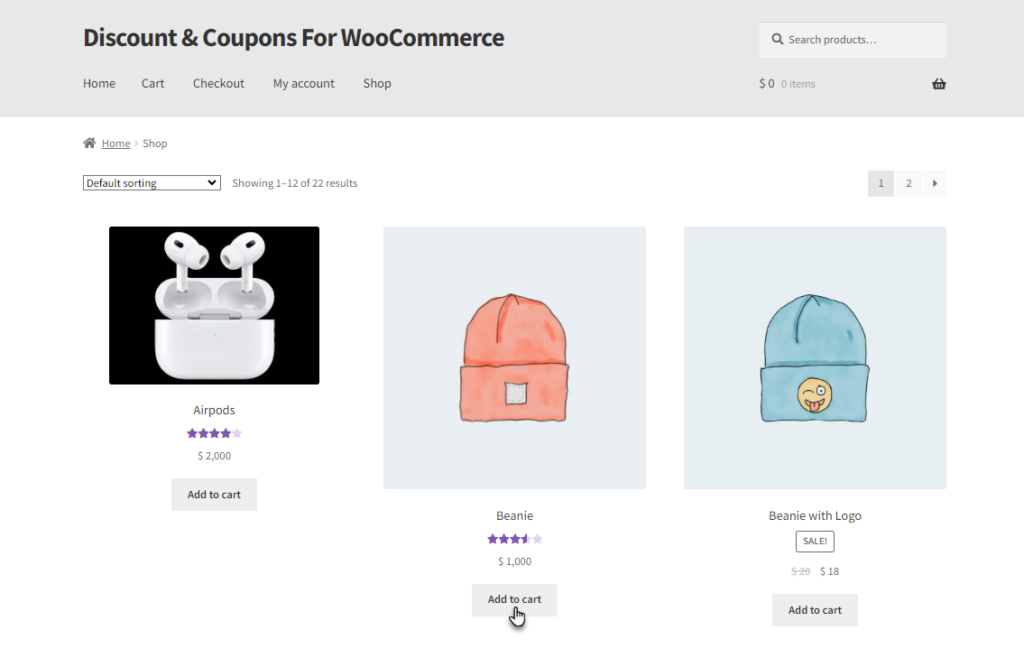
- Go to the Shop page.
- Add the Discounted item to the cart.
- Go to the Cart page.
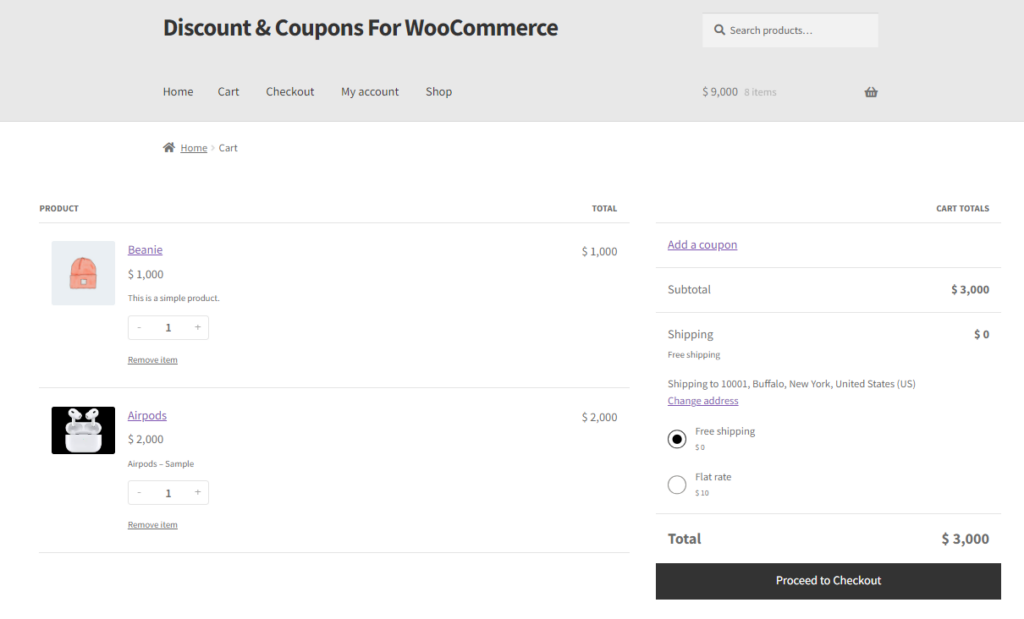
- Match the Condition of the discount in the cart.

- The Discount Rule Applied message will be displayed in the cart and the discounted price will be displayed.

Product Quantity
- Select Product Quantity from the Condition Type drop-down list. When this condition is chosen, the quantity of a specific product will be checked to meet the condition before a Free Shipping discount is applied.
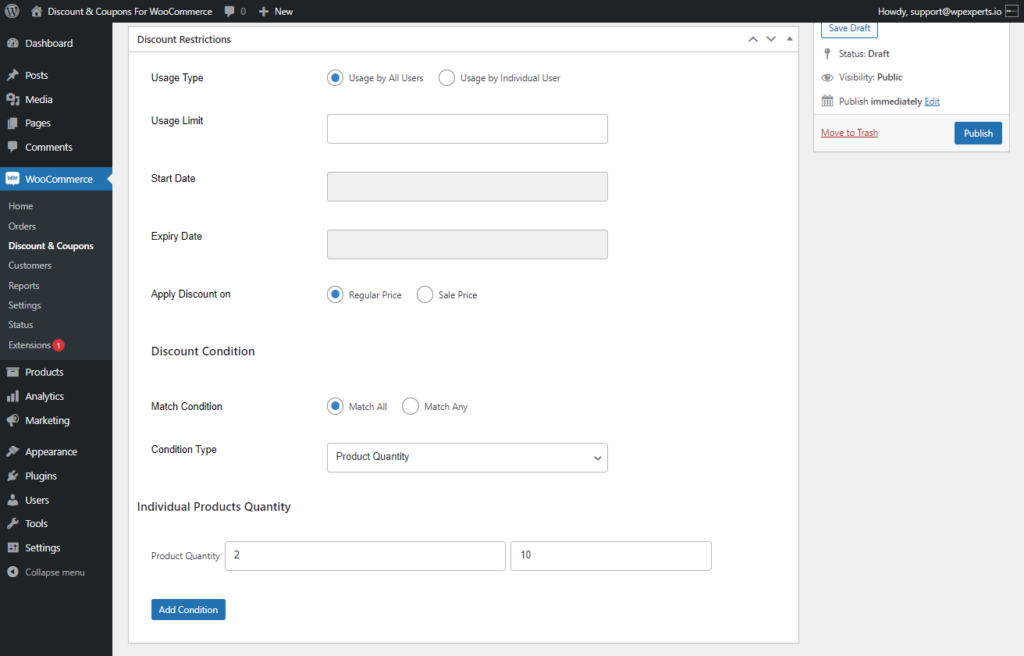
PLEASE NOTE: The Product Quantity option is briefly explained in the On Product Discount type.
Front End Impact
- Go to the Shop page.
- Add the Discounted item to the cart.
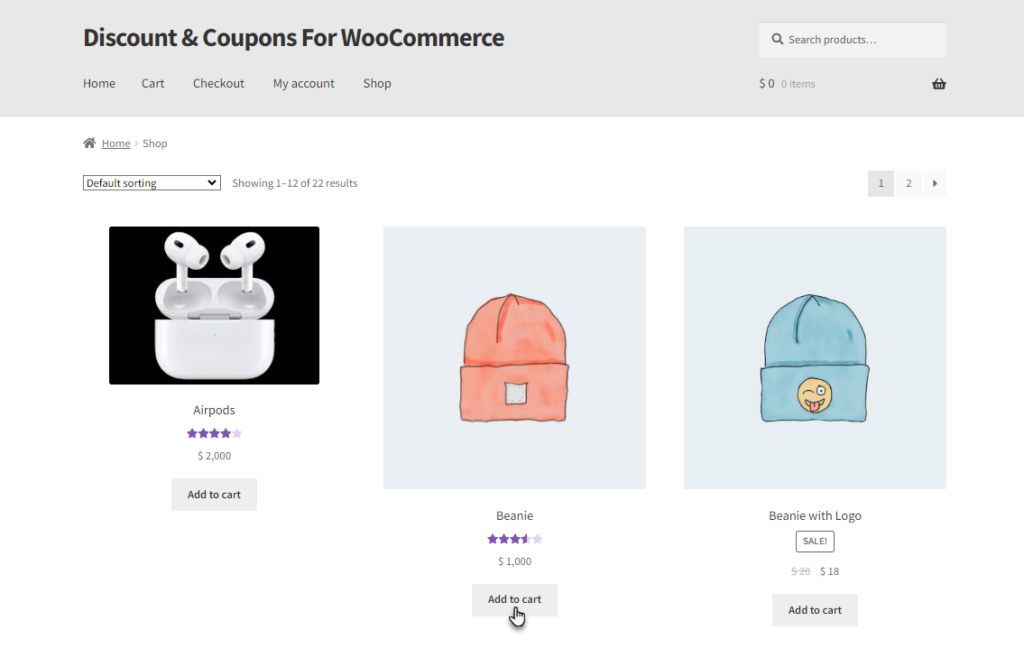
- Go to the Cart page.

- Match the Condition of the discount in the cart.

- The Discount Rule Applied message will be displayed in the cart and the discounted price will be displayed.

Payment Methods
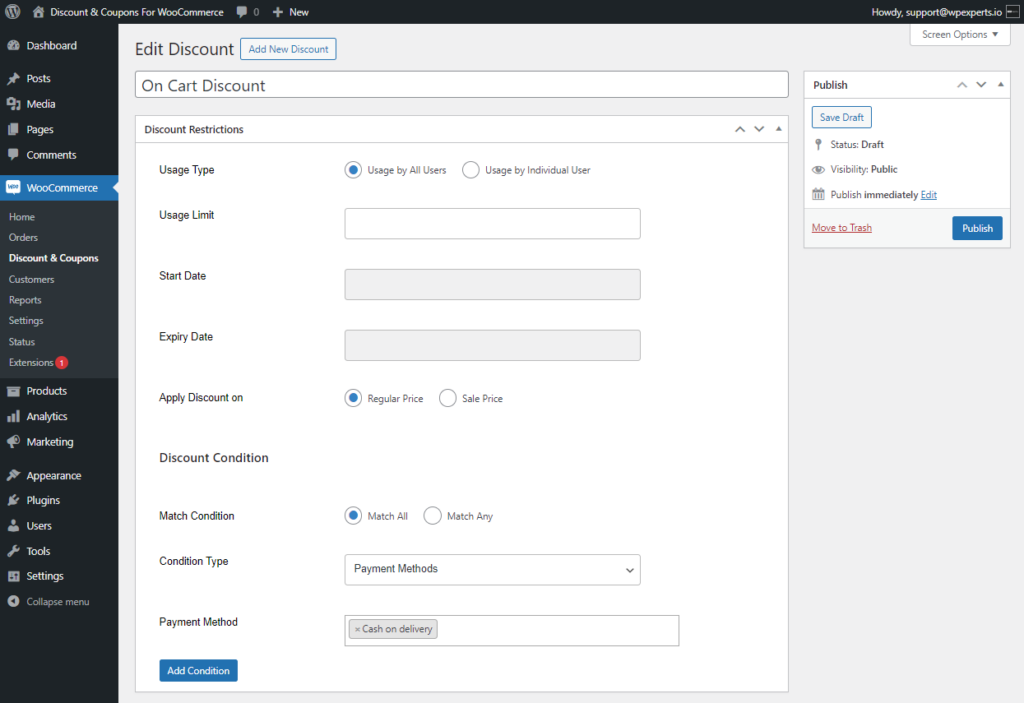
- Select Payment Methods from the Condition Type drop-down list. When this condition is chosen, the Free Shipping discount will be applied to the specified payment methods.
- Select the Payment methods for which the Free Shipping discount will be applicable in the Payment Method field.
Front End Impact
- Go to the Shop page.
- Add the Discounted item to the cart.
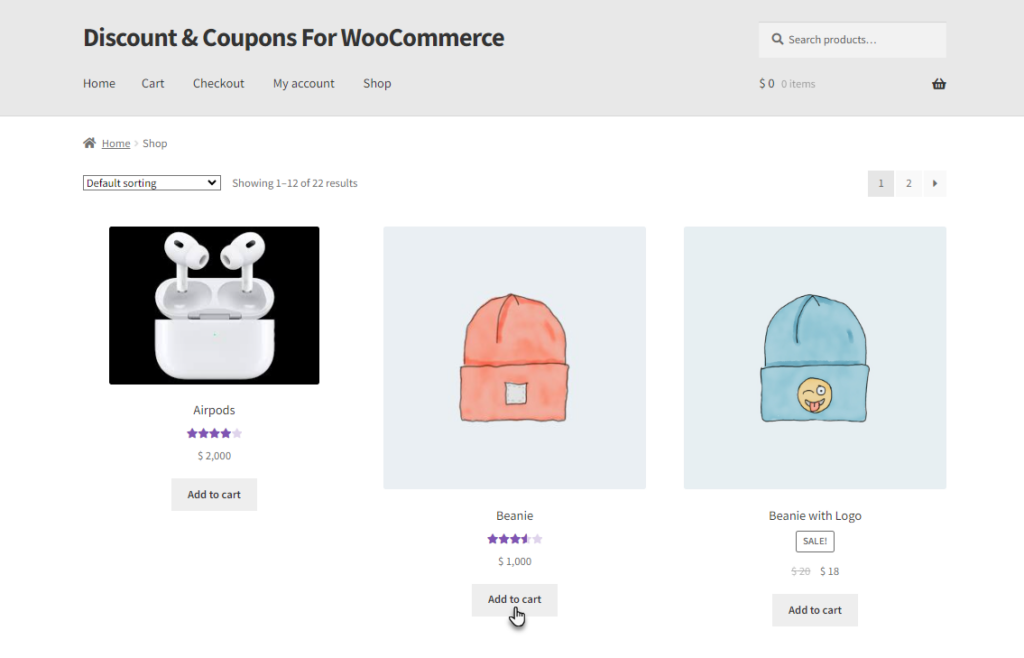
- Match the Condition on the checkout page by selecting the Payment method set by the admin.

- The Discount Rule Applied message will be displayed on the checkout page and the discounted price will be displayed.

User Roles
- Select User Roles from the Condition Type drop-down list. When this condition is chosen, only users with specific user roles will be eligible to receive the Free Shipping discount.
- Add the User Roles in the User Role field.
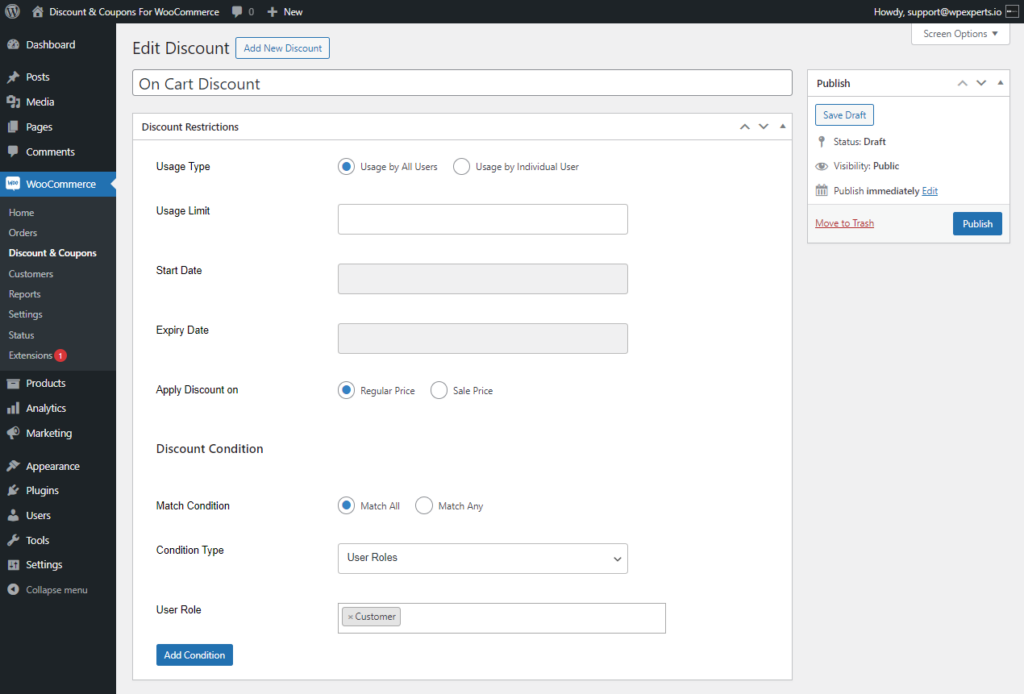
PLEASE NOTE: The chosen role will be able to avail the discount.
Logged in Users
- Select Logged in Users from the Condition Type drop-down list. When this condition is selected, the admin has the option to limit the Free Shipping discount to users who are logged in, not logged in, or both.
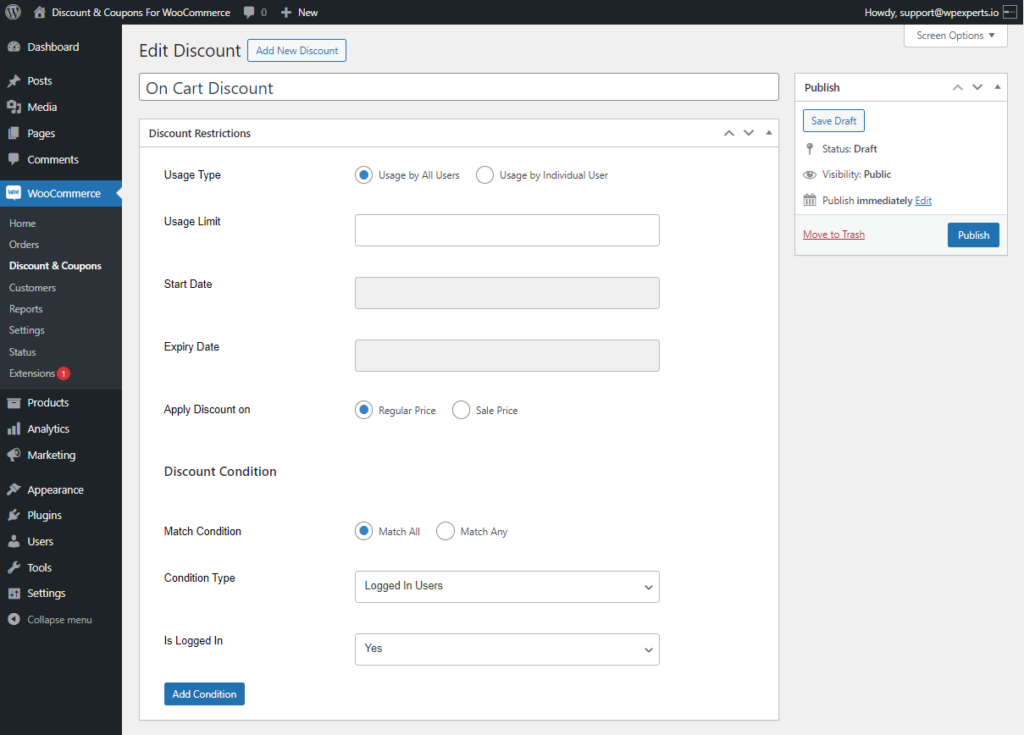
- Select the logged-in status of the user from the Is Logged in drop-down.
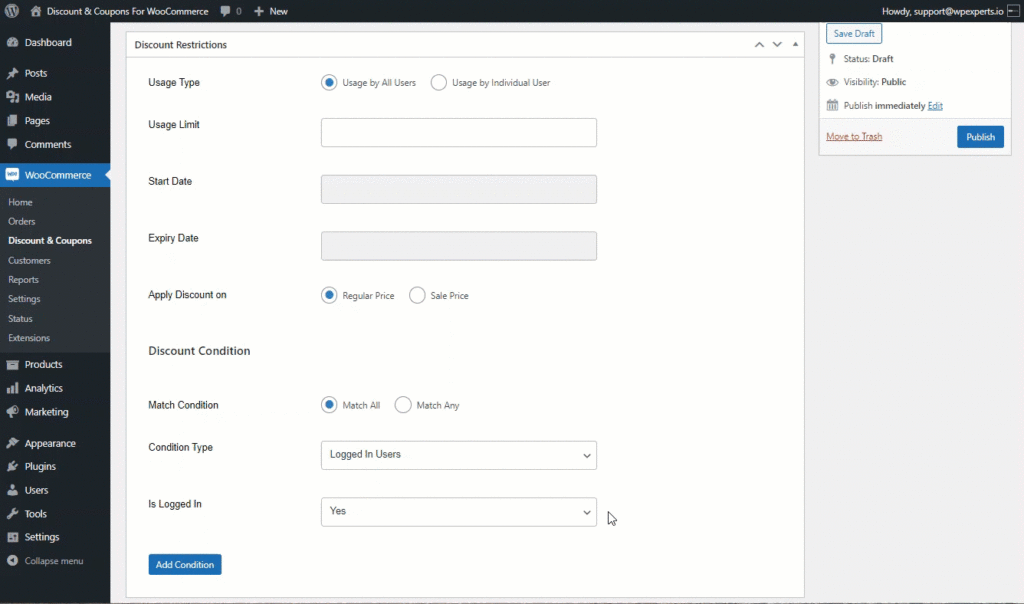
- Now, only logged in users will be able to avail the discount.
- In case of No logged in user, then only Guest users will be able to avail the discount.
- In case of Both, the discount can be availed by both logged in and logged out users.
Coupon Tab
- Once done with the Discount Restrictions, move to the Coupon Tab which enables the admin to use this discount as a coupon.
- Enable the coupon by checking the Make this discount type a Coupon check button.
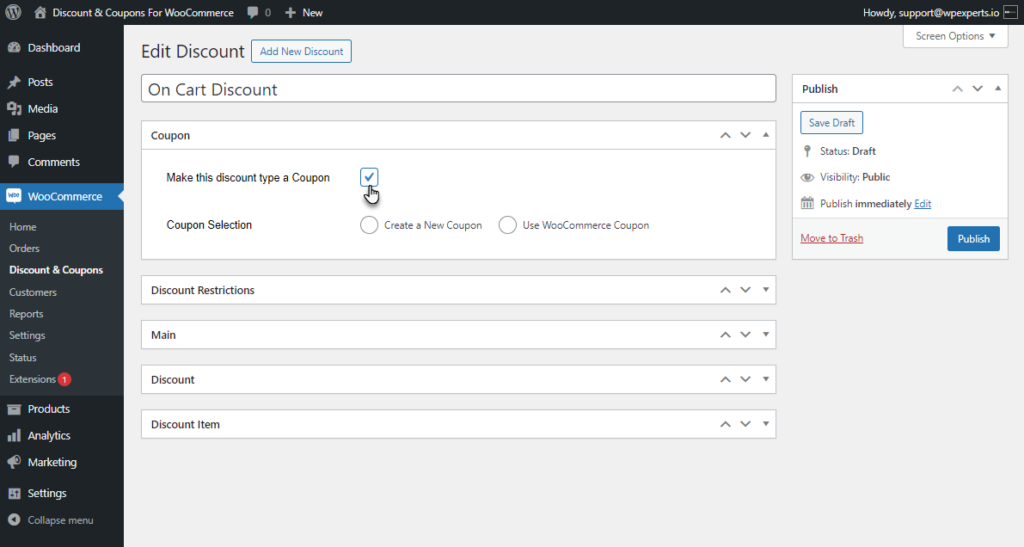
- Enabling the coupon will provide the admin with two options
- Create New Coupon
- Use WooCommerce Coupon
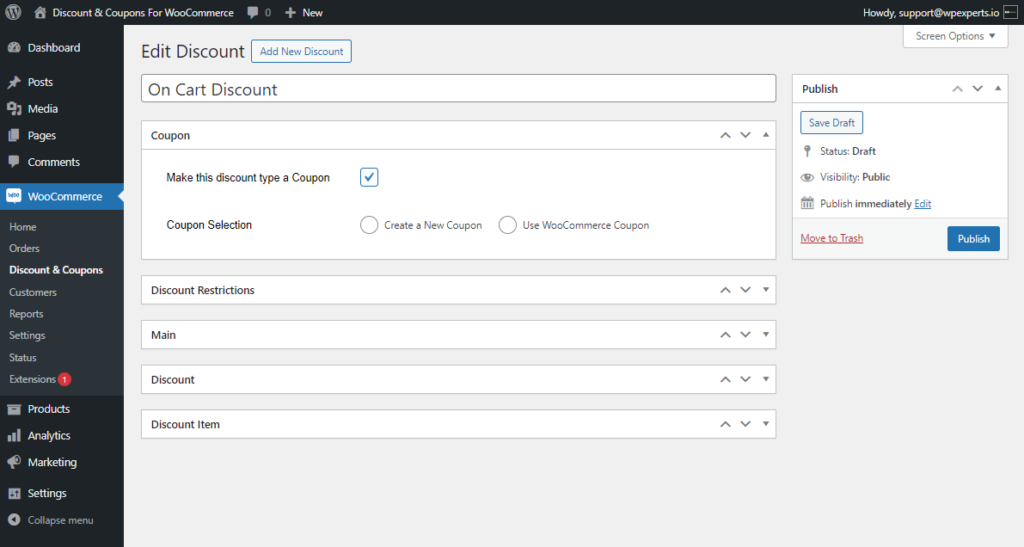
PLEASE NOTE: The Create New Coupon and WooCommerce Coupon options are briefly explained in the On Product Discount
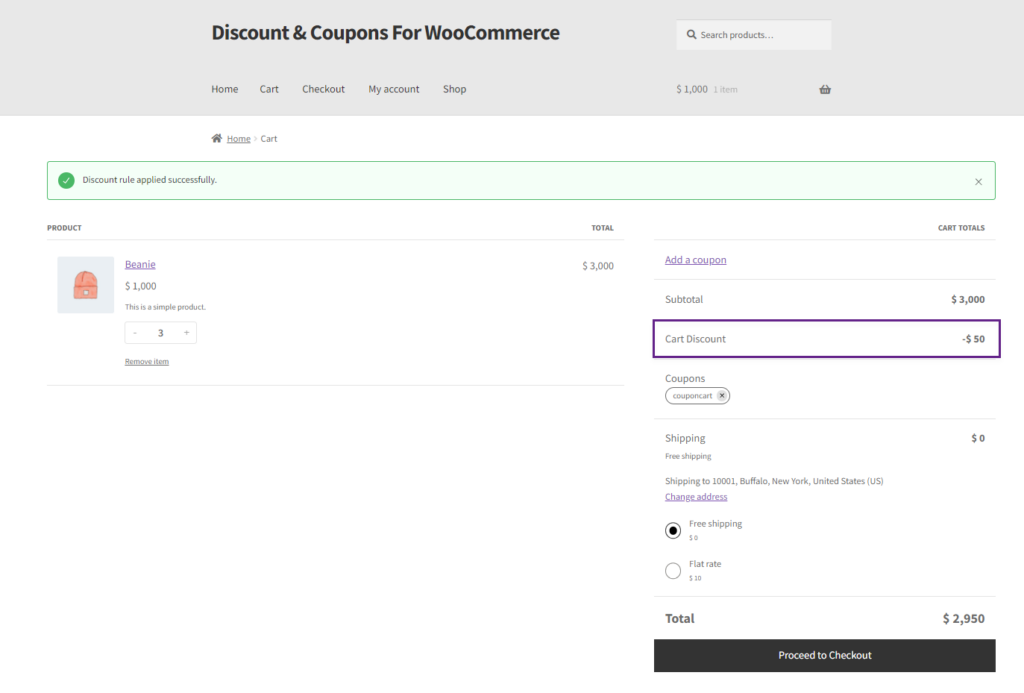
Front End Impact
- Go to the Shop page.
- Add the Discounted item to the cart.
Free Shipping Discount
- In the Free Shipping Discount, the shipping cost will be eliminated if the specified discount condition is matched.
- Go to WordPress Admin Dashboard > Discounts & Coupons > Add New Discount.
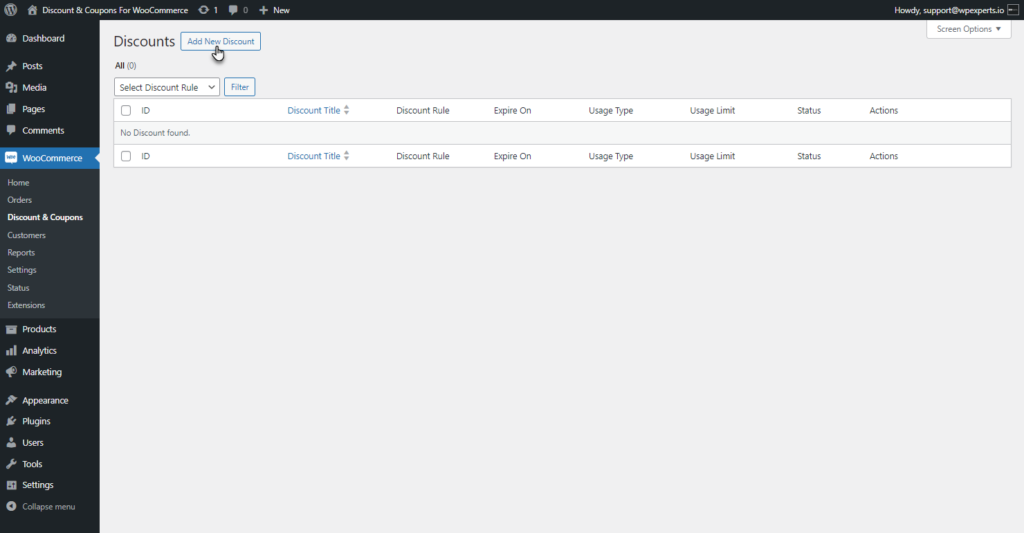
- Add New Discount screen will appear.
- Add a title to your Discount.
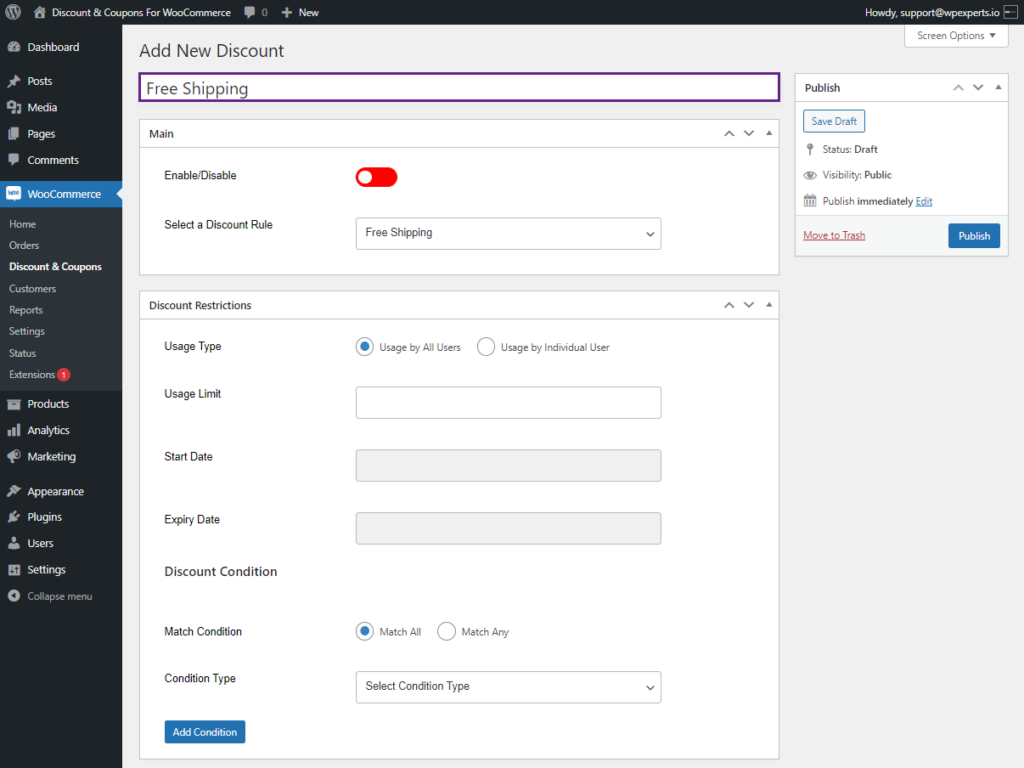
- There will be three tabs to configure your Discount.
- Main
- Discount Restrictions
- Coupon
PLEASE NOTE: The Coupon tab Settings can be configured by the same process defined in the On Product Discount Type. The setting of this tab can be configured as per needs.
Main Tab
- The admin can enable and select the discount rule in the Main tab.
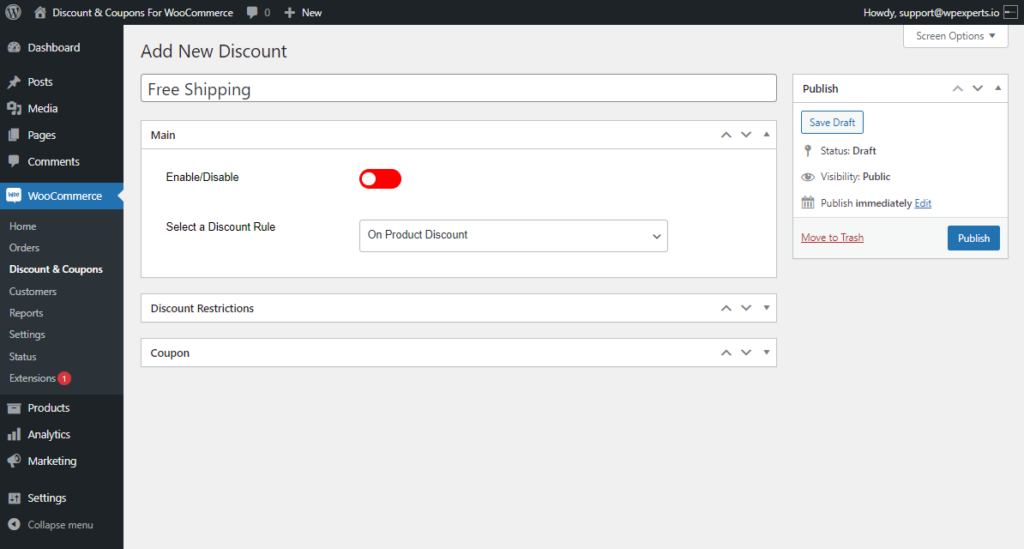
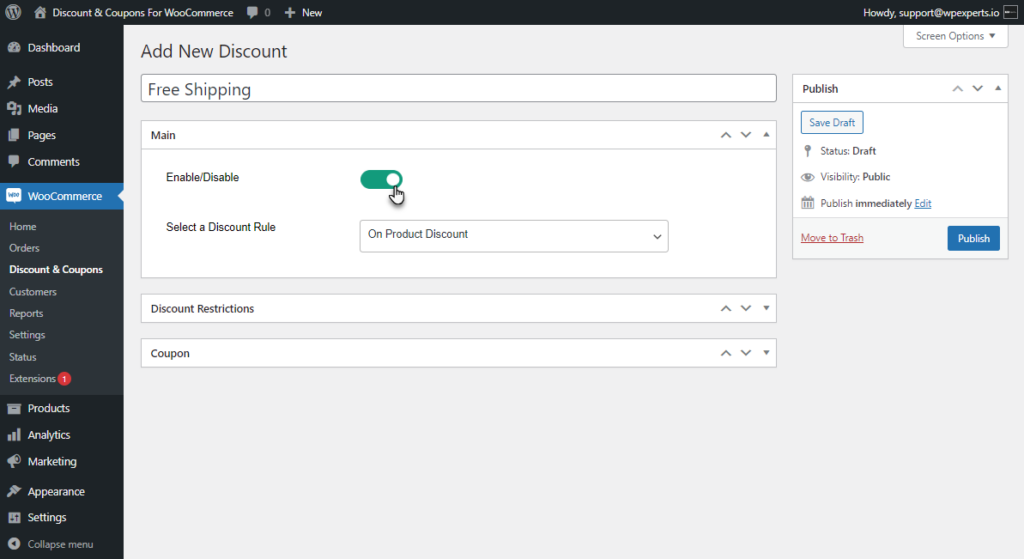
- Enable the discount by using the Enable/Disable toggle button.
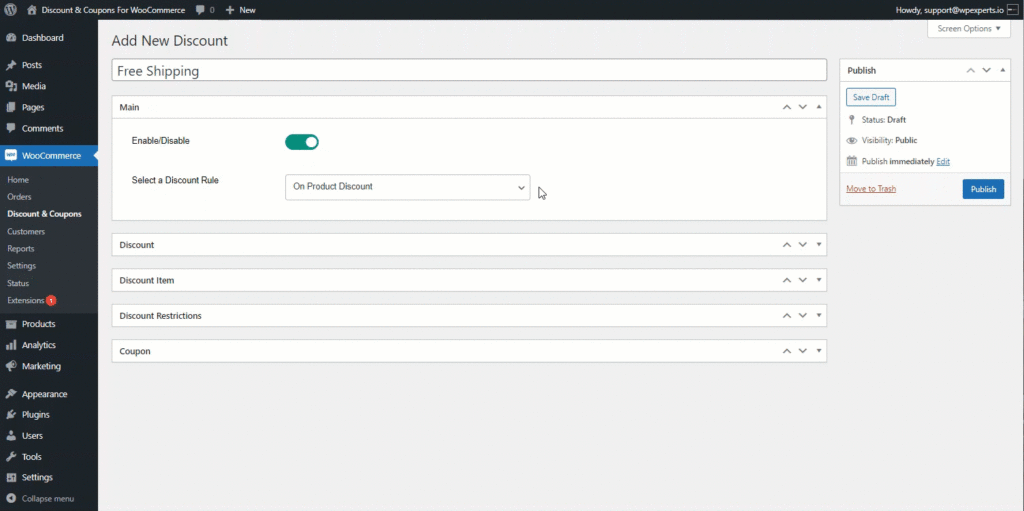
- Select the discount rule from the Select a Discount Rule drop-down list. By default, the On Product Discount rule will be selected.
Discount Restrictions Tab
↑ Back to top- Once done with the Main tab scroll down to the Discount Restrictions Tab. This tab allows the admin to restrict the Discount usage and set Discount Conditions as per requirements.
- The Discount Restrictions Tab is configured by the process explained in the On Product Discount.
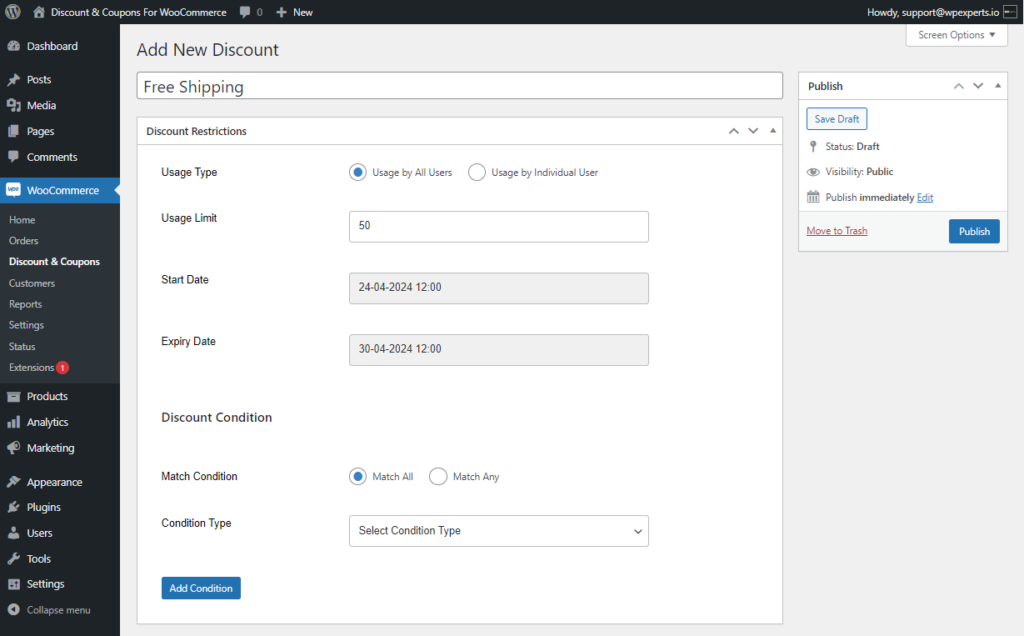
2. Move to the Condition Type in the Discount Conditions sub-tab.
Discount Conditions
- This option allows the admin to set a Discount Condition. The admin can use multiple Conditions as needed.
- If the admin sets multiple conditions, the Match Condition option allows the admin to choose between Match All or Match Any condition option.

- There are six discount conditions that are provided in the Condition Type drop-down list.
- Subtotal
- Cart Item Quantity
- Product Quantity
- Payment Methods
- User Roles
- Logged in Users
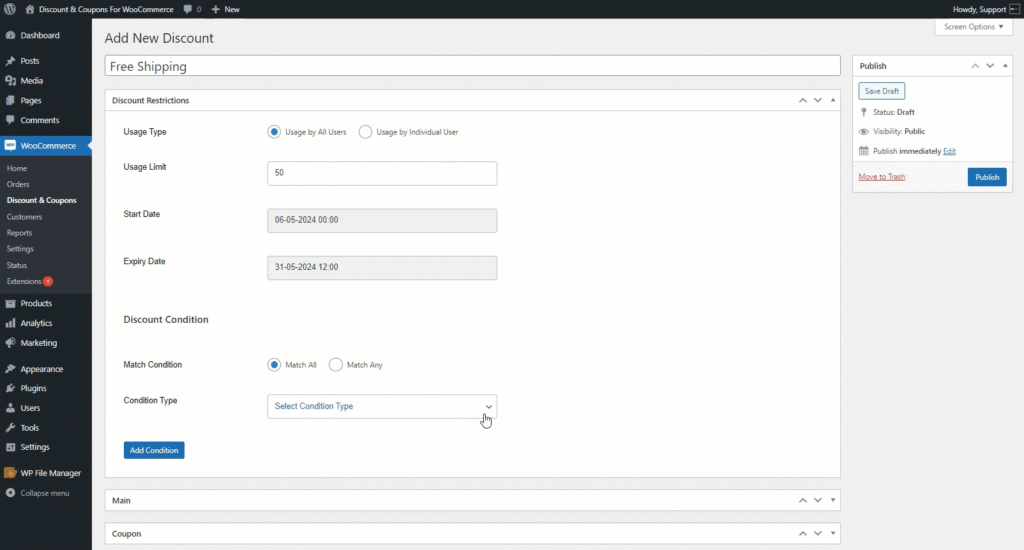
Subtotal
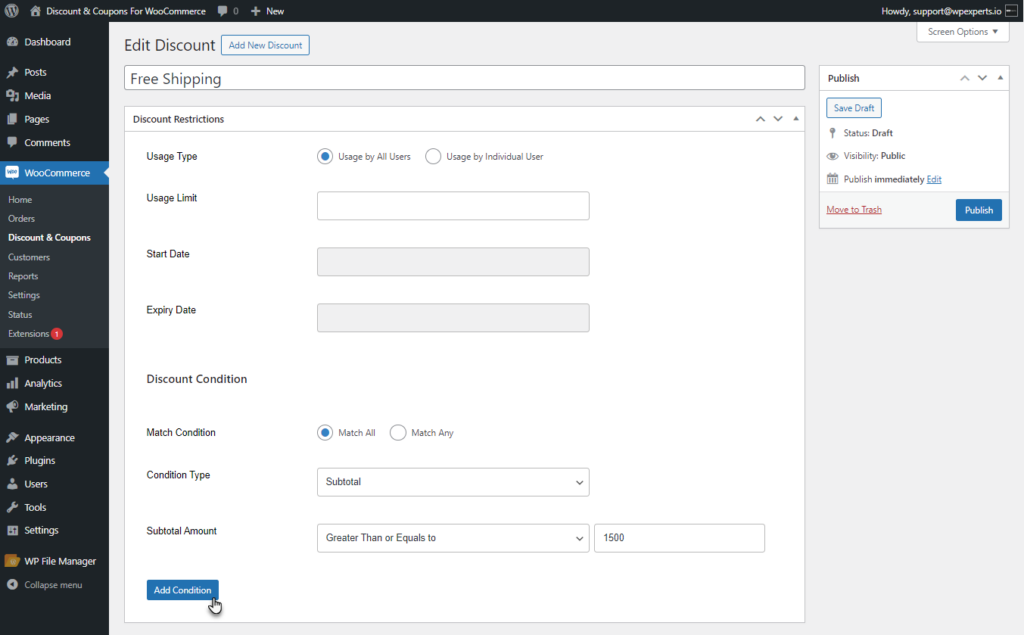
- Select Subtotal from the Condition Type drop-down list. When this condition is chosen, the Free Shipping will be effective on the Cart and Checkout page once the specified subtotal amount is reached on the Cart page and Checkout page.
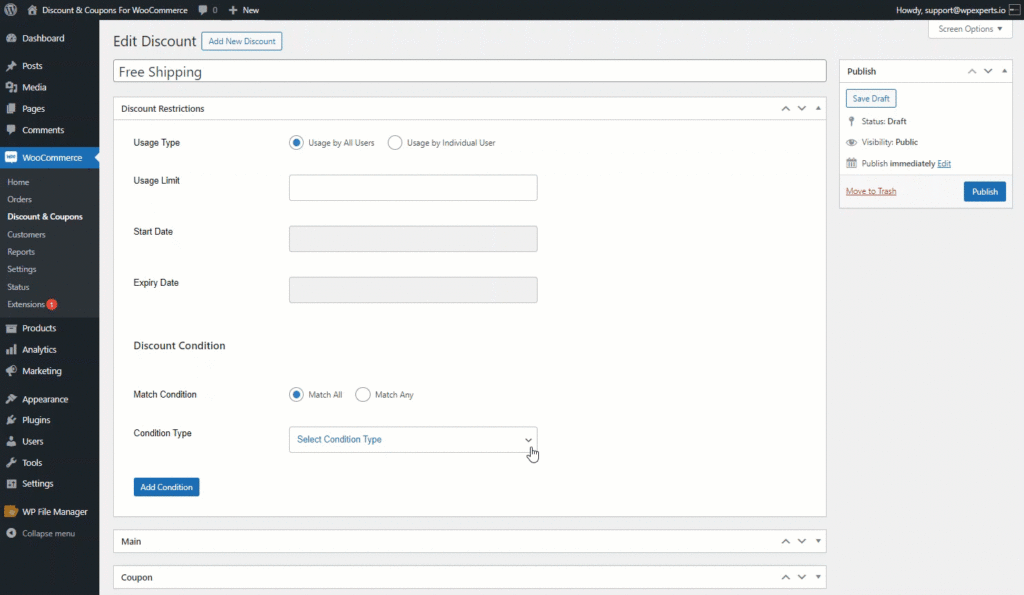
- Enabling this will provide the admin option to select conditions for the Subtotal Amount. Admin can set different conditions for Discount from the drop-down list.
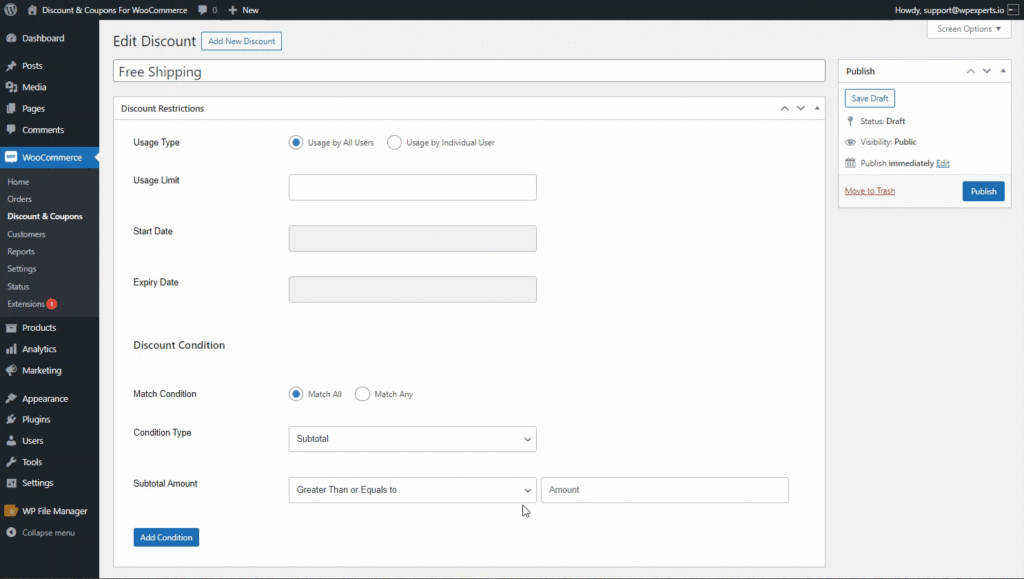
- Enter the amount in the Amount field with respect to the condition set in the Subtotal Amount option.
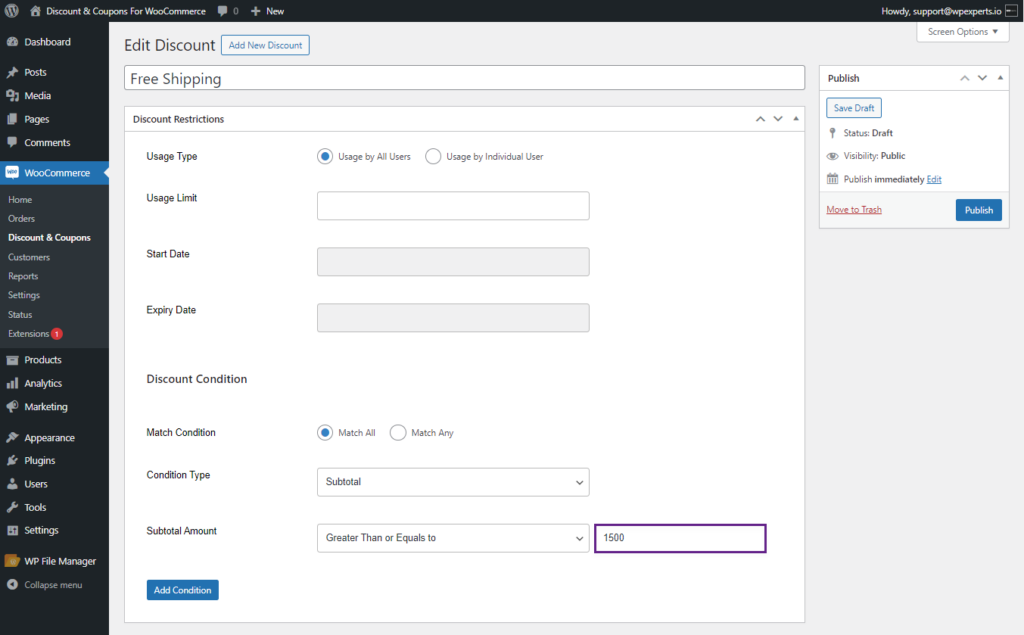
- The admin can add multiple conditions using the Add Condition button.
Front End Impact
- Go to the Shop page.
- Add the Discounted item to the cart.

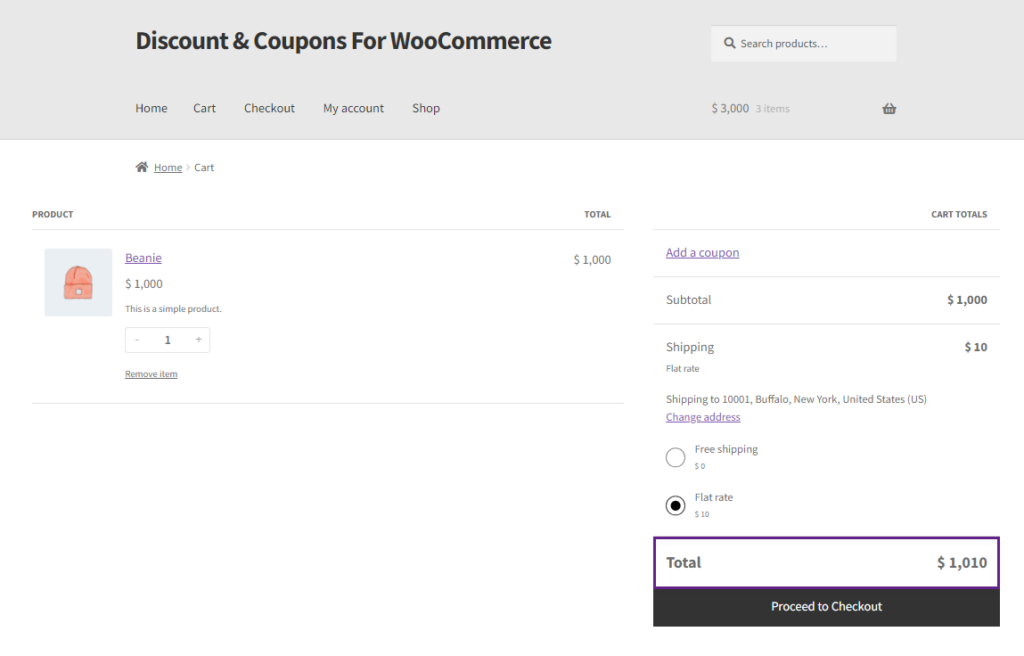
- Go to the Cart page. No Free Shipping discount rule is applied since the Cart item quantity is less than the set quantity.
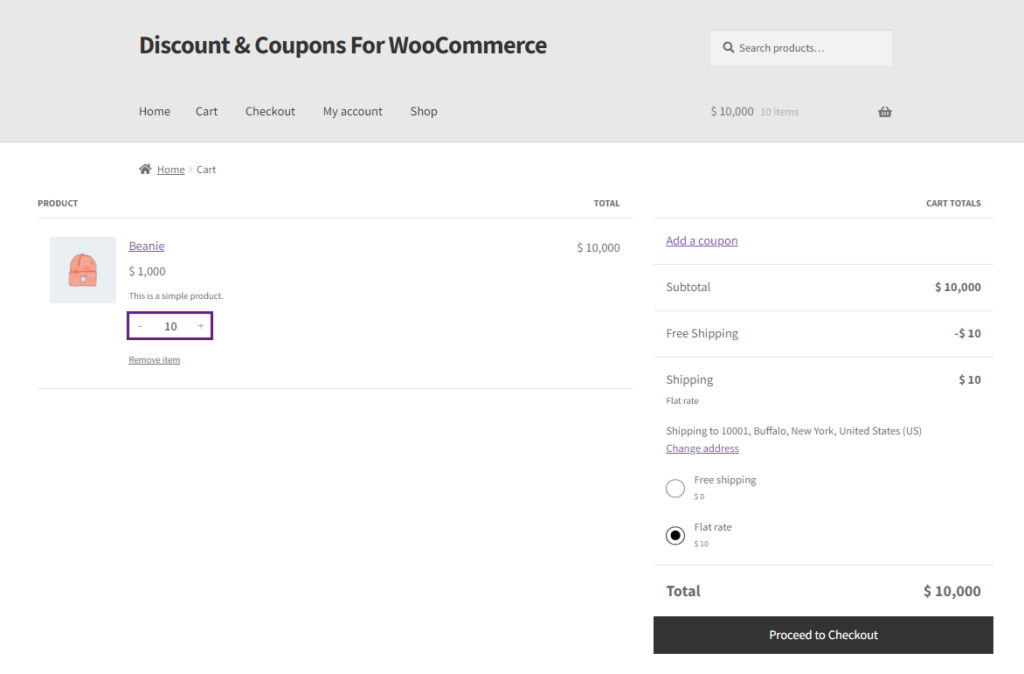
- Match the Condition of the discount in the cart.
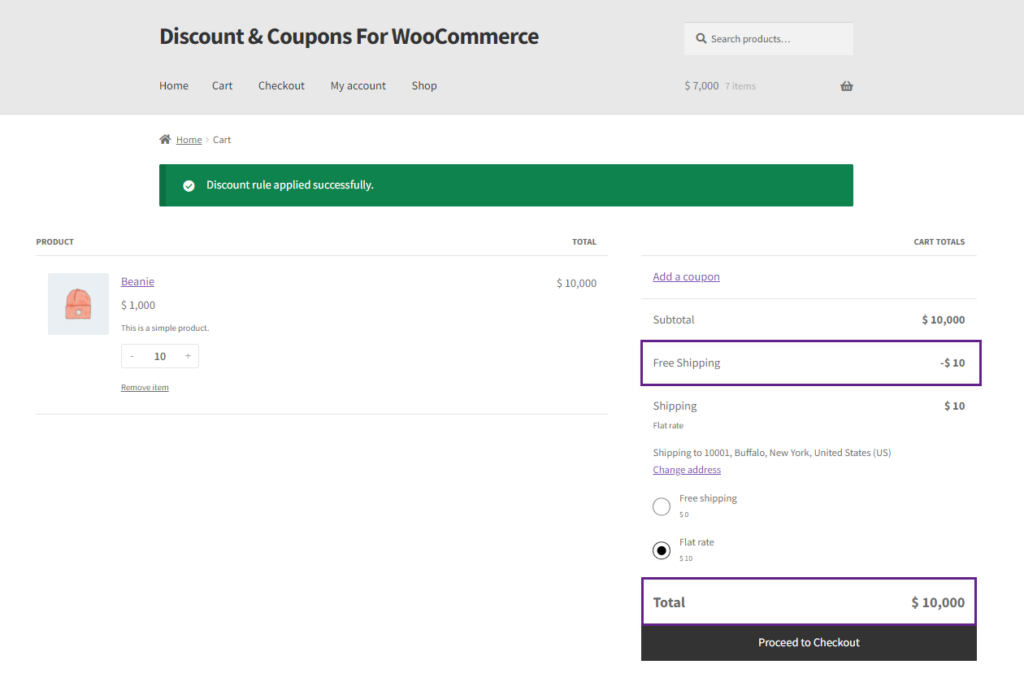
- The Discount Rule Applied message will be displayed in the cart and the Free Shipping Discount will be displayed.
Cart Item Quantity
- Select Cart item Quantity from the Condition Type drop-down list. When this condition is chosen, the total number of items in the cart will be checked to meet the condition before the Free Shipping discount is applied.
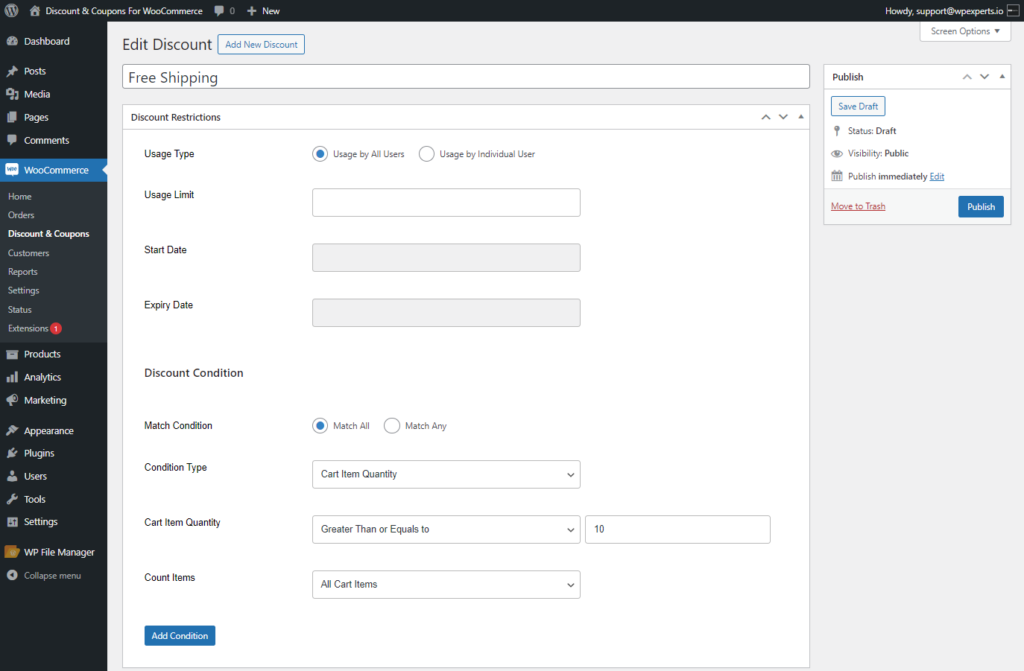
PLEASE NOTE: The Cart Item Quantity and Count Items options are briefly explained in the On Product Discount type.
Front End Impact
- Go to the Shop page.
- Add the Discounted item to the cart.

- Go to the Cart page.

- Match the Condition of the discount in the cart.
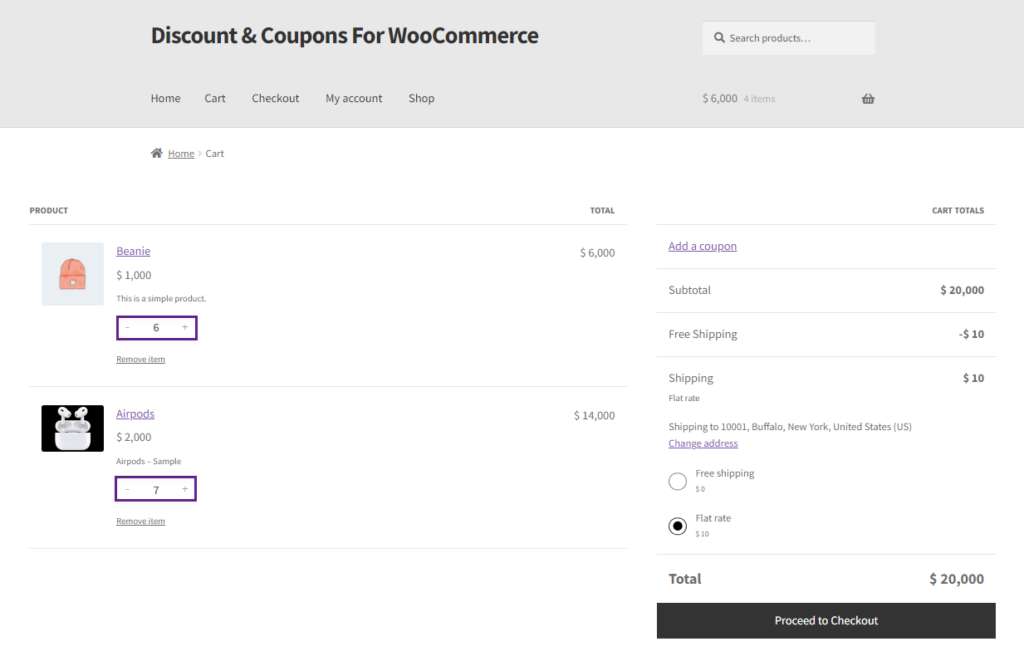
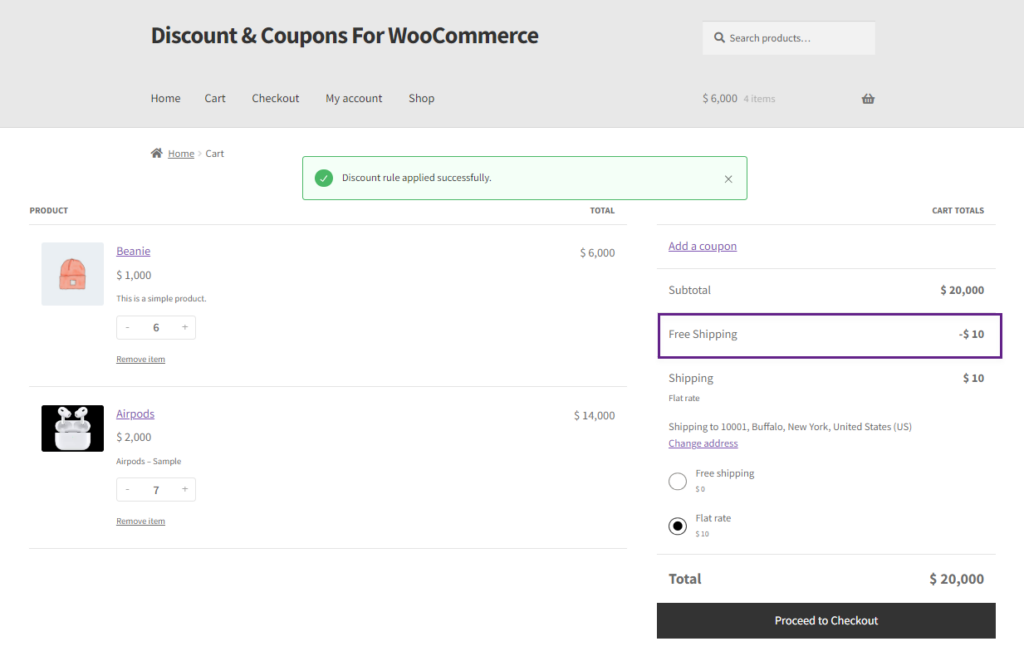
- The Discount Rule Applied message will be displayed on the cart and the Free Shipping Discount will be displayed.
Product Quantity
- Select Product Quantity from the Condition Type drop-down list. When this condition is chosen, the quantity of a specific product will be checked to meet the condition before a Free Shipping discount is applied.

PLEASE NOTE: The Product Quantity option is briefly explained in the On Product Discount type.
Front End Impact
- Go to the Shop page.
- Add the Discounted item to the cart.

- Go to the Cart page.
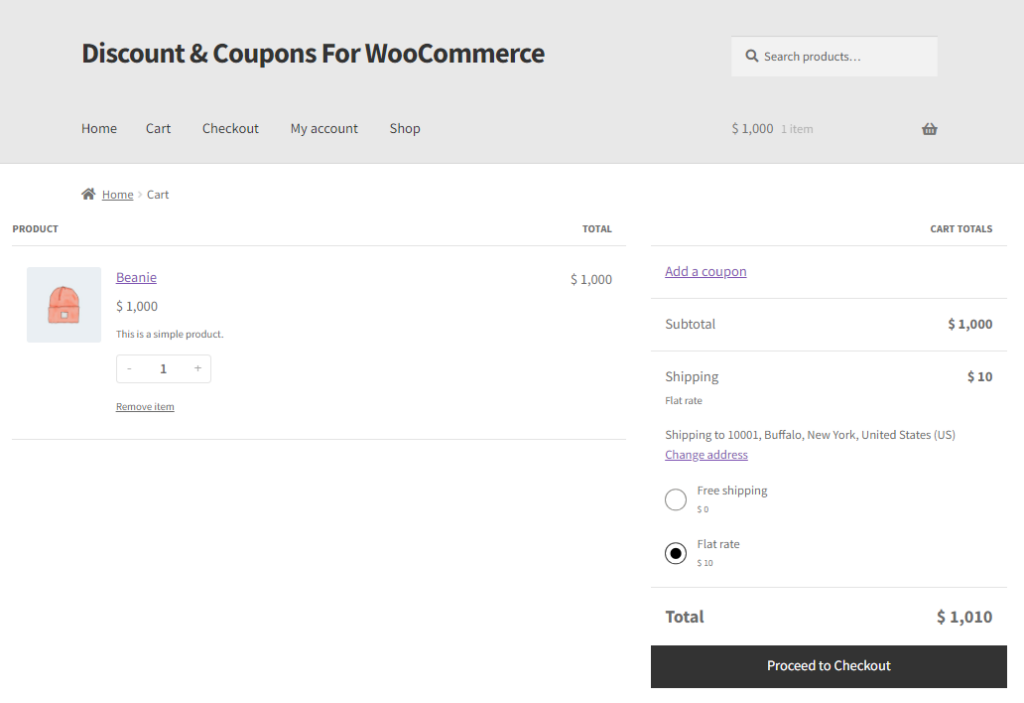
- Match the Condition of the discount in the cart.
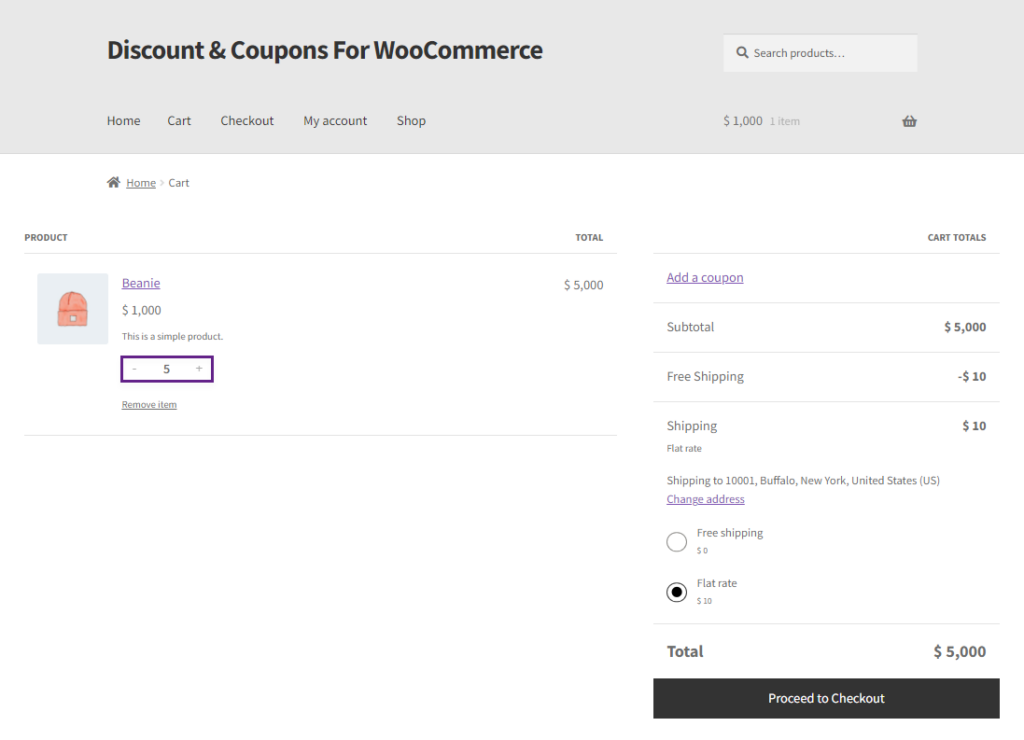
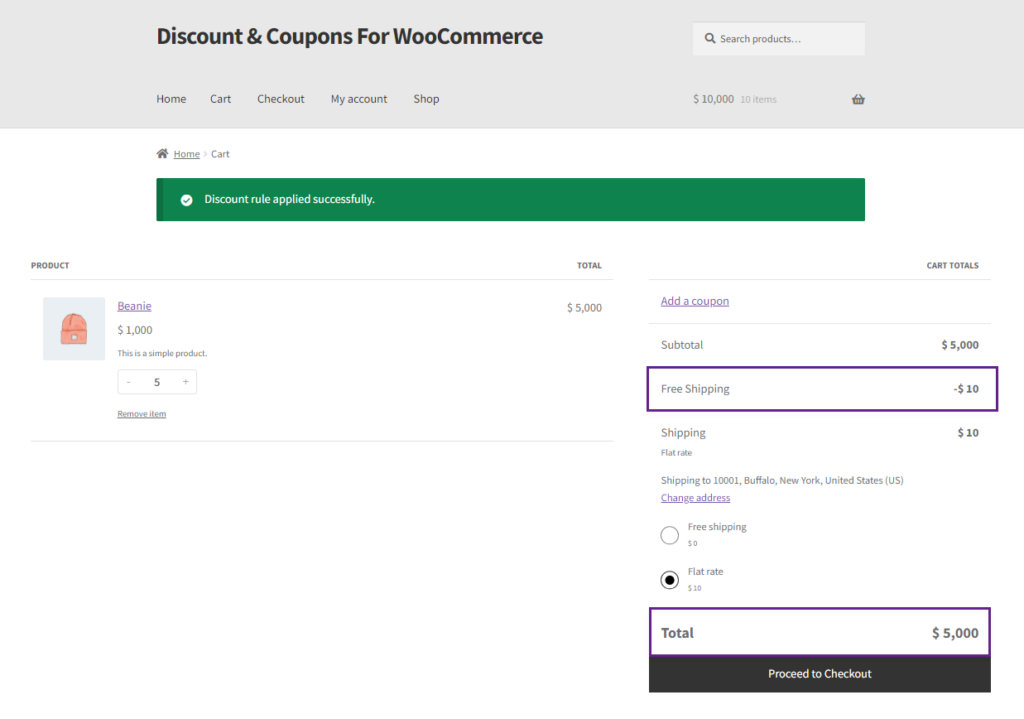
- The Discount Rule Applied message will be displayed in the cart and the discounted price will be displayed.
Payment Methods
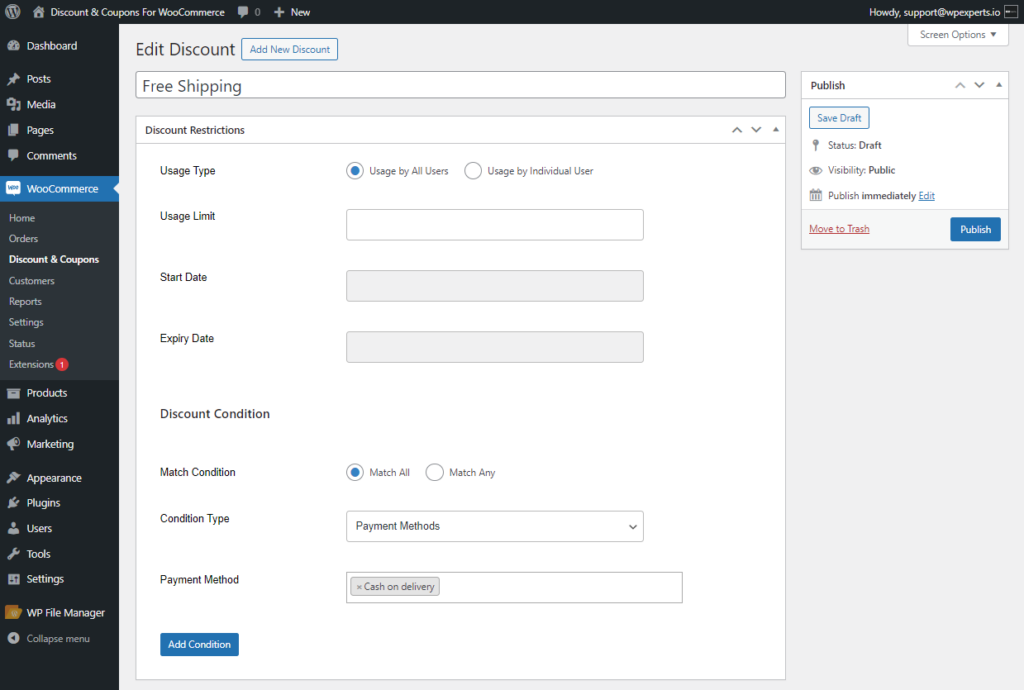
- Select Payment Methods from the Condition Type drop-down list. When this condition is chosen, the Free Shipping discount will be applied to the specified payment methods.
- Select the Payment methods for which the Free Shipping discount will be applicable in the Payment Method field.
Front End Impact
- Go to the Shop page.
- Add the Discounted item to the cart.

- Match the Condition on the checkout page by selecting the Payment method set by the admin.
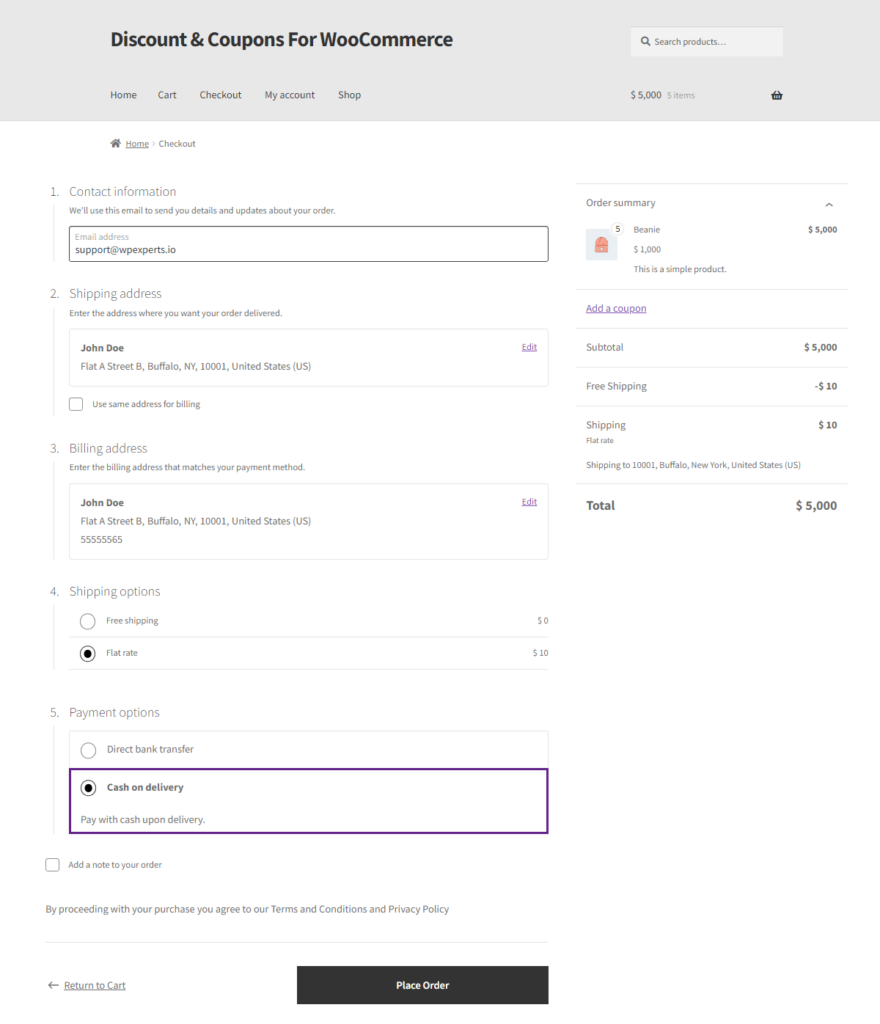
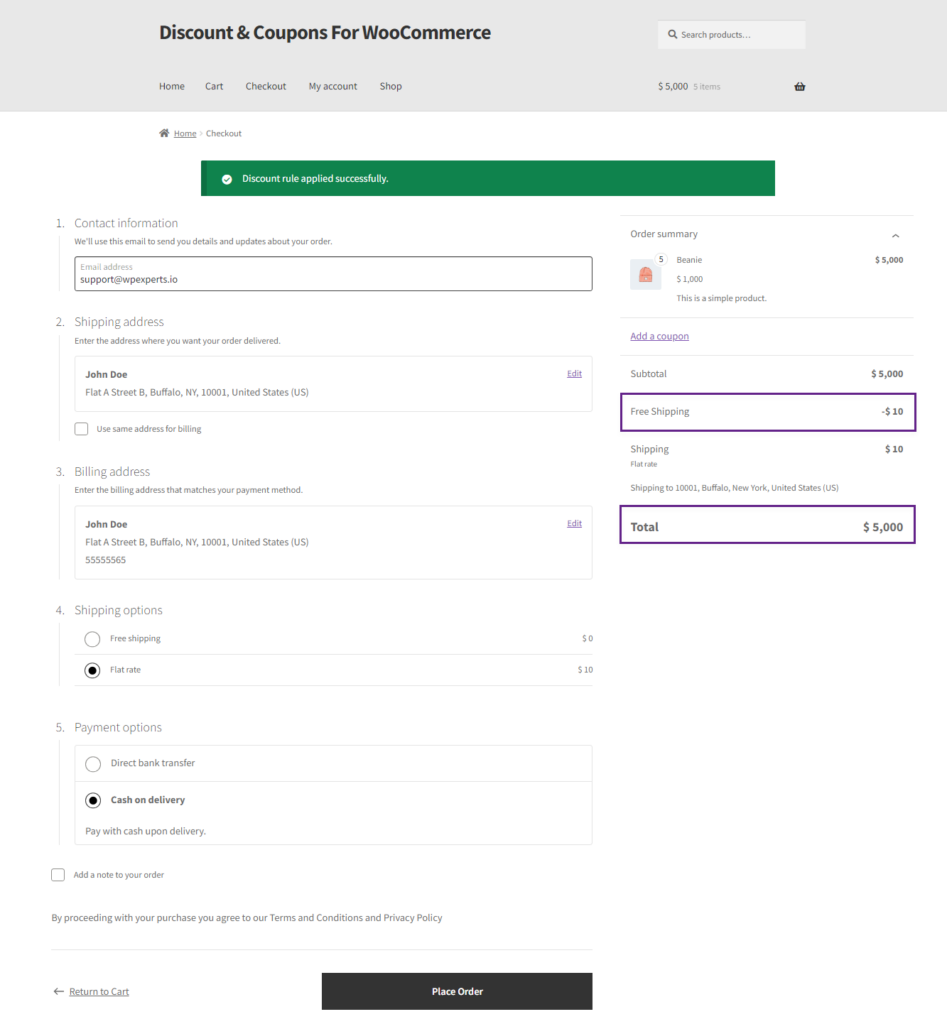
- Discount Rule Applied message will be displayed on the checkout page and the free shipping will be applied.
User Roles
- Select User Roles from the Condition Type drop-down list. When this condition is chosen, only users with specific user roles will be eligible to receive the Free Shipping discount.
- Add the User Roles in the User Role field.
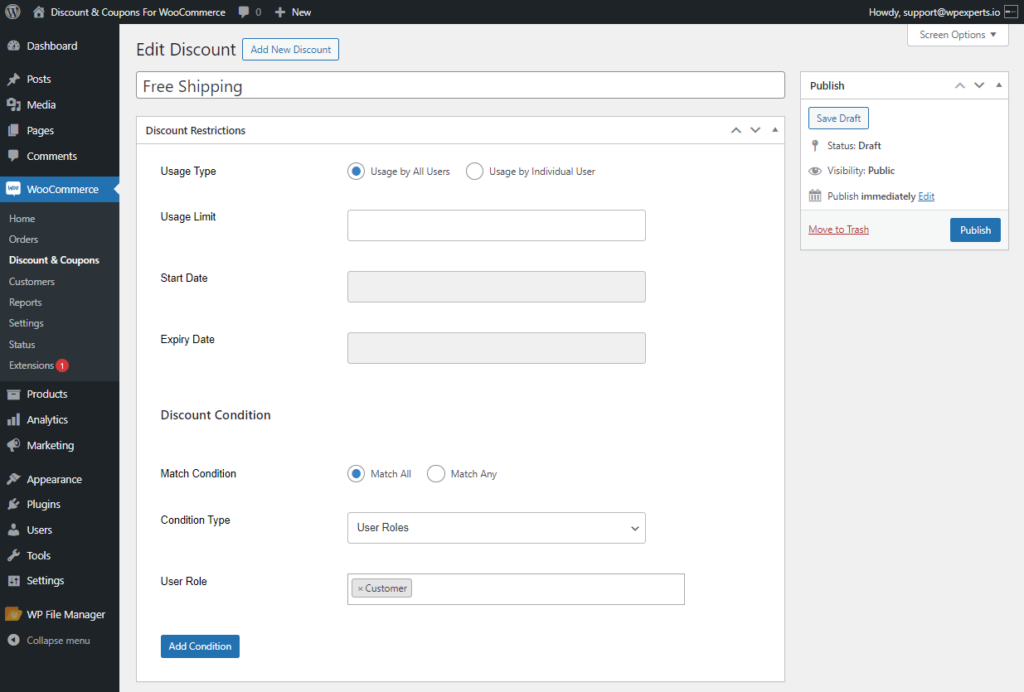
PLEASE NOTE: The chosen role will be able to avail the discount.
Logged in Users
- Select Logged in Users from the Condition Type drop-down list. When this condition is selected, the admin has the option to limit the Free Shipping discount to users who are logged in, not logged in, or both.
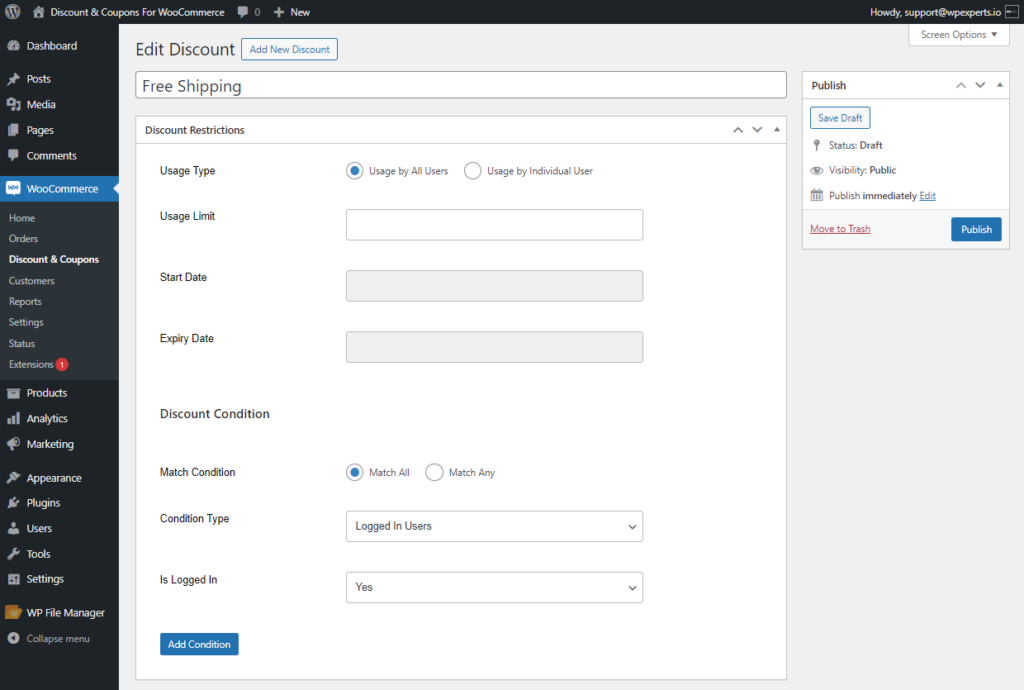
- Select the logged-in status of the user from the Is Logged in drop-down.
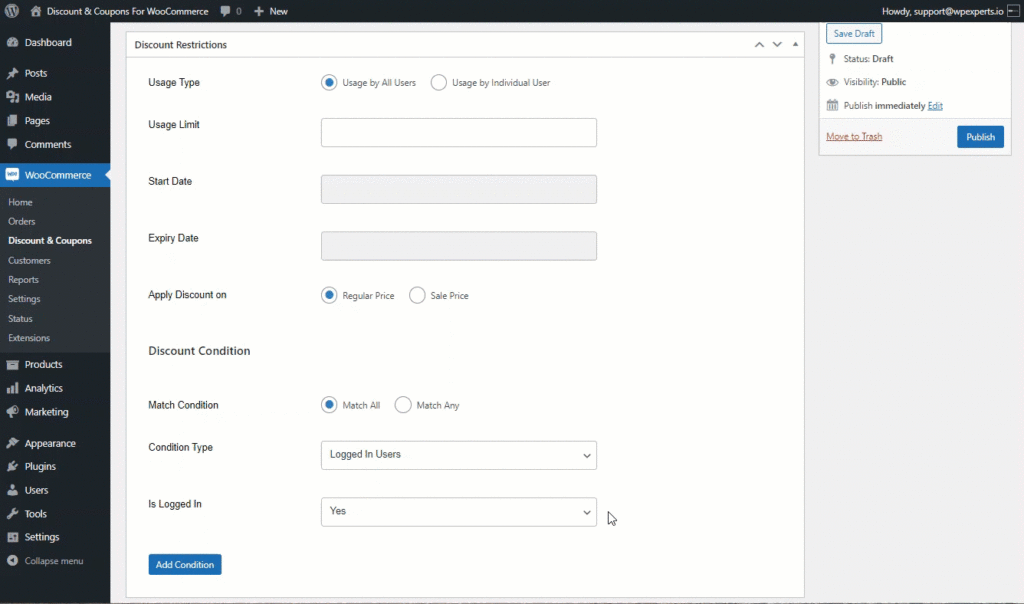
- Now, only logged in users will be able to avail the discount.
- In case of No logged in user, then only Guest users will be able to avail the discount.
- In case of Both, the discount can be availed by both logged in and logged out users.
Coupon Tab
- Once done with the Discount Restrictions, move to the Coupon Tab which enables the admin to use this discount as a coupon.
- Enable the coupon by checking the Make this discount type a Coupon check button.
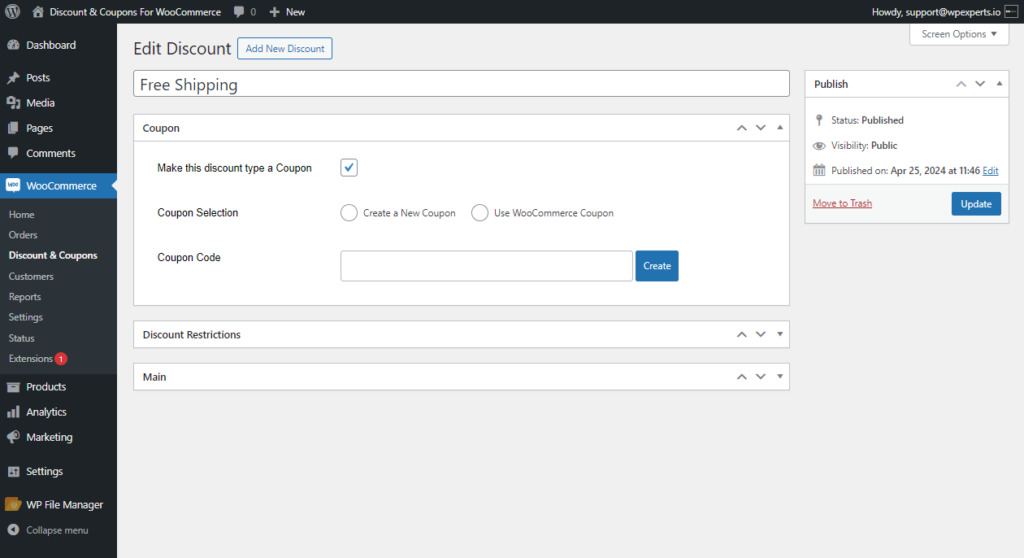
- Enabling the coupon will provide the admin with two options
- Create New Coupon
- Use WooCommerce Coupon
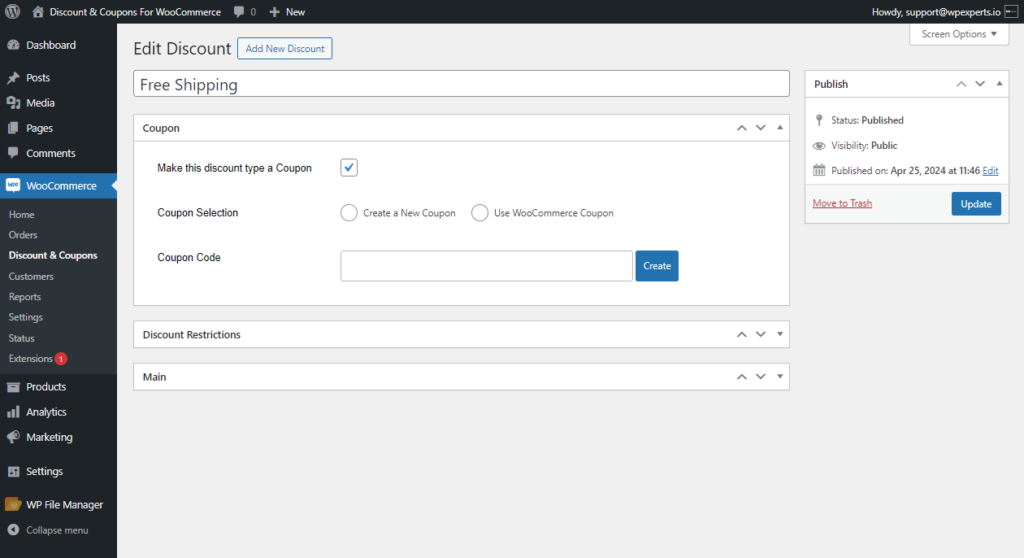
PLEASE NOTE: The Create New Coupon and WooCommerce Coupon options are briefly explained in the On Product Discount type.
Create New Coupon
- Select the Create a New Coupon radio button in the coupon Selection option. This will create a new coupon for the discount.
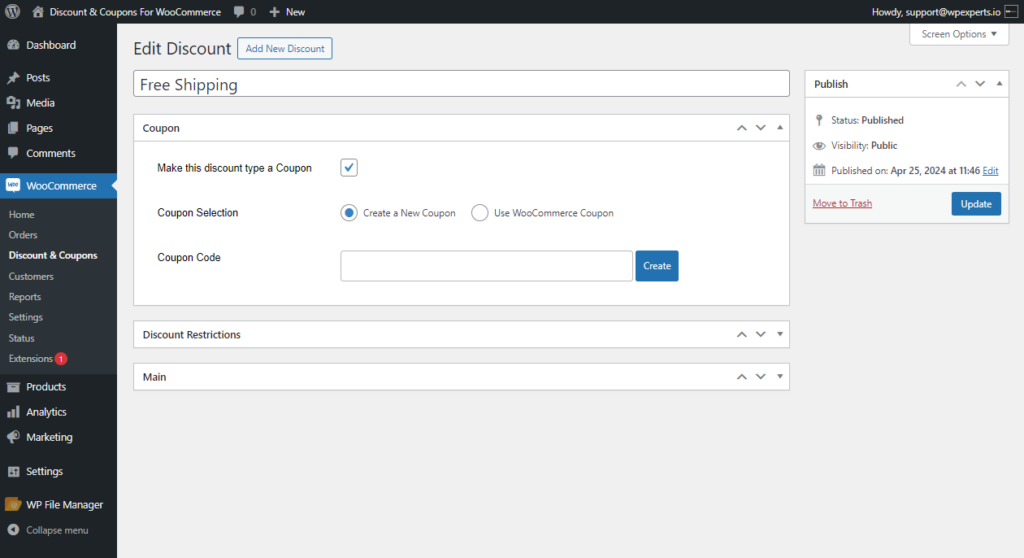
- Create a Coupon Code for this discount as described in On Product Discount.
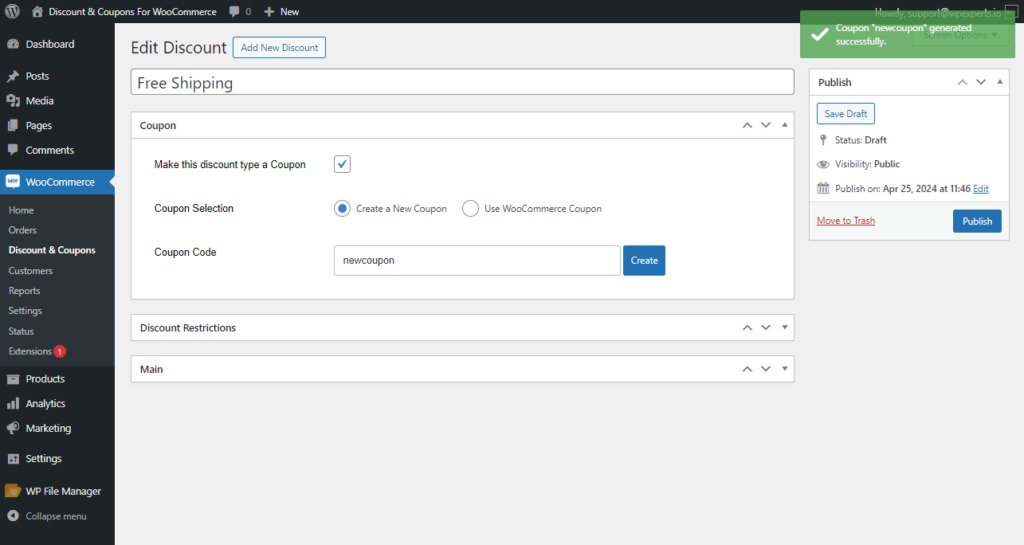
Front End Impact
- Go to the Shop page.
- Add the Discounted item to the cart.
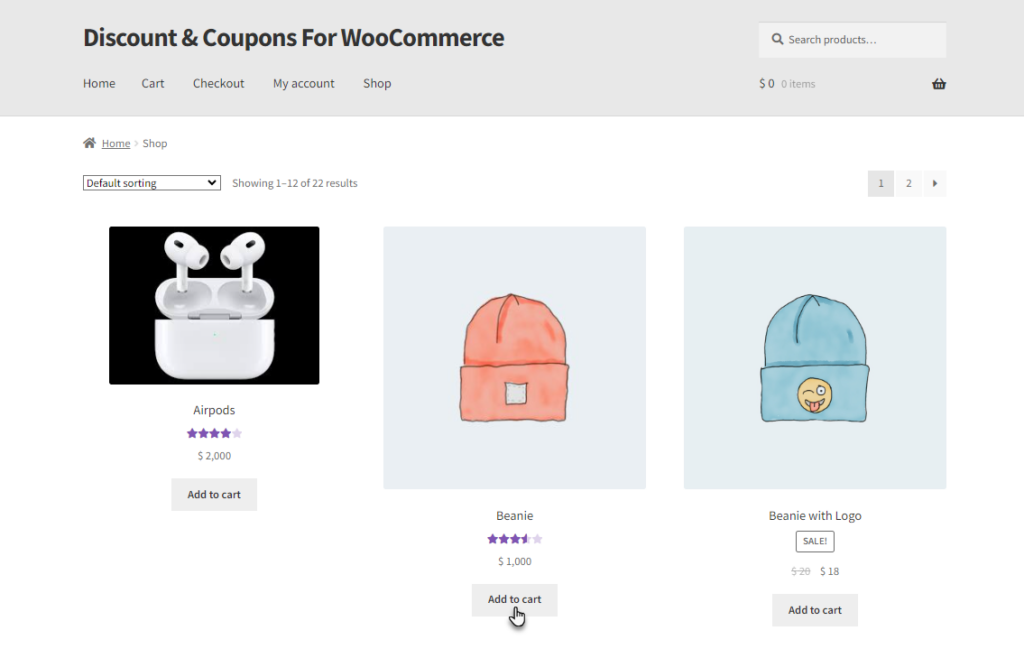
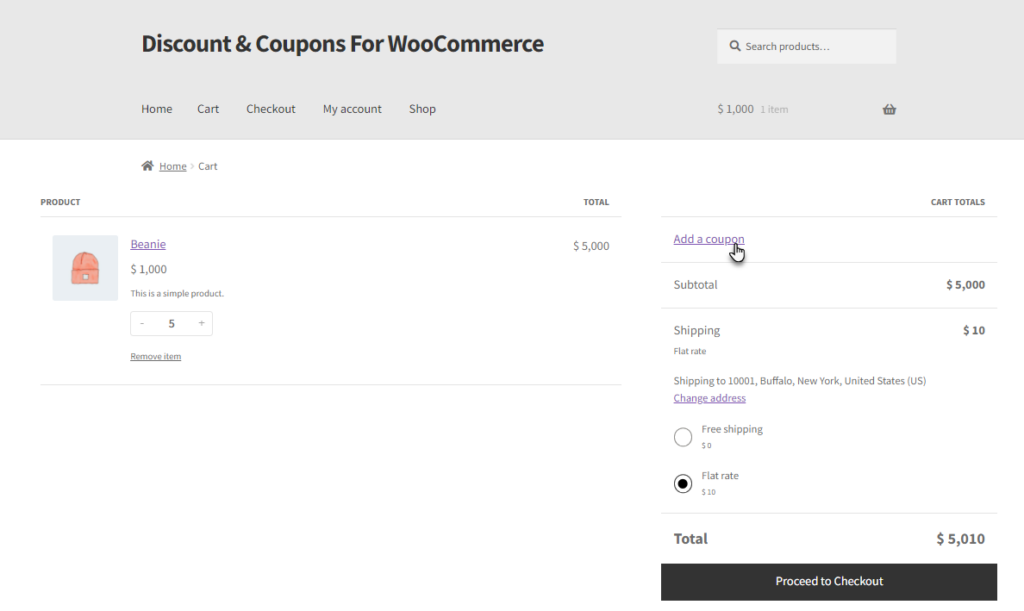
- Navigate to the Cart page. There will be an Add a coupon option on the cart page. Click on the Add a coupon option.
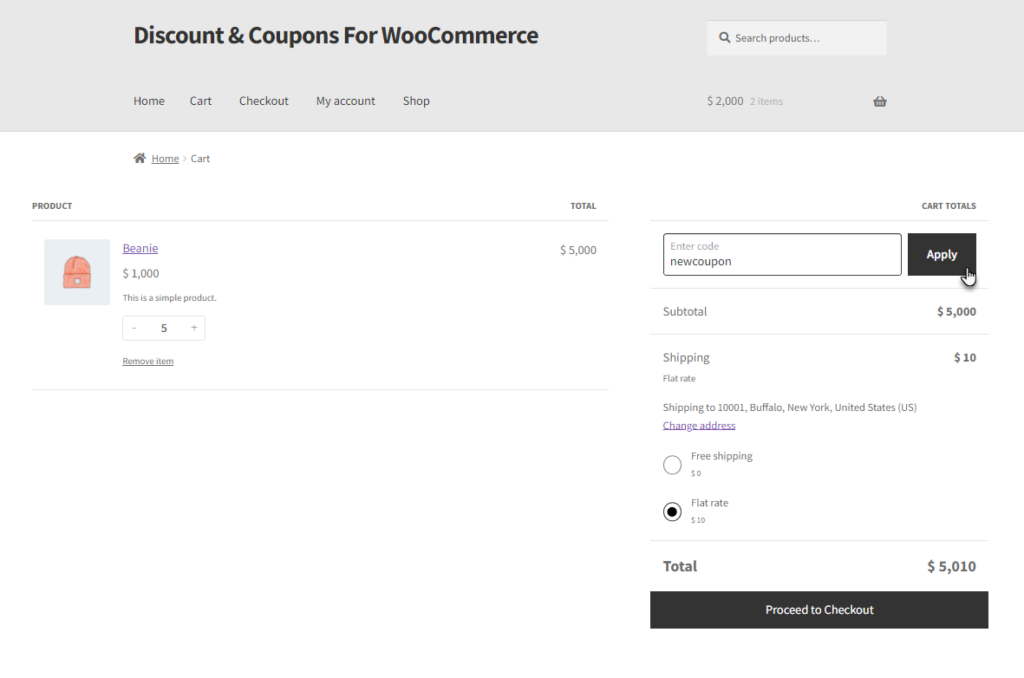
- Enter the coupon code in the Enter Code field and click on Apply.
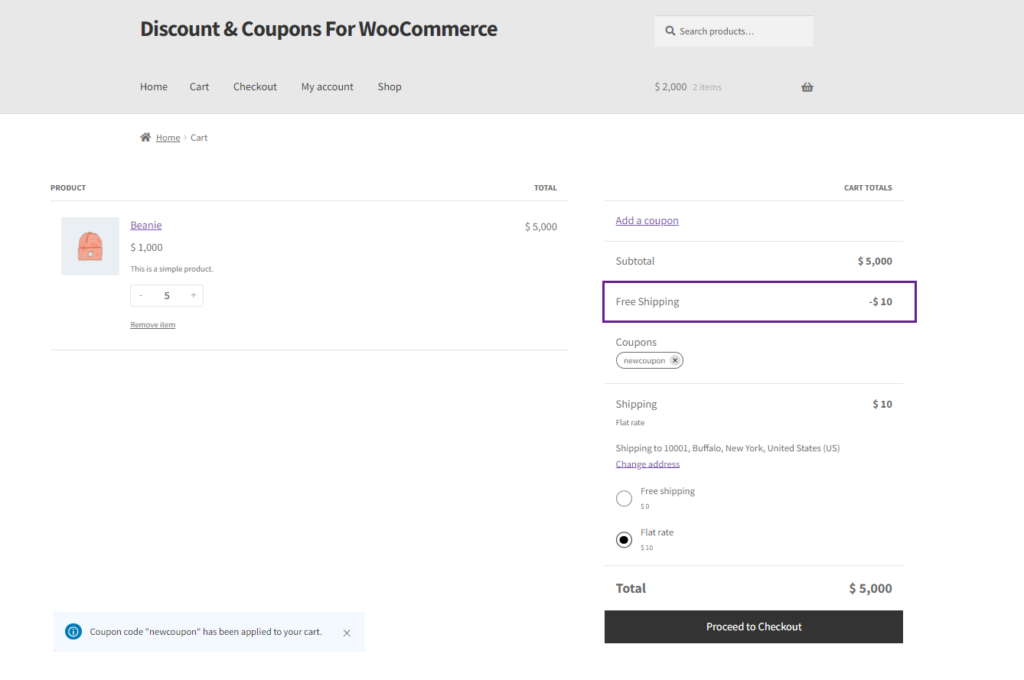
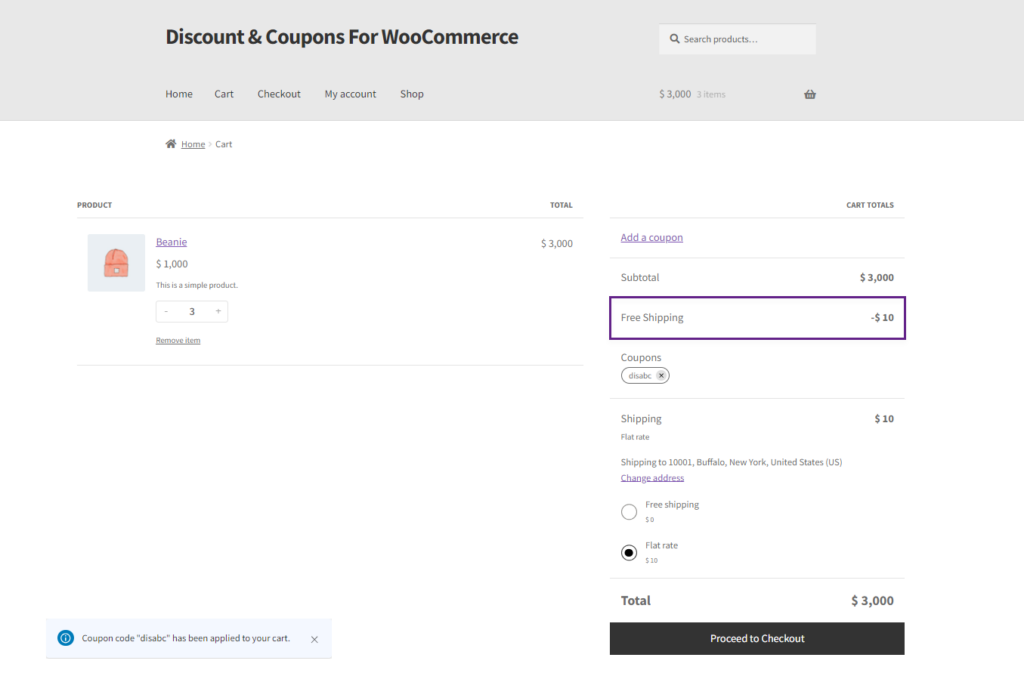
- A Free Shipping coupon discount will be applied to your product. The Shipping price will be eliminated and a message will appear on the screen.
Use WooCommerce Coupon
- Select the Use WooCommerce Coupon radio button in the coupon Selection option. This will allow admin to use the WooCommerce Coupons.
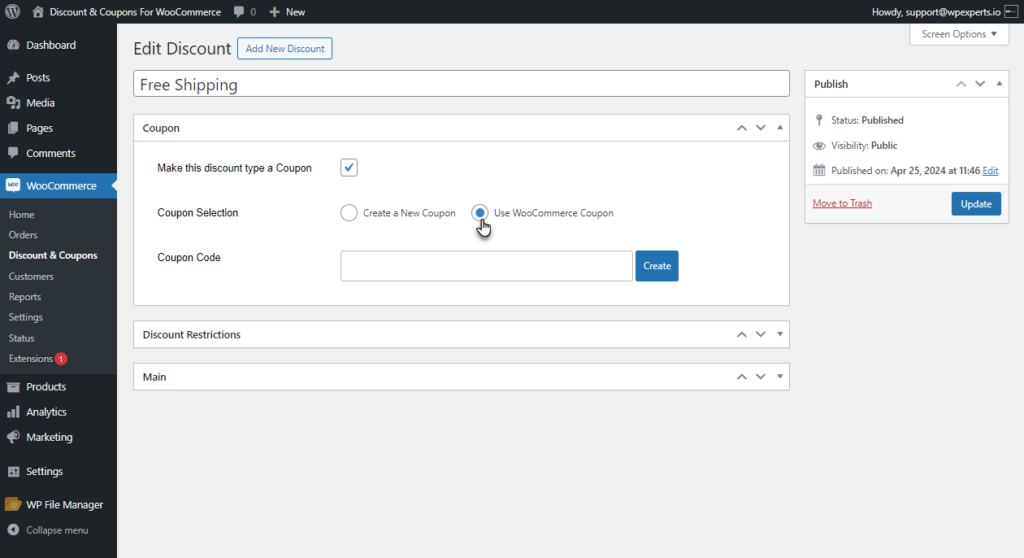
- Choose the WooCommerce Coupons through the Select Coupon field. This option will provide the list of WooCommerce Coupons available. Choose the coupon from the list.
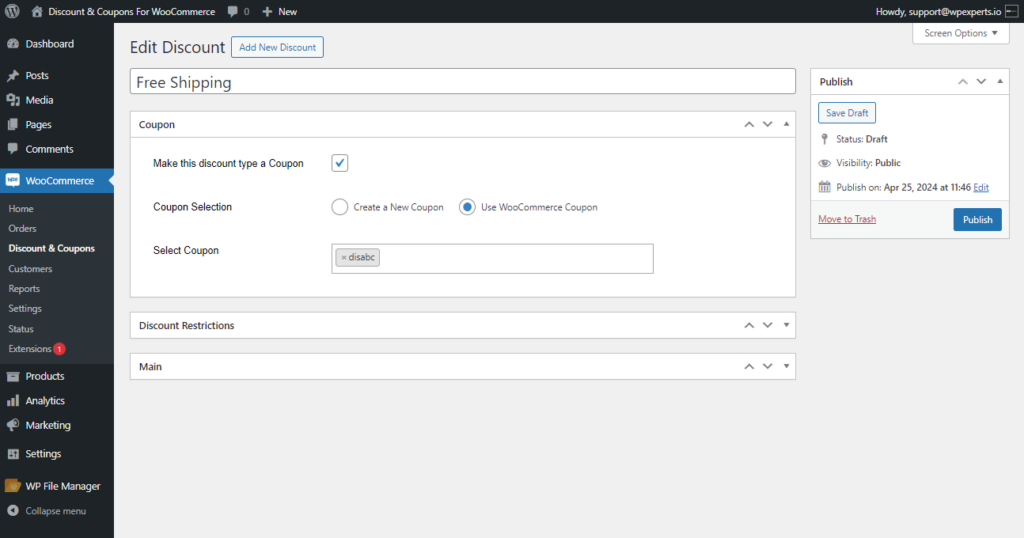
Front End Impact
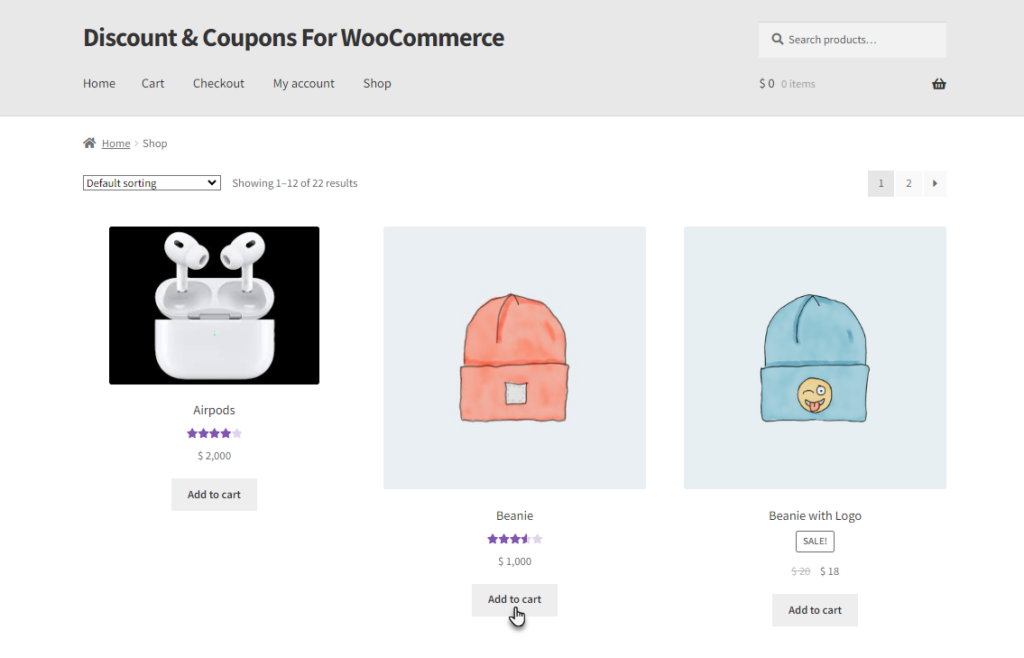
- Go to the Shop page.
- Add the Discounted item to the cart.
- Navigate to the Cart page. There will be an Add a coupon option on the cart page. Click on the Add a coupon option.
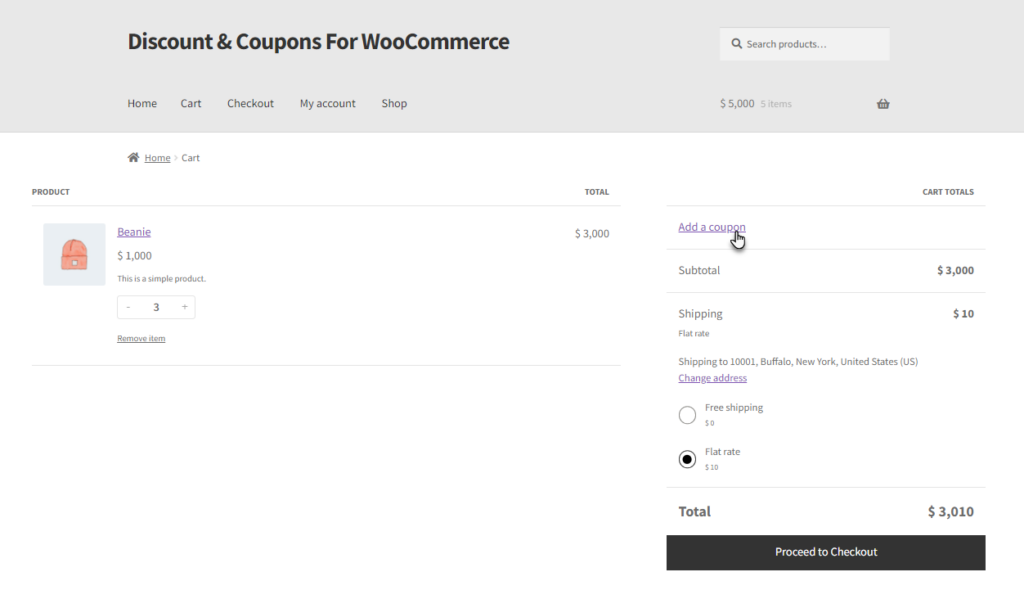
- Enter the coupon code in the Enter Code field and click on apply.
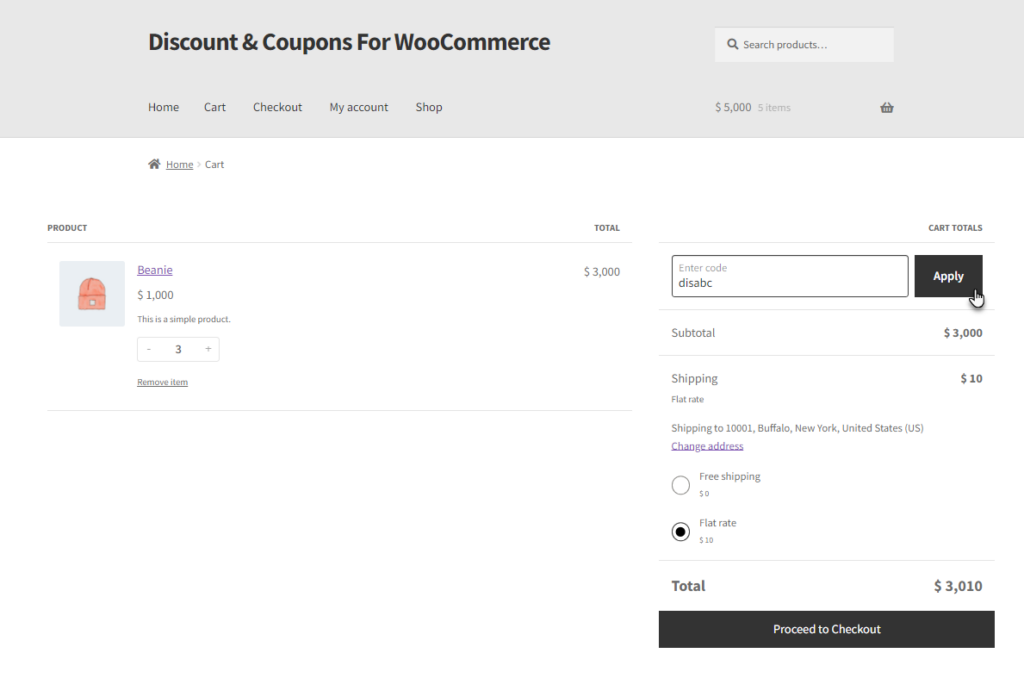
- A Coupon discount will be applied to your product. The price will be updated and a message will appear at the screen.
Bulk Product Discount
- In the Bulk Product Discount, This Discount is applied on a tiered product, wherein various product ranges are designated, each with its corresponding discount value. This discount will be automatically applied upon selecting a specific quantity range of the product.
- Go to WordPress Admin Dashboard > Discounts & Coupons > Add New Discount.
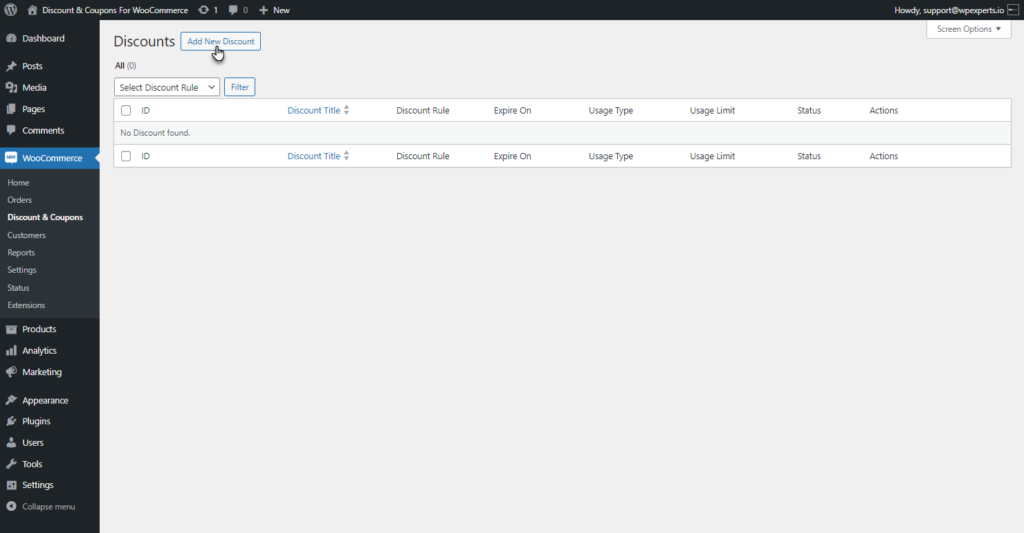
- Add New Discount screen will appear.
- Add a title to your Discount.
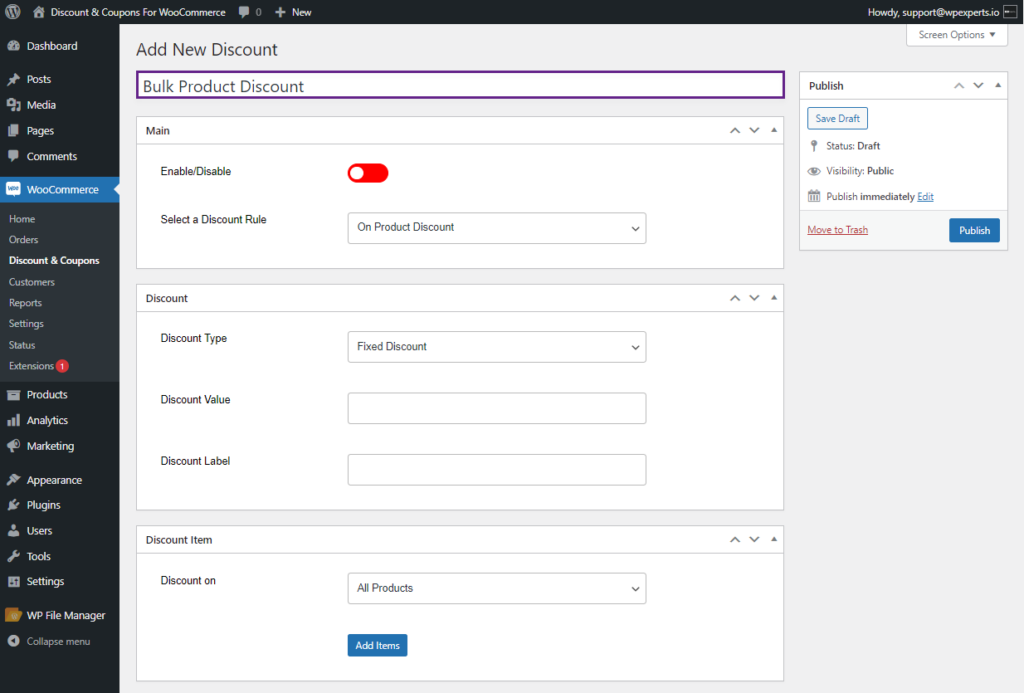
- There will be five tabs to configure your Discount.
- Main
- Discount Item
- Discount
- Discount Restrictions
- Coupon
PLEASE NOTE: The Discount and Coupon tab Settings can be configured by the same process elaborated in the On Product Discount Type. The setting of these tabs can be configured as per needs.
Main Tab
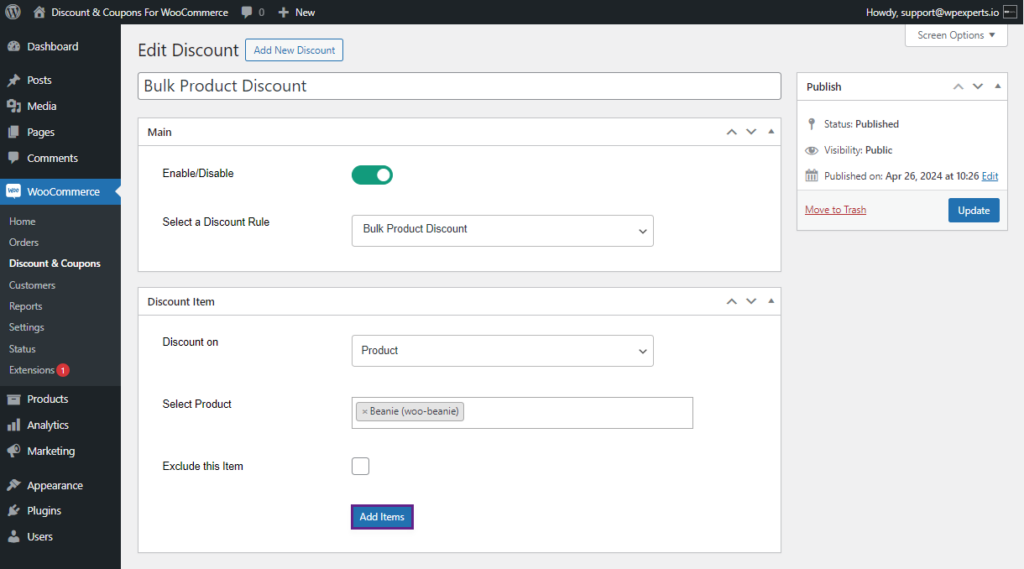
- The admin can enable and select the discount rule in the Main tab.
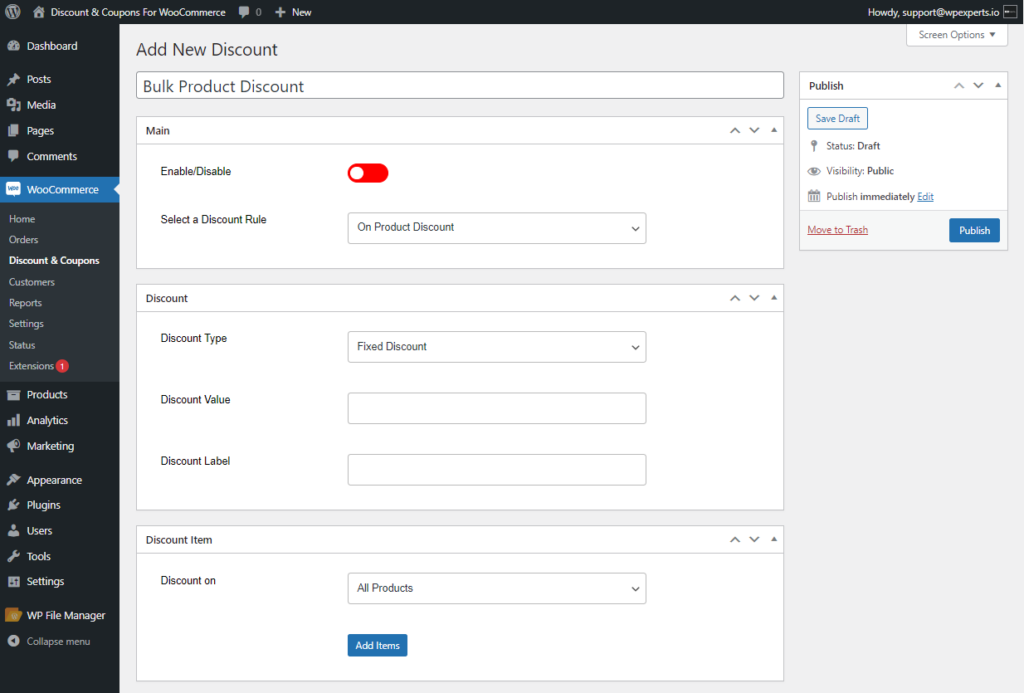
- Enable the discount by using the Enable/Disable toggle button.
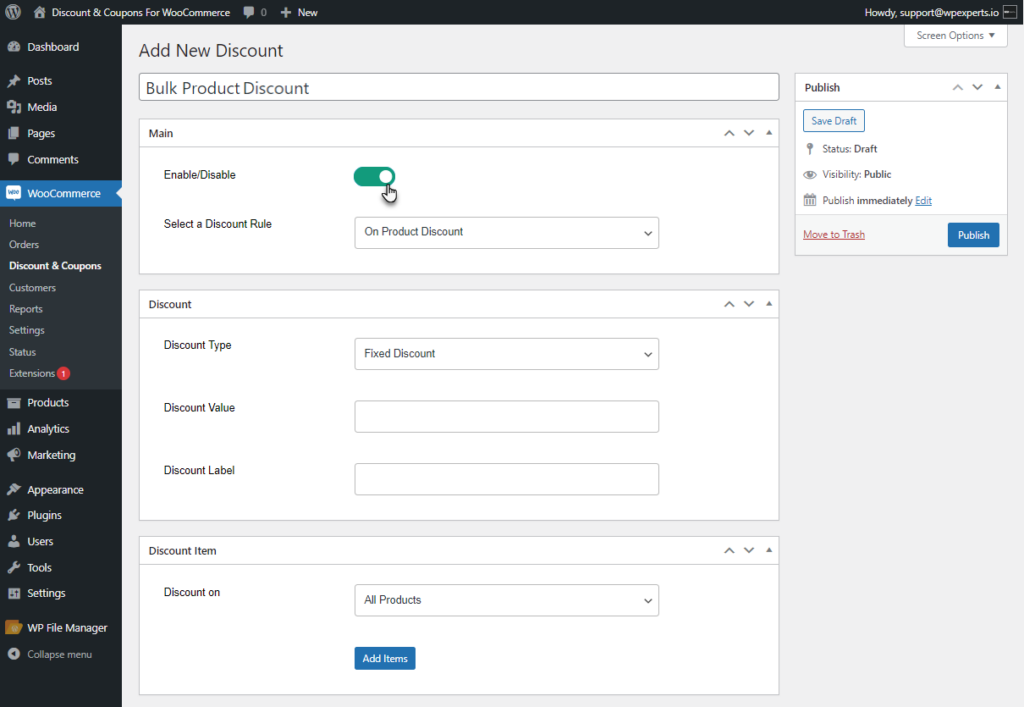
- Select the Bulk Product Discount rule from the Select a Discount Rule from the drop-down list. By default, the On Product Discount rule will be selected.
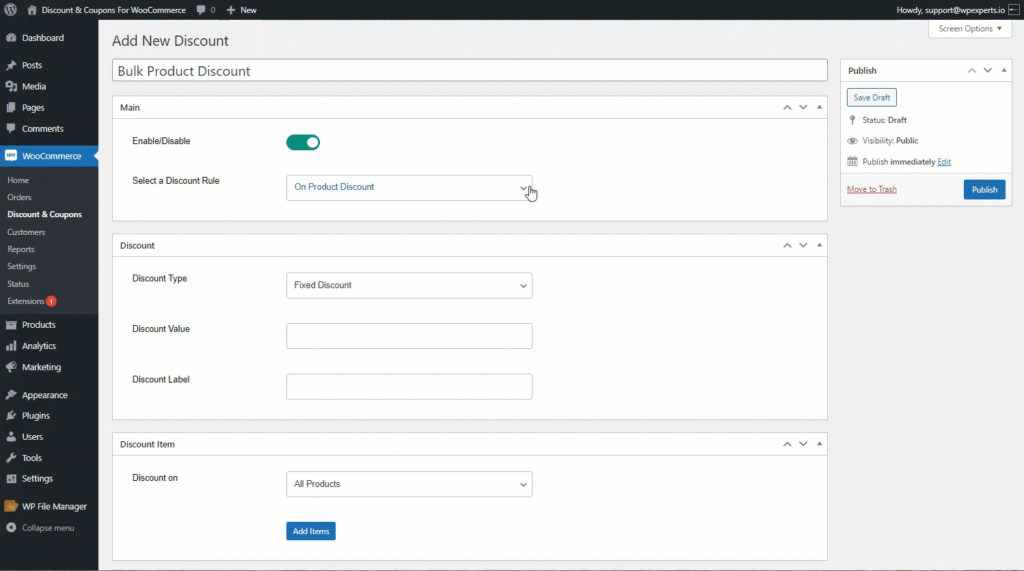
Discount Item Tab
- The Discount Item tab is configured by the process explained in the On Product Discount type. A single product or category can be selected in the Discount on.
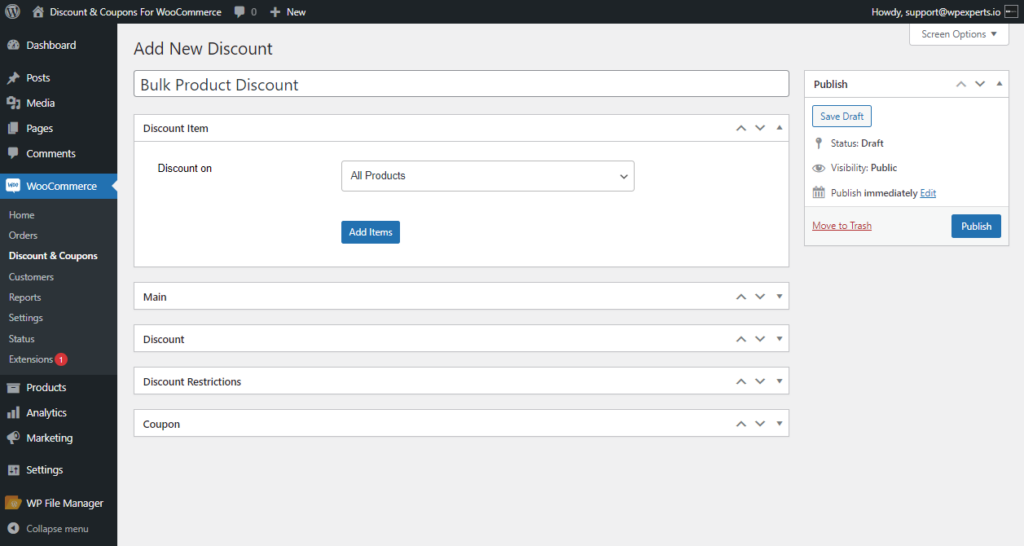
- Admin can add multiple Items using the Add Items Button.
Discount Tab
- In this tab, users can select the discount type, specify its value, and assign a label to the discount.
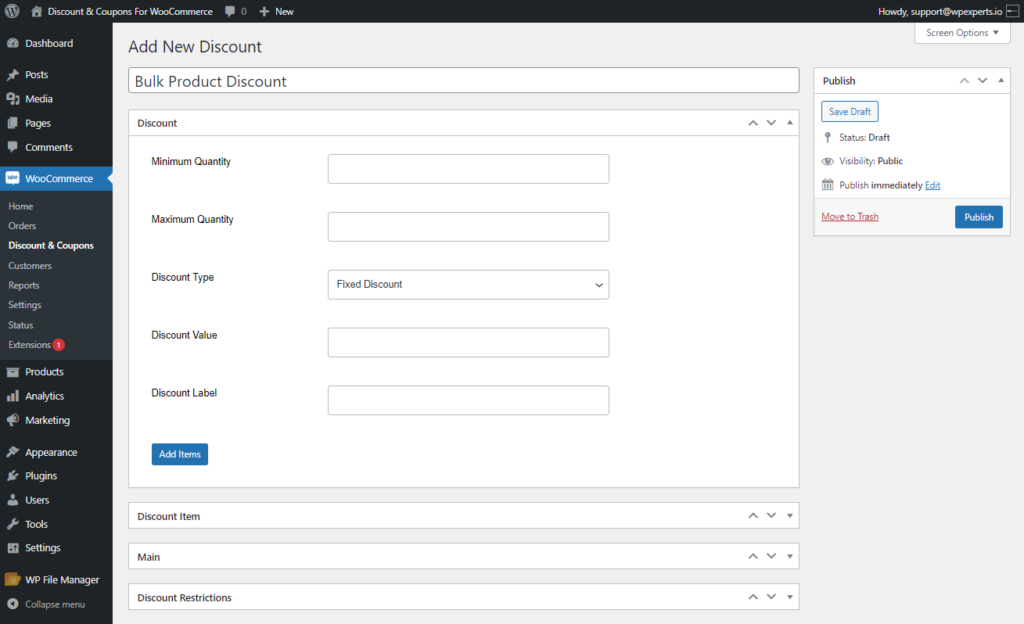
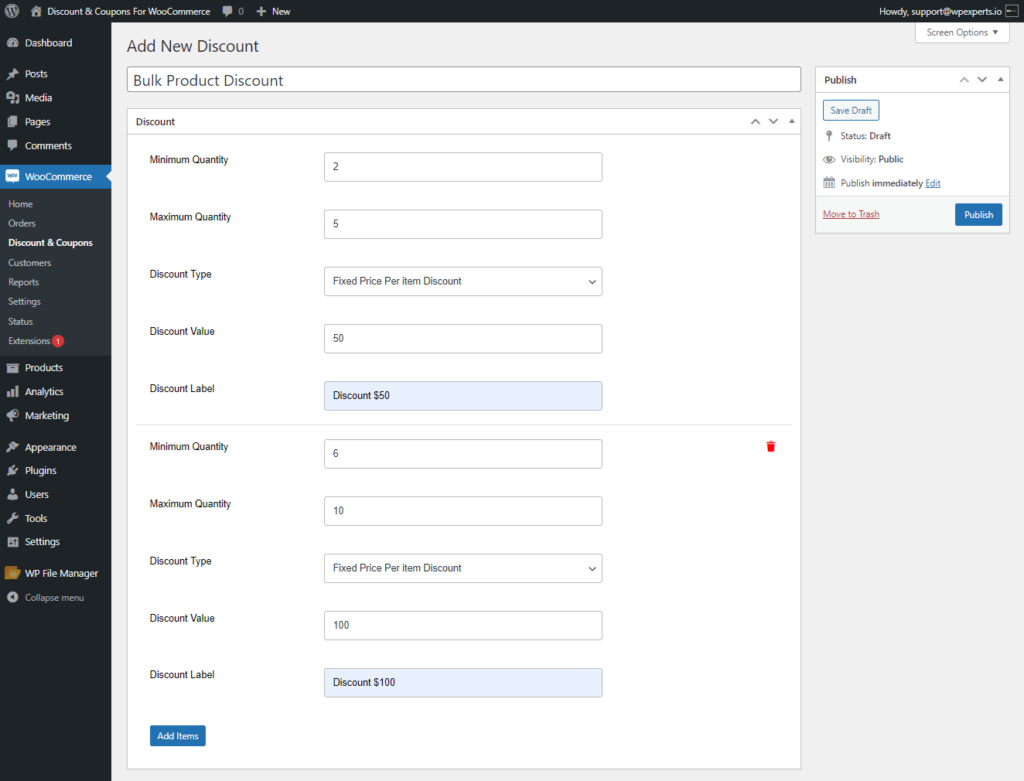
- Enter the minimum quantity for the product for the discount in the Minimum Quantity field.
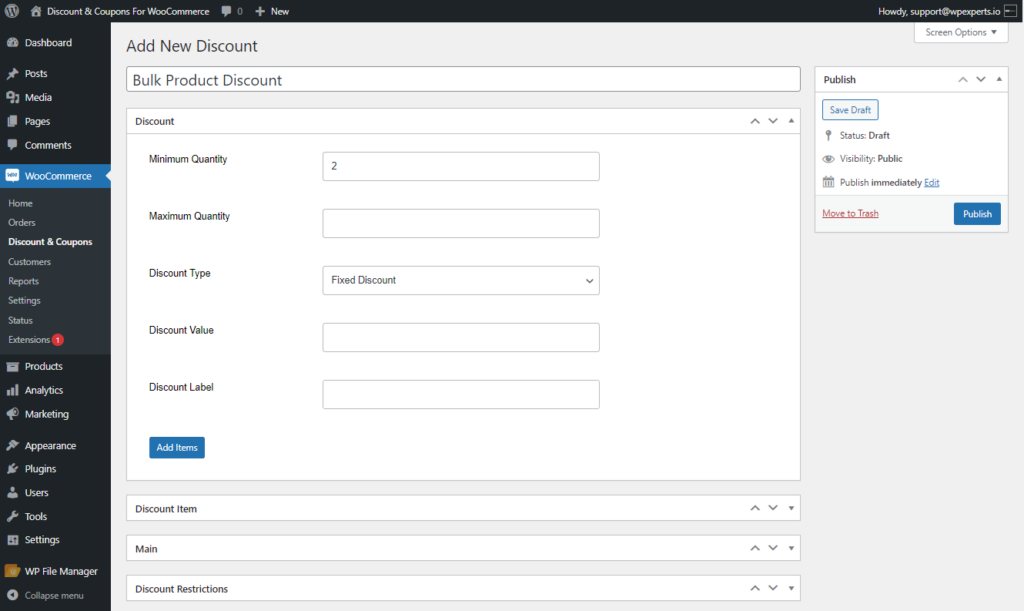
- Enter the maximum quantity for the product for the discount in the Maximum Quantity field.
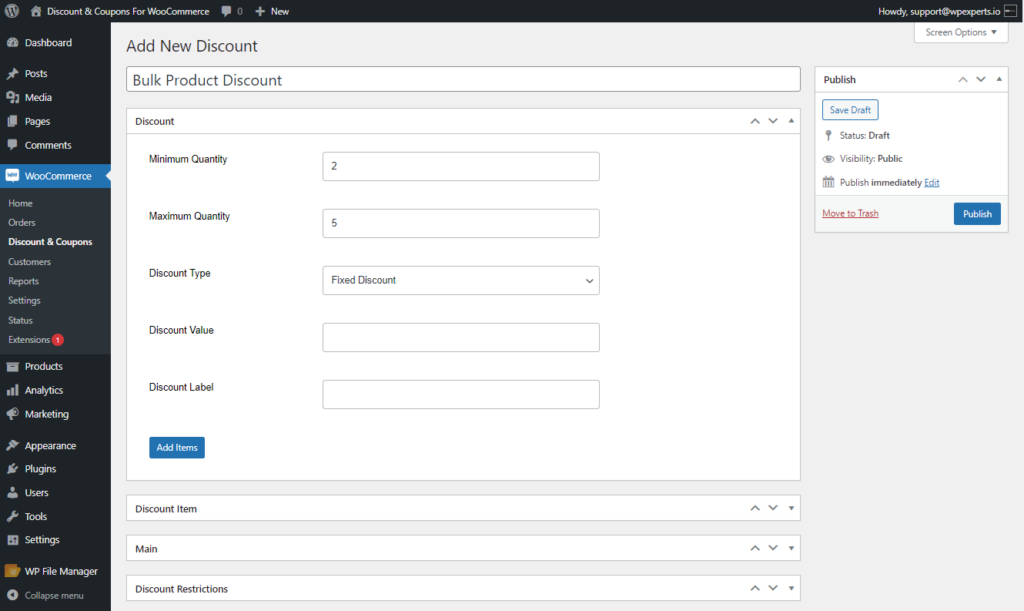
- Select the Discount Type from the Discount Type drop-down list for the product.
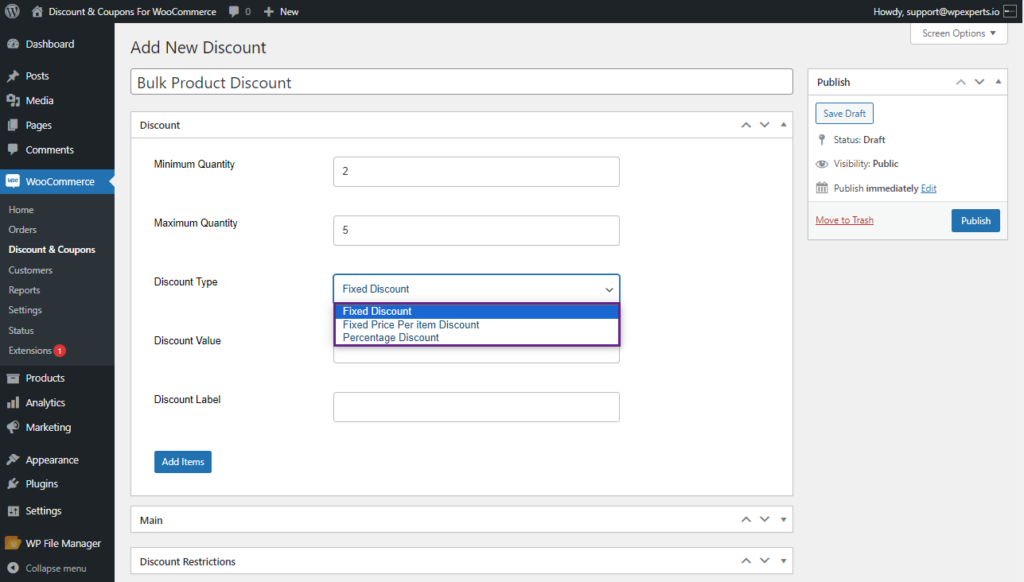
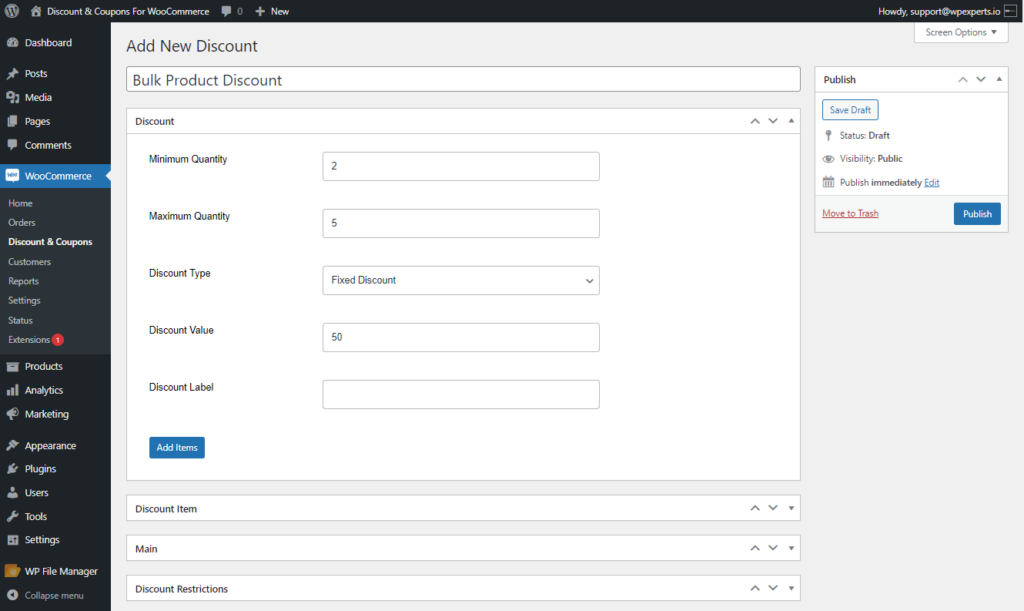
- Enter the desired discount amount into the Discount Value field to apply the discount.
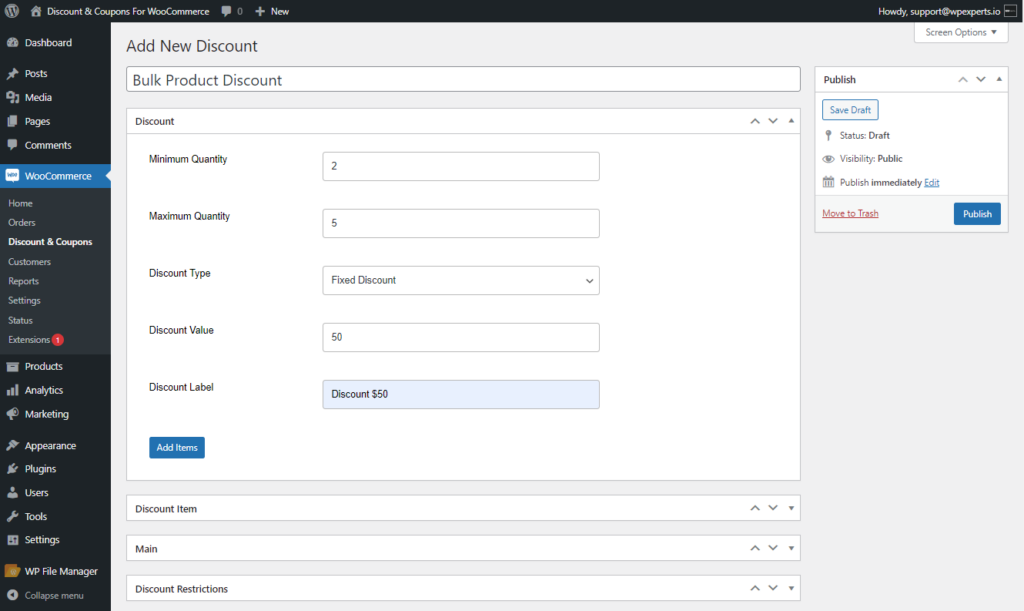
- Admin can assign a label to the discount in the Discount Label field.
- Admin can add multiple items offering Bulk Product Discount by clicking on the Add Items button.
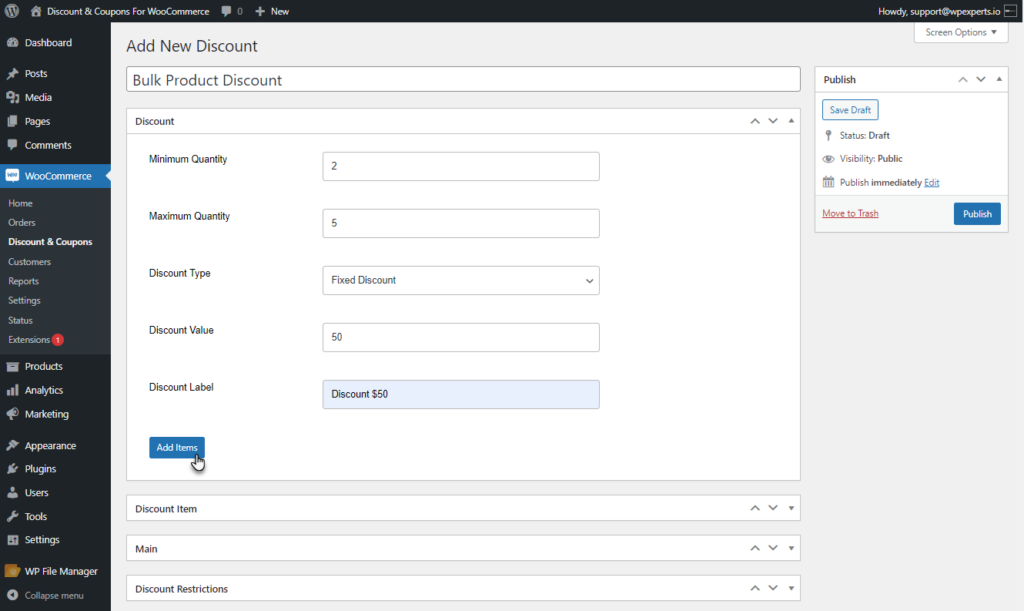
- Set the minimum, maximum quantity, and discount value for the bulk product item.
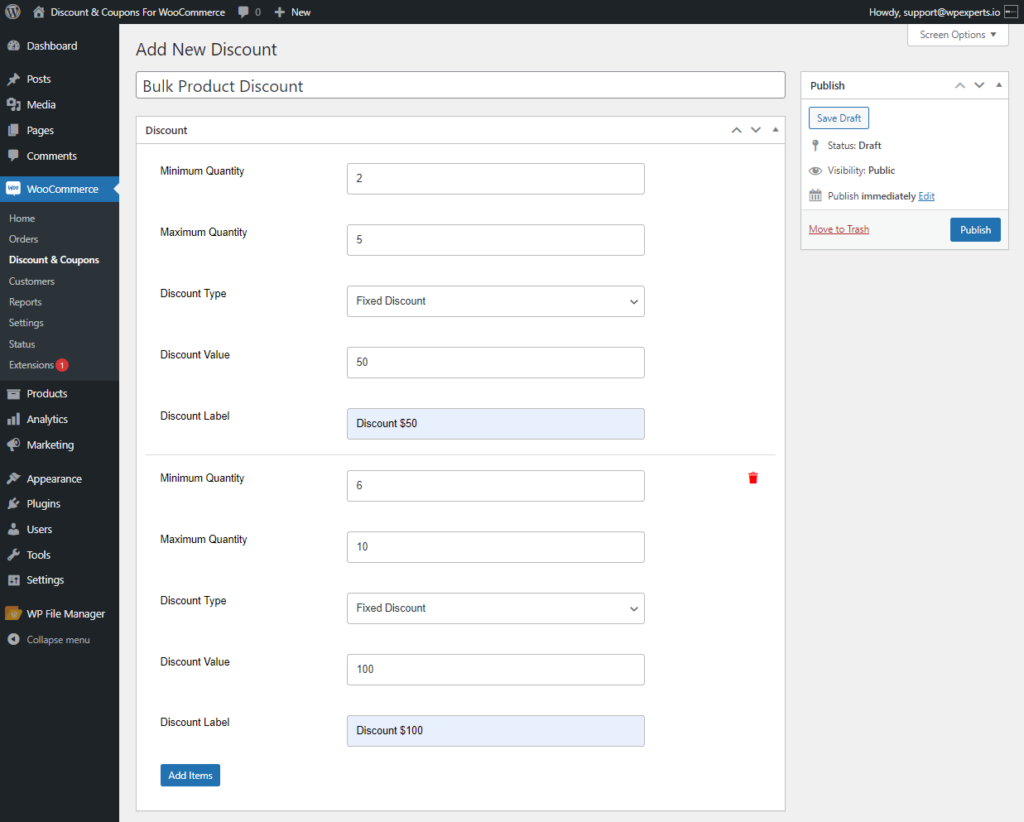
- In the Discount Type, three types of discounts are provided.
Fixed Discount
- When the Discount type is selected as Fixed Discount.
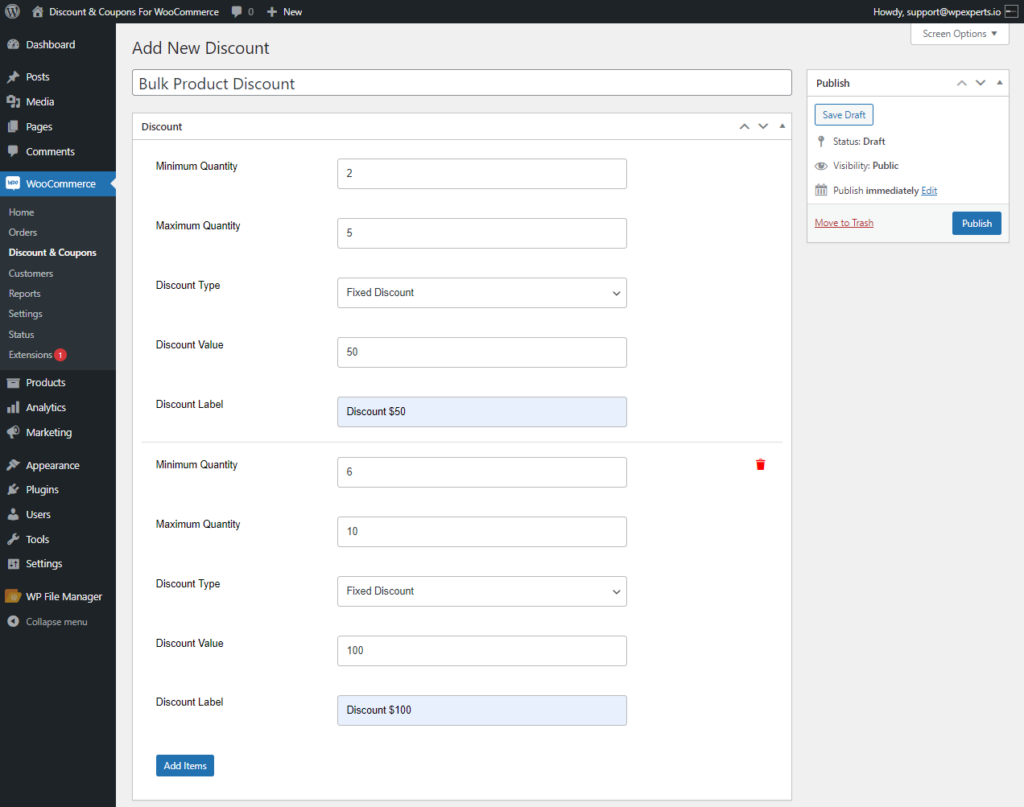
Front End Impact
- Go to the Product Page.
- Add the Discounted item to the cart.
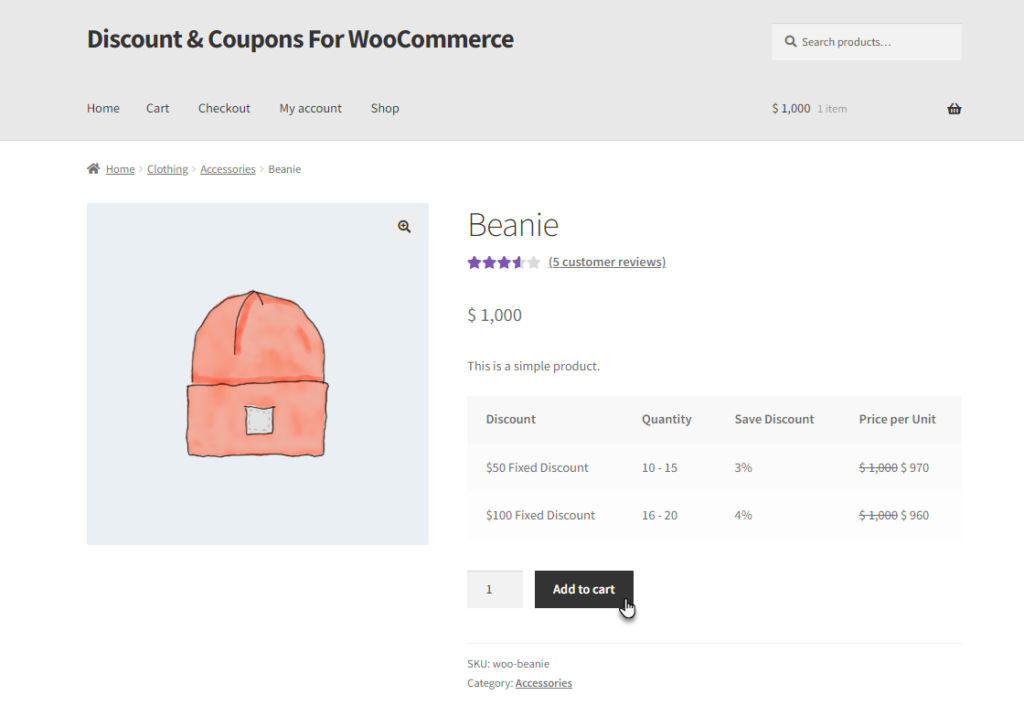
- Go to the Cart page.
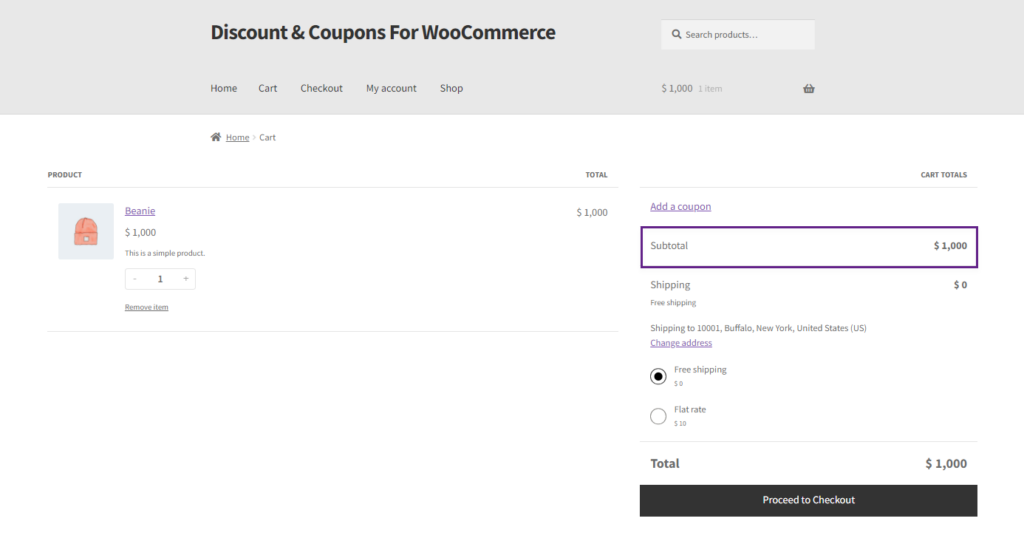
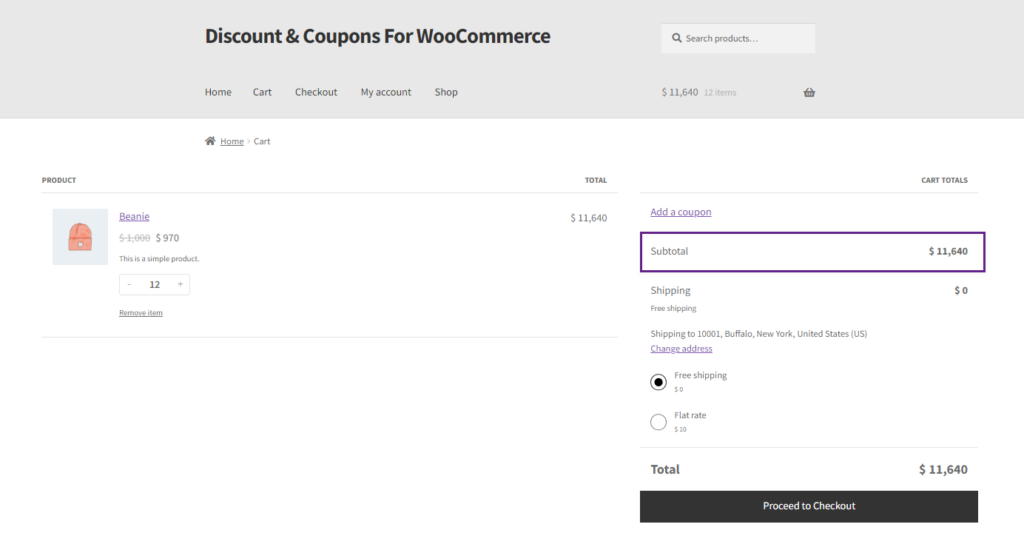
- Match the first condition for the first Discount on the Product. A Discounted Price will appear as per the settings configured.
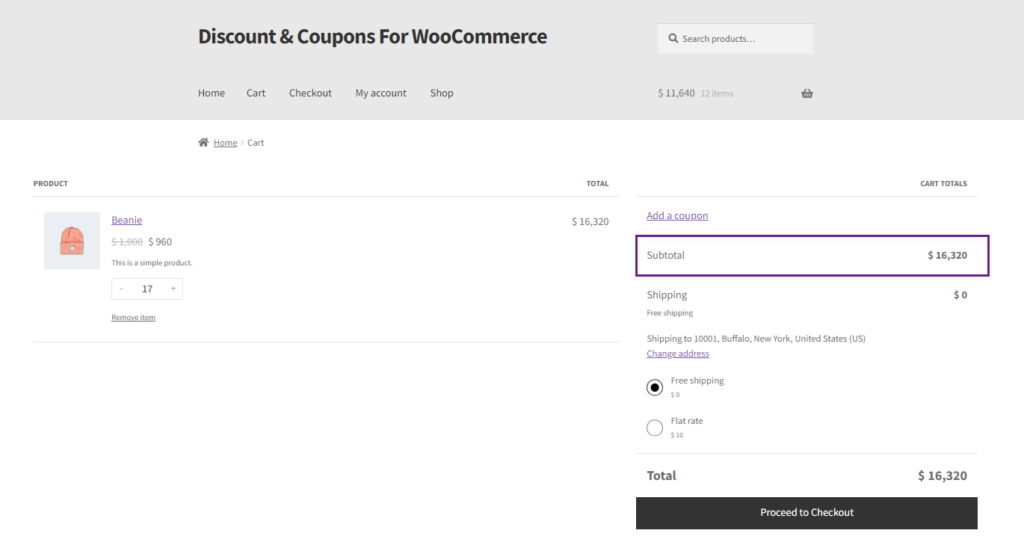
- Now, match the second condition for the second discount on the same product. A Discounted Price will appear as per the settings configured.
Fixed Price Per Item Discount
- When the Discount type is selected as Fixed Price Per Discount.
Front End Impact
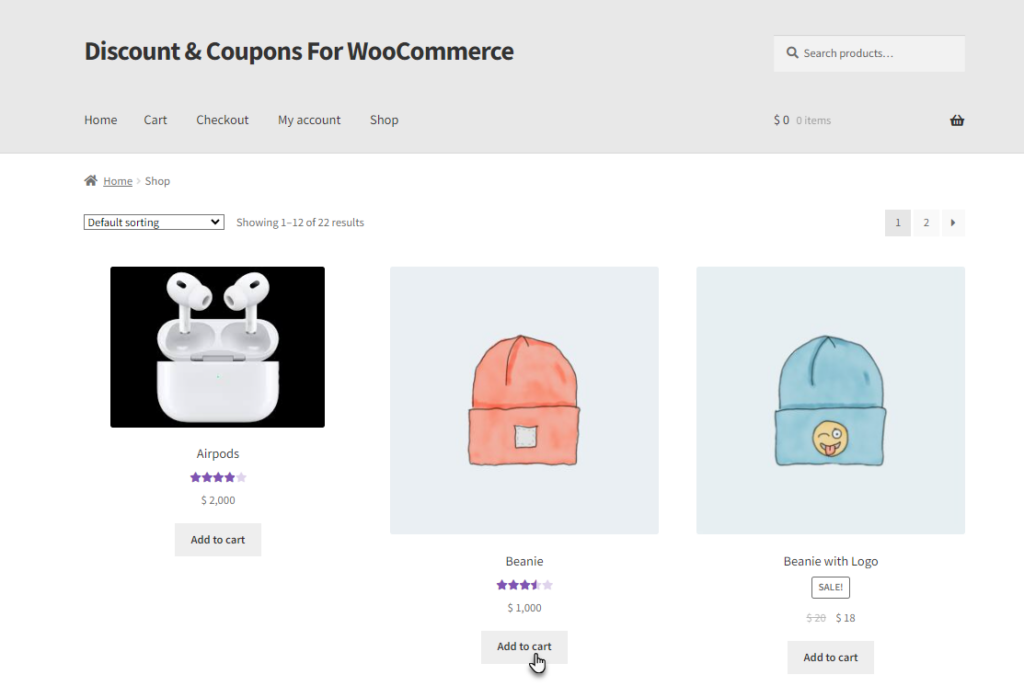
- Go to the Shop Page.
- Add the Discounted item to the cart.
- Go to the Cart page.
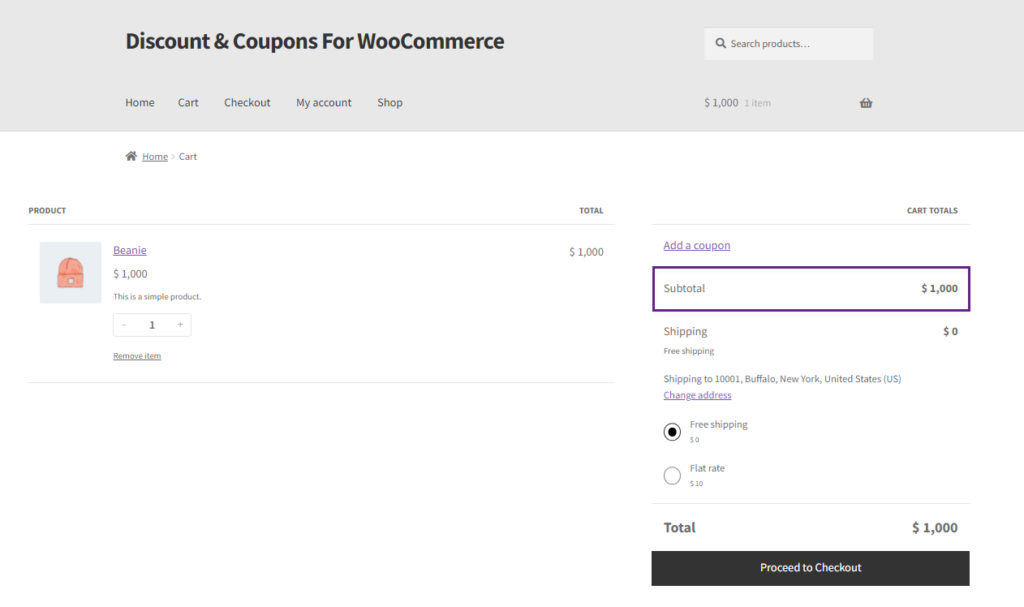
- Match the first condition for the first Discount on the Product. A message will appear with the discounted price.
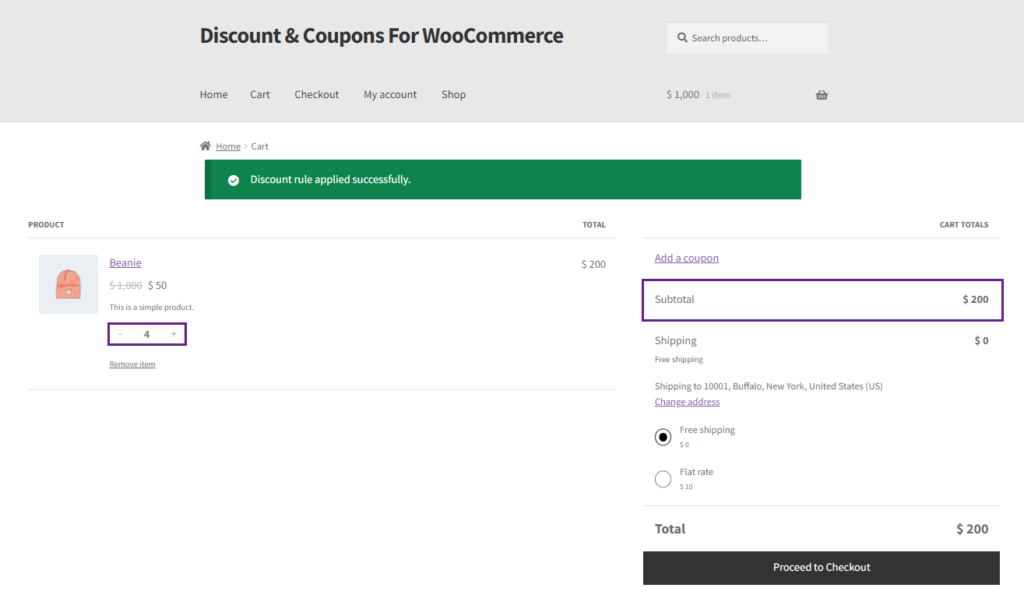
- Now, match the second condition for the second discount on the same product. A message will appear with the discounted price.
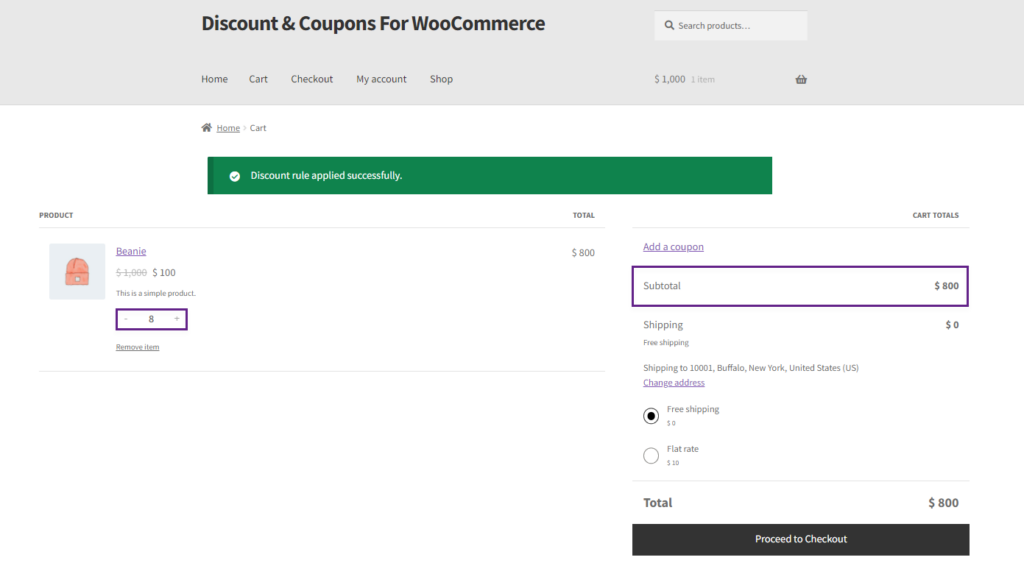
Percentage Discount
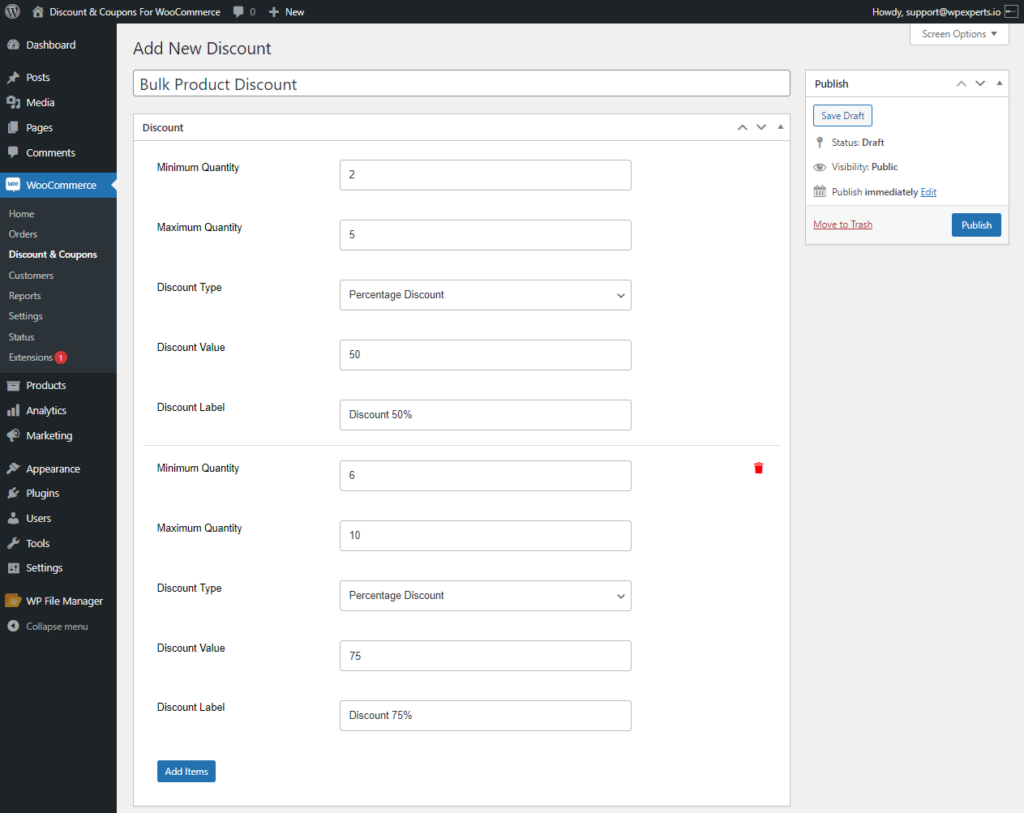
- When the Discount type is selected as Percentage Discount.
Front End Impact
- Go to the Shop Page.
- Add the Discounted item to the cart.
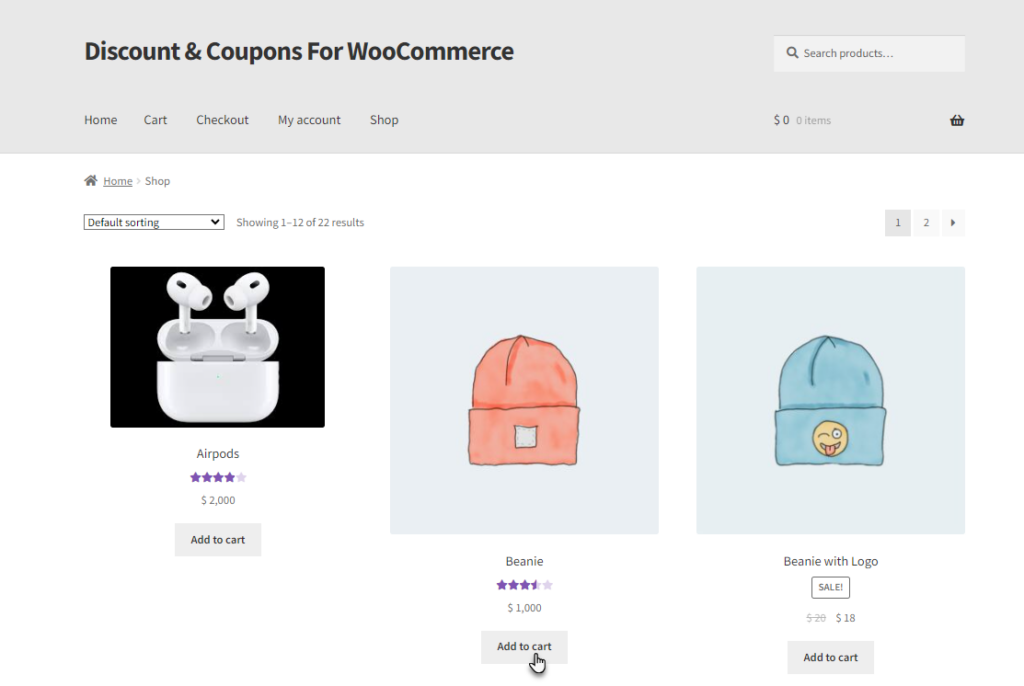
- Go to the Cart page.
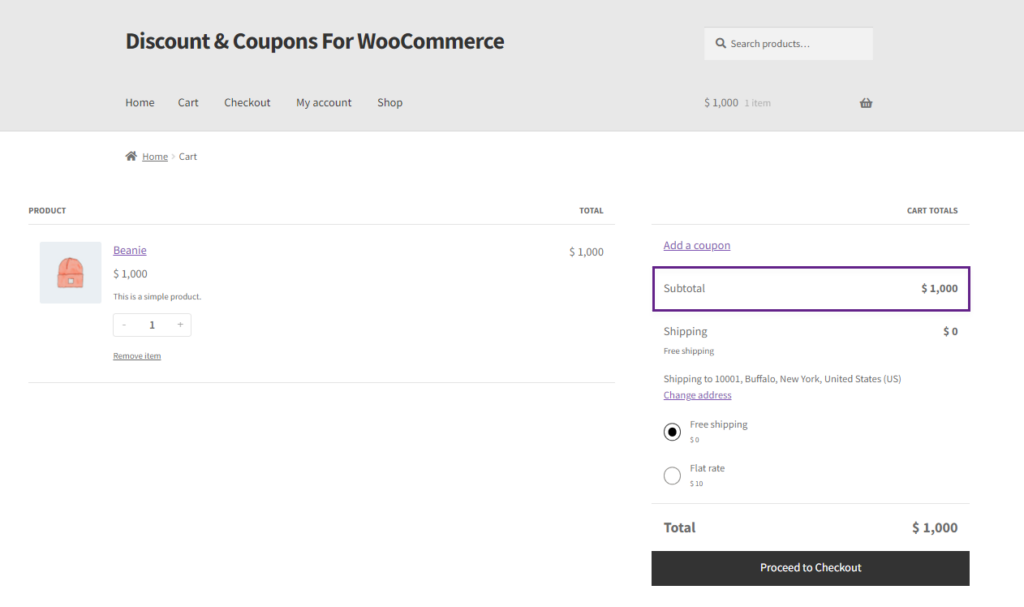
- Match the first condition for the first Discount on the Product. A message will appear with the discounted price.
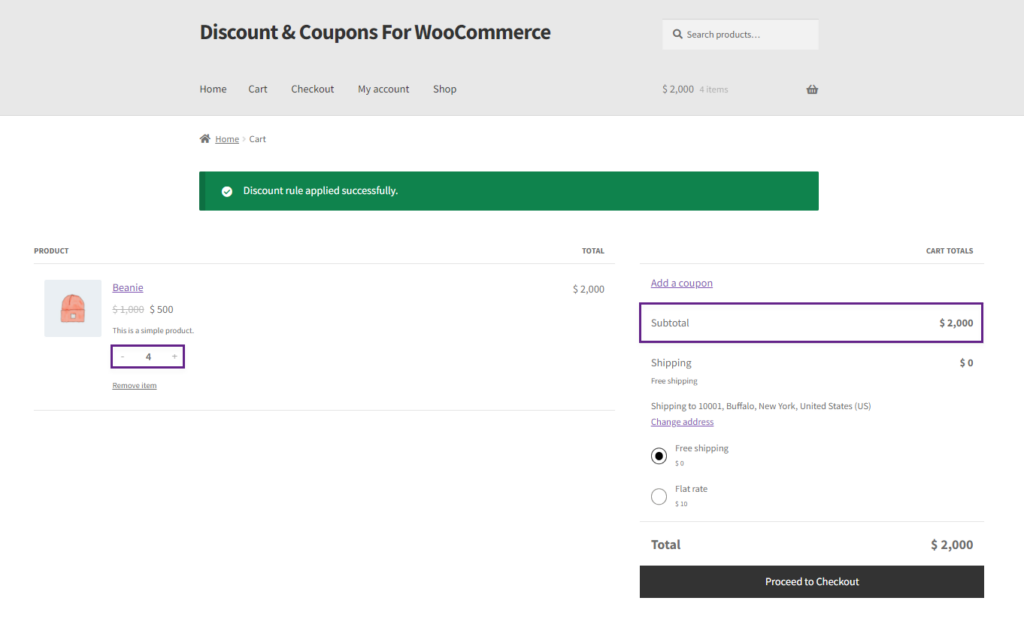
- Now, match the second condition for the second discount on the same product. A message will appear with the discounted price.
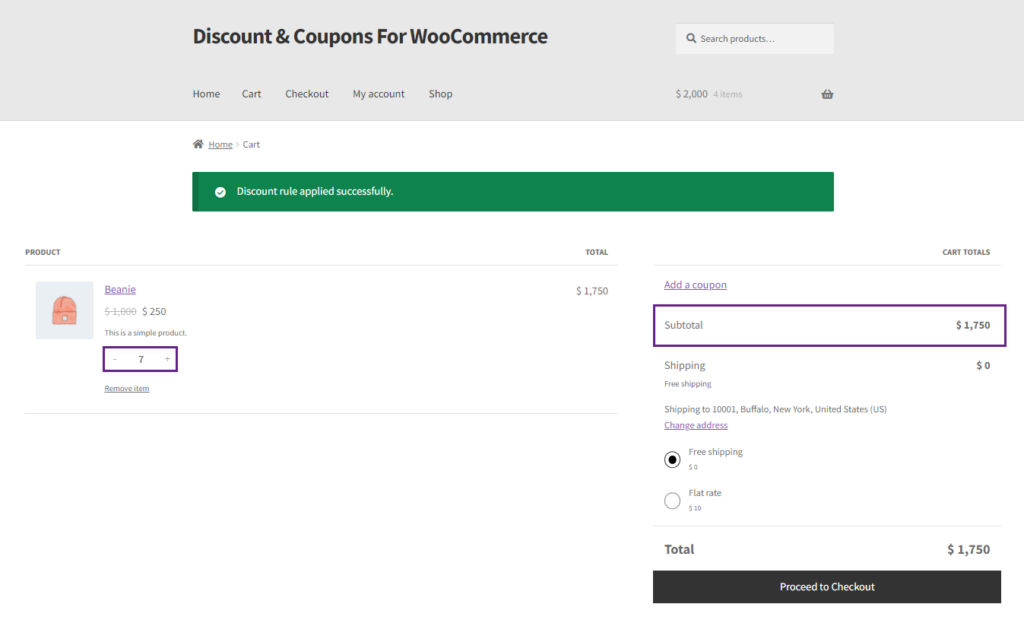
Discount Restrictions Tab
- Once done with the Discount tab scroll down to the Discount Restrictions Tab. This tab allows the admin to restrict the Discount usage as per requirements.
- The Discount Restrictions Tab is configured by the process explained in the On Product Discount.
Coupon Tab
- When done with the Discount Restrictions, move to the Coupon Tab which enables the admin to use this discount as a coupon.
- Enable the coupon by checking the Make this discount type a Coupon check button.
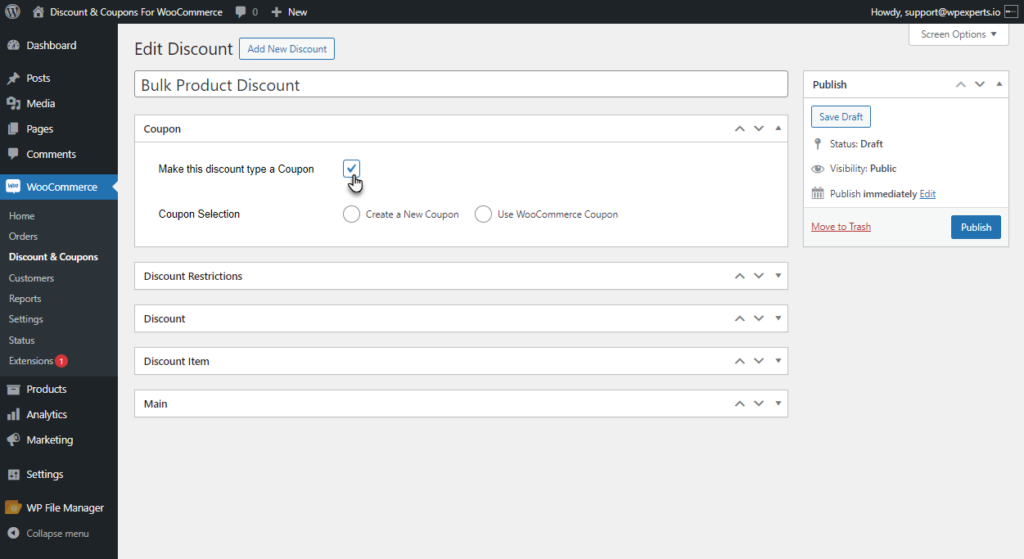
- Enabling the coupon will provide the admin with two options
- Create New Coupon
- Use WooCommerce Coupon
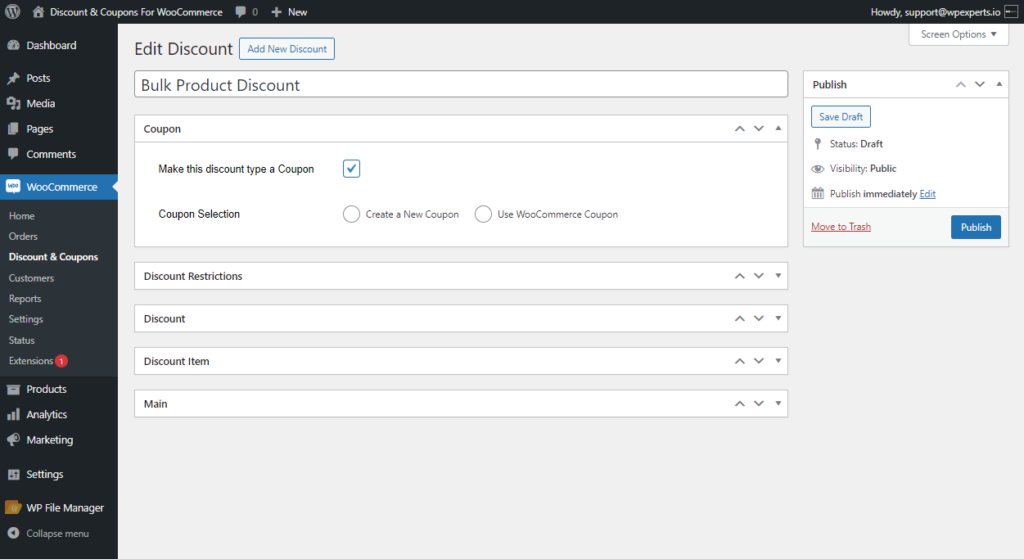
PLEASE NOTE: The Create New Coupon and WooCommerce Coupon options are briefly explained in the On Product Discount type.
Front End Impact
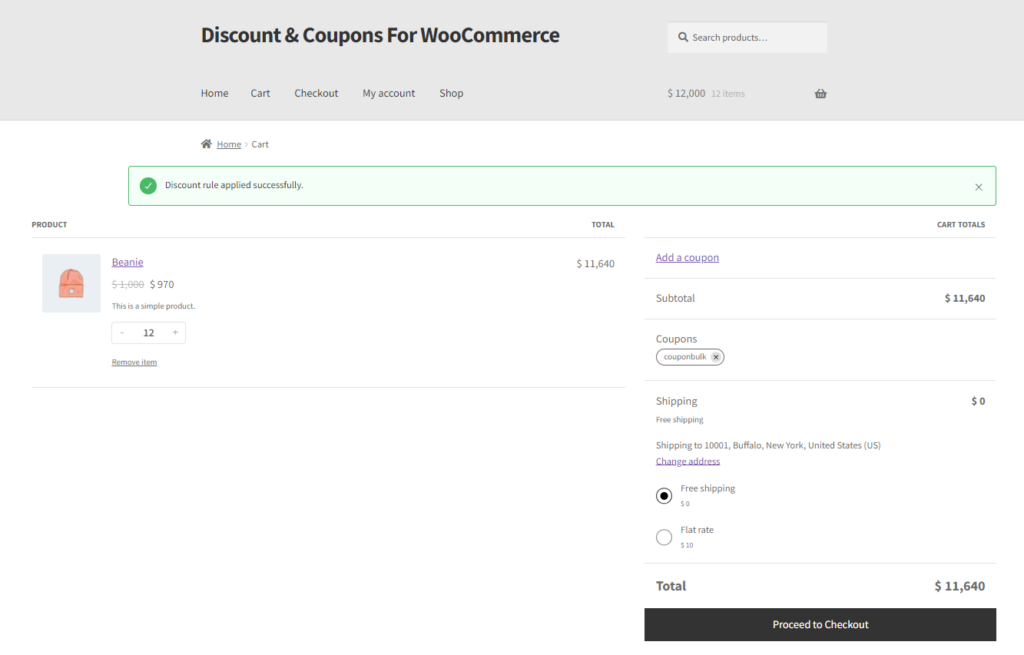
- Go to the Cart page. Apply the Coupon Code.
- A Bulk Product Discount coupon discount will be applied to your product.
Discount Display on Product Page
- Navigate to WordPress Admin Dashboard > WooCommerce > Discount & Coupons > Add New / Edit Discount.
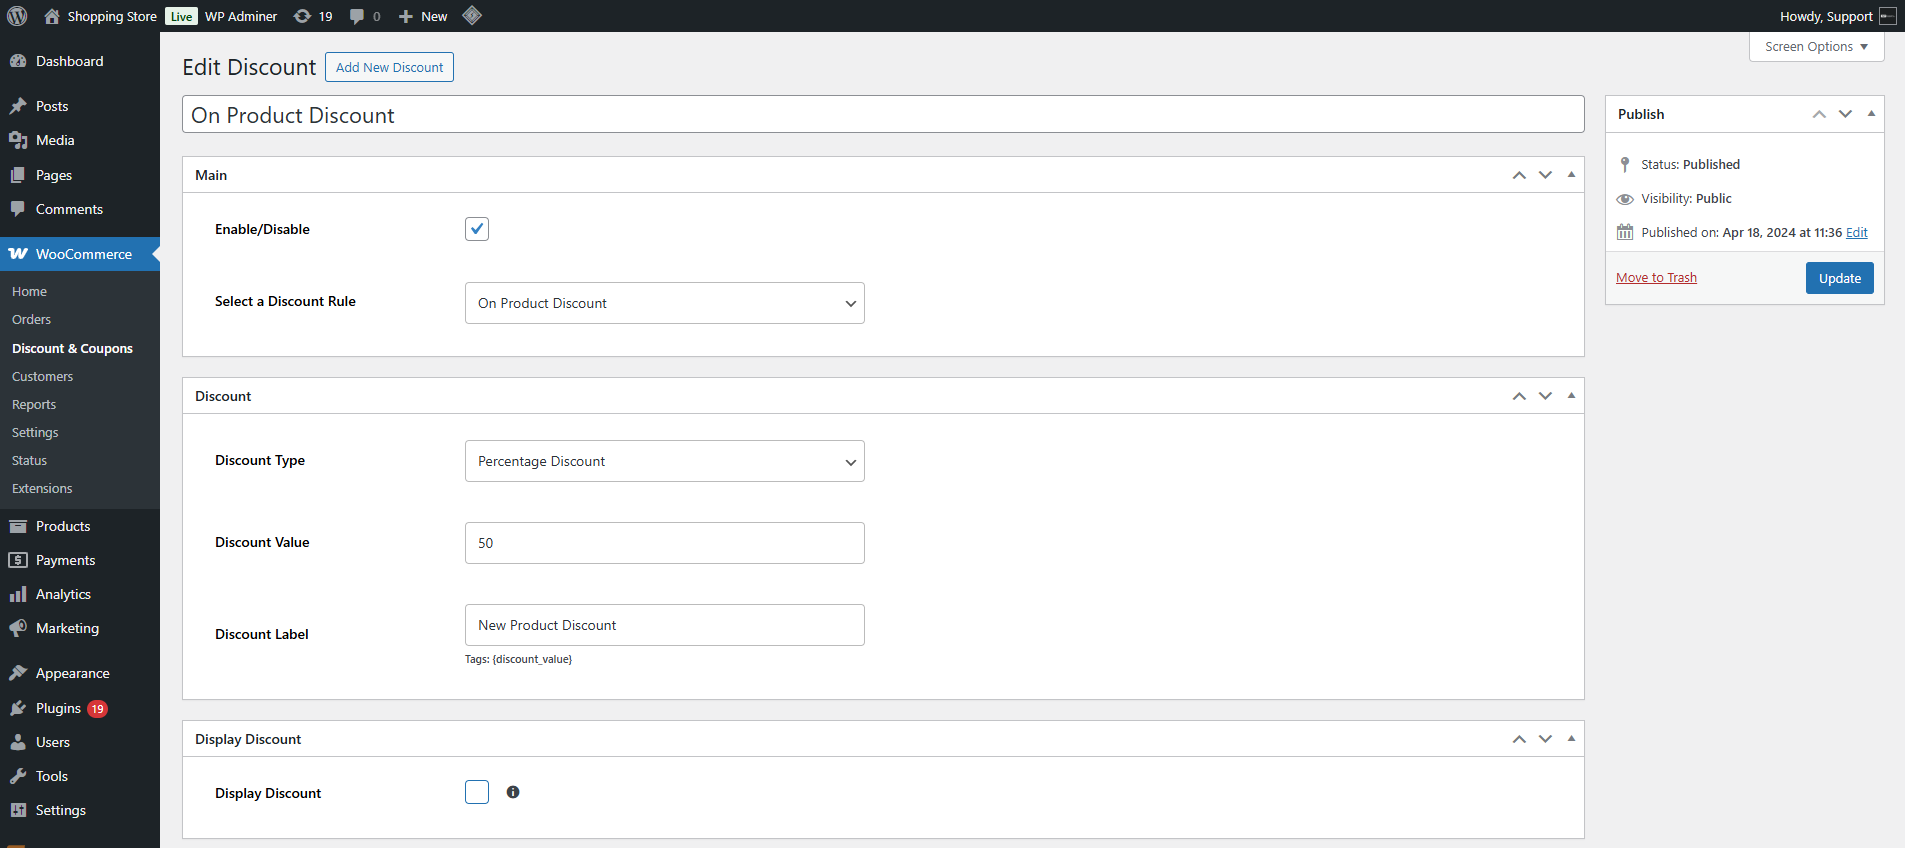
- Locate and enable the “Display Discount” option.

- The admin can customize the display bar’s appearance using available settings. Change the bar background color and discount text color as desired.

- Enter the discount text to be shown in the display bar.

- Set the bar placement, with three available positions:
- Above Product Name
- Above Add to Cart
- Below, Add to Cart

- Click the Update button to save the changes.

Front End Impact
- Log in to your account.
- Go to the Product page. A Discount bar will appear.

Sticky Button
↑ Back to top- This feature enables admins to display all active discounts in a sticky button on the pages, allowing customers to view discount details before meeting any conditions.
- Navigate to WordPress Admin Dashboard > WooCommerce > Discount & Coupons > Sticky Button.

- Enable the sticky button.

- Add text for the sticky button.
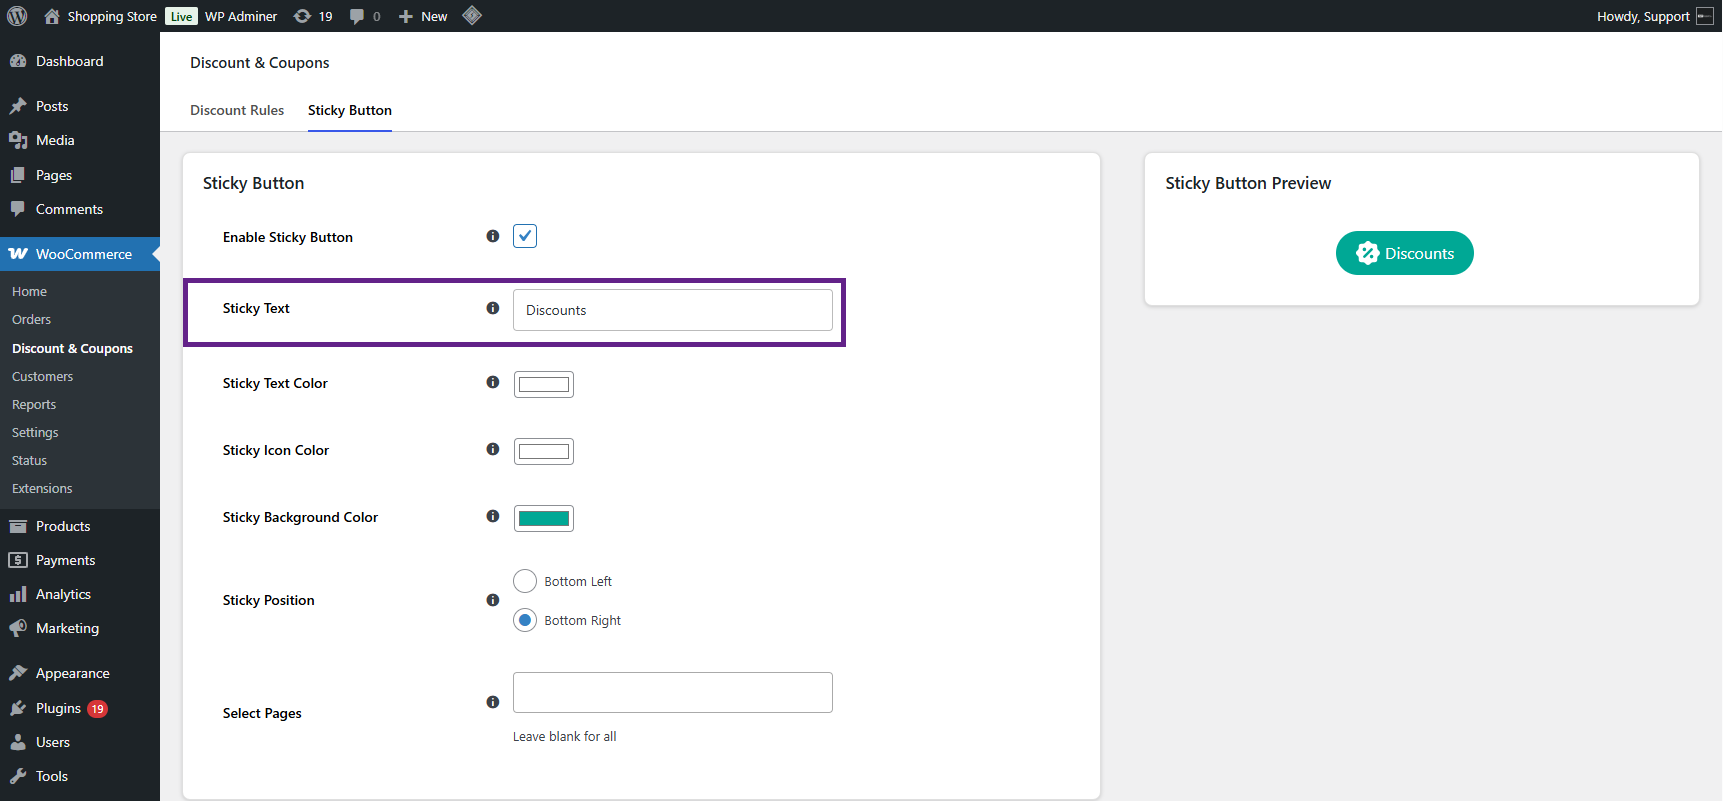
- The admin can customize the sticky button by changing the sticky text color, sticky icon color, and sticky background color.

- The admin can set the sticky button position as desired.

- The admin can select the pages where the sticky button will appear. If left blank, it will appear on all pages.

- Once the sticky button is enabled, the admin can customize the panel style by setting the panel header text, header text color, panel background color, discount background color, title color, and description color.

- Click on the save button to update the settings.

- After completing the sticky button settings, navigate to WordPress Admin Dashboard > WooCommerce > Discount & Coupons > Add New / Edit Discount. Locate and enable the Add Discount Rule in the Sticky option.
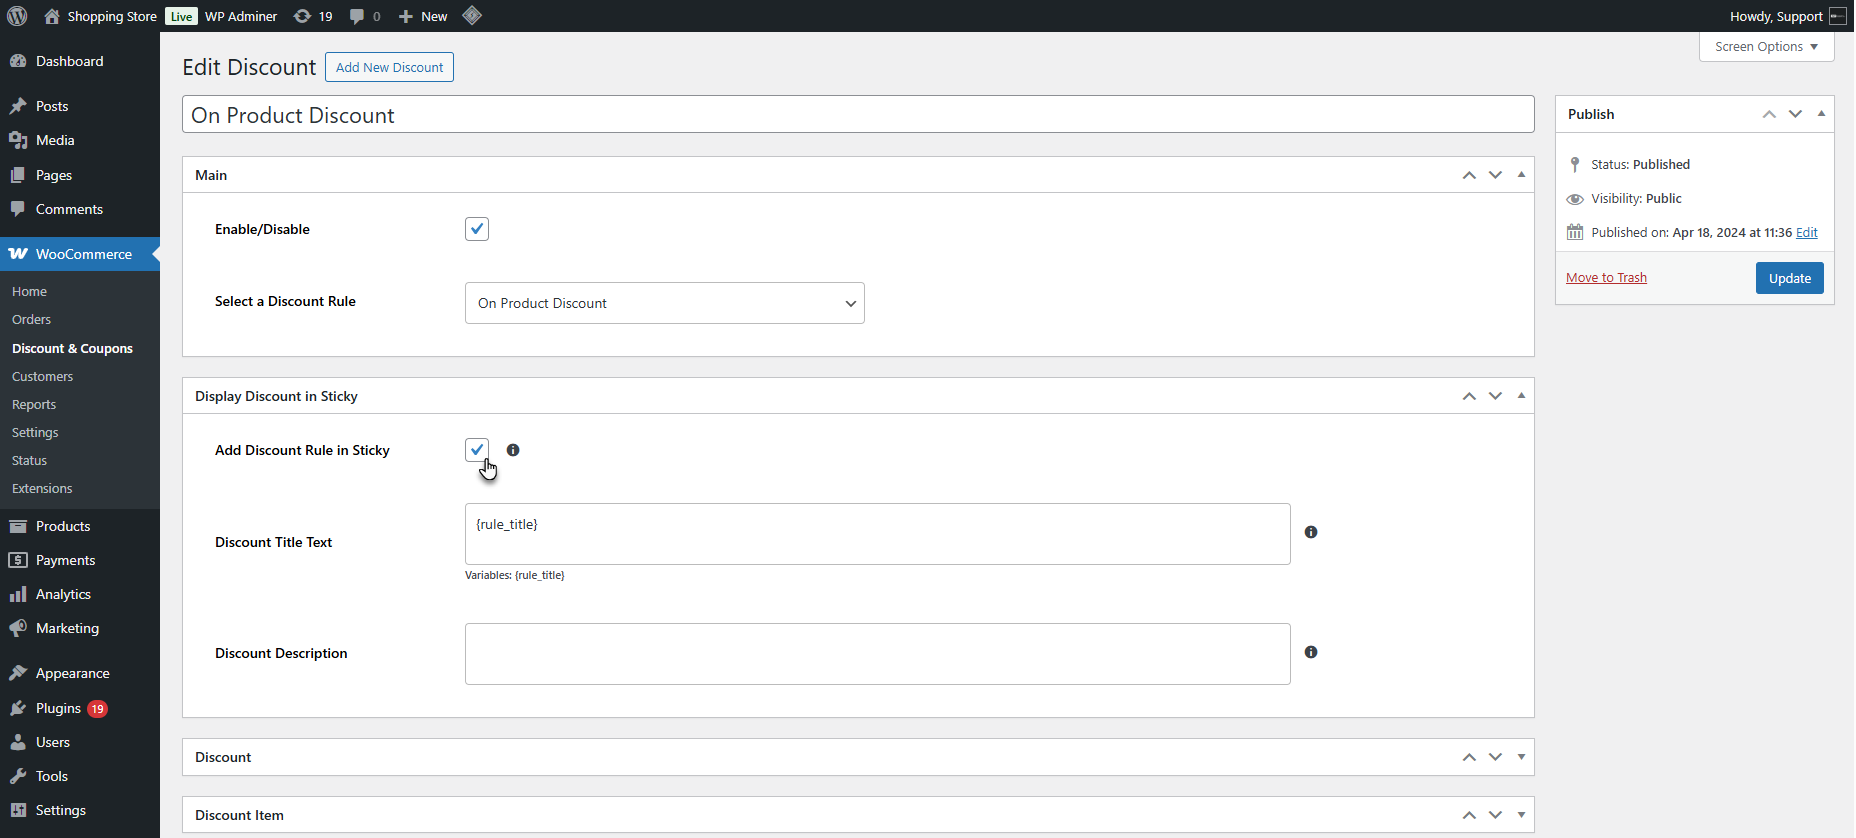
- Add the title and optional description for the discount that will appear on the front end, and update the settings.

Front End Impact
↑ Back to top- Log in to your account.
- Go to the shop page. The sticky button will appear. Click on the Sticky button.

- The Sticky panel will appear, displaying all available discounts.

Discount & Coupon General Settings
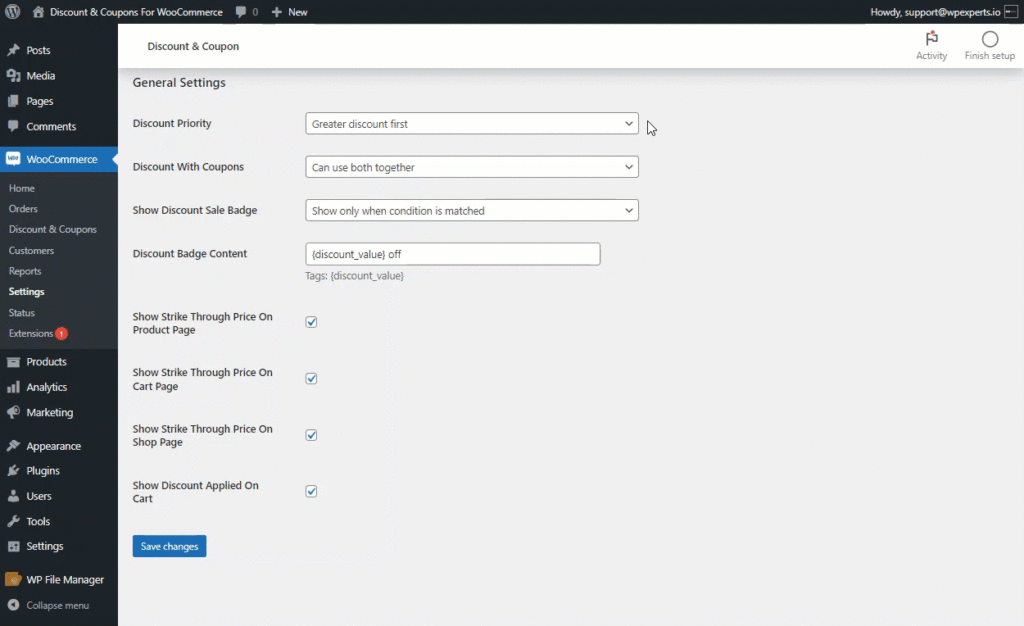
↑ Back to top- For the General Settings of the Discount & Coupons Go to WordPress AdminDashboard > WooCommerce > Settings.
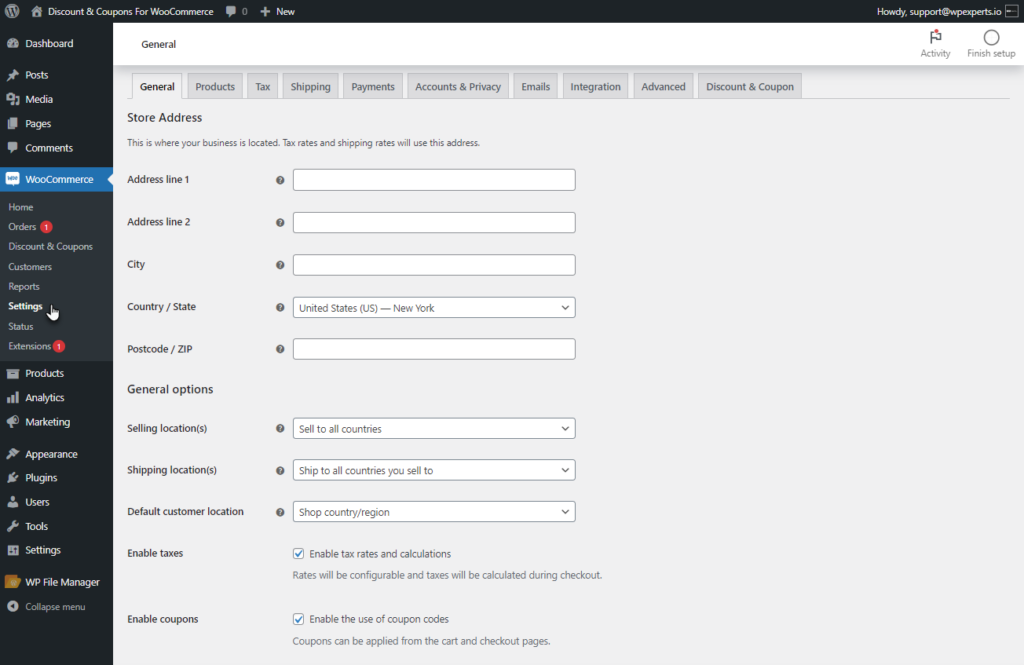
- Switch to the Discount & Coupon Tab. This tab allows the admin to configure the General settings of the Discount & Coupon.
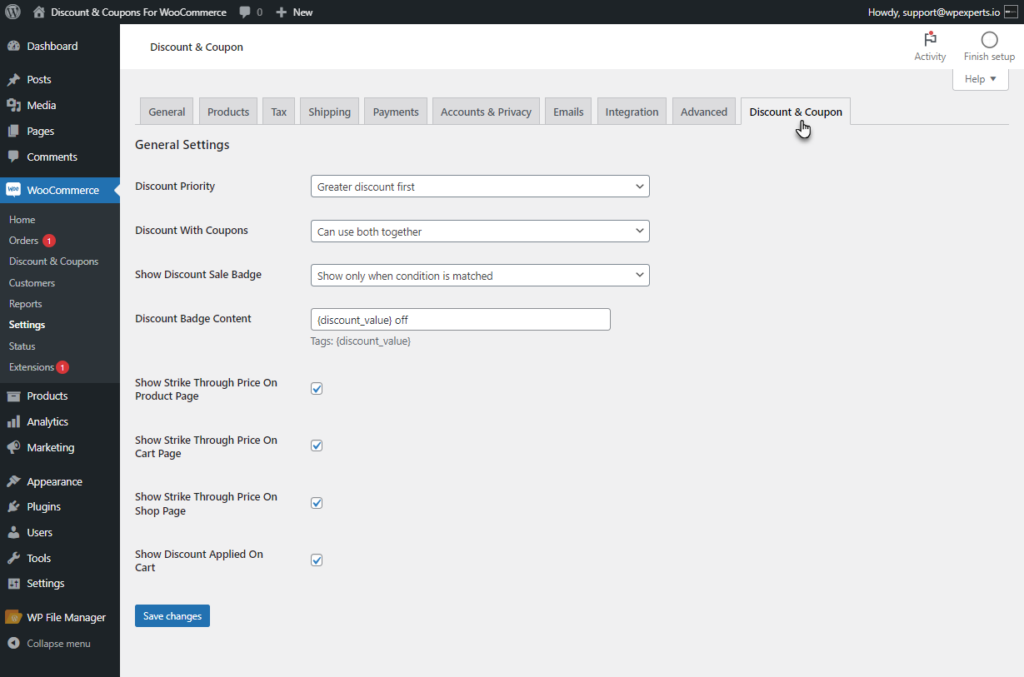
- The General setting of Discount & Coupons can be configured by the following options.
Discount Priority
- This option provides four conditions for the admin to prioritize discounts when multiple discount rules are applied.
a. Greater discount first
- When this condition is selected, the discount offering the highest discount will be applied to the product first.
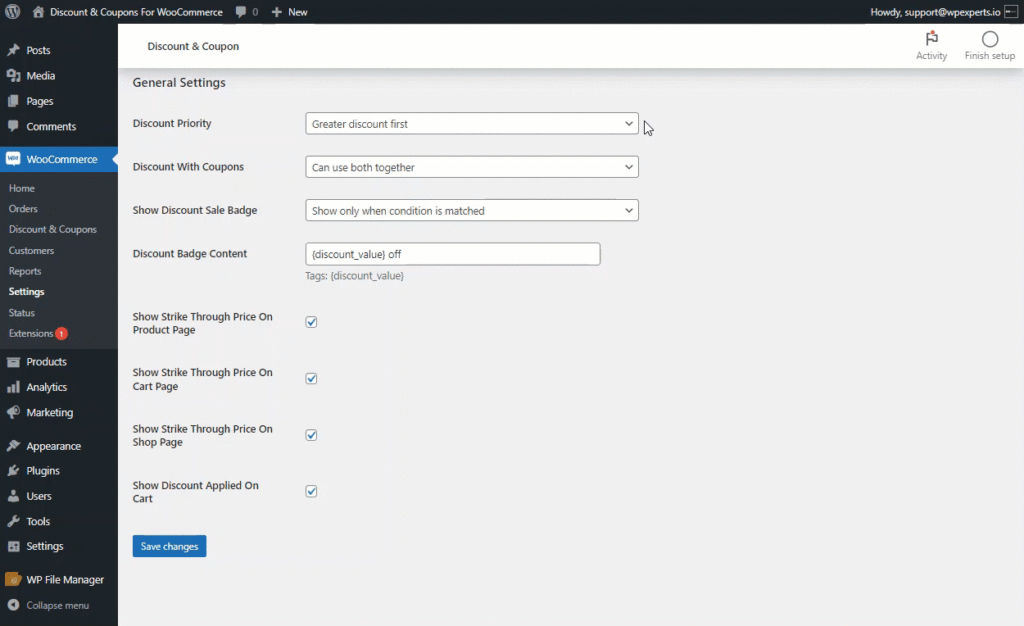
b. Lesser discount first
- When this condition is selected, the discount offering the lower discount will be applied to the product first.
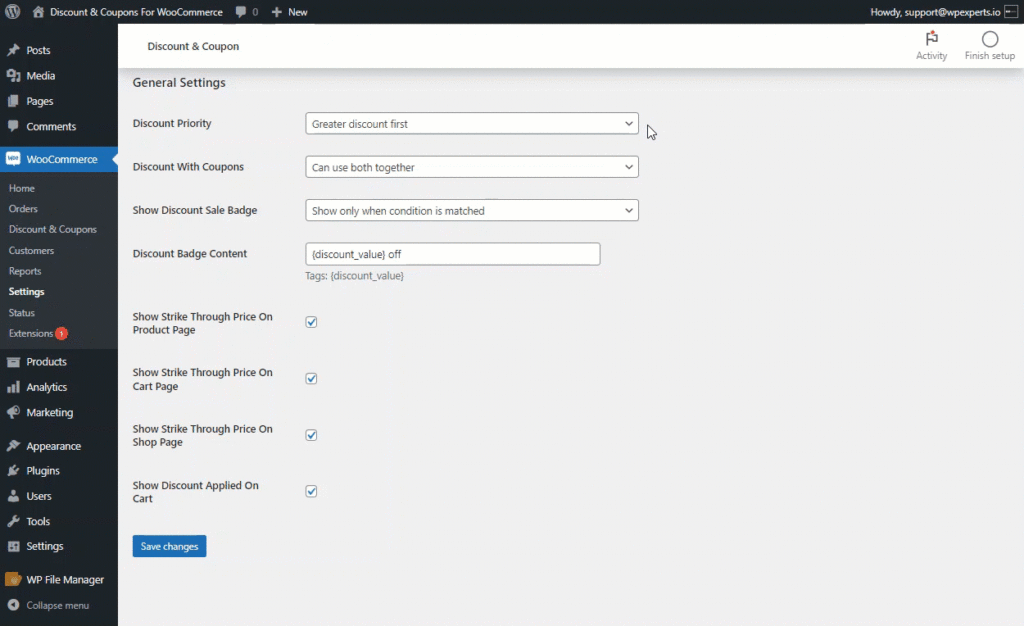
c. First matched rule
- When this condition is selected, the discount rule that matches first will be applied.
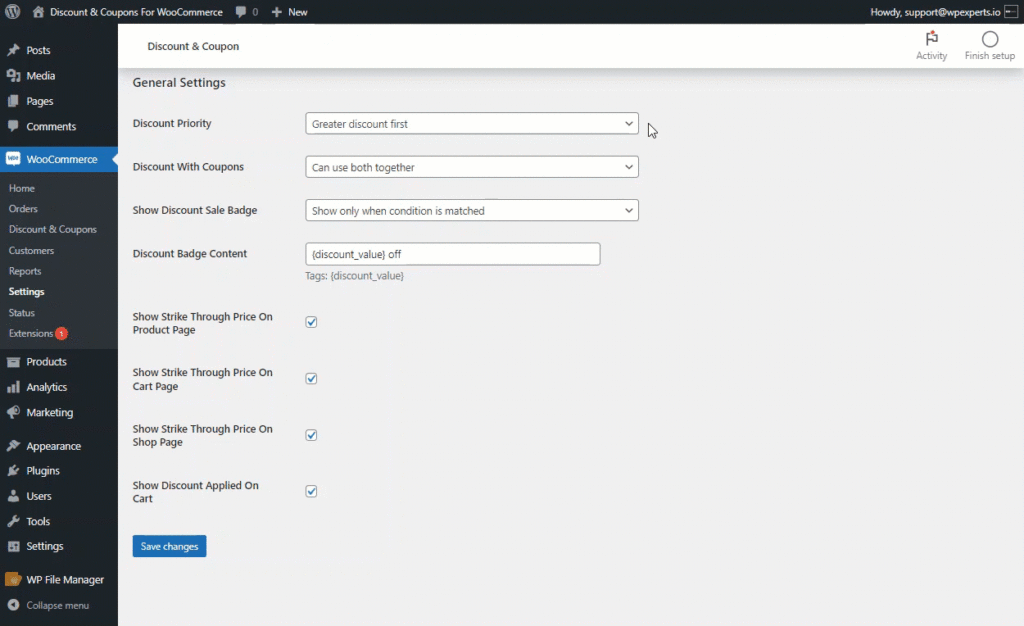
d. All matched rules ( Stackable )
- When this condition is selected, All matched rules will be applied.
Front End Impact
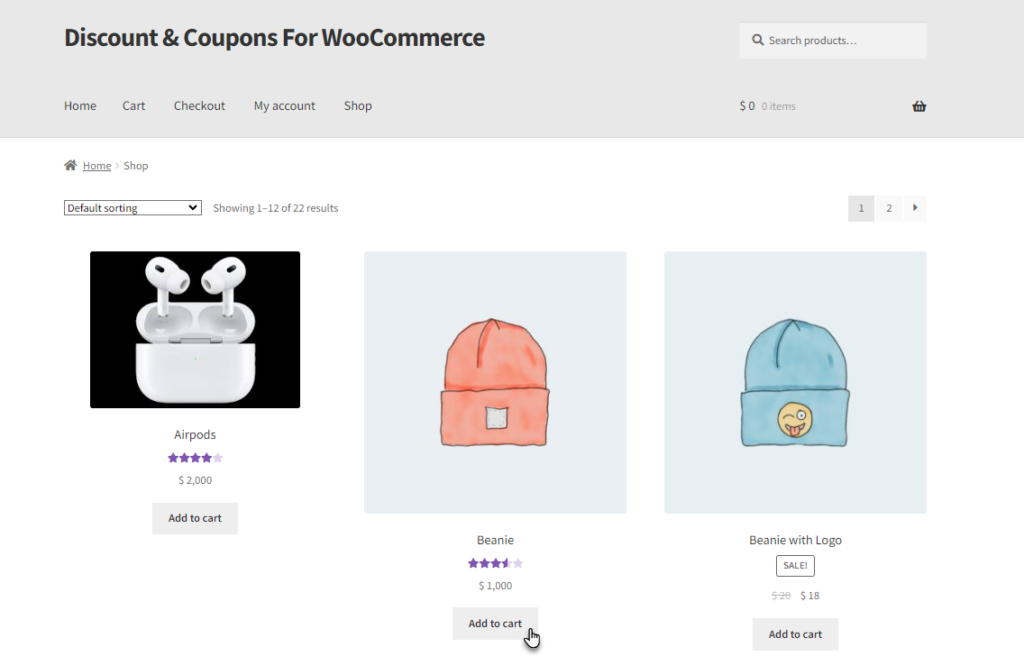
- Go to the Shop page.
- Add the discounted item to the cart.
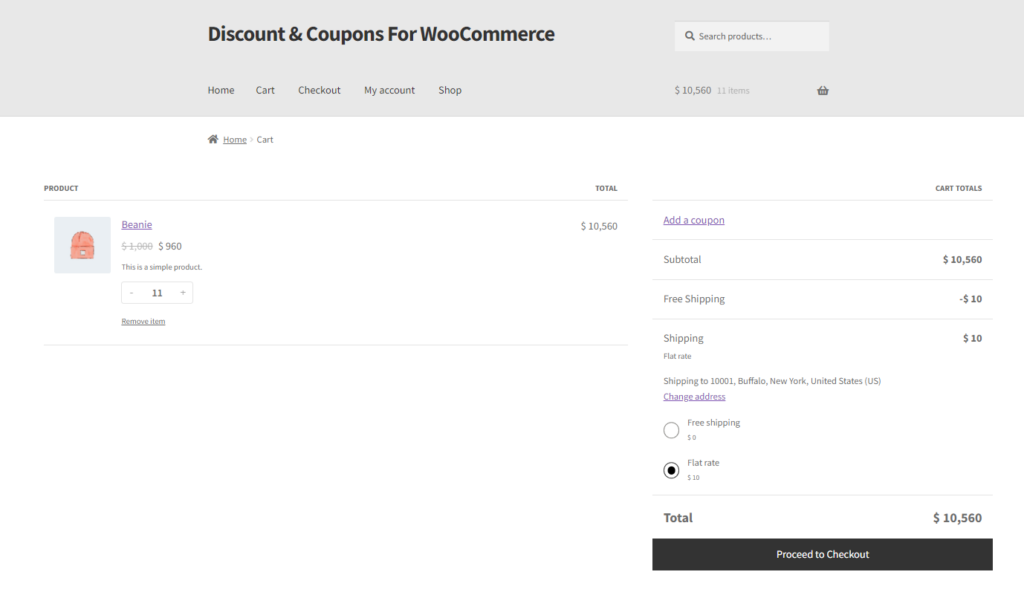
- Meet the conditions for all the discount types configured.
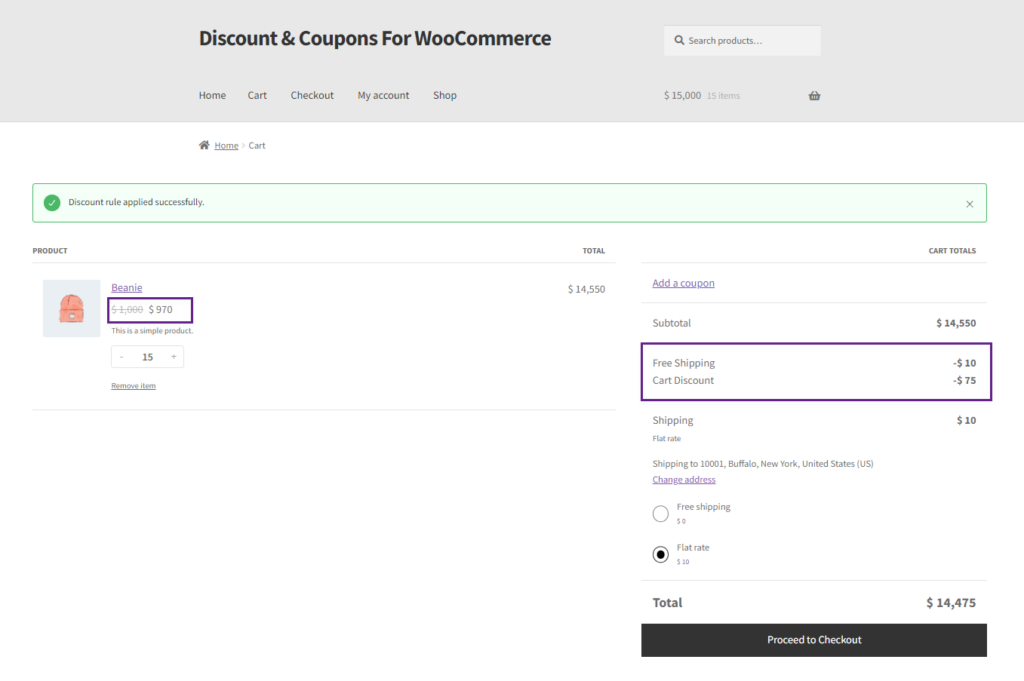
- All the Discount types will be applied to the item.
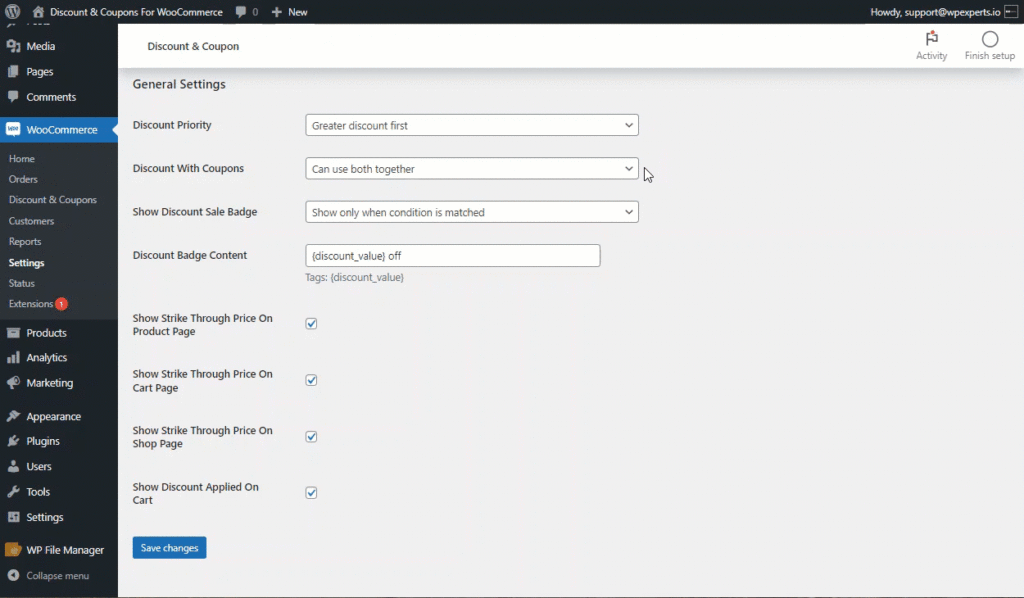
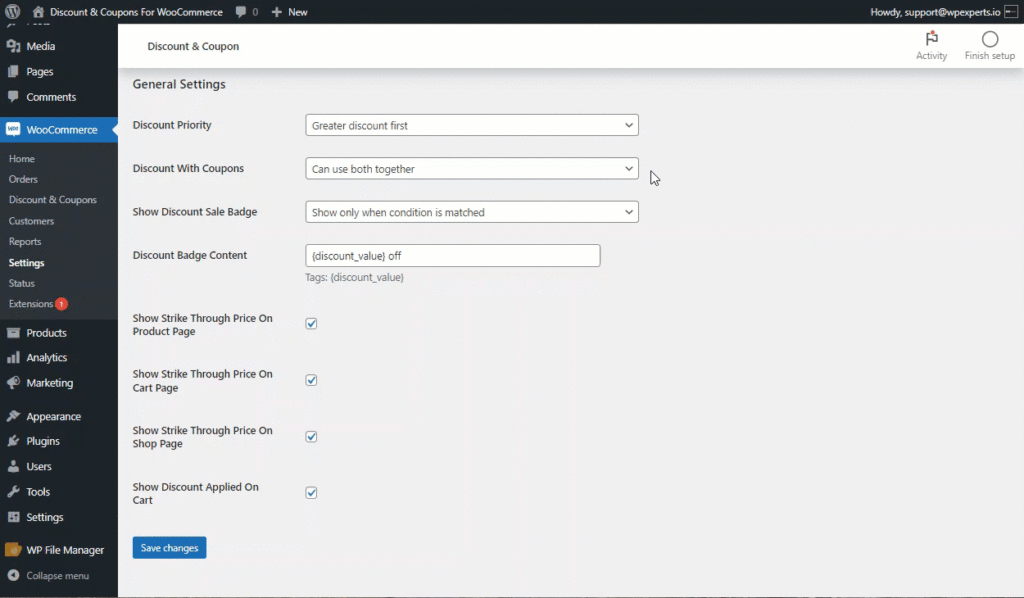
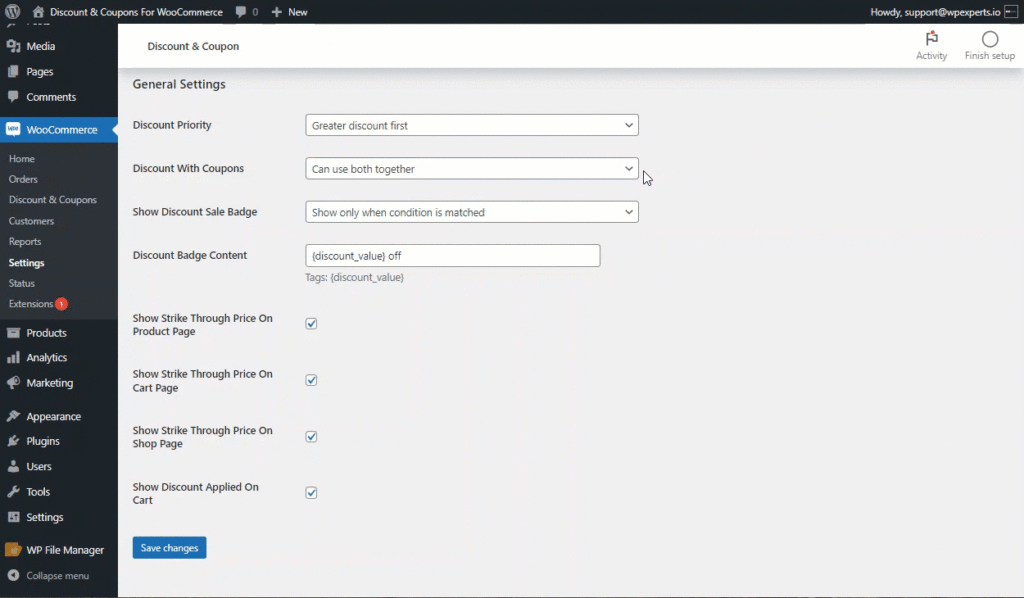
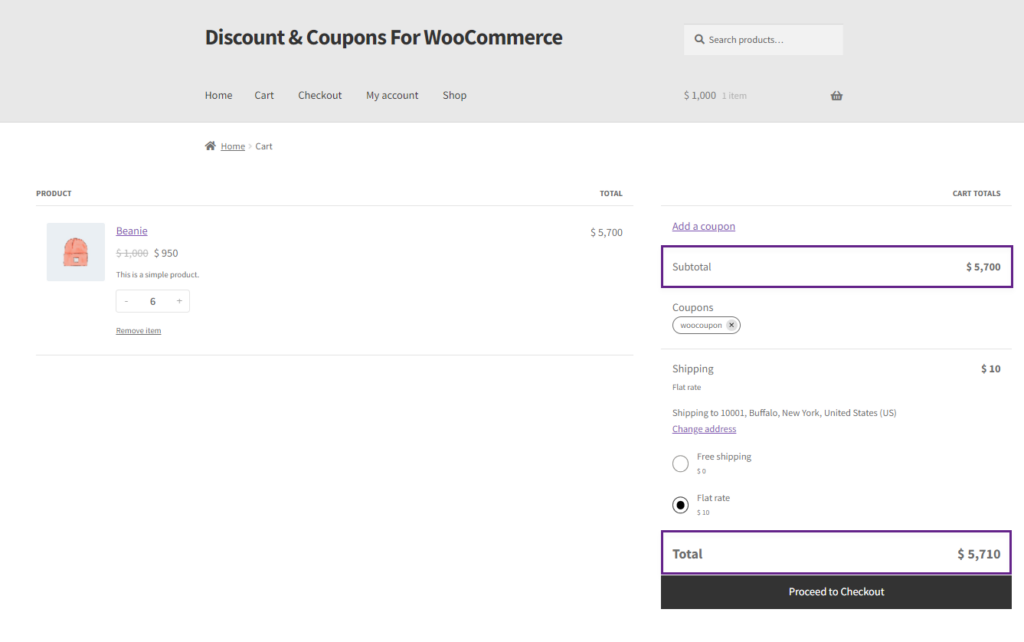
Discount with Coupons
- This option enables the admin to decide whether customers can utilize discount rules and WooCommerce coupons together.
a. Can use both together
- When this condition is selected, admin can use both coupons and discount rules simultaneously on the same cart.
b. Can only use Coupon
- When this condition is selected, admin can only apply coupons; discount rules cannot be used.
c. Can only use discount rule
- When this condition is selected, admin can only avail discounts on the cart; coupons cannot be applied.
Front End Impact
- After adding a discounted item to the cart. Click on the Add a Coupon option.
- Enter a Coupon Code and click on Apply.
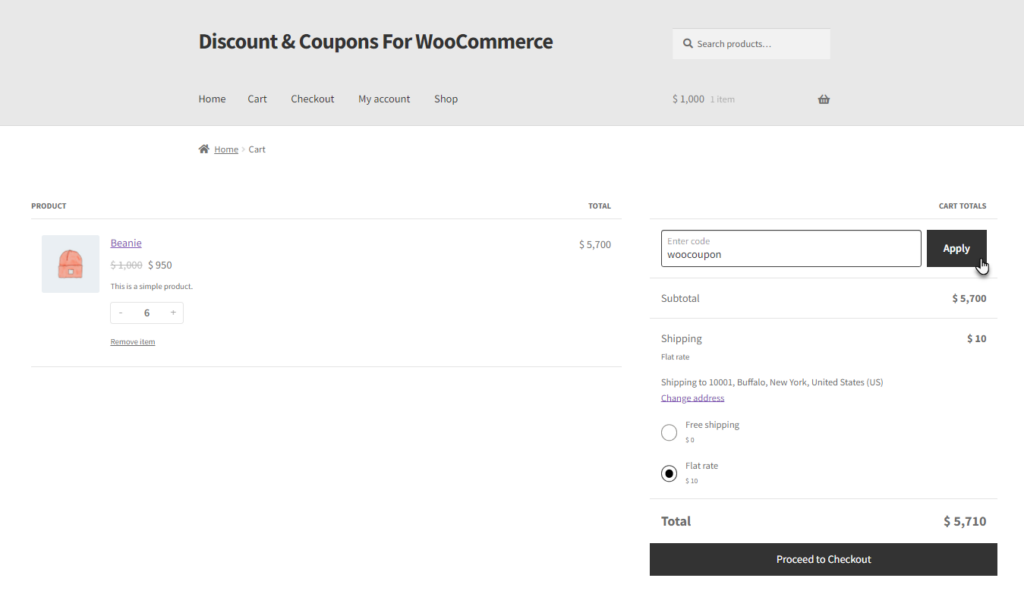
- A Coupon will be applied but no effect on the subtotal or Total amount.
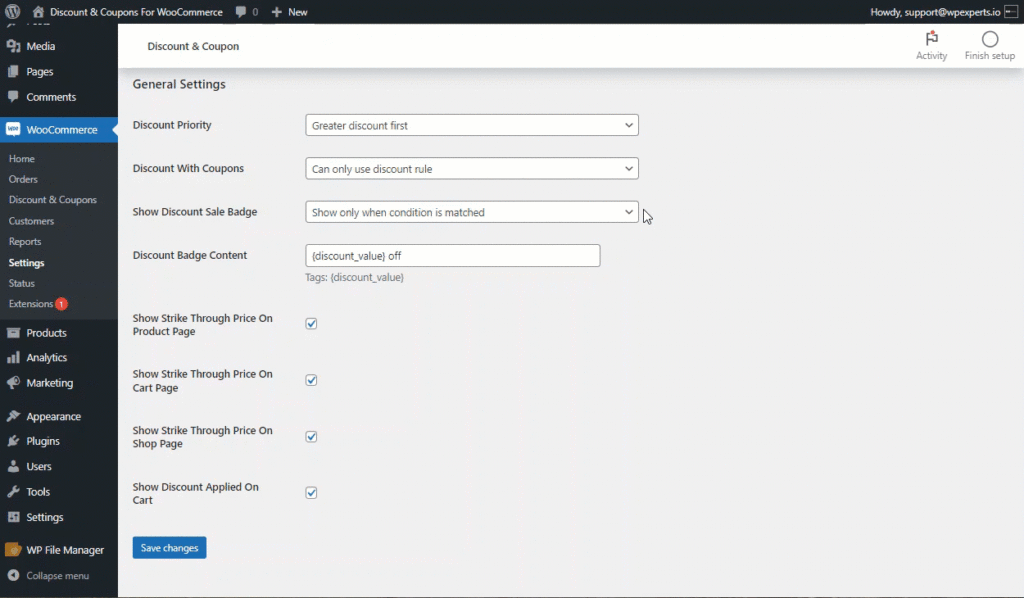
Show Discount Sale Badge
- This option allows admin to Display a discount sale badge on the product.
Front End Impact
- Go to the product page.
- The Discount Sale badge will be displayed on the product.

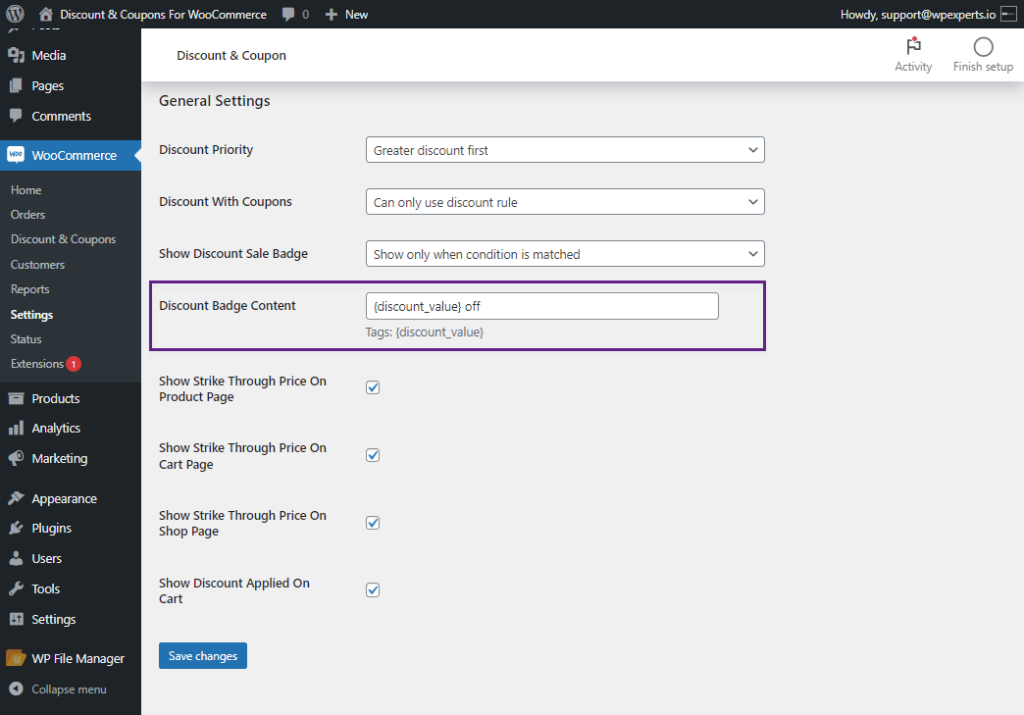
Discount Badge Content
- This option allows the admin to change the Content of the discount sale badge on the product.
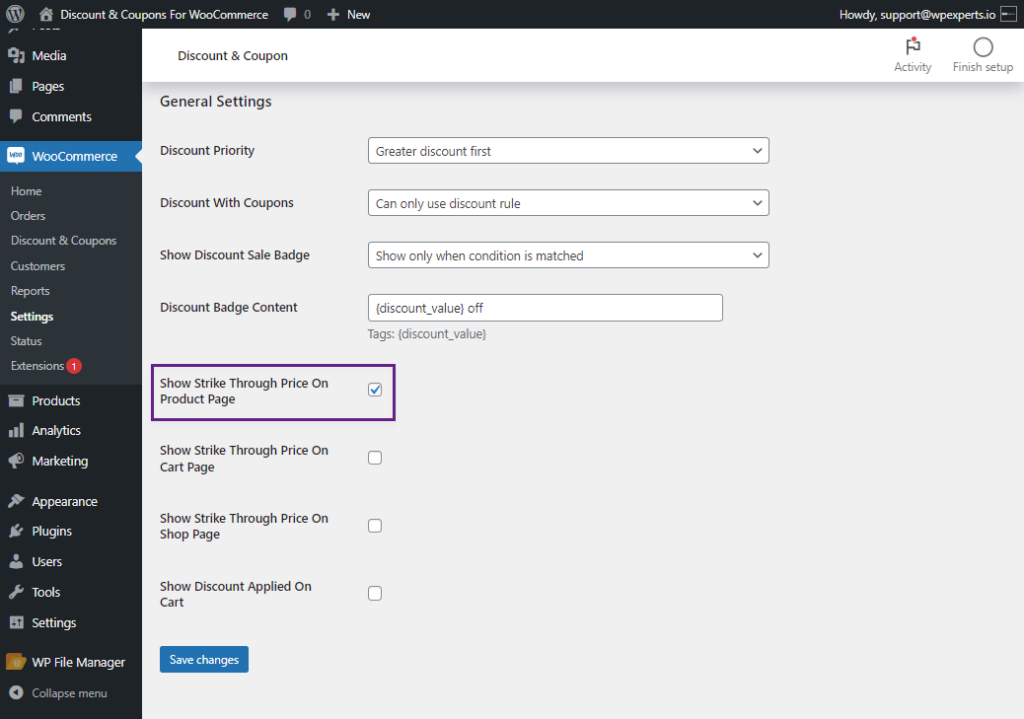
Show Strike-Through Price On Product Page
- Enable this option to display the strike-through price of the product on the Product page.
Front End Impact
- Go to the product page.
- The Strike Through price of the product will be displayed on the Product page.

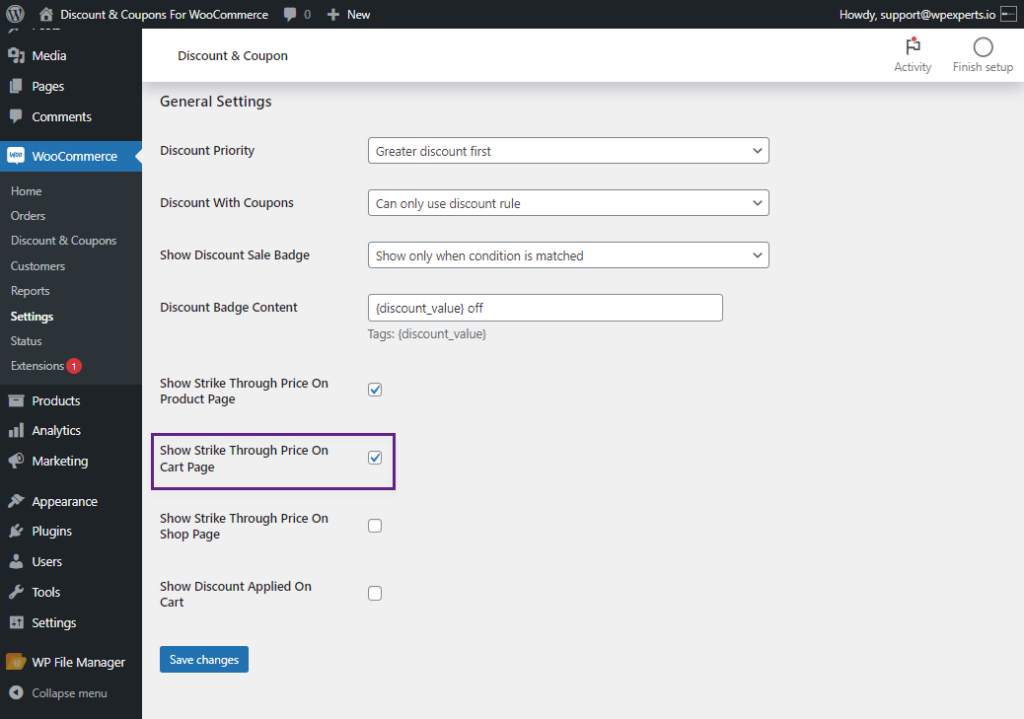
Show Strike-Through Price On Cart Page
- Enable this option to display strike through price of the product on the Cart page.
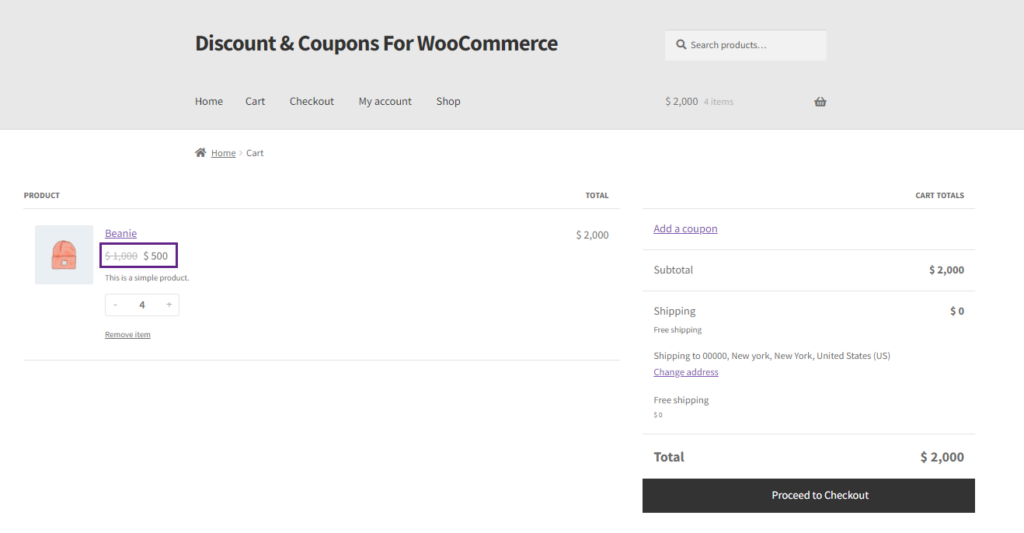
Front End Impact
- Go to the Cart page.
- The Strike Through price of the product will be displayed on the Cart page.
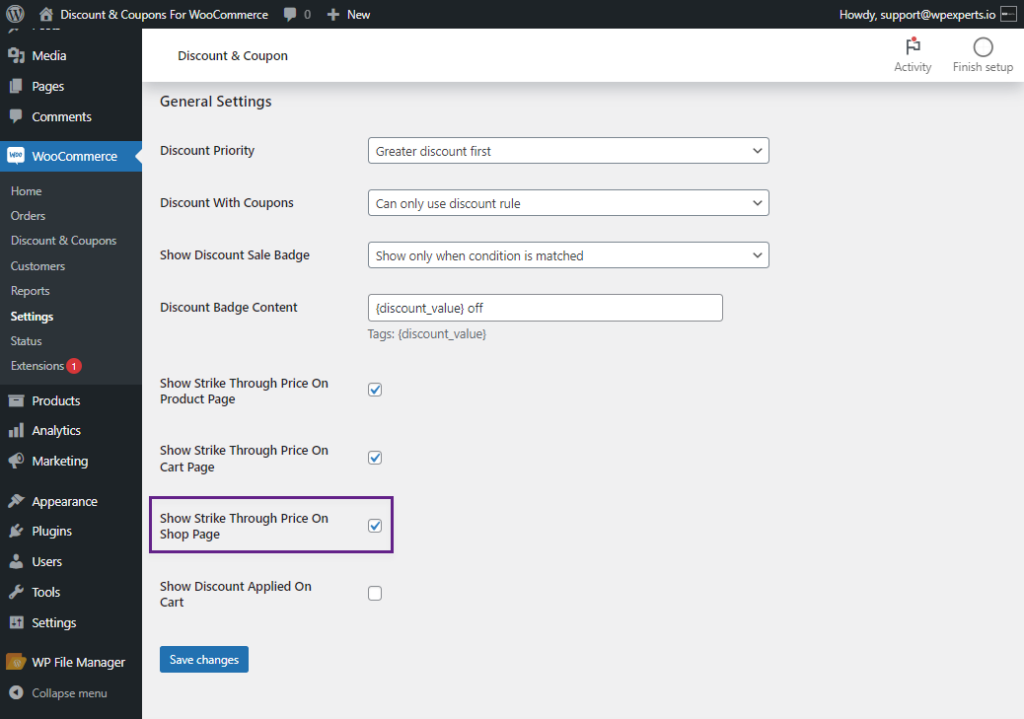
Show Strike-Through Price On Shop Page
- Enable this option to display strikethrough product price on the Shop page.
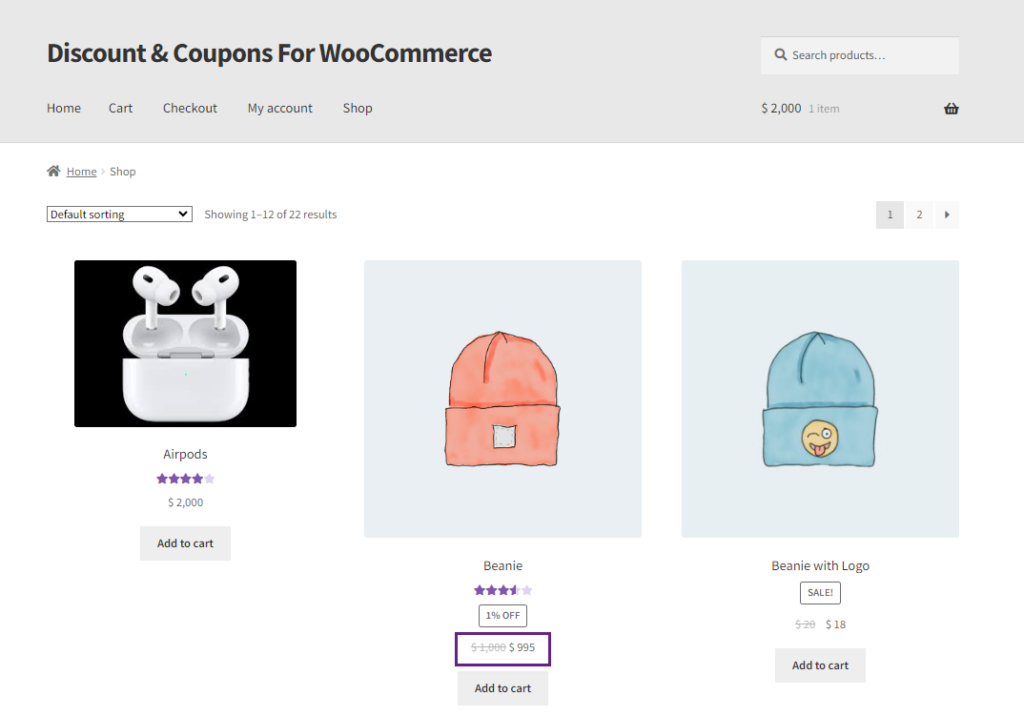
Front End Impact
- Go to the Shop page.
- The Strike Through price of the product will be displayed on the Shop page.
Show Discount Applied On Cart
- Enable this option to display a message on the cart page when any discount rule is applied.
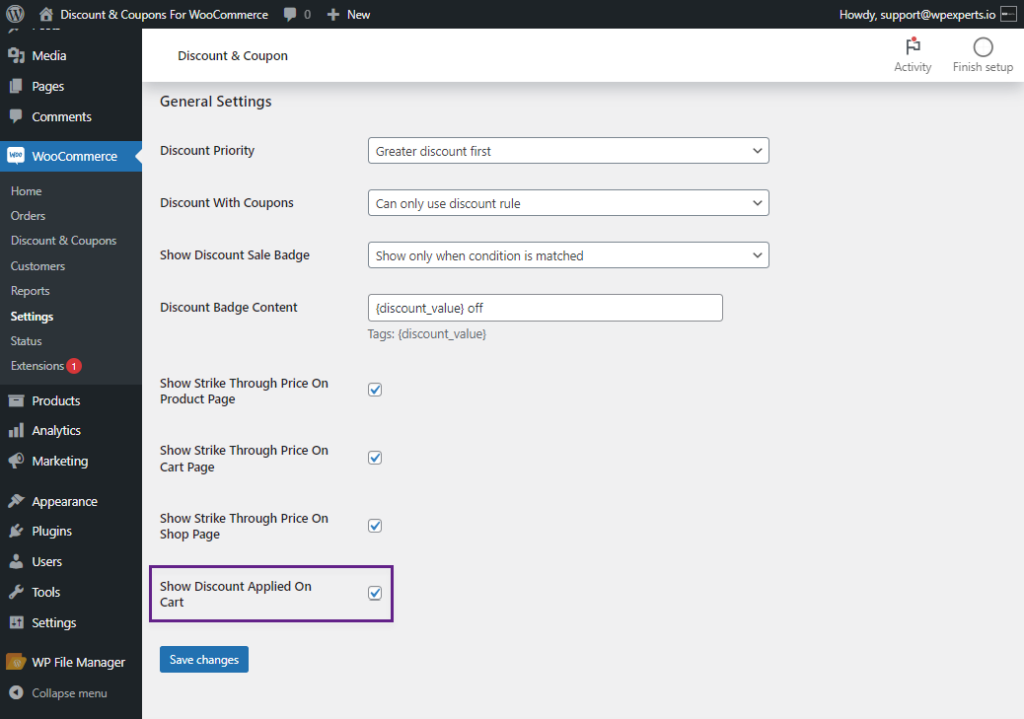
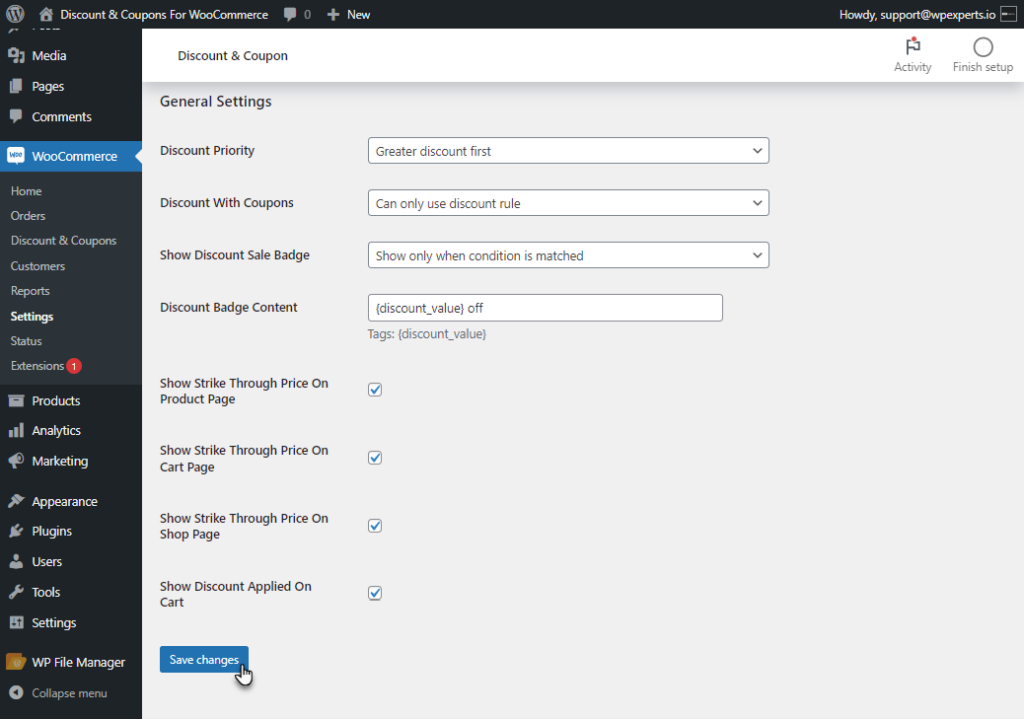
- Click on the Save Changes button to apply the settings.
Front End Impact
- Go to the Cart page.
- Match any Discount Rule. A pop-up message will appear on the screen indicating Discount Rule Applied Successfully.
